Doina Alexei
  • Sewing Tutorials
    • Basics >
      • Aligning Pattern Grainlines To Fabric
      • Preparing Fabrics For Sewing
      • Pinning Sewing Patterns To Fabric
      • Placing Sewing Patterns On Fabric For Cutting
      • Rotary Cutters or Fabric Scissors?
      • Cutting The Sewing Patterns
      • What Are Notches And How To Use Them In The Sewing Process
      • Transferring Notches From Pattern To Fabric
      • Transferring Seamlines to Fabric
      • Staystitching
      • Backstitching: A Complete Guide
      • Hand Basting: A Complete Guide
      • Sewing Continuous Bias Binding
    • Darts >
      • Marking And Transferring Darts To Fabric
      • What Are Darts And Dart Components
      • Folding, Pinning And Hand Basting Darts
      • Handling Dart Excess: Bulk And Tension
      • How To Sew A French Dart
      • How To Sew And Iron Single Pointed Darts
      • How To Sew And Iron Contour Darts
      • Sewing Darts With Decorative/Beaded Fabrics
    • Sewing Seams >
      • ​The Basics Of Seams And Seam Allowance
      • How To Sew A Straight Seam
      • Sewing Curved Seams
      • Sewing Corner Seams
      • Trimming And Grading Seam Excess
      • Notching/Clipping Seam Allowance for Tension Release
      • Sewing Topstitched Seams
      • Sewing Corded Seams
      • Sewing A Slot Seam
      • Sewing A Gathered Seam
      • Sewing Bias Seams
      • Sewing Seams With Ease
      • Sewing Seams With Crossing Seamlines
      • Sewing Unlike Fabric Seams
      • How To Iron Seams: Ironing Tools And Conventions
      • Sewing With Knit Fabrics
      • Understanding Stitch Length And Tension
      • Sewing Unique Fabric Seams
    • Seam Finishes >
      • Seam Finishing Techniques - Overview
      • Applying A Pinked Seam Finish
      • Applying A Bias Bound Seam Finish
      • Serging And Zigzag Seam Finishes
      • Sewing A Self-Bound Seam Finish
      • Sewing A French Seam Finish
      • Sewing A Hong Kong Seam Finish
      • Sewing A Mock French Seam Finish
      • Sewing A Turned-and-Stitched Seam Finish
      • Sewing Overcast Hand-Applied Seam Finishes
      • Sewing A Flat Felled Seam
      • Sewing A Hairline Seam Finish
    • Hem Finishes >
      • Garment Hem Finishes: Overview
      • ​Sewing A Double Fold Hem Finish
      • Sewing A Single Fold Hem Finish
      • Sewing Bound Hem Finishes
      • Sewing An Exposed Double Layer Bound Hem
      • Sewing A Folded-Up Bound Hem with Pre-folded Binding
      • Sewing A Hong Kong Hem Finish
      • Sewing A Band Hem Finish
      • Sewing A Bias Faced Hem Finish
      • Sewing A Twill Tape Hem Finish
      • Sewing A Rolled Hem Finish
      • Sewing A Shaped Hem Facing
      • Using Fusible Hem Tape And Webbing
      • Finishing A Lace Fabric Hem
      • Finishing A Leather Hem
      • Sewing Faced Hem Corners
      • How To Finish Lining At The Hem
      • Finishing Fabric Corners by Mitering >
        • Mitering Fabric Corners With A Full Bias Facing
        • Mitering Fabric Corners With Exposed Binding
      • Interfacing A Hemline: Lined And Unlined Examples
    • Sewing Pockets >
      • Curved Patch Pocket With Flap
      • Unlined Square Patch Pockets
      • Lined Patch Pockets: Two Ways
      • Extension On-Seam Pockets
      • Separate On-Seam Pocket
      • Front Hip Pockets
      • Bound Double Welt Pocket
      • Double Welt Pocket With Flap
      • Self-Welt Pocket (Using Single Fabric Layer)
      • Slanted Welt Pocket (Hand-Stitched)
      • Faced Slash Pockets: Overview >
        • Sewing A Faced Slit Pocket
        • Sewing A Rectangular Slash Pocket
        • Sew A Star-Shaped Faced Pocket
    • Sewing Zippers >
      • Sewing Zippers: General Information
      • Sewing A Centered Zipper
      • Sewing A Lapped Zipper
      • Sewing An Invisible Zipper
      • Sewing A Fly Front Zipper
      • Sewing A Closed-End Exposed Zipper (No Seam)
      • Sewing An Exposed Separating Zipper
      • Sewing Hand Stitched Zipper Applications
      • Sewing A Zipper Underlay
      • Sewing A Placket-Enclosed Separating Zipper
    • Sleeveless Finishes >
      • Sleeveless Armhole Finishes: General Information
      • Finishing Sleeveless Garments with Lining
      • Sewing A Folded-Under Bound Armhole Finish
      • Sewing A Shaped Armhole Facing
      • Finishing Armhole Edges With Exposed Binding
      • Finishing Armhole Edges With Decorative Trim
    • Neckline Finishes >
      • Sewing A Neck Shaped Facing
      • Sewing An All-In-One Neck Facing
      • Neck And Garment Opening Combination Facings >
        • Sewing An Extended Front-Neck Facing
        • Sewing A Separate Neck-Front Facing
      • Sewing A Bias Faced Neckline Finish
      • Sewing A Band Neckline Finish
      • Bound Neckline Finishes: Overview >
        • Sewing A Single Layer Bound Neckline
        • Finishing A Neckline With Pre-Folded Binding
        • Sewing A Double Layer Bound Neckline Finish
      • Sewing A Semi-Stretch Strip Band Neckline
      • Ribbed Neck Band And Classic Turtleneck
      • Decorative Neckline Finishes >
        • Sewing A Neckline With Decorative Inset
        • Sewing A Piped Cording Faced Neckline
        • Sewing Decorative Trim To A Finished Neckline
    • Finishing Facing Edges >
      • Finishing Facing Edges: Overview
      • Folded-And-Topstitched Overedge Facing Finish
      • Sewing A Bound Facing Edge Finish
      • Sewing A Hong Kong Facing Finish
      • Sewing A Rolled Edge Facing Finish
      • Sewing A Twill Tape Facing Edge Finish
      • Sewing An Overedge-Stitch Facing Finish
    • Extras >
      • A Complete Guide on Interfacing
      • Sewing Bound Spaghetti Straps
      • Sewing Spaghetti Straps To A Faced Neckline
      • Sewing Ruffles: Overview
      • Patterning And Sewing A Circle Ruffle
      • Sewing A Gathered Heading Ruffle
      • Sewing Double Layer Gathered Ruffles
      • Sewing A Gathered Ruffle Into A Seam
      • Sewing A Gathered Ruffle To A Fabric Edge
      • Sewing A Fabric Surface Slit
      • Sewing A Slit Seam
      • Hand-Applied Straight Stitches
      • Hand-Applied Blind Stitches
      • Hand-Applied Overedge Stitches
      • Hand-Applied Tack Stitches
      • Hand-Applied Decorative Stitches
  • Custom Apparel
    • Custom Bridal
  • Submit A Sewing Question
  • About
  • Blog

How To Sew A Faced Slit To The Bottom Of A Sleeve

10/29/2019

0 Comments

 
Don’t you love simple sewing techniques that when finished, look like hours of hard work? In today’s tutorial, I’ll show you one such technique- sewing a faced slit to the bottom edge of a sleeve. I chose to add this finish to a sleeve as this is one of its most conventional uses. A faced slit looks beautiful on heavier weight pieces like blazers and coats.
There is undeniably a clean, tailored aspect to anything that features a facing. Using a facing to add a slit not only provides an elevated, high quality finish, it is also a great way to add an opening into the surface of fabric without relying on an actual seam.

There is no argument that slits which open from a seam are certainly more durable, but as in the case of a sleeve cuff, a shorter faced slit is a great option for areas that don’t require as much movement and stretch. The key word here is “shorter”. Seamless faced slits usually function and hang best at a shorter length as they are more tailored and structured in nature. Of course, a slit that originates from an actual seam can also be faced or lined. This sort of slit style however is an entirely different technique than what we’ll talk about today.
Picture
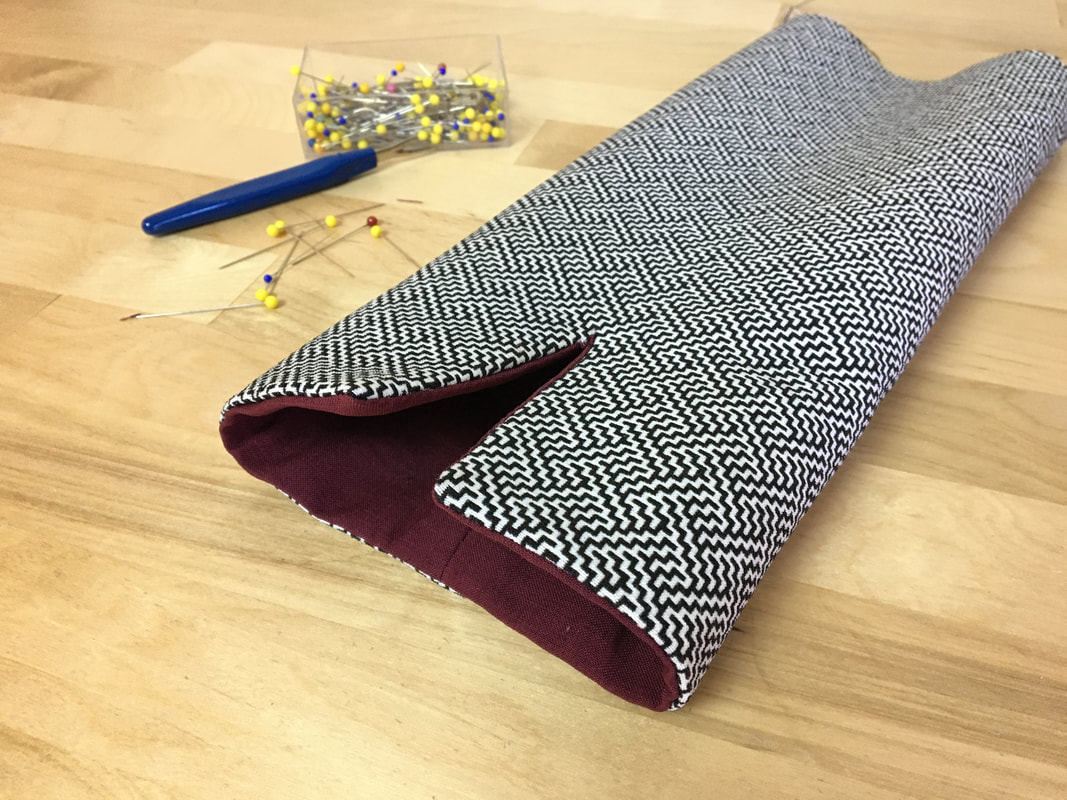
​Here are some important notes on facings before we move on to the sewing steps below:
  • Always try to back the wrong side of facings with interfacing. I prefer fusible knit interfacing but you may use any suitable style of your choice. Doing so will not only add more structure to the faced edges, it will also increase durability and prevent the facing layer from rolling to the outside of the garment.
  • When possible, press the seam allowance open on both the facing and garment seams. Facing seams will usually end up overlapping with garment seams. Pressing the seam allowance open will eliminate some bulk and keep the layers laying flatter.
  • With facings, one edge will be sewn to the corresponding garment edge while another will need to be either clean finished on its own or into lining. Keep that in mind in the construction process- I suggest that if the facing’s outer edge is standalone (not sewn into lining), clean finish it before connecting the facing to the garment. It will just be easier to handle in the later sewing process.
  • After the facing is sewn, always press the finished faced edge on the garment to reinforce its position. You’ll see more on this process below.
  • A faced slit does not always need to be understitched. I’ve been going on and on about how important understitching is, but not today. With a slit, you see a lot of the facing layer on the outside of the garment thus it has to become part of the garment’s design. Understitching is a purely functional technique and should be hidden on the inside of the garment. For that reason, under-stitching is not necessary on a faced slit finish such as the one in this tutorial.
  • Use a pointer or a plain sewing pin to bring sharp/straight corners out. You’ll see more on this concept below. In the meantime, check out this tutorial for a more extensive look at finishing corners: How To Finish Inner And Outer Self-Finished Fabric Corners.

Picture
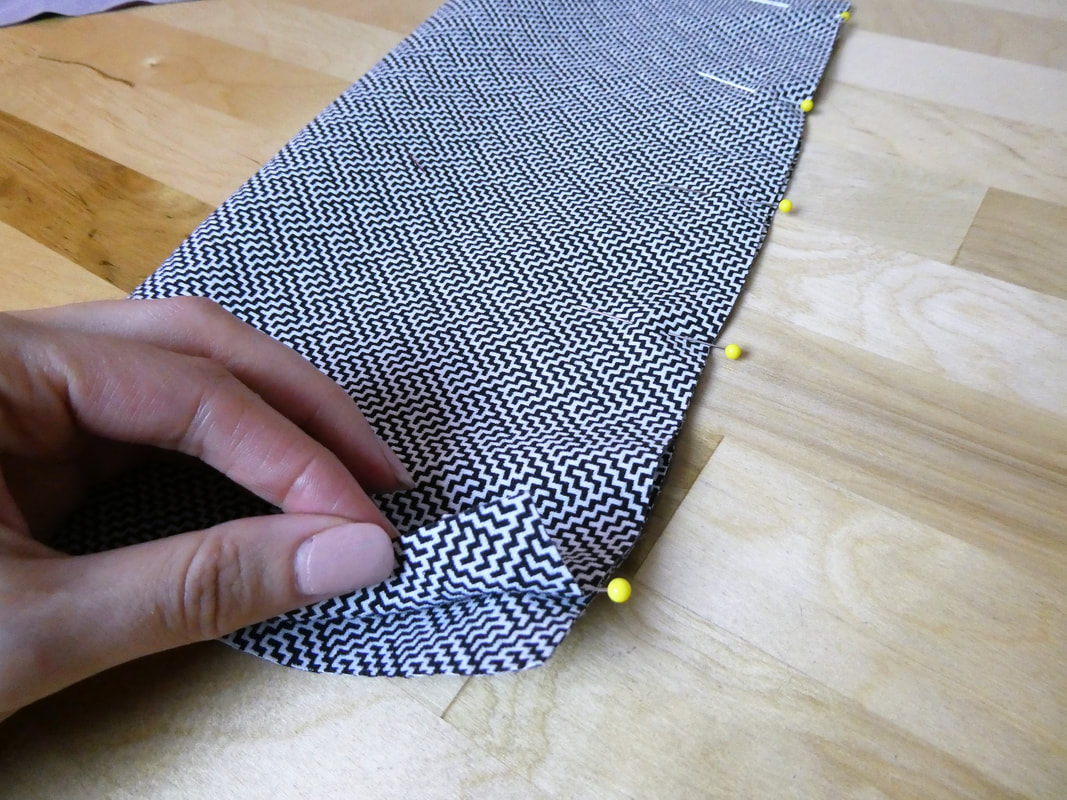
1. Pin the sleeve seam with the face of the fabric touching.
Picture
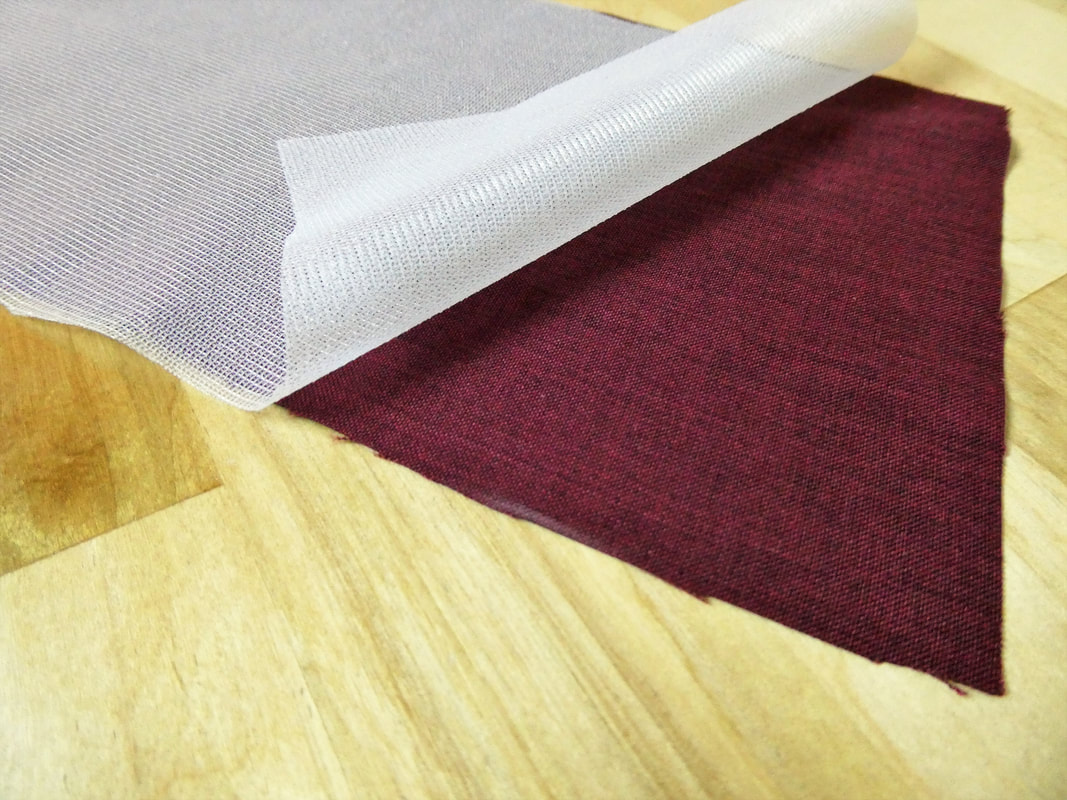
Now let's work on the facing. To start with, add interfacing to back and reinforce the facing layer. I prefer to work with fusible interfacing but you can choose whatever option you like! This style facing is a rectangular shape corresponding to the length of the sleeve's bottom edge. 
Picture
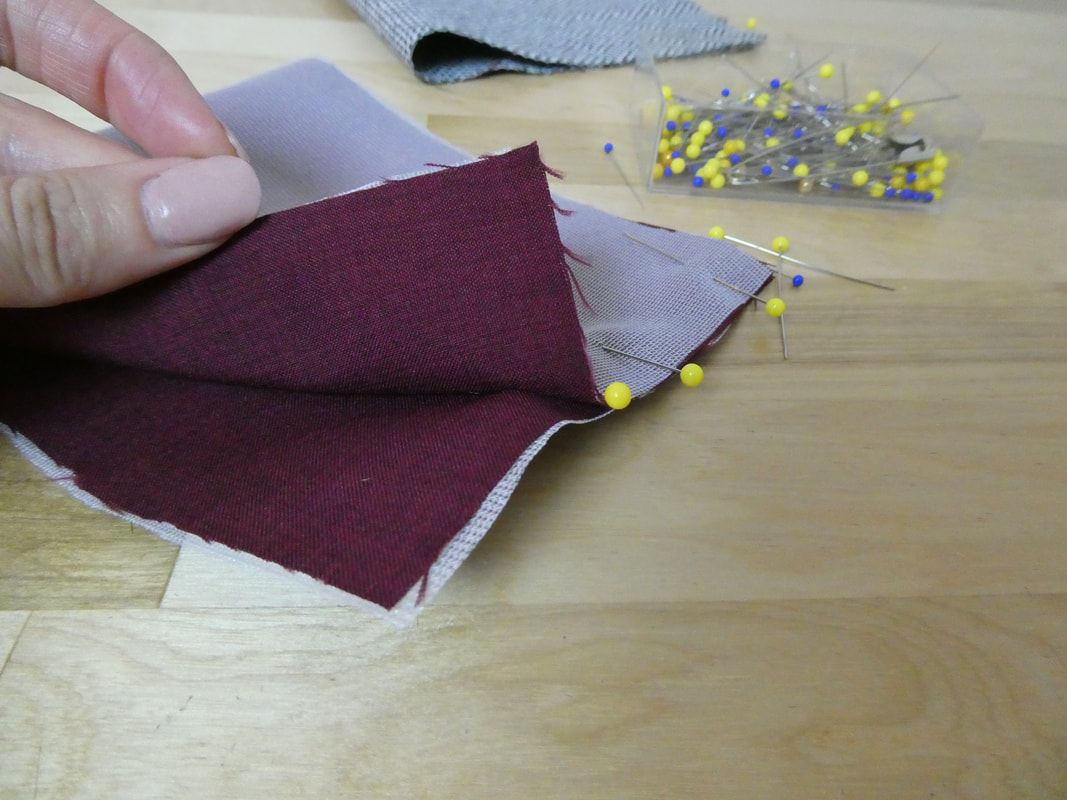
2. Fold the facing over such that the fabric face side is touching, and pin the edges to each other in horizontal direction as shown above. 
Picture
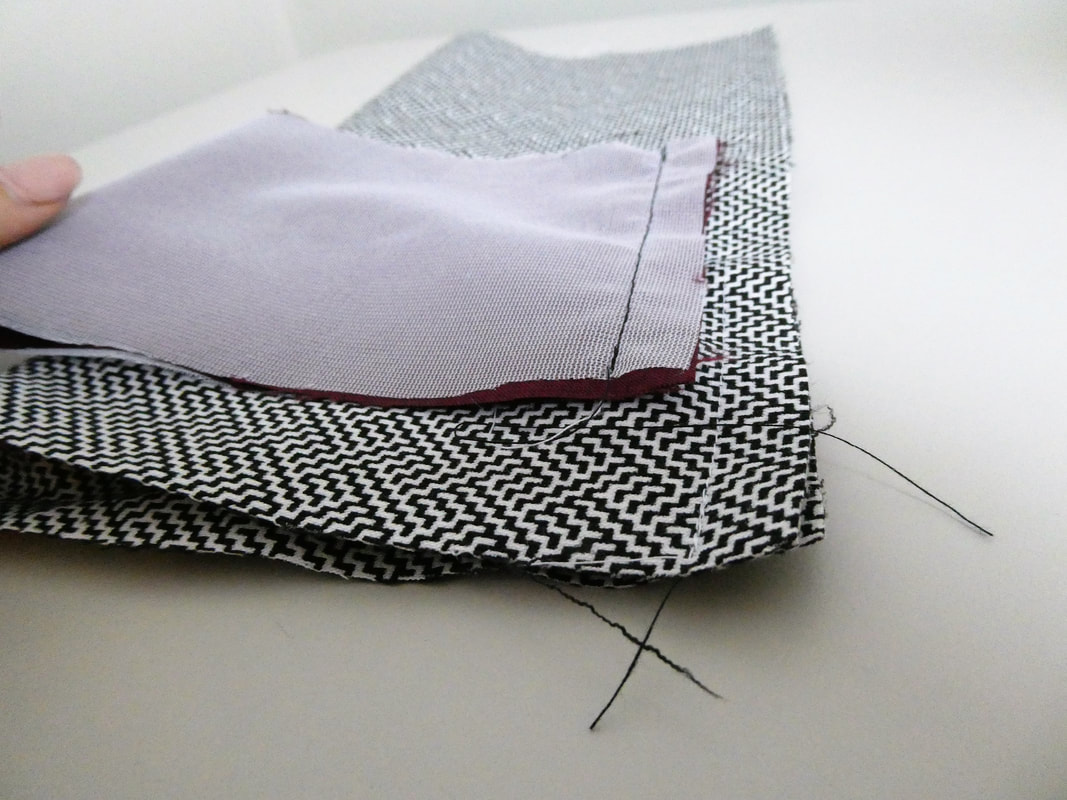
3. Stitch both sleeve and facing seams at the designated seam allowance. As always my seam allowance is 1/2".
Picture
Picture
4. Press the seam allowance open one both seams. Doing so will ensure a flat, smooth seam finish. 
Picture
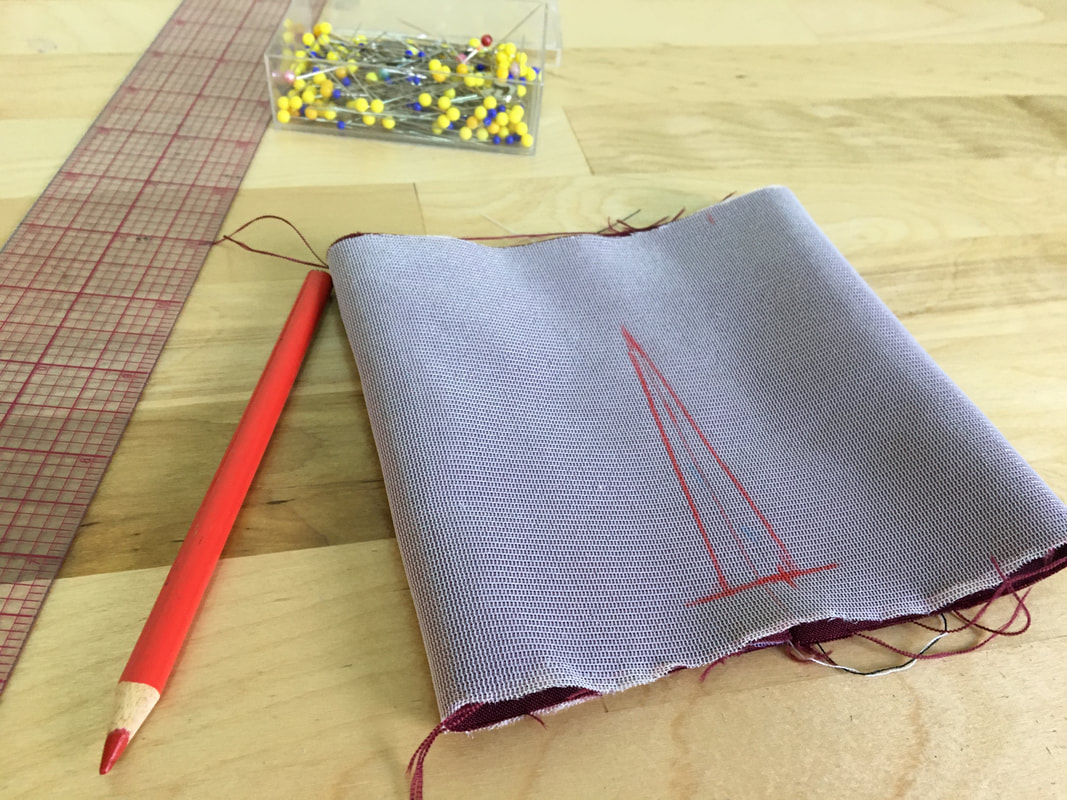
Before actually attaching the facing to the bottom sleeve edge, it is important to first add all corresponding sewing marks to be used in the stitching process. These lines should be drawn on the wrong side of the facing at the exact location of the desired slit.  I am adding my slit to the center of the sleeve, opposite the sleeve seam. I'll be drawing my stitch markings as described below: 

The slit markings consist of two portions: two stitch lines and the middle cut line.

The two stitch lines intersect into a point at the top which designates the beginning of the slit. The distance between these stitch lines will determine how wide the slit opening will be. 

The cut line is positioned right down the middle of the two stitch lines. Once the angular lines are stitched, the sleeve and facing layers are cut down this middle line to actually open up the slit. As you may have noticed, the structure of these slit marking are very similar to those of a single pointed dart.

5. In the image above, I drew my stitch lines at about 1/2" from each other. I also recommend drawing the bottom seamline as it will serve as a great guide when sewing the corners of the slit opening (more on this below).
Note: Use your ruler and a fabric marking pencil (or tailor's chalk) to safely add the lines. 
Picture
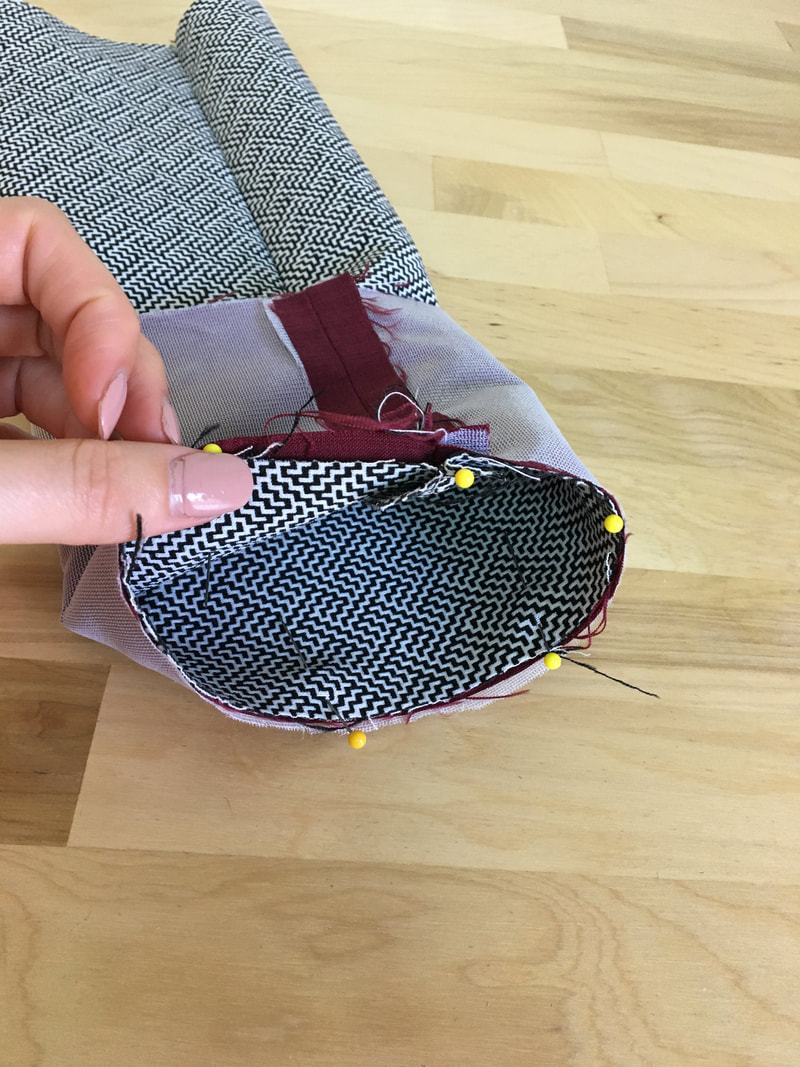
6. Next, align the facing edge to the sleeve bottom edge with the seams overlapping and fabric face sides touching. Pin perpendicular to the edge to keep the two layers together in this alignment. 
Picture
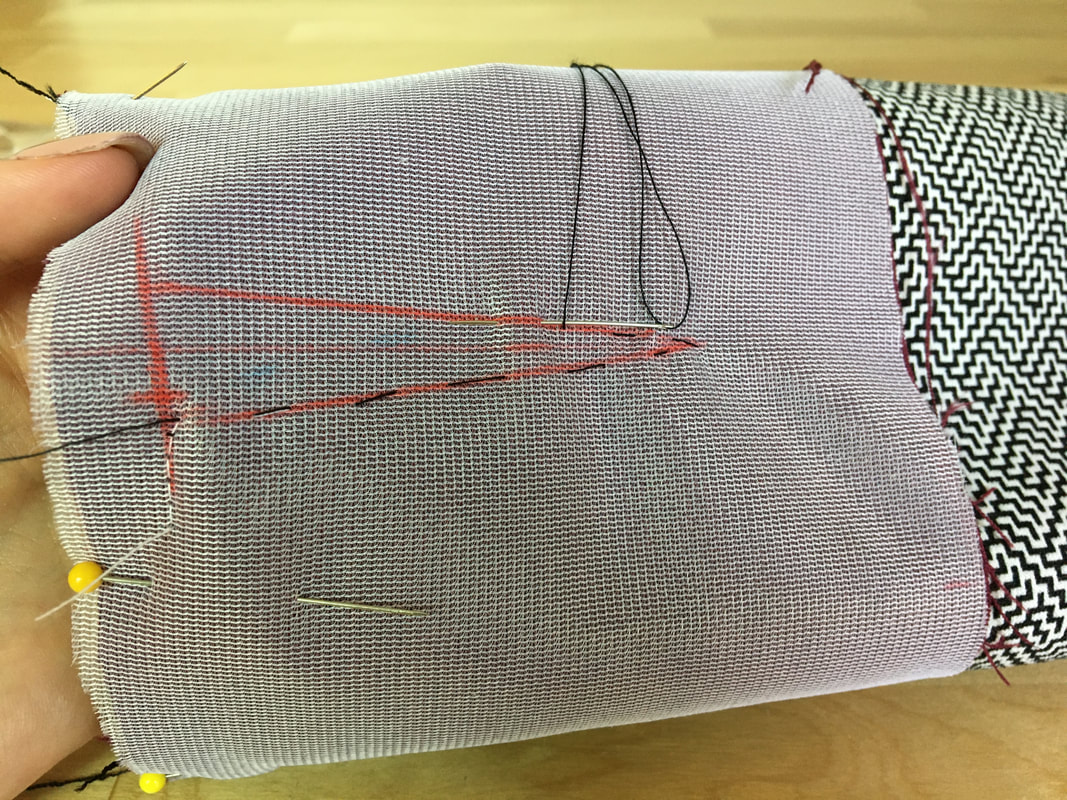
7. An important step: Hand baste the facing to the sleeve layer directly through the two stitch lines. Applying the temporary hand basting will keep the facing flat and aligned properly during the machine stitching process. If you skip this step, the two fabric layers will most likely shift around as you stitch down the triangular shape. A quick basting stitch will prevent any disturbance in alignment and provide more comfort during the machine sewing process. 
Picture
8. Start at the base seamline and stitch towards the slit opening marks through both facing and sleeve fabric layers. 
Picture
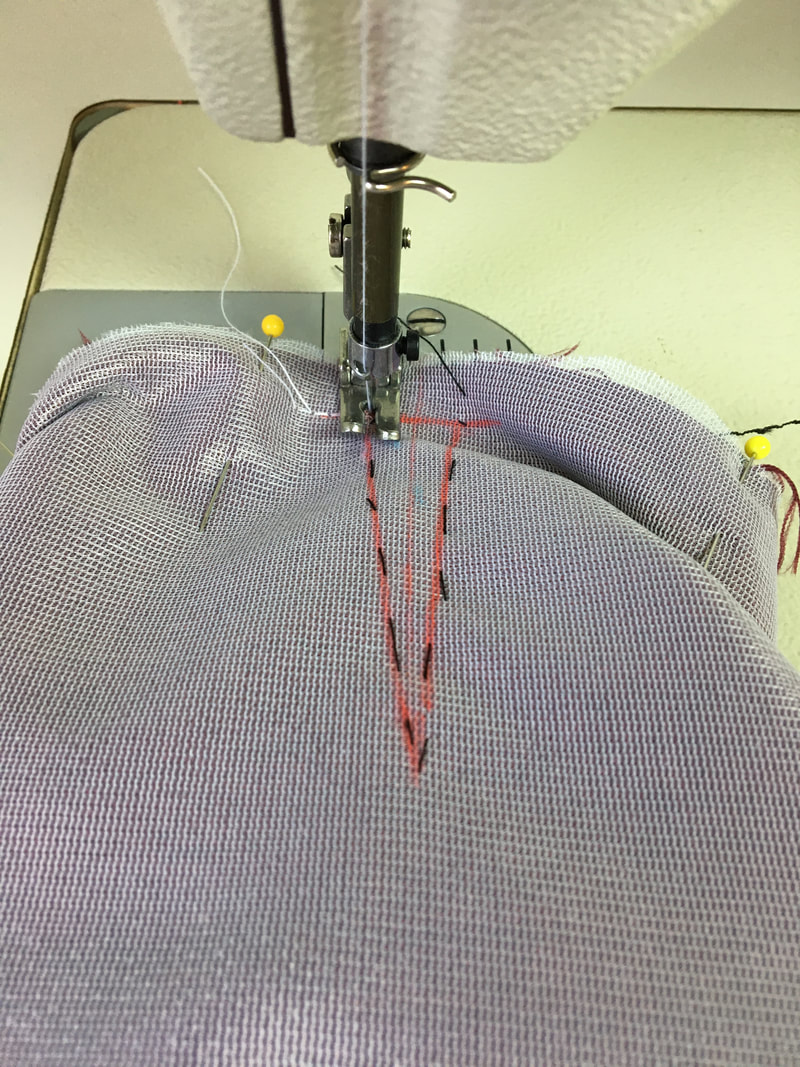
When you arrive at the very base of the first stitch line, insert the machine needle, lift the presser foot, and keeping the needle in, shift the direction of the stitch towards the angular point at the top. 
Picture
Continue stitching following the marked line until you arrive at the top angular point. 
Picture
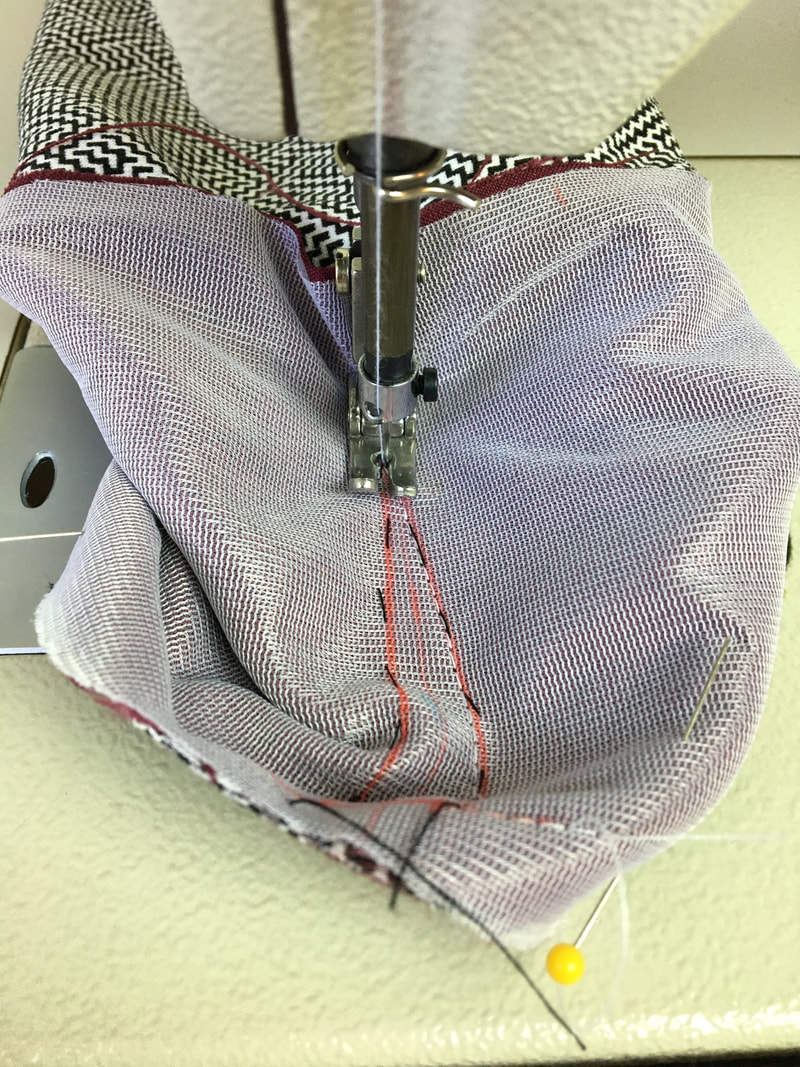
Just as you did above, leave the needle inserted at the vanishing point and lifting the presser foot, shift the direction of the stitch down, towards the bottom of the sleeve. Continue stitching down the second line as shown. 
Picture
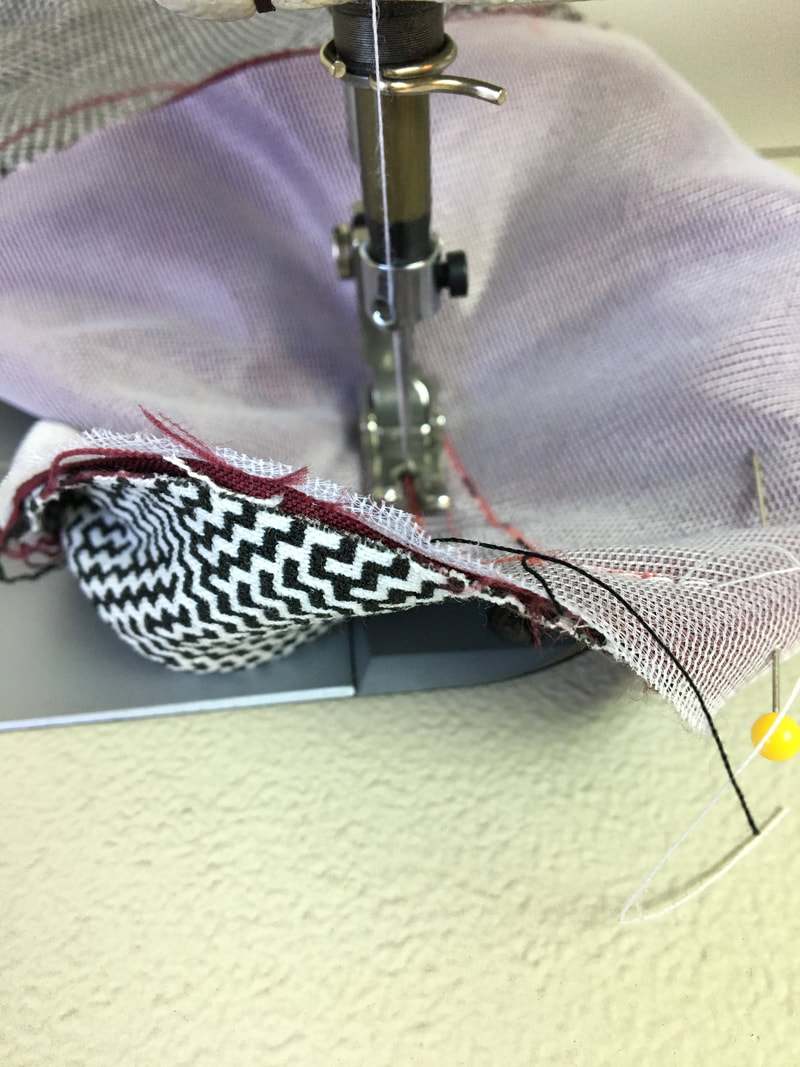
Keep the facing and sleeve layers as flat as possible and be careful not to catch other sleeve layers underneath as you stitch. 
Picture
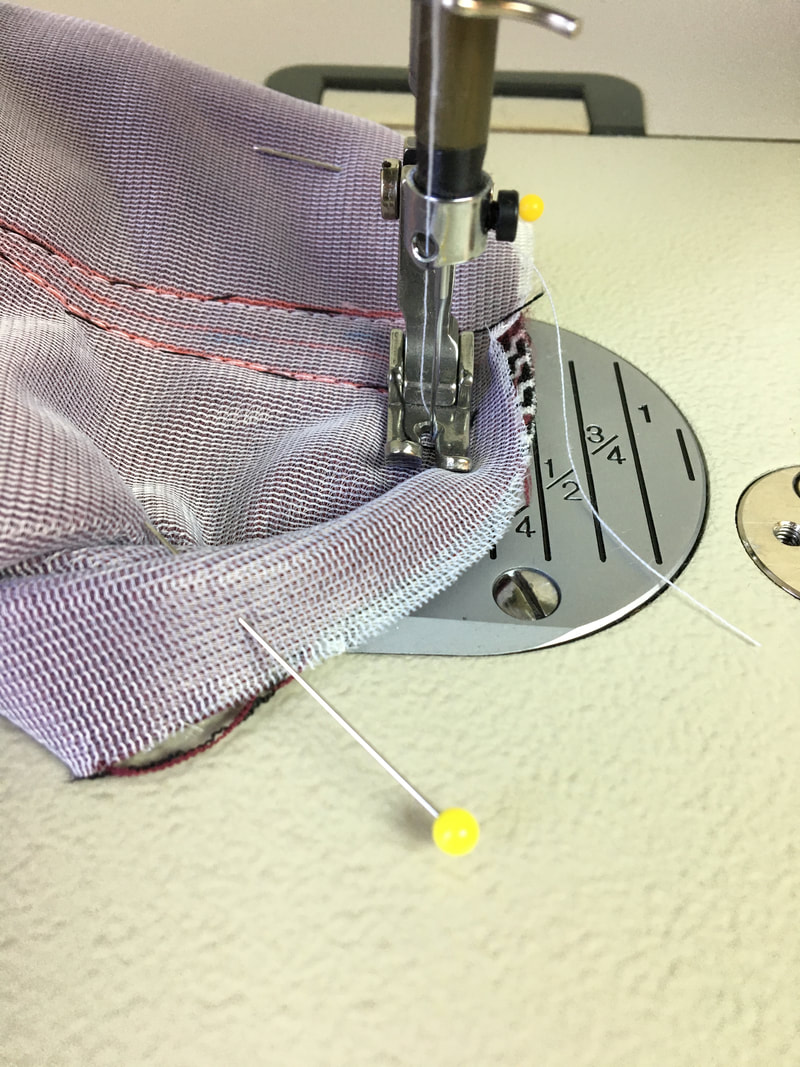
When you arrive at the base of the second stitch line, turn the direction of the needle horizontally to complete the rest of the faced edge. 
Picture
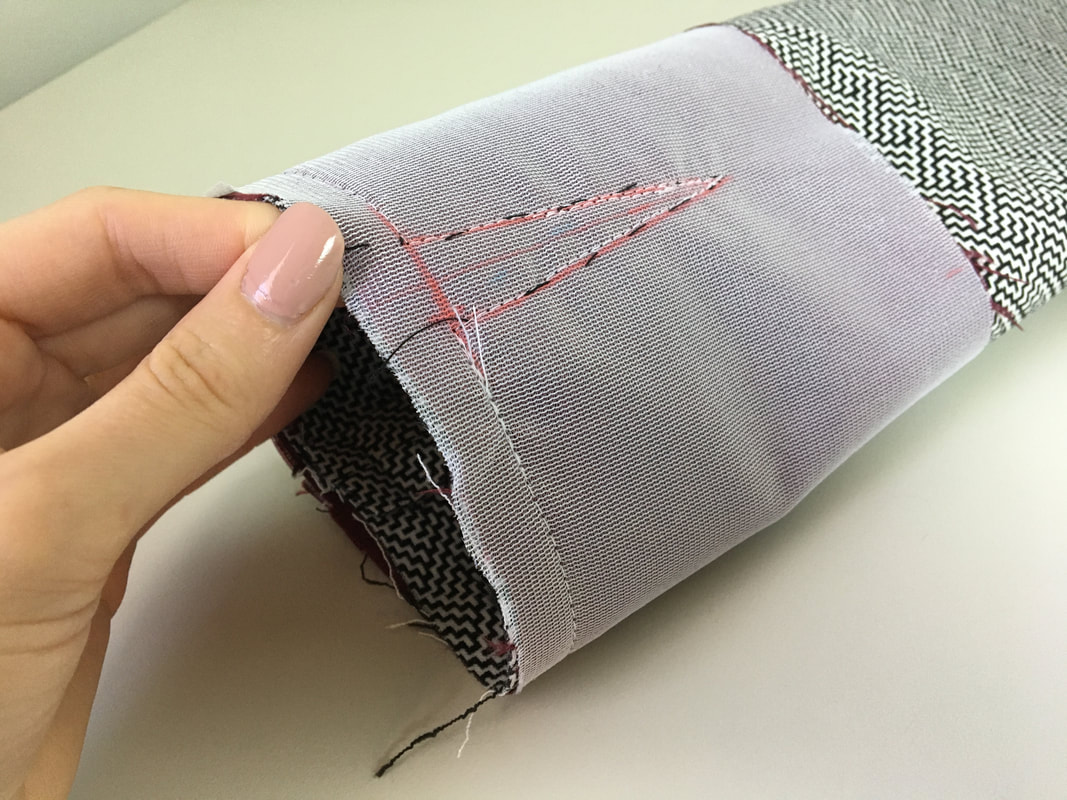
Continue stitching all around the bottom edge following your designated seam allowance (1/2" for me) until you arrive at the point where you started. Backstitch to reinforce the end of the stitch.  
It is also important at this point to apply a second layer of stitching along the corner for extra reinforcement. 
Picture
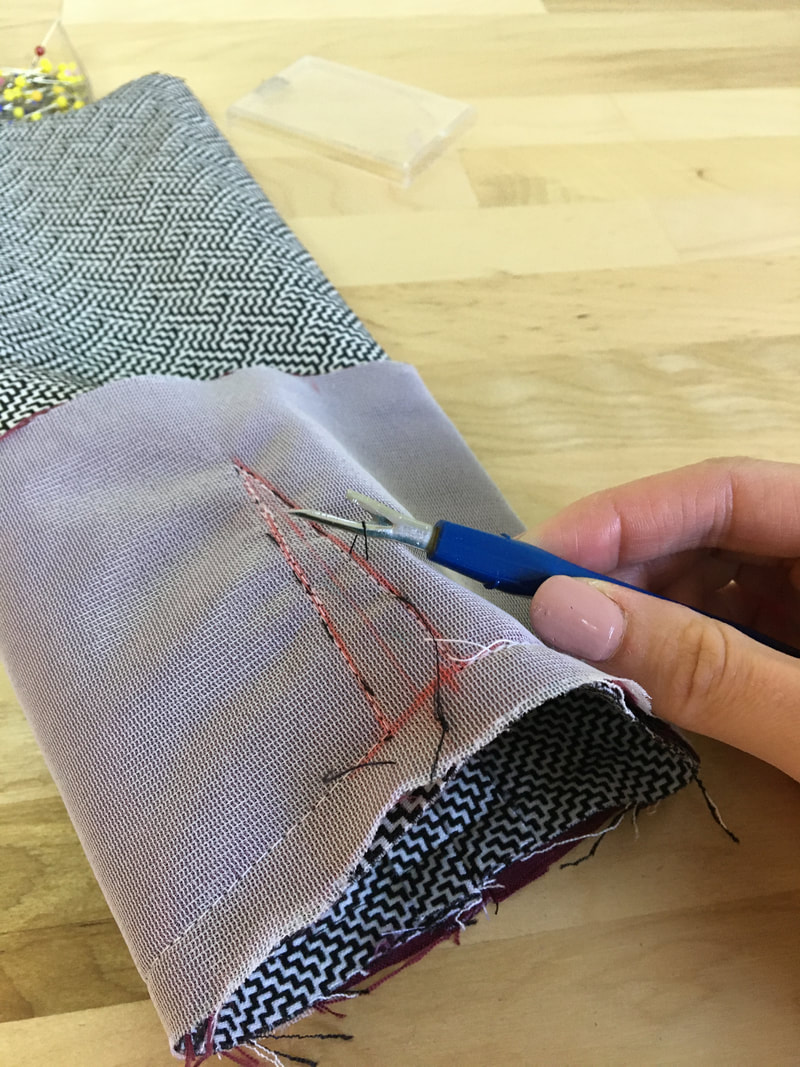
9. Remove the hand basting stitches using your seam ripper as shown. It is no longer needed past this point.
Picture
Picture
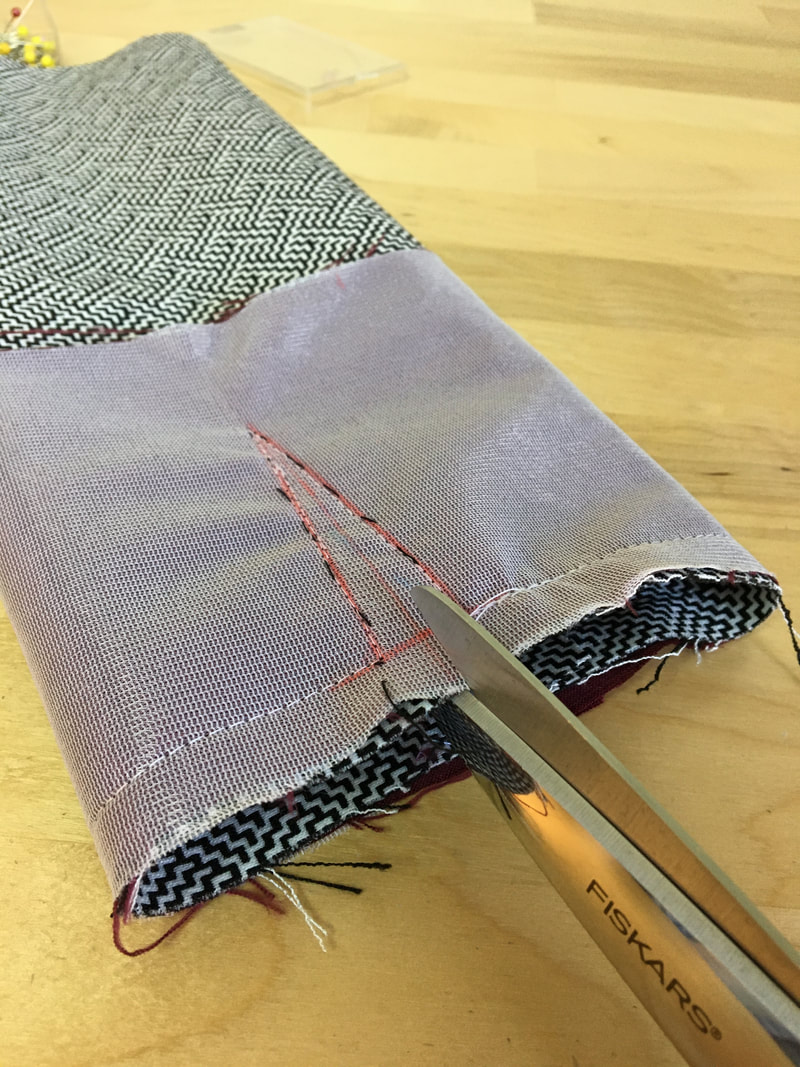
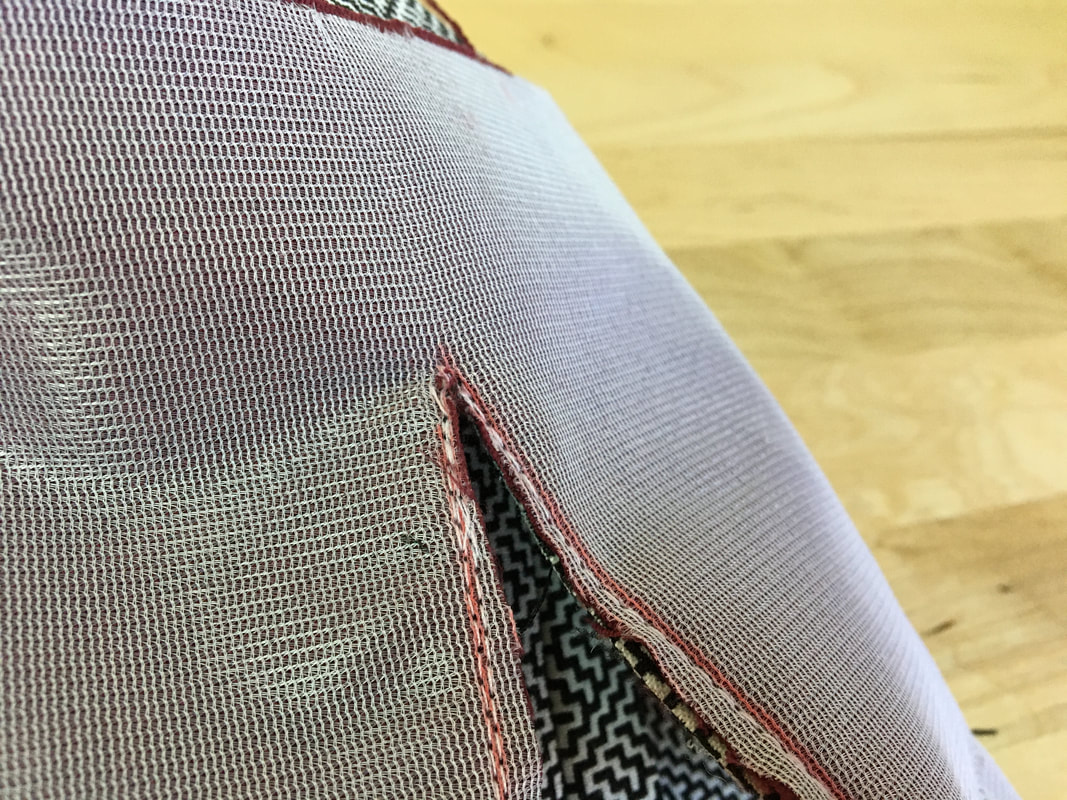
10. Cut down the middle line starting at the bottom and finishing at the very top corner. Be very careful as you arrive at the top vanishing point- cut as close as possible to the point but not through the actual stitching. 
Picture
Picture
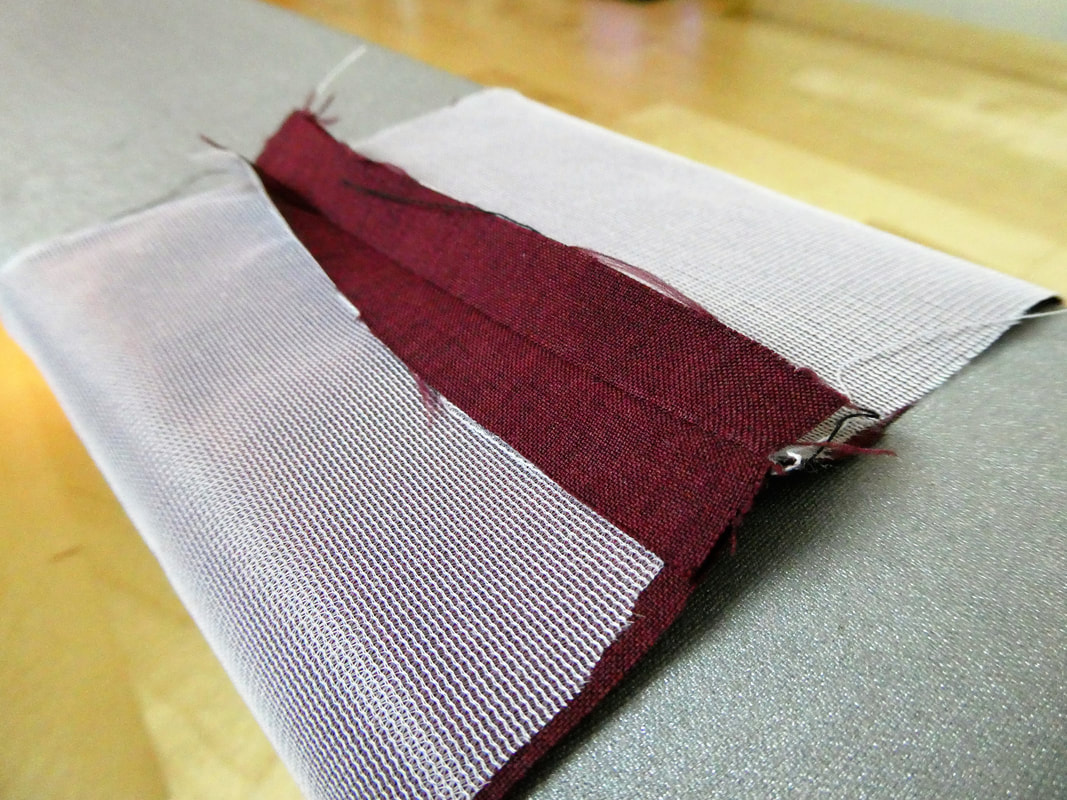
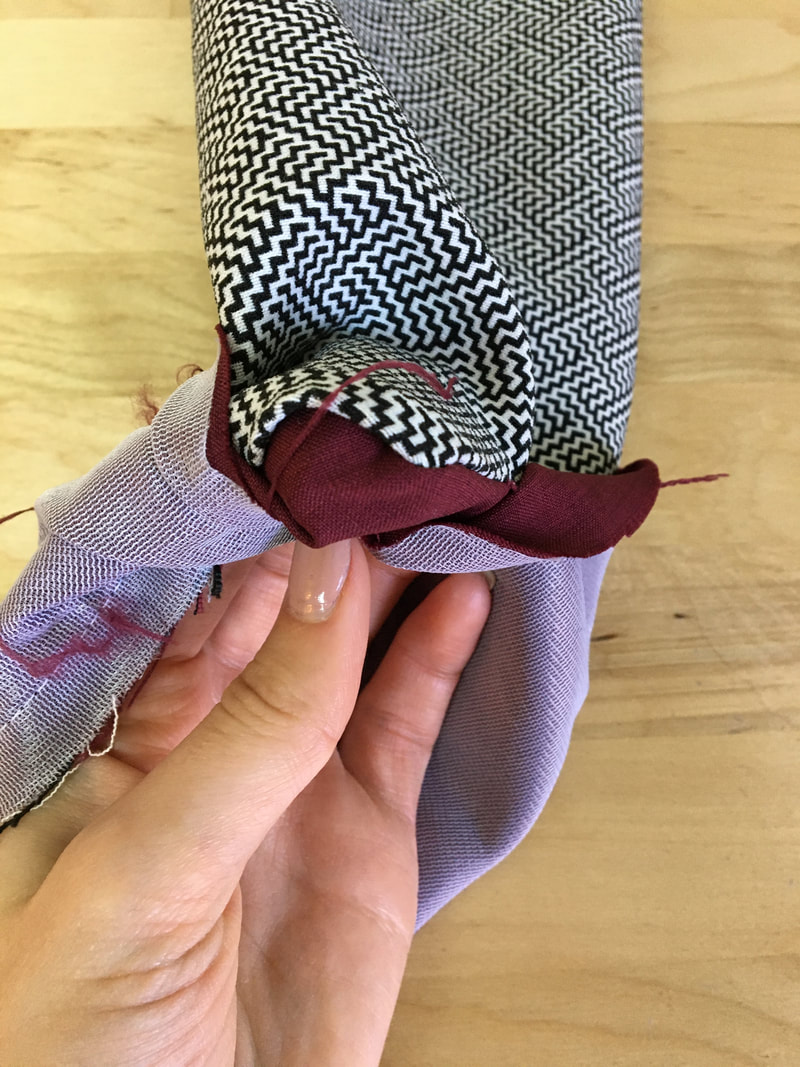
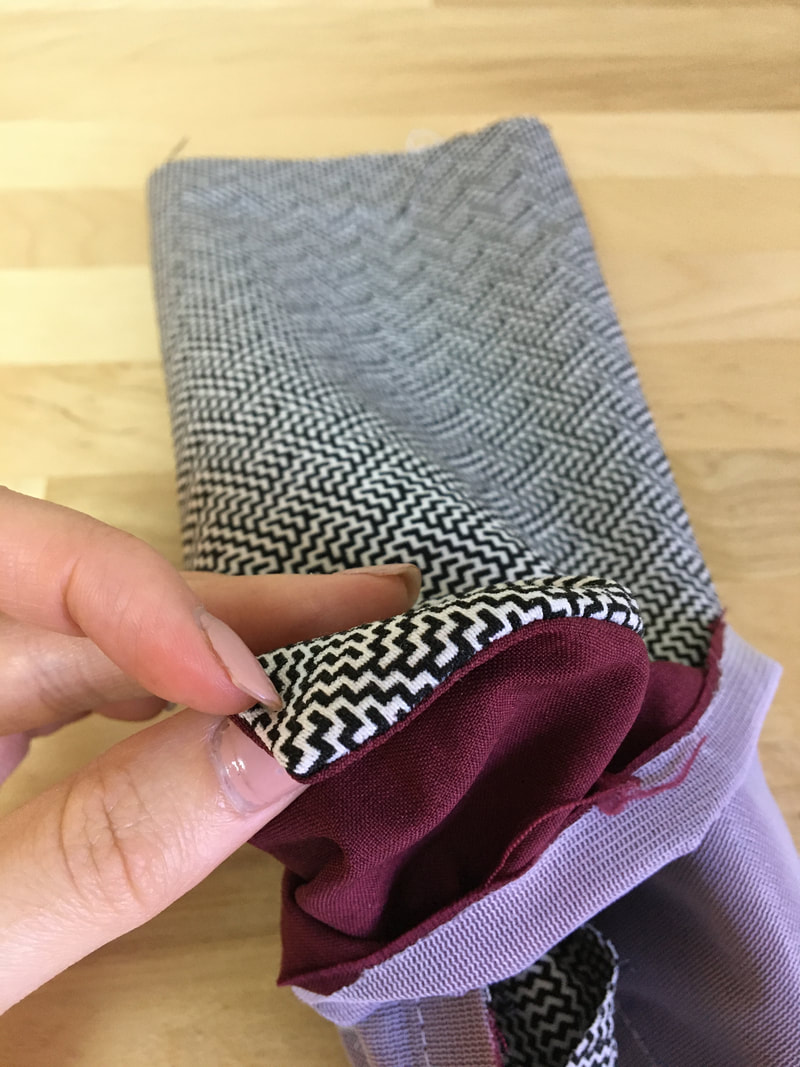
11. Turn the facing layer towards the inside to expose the sleeve's face side. Pull each slit corner out as shown. For this process, you can use a pin (as I did) or a pointer tool if you have one. 
If you find that the top slit corner puckers and doesn't lay flat, turn the facing back on its wrong side and cut a bit more into the corner. Again, be very careful not to accidentally cut the actual stitching. 
Picture
Picture
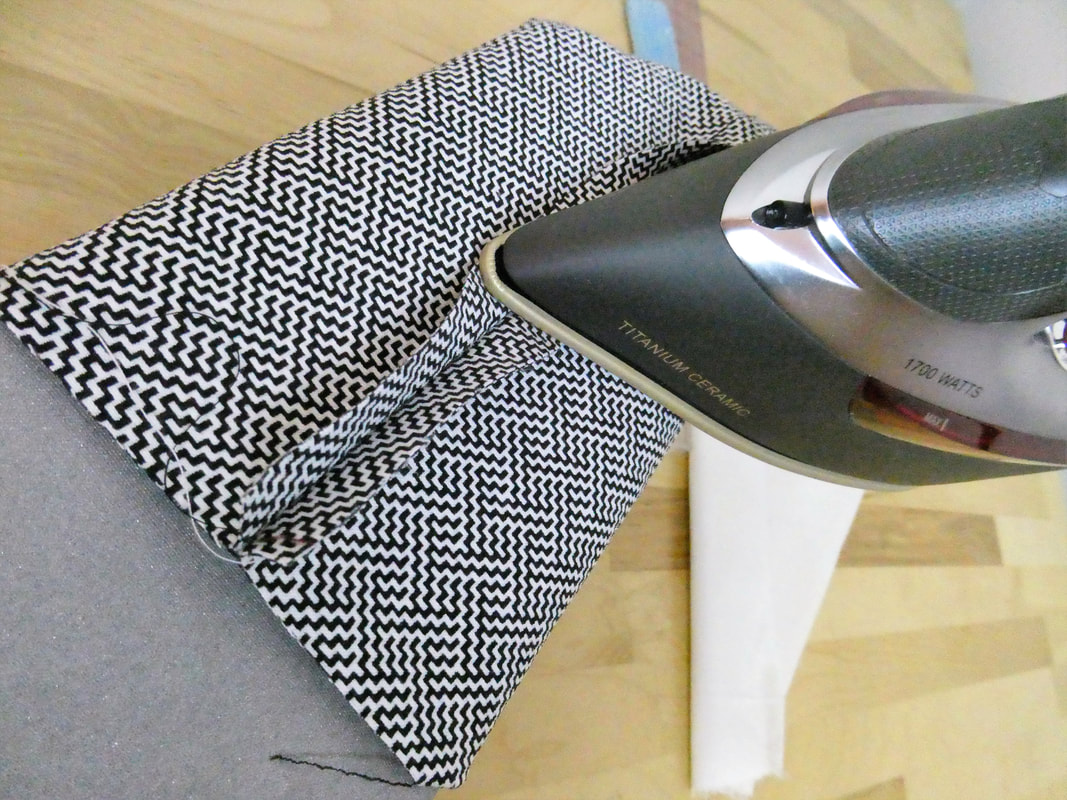
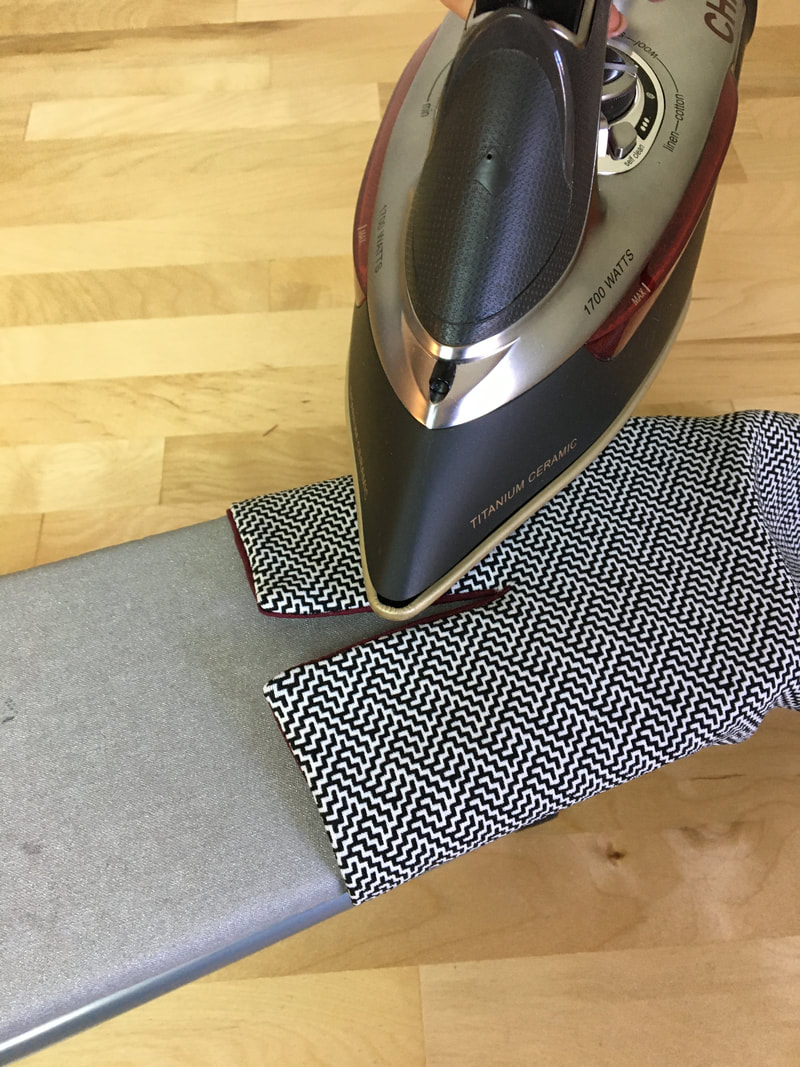
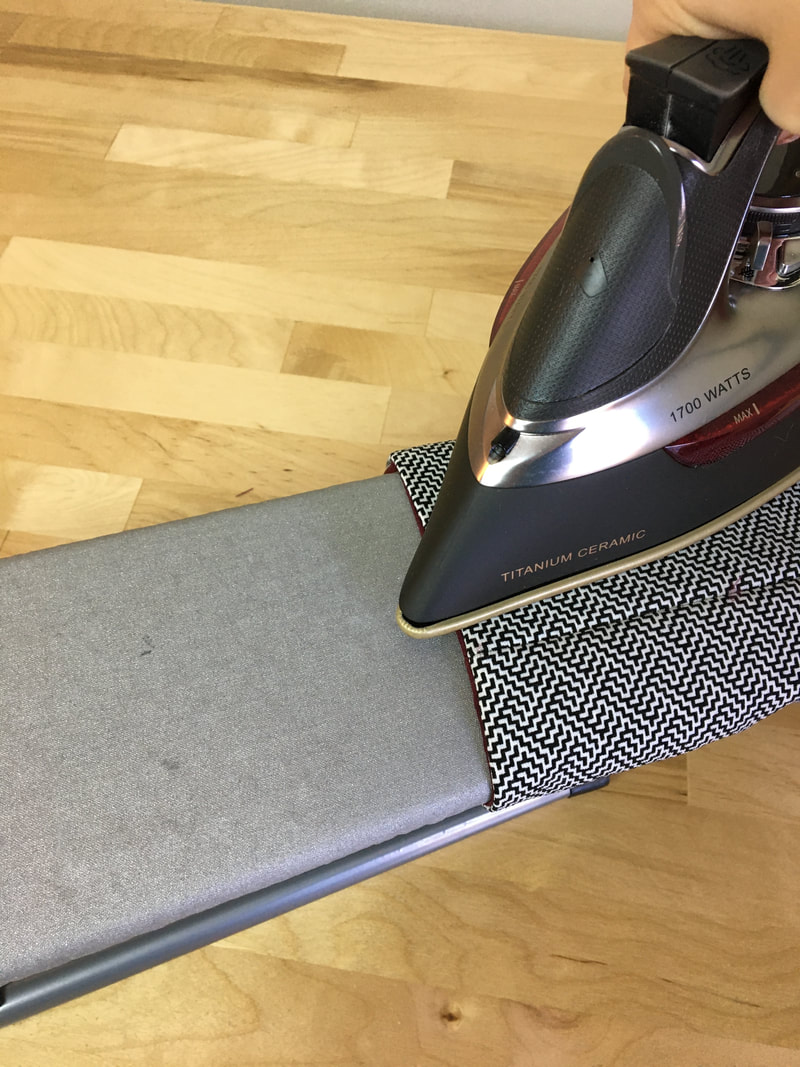
12. Last but not least, iron the finished slit and the sleeve's finished edge. Pressing is essential as it ensures all the layers are smooth and lay professionally flat. 
Picture
Wasn't that easy? The best part is, you can control the length and width of your slit with a few simple sketched lines and without the need for complicated patterns and tools!

Similar Tutorials You May Like:
How To Sew  A Round Neckline Facing
What Is Basting: How And When To Use It In Garment Construction 
How To Close Or Lower A Dress Slit Opening 
How To Add A Top Stitched Slit To A Dress Or Skirt
The Basics Of Interfacing For Sewing Beginners

Picture
Make A Dress With The Learn To Sew Box 
explore the learn to sew box
shop the learn to sew box

0 Comments


Leave a Reply.

    The Blog: 

    A journey into our design process, sewing tutorials, fashion tips, and all the inspiring people and things we love.


    Picture

    Doina Alexei 

    Designer by trade and dressmaker at heart.  I spend most of my days obsessing over new fabrics and daydreaming new ideas. 

    Picture
    Sadie
    Executive Assistant &
    Client Relations Manager

    Archives

    November 2019
    October 2019
    August 2019
    July 2019
    June 2019
    May 2019
    March 2019
    February 2019
    January 2019
    December 2018
    November 2018
    October 2018
    September 2018
    August 2018
    July 2018
    June 2018
    May 2018
    April 2018
    March 2018
    February 2018
    January 2018
    December 2017
    November 2017
    October 2017
    September 2017
    August 2017
    July 2017
    June 2017
    May 2017
    April 2017
    March 2017
    February 2017
    January 2017
    December 2016
    November 2016
    October 2016
    September 2016
    August 2016

    Categories

    All
    Fashion
    Ideas & Inspiration
    Inspiration
    Pattern Making
    Pattern-Making
    Sewing
    Textiles

    RSS Feed


      Inspiring stories and sewing tutorials directly to your inbox! 
      ​

    Subscribe

    Picture

Have A Personalized Sewing Question?

Ask It Here

Services

​Custom Apparel
Custom Bridal
​Sewing Tutorials
​

Company

About
Blog

Support

Contact
Terms of Service
DMCA.com Protection Status
© COPYRIGHT 2022. ALL RIGHTS RESERVED.
  • Sewing Tutorials
    • Basics >
      • Aligning Pattern Grainlines To Fabric
      • Preparing Fabrics For Sewing
      • Pinning Sewing Patterns To Fabric
      • Placing Sewing Patterns On Fabric For Cutting
      • Rotary Cutters or Fabric Scissors?
      • Cutting The Sewing Patterns
      • What Are Notches And How To Use Them In The Sewing Process
      • Transferring Notches From Pattern To Fabric
      • Transferring Seamlines to Fabric
      • Staystitching
      • Backstitching: A Complete Guide
      • Hand Basting: A Complete Guide
      • Sewing Continuous Bias Binding
    • Darts >
      • Marking And Transferring Darts To Fabric
      • What Are Darts And Dart Components
      • Folding, Pinning And Hand Basting Darts
      • Handling Dart Excess: Bulk And Tension
      • How To Sew A French Dart
      • How To Sew And Iron Single Pointed Darts
      • How To Sew And Iron Contour Darts
      • Sewing Darts With Decorative/Beaded Fabrics
    • Sewing Seams >
      • ​The Basics Of Seams And Seam Allowance
      • How To Sew A Straight Seam
      • Sewing Curved Seams
      • Sewing Corner Seams
      • Trimming And Grading Seam Excess
      • Notching/Clipping Seam Allowance for Tension Release
      • Sewing Topstitched Seams
      • Sewing Corded Seams
      • Sewing A Slot Seam
      • Sewing A Gathered Seam
      • Sewing Bias Seams
      • Sewing Seams With Ease
      • Sewing Seams With Crossing Seamlines
      • Sewing Unlike Fabric Seams
      • How To Iron Seams: Ironing Tools And Conventions
      • Sewing With Knit Fabrics
      • Understanding Stitch Length And Tension
      • Sewing Unique Fabric Seams
    • Seam Finishes >
      • Seam Finishing Techniques - Overview
      • Applying A Pinked Seam Finish
      • Applying A Bias Bound Seam Finish
      • Serging And Zigzag Seam Finishes
      • Sewing A Self-Bound Seam Finish
      • Sewing A French Seam Finish
      • Sewing A Hong Kong Seam Finish
      • Sewing A Mock French Seam Finish
      • Sewing A Turned-and-Stitched Seam Finish
      • Sewing Overcast Hand-Applied Seam Finishes
      • Sewing A Flat Felled Seam
      • Sewing A Hairline Seam Finish
    • Hem Finishes >
      • Garment Hem Finishes: Overview
      • ​Sewing A Double Fold Hem Finish
      • Sewing A Single Fold Hem Finish
      • Sewing Bound Hem Finishes
      • Sewing An Exposed Double Layer Bound Hem
      • Sewing A Folded-Up Bound Hem with Pre-folded Binding
      • Sewing A Hong Kong Hem Finish
      • Sewing A Band Hem Finish
      • Sewing A Bias Faced Hem Finish
      • Sewing A Twill Tape Hem Finish
      • Sewing A Rolled Hem Finish
      • Sewing A Shaped Hem Facing
      • Using Fusible Hem Tape And Webbing
      • Finishing A Lace Fabric Hem
      • Finishing A Leather Hem
      • Sewing Faced Hem Corners
      • How To Finish Lining At The Hem
      • Finishing Fabric Corners by Mitering >
        • Mitering Fabric Corners With A Full Bias Facing
        • Mitering Fabric Corners With Exposed Binding
      • Interfacing A Hemline: Lined And Unlined Examples
    • Sewing Pockets >
      • Curved Patch Pocket With Flap
      • Unlined Square Patch Pockets
      • Lined Patch Pockets: Two Ways
      • Extension On-Seam Pockets
      • Separate On-Seam Pocket
      • Front Hip Pockets
      • Bound Double Welt Pocket
      • Double Welt Pocket With Flap
      • Self-Welt Pocket (Using Single Fabric Layer)
      • Slanted Welt Pocket (Hand-Stitched)
      • Faced Slash Pockets: Overview >
        • Sewing A Faced Slit Pocket
        • Sewing A Rectangular Slash Pocket
        • Sew A Star-Shaped Faced Pocket
    • Sewing Zippers >
      • Sewing Zippers: General Information
      • Sewing A Centered Zipper
      • Sewing A Lapped Zipper
      • Sewing An Invisible Zipper
      • Sewing A Fly Front Zipper
      • Sewing A Closed-End Exposed Zipper (No Seam)
      • Sewing An Exposed Separating Zipper
      • Sewing Hand Stitched Zipper Applications
      • Sewing A Zipper Underlay
      • Sewing A Placket-Enclosed Separating Zipper
    • Sleeveless Finishes >
      • Sleeveless Armhole Finishes: General Information
      • Finishing Sleeveless Garments with Lining
      • Sewing A Folded-Under Bound Armhole Finish
      • Sewing A Shaped Armhole Facing
      • Finishing Armhole Edges With Exposed Binding
      • Finishing Armhole Edges With Decorative Trim
    • Neckline Finishes >
      • Sewing A Neck Shaped Facing
      • Sewing An All-In-One Neck Facing
      • Neck And Garment Opening Combination Facings >
        • Sewing An Extended Front-Neck Facing
        • Sewing A Separate Neck-Front Facing
      • Sewing A Bias Faced Neckline Finish
      • Sewing A Band Neckline Finish
      • Bound Neckline Finishes: Overview >
        • Sewing A Single Layer Bound Neckline
        • Finishing A Neckline With Pre-Folded Binding
        • Sewing A Double Layer Bound Neckline Finish
      • Sewing A Semi-Stretch Strip Band Neckline
      • Ribbed Neck Band And Classic Turtleneck
      • Decorative Neckline Finishes >
        • Sewing A Neckline With Decorative Inset
        • Sewing A Piped Cording Faced Neckline
        • Sewing Decorative Trim To A Finished Neckline
    • Finishing Facing Edges >
      • Finishing Facing Edges: Overview
      • Folded-And-Topstitched Overedge Facing Finish
      • Sewing A Bound Facing Edge Finish
      • Sewing A Hong Kong Facing Finish
      • Sewing A Rolled Edge Facing Finish
      • Sewing A Twill Tape Facing Edge Finish
      • Sewing An Overedge-Stitch Facing Finish
    • Extras >
      • A Complete Guide on Interfacing
      • Sewing Bound Spaghetti Straps
      • Sewing Spaghetti Straps To A Faced Neckline
      • Sewing Ruffles: Overview
      • Patterning And Sewing A Circle Ruffle
      • Sewing A Gathered Heading Ruffle
      • Sewing Double Layer Gathered Ruffles
      • Sewing A Gathered Ruffle Into A Seam
      • Sewing A Gathered Ruffle To A Fabric Edge
      • Sewing A Fabric Surface Slit
      • Sewing A Slit Seam
      • Hand-Applied Straight Stitches
      • Hand-Applied Blind Stitches
      • Hand-Applied Overedge Stitches
      • Hand-Applied Tack Stitches
      • Hand-Applied Decorative Stitches
  • Custom Apparel
    • Custom Bridal
  • Submit A Sewing Question
  • About
  • Blog