|
Cropped pants have made a huge come back in the past few years. We've seen them in a variety of different looks, from denim to comfy sweats to tailored work pants and beyond. They work great for any age and style and are uniquely versatile. We've used them a lot in our past and present collections and found that there is no limit to the different ways you can wear them. If styled the right way, you can create an outfit for any occasion. We put together 6 simple but great ways to get the most wear out of the cropped pants you already own. If you don't already have a pair, we suggest you shop around for one keeping the following tips in mind: 1. Wear your loose fitting cropped pants with a lightweight, silky tunic. 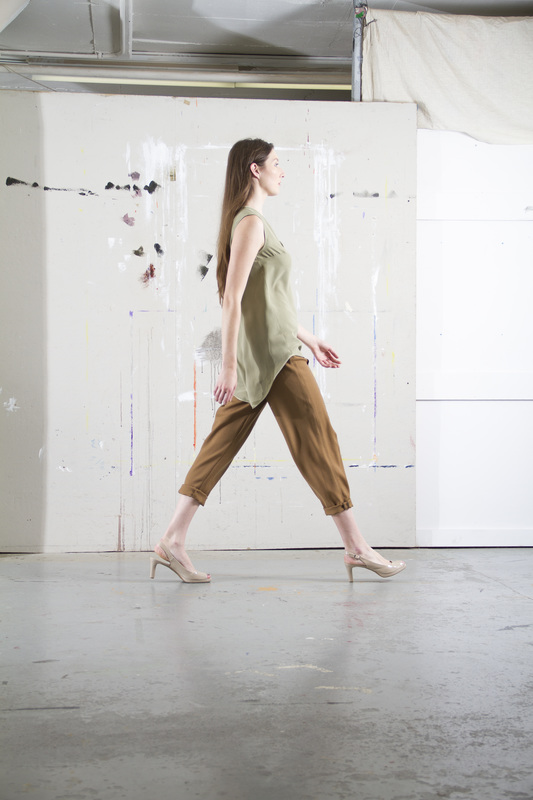 2. Include them in your work outfit by combining your cropped pants with a similar color/fabric blazer. Wear them with your favorite heels to give the outfit the appropriate business-attire feel. 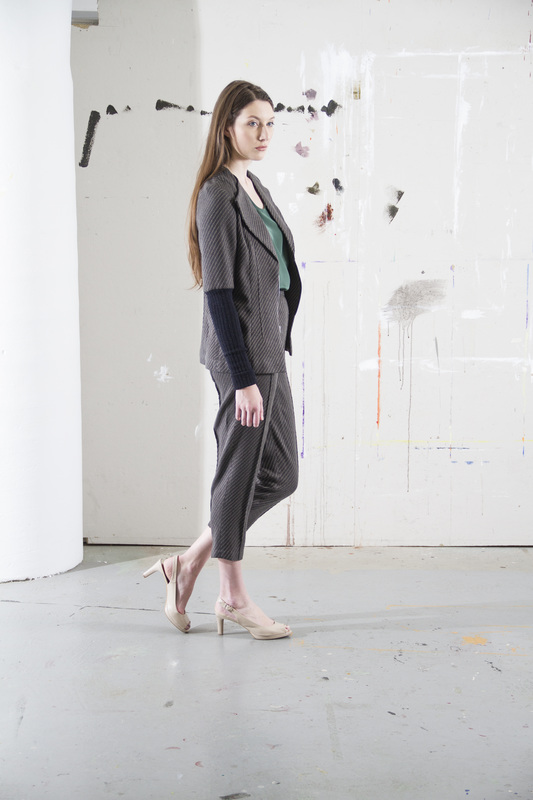 3. Combine your knit cropped pants or cropped sweats with a more formal, loose blouse. The secret is to choose a blouse that is loose fitting and has a lightweight drape. In the style bellow, our pleated jersey knit cropped pants are combined with a beautiful cowl neck suede silk blouse creating an outfit that maintains it's comfort without being overly sporty. 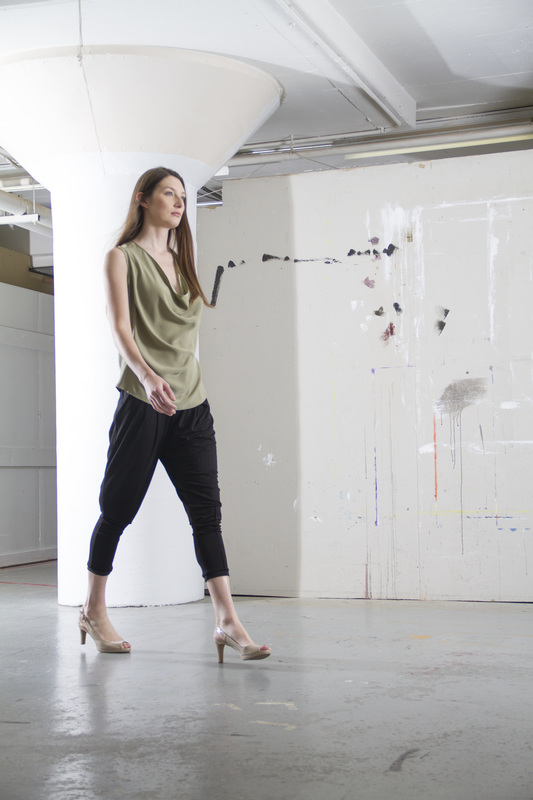 4. Create the perfect balance of young and modern by wearing your more tailored cropped pants with a cropped top. Try rolling the bottom of each pant leg into a cuff for a more casual look. 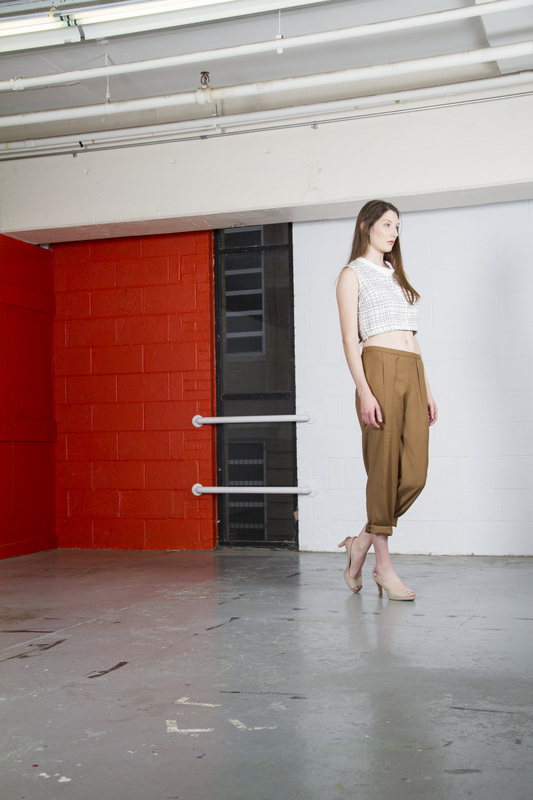 5. Cuff the bottom of the pant legs and try pairing them with a monochromatic top. We love the white monochromatic look but dark blues and black will work just as well. We suggest you avoid a color scheme that is too pastel, as this can often be reminiscent of scrubs rather then a stylish outfit. 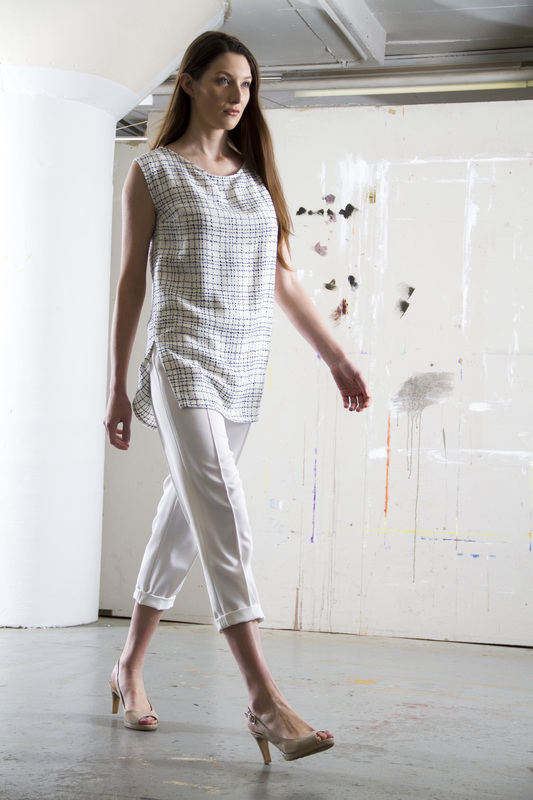 6. Cropped pants are not just for spring and summer. Style them with your heavier pieces for a great late-fall look. The beauty here is that any shoes work great in combination with this outfit. Try anything from your favorite high-heeled boots to your most comfortable flats. 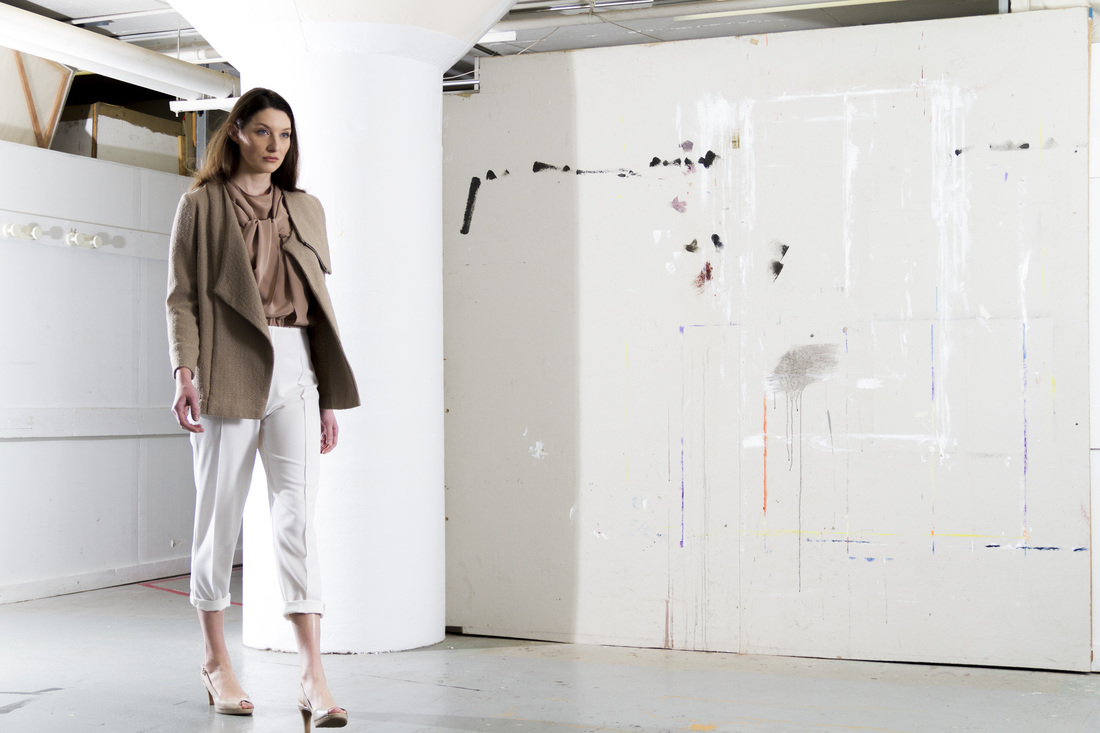
0 Comments
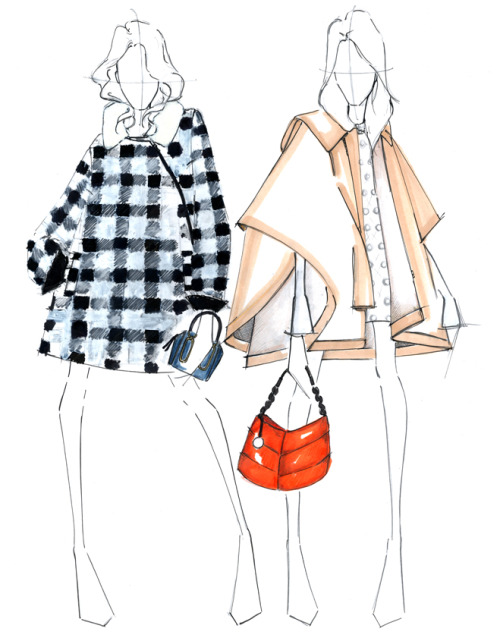
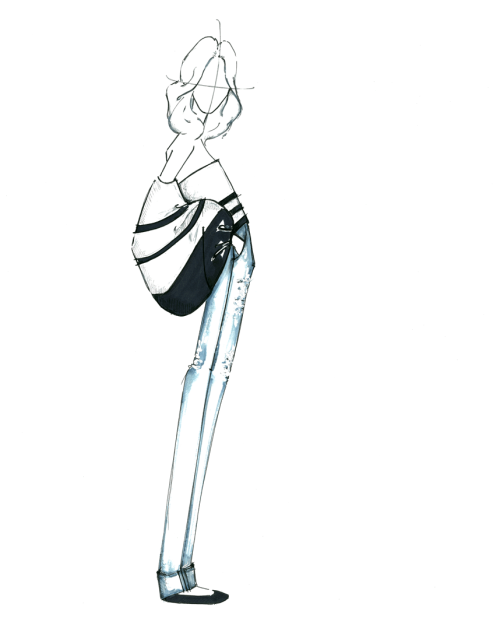
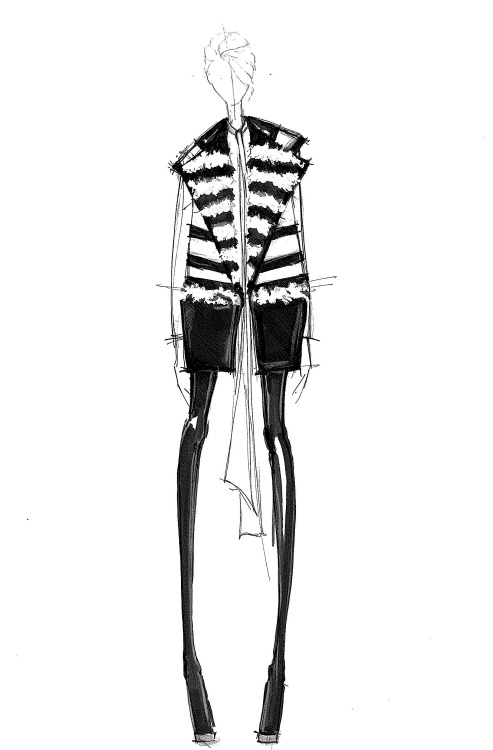
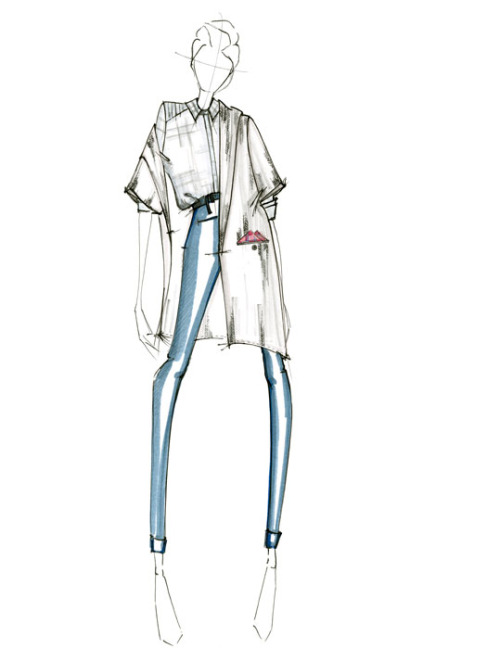
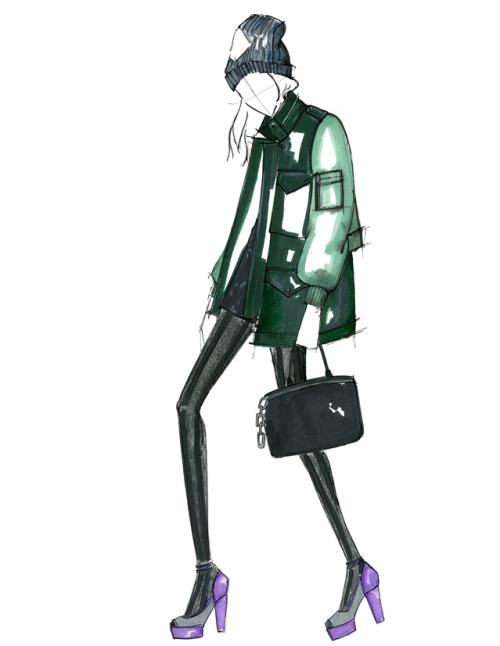
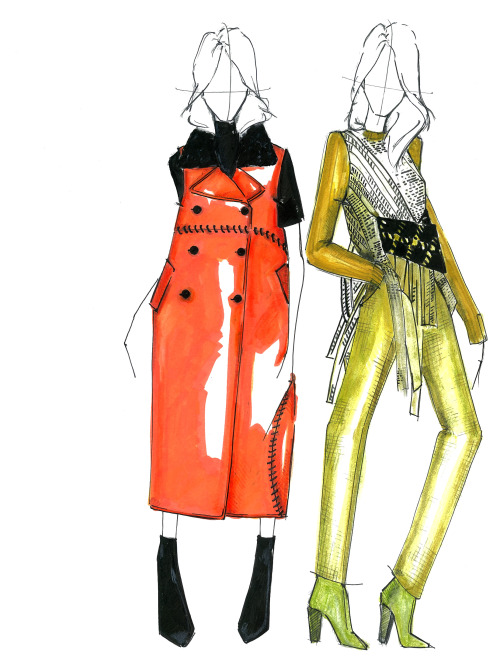
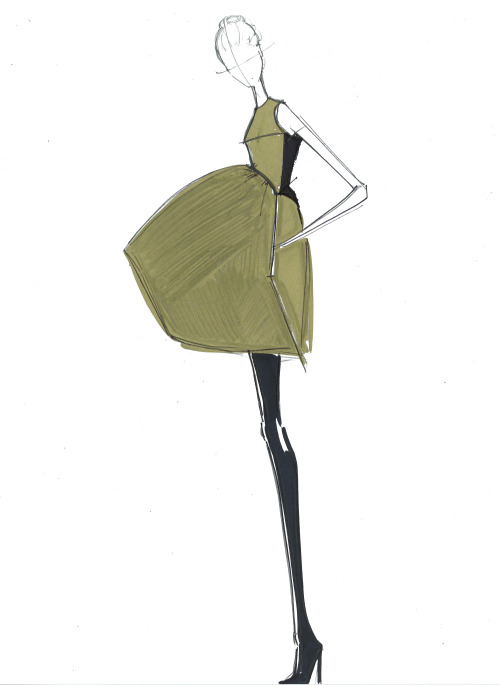
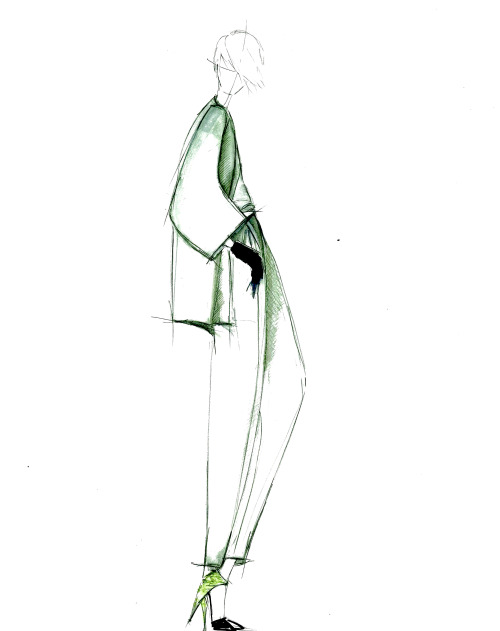
We certainly think so. This week's inspiration is an up-and-coming illustrator that knows how to paint outside the lines both literally and figuratively. With features in Martha Stewart Living and WWD, Alessandra De Gregorio doesn't follow the rules and that's why we love her work. The first thing you notice looking at her illustrations is her unique architectural style. She uses freehand straight lines to create sharp edges that capture the unexpected movement of each clothing item. There is something so grand about how her illustrated figures stand, their body language exuding confidence with a busy, city-girl feel. There's a futuristic aspect in the way Alessandra illustrates, but what sets her apart from the rest is her ability to bring it all together with great classic craftsmanship. She captured our attention this week and got us thinking about the importance of fashion illustration. A craft that has been overshadowed by huge technological advancement but which is also making somewhat of a comeback. We think learning how to illustrate by hand is the most important step in developing your creative process. The tactile aspect of illustrating by hand is simply irreplaceable. Touching the paper and seeing each line and color come to life creates a deep connection between the artist and his/her work. What do you think? Here are some of our favorites from Alessandra's collection!
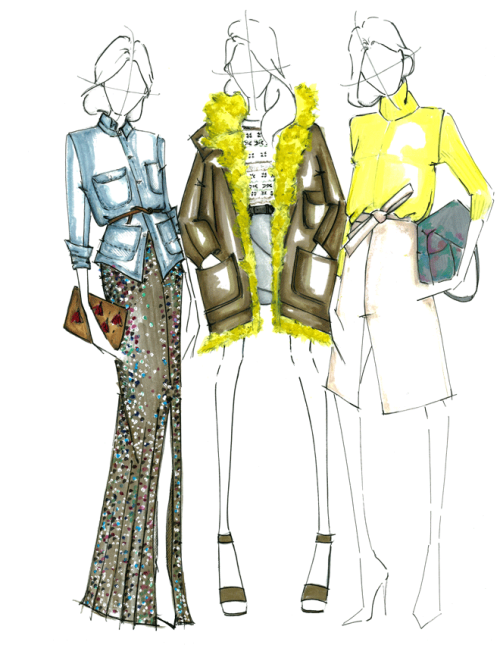  Illustrated by Alessandra De Gregorio
No, we are not talking about sailor knots although those are fun also. At Doina Alexei, we've long been fans of knotting and twisting the fabric in our design aesthetic. Not that bows aren't pretty, but there is something a little limiting about designing with them (in our humble opinion). Believe it or not, it is actually not an easy task to use a bow properly in clothing. The size, shape and fabric all have to be taken into account and on top of that, the positioning of a bow on a clothing item can prove to be a little challenging. Add it in the wrong areas of the garment and it will look too junior, make it too big in size and it will be too theatrical, use the wrong color and fabric and it risks looking a little out of place for everyday use. We took the modern approach and replaced the bow with the knot. Knotting fabric is actually fun to do. We love adding knot details to straps thus creating original asymmetric looks, or simply draping the fabric in a soft knot creating a more feminine, classic look. Using knots in clothing design gives you a wide range of possibilities. When it comes to the size and placement, there isn't much that wont work. It always ends up looking original, modern and fresh. You do have to watch out for fabric knots that are too large or heavy because it risks looking too bulky and adding too much weight thus jeopardizing comfort. Overall, we think using a knot detail offers a versatile option over the bow. With a little creativity, knotting can be used on a variety of styles, from work blouses to casual dresses and beyond. Don't believe us? Check out the following examples as proof.  The feminine "fold knot". 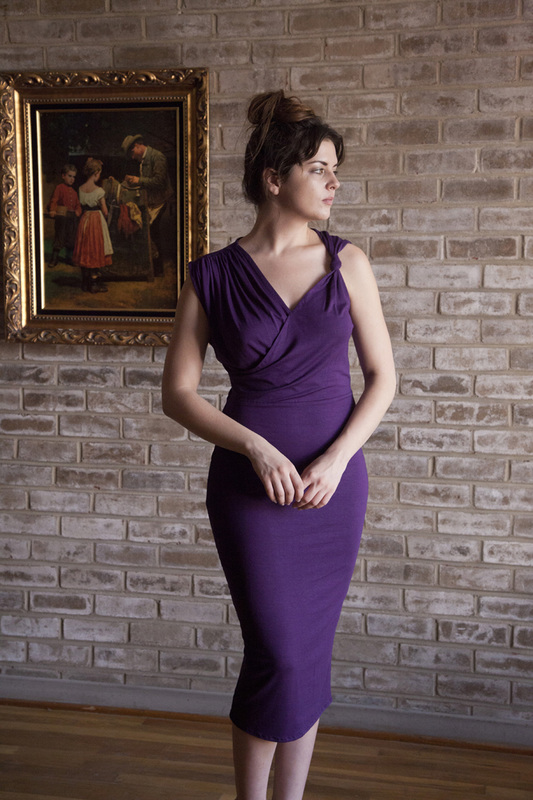 The comfy knit dress with knotted side strap. 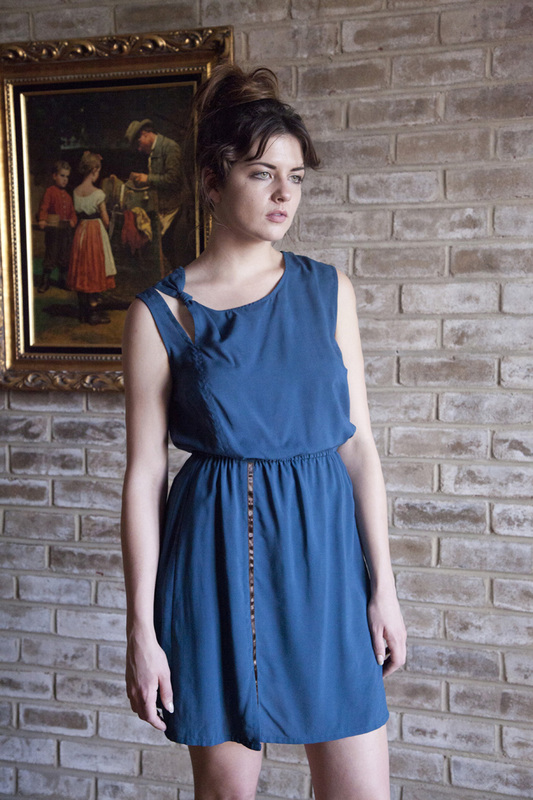 The everyday elastic waist dress with small knot detail. Looking for more unique stuff? Check out our 11:11 Jacket, the magical jacket that transforms into a bag! We should’ve told you earlier but we were staying busy designing our 11:11 jacket, you know that magical jacket that transforms into a bag? But have no fear, spring and summer will grace us with its presence again and these timeless spaghetti strap dresses will be a staple in your closet the entire season! Of course if you live in a warm climate all year-round, you're in luck. Simple yet perfect for hot summer days, these easy to wear dresses are comfortable, stylish and quite timeless. We find them to be the hardest workers in your closet, offering a variety of ways to dress them up or down with undeniable comfort during warmer days. The spaghetti strap dresses at Doina Alexei are designed to be the perfect combination of appropriate length and fabric choice. The following dresses work just as well for a cocktail party as they do for shopping and running errands all day. Check them out and tell us what your favorites are! 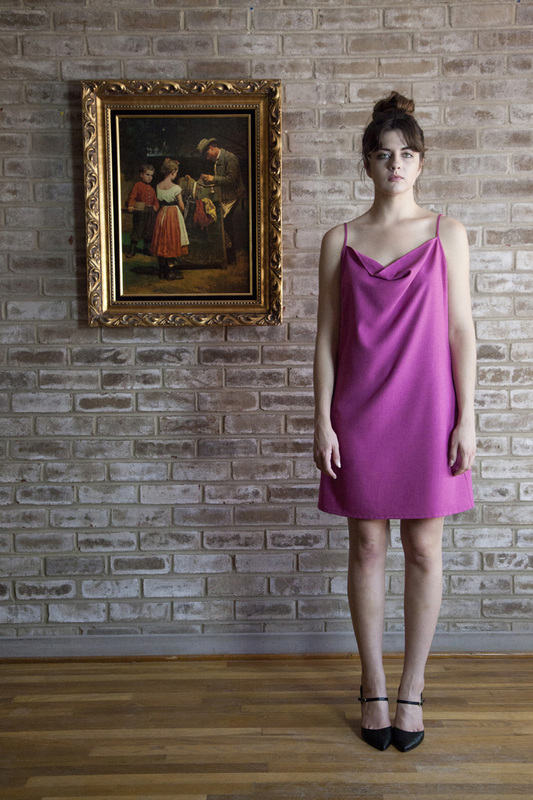 This light-magenta dress has a unique fold at the neckline, and along with its somewhat tailored nature, it creates the perfect combination of casual and dressed up.  This silky paisley dress has beautiful gold undertones. It's 70's inspired look is perfect for all your favorite summer parties. 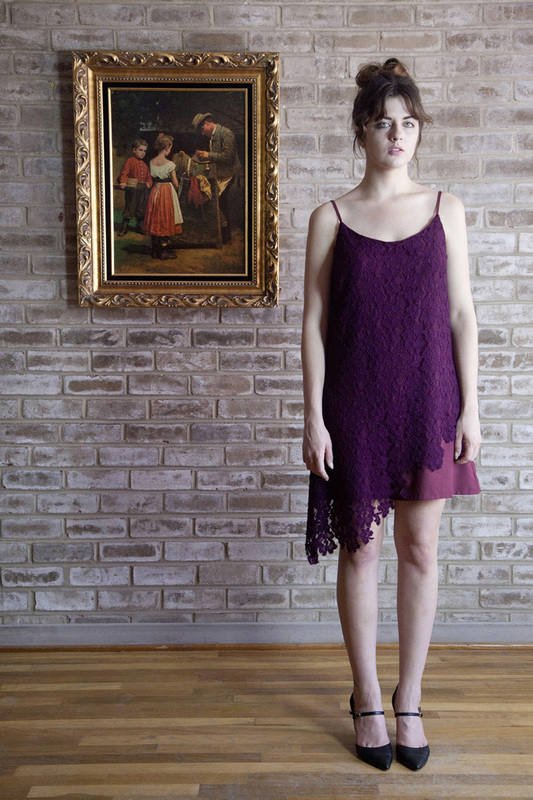 Although this is more of a dressed-up look, there's no reason why you couldn't wear this adorable lace dress in a more casual setting. We love the burgundy fabric peeking from the lace underneath creating a unique, very feminine look. There's a reason why we called it "the Romance Dress"-It just works. 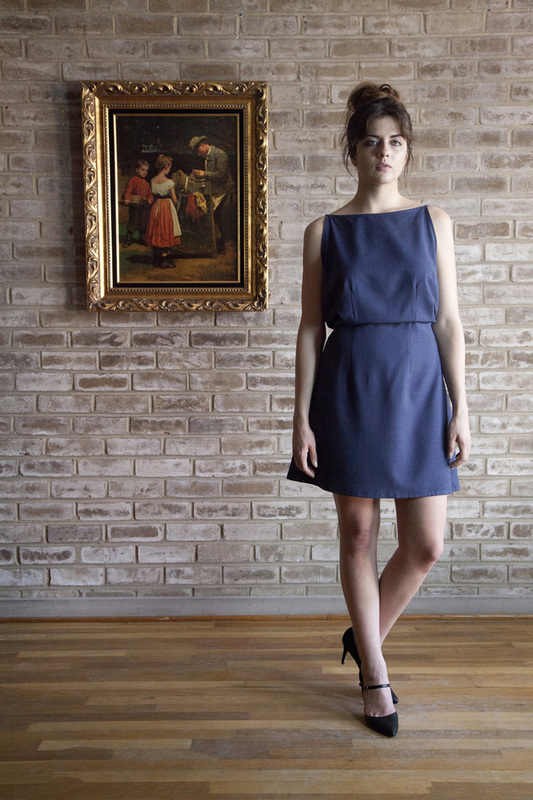 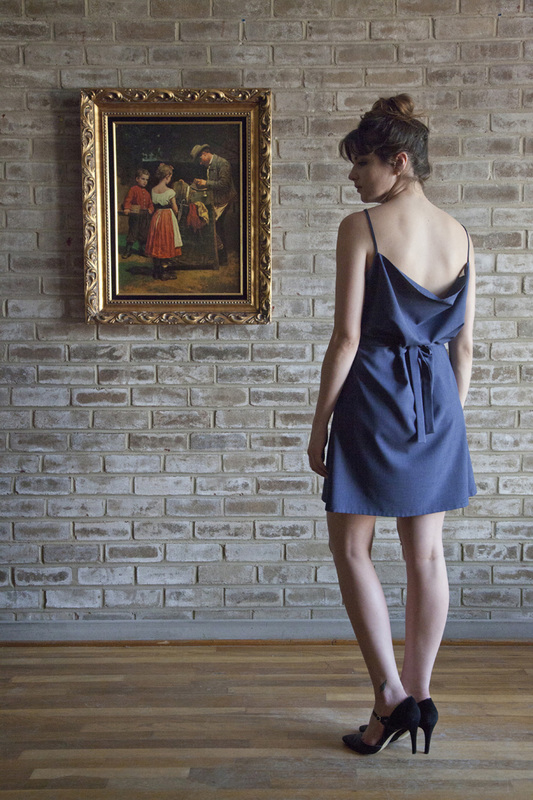 This simple, navy dress is a classic. With a clean cut at the front and a beautiful drape along the open back it is just the right amount of sophistication you expect from a good casual spaghetti strap dress. Of course, it wouldn't work as well if it didn't have that waist tie at the back, bringing it all together in the most well-composed design.
Do you ever think of clothing as a form of art? We think every fashion item offers something visually interesting, but what about a clothing item that is so unique, you can only look but you can't wear. Well actually, there's no such thing as not being able to wear something ... If you are a daring trendsetter girl, you can pull off anything! Anyways, this is another blast-from-the-past post, and specifically a photo shoot with photographer Connie Jang (more on this talented artist coming soon). The year is 2012, the place? Brooklyn, New York. We designed a few very special looks for this editorial only. These looks were never meant to land on the for-sale rack, but rather capture our brand identity at the time. Courtesy of Connie Jang's vision, the images were taken using a vintage black & white film camera and the results were well worth it. The natural beauty of working with a film camera is the inability to control the lighting on the device itself, and rather masterfully control the shadows and lighting in your physical setting. The photos are developed in the darkroom, and the results can either be a disaster or a masterpiece. In this case, we think the latter describes this photo shoot the best. We chose two of our favorite looks from this vintage photo shoot to share with you. One is an asymmetrically draped white linen dress with a tie-back motif. This dress was carefully draped on the dressform and features multiple twists and folds at the shoulder seam. The result is a beautiful array of organic shapes across the front which drape over the opposite shoulder to create a rectangular drape at the back. 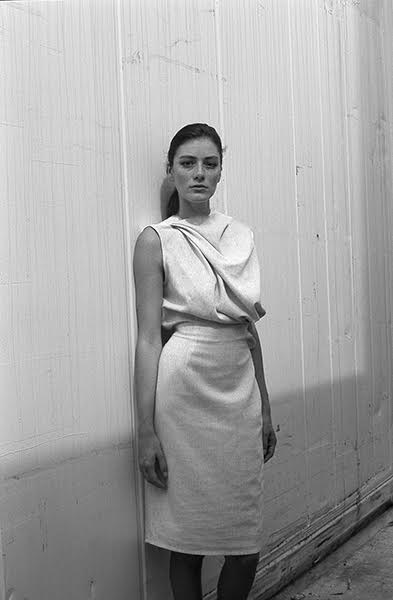 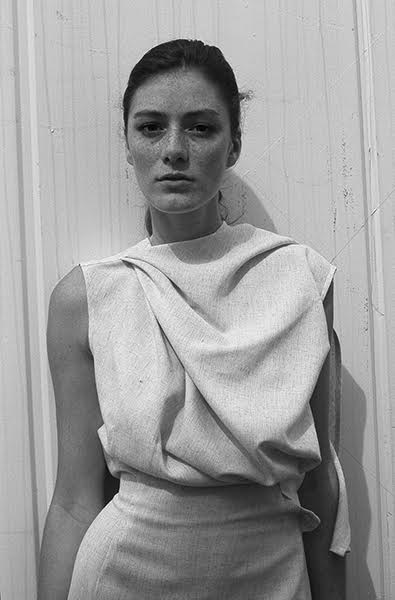 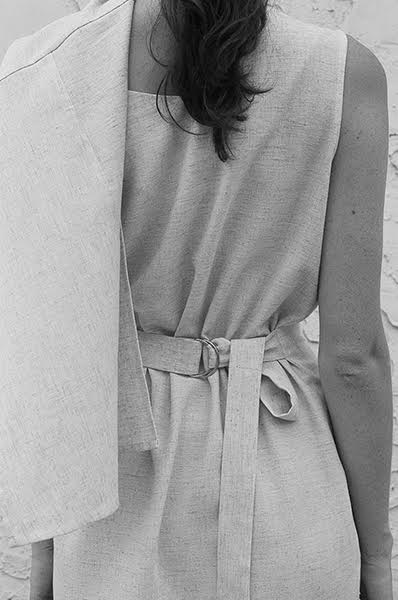 The second look featured bellow is a loose fitting cotton twill dress with a unique shawl-like addition. The shawl detail starts at the back by creating a row of evenly distributed pleats along the center-back seam and extends over the shoulder to create a beautiful asymmetric drape. This dress creates a simple but breathless image, facilitated by the natural beauty of our model. 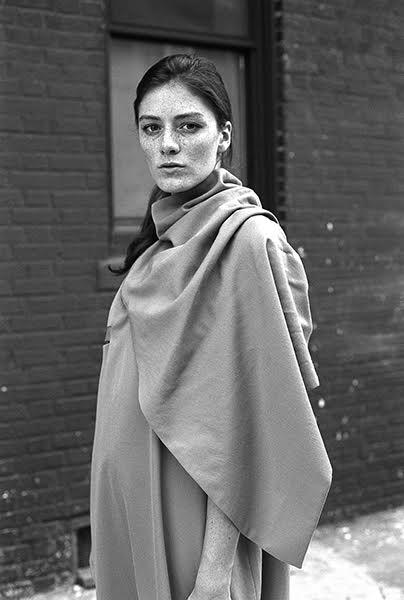 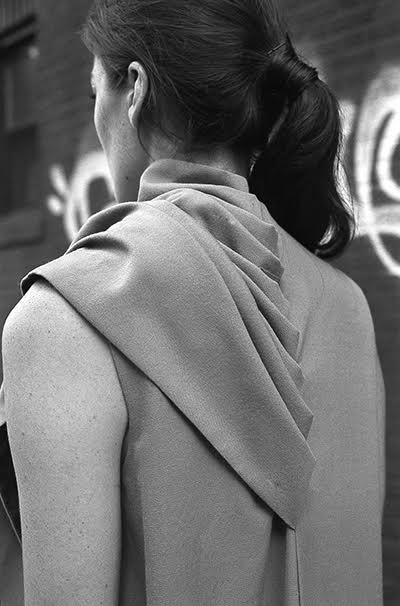 Photography by Connie Jang Looking for more unique stuff? Check out our 11:11 Jacket, the magical jacket that transforms into a bag! Yes, the title is a tad bit deceiving but now that we got you here, we'd like to let you know that braids and twists are not just for beautiful hairstyles- they work just as well on fabric. We know because we've tried it! Today we're looking back on some of our most unique design elements from past collections which include clever fabric braiding and unique twists. Our story starts way back when, in Spring/Summer 2015, when the idea of asymmetric fabric twists came to life in our design aesthetic. The reality is that in the fashion industry, every design idea has already been explored, but it is how you choose to use these already explored ideas in your own way that sets you apart from the rest (yes, it sounds a little cliche, but trust us..). There's no denying that details of braids and twists have been used in clothing before. However, they always seem either too small to be of any importance or too large and complex to constitute a wearable everyday item. We found the balance between the two by incorporating wearable braids and twist design elements into classic styles. It is about making the braided or twisted fabric just the right size and positioning it in all the right areas of the garment. It is this design balancing act that makes a style just as much unique as it is wearable. Now that we've boasted a little *blush*, check out some of our favorites from past seasons. 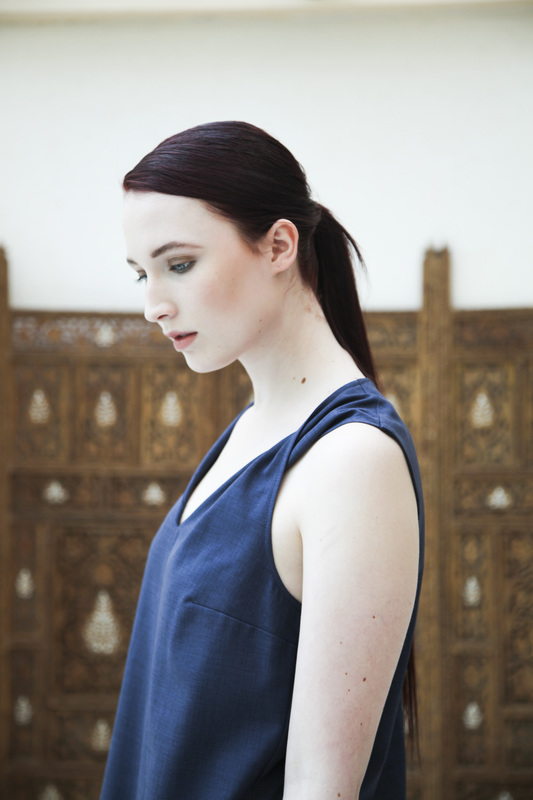 The twist that started it all... from our S/S 15 collection. 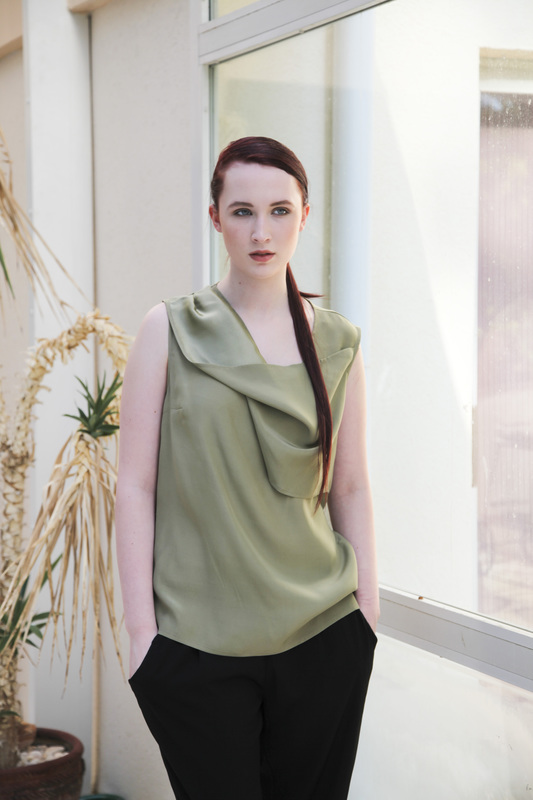 The wavy, soft twist. S/S 15 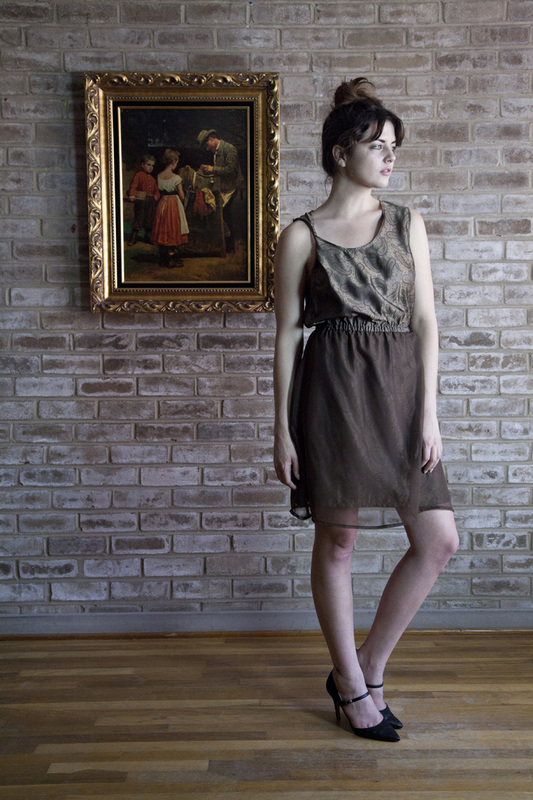 The spinny (no, that is not an official word) twist. S/S 16  The "looks kinda like a bow" twist. S/S 16 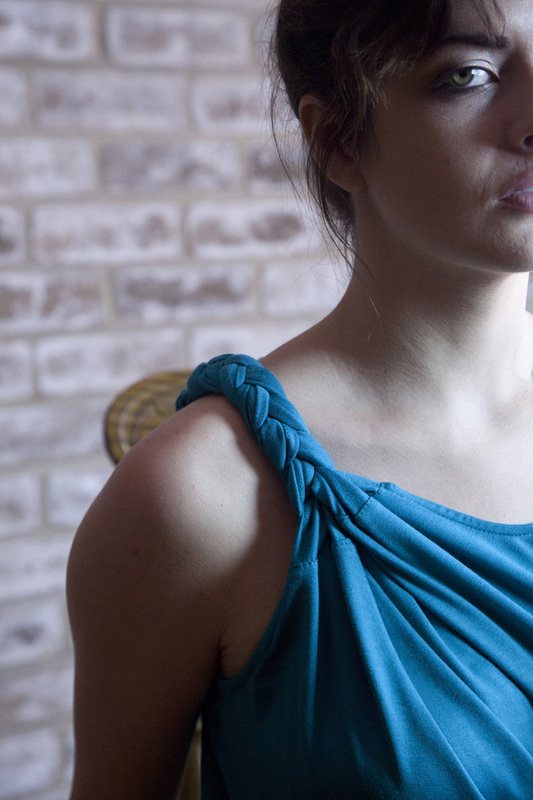 The striking braid strap. S/S 16 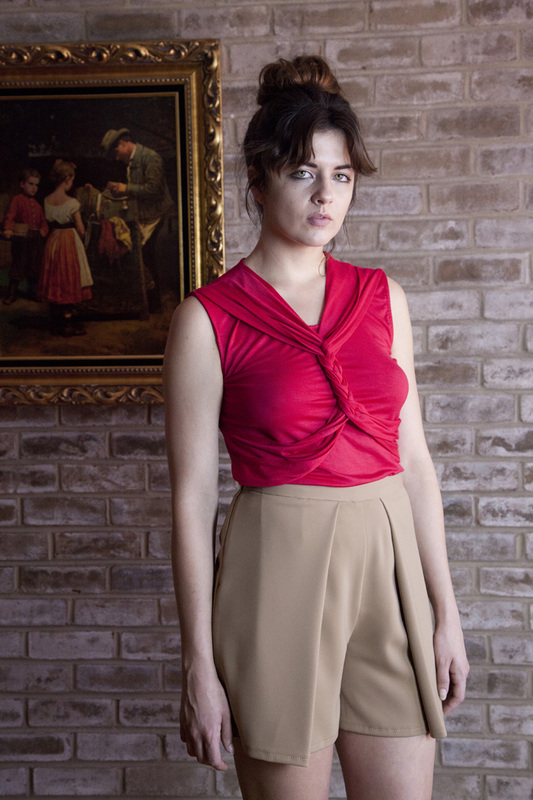 The daring braid. S/S 16 Looking for more unique stuff? Check out our 11:11 Jacket, the magical jacket that transforms into a bag! |
The Blog:A journey into our design process, sewing tutorials, fashion tips, and all the inspiring people and things we love. 
Doina AlexeiDesigner by trade and dressmaker at heart. I spend most of my days obsessing over new fabrics and daydreaming new ideas. 
Sadie
Executive Assistant & Client Relations Manager Archives
November 2019
Categories
All

|

-
Sewing Tutorials
-
Basics
>
- Aligning Pattern Grainlines To Fabric
- Preparing Fabrics For Sewing
- Pinning Sewing Patterns To Fabric
- Placing Sewing Patterns On Fabric For Cutting
- Rotary Cutters or Fabric Scissors?
- Cutting The Sewing Patterns
- What Are Notches And How To Use Them In The Sewing Process
- Transferring Notches From Pattern To Fabric
- Transferring Seamlines to Fabric
- Staystitching
- Backstitching: A Complete Guide
- Hand Basting: A Complete Guide
- Sewing Continuous Bias Binding
- Darts >
-
Sewing Seams
>
- The Basics Of Seams And Seam Allowance
- How To Sew A Straight Seam
- Sewing Curved Seams
- Sewing Corner Seams
- Trimming And Grading Seam Excess
- Notching/Clipping Seam Allowance for Tension Release
- Sewing Topstitched Seams
- Sewing Corded Seams
- Sewing A Slot Seam
- Sewing A Gathered Seam
- Sewing Bias Seams
- Sewing Seams With Ease
- Sewing Seams With Crossing Seamlines
- Sewing Unlike Fabric Seams
- How To Iron Seams: Ironing Tools And Conventions
- Sewing With Knit Fabrics
- Understanding Stitch Length And Tension
- Sewing Unique Fabric Seams
-
Seam Finishes
>
- Seam Finishing Techniques - Overview
- Applying A Pinked Seam Finish
- Applying A Bias Bound Seam Finish
- Serging And Zigzag Seam Finishes
- Sewing A Self-Bound Seam Finish
- Sewing A French Seam Finish
- Sewing A Hong Kong Seam Finish
- Sewing A Mock French Seam Finish
- Sewing A Turned-and-Stitched Seam Finish
- Sewing Overcast Hand-Applied Seam Finishes
- Sewing A Flat Felled Seam
- Sewing A Hairline Seam Finish
-
Hem Finishes
>
- Garment Hem Finishes: Overview
- Sewing A Double Fold Hem Finish
- Sewing A Single Fold Hem Finish
- Sewing Bound Hem Finishes
- Sewing An Exposed Double Layer Bound Hem
- Sewing A Folded-Up Bound Hem with Pre-folded Binding
- Sewing A Hong Kong Hem Finish
- Sewing A Band Hem Finish
- Sewing A Bias Faced Hem Finish
- Sewing A Twill Tape Hem Finish
- Sewing A Rolled Hem Finish
- Sewing A Shaped Hem Facing
- Using Fusible Hem Tape And Webbing
- Finishing A Lace Fabric Hem
- Finishing A Leather Hem
- Sewing Faced Hem Corners
- How To Finish Lining At The Hem
- Finishing Fabric Corners by Mitering >
- Interfacing A Hemline: Lined And Unlined Examples
-
Sewing Pockets
>
- Curved Patch Pocket With Flap
- Unlined Square Patch Pockets
- Lined Patch Pockets: Two Ways
- Extension On-Seam Pockets
- Separate On-Seam Pocket
- Front Hip Pockets
- Bound Double Welt Pocket
- Double Welt Pocket With Flap
- Self-Welt Pocket (Using Single Fabric Layer)
- Slanted Welt Pocket (Hand-Stitched)
- Faced Slash Pockets: Overview >
-
Sewing Zippers
>
- Sewing Zippers: General Information
- Sewing A Centered Zipper
- Sewing A Lapped Zipper
- Sewing An Invisible Zipper
- Sewing A Fly Front Zipper
- Sewing A Closed-End Exposed Zipper (No Seam)
- Sewing An Exposed Separating Zipper
- Sewing Hand Stitched Zipper Applications
- Sewing A Zipper Underlay
- Sewing A Placket-Enclosed Separating Zipper
- Sleeveless Finishes >
-
Neckline Finishes
>
- Sewing A Neck Shaped Facing
- Sewing An All-In-One Neck Facing
- Neck And Garment Opening Combination Facings >
- Sewing A Bias Faced Neckline Finish
- Sewing A Band Neckline Finish
- Bound Neckline Finishes: Overview >
- Sewing A Semi-Stretch Strip Band Neckline
- Ribbed Neck Band And Classic Turtleneck
- Decorative Neckline Finishes >
- Finishing Facing Edges >
-
Extras
>
- A Complete Guide on Interfacing
- Sewing Bound Spaghetti Straps
- Sewing Spaghetti Straps To A Faced Neckline
- Sewing Ruffles: Overview
- Patterning And Sewing A Circle Ruffle
- Sewing A Gathered Heading Ruffle
- Sewing Double Layer Gathered Ruffles
- Sewing A Gathered Ruffle Into A Seam
- Sewing A Gathered Ruffle To A Fabric Edge
- Sewing A Fabric Surface Slit
- Sewing A Slit Seam
- Hand-Applied Straight Stitches
- Hand-Applied Blind Stitches
- Hand-Applied Overedge Stitches
- Hand-Applied Tack Stitches
- Hand-Applied Decorative Stitches
-
Basics
>
- Custom Bridal
- Custom Apparel
- About
- Blog
 RSS Feed
Services |
Company |
|
