Doina Alexei
  • Sewing Tutorials
    • Basics >
      • Aligning Pattern Grainlines To Fabric
      • Preparing Fabrics For Sewing
      • Pinning Sewing Patterns To Fabric
      • Placing Sewing Patterns On Fabric For Cutting
      • Rotary Cutters or Fabric Scissors?
      • Cutting The Sewing Patterns
      • What Are Notches And How To Use Them In The Sewing Process
      • Transferring Notches From Pattern To Fabric
      • Transferring Seamlines to Fabric
      • Staystitching
      • Backstitching: A Complete Guide
      • Hand Basting: A Complete Guide
      • Sewing Continuous Bias Binding
    • Darts >
      • Marking And Transferring Darts To Fabric
      • What Are Darts And Dart Components
      • Folding, Pinning And Hand Basting Darts
      • Handling Dart Excess: Bulk And Tension
      • How To Sew A French Dart
      • How To Sew And Iron Single Pointed Darts
      • How To Sew And Iron Contour Darts
      • Sewing Darts With Decorative/Beaded Fabrics
    • Sewing Seams >
      • ​The Basics Of Seams And Seam Allowance
      • How To Sew A Straight Seam
      • Sewing Curved Seams
      • Sewing Corner Seams
      • Trimming And Grading Seam Excess
      • Notching/Clipping Seam Allowance for Tension Release
      • Sewing Topstitched Seams
      • Sewing Corded Seams
      • Sewing A Slot Seam
      • Sewing A Gathered Seam
      • Sewing Bias Seams
      • Sewing Seams With Ease
      • Sewing Seams With Crossing Seamlines
      • Sewing Unlike Fabric Seams
      • How To Iron Seams: Ironing Tools And Conventions
      • Sewing With Knit Fabrics
      • Understanding Stitch Length And Tension
      • Sewing Unique Fabric Seams
    • Seam Finishes >
      • Seam Finishing Techniques - Overview
      • Applying A Pinked Seam Finish
      • Applying A Bias Bound Seam Finish
      • Serging And Zigzag Seam Finishes
      • Sewing A Self-Bound Seam Finish
      • Sewing A French Seam Finish
      • Sewing A Hong Kong Seam Finish
      • Sewing A Mock French Seam Finish
      • Sewing A Turned-and-Stitched Seam Finish
      • Sewing Overcast Hand-Applied Seam Finishes
      • Sewing A Flat Felled Seam
      • Sewing A Hairline Seam Finish
    • Hem Finishes >
      • Garment Hem Finishes: Overview
      • ​Sewing A Double Fold Hem Finish
      • Sewing A Single Fold Hem Finish
      • Sewing Bound Hem Finishes
      • Sewing An Exposed Double Layer Bound Hem
      • Sewing A Folded-Up Bound Hem with Pre-folded Binding
      • Sewing A Hong Kong Hem Finish
      • Sewing A Band Hem Finish
      • Sewing A Bias Faced Hem Finish
      • Sewing A Twill Tape Hem Finish
      • Sewing A Rolled Hem Finish
      • Sewing A Shaped Hem Facing
      • Using Fusible Hem Tape And Webbing
      • Finishing A Lace Fabric Hem
      • Finishing A Leather Hem
      • Sewing Faced Hem Corners
      • How To Finish Lining At The Hem
      • Finishing Fabric Corners by Mitering >
        • Mitering Fabric Corners With A Full Bias Facing
        • Mitering Fabric Corners With Exposed Binding
      • Interfacing A Hemline: Lined And Unlined Examples
    • Sewing Pockets >
      • Curved Patch Pocket With Flap
      • Unlined Square Patch Pockets
      • Lined Patch Pockets: Two Ways
      • Extension On-Seam Pockets
      • Separate On-Seam Pocket
      • Front Hip Pockets
      • Bound Double Welt Pocket
      • Double Welt Pocket With Flap
      • Self-Welt Pocket (Using Single Fabric Layer)
      • Slanted Welt Pocket (Hand-Stitched)
      • Faced Slash Pockets: Overview >
        • Sewing A Faced Slit Pocket
        • Sewing A Rectangular Slash Pocket
        • Sew A Star-Shaped Faced Pocket
    • Sewing Zippers >
      • Sewing Zippers: General Information
      • Sewing A Centered Zipper
      • Sewing A Lapped Zipper
      • Sewing An Invisible Zipper
      • Sewing A Fly Front Zipper
      • Sewing A Closed-End Exposed Zipper (No Seam)
      • Sewing An Exposed Separating Zipper
      • Sewing Hand Stitched Zipper Applications
      • Sewing A Zipper Underlay
      • Sewing A Placket-Enclosed Separating Zipper
    • Sleeveless Finishes >
      • Sleeveless Armhole Finishes: General Information
      • Finishing Sleeveless Garments with Lining
      • Sewing A Folded-Under Bound Armhole Finish
      • Sewing A Shaped Armhole Facing
      • Finishing Armhole Edges With Exposed Binding
      • Finishing Armhole Edges With Decorative Trim
    • Neckline Finishes >
      • Sewing A Neck Shaped Facing
      • Sewing An All-In-One Neck Facing
      • Neck And Garment Opening Combination Facings >
        • Sewing An Extended Front-Neck Facing
        • Sewing A Separate Neck-Front Facing
      • Sewing A Bias Faced Neckline Finish
      • Sewing A Band Neckline Finish
      • Bound Neckline Finishes: Overview >
        • Sewing A Single Layer Bound Neckline
        • Finishing A Neckline With Pre-Folded Binding
        • Sewing A Double Layer Bound Neckline Finish
      • Sewing A Semi-Stretch Strip Band Neckline
      • Ribbed Neck Band And Classic Turtleneck
      • Decorative Neckline Finishes >
        • Sewing A Neckline With Decorative Inset
        • Sewing A Piped Cording Faced Neckline
        • Sewing Decorative Trim To A Finished Neckline
    • Finishing Facing Edges >
      • Finishing Facing Edges: Overview
      • Folded-And-Topstitched Overedge Facing Finish
      • Sewing A Bound Facing Edge Finish
      • Sewing A Hong Kong Facing Finish
      • Sewing A Rolled Edge Facing Finish
      • Sewing A Twill Tape Facing Edge Finish
      • Sewing An Overedge-Stitch Facing Finish
    • Extras >
      • A Complete Guide on Interfacing
      • Sewing Bound Spaghetti Straps
      • Sewing Spaghetti Straps To A Faced Neckline
      • Sewing Ruffles: Overview
      • Patterning And Sewing A Circle Ruffle
      • Sewing A Gathered Heading Ruffle
      • Sewing Double Layer Gathered Ruffles
      • Sewing A Gathered Ruffle Into A Seam
      • Sewing A Gathered Ruffle To A Fabric Edge
      • Sewing A Fabric Surface Slit
      • Sewing A Slit Seam
      • Hand-Applied Straight Stitches
      • Hand-Applied Blind Stitches
      • Hand-Applied Overedge Stitches
      • Hand-Applied Tack Stitches
      • Hand-Applied Decorative Stitches
  • Custom Apparel
    • Custom Bridal
  • Submit A Sewing Question
  • About
  • Blog

How To Sew A Shaped Facing To A Neckline Edge

What Is A Shaped Facing
Picture
Regular shaped facings are great for sewing beginners as they provide practice with a few important techniques simultaneously: staystitching, understitching, applying interfacing, grading, trimming, notching and hand tacking. That is quite a lot of different sewing elements all grouped into a single sewing task!
Picture
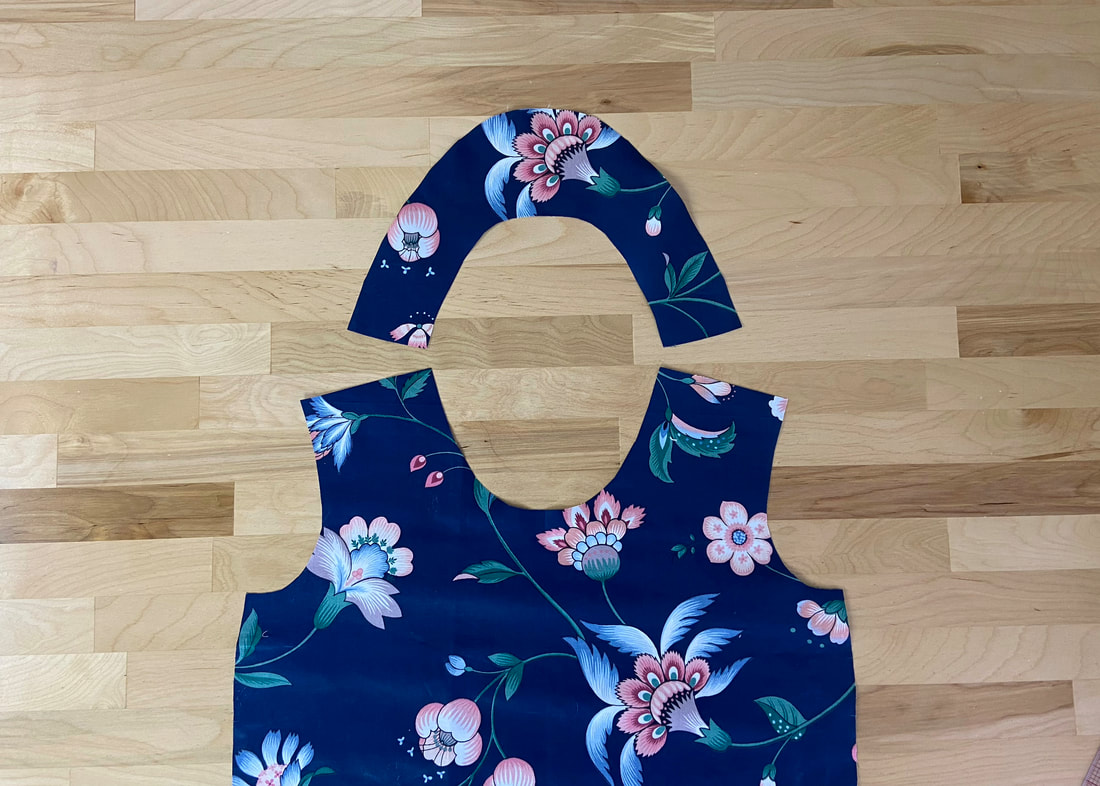
A shaped facing is a separate unit that is exactly the same shape as the garment edge it finishes. The only difference is that a facing is the garment’s mirror image in terms of fabric face sides. 
Picture
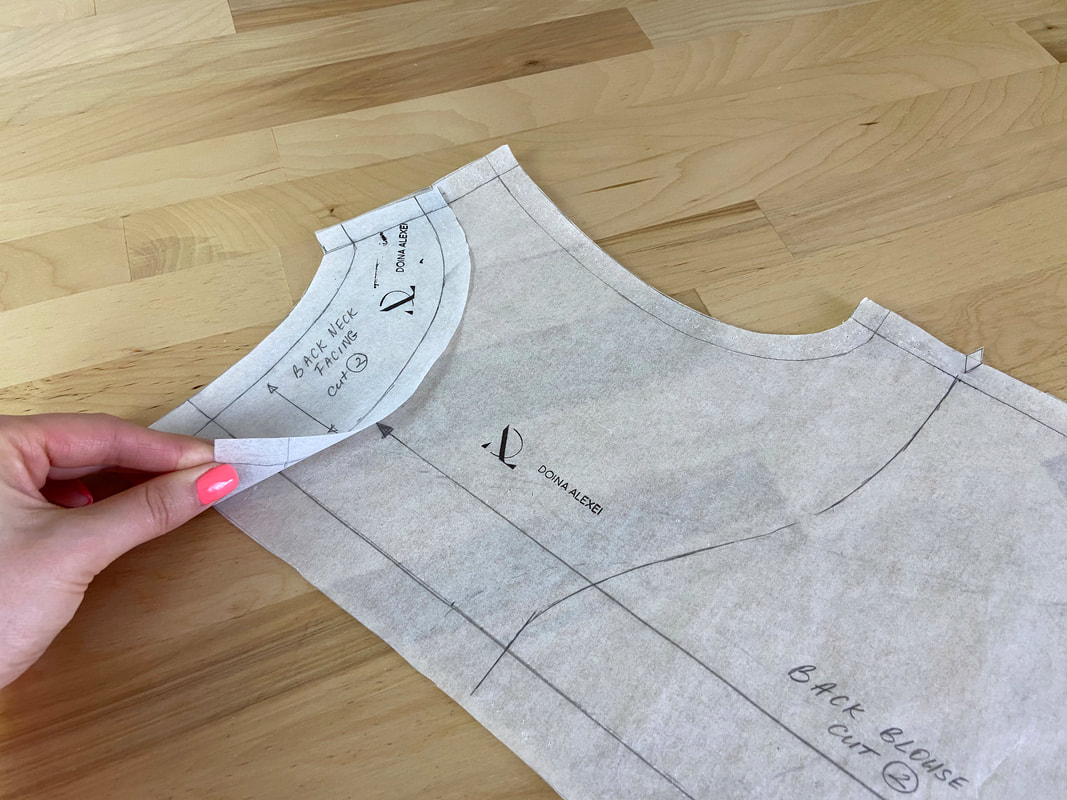
Sewing patterns for the shaped facing pieces are generated from the main garment patterns. Conventional shaped facings are comprised of separate pieces corresponding to the back, usually two identical pieces if the center back has a zipper (or other closure), and a full front piece. 
For garments that have a front opening, there are certain shaped facings that blend with the garment opening and front neckline simultaneously to finish the two edges with a single facing piece. 
Picture
Facings provide a smooth, clean neckline finish with no stitching visible on the face of the garment. For that reason, facings are often used with dressy, more tailored styles. Since facings provide more structure, they may not always be suitable for flowy, draped garments (especially those that are more casual in nature). 

Interfacing The Facing Pieces

​The garment and/or the facing have to be interfaced for extra stability prior to the facing being attached. 
Picture
If your pattern set does not provide separate interfacing patterns, use your facing patterns to cut out the interfacing portions. ​
If you are working with fusible interfacing, make sure you cut the pieces such that the adhesive side corresponds to the wrong side of each facing or garment (depending on where it is added). 
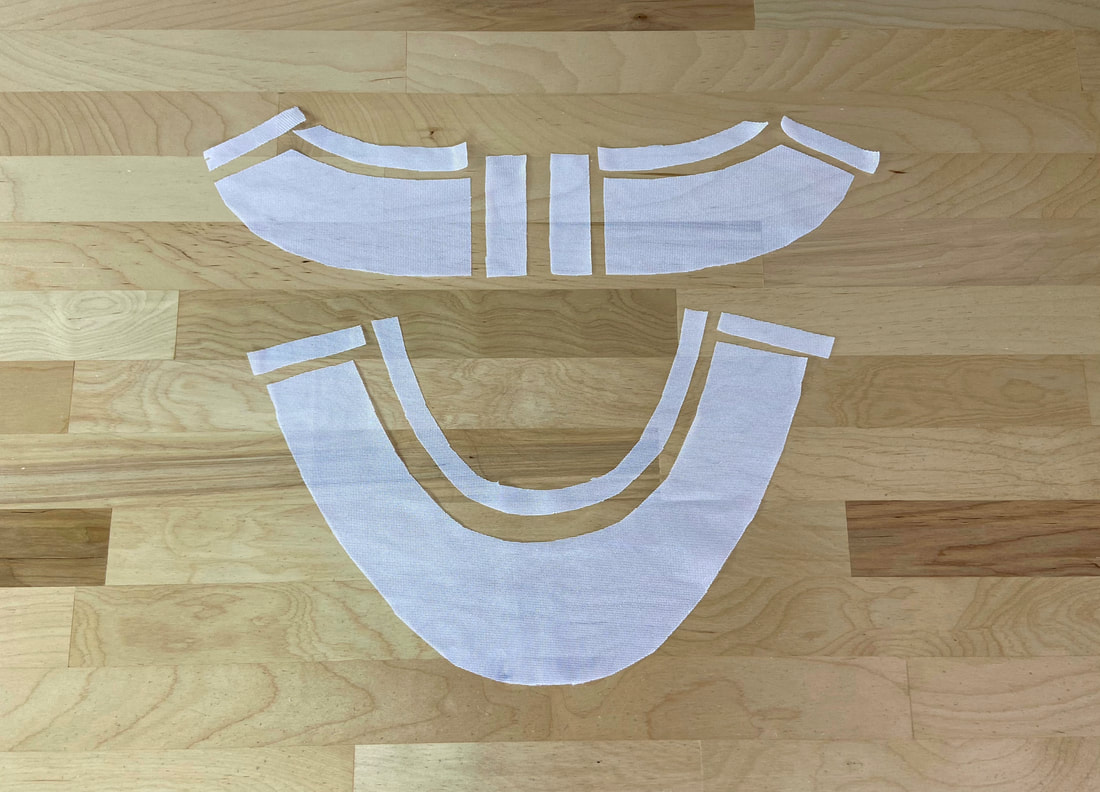
Once the interfacing pieces are cut, trim all the edges down to ½” or the seam allowance length- your patterns should specify which. ​
Picture
​Conventionally, interfacing backs the garment layer thus it is attached to the wrong side of the area that will house the facing. However, depending on the fabric, you may choose to add interfacing to the facing layer instead. This is true especially in cases where the garment fabric is thicker and more structured than the facing. In this instance, the facing needs extra reinforcement so that it lays flat and doesn’t roll to the outside of the neckline edge. 
​In some rare cases, you may need to add interfacing to both garment and facing layers. This is especially true when the interfacing is very thin, and the facing and garment fabrics are flimsy and need extra structure along the neckline.
Picture
For a garment that has a back zipper, as is very common with neck facings, the interfacing shouldn’t extend into the zipper placket but rather stop at the center back seamline. If your interfacing is lightweight and doesn’t add bulk, it is ok not to trim the interfacing edges. Sometimes, extending the interfacing past the seamline into the zipper seam allowance can provide an extra layer of stability for lightweight, flimsy fabrics.

Sewing A Round Neck Facing With Center Back Zipper Opening

​In the steps below, you will learn how to sew a regular shaped facing to a curved neckline using two different methods of finishing the facing ends to the zipper tape: One is hand-stitched (most traditional), the other is completed by machine (fastest).
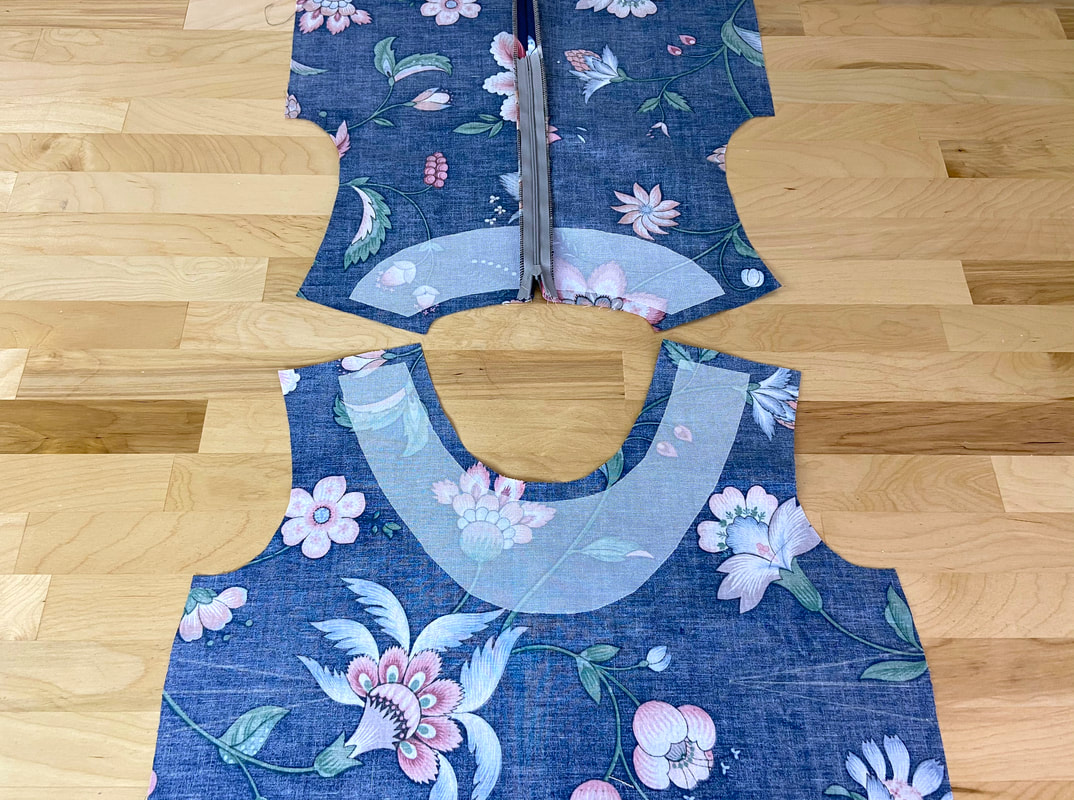
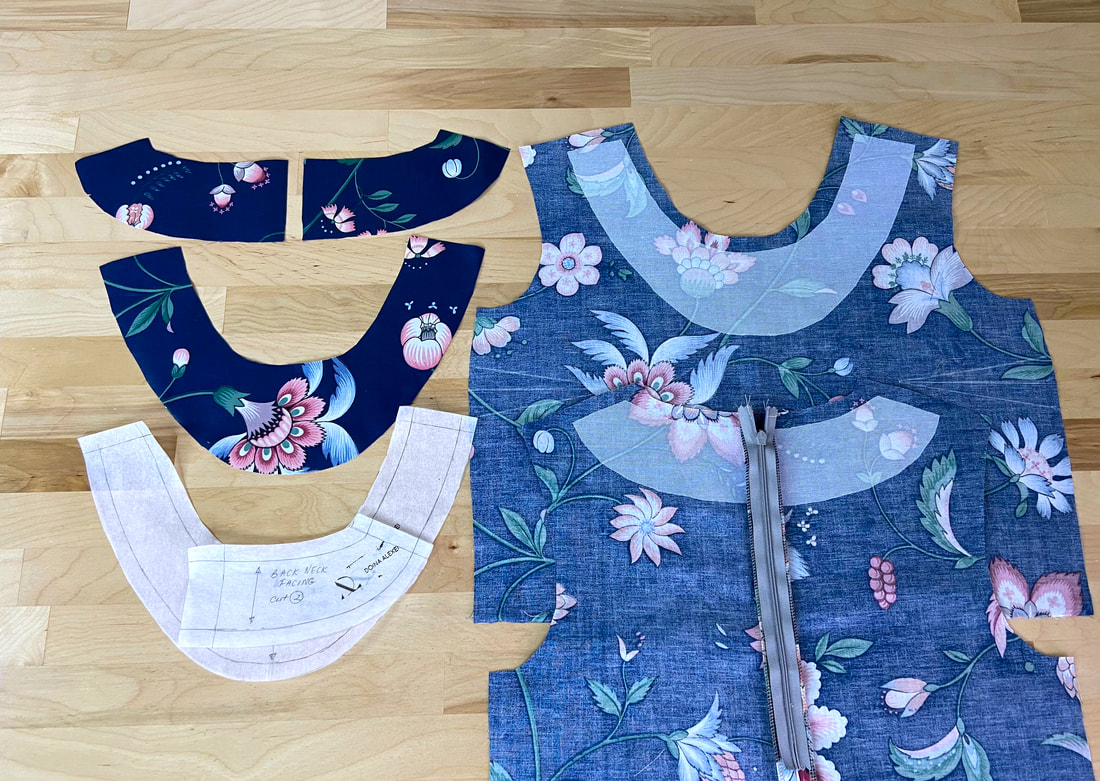
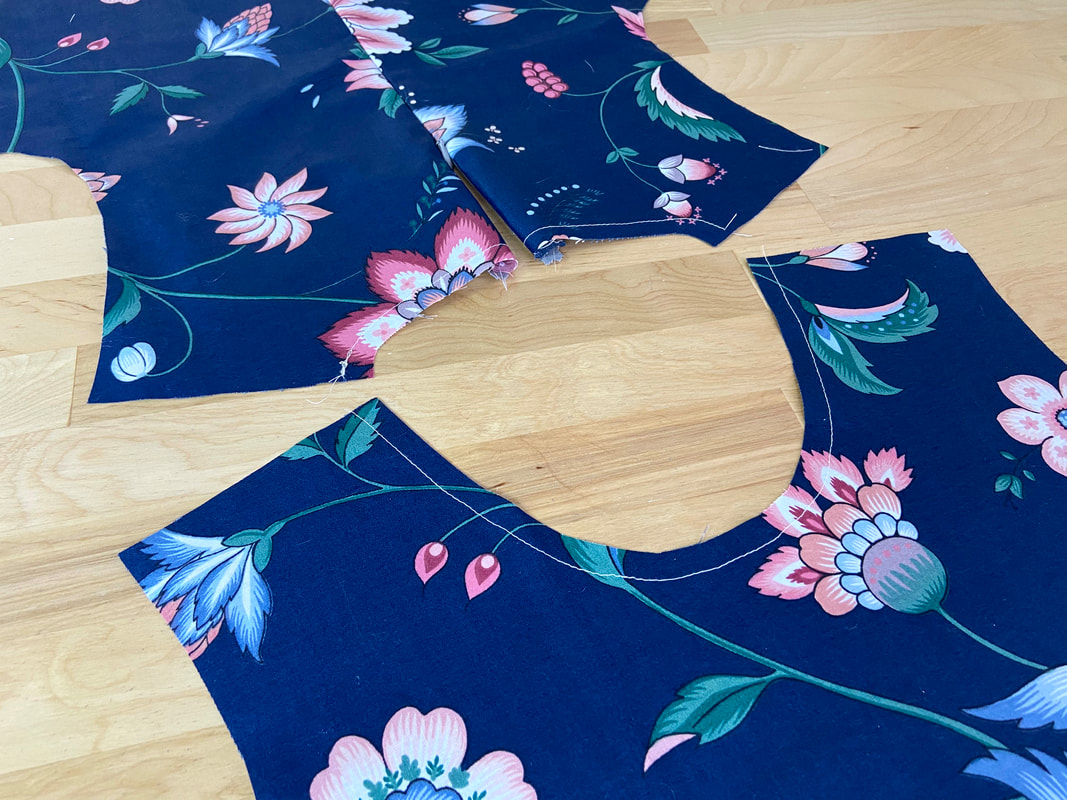
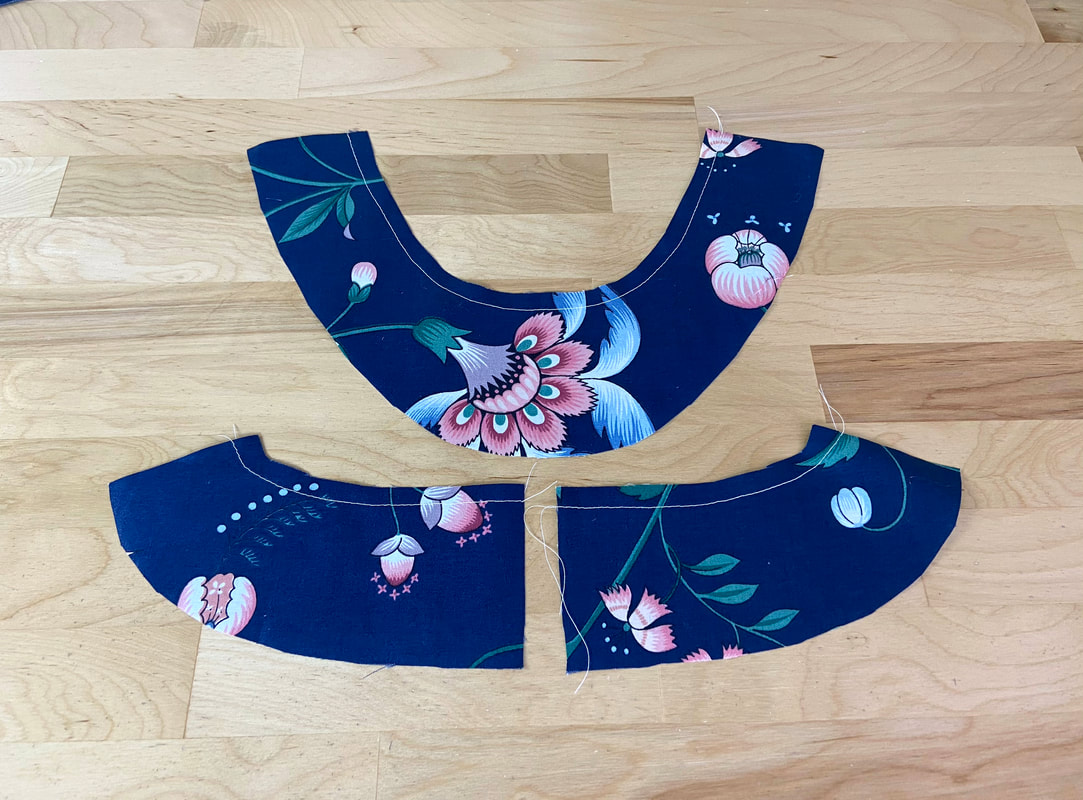
1. Cut out all your facing and interfacing pieces first. 
Picture
​This facing has two identical (mirror image) pieces for the back and one full piece for the front neck. You should have one pattern for the front and one pattern for the back pieces. 
The two back portions are cut by folding the fabric and cutting through both fabric layers at once.
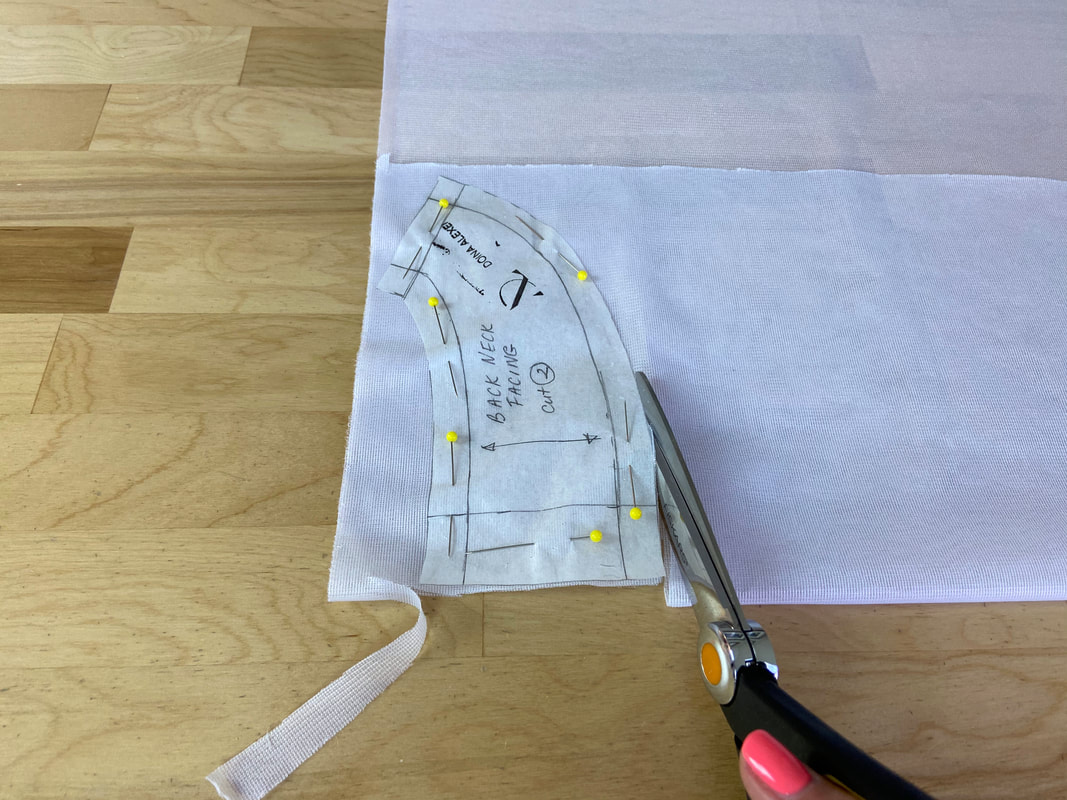
If your pattern set does not provide separate interfacing patterns, use the neck facing patterns to cut them out using the method described above. 
If working with fusible interfacing, treat the adhesive side as the “right” side in the cutting process.
Picture
2. Trim the interfacing down to ½” along all edges.
Picture
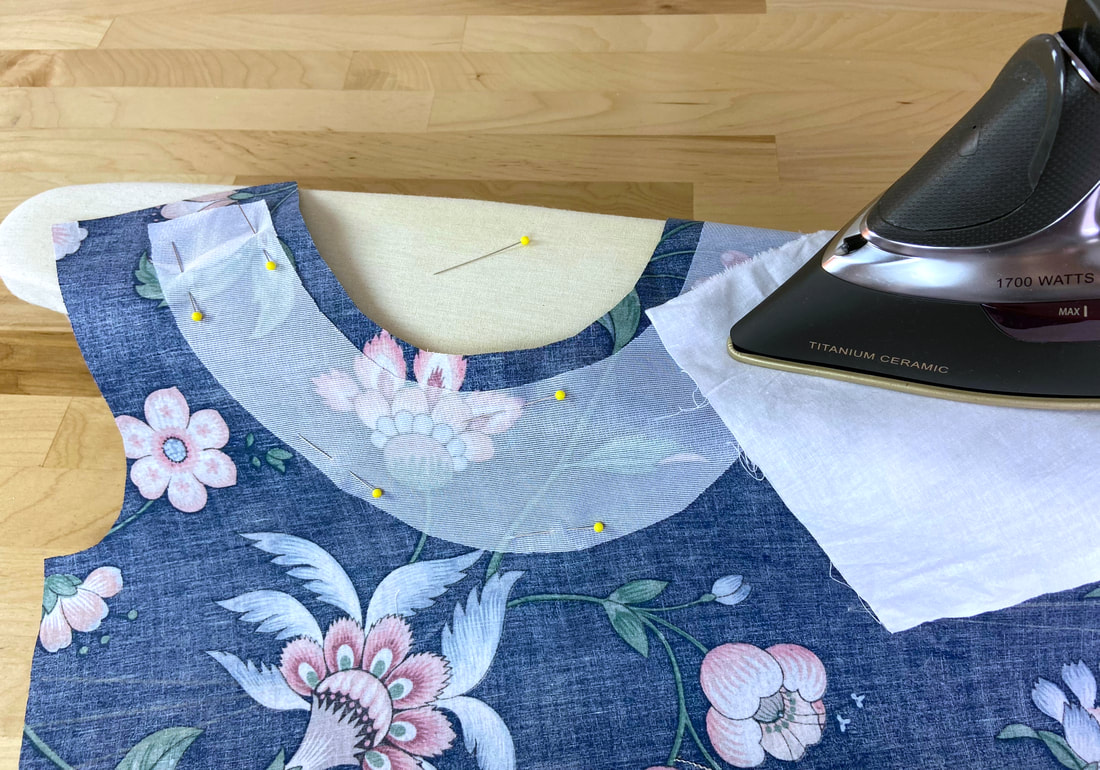
3. Assuming you are using fusible interfacing, center each interfacing piece on the wrong side of each garment piece and make sure the adhesive side is touching the fabric. Using a protective cloth, iron on top of the interfacing to fuse the two layers together.
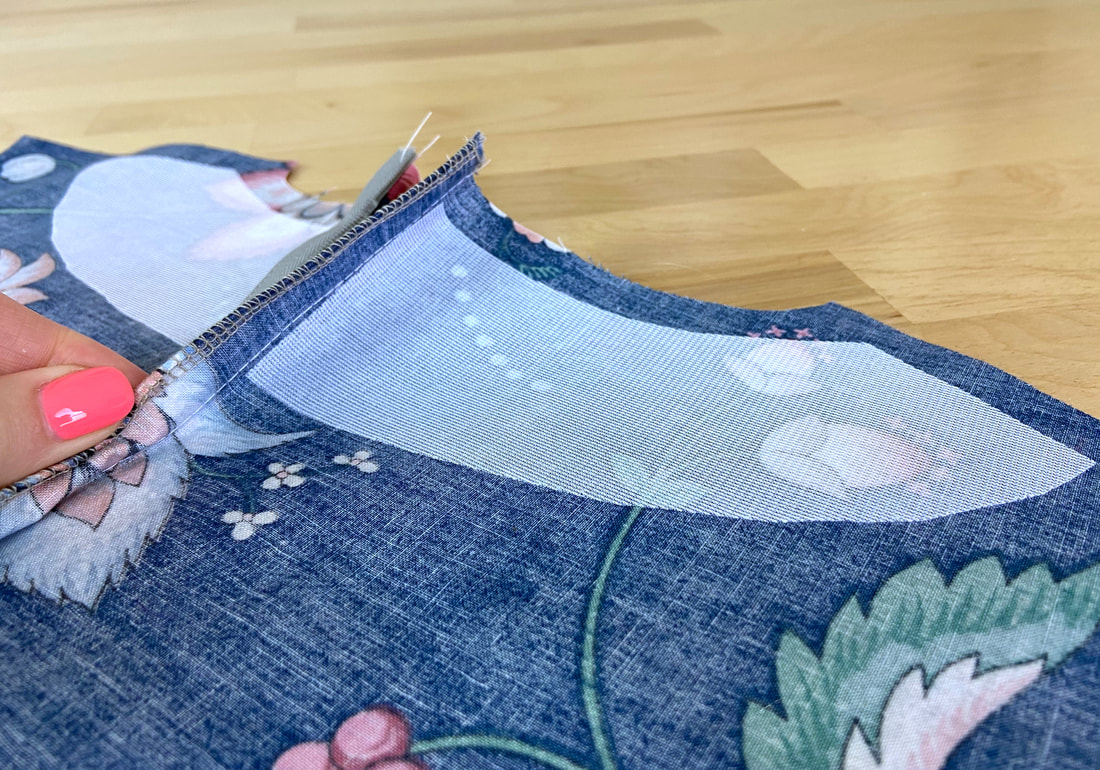
Before moving on to sewing the seams, it is important to first staystitch the garment neckline and the facing neckline edges. 
Picture
Staystitching is applied at about ¼” from the edge of the neckline in, within the seam allowance, to stabilize the curved edges and prevent them from stretching or losing their shape during the construction process. 
Picture
Staystitching is applied particularly along neckline and armhole edges as these are curved and thus most vulnerable to unwanted stretching. Similarly important is staystitch the facing pieces. 
More info on staystitching in this tutorial: Staystitching
Picture
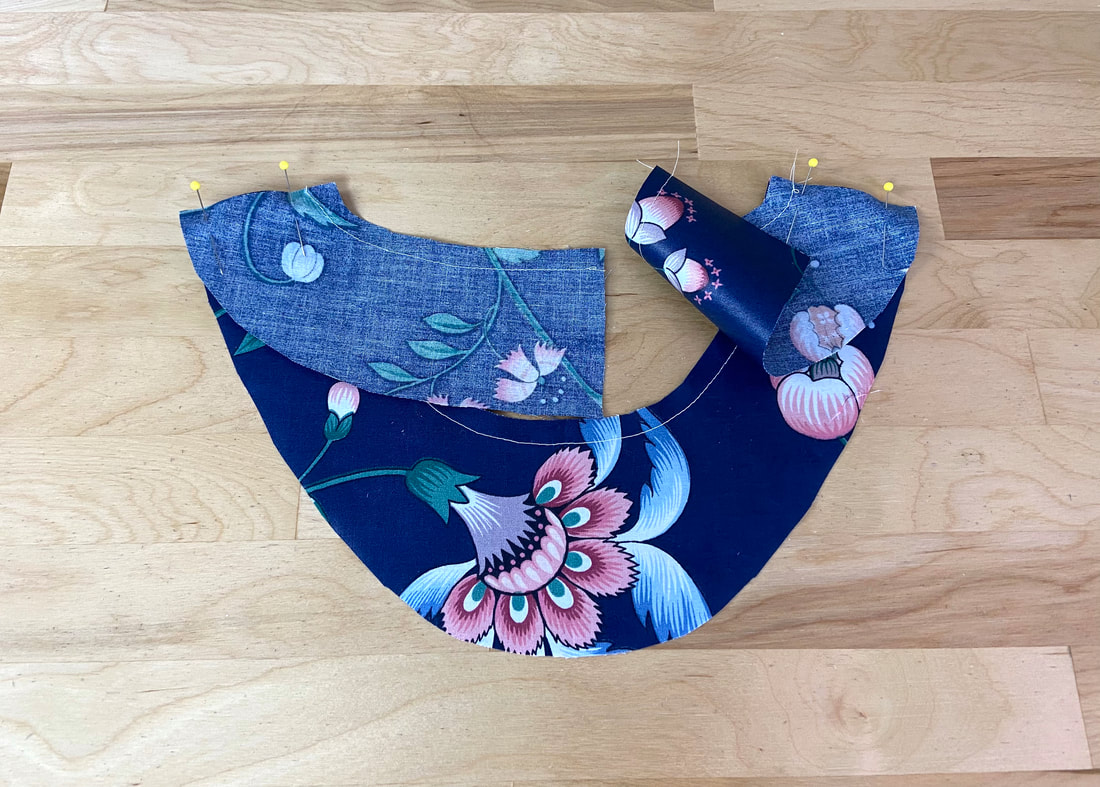
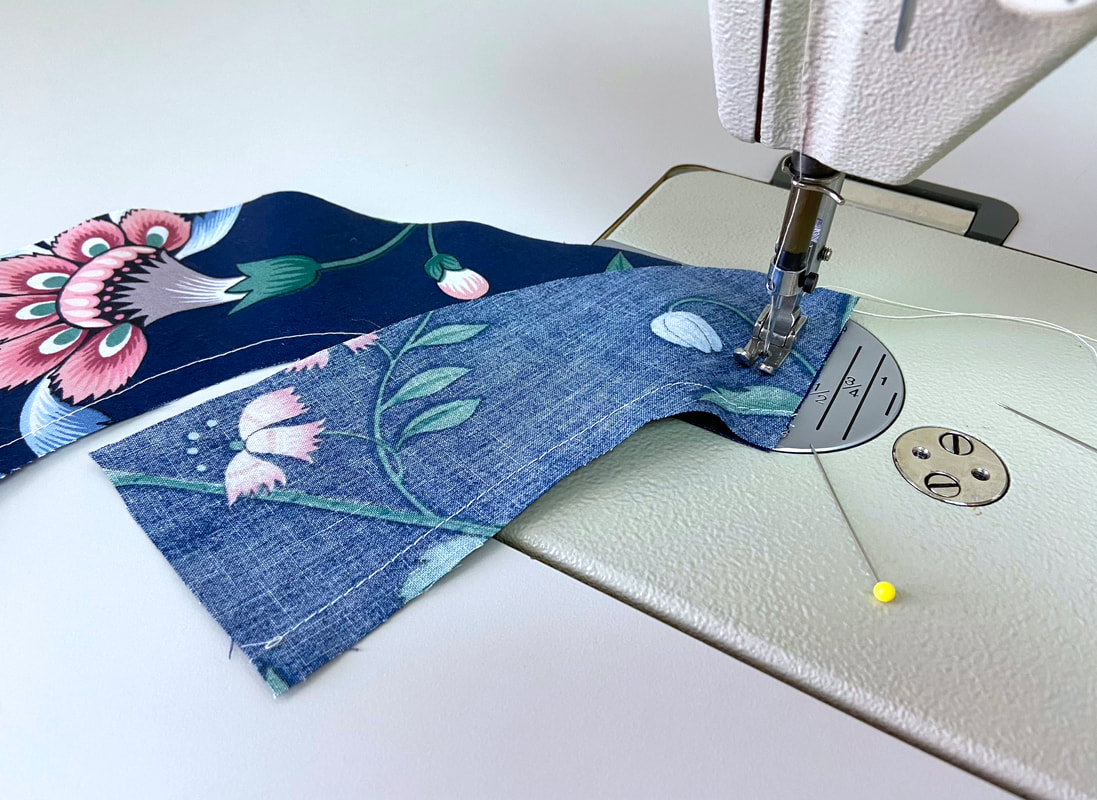
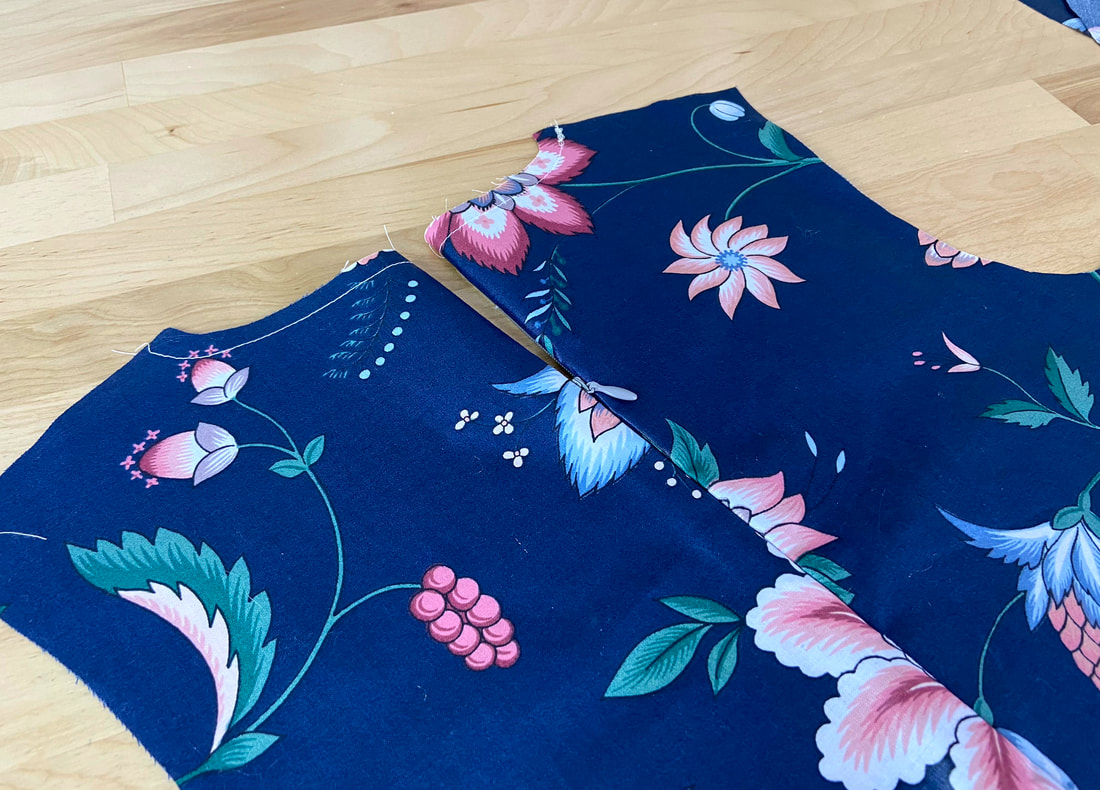
4. Now that the neck facing pieces are prepped, align them at each shoulder. Match each front shoulder seam edge to each corresponding back shoulder seam edge such that fabric face sides are touching. Insert pins perpendicular to the edges as shown. Depending on your comfort level with your sewing machine, you may need to hand baste for extra stability.
Picture
​5. Stitch the shoulder seams at the designated seam allowance- ½” in this case. Backstitch on both ends of the stitch for extra reinforcement.
Picture
6. To minimize bulk, trim the seam allowance edges about halfway down (1/4” in this case).
Picture
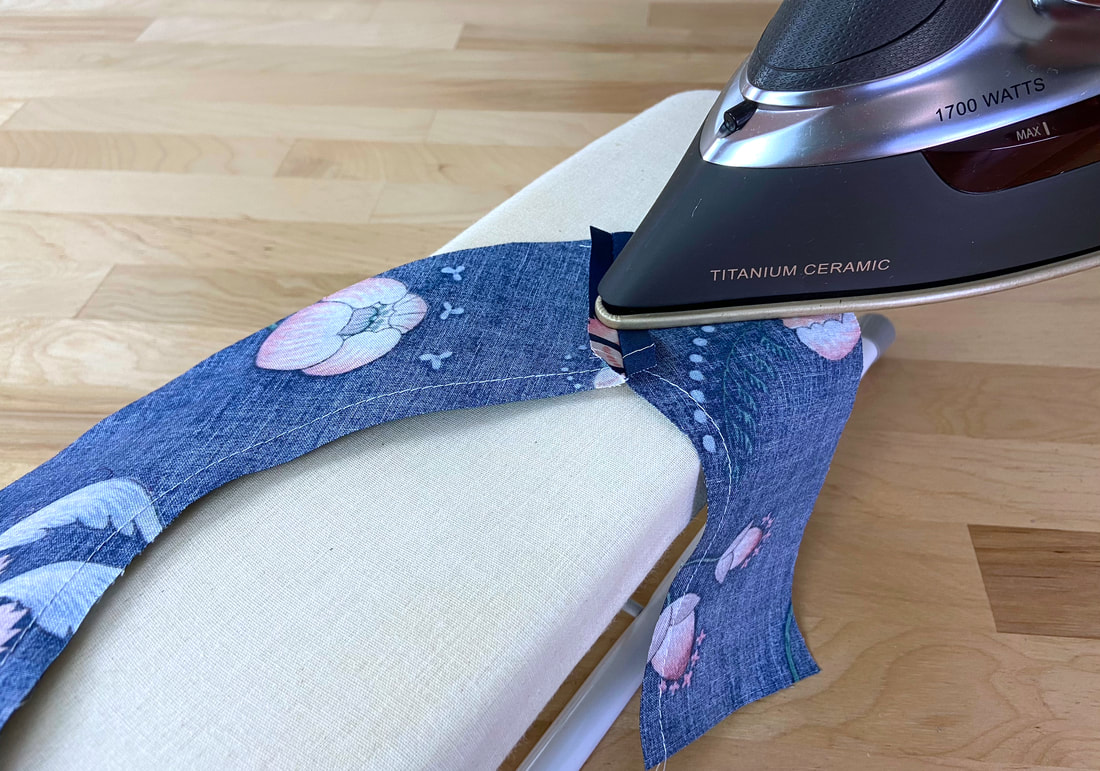
7. Open the seam allowance edges and iron them in open position. Iron from the wrong side of the seam as shown. 
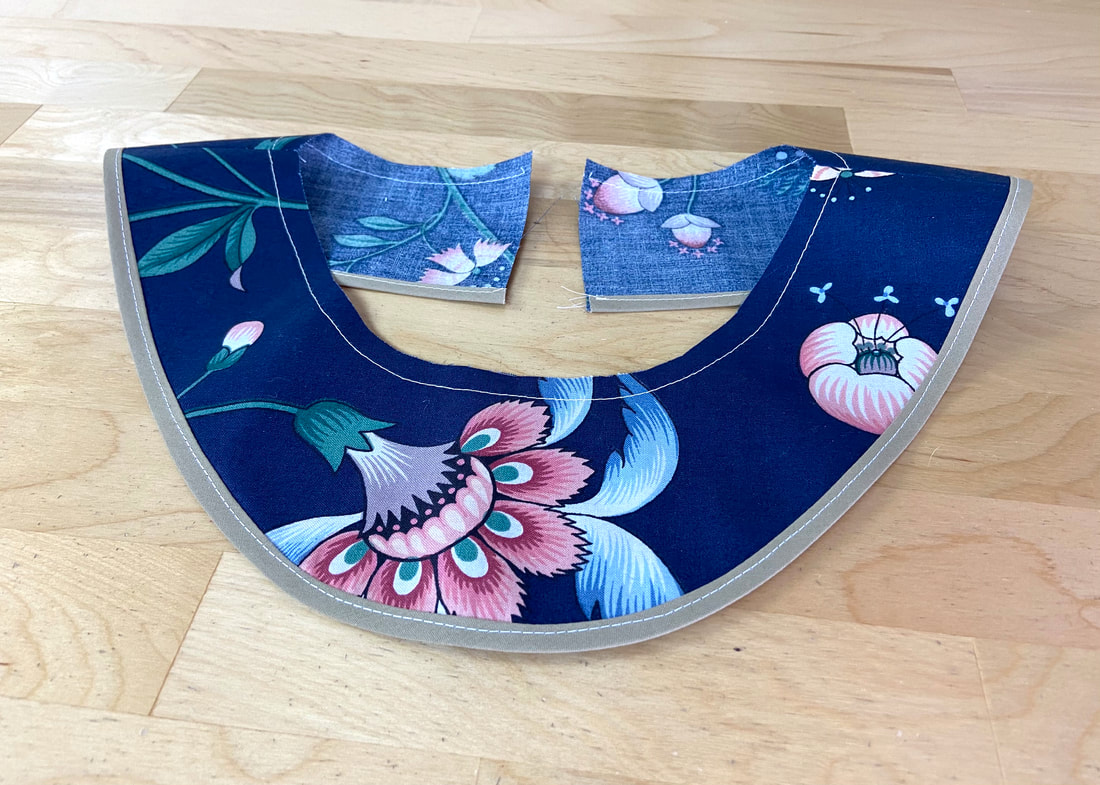
8. At this point clean finish the facing outer edge with the finishing technique of your choice. To find the best option, check out these facing edge finishing methods: Finishing Facing Edges​
Picture
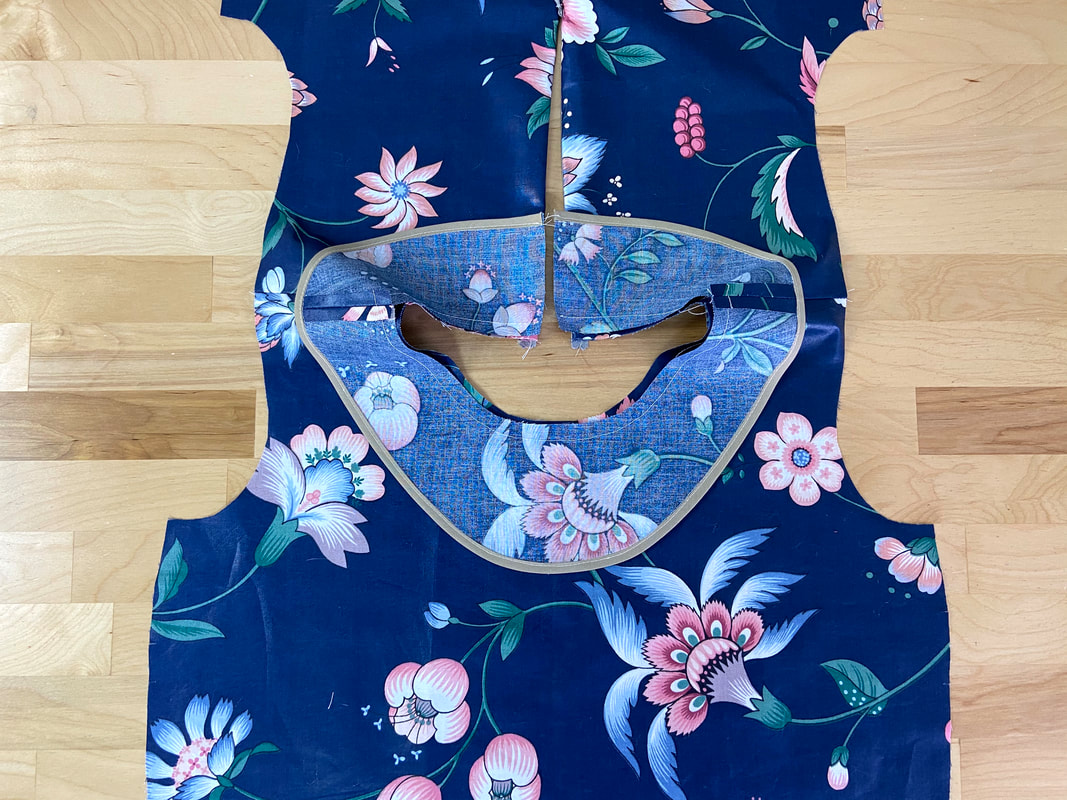
In this tutorial, bias binding is used. The bias binding strip is applied along the entire outer edge of the facing. The outer edge is always longer and should have no notches. The inner, shorter facing edge is sewn to the garment neckline. 
9. Now that the outer edge is clean finished, the facing can be aligned and stitched to the garment's neckline. 
To start with, it is important to consider whether the zipper has been sewn in yet. You can apply the facing both before and after the zipper has been inserted. However, applying the zipper first is highly recommended as it tends to facilitate the construction process. 
Picture
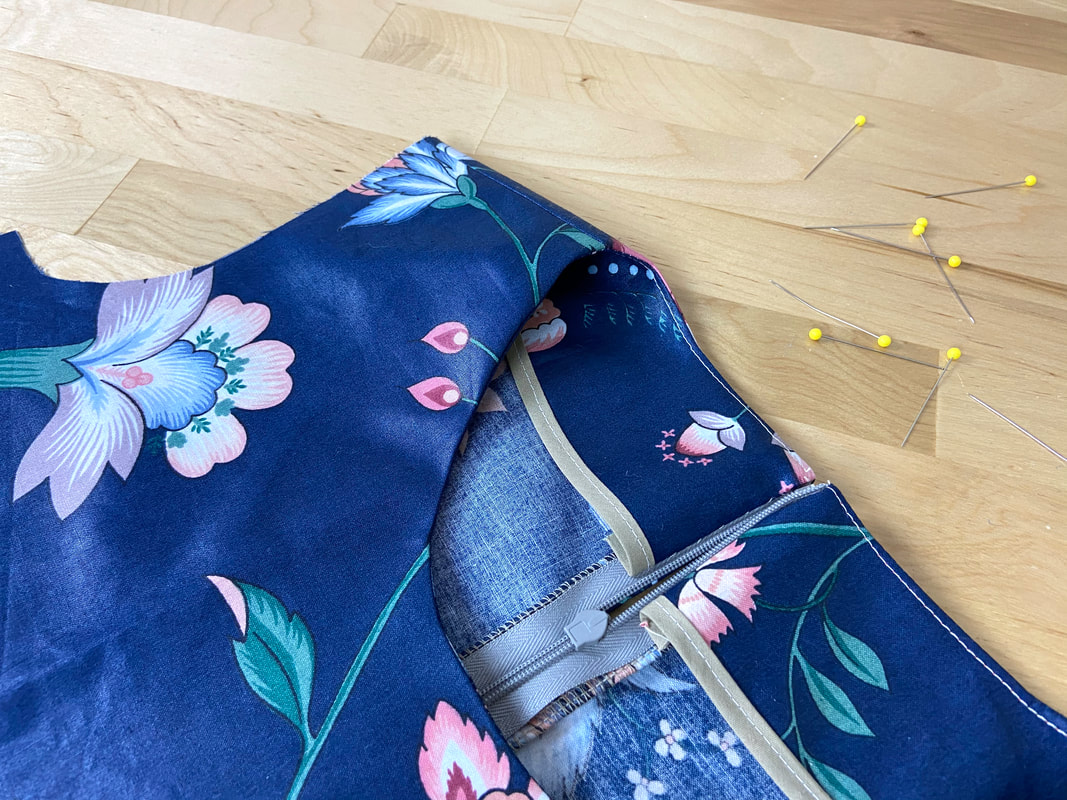
In this tutorial, the invisible zipper has already been sewn into the center back seam. 
Picture
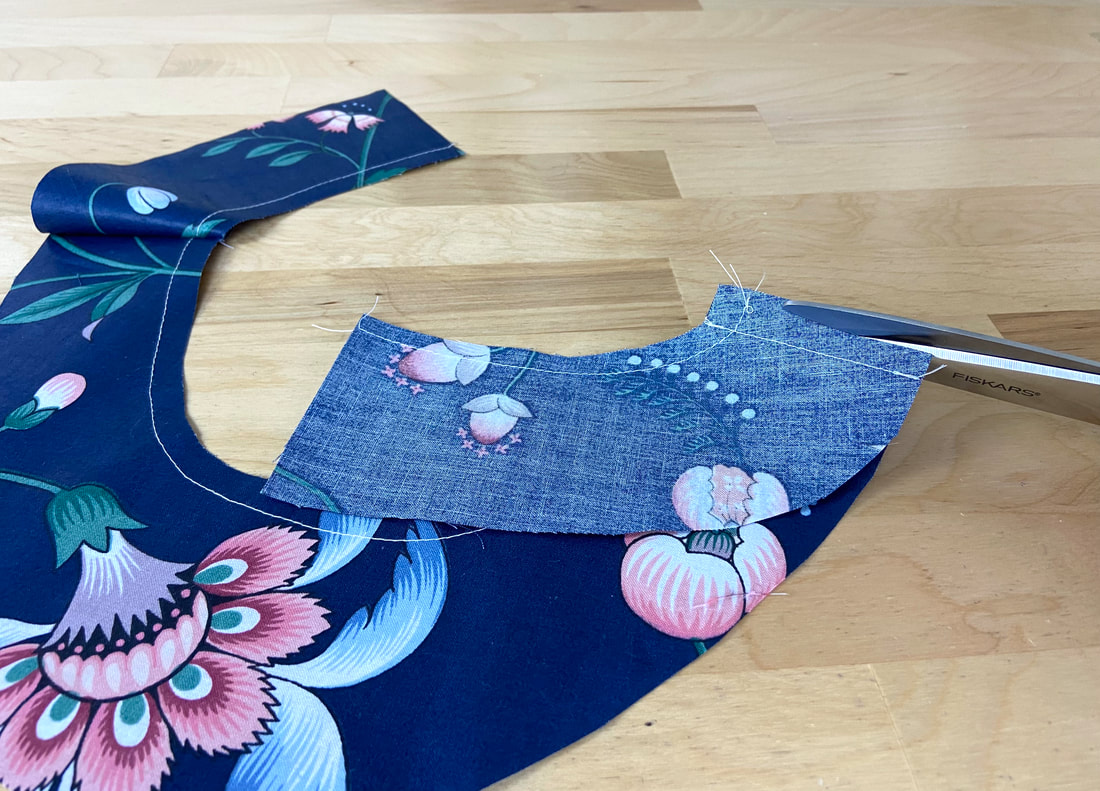
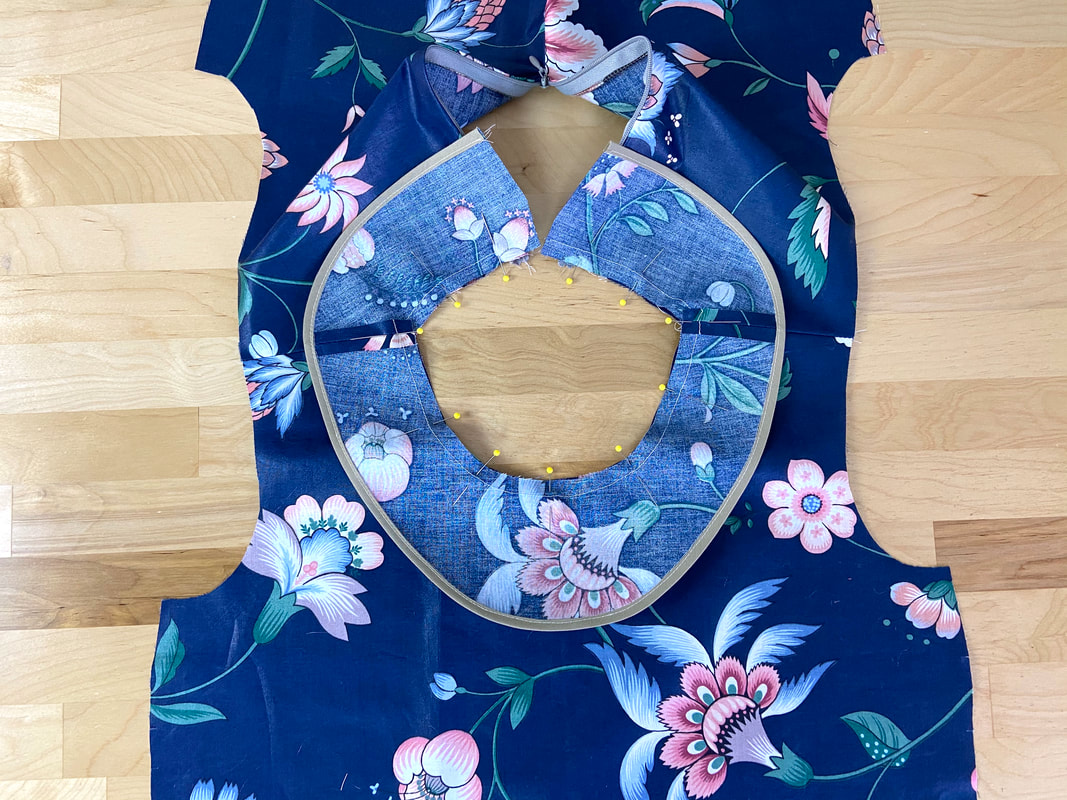
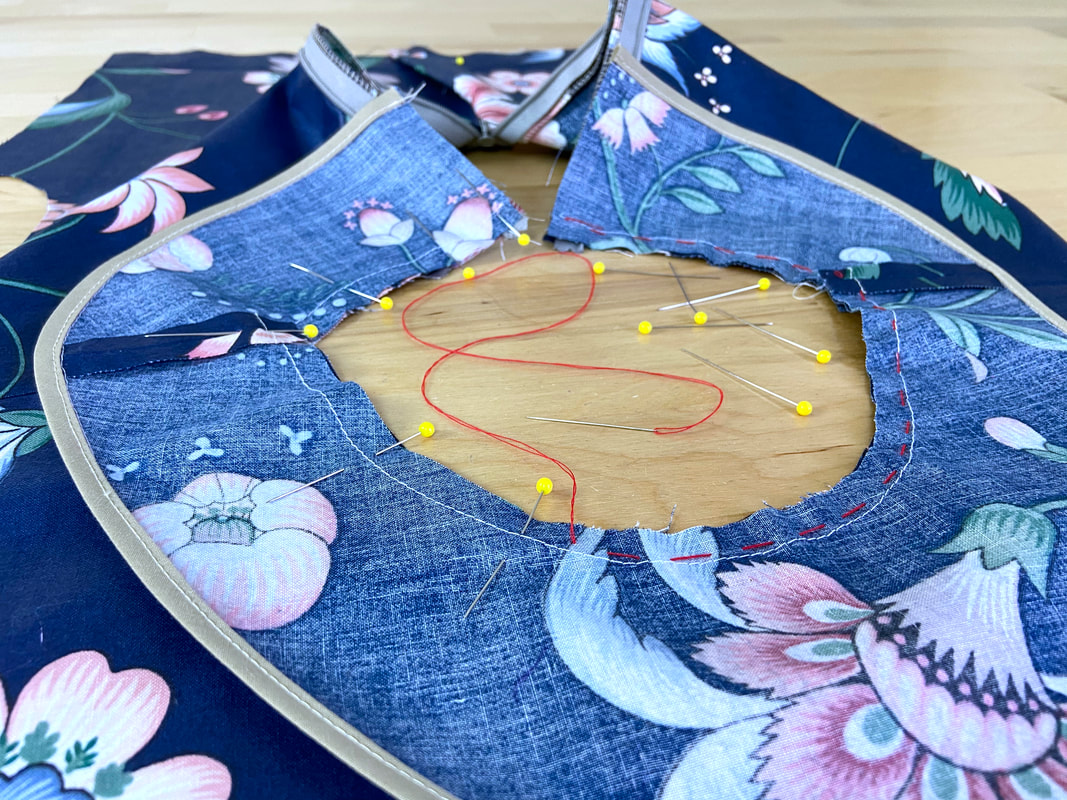
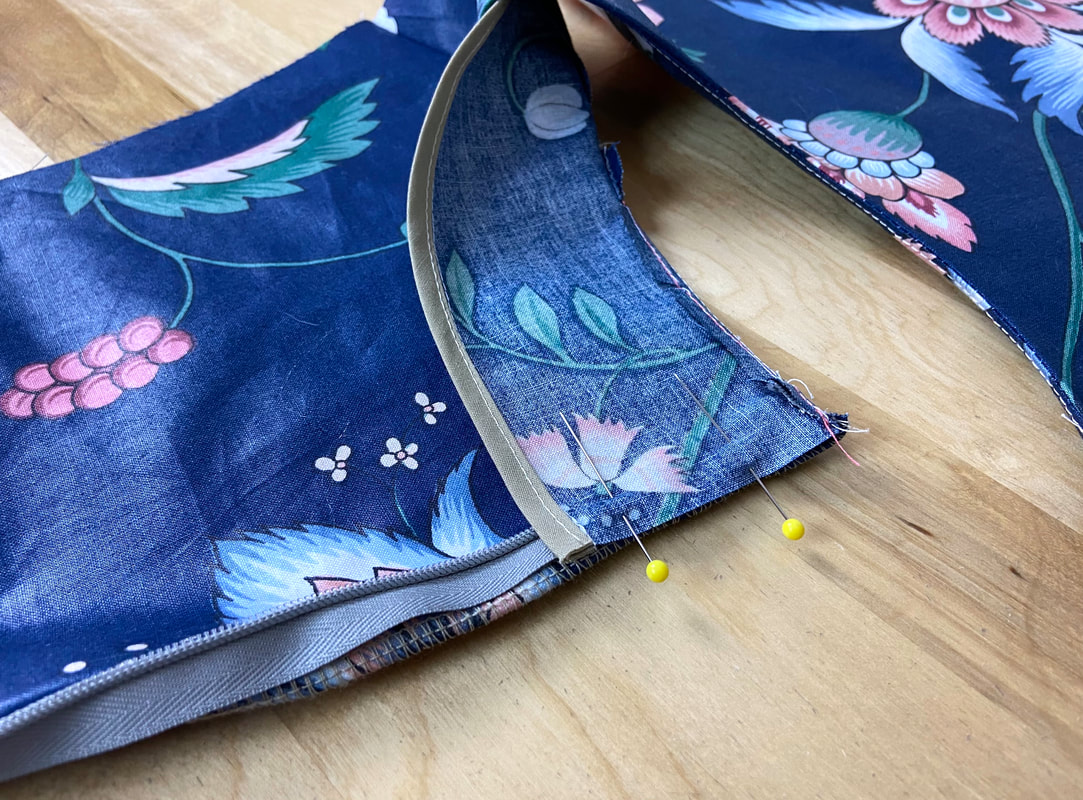
10. Align the facing staystitched edge (inner, shorter edge) to the garment neckline edge such that the fabric face sides are touching. First, match all the shoulder seams, then all notches (if any), then the rest of the edge. 
Picture
​As you match the facing edge to the neckline, insert pins perpendicularly to keep the alignment in place. 
11. When you arrive at the zipper opening:
Picture
​For the hand slipstitched method: Wrap the facing edges around the natural position of the zipper. This technique works for all zipper styles. 
Picture
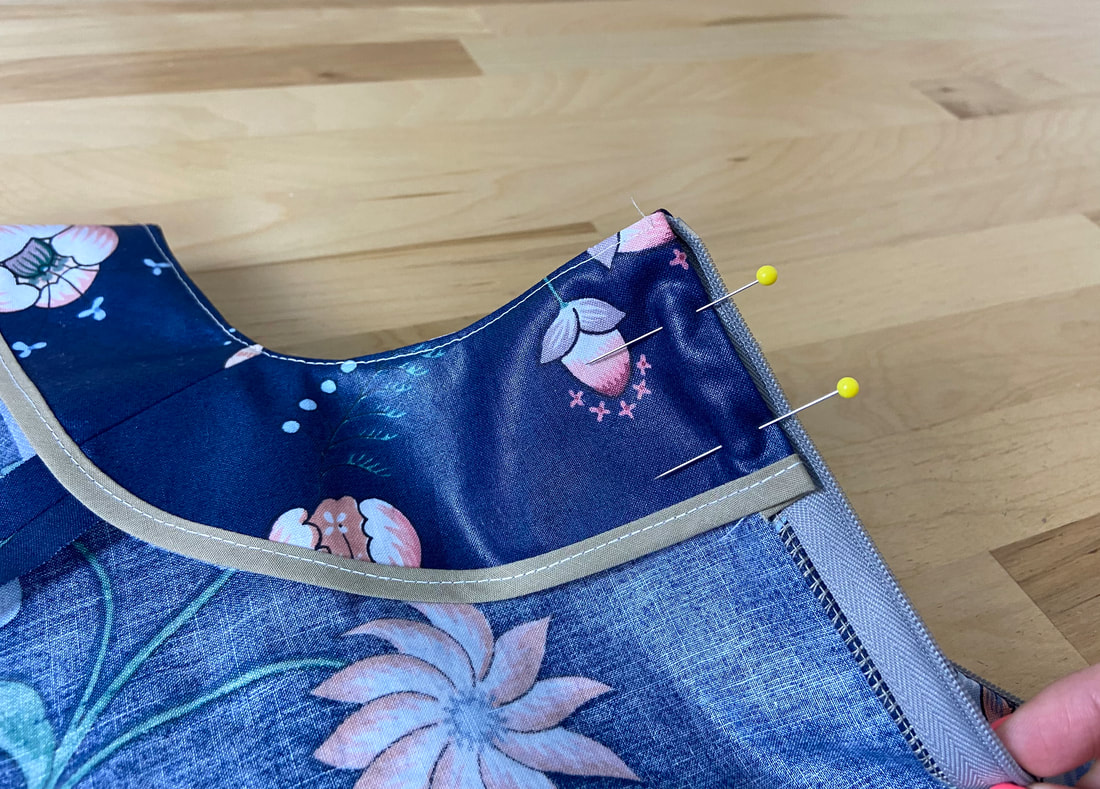
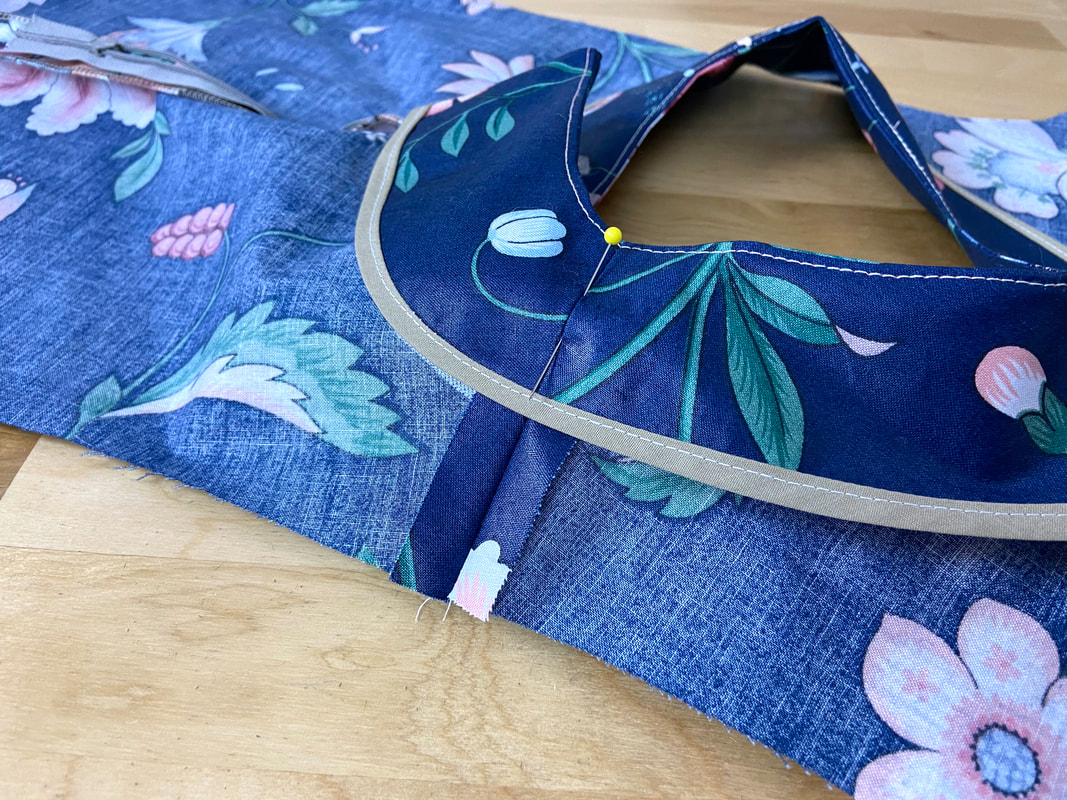
​For the machine stitched  zipper finish: Open the center back folded edges housing the zipper, and match the end of each facing portion to its corresponding zipper opening edge as shown. 
This technique works for zipper application where the center back edge can be extended outwards fully- Invisible zippers or exposed zippers are best examples in this instance.
Picture
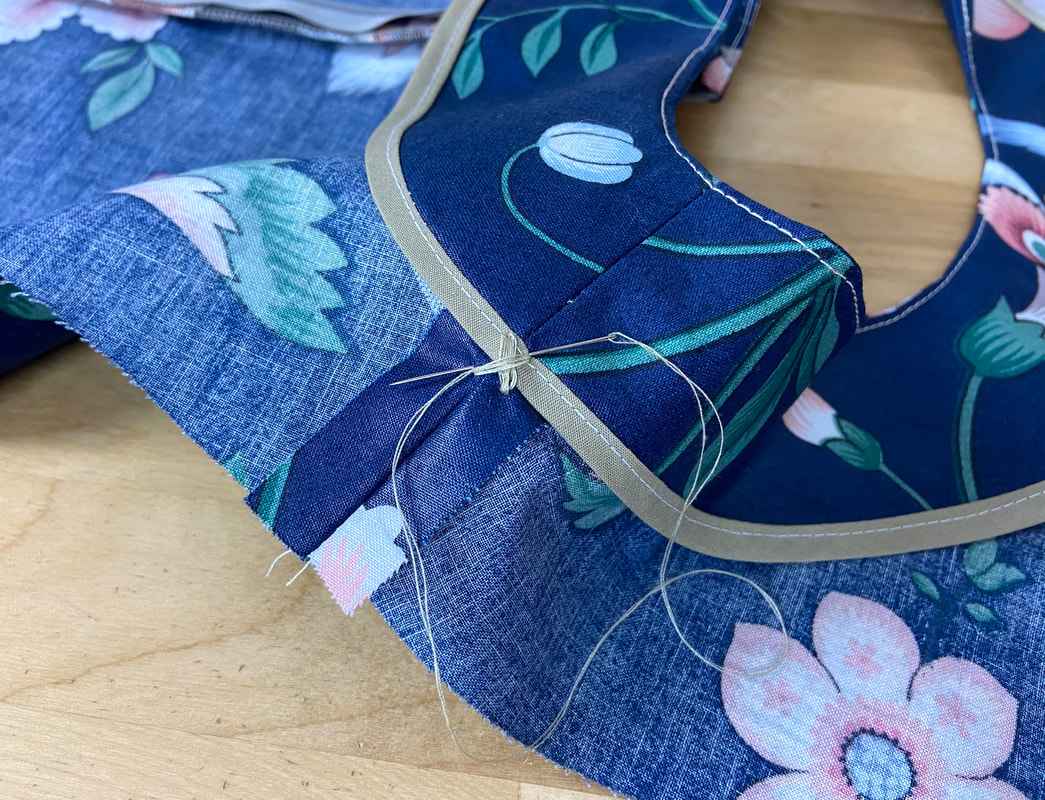
12. Hand baste the facing to the garment neckline edge above the seamline, staying within the seam allowance. 
Picture
Picture
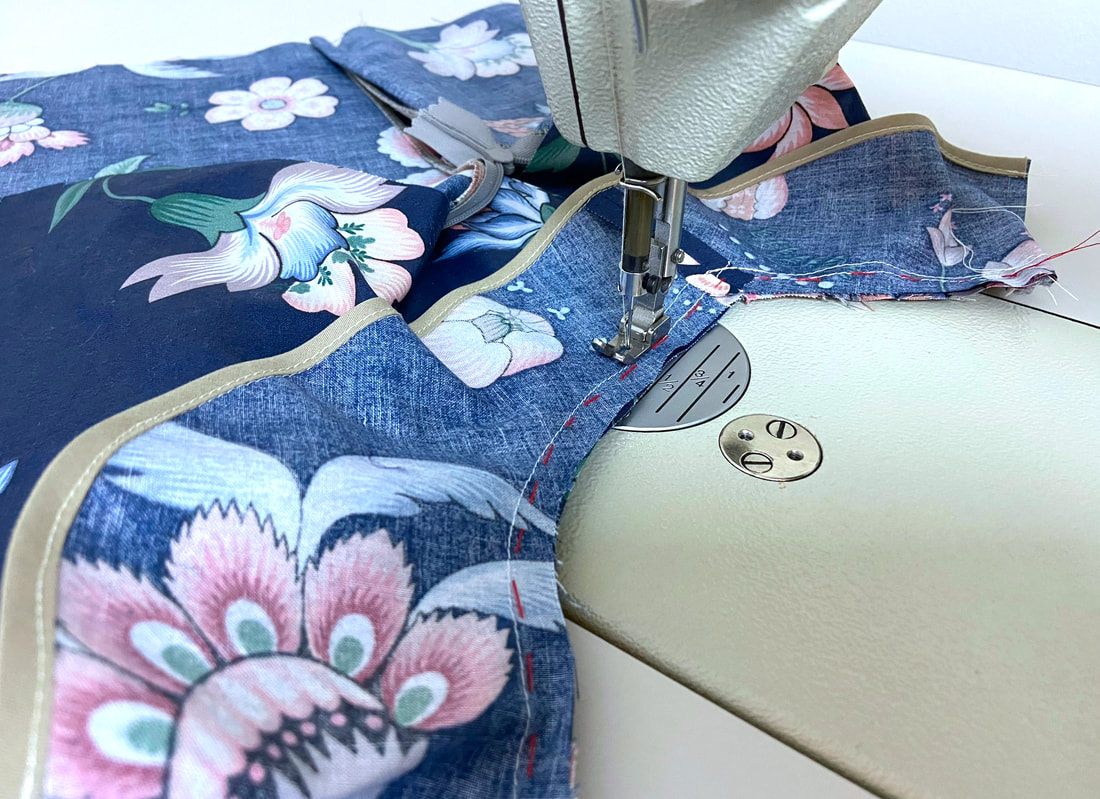
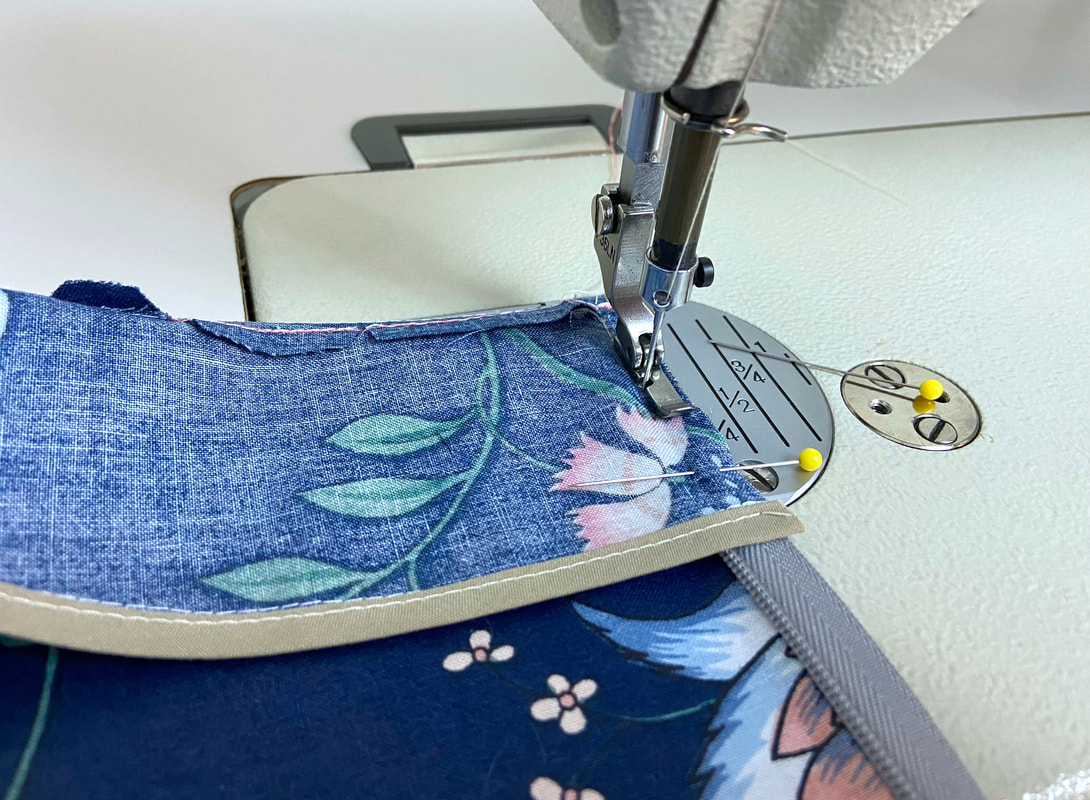
13. Machine stitch the two layers together carefully following the appropriate sewing machine seam allowance guides- ½” in this case. Backstitch at both ends of the stitch and remove the basting once complete. 
Picture
14. Trim the seam allowance down and grade it if needed. 
Picture
Grading is the technique of trimming the facing seam allowance shorter than the garment in order to eliminate extra bulk. ​
​Grading may not always be necessary if you are already working with light fabrics that don’t accumulate bulk. Be careful not to trim or grade the seam allowance too close to the stitching or you risk weakening the finished neckline edge, especially if the fabric is loosely woven and frays a lot. 
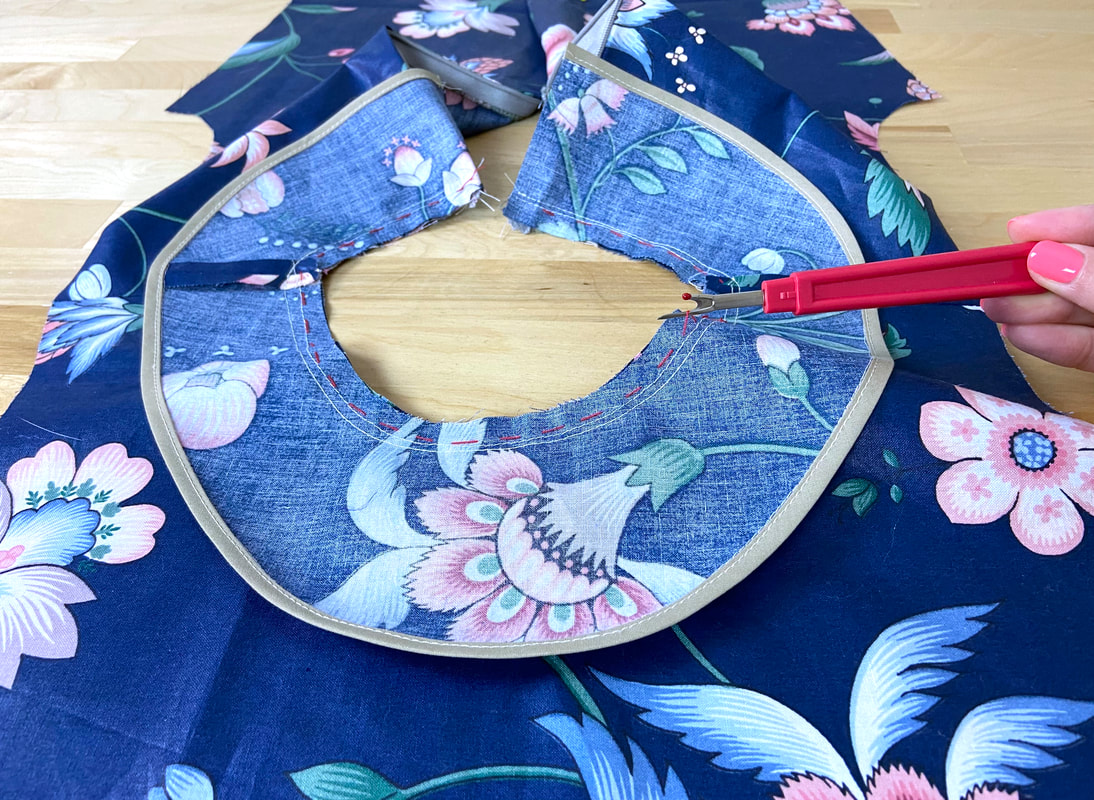
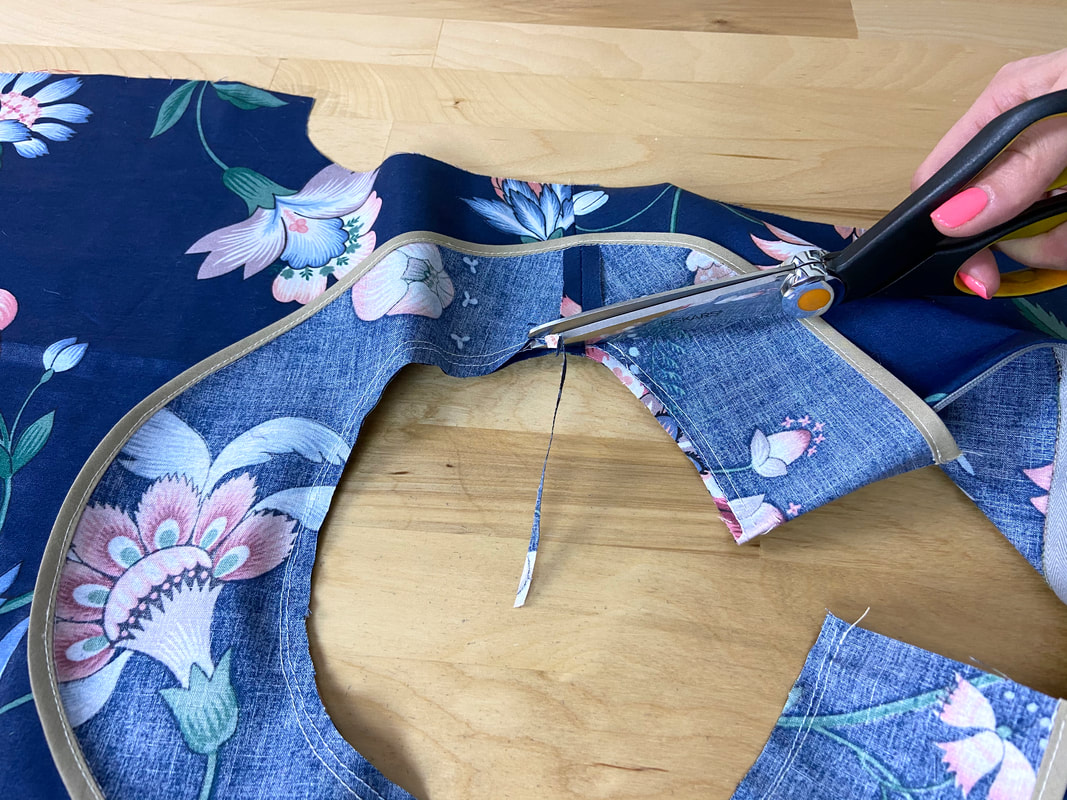
Equally important (if not more important) is notching the seam allowance throughout to release tension. 
Picture
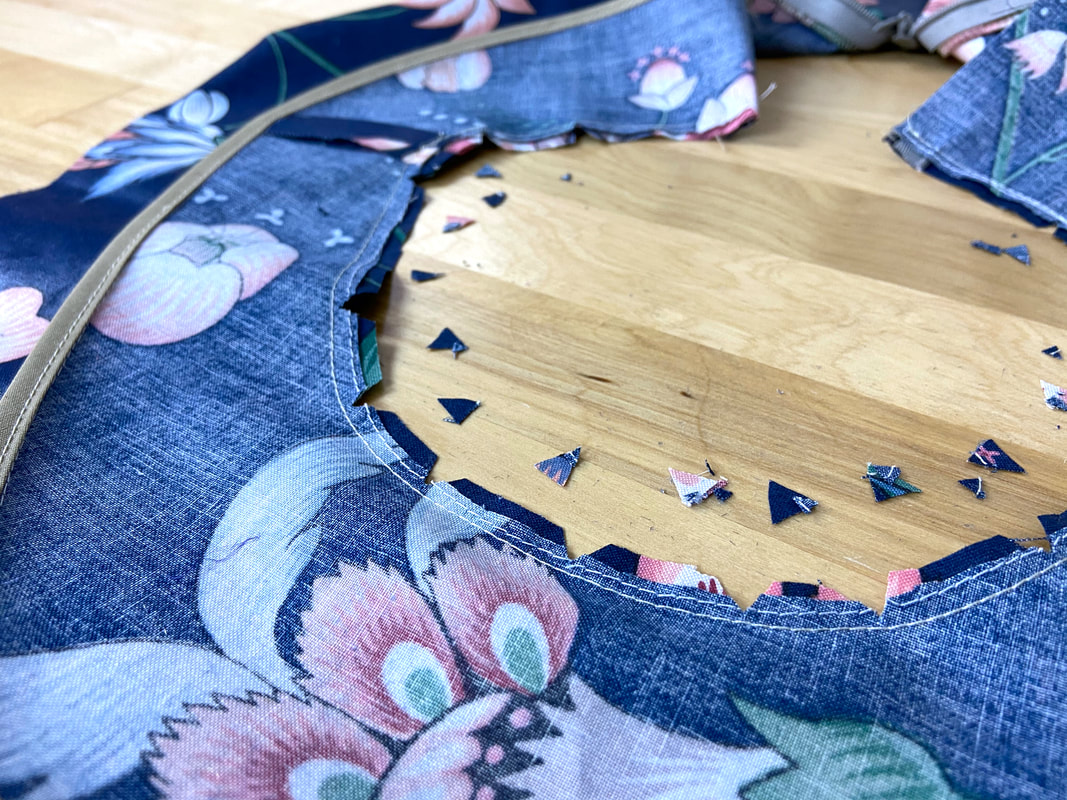
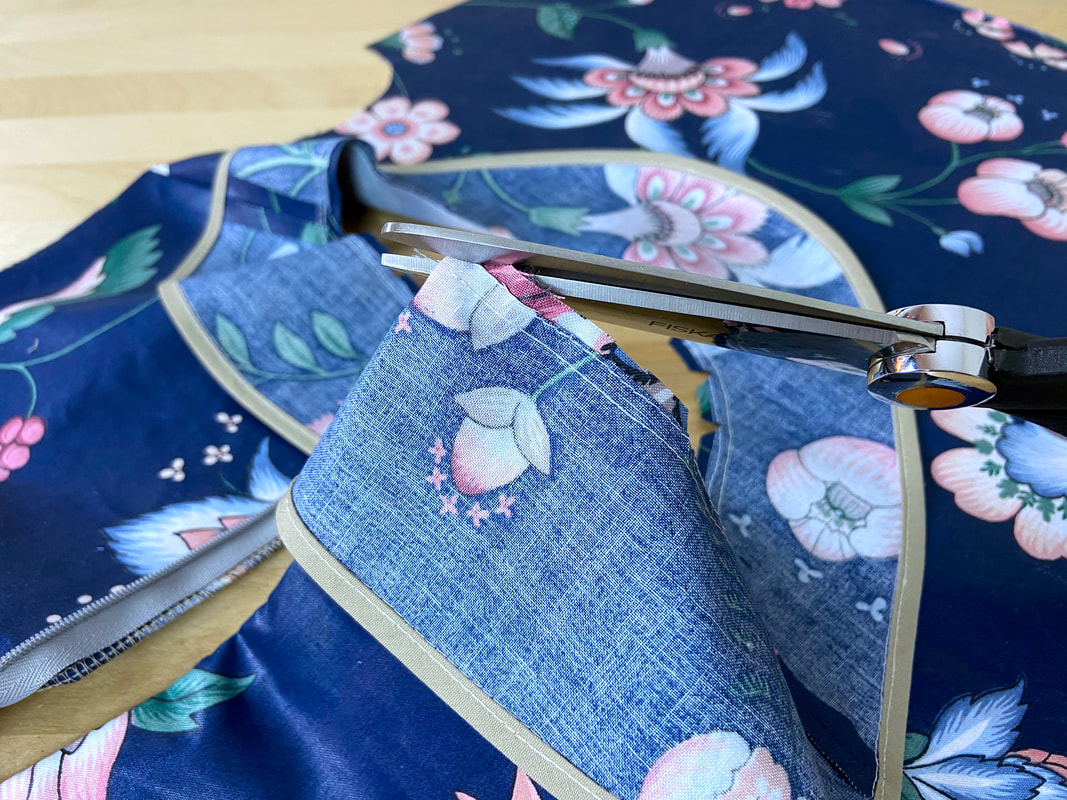
15. Cut wedge clips into the seam allowance edge but be careful not to cut too close to the actual stitching or you risk weakening the neckline edge.
Picture
Picture
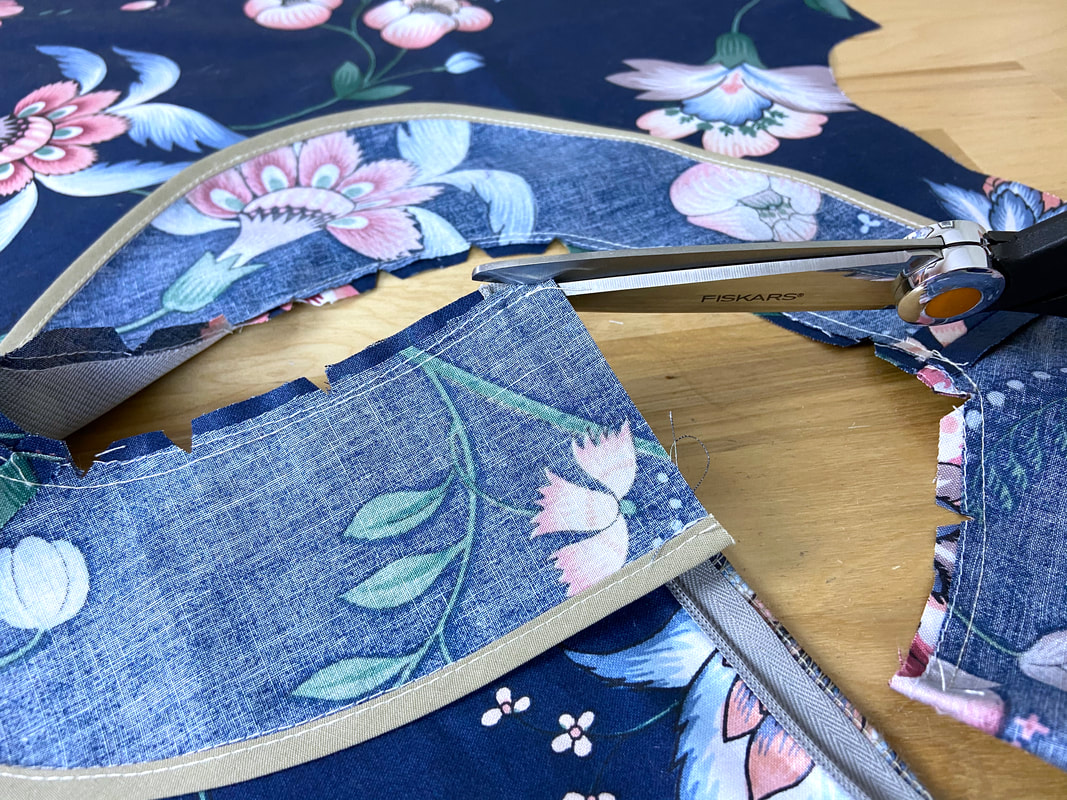
To further minimize bulk, cut the seam allowance excess diagonally at the corners. 
Picture
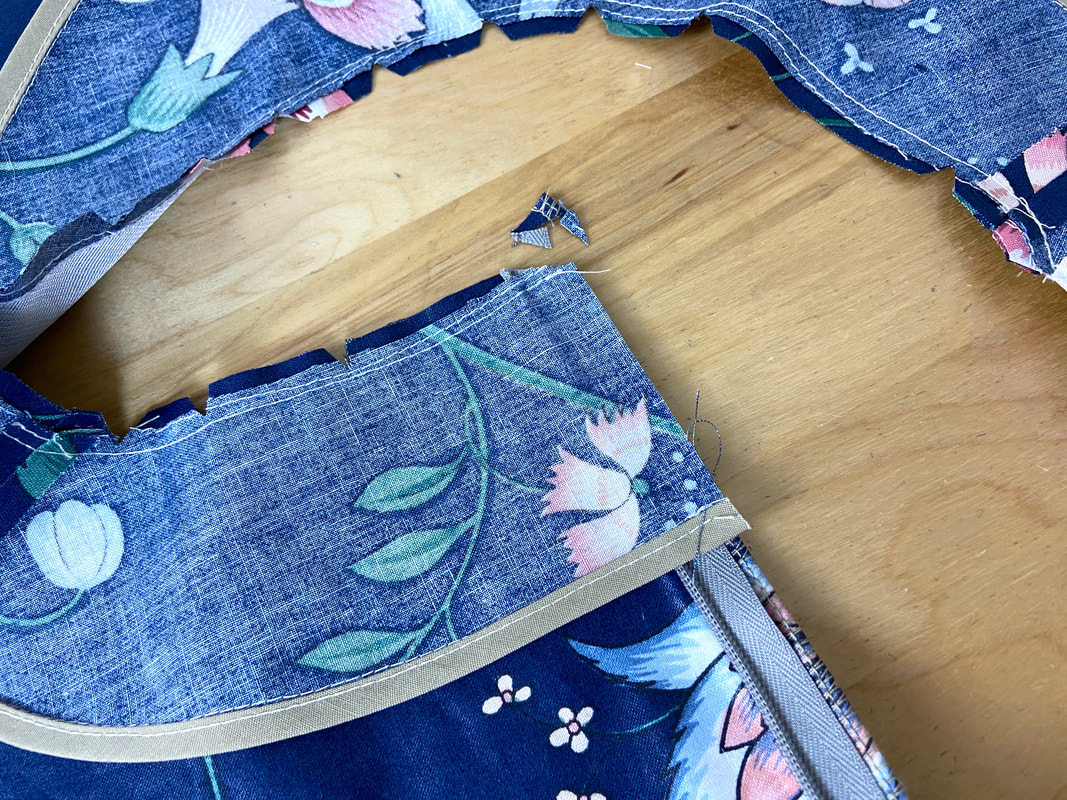
Notch the corners regardless of which zipper facing finish you are using (hand or machine stitched).
Picture
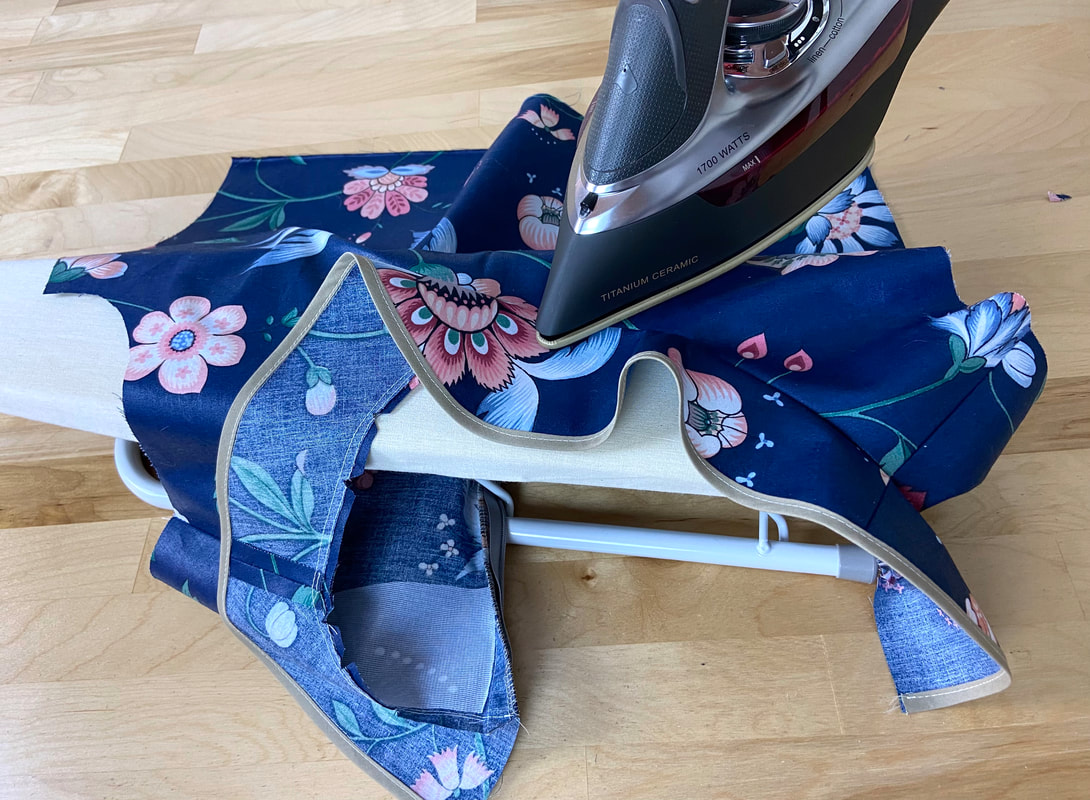
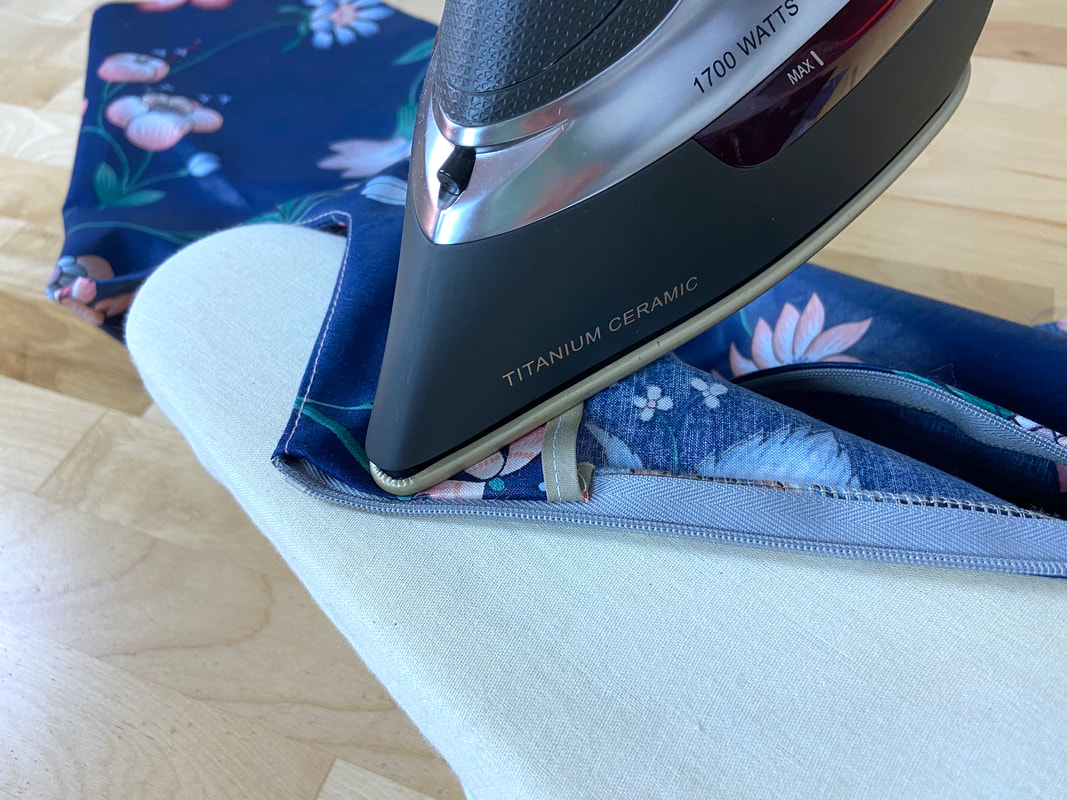
16. From the garment's face side, iron all the seam allowance layers pointing away from the garment as shown. It will be easiest to iron this portion over a tailor’s ham or a sleeve board.
Picture
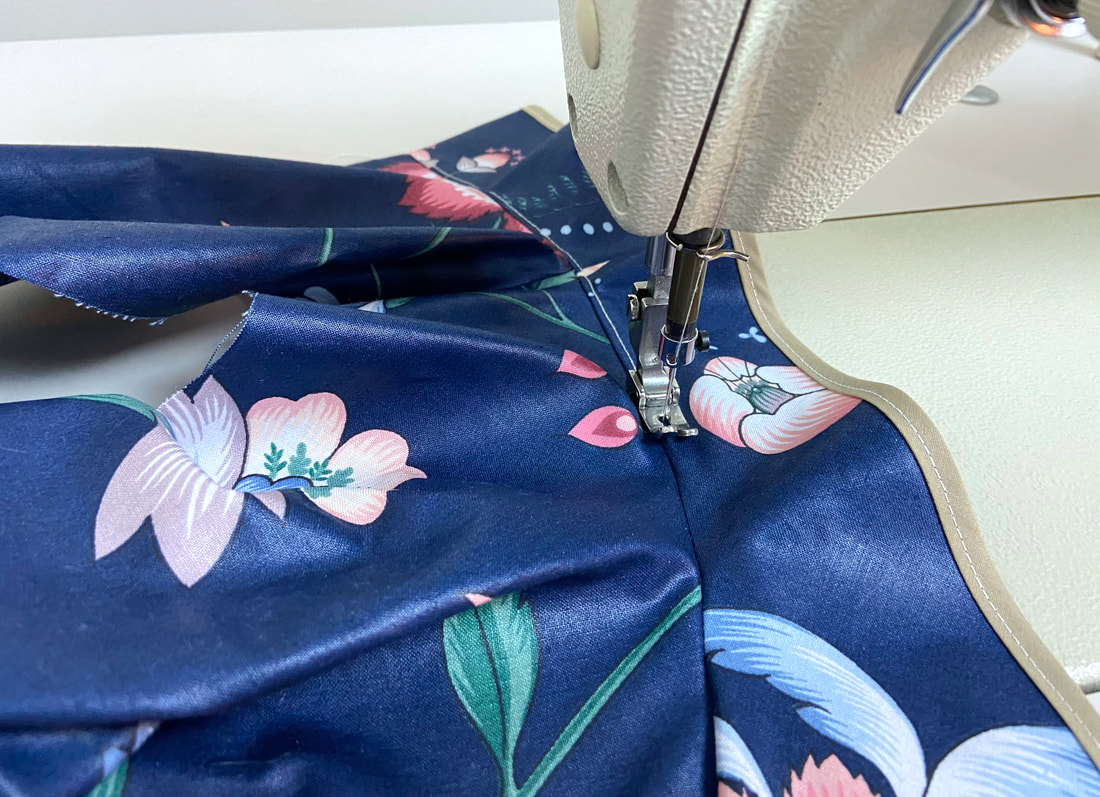
17. Next, understitch at approximately 1/8” away from the seamline through the facing and seam allowance layers underneath. This stitch (known as understitching) will prevent the facing from rolling to the outside of the garment, as well as keep the neckline laying smooth and flat.
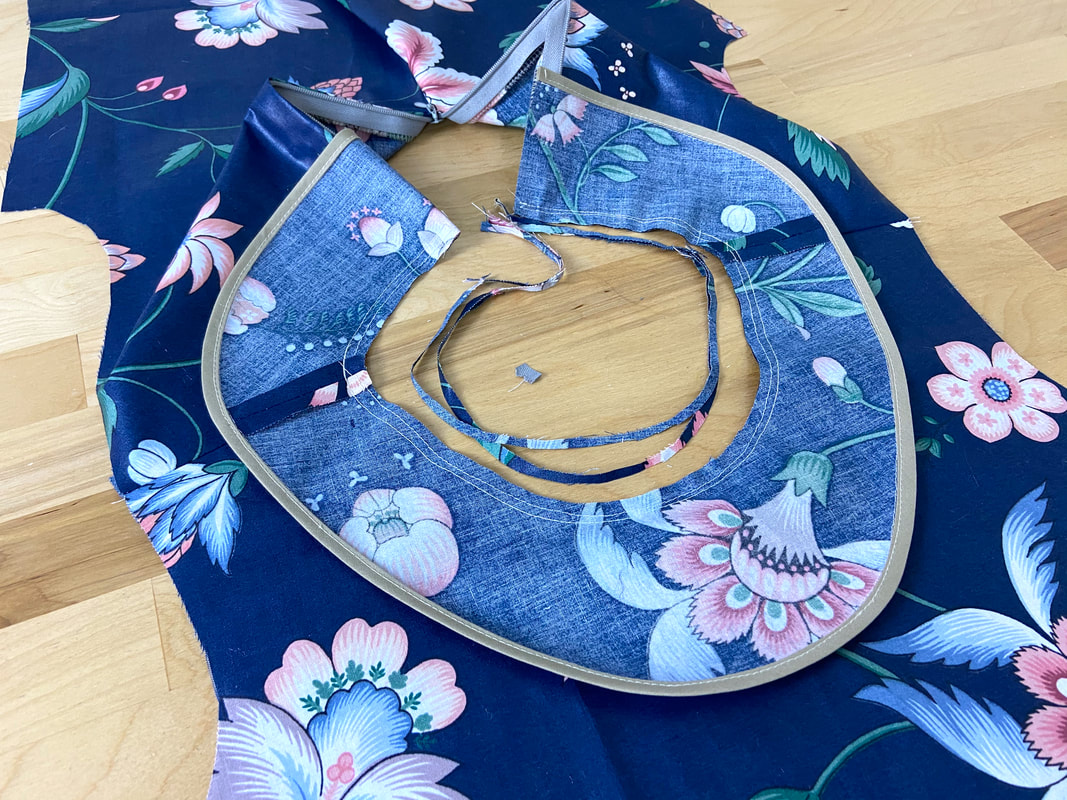
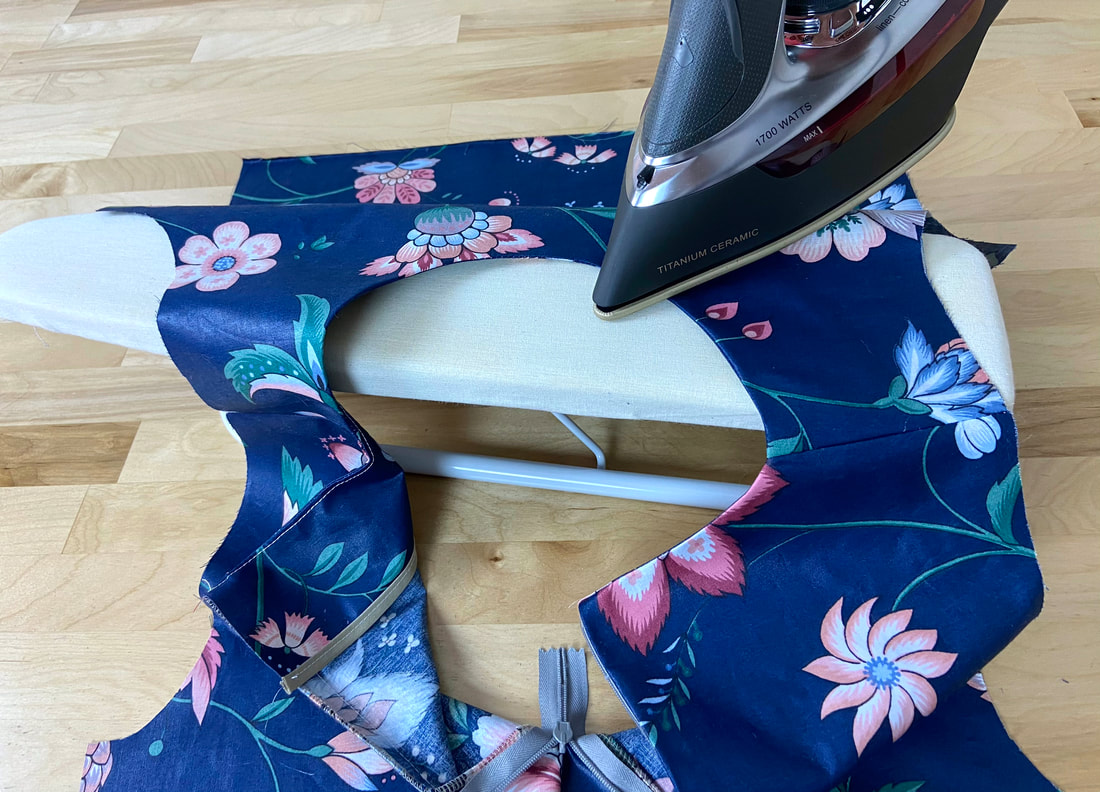
Picture
18. ​Turn the facing on its right side and iron the finished edge carefully. You may need to use a sleeve board or tailor’s ham if you have them. 
Picture
To finish the facing ends to the zipper by hand: Turn the facing toward the inside of the garment, aligning it in its natural position. Open the zipper and fold in the facing end. Pin each facing end to each zipper tape portion. ​
Picture
To complete, slipstitch through the facing folds and zipper tape layers. 
You can learn how to apply a slipstitch here: Hand-Applied Blind Stitches
Picture
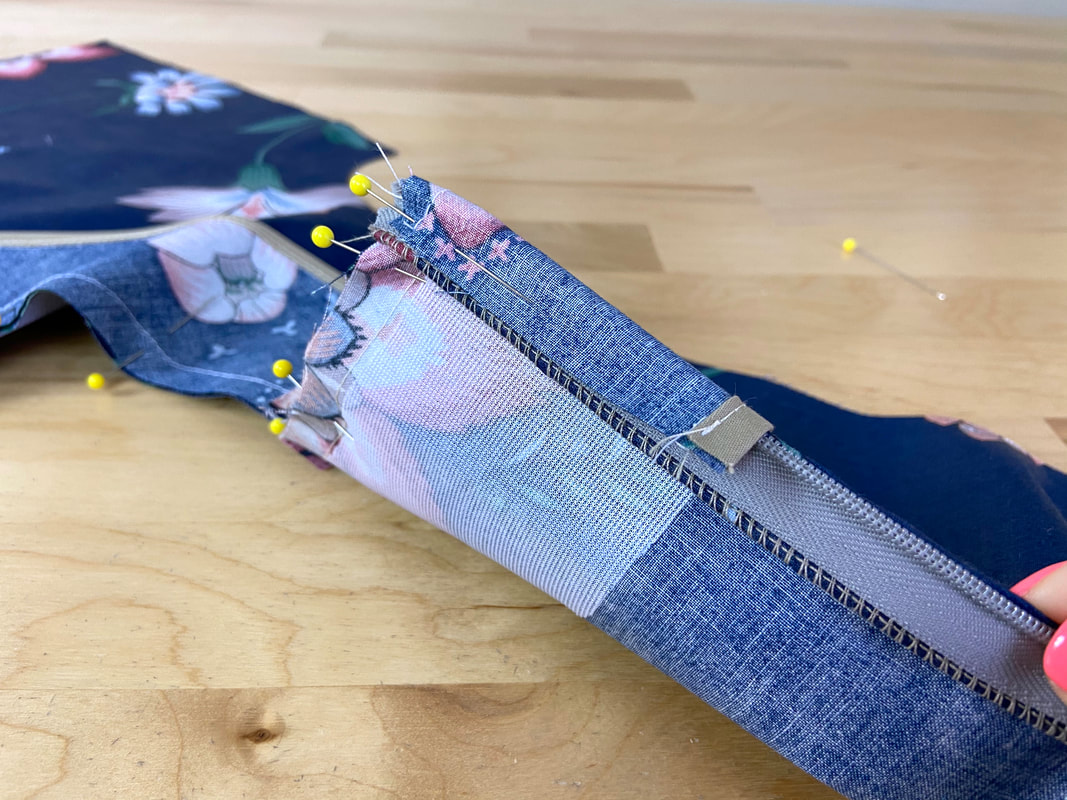
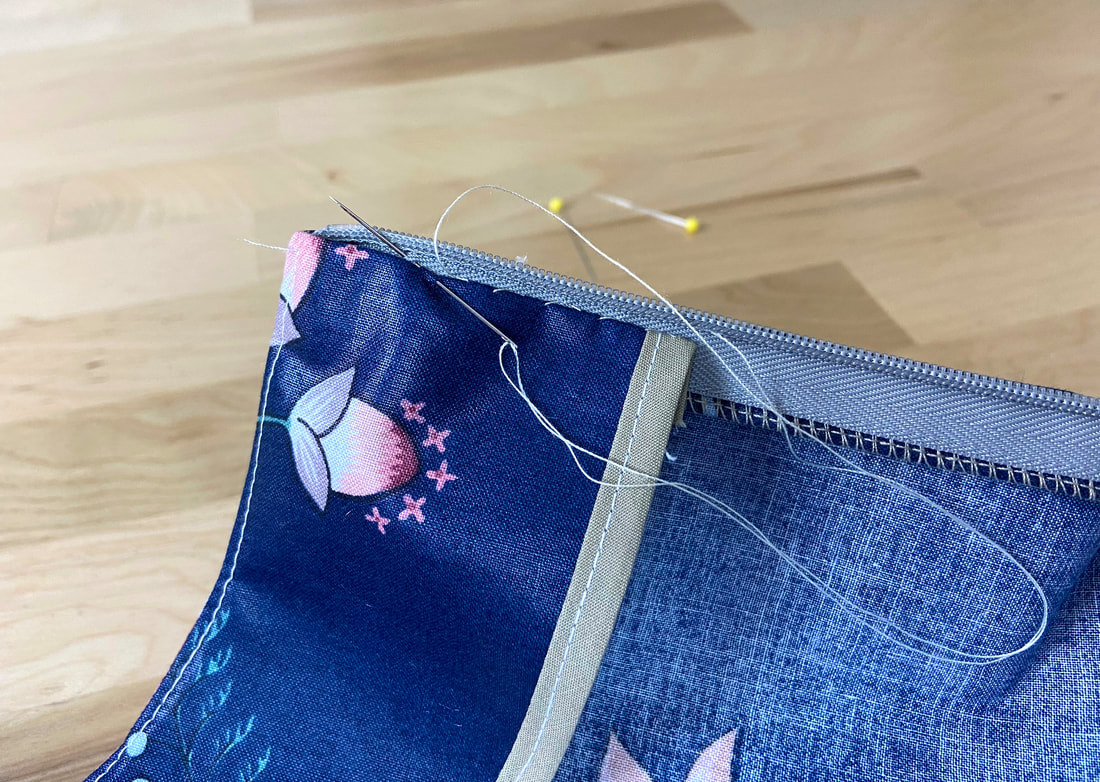
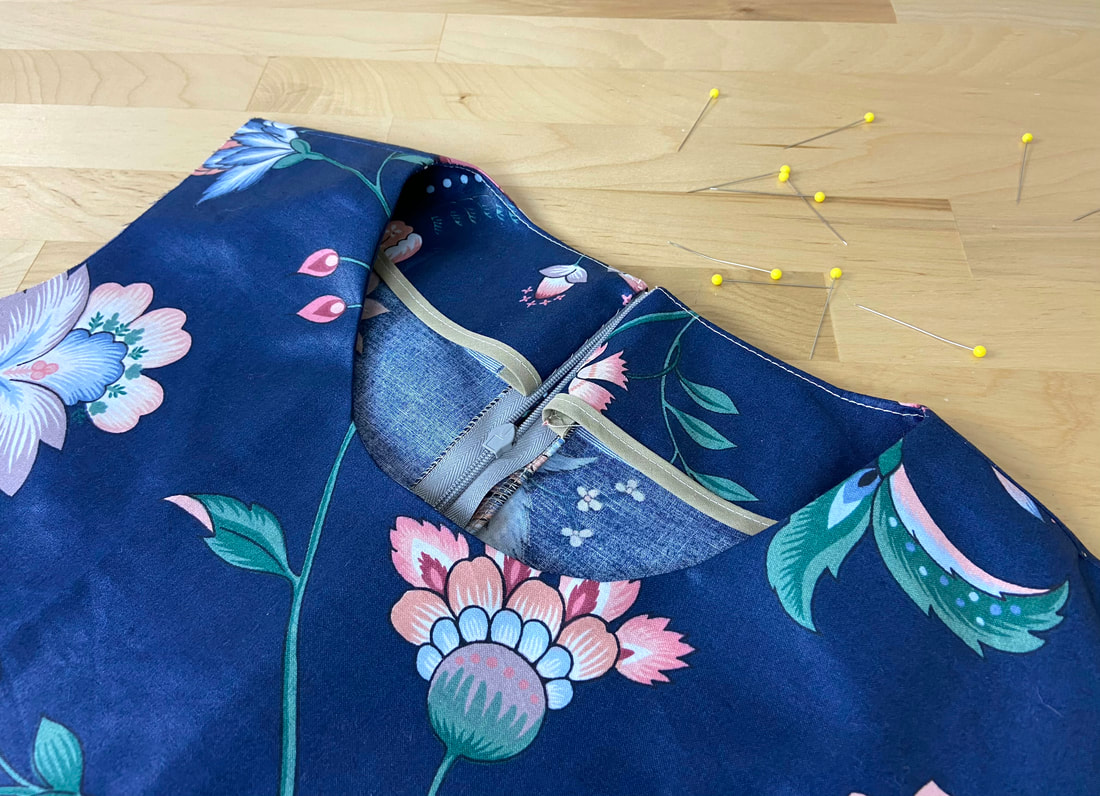
To machine stitch the facing ends (invisible zipper example): Keeping the facing on its wrong side, align each facing end to its corresponding garment center back edge such that the zipper tape is sandwiched in between and fabric face sides are touching. Insert a few pins perpendicularly to secure this alignment. It is also extremely helpful to hand baste for extra security. 
Picture
Switch your machine presser foot to a zipper presser foot, and stitch the edges together next to the zipper teeth. Be very careful not to catch the zipper coils in the process.
Picture
​Turn the facing on its right side and press the finished neckline edge carefully. Again, it is easiest to use an ironing add-on like a tailor’s ham or sleeve board. 

Note: Trim the corner excess seam allowance before turning the facing application on its right side.
Last but not least, it is equally important to secure the facing layer to the inside of the garment. To achieve this, hand tack the free-hanging facing edge to the garment seam allowance at each intersecting seam. 
Picture
19. Turn the garment on its wrong side and match the corresponding facing and garment shoulder seams. Pin through each seam to secure. 
Picture
20. ​Using a regular whipstitch or a cross tack, stitch to connect the facing edge to the garment seam allowance layer (only) at each shoulder seam. 
Picture
The addition of the cross tacks will maintain the facing's correct alignment throughout the garment's life cycle.
DMCA.com Protection Status
All content, including images and text, may not be copied, replicated, or redistributed without express written permission. This website is regularly screened and monitored for content protection.

Have A Personalized Sewing Question?

Ask It Here

Services

​Custom Apparel
Custom Bridal
​Sewing Tutorials
​

Company

About
Blog

Support

Contact
Terms of Service
DMCA.com Protection Status
© COPYRIGHT 2022. ALL RIGHTS RESERVED.
  • Sewing Tutorials
    • Basics >
      • Aligning Pattern Grainlines To Fabric
      • Preparing Fabrics For Sewing
      • Pinning Sewing Patterns To Fabric
      • Placing Sewing Patterns On Fabric For Cutting
      • Rotary Cutters or Fabric Scissors?
      • Cutting The Sewing Patterns
      • What Are Notches And How To Use Them In The Sewing Process
      • Transferring Notches From Pattern To Fabric
      • Transferring Seamlines to Fabric
      • Staystitching
      • Backstitching: A Complete Guide
      • Hand Basting: A Complete Guide
      • Sewing Continuous Bias Binding
    • Darts >
      • Marking And Transferring Darts To Fabric
      • What Are Darts And Dart Components
      • Folding, Pinning And Hand Basting Darts
      • Handling Dart Excess: Bulk And Tension
      • How To Sew A French Dart
      • How To Sew And Iron Single Pointed Darts
      • How To Sew And Iron Contour Darts
      • Sewing Darts With Decorative/Beaded Fabrics
    • Sewing Seams >
      • ​The Basics Of Seams And Seam Allowance
      • How To Sew A Straight Seam
      • Sewing Curved Seams
      • Sewing Corner Seams
      • Trimming And Grading Seam Excess
      • Notching/Clipping Seam Allowance for Tension Release
      • Sewing Topstitched Seams
      • Sewing Corded Seams
      • Sewing A Slot Seam
      • Sewing A Gathered Seam
      • Sewing Bias Seams
      • Sewing Seams With Ease
      • Sewing Seams With Crossing Seamlines
      • Sewing Unlike Fabric Seams
      • How To Iron Seams: Ironing Tools And Conventions
      • Sewing With Knit Fabrics
      • Understanding Stitch Length And Tension
      • Sewing Unique Fabric Seams
    • Seam Finishes >
      • Seam Finishing Techniques - Overview
      • Applying A Pinked Seam Finish
      • Applying A Bias Bound Seam Finish
      • Serging And Zigzag Seam Finishes
      • Sewing A Self-Bound Seam Finish
      • Sewing A French Seam Finish
      • Sewing A Hong Kong Seam Finish
      • Sewing A Mock French Seam Finish
      • Sewing A Turned-and-Stitched Seam Finish
      • Sewing Overcast Hand-Applied Seam Finishes
      • Sewing A Flat Felled Seam
      • Sewing A Hairline Seam Finish
    • Hem Finishes >
      • Garment Hem Finishes: Overview
      • ​Sewing A Double Fold Hem Finish
      • Sewing A Single Fold Hem Finish
      • Sewing Bound Hem Finishes
      • Sewing An Exposed Double Layer Bound Hem
      • Sewing A Folded-Up Bound Hem with Pre-folded Binding
      • Sewing A Hong Kong Hem Finish
      • Sewing A Band Hem Finish
      • Sewing A Bias Faced Hem Finish
      • Sewing A Twill Tape Hem Finish
      • Sewing A Rolled Hem Finish
      • Sewing A Shaped Hem Facing
      • Using Fusible Hem Tape And Webbing
      • Finishing A Lace Fabric Hem
      • Finishing A Leather Hem
      • Sewing Faced Hem Corners
      • How To Finish Lining At The Hem
      • Finishing Fabric Corners by Mitering >
        • Mitering Fabric Corners With A Full Bias Facing
        • Mitering Fabric Corners With Exposed Binding
      • Interfacing A Hemline: Lined And Unlined Examples
    • Sewing Pockets >
      • Curved Patch Pocket With Flap
      • Unlined Square Patch Pockets
      • Lined Patch Pockets: Two Ways
      • Extension On-Seam Pockets
      • Separate On-Seam Pocket
      • Front Hip Pockets
      • Bound Double Welt Pocket
      • Double Welt Pocket With Flap
      • Self-Welt Pocket (Using Single Fabric Layer)
      • Slanted Welt Pocket (Hand-Stitched)
      • Faced Slash Pockets: Overview >
        • Sewing A Faced Slit Pocket
        • Sewing A Rectangular Slash Pocket
        • Sew A Star-Shaped Faced Pocket
    • Sewing Zippers >
      • Sewing Zippers: General Information
      • Sewing A Centered Zipper
      • Sewing A Lapped Zipper
      • Sewing An Invisible Zipper
      • Sewing A Fly Front Zipper
      • Sewing A Closed-End Exposed Zipper (No Seam)
      • Sewing An Exposed Separating Zipper
      • Sewing Hand Stitched Zipper Applications
      • Sewing A Zipper Underlay
      • Sewing A Placket-Enclosed Separating Zipper
    • Sleeveless Finishes >
      • Sleeveless Armhole Finishes: General Information
      • Finishing Sleeveless Garments with Lining
      • Sewing A Folded-Under Bound Armhole Finish
      • Sewing A Shaped Armhole Facing
      • Finishing Armhole Edges With Exposed Binding
      • Finishing Armhole Edges With Decorative Trim
    • Neckline Finishes >
      • Sewing A Neck Shaped Facing
      • Sewing An All-In-One Neck Facing
      • Neck And Garment Opening Combination Facings >
        • Sewing An Extended Front-Neck Facing
        • Sewing A Separate Neck-Front Facing
      • Sewing A Bias Faced Neckline Finish
      • Sewing A Band Neckline Finish
      • Bound Neckline Finishes: Overview >
        • Sewing A Single Layer Bound Neckline
        • Finishing A Neckline With Pre-Folded Binding
        • Sewing A Double Layer Bound Neckline Finish
      • Sewing A Semi-Stretch Strip Band Neckline
      • Ribbed Neck Band And Classic Turtleneck
      • Decorative Neckline Finishes >
        • Sewing A Neckline With Decorative Inset
        • Sewing A Piped Cording Faced Neckline
        • Sewing Decorative Trim To A Finished Neckline
    • Finishing Facing Edges >
      • Finishing Facing Edges: Overview
      • Folded-And-Topstitched Overedge Facing Finish
      • Sewing A Bound Facing Edge Finish
      • Sewing A Hong Kong Facing Finish
      • Sewing A Rolled Edge Facing Finish
      • Sewing A Twill Tape Facing Edge Finish
      • Sewing An Overedge-Stitch Facing Finish
    • Extras >
      • A Complete Guide on Interfacing
      • Sewing Bound Spaghetti Straps
      • Sewing Spaghetti Straps To A Faced Neckline
      • Sewing Ruffles: Overview
      • Patterning And Sewing A Circle Ruffle
      • Sewing A Gathered Heading Ruffle
      • Sewing Double Layer Gathered Ruffles
      • Sewing A Gathered Ruffle Into A Seam
      • Sewing A Gathered Ruffle To A Fabric Edge
      • Sewing A Fabric Surface Slit
      • Sewing A Slit Seam
      • Hand-Applied Straight Stitches
      • Hand-Applied Blind Stitches
      • Hand-Applied Overedge Stitches
      • Hand-Applied Tack Stitches
      • Hand-Applied Decorative Stitches
  • Custom Apparel
    • Custom Bridal
  • Submit A Sewing Question
  • About
  • Blog