Doina Alexei
  • Custom Bridal
  • The Process
  • Our Brides
  • About
  • Sewing Tutorials
    • Basics >
      • Aligning Pattern Grainlines To Fabric
      • Preparing Fabrics For Sewing
      • Pinning Sewing Patterns To Fabric
      • Placing Sewing Patterns On Fabric For Cutting
      • Rotary Cutters or Fabric Scissors?
      • Cutting The Sewing Patterns
      • What Are Notches And How To Use Them In The Sewing Process
      • Transferring Notches From Pattern To Fabric
      • Transferring Seamlines to Fabric
      • Staystitching
      • Backstitching: A Complete Guide
      • Hand Basting: A Complete Guide
      • Sewing Continuous Bias Binding
    • Darts >
      • Marking And Transferring Darts To Fabric
      • What Are Darts And Dart Components
      • Folding, Pinning And Hand Basting Darts
      • Handling Dart Excess: Bulk And Tension
      • How To Sew A French Dart
      • How To Sew And Iron Single Pointed Darts
      • How To Sew And Iron Contour Darts
      • Sewing Darts With Decorative/Beaded Fabrics
    • Sewing Seams >
      • ​The Basics Of Seams And Seam Allowance
      • How To Sew A Straight Seam
      • Sewing Curved Seams
      • Sewing Corner Seams
      • Trimming And Grading Seam Excess
      • Notching/Clipping Seam Allowance for Tension Release
      • Sewing Topstitched Seams
      • Sewing Corded Seams
      • Sewing A Slot Seam
      • Sewing A Gathered Seam
      • Sewing Bias Seams
      • Sewing Seams With Ease
      • Sewing Seams With Crossing Seamlines
      • Sewing Unlike Fabric Seams
      • How To Iron Seams: Ironing Tools And Conventions
      • Sewing With Knit Fabrics
      • Understanding Stitch Length And Tension
      • Sewing Unique Fabric Seams
    • Seam Finishes >
      • Seam Finishing Techniques - Overview
      • Applying A Pinked Seam Finish
      • Applying A Bias Bound Seam Finish
      • Serging And Zigzag Seam Finishes
      • Sewing A Self-Bound Seam Finish
      • Sewing A French Seam Finish
      • Sewing A Hong Kong Seam Finish
      • Sewing A Mock French Seam Finish
      • Sewing A Turned-and-Stitched Seam Finish
      • Sewing Overcast Hand-Applied Seam Finishes
      • Sewing A Flat Felled Seam
      • Sewing A Hairline Seam Finish
    • Hem Finishes >
      • Garment Hem Finishes: Overview
      • ​Sewing A Double Fold Hem Finish
      • Sewing A Single Fold Hem Finish
      • Sewing Bound Hem Finishes
      • Sewing An Exposed Double Layer Bound Hem
      • Sewing A Folded-Up Bound Hem with Pre-folded Binding
      • Sewing A Hong Kong Hem Finish
      • Sewing A Band Hem Finish
      • Sewing A Bias Faced Hem Finish
      • Sewing A Twill Tape Hem Finish
      • Sewing A Rolled Hem Finish
      • Sewing A Shaped Hem Facing
      • Using Fusible Hem Tape And Webbing
      • Finishing A Lace Fabric Hem
      • Finishing A Leather Hem
      • Sewing Faced Hem Corners
      • How To Finish Lining At The Hem
      • Finishing Fabric Corners by Mitering >
        • Mitering Fabric Corners With A Full Bias Facing
        • Mitering Fabric Corners With Exposed Binding
      • Interfacing A Hemline: Lined And Unlined Examples
    • Sewing Pockets >
      • Curved Patch Pocket With Flap
      • Unlined Square Patch Pockets
      • Lined Patch Pockets: Two Ways
      • Extension On-Seam Pockets
      • Separate On-Seam Pocket
      • Front Hip Pockets
      • Bound Double Welt Pocket
      • Double Welt Pocket With Flap
      • Self-Welt Pocket (Using Single Fabric Layer)
      • Slanted Welt Pocket (Hand-Stitched)
      • Faced Slash Pockets: Overview >
        • Sewing A Faced Slit Pocket
        • Sewing A Rectangular Slash Pocket
        • Sew A Star-Shaped Faced Pocket
    • Sewing Zippers >
      • Sewing Zippers: General Information
      • Sewing A Centered Zipper
      • Sewing A Lapped Zipper
      • Sewing An Invisible Zipper
      • Sewing A Fly Front Zipper
      • Sewing A Closed-End Exposed Zipper (No Seam)
      • Sewing An Exposed Separating Zipper
      • Sewing Hand Stitched Zipper Applications
      • Sewing A Zipper Underlay
      • Sewing A Placket-Enclosed Separating Zipper
    • Sleeveless Finishes >
      • Sleeveless Armhole Finishes: General Information
      • Finishing Sleeveless Garments with Lining
      • Sewing A Folded-Under Bound Armhole Finish
      • Sewing A Shaped Armhole Facing
      • Finishing Armhole Edges With Exposed Binding
      • Finishing Armhole Edges With Decorative Trim
    • Neckline Finishes >
      • Sewing A Neck Shaped Facing
      • Sewing An All-In-One Neck Facing
      • Neck And Garment Opening Combination Facings >
        • Sewing An Extended Front-Neck Facing
        • Sewing A Separate Neck-Front Facing
      • Sewing A Bias Faced Neckline Finish
      • Sewing A Band Neckline Finish
      • Bound Neckline Finishes: Overview >
        • Sewing A Single Layer Bound Neckline
        • Finishing A Neckline With Pre-Folded Binding
        • Sewing A Double Layer Bound Neckline Finish
      • Sewing A Semi-Stretch Strip Band Neckline
      • Ribbed Neck Band And Classic Turtleneck
      • Decorative Neckline Finishes >
        • Sewing A Neckline With Decorative Inset
        • Sewing A Piped Cording Faced Neckline
        • Sewing Decorative Trim To A Finished Neckline
    • Finishing Facing Edges >
      • Finishing Facing Edges: Overview
      • Folded-And-Topstitched Overedge Facing Finish
      • Sewing A Bound Facing Edge Finish
      • Sewing A Hong Kong Facing Finish
      • Sewing A Rolled Edge Facing Finish
      • Sewing A Twill Tape Facing Edge Finish
      • Sewing An Overedge-Stitch Facing Finish
    • Extras >
      • A Complete Guide on Interfacing
      • Sewing Bound Spaghetti Straps
      • Sewing Spaghetti Straps To A Faced Neckline
      • Sewing Ruffles: Overview
      • Patterning And Sewing A Circle Ruffle
      • Sewing A Gathered Heading Ruffle
      • Sewing Double Layer Gathered Ruffles
      • Sewing A Gathered Ruffle Into A Seam
      • Sewing A Gathered Ruffle To A Fabric Edge
      • Sewing A Fabric Surface Slit
      • Sewing A Slit Seam
      • Hand-Applied Straight Stitches
      • Hand-Applied Blind Stitches
      • Hand-Applied Overedge Stitches
      • Hand-Applied Tack Stitches
      • Hand-Applied Decorative Stitches

Two Methods For Clean-Finishing A Lace Garment's Hemline

When it comes to hemming, lace is treated quite differently than regular woven or knit fabrics. 
Picture
Due to their unique structure, most laces do not fray or unravel when cut. For that reason, you won’t have to worry about containing unraveling threads, or folding the hem to hide the cut edge on the inside of the garment.
When it comes to finishing a lace fabric hem, there are two common techniques you can use. Each is based on the desired design effect and of course, the type of lace fabric being used.
Method 1: The easiest of the two options is to trim the bottom edge of the garment’s hem around an existing lace pattern or motif. 
Picture
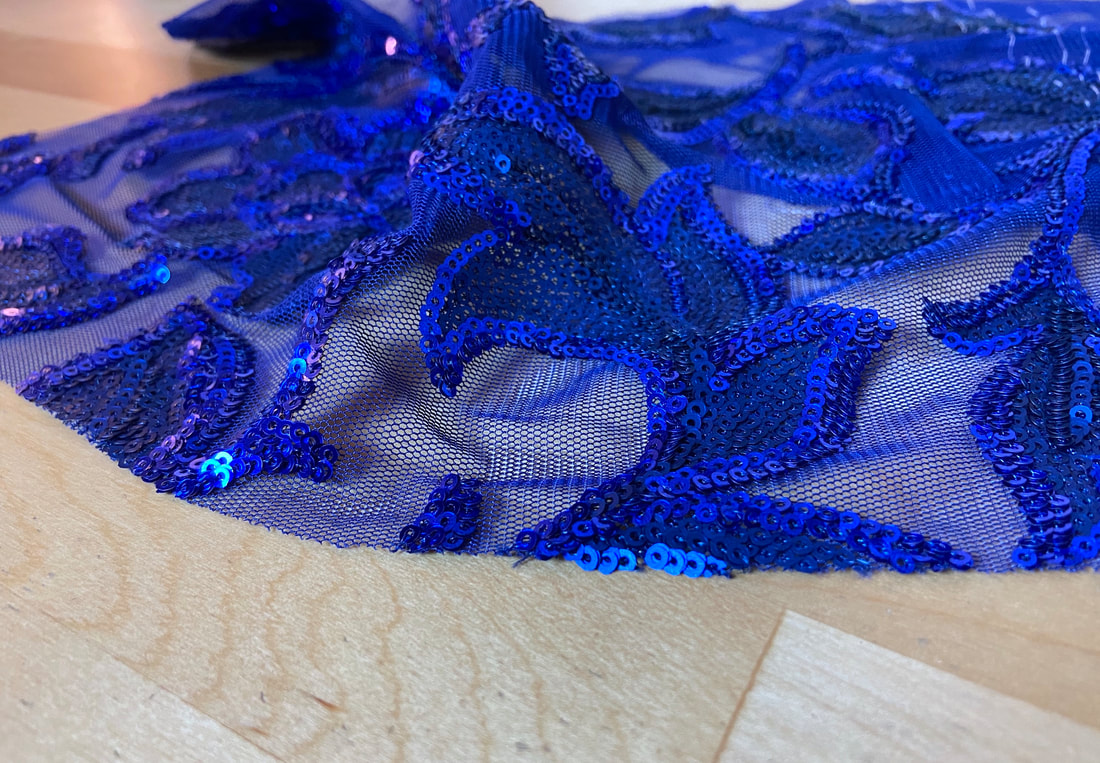
This method can only be achieved if there is an actual pattern to follow such that when cut along its edge, the resulting finish is clean and looks intentional (very important). Most lace fabrics that have a denser pattern with a visually intermingled motif will work well with this technique.
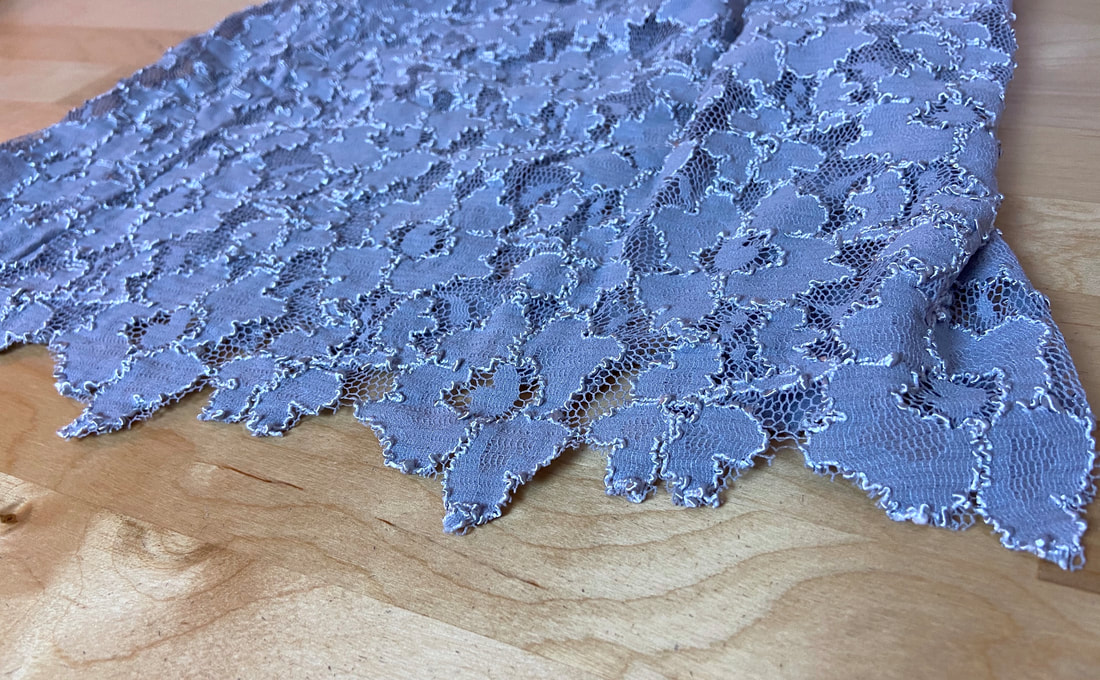
Laces that have an irregular pattern with visual elements placed at random and at a distance from one another, will not be appropriate for this technique. In this instance, there is no repetitive line or motif that allows you to create an intentional cut edge. 
Picture
For this type of lace, you can finish the hemline with a matching band or decorative trim- this technique is described in Method 2 below.
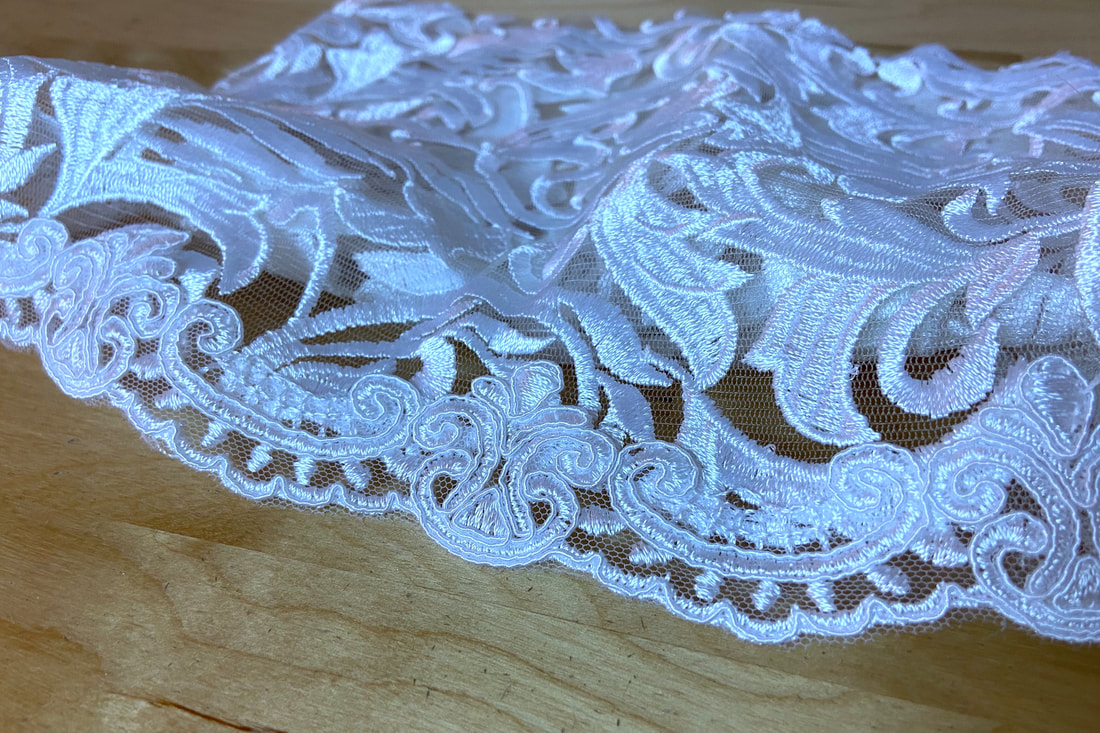
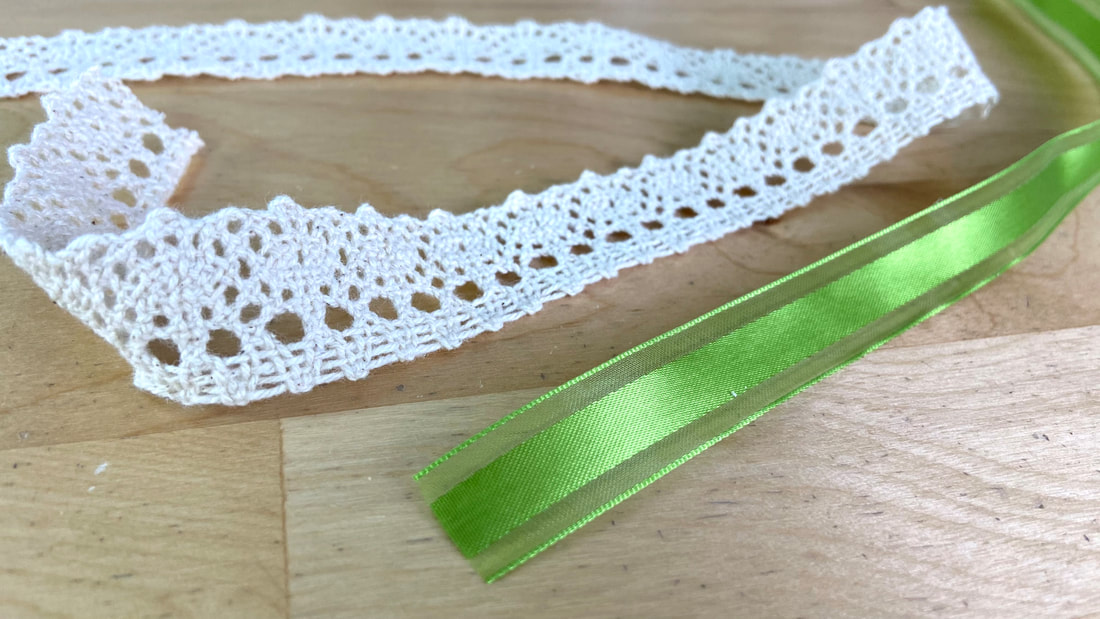
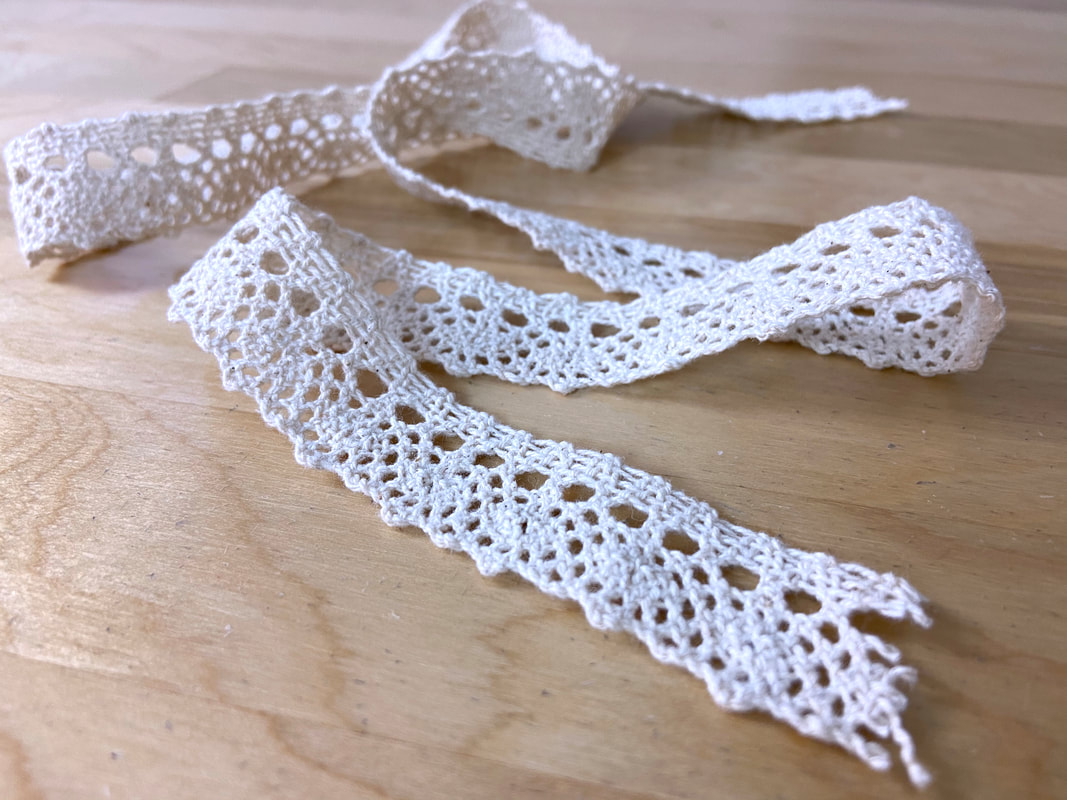
Method 2: Using a separate trim as an applique is another great option for clean finishing lace hemlines. This method is highly versatile and can be used with all laces regardless of their print and/or motif.
Picture
The trim itself is chosen based on the desired design effect. Conventionally, a lace trim should blend naturally into the lace fabric in terms of both weight and color- although the motif/pattern itself can differ.
Many lace trims have a shape that is specifically designed for use along hem edges. These types of decorative trims are often utilized with bridal and eveningwear.
Picture
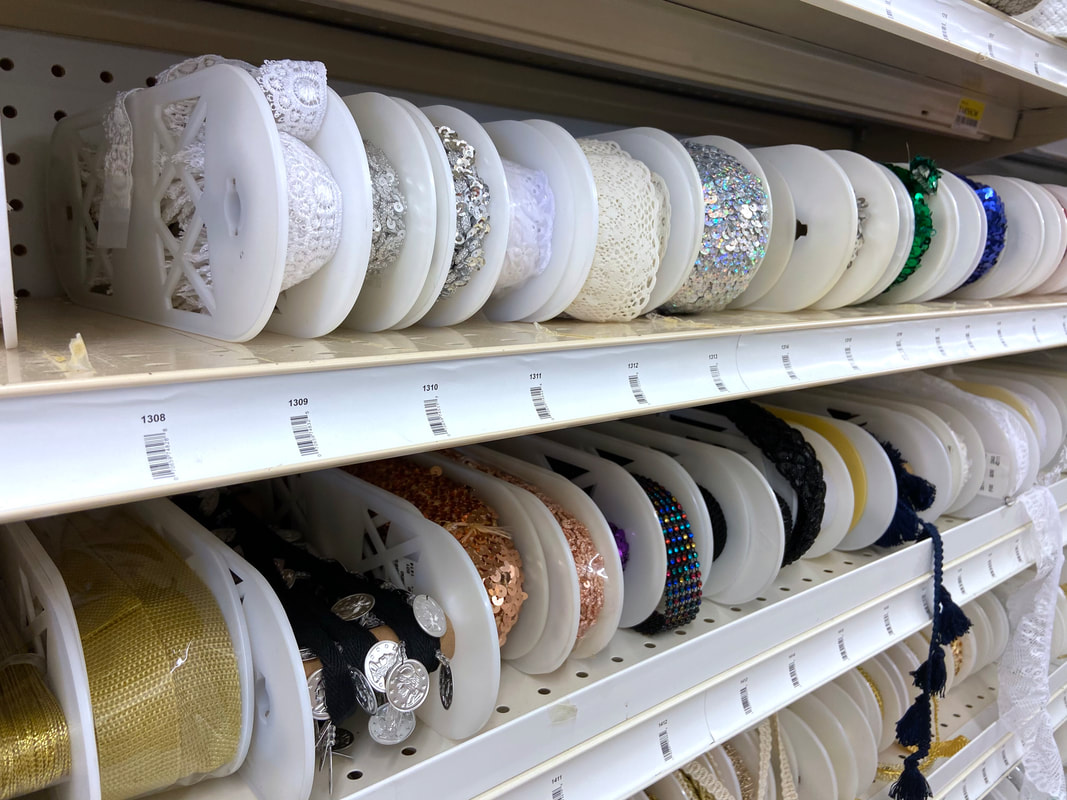
You can buy lace and other decorative trims at various widths and shapes to fit perfectly within your project. When choosing the most appropriate hemming trim, it should provide enough width and structure to support the garment’s lace fabric as well as achieve the desired design effect.
In terms of application, lace and other decorative trims can be either machine stitched, or hand sewn. Which to use depends on trim design and the garment’s lace fabric.
Picture
If the trim is heavily decorated or constructed such that it does not allow for direct machine stitching, it will have to be hand sewn. On that note, if the garment’s lace is heavily beaded, the trim may need to be hand-applied even if the trim itself can be machine stitched.
Picture
Many lace trims that are designed specifically for hem finishing can be easily machine stitched. In most cases, the trim provides a woven-in stitching guide along one (or both) of its lengthwise edges.
The examples below cover both the machine-stitched and hand-sewn versions.

Method 1: Trim-Finishing A Lace Hemline

As noted above, only laces that have a repetitive, defined motif can be trim-finished. If using this technique, always consider the look and design of the final garment. This hemming technique provides a more casual effect which is mostly used with asymmetric hemlines or lace fabric overlays.
Picture
Do not trim-finish the lace hem until all the garment’s crossing seams have been sewn. Trimming the fabric pieces individually, prior to stitching the seams, will disrupt the visual continuity of the finished hemline pattern.
Picture
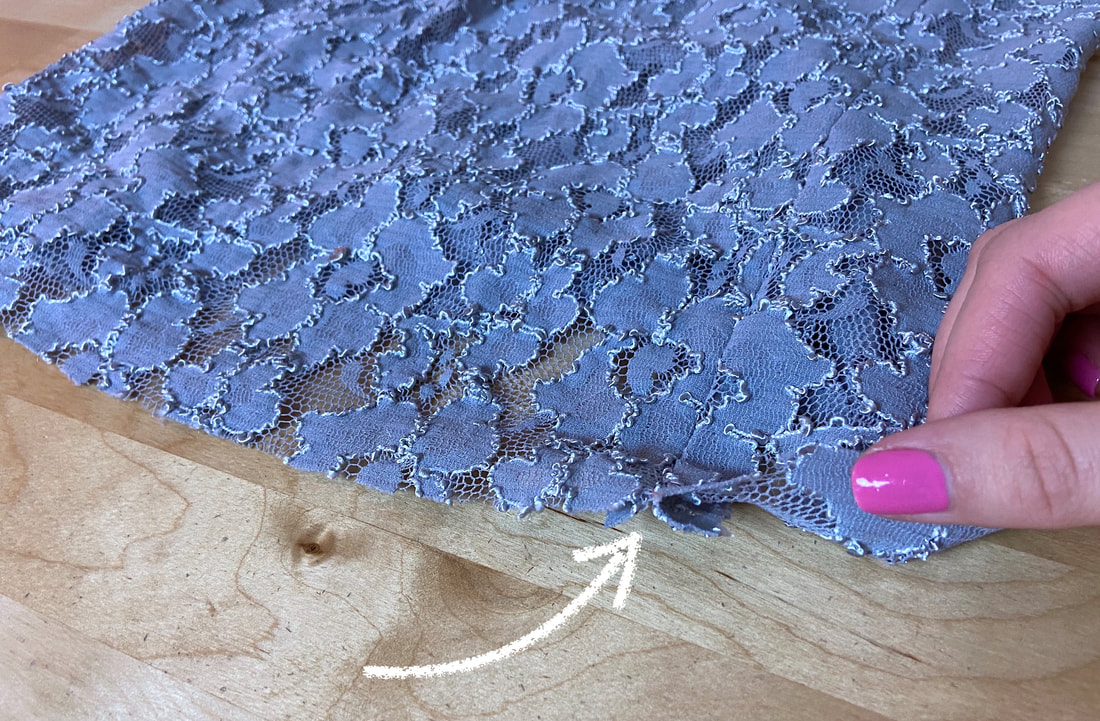
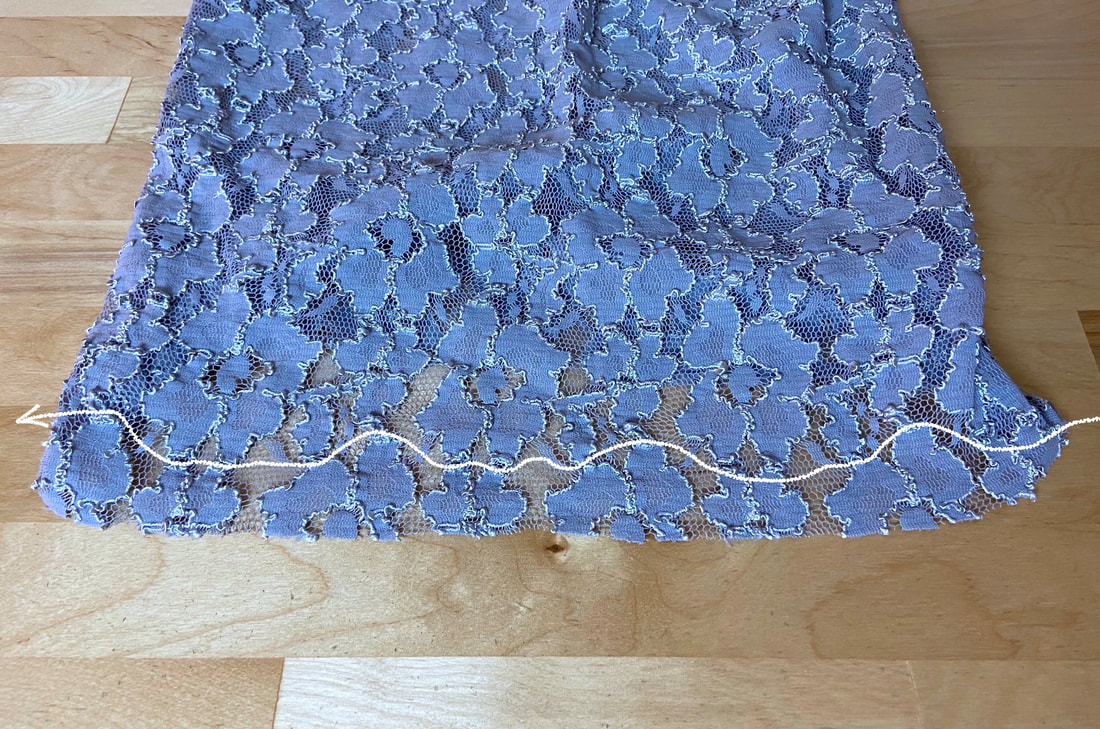
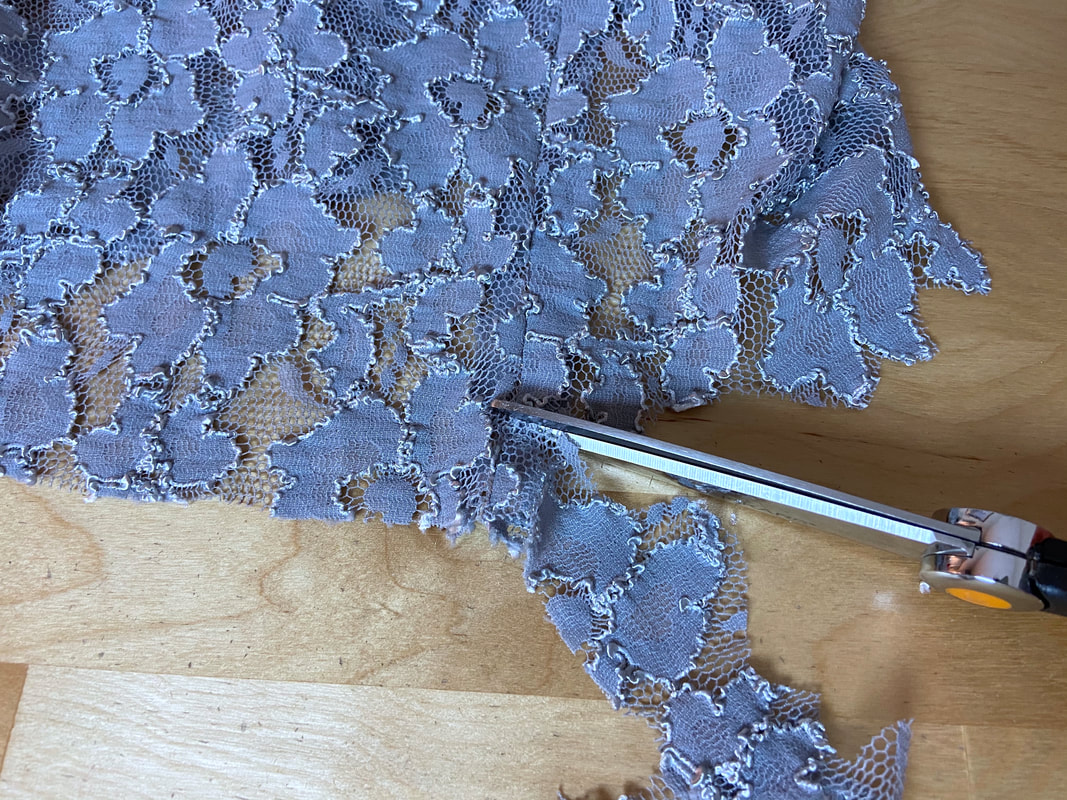
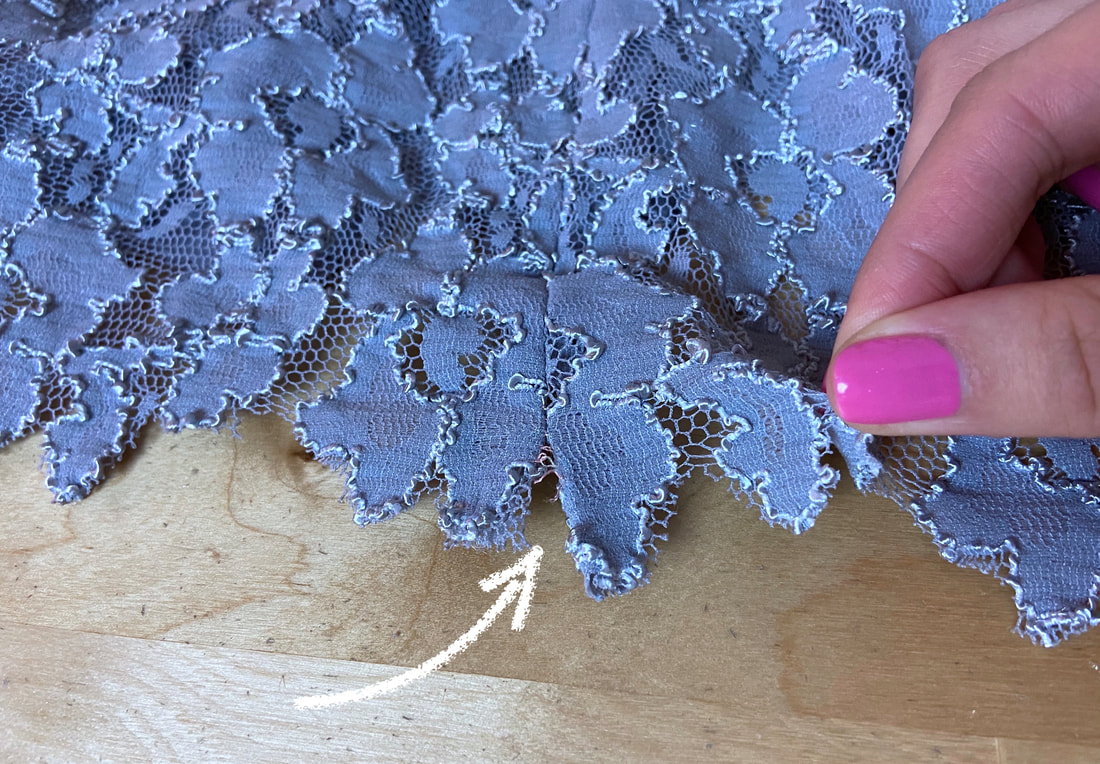
1. To trim-finish lace, identify a defined pattern located as close to the garment’s bottom edge as possible. When cutting along the edge of this pattern, an intentional lace motif will form along the finished edge of the hem.
In this case, the larger flowers are used as the hemline pattern.
Picture
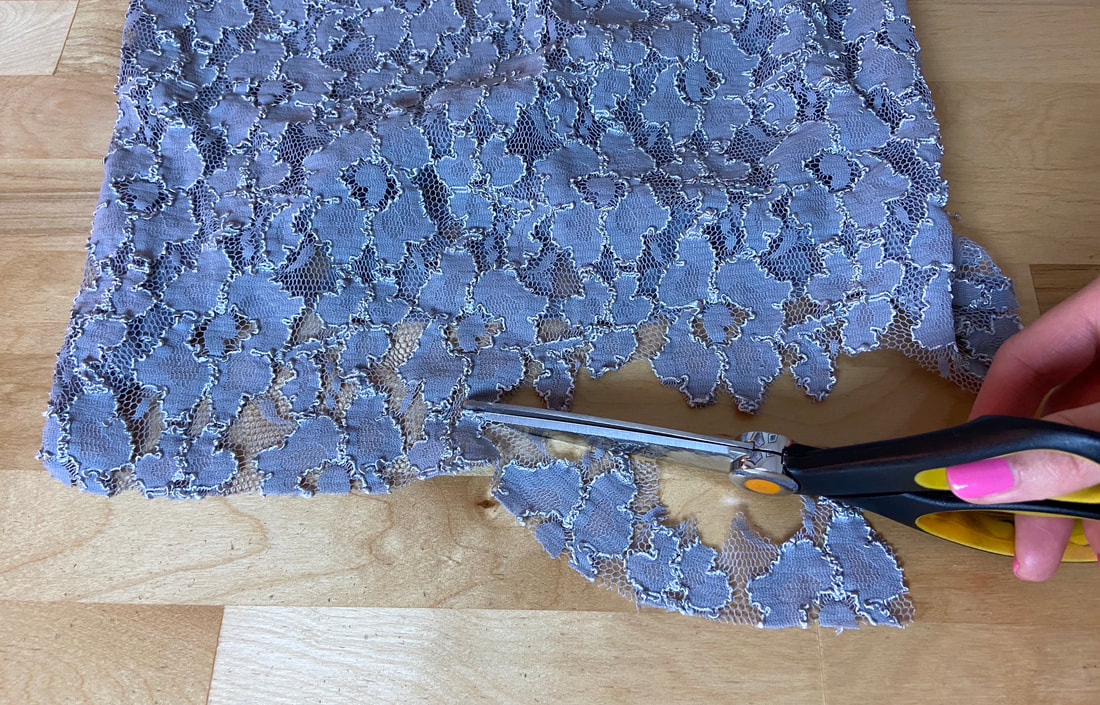
2. Using a good pair of fabric scissors, trim carefully along the bottom of the pattern lines, removing the unnecessary excess and leaving a clean-cut edge behind.
Do not cut directly through any of the elements that constitute your chosen pattern as this can destabilize the final hem as well as create a visual disruption. Instead, cut right below the bottom pattern lines as shown.
Picture
Picture
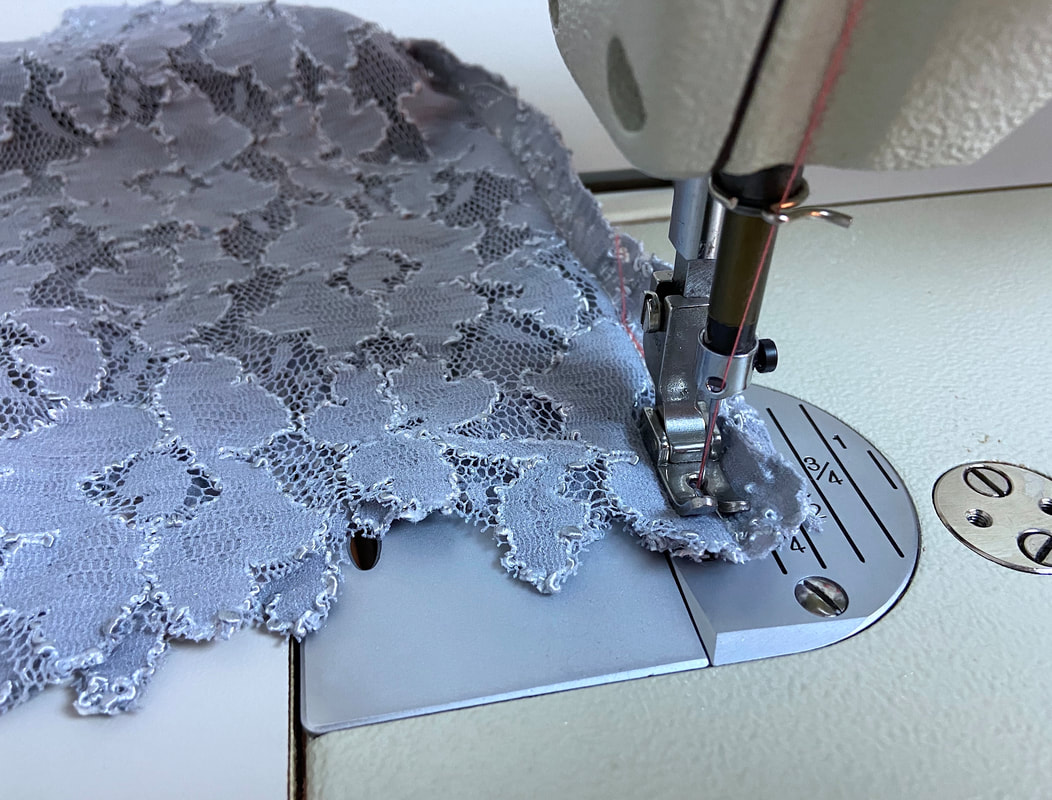
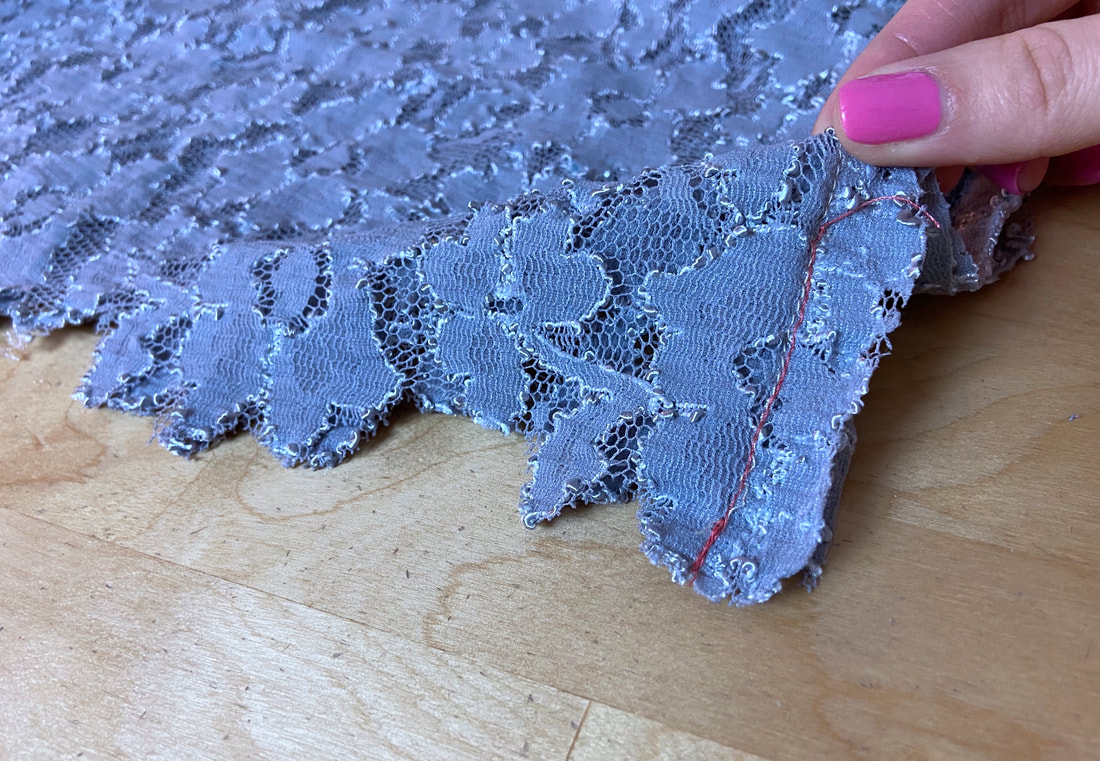
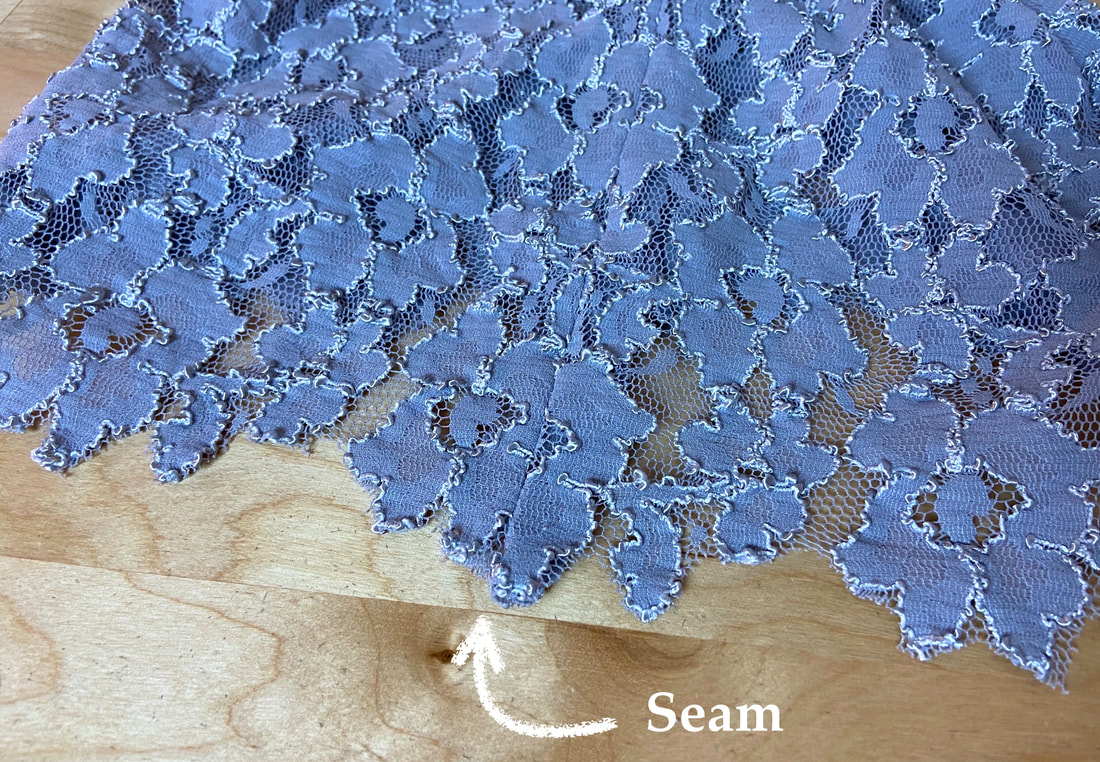
3. Since this hemming technique requires trimming through the garment’s crossing seams, you’ll have to reinforce the bottom of these seams with additional stitching once the lace is fully trimmed.
Picture
Picture
Reinforcing the seams will provide long term durability and eliminate visual and structural disruptions in the final hemline. 
Picture
If you skip this step, the existing seam stitch that was slashed through in the lace trimming process will unravel as soon as the garment’s first use.

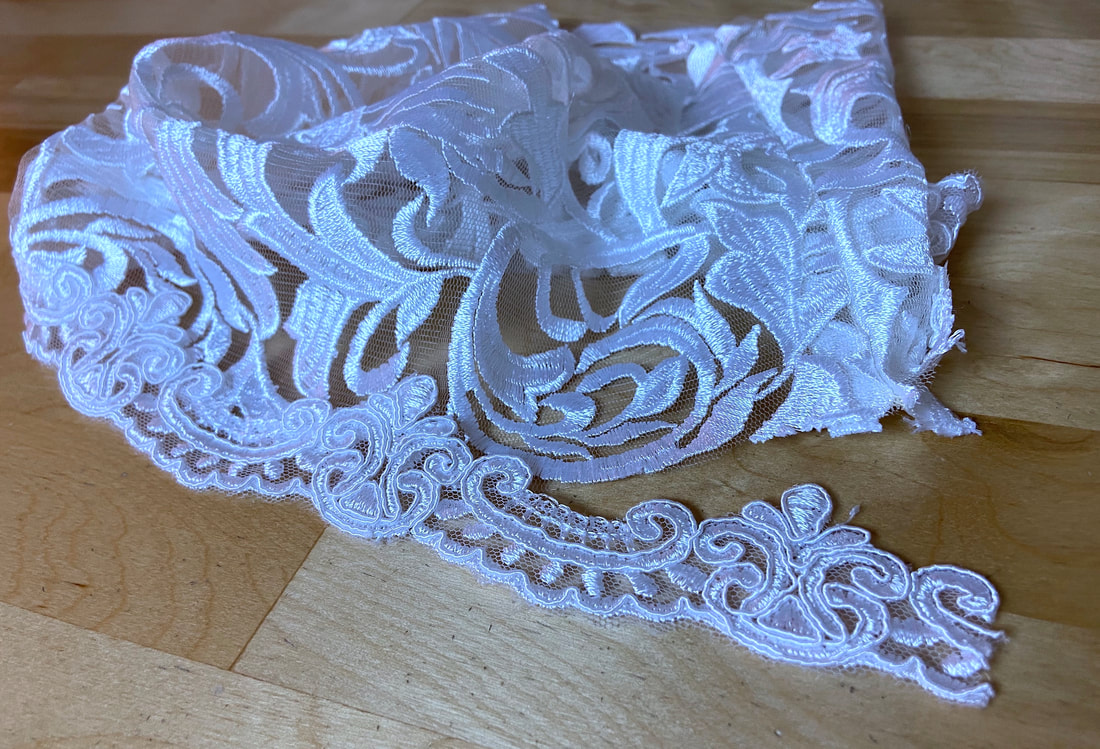
Method 2: Finishing A Lace Hem With Trim Applique

As the most universal finish, using a trim applique works with all laces regardless of the fabric’s weight and pattern. 
Picture
Nonetheless, the trim you choose should blend in naturally with the garment’s lace fabric. If a contrast look is desired, the color, width and weight of the trim should be compatible with the lace fabric at hand.
To choose the perfect trim, take a swatch (4” x 4”) of your lace to the fabric store and try the different trims against the lace’s edge. The trim should be wide enough to comfortably cover the hem allowance edge, and fall within the same thickness and weight-range as the lace fabric itself.
Picture
1. To start with, trim the hem allowance down to about ¼”.
Picture
2. Lay the garment hem edge flat and facing up on the table. Place one end of the lace trim at about ½” past one of the garment’s seams as shown. 
The wrong side of the lace trim should be touching the face of the fabric.
Picture
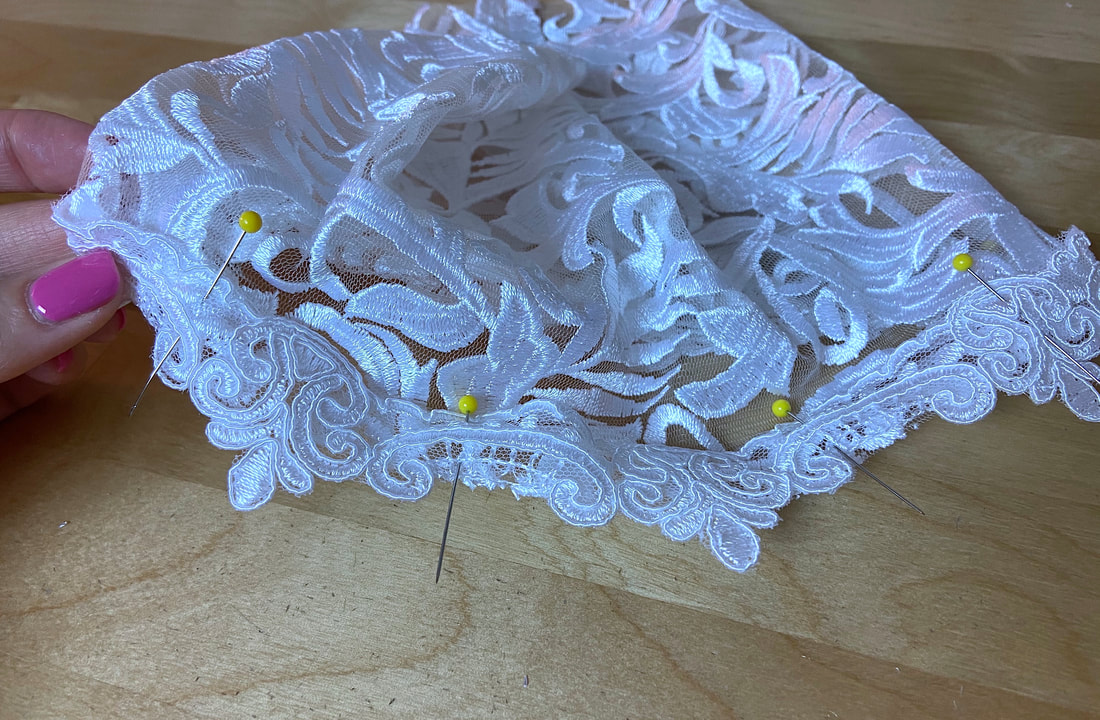
3. Position the rest of the lace trim along the hem such that the trim’s bottom lengthwise edge aligns with the garment’s hem edge as shown. Insert pins to keep the two layers perfectly aligned.
Picture
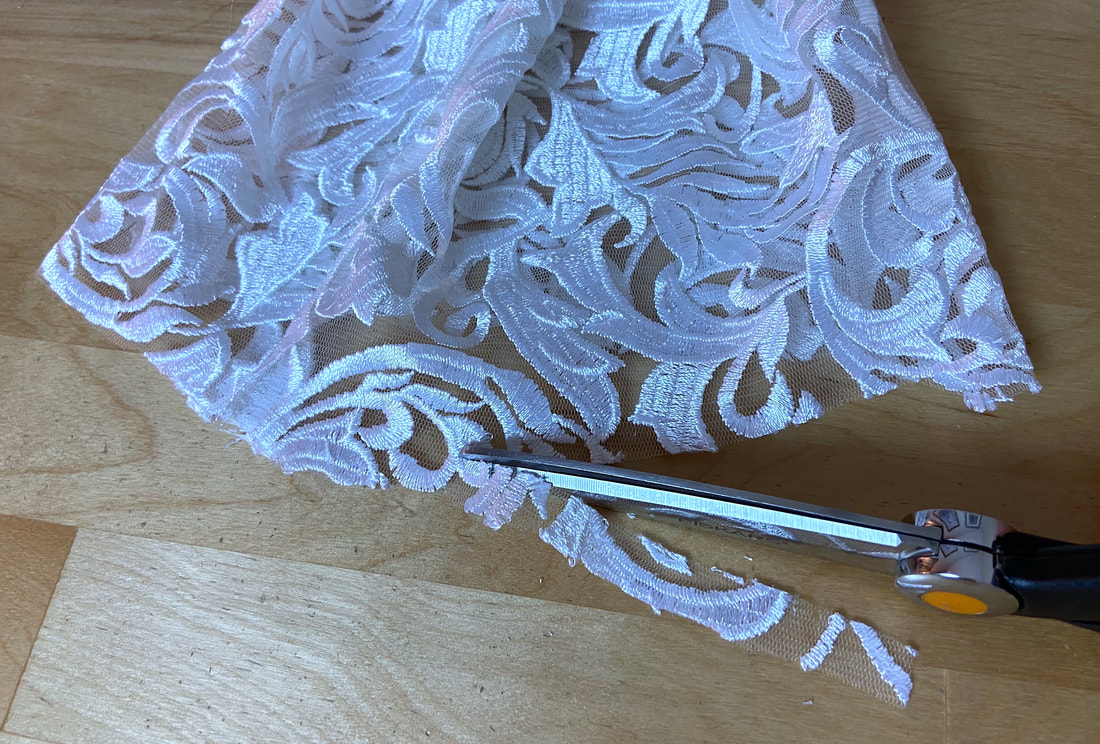
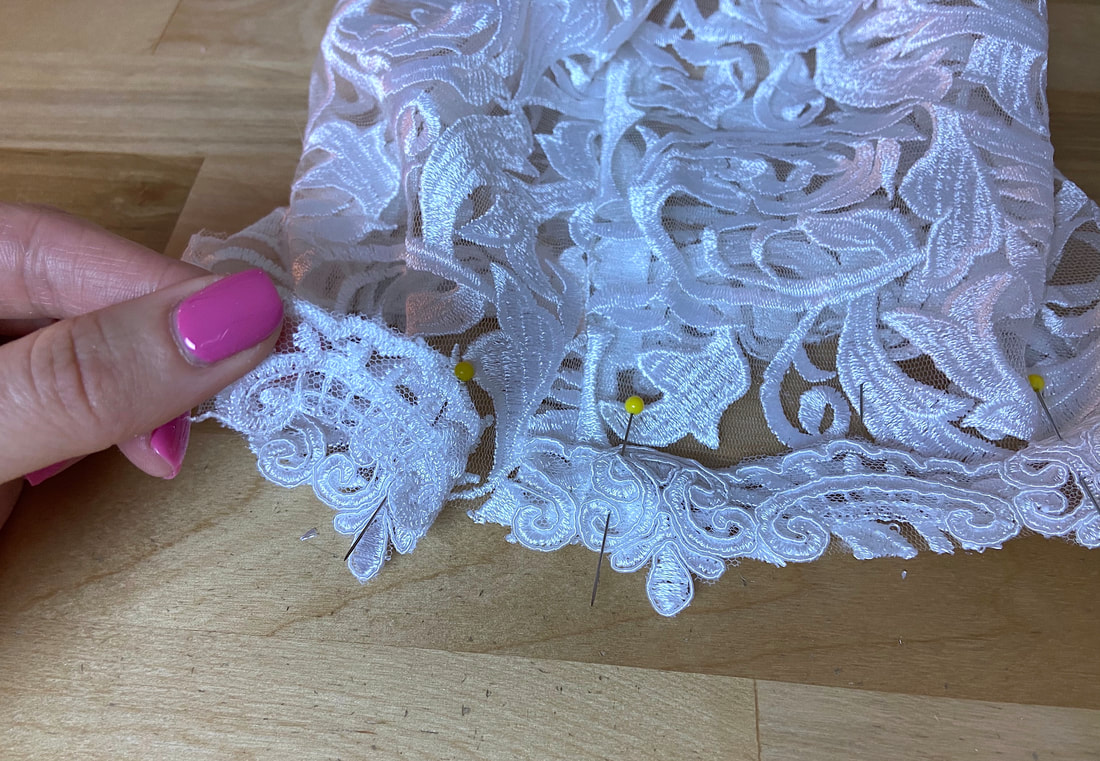
4. When arriving at the starting point, cut the end of the trim at about ½” past the garment seam as shown.
Picture
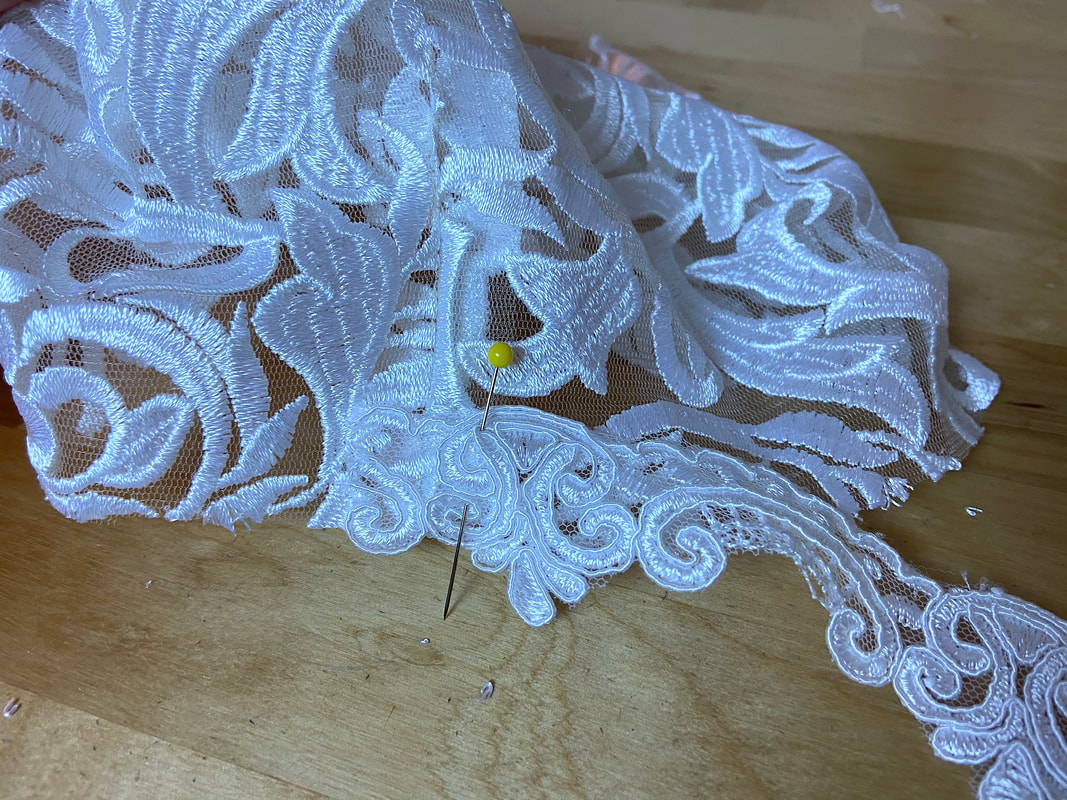
5. Next, fold the end of the trim in such that this folded edge is in line with the garment's seamline. The starting end of the trim should be positioned underneath.
Picture
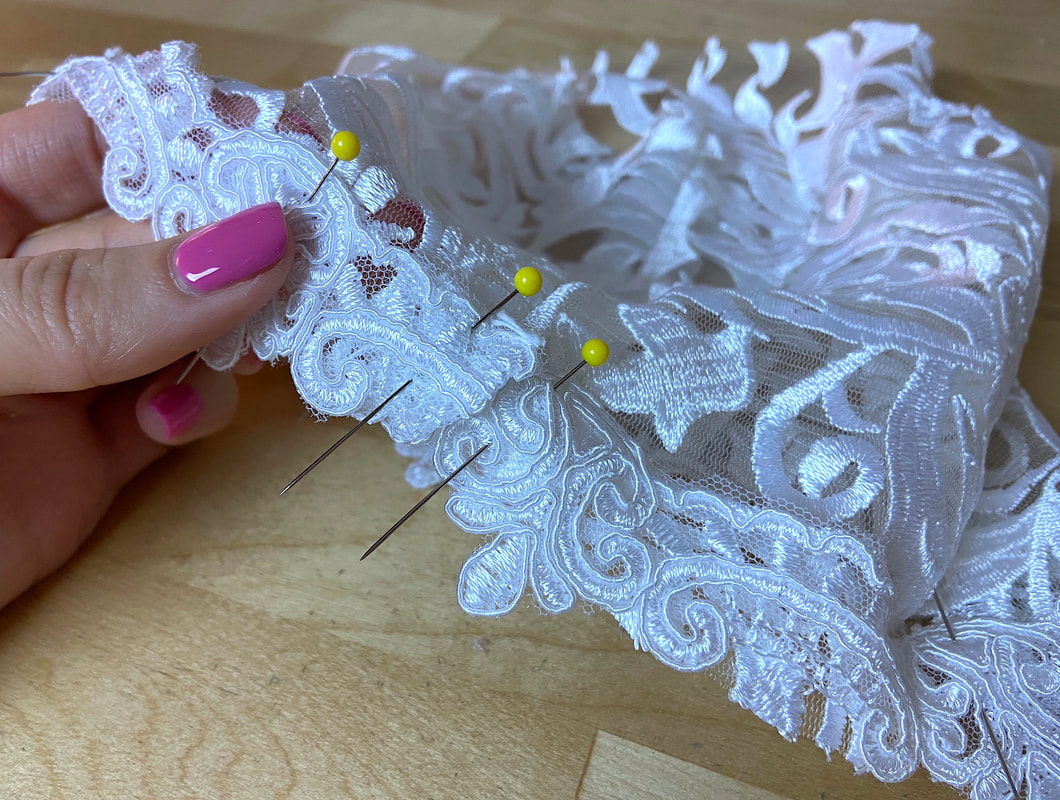
6. Hand baste the trim to the garment hem in this position. Remove the pins as you baste. 
Although hand basting is not required, keep in mind that lace fabrics are textured and have a tendency to slip away during the stitching process. Hand basting will provide extra stability and aid in the machine stitching process.
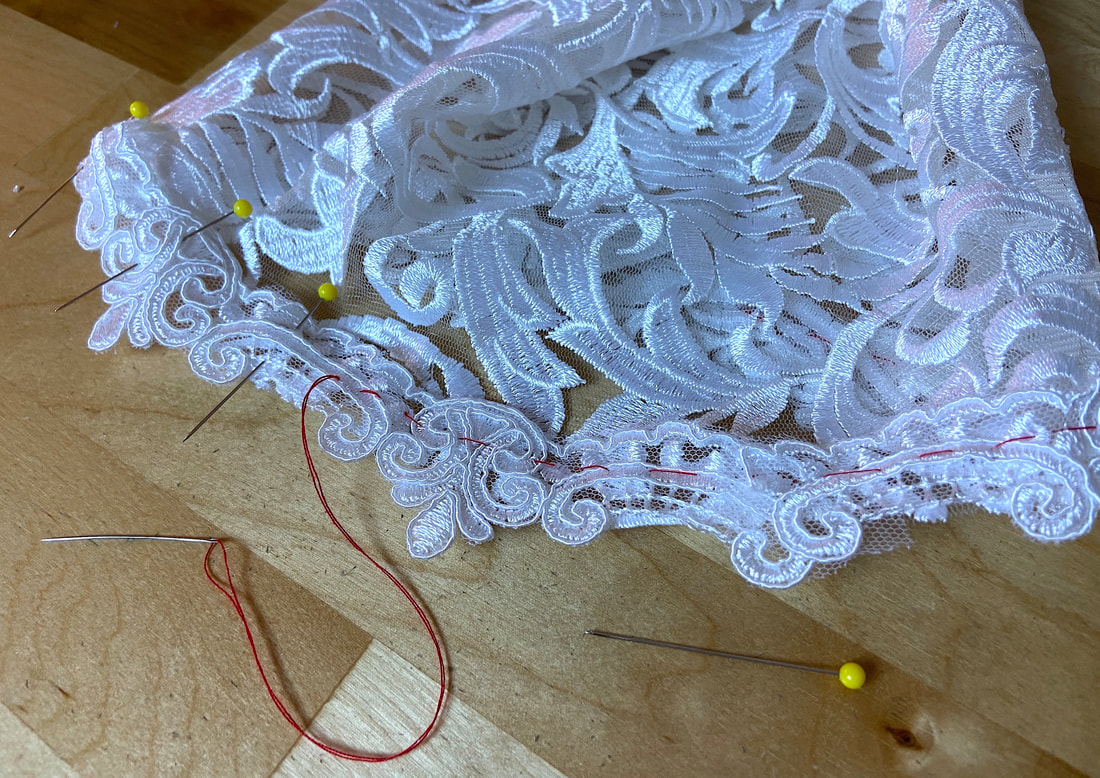
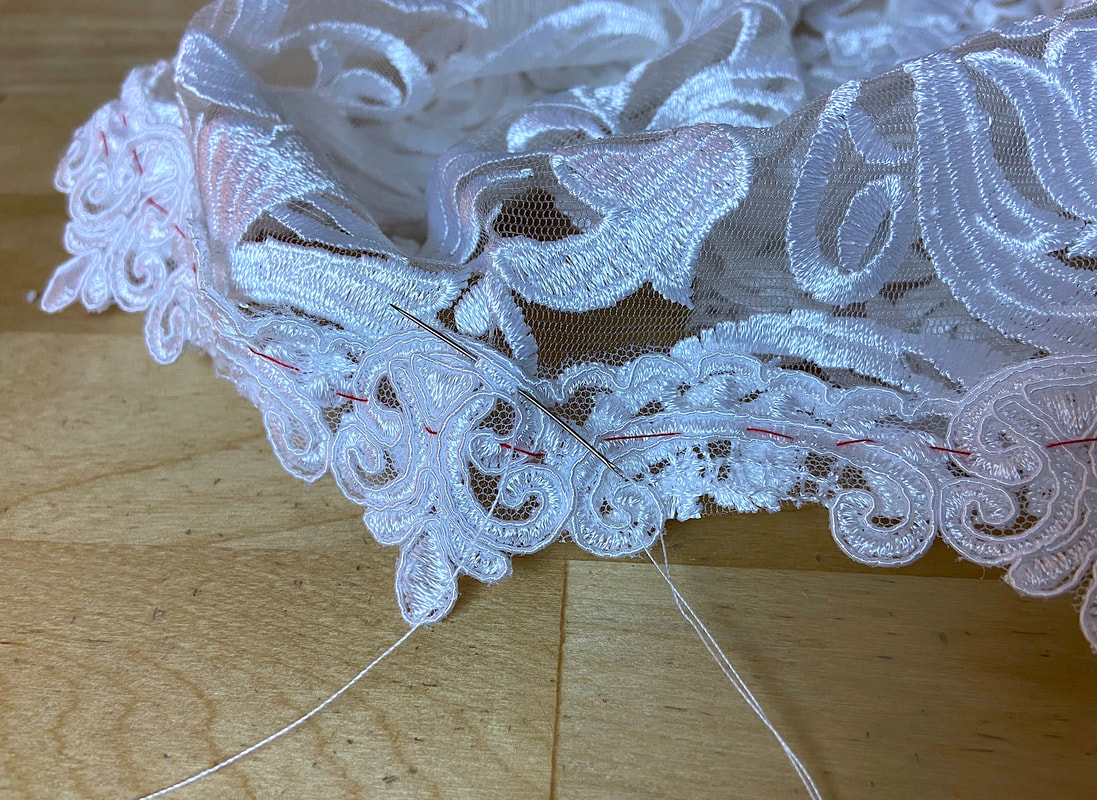
7. At this point, you can either machine stitch the top edge of the trim to the garment layer, or hand stitch it using a slipstitch, whipstitch, prickstitch or catchstitch.
Picture
Machine stitching is suitable for most lace trims that have a straight lengthwise edge and are not heavily decorated. Many of them provide a woven-in stitching guideline along their top edge.
If necessary, use a zipper foot to stitch next to raised edges. Match the thread color to the trim, and stitch its top edge to the garment lace as shown.
Picture
If, like in this case, the trim cannot be machine stitched, use matching color thread to hand sew the trim’s top edge to the lace fabric underneath.
You can use the following stitches depending on which you find most suitable for the trim and fabric at hand:
Click to visit tutorial:
Slipsticthing
Catchsticthing
Prickstitching
Whipsticthing
Picture
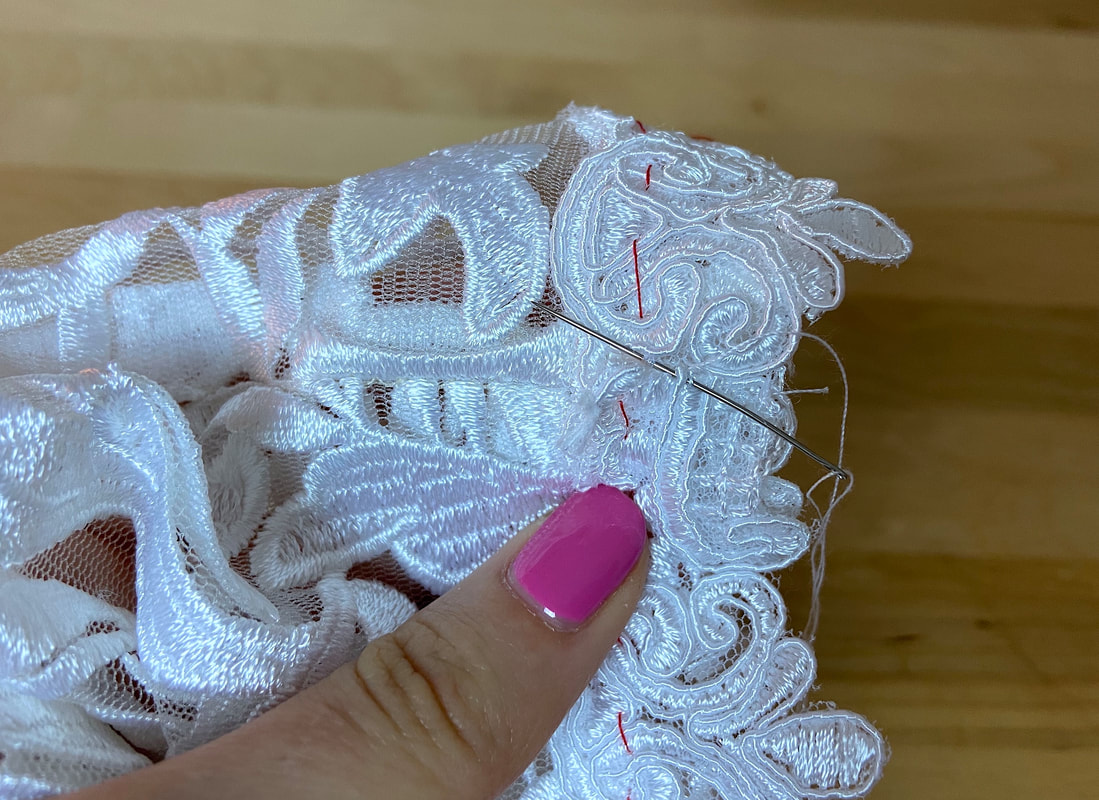
8. Once the trim is attached either by hand or machine, secure the folded end of the trim to the layer it overlaps by blind stitching with matching color thread.
Picture
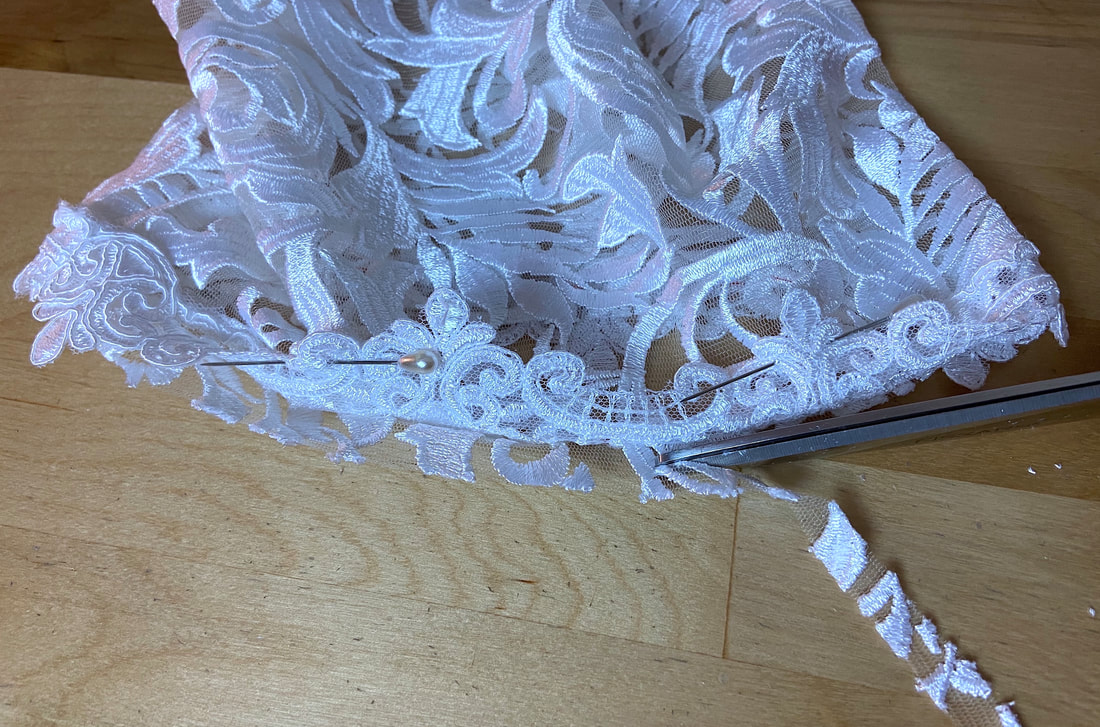
9. Finally, lift the bottom (unconnected) edge of the lace trim and cut halfway through the garment’s hem as shown. This will not only minimize bulk but also hide the lace fabric’s bottom edge more effectively. 
DMCA.com Protection Status
All content, including images and text, may not be copied, replicated, or redistributed without express written permission. This website is regularly screened and monitored for content protection.

Services

​Custom Apparel
Custom Bridal
​Sewing Tutorials
​

Company

About
Blog

Support

Contact
Terms of Service
DMCA.com Protection Status
© COPYRIGHT 2024. ALL RIGHTS RESERVED.
  • Custom Bridal
  • The Process
  • Our Brides
  • About
  • Sewing Tutorials
    • Basics >
      • Aligning Pattern Grainlines To Fabric
      • Preparing Fabrics For Sewing
      • Pinning Sewing Patterns To Fabric
      • Placing Sewing Patterns On Fabric For Cutting
      • Rotary Cutters or Fabric Scissors?
      • Cutting The Sewing Patterns
      • What Are Notches And How To Use Them In The Sewing Process
      • Transferring Notches From Pattern To Fabric
      • Transferring Seamlines to Fabric
      • Staystitching
      • Backstitching: A Complete Guide
      • Hand Basting: A Complete Guide
      • Sewing Continuous Bias Binding
    • Darts >
      • Marking And Transferring Darts To Fabric
      • What Are Darts And Dart Components
      • Folding, Pinning And Hand Basting Darts
      • Handling Dart Excess: Bulk And Tension
      • How To Sew A French Dart
      • How To Sew And Iron Single Pointed Darts
      • How To Sew And Iron Contour Darts
      • Sewing Darts With Decorative/Beaded Fabrics
    • Sewing Seams >
      • ​The Basics Of Seams And Seam Allowance
      • How To Sew A Straight Seam
      • Sewing Curved Seams
      • Sewing Corner Seams
      • Trimming And Grading Seam Excess
      • Notching/Clipping Seam Allowance for Tension Release
      • Sewing Topstitched Seams
      • Sewing Corded Seams
      • Sewing A Slot Seam
      • Sewing A Gathered Seam
      • Sewing Bias Seams
      • Sewing Seams With Ease
      • Sewing Seams With Crossing Seamlines
      • Sewing Unlike Fabric Seams
      • How To Iron Seams: Ironing Tools And Conventions
      • Sewing With Knit Fabrics
      • Understanding Stitch Length And Tension
      • Sewing Unique Fabric Seams
    • Seam Finishes >
      • Seam Finishing Techniques - Overview
      • Applying A Pinked Seam Finish
      • Applying A Bias Bound Seam Finish
      • Serging And Zigzag Seam Finishes
      • Sewing A Self-Bound Seam Finish
      • Sewing A French Seam Finish
      • Sewing A Hong Kong Seam Finish
      • Sewing A Mock French Seam Finish
      • Sewing A Turned-and-Stitched Seam Finish
      • Sewing Overcast Hand-Applied Seam Finishes
      • Sewing A Flat Felled Seam
      • Sewing A Hairline Seam Finish
    • Hem Finishes >
      • Garment Hem Finishes: Overview
      • ​Sewing A Double Fold Hem Finish
      • Sewing A Single Fold Hem Finish
      • Sewing Bound Hem Finishes
      • Sewing An Exposed Double Layer Bound Hem
      • Sewing A Folded-Up Bound Hem with Pre-folded Binding
      • Sewing A Hong Kong Hem Finish
      • Sewing A Band Hem Finish
      • Sewing A Bias Faced Hem Finish
      • Sewing A Twill Tape Hem Finish
      • Sewing A Rolled Hem Finish
      • Sewing A Shaped Hem Facing
      • Using Fusible Hem Tape And Webbing
      • Finishing A Lace Fabric Hem
      • Finishing A Leather Hem
      • Sewing Faced Hem Corners
      • How To Finish Lining At The Hem
      • Finishing Fabric Corners by Mitering >
        • Mitering Fabric Corners With A Full Bias Facing
        • Mitering Fabric Corners With Exposed Binding
      • Interfacing A Hemline: Lined And Unlined Examples
    • Sewing Pockets >
      • Curved Patch Pocket With Flap
      • Unlined Square Patch Pockets
      • Lined Patch Pockets: Two Ways
      • Extension On-Seam Pockets
      • Separate On-Seam Pocket
      • Front Hip Pockets
      • Bound Double Welt Pocket
      • Double Welt Pocket With Flap
      • Self-Welt Pocket (Using Single Fabric Layer)
      • Slanted Welt Pocket (Hand-Stitched)
      • Faced Slash Pockets: Overview >
        • Sewing A Faced Slit Pocket
        • Sewing A Rectangular Slash Pocket
        • Sew A Star-Shaped Faced Pocket
    • Sewing Zippers >
      • Sewing Zippers: General Information
      • Sewing A Centered Zipper
      • Sewing A Lapped Zipper
      • Sewing An Invisible Zipper
      • Sewing A Fly Front Zipper
      • Sewing A Closed-End Exposed Zipper (No Seam)
      • Sewing An Exposed Separating Zipper
      • Sewing Hand Stitched Zipper Applications
      • Sewing A Zipper Underlay
      • Sewing A Placket-Enclosed Separating Zipper
    • Sleeveless Finishes >
      • Sleeveless Armhole Finishes: General Information
      • Finishing Sleeveless Garments with Lining
      • Sewing A Folded-Under Bound Armhole Finish
      • Sewing A Shaped Armhole Facing
      • Finishing Armhole Edges With Exposed Binding
      • Finishing Armhole Edges With Decorative Trim
    • Neckline Finishes >
      • Sewing A Neck Shaped Facing
      • Sewing An All-In-One Neck Facing
      • Neck And Garment Opening Combination Facings >
        • Sewing An Extended Front-Neck Facing
        • Sewing A Separate Neck-Front Facing
      • Sewing A Bias Faced Neckline Finish
      • Sewing A Band Neckline Finish
      • Bound Neckline Finishes: Overview >
        • Sewing A Single Layer Bound Neckline
        • Finishing A Neckline With Pre-Folded Binding
        • Sewing A Double Layer Bound Neckline Finish
      • Sewing A Semi-Stretch Strip Band Neckline
      • Ribbed Neck Band And Classic Turtleneck
      • Decorative Neckline Finishes >
        • Sewing A Neckline With Decorative Inset
        • Sewing A Piped Cording Faced Neckline
        • Sewing Decorative Trim To A Finished Neckline
    • Finishing Facing Edges >
      • Finishing Facing Edges: Overview
      • Folded-And-Topstitched Overedge Facing Finish
      • Sewing A Bound Facing Edge Finish
      • Sewing A Hong Kong Facing Finish
      • Sewing A Rolled Edge Facing Finish
      • Sewing A Twill Tape Facing Edge Finish
      • Sewing An Overedge-Stitch Facing Finish
    • Extras >
      • A Complete Guide on Interfacing
      • Sewing Bound Spaghetti Straps
      • Sewing Spaghetti Straps To A Faced Neckline
      • Sewing Ruffles: Overview
      • Patterning And Sewing A Circle Ruffle
      • Sewing A Gathered Heading Ruffle
      • Sewing Double Layer Gathered Ruffles
      • Sewing A Gathered Ruffle Into A Seam
      • Sewing A Gathered Ruffle To A Fabric Edge
      • Sewing A Fabric Surface Slit
      • Sewing A Slit Seam
      • Hand-Applied Straight Stitches
      • Hand-Applied Blind Stitches
      • Hand-Applied Overedge Stitches
      • Hand-Applied Tack Stitches
      • Hand-Applied Decorative Stitches