Doina Alexei
  • Sewing Tutorials
    • Basics >
      • Aligning Pattern Grainlines To Fabric
      • Preparing Fabrics For Sewing
      • Pinning Sewing Patterns To Fabric
      • Placing Sewing Patterns On Fabric For Cutting
      • Rotary Cutters or Fabric Scissors?
      • Cutting The Sewing Patterns
      • What Are Notches And How To Use Them In The Sewing Process
      • Transferring Notches From Pattern To Fabric
      • Transferring Seamlines to Fabric
      • Staystitching
      • Backstitching: A Complete Guide
      • Hand Basting: A Complete Guide
      • Sewing Continuous Bias Binding
    • Darts >
      • Marking And Transferring Darts To Fabric
      • What Are Darts And Dart Components
      • Folding, Pinning And Hand Basting Darts
      • Handling Dart Excess: Bulk And Tension
      • How To Sew A French Dart
      • How To Sew And Iron Single Pointed Darts
      • How To Sew And Iron Contour Darts
      • Sewing Darts With Decorative/Beaded Fabrics
    • Sewing Seams >
      • ​The Basics Of Seams And Seam Allowance
      • How To Sew A Straight Seam
      • Sewing Curved Seams
      • Sewing Corner Seams
      • Trimming And Grading Seam Excess
      • Notching/Clipping Seam Allowance for Tension Release
      • Sewing Topstitched Seams
      • Sewing Corded Seams
      • Sewing A Slot Seam
      • Sewing A Gathered Seam
      • Sewing Bias Seams
      • Sewing Seams With Ease
      • Sewing Seams With Crossing Seamlines
      • Sewing Unlike Fabric Seams
      • How To Iron Seams: Ironing Tools And Conventions
      • Sewing With Knit Fabrics
      • Understanding Stitch Length And Tension
      • Sewing Unique Fabric Seams
    • Seam Finishes >
      • Seam Finishing Techniques - Overview
      • Applying A Pinked Seam Finish
      • Applying A Bias Bound Seam Finish
      • Serging And Zigzag Seam Finishes
      • Sewing A Self-Bound Seam Finish
      • Sewing A French Seam Finish
      • Sewing A Hong Kong Seam Finish
      • Sewing A Mock French Seam Finish
      • Sewing A Turned-and-Stitched Seam Finish
      • Sewing Overcast Hand-Applied Seam Finishes
      • Sewing A Flat Felled Seam
      • Sewing A Hairline Seam Finish
    • Hem Finishes >
      • Garment Hem Finishes: Overview
      • ​Sewing A Double Fold Hem Finish
      • Sewing A Single Fold Hem Finish
      • Sewing Bound Hem Finishes
      • Sewing An Exposed Double Layer Bound Hem
      • Sewing A Folded-Up Bound Hem with Pre-folded Binding
      • Sewing A Hong Kong Hem Finish
      • Sewing A Band Hem Finish
      • Sewing A Bias Faced Hem Finish
      • Sewing A Twill Tape Hem Finish
      • Sewing A Rolled Hem Finish
      • Sewing A Shaped Hem Facing
      • Using Fusible Hem Tape And Webbing
      • Finishing A Lace Fabric Hem
      • Finishing A Leather Hem
      • Sewing Faced Hem Corners
      • How To Finish Lining At The Hem
      • Finishing Fabric Corners by Mitering >
        • Mitering Fabric Corners With A Full Bias Facing
        • Mitering Fabric Corners With Exposed Binding
      • Interfacing A Hemline: Lined And Unlined Examples
    • Sewing Pockets >
      • Curved Patch Pocket With Flap
      • Unlined Square Patch Pockets
      • Lined Patch Pockets: Two Ways
      • Extension On-Seam Pockets
      • Separate On-Seam Pocket
      • Front Hip Pockets
      • Bound Double Welt Pocket
      • Double Welt Pocket With Flap
      • Self-Welt Pocket (Using Single Fabric Layer)
      • Slanted Welt Pocket (Hand-Stitched)
      • Faced Slash Pockets: Overview >
        • Sewing A Faced Slit Pocket
        • Sewing A Rectangular Slash Pocket
        • Sew A Star-Shaped Faced Pocket
    • Sewing Zippers >
      • Sewing Zippers: General Information
      • Sewing A Centered Zipper
      • Sewing A Lapped Zipper
      • Sewing An Invisible Zipper
      • Sewing A Fly Front Zipper
      • Sewing A Closed-End Exposed Zipper (No Seam)
      • Sewing An Exposed Separating Zipper
      • Sewing Hand Stitched Zipper Applications
      • Sewing A Zipper Underlay
      • Sewing A Placket-Enclosed Separating Zipper
    • Sleeveless Finishes >
      • Sleeveless Armhole Finishes: General Information
      • Finishing Sleeveless Garments with Lining
      • Sewing A Folded-Under Bound Armhole Finish
      • Sewing A Shaped Armhole Facing
      • Finishing Armhole Edges With Exposed Binding
      • Finishing Armhole Edges With Decorative Trim
    • Neckline Finishes >
      • Sewing A Neck Shaped Facing
      • Sewing An All-In-One Neck Facing
      • Neck And Garment Opening Combination Facings >
        • Sewing An Extended Front-Neck Facing
        • Sewing A Separate Neck-Front Facing
      • Sewing A Bias Faced Neckline Finish
      • Sewing A Band Neckline Finish
      • Bound Neckline Finishes: Overview >
        • Sewing A Single Layer Bound Neckline
        • Finishing A Neckline With Pre-Folded Binding
        • Sewing A Double Layer Bound Neckline Finish
      • Sewing A Semi-Stretch Strip Band Neckline
      • Ribbed Neck Band And Classic Turtleneck
      • Decorative Neckline Finishes >
        • Sewing A Neckline With Decorative Inset
        • Sewing A Piped Cording Faced Neckline
        • Sewing Decorative Trim To A Finished Neckline
    • Finishing Facing Edges >
      • Finishing Facing Edges: Overview
      • Folded-And-Topstitched Overedge Facing Finish
      • Sewing A Bound Facing Edge Finish
      • Sewing A Hong Kong Facing Finish
      • Sewing A Rolled Edge Facing Finish
      • Sewing A Twill Tape Facing Edge Finish
      • Sewing An Overedge-Stitch Facing Finish
    • Extras >
      • A Complete Guide on Interfacing
      • Sewing Bound Spaghetti Straps
      • Sewing Spaghetti Straps To A Faced Neckline
      • Sewing Ruffles: Overview
      • Patterning And Sewing A Circle Ruffle
      • Sewing A Gathered Heading Ruffle
      • Sewing Double Layer Gathered Ruffles
      • Sewing A Gathered Ruffle Into A Seam
      • Sewing A Gathered Ruffle To A Fabric Edge
      • Sewing A Fabric Surface Slit
      • Sewing A Slit Seam
      • Hand-Applied Straight Stitches
      • Hand-Applied Blind Stitches
      • Hand-Applied Overedge Stitches
      • Hand-Applied Tack Stitches
      • Hand-Applied Decorative Stitches
  • Custom Apparel
    • Custom Bridal
  • Submit A Sewing Question
  • About
  • Blog

How To Sew A Mock French Seam Finish

What Is A Mock French Seam
​As the name may have hinted, a mock French seam looks very similar to a French seam. However, the steps for constructing a mock French seam are in fact quite different, but a bit simpler, especially for sewing beginners. 
Picture
Just like a regular French seam, a mock French seam is completed with two separate stitches. However, in a mock French seam, the seam is stitched as you would any regular seam: face sides touching and following the designated seam allowance. In contrast, a regular French seam application requires that fabric wrong sides are aligned and stitched at half the seam allowance first, before proceeding to the final, second stitch. 
​In a mock French seam, the seam allowance does not always require trimming unless it is very wide and bulky.
In a regular French seam, the width of the finished enclosed seam allowance is conventionally ¼”- the same is true for a mock French seam finish. The narrower seam allowance ensures increased flexibility, and works great with lightweight, sheer fabrics. ​
A mock French seam is used when regular French seams are difficult to apply. For example, along curved seam allowance edges or as a last-minute finish where the seams have already been sewn in a conventional manner (with the face sides touching). Mock French seams are also a quicker finish for medium weight, non-sheer garments were a more professional self-enclosed application is desired. 
Picture
A mock French seam is especially useful if the inside of the seams will be visible on the outside of the garment. ​
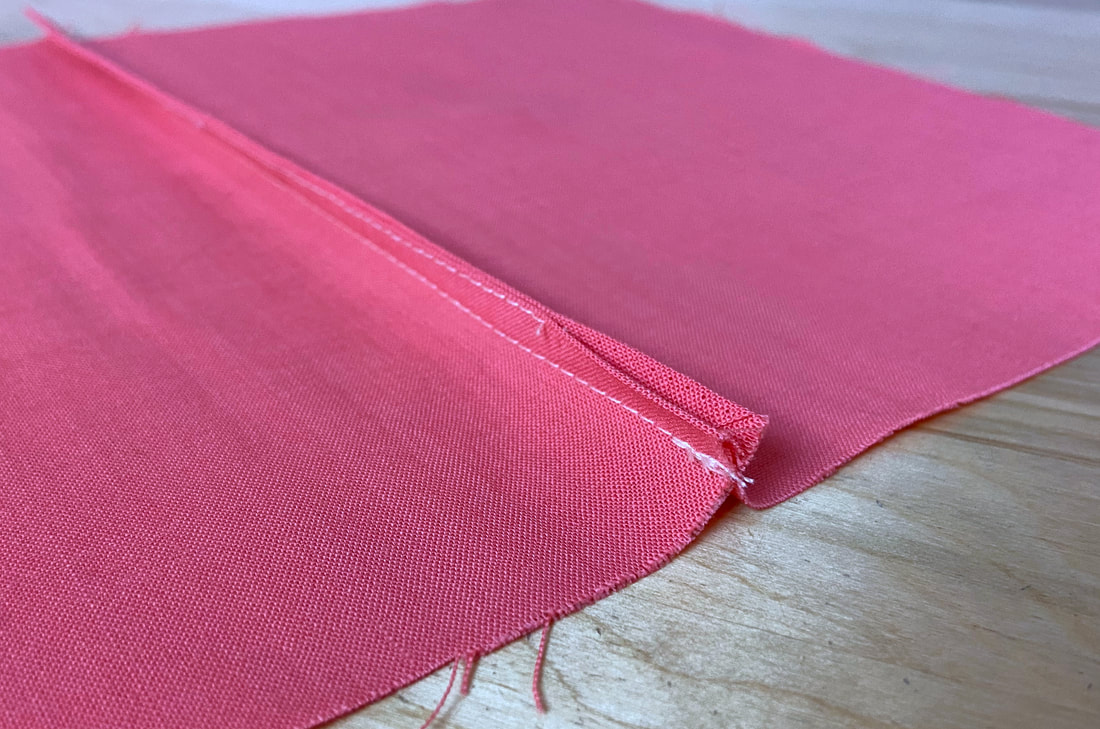
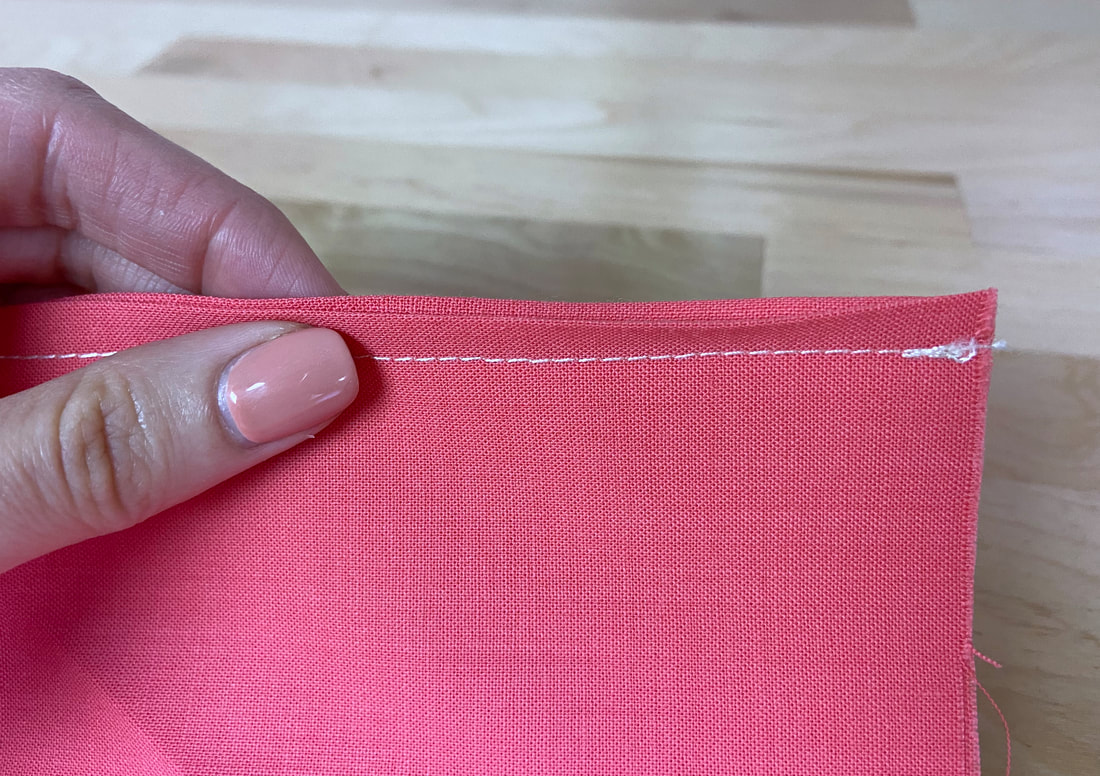
You can distinguish a mock French seam from a regular French seam by looking at the finished seam allowance on the wrong side of the garment. 
Picture
A mock French seam has a visible topstitch along the edge of the folded seam allowance. 
Picture
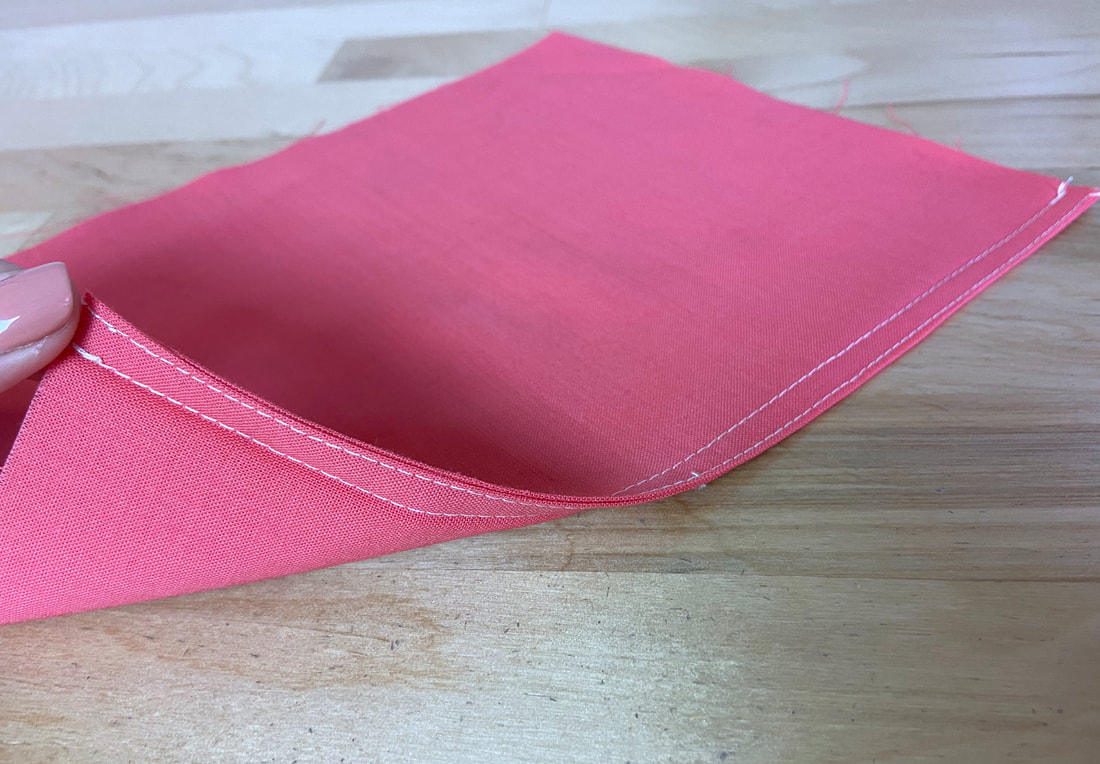
A regular French seam on the other hand, has a seamline corresponding to its folded edge, and features no visible topstitching. ​​

Applying A Mock French Finish To A Straight Seam

Assuming the seam allowance is ½”:
Picture
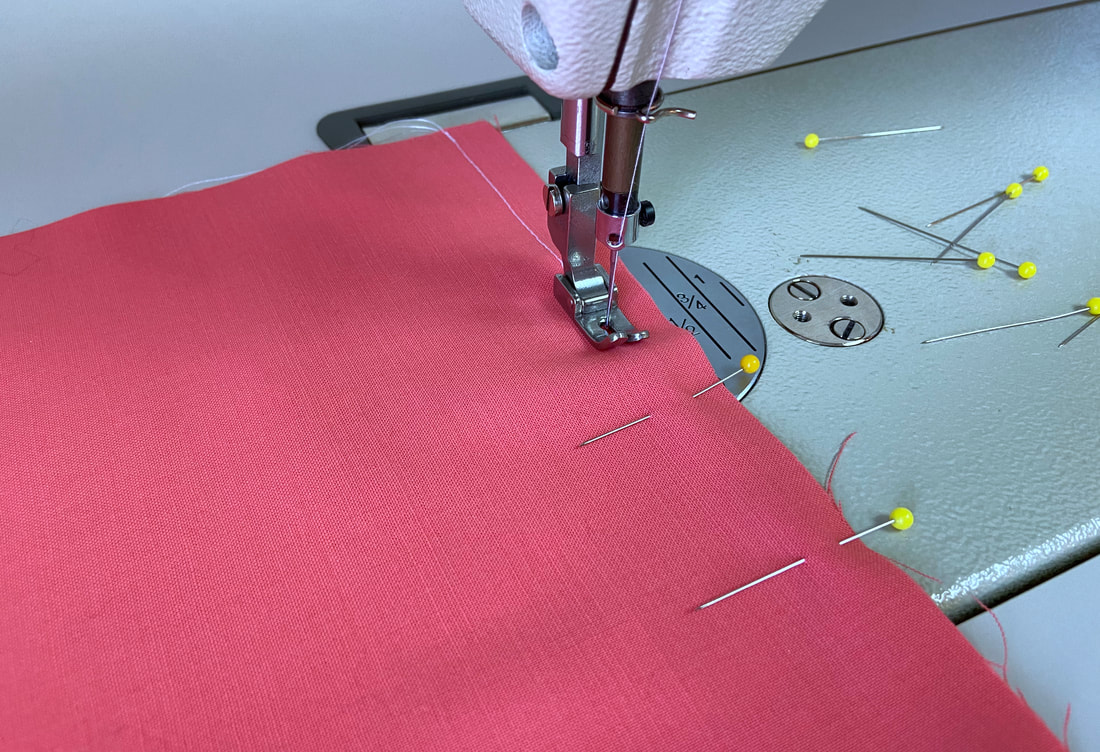
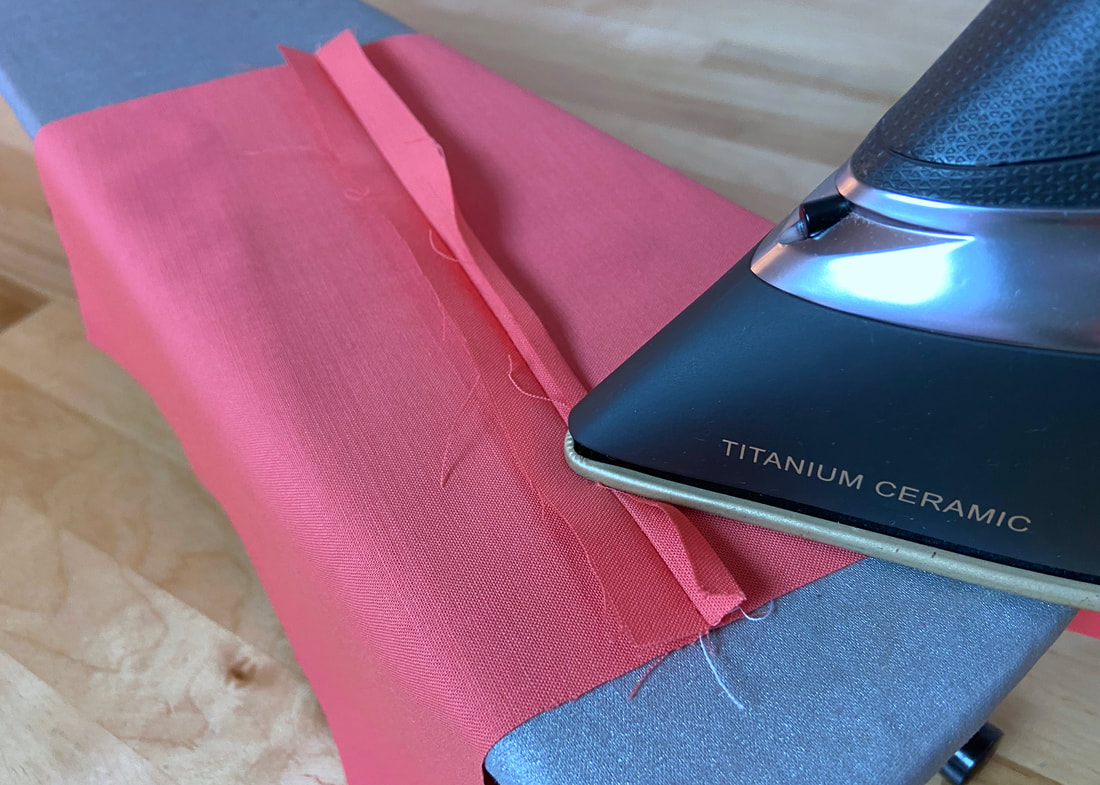
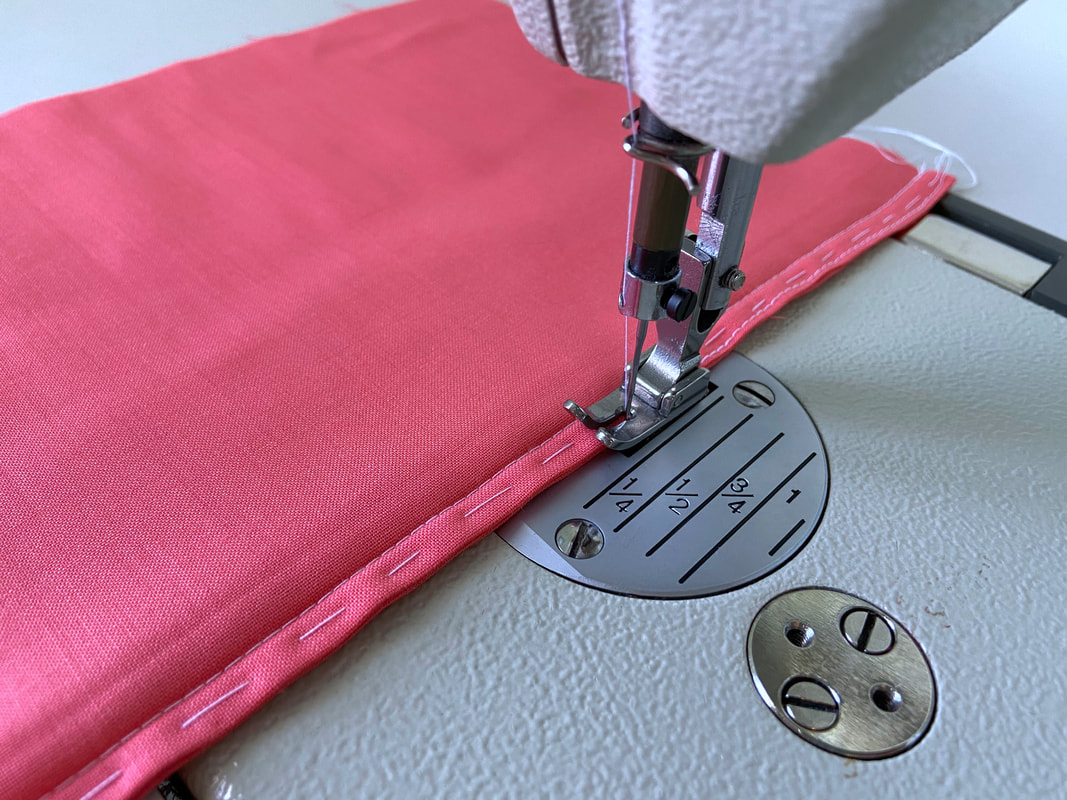
1. Align the seam edges with the face sides touching. Pin and stitch the seam at the designated seam allowance (½” in this example). You should treat this first stitch as you would any regular seam. 
Picture
2. With wrong side facing up, turn the seam allowance edges in, towards the stitched seamline at a ¼” distance. When brought together, the seam allowance folded edges should align perfectly as shown above. 
Picture
Picture
The easiest way to accomplish this is to fold each edge individually, and iron as you fold to crease the resulting fold line. 
​Since the seam allowance in this example is ½”, the edge is folded at exactly halfway. The seam allowance raw edges meet at the seamline which in this case, provides a guide in the folding process while also eliminating the need to measure while folding. 
Picture
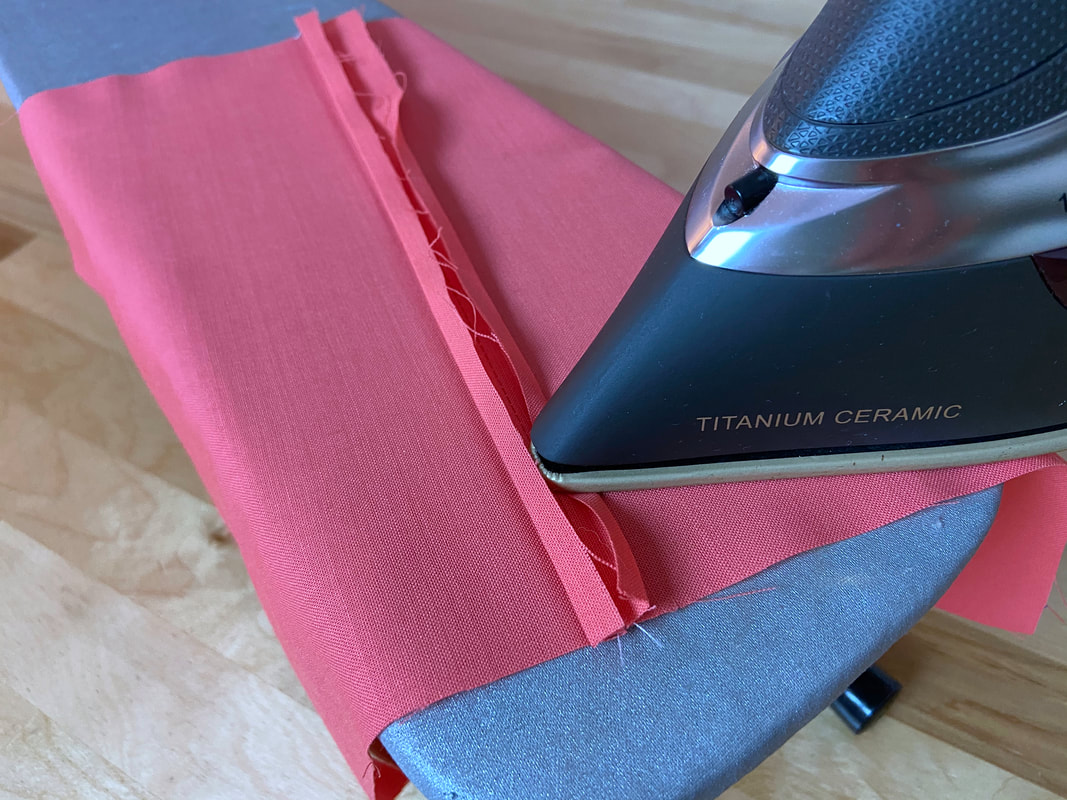
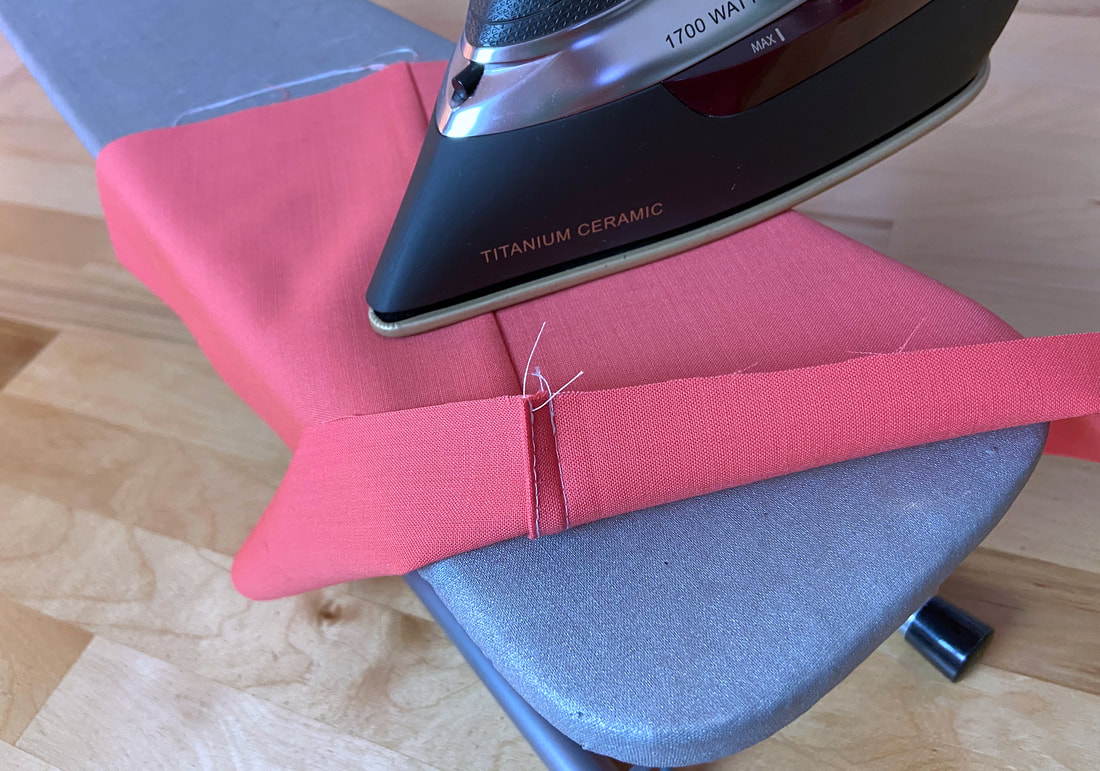
3. Once both seam allowance edges are ironed and folded in position, bring them together such that the folded edges align. Press the folded seam allowance layers one more time to stabilize the edges. 
Picture
4. Insert a few pins through the folded seam allowance edges or better yet, hand baste to keep them more securely in place.
Picture
5. Next, machine stitch the folded edges together right next to the fold lines as shown. The topstitch application will enclose all seam allowance raw edges, resulting in a finish that looks very similar to a regular French seam. 
Picture
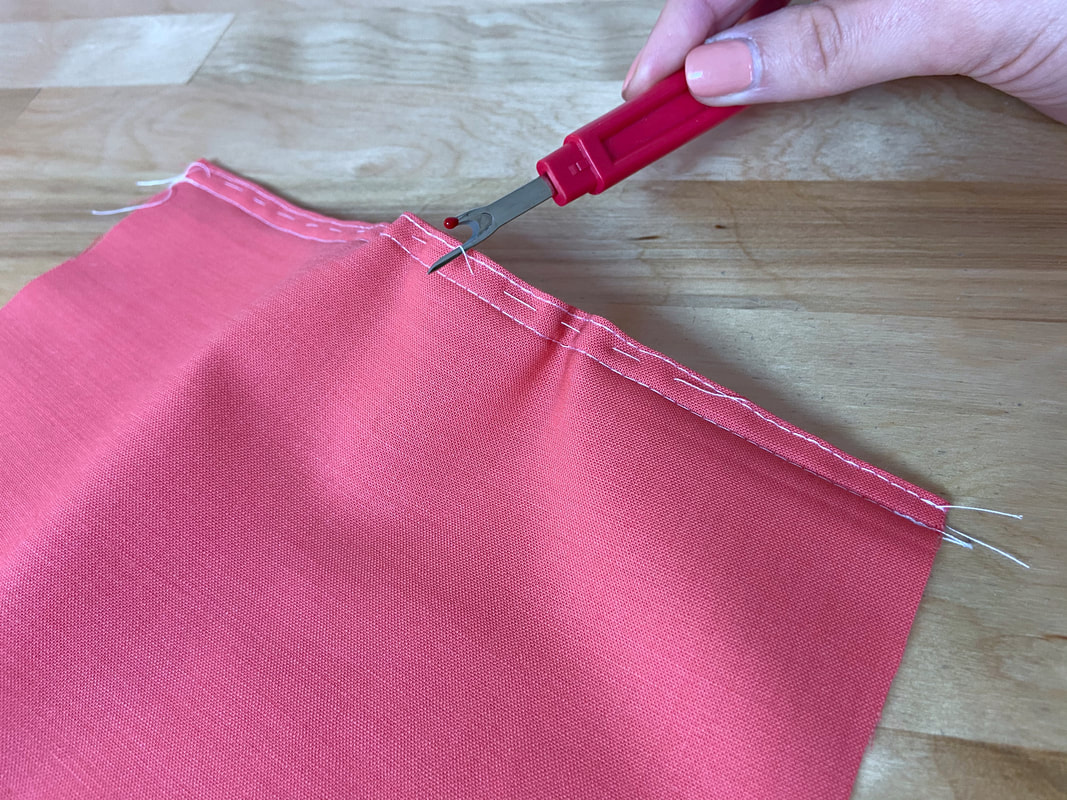
Once topstitched, remove the temporary hand basting using a seam ripper.
Picture
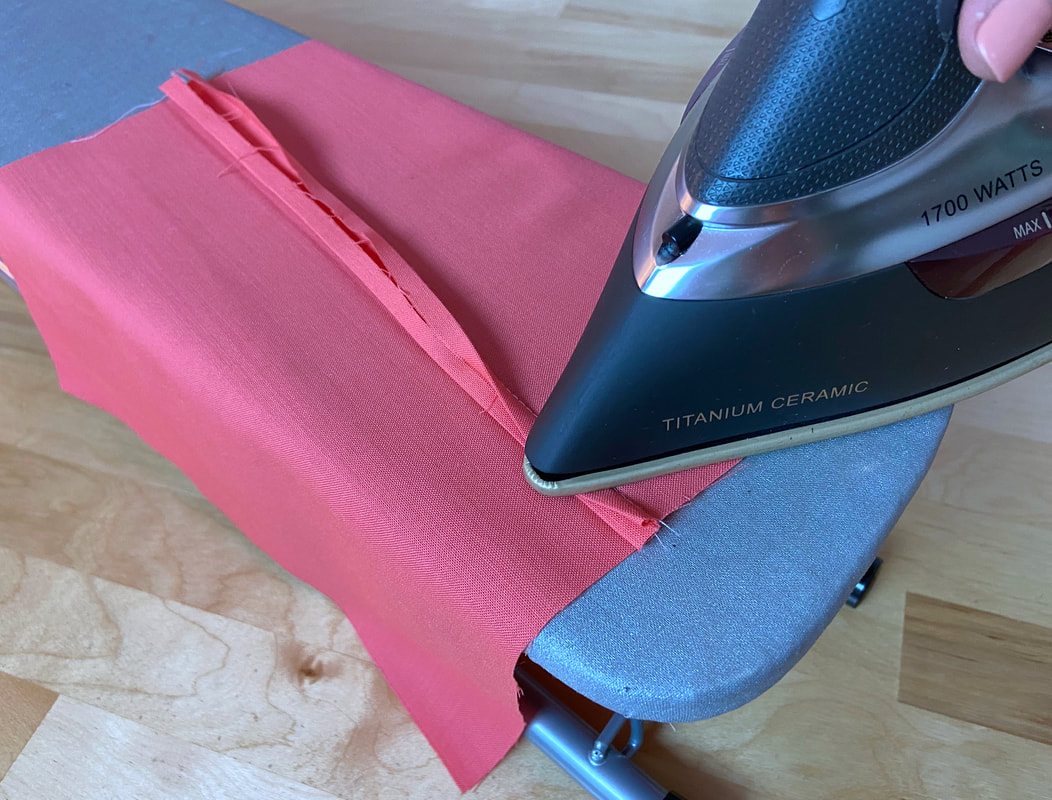
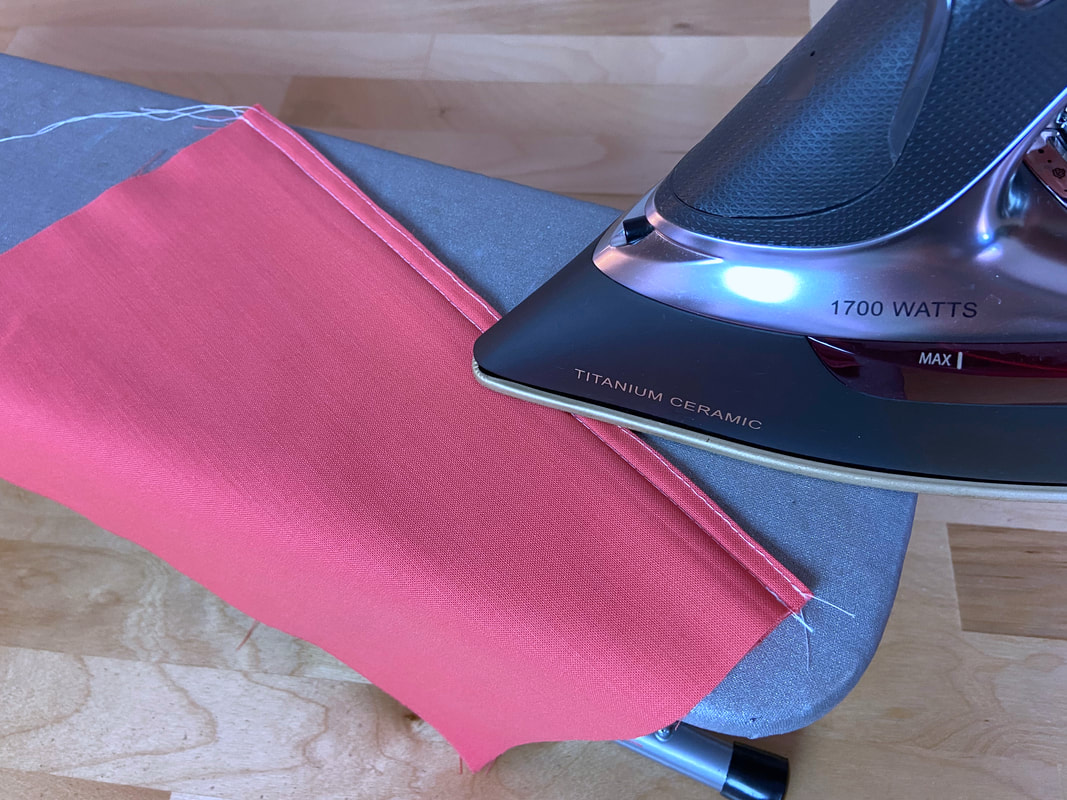
6. Iron the enclosed seam allowance in the direction it was stitched. 
Picture
7. To complete, iron the entire finished seam with the seam allowance pointing to a single direction- preferably towards the back of the garment. 
DMCA.com Protection Status
All content, including images and text, may not be copied, replicated, or redistributed without express written permission. This website is regularly screened and monitored for content protection.

Have A Personalized Sewing Question?

Ask It Here

Services

​Custom Apparel
Custom Bridal
​Sewing Tutorials
​

Company

About
Blog

Support

Contact
Terms of Service
DMCA.com Protection Status
© COPYRIGHT 2022. ALL RIGHTS RESERVED.
  • Sewing Tutorials
    • Basics >
      • Aligning Pattern Grainlines To Fabric
      • Preparing Fabrics For Sewing
      • Pinning Sewing Patterns To Fabric
      • Placing Sewing Patterns On Fabric For Cutting
      • Rotary Cutters or Fabric Scissors?
      • Cutting The Sewing Patterns
      • What Are Notches And How To Use Them In The Sewing Process
      • Transferring Notches From Pattern To Fabric
      • Transferring Seamlines to Fabric
      • Staystitching
      • Backstitching: A Complete Guide
      • Hand Basting: A Complete Guide
      • Sewing Continuous Bias Binding
    • Darts >
      • Marking And Transferring Darts To Fabric
      • What Are Darts And Dart Components
      • Folding, Pinning And Hand Basting Darts
      • Handling Dart Excess: Bulk And Tension
      • How To Sew A French Dart
      • How To Sew And Iron Single Pointed Darts
      • How To Sew And Iron Contour Darts
      • Sewing Darts With Decorative/Beaded Fabrics
    • Sewing Seams >
      • ​The Basics Of Seams And Seam Allowance
      • How To Sew A Straight Seam
      • Sewing Curved Seams
      • Sewing Corner Seams
      • Trimming And Grading Seam Excess
      • Notching/Clipping Seam Allowance for Tension Release
      • Sewing Topstitched Seams
      • Sewing Corded Seams
      • Sewing A Slot Seam
      • Sewing A Gathered Seam
      • Sewing Bias Seams
      • Sewing Seams With Ease
      • Sewing Seams With Crossing Seamlines
      • Sewing Unlike Fabric Seams
      • How To Iron Seams: Ironing Tools And Conventions
      • Sewing With Knit Fabrics
      • Understanding Stitch Length And Tension
      • Sewing Unique Fabric Seams
    • Seam Finishes >
      • Seam Finishing Techniques - Overview
      • Applying A Pinked Seam Finish
      • Applying A Bias Bound Seam Finish
      • Serging And Zigzag Seam Finishes
      • Sewing A Self-Bound Seam Finish
      • Sewing A French Seam Finish
      • Sewing A Hong Kong Seam Finish
      • Sewing A Mock French Seam Finish
      • Sewing A Turned-and-Stitched Seam Finish
      • Sewing Overcast Hand-Applied Seam Finishes
      • Sewing A Flat Felled Seam
      • Sewing A Hairline Seam Finish
    • Hem Finishes >
      • Garment Hem Finishes: Overview
      • ​Sewing A Double Fold Hem Finish
      • Sewing A Single Fold Hem Finish
      • Sewing Bound Hem Finishes
      • Sewing An Exposed Double Layer Bound Hem
      • Sewing A Folded-Up Bound Hem with Pre-folded Binding
      • Sewing A Hong Kong Hem Finish
      • Sewing A Band Hem Finish
      • Sewing A Bias Faced Hem Finish
      • Sewing A Twill Tape Hem Finish
      • Sewing A Rolled Hem Finish
      • Sewing A Shaped Hem Facing
      • Using Fusible Hem Tape And Webbing
      • Finishing A Lace Fabric Hem
      • Finishing A Leather Hem
      • Sewing Faced Hem Corners
      • How To Finish Lining At The Hem
      • Finishing Fabric Corners by Mitering >
        • Mitering Fabric Corners With A Full Bias Facing
        • Mitering Fabric Corners With Exposed Binding
      • Interfacing A Hemline: Lined And Unlined Examples
    • Sewing Pockets >
      • Curved Patch Pocket With Flap
      • Unlined Square Patch Pockets
      • Lined Patch Pockets: Two Ways
      • Extension On-Seam Pockets
      • Separate On-Seam Pocket
      • Front Hip Pockets
      • Bound Double Welt Pocket
      • Double Welt Pocket With Flap
      • Self-Welt Pocket (Using Single Fabric Layer)
      • Slanted Welt Pocket (Hand-Stitched)
      • Faced Slash Pockets: Overview >
        • Sewing A Faced Slit Pocket
        • Sewing A Rectangular Slash Pocket
        • Sew A Star-Shaped Faced Pocket
    • Sewing Zippers >
      • Sewing Zippers: General Information
      • Sewing A Centered Zipper
      • Sewing A Lapped Zipper
      • Sewing An Invisible Zipper
      • Sewing A Fly Front Zipper
      • Sewing A Closed-End Exposed Zipper (No Seam)
      • Sewing An Exposed Separating Zipper
      • Sewing Hand Stitched Zipper Applications
      • Sewing A Zipper Underlay
      • Sewing A Placket-Enclosed Separating Zipper
    • Sleeveless Finishes >
      • Sleeveless Armhole Finishes: General Information
      • Finishing Sleeveless Garments with Lining
      • Sewing A Folded-Under Bound Armhole Finish
      • Sewing A Shaped Armhole Facing
      • Finishing Armhole Edges With Exposed Binding
      • Finishing Armhole Edges With Decorative Trim
    • Neckline Finishes >
      • Sewing A Neck Shaped Facing
      • Sewing An All-In-One Neck Facing
      • Neck And Garment Opening Combination Facings >
        • Sewing An Extended Front-Neck Facing
        • Sewing A Separate Neck-Front Facing
      • Sewing A Bias Faced Neckline Finish
      • Sewing A Band Neckline Finish
      • Bound Neckline Finishes: Overview >
        • Sewing A Single Layer Bound Neckline
        • Finishing A Neckline With Pre-Folded Binding
        • Sewing A Double Layer Bound Neckline Finish
      • Sewing A Semi-Stretch Strip Band Neckline
      • Ribbed Neck Band And Classic Turtleneck
      • Decorative Neckline Finishes >
        • Sewing A Neckline With Decorative Inset
        • Sewing A Piped Cording Faced Neckline
        • Sewing Decorative Trim To A Finished Neckline
    • Finishing Facing Edges >
      • Finishing Facing Edges: Overview
      • Folded-And-Topstitched Overedge Facing Finish
      • Sewing A Bound Facing Edge Finish
      • Sewing A Hong Kong Facing Finish
      • Sewing A Rolled Edge Facing Finish
      • Sewing A Twill Tape Facing Edge Finish
      • Sewing An Overedge-Stitch Facing Finish
    • Extras >
      • A Complete Guide on Interfacing
      • Sewing Bound Spaghetti Straps
      • Sewing Spaghetti Straps To A Faced Neckline
      • Sewing Ruffles: Overview
      • Patterning And Sewing A Circle Ruffle
      • Sewing A Gathered Heading Ruffle
      • Sewing Double Layer Gathered Ruffles
      • Sewing A Gathered Ruffle Into A Seam
      • Sewing A Gathered Ruffle To A Fabric Edge
      • Sewing A Fabric Surface Slit
      • Sewing A Slit Seam
      • Hand-Applied Straight Stitches
      • Hand-Applied Blind Stitches
      • Hand-Applied Overedge Stitches
      • Hand-Applied Tack Stitches
      • Hand-Applied Decorative Stitches
  • Custom Apparel
    • Custom Bridal
  • Submit A Sewing Question
  • About
  • Blog