Doina Alexei
  • Sewing Tutorials
    • Basics >
      • Aligning Pattern Grainlines To Fabric
      • Preparing Fabrics For Sewing
      • Pinning Sewing Patterns To Fabric
      • Placing Sewing Patterns On Fabric For Cutting
      • Rotary Cutters or Fabric Scissors?
      • Cutting The Sewing Patterns
      • What Are Notches And How To Use Them In The Sewing Process
      • Transferring Notches From Pattern To Fabric
      • Transferring Seamlines to Fabric
      • Staystitching
      • Backstitching: A Complete Guide
      • Hand Basting: A Complete Guide
      • Sewing Continuous Bias Binding
    • Darts >
      • Marking And Transferring Darts To Fabric
      • What Are Darts And Dart Components
      • Folding, Pinning And Hand Basting Darts
      • Handling Dart Excess: Bulk And Tension
      • How To Sew A French Dart
      • How To Sew And Iron Single Pointed Darts
      • How To Sew And Iron Contour Darts
      • Sewing Darts With Decorative/Beaded Fabrics
    • Sewing Seams >
      • ​The Basics Of Seams And Seam Allowance
      • How To Sew A Straight Seam
      • Sewing Curved Seams
      • Sewing Corner Seams
      • Trimming And Grading Seam Excess
      • Notching/Clipping Seam Allowance for Tension Release
      • Sewing Topstitched Seams
      • Sewing Corded Seams
      • Sewing A Slot Seam
      • Sewing A Gathered Seam
      • Sewing Bias Seams
      • Sewing Seams With Ease
      • Sewing Seams With Crossing Seamlines
      • Sewing Unlike Fabric Seams
      • How To Iron Seams: Ironing Tools And Conventions
      • Sewing With Knit Fabrics
      • Understanding Stitch Length And Tension
      • Sewing Unique Fabric Seams
    • Seam Finishes >
      • Seam Finishing Techniques - Overview
      • Applying A Pinked Seam Finish
      • Applying A Bias Bound Seam Finish
      • Serging And Zigzag Seam Finishes
      • Sewing A Self-Bound Seam Finish
      • Sewing A French Seam Finish
      • Sewing A Hong Kong Seam Finish
      • Sewing A Mock French Seam Finish
      • Sewing A Turned-and-Stitched Seam Finish
      • Sewing Overcast Hand-Applied Seam Finishes
      • Sewing A Flat Felled Seam
      • Sewing A Hairline Seam Finish
    • Hem Finishes >
      • Garment Hem Finishes: Overview
      • ​Sewing A Double Fold Hem Finish
      • Sewing A Single Fold Hem Finish
      • Sewing Bound Hem Finishes
      • Sewing An Exposed Double Layer Bound Hem
      • Sewing A Folded-Up Bound Hem with Pre-folded Binding
      • Sewing A Hong Kong Hem Finish
      • Sewing A Band Hem Finish
      • Sewing A Bias Faced Hem Finish
      • Sewing A Twill Tape Hem Finish
      • Sewing A Rolled Hem Finish
      • Sewing A Shaped Hem Facing
      • Using Fusible Hem Tape And Webbing
      • Finishing A Lace Fabric Hem
      • Finishing A Leather Hem
      • Sewing Faced Hem Corners
      • How To Finish Lining At The Hem
      • Finishing Fabric Corners by Mitering >
        • Mitering Fabric Corners With A Full Bias Facing
        • Mitering Fabric Corners With Exposed Binding
      • Interfacing A Hemline: Lined And Unlined Examples
    • Sewing Pockets >
      • Curved Patch Pocket With Flap
      • Unlined Square Patch Pockets
      • Lined Patch Pockets: Two Ways
      • Extension On-Seam Pockets
      • Separate On-Seam Pocket
      • Front Hip Pockets
      • Bound Double Welt Pocket
      • Double Welt Pocket With Flap
      • Self-Welt Pocket (Using Single Fabric Layer)
      • Slanted Welt Pocket (Hand-Stitched)
      • Faced Slash Pockets: Overview >
        • Sewing A Faced Slit Pocket
        • Sewing A Rectangular Slash Pocket
        • Sew A Star-Shaped Faced Pocket
    • Sewing Zippers >
      • Sewing Zippers: General Information
      • Sewing A Centered Zipper
      • Sewing A Lapped Zipper
      • Sewing An Invisible Zipper
      • Sewing A Fly Front Zipper
      • Sewing A Closed-End Exposed Zipper (No Seam)
      • Sewing An Exposed Separating Zipper
      • Sewing Hand Stitched Zipper Applications
      • Sewing A Zipper Underlay
      • Sewing A Placket-Enclosed Separating Zipper
    • Sleeveless Finishes >
      • Sleeveless Armhole Finishes: General Information
      • Finishing Sleeveless Garments with Lining
      • Sewing A Folded-Under Bound Armhole Finish
      • Sewing A Shaped Armhole Facing
      • Finishing Armhole Edges With Exposed Binding
      • Finishing Armhole Edges With Decorative Trim
    • Neckline Finishes >
      • Sewing A Neck Shaped Facing
      • Sewing An All-In-One Neck Facing
      • Neck And Garment Opening Combination Facings >
        • Sewing An Extended Front-Neck Facing
        • Sewing A Separate Neck-Front Facing
      • Sewing A Bias Faced Neckline Finish
      • Sewing A Band Neckline Finish
      • Bound Neckline Finishes: Overview >
        • Sewing A Single Layer Bound Neckline
        • Finishing A Neckline With Pre-Folded Binding
        • Sewing A Double Layer Bound Neckline Finish
      • Sewing A Semi-Stretch Strip Band Neckline
      • Ribbed Neck Band And Classic Turtleneck
      • Decorative Neckline Finishes >
        • Sewing A Neckline With Decorative Inset
        • Sewing A Piped Cording Faced Neckline
        • Sewing Decorative Trim To A Finished Neckline
    • Finishing Facing Edges >
      • Finishing Facing Edges: Overview
      • Folded-And-Topstitched Overedge Facing Finish
      • Sewing A Bound Facing Edge Finish
      • Sewing A Hong Kong Facing Finish
      • Sewing A Rolled Edge Facing Finish
      • Sewing A Twill Tape Facing Edge Finish
      • Sewing An Overedge-Stitch Facing Finish
    • Extras >
      • A Complete Guide on Interfacing
      • Sewing Bound Spaghetti Straps
      • Sewing Spaghetti Straps To A Faced Neckline
      • Sewing Ruffles: Overview
      • Patterning And Sewing A Circle Ruffle
      • Sewing A Gathered Heading Ruffle
      • Sewing Double Layer Gathered Ruffles
      • Sewing A Gathered Ruffle Into A Seam
      • Sewing A Gathered Ruffle To A Fabric Edge
      • Sewing A Fabric Surface Slit
      • Sewing A Slit Seam
      • Hand-Applied Straight Stitches
      • Hand-Applied Blind Stitches
      • Hand-Applied Overedge Stitches
      • Hand-Applied Tack Stitches
      • Hand-Applied Decorative Stitches
  • Custom Apparel
    • Custom Bridal
  • Submit A Sewing Question
  • About
  • Blog

How To Sew A Traditional Band Neckline Finish

What Is A Band Neckline
A band neckline is a great alternative for medium to heavy weight fabrics. It provides a fully enclosed finish for all the neck raw edges, and features a seamline that becomes part of the garment design. 
Picture
A banded neckline is finished with a separate shaped fabric strip which is faced to form the band. This band is then attached to the garment’s neckline to complete the finish. 
The seam that connects the garment to the band is, of course, visible on the face of the garment and located anywhere from 1” to 3” from the finished neckline edge. The seam location depends on the width of the band. ​
Picture
​The band itself is fully finished with a facing, thus when attached to the garment, all raw edges are encased and stitched on the inside of this facing. 
Sewing a band neckline requires separate patterns for the band and its facing.  The band completes the garment while its facing clean finishes it. 
Picture
Conventionally, the facing pieces are cut from the same patterns as the band since they are the identical mirror copy of each other. 
Both band and facing should be interfaced for added durability and structure. In some cases, only the band is interfaced and the facing is left as is- your pattern set will most likely provide these specifications. ​
The pattern pieces for a neckline band are similar to a regular shaped facing but usually narrower in width.  
Picture
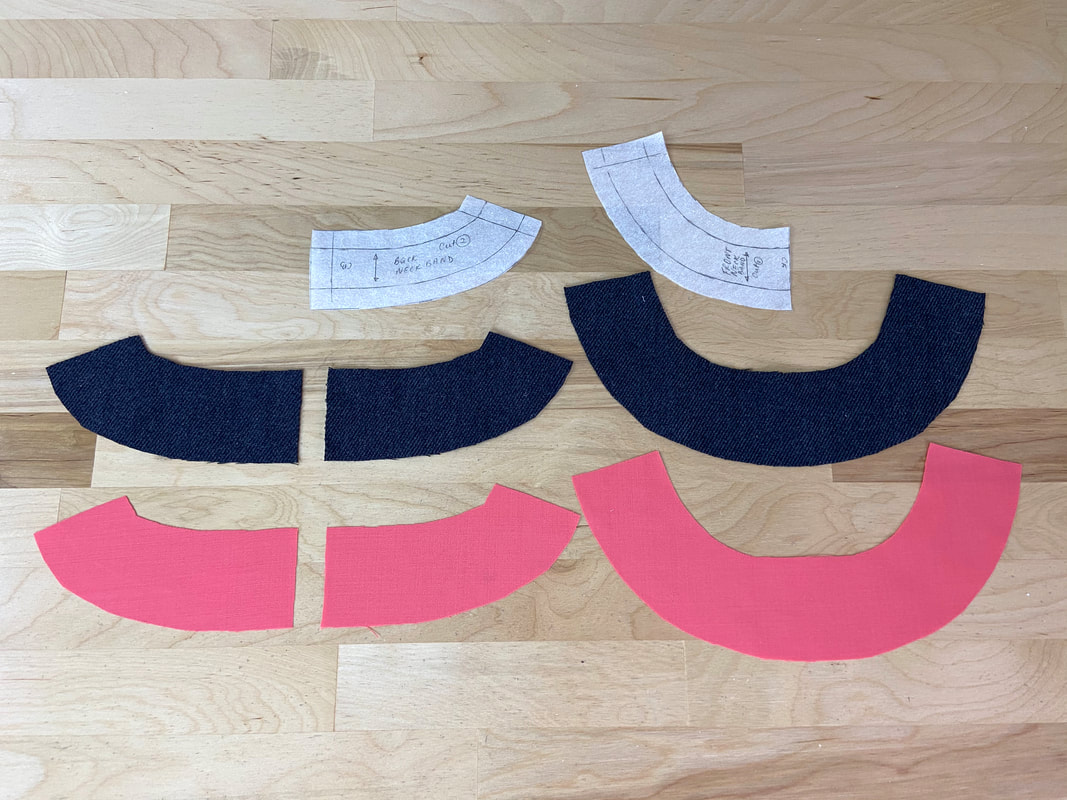
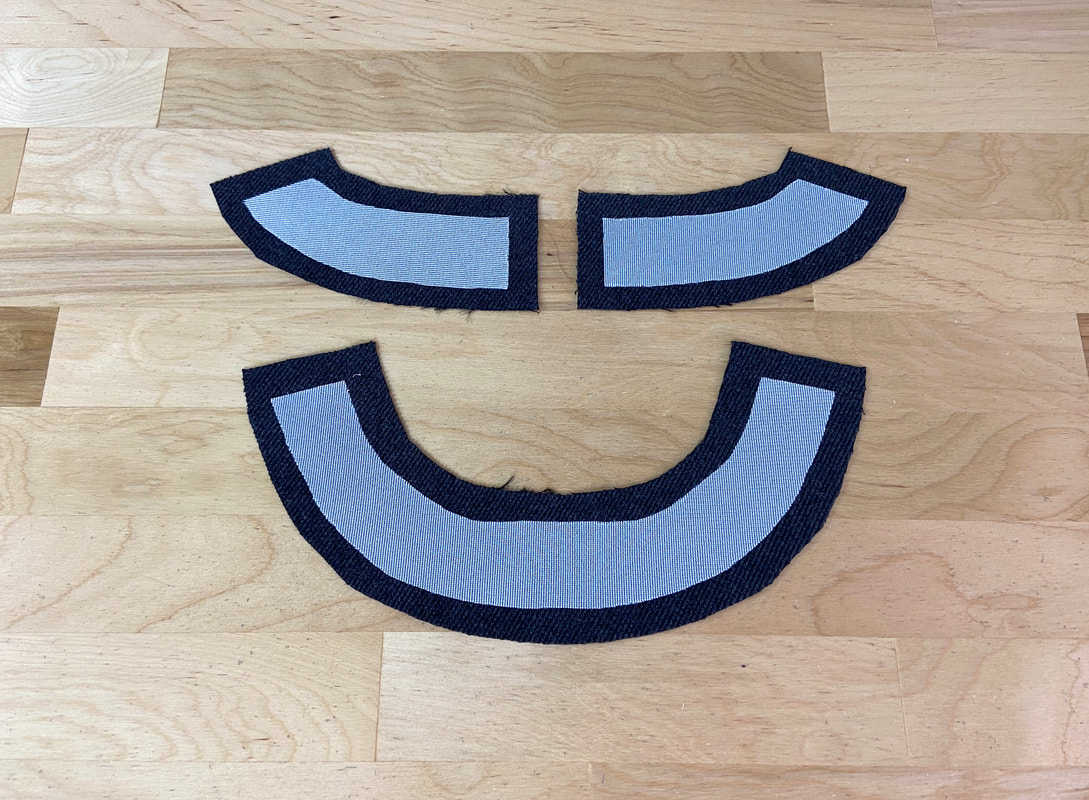
Assuming the neckline has a center back opening (housing a zipper), the band will consist of two identical center back pieces (one pattern), and one full front piece (second pattern). These two patterns can also be used to cut the facing portions.

How To Sew A Band Neck Finish

Picture
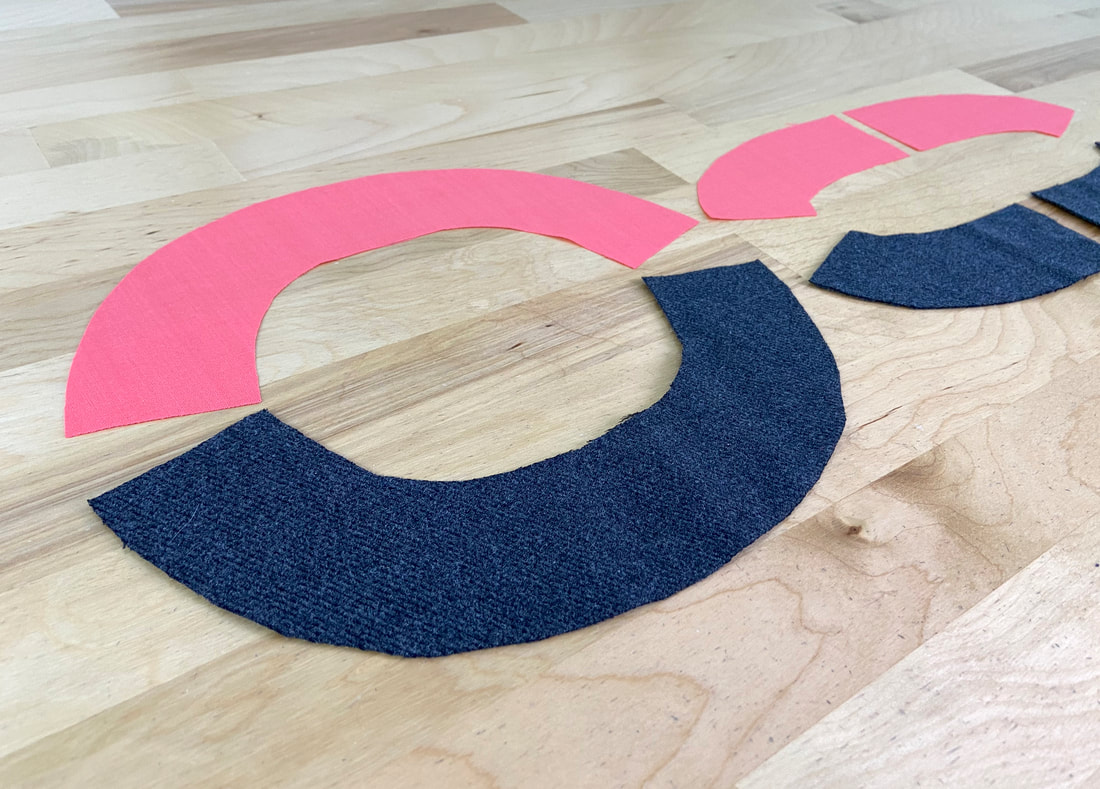
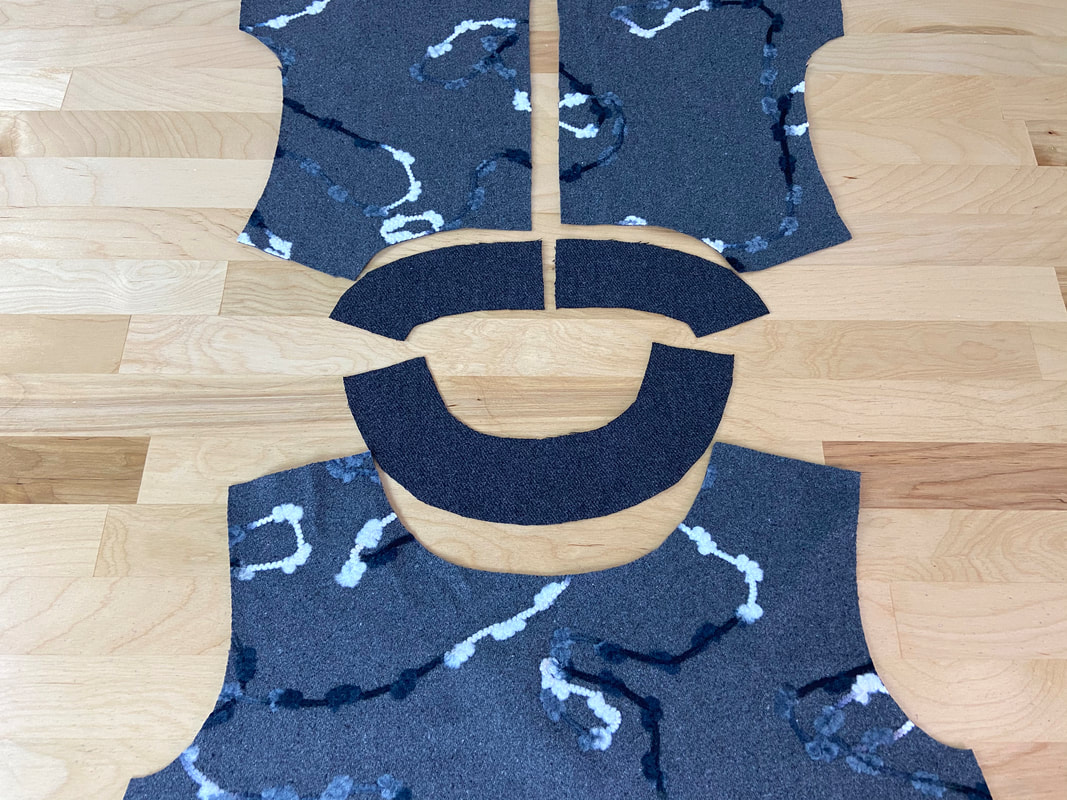
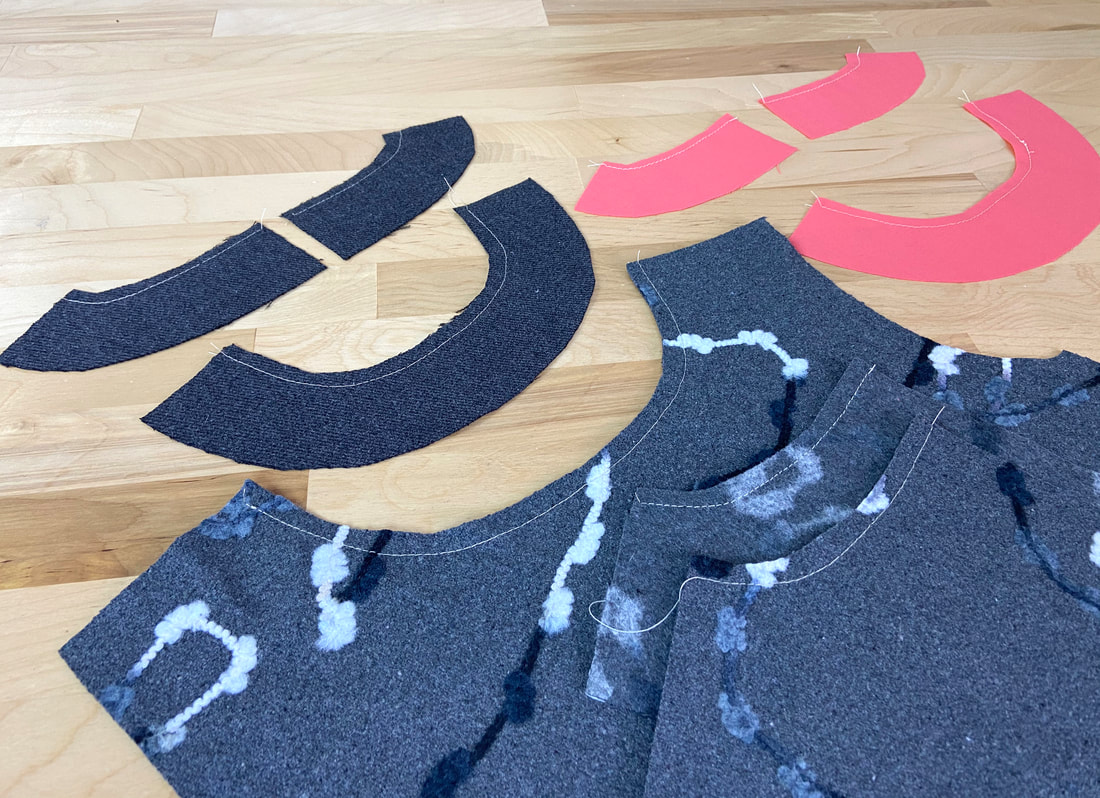
1. Cut out the neck band pieces and its corresponding facing pieces. Place all the pieces next to the corresponding garment edges and make sure their fabric face sides are matching and aligning as they should. 
Picture
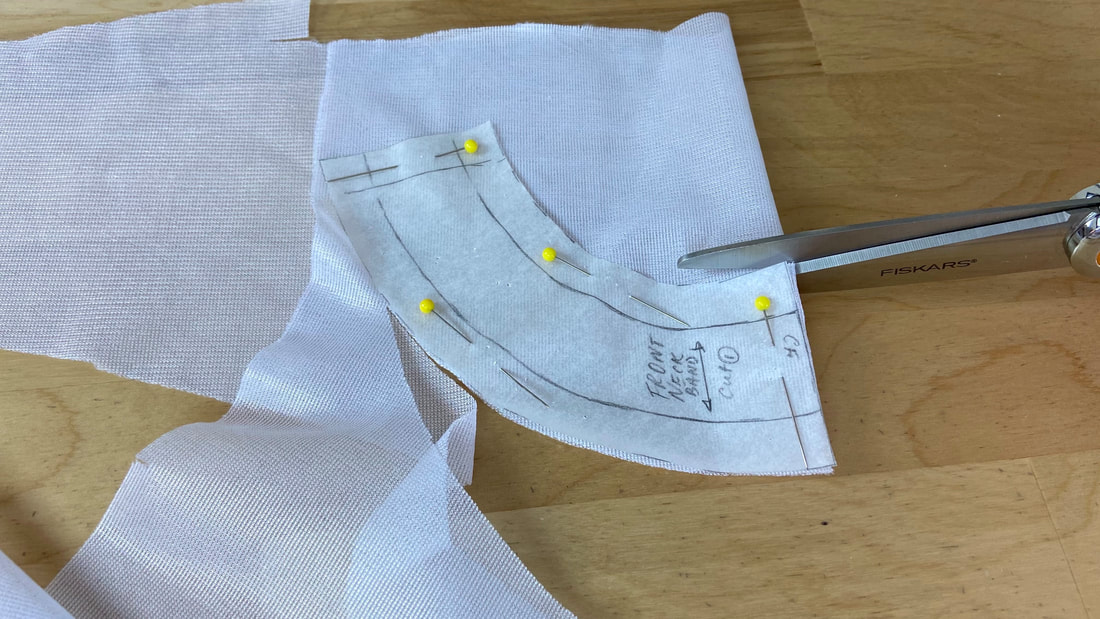
2. Use the same patterns to cut the interfacing pieces only for the band self portions. The facing will be left as is. Choose the interfacing that is most appropriate for the fabric at hand. If working with fusible interfacing, make sure the adhesive side corresponds to the wrong side of each piece. ​
Picture
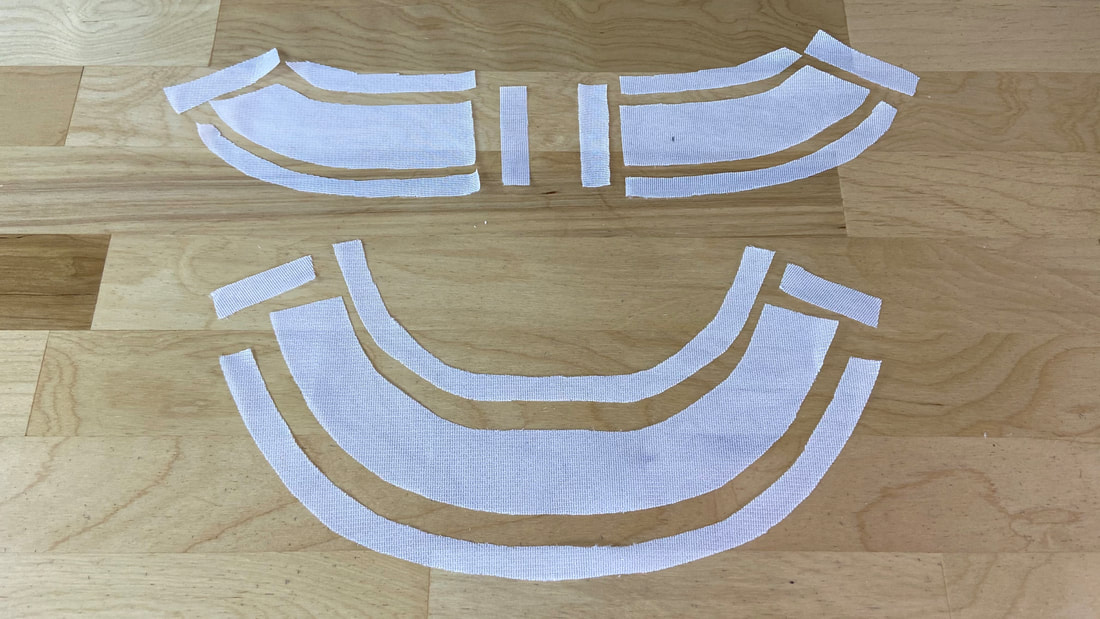
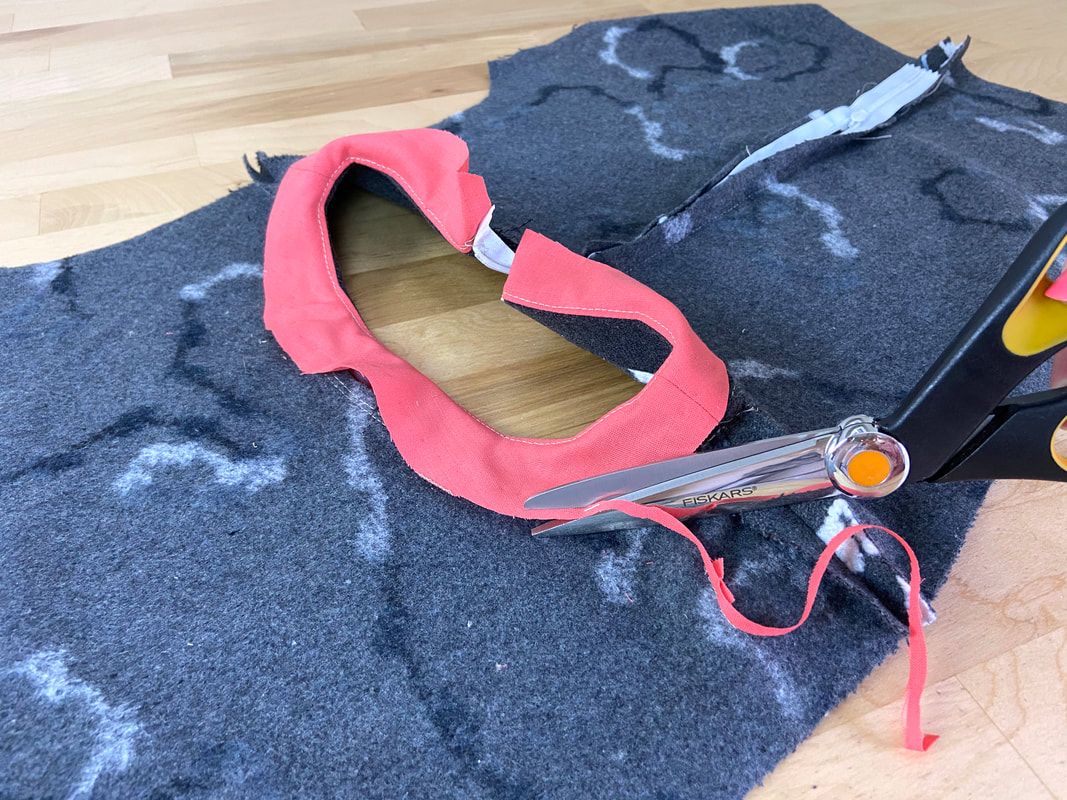
3. Trim the interfacing by 1/2" along each edge.
Picture
Picture
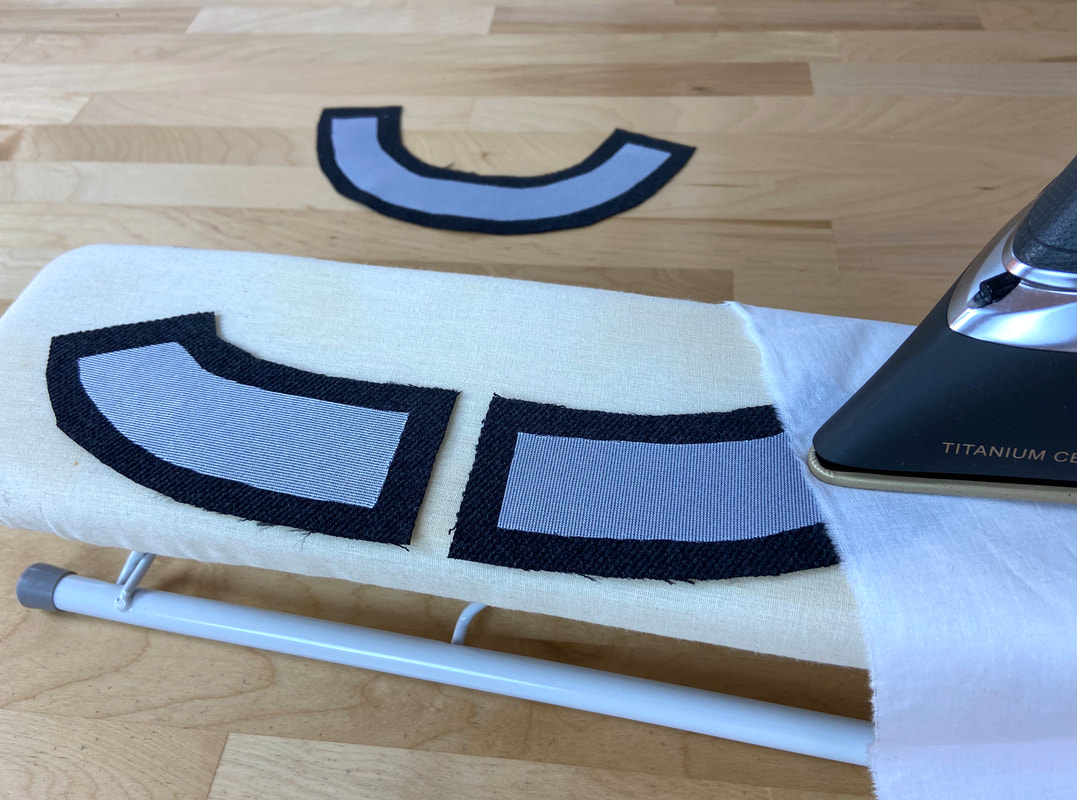
4. Attach the interfacing by fusing it to the wrong side of each corresponding neck band piece. Follow the steps in this tutorial for more guidance on this process: A Complete Guide on Interfacing
Picture
5. Staystitch all garment neckline, band and facing edges before proceeding with the sewing process. 
​Staystitching is used as a stabilizer to prevent the curved edges from stretching and losing their shape during the construction process. It is especially necessary on neck edges, particularly when the fabric is loosely woven and lacks structure. 
Picture
6. Align the shoulder seams of the band pieces, pin and stitch them together at the designated seam allowance - 1/2” in this case. 
Picture
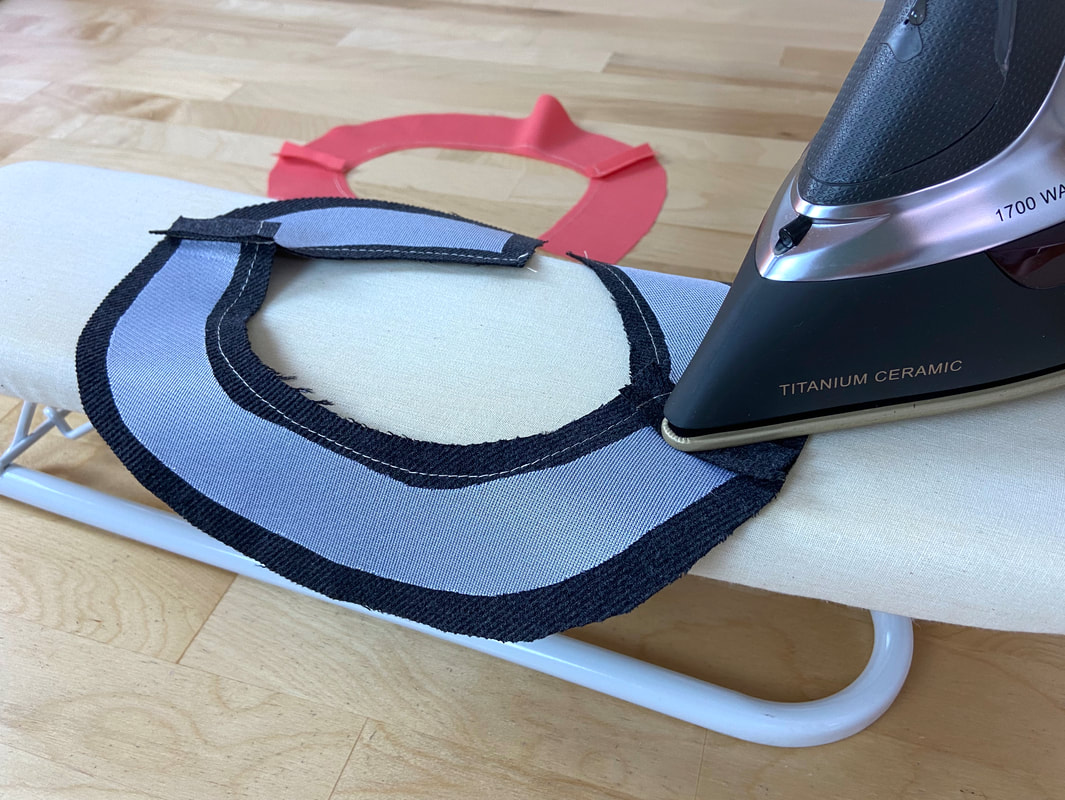
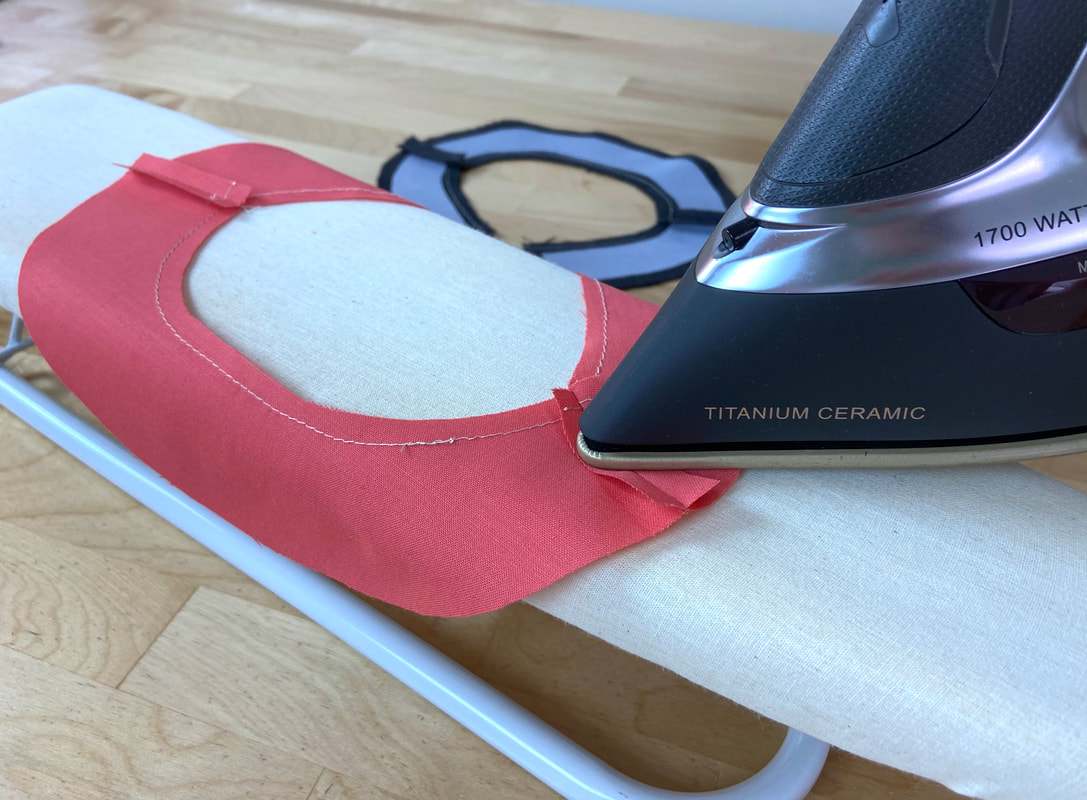
7. Trim the seam allowances halfway down if needed to minimize bulk. Open and iron them flat on each shoulder seam as shown. 
Picture
Repeat the trimming and ironing process on the facing shoulder seams. 
At this point, you can either connect the band to the garment first and apply the facing after, or you can attach the facing to the top edge of the band first, then sew the entire faced band to the garment after. In this tutorial, the second option is used. 
Picture
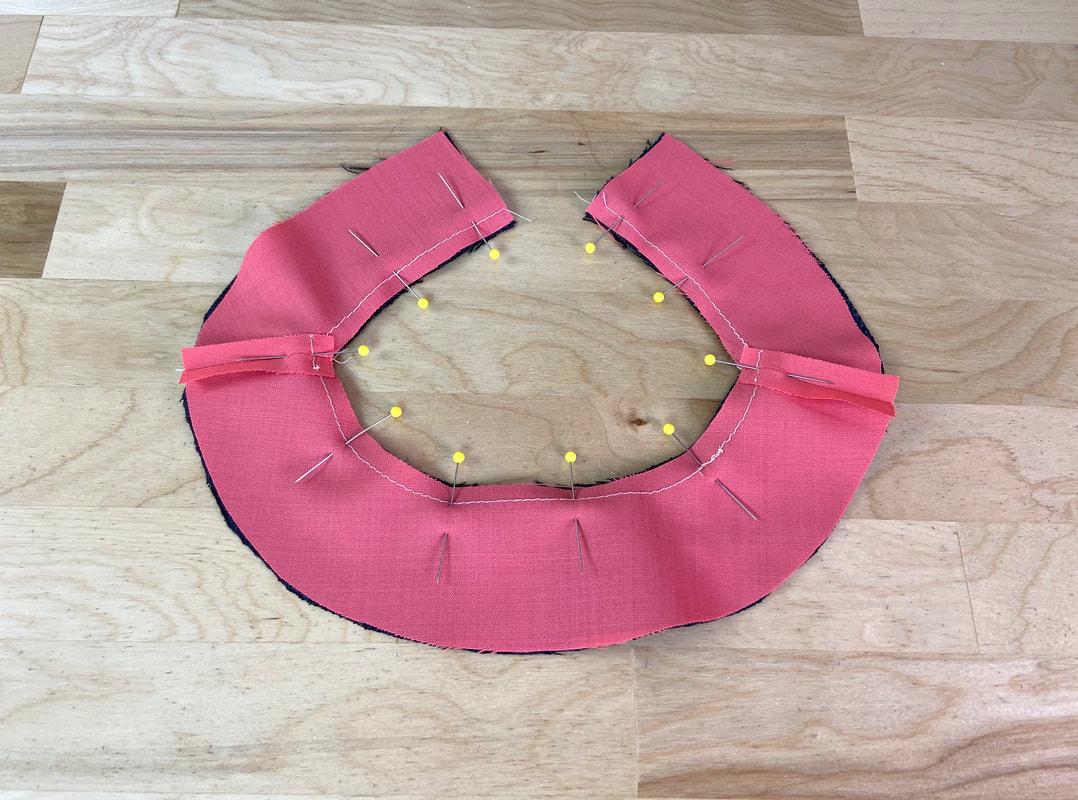
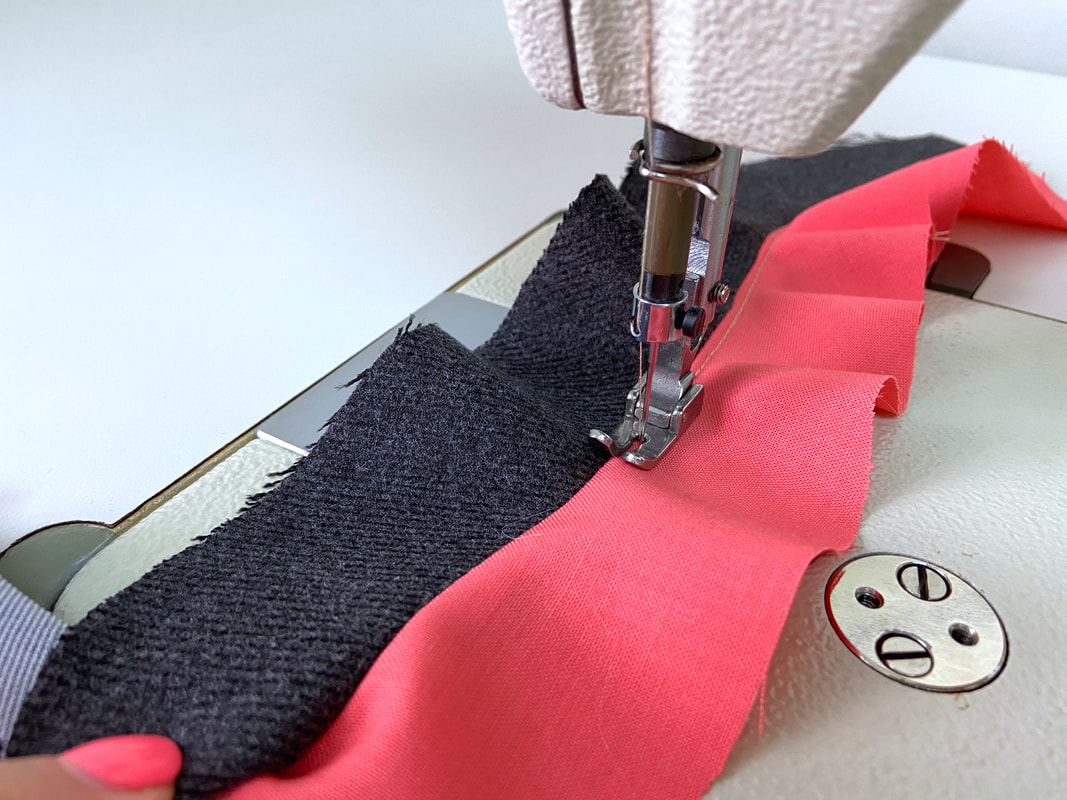
8. Place the facing on top of the band such that the shoulder seams are matching and fabric right sides are touching. Align the top edge of the facing to that of the band, and insert pins horizontally as shown. Hand baste for extra stability if needed.
Picture
9. Stitch from one end of the garment opening to the other end, following the designated seam allowance - ½” in this example.
Picture
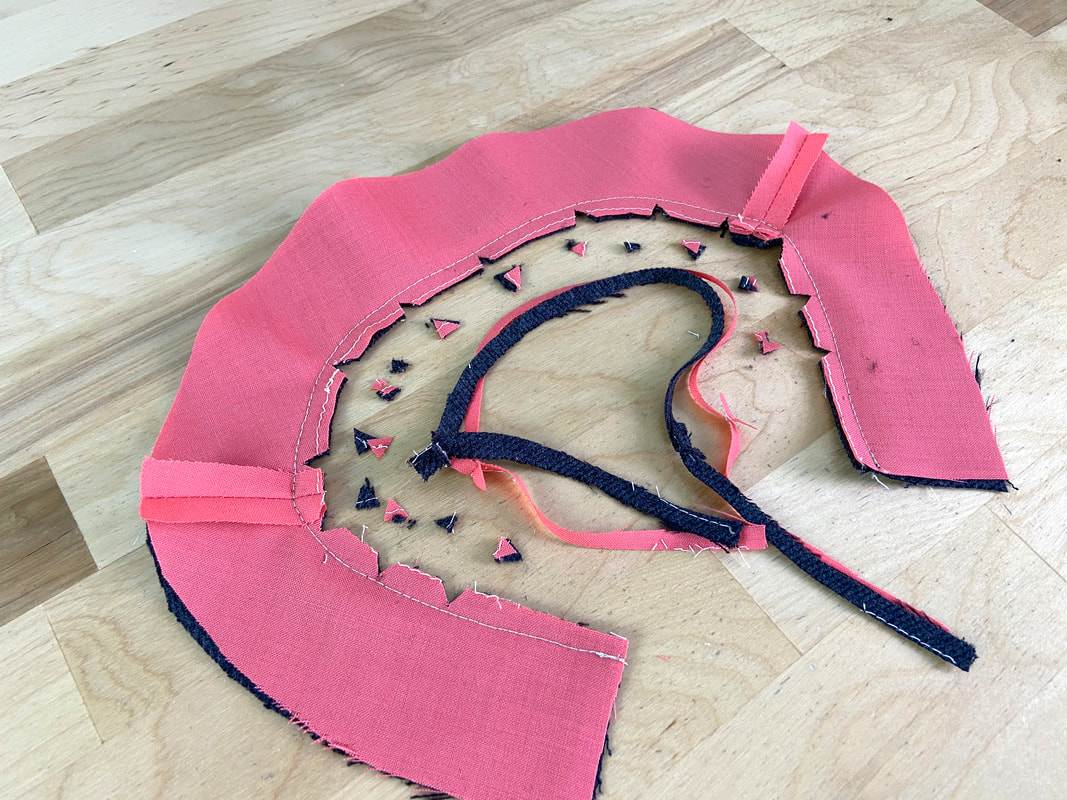
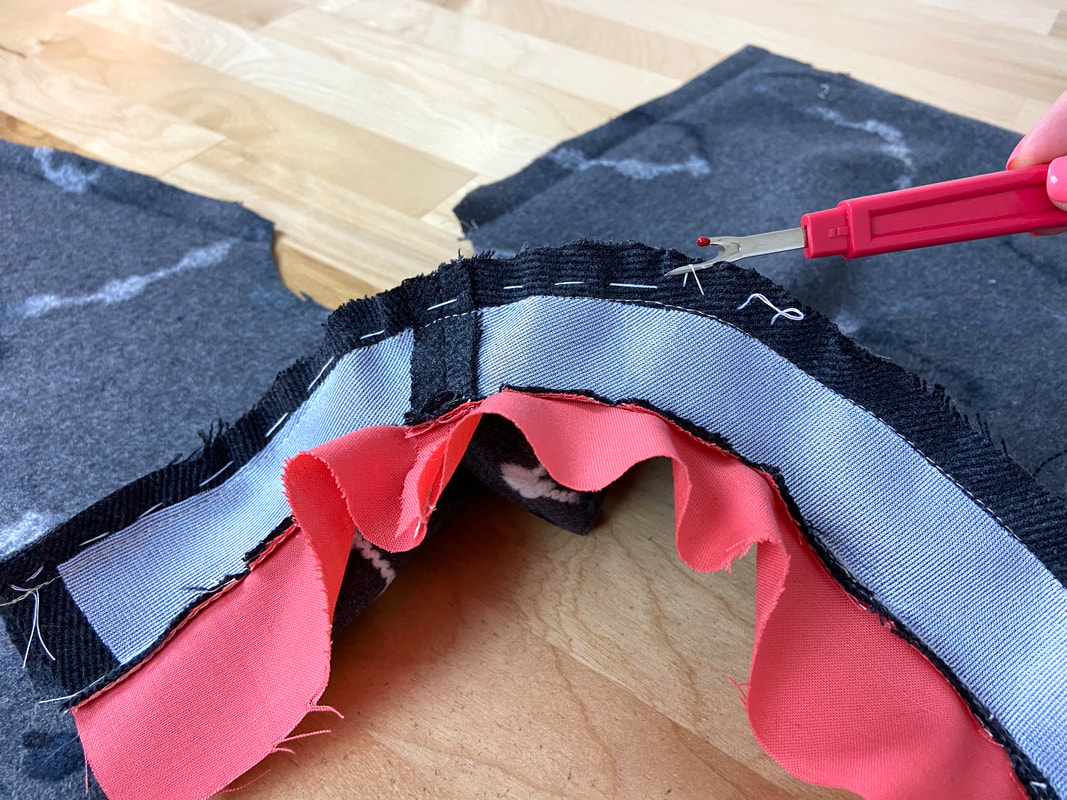
10. To minimize bulk and release tension in this curved edge, trim the seam allowance down to half its width and notch the seam allowance with wedge clips as shown. 
More on notching for tension release is covered in this tutorial: Notching/Clipping Seam Allowance for Tension Release
Picture
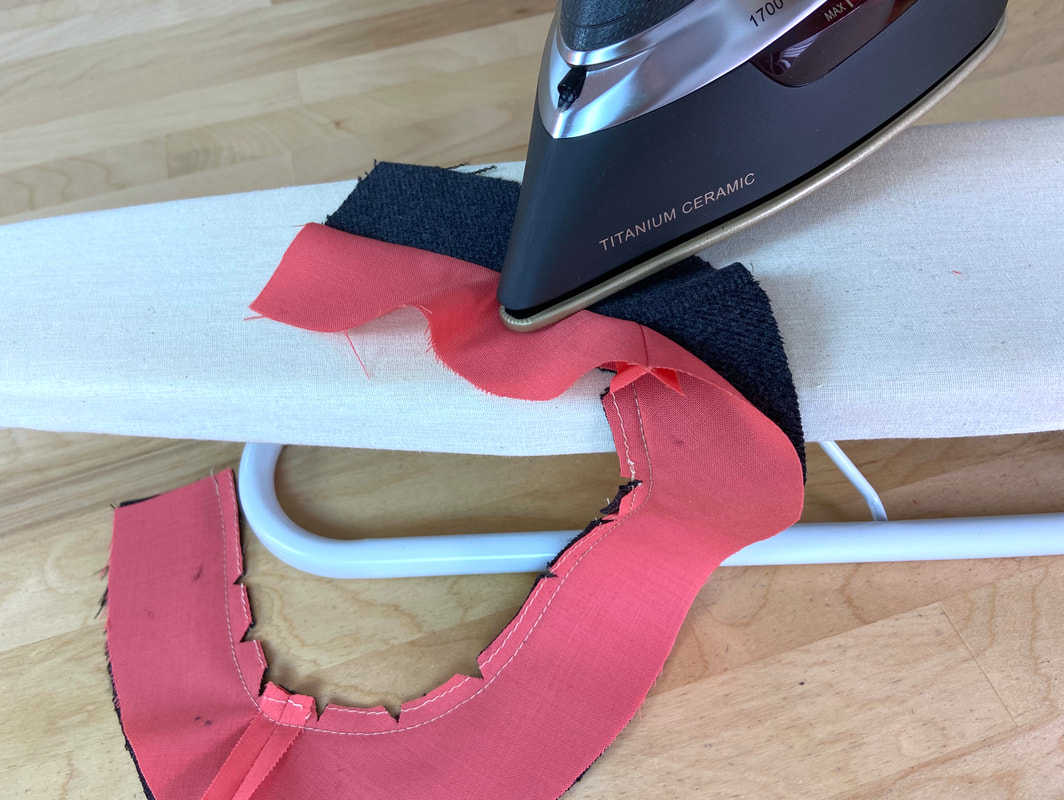
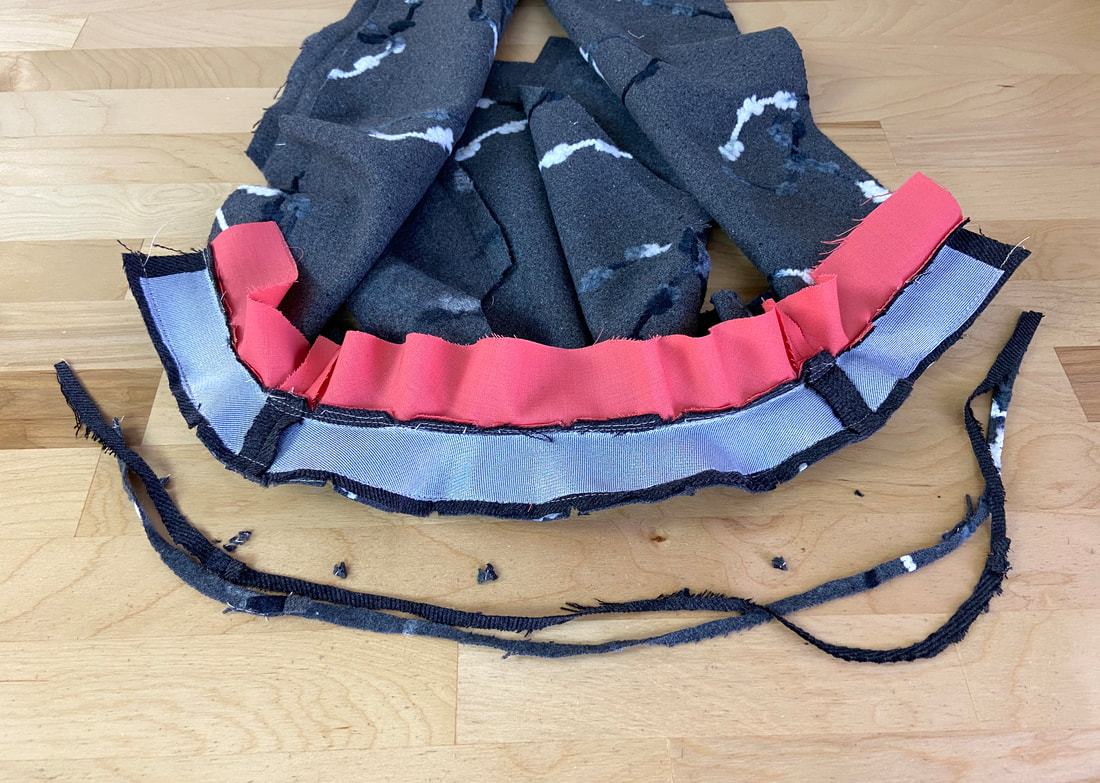
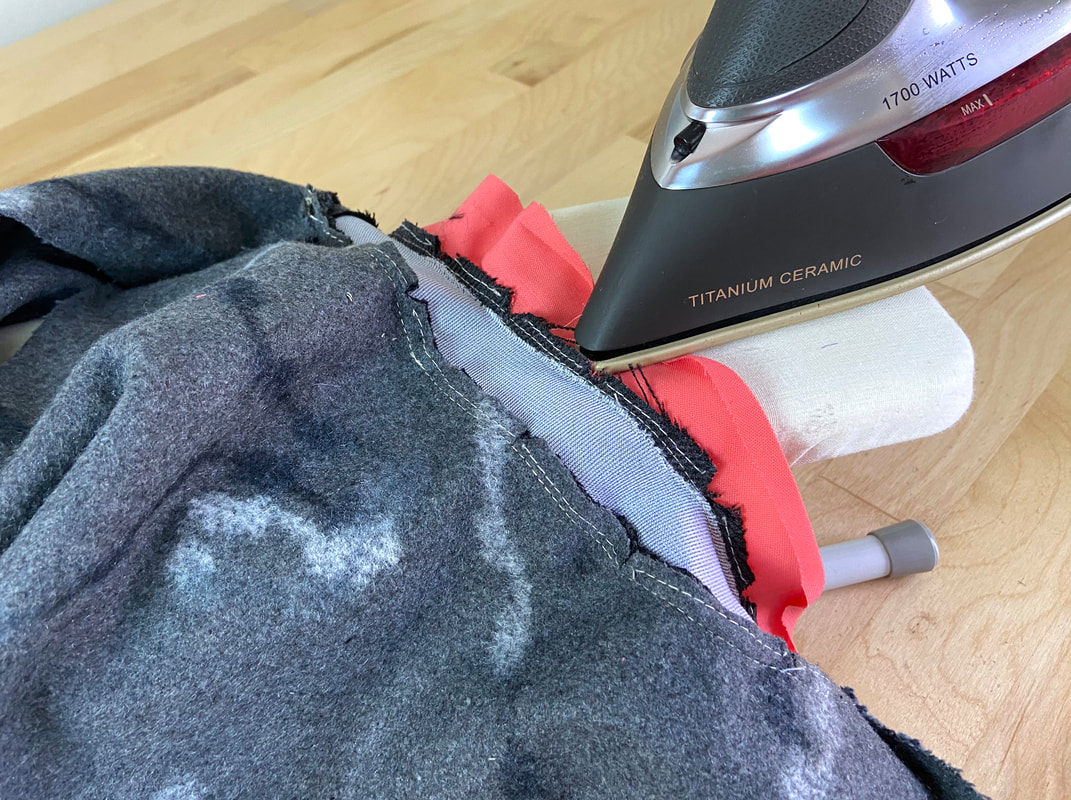
11. Iron the seam with the facing layer and all seam allowance pointing away from the band. 
Picture
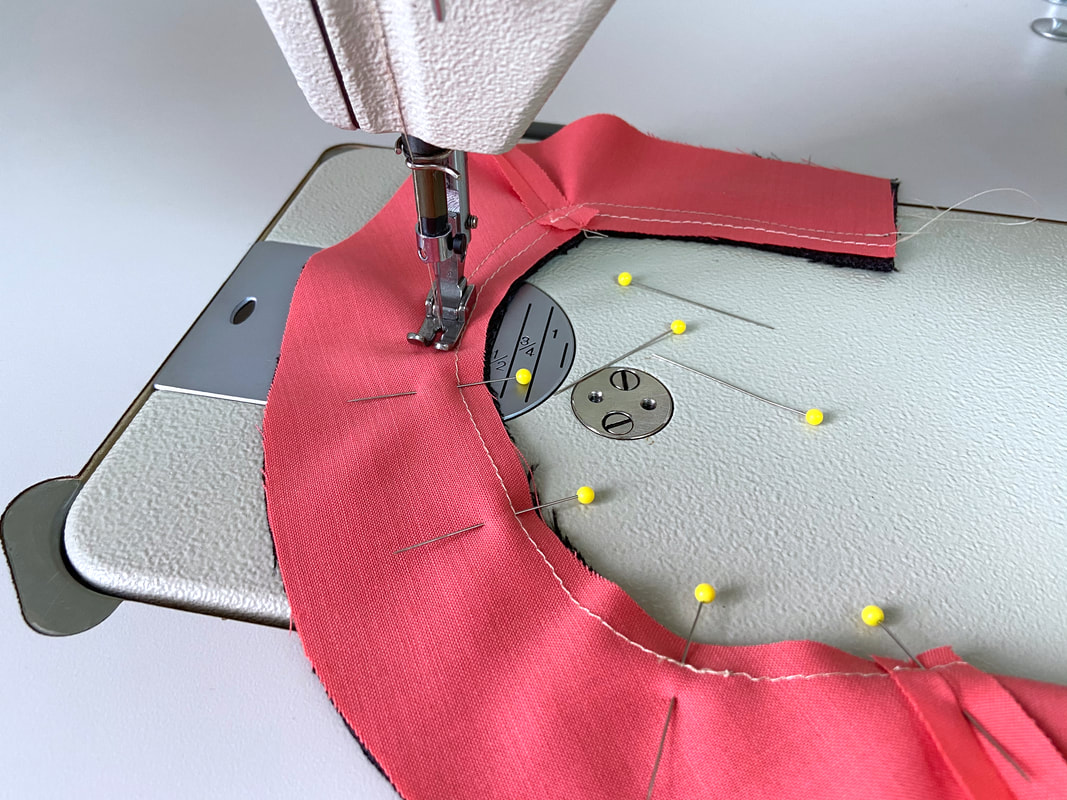
12. Understitch next to the seamline through the facing and seam allowance layers underneath. This stitch should be located at about 1/8” from the seamline and will serve to keep the band neckline flat. 
Picture
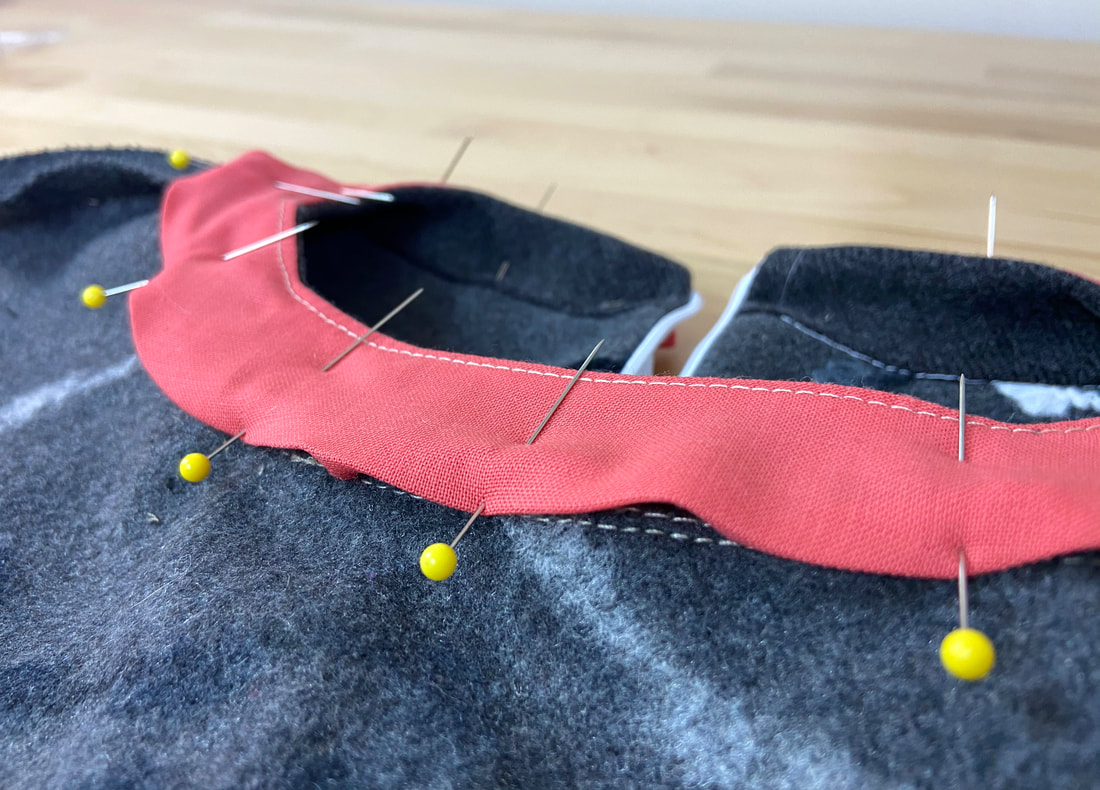
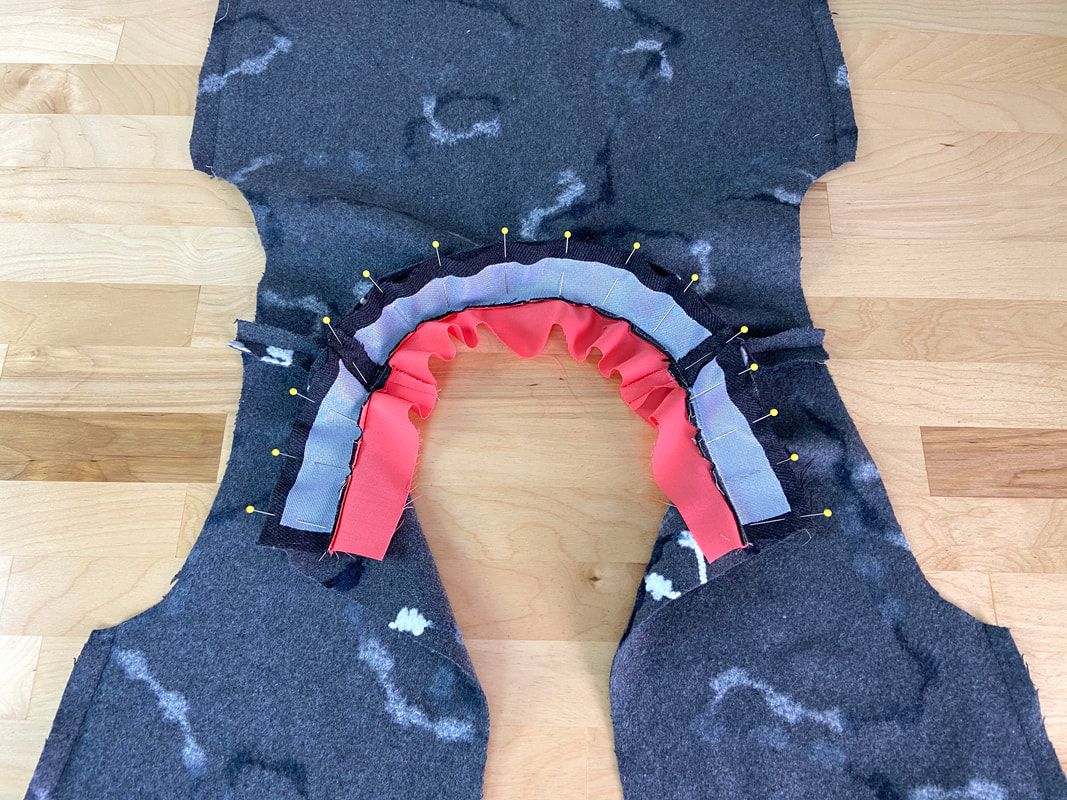
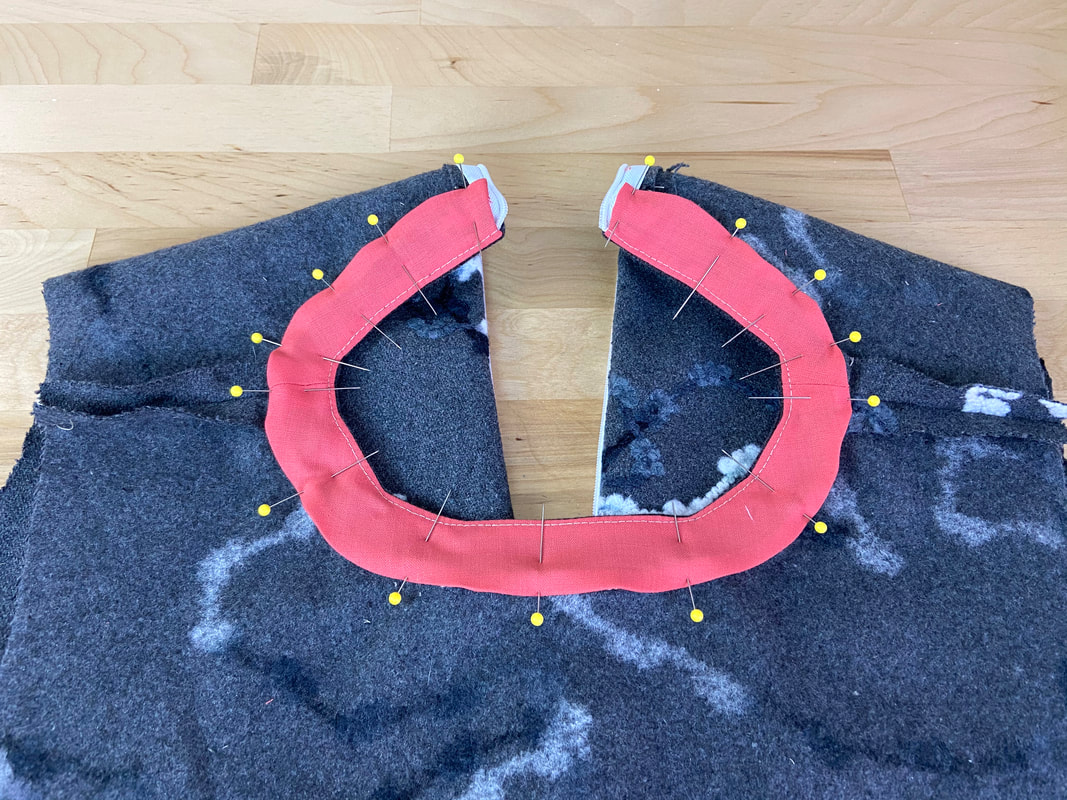
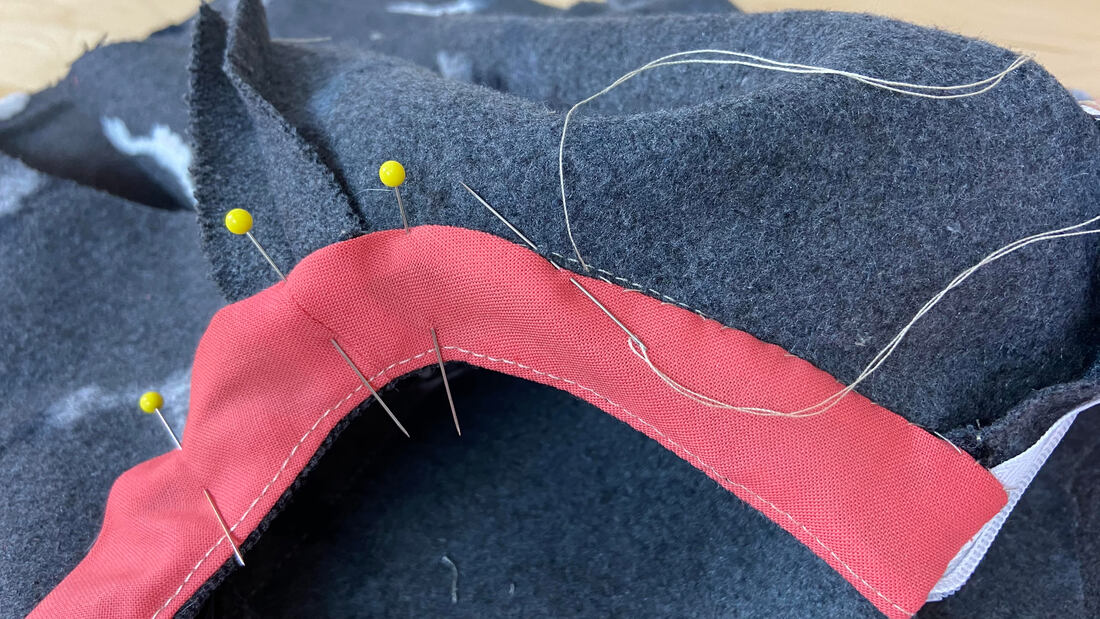
13. Next, let's connect the faced band to the garment neckline. Match the bottom edge of the band (interfaced layer) to the garment neck edge with face sides touching and shoulder seams aligning. ​It is easiest to first match the shoulder seams then align and pin the rest of the neckline to the band edge. Pin horizontally as shown.
Picture
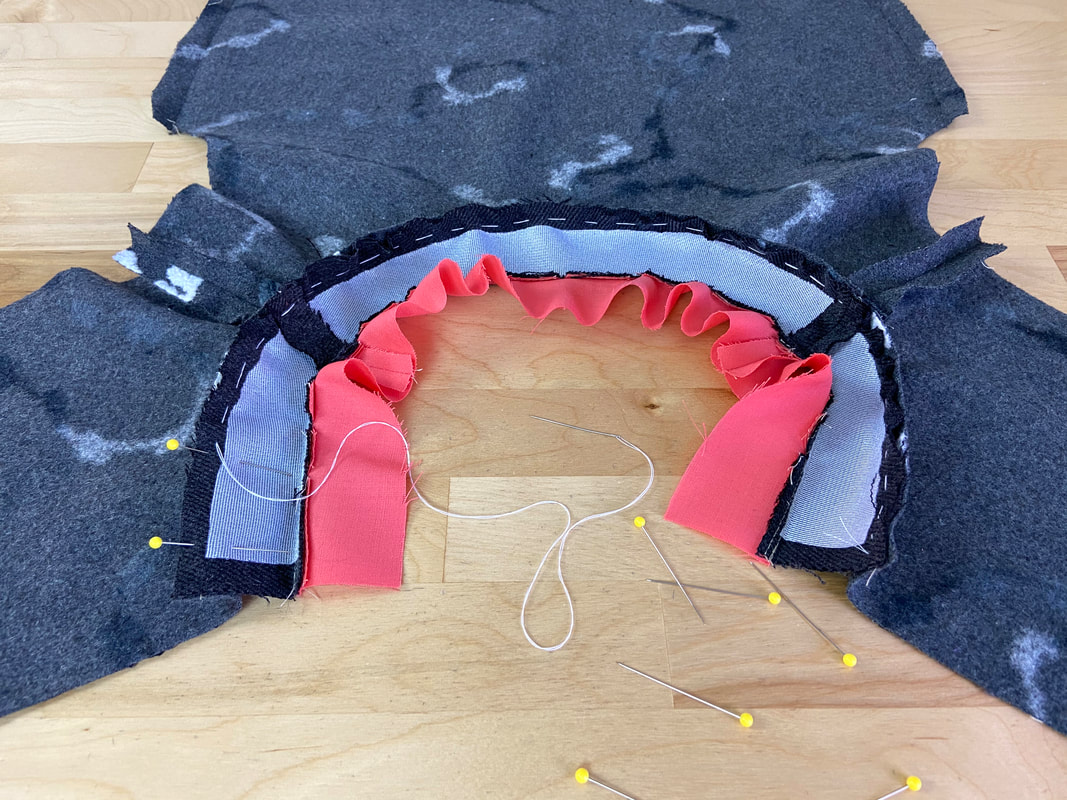
At this point, it may help to hand baste for extra stability prior to machine stitching.
Picture
Picture
14. Machine stitch the two layers together at the designated seam allowance (1/2” in this case). Start on one end of the garment opening and end at the other. Backstitch at the beginning and end of the stitch and remove the hand basting once complete. 
Picture
15. When finished, trim the seam allowance down to half its width. Clip wedge notches into the seam allowance to release strain and tension thus allowing the seam to lay flat. 
Picture
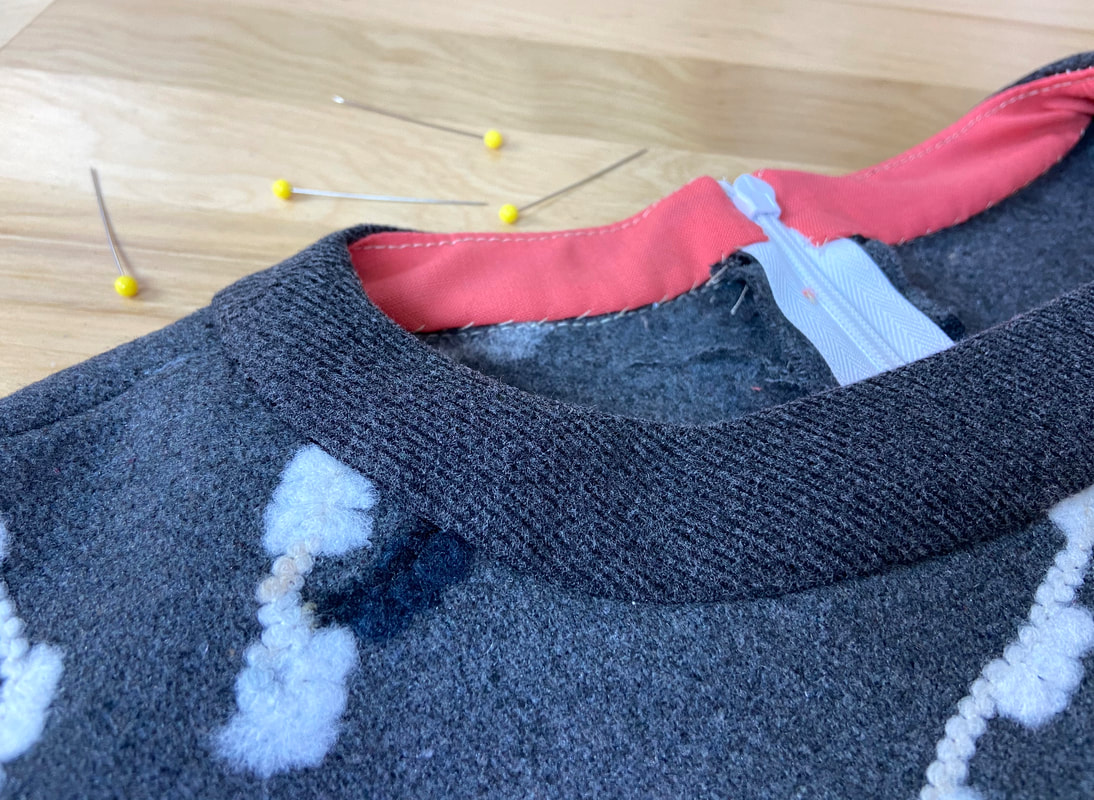
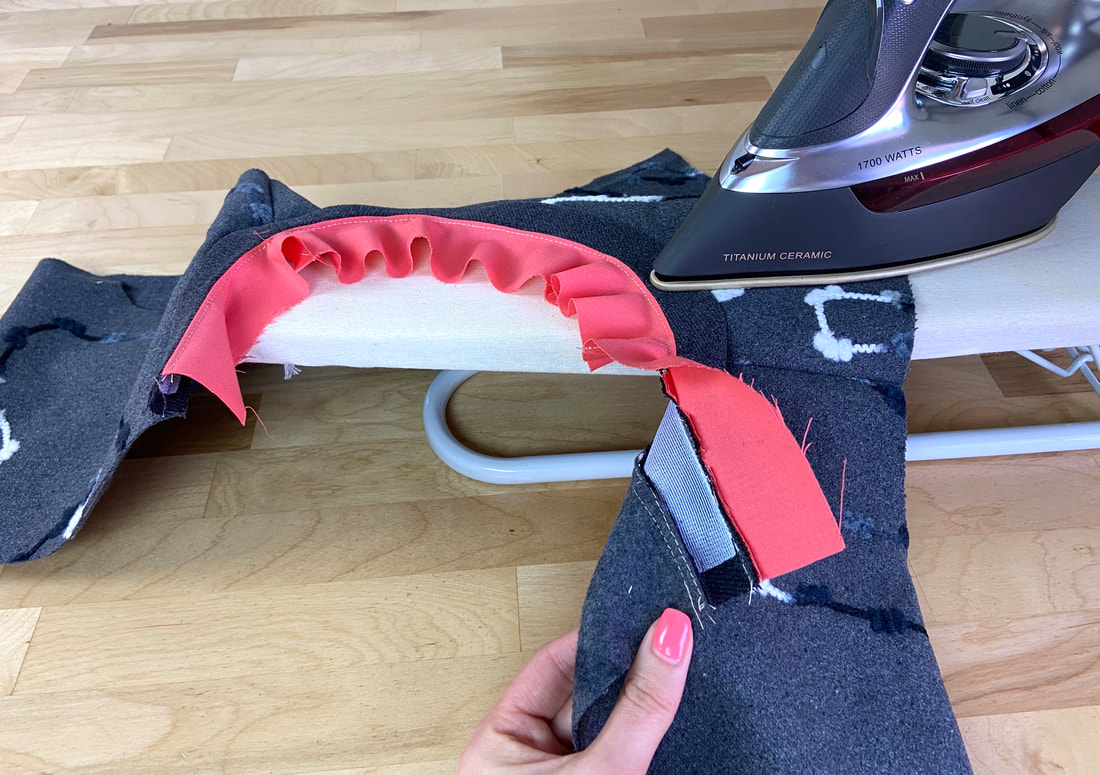
16. Iron the seam with the seam allowance pointing up, towards the band. 
Picture
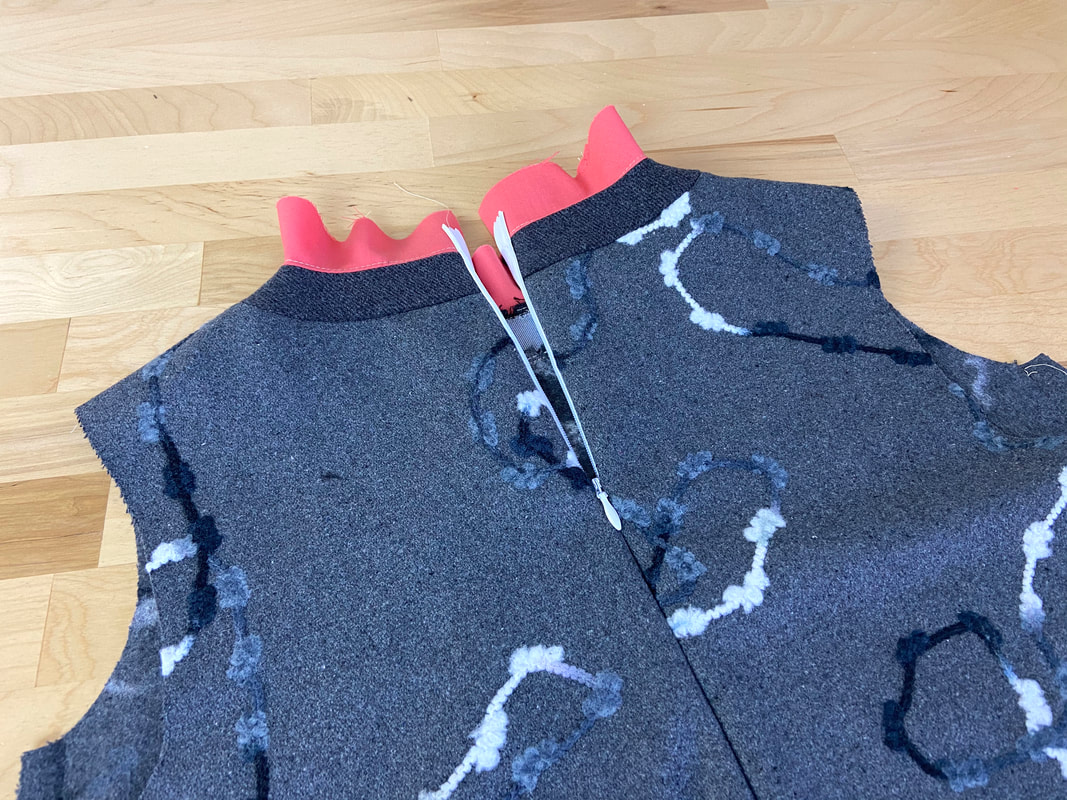
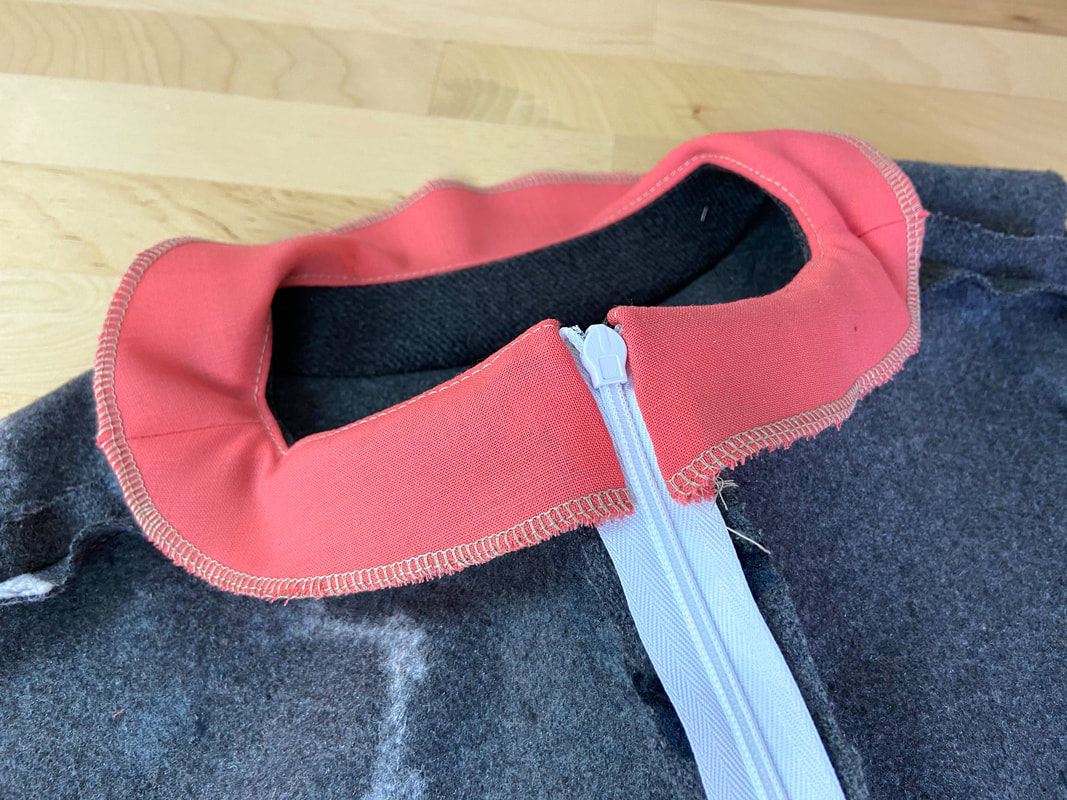
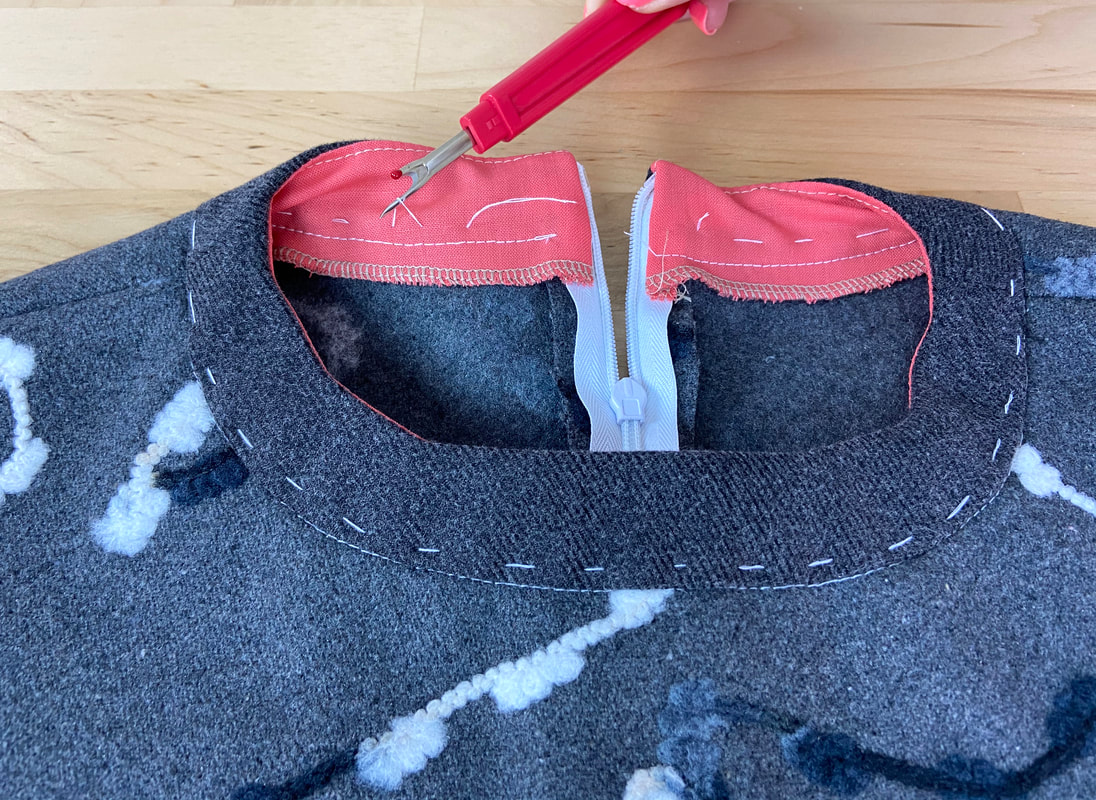
17. Sew the zipper into the garment opening at this point. It is important to insert the zipper before sealing the facing layer. 
After the zipper is sewn, you can seal all facing edges either by hand using a slipstitch, or by machine stitching. 
Although more time consuming, as a beginner, the hand slipstitch method (described below) will be a little easier. 
To finish the neckline band facing by hand:
Picture
1. Trim the lengthwise facing edge down to ¼”. 
Picture
2. Fold the trimmed edge at 1/4” and iron as you fold to crease. This fold line should correspond to the seamline
Picture
3. Next, align the folded bottom edge of the facing such that it meets the neck-band seam and all seam allowance edges are enclosed on the inside. In this position, the shoulder seams should be matching perfectly. Insert pins perpendicularly to keep the facing aligned. You may even hand baste if you feel that you need the extra stability. 
Picture
4. At the garment opening, fold each end of the facing and pin it to the zipper tape on each end as shown. 
Picture
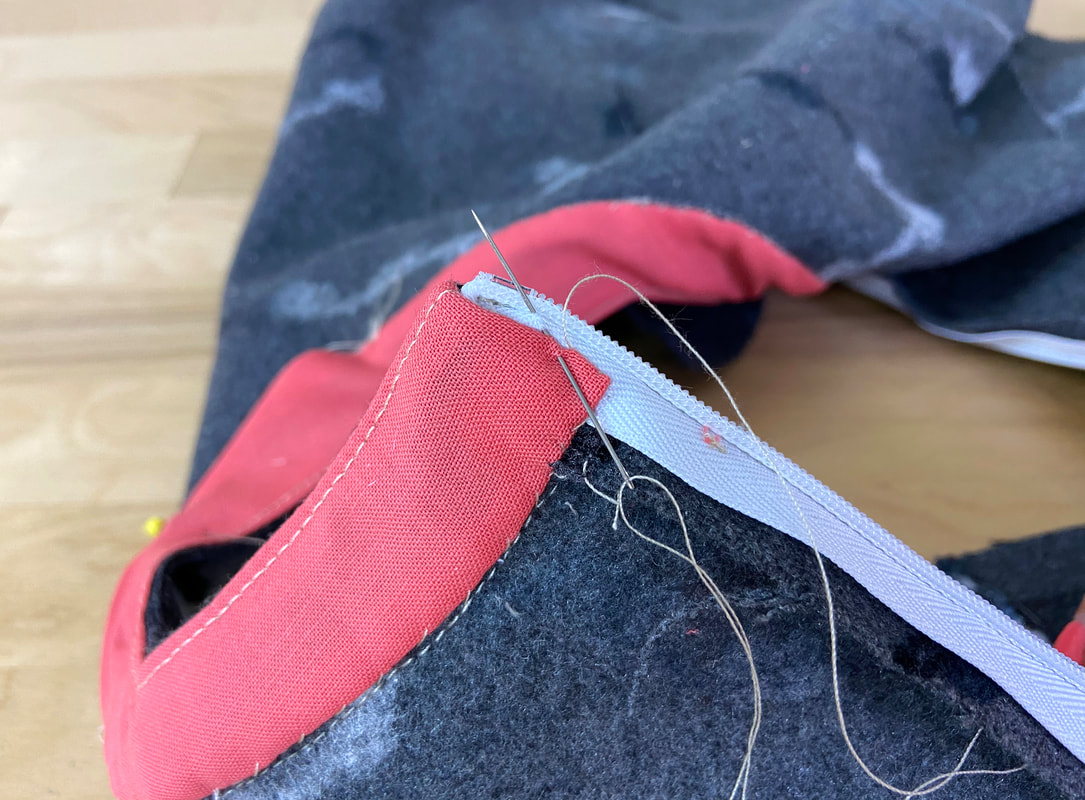
5. To seal all edges, slipstitch through the facing fold and the garment layer underneath. The stitching should not be visible on the garment’s right side. It helps to slipstitch right next to the existing seam stitching staying within the band's seam allowance.
​Learn how to slipstitch by following the steps in this tutorial: Hand-Applied Blind Stitches
Picture
6. To complete the application, slipstitch through the fold and zipper tape on each side. 
To finish the neck band facing by machine:
Picture
1. Apply a finish to the bottom edge of the facing. You can choose an overedge stitch, binding or turned-and-stitched method. Check out some of these options: Finishing Facing Edges
Picture
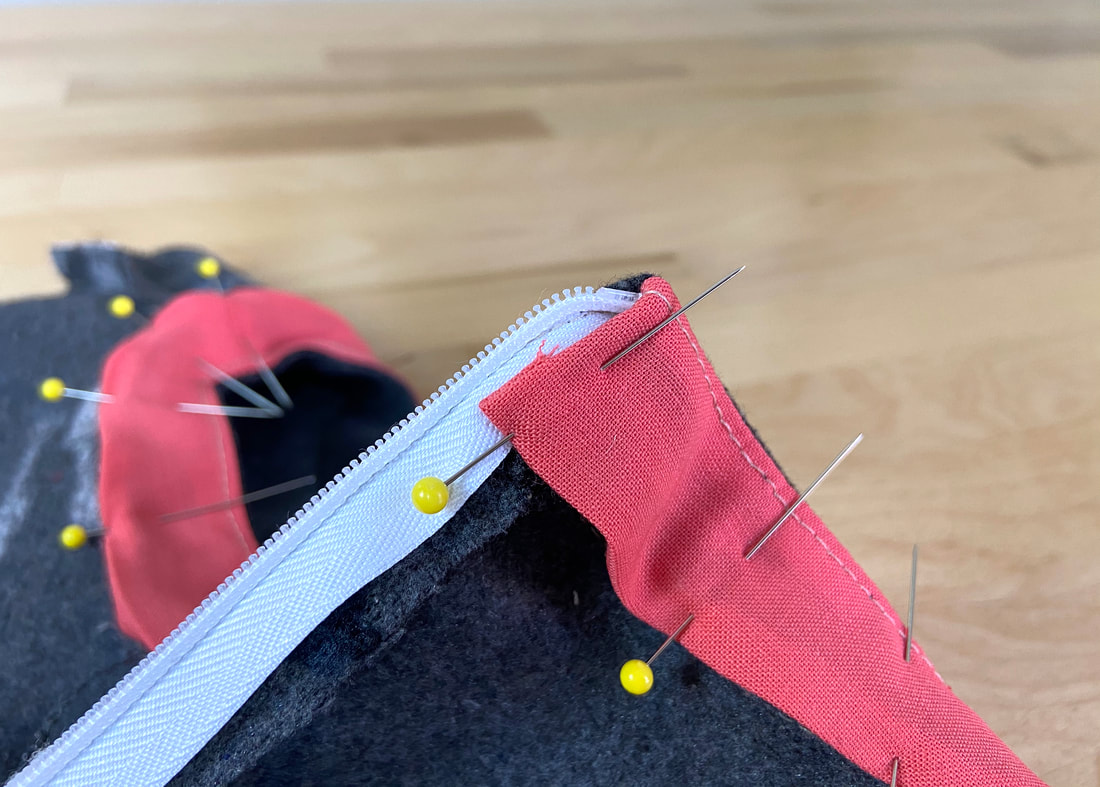
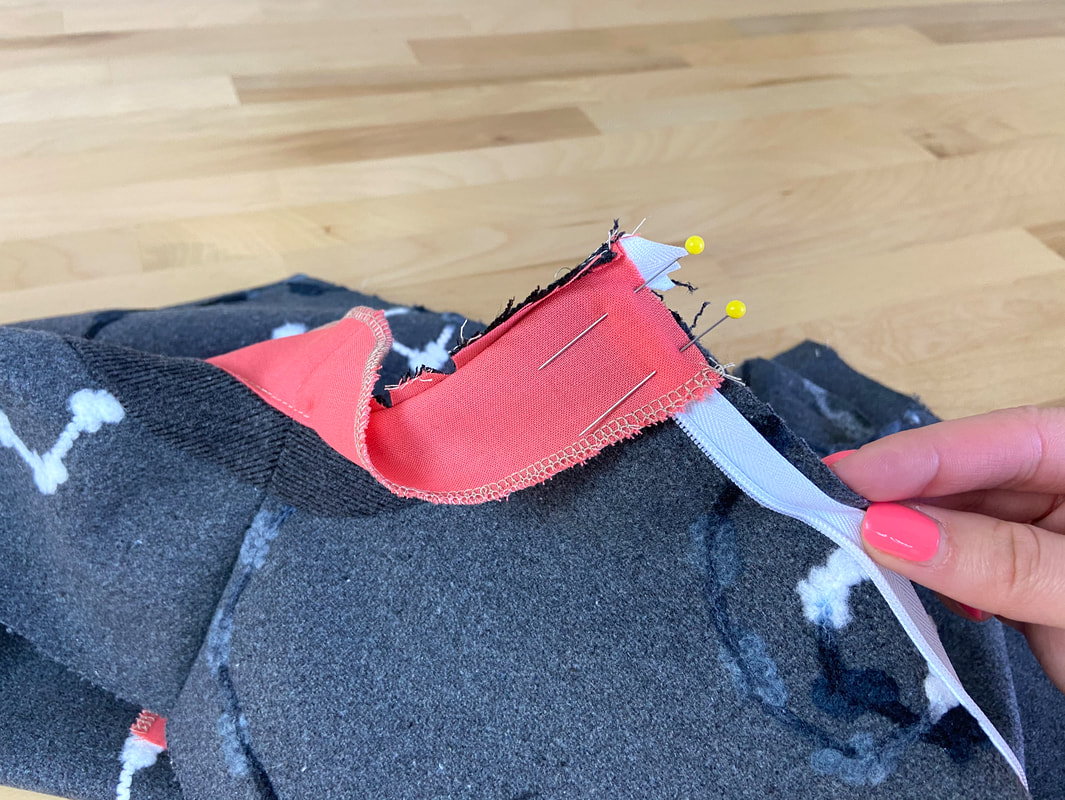
2. Flip the end of the facing over the zipper such that the band and facing right sides are touching and zipper tape is sandwiched in between. Insert pins horizontally to hold these layers in place. 
Picture
Picture
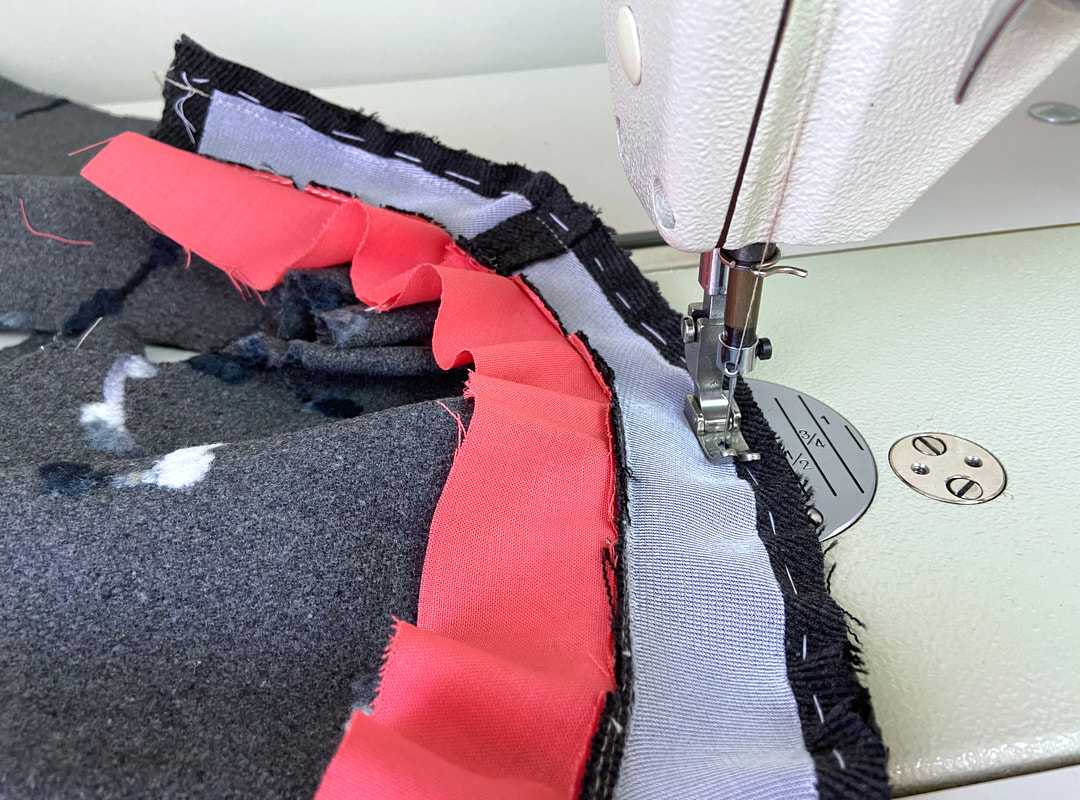
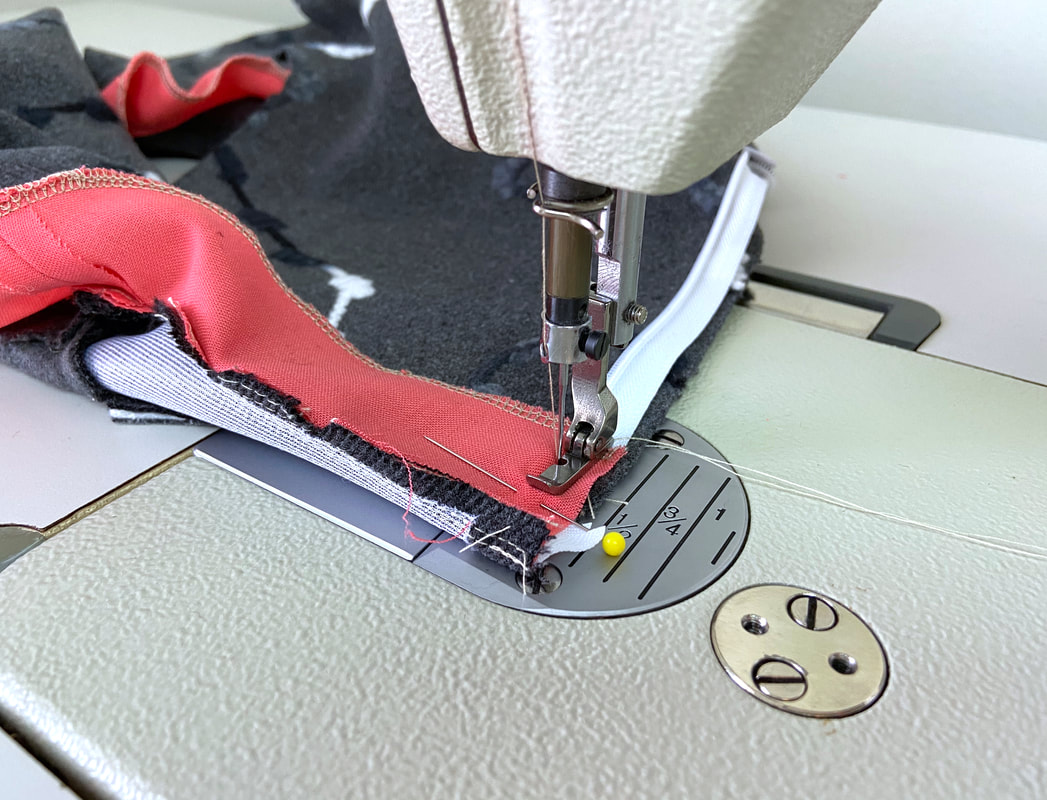
3. Using a zipper presser foot, stitch next to the zipper teeth through the facing, zipper tape, and band seam allowance layers. Repeat on both ends of the facing. Once finished, flip the facing back to its right side. 
Note: This technique only works for invisible zipper and separating zipper applications (and similar variations). Use a hand slipstitch with all other zippers. 
Picture
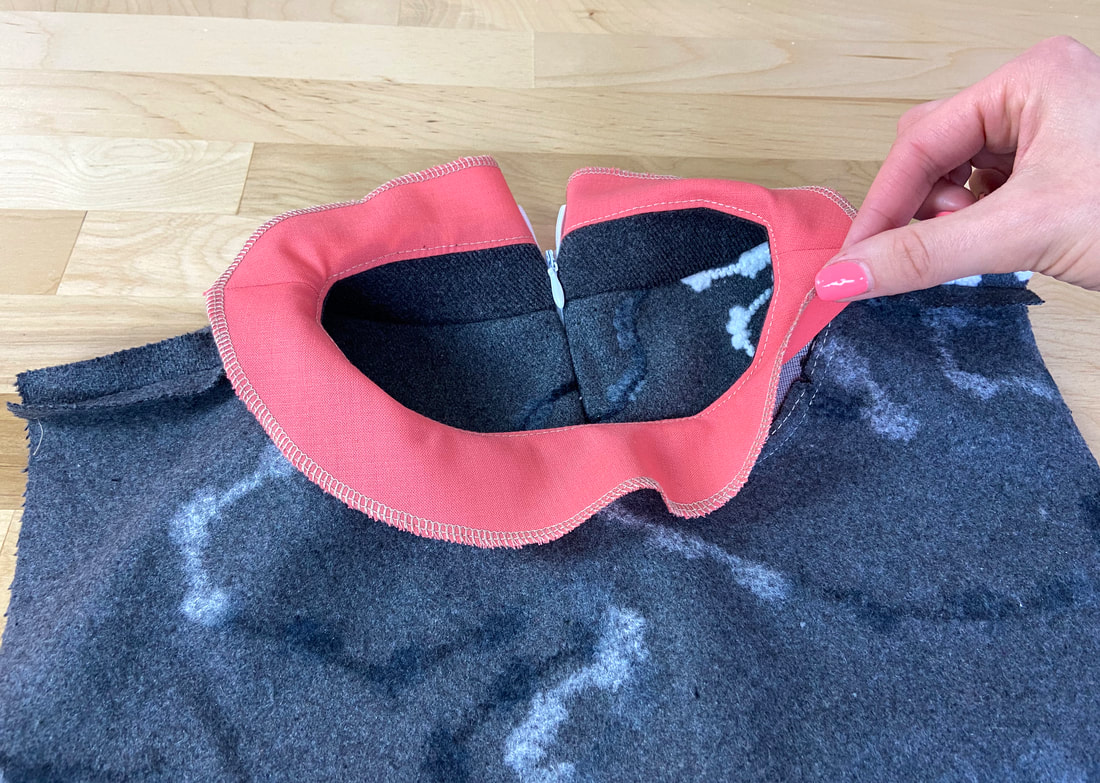
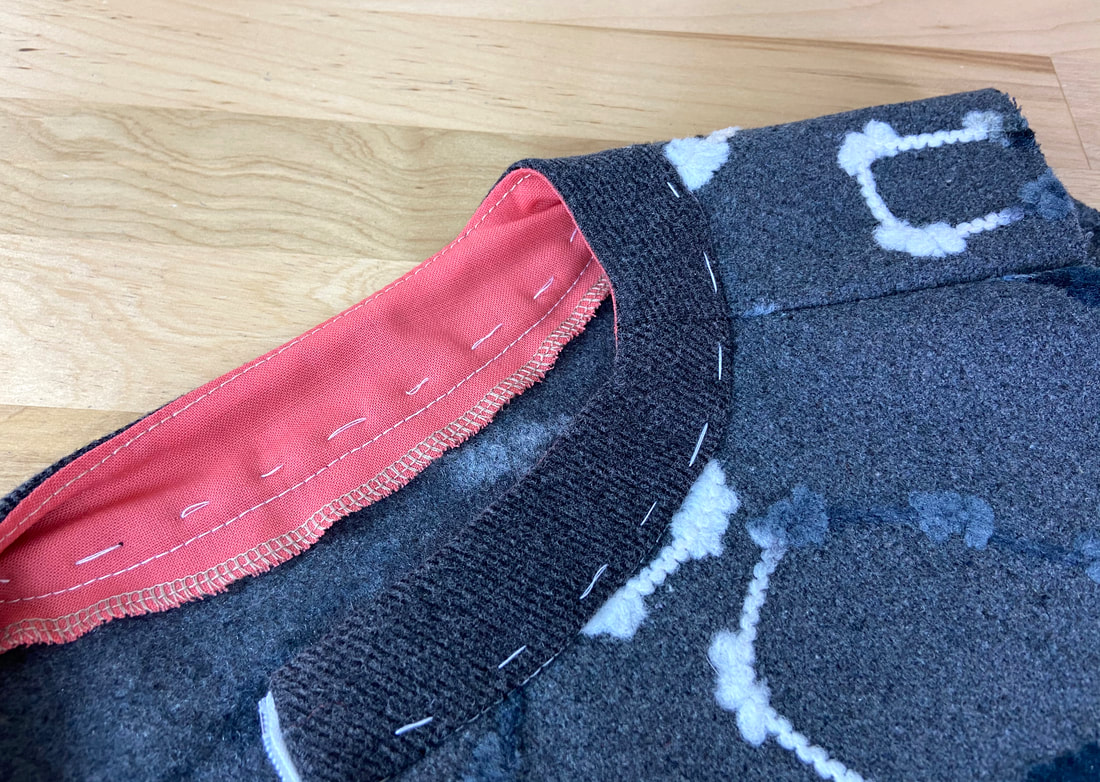
4. Next, bring the facing over the neck-band seam such that all fabric raw edges are enclosed. The finished facing edge will extend past the band seamline. Make sure the shoulder seams are aligned as well. It helps to hand baste the facing in this position prior to machine stitching. ​
Picture
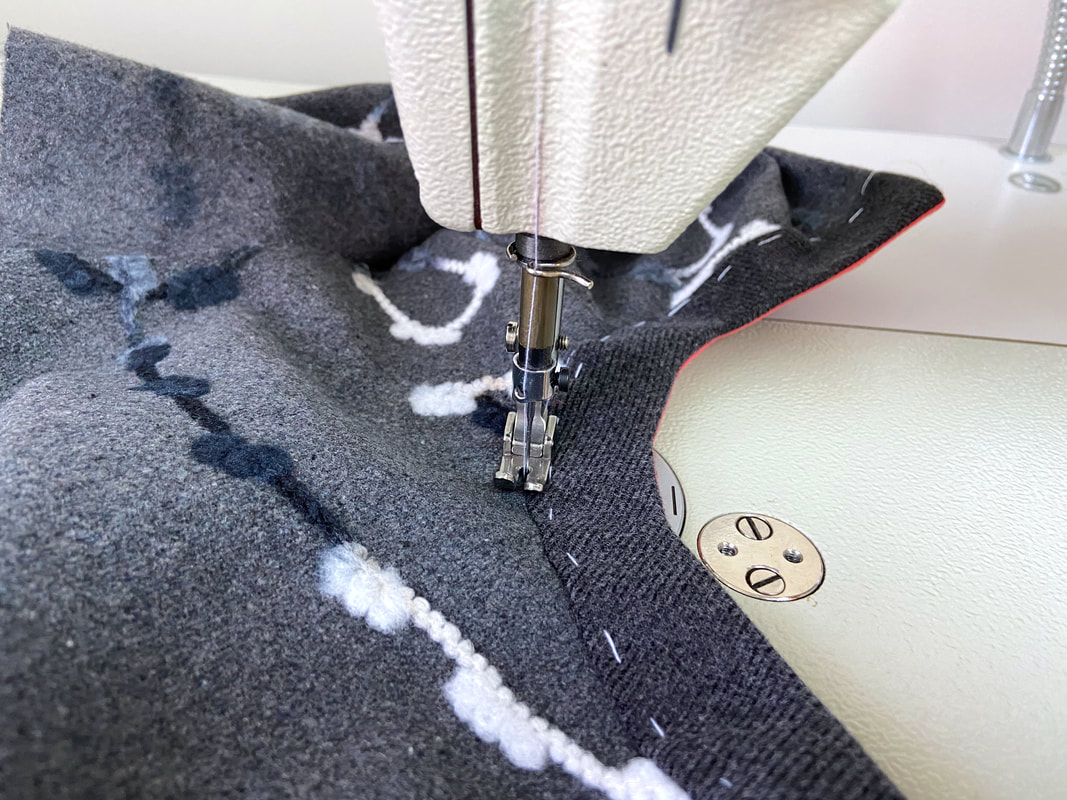
5. With the garment on its right side, and zipper all the way open, stitch into the ridge of the band seam, starting on one side of the garment opening and ending at the other. 
Picture
The machine stitch will capture the edge of the facing underneath. Be careful not to accidentally stitch outside of the seamline- the stitching should be almost invisible on the neckline’s face side. ​
Picture
Picture
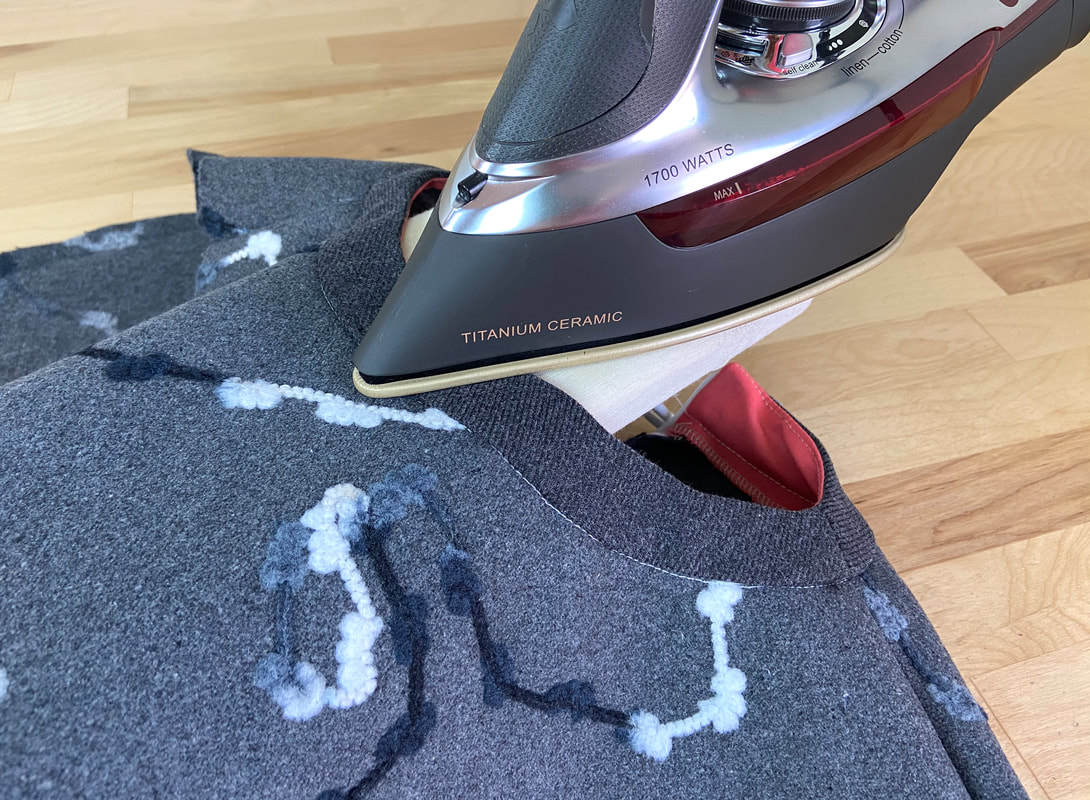
6. Last but not least, remove any hand basting stitches, and press the neck band in the direction it was stitched. Use a protective ironing cloth for heat sensitive fabrics. 
DMCA.com Protection Status
All content, including images and text, may not be copied, replicated, or redistributed without express written permission. This website is regularly screened and monitored for content protection.

Have A Personalized Sewing Question?

Ask It Here

Services

​Custom Apparel
Custom Bridal
​Sewing Tutorials
​

Company

About
Blog

Support

Contact
Terms of Service
DMCA.com Protection Status
© COPYRIGHT 2022. ALL RIGHTS RESERVED.
  • Sewing Tutorials
    • Basics >
      • Aligning Pattern Grainlines To Fabric
      • Preparing Fabrics For Sewing
      • Pinning Sewing Patterns To Fabric
      • Placing Sewing Patterns On Fabric For Cutting
      • Rotary Cutters or Fabric Scissors?
      • Cutting The Sewing Patterns
      • What Are Notches And How To Use Them In The Sewing Process
      • Transferring Notches From Pattern To Fabric
      • Transferring Seamlines to Fabric
      • Staystitching
      • Backstitching: A Complete Guide
      • Hand Basting: A Complete Guide
      • Sewing Continuous Bias Binding
    • Darts >
      • Marking And Transferring Darts To Fabric
      • What Are Darts And Dart Components
      • Folding, Pinning And Hand Basting Darts
      • Handling Dart Excess: Bulk And Tension
      • How To Sew A French Dart
      • How To Sew And Iron Single Pointed Darts
      • How To Sew And Iron Contour Darts
      • Sewing Darts With Decorative/Beaded Fabrics
    • Sewing Seams >
      • ​The Basics Of Seams And Seam Allowance
      • How To Sew A Straight Seam
      • Sewing Curved Seams
      • Sewing Corner Seams
      • Trimming And Grading Seam Excess
      • Notching/Clipping Seam Allowance for Tension Release
      • Sewing Topstitched Seams
      • Sewing Corded Seams
      • Sewing A Slot Seam
      • Sewing A Gathered Seam
      • Sewing Bias Seams
      • Sewing Seams With Ease
      • Sewing Seams With Crossing Seamlines
      • Sewing Unlike Fabric Seams
      • How To Iron Seams: Ironing Tools And Conventions
      • Sewing With Knit Fabrics
      • Understanding Stitch Length And Tension
      • Sewing Unique Fabric Seams
    • Seam Finishes >
      • Seam Finishing Techniques - Overview
      • Applying A Pinked Seam Finish
      • Applying A Bias Bound Seam Finish
      • Serging And Zigzag Seam Finishes
      • Sewing A Self-Bound Seam Finish
      • Sewing A French Seam Finish
      • Sewing A Hong Kong Seam Finish
      • Sewing A Mock French Seam Finish
      • Sewing A Turned-and-Stitched Seam Finish
      • Sewing Overcast Hand-Applied Seam Finishes
      • Sewing A Flat Felled Seam
      • Sewing A Hairline Seam Finish
    • Hem Finishes >
      • Garment Hem Finishes: Overview
      • ​Sewing A Double Fold Hem Finish
      • Sewing A Single Fold Hem Finish
      • Sewing Bound Hem Finishes
      • Sewing An Exposed Double Layer Bound Hem
      • Sewing A Folded-Up Bound Hem with Pre-folded Binding
      • Sewing A Hong Kong Hem Finish
      • Sewing A Band Hem Finish
      • Sewing A Bias Faced Hem Finish
      • Sewing A Twill Tape Hem Finish
      • Sewing A Rolled Hem Finish
      • Sewing A Shaped Hem Facing
      • Using Fusible Hem Tape And Webbing
      • Finishing A Lace Fabric Hem
      • Finishing A Leather Hem
      • Sewing Faced Hem Corners
      • How To Finish Lining At The Hem
      • Finishing Fabric Corners by Mitering >
        • Mitering Fabric Corners With A Full Bias Facing
        • Mitering Fabric Corners With Exposed Binding
      • Interfacing A Hemline: Lined And Unlined Examples
    • Sewing Pockets >
      • Curved Patch Pocket With Flap
      • Unlined Square Patch Pockets
      • Lined Patch Pockets: Two Ways
      • Extension On-Seam Pockets
      • Separate On-Seam Pocket
      • Front Hip Pockets
      • Bound Double Welt Pocket
      • Double Welt Pocket With Flap
      • Self-Welt Pocket (Using Single Fabric Layer)
      • Slanted Welt Pocket (Hand-Stitched)
      • Faced Slash Pockets: Overview >
        • Sewing A Faced Slit Pocket
        • Sewing A Rectangular Slash Pocket
        • Sew A Star-Shaped Faced Pocket
    • Sewing Zippers >
      • Sewing Zippers: General Information
      • Sewing A Centered Zipper
      • Sewing A Lapped Zipper
      • Sewing An Invisible Zipper
      • Sewing A Fly Front Zipper
      • Sewing A Closed-End Exposed Zipper (No Seam)
      • Sewing An Exposed Separating Zipper
      • Sewing Hand Stitched Zipper Applications
      • Sewing A Zipper Underlay
      • Sewing A Placket-Enclosed Separating Zipper
    • Sleeveless Finishes >
      • Sleeveless Armhole Finishes: General Information
      • Finishing Sleeveless Garments with Lining
      • Sewing A Folded-Under Bound Armhole Finish
      • Sewing A Shaped Armhole Facing
      • Finishing Armhole Edges With Exposed Binding
      • Finishing Armhole Edges With Decorative Trim
    • Neckline Finishes >
      • Sewing A Neck Shaped Facing
      • Sewing An All-In-One Neck Facing
      • Neck And Garment Opening Combination Facings >
        • Sewing An Extended Front-Neck Facing
        • Sewing A Separate Neck-Front Facing
      • Sewing A Bias Faced Neckline Finish
      • Sewing A Band Neckline Finish
      • Bound Neckline Finishes: Overview >
        • Sewing A Single Layer Bound Neckline
        • Finishing A Neckline With Pre-Folded Binding
        • Sewing A Double Layer Bound Neckline Finish
      • Sewing A Semi-Stretch Strip Band Neckline
      • Ribbed Neck Band And Classic Turtleneck
      • Decorative Neckline Finishes >
        • Sewing A Neckline With Decorative Inset
        • Sewing A Piped Cording Faced Neckline
        • Sewing Decorative Trim To A Finished Neckline
    • Finishing Facing Edges >
      • Finishing Facing Edges: Overview
      • Folded-And-Topstitched Overedge Facing Finish
      • Sewing A Bound Facing Edge Finish
      • Sewing A Hong Kong Facing Finish
      • Sewing A Rolled Edge Facing Finish
      • Sewing A Twill Tape Facing Edge Finish
      • Sewing An Overedge-Stitch Facing Finish
    • Extras >
      • A Complete Guide on Interfacing
      • Sewing Bound Spaghetti Straps
      • Sewing Spaghetti Straps To A Faced Neckline
      • Sewing Ruffles: Overview
      • Patterning And Sewing A Circle Ruffle
      • Sewing A Gathered Heading Ruffle
      • Sewing Double Layer Gathered Ruffles
      • Sewing A Gathered Ruffle Into A Seam
      • Sewing A Gathered Ruffle To A Fabric Edge
      • Sewing A Fabric Surface Slit
      • Sewing A Slit Seam
      • Hand-Applied Straight Stitches
      • Hand-Applied Blind Stitches
      • Hand-Applied Overedge Stitches
      • Hand-Applied Tack Stitches
      • Hand-Applied Decorative Stitches
  • Custom Apparel
    • Custom Bridal
  • Submit A Sewing Question
  • About
  • Blog