Doina Alexei
  • Sewing Tutorials
    • Basics >
      • Aligning Pattern Grainlines To Fabric
      • Preparing Fabrics For Sewing
      • Pinning Sewing Patterns To Fabric
      • Placing Sewing Patterns On Fabric For Cutting
      • Rotary Cutters or Fabric Scissors?
      • Cutting The Sewing Patterns
      • What Are Notches And How To Use Them In The Sewing Process
      • Transferring Notches From Pattern To Fabric
      • Transferring Seamlines to Fabric
      • Staystitching
      • Backstitching: A Complete Guide
      • Hand Basting: A Complete Guide
      • Sewing Continuous Bias Binding
    • Darts >
      • Marking And Transferring Darts To Fabric
      • What Are Darts And Dart Components
      • Folding, Pinning And Hand Basting Darts
      • Handling Dart Excess: Bulk And Tension
      • How To Sew A French Dart
      • How To Sew And Iron Single Pointed Darts
      • How To Sew And Iron Contour Darts
      • Sewing Darts With Decorative/Beaded Fabrics
    • Sewing Seams >
      • ​The Basics Of Seams And Seam Allowance
      • How To Sew A Straight Seam
      • Sewing Curved Seams
      • Sewing Corner Seams
      • Trimming And Grading Seam Excess
      • Notching/Clipping Seam Allowance for Tension Release
      • Sewing Topstitched Seams
      • Sewing Corded Seams
      • Sewing A Slot Seam
      • Sewing A Gathered Seam
      • Sewing Bias Seams
      • Sewing Seams With Ease
      • Sewing Seams With Crossing Seamlines
      • Sewing Unlike Fabric Seams
      • How To Iron Seams: Ironing Tools And Conventions
      • Sewing With Knit Fabrics
      • Understanding Stitch Length And Tension
      • Sewing Unique Fabric Seams
    • Seam Finishes >
      • Seam Finishing Techniques - Overview
      • Applying A Pinked Seam Finish
      • Applying A Bias Bound Seam Finish
      • Serging And Zigzag Seam Finishes
      • Sewing A Self-Bound Seam Finish
      • Sewing A French Seam Finish
      • Sewing A Hong Kong Seam Finish
      • Sewing A Mock French Seam Finish
      • Sewing A Turned-and-Stitched Seam Finish
      • Sewing Overcast Hand-Applied Seam Finishes
      • Sewing A Flat Felled Seam
      • Sewing A Hairline Seam Finish
    • Hem Finishes >
      • Garment Hem Finishes: Overview
      • ​Sewing A Double Fold Hem Finish
      • Sewing A Single Fold Hem Finish
      • Sewing Bound Hem Finishes
      • Sewing An Exposed Double Layer Bound Hem
      • Sewing A Folded-Up Bound Hem with Pre-folded Binding
      • Sewing A Hong Kong Hem Finish
      • Sewing A Band Hem Finish
      • Sewing A Bias Faced Hem Finish
      • Sewing A Twill Tape Hem Finish
      • Sewing A Rolled Hem Finish
      • Sewing A Shaped Hem Facing
      • Using Fusible Hem Tape And Webbing
      • Finishing A Lace Fabric Hem
      • Finishing A Leather Hem
      • Sewing Faced Hem Corners
      • How To Finish Lining At The Hem
      • Finishing Fabric Corners by Mitering >
        • Mitering Fabric Corners With A Full Bias Facing
        • Mitering Fabric Corners With Exposed Binding
      • Interfacing A Hemline: Lined And Unlined Examples
    • Sewing Pockets >
      • Curved Patch Pocket With Flap
      • Unlined Square Patch Pockets
      • Lined Patch Pockets: Two Ways
      • Extension On-Seam Pockets
      • Separate On-Seam Pocket
      • Front Hip Pockets
      • Bound Double Welt Pocket
      • Double Welt Pocket With Flap
      • Self-Welt Pocket (Using Single Fabric Layer)
      • Slanted Welt Pocket (Hand-Stitched)
      • Faced Slash Pockets: Overview >
        • Sewing A Faced Slit Pocket
        • Sewing A Rectangular Slash Pocket
        • Sew A Star-Shaped Faced Pocket
    • Sewing Zippers >
      • Sewing Zippers: General Information
      • Sewing A Centered Zipper
      • Sewing A Lapped Zipper
      • Sewing An Invisible Zipper
      • Sewing A Fly Front Zipper
      • Sewing A Closed-End Exposed Zipper (No Seam)
      • Sewing An Exposed Separating Zipper
      • Sewing Hand Stitched Zipper Applications
      • Sewing A Zipper Underlay
      • Sewing A Placket-Enclosed Separating Zipper
    • Sleeveless Finishes >
      • Sleeveless Armhole Finishes: General Information
      • Finishing Sleeveless Garments with Lining
      • Sewing A Folded-Under Bound Armhole Finish
      • Sewing A Shaped Armhole Facing
      • Finishing Armhole Edges With Exposed Binding
      • Finishing Armhole Edges With Decorative Trim
    • Neckline Finishes >
      • Sewing A Neck Shaped Facing
      • Sewing An All-In-One Neck Facing
      • Neck And Garment Opening Combination Facings >
        • Sewing An Extended Front-Neck Facing
        • Sewing A Separate Neck-Front Facing
      • Sewing A Bias Faced Neckline Finish
      • Sewing A Band Neckline Finish
      • Bound Neckline Finishes: Overview >
        • Sewing A Single Layer Bound Neckline
        • Finishing A Neckline With Pre-Folded Binding
        • Sewing A Double Layer Bound Neckline Finish
      • Sewing A Semi-Stretch Strip Band Neckline
      • Ribbed Neck Band And Classic Turtleneck
      • Decorative Neckline Finishes >
        • Sewing A Neckline With Decorative Inset
        • Sewing A Piped Cording Faced Neckline
        • Sewing Decorative Trim To A Finished Neckline
    • Finishing Facing Edges >
      • Finishing Facing Edges: Overview
      • Folded-And-Topstitched Overedge Facing Finish
      • Sewing A Bound Facing Edge Finish
      • Sewing A Hong Kong Facing Finish
      • Sewing A Rolled Edge Facing Finish
      • Sewing A Twill Tape Facing Edge Finish
      • Sewing An Overedge-Stitch Facing Finish
    • Extras >
      • A Complete Guide on Interfacing
      • Sewing Bound Spaghetti Straps
      • Sewing Spaghetti Straps To A Faced Neckline
      • Sewing Ruffles: Overview
      • Patterning And Sewing A Circle Ruffle
      • Sewing A Gathered Heading Ruffle
      • Sewing Double Layer Gathered Ruffles
      • Sewing A Gathered Ruffle Into A Seam
      • Sewing A Gathered Ruffle To A Fabric Edge
      • Sewing A Fabric Surface Slit
      • Sewing A Slit Seam
      • Hand-Applied Straight Stitches
      • Hand-Applied Blind Stitches
      • Hand-Applied Overedge Stitches
      • Hand-Applied Tack Stitches
      • Hand-Applied Decorative Stitches
  • Custom Apparel
    • Custom Bridal
  • Submit A Sewing Question
  • About
  • Blog

Types Of Zippers And Zipper Components Used In Dressmaking: A Complete Guide

​Zippers are perhaps the most functional invention in dressmaking. As a closure mechanism, zippers work effortlessly with almost all woven and semi-stretch garments. To accommodate the design and structure of a clothing item, zippers come in a variety of different styles, lengths, materials and closing mechanisms. 
Picture
From separating to invisible, various zipper styles are able to accommodate almost all types of seams and their location on the garment. True to form, each of these zipper styles are supported by a variety of zipper application techniques based on fabric, seam location and desired finish. 
​In this tutorial, you’ll learn more about the basic structure of a zipper and the three types of zippers used in dressmaking. 
At the end of this tutorial, you will find links to 8 zipper applications with detailed sewing tutorials for each. 

Types Of Zippers

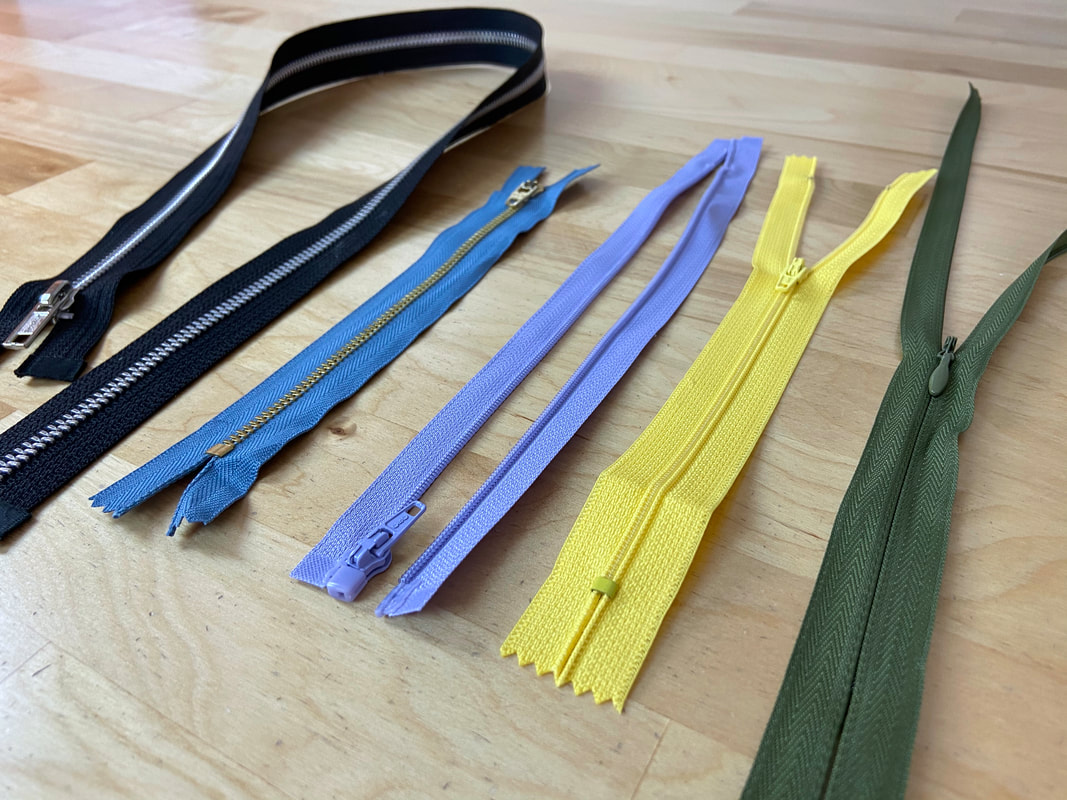
There are three main types of zippers used in dressmaking. Each style comes in a variety of colors, metal or plastic coils, lengths and materials.
Separating Zippers
Picture
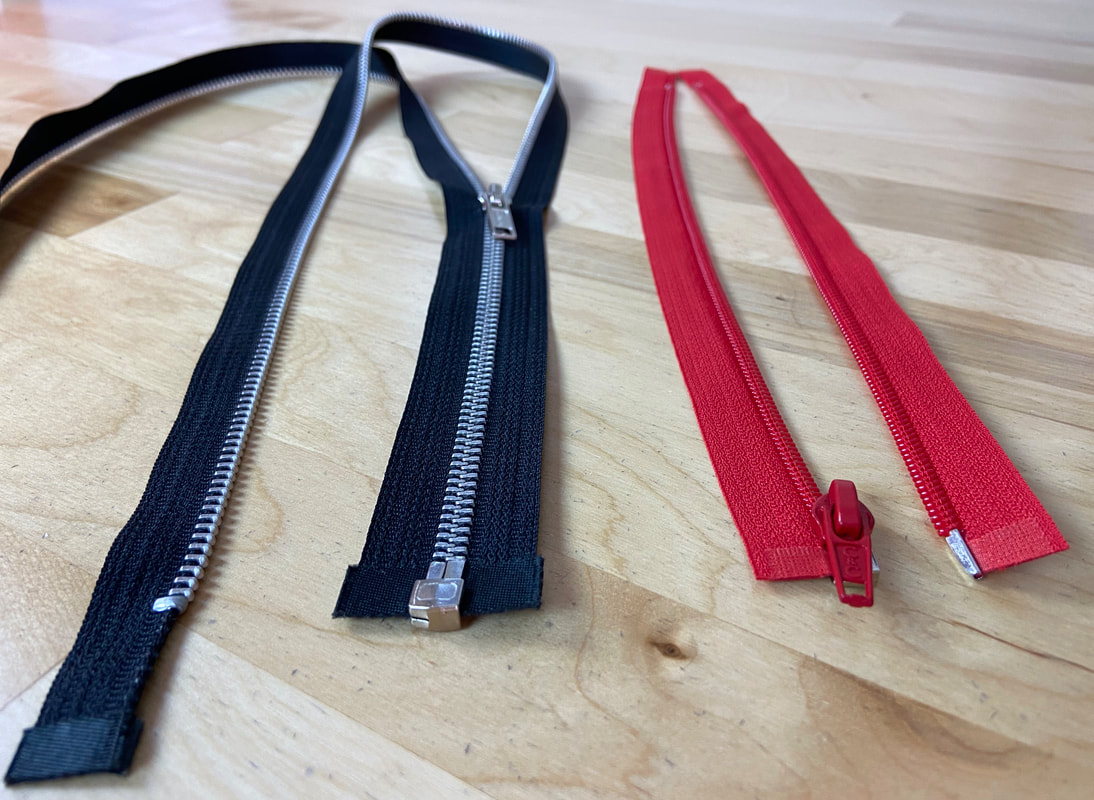
Separating zippers are those that unzip completely and separate at the bottom. These zippers are used on full garment openings or any instance that requires the fabric pieces to separate fully. 
In a separating zipper style, the bottom stop on one portion of the zipper can be easily inserted through the zipper slider to connect and zip the two edges together. 
Picture
Separating zippers can be constructed with both metal teeth and plastic coils. In general, they are bulkier and considered more heavy-duty than other zipper styles. 
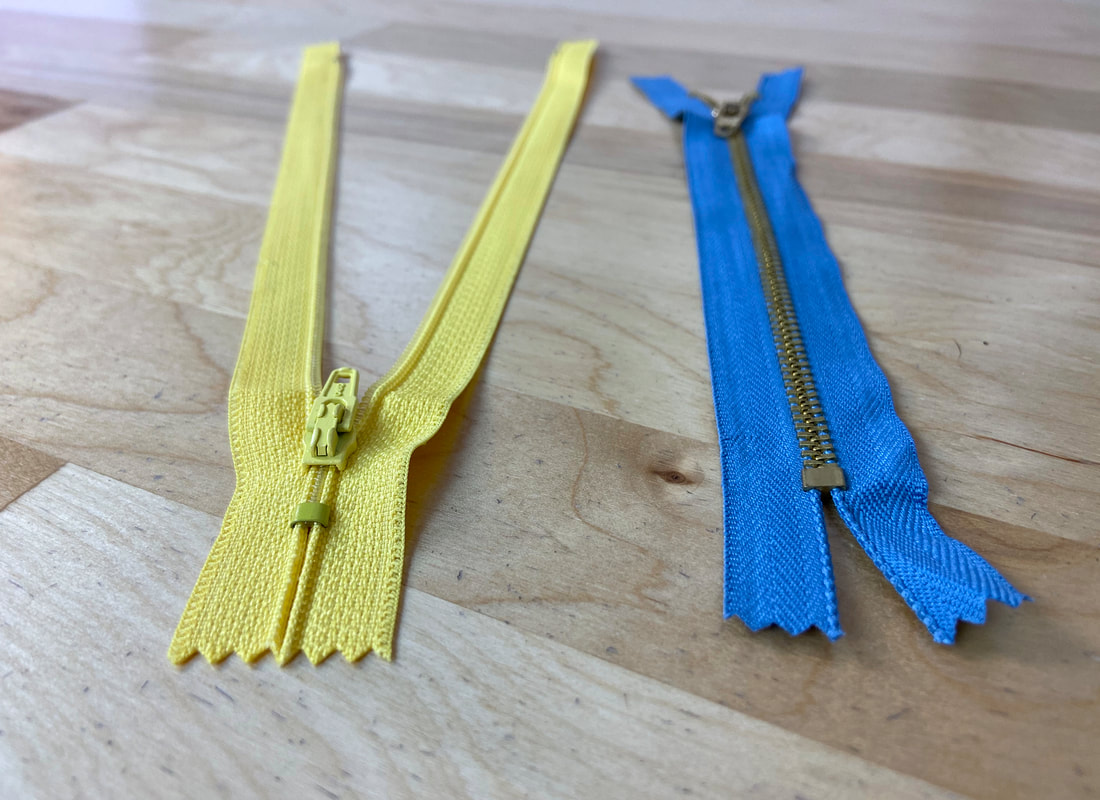
Regular (Conventional) Zippers
Picture
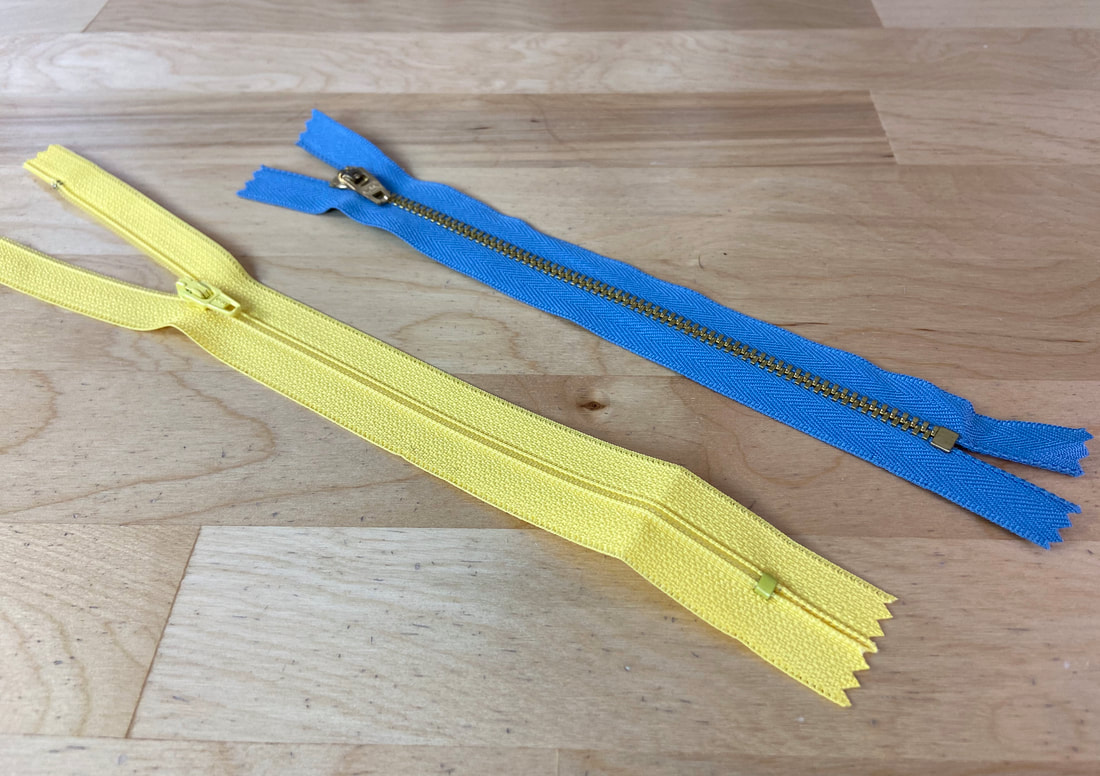
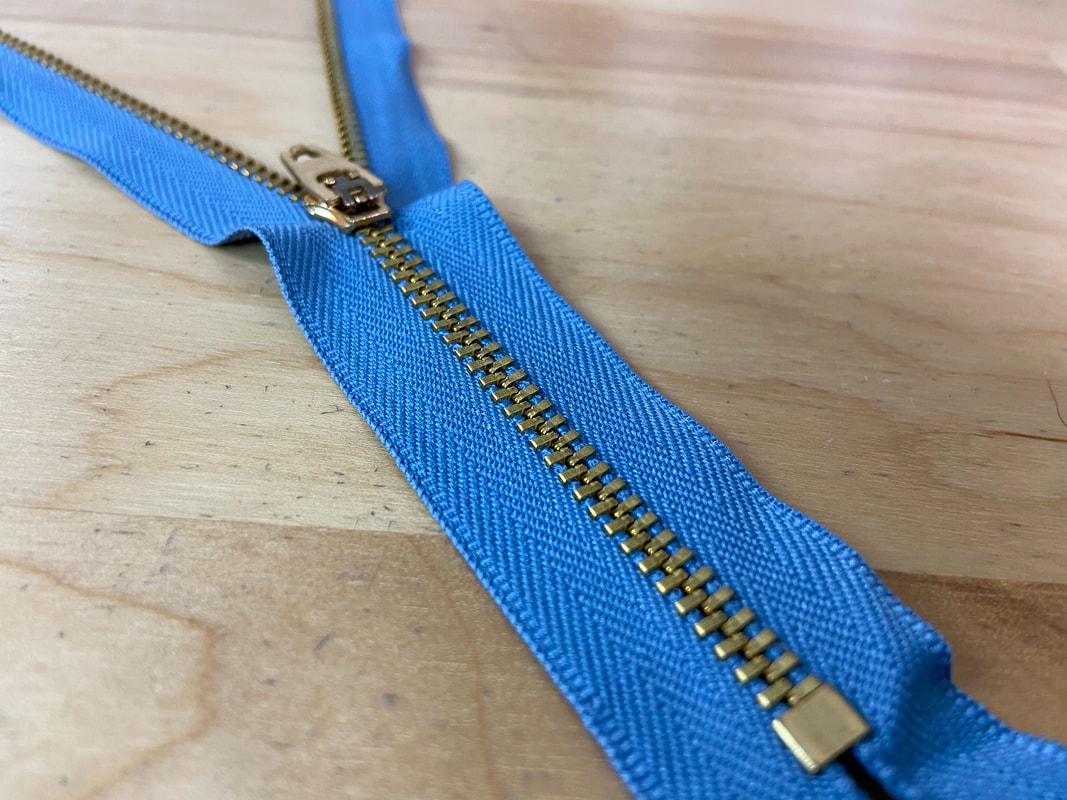
A conventional zipper is made of either a metal chain or plastic coils which are always closed at the bottom. This zipper style is widely used in dressmaking and can be easily inserted into a seam using a variety of different applications. 
Picture
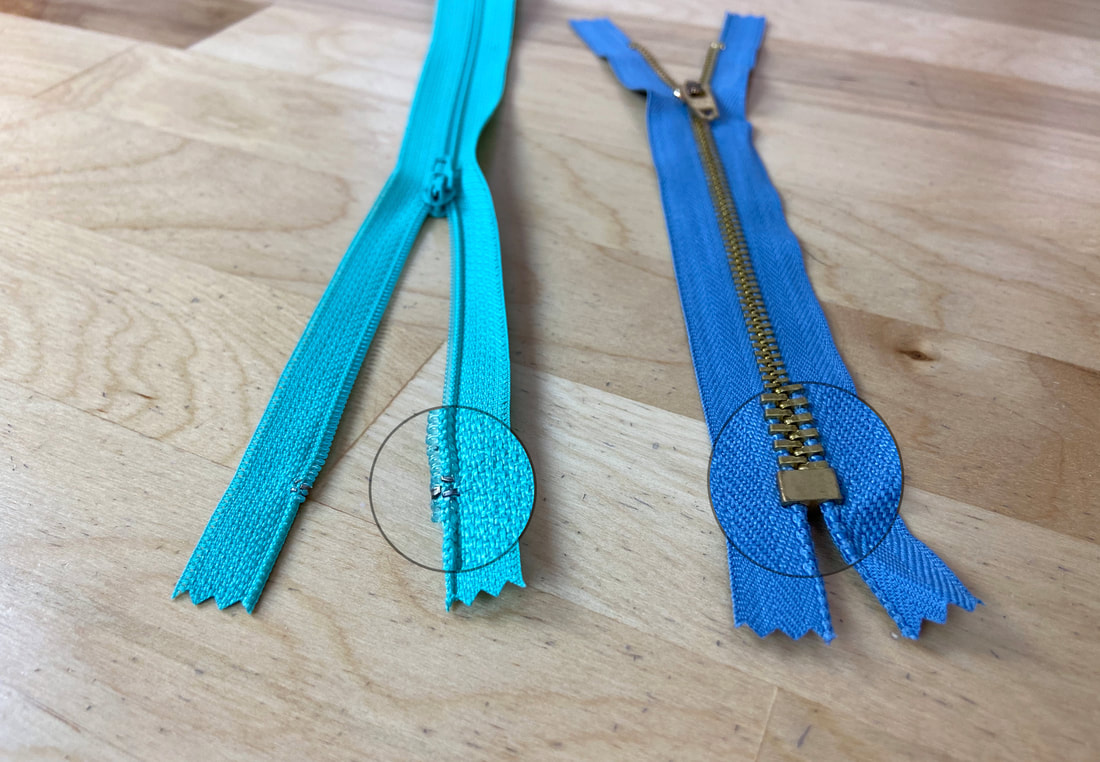
​The difference between a closed-end zipper and a separating zipper is fairly obvious: A separating zipper can separate fully when unzipped while a closed-end zipper only unzips to the location of the bottom stop. For that reason, conventional zippers cannot be used with a separating front opening on a garment. 
Invisible Zippers
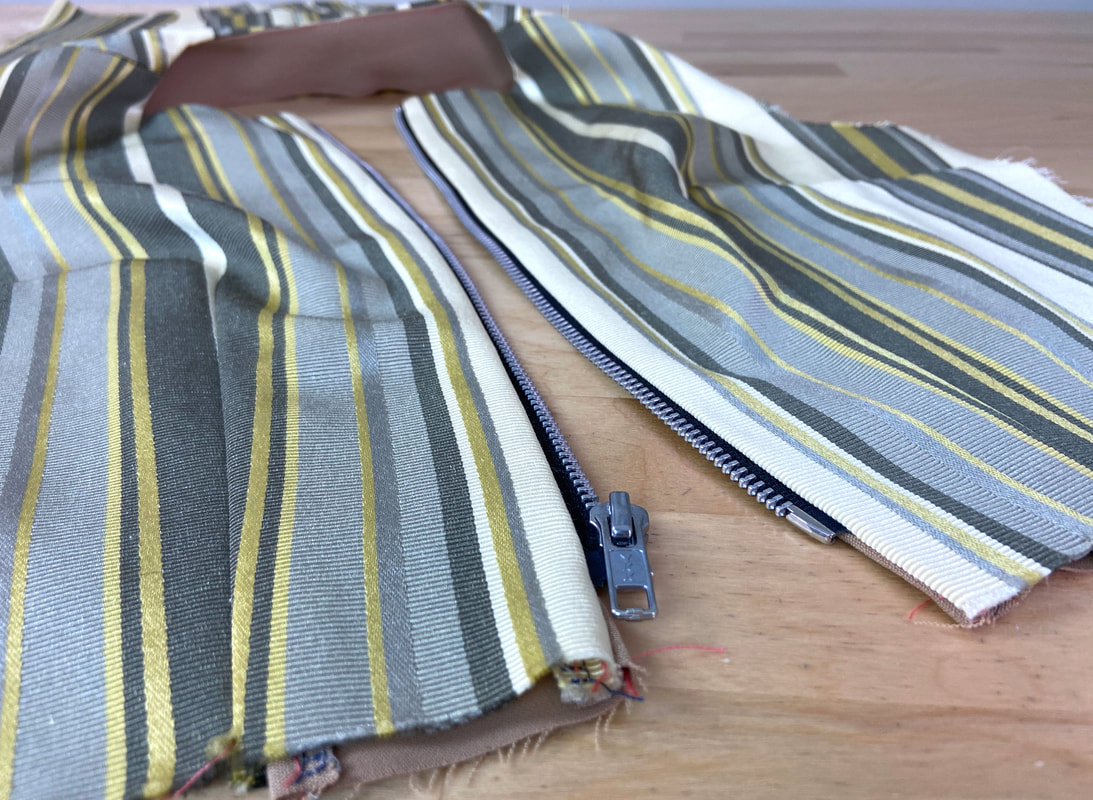
​Invisible zippers are unique both in terms of structure and the manner in which they are used in dressmaking. 
Picture
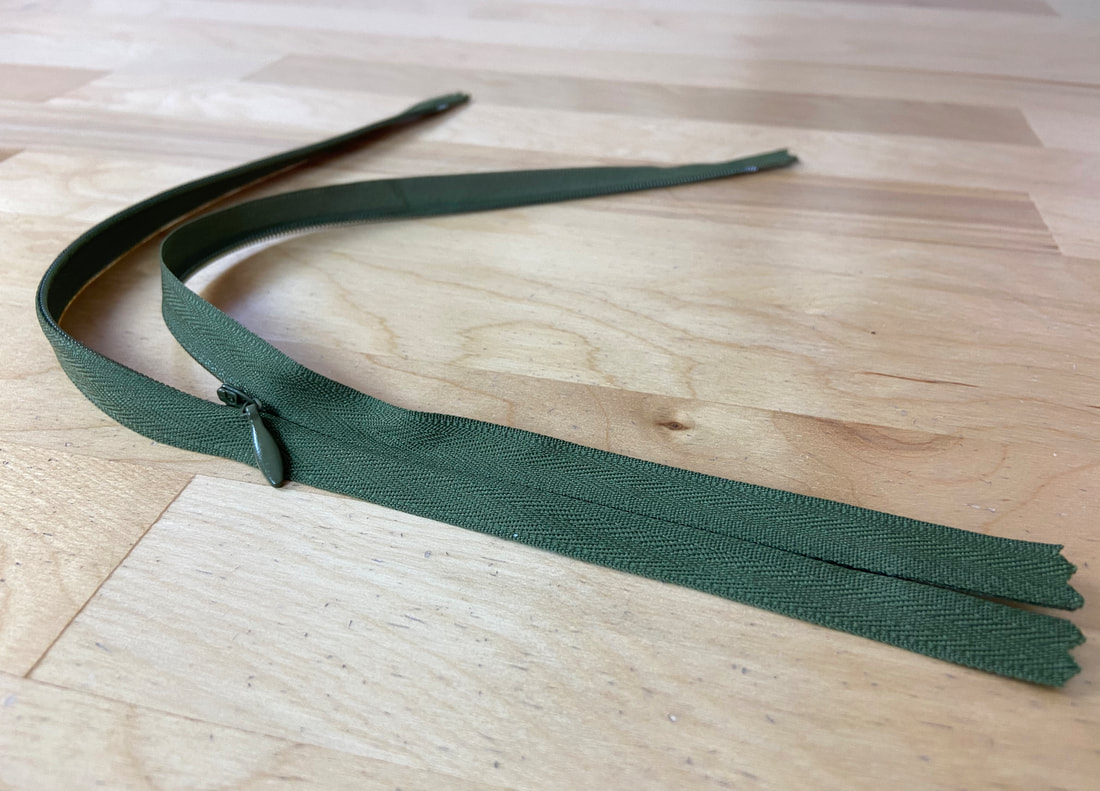
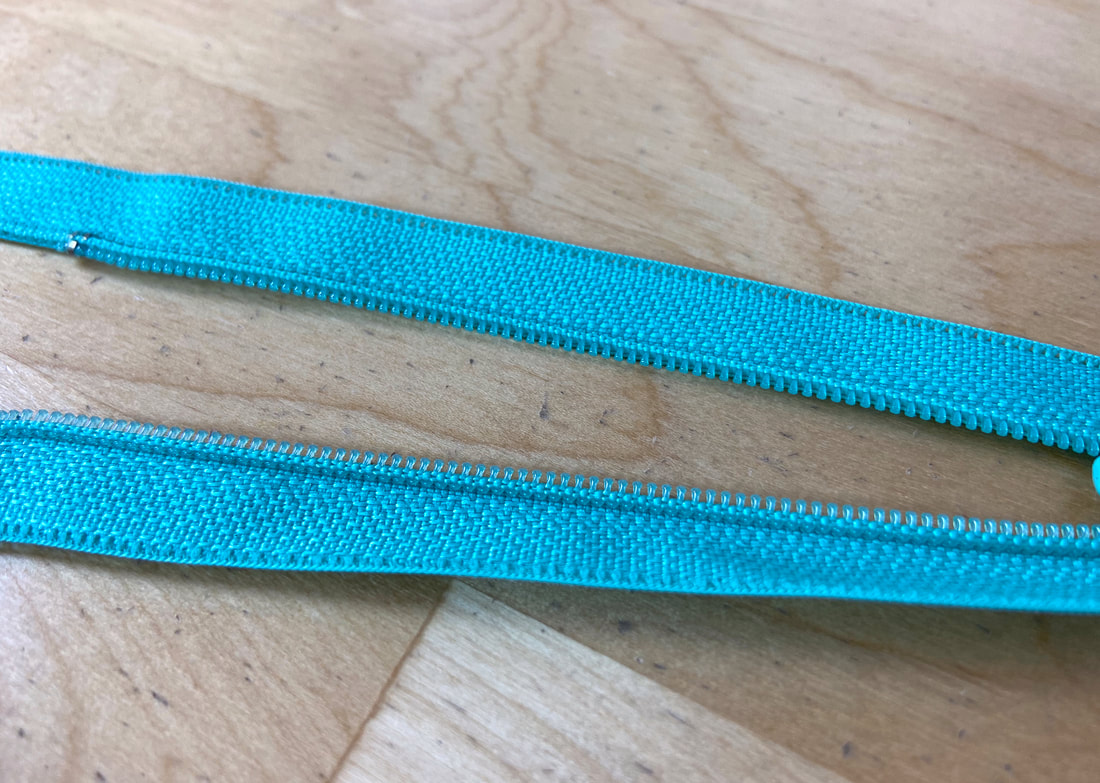
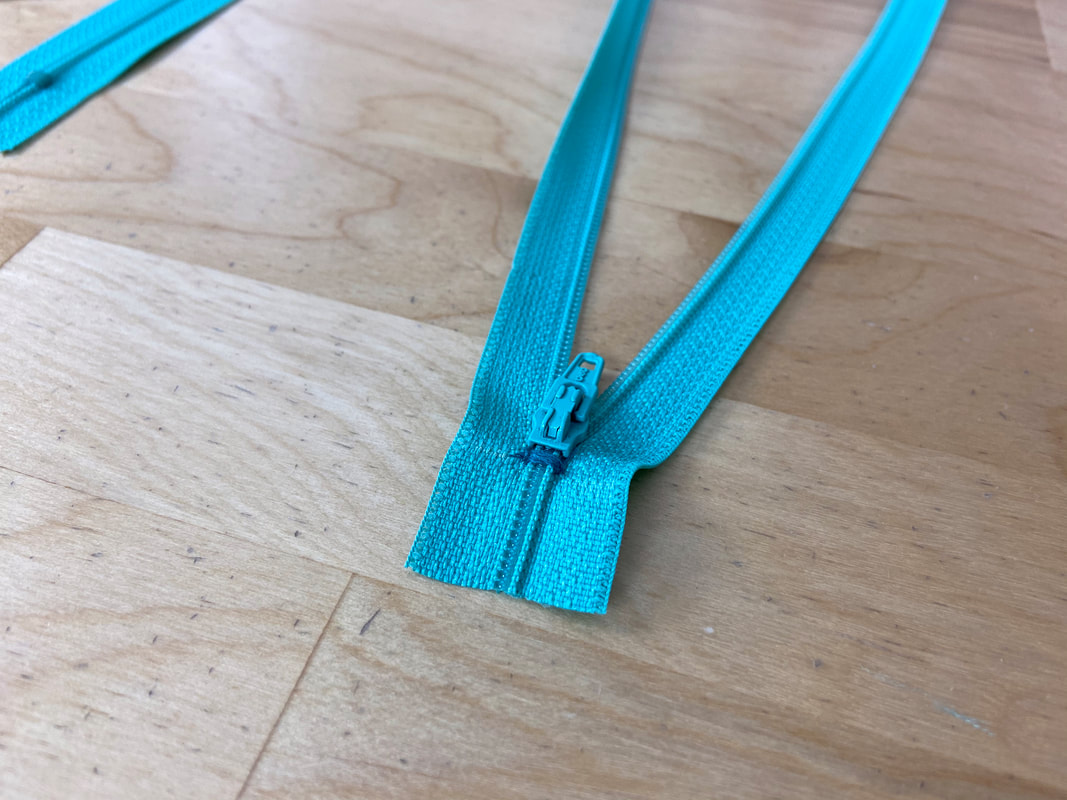
An invisible zipper is a closed-end zipper constructed of coils that are folded in such that when the zipper is inserted into a seam, it disappears along the finished seamline. 
​Invisible zippers are commonly used along the side seams and center back seams of lightweight dresses and blouses. 
Picture
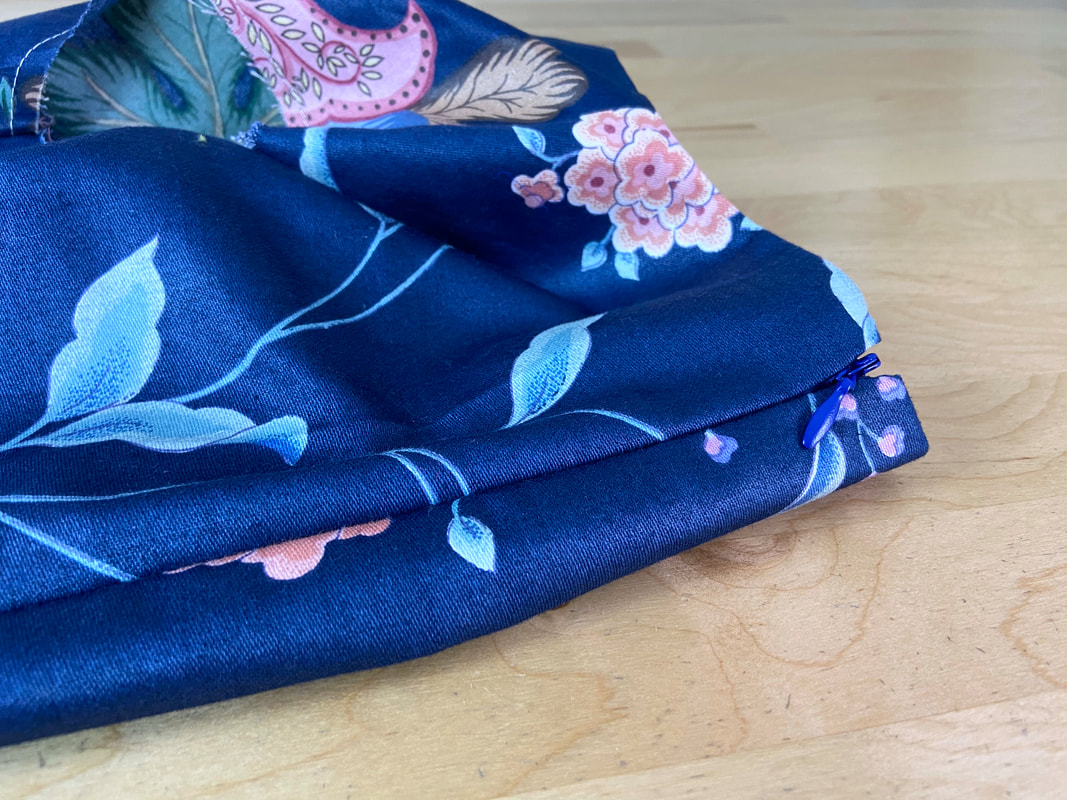
In the finished application, the only portion visible on the right side of the garment is the pull tab. When the color of the zipper matches that of the garment perfectly, the small tab blends into the seam for an invisible finish.
While conventional zippers can be applied in a variety of different styles, there is only a single technique you can use to sew invisible zippers. 
Follow this tutorial for a step-by-step guide on sewing invisible zippers: Sewing An Invisible Zipper

Basic Zipper Components

Picture
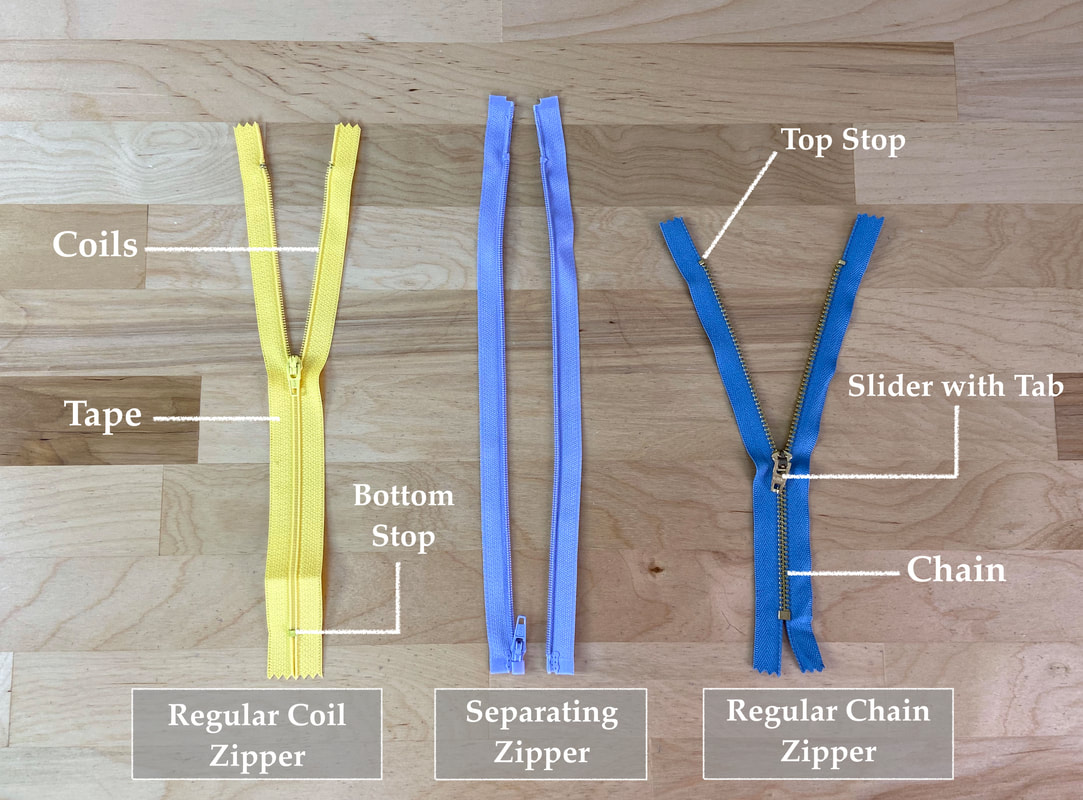
Above is a diagram of basic zipper components. This is a universal zipper structure that applies to all three zipper types described above (separating, regular and invisible).
Picture
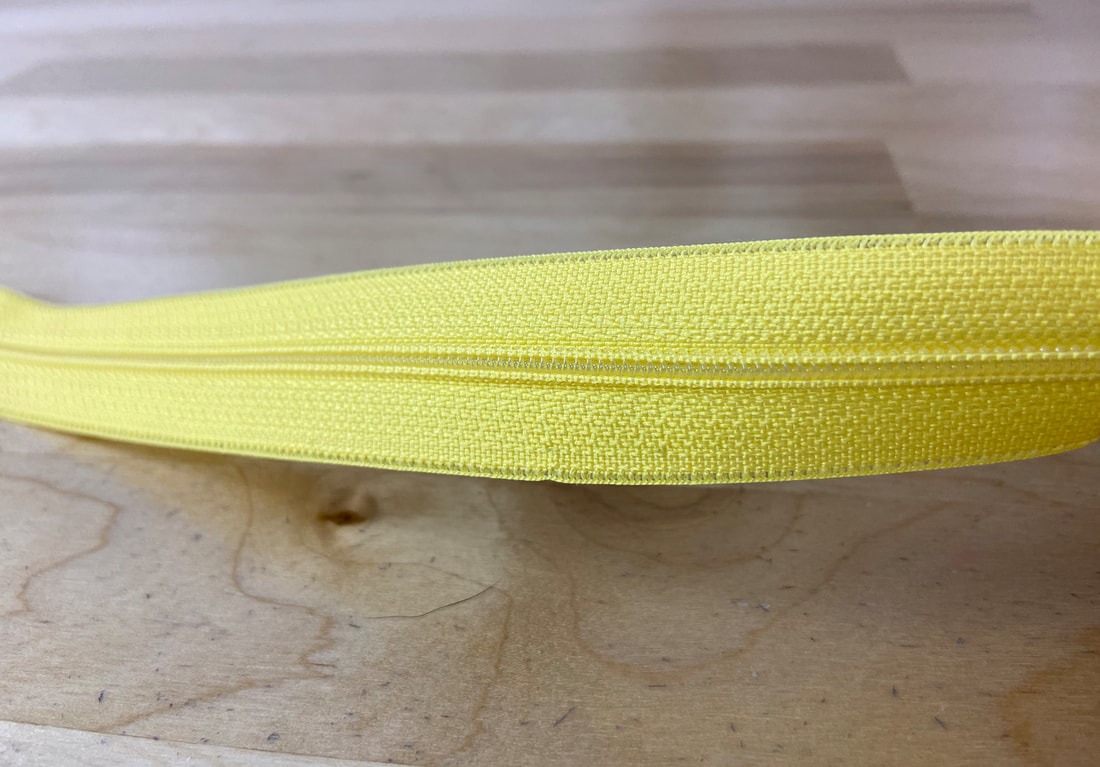
Zipper coils are plastic (polyester) zipper teeth that are commonly used with all three zipper types described above. They have a spiral structure that provides a durable, lightweight connection. Due to the nature of the plastic material, coils are available in a lot more color variations than metal chain zippers. 
Picture
Zipper chains are constructed of metal featuring a chain structure. As opposed to plastic coils, metal zippers have more color limitations. Zipper chains are most commonly available in metal tones like silver, brass, copper and gold. If not properly treated, they are also prone to rusting with prolonged use. 
A metal chain can only be used with separating and conventional zippers. Due to their unique structure, invisible zippers cannot be made with a metal chain, 
Picture
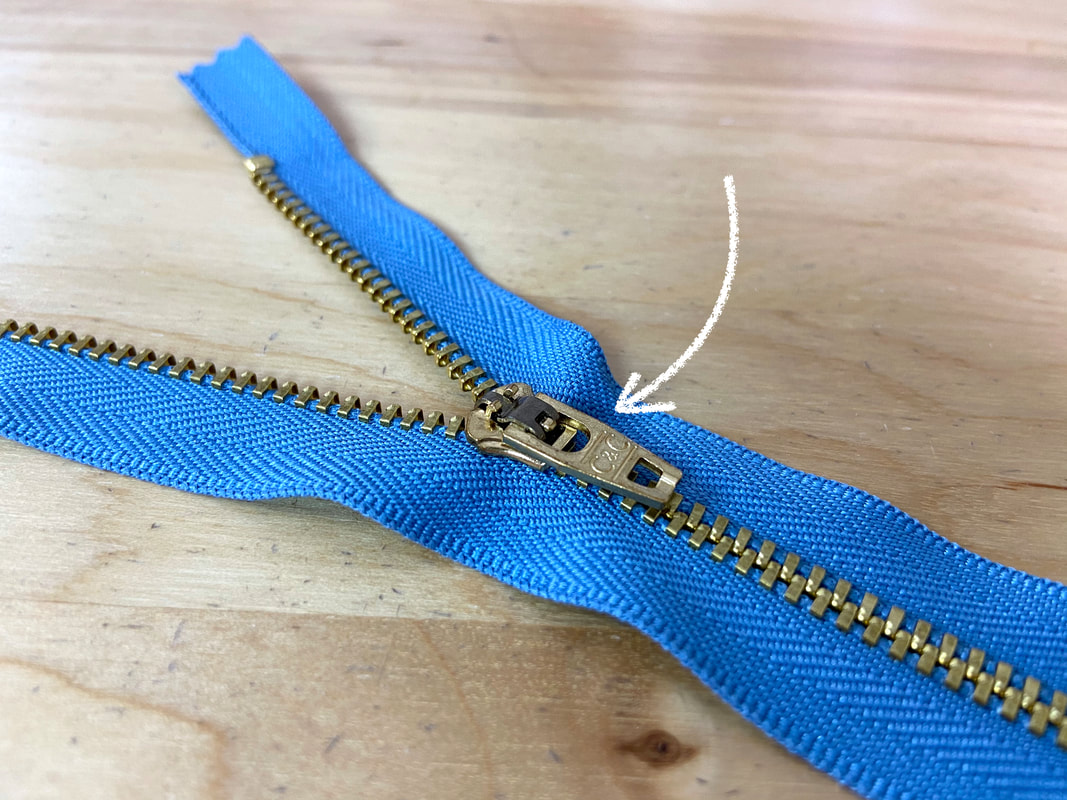
The slider with tab is the zipper portion that allows us to easily zip and unzip the zipper. The slider closes and opens the chain or plastic coils, while the tab provides a way to easily handle the slider up and down as needed. 
Picture
​Zipper stops are positioned at both top and bottom, and serve as a way to stop the slider from coming off the zipper track. If the slider is pulled off the zipper coils/chain, the zipper edges separate when pulled apart. When this happens, the zipper cannot be closed back up without placing the slider back in its appropriate position. 
Picture
​Each zipper is constructed of two zipper tape portions. Each portion houses a row of zipper coils or metal chain. Aside from keeping the coils/chain together, each tape layer has a stitching guide woven into its center. These woven guidelines are used in the zipper application process. 
Conventionally, zipper tapes are made of polyester, nylon or cotton blends.

Shortening Zippers At Home

​While zippers are available in various lengths, you may not always find the perfect size for your specific project. If you find yourself in this situation, keep in mind that you can always shorten zippers at home. 
All zippers, whether conventional, invisible or separating, can be shortened by hand. Depending on zipper type, two basic techniques are used. These two methods are shown below.
For conventional zippers and invisible zippers: 
Picture
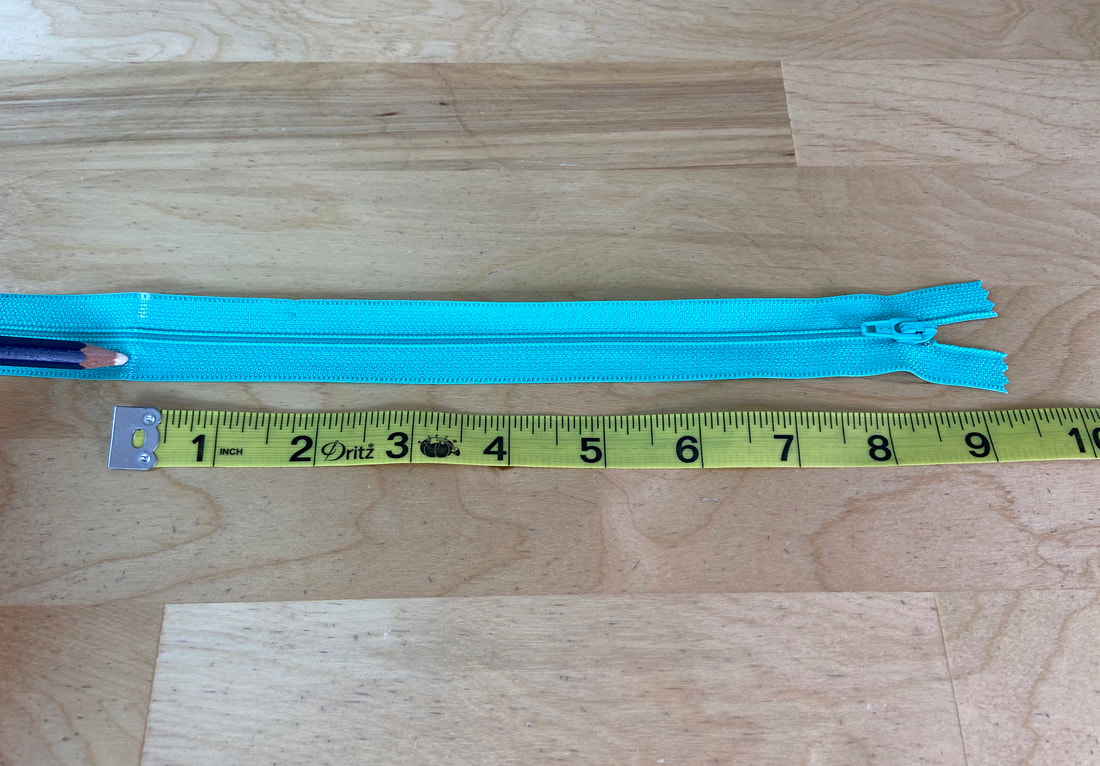
1. From the top down, measure the desired new length along the zipper, and mark this new location with a pin or pencil mark. 
Picture
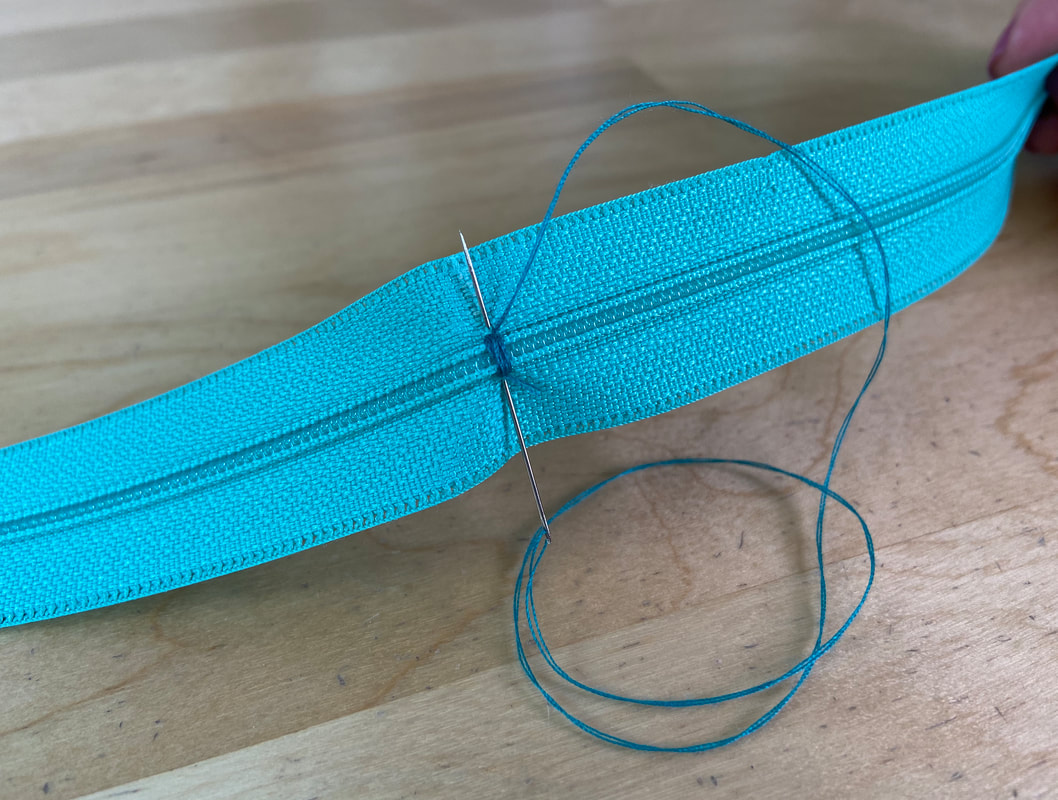
2. Using a hand-applied whipstitch and double thread, stitch around the zipper coils at the marked location until the stitch is durable and secure. This whipstitch will serve as your new bottom stop and keep the coils from coming apart once the zipper is trimmed in the next step. 
Picture
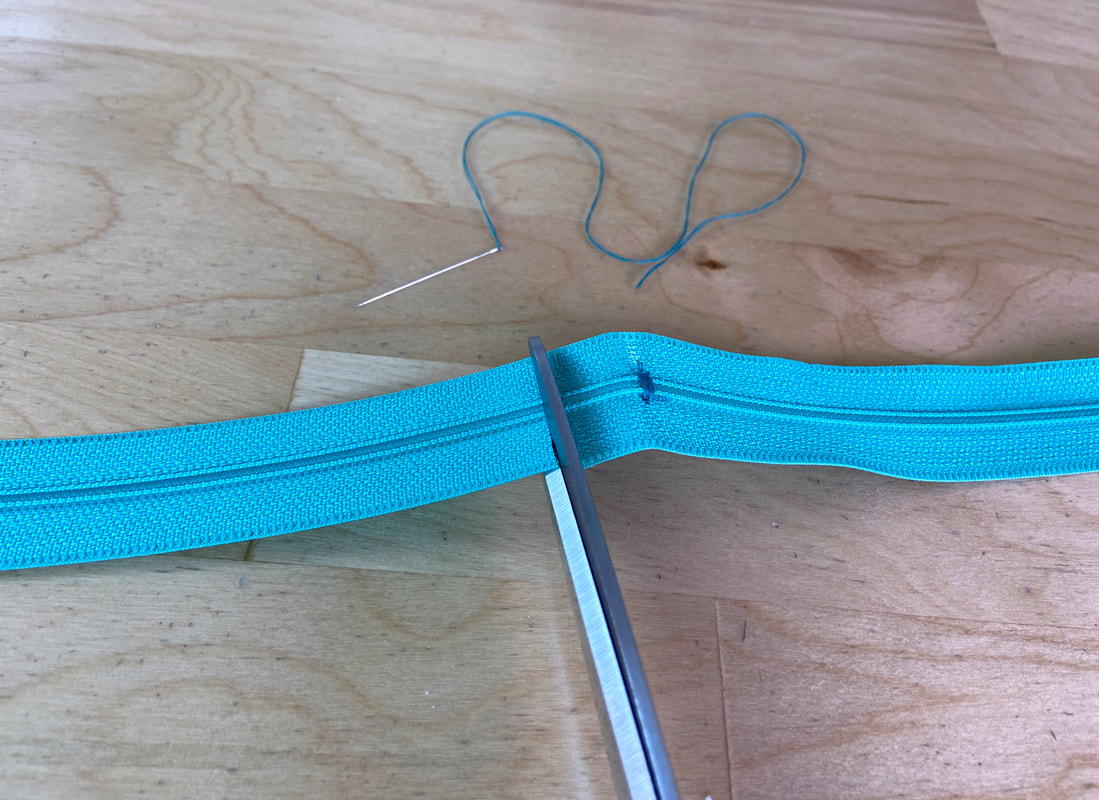
3. Last but not least, trim the bottom zipper excess at about ½” away from the hand-applied whipstitch.
Picture
The shortened zipper can now be safely unzipped all the way down to the whipstitch.
For separating zippers:
Picture
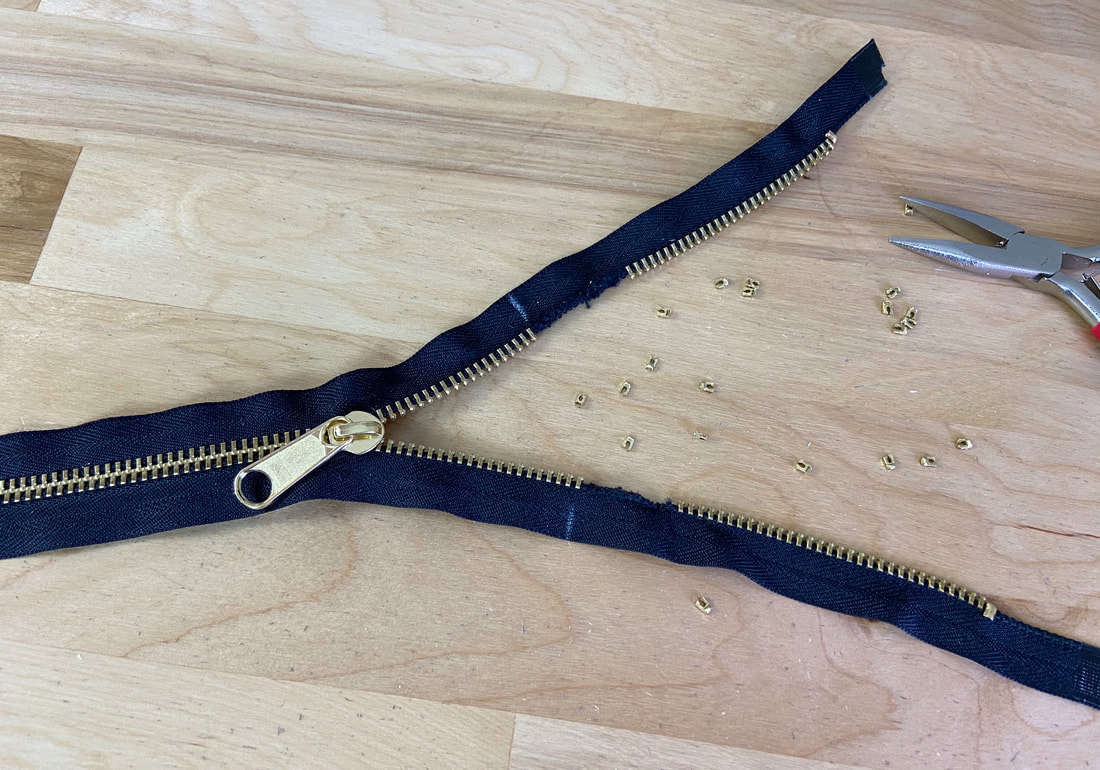
A separating zipper is shortened at the top instead of the bottom. Since both left and right portions have to remain separate, each one is shortened individually using a conventional pair of pliers.
Picture
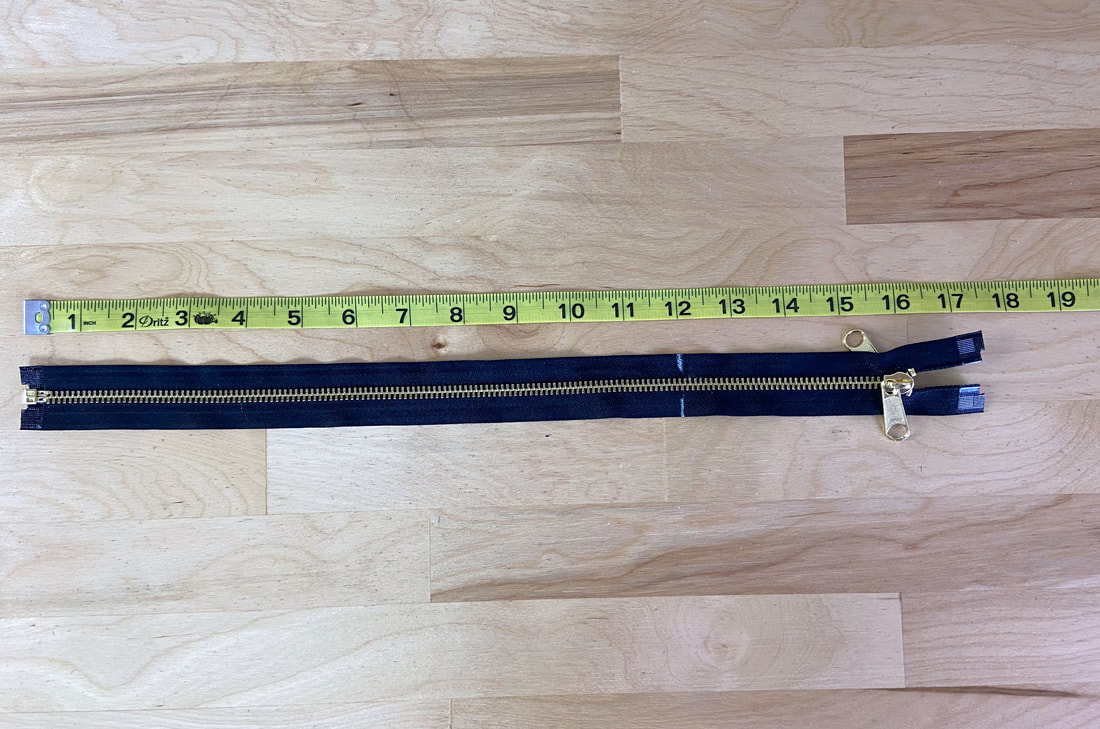
1. Measure and mark the new zipper length from bottom to top. Mark this location with tailor’s chalk or a quilting pencil on both sides of the zipper as shown. Adding the mark on both sides is extremely important since the zipper has to stay open during the shortening process. 
Picture
Picture
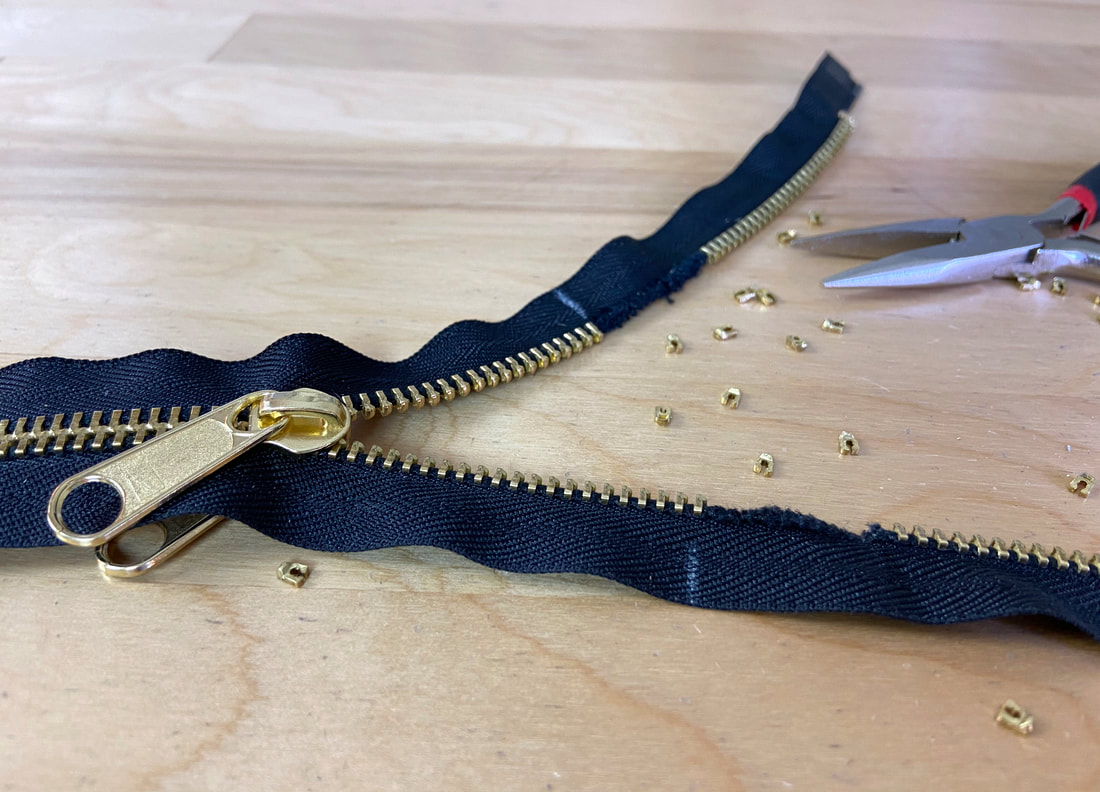
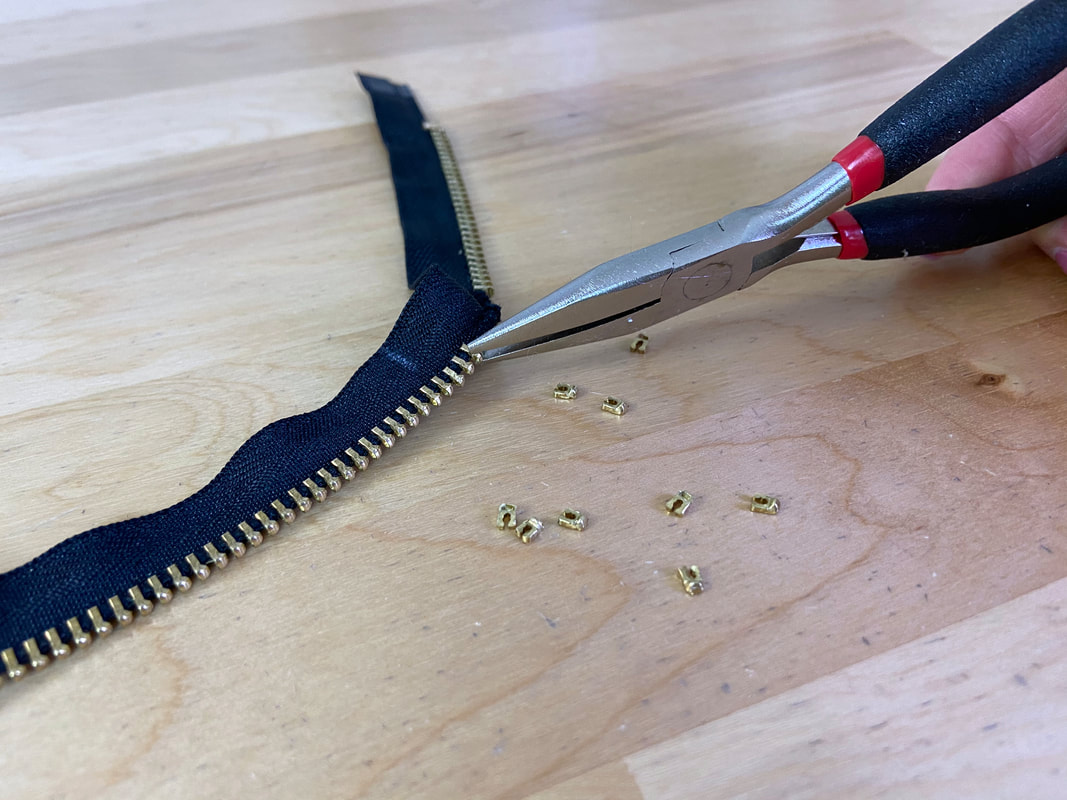
2. The zipper chain links above the tailor’s chalk mark are removed one by one using flat head pliers. Simply grab each individual zipper “tooth” and pull it away from the tape to remove it. Continue on both sides of the zipper tape for a 1" distance until you arrive at the marks noted in Step 1 above. 
Picture
Picture
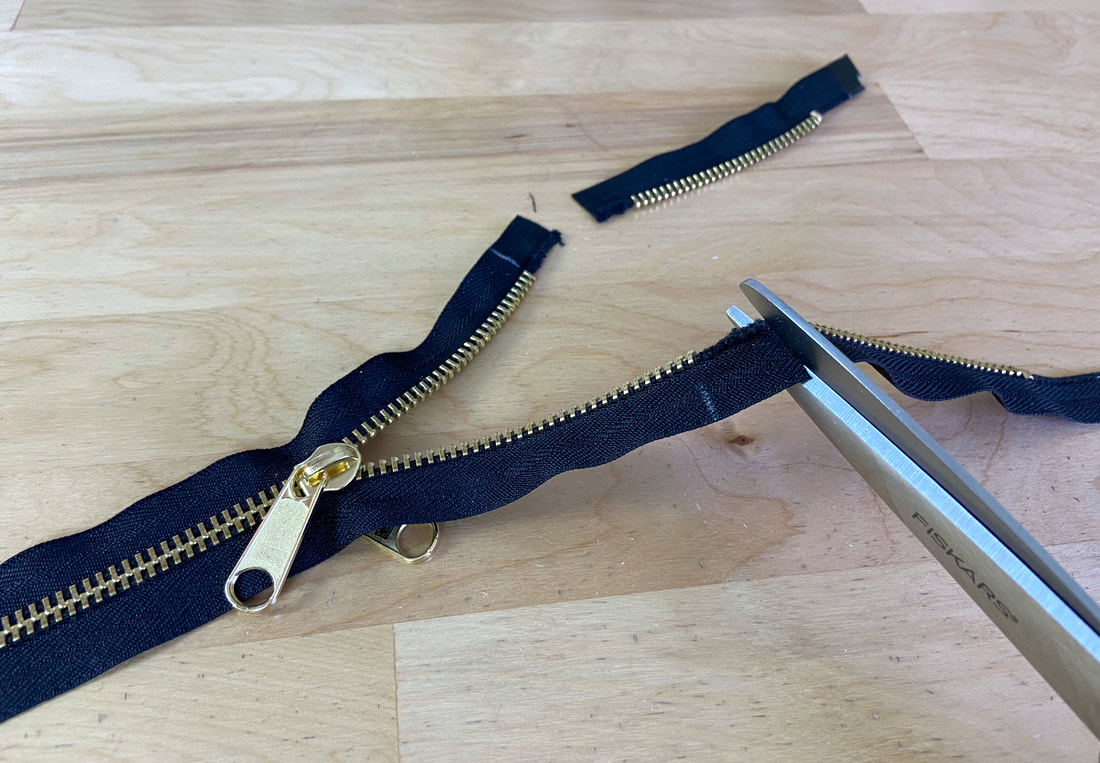
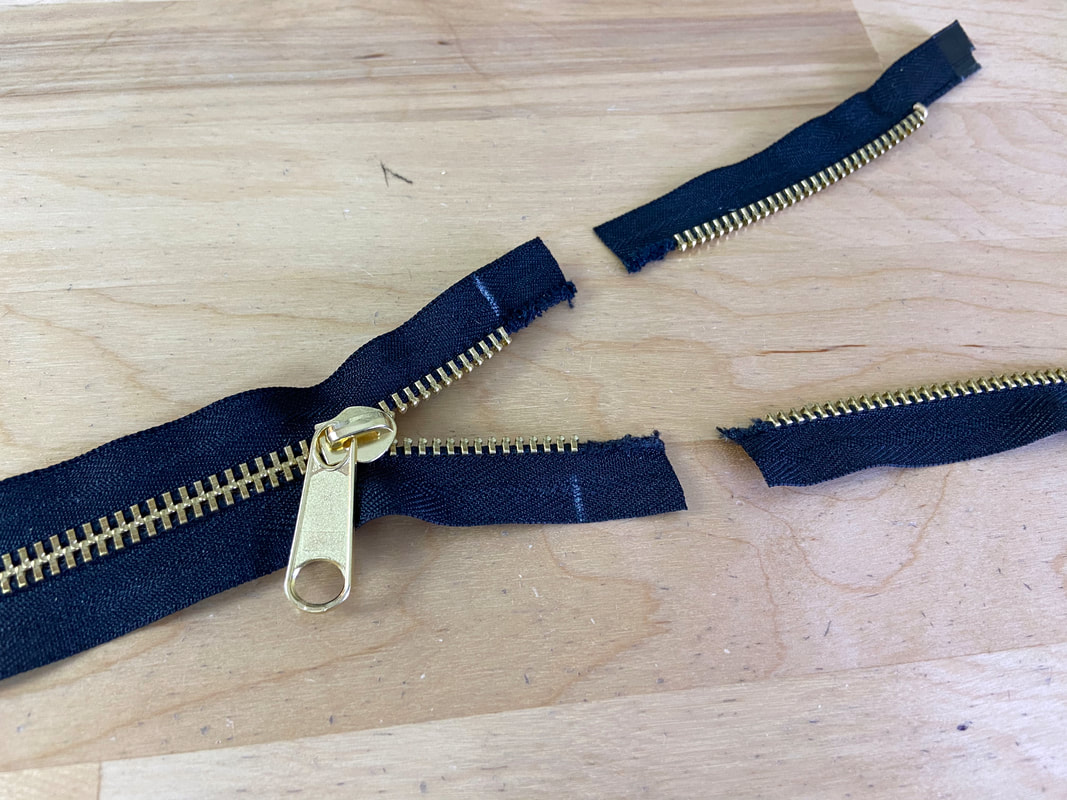
3. Trim the excess tape and zipper chain at about ½” from the top of the remaining chain links. 
If possible, remove the top zipper stops from the original zipper and crimp them onto the end of each shortened zipper portion. You can also use a whipstitch (applied with matching color thread) to create manual zipper stops.

General Tips And Techniques For Sewing Zippers

  • When sewing lapped and centered zippers, the seam is machine basted shut during the zipper application process and not released until after the zipper is inserted.
  • Hand basting or double stick tape provides a secure way to keep the zipper properly aligned during the sewing process.
  • As you align the zipper, consider the garment’s top edge finish when deciding how low to position the zipper on the seam.
  • For best results, use a zipper color that matches the color of the garment best.
  • If you can’t find the right zipper size in the desired color, buy a longer one in the matching color of the garment. All zippers can be shortened at home.
  • Almost all zippers have a built-in stitching guideline along the zipper tape. Use it in the application process as needed.
  • When sewing invisible zippers to a seam with crossing seamlines that intersect, the zipper should be inserted such that the horizontal crossing seams form a smooth, continuous line. To facilitate the process, mark the exact location of each crossing seam on the zipper tape. When the zipper is stitched and closed, the seams should meet at the same exact point.
  • When sewing invisible zippers, clean finish the seam allowance edges individually prior to aligning and stitching the zipper.
  • In an invisible zipper application, the seam is not fully stitched until after the zipper is attached. The seam edges are fully separated during the application process.
  • Always hand baste the topstitch lines of the desired zipper placket prior to applying the final machine topstitching (especially in the case of lapped and centered zippers). The hand basting will provide a stitching guide and keep all the layers securely aligned underneath.
  • Always use a zipper presser foot when stitching along the zipper tape or next to the zipper teeth.
  • Never stitch directly on top of metal chain or heavy plastic coils. 

Common Zipper Applications:

​Sewing a Centered Zipper
​Sewing A Lapped Zipper
​Sewing An Invisible Zipper
​Sewing A Fly Front Zipper
​Sewing A Closed-End Exposed Zipper (No Seam)
​Sewing An Exposed Separating Zipper
​Sewing Hand Stitched Zipper Applications
​Sewing A Placket-Enclosed Separating Zipper
​Sewing A Zipper Underlay
DMCA.com Protection Status
All content, including images and text, may not be copied, replicated, or redistributed without express written permission. This website is regularly screened and monitored for content protection.

Have A Personalized Sewing Question?

Ask It Here

Services

​Custom Apparel
Custom Bridal
​Sewing Tutorials
​

Company

About
Blog

Support

Contact
Terms of Service
DMCA.com Protection Status
© COPYRIGHT 2022. ALL RIGHTS RESERVED.
  • Sewing Tutorials
    • Basics >
      • Aligning Pattern Grainlines To Fabric
      • Preparing Fabrics For Sewing
      • Pinning Sewing Patterns To Fabric
      • Placing Sewing Patterns On Fabric For Cutting
      • Rotary Cutters or Fabric Scissors?
      • Cutting The Sewing Patterns
      • What Are Notches And How To Use Them In The Sewing Process
      • Transferring Notches From Pattern To Fabric
      • Transferring Seamlines to Fabric
      • Staystitching
      • Backstitching: A Complete Guide
      • Hand Basting: A Complete Guide
      • Sewing Continuous Bias Binding
    • Darts >
      • Marking And Transferring Darts To Fabric
      • What Are Darts And Dart Components
      • Folding, Pinning And Hand Basting Darts
      • Handling Dart Excess: Bulk And Tension
      • How To Sew A French Dart
      • How To Sew And Iron Single Pointed Darts
      • How To Sew And Iron Contour Darts
      • Sewing Darts With Decorative/Beaded Fabrics
    • Sewing Seams >
      • ​The Basics Of Seams And Seam Allowance
      • How To Sew A Straight Seam
      • Sewing Curved Seams
      • Sewing Corner Seams
      • Trimming And Grading Seam Excess
      • Notching/Clipping Seam Allowance for Tension Release
      • Sewing Topstitched Seams
      • Sewing Corded Seams
      • Sewing A Slot Seam
      • Sewing A Gathered Seam
      • Sewing Bias Seams
      • Sewing Seams With Ease
      • Sewing Seams With Crossing Seamlines
      • Sewing Unlike Fabric Seams
      • How To Iron Seams: Ironing Tools And Conventions
      • Sewing With Knit Fabrics
      • Understanding Stitch Length And Tension
      • Sewing Unique Fabric Seams
    • Seam Finishes >
      • Seam Finishing Techniques - Overview
      • Applying A Pinked Seam Finish
      • Applying A Bias Bound Seam Finish
      • Serging And Zigzag Seam Finishes
      • Sewing A Self-Bound Seam Finish
      • Sewing A French Seam Finish
      • Sewing A Hong Kong Seam Finish
      • Sewing A Mock French Seam Finish
      • Sewing A Turned-and-Stitched Seam Finish
      • Sewing Overcast Hand-Applied Seam Finishes
      • Sewing A Flat Felled Seam
      • Sewing A Hairline Seam Finish
    • Hem Finishes >
      • Garment Hem Finishes: Overview
      • ​Sewing A Double Fold Hem Finish
      • Sewing A Single Fold Hem Finish
      • Sewing Bound Hem Finishes
      • Sewing An Exposed Double Layer Bound Hem
      • Sewing A Folded-Up Bound Hem with Pre-folded Binding
      • Sewing A Hong Kong Hem Finish
      • Sewing A Band Hem Finish
      • Sewing A Bias Faced Hem Finish
      • Sewing A Twill Tape Hem Finish
      • Sewing A Rolled Hem Finish
      • Sewing A Shaped Hem Facing
      • Using Fusible Hem Tape And Webbing
      • Finishing A Lace Fabric Hem
      • Finishing A Leather Hem
      • Sewing Faced Hem Corners
      • How To Finish Lining At The Hem
      • Finishing Fabric Corners by Mitering >
        • Mitering Fabric Corners With A Full Bias Facing
        • Mitering Fabric Corners With Exposed Binding
      • Interfacing A Hemline: Lined And Unlined Examples
    • Sewing Pockets >
      • Curved Patch Pocket With Flap
      • Unlined Square Patch Pockets
      • Lined Patch Pockets: Two Ways
      • Extension On-Seam Pockets
      • Separate On-Seam Pocket
      • Front Hip Pockets
      • Bound Double Welt Pocket
      • Double Welt Pocket With Flap
      • Self-Welt Pocket (Using Single Fabric Layer)
      • Slanted Welt Pocket (Hand-Stitched)
      • Faced Slash Pockets: Overview >
        • Sewing A Faced Slit Pocket
        • Sewing A Rectangular Slash Pocket
        • Sew A Star-Shaped Faced Pocket
    • Sewing Zippers >
      • Sewing Zippers: General Information
      • Sewing A Centered Zipper
      • Sewing A Lapped Zipper
      • Sewing An Invisible Zipper
      • Sewing A Fly Front Zipper
      • Sewing A Closed-End Exposed Zipper (No Seam)
      • Sewing An Exposed Separating Zipper
      • Sewing Hand Stitched Zipper Applications
      • Sewing A Zipper Underlay
      • Sewing A Placket-Enclosed Separating Zipper
    • Sleeveless Finishes >
      • Sleeveless Armhole Finishes: General Information
      • Finishing Sleeveless Garments with Lining
      • Sewing A Folded-Under Bound Armhole Finish
      • Sewing A Shaped Armhole Facing
      • Finishing Armhole Edges With Exposed Binding
      • Finishing Armhole Edges With Decorative Trim
    • Neckline Finishes >
      • Sewing A Neck Shaped Facing
      • Sewing An All-In-One Neck Facing
      • Neck And Garment Opening Combination Facings >
        • Sewing An Extended Front-Neck Facing
        • Sewing A Separate Neck-Front Facing
      • Sewing A Bias Faced Neckline Finish
      • Sewing A Band Neckline Finish
      • Bound Neckline Finishes: Overview >
        • Sewing A Single Layer Bound Neckline
        • Finishing A Neckline With Pre-Folded Binding
        • Sewing A Double Layer Bound Neckline Finish
      • Sewing A Semi-Stretch Strip Band Neckline
      • Ribbed Neck Band And Classic Turtleneck
      • Decorative Neckline Finishes >
        • Sewing A Neckline With Decorative Inset
        • Sewing A Piped Cording Faced Neckline
        • Sewing Decorative Trim To A Finished Neckline
    • Finishing Facing Edges >
      • Finishing Facing Edges: Overview
      • Folded-And-Topstitched Overedge Facing Finish
      • Sewing A Bound Facing Edge Finish
      • Sewing A Hong Kong Facing Finish
      • Sewing A Rolled Edge Facing Finish
      • Sewing A Twill Tape Facing Edge Finish
      • Sewing An Overedge-Stitch Facing Finish
    • Extras >
      • A Complete Guide on Interfacing
      • Sewing Bound Spaghetti Straps
      • Sewing Spaghetti Straps To A Faced Neckline
      • Sewing Ruffles: Overview
      • Patterning And Sewing A Circle Ruffle
      • Sewing A Gathered Heading Ruffle
      • Sewing Double Layer Gathered Ruffles
      • Sewing A Gathered Ruffle Into A Seam
      • Sewing A Gathered Ruffle To A Fabric Edge
      • Sewing A Fabric Surface Slit
      • Sewing A Slit Seam
      • Hand-Applied Straight Stitches
      • Hand-Applied Blind Stitches
      • Hand-Applied Overedge Stitches
      • Hand-Applied Tack Stitches
      • Hand-Applied Decorative Stitches
  • Custom Apparel
    • Custom Bridal
  • Submit A Sewing Question
  • About
  • Blog