Doina Alexei
  • Custom Bridal
  • The Process
  • Our Brides
  • About
  • Sewing Tutorials
    • Basics >
      • Aligning Pattern Grainlines To Fabric
      • Preparing Fabrics For Sewing
      • Pinning Sewing Patterns To Fabric
      • Placing Sewing Patterns On Fabric For Cutting
      • Rotary Cutters or Fabric Scissors?
      • Cutting The Sewing Patterns
      • What Are Notches And How To Use Them In The Sewing Process
      • Transferring Notches From Pattern To Fabric
      • Transferring Seamlines to Fabric
      • Staystitching
      • Backstitching: A Complete Guide
      • Hand Basting: A Complete Guide
      • Sewing Continuous Bias Binding
    • Darts >
      • Marking And Transferring Darts To Fabric
      • What Are Darts And Dart Components
      • Folding, Pinning And Hand Basting Darts
      • Handling Dart Excess: Bulk And Tension
      • How To Sew A French Dart
      • How To Sew And Iron Single Pointed Darts
      • How To Sew And Iron Contour Darts
      • Sewing Darts With Decorative/Beaded Fabrics
    • Sewing Seams >
      • ​The Basics Of Seams And Seam Allowance
      • How To Sew A Straight Seam
      • Sewing Curved Seams
      • Sewing Corner Seams
      • Trimming And Grading Seam Excess
      • Notching/Clipping Seam Allowance for Tension Release
      • Sewing Topstitched Seams
      • Sewing Corded Seams
      • Sewing A Slot Seam
      • Sewing A Gathered Seam
      • Sewing Bias Seams
      • Sewing Seams With Ease
      • Sewing Seams With Crossing Seamlines
      • Sewing Unlike Fabric Seams
      • How To Iron Seams: Ironing Tools And Conventions
      • Sewing With Knit Fabrics
      • Understanding Stitch Length And Tension
      • Sewing Unique Fabric Seams
    • Seam Finishes >
      • Seam Finishing Techniques - Overview
      • Applying A Pinked Seam Finish
      • Applying A Bias Bound Seam Finish
      • Serging And Zigzag Seam Finishes
      • Sewing A Self-Bound Seam Finish
      • Sewing A French Seam Finish
      • Sewing A Hong Kong Seam Finish
      • Sewing A Mock French Seam Finish
      • Sewing A Turned-and-Stitched Seam Finish
      • Sewing Overcast Hand-Applied Seam Finishes
      • Sewing A Flat Felled Seam
      • Sewing A Hairline Seam Finish
    • Hem Finishes >
      • Garment Hem Finishes: Overview
      • ​Sewing A Double Fold Hem Finish
      • Sewing A Single Fold Hem Finish
      • Sewing Bound Hem Finishes
      • Sewing An Exposed Double Layer Bound Hem
      • Sewing A Folded-Up Bound Hem with Pre-folded Binding
      • Sewing A Hong Kong Hem Finish
      • Sewing A Band Hem Finish
      • Sewing A Bias Faced Hem Finish
      • Sewing A Twill Tape Hem Finish
      • Sewing A Rolled Hem Finish
      • Sewing A Shaped Hem Facing
      • Using Fusible Hem Tape And Webbing
      • Finishing A Lace Fabric Hem
      • Finishing A Leather Hem
      • Sewing Faced Hem Corners
      • How To Finish Lining At The Hem
      • Finishing Fabric Corners by Mitering >
        • Mitering Fabric Corners With A Full Bias Facing
        • Mitering Fabric Corners With Exposed Binding
      • Interfacing A Hemline: Lined And Unlined Examples
    • Sewing Pockets >
      • Curved Patch Pocket With Flap
      • Unlined Square Patch Pockets
      • Lined Patch Pockets: Two Ways
      • Extension On-Seam Pockets
      • Separate On-Seam Pocket
      • Front Hip Pockets
      • Bound Double Welt Pocket
      • Double Welt Pocket With Flap
      • Self-Welt Pocket (Using Single Fabric Layer)
      • Slanted Welt Pocket (Hand-Stitched)
      • Faced Slash Pockets: Overview >
        • Sewing A Faced Slit Pocket
        • Sewing A Rectangular Slash Pocket
        • Sew A Star-Shaped Faced Pocket
    • Sewing Zippers >
      • Sewing Zippers: General Information
      • Sewing A Centered Zipper
      • Sewing A Lapped Zipper
      • Sewing An Invisible Zipper
      • Sewing A Fly Front Zipper
      • Sewing A Closed-End Exposed Zipper (No Seam)
      • Sewing An Exposed Separating Zipper
      • Sewing Hand Stitched Zipper Applications
      • Sewing A Zipper Underlay
      • Sewing A Placket-Enclosed Separating Zipper
    • Sleeveless Finishes >
      • Sleeveless Armhole Finishes: General Information
      • Finishing Sleeveless Garments with Lining
      • Sewing A Folded-Under Bound Armhole Finish
      • Sewing A Shaped Armhole Facing
      • Finishing Armhole Edges With Exposed Binding
      • Finishing Armhole Edges With Decorative Trim
    • Neckline Finishes >
      • Sewing A Neck Shaped Facing
      • Sewing An All-In-One Neck Facing
      • Neck And Garment Opening Combination Facings >
        • Sewing An Extended Front-Neck Facing
        • Sewing A Separate Neck-Front Facing
      • Sewing A Bias Faced Neckline Finish
      • Sewing A Band Neckline Finish
      • Bound Neckline Finishes: Overview >
        • Sewing A Single Layer Bound Neckline
        • Finishing A Neckline With Pre-Folded Binding
        • Sewing A Double Layer Bound Neckline Finish
      • Sewing A Semi-Stretch Strip Band Neckline
      • Ribbed Neck Band And Classic Turtleneck
      • Decorative Neckline Finishes >
        • Sewing A Neckline With Decorative Inset
        • Sewing A Piped Cording Faced Neckline
        • Sewing Decorative Trim To A Finished Neckline
    • Finishing Facing Edges >
      • Finishing Facing Edges: Overview
      • Folded-And-Topstitched Overedge Facing Finish
      • Sewing A Bound Facing Edge Finish
      • Sewing A Hong Kong Facing Finish
      • Sewing A Rolled Edge Facing Finish
      • Sewing A Twill Tape Facing Edge Finish
      • Sewing An Overedge-Stitch Facing Finish
    • Extras >
      • A Complete Guide on Interfacing
      • Sewing Bound Spaghetti Straps
      • Sewing Spaghetti Straps To A Faced Neckline
      • Sewing Ruffles: Overview
      • Patterning And Sewing A Circle Ruffle
      • Sewing A Gathered Heading Ruffle
      • Sewing Double Layer Gathered Ruffles
      • Sewing A Gathered Ruffle Into A Seam
      • Sewing A Gathered Ruffle To A Fabric Edge
      • Sewing A Fabric Surface Slit
      • Sewing A Slit Seam
      • Hand-Applied Straight Stitches
      • Hand-Applied Blind Stitches
      • Hand-Applied Overedge Stitches
      • Hand-Applied Tack Stitches
      • Hand-Applied Decorative Stitches

Dressmaking: How To Finish Sleeveless Garments With Lining

Picture
​Finishing sleeveless garments with lining is very similar in construction to an-all-in-one facing. Conveniently, the lining layer finishes both the neck and armhole edges simultaneously. 
Picture
​Traditionally, the lining pieces are attached to facings and not directly to the garment’s neck and armhole edges. 
​By design, lining fabric is thin and flimsy and can’t support the required structure and stability needed along these curved edges. For that reason, a facing is used to provide sufficient stability and structure. As with everything in dressmaking, there are exceptions.
Picture
You can use lining alone (no need for facings) when the lining fabric is either identical or similar in weight and structure to the garment’s fabric. This is common with lightweight sleeveless blouses and dresses that are “flowey” and feature a more draped effect. In this case, the use of a facing would actually weigh down the drape and flexibility of the overall garment. Remember, facings add beautiful structure but not all styles need this structure. 
Picture
Lining is, for the most part, simple to sew. Just like an all-in-one facing, lining conveniently clean-finishes both neckline and armhole edges. The two require identical techniques in terms of the application process, bulk minimization, understitching and ironing.
Picture
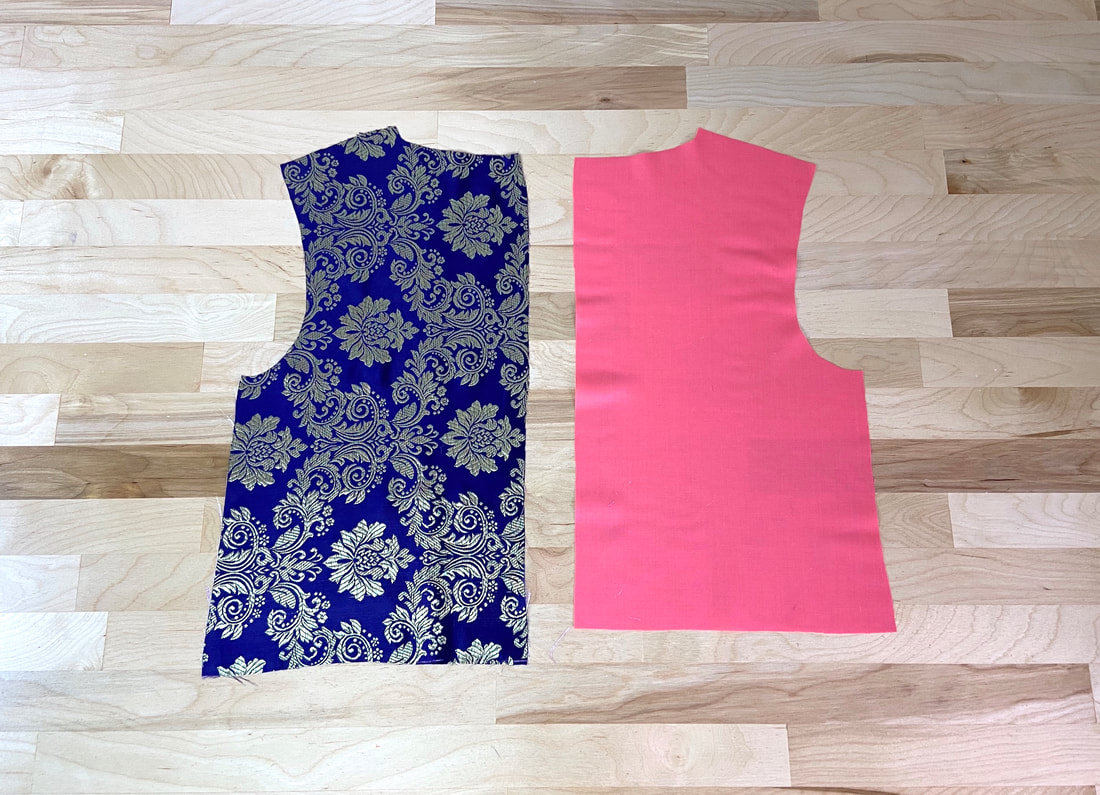
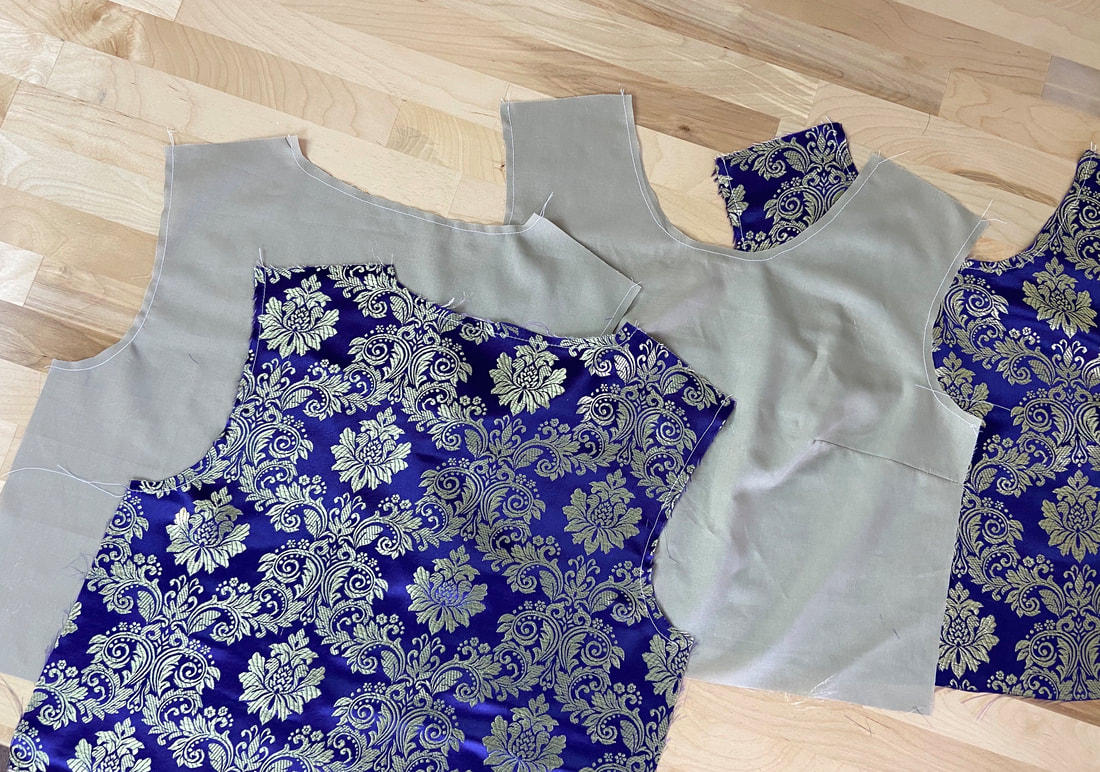
As is true with facings, lining is cut at exactly the same shape as the garment, with the exception of length variations. The lining's length is determined based on the type of finish applied at the hem. ​​You can learn more about lined hems in this tutorial: How To Finish Lining At The Hem
If separate patterns are not provided, cut your lining pieces using the same sewing patterns as the garment portions to be lined. 
​The lining’s face side should correspond to the inside of the garment- keep this in mind when matching the lining pieces to the garment. Following the steps below should shed some light on the process, so let’s get started! 

Sewing Lining To A Sleeveless Garment With Front/Back Separating Seam

There are two main techniques you can use to fully line a garment. The choice of which to use depends on whether your garment has a back or front seam that fully separates (usually center back or center front seams). Both versions are shown below.
To sew lining to a garment with a front or back separating seam:
Picture
​As an initial step, staystitch the front and back neckline and armhole edges within the seam allowance of both garment and lining pieces. Staystitching will prevent these curved edges from stretching and losing their shape in the sewing and handling process.
You can learn more about staystitching in this tutorial: Staystitching
Picture
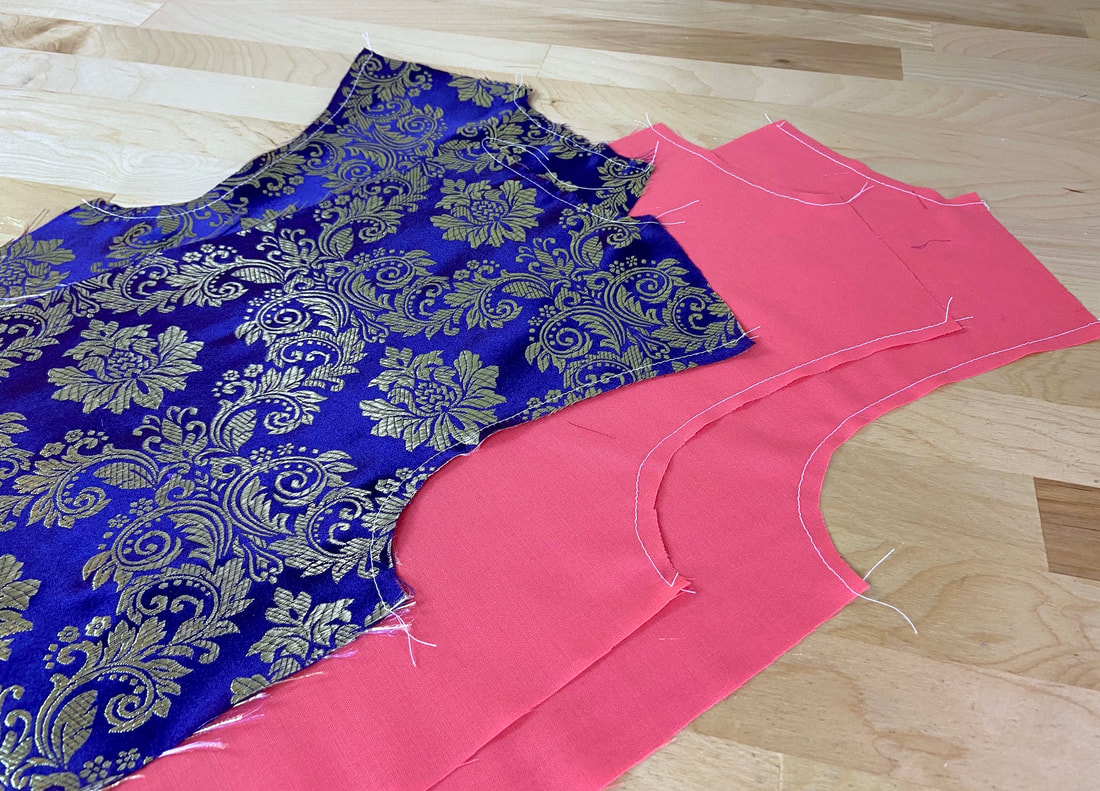
1. Align and stitch the shoulder seams of both garment and lining pieces at the designated seam allowance. 
Leave the side seams and separating front or back seam open- this is crucial for attaching the lining in one piece. 
Picture
In this example, the garment has a center back seam which is left open throughout the sewing process.
Picture
2. Trim the seam allowance halfway down (especially if working with bulky fabric) and iron the seam allowance open as shown. Do this on both the lining and garment seams.
Picture
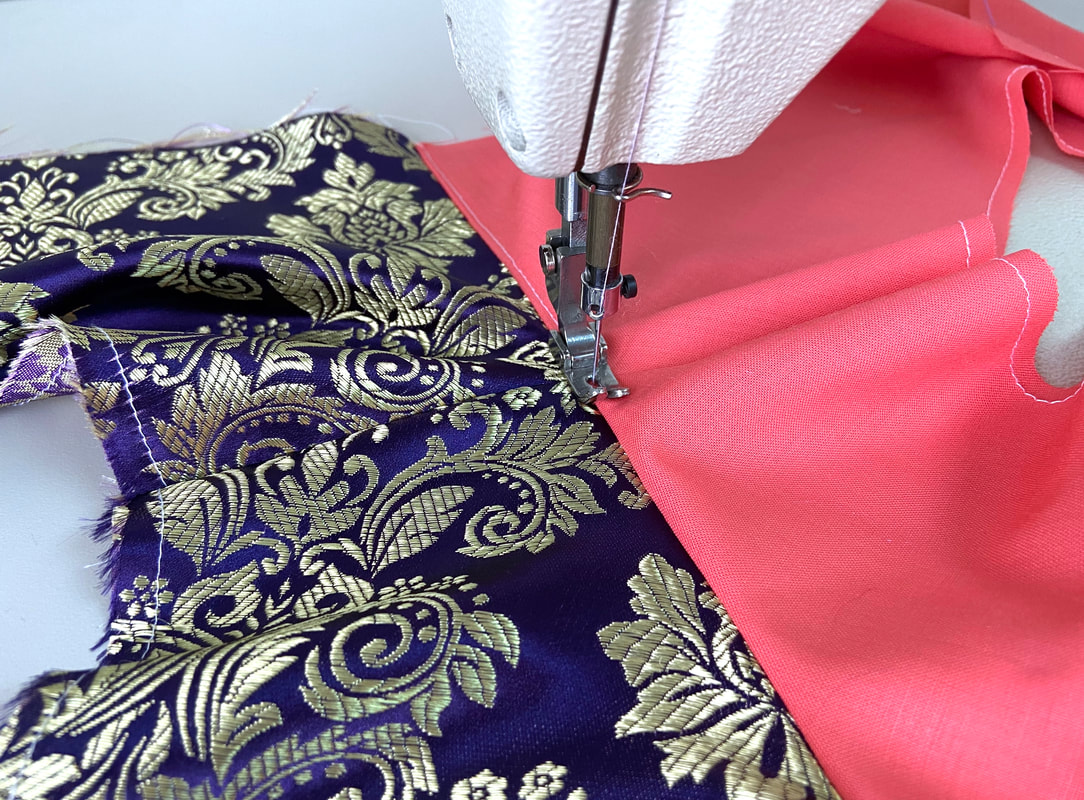
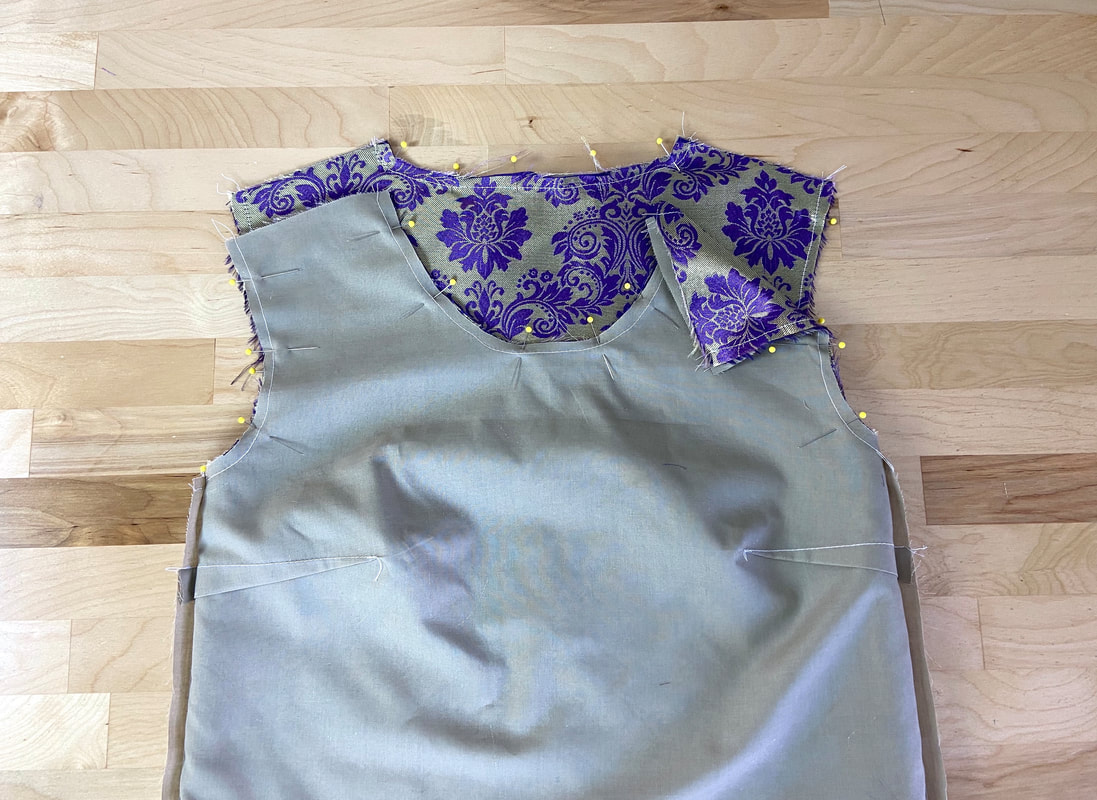
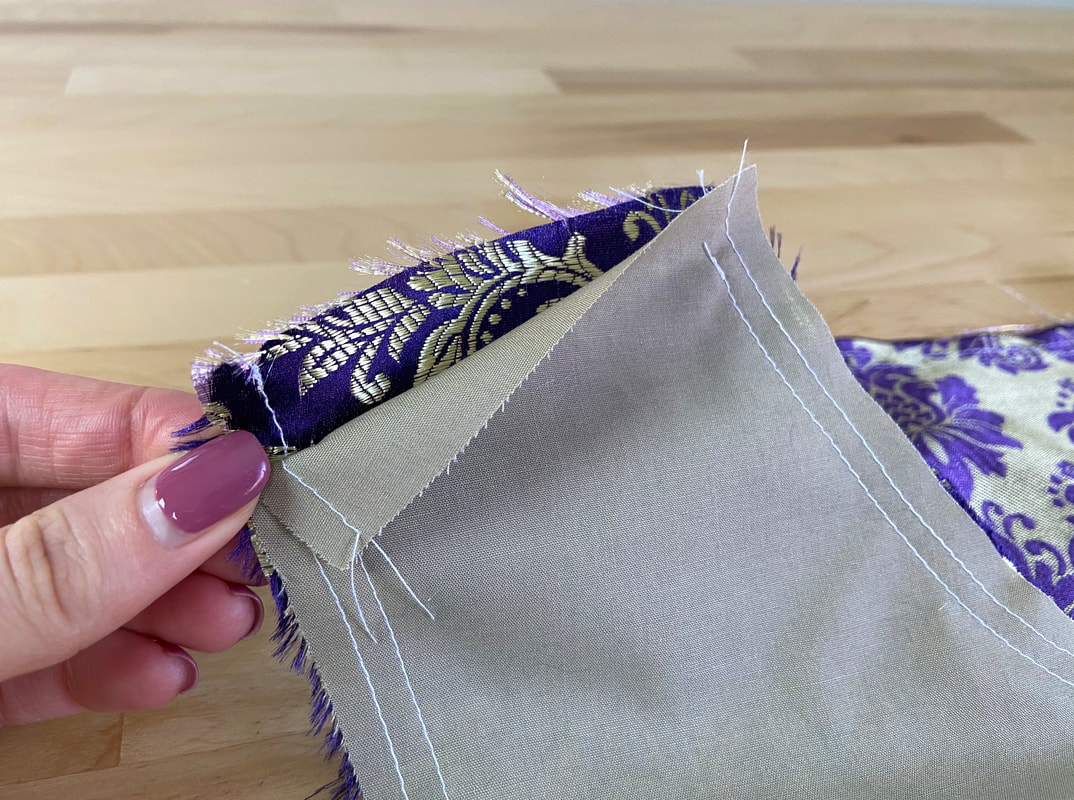
3. Spread the garment layer flat on the table with its face side up, and place the lining layer on top of garment layer such that the right sides are touching and all matching edges align. The neckline and armhole curves should correspond perfectly to one another.
Picture
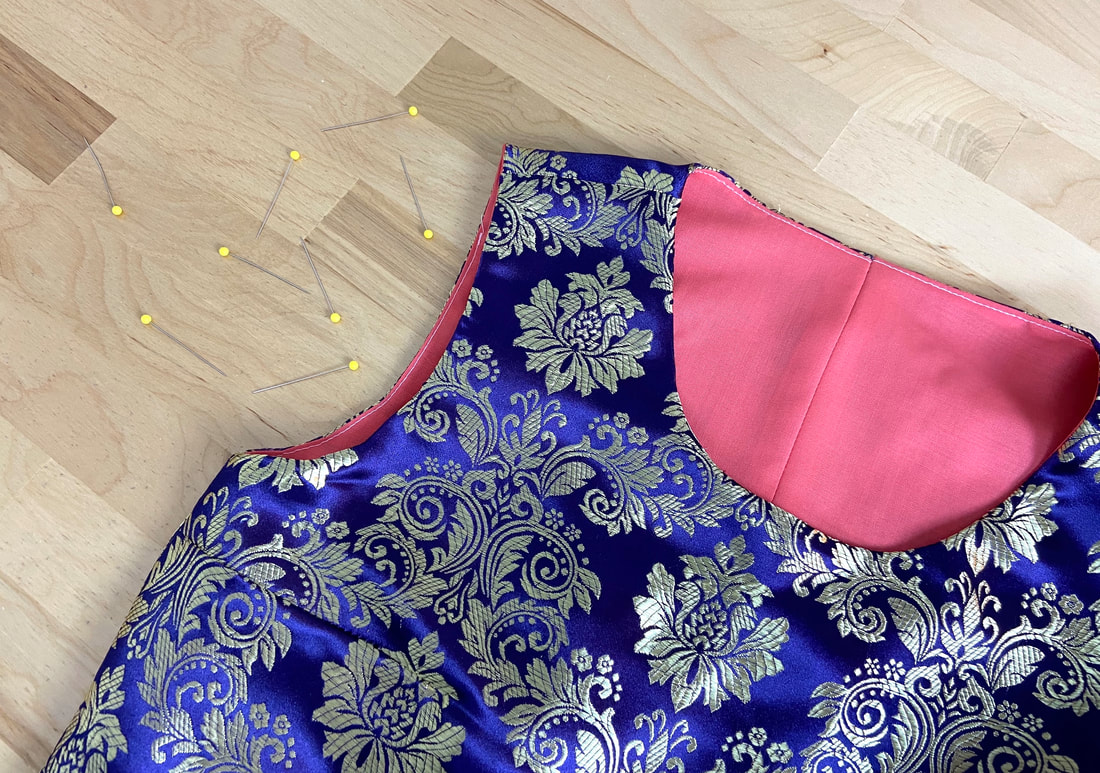
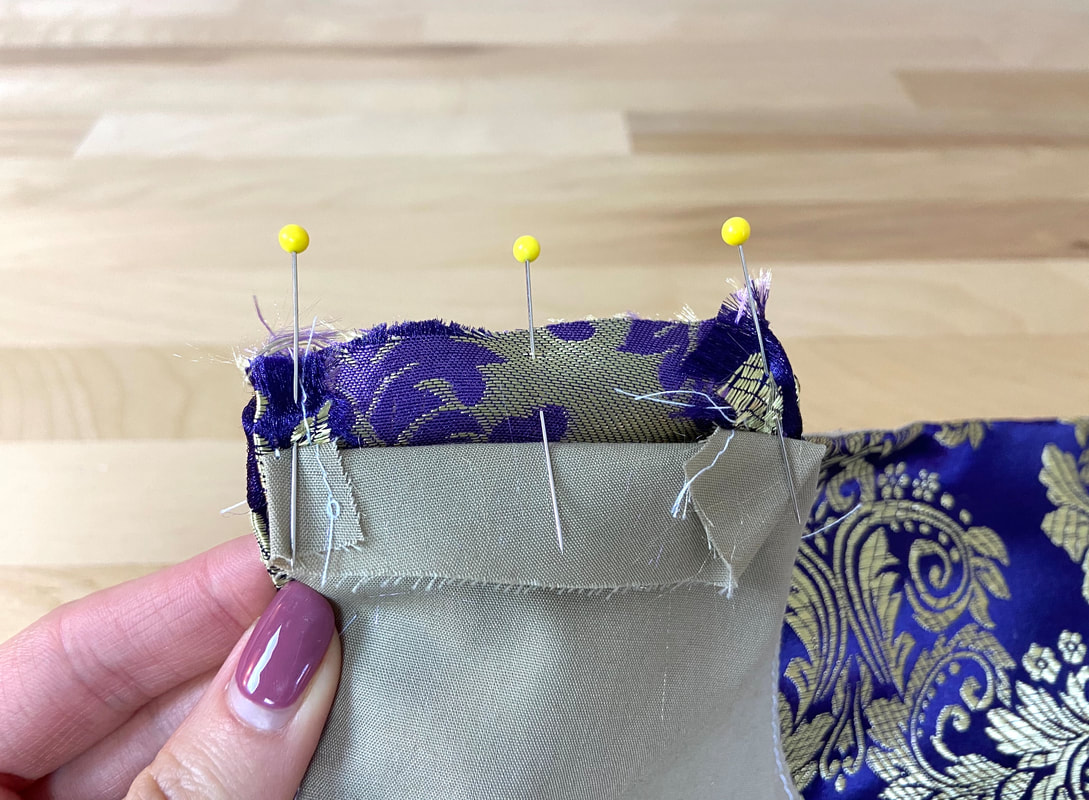
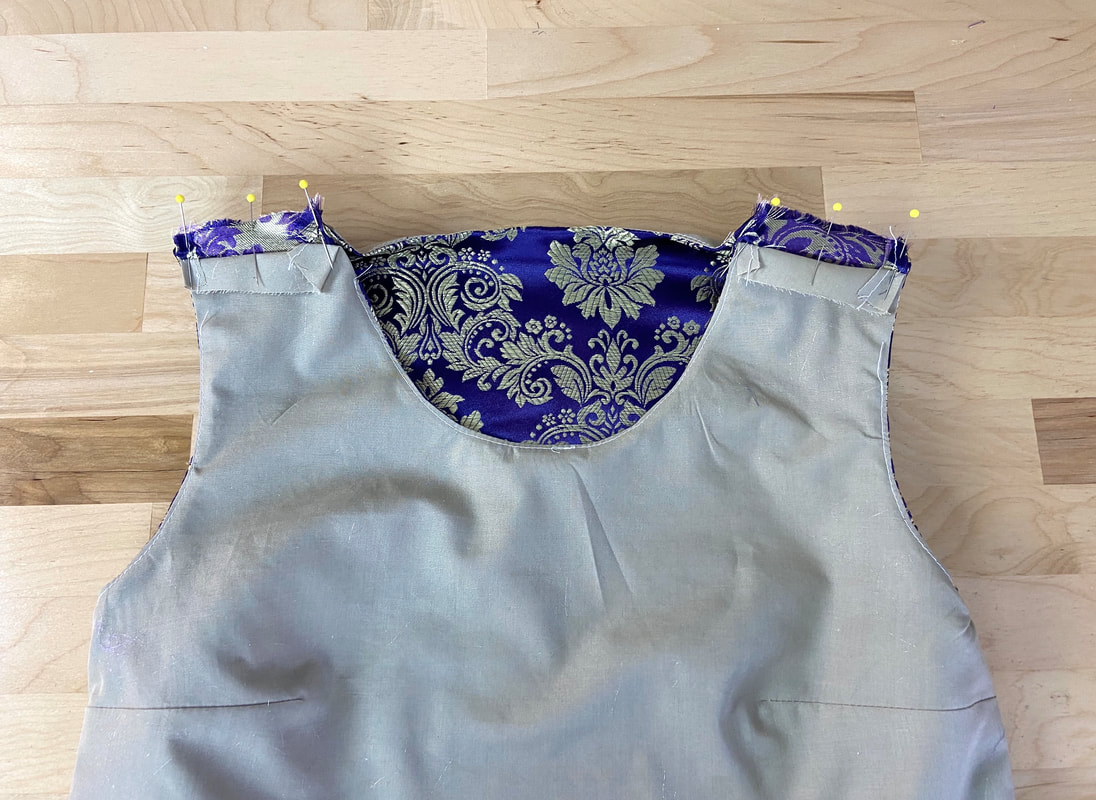
4. Insert pins through the lining and garment layer perpendicular to the neck edge as shown.
Picture
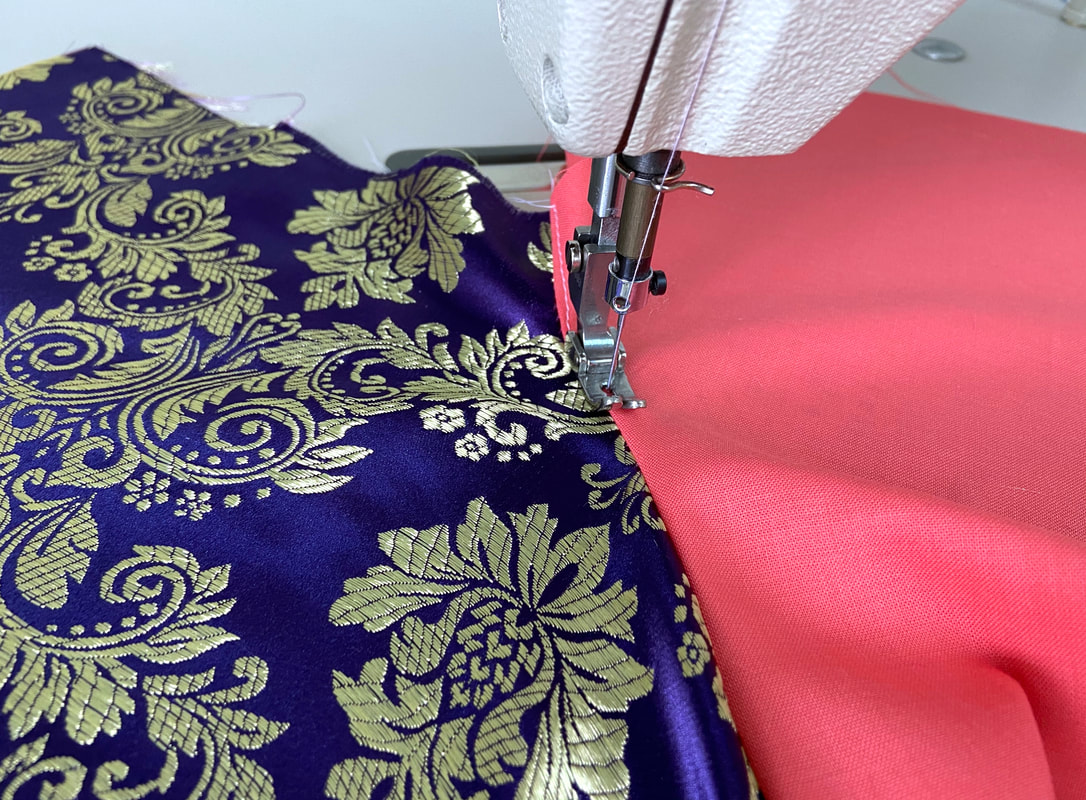
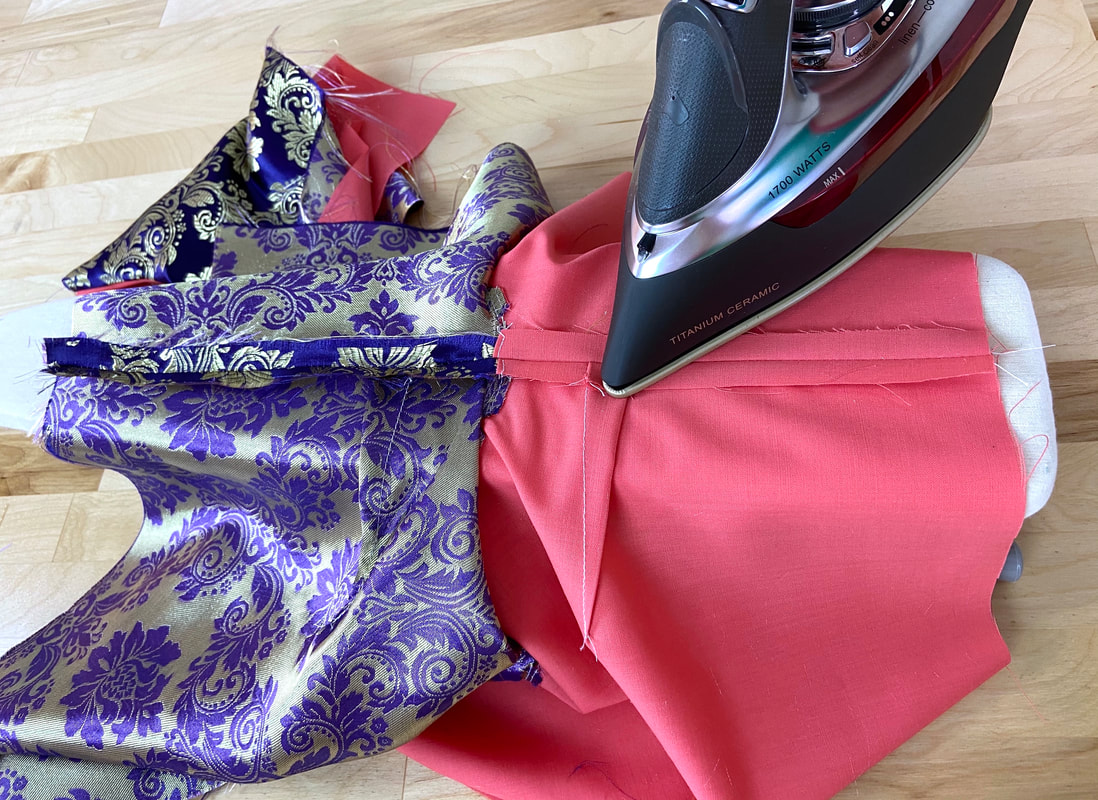
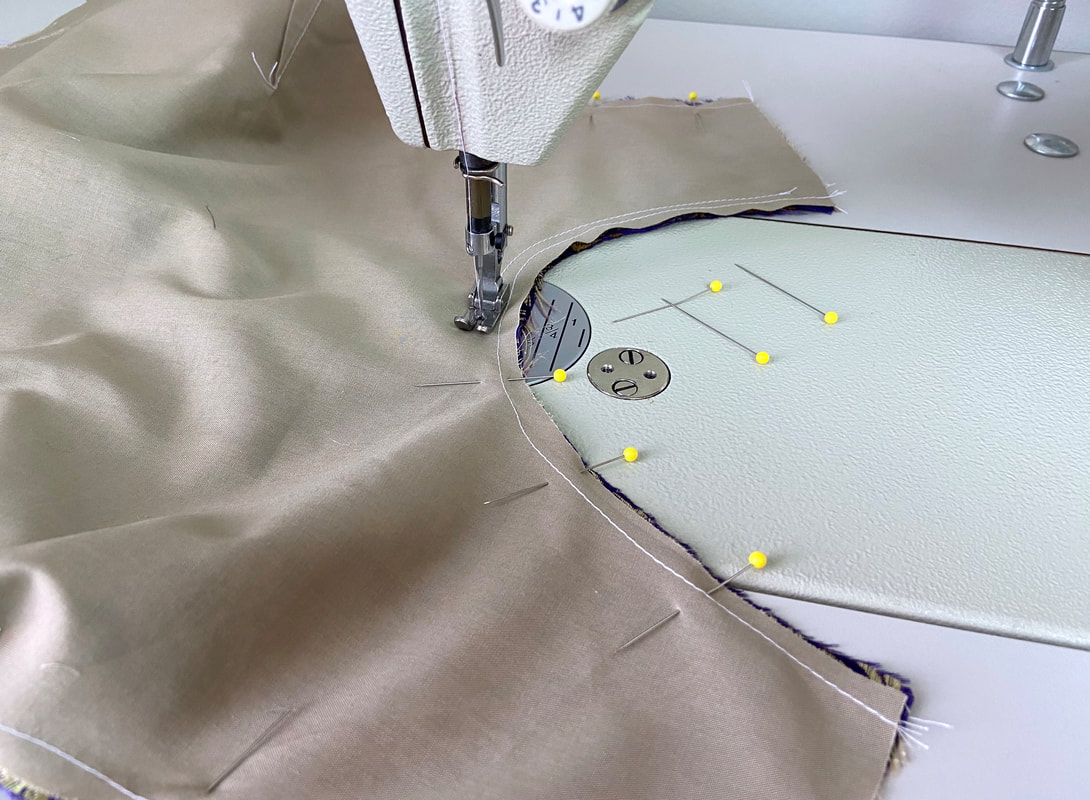
​5. Stitch along the neckline curve at the designated seam allowance. As always, the seam allowance is ½” in this case.
Picture
Picture
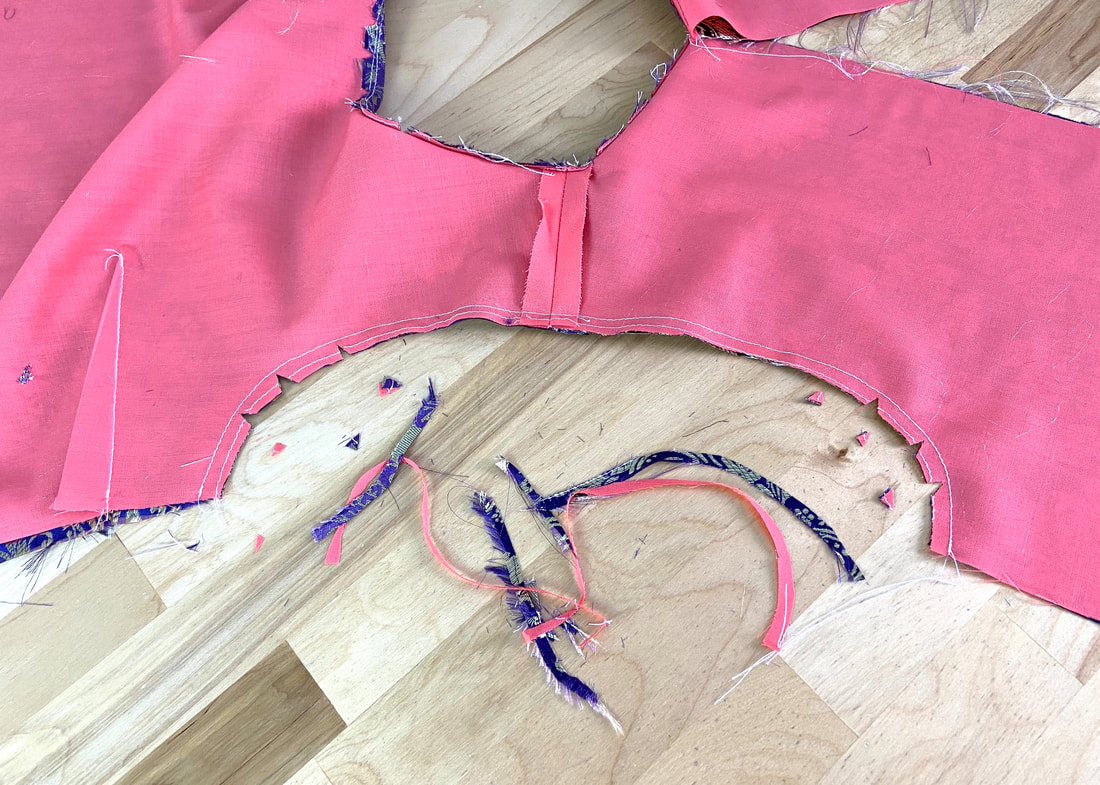
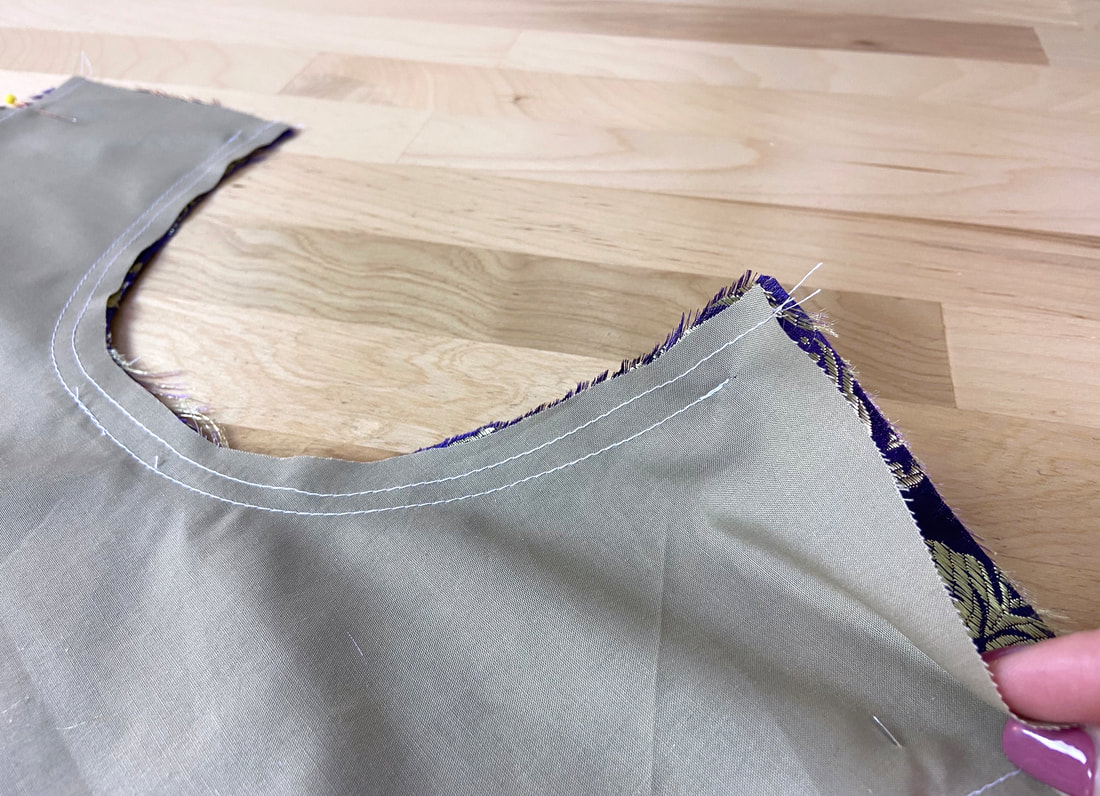
​6. Trim the seam allowance down to half its width to minimize bulk.
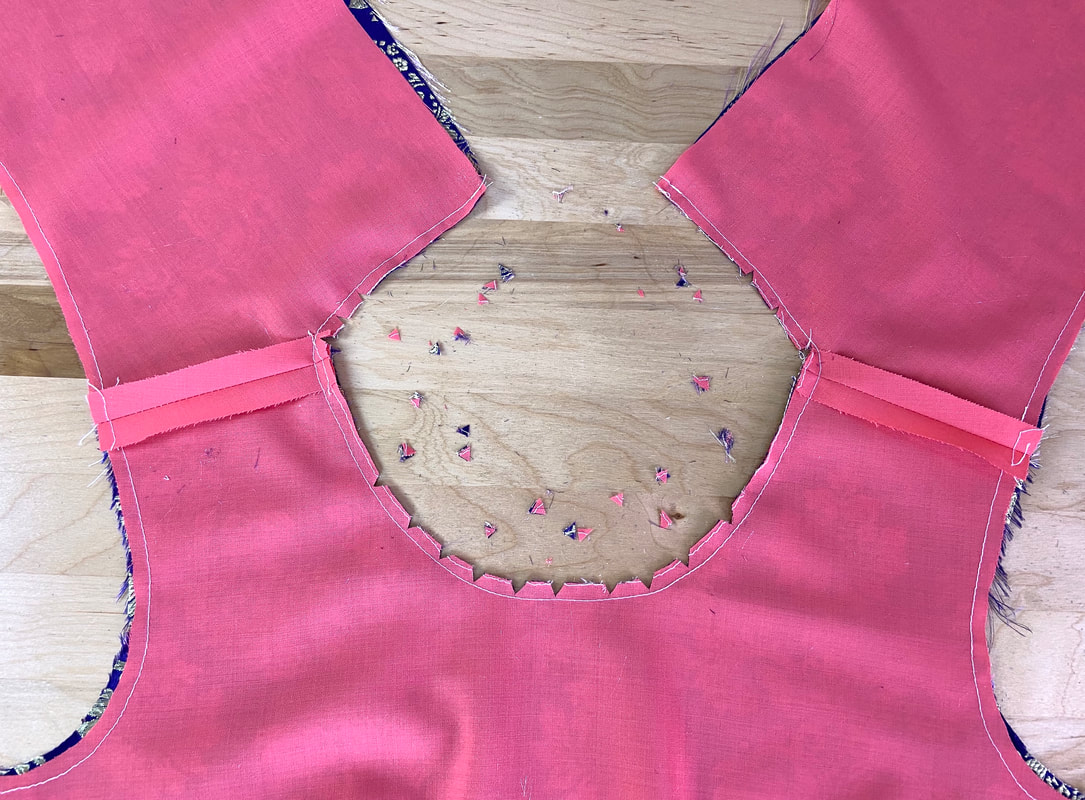
Picture
7. ​Next, clip wedge-shaped notches within the seam allowance along the curve of the neckline as shown. Doing so will release tension and allow the finished neckline to lay flat.
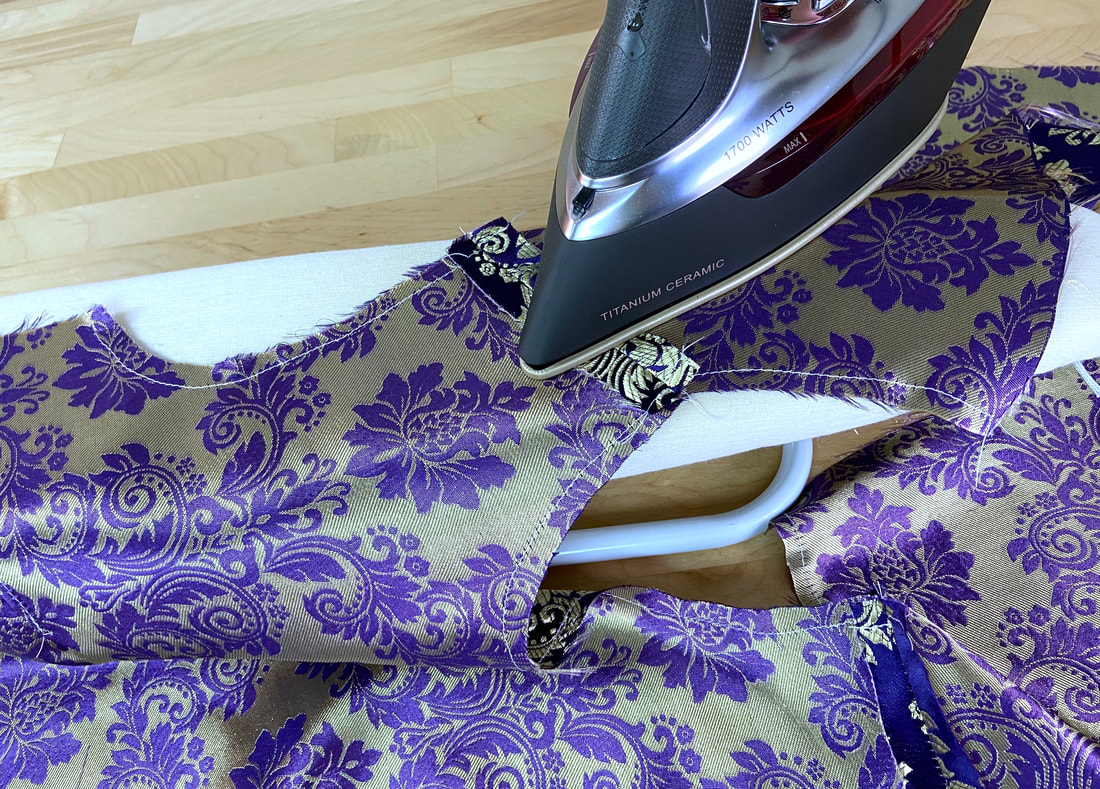
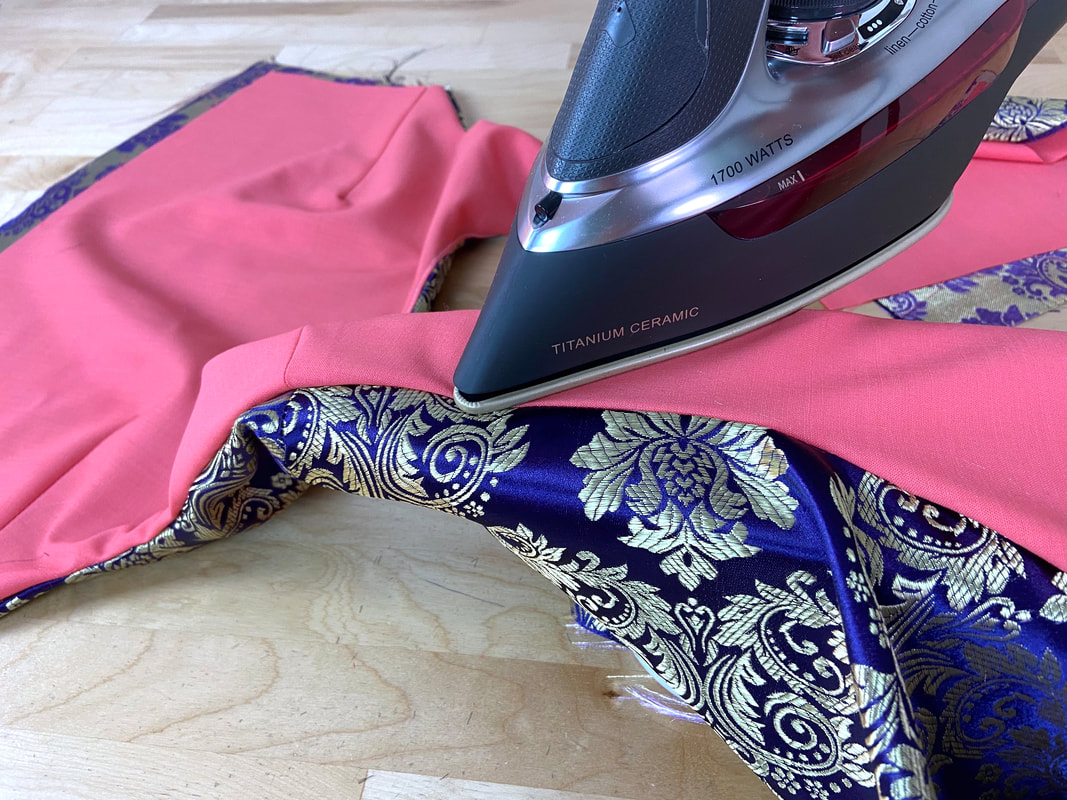
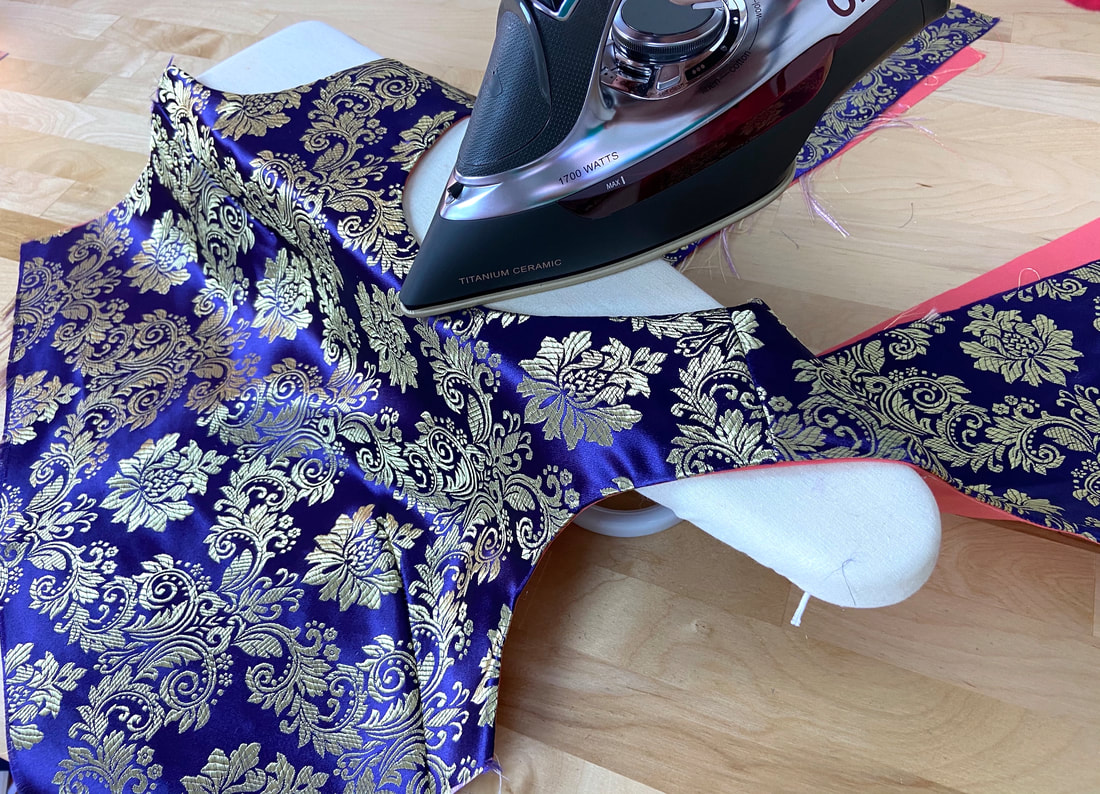
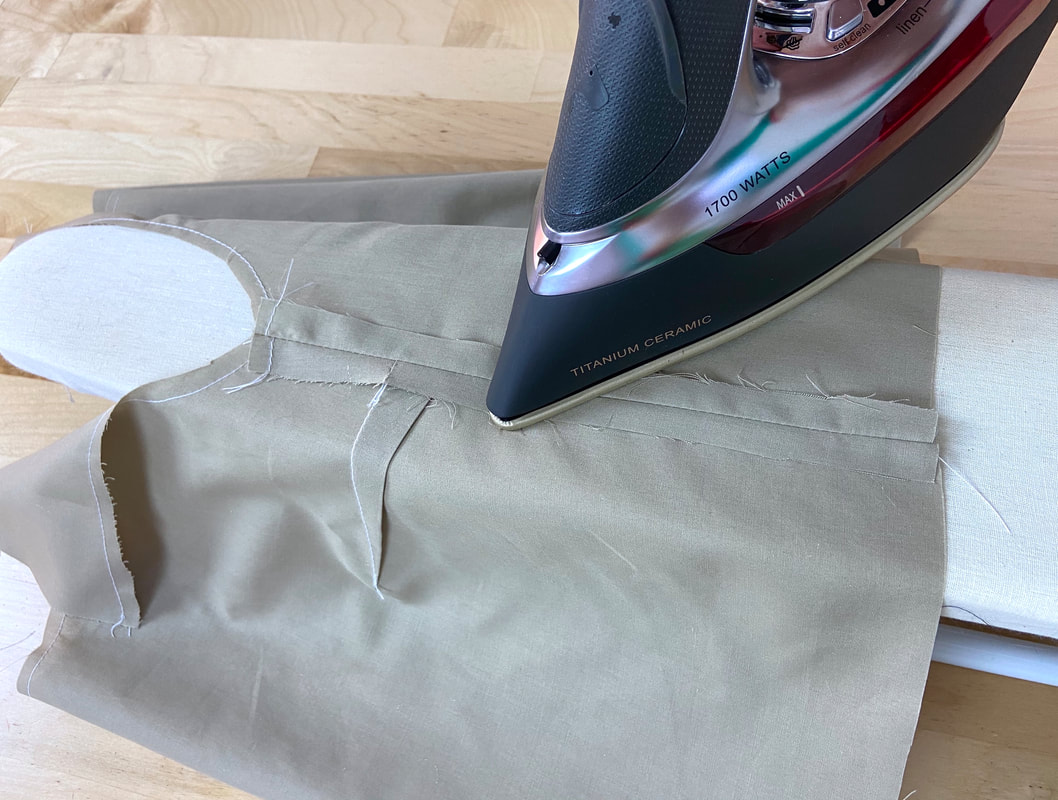
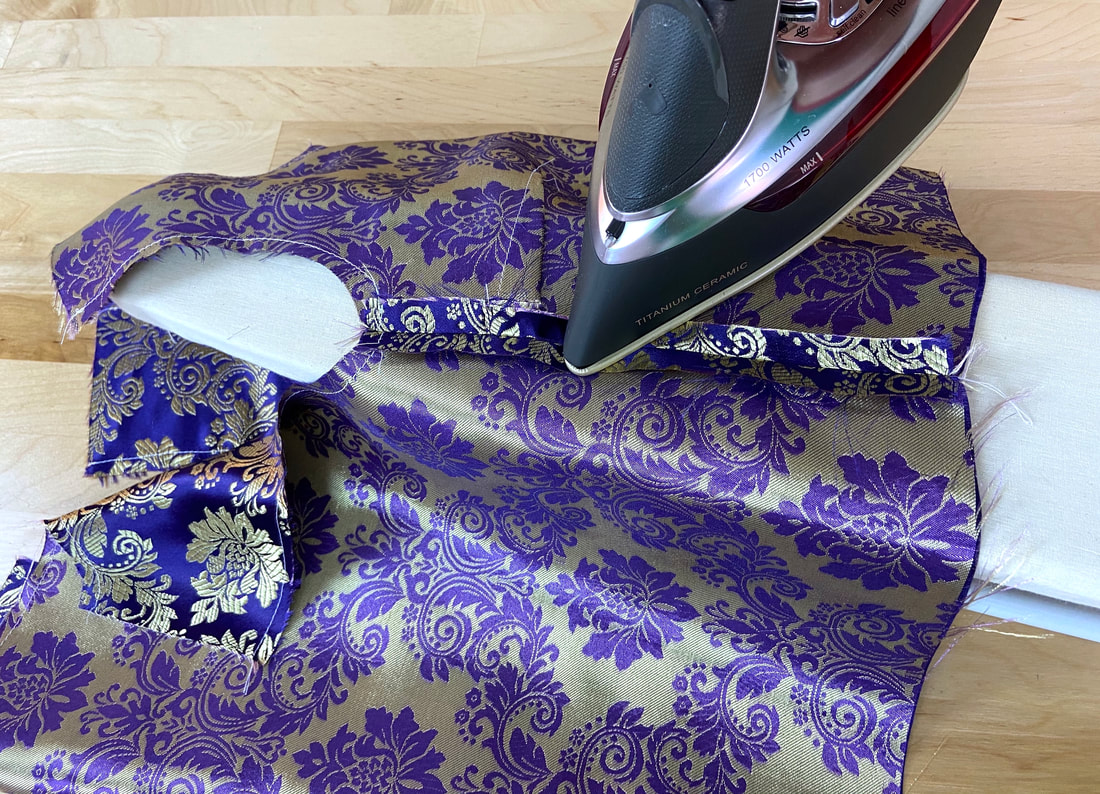
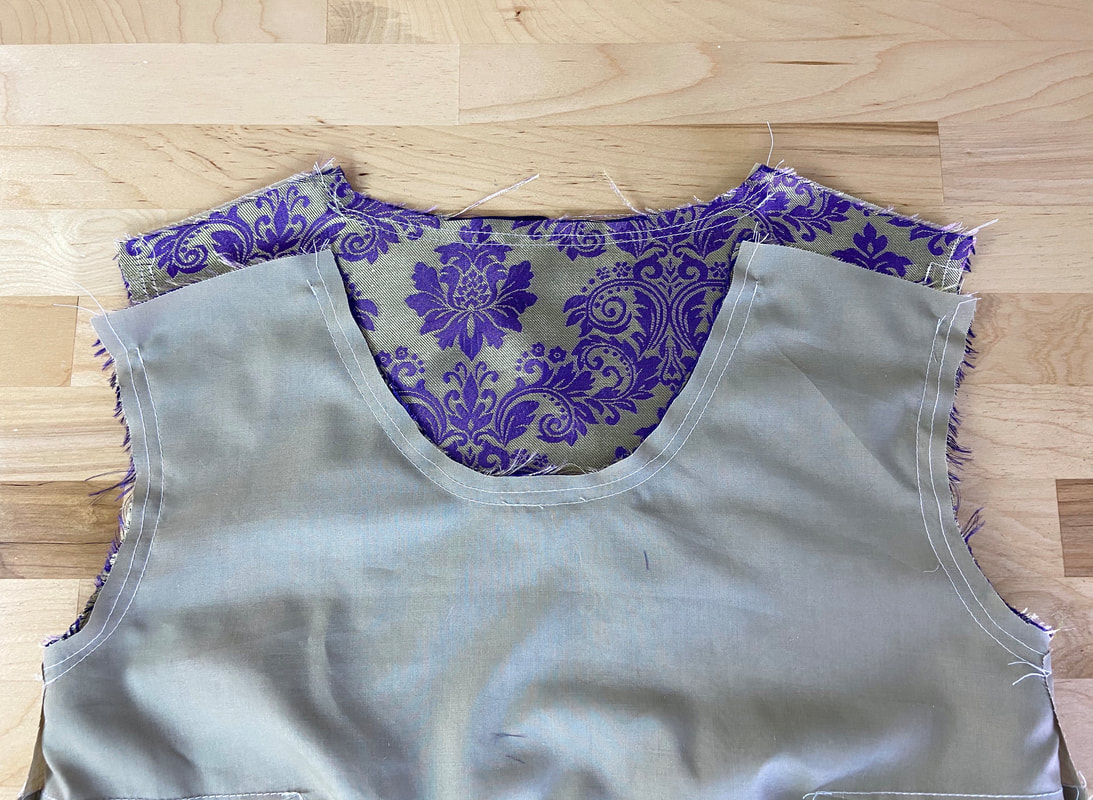
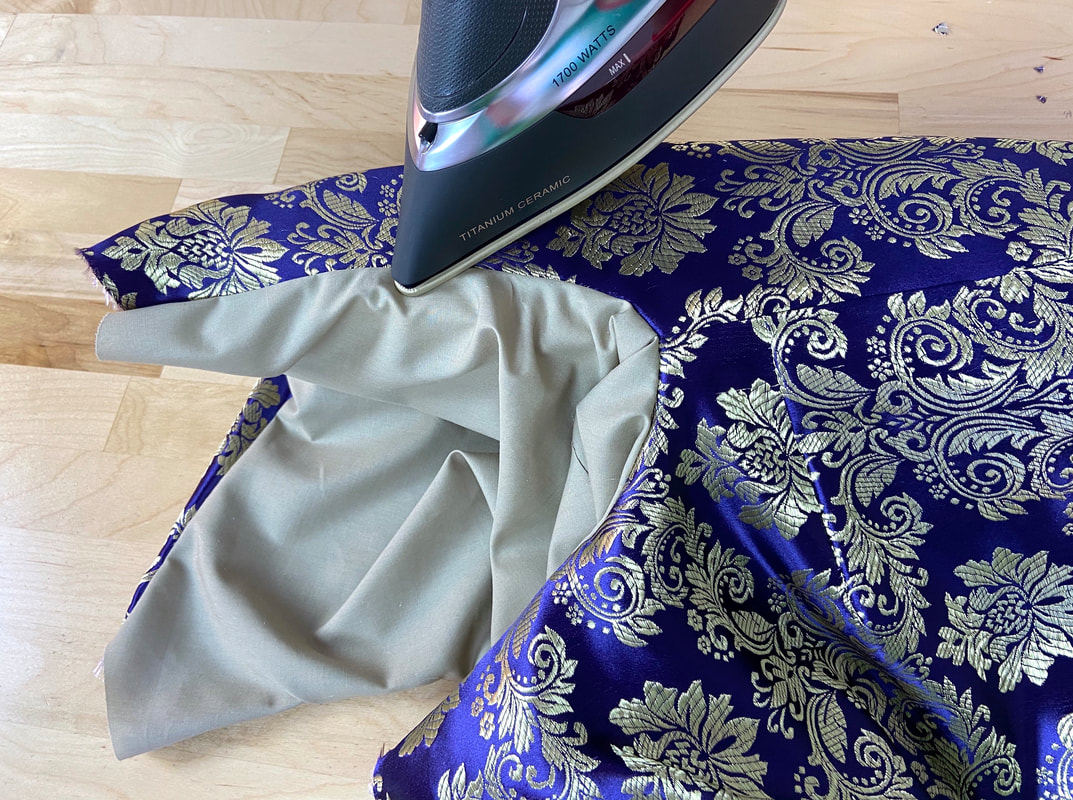
Picture
8. ​Extend the lining layer and seam allowances away from the garment and iron the neckline seam in this position.
Picture
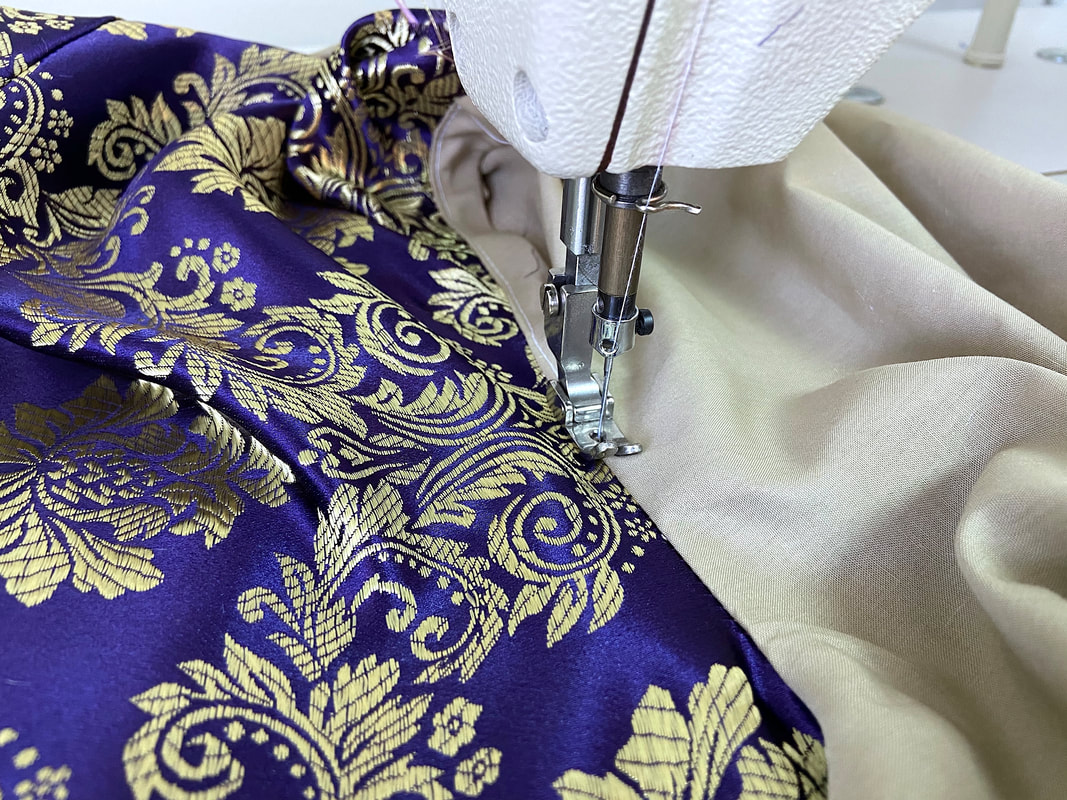
9. Apply a stitch through the lining and seam allowances underneath at a short distance from the neckline seam. This is called understitching and it will keep the lining flat and facing inwards at all times.
Picture
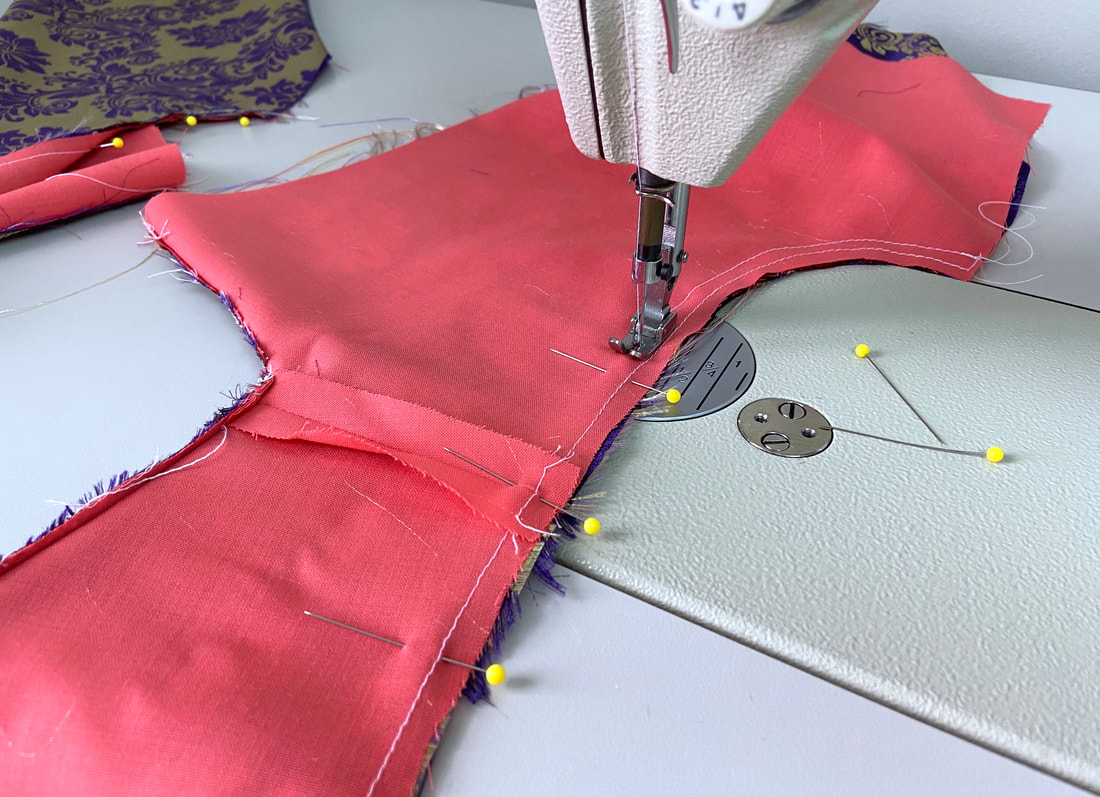
10. Next, bring the lining back in alignment with the garment layer such that the fabric face sides are touching. Align corresponding lining and garment armhole edges to one another and insert pins perpendicular to the edge as you did with the neckline.
Picture
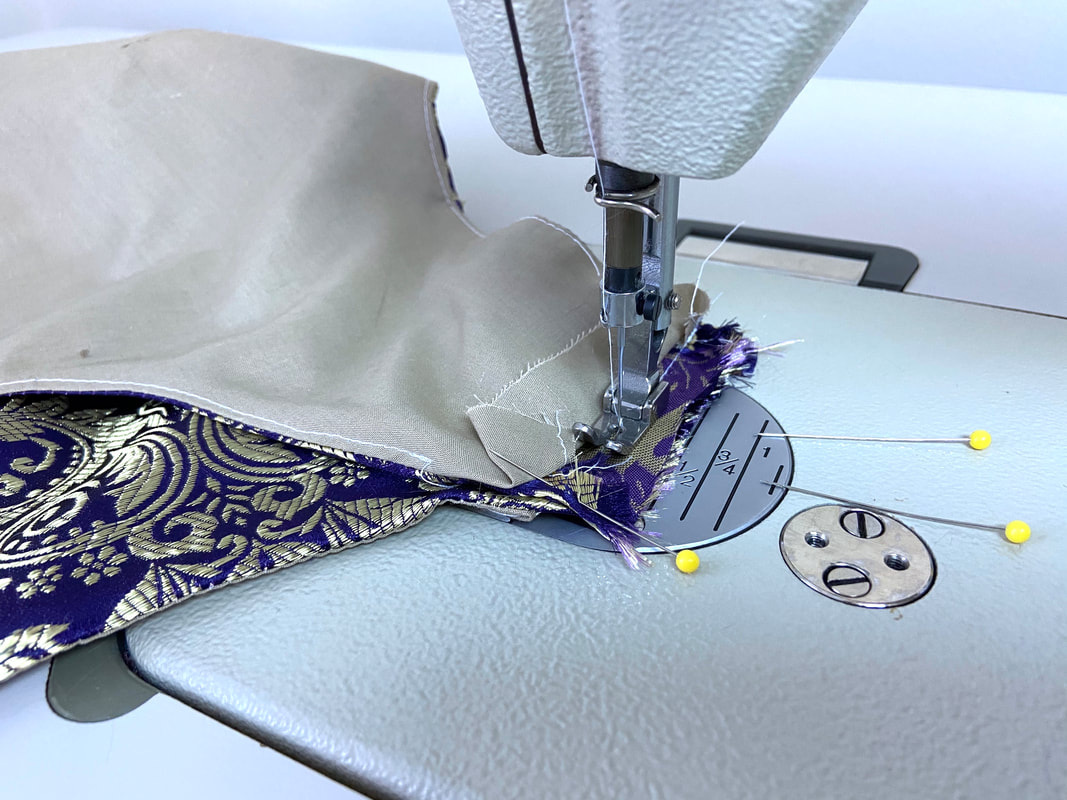
11. Stitch the armholes at the designated seam allowance- ½” in this case. 
Picture
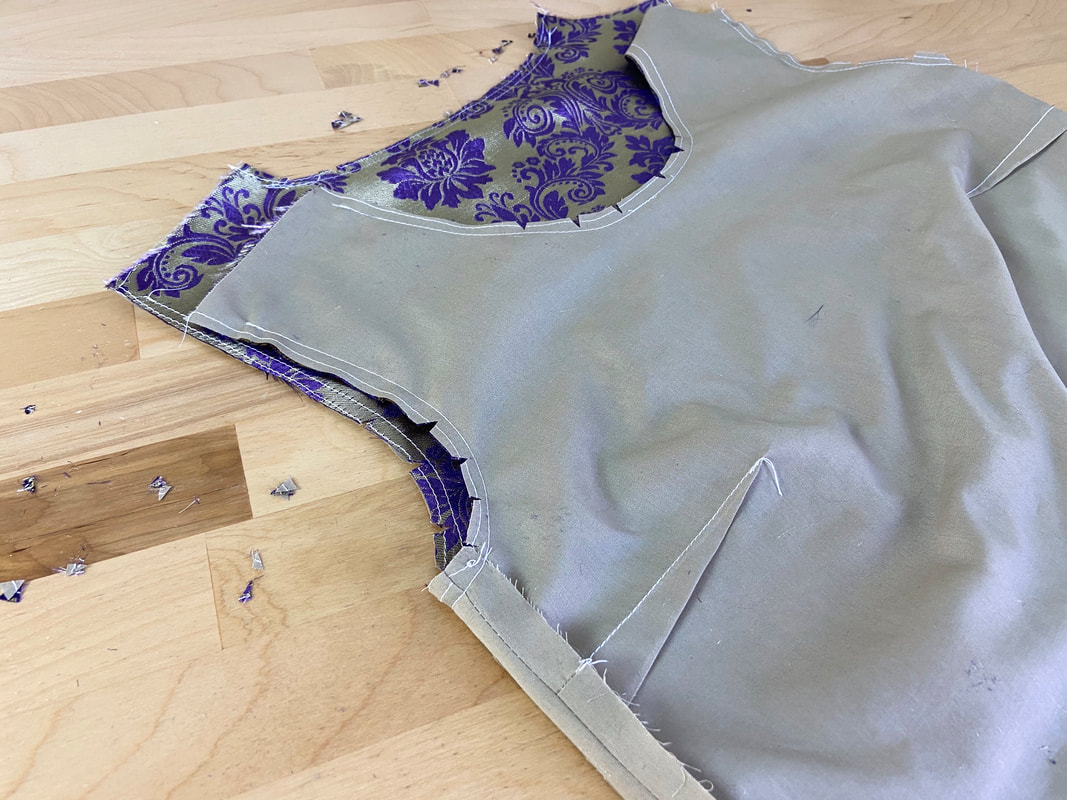
Similar to how you handle the neck edge, trim the seam allowance down to half its width and notch it for tension release at the most curved areas of the underarm. Try not to overdo the notching as this can weaken the finished armhole edge.
Picture
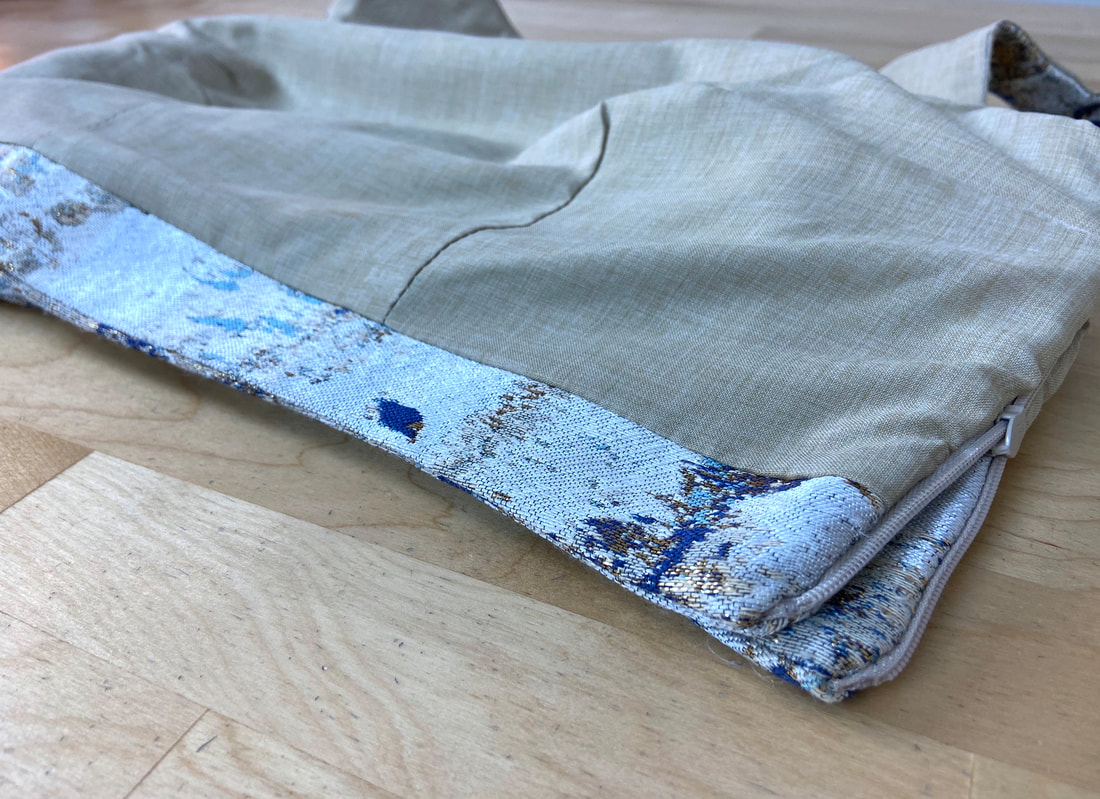
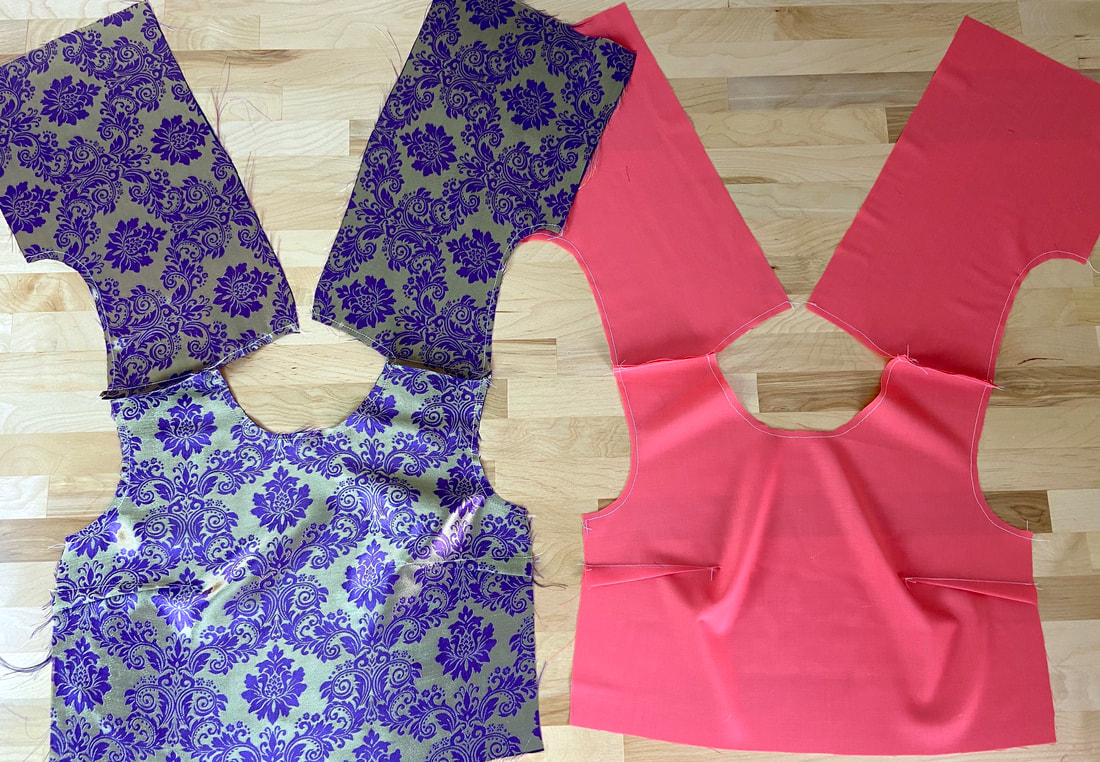
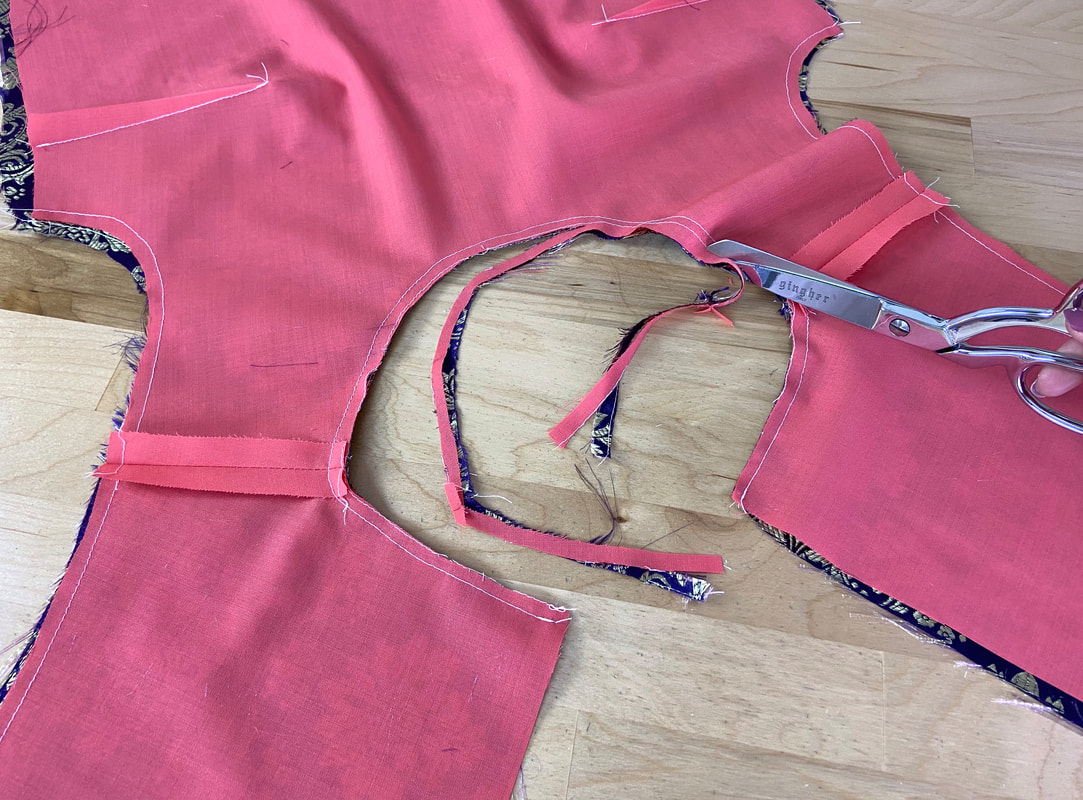
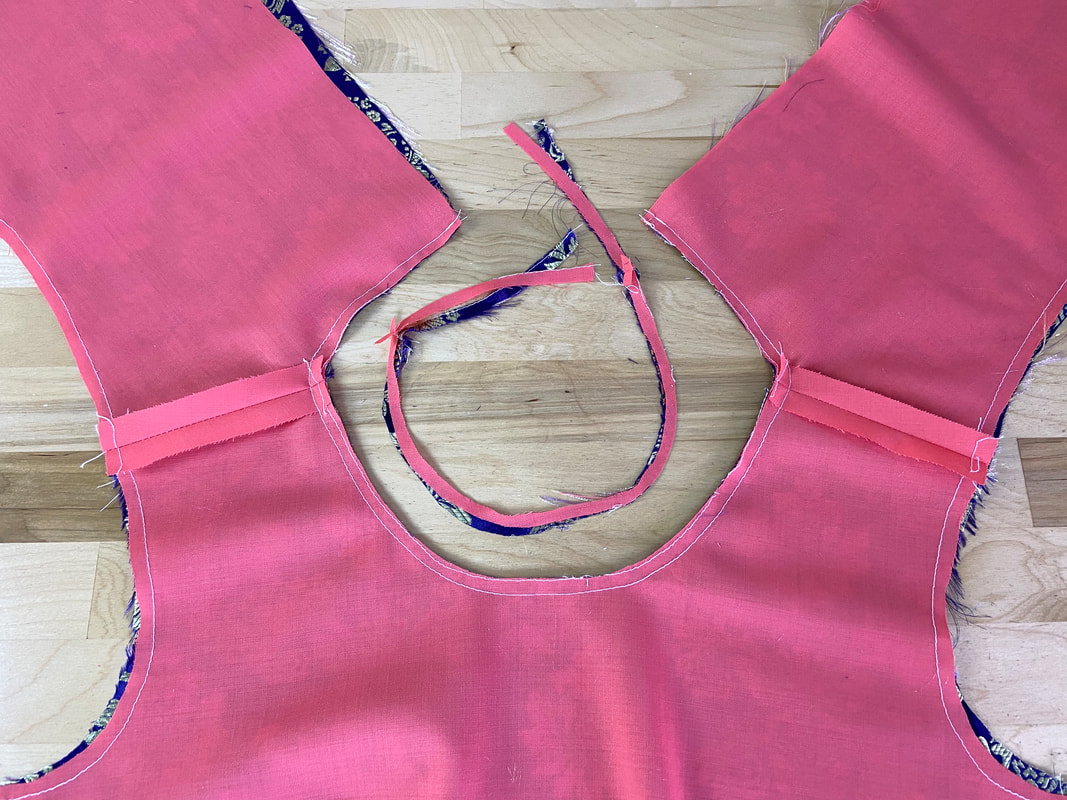
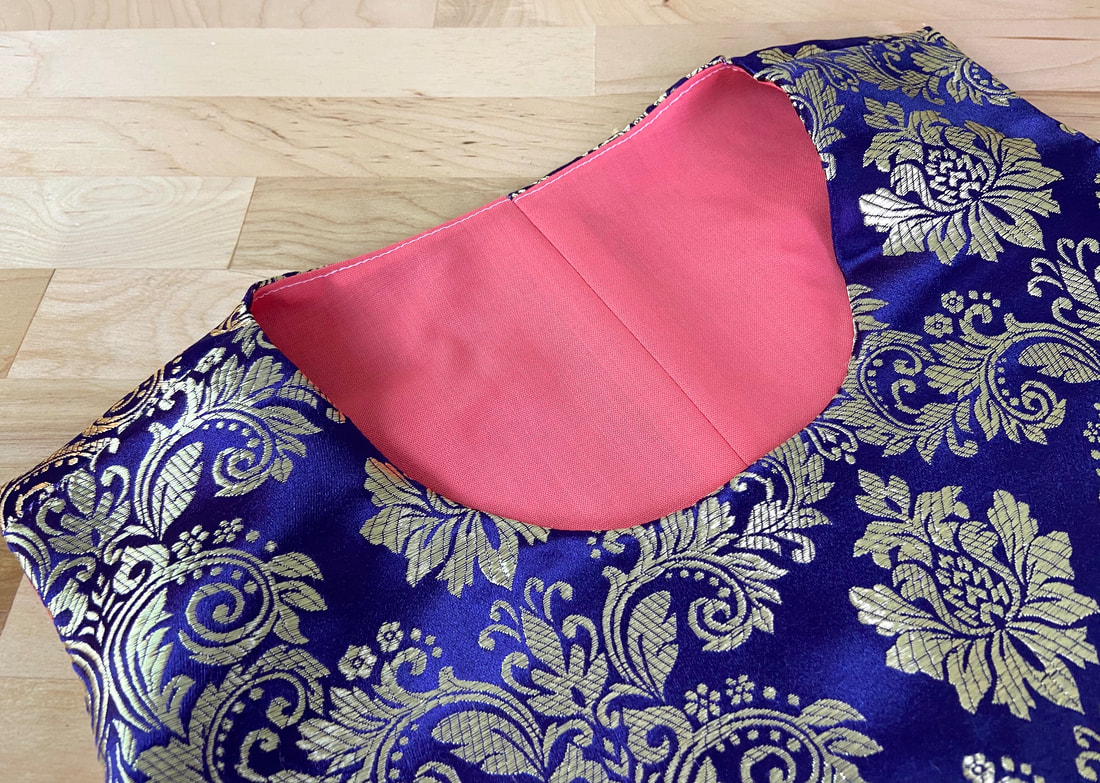
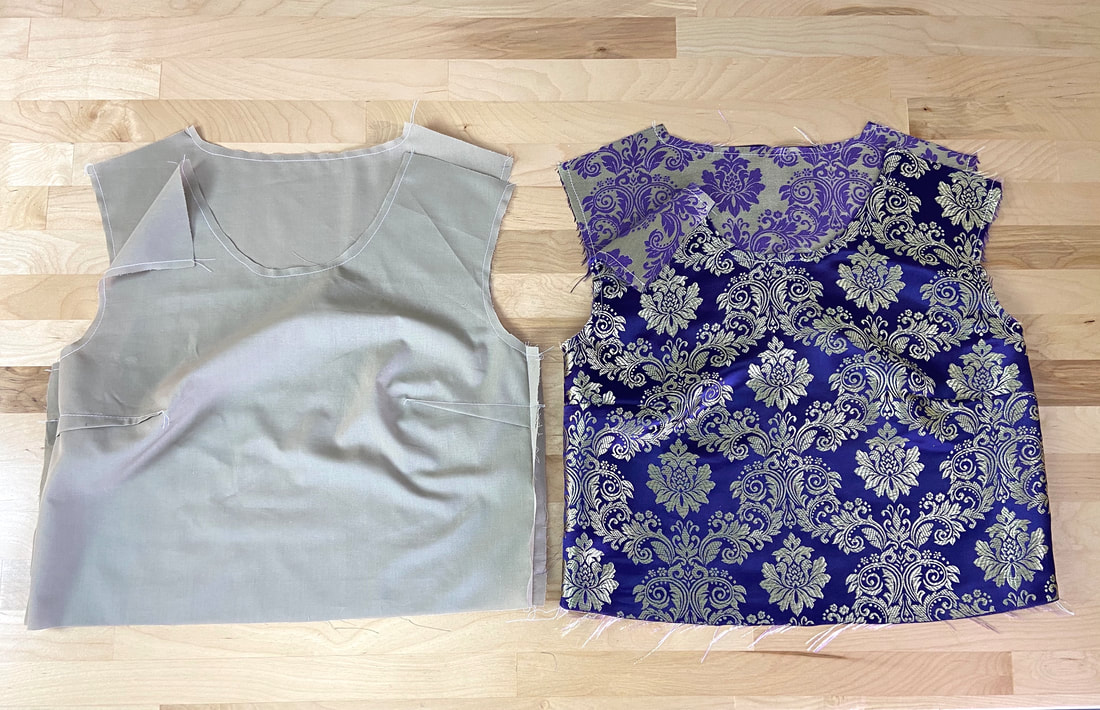
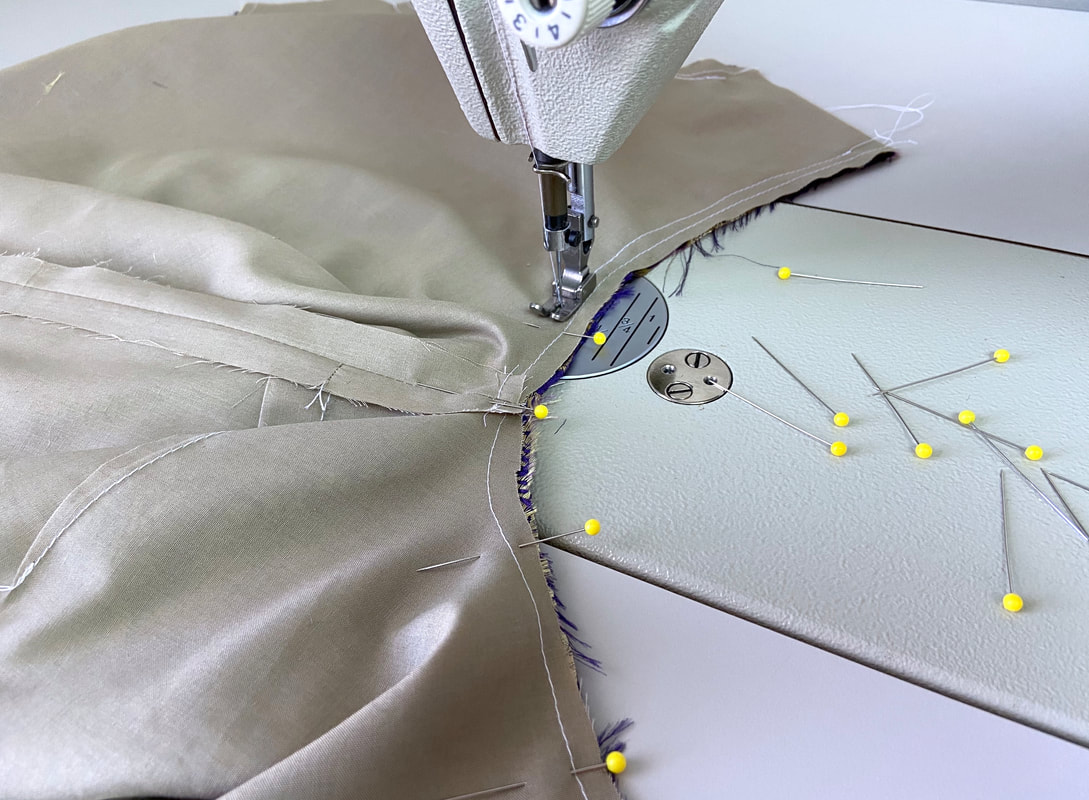
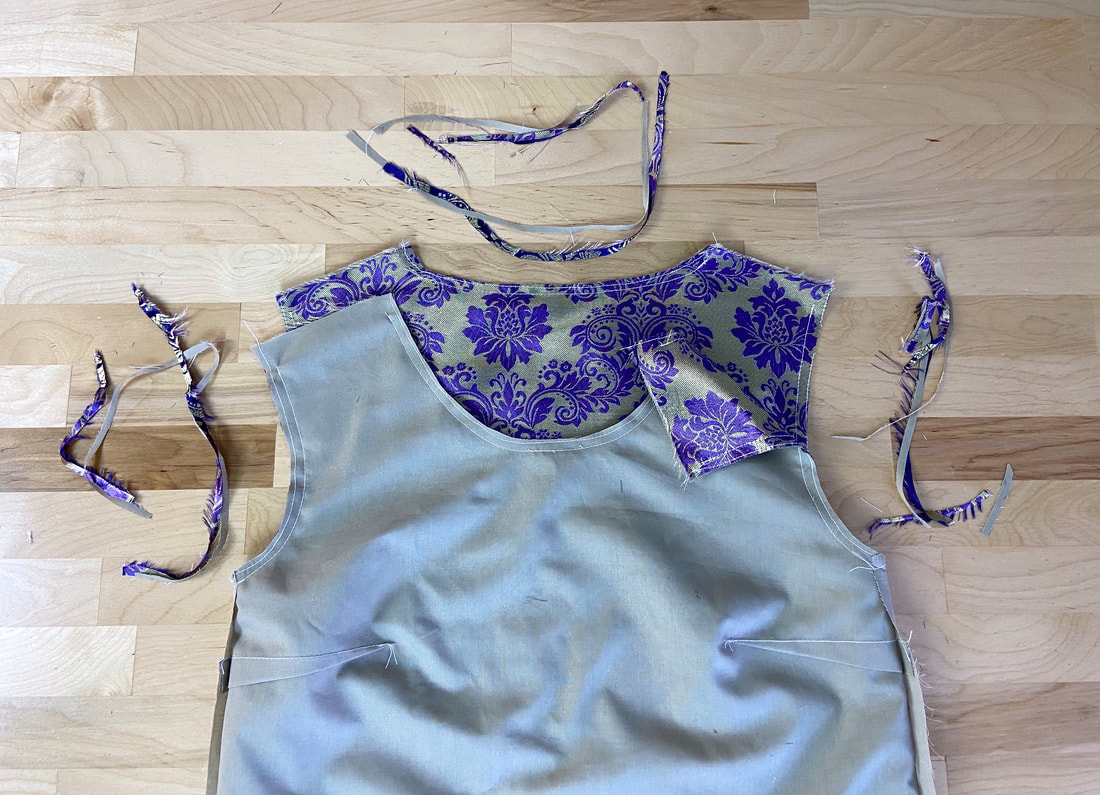
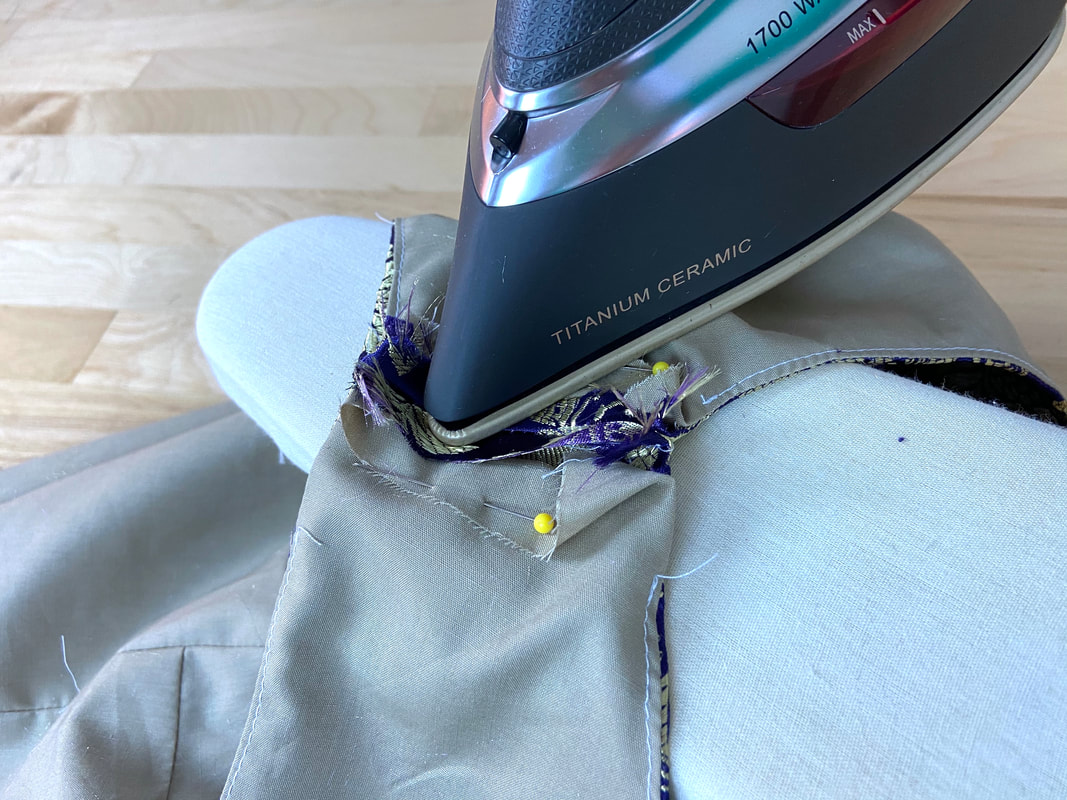
12. Next, pull the garment and lining layers through the center back seam opening as shown. The neck and armhole edges are now fully lined!
Picture
​13. Using a sleeve board, iron the armhole lining seams with the seam allowance pointing away from the garment layer.
Picture
14. Using your sewing machine, understitch as much of the armhole lining as you can. For optimal comfort, start and stop the stitching from different points. 
Picture
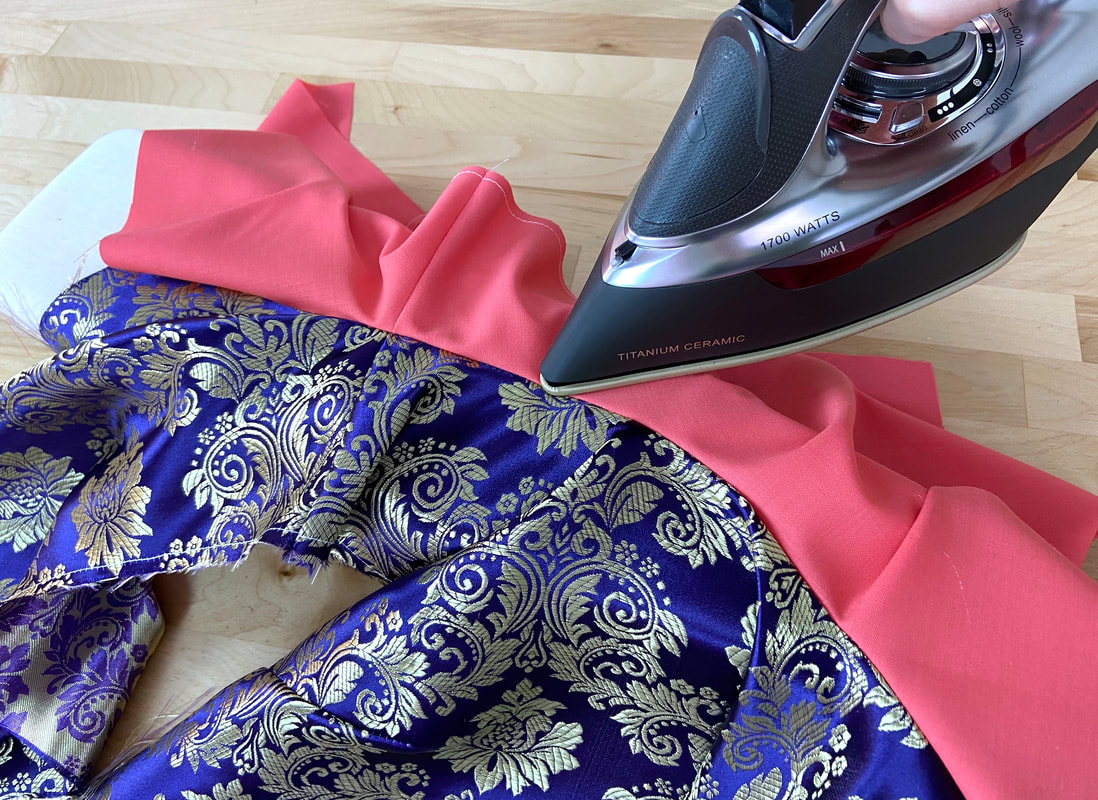
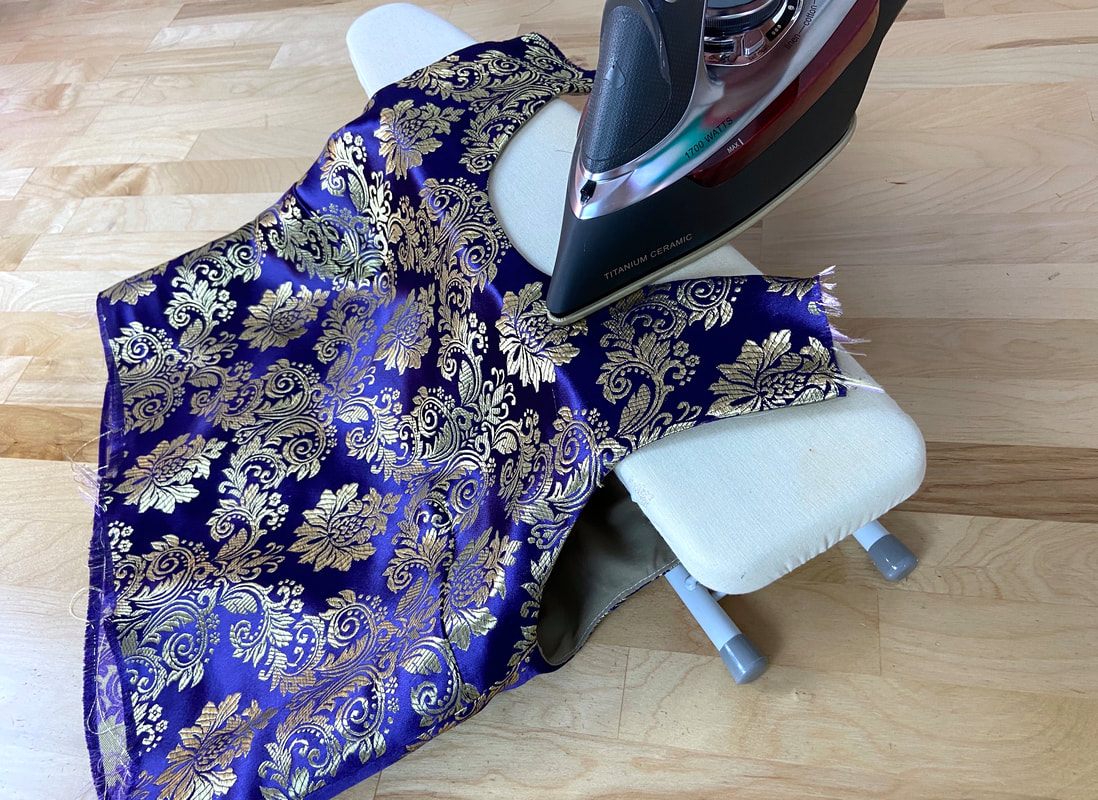
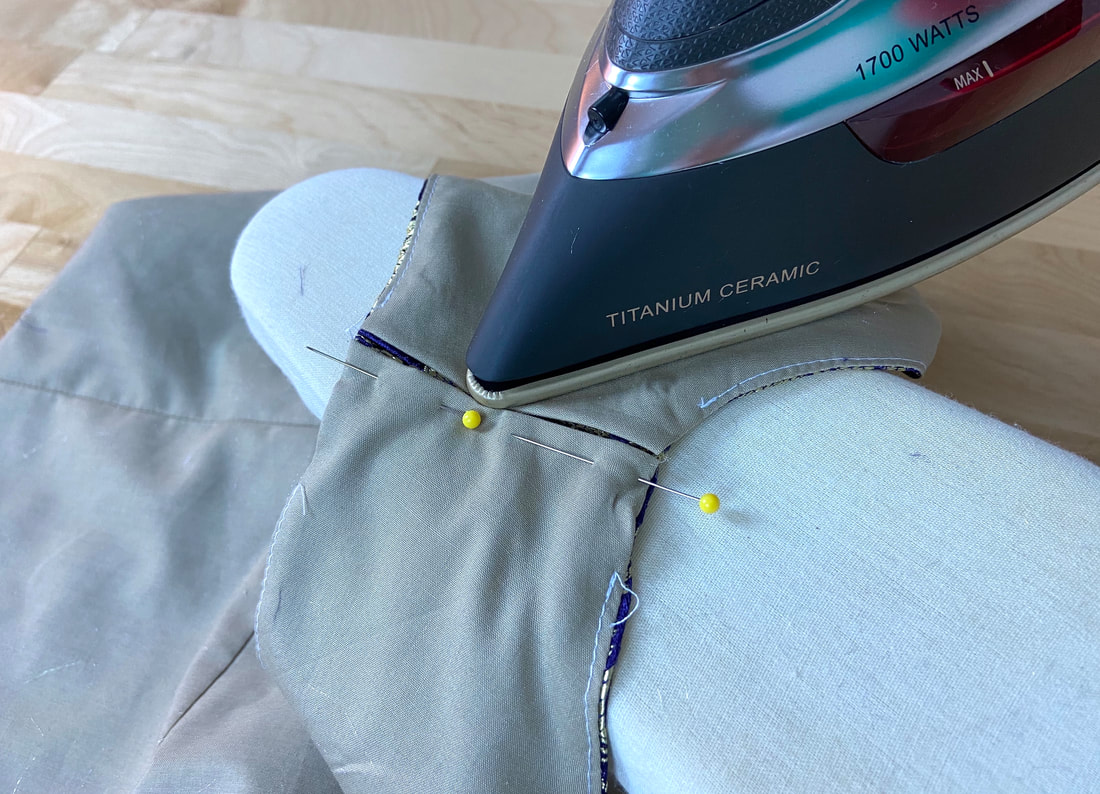
15. Once both armhole edges are understitched (to the best of your ability), iron the finished armhole and neckline edges as shown. If needed, use a protective cloth for heat sensitive fabrics.
Picture
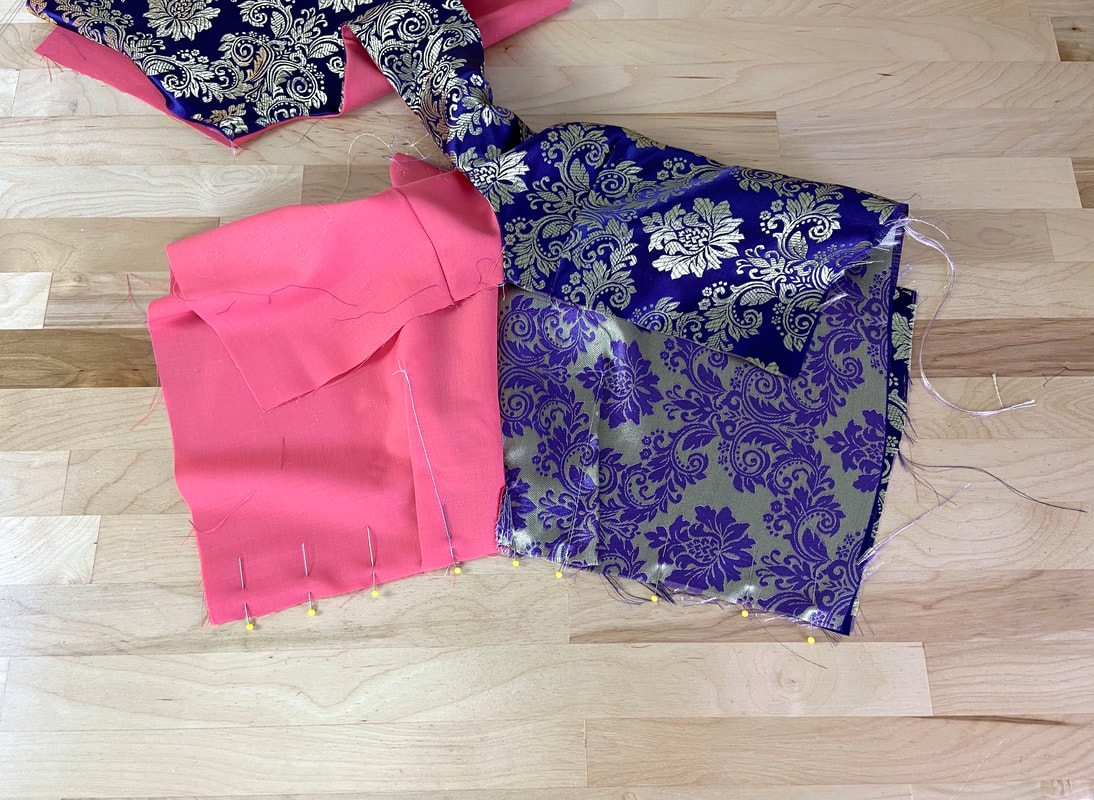
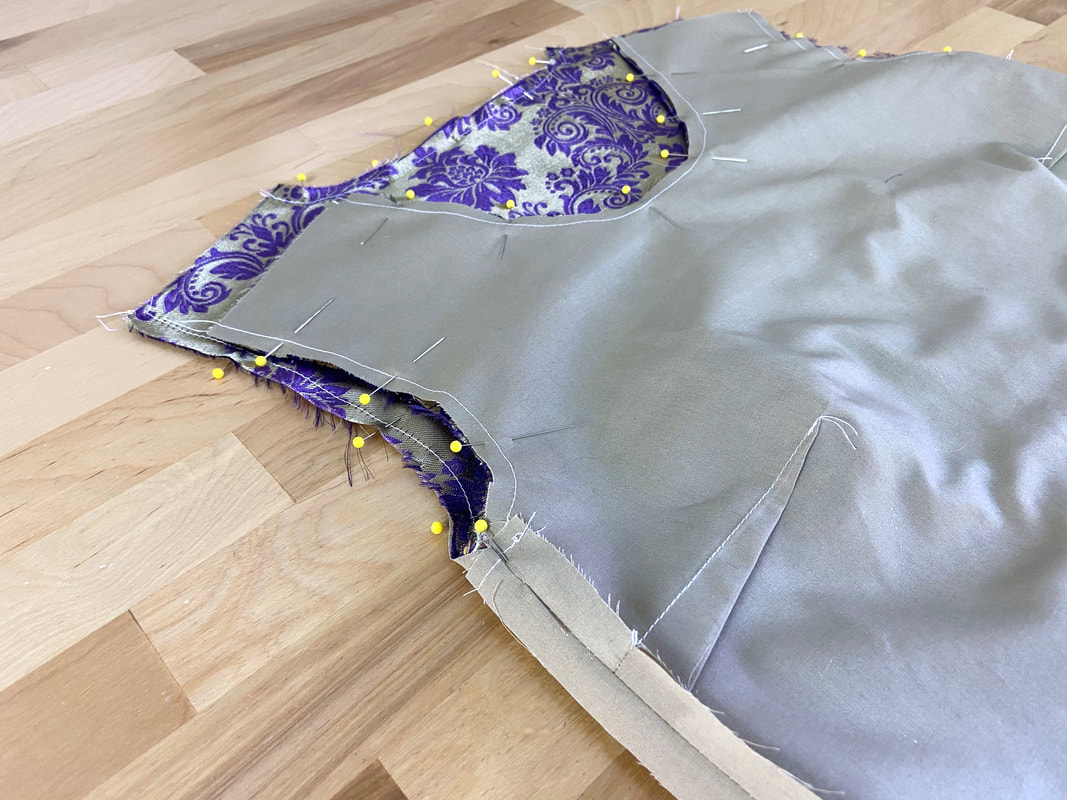
16. To complete the side seams, flip the lining and garment layers on their wrong sides and align the corresponding side seam edges with face sides touching as shown. The front and back underarm seams should align and overlap. Pin the lining and garment layers perpendicular to the edge as shown.
Picture
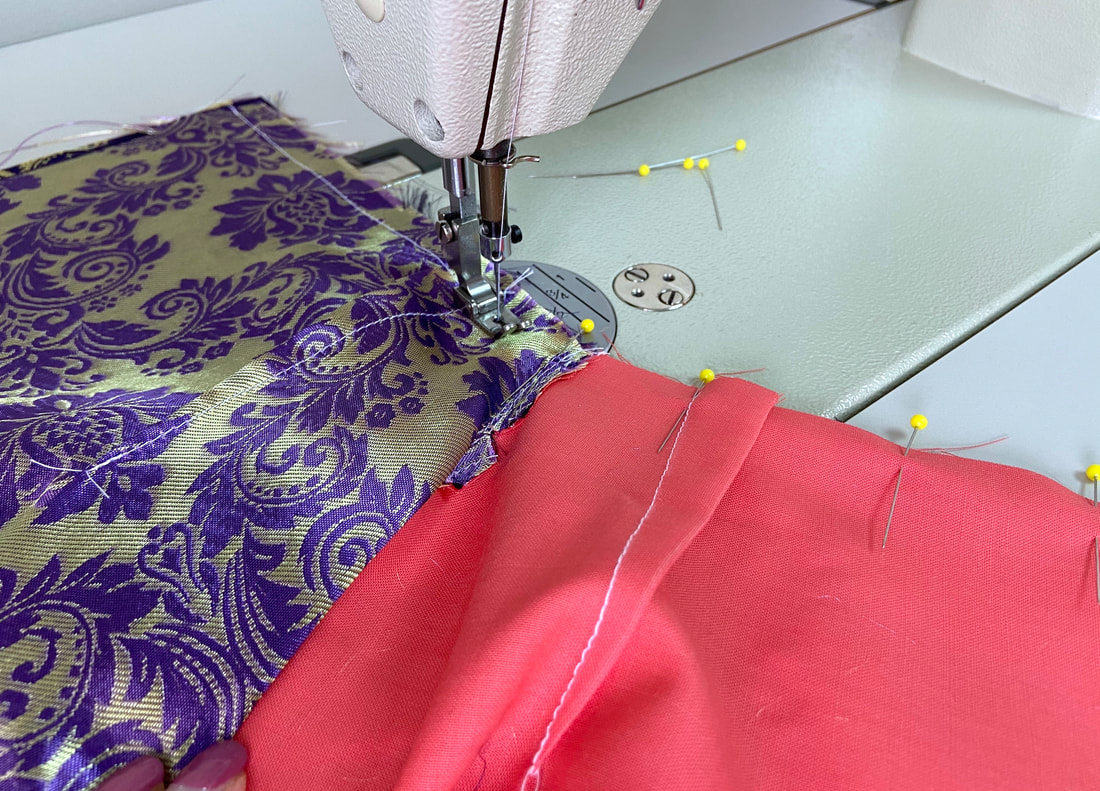
17. Starting at either the garment or lining hem (depending on your pin placement), machine stitch the garment and lining side seam in one go.
Picture
18. Using a sleeve ironing board, iron the seam allowance open as shown. Clean finish the seam allowance edges if needed.
Picture
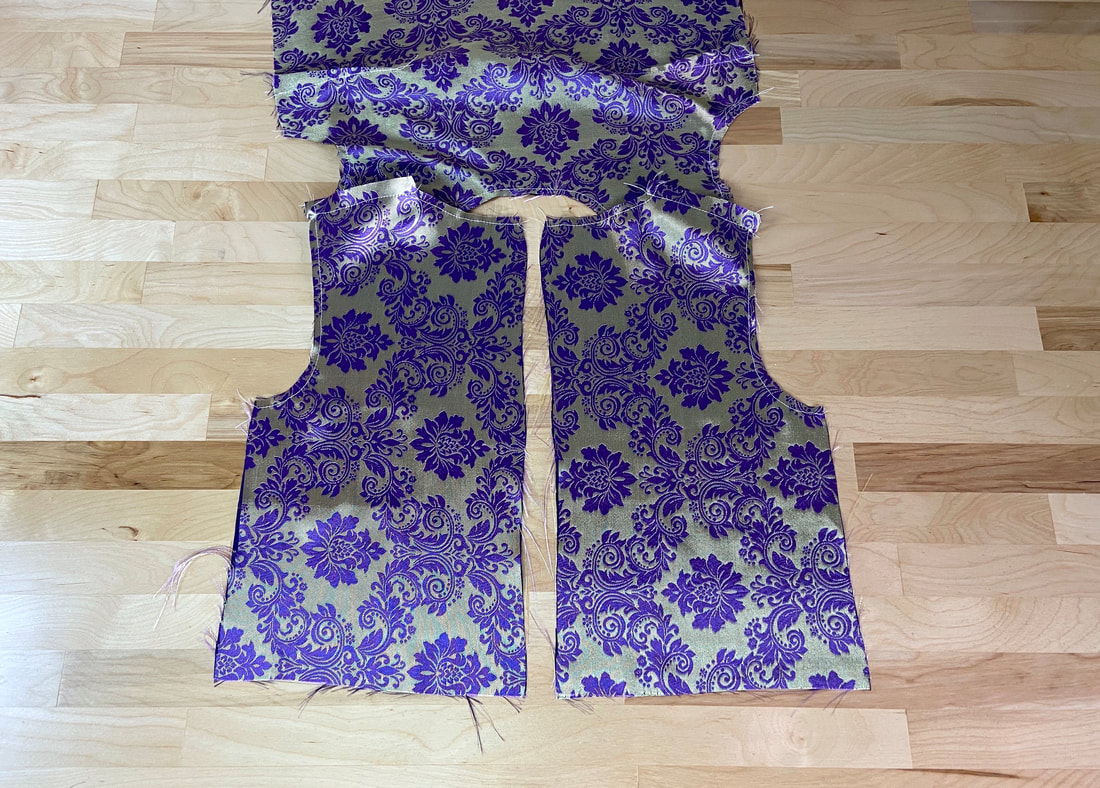
19. Repeat the process on the other side seam and the center back seam to complete the lining application.

Sewing Lining To A Sleeveless Garment Without A Separating Seam

To sew lining to a garment without a front or back separating seam:
Picture
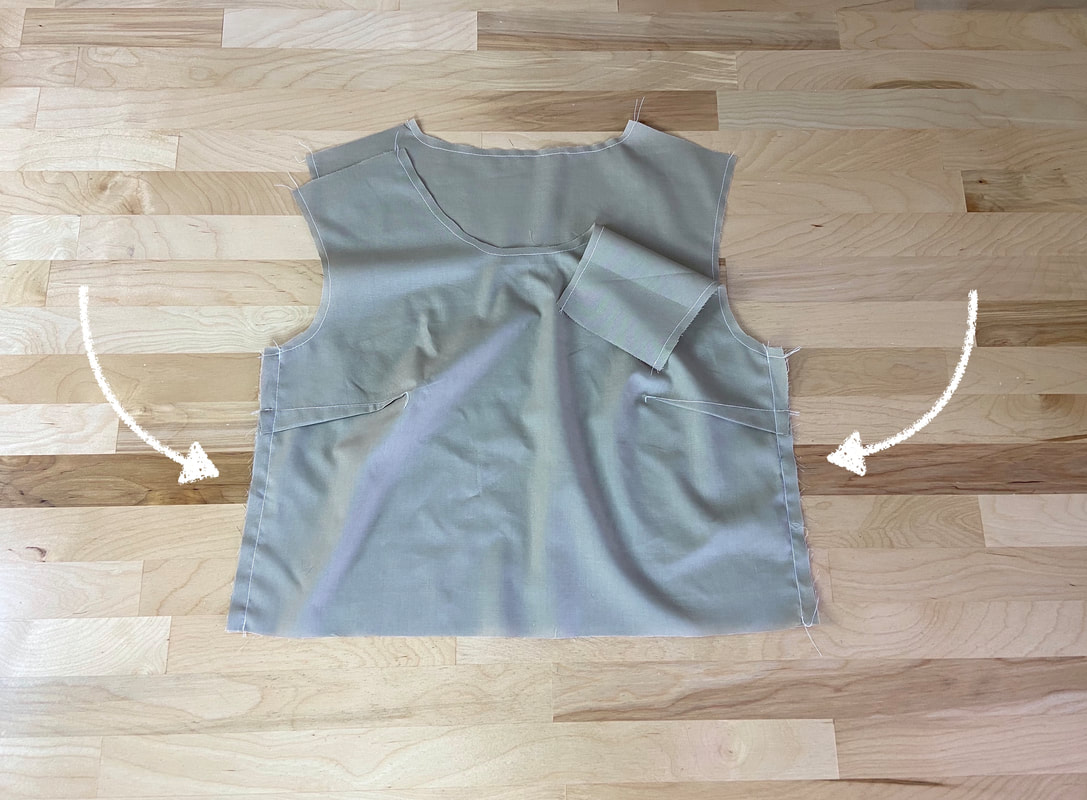
​As a starting point, staystitch the armhole and neckline edges to stabilize the curves.
Picture
1. Align and stitch the lining side seams at the designated seam allowance. ½” in this example. 
Picture
Finish fraying edges if necessary and iron the seam allowance open as shown.
Picture
2. Repeat Step 1 above with the garment portion. Again, stitch and iron the garment side seams as shown. 
Picture
​The shoulder seams on both lining and garment are left unstitched for now.
Picture
Picture
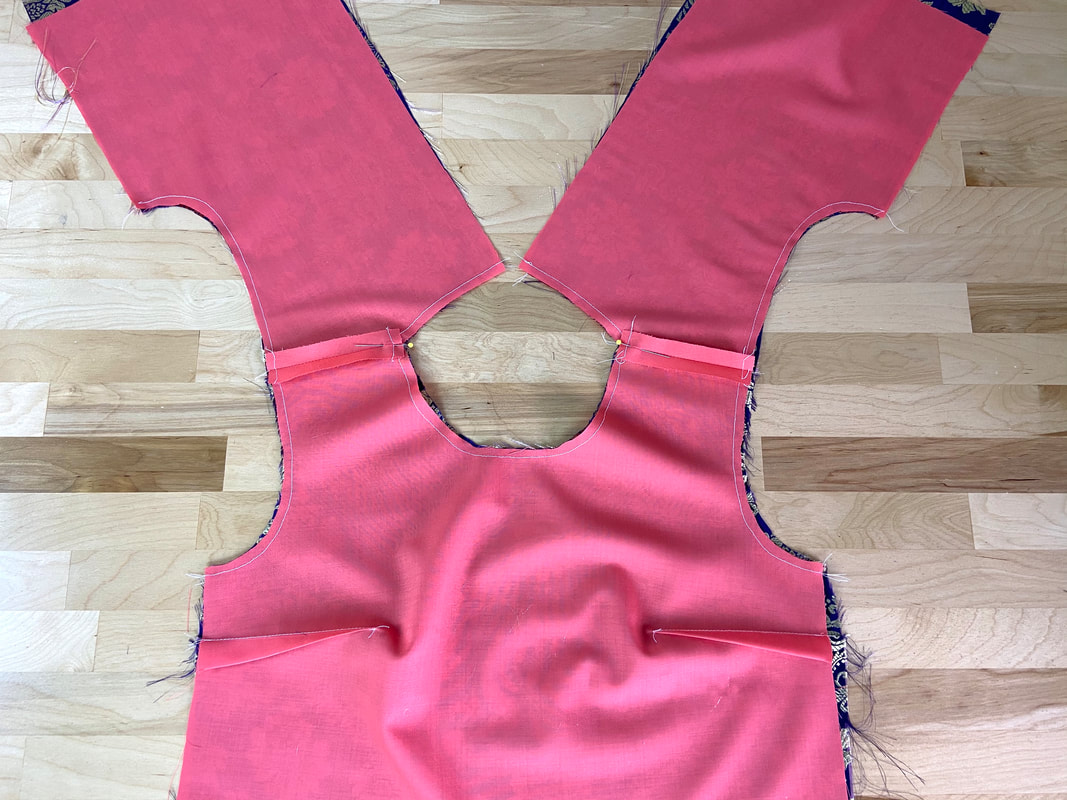
​3. With the garment on its face side and lining on its wrong side (as shown), place the lining layer on top of the garment layer such that the fabric face sides are touching, and the corresponding armhole and neck edges align. ​Pin the lining and garment layers together along the neckline and armhole edges. Insert the pins perpendicular to the edge as shown.
Picture
​4. Machine stitch the lining and garment neckline starting at one shoulder seamline and ending at the other as shown. 
Picture
The seam allowance (1/2”) at the shoulder seam edges should be left unstitched as shown. ​
Repeat the stitching process on both front and back neckline.
Picture
Picture
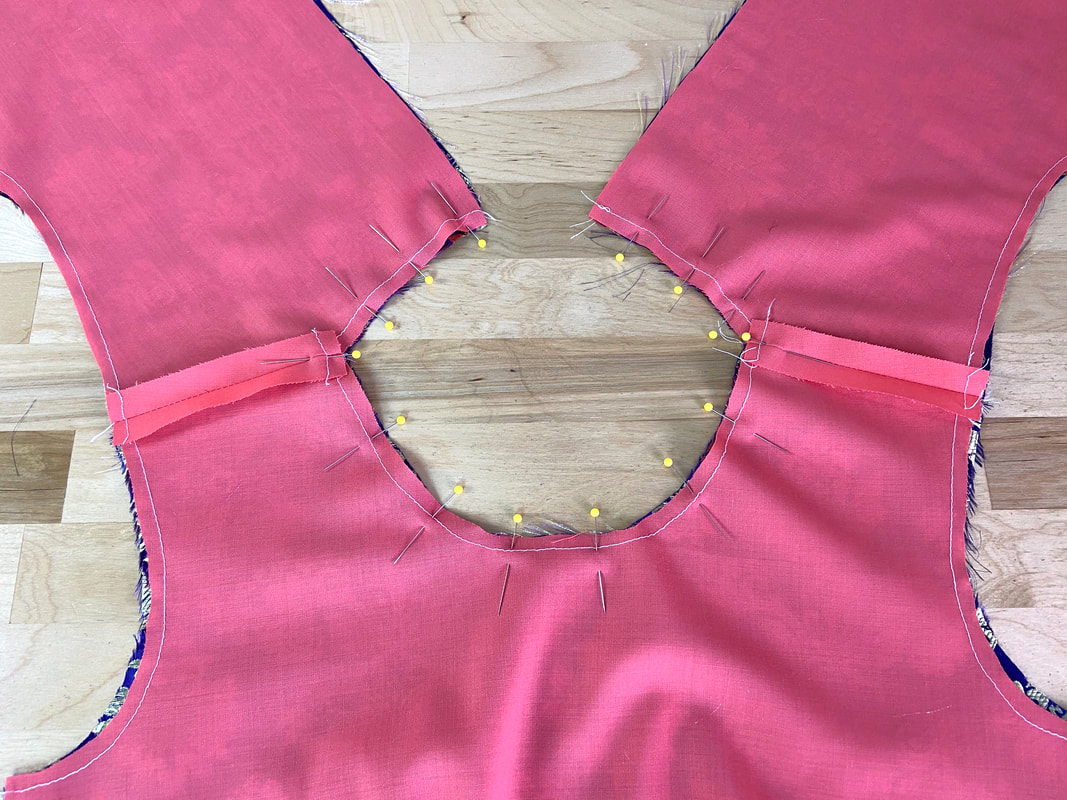
5. Next, stitch the armhole edges, starting at one shoulder seamline and ending at the other as shown. The ½” shoulder seam allowances should be left unstitched. 
Picture
​Repeat this stitching process on both armholes.
Picture
​6. Trim the neck and armhole seam allowance down to half its width.
Picture
​7. Clip wedge-shaped notches into the seam allowance along the most curved areas of the neckline and armholes. These clipped notches will release tension in the curved seam and allow the finished neck/armholes to lay flat.
More on notching for tension-release in this tutorial: Notching/Clipping Seam Allowance for Tension Release
Picture
8. Turn the lined garment on its right side through the open shoulder seams. Iron each armhole and neckline seam with the seam allowance pointing towards the lining layer. Use a sleeve ironing board for added comfort in the process.
Picture
​9. Understitch the lining as much as you comfortably can along the neckline and both armhole edges as shown. An understitch is a straight stitch applied next to the seamline through the facing and seam allowance layers underneath. It keeps the finished lined edges flat and smooth throughout. 
Picture
10. Prior to completing the shoulder seams, iron the finished neck and armhole edges.
Picture
Picture
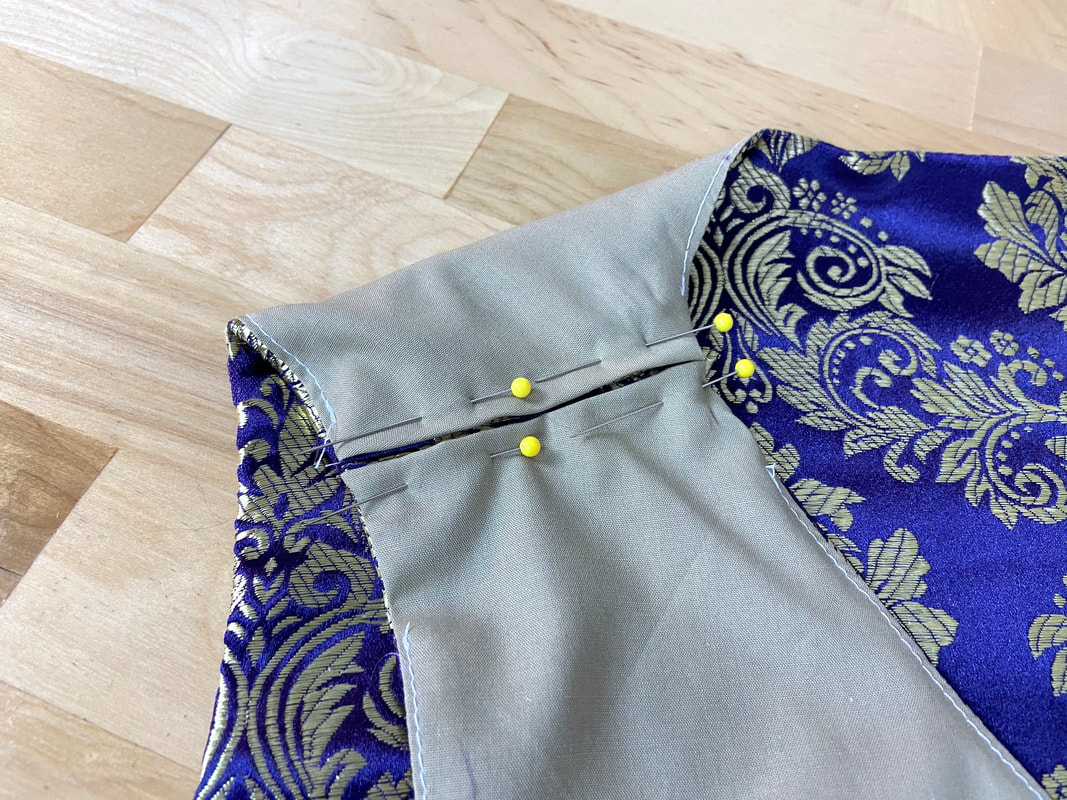
​11. To sew and finish the shoulder seams, first, align the corresponding garment shoulder seam edges and pin them perpendicularly in preparation for machine stitching.
Picture
12. Machine stitch both shoulder seams at the designated seam allowance- as always, ½” in this tutorial.
Picture
13. Trim the shoulder seam allowance down to half its width and iron the seam with the seam allowance open.
Picture
Picture
14. Last but not least, fold the lining shoulder seam edges in such that the stitched shoulder seamlines align with the folded edges as shown. ​​Iron the folded edges in this position and insert a few pins to hold.
Picture
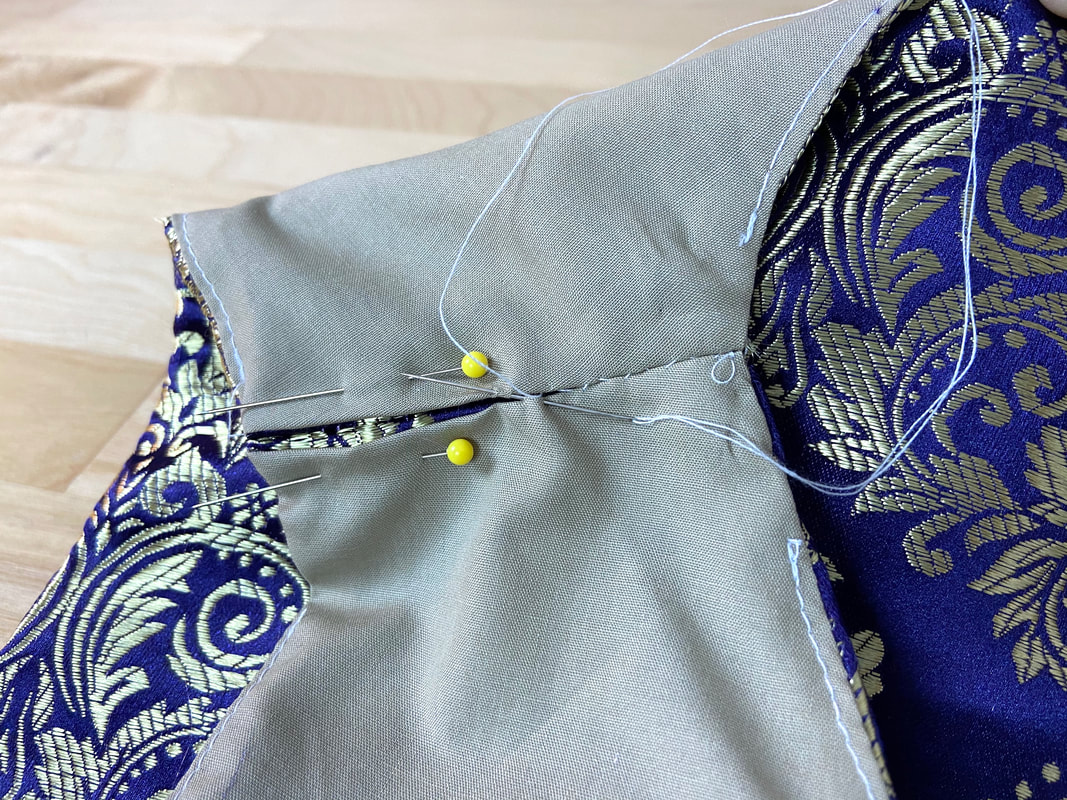
15. Using a slipstitch, blind stitch through the lining’s folded edges catching the garment’s shoulder seam allowance underneath. Slipstitching seals the lining edges leaving an invisible-stitch finish.  
More on how to slipstitch in this tutorial: Hand-Applied Blind Stitches
Picture
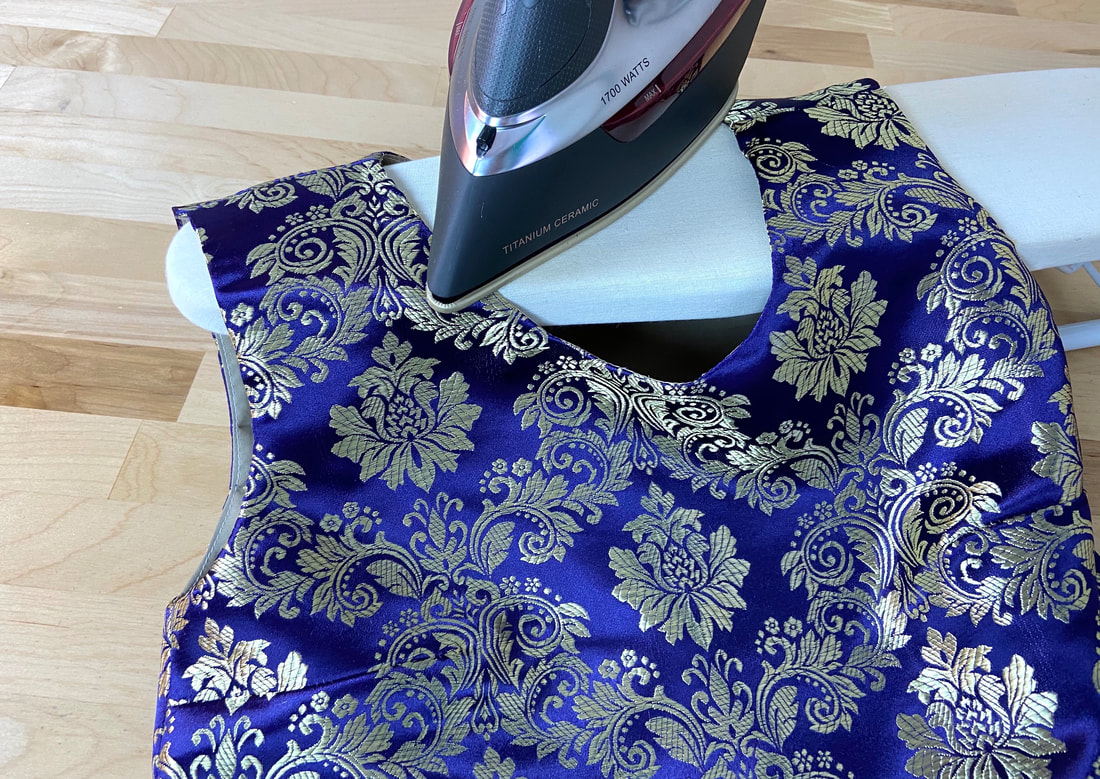
16. As a final step, give the finished shoulder seams, armhole and neck edges one last press for a clean, professional finish. As always, be mindful of heat sensitive fabric and use a protective cloth when appropriate. 
DMCA.com Protection Status
All content, including images and text, may not be copied, replicated, or redistributed without express written permission. This website is regularly screened and monitored for content protection.

Services

​Custom Apparel
Custom Bridal
​Sewing Tutorials
​

Company

About
Blog

Support

Contact
Terms of Service
DMCA.com Protection Status
© COPYRIGHT 2024. ALL RIGHTS RESERVED.
  • Custom Bridal
  • The Process
  • Our Brides
  • About
  • Sewing Tutorials
    • Basics >
      • Aligning Pattern Grainlines To Fabric
      • Preparing Fabrics For Sewing
      • Pinning Sewing Patterns To Fabric
      • Placing Sewing Patterns On Fabric For Cutting
      • Rotary Cutters or Fabric Scissors?
      • Cutting The Sewing Patterns
      • What Are Notches And How To Use Them In The Sewing Process
      • Transferring Notches From Pattern To Fabric
      • Transferring Seamlines to Fabric
      • Staystitching
      • Backstitching: A Complete Guide
      • Hand Basting: A Complete Guide
      • Sewing Continuous Bias Binding
    • Darts >
      • Marking And Transferring Darts To Fabric
      • What Are Darts And Dart Components
      • Folding, Pinning And Hand Basting Darts
      • Handling Dart Excess: Bulk And Tension
      • How To Sew A French Dart
      • How To Sew And Iron Single Pointed Darts
      • How To Sew And Iron Contour Darts
      • Sewing Darts With Decorative/Beaded Fabrics
    • Sewing Seams >
      • ​The Basics Of Seams And Seam Allowance
      • How To Sew A Straight Seam
      • Sewing Curved Seams
      • Sewing Corner Seams
      • Trimming And Grading Seam Excess
      • Notching/Clipping Seam Allowance for Tension Release
      • Sewing Topstitched Seams
      • Sewing Corded Seams
      • Sewing A Slot Seam
      • Sewing A Gathered Seam
      • Sewing Bias Seams
      • Sewing Seams With Ease
      • Sewing Seams With Crossing Seamlines
      • Sewing Unlike Fabric Seams
      • How To Iron Seams: Ironing Tools And Conventions
      • Sewing With Knit Fabrics
      • Understanding Stitch Length And Tension
      • Sewing Unique Fabric Seams
    • Seam Finishes >
      • Seam Finishing Techniques - Overview
      • Applying A Pinked Seam Finish
      • Applying A Bias Bound Seam Finish
      • Serging And Zigzag Seam Finishes
      • Sewing A Self-Bound Seam Finish
      • Sewing A French Seam Finish
      • Sewing A Hong Kong Seam Finish
      • Sewing A Mock French Seam Finish
      • Sewing A Turned-and-Stitched Seam Finish
      • Sewing Overcast Hand-Applied Seam Finishes
      • Sewing A Flat Felled Seam
      • Sewing A Hairline Seam Finish
    • Hem Finishes >
      • Garment Hem Finishes: Overview
      • ​Sewing A Double Fold Hem Finish
      • Sewing A Single Fold Hem Finish
      • Sewing Bound Hem Finishes
      • Sewing An Exposed Double Layer Bound Hem
      • Sewing A Folded-Up Bound Hem with Pre-folded Binding
      • Sewing A Hong Kong Hem Finish
      • Sewing A Band Hem Finish
      • Sewing A Bias Faced Hem Finish
      • Sewing A Twill Tape Hem Finish
      • Sewing A Rolled Hem Finish
      • Sewing A Shaped Hem Facing
      • Using Fusible Hem Tape And Webbing
      • Finishing A Lace Fabric Hem
      • Finishing A Leather Hem
      • Sewing Faced Hem Corners
      • How To Finish Lining At The Hem
      • Finishing Fabric Corners by Mitering >
        • Mitering Fabric Corners With A Full Bias Facing
        • Mitering Fabric Corners With Exposed Binding
      • Interfacing A Hemline: Lined And Unlined Examples
    • Sewing Pockets >
      • Curved Patch Pocket With Flap
      • Unlined Square Patch Pockets
      • Lined Patch Pockets: Two Ways
      • Extension On-Seam Pockets
      • Separate On-Seam Pocket
      • Front Hip Pockets
      • Bound Double Welt Pocket
      • Double Welt Pocket With Flap
      • Self-Welt Pocket (Using Single Fabric Layer)
      • Slanted Welt Pocket (Hand-Stitched)
      • Faced Slash Pockets: Overview >
        • Sewing A Faced Slit Pocket
        • Sewing A Rectangular Slash Pocket
        • Sew A Star-Shaped Faced Pocket
    • Sewing Zippers >
      • Sewing Zippers: General Information
      • Sewing A Centered Zipper
      • Sewing A Lapped Zipper
      • Sewing An Invisible Zipper
      • Sewing A Fly Front Zipper
      • Sewing A Closed-End Exposed Zipper (No Seam)
      • Sewing An Exposed Separating Zipper
      • Sewing Hand Stitched Zipper Applications
      • Sewing A Zipper Underlay
      • Sewing A Placket-Enclosed Separating Zipper
    • Sleeveless Finishes >
      • Sleeveless Armhole Finishes: General Information
      • Finishing Sleeveless Garments with Lining
      • Sewing A Folded-Under Bound Armhole Finish
      • Sewing A Shaped Armhole Facing
      • Finishing Armhole Edges With Exposed Binding
      • Finishing Armhole Edges With Decorative Trim
    • Neckline Finishes >
      • Sewing A Neck Shaped Facing
      • Sewing An All-In-One Neck Facing
      • Neck And Garment Opening Combination Facings >
        • Sewing An Extended Front-Neck Facing
        • Sewing A Separate Neck-Front Facing
      • Sewing A Bias Faced Neckline Finish
      • Sewing A Band Neckline Finish
      • Bound Neckline Finishes: Overview >
        • Sewing A Single Layer Bound Neckline
        • Finishing A Neckline With Pre-Folded Binding
        • Sewing A Double Layer Bound Neckline Finish
      • Sewing A Semi-Stretch Strip Band Neckline
      • Ribbed Neck Band And Classic Turtleneck
      • Decorative Neckline Finishes >
        • Sewing A Neckline With Decorative Inset
        • Sewing A Piped Cording Faced Neckline
        • Sewing Decorative Trim To A Finished Neckline
    • Finishing Facing Edges >
      • Finishing Facing Edges: Overview
      • Folded-And-Topstitched Overedge Facing Finish
      • Sewing A Bound Facing Edge Finish
      • Sewing A Hong Kong Facing Finish
      • Sewing A Rolled Edge Facing Finish
      • Sewing A Twill Tape Facing Edge Finish
      • Sewing An Overedge-Stitch Facing Finish
    • Extras >
      • A Complete Guide on Interfacing
      • Sewing Bound Spaghetti Straps
      • Sewing Spaghetti Straps To A Faced Neckline
      • Sewing Ruffles: Overview
      • Patterning And Sewing A Circle Ruffle
      • Sewing A Gathered Heading Ruffle
      • Sewing Double Layer Gathered Ruffles
      • Sewing A Gathered Ruffle Into A Seam
      • Sewing A Gathered Ruffle To A Fabric Edge
      • Sewing A Fabric Surface Slit
      • Sewing A Slit Seam
      • Hand-Applied Straight Stitches
      • Hand-Applied Blind Stitches
      • Hand-Applied Overedge Stitches
      • Hand-Applied Tack Stitches
      • Hand-Applied Decorative Stitches