Doina Alexei
  • Sewing Tutorials
    • Basics >
      • Aligning Pattern Grainlines To Fabric
      • Preparing Fabrics For Sewing
      • Pinning Sewing Patterns To Fabric
      • Placing Sewing Patterns On Fabric For Cutting
      • Rotary Cutters or Fabric Scissors?
      • Cutting The Sewing Patterns
      • What Are Notches And How To Use Them In The Sewing Process
      • Transferring Notches From Pattern To Fabric
      • Transferring Seamlines to Fabric
      • Staystitching
      • Backstitching: A Complete Guide
      • Hand Basting: A Complete Guide
      • Sewing Continuous Bias Binding
    • Darts >
      • Marking And Transferring Darts To Fabric
      • What Are Darts And Dart Components
      • Folding, Pinning And Hand Basting Darts
      • Handling Dart Excess: Bulk And Tension
      • How To Sew A French Dart
      • How To Sew And Iron Single Pointed Darts
      • How To Sew And Iron Contour Darts
      • Sewing Darts With Decorative/Beaded Fabrics
    • Sewing Seams >
      • ​The Basics Of Seams And Seam Allowance
      • How To Sew A Straight Seam
      • Sewing Curved Seams
      • Sewing Corner Seams
      • Trimming And Grading Seam Excess
      • Notching/Clipping Seam Allowance for Tension Release
      • Sewing Topstitched Seams
      • Sewing Corded Seams
      • Sewing A Slot Seam
      • Sewing A Gathered Seam
      • Sewing Bias Seams
      • Sewing Seams With Ease
      • Sewing Seams With Crossing Seamlines
      • Sewing Unlike Fabric Seams
      • How To Iron Seams: Ironing Tools And Conventions
      • Sewing With Knit Fabrics
      • Understanding Stitch Length And Tension
      • Sewing Unique Fabric Seams
    • Seam Finishes >
      • Seam Finishing Techniques - Overview
      • Applying A Pinked Seam Finish
      • Applying A Bias Bound Seam Finish
      • Serging And Zigzag Seam Finishes
      • Sewing A Self-Bound Seam Finish
      • Sewing A French Seam Finish
      • Sewing A Hong Kong Seam Finish
      • Sewing A Mock French Seam Finish
      • Sewing A Turned-and-Stitched Seam Finish
      • Sewing Overcast Hand-Applied Seam Finishes
      • Sewing A Flat Felled Seam
      • Sewing A Hairline Seam Finish
    • Hem Finishes >
      • Garment Hem Finishes: Overview
      • ​Sewing A Double Fold Hem Finish
      • Sewing A Single Fold Hem Finish
      • Sewing Bound Hem Finishes
      • Sewing An Exposed Double Layer Bound Hem
      • Sewing A Folded-Up Bound Hem with Pre-folded Binding
      • Sewing A Hong Kong Hem Finish
      • Sewing A Band Hem Finish
      • Sewing A Bias Faced Hem Finish
      • Sewing A Twill Tape Hem Finish
      • Sewing A Rolled Hem Finish
      • Sewing A Shaped Hem Facing
      • Using Fusible Hem Tape And Webbing
      • Finishing A Lace Fabric Hem
      • Finishing A Leather Hem
      • Sewing Faced Hem Corners
      • How To Finish Lining At The Hem
      • Finishing Fabric Corners by Mitering >
        • Mitering Fabric Corners With A Full Bias Facing
        • Mitering Fabric Corners With Exposed Binding
      • Interfacing A Hemline: Lined And Unlined Examples
    • Sewing Pockets >
      • Curved Patch Pocket With Flap
      • Unlined Square Patch Pockets
      • Lined Patch Pockets: Two Ways
      • Extension On-Seam Pockets
      • Separate On-Seam Pocket
      • Front Hip Pockets
      • Bound Double Welt Pocket
      • Double Welt Pocket With Flap
      • Self-Welt Pocket (Using Single Fabric Layer)
      • Slanted Welt Pocket (Hand-Stitched)
      • Faced Slash Pockets: Overview >
        • Sewing A Faced Slit Pocket
        • Sewing A Rectangular Slash Pocket
        • Sew A Star-Shaped Faced Pocket
    • Sewing Zippers >
      • Sewing Zippers: General Information
      • Sewing A Centered Zipper
      • Sewing A Lapped Zipper
      • Sewing An Invisible Zipper
      • Sewing A Fly Front Zipper
      • Sewing A Closed-End Exposed Zipper (No Seam)
      • Sewing An Exposed Separating Zipper
      • Sewing Hand Stitched Zipper Applications
      • Sewing A Zipper Underlay
      • Sewing A Placket-Enclosed Separating Zipper
    • Sleeveless Finishes >
      • Sleeveless Armhole Finishes: General Information
      • Finishing Sleeveless Garments with Lining
      • Sewing A Folded-Under Bound Armhole Finish
      • Sewing A Shaped Armhole Facing
      • Finishing Armhole Edges With Exposed Binding
      • Finishing Armhole Edges With Decorative Trim
    • Neckline Finishes >
      • Sewing A Neck Shaped Facing
      • Sewing An All-In-One Neck Facing
      • Neck And Garment Opening Combination Facings >
        • Sewing An Extended Front-Neck Facing
        • Sewing A Separate Neck-Front Facing
      • Sewing A Bias Faced Neckline Finish
      • Sewing A Band Neckline Finish
      • Bound Neckline Finishes: Overview >
        • Sewing A Single Layer Bound Neckline
        • Finishing A Neckline With Pre-Folded Binding
        • Sewing A Double Layer Bound Neckline Finish
      • Sewing A Semi-Stretch Strip Band Neckline
      • Ribbed Neck Band And Classic Turtleneck
      • Decorative Neckline Finishes >
        • Sewing A Neckline With Decorative Inset
        • Sewing A Piped Cording Faced Neckline
        • Sewing Decorative Trim To A Finished Neckline
    • Finishing Facing Edges >
      • Finishing Facing Edges: Overview
      • Folded-And-Topstitched Overedge Facing Finish
      • Sewing A Bound Facing Edge Finish
      • Sewing A Hong Kong Facing Finish
      • Sewing A Rolled Edge Facing Finish
      • Sewing A Twill Tape Facing Edge Finish
      • Sewing An Overedge-Stitch Facing Finish
    • Extras >
      • A Complete Guide on Interfacing
      • Sewing Bound Spaghetti Straps
      • Sewing Spaghetti Straps To A Faced Neckline
      • Sewing Ruffles: Overview
      • Patterning And Sewing A Circle Ruffle
      • Sewing A Gathered Heading Ruffle
      • Sewing Double Layer Gathered Ruffles
      • Sewing A Gathered Ruffle Into A Seam
      • Sewing A Gathered Ruffle To A Fabric Edge
      • Sewing A Fabric Surface Slit
      • Sewing A Slit Seam
      • Hand-Applied Straight Stitches
      • Hand-Applied Blind Stitches
      • Hand-Applied Overedge Stitches
      • Hand-Applied Tack Stitches
      • Hand-Applied Decorative Stitches
  • Custom Apparel
    • Custom Bridal
  • Submit A Sewing Question
  • About
  • Blog

Two Techniques For Sewing Lined Patch Pockets

What Is A Lined Patch Pocket
A lined patch pocket uses full lining to enclose all raw edges before the pocket is sewn to the fabric surface. As opposed to the unlined option, with lined patch pockets, you do not have to pre-fold edges, miter corners or easestitch curved edges to facilitate folding. 
Picture
Depending on the fabric, the pocket lining can be the same as the garment or a thinner, lightweight material. Depending on desired look, the lining layer can have a contrasting color and texture. 
A lined patch pocket is considered a higher quality pocket application. This pocket style is used with more structured garments, especially tailored ones like business suits, blazers, jackets and coats. 
​The beauty of lined patch pockets is that they produce a clean look both on the outside and inside of the application. Since the pocket layer is fully backed with lining, these classic pockets also provide increased durability.  
Lined patch pockets work well with lightweight, flimsy fabrics providing more body and stability to the pocket structure. The addition of the lining is also a great way to add opacity to sheer fabrics.
Picture
As noted above, the patch pocket piece is first fully lined, then stitched to the garment surface. There are two main techniques used in the process of lining a patch pocket, one being a bit simpler than the other. 
Picture
​In the first instance (the more difficult version), the lining and pocket layers are cut separately and sewn together along all edges to fully enclose them. With many tailored applications, the lining layer is connected to a facing that clean finishes the top edge of the pocket. The facing is always cut from the same fabric as the pocket itself, while the lightweight lining layer is hidden on the inside of the pocket. 
Picture
The second instance, which you may find to be easier to sew, is one where the pocket layer is cut at twice its size, and mirror image of its shape (if curved at the bottom), and folded onto itself for clean finishing. In this case, the pocket’s top edge corresponds to the fold, while the side and bottom edges are enclosed with a stitch. In this case, the pocket is easier to align and skips an extra row of stitching. 
Both versions are shown below. Let’s get started with the separate lining example.

How To Sew A Patch Pocket Using A Separate Lining Layer

Picture
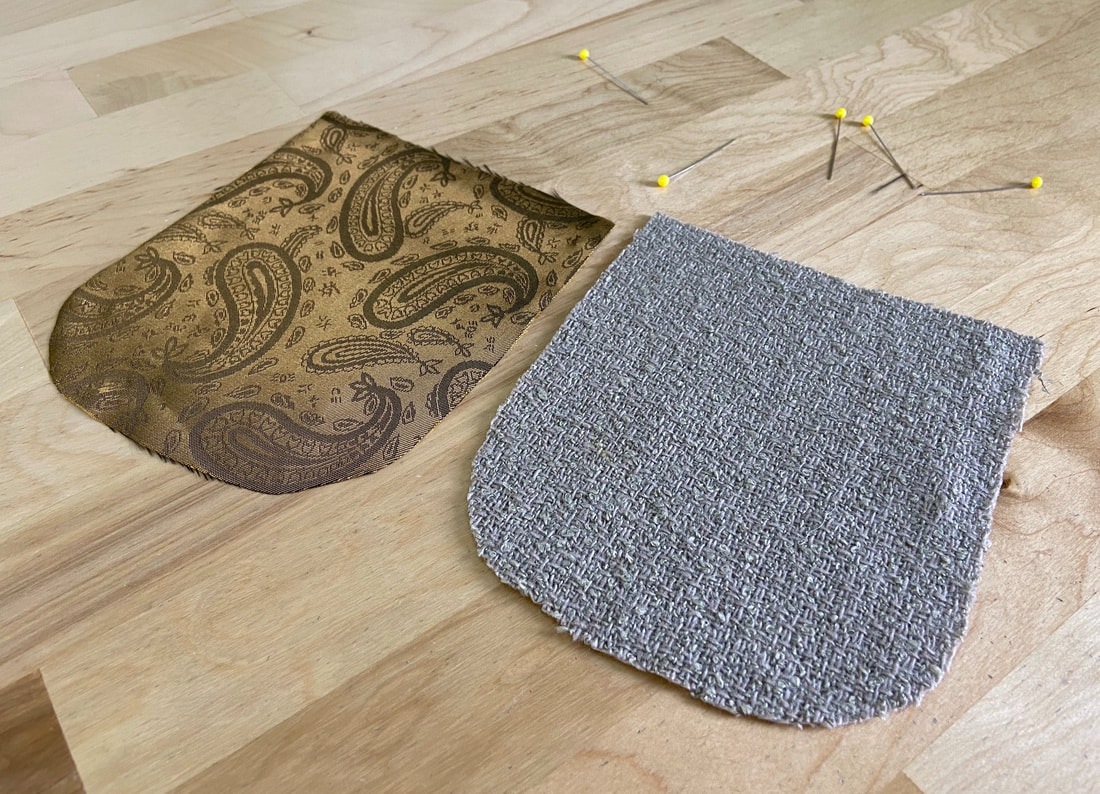
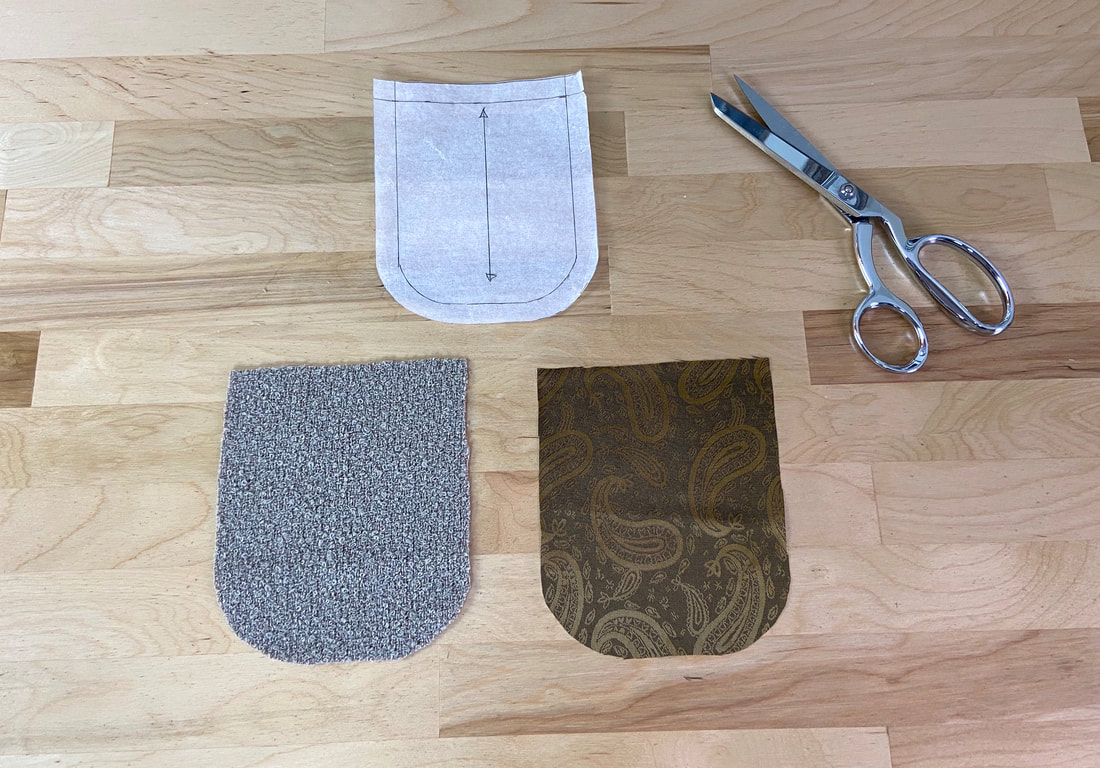
1. Cut one piece of the pocket layer and one of the lining as shown. Given that the same pattern is used to cut both, they should be identical in shape and size. 
Picture
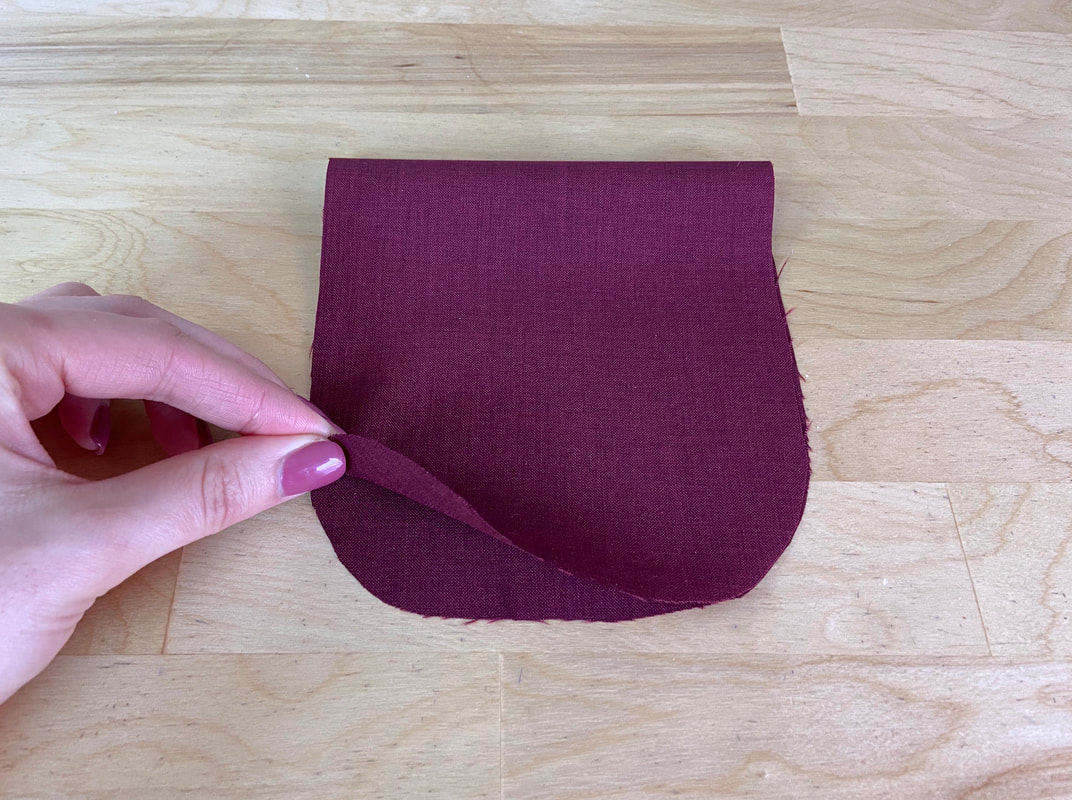
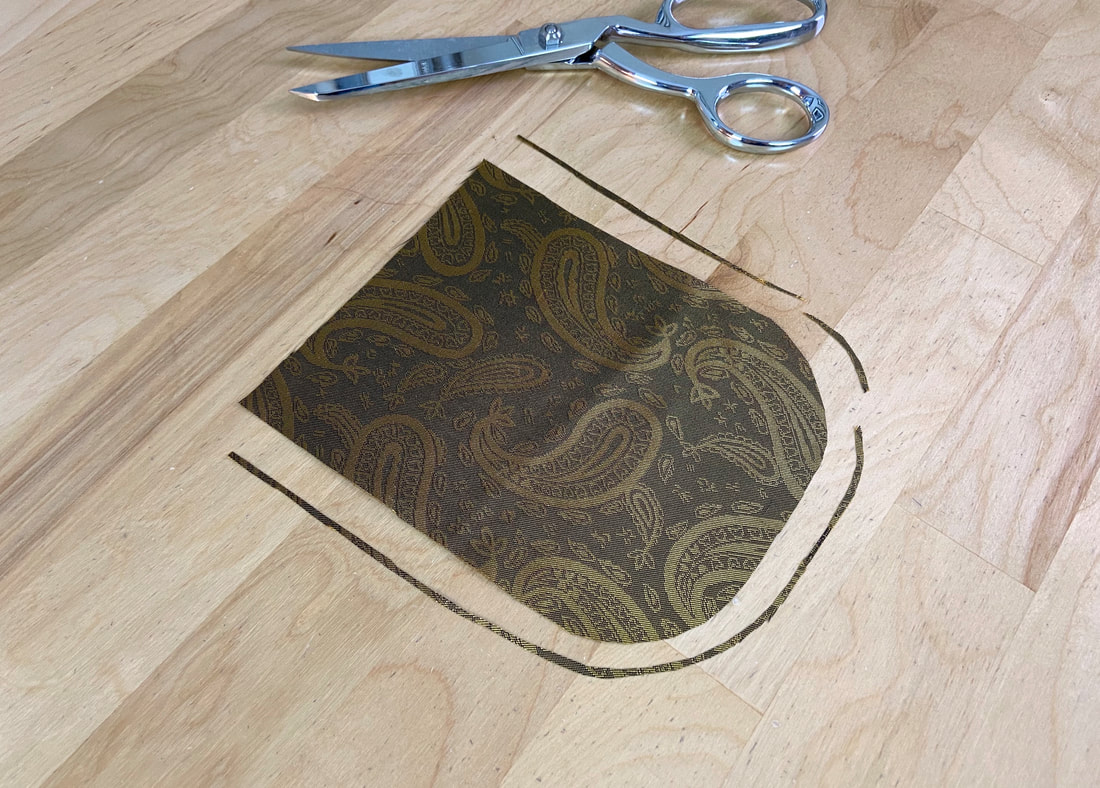
2. Trim about 1/16” to 1/8” along all edges of the lining piece. Trimming this small amount of excess will make the lining layer slightly smaller such that when it is sewn to the pocket layer, it pulls the seamlines in towards the wrong side, hiding the lining and seamlines underneath the final application. 
Picture
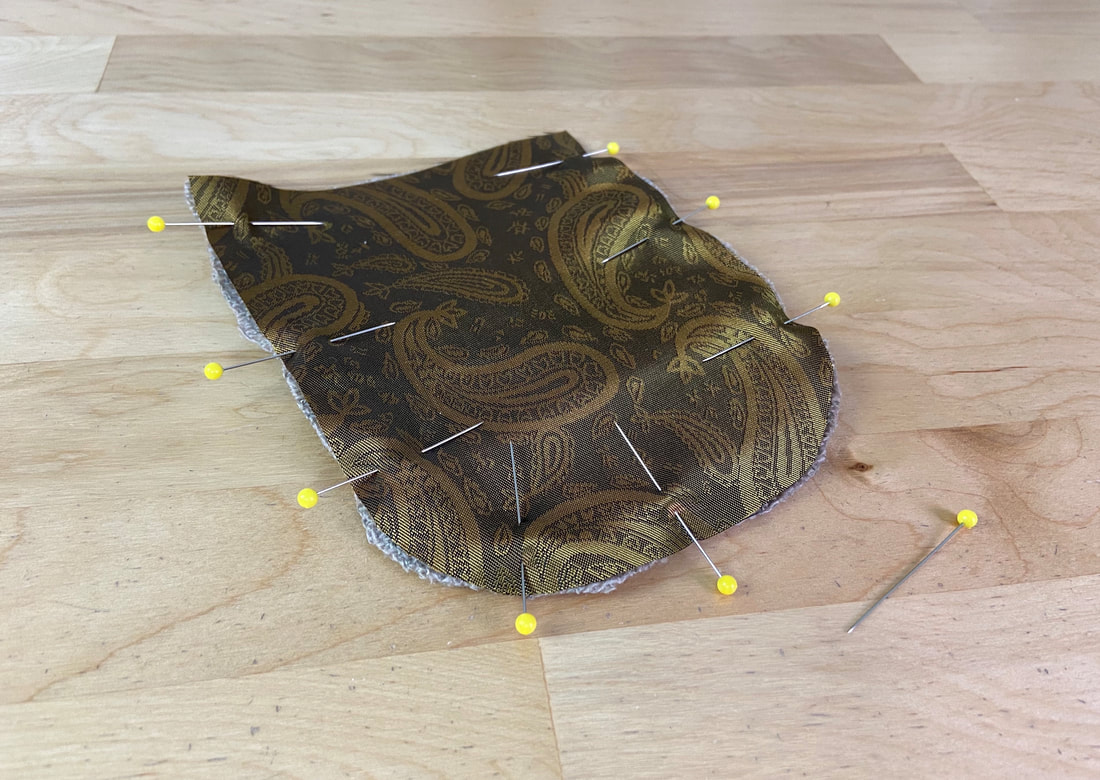
3. Align the pocket layer to the lining layer with face sides touching and all edges aligning. You may find it a bit tricky to align the smaller lining to the larger pocket piece. Don’t worry about the irregular body of the fabric layers- focus only on the edges for now. 
​Insert pins perpendicularly along all edges. It may help in this case to hand baste the two layers together along all edges. 
Picture
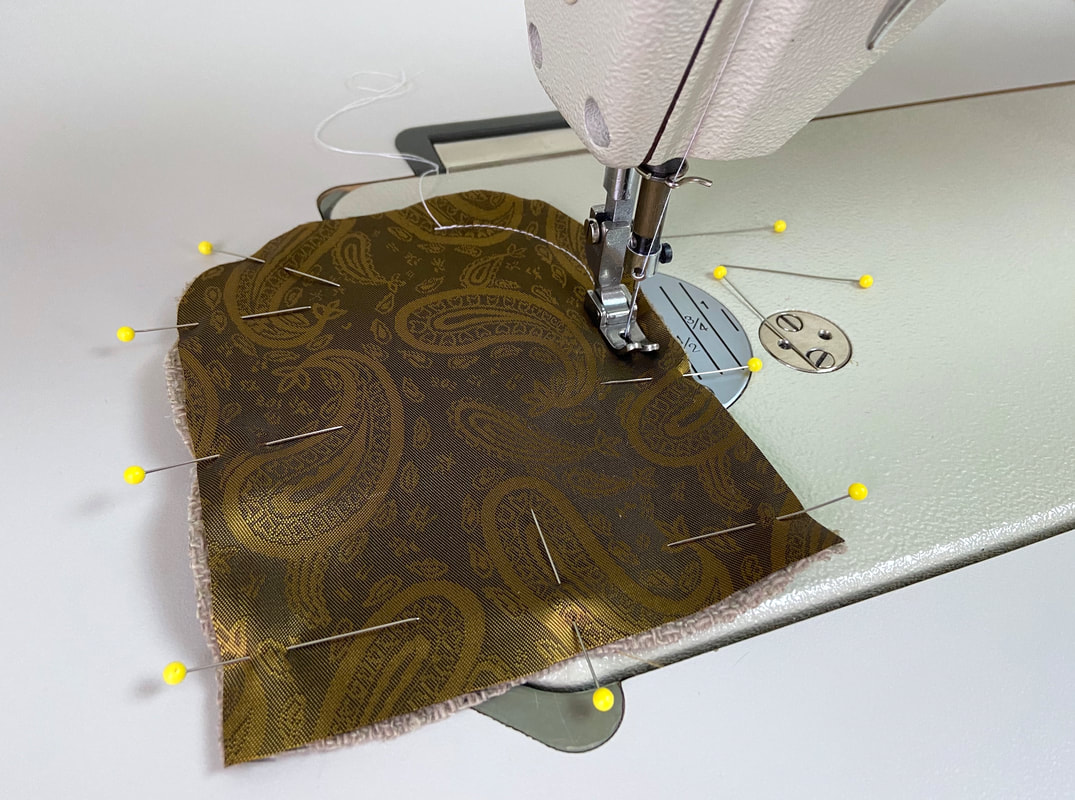
4. Starting along the bottom edge, about 1” away from the center, backstitch then stitch the two layers following the designated seam allowance -1/2” in this case. 
​Keep the stitch as even as possible, especially if the pocket’s bottom edges are curved as they are in this application. 
Picture
Continue stitching along all pocket edges stopping at about 1.5” from the starting point. Backstitch at this location to complete the stitch. The gap created will allow you to turn the pocket on its face side. 
Picture
Picture
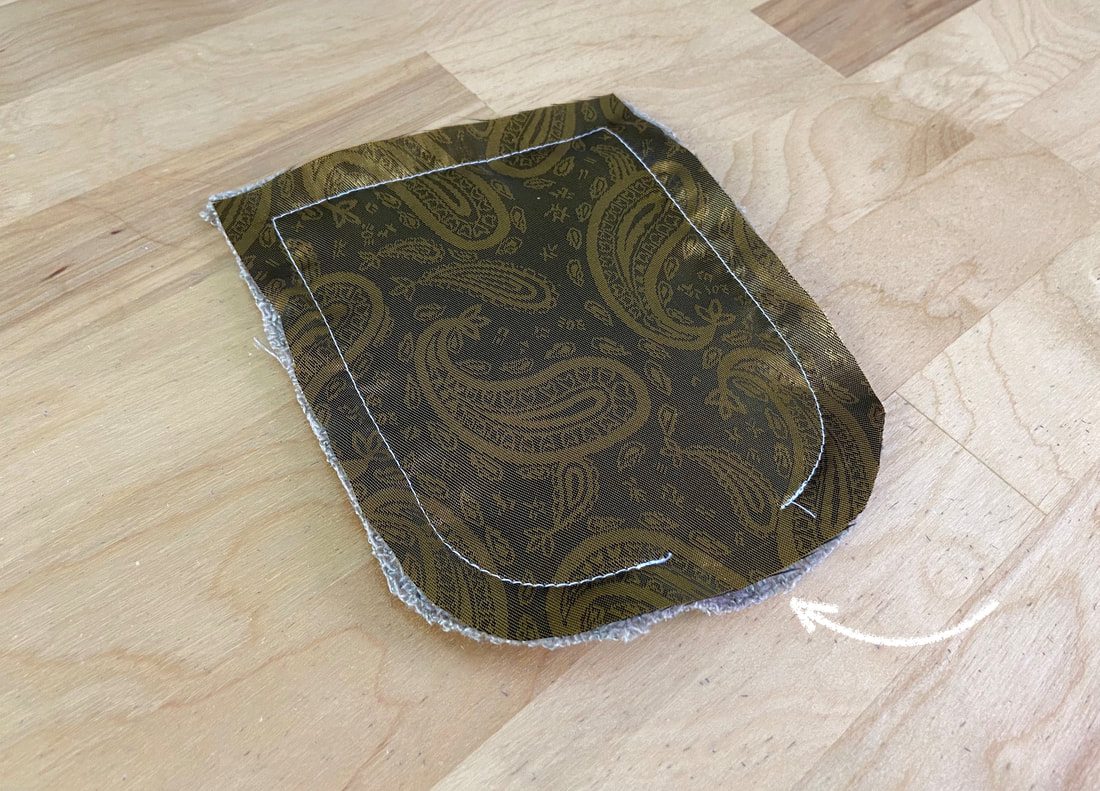
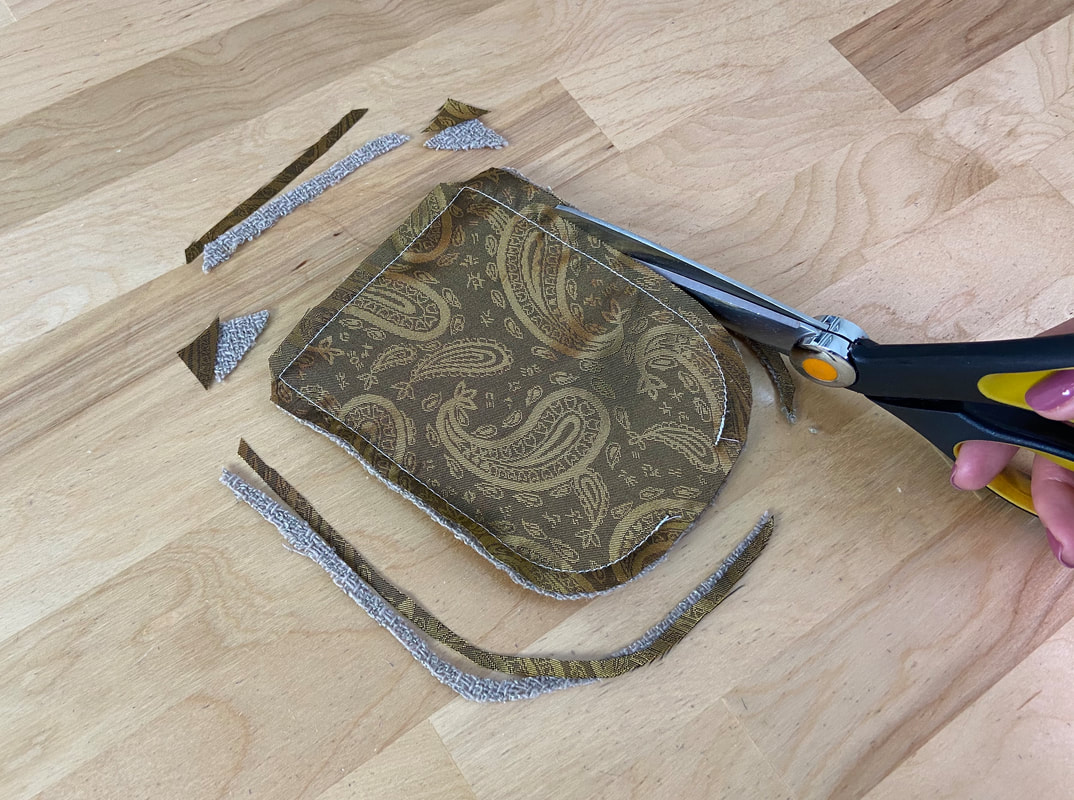
5. To minimize bulk, trim, notch and grade the seam allowance as shown. Clip the top corners to achieve smooth, straight edges. 
Picture
Picture
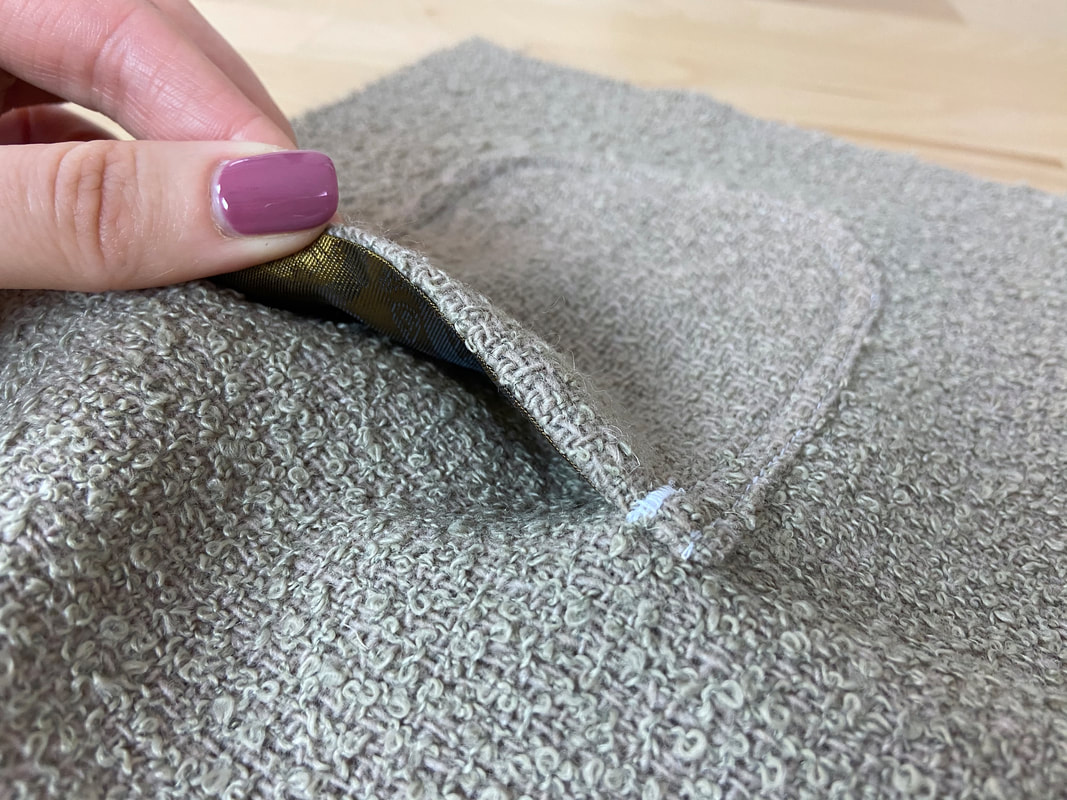
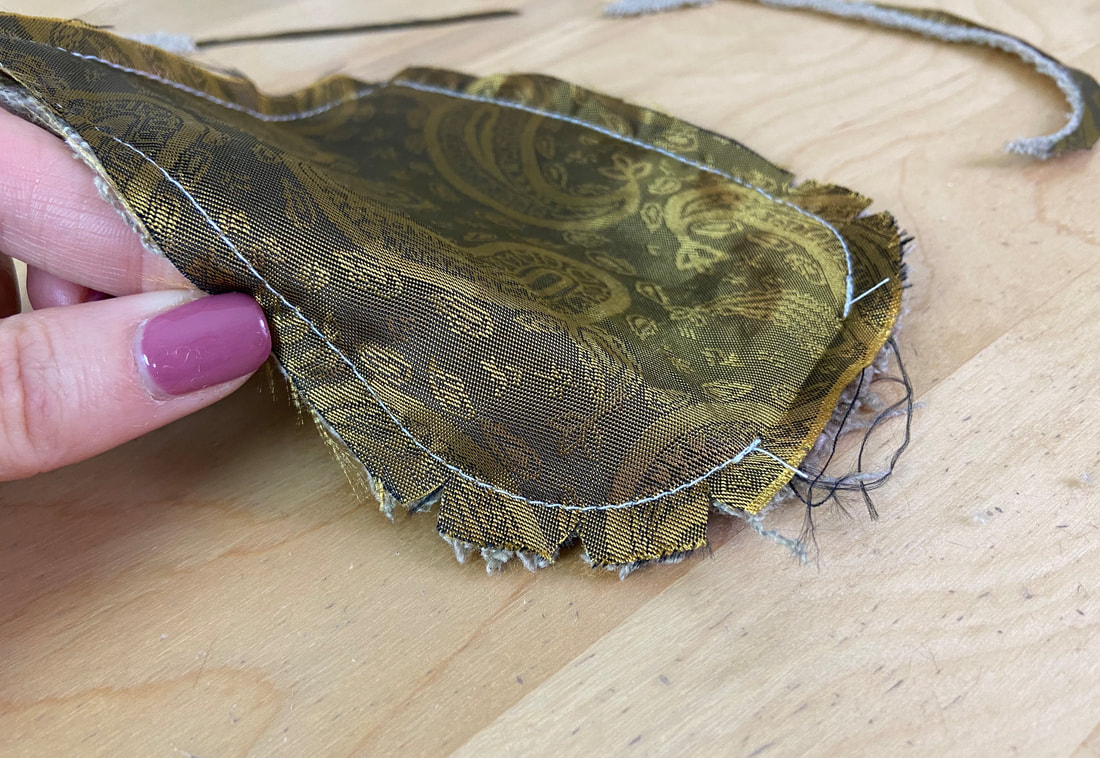
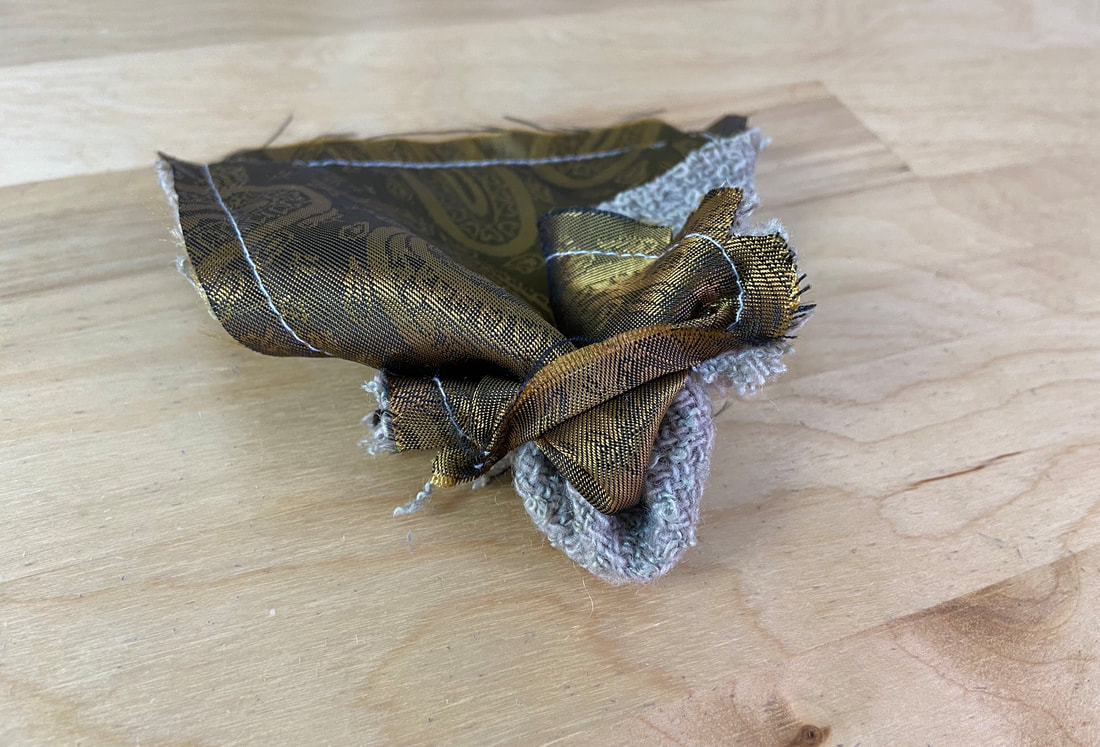
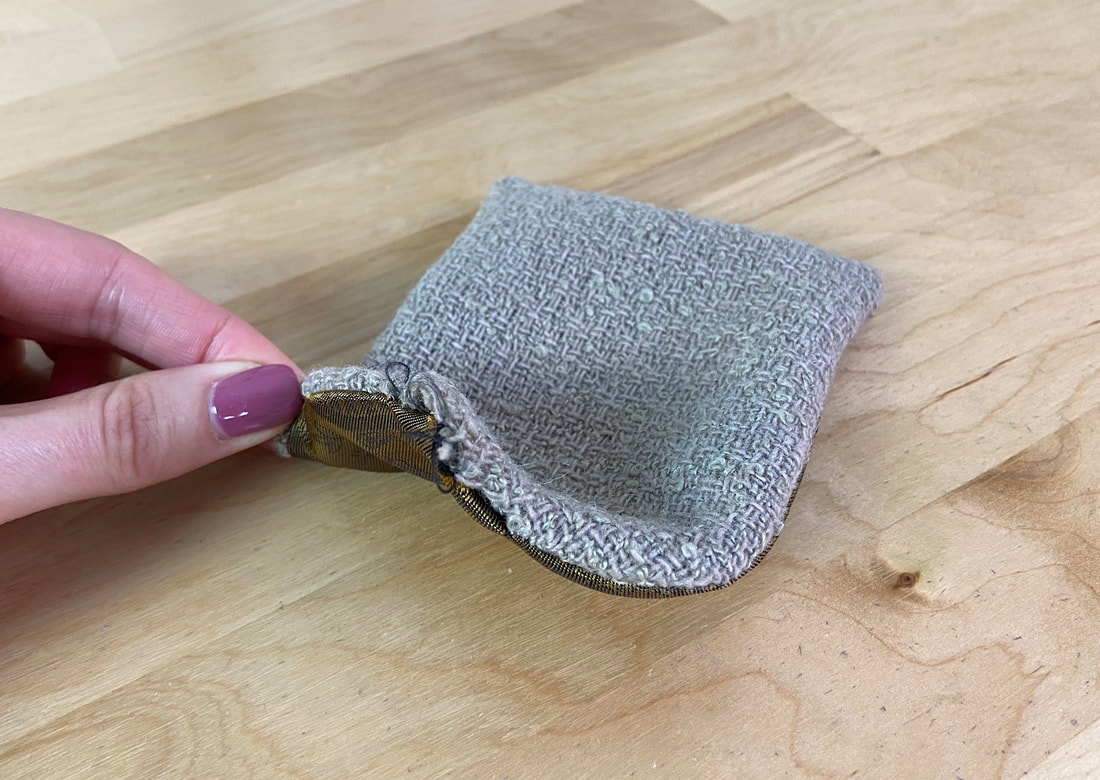
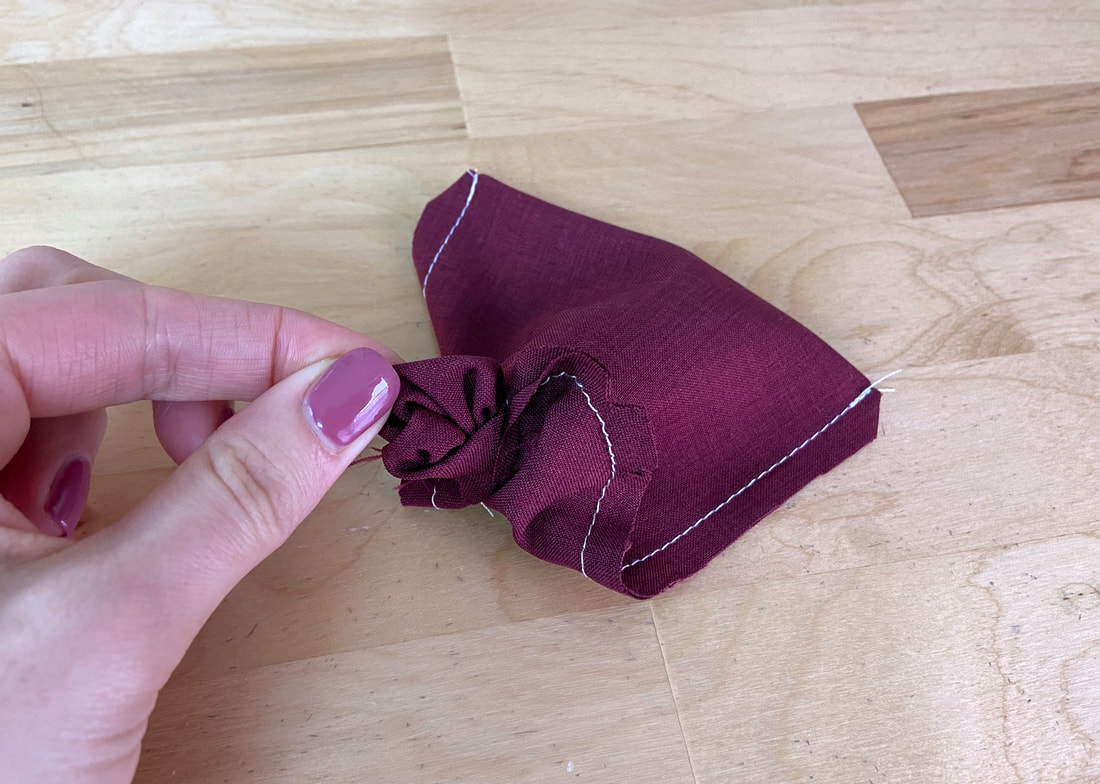
6. Pull the fabric layers through the bottom opening to turn the finished lined pocket on its right side as shown. 
Picture
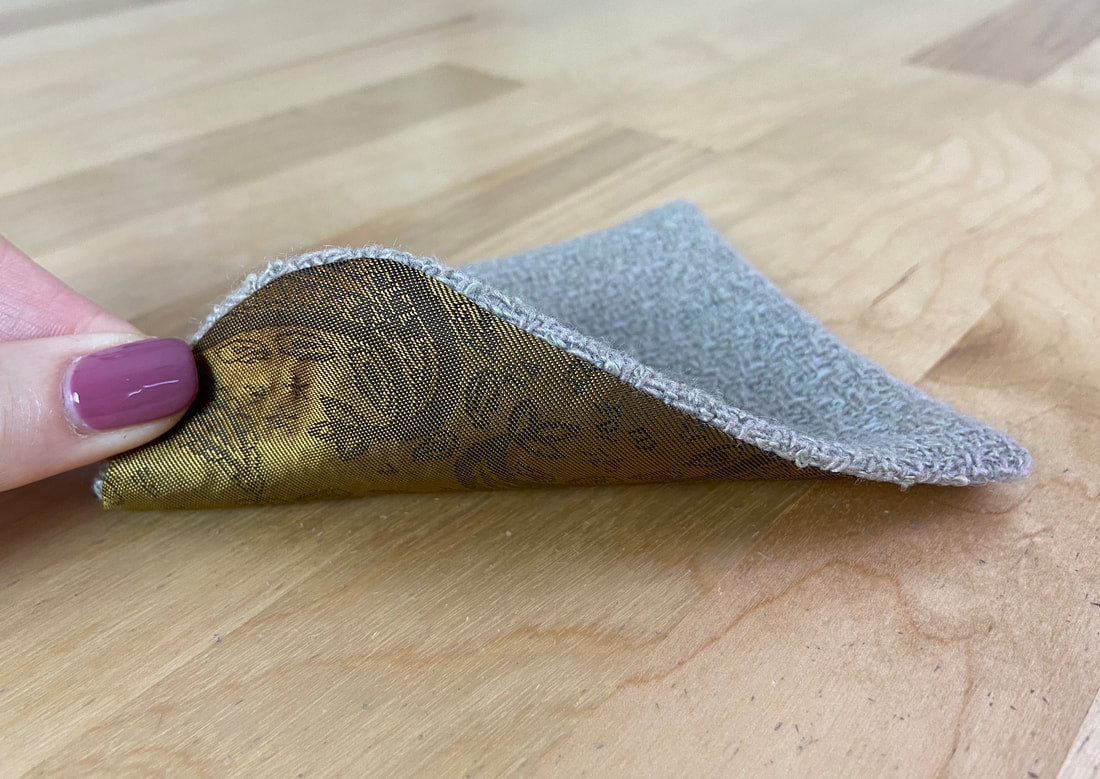
7. Bring the finished edges out. Since the lining was trimmed a bit smaller than the pocket layer, the lining should pull the seamlines inward hiding them on the pocket’s wrong side as shown. 
Picture
Picture
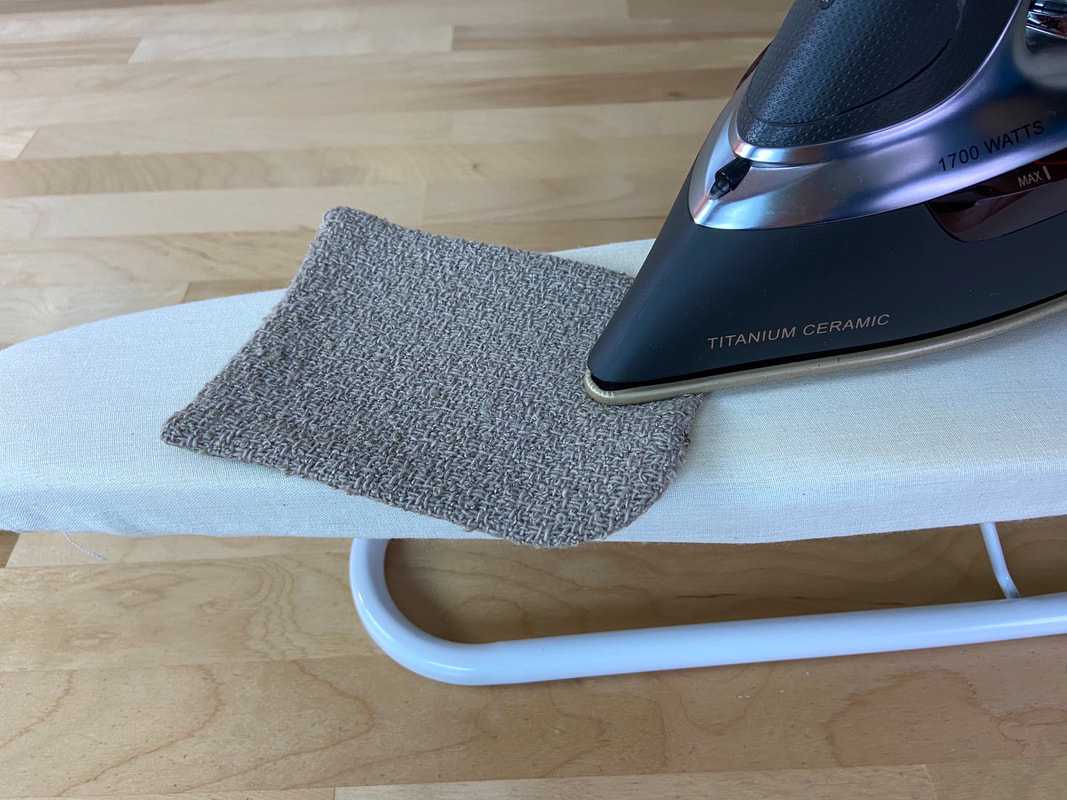
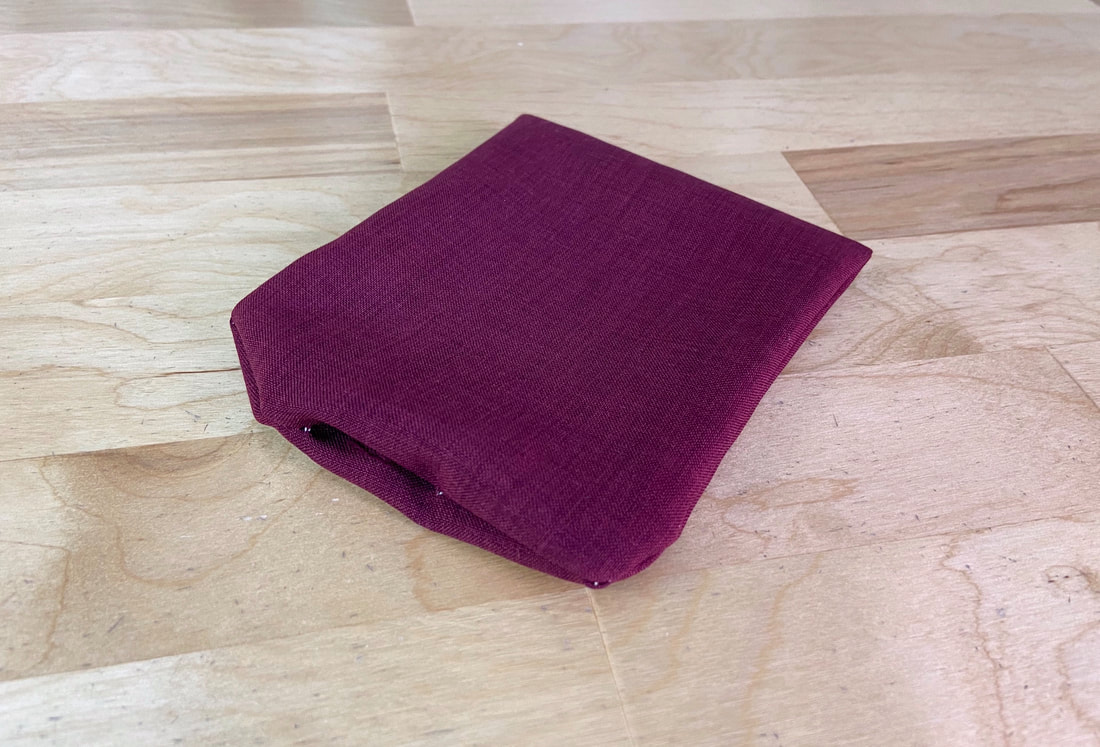
​Fold the edges of the open gap at the bottom such that they blend into the rest of the finished edge. Iron the folded edges as shown. 
Picture
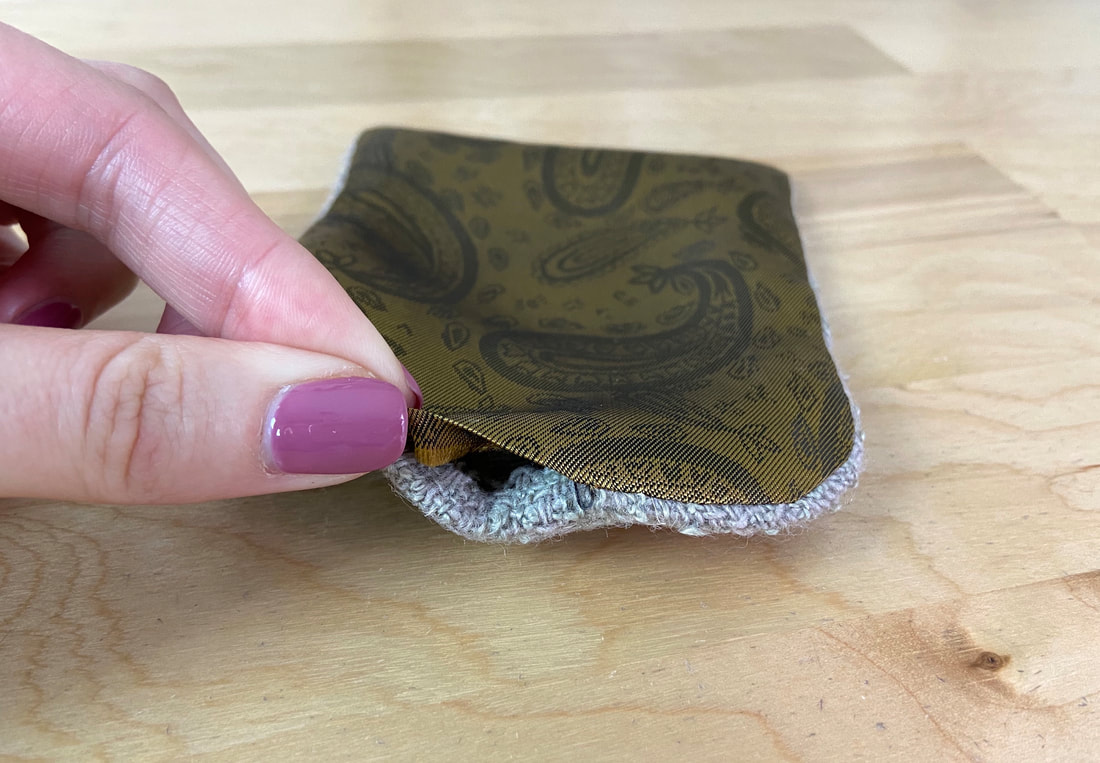
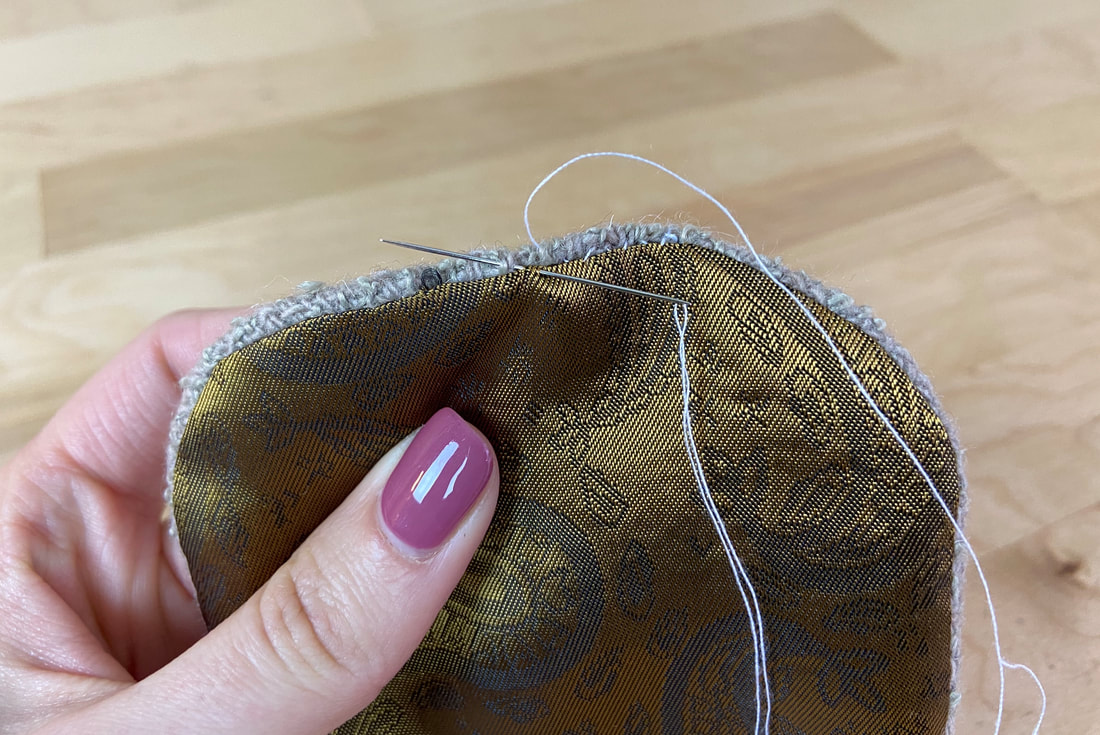
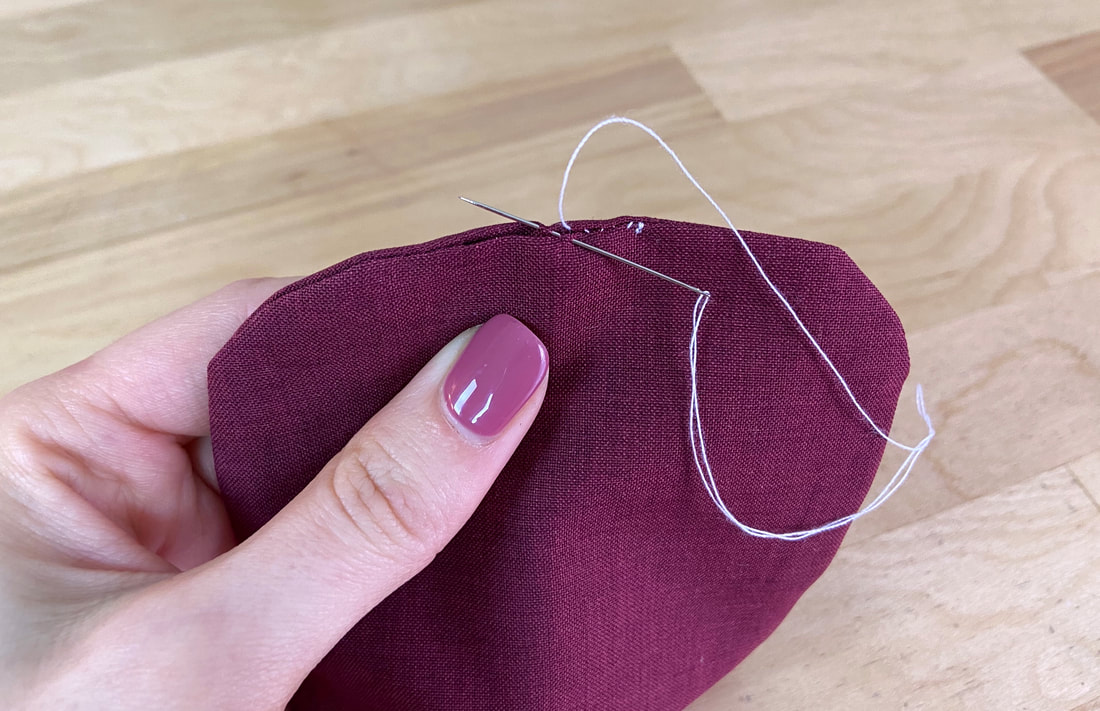
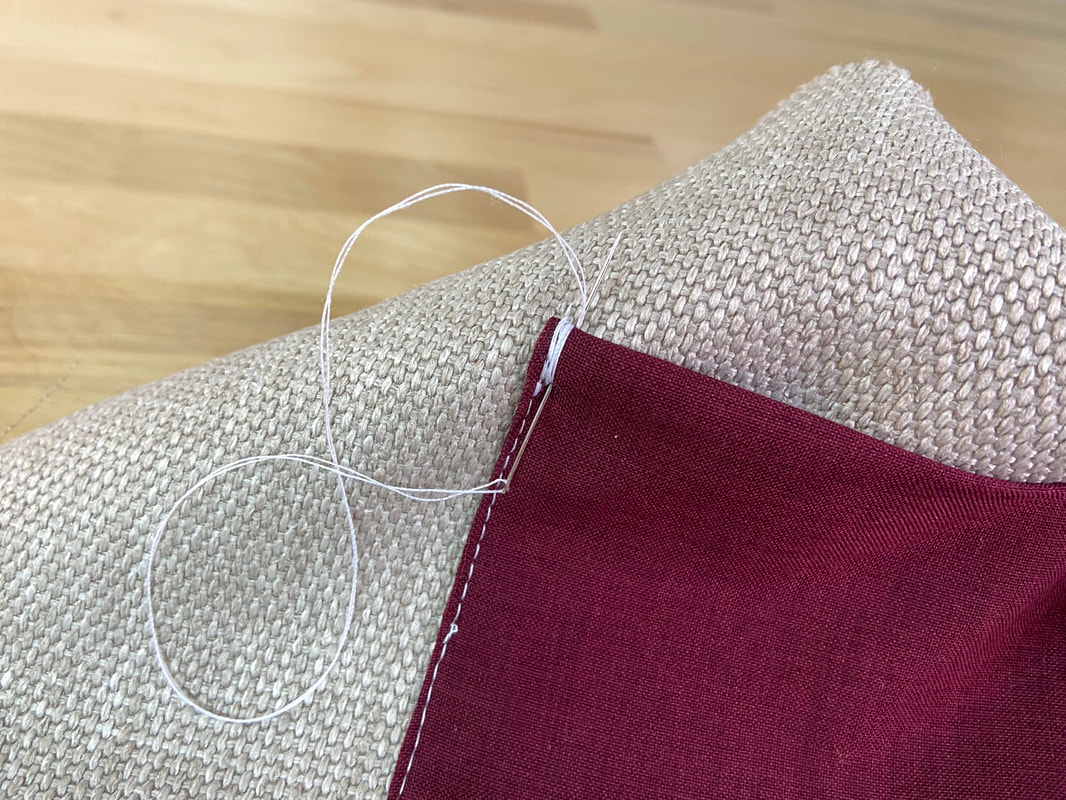
8. Before proceeding to sewing the pocket to the garment layer, slipstitch the pocket gap closed using matching color thread. The slipstitch will completely seal the lined pocket piece with an invisible finish. 
Picture
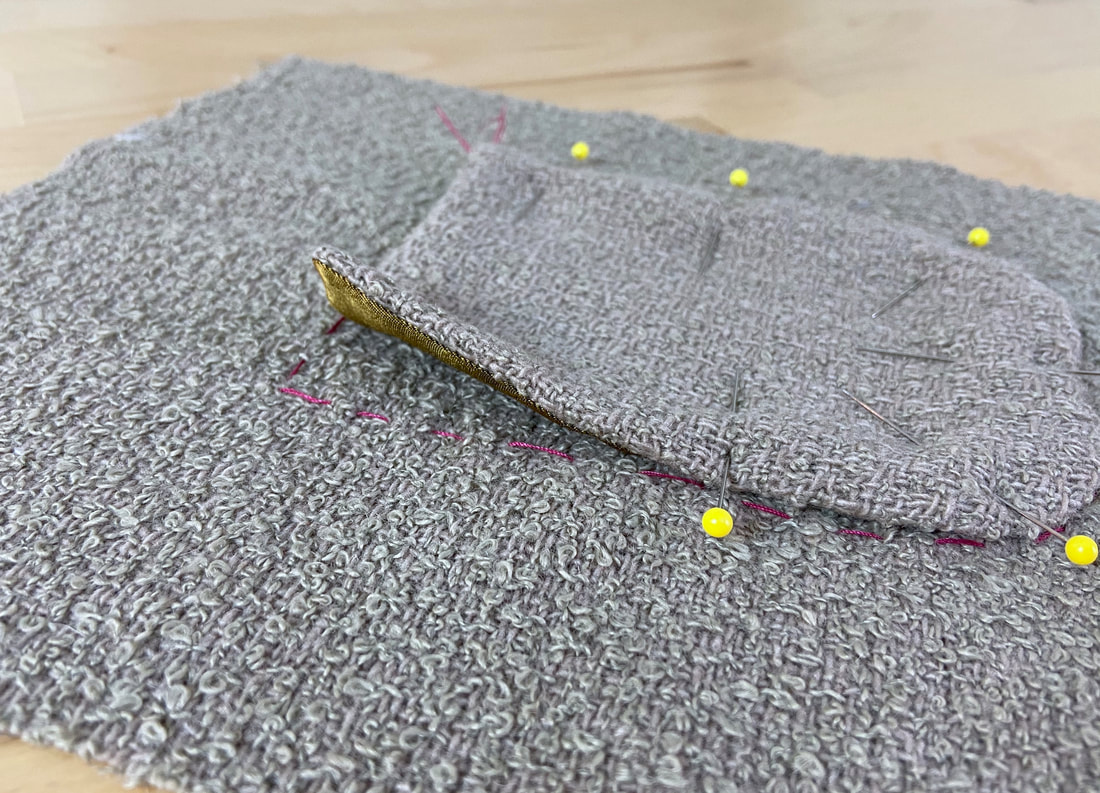
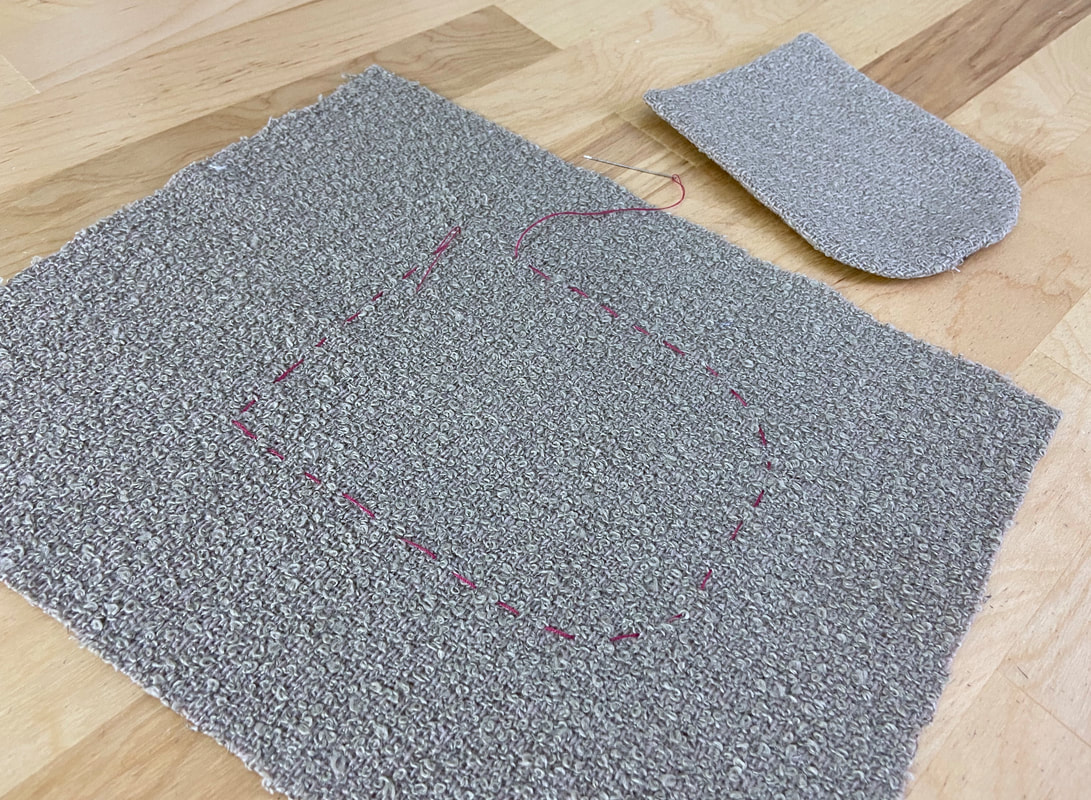
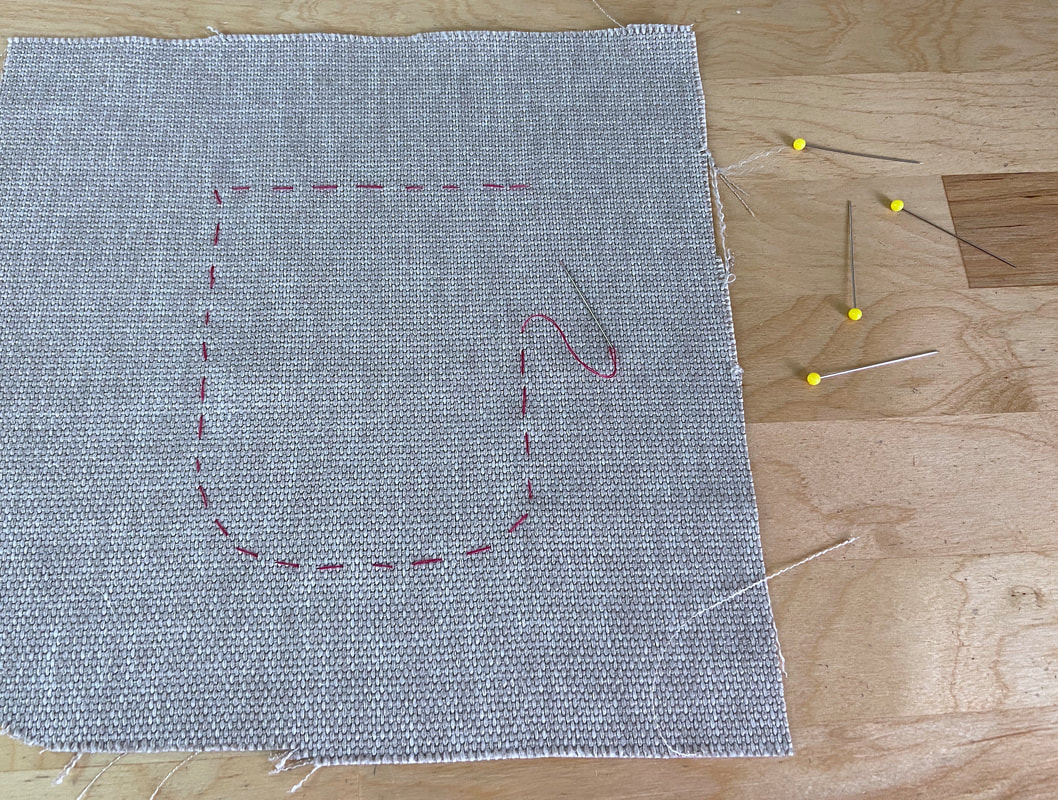
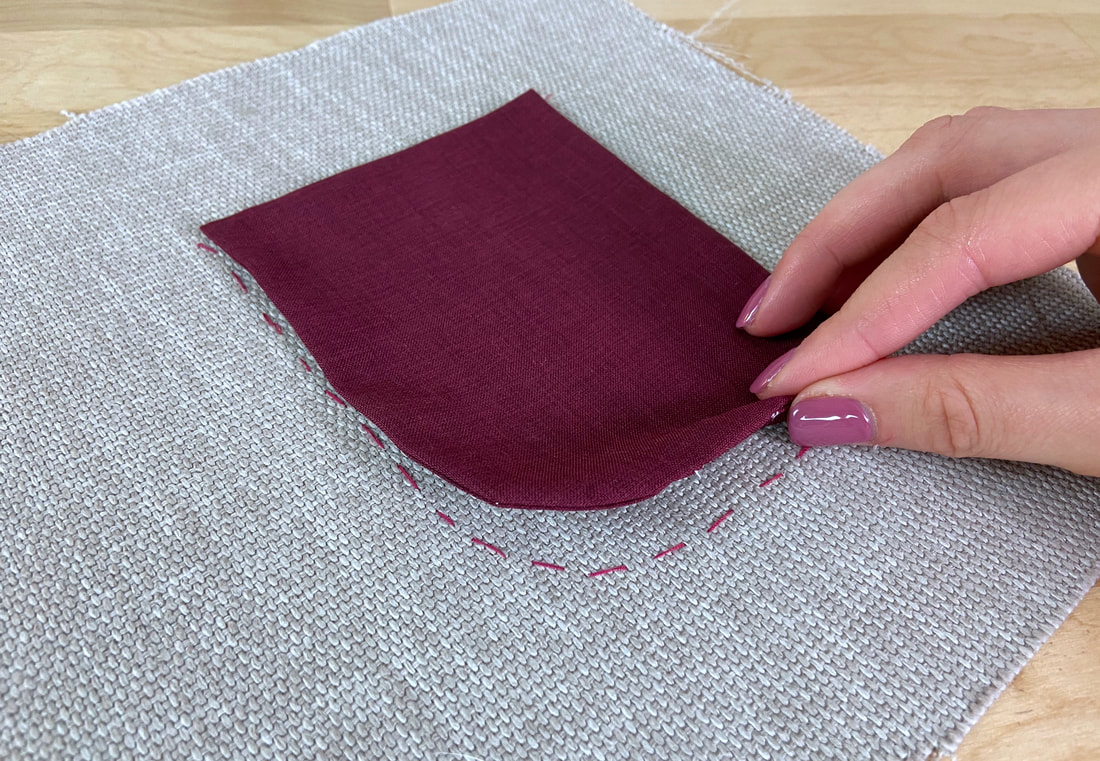
9. On the garment surface, mark the shape and exact location of the patch pocket with hand basting as shown. 
Picture
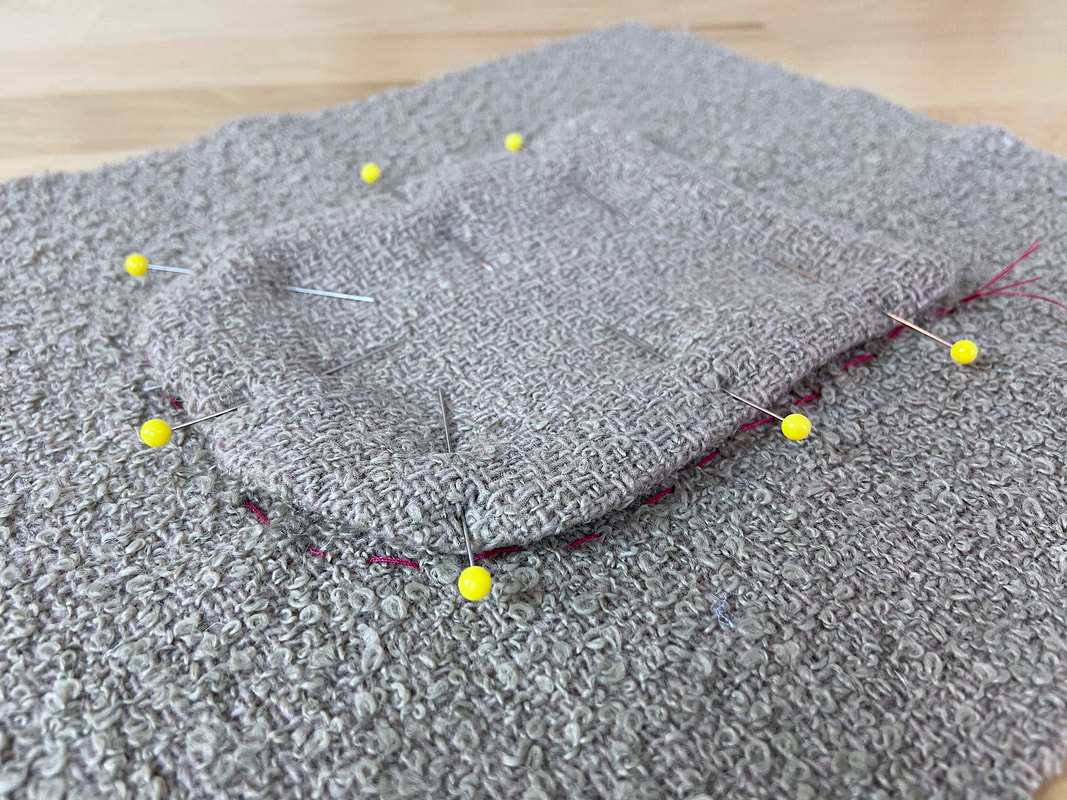
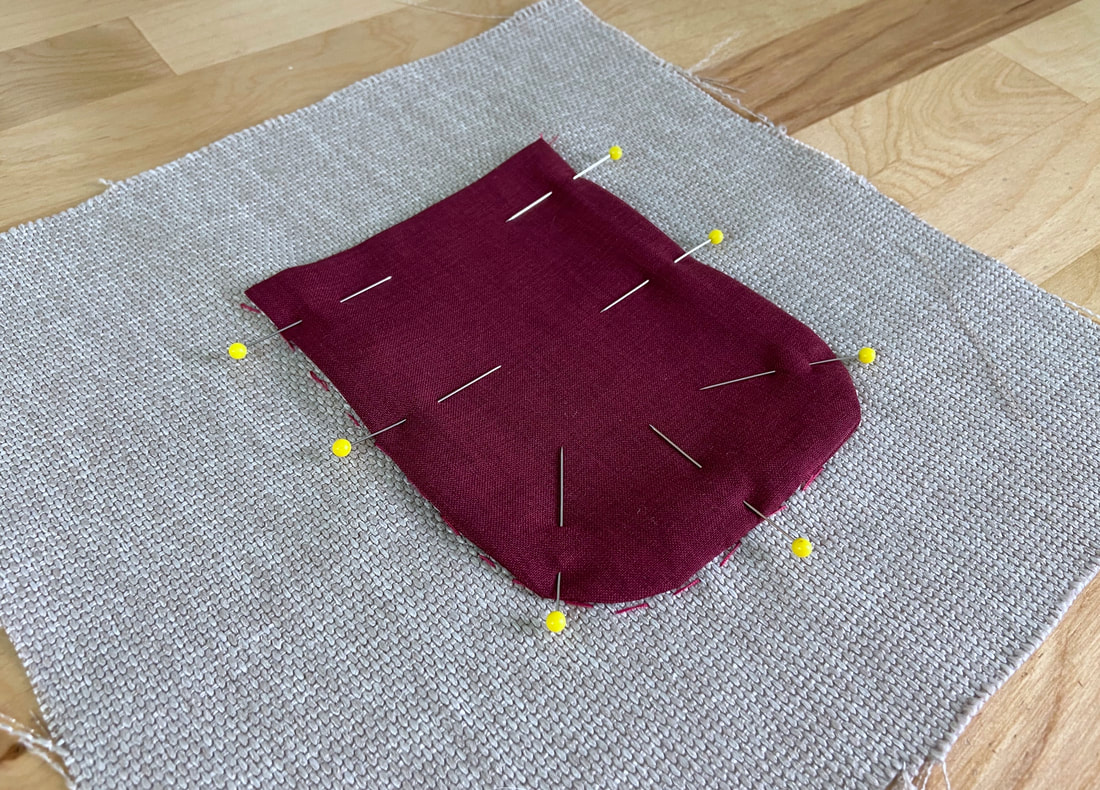
10. Align the patch pocket piece to the indicated marks, and pin it down along all edges, except for the top opening. ​
Picture
To facilitate the topstitching process, hand baste the patch pocket in place. 
Picture
Picture
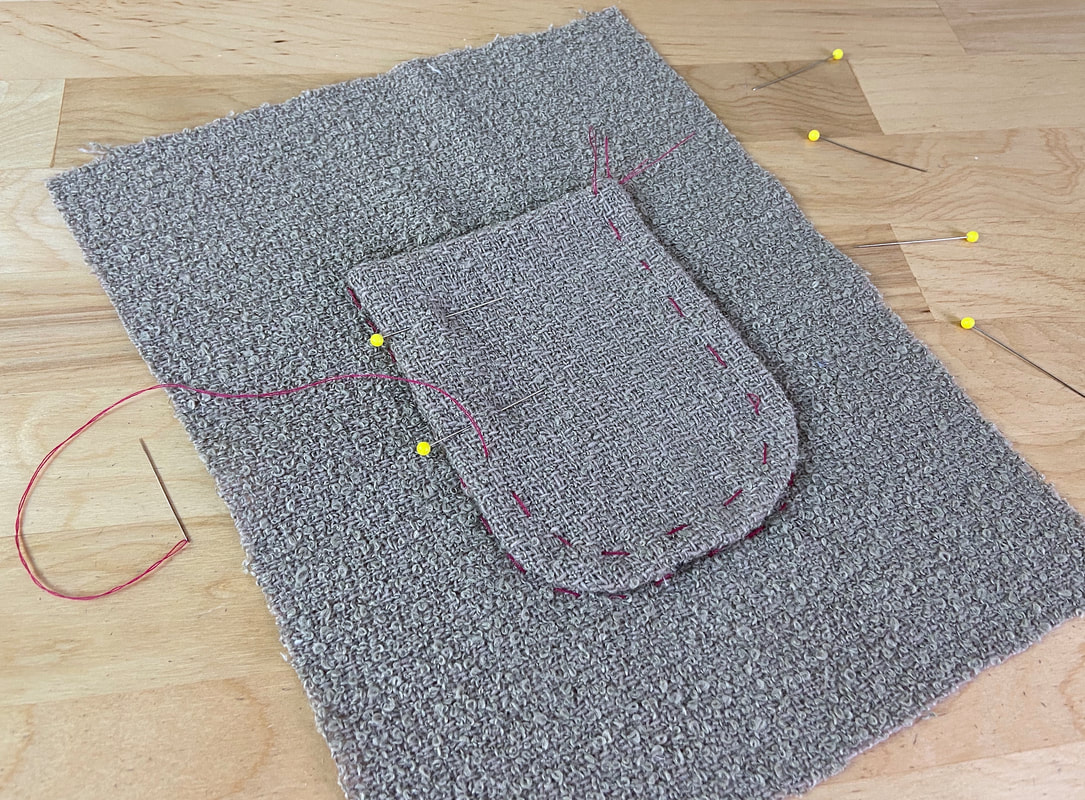
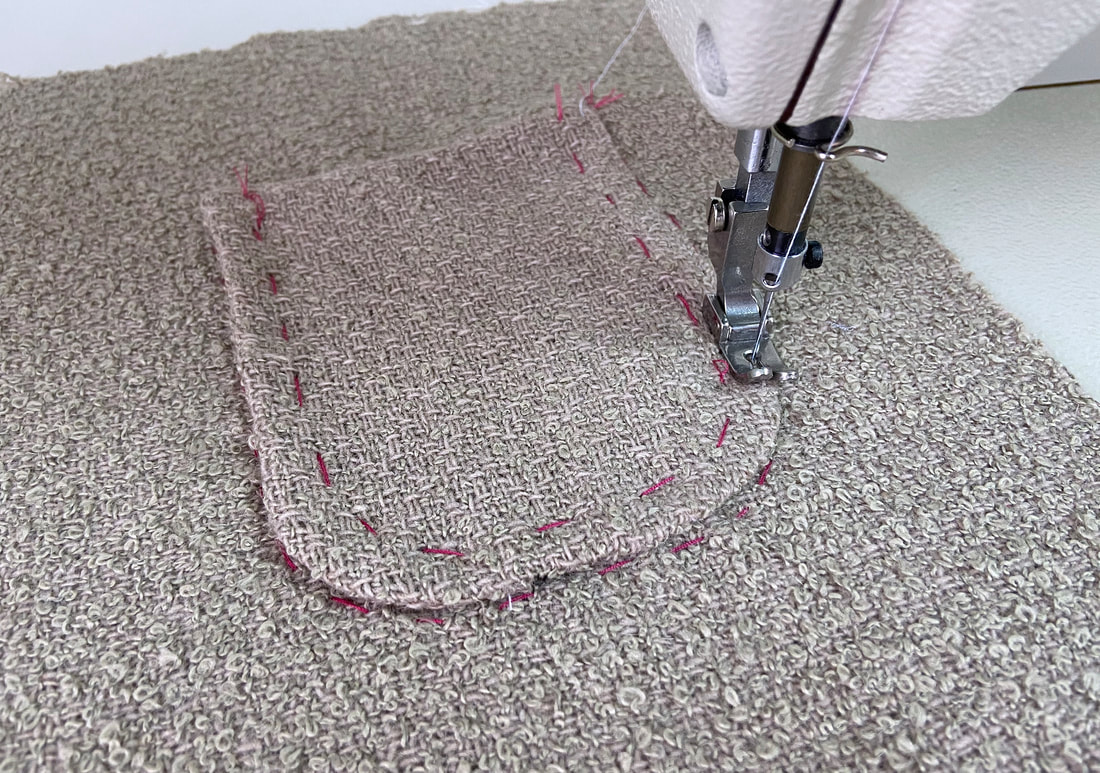
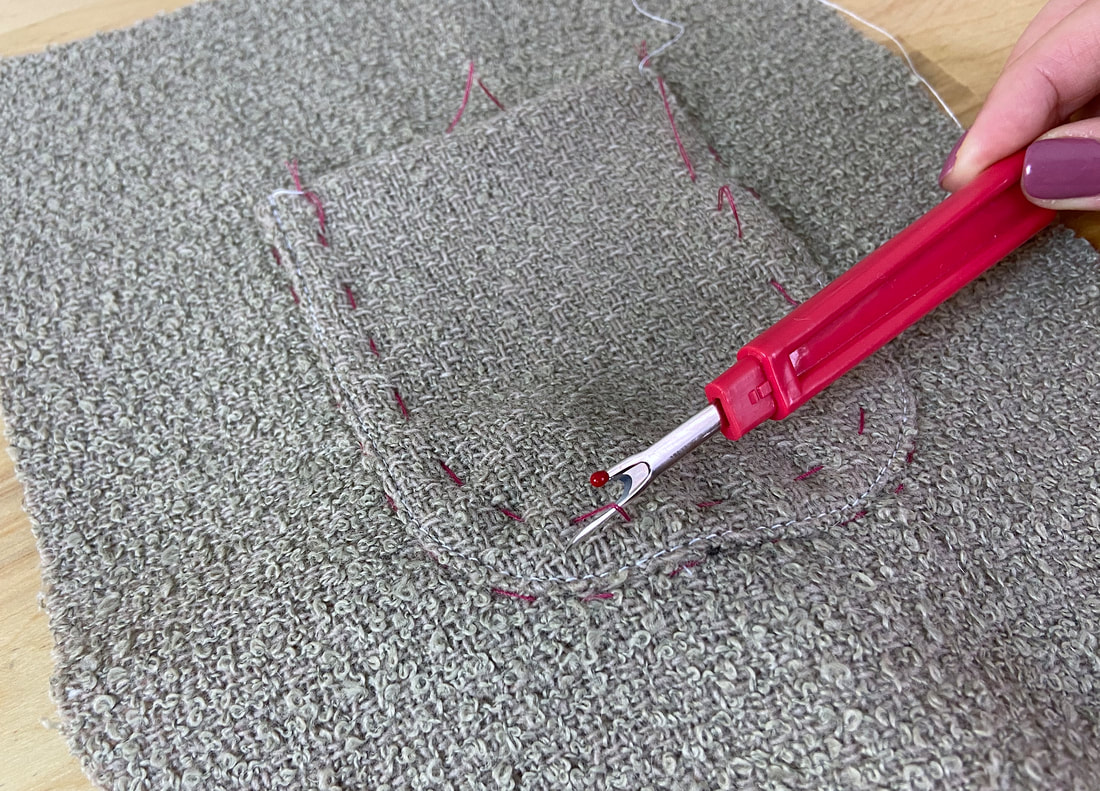
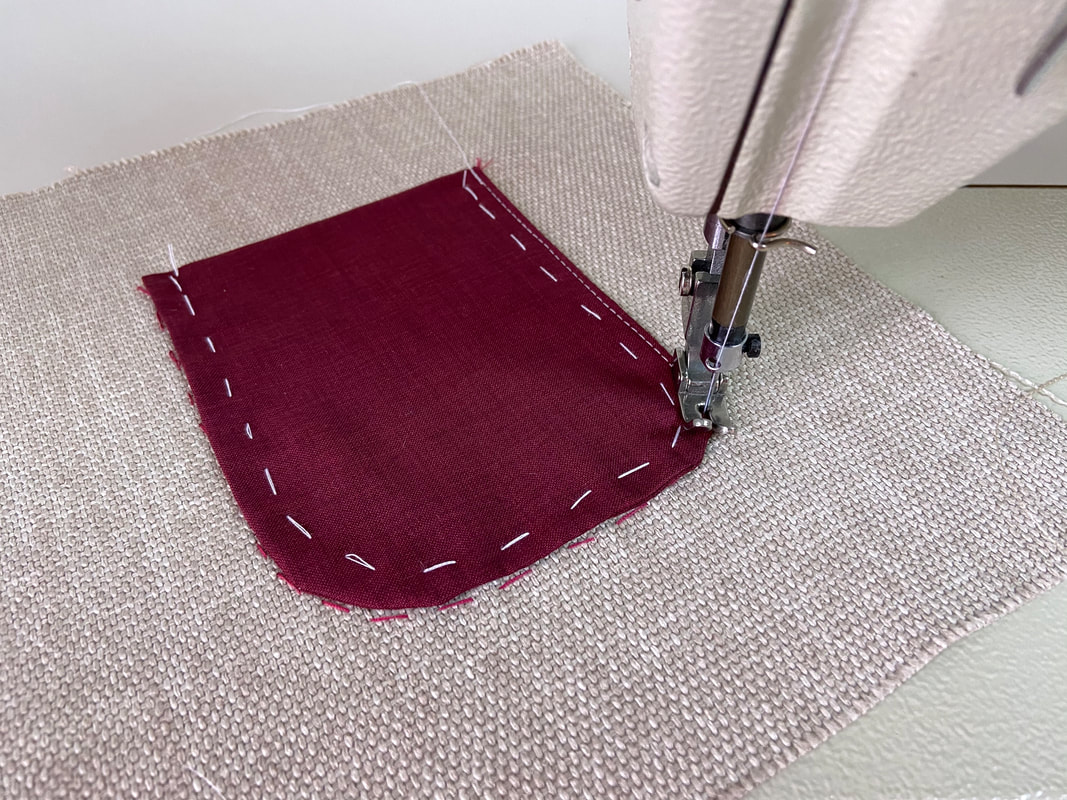
11. Starting at one of the top corners, stitch as close as you can to the lined pocket edge until you arrive at the other top opening corner. Make sure to backstitch at both beginning and end of the stitch for durability. 
​For added strength and as an additional decorative element, you can add a second row of topstitching at about ¼” away from the first. 
Picture
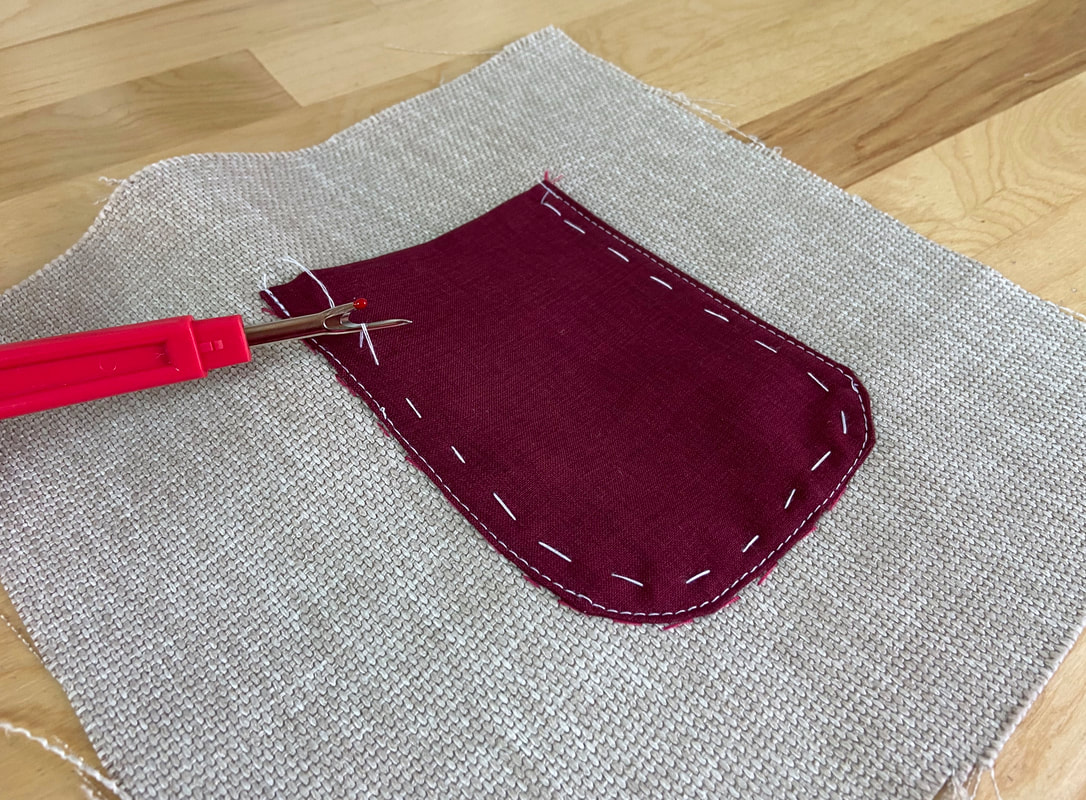
Once topstitched, remove the hand basting using a seam ripper. 
Picture
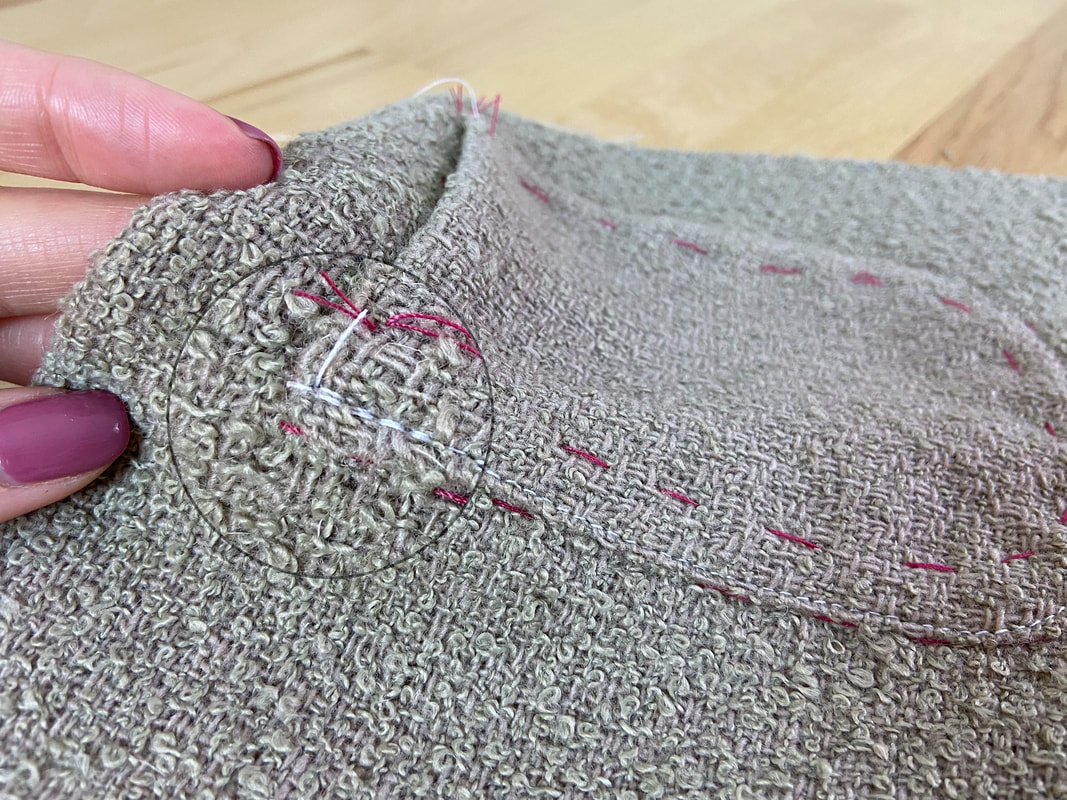
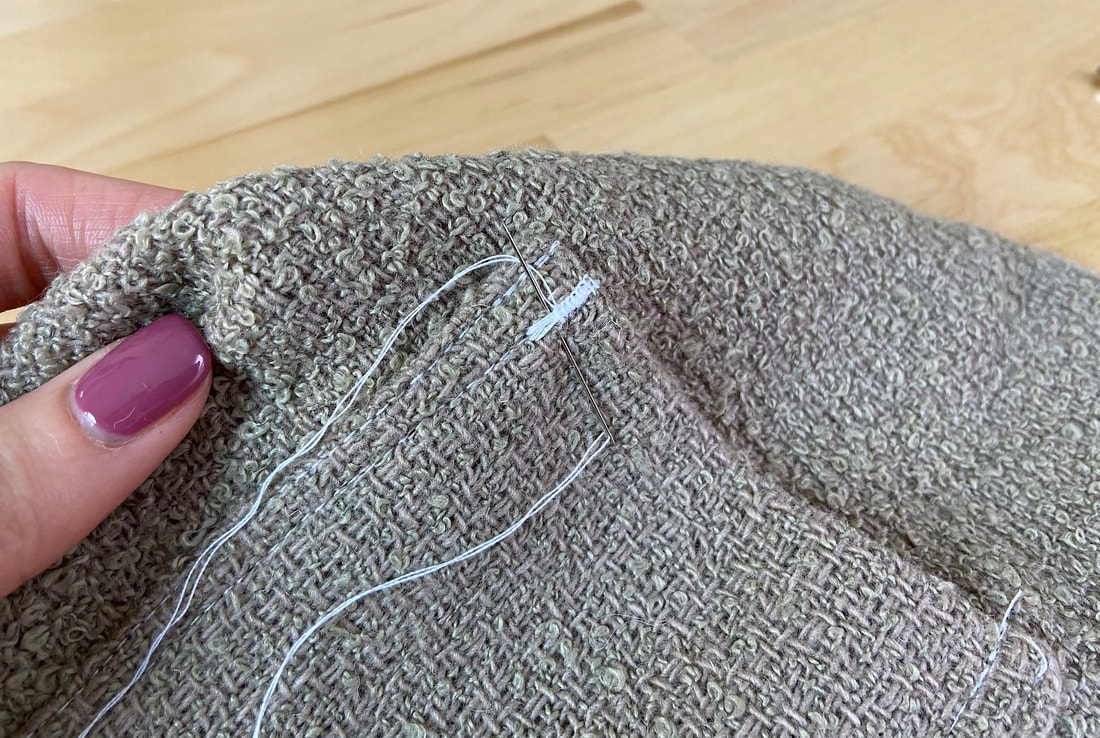
12. To further reinforce the pocket opening corners, add a bar tack, an arrowhead tack or a whipstitch to prevent them from coming undone with prolonged use. 

How To Sew A Patch Pocket With A Lining Extension

The concept is similar to the separate lining example described above, but in this case, the lining layer folds over itself at the top. Hence, the lining is always the same fabrics as the pocket layer. 
Picture
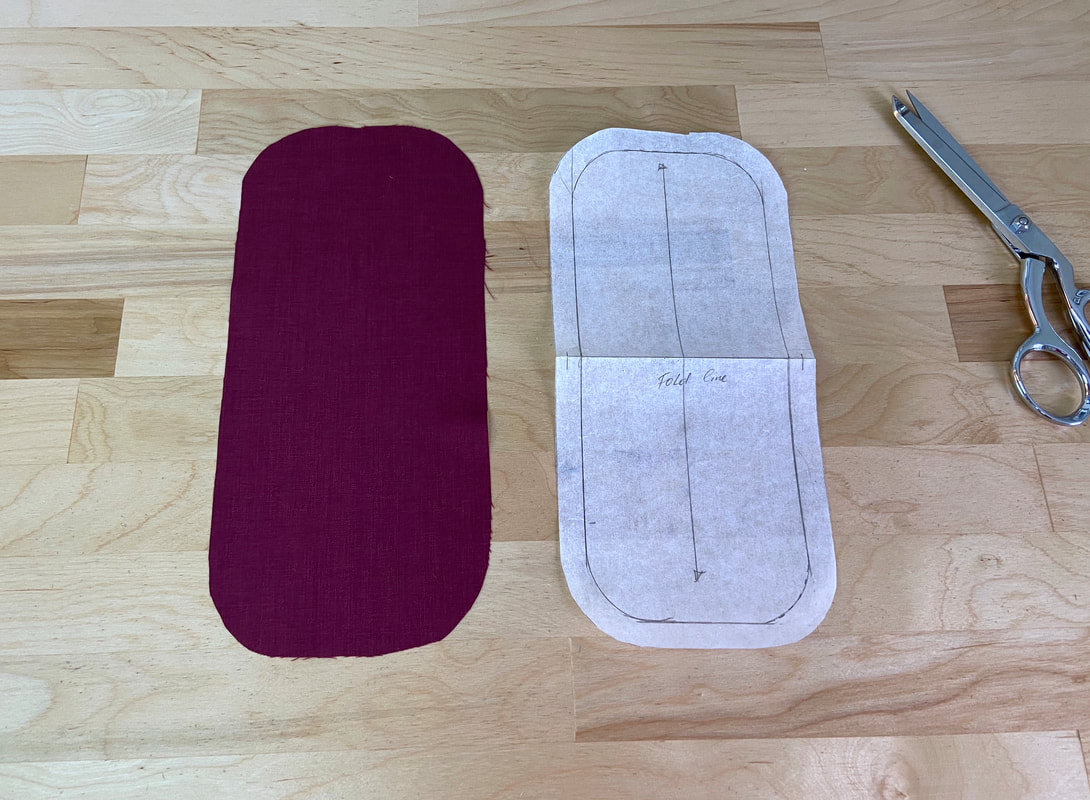
1. Start by cutting the pocket piece. The lining extension looks exactly like the pocket layer but is the mirror image of it across the top fold line. 
Picture
2. Fold the fabric with face sides touching, such that that all pocket and lining extension edges align. The fold created at the top corresponds to the pocket opening edge. 
Picture
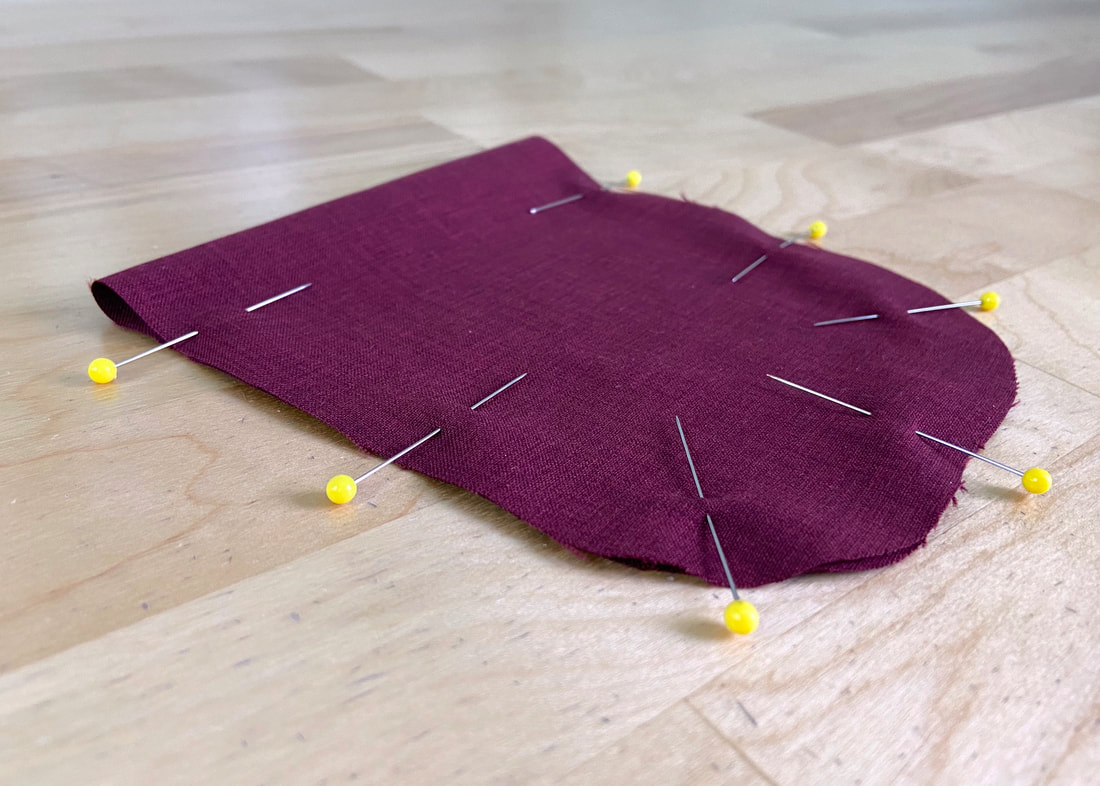
Insert pins perpendicularly along all edges as shown. 
Picture
Picture
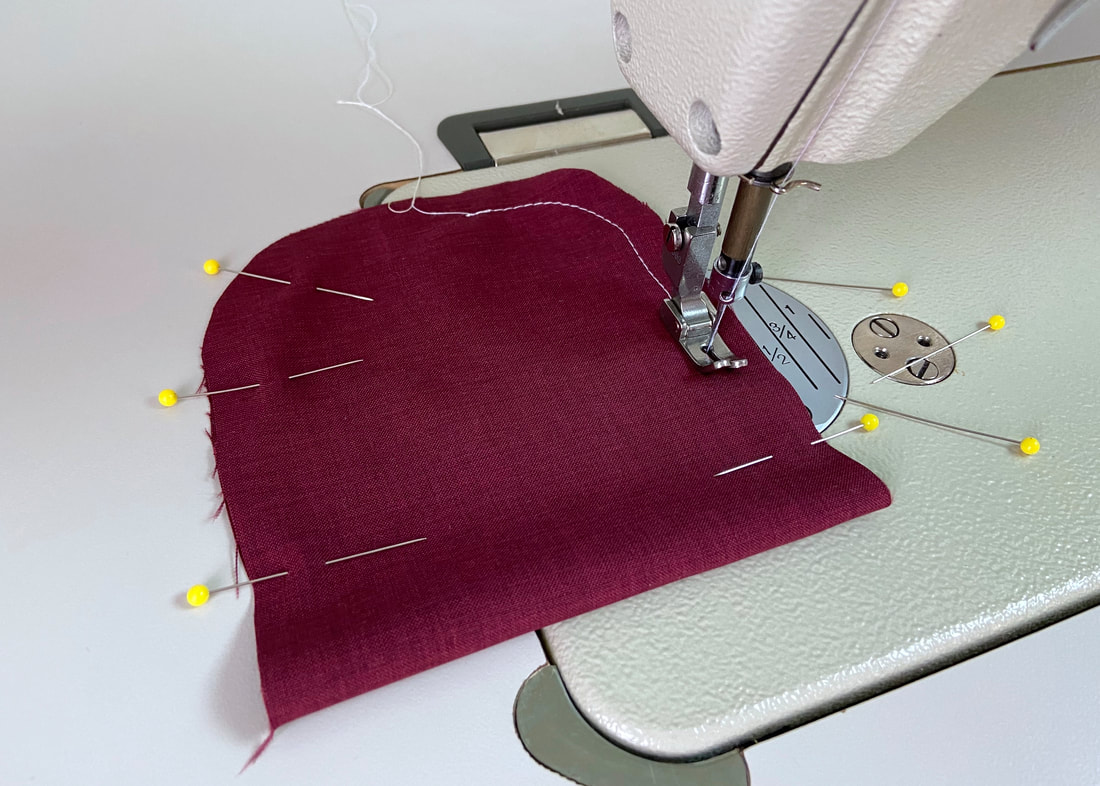
3. Follow the same stitching, trimming, notching and grading process described above. In this case, you can’t stitch across the top so you’ll have to stitch on each side and bottom half portions separately. Don’t forget to leave the 1.5” gap at the bottom. 
Picture
Trim the seam allowance excess and notch the top corners and curved bottom edge to minimize bulk and eliminate tension.
Picture
Picture
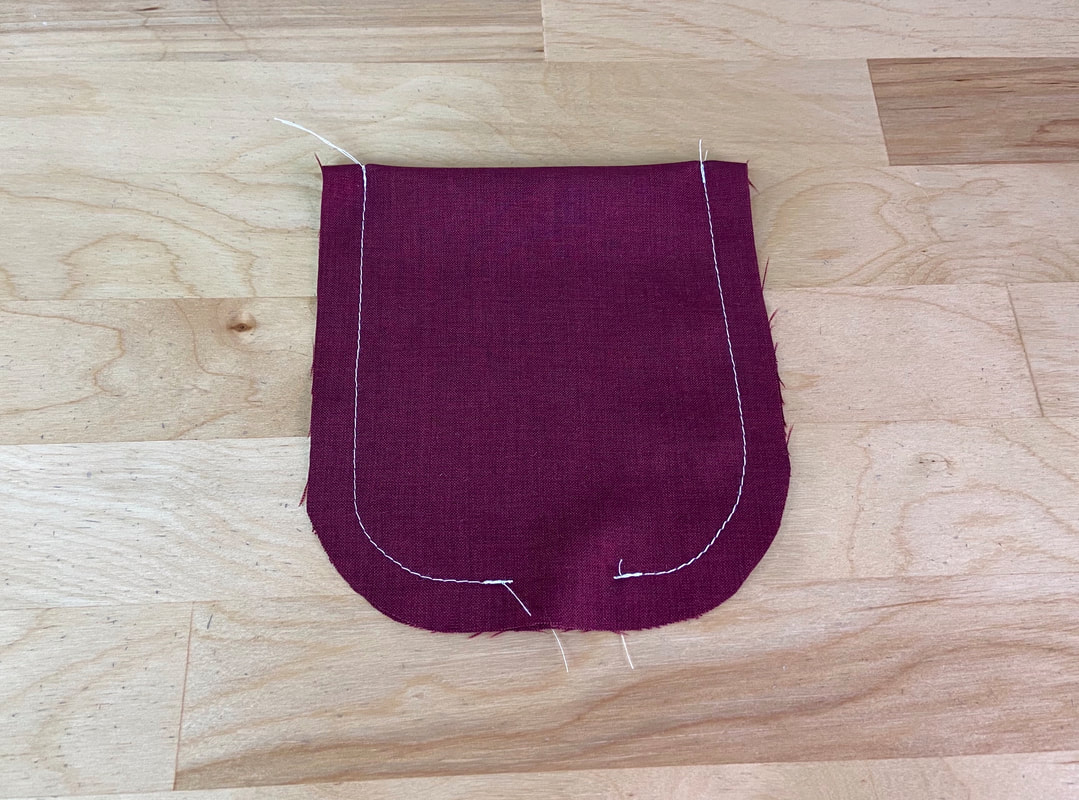
4. Once the pocket and lining layers are stitched and the seam allowances are fully trimmed/notched, bring all layers to their face side through the open gap at the bottom.
Picture
Picture
5. Iron all finished edges and slipstitch the bottom gap closed as described above. All pocket edges correspond to a seam except the top edge which is a simple fold.
Picture
6. Mark the shape and location of the patch pocket on the garment layer.
Picture
Picture
7. Align the pocket piece within the indicated lines. Pin perpendicularly along the side and bottom edges. 
Picture
Picture
8. Repeat the topstitching process described above to permanently sew the patch pocket to the fabric surface. Add a second row of topstitching if desired. 
Picture
9. Use a tacking, whipstitching or double stitching technique to reinforce the patch pocket’s top opening corners. 
In this case, a whipstitch is applied vertically across each corner as shown. 
To learn how to apply a variety of tacks, follow the steps in this tutorial: Hand-Applied Tack Stitches
Picture
Keep in mind that due to the missing top edge seam, a patch pocket with a folded lining extension is not as durable as one that is separately lined. When lined separately, the top stitch provides an extra layer of stability, while a simple fold risks stretching out and losing its shape over time. Nevertheless, this is a great pocket lining technique for most clothing items that are not designed for heavy duty use. 
DMCA.com Protection Status
All content, including images and text, may not be copied, replicated, or redistributed without express written permission. This website is regularly screened and monitored for content protection.

Have A Personalized Sewing Question?

Ask It Here

Services

​Custom Apparel
Custom Bridal
​Sewing Tutorials
​

Company

About
Blog

Support

Contact
Terms of Service
DMCA.com Protection Status
© COPYRIGHT 2022. ALL RIGHTS RESERVED.
  • Sewing Tutorials
    • Basics >
      • Aligning Pattern Grainlines To Fabric
      • Preparing Fabrics For Sewing
      • Pinning Sewing Patterns To Fabric
      • Placing Sewing Patterns On Fabric For Cutting
      • Rotary Cutters or Fabric Scissors?
      • Cutting The Sewing Patterns
      • What Are Notches And How To Use Them In The Sewing Process
      • Transferring Notches From Pattern To Fabric
      • Transferring Seamlines to Fabric
      • Staystitching
      • Backstitching: A Complete Guide
      • Hand Basting: A Complete Guide
      • Sewing Continuous Bias Binding
    • Darts >
      • Marking And Transferring Darts To Fabric
      • What Are Darts And Dart Components
      • Folding, Pinning And Hand Basting Darts
      • Handling Dart Excess: Bulk And Tension
      • How To Sew A French Dart
      • How To Sew And Iron Single Pointed Darts
      • How To Sew And Iron Contour Darts
      • Sewing Darts With Decorative/Beaded Fabrics
    • Sewing Seams >
      • ​The Basics Of Seams And Seam Allowance
      • How To Sew A Straight Seam
      • Sewing Curved Seams
      • Sewing Corner Seams
      • Trimming And Grading Seam Excess
      • Notching/Clipping Seam Allowance for Tension Release
      • Sewing Topstitched Seams
      • Sewing Corded Seams
      • Sewing A Slot Seam
      • Sewing A Gathered Seam
      • Sewing Bias Seams
      • Sewing Seams With Ease
      • Sewing Seams With Crossing Seamlines
      • Sewing Unlike Fabric Seams
      • How To Iron Seams: Ironing Tools And Conventions
      • Sewing With Knit Fabrics
      • Understanding Stitch Length And Tension
      • Sewing Unique Fabric Seams
    • Seam Finishes >
      • Seam Finishing Techniques - Overview
      • Applying A Pinked Seam Finish
      • Applying A Bias Bound Seam Finish
      • Serging And Zigzag Seam Finishes
      • Sewing A Self-Bound Seam Finish
      • Sewing A French Seam Finish
      • Sewing A Hong Kong Seam Finish
      • Sewing A Mock French Seam Finish
      • Sewing A Turned-and-Stitched Seam Finish
      • Sewing Overcast Hand-Applied Seam Finishes
      • Sewing A Flat Felled Seam
      • Sewing A Hairline Seam Finish
    • Hem Finishes >
      • Garment Hem Finishes: Overview
      • ​Sewing A Double Fold Hem Finish
      • Sewing A Single Fold Hem Finish
      • Sewing Bound Hem Finishes
      • Sewing An Exposed Double Layer Bound Hem
      • Sewing A Folded-Up Bound Hem with Pre-folded Binding
      • Sewing A Hong Kong Hem Finish
      • Sewing A Band Hem Finish
      • Sewing A Bias Faced Hem Finish
      • Sewing A Twill Tape Hem Finish
      • Sewing A Rolled Hem Finish
      • Sewing A Shaped Hem Facing
      • Using Fusible Hem Tape And Webbing
      • Finishing A Lace Fabric Hem
      • Finishing A Leather Hem
      • Sewing Faced Hem Corners
      • How To Finish Lining At The Hem
      • Finishing Fabric Corners by Mitering >
        • Mitering Fabric Corners With A Full Bias Facing
        • Mitering Fabric Corners With Exposed Binding
      • Interfacing A Hemline: Lined And Unlined Examples
    • Sewing Pockets >
      • Curved Patch Pocket With Flap
      • Unlined Square Patch Pockets
      • Lined Patch Pockets: Two Ways
      • Extension On-Seam Pockets
      • Separate On-Seam Pocket
      • Front Hip Pockets
      • Bound Double Welt Pocket
      • Double Welt Pocket With Flap
      • Self-Welt Pocket (Using Single Fabric Layer)
      • Slanted Welt Pocket (Hand-Stitched)
      • Faced Slash Pockets: Overview >
        • Sewing A Faced Slit Pocket
        • Sewing A Rectangular Slash Pocket
        • Sew A Star-Shaped Faced Pocket
    • Sewing Zippers >
      • Sewing Zippers: General Information
      • Sewing A Centered Zipper
      • Sewing A Lapped Zipper
      • Sewing An Invisible Zipper
      • Sewing A Fly Front Zipper
      • Sewing A Closed-End Exposed Zipper (No Seam)
      • Sewing An Exposed Separating Zipper
      • Sewing Hand Stitched Zipper Applications
      • Sewing A Zipper Underlay
      • Sewing A Placket-Enclosed Separating Zipper
    • Sleeveless Finishes >
      • Sleeveless Armhole Finishes: General Information
      • Finishing Sleeveless Garments with Lining
      • Sewing A Folded-Under Bound Armhole Finish
      • Sewing A Shaped Armhole Facing
      • Finishing Armhole Edges With Exposed Binding
      • Finishing Armhole Edges With Decorative Trim
    • Neckline Finishes >
      • Sewing A Neck Shaped Facing
      • Sewing An All-In-One Neck Facing
      • Neck And Garment Opening Combination Facings >
        • Sewing An Extended Front-Neck Facing
        • Sewing A Separate Neck-Front Facing
      • Sewing A Bias Faced Neckline Finish
      • Sewing A Band Neckline Finish
      • Bound Neckline Finishes: Overview >
        • Sewing A Single Layer Bound Neckline
        • Finishing A Neckline With Pre-Folded Binding
        • Sewing A Double Layer Bound Neckline Finish
      • Sewing A Semi-Stretch Strip Band Neckline
      • Ribbed Neck Band And Classic Turtleneck
      • Decorative Neckline Finishes >
        • Sewing A Neckline With Decorative Inset
        • Sewing A Piped Cording Faced Neckline
        • Sewing Decorative Trim To A Finished Neckline
    • Finishing Facing Edges >
      • Finishing Facing Edges: Overview
      • Folded-And-Topstitched Overedge Facing Finish
      • Sewing A Bound Facing Edge Finish
      • Sewing A Hong Kong Facing Finish
      • Sewing A Rolled Edge Facing Finish
      • Sewing A Twill Tape Facing Edge Finish
      • Sewing An Overedge-Stitch Facing Finish
    • Extras >
      • A Complete Guide on Interfacing
      • Sewing Bound Spaghetti Straps
      • Sewing Spaghetti Straps To A Faced Neckline
      • Sewing Ruffles: Overview
      • Patterning And Sewing A Circle Ruffle
      • Sewing A Gathered Heading Ruffle
      • Sewing Double Layer Gathered Ruffles
      • Sewing A Gathered Ruffle Into A Seam
      • Sewing A Gathered Ruffle To A Fabric Edge
      • Sewing A Fabric Surface Slit
      • Sewing A Slit Seam
      • Hand-Applied Straight Stitches
      • Hand-Applied Blind Stitches
      • Hand-Applied Overedge Stitches
      • Hand-Applied Tack Stitches
      • Hand-Applied Decorative Stitches
  • Custom Apparel
    • Custom Bridal
  • Submit A Sewing Question
  • About
  • Blog