Doina Alexei
  • Sewing Tutorials
    • Basics >
      • Aligning Pattern Grainlines To Fabric
      • Preparing Fabrics For Sewing
      • Pinning Sewing Patterns To Fabric
      • Placing Sewing Patterns On Fabric For Cutting
      • Rotary Cutters or Fabric Scissors?
      • Cutting The Sewing Patterns
      • What Are Notches And How To Use Them In The Sewing Process
      • Transferring Notches From Pattern To Fabric
      • Transferring Seamlines to Fabric
      • Staystitching
      • Backstitching: A Complete Guide
      • Hand Basting: A Complete Guide
      • Sewing Continuous Bias Binding
    • Darts >
      • Marking And Transferring Darts To Fabric
      • What Are Darts And Dart Components
      • Folding, Pinning And Hand Basting Darts
      • Handling Dart Excess: Bulk And Tension
      • How To Sew A French Dart
      • How To Sew And Iron Single Pointed Darts
      • How To Sew And Iron Contour Darts
      • Sewing Darts With Decorative/Beaded Fabrics
    • Sewing Seams >
      • ​The Basics Of Seams And Seam Allowance
      • How To Sew A Straight Seam
      • Sewing Curved Seams
      • Sewing Corner Seams
      • Trimming And Grading Seam Excess
      • Notching/Clipping Seam Allowance for Tension Release
      • Sewing Topstitched Seams
      • Sewing Corded Seams
      • Sewing A Slot Seam
      • Sewing A Gathered Seam
      • Sewing Bias Seams
      • Sewing Seams With Ease
      • Sewing Seams With Crossing Seamlines
      • Sewing Unlike Fabric Seams
      • How To Iron Seams: Ironing Tools And Conventions
      • Sewing With Knit Fabrics
      • Understanding Stitch Length And Tension
      • Sewing Unique Fabric Seams
    • Seam Finishes >
      • Seam Finishing Techniques - Overview
      • Applying A Pinked Seam Finish
      • Applying A Bias Bound Seam Finish
      • Serging And Zigzag Seam Finishes
      • Sewing A Self-Bound Seam Finish
      • Sewing A French Seam Finish
      • Sewing A Hong Kong Seam Finish
      • Sewing A Mock French Seam Finish
      • Sewing A Turned-and-Stitched Seam Finish
      • Sewing Overcast Hand-Applied Seam Finishes
      • Sewing A Flat Felled Seam
      • Sewing A Hairline Seam Finish
    • Hem Finishes >
      • Garment Hem Finishes: Overview
      • ​Sewing A Double Fold Hem Finish
      • Sewing A Single Fold Hem Finish
      • Sewing Bound Hem Finishes
      • Sewing An Exposed Double Layer Bound Hem
      • Sewing A Folded-Up Bound Hem with Pre-folded Binding
      • Sewing A Hong Kong Hem Finish
      • Sewing A Band Hem Finish
      • Sewing A Bias Faced Hem Finish
      • Sewing A Twill Tape Hem Finish
      • Sewing A Rolled Hem Finish
      • Sewing A Shaped Hem Facing
      • Using Fusible Hem Tape And Webbing
      • Finishing A Lace Fabric Hem
      • Finishing A Leather Hem
      • Sewing Faced Hem Corners
      • How To Finish Lining At The Hem
      • Finishing Fabric Corners by Mitering >
        • Mitering Fabric Corners With A Full Bias Facing
        • Mitering Fabric Corners With Exposed Binding
      • Interfacing A Hemline: Lined And Unlined Examples
    • Sewing Pockets >
      • Curved Patch Pocket With Flap
      • Unlined Square Patch Pockets
      • Lined Patch Pockets: Two Ways
      • Extension On-Seam Pockets
      • Separate On-Seam Pocket
      • Front Hip Pockets
      • Bound Double Welt Pocket
      • Double Welt Pocket With Flap
      • Self-Welt Pocket (Using Single Fabric Layer)
      • Slanted Welt Pocket (Hand-Stitched)
      • Faced Slash Pockets: Overview >
        • Sewing A Faced Slit Pocket
        • Sewing A Rectangular Slash Pocket
        • Sew A Star-Shaped Faced Pocket
    • Sewing Zippers >
      • Sewing Zippers: General Information
      • Sewing A Centered Zipper
      • Sewing A Lapped Zipper
      • Sewing An Invisible Zipper
      • Sewing A Fly Front Zipper
      • Sewing A Closed-End Exposed Zipper (No Seam)
      • Sewing An Exposed Separating Zipper
      • Sewing Hand Stitched Zipper Applications
      • Sewing A Zipper Underlay
      • Sewing A Placket-Enclosed Separating Zipper
    • Sleeveless Finishes >
      • Sleeveless Armhole Finishes: General Information
      • Finishing Sleeveless Garments with Lining
      • Sewing A Folded-Under Bound Armhole Finish
      • Sewing A Shaped Armhole Facing
      • Finishing Armhole Edges With Exposed Binding
      • Finishing Armhole Edges With Decorative Trim
    • Neckline Finishes >
      • Sewing A Neck Shaped Facing
      • Sewing An All-In-One Neck Facing
      • Neck And Garment Opening Combination Facings >
        • Sewing An Extended Front-Neck Facing
        • Sewing A Separate Neck-Front Facing
      • Sewing A Bias Faced Neckline Finish
      • Sewing A Band Neckline Finish
      • Bound Neckline Finishes: Overview >
        • Sewing A Single Layer Bound Neckline
        • Finishing A Neckline With Pre-Folded Binding
        • Sewing A Double Layer Bound Neckline Finish
      • Sewing A Semi-Stretch Strip Band Neckline
      • Ribbed Neck Band And Classic Turtleneck
      • Decorative Neckline Finishes >
        • Sewing A Neckline With Decorative Inset
        • Sewing A Piped Cording Faced Neckline
        • Sewing Decorative Trim To A Finished Neckline
    • Finishing Facing Edges >
      • Finishing Facing Edges: Overview
      • Folded-And-Topstitched Overedge Facing Finish
      • Sewing A Bound Facing Edge Finish
      • Sewing A Hong Kong Facing Finish
      • Sewing A Rolled Edge Facing Finish
      • Sewing A Twill Tape Facing Edge Finish
      • Sewing An Overedge-Stitch Facing Finish
    • Extras >
      • A Complete Guide on Interfacing
      • Sewing Bound Spaghetti Straps
      • Sewing Spaghetti Straps To A Faced Neckline
      • Sewing Ruffles: Overview
      • Patterning And Sewing A Circle Ruffle
      • Sewing A Gathered Heading Ruffle
      • Sewing Double Layer Gathered Ruffles
      • Sewing A Gathered Ruffle Into A Seam
      • Sewing A Gathered Ruffle To A Fabric Edge
      • Sewing A Fabric Surface Slit
      • Sewing A Slit Seam
      • Hand-Applied Straight Stitches
      • Hand-Applied Blind Stitches
      • Hand-Applied Overedge Stitches
      • Hand-Applied Tack Stitches
      • Hand-Applied Decorative Stitches
  • Custom Apparel
    • Custom Bridal
  • Submit A Sewing Question
  • About
  • Blog

Dressmaking: 3 Types Of Topstitched Seams And How To Sew Them

A topstitched seam is, for the most part, decorative in nature. In many instances however, it does also offer significant functionality. 
Picture
As you might have guessed by its name, topstitching is applied on the fabric surface, and is always visible on the face of the garment.
Conventionally, topstitching is added to either both or a single side of the seam catching the seam allowance layer(s) underneath. This type of surface stitching can be used to visually isolate a seamline and/or provide visual interest to the garment overall.
Picture
While mostly aesthetic in its purpose, topstitching can also be used to permanently keep seam allowances pointing in a desired direction. It conveniently also adds an extra layer of durability to a seam. 
Using topstitching as a way to permanently keep seam allowance down is one of the best ways to maintain seam structure in a garment designated for regular machine washing and long term wear. While directionally ironing seam allowance will achieve the same results, pressing alone will not withstand continuous machine washing cycles. As a result, you may have to iron the seam allowance again after each wash. If you find yourself in this scenario, topstitching is a great way to avoid the issue. 
Picture
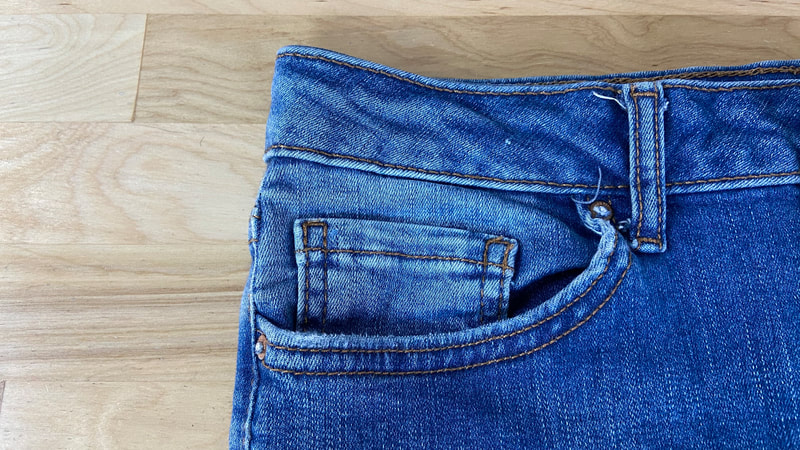
Design wise, topstitching adds a more casual, sporty look to a garment. For that reason, it is very commonly used with outerwear, activewear, casual sportswear and denim. That’s because as noted above, topstitching is a great tool for keeping seams flat, thus reducing bulk and increasing durability. This is especially helpful with garments that have a higher number of intersecting seams. 
A topstitched seam is a fairly simple application especially once you get a little practice under your sleeve. 
Given that topstitching is usually added in relation to a seam, the seamline provides a convenient guide in the sewing process. ​
Before you take a closer look at sewing three of the most common topstitching styles, here are a few basic concepts to keep in mind as you delve deeper into learning this functional yet decorative stitch:
Picture
  • Topstitching is applied from the face of the garment where the right side of the seamline can be followed in the stitching process.
Picture
  • Prior to topstitching, the seam and its seam allowance should always be ironed in the appropriate/desired direction. 
Picture
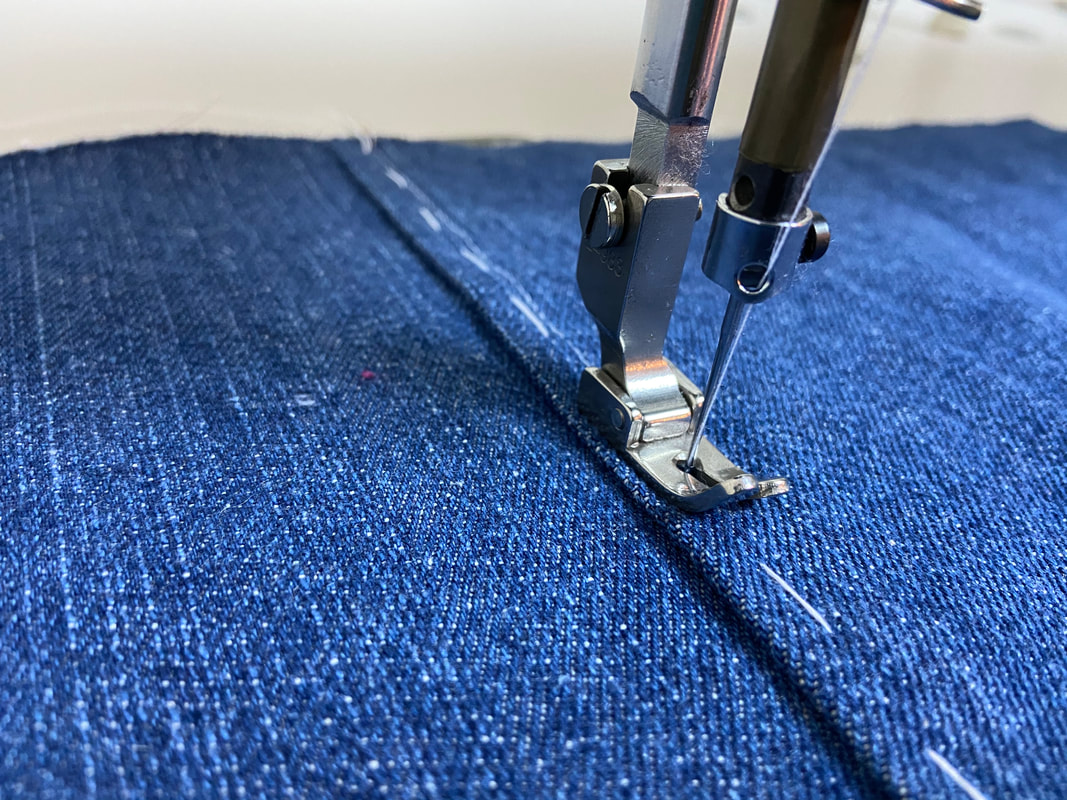
  • When topstitching, the regular seam allowance guides on your sewing machine will not be visible in the process thus you cannot follow them as you would with a regular seam. Alternatively, use either basting, masking tape or the edge of the presser foot as a topstitching guide. As you become more advanced, you will actually be able to topstitch evenly just by using the garment seamline alone without the need for a separate guide.
Picture
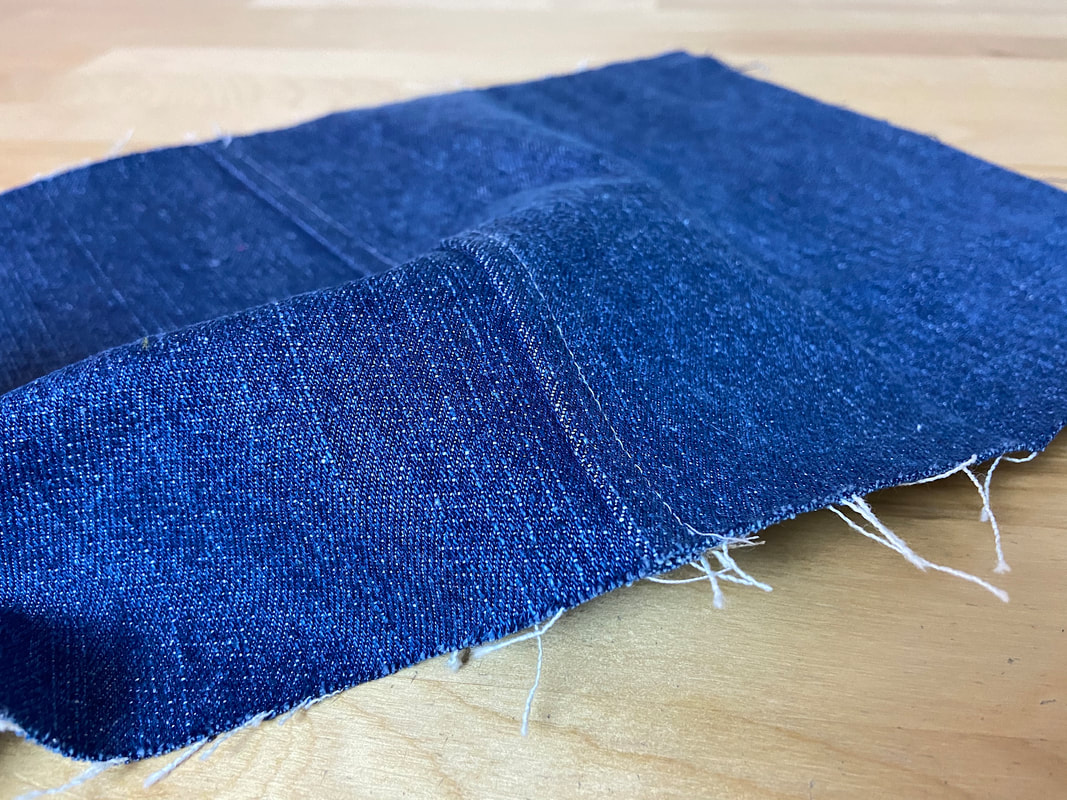
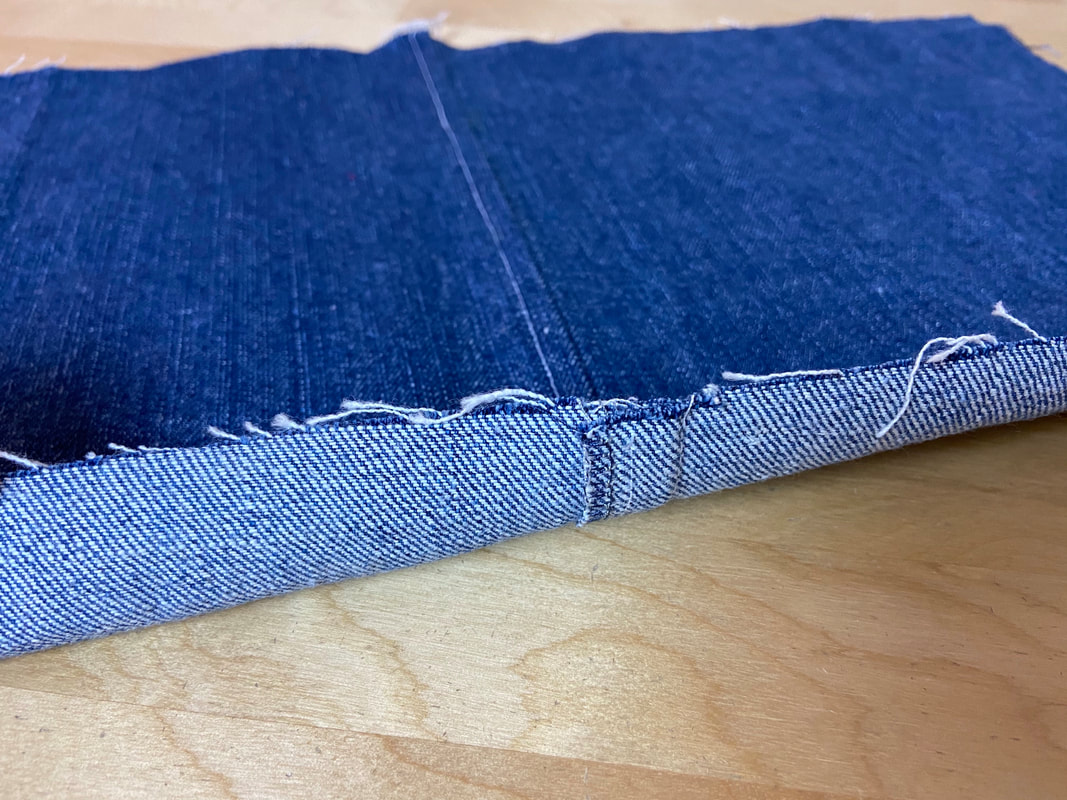
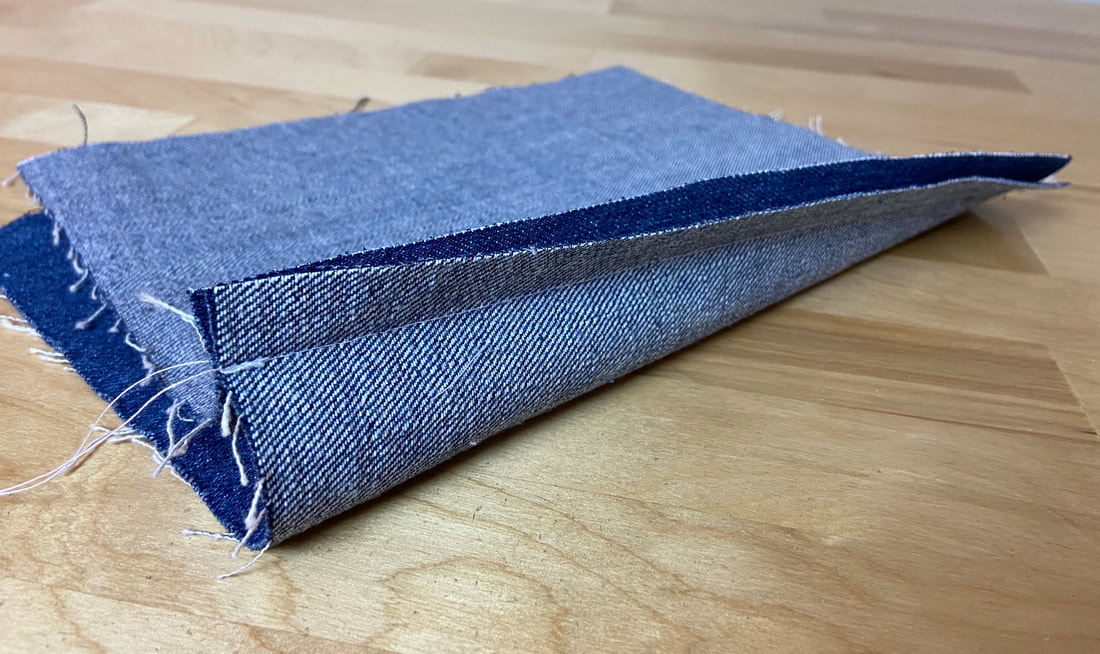
  • Grading will most likely be necessary when topstitching seam allowance layers to a single side. Such is the case when sewing a welt seam for example (shown below). In this instance, the hidden seam allowance layer is trimmed prior to pressing and finally topstitching the seam. 
Picture
  • Unless you work with crisp, structured fabrics, just ironing the seam allowance may not be enough to hold the layers flat during topstitching. Fabrics that are flimsy and difficult to iron will need to be pinned and/or hand basted in preparation for topstitching- more on this process below. 
Picture
  • The raw seam allowance edges will need to be clean finished either together or separately prior to ironing and topstitching them. The most universal finishing technique is an overedge stitch like zigzag or serging. 
For additional options, check out some of these seam finishing techniques: Seam Finishes

Sewing A Welt Seam (Topstitching On One Side Of The Seam)

Picture
1. Sew a regular seam following conventional seam stitching rules. Follow the steps in this tutorial to sew a straight seam: How To Sew A Straight Seam
Picture
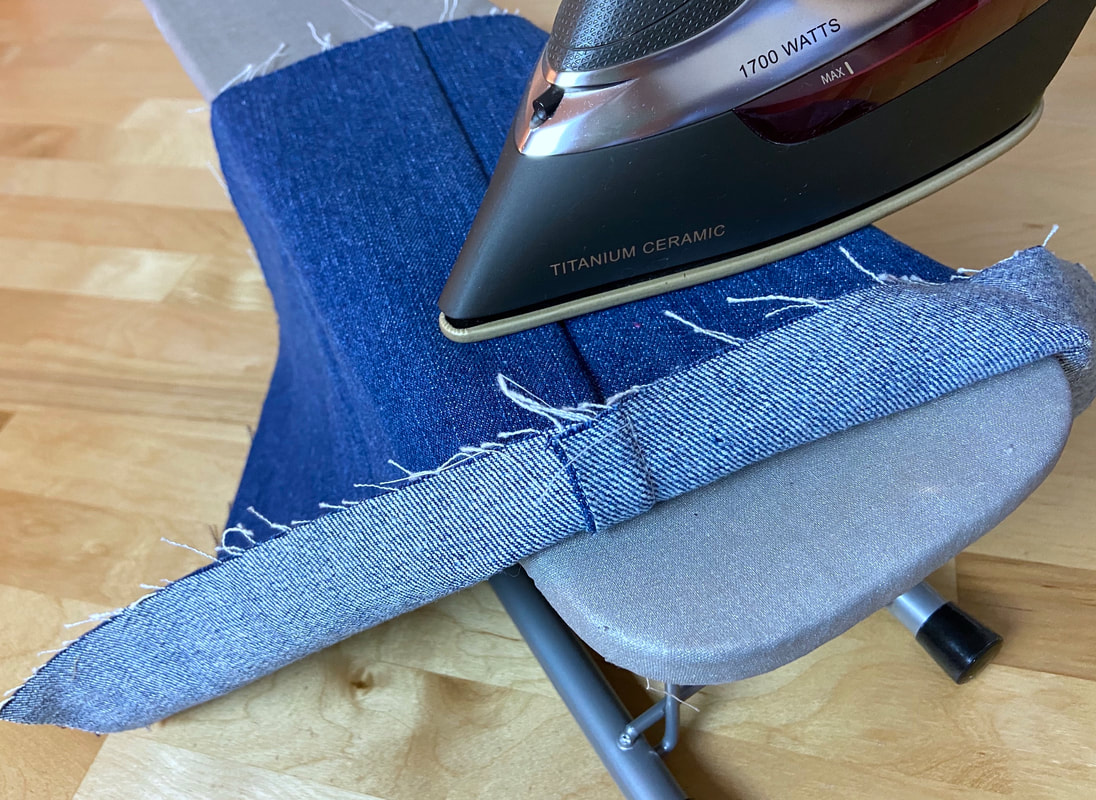
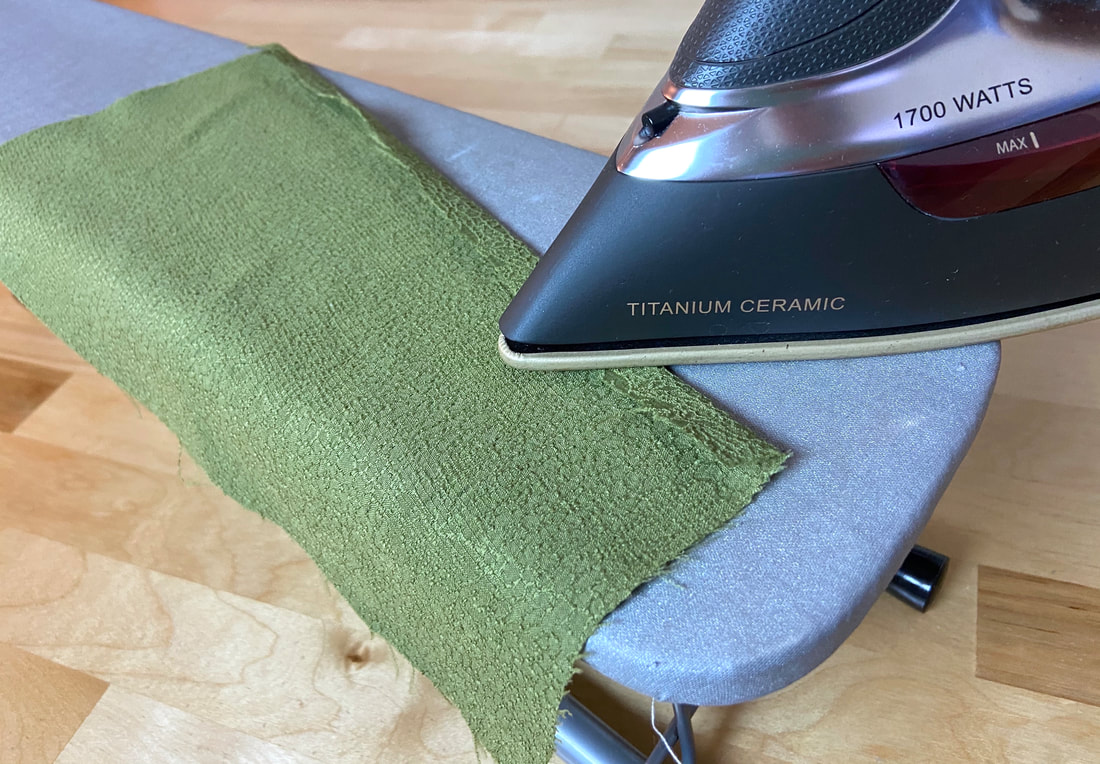
2. Decide which side of the seamline you’d like to place the topstitching. Iron the seam with the seam allowance pointing in this direction. 
You will find that ironing the seam allowance in a single direction is easiest to achieve from the face of the seam. For heat sensitive fabrics, always use a protective cloth in the ironing process.
Picture
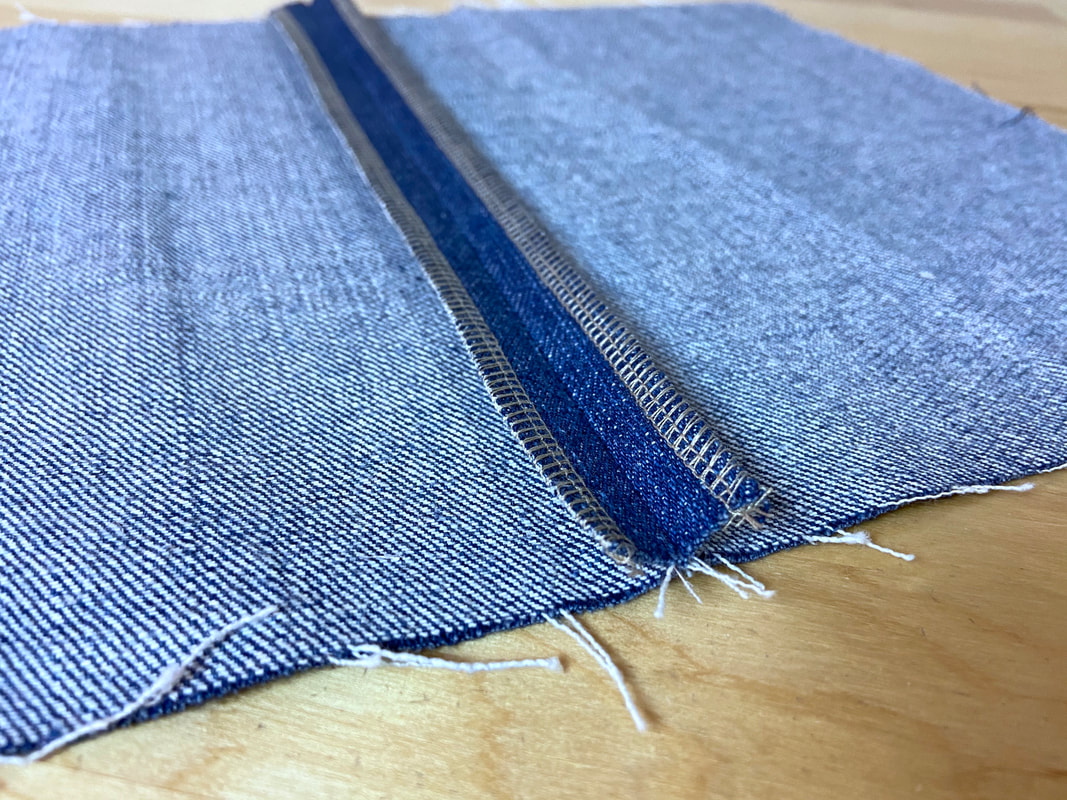
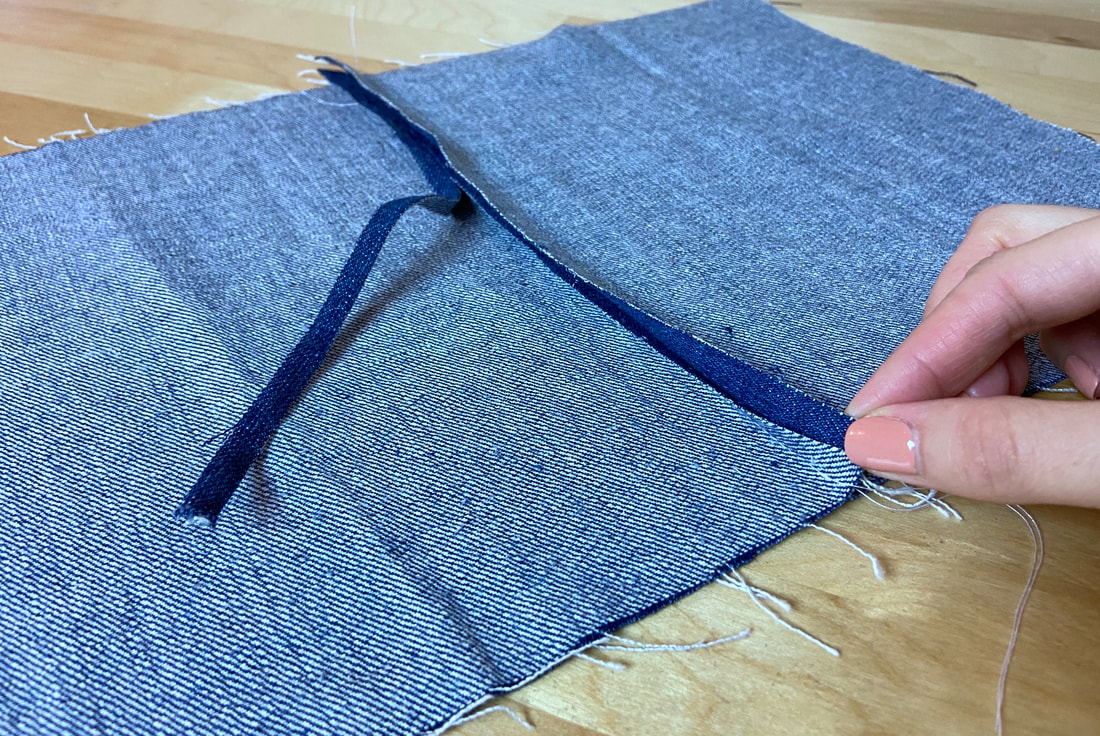
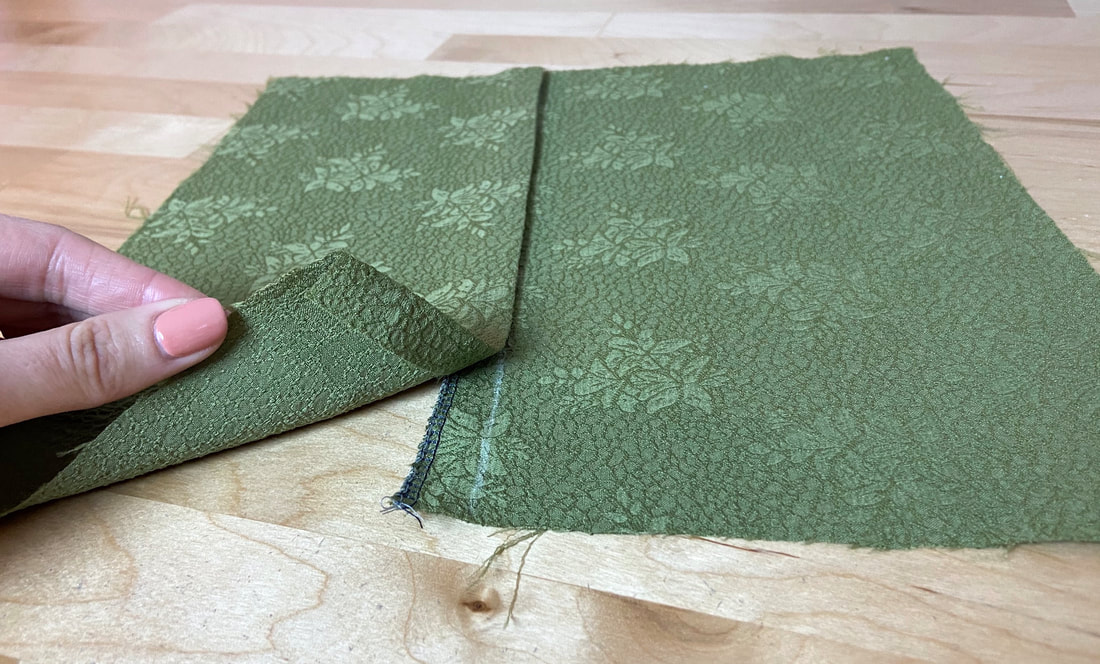
3. Trim the seam allowance layer located underneath the other to about ¼”, or half the seam allowance width. 
Picture
4. Clean finish the top seam allowance layer (untrimmed layer) with an overedge stitch or any other method appropriate for your fabric. ​
Picture
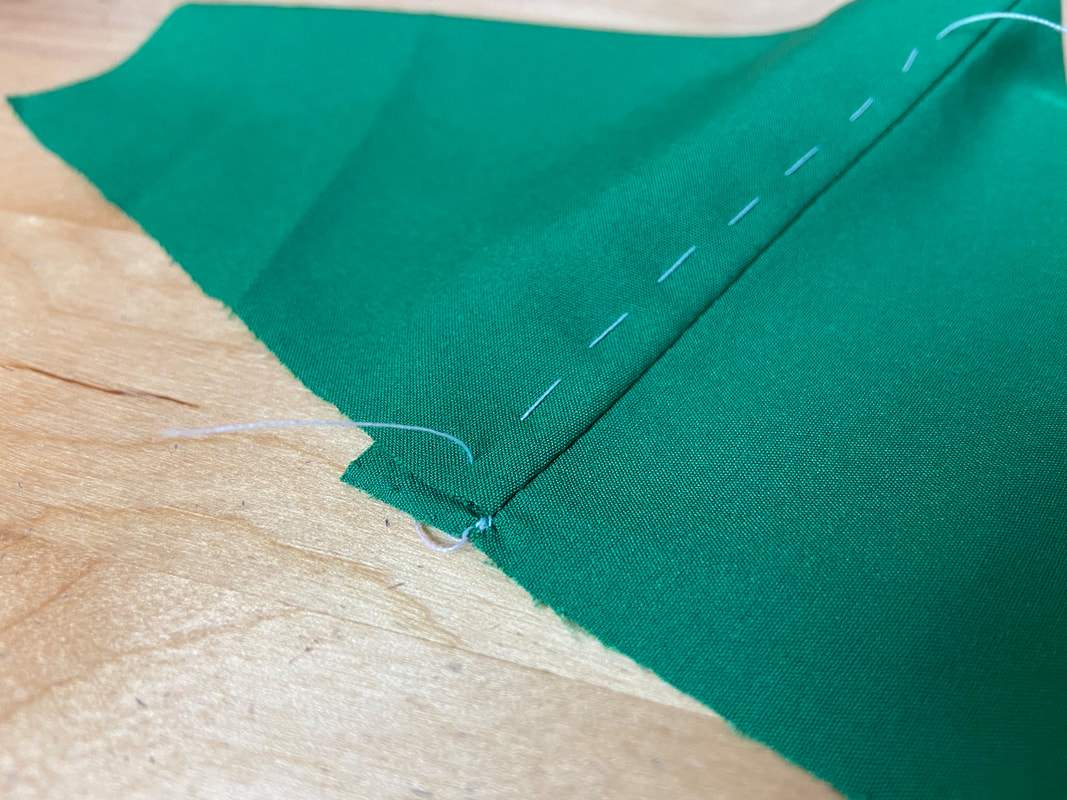
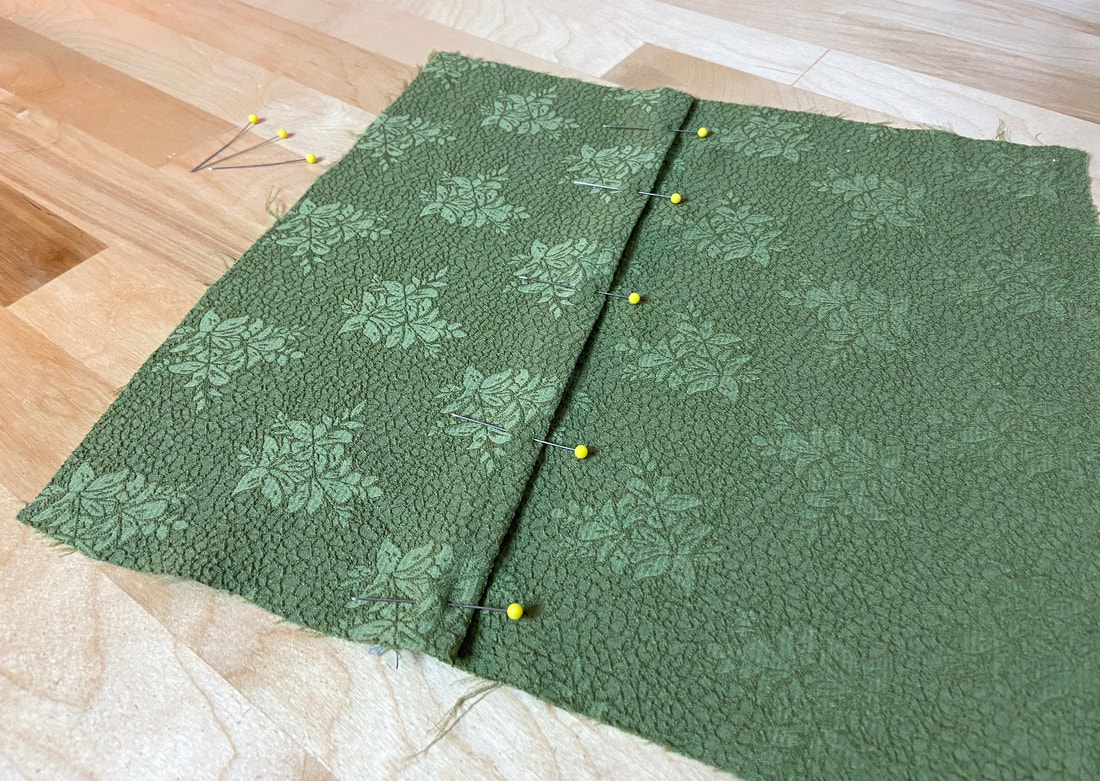
5. From the right side of the garment, insert a few pins horizontally along the seam, catching the seam allowance layers underneath. 
Picture
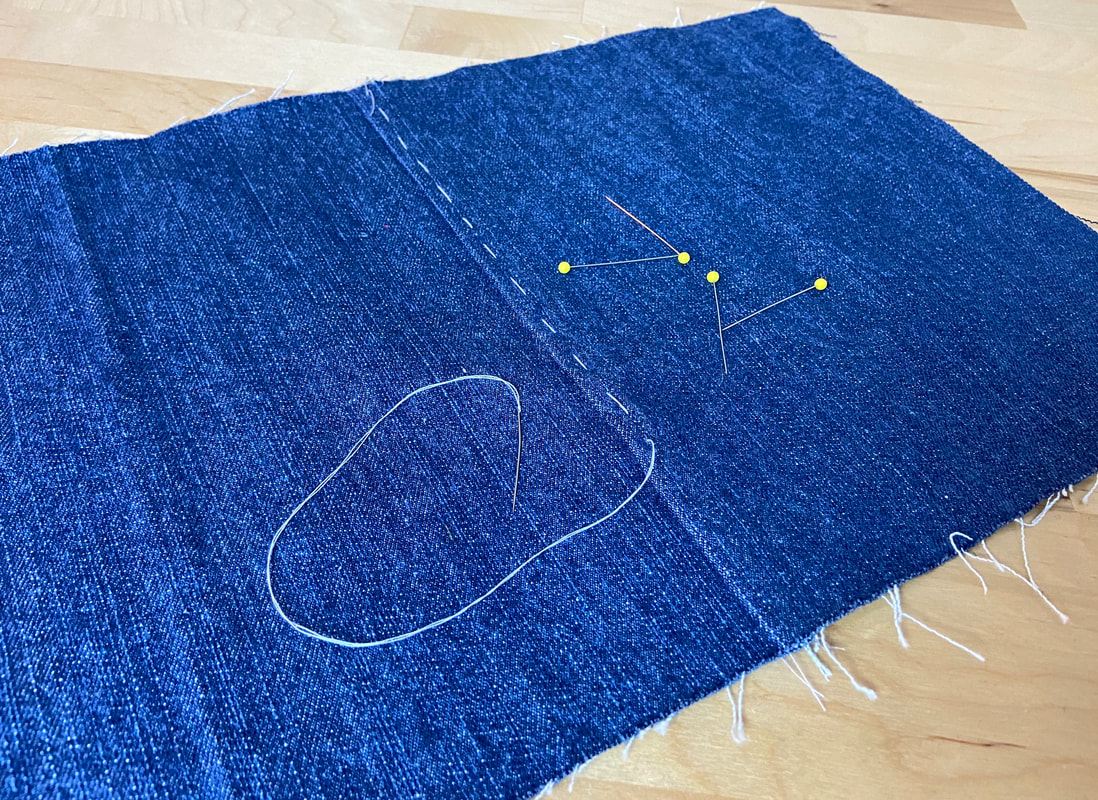
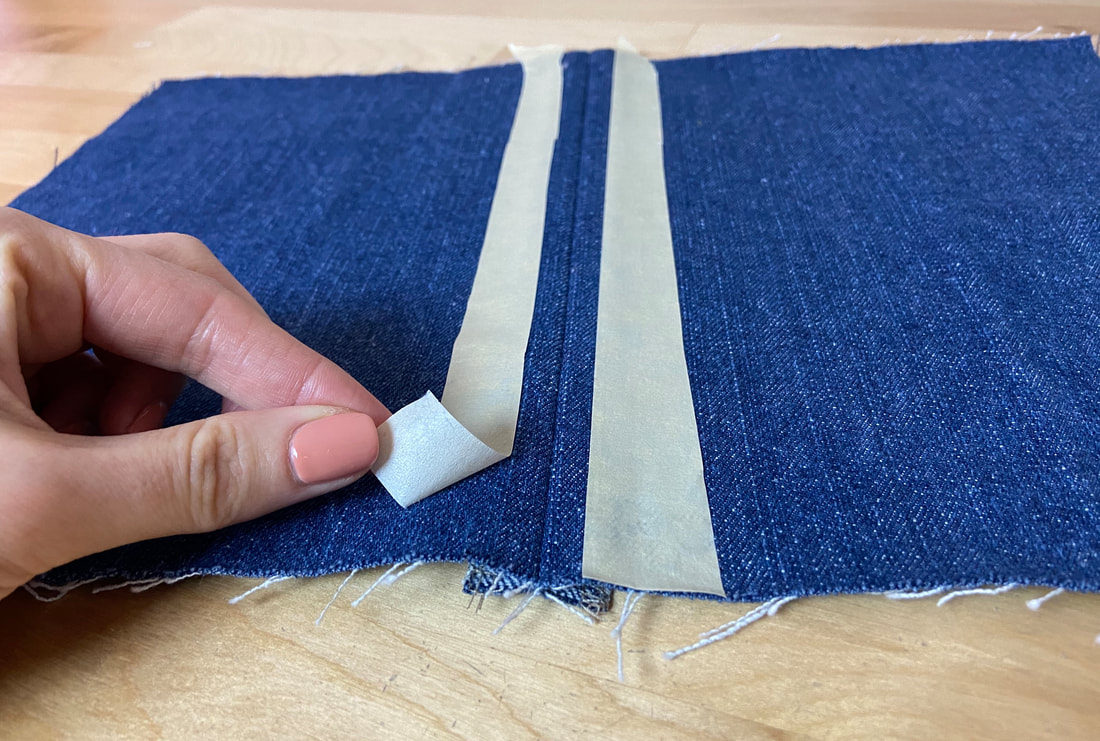
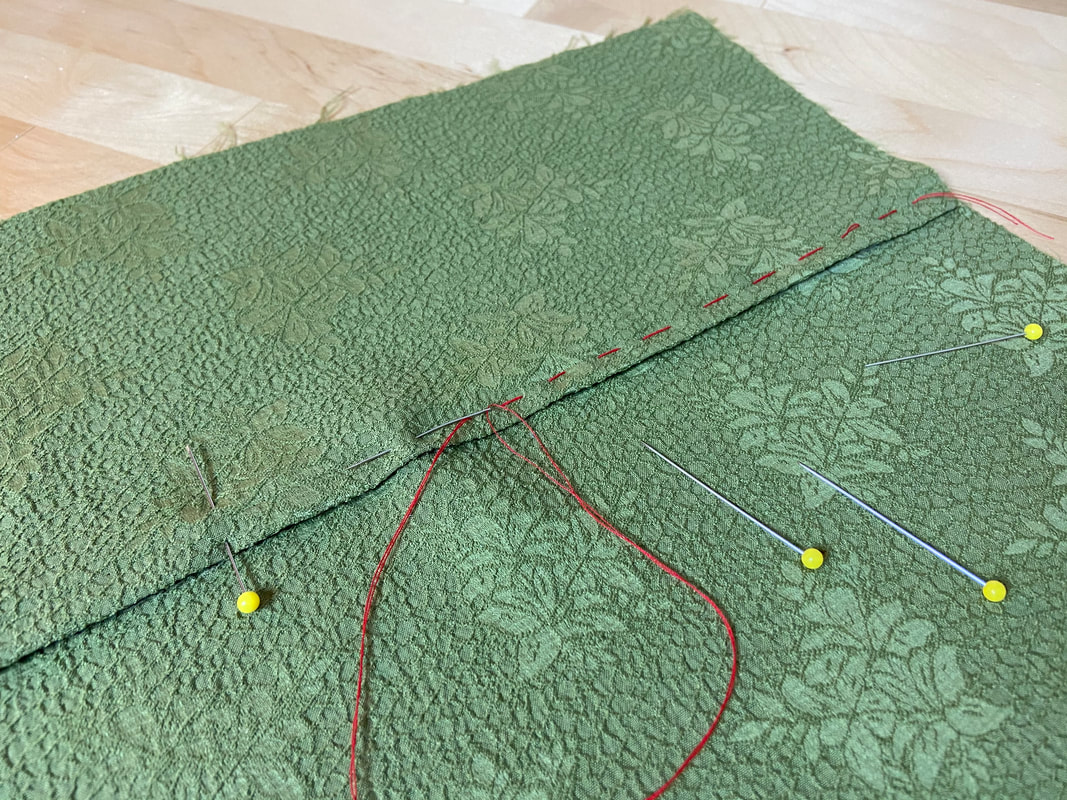
6. At this point, you can use masking tape or a simple hand basting stitch to mark the topstitch line directly on the fabric surface. If using a basting stitch, remove the pins as they will no longer be needed. 
​If you feel completely comfortable stitching on your sewing machine, you can skip the marking step altogether and simply use the edge of your presser foot to guide you through the topstitching process.
Picture
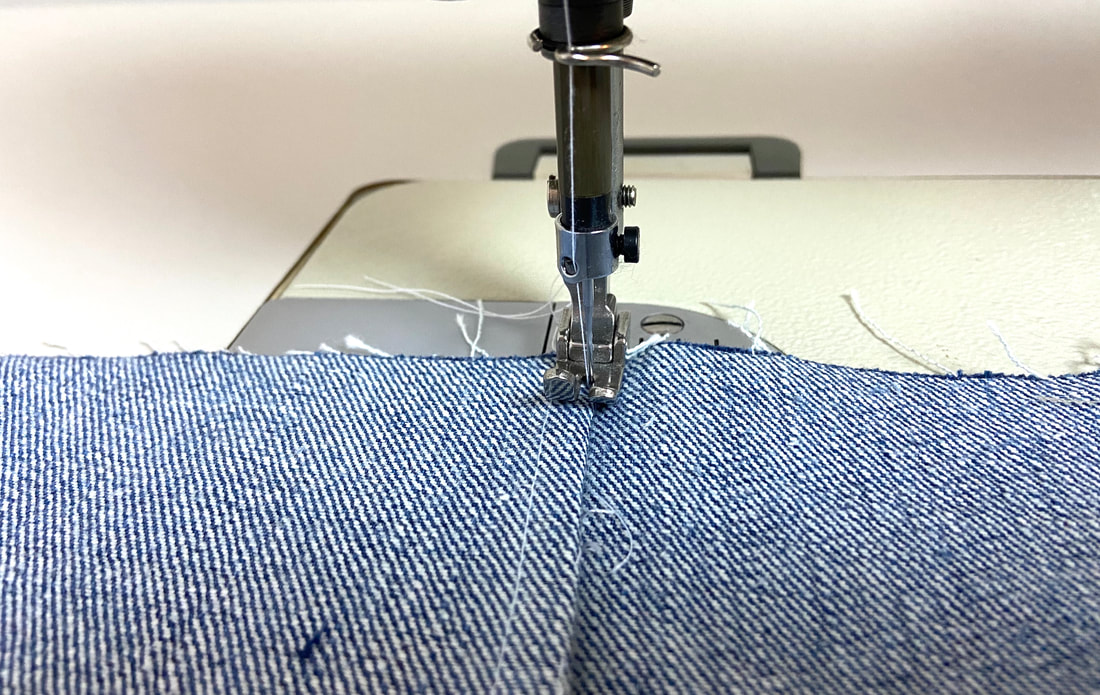
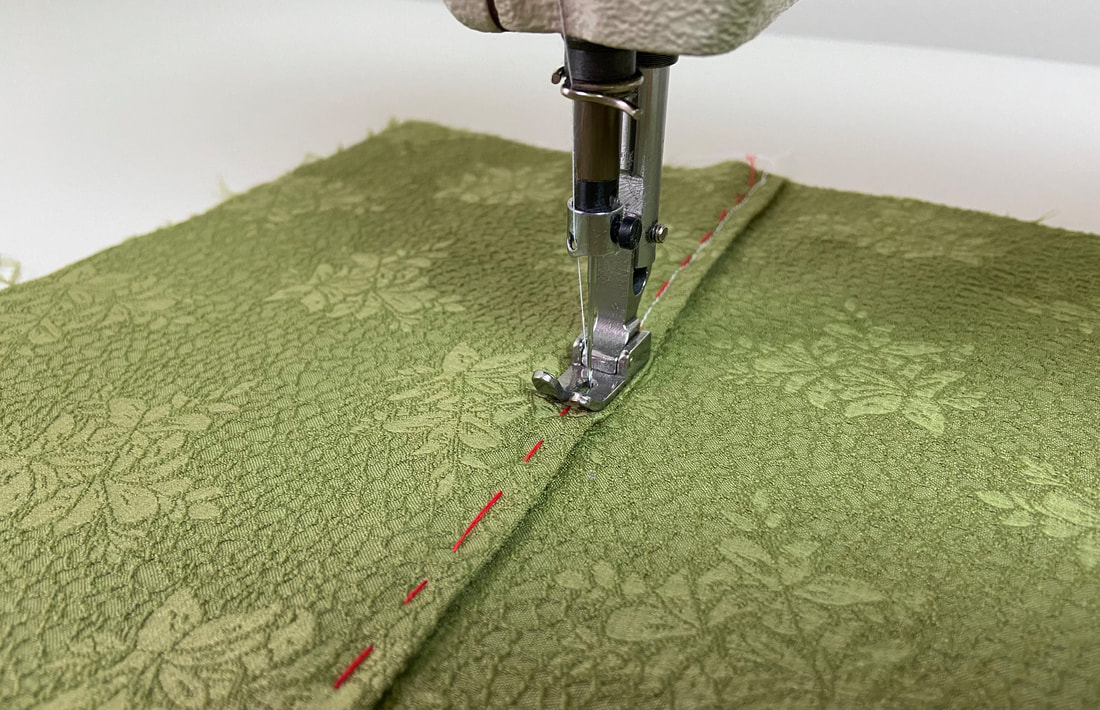
7. Working on the face side, topstitch along the seamline, catching the seam allowance layers underneath. Keep your topstitching as evenly positioned from the seam as possible. 
Picture
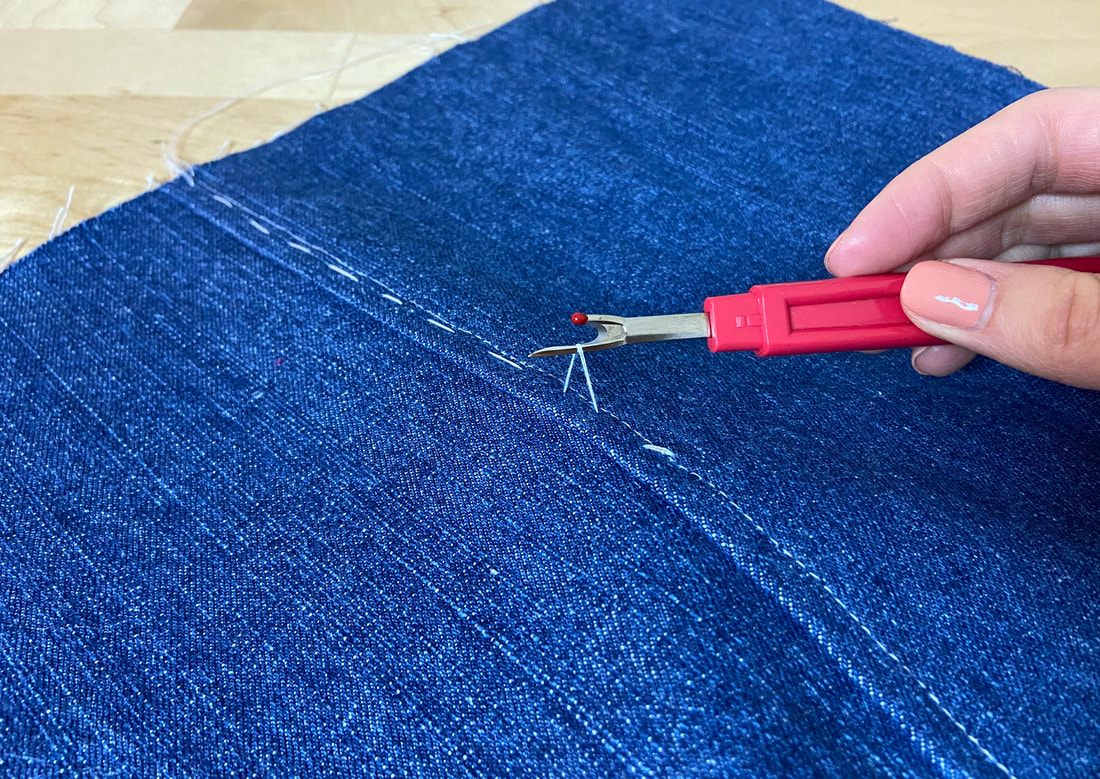
Remove the hand basting at this point. 
Picture
8. To complete, press the finished topstitched seam in the direction the stitching was applied. 
Picture
Note: You can also fold the longer seam allowance edge over the trimmed one to enclose it for a cleaner look. This finish however, requires the topstitching to be applied from the wrong side of the seam as opposed to its right side as shown above. 

Topstitching On Both Sides Of The Seam

Picture
1. Sew a seam following standard seam stitching rules: face sides touching and following the designated seam allowance. 
Picture
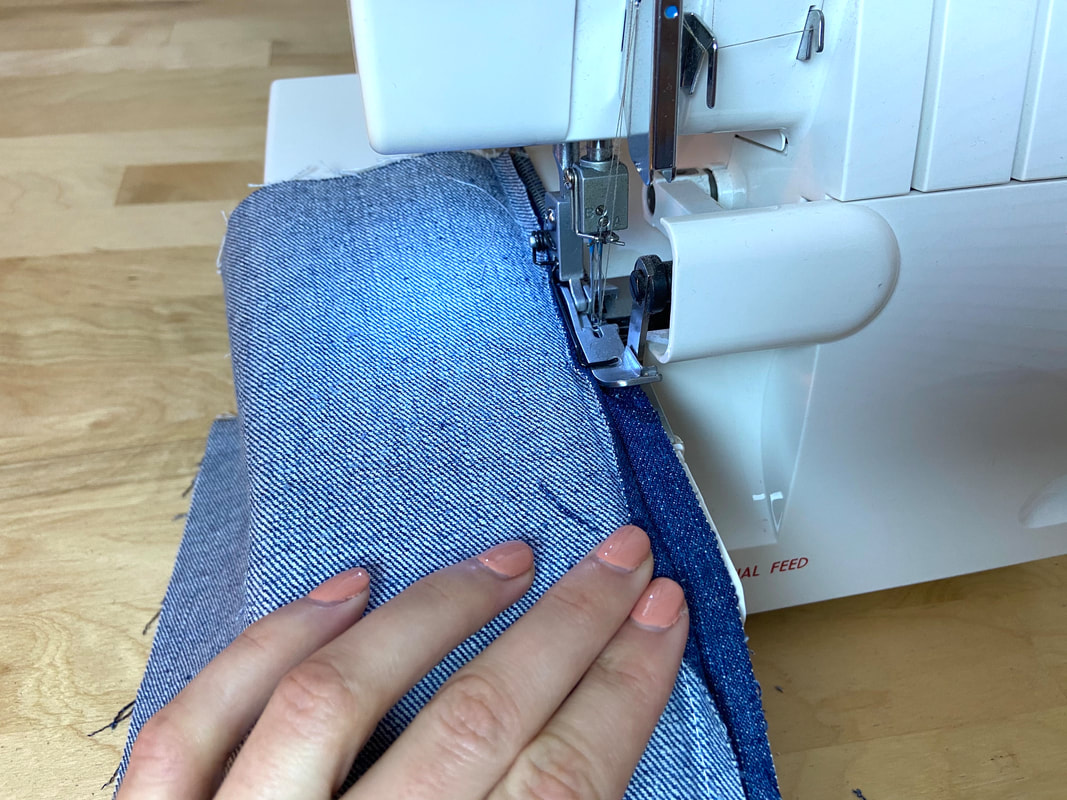
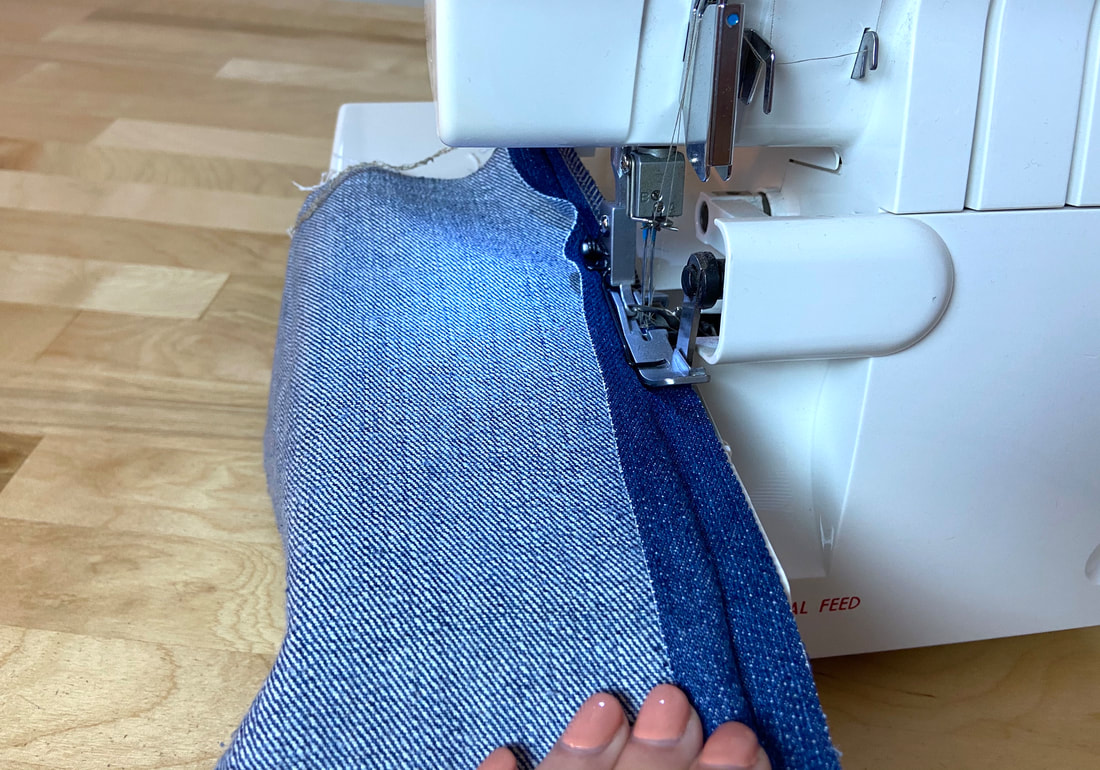
2. Clean finish each seam allowance edge individually. For a fast, effective finish, use a zigzag or overlock stitch. For detailed steps on applying these overedge stitches, check this seam finishing tutorial: Serging And Zigzag Seam Finishes
Picture
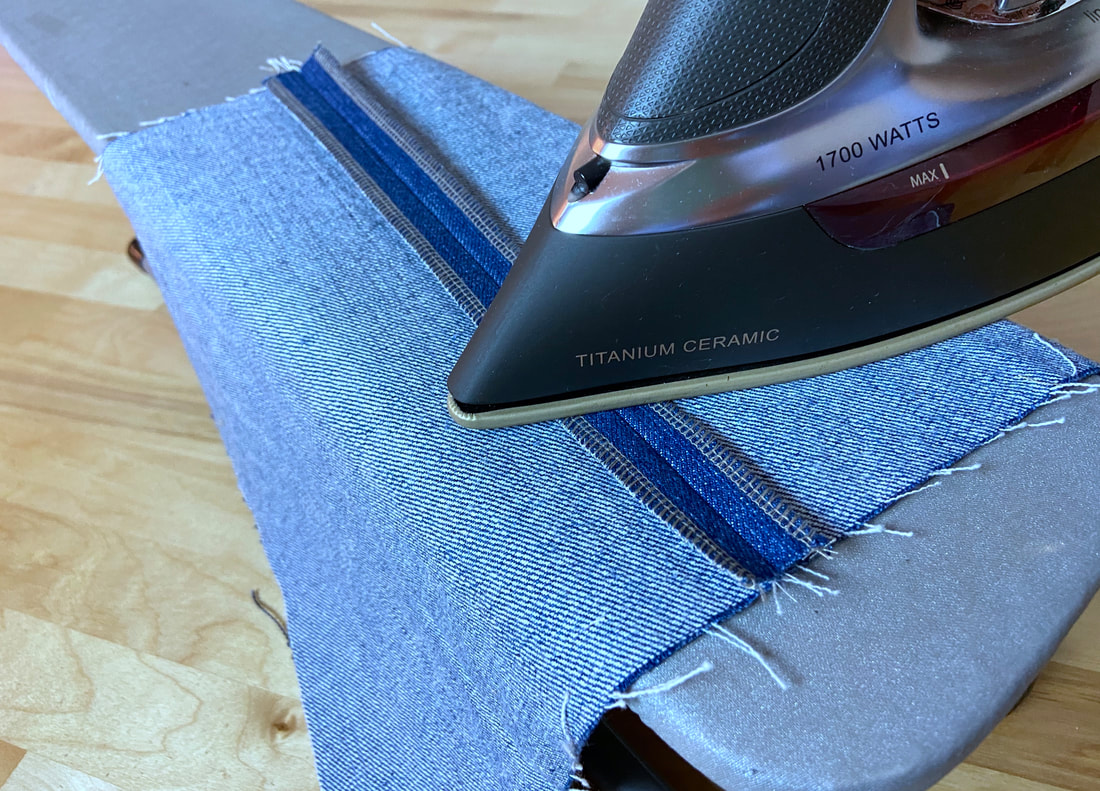
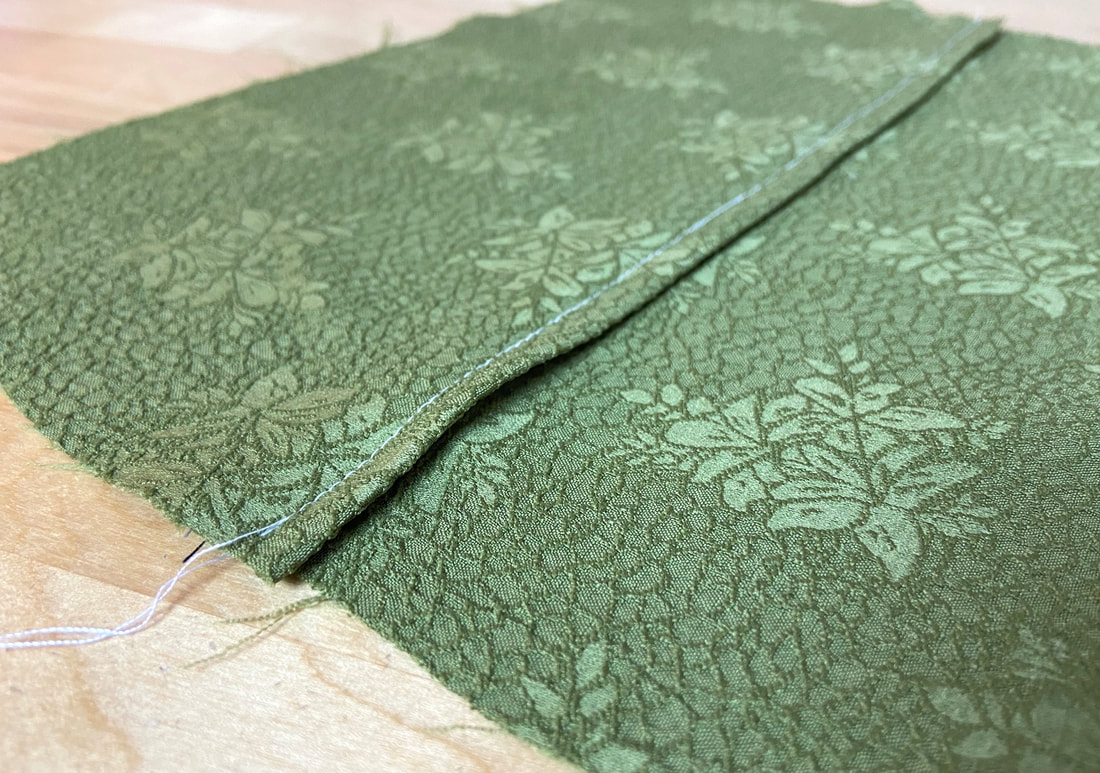
3. Press the stitch in the direction it was applied, then iron the seam with the seam allowance open as shown. 
Picture
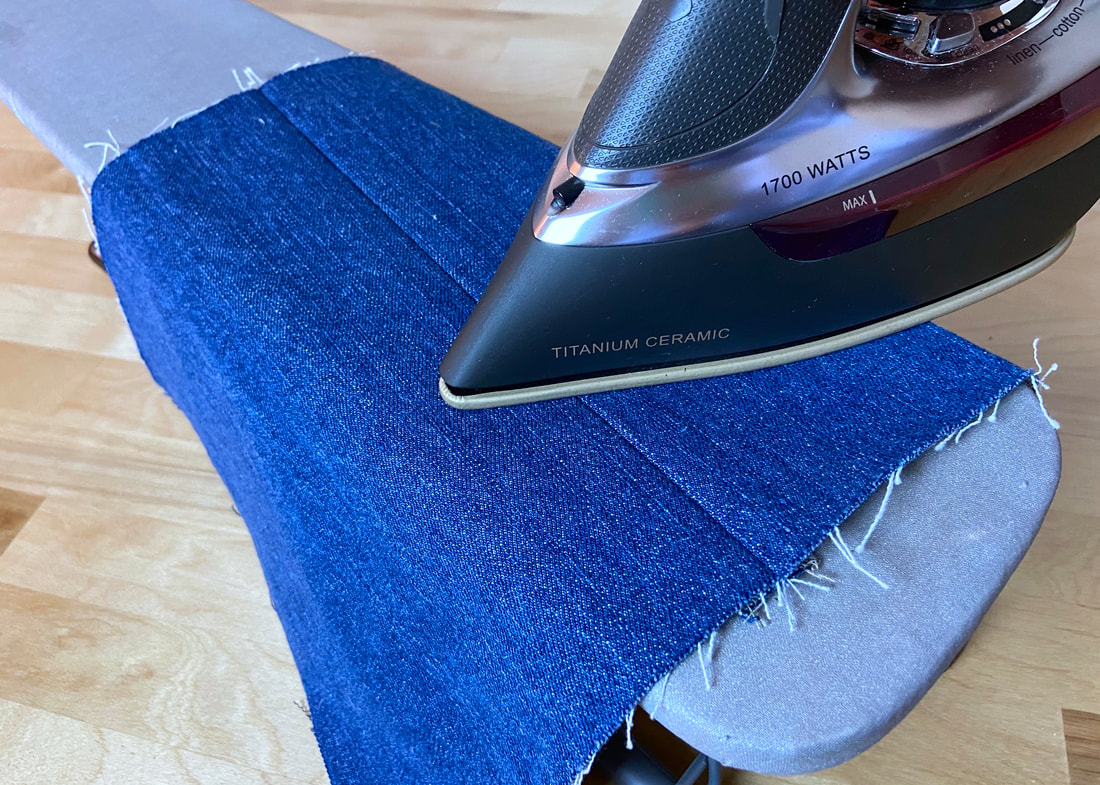
Iron on the wrong side of the seam first, then on the face of the seam again to flatten it. Use a protective cloth in the ironing process if needed. ​
Picture
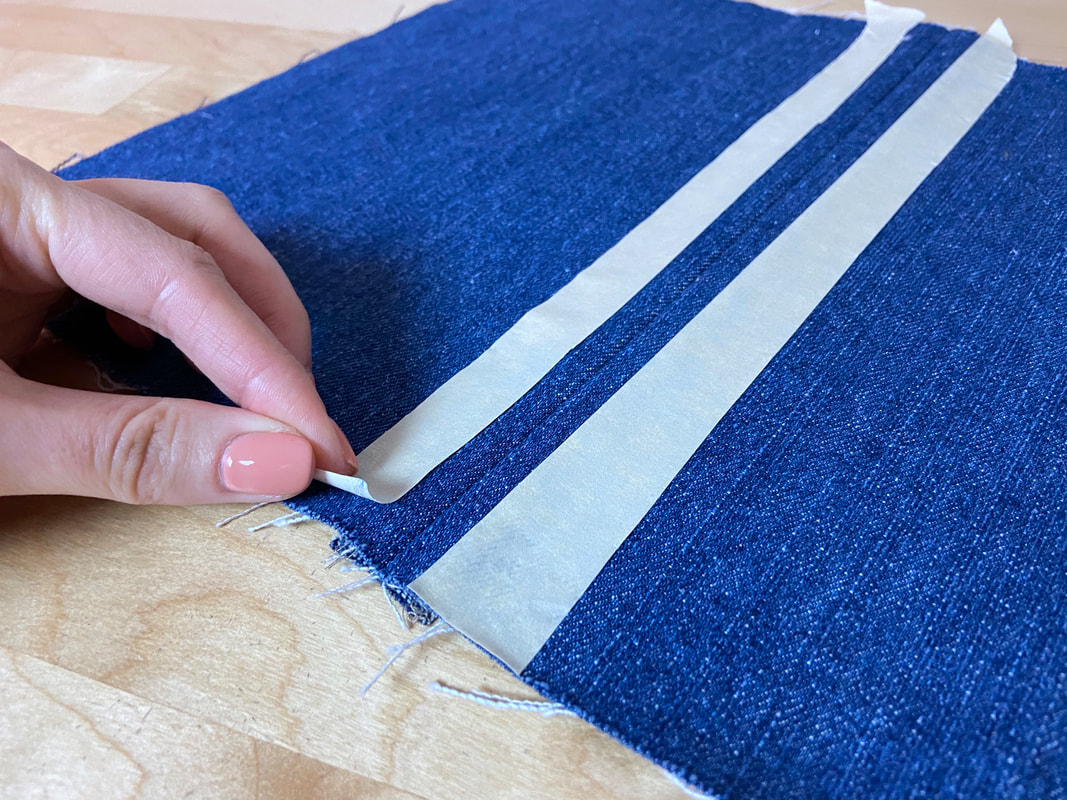
​If you do not feel comfortable with your sewing machine yet, use masking tape to mark the desired topstitch location. 
Picture
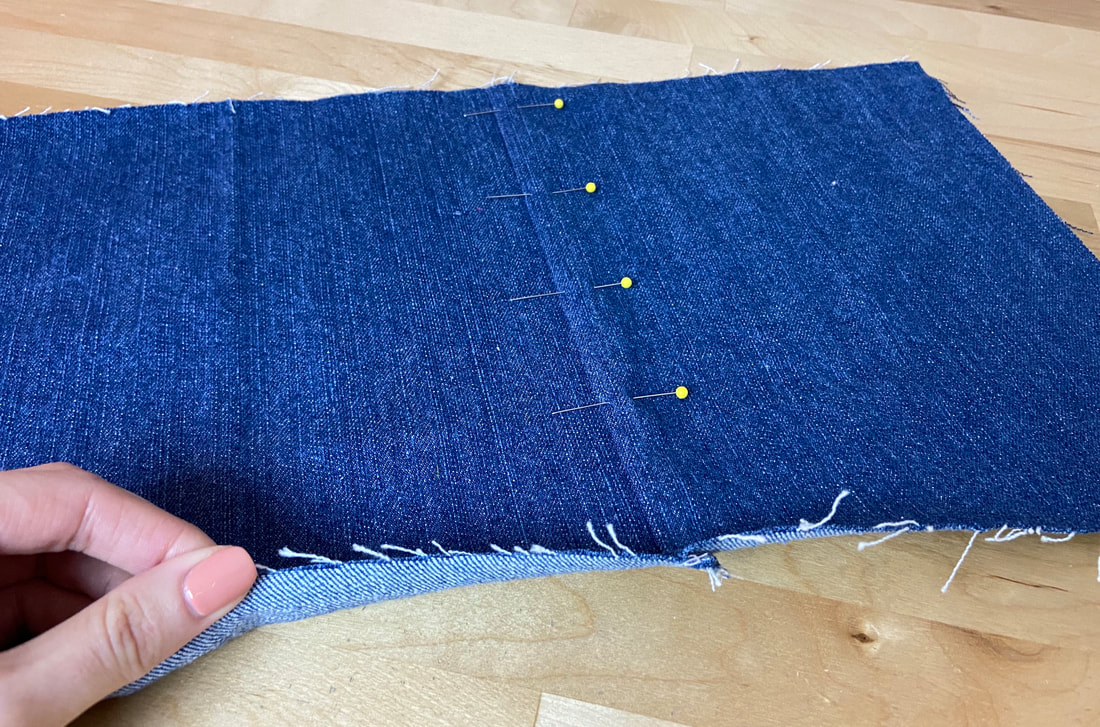
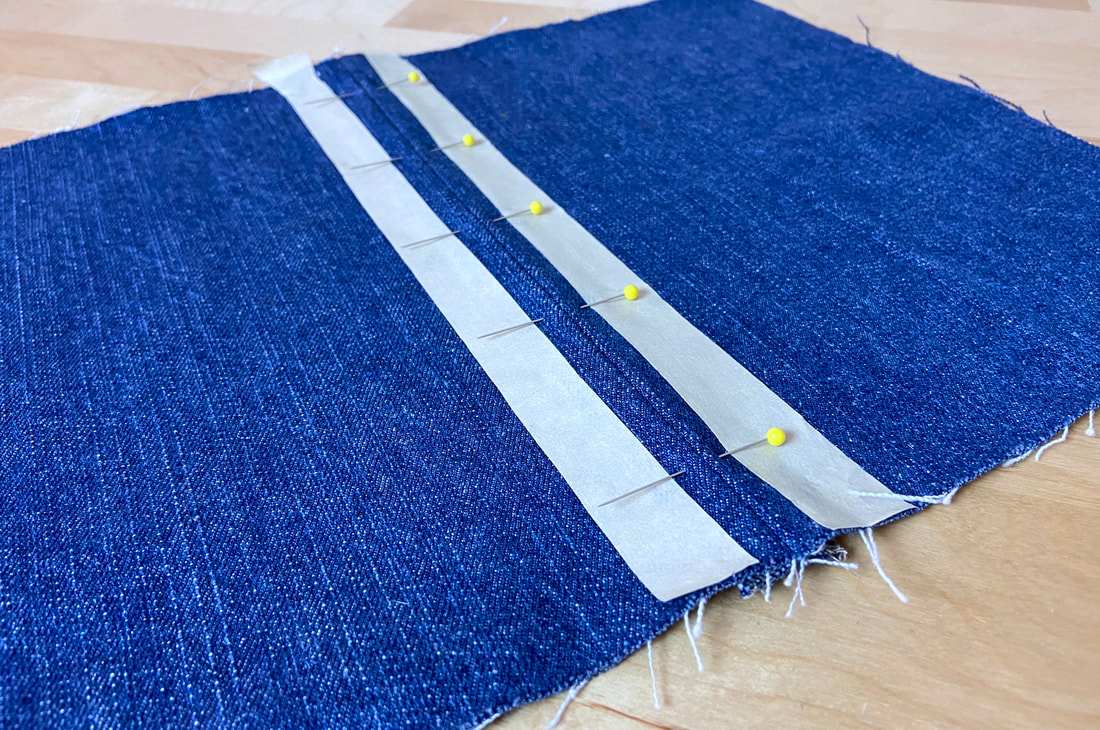
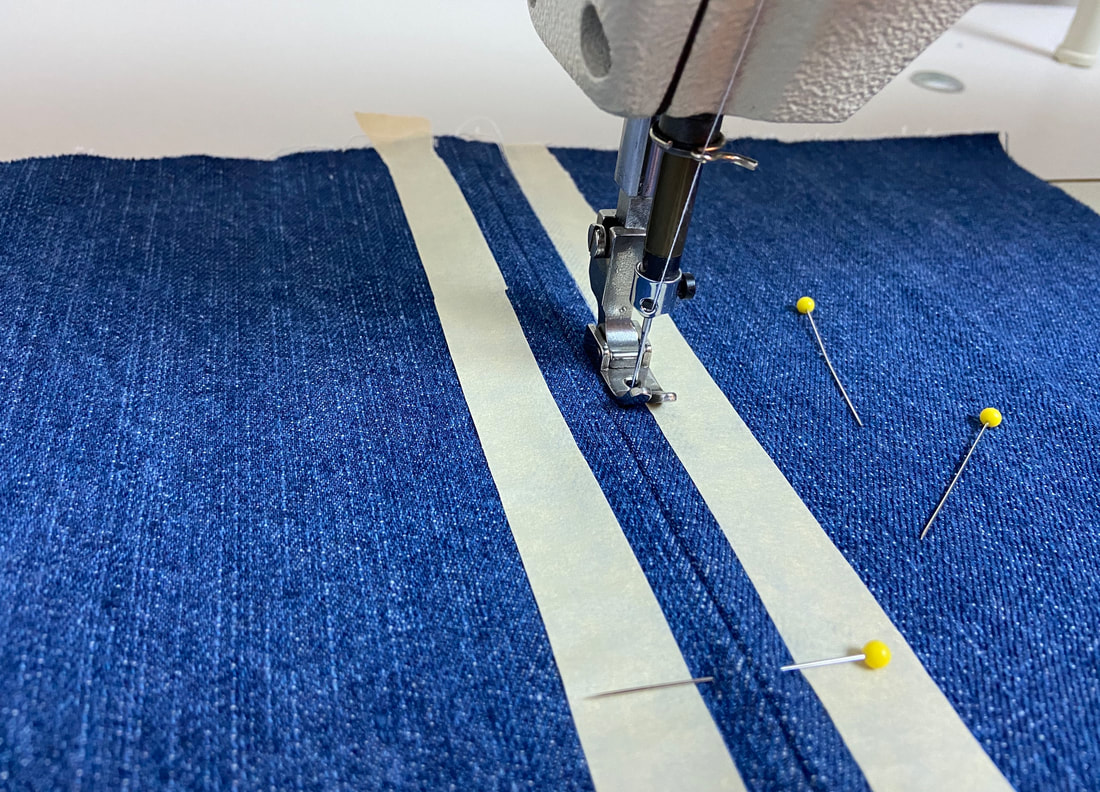
4. From the face of the garment, insert a few pins perpendicular to the seamline, through the garment and seam allowance layers underneath.
If your fabric is thin and difficult to control, use a hand basting stitch to add more stability during the topstitching process. ​
Picture
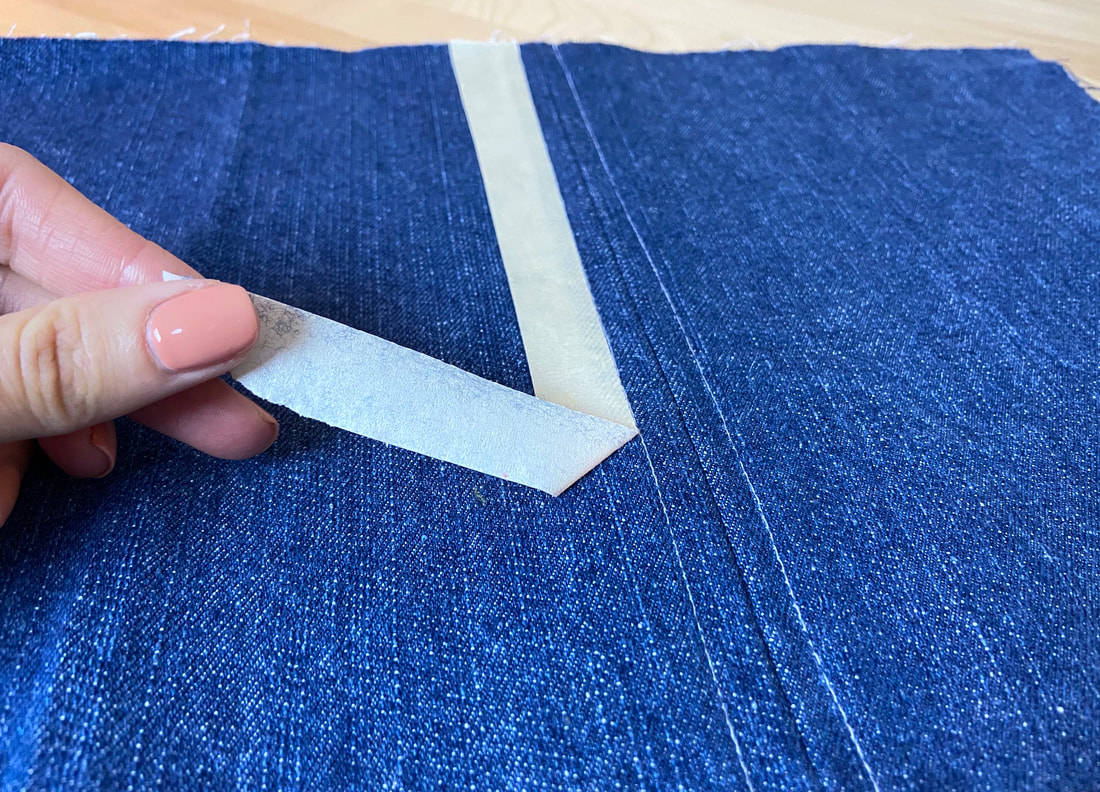
5. Working from the face of the seam, stitch at the desired distance from the seamline on each side, catching the seam allowance layers underneath as you stitch. Use the presser foot edge in relation to the seamline to keep the topstitching smooth and evenly distributed. Stitch right next to the edge of the masking tape. 
Picture
Gently remove the masking tape once the topstitch is complete. ​
Picture
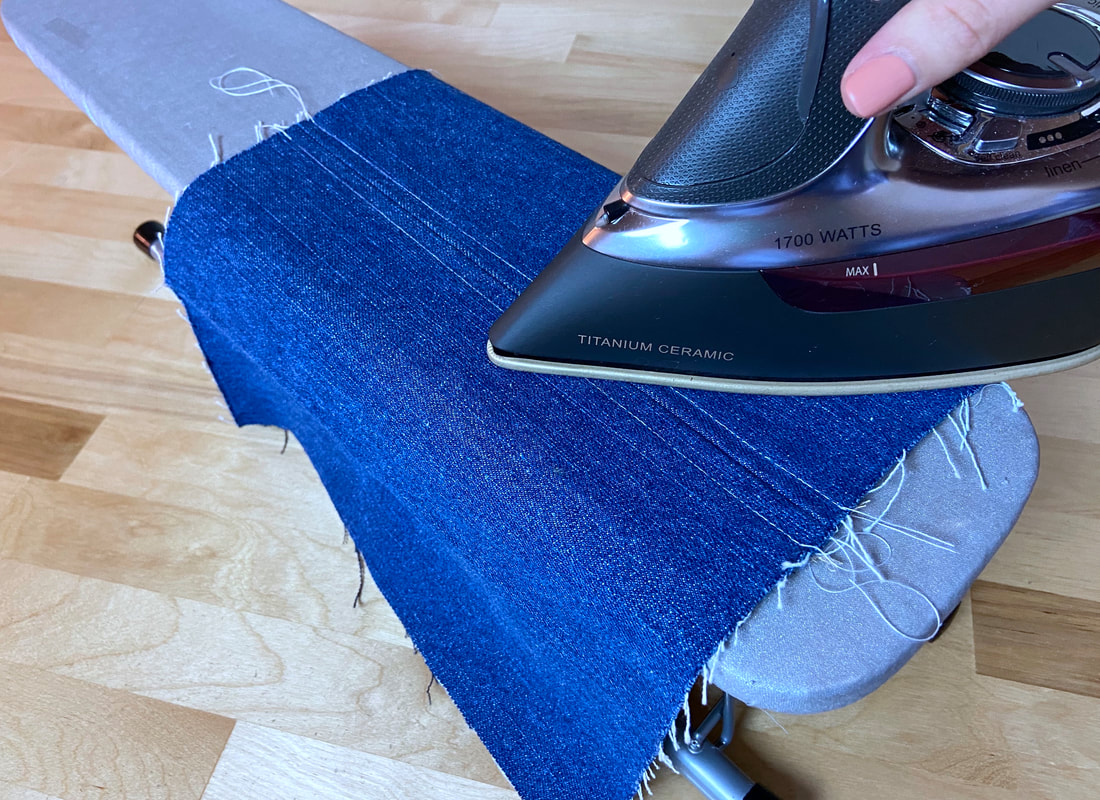
6. Press the topstitched seam in the direction the stitching was applied. Be sure to use a protective cloth if working with heat sensitive fabrics.

Sewing A Tuck Seam

Picture
A tuck seam is a little different than a regular topstitched seam as it skips the step of actually sewing the seam prior to topstitching. Instead, the fabric is simply folded and directly topstitched through all layers of the garment and seam allowance underneath. 
Picture
1. To start with, fold one of the seam edges down its seamline (or designated seam allowance width). Iron this fold to crease the fold line. 
Picture
2. Place the folded piece on top of the other seam edge matching the fold to the corresponding seamline as shown. It helps in this case to have the lines transferred onto each fabric piece. You can also use a gage pointer or ruler to find the seamlines if they have not already been marked. 
Picture
3. Insert a few pins horizontally to keep the folded layer properly aligned to its corresponding seamline.  
Picture
4. Hand baste through all layers of the garment and seam allowance underneath as shown. 
Picture
5. To complete the tuck seam, topstitch at about ¼” away from the folded edge through all layers of the garment and seam allowance underneath. 
Picture
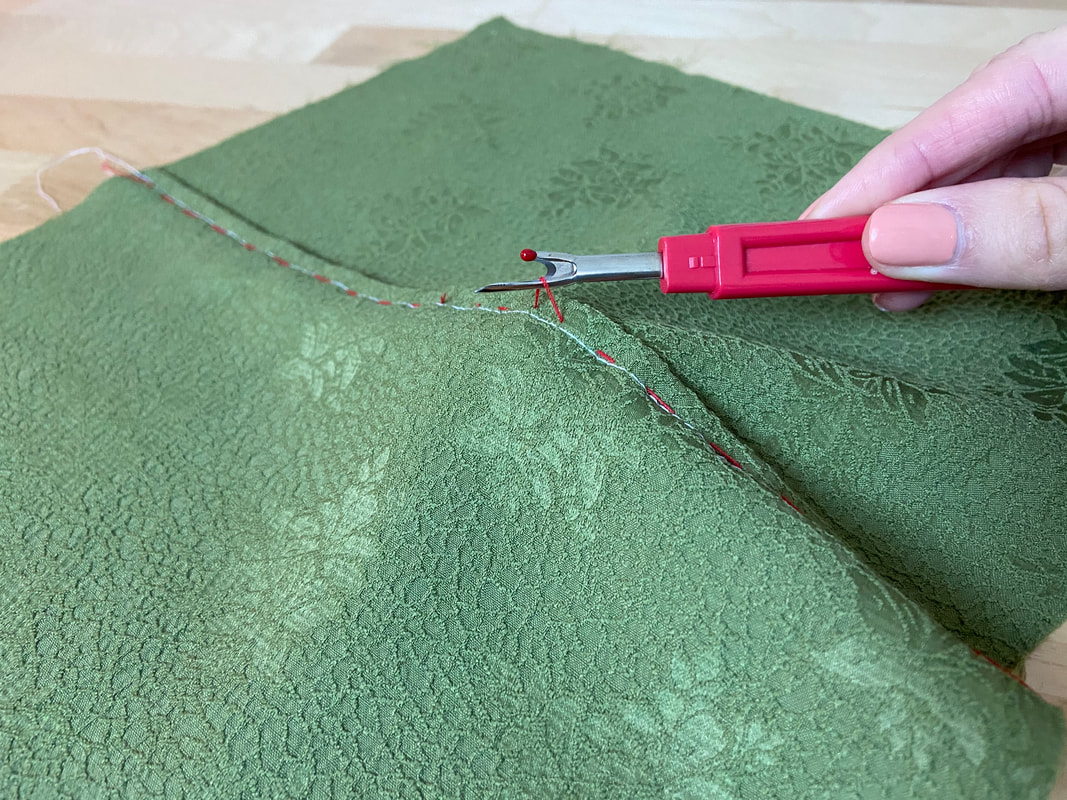
Once stitched, remove the hand basting using a seam ripper.
Picture
6. To complete, iron the final topstitch application in the direction it was stitched. 
​Note: Consider applying an overedge stitch finish like serging or zig zag to each seam allowance edge prior to folding and topstitching. Finishing the seam allowance edges is more difficult to accomplish once the tuck seam is completed.
DMCA.com Protection Status
All content, including images and text, may not be copied, replicated, or redistributed without express written permission. This website is regularly screened and monitored for content protection.

Have A Personalized Sewing Question?

Ask It Here

Services

​Custom Apparel
Custom Bridal
​Sewing Tutorials
​

Company

About
Blog

Support

Contact
Terms of Service
DMCA.com Protection Status
© COPYRIGHT 2022. ALL RIGHTS RESERVED.
  • Sewing Tutorials
    • Basics >
      • Aligning Pattern Grainlines To Fabric
      • Preparing Fabrics For Sewing
      • Pinning Sewing Patterns To Fabric
      • Placing Sewing Patterns On Fabric For Cutting
      • Rotary Cutters or Fabric Scissors?
      • Cutting The Sewing Patterns
      • What Are Notches And How To Use Them In The Sewing Process
      • Transferring Notches From Pattern To Fabric
      • Transferring Seamlines to Fabric
      • Staystitching
      • Backstitching: A Complete Guide
      • Hand Basting: A Complete Guide
      • Sewing Continuous Bias Binding
    • Darts >
      • Marking And Transferring Darts To Fabric
      • What Are Darts And Dart Components
      • Folding, Pinning And Hand Basting Darts
      • Handling Dart Excess: Bulk And Tension
      • How To Sew A French Dart
      • How To Sew And Iron Single Pointed Darts
      • How To Sew And Iron Contour Darts
      • Sewing Darts With Decorative/Beaded Fabrics
    • Sewing Seams >
      • ​The Basics Of Seams And Seam Allowance
      • How To Sew A Straight Seam
      • Sewing Curved Seams
      • Sewing Corner Seams
      • Trimming And Grading Seam Excess
      • Notching/Clipping Seam Allowance for Tension Release
      • Sewing Topstitched Seams
      • Sewing Corded Seams
      • Sewing A Slot Seam
      • Sewing A Gathered Seam
      • Sewing Bias Seams
      • Sewing Seams With Ease
      • Sewing Seams With Crossing Seamlines
      • Sewing Unlike Fabric Seams
      • How To Iron Seams: Ironing Tools And Conventions
      • Sewing With Knit Fabrics
      • Understanding Stitch Length And Tension
      • Sewing Unique Fabric Seams
    • Seam Finishes >
      • Seam Finishing Techniques - Overview
      • Applying A Pinked Seam Finish
      • Applying A Bias Bound Seam Finish
      • Serging And Zigzag Seam Finishes
      • Sewing A Self-Bound Seam Finish
      • Sewing A French Seam Finish
      • Sewing A Hong Kong Seam Finish
      • Sewing A Mock French Seam Finish
      • Sewing A Turned-and-Stitched Seam Finish
      • Sewing Overcast Hand-Applied Seam Finishes
      • Sewing A Flat Felled Seam
      • Sewing A Hairline Seam Finish
    • Hem Finishes >
      • Garment Hem Finishes: Overview
      • ​Sewing A Double Fold Hem Finish
      • Sewing A Single Fold Hem Finish
      • Sewing Bound Hem Finishes
      • Sewing An Exposed Double Layer Bound Hem
      • Sewing A Folded-Up Bound Hem with Pre-folded Binding
      • Sewing A Hong Kong Hem Finish
      • Sewing A Band Hem Finish
      • Sewing A Bias Faced Hem Finish
      • Sewing A Twill Tape Hem Finish
      • Sewing A Rolled Hem Finish
      • Sewing A Shaped Hem Facing
      • Using Fusible Hem Tape And Webbing
      • Finishing A Lace Fabric Hem
      • Finishing A Leather Hem
      • Sewing Faced Hem Corners
      • How To Finish Lining At The Hem
      • Finishing Fabric Corners by Mitering >
        • Mitering Fabric Corners With A Full Bias Facing
        • Mitering Fabric Corners With Exposed Binding
      • Interfacing A Hemline: Lined And Unlined Examples
    • Sewing Pockets >
      • Curved Patch Pocket With Flap
      • Unlined Square Patch Pockets
      • Lined Patch Pockets: Two Ways
      • Extension On-Seam Pockets
      • Separate On-Seam Pocket
      • Front Hip Pockets
      • Bound Double Welt Pocket
      • Double Welt Pocket With Flap
      • Self-Welt Pocket (Using Single Fabric Layer)
      • Slanted Welt Pocket (Hand-Stitched)
      • Faced Slash Pockets: Overview >
        • Sewing A Faced Slit Pocket
        • Sewing A Rectangular Slash Pocket
        • Sew A Star-Shaped Faced Pocket
    • Sewing Zippers >
      • Sewing Zippers: General Information
      • Sewing A Centered Zipper
      • Sewing A Lapped Zipper
      • Sewing An Invisible Zipper
      • Sewing A Fly Front Zipper
      • Sewing A Closed-End Exposed Zipper (No Seam)
      • Sewing An Exposed Separating Zipper
      • Sewing Hand Stitched Zipper Applications
      • Sewing A Zipper Underlay
      • Sewing A Placket-Enclosed Separating Zipper
    • Sleeveless Finishes >
      • Sleeveless Armhole Finishes: General Information
      • Finishing Sleeveless Garments with Lining
      • Sewing A Folded-Under Bound Armhole Finish
      • Sewing A Shaped Armhole Facing
      • Finishing Armhole Edges With Exposed Binding
      • Finishing Armhole Edges With Decorative Trim
    • Neckline Finishes >
      • Sewing A Neck Shaped Facing
      • Sewing An All-In-One Neck Facing
      • Neck And Garment Opening Combination Facings >
        • Sewing An Extended Front-Neck Facing
        • Sewing A Separate Neck-Front Facing
      • Sewing A Bias Faced Neckline Finish
      • Sewing A Band Neckline Finish
      • Bound Neckline Finishes: Overview >
        • Sewing A Single Layer Bound Neckline
        • Finishing A Neckline With Pre-Folded Binding
        • Sewing A Double Layer Bound Neckline Finish
      • Sewing A Semi-Stretch Strip Band Neckline
      • Ribbed Neck Band And Classic Turtleneck
      • Decorative Neckline Finishes >
        • Sewing A Neckline With Decorative Inset
        • Sewing A Piped Cording Faced Neckline
        • Sewing Decorative Trim To A Finished Neckline
    • Finishing Facing Edges >
      • Finishing Facing Edges: Overview
      • Folded-And-Topstitched Overedge Facing Finish
      • Sewing A Bound Facing Edge Finish
      • Sewing A Hong Kong Facing Finish
      • Sewing A Rolled Edge Facing Finish
      • Sewing A Twill Tape Facing Edge Finish
      • Sewing An Overedge-Stitch Facing Finish
    • Extras >
      • A Complete Guide on Interfacing
      • Sewing Bound Spaghetti Straps
      • Sewing Spaghetti Straps To A Faced Neckline
      • Sewing Ruffles: Overview
      • Patterning And Sewing A Circle Ruffle
      • Sewing A Gathered Heading Ruffle
      • Sewing Double Layer Gathered Ruffles
      • Sewing A Gathered Ruffle Into A Seam
      • Sewing A Gathered Ruffle To A Fabric Edge
      • Sewing A Fabric Surface Slit
      • Sewing A Slit Seam
      • Hand-Applied Straight Stitches
      • Hand-Applied Blind Stitches
      • Hand-Applied Overedge Stitches
      • Hand-Applied Tack Stitches
      • Hand-Applied Decorative Stitches
  • Custom Apparel
    • Custom Bridal
  • Submit A Sewing Question
  • About
  • Blog