Doina Alexei
  • Sewing Tutorials
    • Basics >
      • Aligning Pattern Grainlines To Fabric
      • Preparing Fabrics For Sewing
      • Pinning Sewing Patterns To Fabric
      • Placing Sewing Patterns On Fabric For Cutting
      • Rotary Cutters or Fabric Scissors?
      • Cutting The Sewing Patterns
      • What Are Notches And How To Use Them In The Sewing Process
      • Transferring Notches From Pattern To Fabric
      • Transferring Seamlines to Fabric
      • Staystitching
      • Backstitching: A Complete Guide
      • Hand Basting: A Complete Guide
      • Sewing Continuous Bias Binding
    • Darts >
      • Marking And Transferring Darts To Fabric
      • What Are Darts And Dart Components
      • Folding, Pinning And Hand Basting Darts
      • Handling Dart Excess: Bulk And Tension
      • How To Sew A French Dart
      • How To Sew And Iron Single Pointed Darts
      • How To Sew And Iron Contour Darts
      • Sewing Darts With Decorative/Beaded Fabrics
    • Sewing Seams >
      • ​The Basics Of Seams And Seam Allowance
      • How To Sew A Straight Seam
      • Sewing Curved Seams
      • Sewing Corner Seams
      • Trimming And Grading Seam Excess
      • Notching/Clipping Seam Allowance for Tension Release
      • Sewing Topstitched Seams
      • Sewing Corded Seams
      • Sewing A Slot Seam
      • Sewing A Gathered Seam
      • Sewing Bias Seams
      • Sewing Seams With Ease
      • Sewing Seams With Crossing Seamlines
      • Sewing Unlike Fabric Seams
      • How To Iron Seams: Ironing Tools And Conventions
      • Sewing With Knit Fabrics
      • Understanding Stitch Length And Tension
      • Sewing Unique Fabric Seams
    • Seam Finishes >
      • Seam Finishing Techniques - Overview
      • Applying A Pinked Seam Finish
      • Applying A Bias Bound Seam Finish
      • Serging And Zigzag Seam Finishes
      • Sewing A Self-Bound Seam Finish
      • Sewing A French Seam Finish
      • Sewing A Hong Kong Seam Finish
      • Sewing A Mock French Seam Finish
      • Sewing A Turned-and-Stitched Seam Finish
      • Sewing Overcast Hand-Applied Seam Finishes
      • Sewing A Flat Felled Seam
      • Sewing A Hairline Seam Finish
    • Hem Finishes >
      • Garment Hem Finishes: Overview
      • ​Sewing A Double Fold Hem Finish
      • Sewing A Single Fold Hem Finish
      • Sewing Bound Hem Finishes
      • Sewing An Exposed Double Layer Bound Hem
      • Sewing A Folded-Up Bound Hem with Pre-folded Binding
      • Sewing A Hong Kong Hem Finish
      • Sewing A Band Hem Finish
      • Sewing A Bias Faced Hem Finish
      • Sewing A Twill Tape Hem Finish
      • Sewing A Rolled Hem Finish
      • Sewing A Shaped Hem Facing
      • Using Fusible Hem Tape And Webbing
      • Finishing A Lace Fabric Hem
      • Finishing A Leather Hem
      • Sewing Faced Hem Corners
      • How To Finish Lining At The Hem
      • Finishing Fabric Corners by Mitering >
        • Mitering Fabric Corners With A Full Bias Facing
        • Mitering Fabric Corners With Exposed Binding
      • Interfacing A Hemline: Lined And Unlined Examples
    • Sewing Pockets >
      • Curved Patch Pocket With Flap
      • Unlined Square Patch Pockets
      • Lined Patch Pockets: Two Ways
      • Extension On-Seam Pockets
      • Separate On-Seam Pocket
      • Front Hip Pockets
      • Bound Double Welt Pocket
      • Double Welt Pocket With Flap
      • Self-Welt Pocket (Using Single Fabric Layer)
      • Slanted Welt Pocket (Hand-Stitched)
      • Faced Slash Pockets: Overview >
        • Sewing A Faced Slit Pocket
        • Sewing A Rectangular Slash Pocket
        • Sew A Star-Shaped Faced Pocket
    • Sewing Zippers >
      • Sewing Zippers: General Information
      • Sewing A Centered Zipper
      • Sewing A Lapped Zipper
      • Sewing An Invisible Zipper
      • Sewing A Fly Front Zipper
      • Sewing A Closed-End Exposed Zipper (No Seam)
      • Sewing An Exposed Separating Zipper
      • Sewing Hand Stitched Zipper Applications
      • Sewing A Zipper Underlay
      • Sewing A Placket-Enclosed Separating Zipper
    • Sleeveless Finishes >
      • Sleeveless Armhole Finishes: General Information
      • Finishing Sleeveless Garments with Lining
      • Sewing A Folded-Under Bound Armhole Finish
      • Sewing A Shaped Armhole Facing
      • Finishing Armhole Edges With Exposed Binding
      • Finishing Armhole Edges With Decorative Trim
    • Neckline Finishes >
      • Sewing A Neck Shaped Facing
      • Sewing An All-In-One Neck Facing
      • Neck And Garment Opening Combination Facings >
        • Sewing An Extended Front-Neck Facing
        • Sewing A Separate Neck-Front Facing
      • Sewing A Bias Faced Neckline Finish
      • Sewing A Band Neckline Finish
      • Bound Neckline Finishes: Overview >
        • Sewing A Single Layer Bound Neckline
        • Finishing A Neckline With Pre-Folded Binding
        • Sewing A Double Layer Bound Neckline Finish
      • Sewing A Semi-Stretch Strip Band Neckline
      • Ribbed Neck Band And Classic Turtleneck
      • Decorative Neckline Finishes >
        • Sewing A Neckline With Decorative Inset
        • Sewing A Piped Cording Faced Neckline
        • Sewing Decorative Trim To A Finished Neckline
    • Finishing Facing Edges >
      • Finishing Facing Edges: Overview
      • Folded-And-Topstitched Overedge Facing Finish
      • Sewing A Bound Facing Edge Finish
      • Sewing A Hong Kong Facing Finish
      • Sewing A Rolled Edge Facing Finish
      • Sewing A Twill Tape Facing Edge Finish
      • Sewing An Overedge-Stitch Facing Finish
    • Extras >
      • A Complete Guide on Interfacing
      • Sewing Bound Spaghetti Straps
      • Sewing Spaghetti Straps To A Faced Neckline
      • Sewing Ruffles: Overview
      • Patterning And Sewing A Circle Ruffle
      • Sewing A Gathered Heading Ruffle
      • Sewing Double Layer Gathered Ruffles
      • Sewing A Gathered Ruffle Into A Seam
      • Sewing A Gathered Ruffle To A Fabric Edge
      • Sewing A Fabric Surface Slit
      • Sewing A Slit Seam
      • Hand-Applied Straight Stitches
      • Hand-Applied Blind Stitches
      • Hand-Applied Overedge Stitches
      • Hand-Applied Tack Stitches
      • Hand-Applied Decorative Stitches
  • Custom Apparel
    • Custom Bridal
  • Submit A Sewing Question
  • About
  • Blog

Types Of Machine And Hand-Applied Hemming Techniques Used In Dressmaking

The term hem refers to the bottom edge of the garment. The hemline refers the finished edge of the hem.
Picture
The hemline is usually finished as a last step in the dressmaking process. In most cases, it can be shifted up or down if any alterations in length are desired. It is of course, always easier to make the adjustments on the pattern prior to cutting the fabric pieces. 
However, if the pattern pieces have already been cut, you can shorten the garment in the interim by measuring and trimming directly on the fabric.
While shortening is fairly easy to accomplish, lengthening a hemline after the fabric pieces have been cut is a bit trickier, often requiring a slight design alteration.
Picture
Just as all seams have seam allowance, all hemlines have hem allowance. Clean finishing a garment’s hem is just as important, if not more important, than finishing seam allowance. While seam allowance is safely enclosed on the inside of the garment, often completely out of view, the finished edge of the hemline is more visible on the outside of the garment. ​
Picture
For that reason, the hem finishing technique should be chosen carefully as to not compromise the garment’s design and drape. It should also work with the fabric at hand including any seam crossing into the hemline.
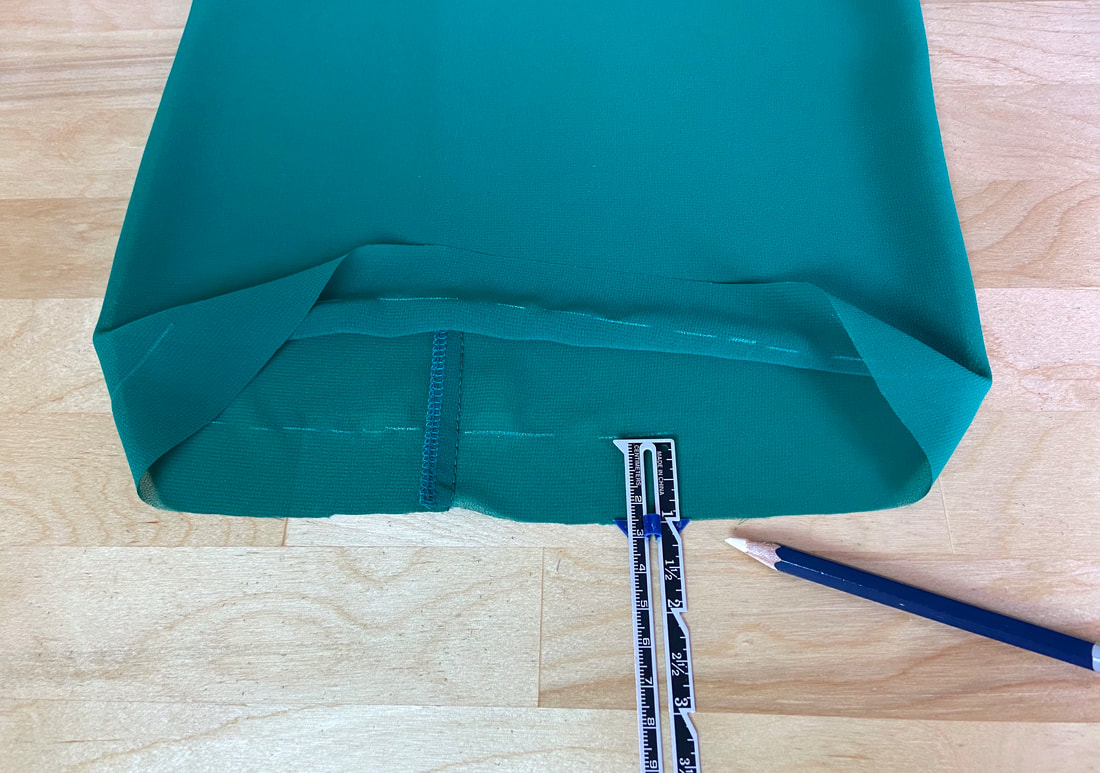
Hem allowance is often wider than seam allowance since it has to support various clean finishing techniques. In most cases, hem allowance width is determined based on the type of finish used and the fabric at hand.
Picture
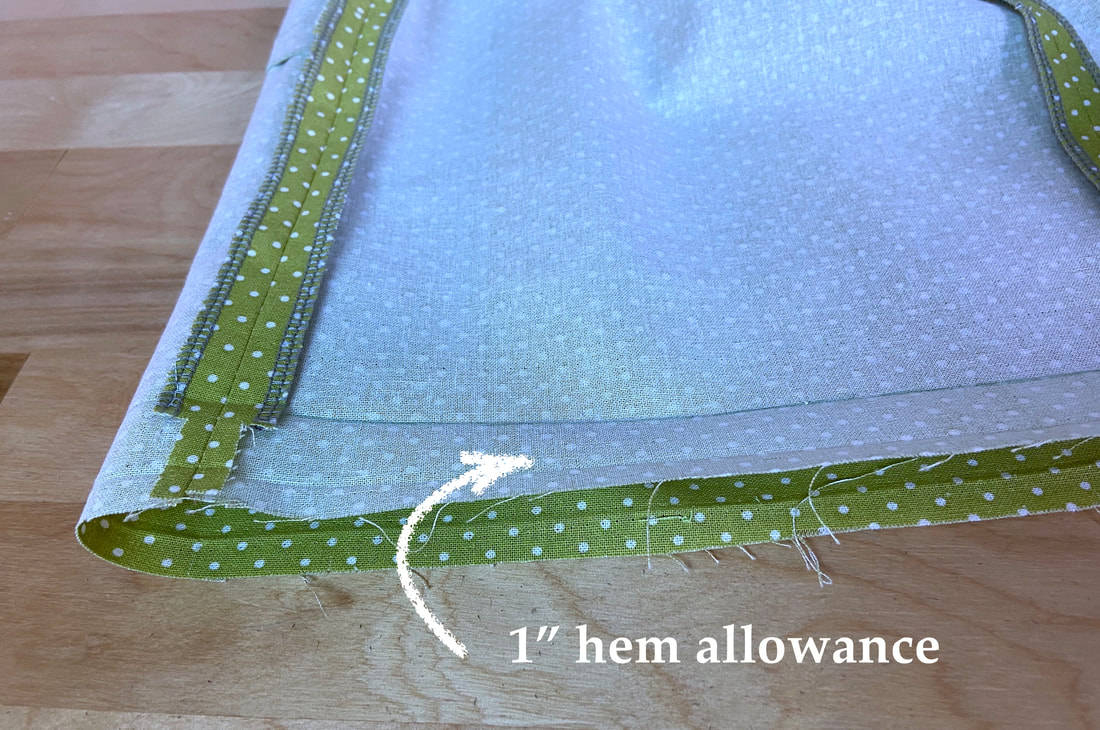
The thicker and heavier the fabric, the wider the hem allowance should be. A good starting point for beginners is to work with 1” hem allowance. This larger width allows to be trimmed if necessary, being more comfortable to handle and supporting most hem finishing techniques.
Speaking of hem finishing techniques, your patterns should specify which to use for your particular project. Additionally, the patterns will include the right hem allowance width to support this finish. 
There are some general rules as to which finishing method to use with a particular fabric and design. Hem finishes can be divided into four large groups: machine topstitched, hand stitched (usually blind stitched), faced, and decorative.

Machine Stitched (Topstitched) Hem Finishes

Picture
Machine stitched hem finishes include either one or multiple rows of topstitching visible along the right side of the garment’s hem. Topstitched finishes are highly effective and most commonly used with casual designs, sportwear and activewear.
Picture
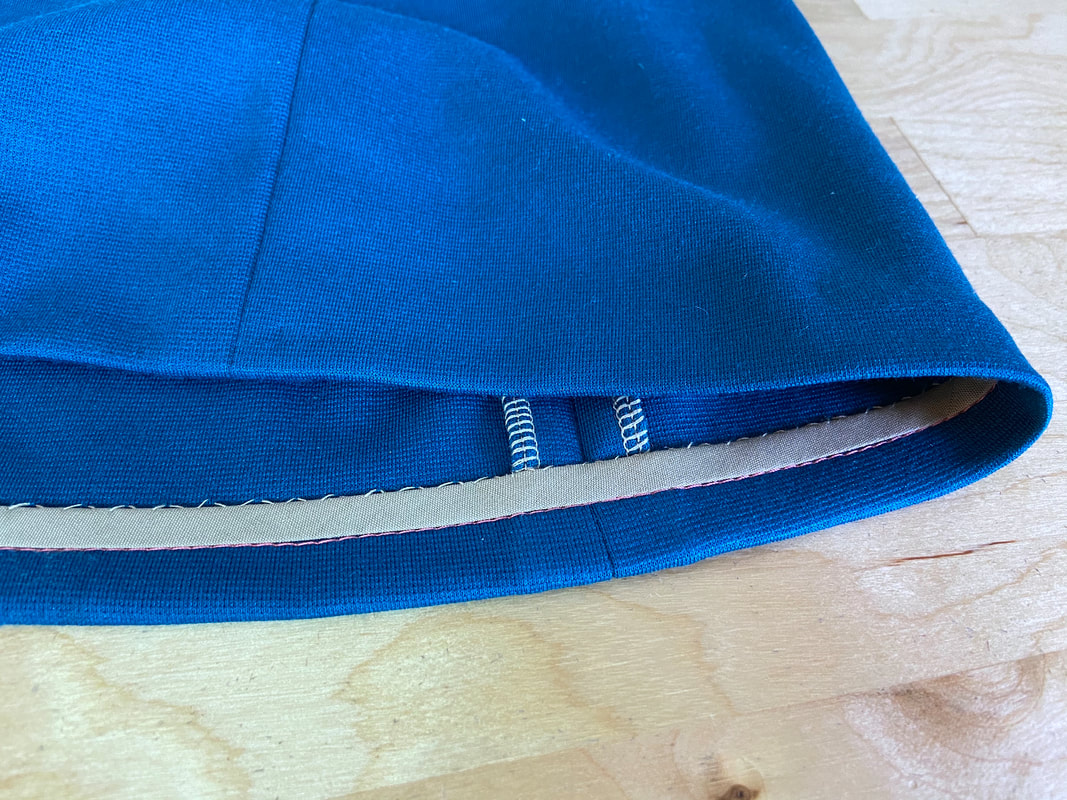
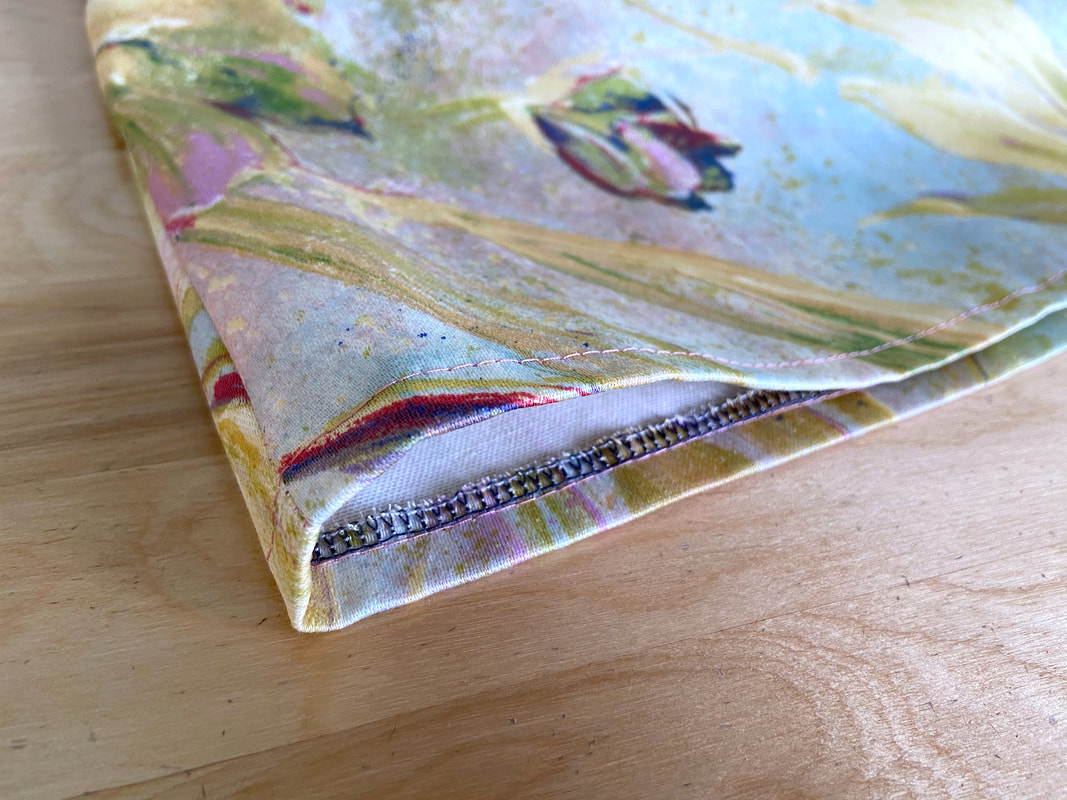
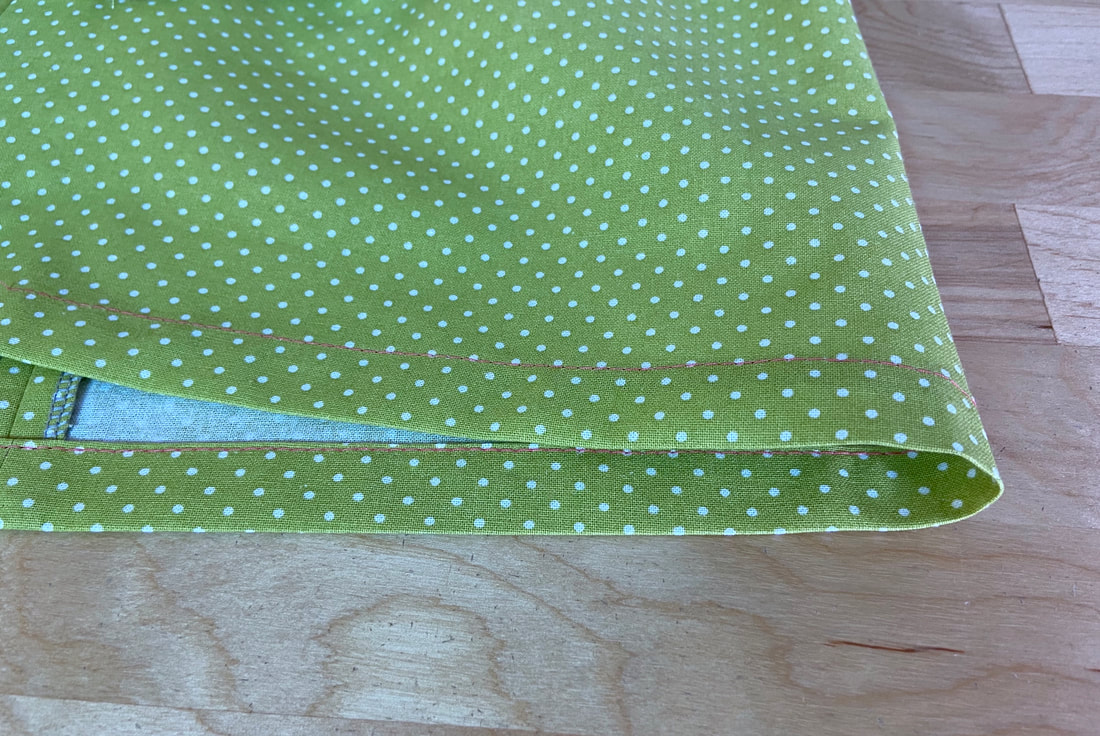
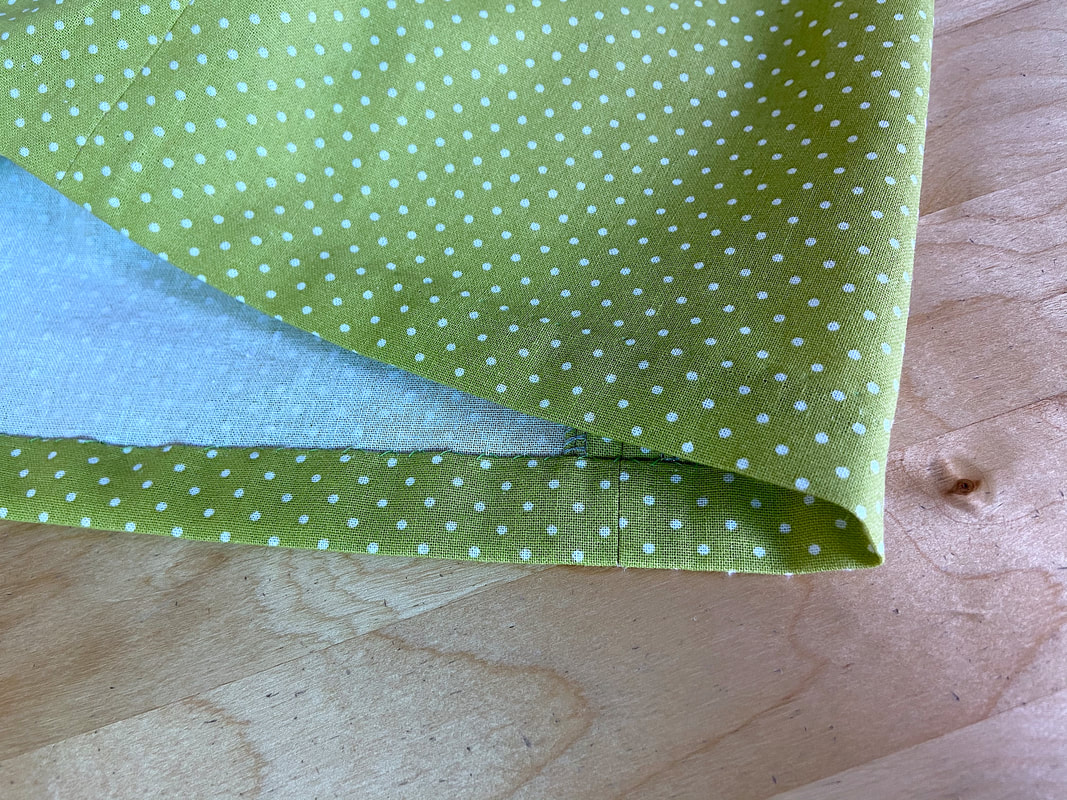
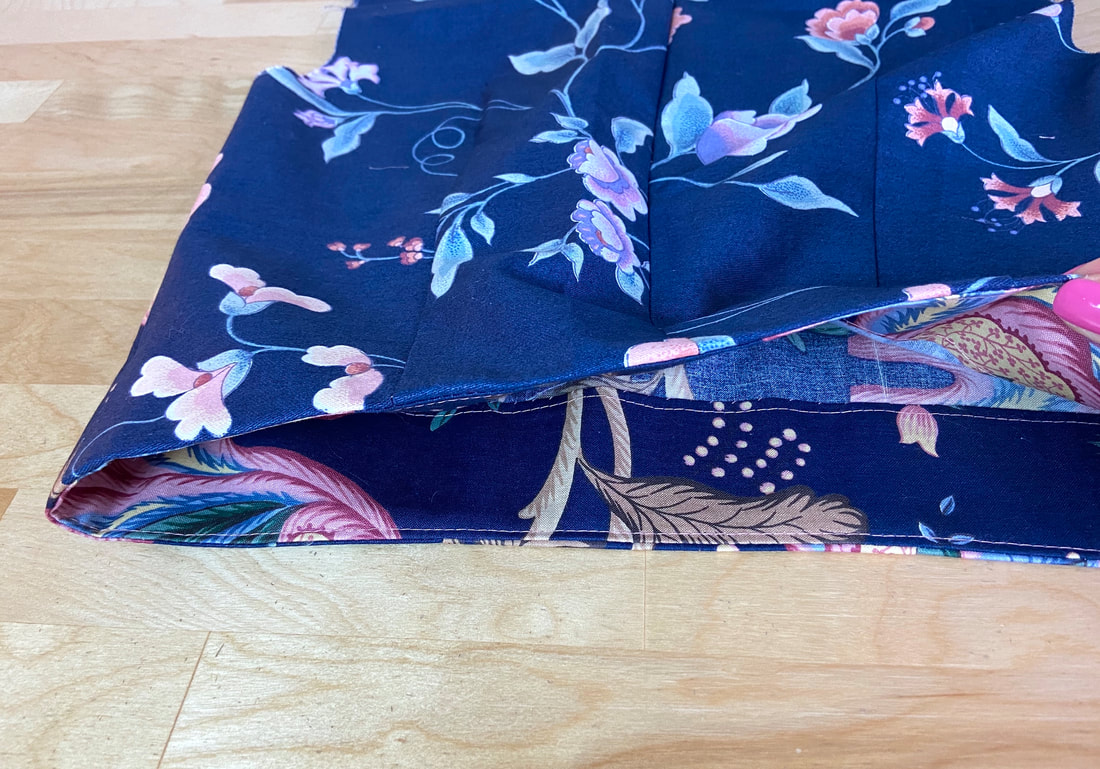
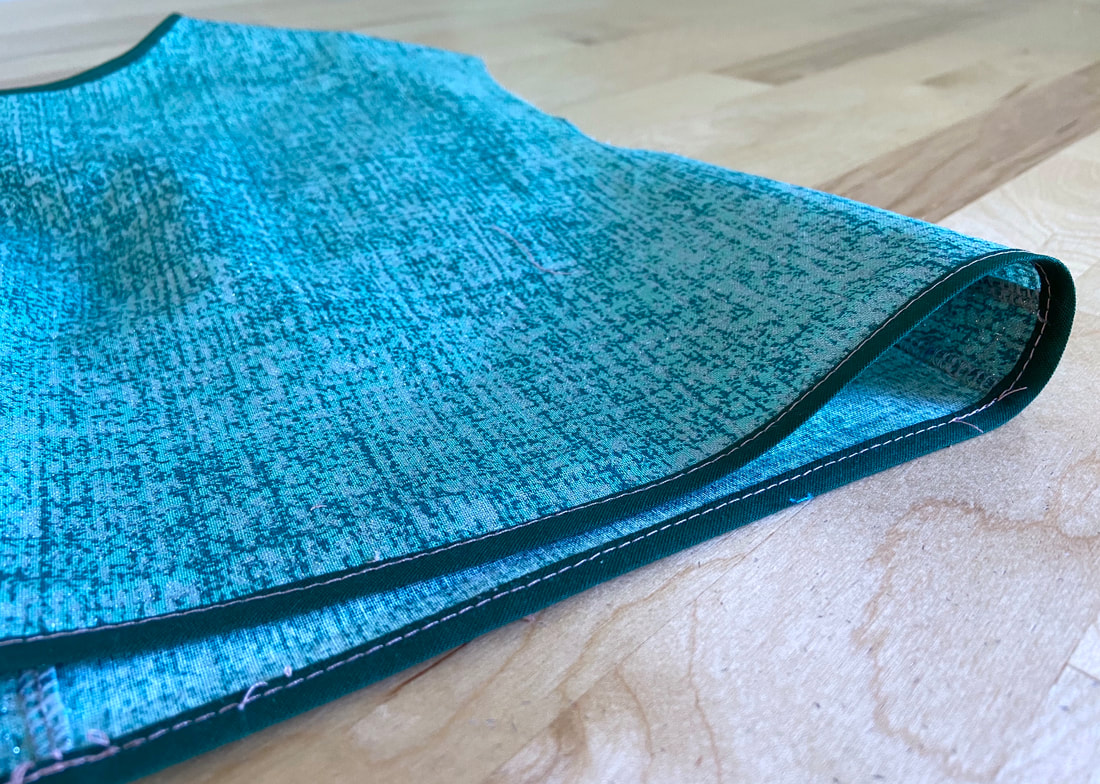
A machine stitched technique entails folding the raw edge of the hem allowance toward the inside of the garment once or twice such that the folded edge corresponds to the finished hemline. This fold is then secured with a machine topstitch to enclose and hide the fabric’s cut edge underneath.
With this technique, the bottom raw edge can be turned once leaving it exposed on the garment's underside, or double folded to completely enclose it.
Topstitched hem finishes are used with light-to-medium weight styles featuring a design that is not directly affected by the visible topstitch. Casual dresses, bottoms, tops, denim, activewear and sportwear work great with a turned-and-stitched hem finish.

Hand-Sewn Hem Finishes

Picture
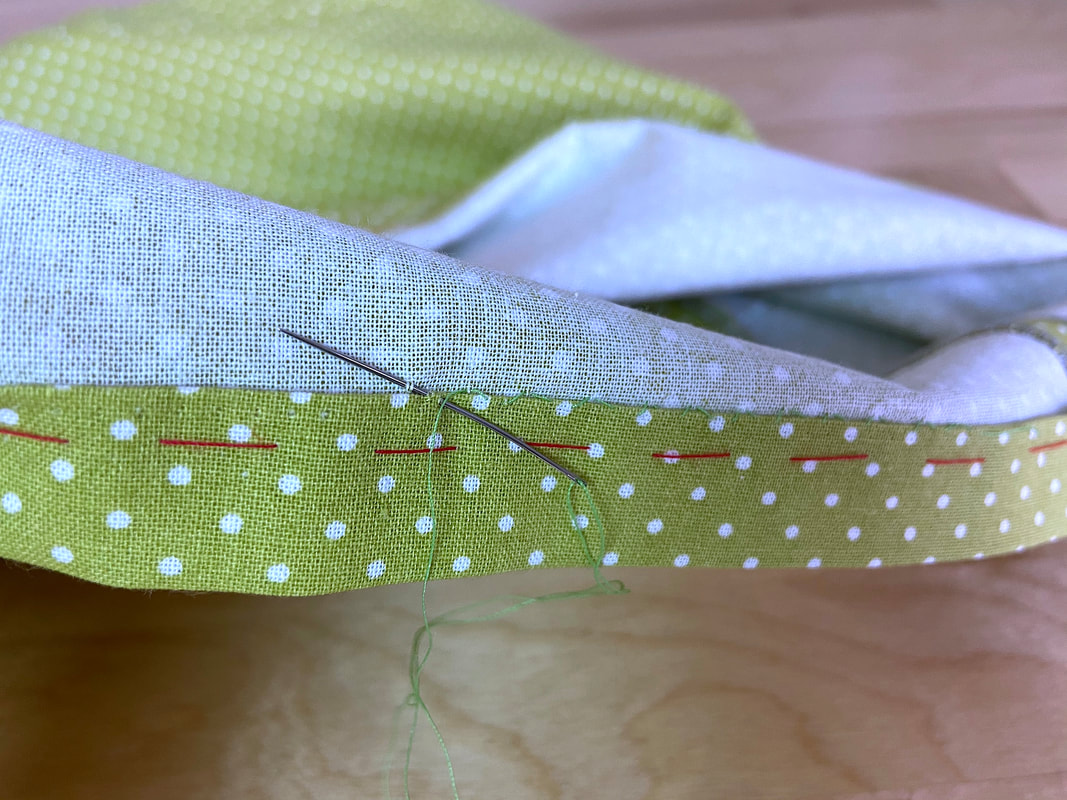
As opposed to a machine-stitched hem finish, a hand sewn technique leaves no visible stitching on the face of the garment. This is achieved by blind stitching, either using a slipstitch or a catchstitch.
Just as in the case of a topstitched style, the finished hemline features a clean-folded edge accomplished by turning the hem’s raw edge up either once or twice (depending on the amount of hem allowance, fabric and type of finish desired).
Picture
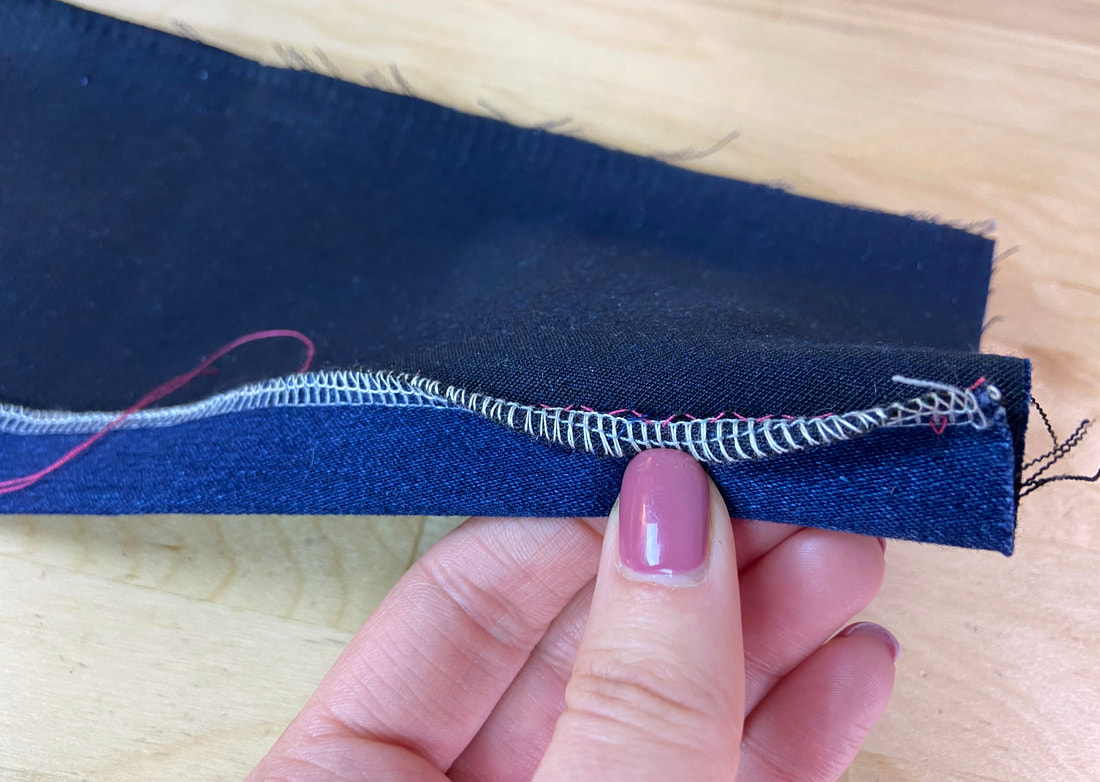
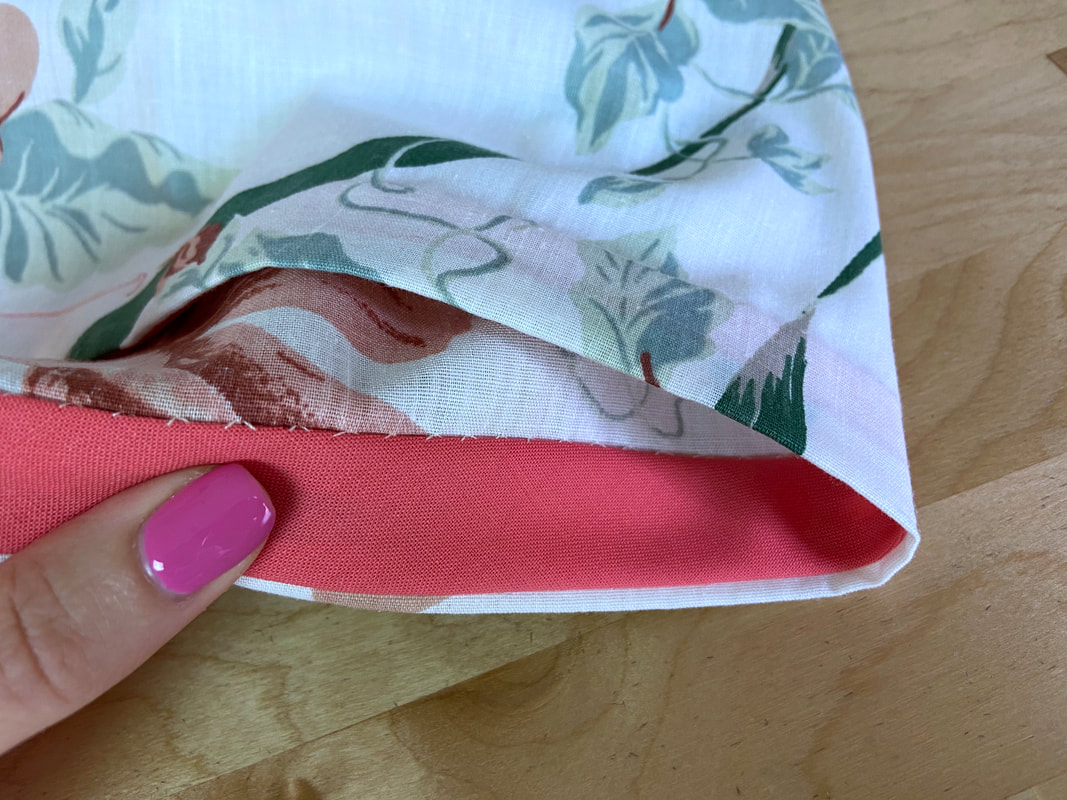
If the hem allowance is folded once, its cut edge will remain exposed on the garment’s underside and thus will require some form of edge finishing. An overedge stitch, binding, bias tape are just a few methods used to clean finish this exposed edge before blind stitching it to the wrong side of the garment.
Picture
If the hem allowance is folded twice, the hem’s cut edge is enclosed within the fold and thus does not require edge finishing. In this case, the hem is blind stitched to the wrong side of the garment following the inner fold of the hem allowance.  
Picture
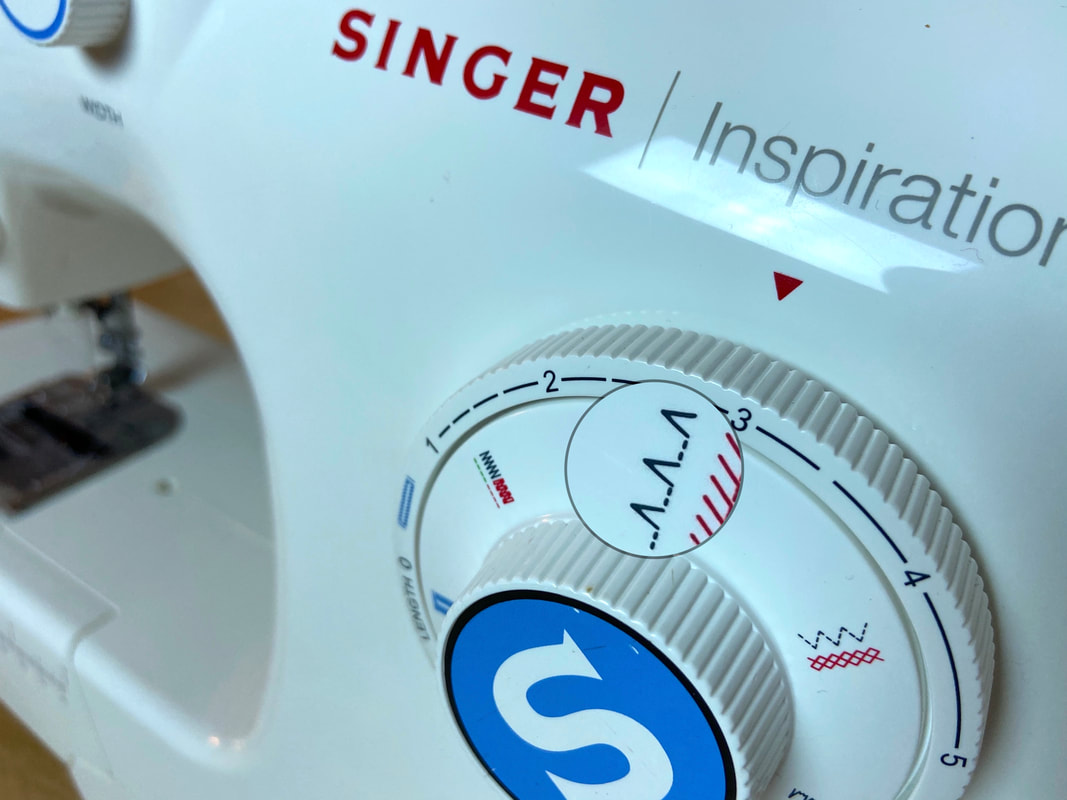
Blind stitching can also be applied by machine using its designated blind stitch setting. This unique stitch resembles a zigzag broken up by straight stitches, alternating between 3-5 straight stitches and a zigzag stitch. To blind stitch by machine, the hem is folded such that only the zigzag portion of the stitch grabs the fabric fold. To master this technique, it is a good idea to practice with scrap fabric a few times before working on the final garment.
Picture
A blind stitched hem is a must for tailored, dressier styles including business-wear, cocktail attire, eveningwear, and any garments that are negatively affected by visible topstitching. This unique finish works well with more structured fabrics, especially those that are thick and textured. For example, a wool garment’s hem is almost always hand or machine finished with blind stitching since topstitching it can often downgrade its quality.
Picture
Almost all tailored items that are finished with a lining will also feature some variation of a hand-finished blind hem. When lining encloses the hem’s raw edges, the hem allowance is usually wider and only folded up once. In this case, the hem allowance is slipstitched in this folded position before finally attaching the lining. In this case, no separate finishes are needed for the fabric's cut edges since they will all be enclosed by the lining layer.
Some examples of blind stitched hemming techniques include: single-fold and slipstitched, double-fold and slipstitched, faced-and-slipstitched, catchstitched, lining enclosed hem allowance, and slipstitched twill tape.

Faced Hemline Finishes

A faced hem finish is one that provides the most structure. It is a great way to clean finish hemlines that have an unusual edge. For example, a dress or skirt that has a slit with a very curved hemline can benefit from a faced hem finish.
Two types of hem facings can be used: a shaped facing and a bias strip. Regardless of which option is used, a faced hem requires a seam that connects the facing to the hem’s raw edge at the hemline.
Picture
A shaped facing is conventionally cut using a separate set of patterns and fits perfectly within the shape of the hemline edge. If your pattern set does not provide the facing patterns, you can use the bottom edge of the garment to cut the individual facing pieces, which are usually cut at a 2” width. 
A shaped facing is stitched to the hem’s raw edges, then folded up and clean-finished to the inside of the garment either using a machine stitch or a blind stitch.
Picture
A bias facing on the other hand, does not require a pattern. In this instance, the bias strip is cut and sewn separately to match the length of the hemline. Since it is cut on the bias, the strip has enough stretch to mold along flared edges, comfortably adjusting to the hem’s shape.
Once prepared, the bias strip is stitched to the bottom edge of the hem, then folded up and either machine stitched or blind stitched to the wrong side of the garment (just as you would with a shaped facing).
Picture
Given its construction process, a faced hem finish is usually a little more time consuming. It works best with structured, heavier items for which a thicker hem does not add bulk. The best examples in this case include garments with unusually-shaped hemlines, flared and gore skirts, outerwear jackets and blazers.

Decorative Hem Finishes

Decorative hem finishes encompass a large group of hemming techniques from trims to binding to separate fabric bands. Regardless of which is used, a hemline is considered to be decorative or semi-decorative if its finished edge features a separate element that contributes to the garment’s design aesthetically.
Decorative hem finishes are not always chosen based on their sole ornamental purpose. By design, they serve the double duty of encasing (or hiding) the hem’s raw edge while also incorporating into the garment's visual aspect.
Picture
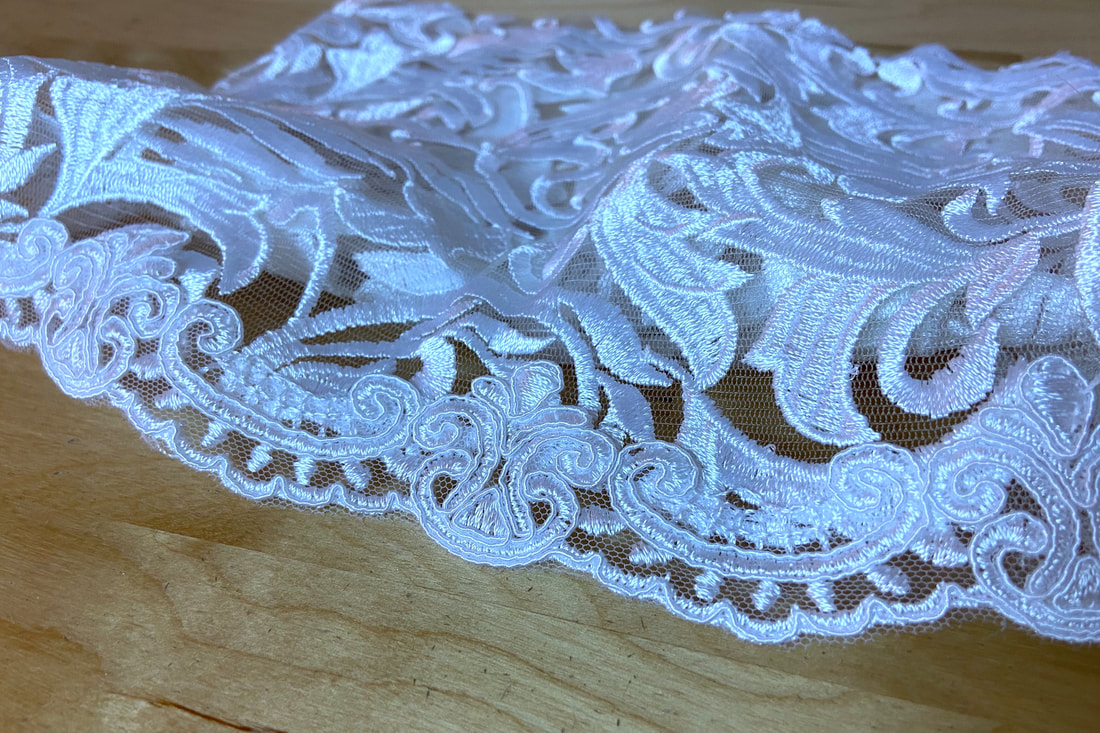
Decorative trims are often used to finish laces and fabrics that do not unravel when cut. The trims are used to cover the cut edge rather than encase it, thus providing a convenient way to add a professional finish.
Picture
Exposed bound hems use matching or contrast color binding to create a linear affect along a garment’s hemline while cleverly encasing its cut edge and thus prevent it from fraying. Keep in mind that an exposed bound finish as such is more appropriate for structured garments that can withstand the weight of the added binding.
Picture
Just like binding, a band hemline is finished with the help of a separate fabric strip that is either cut from the same fabric or a completely different color and material. In this instance, the band serves both a decorative and functional purpose. Conveniently, it enhances the garment’s design while also providing a means for encasing the hem’s raw edge and prevent it from unraveling. ​​
DMCA.com Protection Status
All content, including images and text, may not be copied, replicated, or redistributed without express written permission. This website is regularly screened and monitored for content protection.

Have A Personalized Sewing Question?

Ask It Here

Services

​Custom Apparel
Custom Bridal
​Sewing Tutorials
​

Company

About
Blog

Support

Contact
Terms of Service
DMCA.com Protection Status
© COPYRIGHT 2022. ALL RIGHTS RESERVED.
  • Sewing Tutorials
    • Basics >
      • Aligning Pattern Grainlines To Fabric
      • Preparing Fabrics For Sewing
      • Pinning Sewing Patterns To Fabric
      • Placing Sewing Patterns On Fabric For Cutting
      • Rotary Cutters or Fabric Scissors?
      • Cutting The Sewing Patterns
      • What Are Notches And How To Use Them In The Sewing Process
      • Transferring Notches From Pattern To Fabric
      • Transferring Seamlines to Fabric
      • Staystitching
      • Backstitching: A Complete Guide
      • Hand Basting: A Complete Guide
      • Sewing Continuous Bias Binding
    • Darts >
      • Marking And Transferring Darts To Fabric
      • What Are Darts And Dart Components
      • Folding, Pinning And Hand Basting Darts
      • Handling Dart Excess: Bulk And Tension
      • How To Sew A French Dart
      • How To Sew And Iron Single Pointed Darts
      • How To Sew And Iron Contour Darts
      • Sewing Darts With Decorative/Beaded Fabrics
    • Sewing Seams >
      • ​The Basics Of Seams And Seam Allowance
      • How To Sew A Straight Seam
      • Sewing Curved Seams
      • Sewing Corner Seams
      • Trimming And Grading Seam Excess
      • Notching/Clipping Seam Allowance for Tension Release
      • Sewing Topstitched Seams
      • Sewing Corded Seams
      • Sewing A Slot Seam
      • Sewing A Gathered Seam
      • Sewing Bias Seams
      • Sewing Seams With Ease
      • Sewing Seams With Crossing Seamlines
      • Sewing Unlike Fabric Seams
      • How To Iron Seams: Ironing Tools And Conventions
      • Sewing With Knit Fabrics
      • Understanding Stitch Length And Tension
      • Sewing Unique Fabric Seams
    • Seam Finishes >
      • Seam Finishing Techniques - Overview
      • Applying A Pinked Seam Finish
      • Applying A Bias Bound Seam Finish
      • Serging And Zigzag Seam Finishes
      • Sewing A Self-Bound Seam Finish
      • Sewing A French Seam Finish
      • Sewing A Hong Kong Seam Finish
      • Sewing A Mock French Seam Finish
      • Sewing A Turned-and-Stitched Seam Finish
      • Sewing Overcast Hand-Applied Seam Finishes
      • Sewing A Flat Felled Seam
      • Sewing A Hairline Seam Finish
    • Hem Finishes >
      • Garment Hem Finishes: Overview
      • ​Sewing A Double Fold Hem Finish
      • Sewing A Single Fold Hem Finish
      • Sewing Bound Hem Finishes
      • Sewing An Exposed Double Layer Bound Hem
      • Sewing A Folded-Up Bound Hem with Pre-folded Binding
      • Sewing A Hong Kong Hem Finish
      • Sewing A Band Hem Finish
      • Sewing A Bias Faced Hem Finish
      • Sewing A Twill Tape Hem Finish
      • Sewing A Rolled Hem Finish
      • Sewing A Shaped Hem Facing
      • Using Fusible Hem Tape And Webbing
      • Finishing A Lace Fabric Hem
      • Finishing A Leather Hem
      • Sewing Faced Hem Corners
      • How To Finish Lining At The Hem
      • Finishing Fabric Corners by Mitering >
        • Mitering Fabric Corners With A Full Bias Facing
        • Mitering Fabric Corners With Exposed Binding
      • Interfacing A Hemline: Lined And Unlined Examples
    • Sewing Pockets >
      • Curved Patch Pocket With Flap
      • Unlined Square Patch Pockets
      • Lined Patch Pockets: Two Ways
      • Extension On-Seam Pockets
      • Separate On-Seam Pocket
      • Front Hip Pockets
      • Bound Double Welt Pocket
      • Double Welt Pocket With Flap
      • Self-Welt Pocket (Using Single Fabric Layer)
      • Slanted Welt Pocket (Hand-Stitched)
      • Faced Slash Pockets: Overview >
        • Sewing A Faced Slit Pocket
        • Sewing A Rectangular Slash Pocket
        • Sew A Star-Shaped Faced Pocket
    • Sewing Zippers >
      • Sewing Zippers: General Information
      • Sewing A Centered Zipper
      • Sewing A Lapped Zipper
      • Sewing An Invisible Zipper
      • Sewing A Fly Front Zipper
      • Sewing A Closed-End Exposed Zipper (No Seam)
      • Sewing An Exposed Separating Zipper
      • Sewing Hand Stitched Zipper Applications
      • Sewing A Zipper Underlay
      • Sewing A Placket-Enclosed Separating Zipper
    • Sleeveless Finishes >
      • Sleeveless Armhole Finishes: General Information
      • Finishing Sleeveless Garments with Lining
      • Sewing A Folded-Under Bound Armhole Finish
      • Sewing A Shaped Armhole Facing
      • Finishing Armhole Edges With Exposed Binding
      • Finishing Armhole Edges With Decorative Trim
    • Neckline Finishes >
      • Sewing A Neck Shaped Facing
      • Sewing An All-In-One Neck Facing
      • Neck And Garment Opening Combination Facings >
        • Sewing An Extended Front-Neck Facing
        • Sewing A Separate Neck-Front Facing
      • Sewing A Bias Faced Neckline Finish
      • Sewing A Band Neckline Finish
      • Bound Neckline Finishes: Overview >
        • Sewing A Single Layer Bound Neckline
        • Finishing A Neckline With Pre-Folded Binding
        • Sewing A Double Layer Bound Neckline Finish
      • Sewing A Semi-Stretch Strip Band Neckline
      • Ribbed Neck Band And Classic Turtleneck
      • Decorative Neckline Finishes >
        • Sewing A Neckline With Decorative Inset
        • Sewing A Piped Cording Faced Neckline
        • Sewing Decorative Trim To A Finished Neckline
    • Finishing Facing Edges >
      • Finishing Facing Edges: Overview
      • Folded-And-Topstitched Overedge Facing Finish
      • Sewing A Bound Facing Edge Finish
      • Sewing A Hong Kong Facing Finish
      • Sewing A Rolled Edge Facing Finish
      • Sewing A Twill Tape Facing Edge Finish
      • Sewing An Overedge-Stitch Facing Finish
    • Extras >
      • A Complete Guide on Interfacing
      • Sewing Bound Spaghetti Straps
      • Sewing Spaghetti Straps To A Faced Neckline
      • Sewing Ruffles: Overview
      • Patterning And Sewing A Circle Ruffle
      • Sewing A Gathered Heading Ruffle
      • Sewing Double Layer Gathered Ruffles
      • Sewing A Gathered Ruffle Into A Seam
      • Sewing A Gathered Ruffle To A Fabric Edge
      • Sewing A Fabric Surface Slit
      • Sewing A Slit Seam
      • Hand-Applied Straight Stitches
      • Hand-Applied Blind Stitches
      • Hand-Applied Overedge Stitches
      • Hand-Applied Tack Stitches
      • Hand-Applied Decorative Stitches
  • Custom Apparel
    • Custom Bridal
  • Submit A Sewing Question
  • About
  • Blog