Doina Alexei
  • Sewing Tutorials
    • Basics >
      • Aligning Pattern Grainlines To Fabric
      • Preparing Fabrics For Sewing
      • Pinning Sewing Patterns To Fabric
      • Placing Sewing Patterns On Fabric For Cutting
      • Rotary Cutters or Fabric Scissors?
      • Cutting The Sewing Patterns
      • What Are Notches And How To Use Them In The Sewing Process
      • Transferring Notches From Pattern To Fabric
      • Transferring Seamlines to Fabric
      • Staystitching
      • Backstitching: A Complete Guide
      • Hand Basting: A Complete Guide
      • Sewing Continuous Bias Binding
    • Darts >
      • Marking And Transferring Darts To Fabric
      • What Are Darts And Dart Components
      • Folding, Pinning And Hand Basting Darts
      • Handling Dart Excess: Bulk And Tension
      • How To Sew A French Dart
      • How To Sew And Iron Single Pointed Darts
      • How To Sew And Iron Contour Darts
      • Sewing Darts With Decorative/Beaded Fabrics
    • Sewing Seams >
      • ​The Basics Of Seams And Seam Allowance
      • How To Sew A Straight Seam
      • Sewing Curved Seams
      • Sewing Corner Seams
      • Trimming And Grading Seam Excess
      • Notching/Clipping Seam Allowance for Tension Release
      • Sewing Topstitched Seams
      • Sewing Corded Seams
      • Sewing A Slot Seam
      • Sewing A Gathered Seam
      • Sewing Bias Seams
      • Sewing Seams With Ease
      • Sewing Seams With Crossing Seamlines
      • Sewing Unlike Fabric Seams
      • How To Iron Seams: Ironing Tools And Conventions
      • Sewing With Knit Fabrics
      • Understanding Stitch Length And Tension
      • Sewing Unique Fabric Seams
    • Seam Finishes >
      • Seam Finishing Techniques - Overview
      • Applying A Pinked Seam Finish
      • Applying A Bias Bound Seam Finish
      • Serging And Zigzag Seam Finishes
      • Sewing A Self-Bound Seam Finish
      • Sewing A French Seam Finish
      • Sewing A Hong Kong Seam Finish
      • Sewing A Mock French Seam Finish
      • Sewing A Turned-and-Stitched Seam Finish
      • Sewing Overcast Hand-Applied Seam Finishes
      • Sewing A Flat Felled Seam
      • Sewing A Hairline Seam Finish
    • Hem Finishes >
      • Garment Hem Finishes: Overview
      • ​Sewing A Double Fold Hem Finish
      • Sewing A Single Fold Hem Finish
      • Sewing Bound Hem Finishes
      • Sewing An Exposed Double Layer Bound Hem
      • Sewing A Folded-Up Bound Hem with Pre-folded Binding
      • Sewing A Hong Kong Hem Finish
      • Sewing A Band Hem Finish
      • Sewing A Bias Faced Hem Finish
      • Sewing A Twill Tape Hem Finish
      • Sewing A Rolled Hem Finish
      • Sewing A Shaped Hem Facing
      • Using Fusible Hem Tape And Webbing
      • Finishing A Lace Fabric Hem
      • Finishing A Leather Hem
      • Sewing Faced Hem Corners
      • How To Finish Lining At The Hem
      • Finishing Fabric Corners by Mitering >
        • Mitering Fabric Corners With A Full Bias Facing
        • Mitering Fabric Corners With Exposed Binding
      • Interfacing A Hemline: Lined And Unlined Examples
    • Sewing Pockets >
      • Curved Patch Pocket With Flap
      • Unlined Square Patch Pockets
      • Lined Patch Pockets: Two Ways
      • Extension On-Seam Pockets
      • Separate On-Seam Pocket
      • Front Hip Pockets
      • Bound Double Welt Pocket
      • Double Welt Pocket With Flap
      • Self-Welt Pocket (Using Single Fabric Layer)
      • Slanted Welt Pocket (Hand-Stitched)
      • Faced Slash Pockets: Overview >
        • Sewing A Faced Slit Pocket
        • Sewing A Rectangular Slash Pocket
        • Sew A Star-Shaped Faced Pocket
    • Sewing Zippers >
      • Sewing Zippers: General Information
      • Sewing A Centered Zipper
      • Sewing A Lapped Zipper
      • Sewing An Invisible Zipper
      • Sewing A Fly Front Zipper
      • Sewing A Closed-End Exposed Zipper (No Seam)
      • Sewing An Exposed Separating Zipper
      • Sewing Hand Stitched Zipper Applications
      • Sewing A Zipper Underlay
      • Sewing A Placket-Enclosed Separating Zipper
    • Sleeveless Finishes >
      • Sleeveless Armhole Finishes: General Information
      • Finishing Sleeveless Garments with Lining
      • Sewing A Folded-Under Bound Armhole Finish
      • Sewing A Shaped Armhole Facing
      • Finishing Armhole Edges With Exposed Binding
      • Finishing Armhole Edges With Decorative Trim
    • Neckline Finishes >
      • Sewing A Neck Shaped Facing
      • Sewing An All-In-One Neck Facing
      • Neck And Garment Opening Combination Facings >
        • Sewing An Extended Front-Neck Facing
        • Sewing A Separate Neck-Front Facing
      • Sewing A Bias Faced Neckline Finish
      • Sewing A Band Neckline Finish
      • Bound Neckline Finishes: Overview >
        • Sewing A Single Layer Bound Neckline
        • Finishing A Neckline With Pre-Folded Binding
        • Sewing A Double Layer Bound Neckline Finish
      • Sewing A Semi-Stretch Strip Band Neckline
      • Ribbed Neck Band And Classic Turtleneck
      • Decorative Neckline Finishes >
        • Sewing A Neckline With Decorative Inset
        • Sewing A Piped Cording Faced Neckline
        • Sewing Decorative Trim To A Finished Neckline
    • Finishing Facing Edges >
      • Finishing Facing Edges: Overview
      • Folded-And-Topstitched Overedge Facing Finish
      • Sewing A Bound Facing Edge Finish
      • Sewing A Hong Kong Facing Finish
      • Sewing A Rolled Edge Facing Finish
      • Sewing A Twill Tape Facing Edge Finish
      • Sewing An Overedge-Stitch Facing Finish
    • Extras >
      • A Complete Guide on Interfacing
      • Sewing Bound Spaghetti Straps
      • Sewing Spaghetti Straps To A Faced Neckline
      • Sewing Ruffles: Overview
      • Patterning And Sewing A Circle Ruffle
      • Sewing A Gathered Heading Ruffle
      • Sewing Double Layer Gathered Ruffles
      • Sewing A Gathered Ruffle Into A Seam
      • Sewing A Gathered Ruffle To A Fabric Edge
      • Sewing A Fabric Surface Slit
      • Sewing A Slit Seam
      • Hand-Applied Straight Stitches
      • Hand-Applied Blind Stitches
      • Hand-Applied Overedge Stitches
      • Hand-Applied Tack Stitches
      • Hand-Applied Decorative Stitches
  • Custom Apparel
    • Custom Bridal
  • Submit A Sewing Question
  • About
  • Blog

How To Sew Square Patch Pockets: Unlined Version

​A patch pocket is always sewn onto the fabric surface. Patch pockets come in a variety of different shapes and sizes. They can be decoratively finished or feature add-on functional elements like flaps and zippers. 
​Unlike other pocket styles, a patch pocket bag is not sewn separately but rather formed by its connection with the fabric surface. The layer that is patched onto the fabric surface to form the pocket bag can be either lined or unlined, and have square or curved corners. 
Picture
In this tutorial, you will learn how to sew the simplest of all styles: an unlined patch pocket with square corners. ​
​Unlined patch pockets are used with casual garments as they provide a less structured finish. Since the fabric’s raw edges are simply folded in toward the inside of the pocket, non-sheer (opaque) fabric should be used to securely hide them underneath. 
When sewing any patch pocket application, you should consider not only how to enclose all the fabric’s raw edges but also how to stitch the pocket opening for durability. A few standard techniques are shown below. 
With an unlined patch pocket, the pocket layer's bottom and side edges are pre-folded prior to sewing it to the garment. 
Picture
Picture
If the pocket bottom is curved, a technique called easestitching can be used to facilitate the folding process. ​
To learn how to sew a curved-bottom patch pocket using the easestitching method, check out this tutorial: Curved Patch Pocket With Flap
Picture
Picture
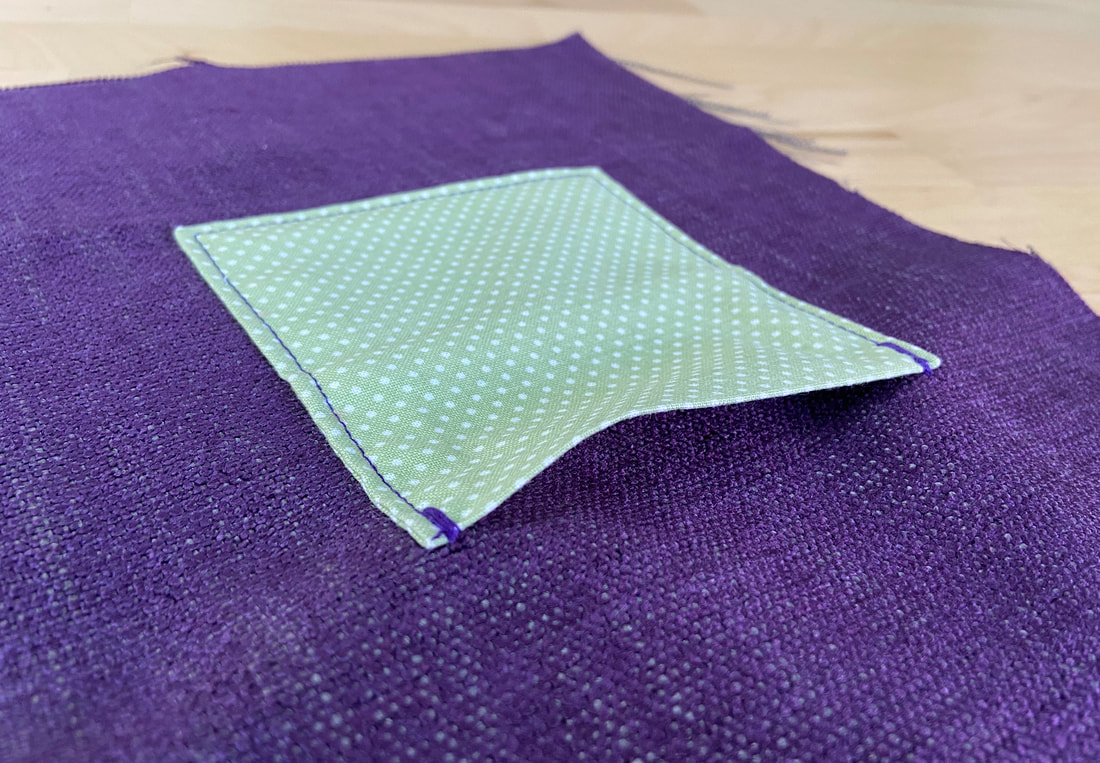
For a square edge patch pocket like the one shown below, the bottom edges are mitered to achieve a clean, flat application. Mitering prevents the fabric edges from peeking underneath the finished pocket corners. 
​The patch pocket's top edge, which naturally corresponds to the pocket opening, is treated a bit differently. This edge should not only be durable and highly functional, its raw edges should also be completely secured and enclosed with a little more than just folding. 
Picture
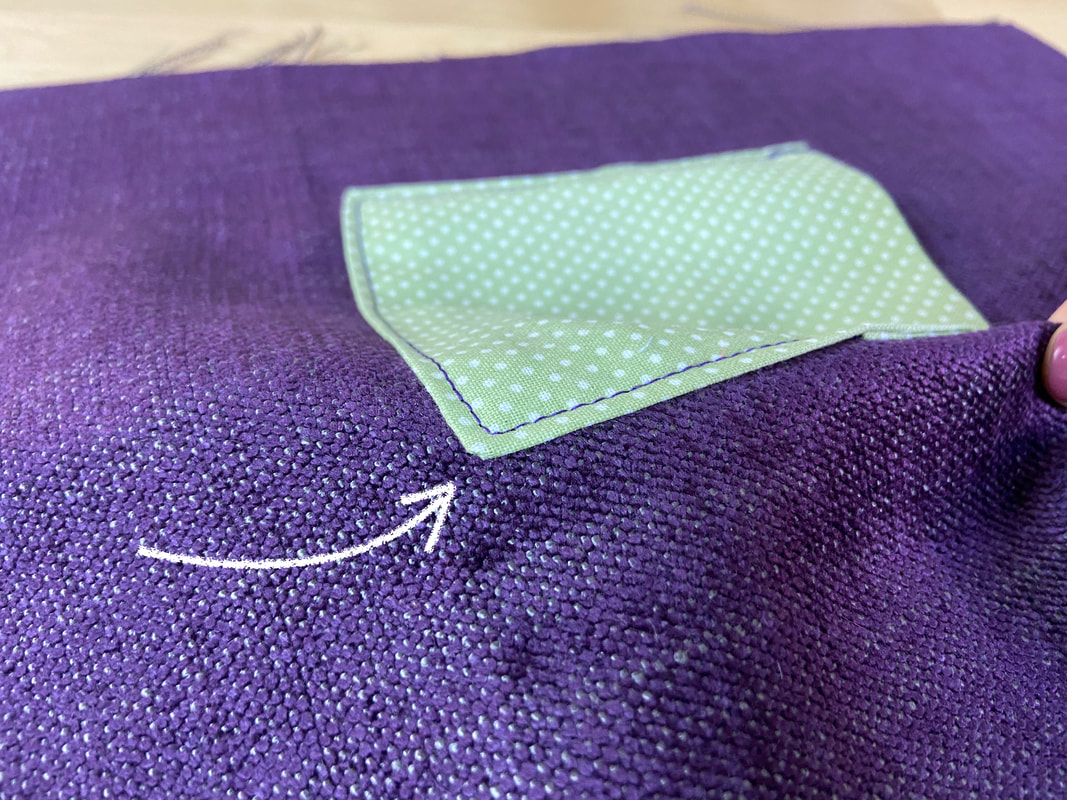
At the pocket opening, no visible raw edges should be peeking from the sides. Not only does this cause the patch pocket to look unfinished, these edges also tend to unravel and distort the pocket opening. 
Picture
An easy way to secure the top edge of an unlined patch pocket is with a built-in facing. This facing extension folds onto itself, over the pocket’s opening edges, naturally clean-finishing the patch pocket’s upper portions including the corners. 

Measuring, Cutting And Attaching A Square (Unlined) Patch Pocket

1. Start by cutting the patch pocket layer. You can either use a pattern (if you have one) or measure, mark and cut it directly from your fabric. 
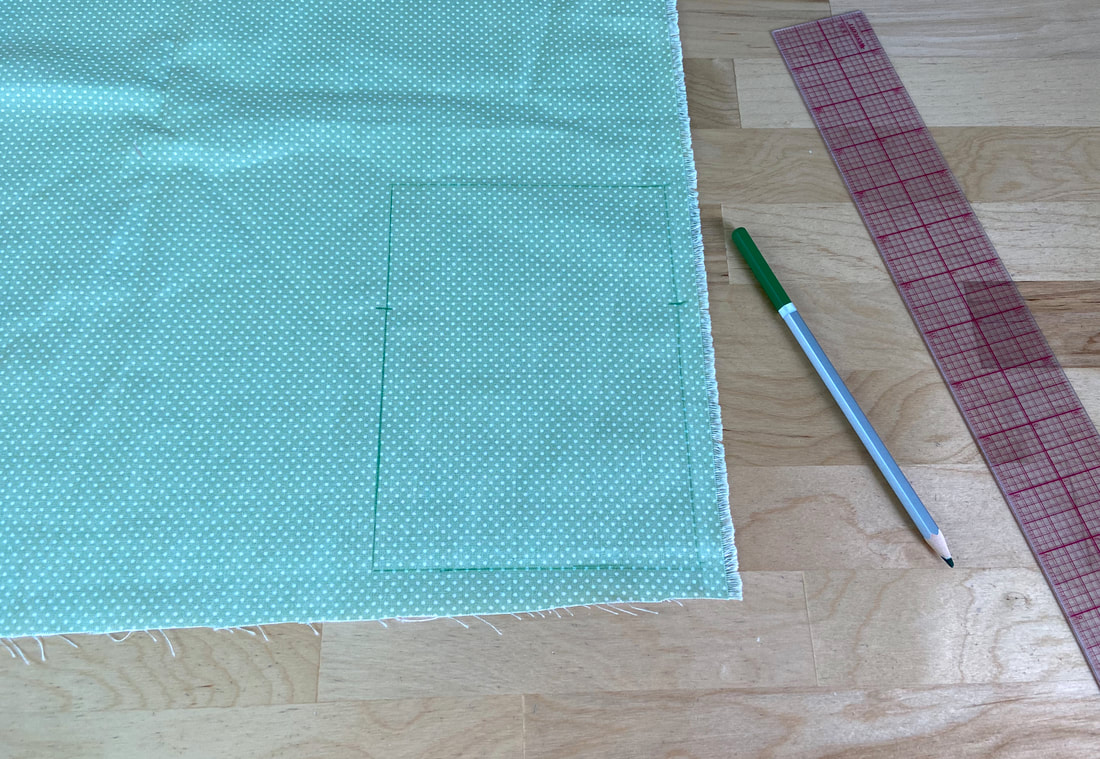
If cutting your pocket piece from scratch, cut a rectangular shape to measure the desired length of the pocket plus two (2) seam allowances and a 2” extension at the top. In addition, add two (2) seam allowances to the desired width. 
In this case, the finished pocket will be 4” x 4”. Thus, the initial fabric cut measures 5” in width (4” plus two ½” seam allowances) and 7” in length. The 7” accounts for two (2) seam allowances of ½” and the 2” extension at the top. 
Picture
Using a ruler draw the 5” x 7” rectangle directly one the fabric surface as shown.
Picture
Carefully cut the rectangular fabric piece along its marked lines. ​
Picture
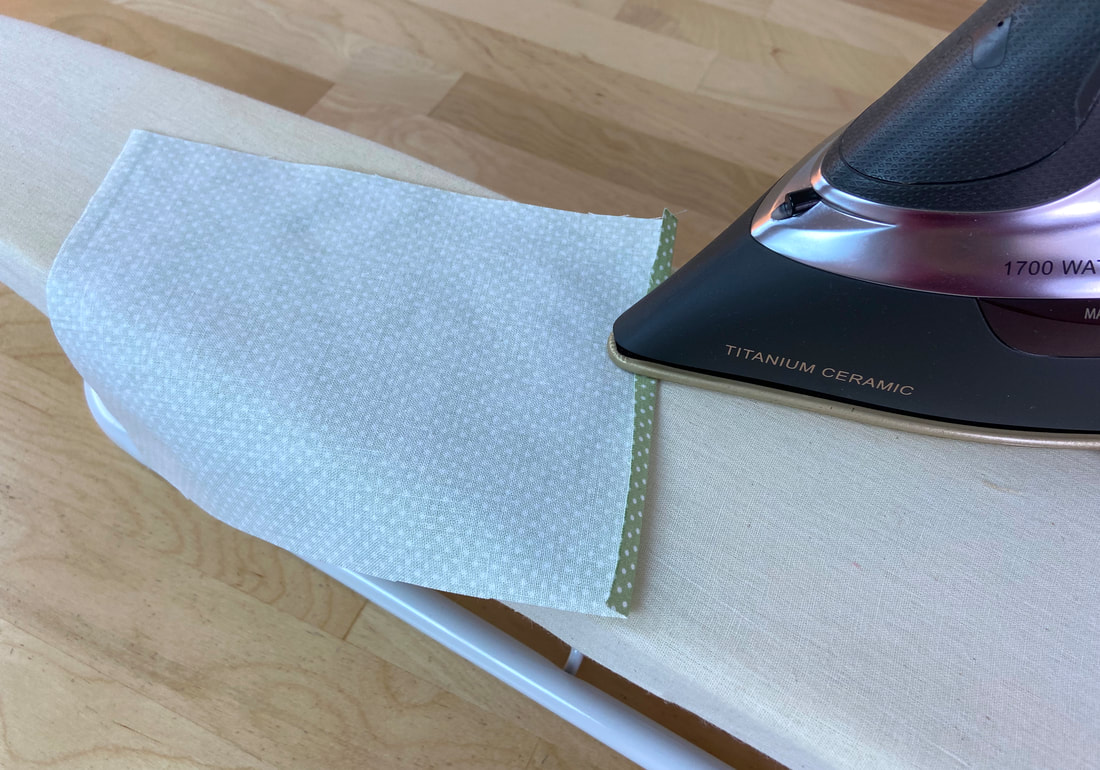
2. Fold the top edge of the rectangular fabric at ¼” toward its wrong side and iron the fold. 
Picture
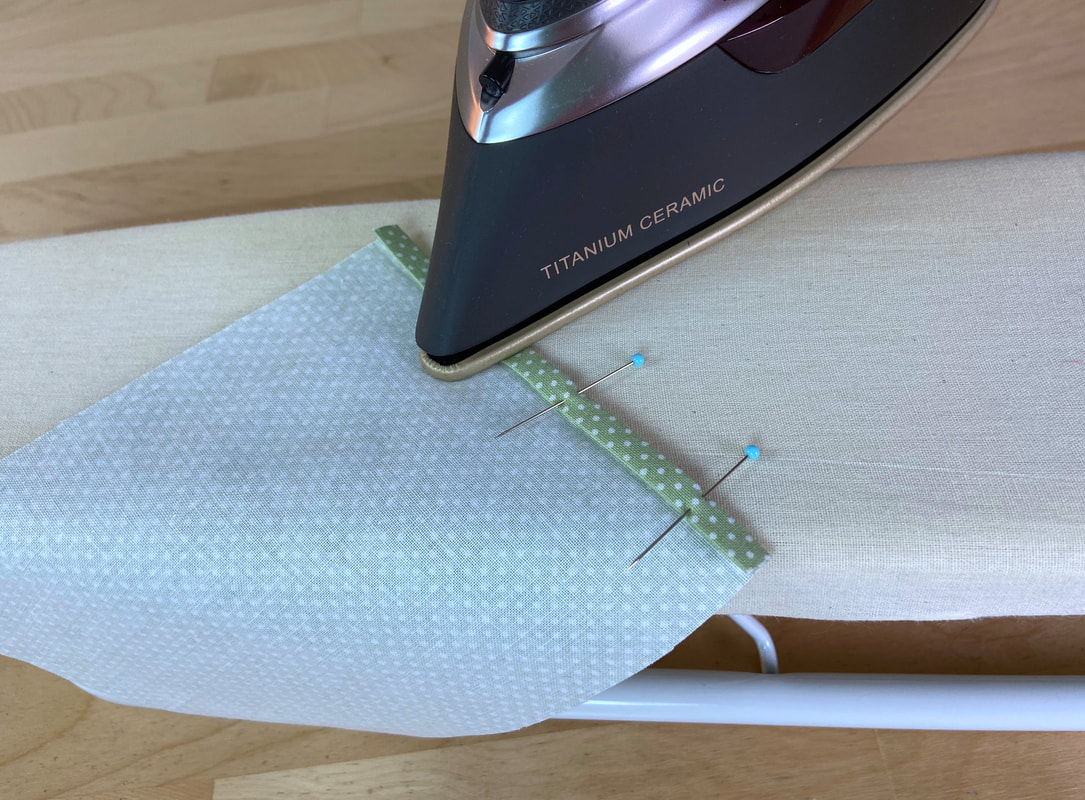
3. Fold again at ¼” to enclose the fabric’s raw edge. Iron as you fold and insert pins to keep the double fold in place for topstitching.
Picture
4. From the fabric’s wrong side, topstitch the folded edges using the inner fold as a guide. Once complete, iron the topstitched folded edge.
Picture
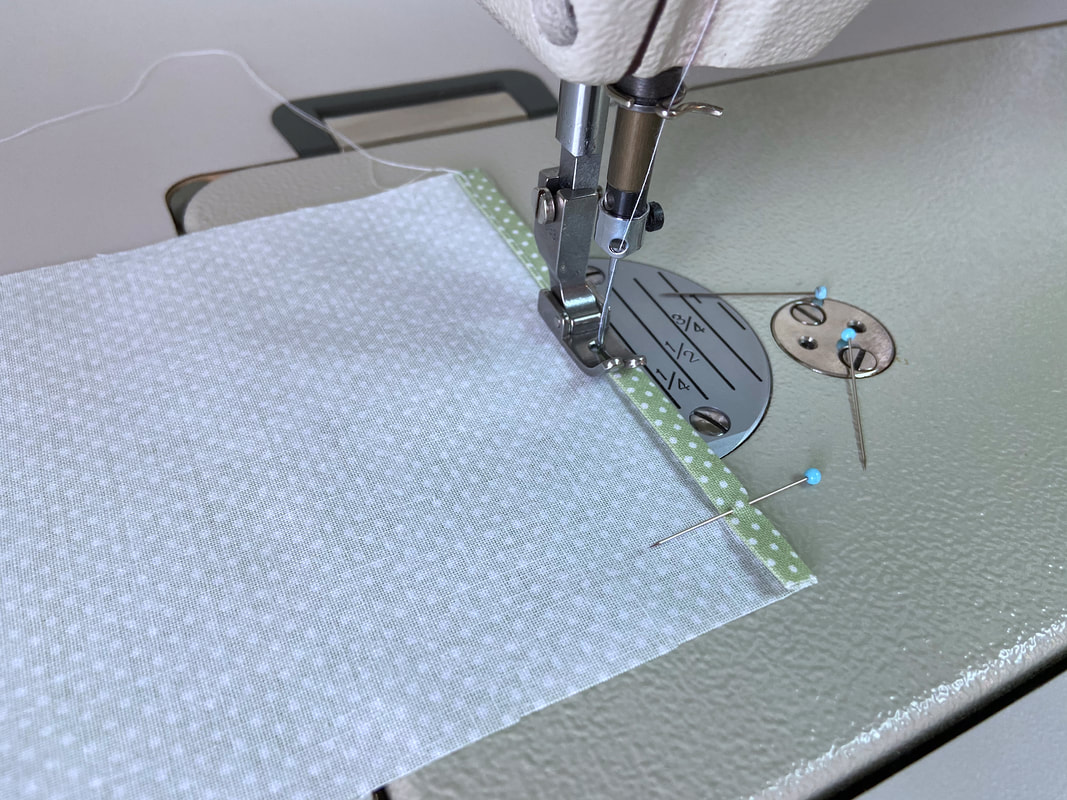
5. Next, fold the finished top edge at 2” toward the right side of the pocket piece (fabric face side should be touching). The resulting fold will correspond to the patch pocket's top finished edge. Insert pins on both sides of the fold, perpendicular to the edge as shown. ​
Picture
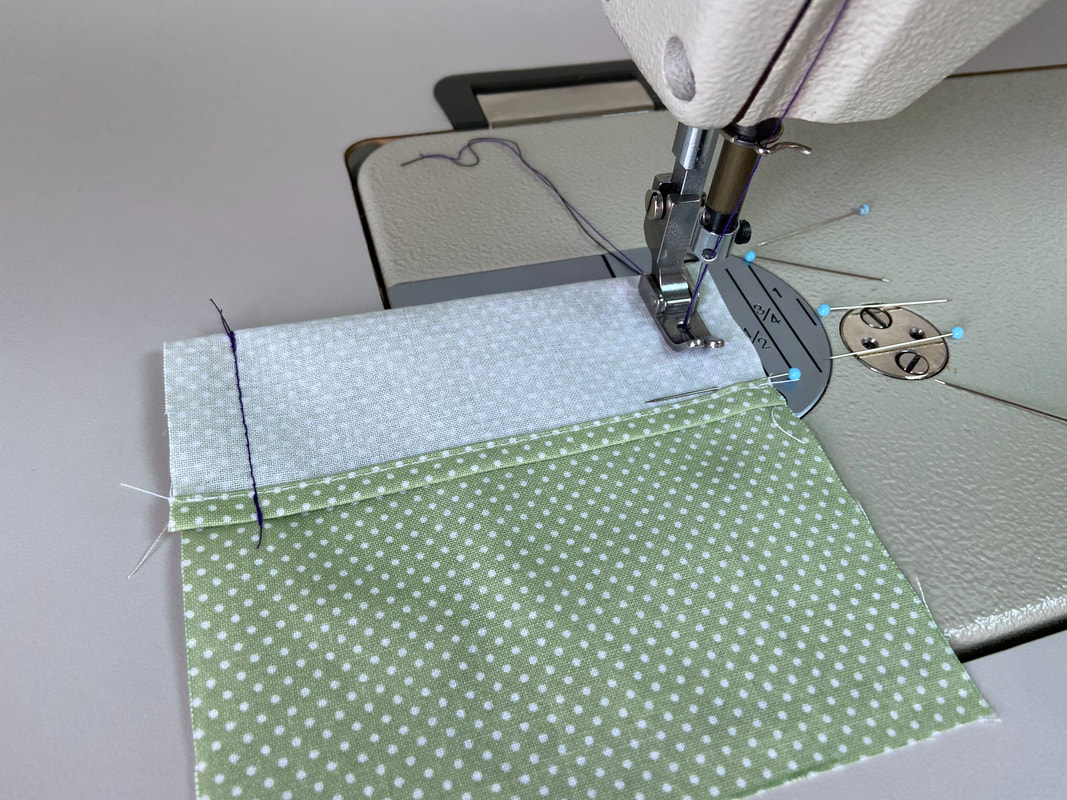
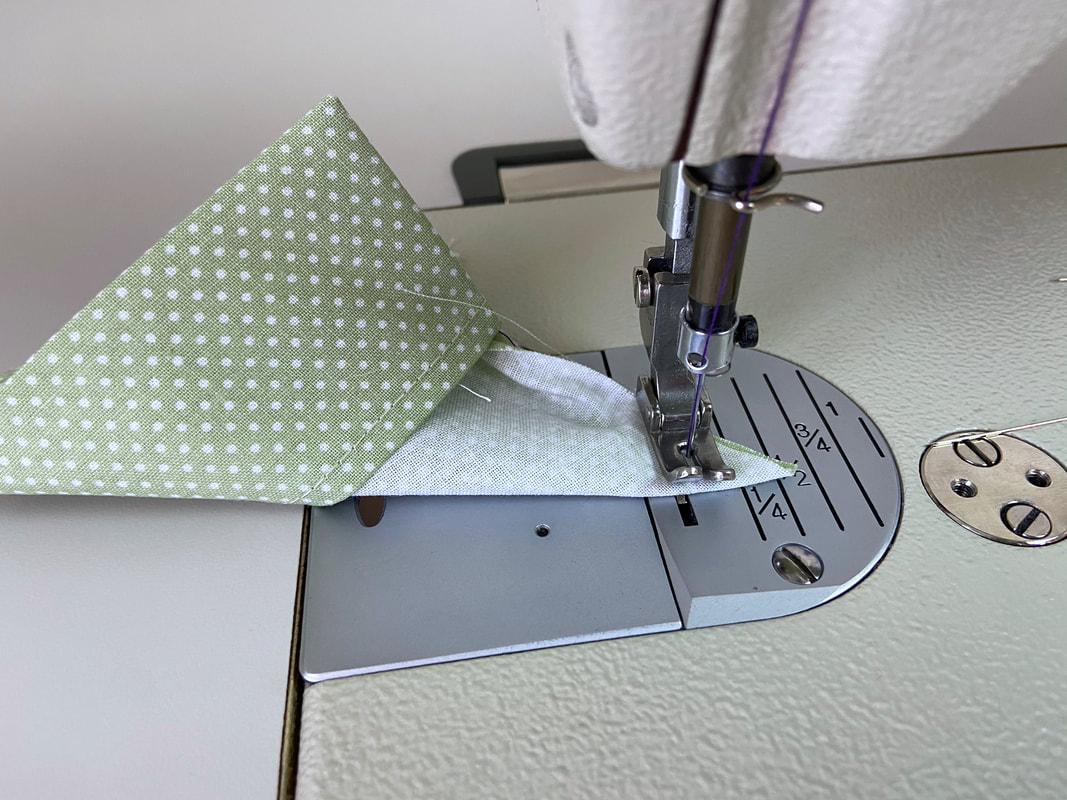
6. Stitch the folded layers at ½” seam allowance on both sides. 
Picture
Picture
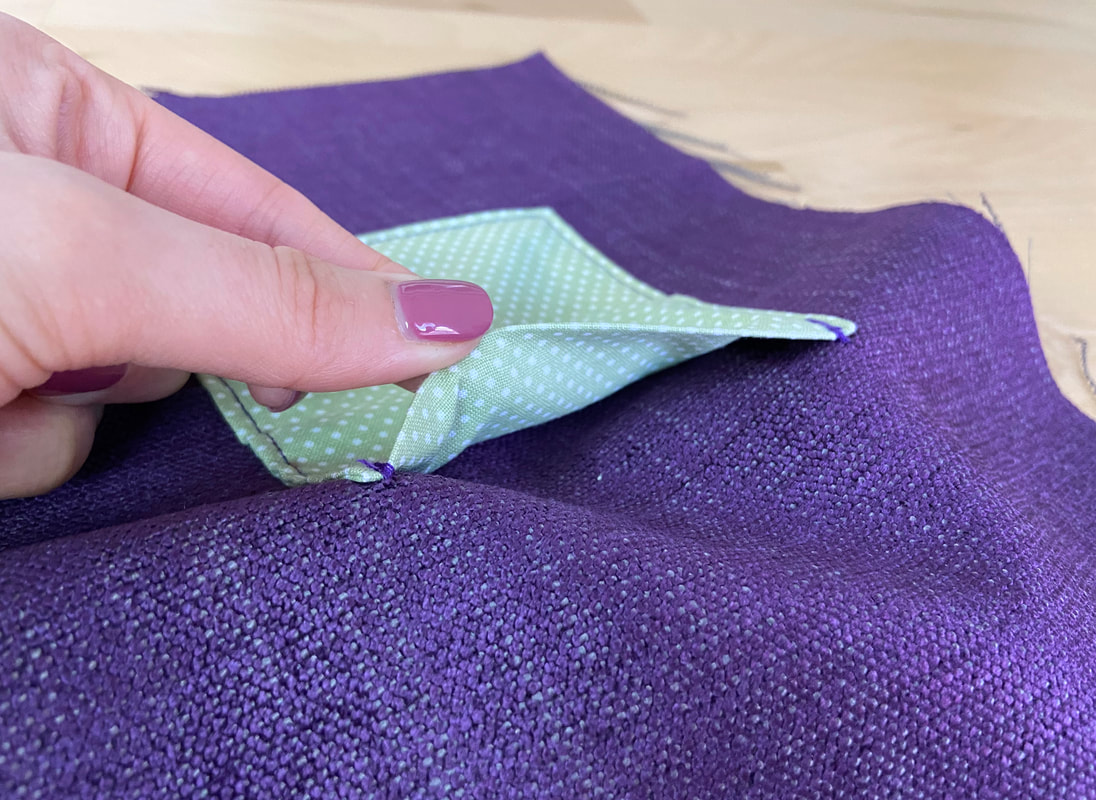
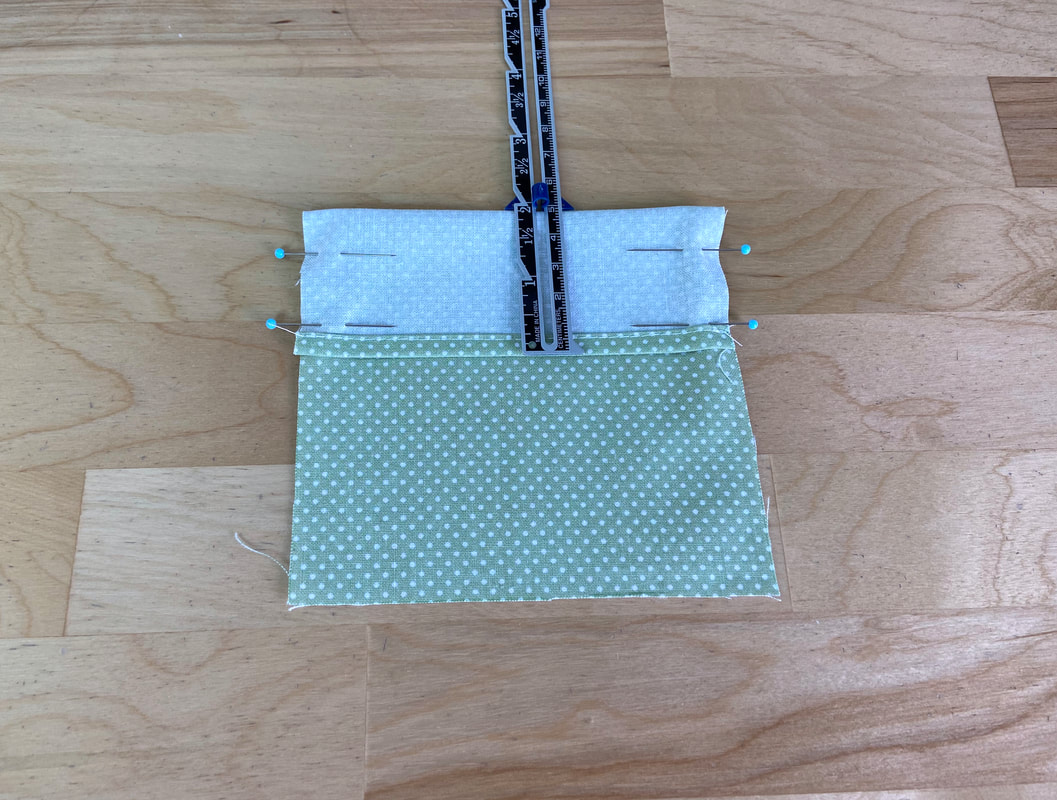
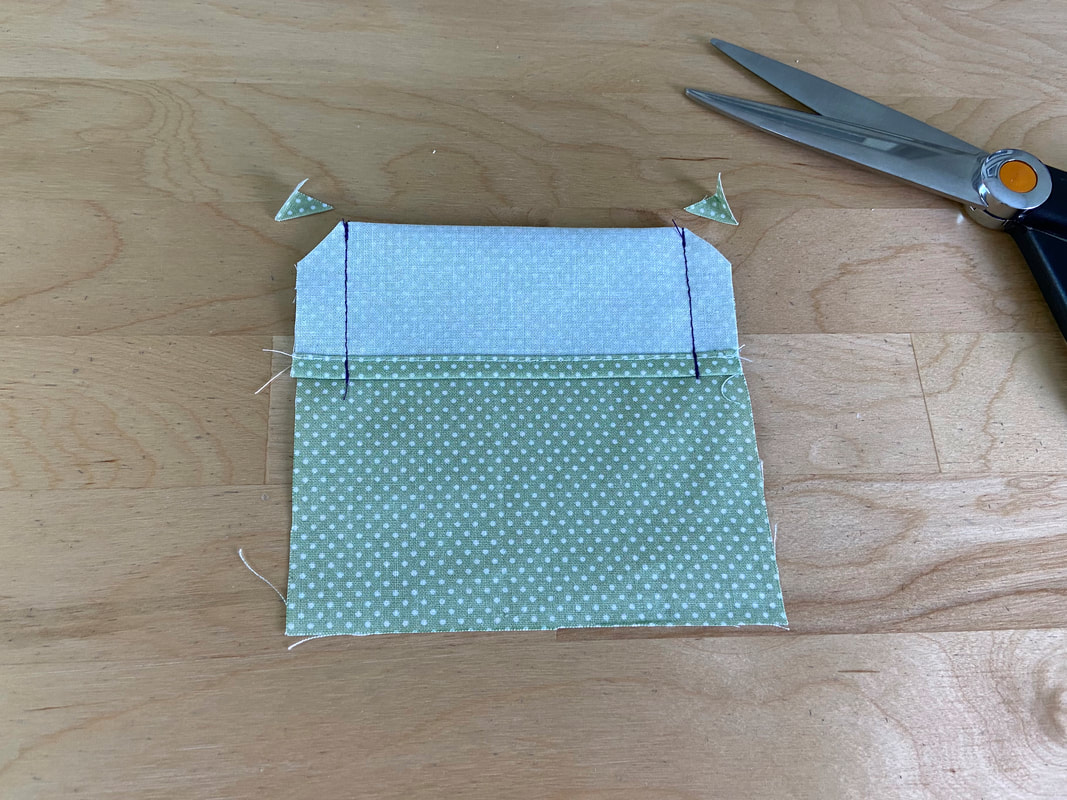
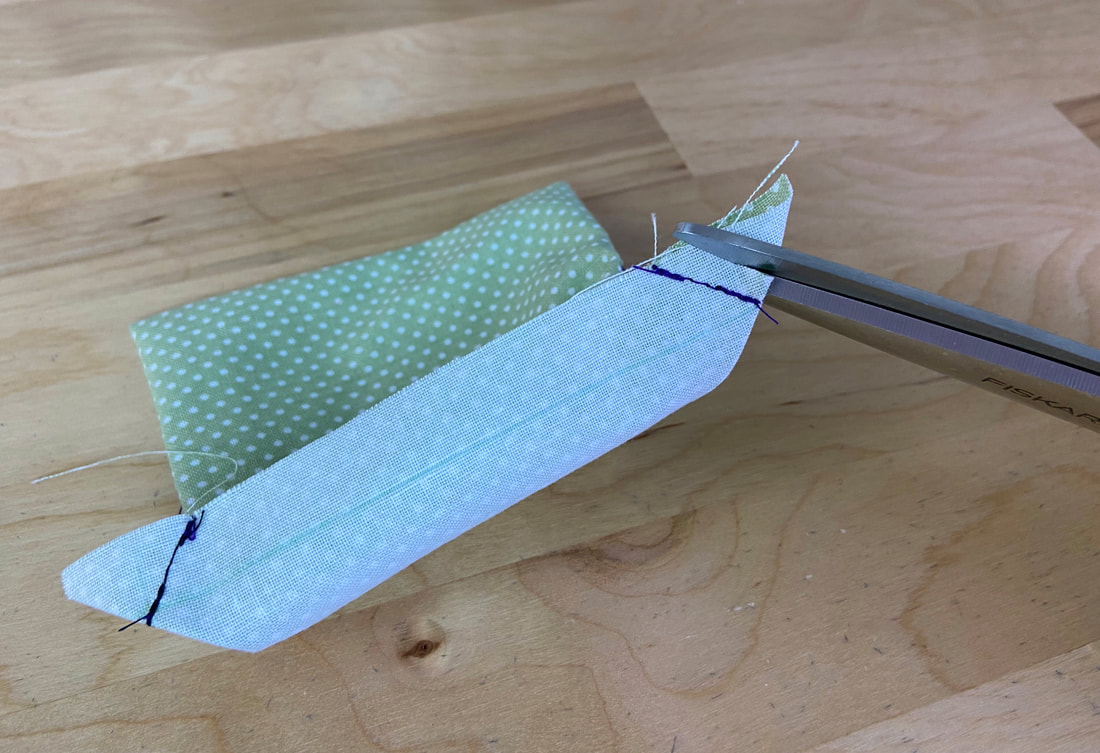
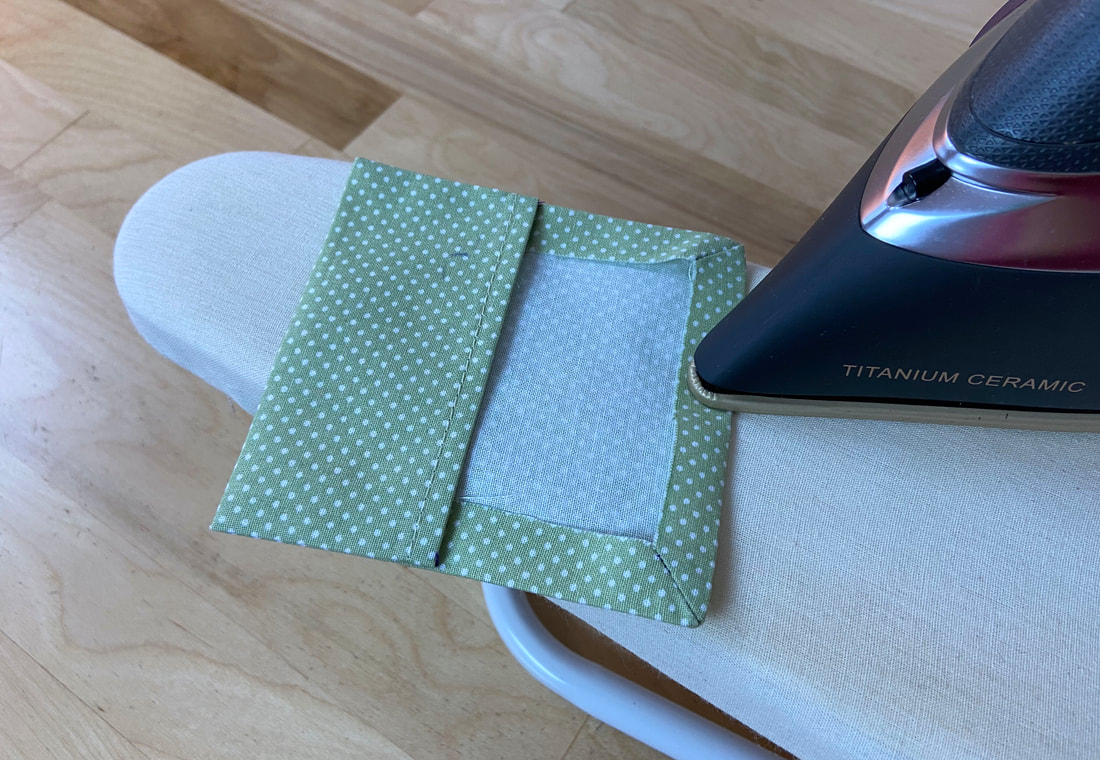
7. Trim and grade the seam allowance at each corner, and turn the folded edge on its face side. The stitched sides should result in fully enclosed, clean-finished corners. Iron the pocket’s finished top and side edges.
Picture
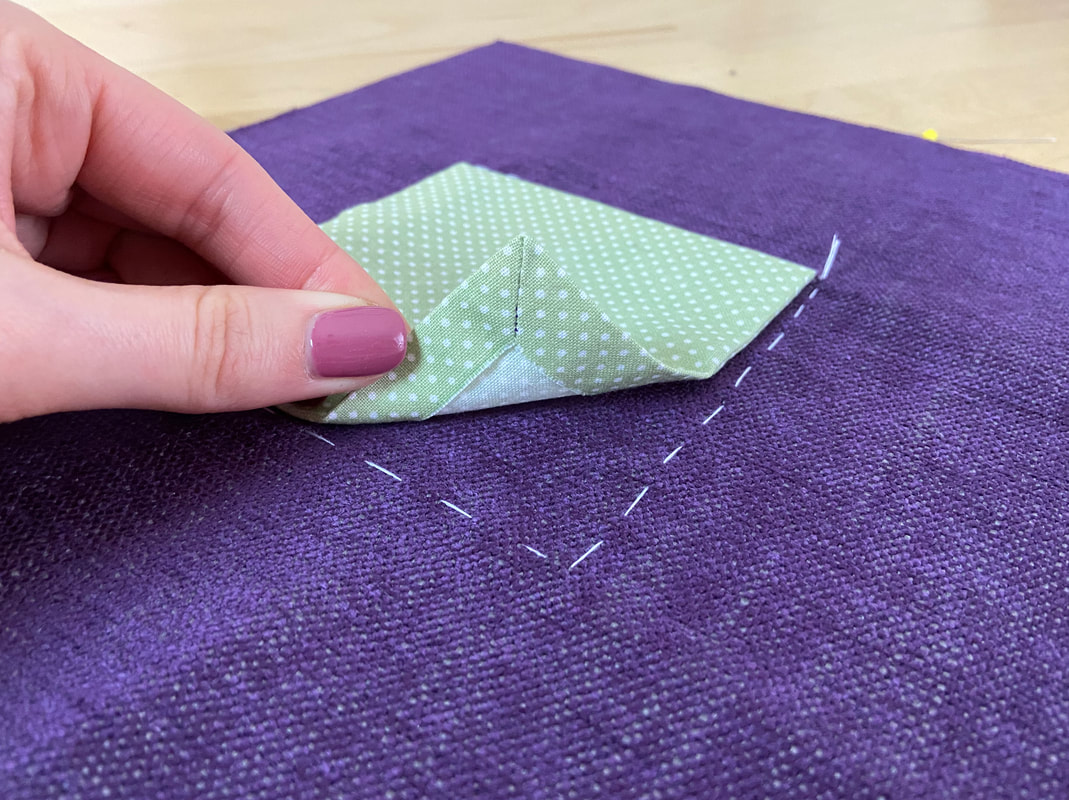
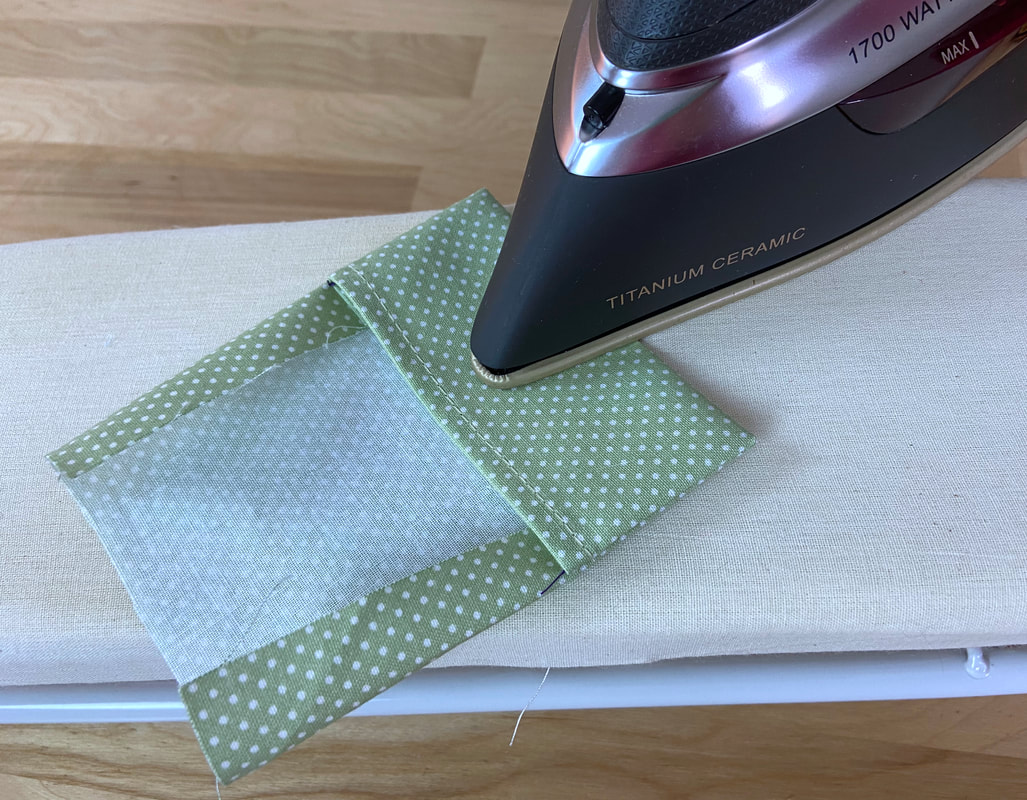
8. Before sewing the pocket to the garment, both bottom corners should be mitered. Fold the corner diagonally toward the wrong side of the fabric such that the intersection of the horizontal and vertical seamlines falls directly on this diagonal fold. Iron the folded edge as shown. 
Picture
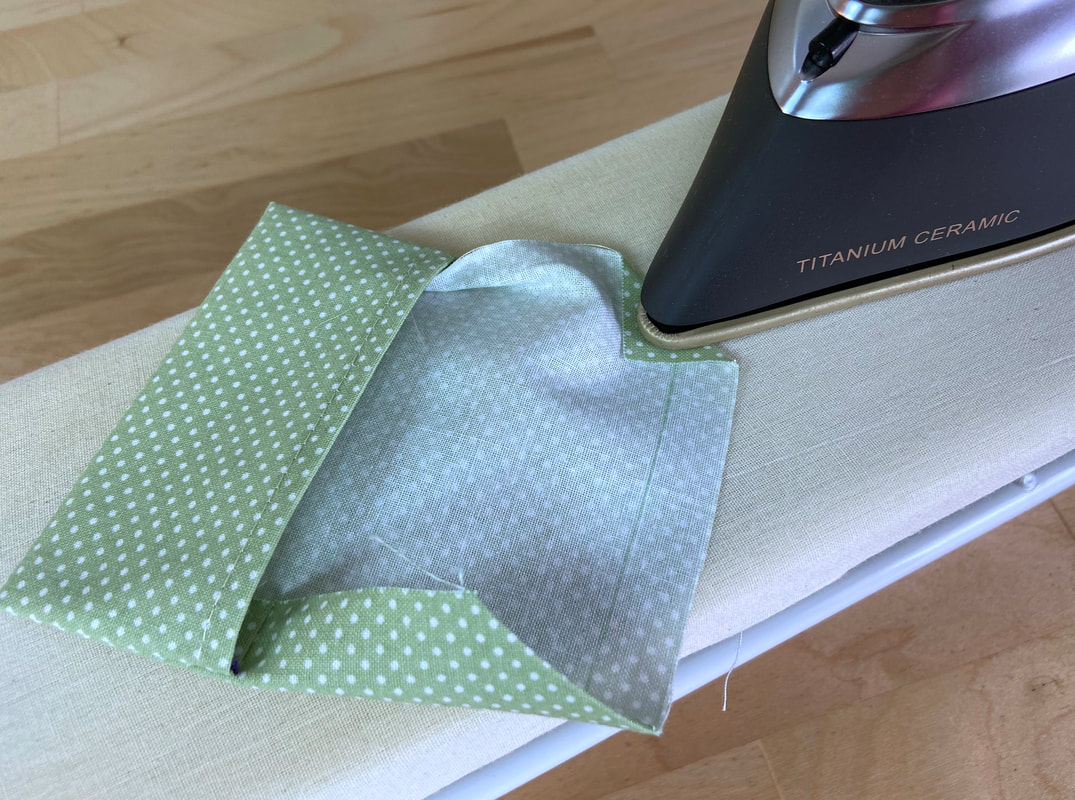
9. Next, open the folded edge and bring the vertical and horizontal edges together such that the folded crease lines overlap and fabric face sides are touching. Insert a pin to hold.
Picture
10. Starting at the widest part, stitch on top of the crease line until you arrive at the fabric fold (corner) as shown. 
Picture
11. Trim the excess seam allowance and notch the corner.
Picture
Picture
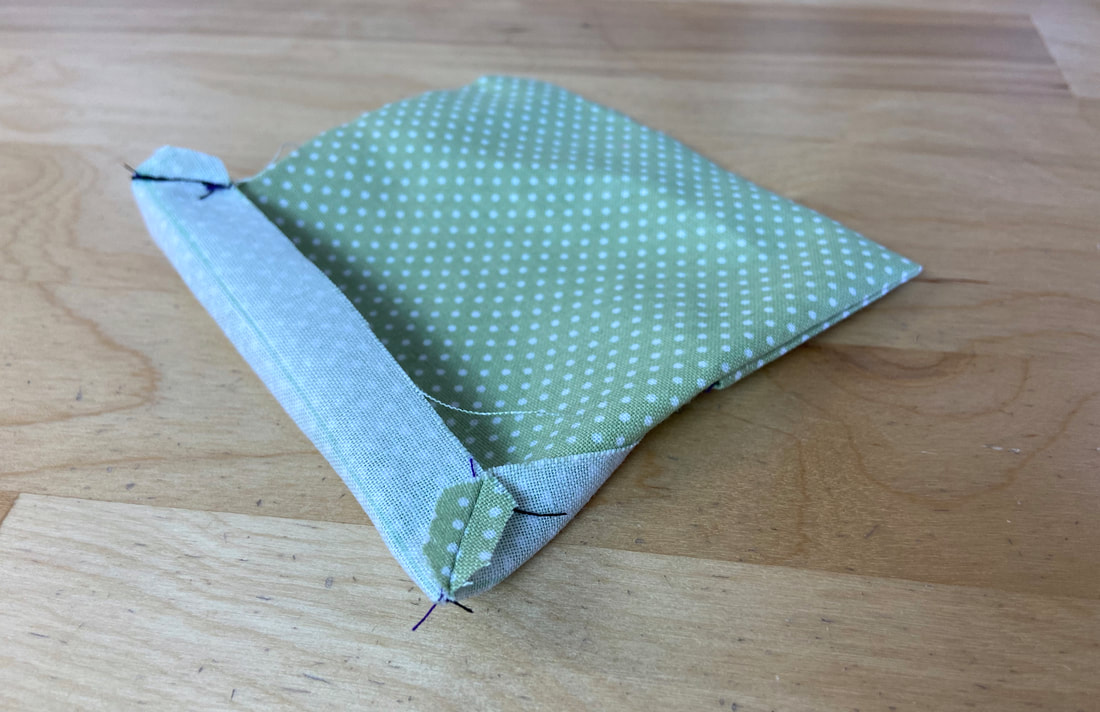
​Iron the corner seam allowance open, and turn the corner back on their right side as shown. 
Repeat the mitering process described above on both patch pocket corners. 
Picture
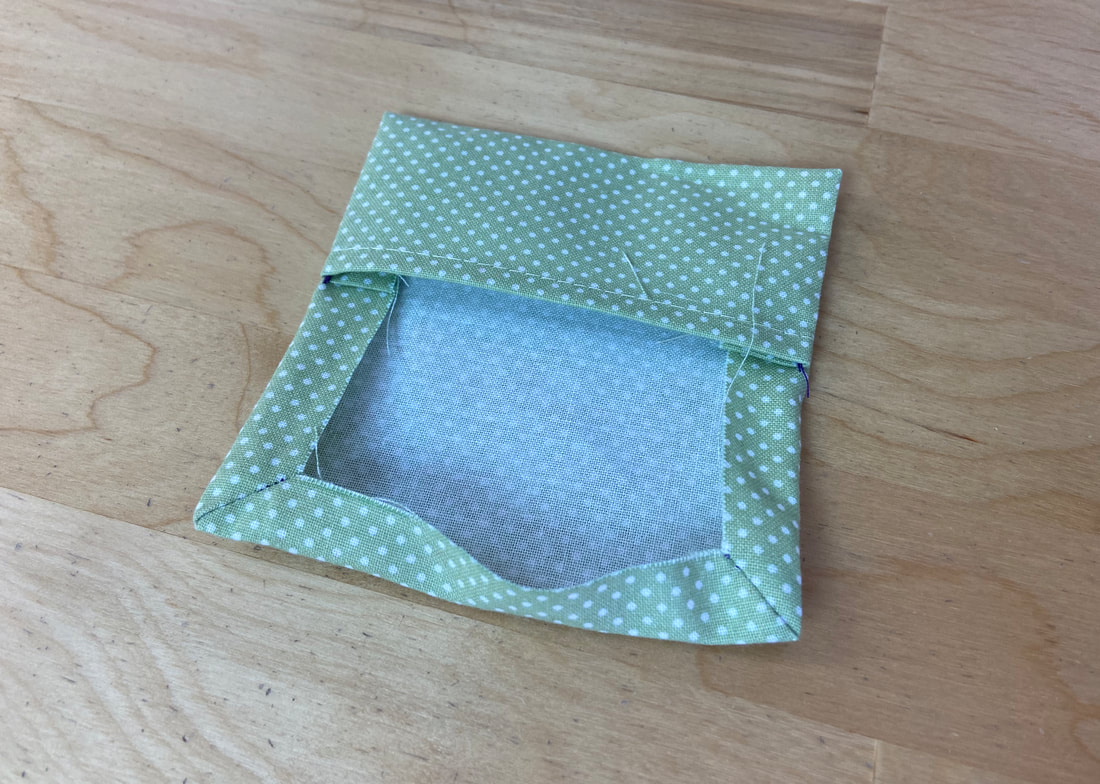
12. Now that the corners are clean-finished, fold the pocket’s side edges at ½” and iron the fold lines. All folded edges should blend into the mitered corners. Next, fold the bottom edge inwards at ½” and iron again. The bottom folded edge should also blend into the mitered corners in a uniform, straight line. ​
Picture
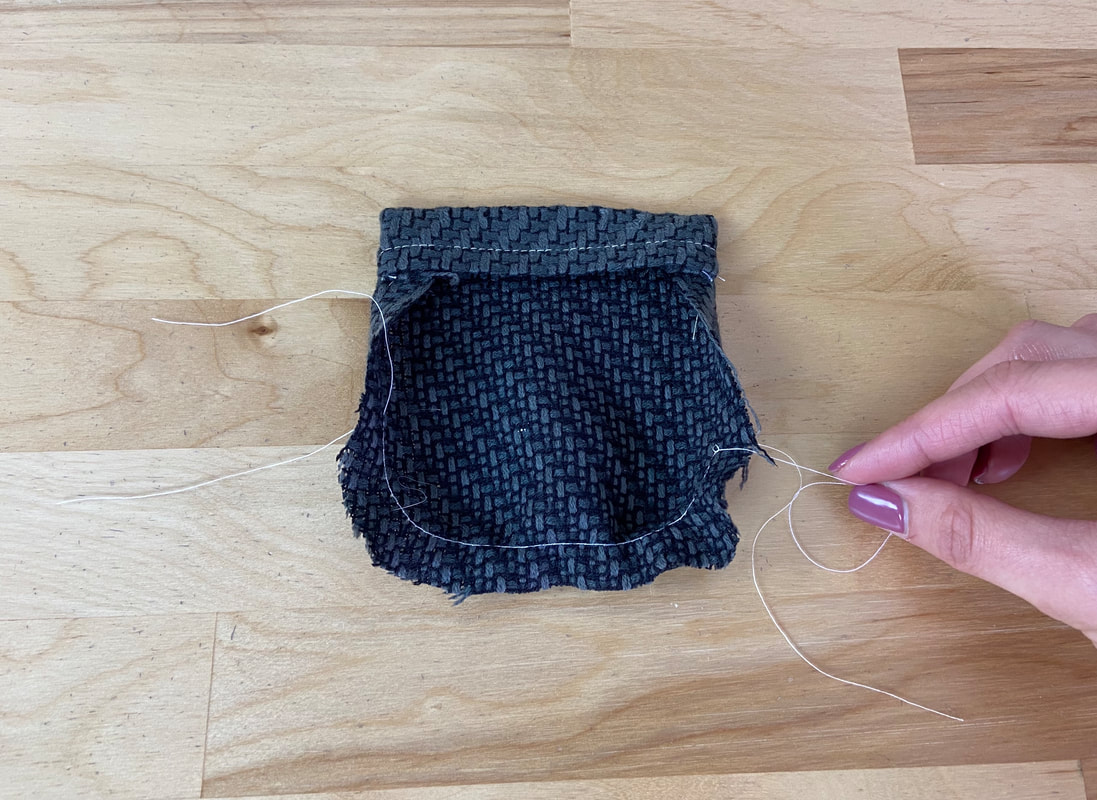
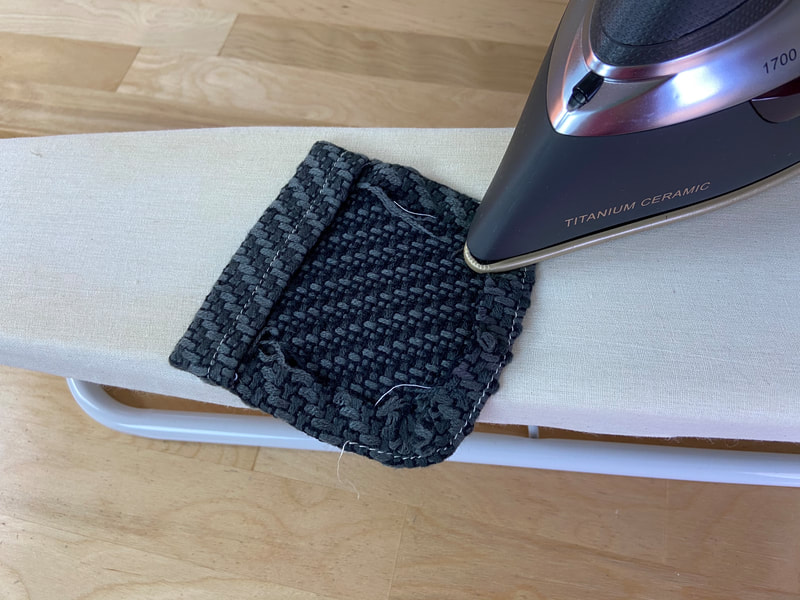
13. At this point, if your fabric does not iron well, you may need to hand baste all the folded edges to ensure they remain flat during the machine application process. 
Picture
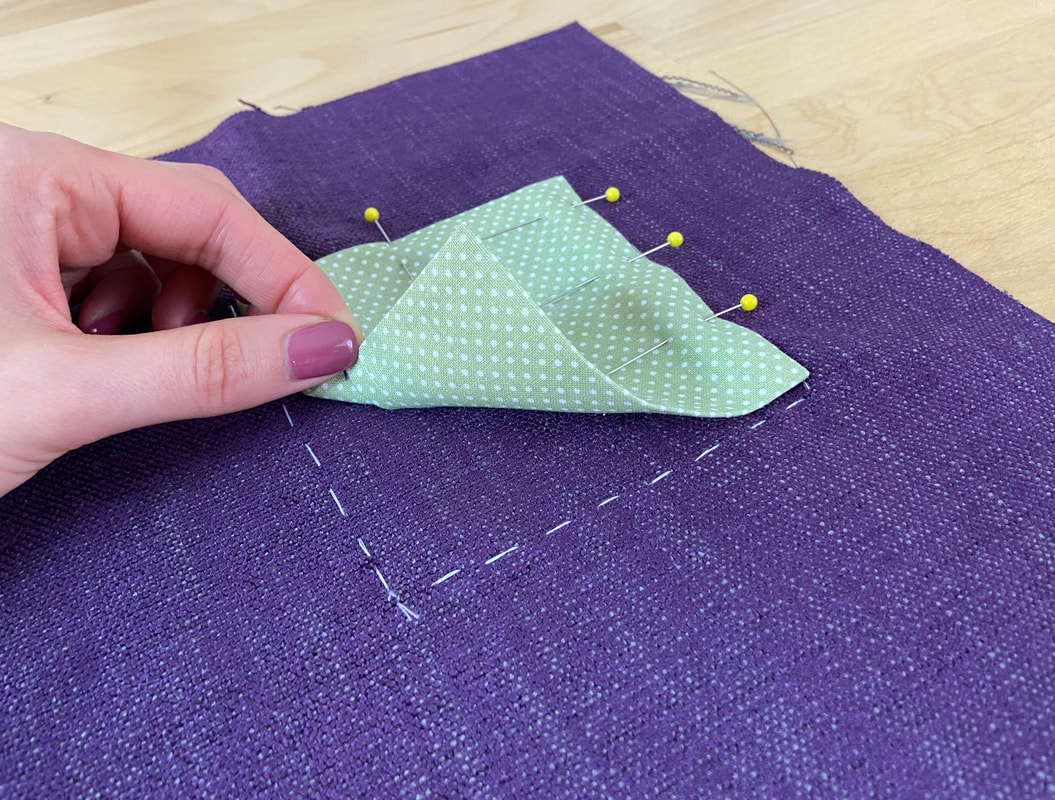
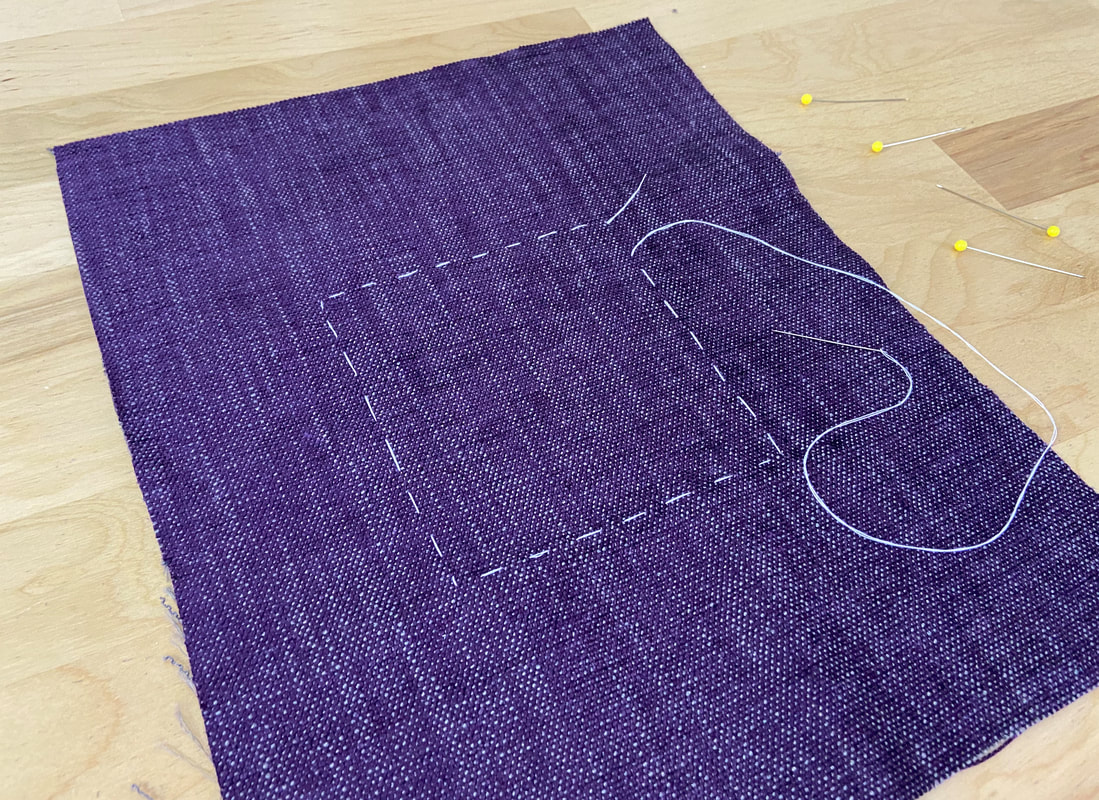
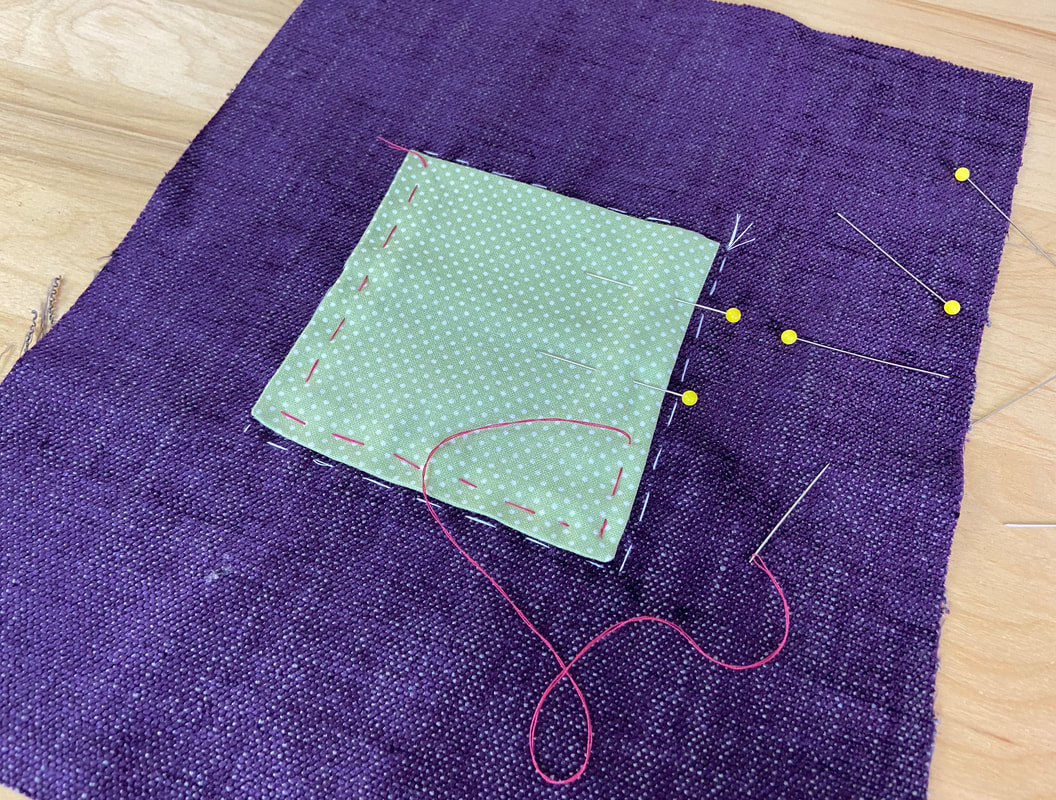
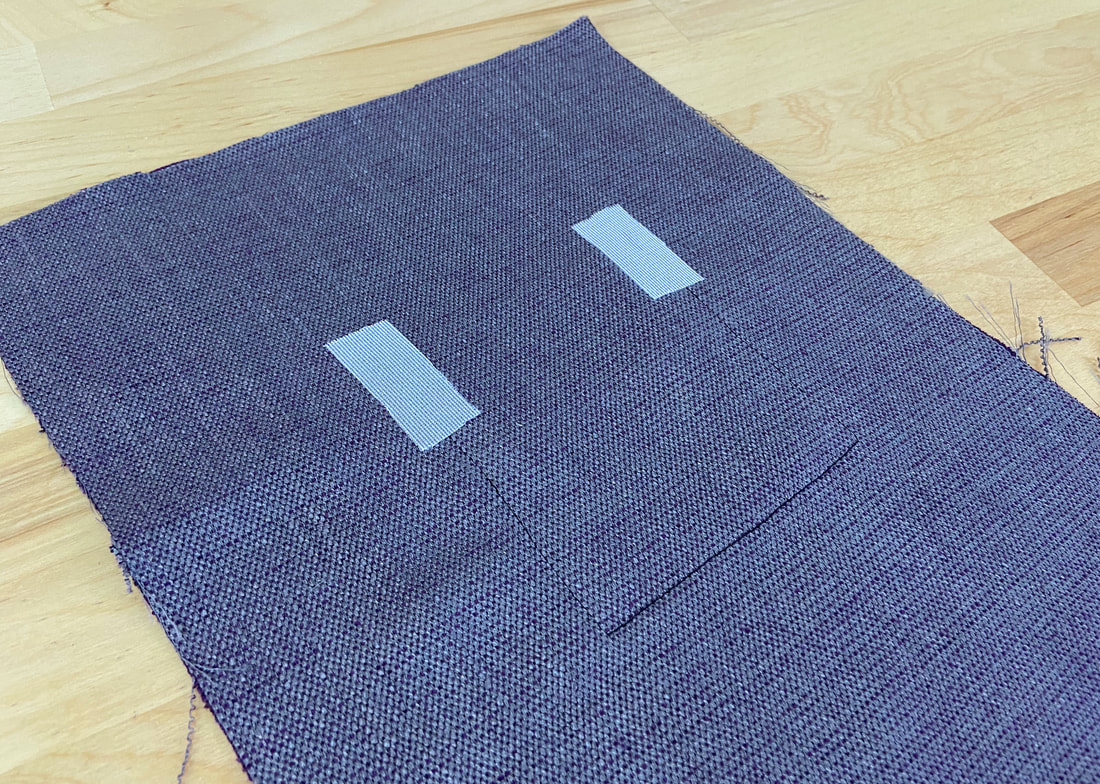
14. Directly on the garment’s surface, hand baste an outline of the pocket at the exact location and size as the final patch pocket. 
Picture
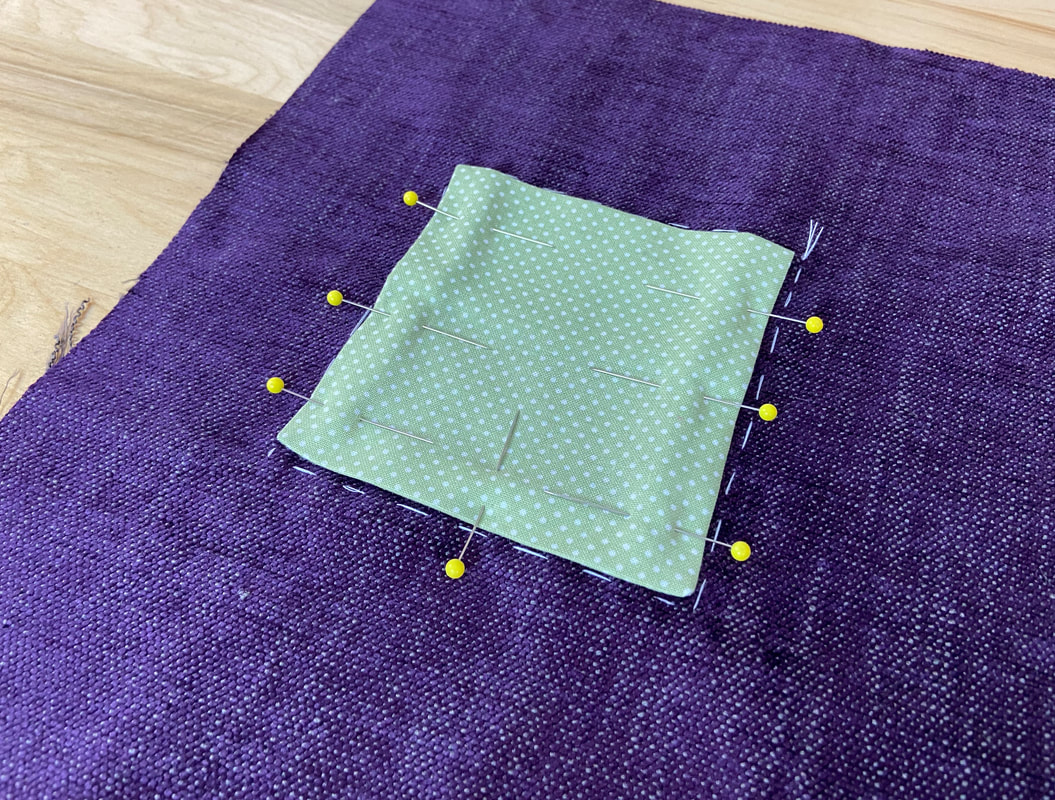
15. Align the finished pocket layer with the hand basted outline and insert pins through all layers to secure.
Picture
Hand baste the pocket to the garment surface. Basting will hold it perfectly in place during machine stitching. ​
Picture
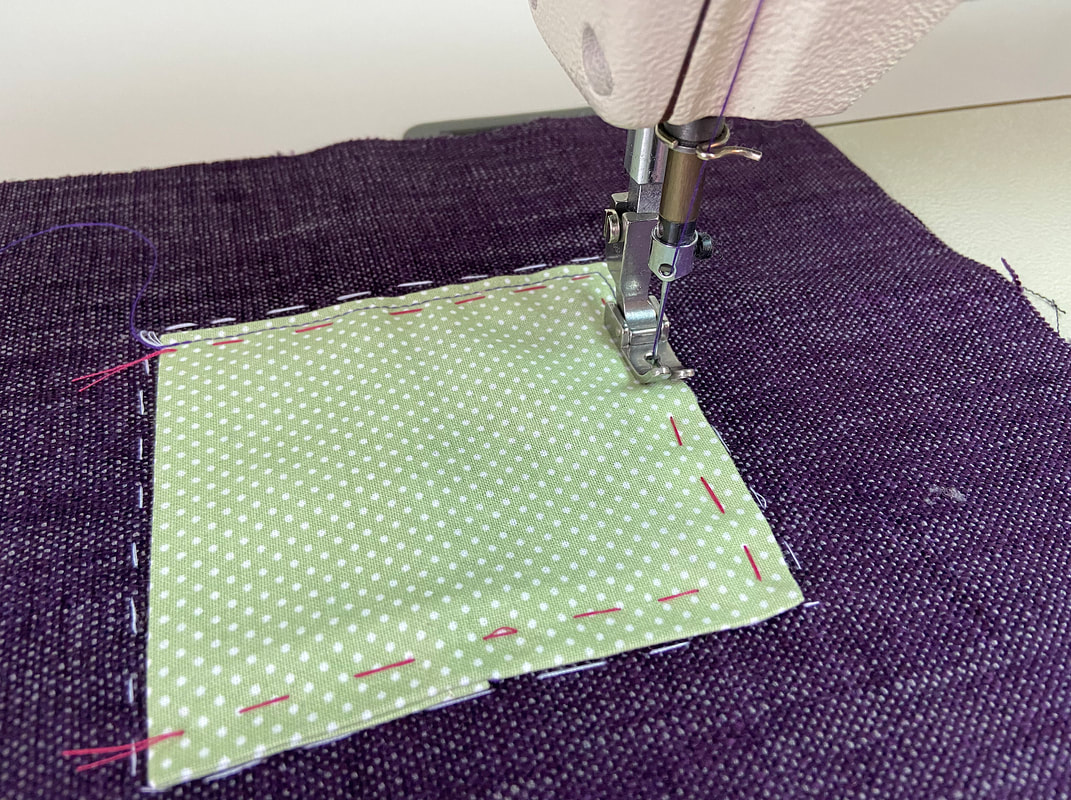
16. Starting at one of the patch pocket’s top corners, machine stitch as close to the folded edge as you can through both the patch pocket edge and garment layer underneath. As you switch direction, pivot the stitch evenly at each corner. Stitch until you arrive at the other top pocket corner. 
Picture
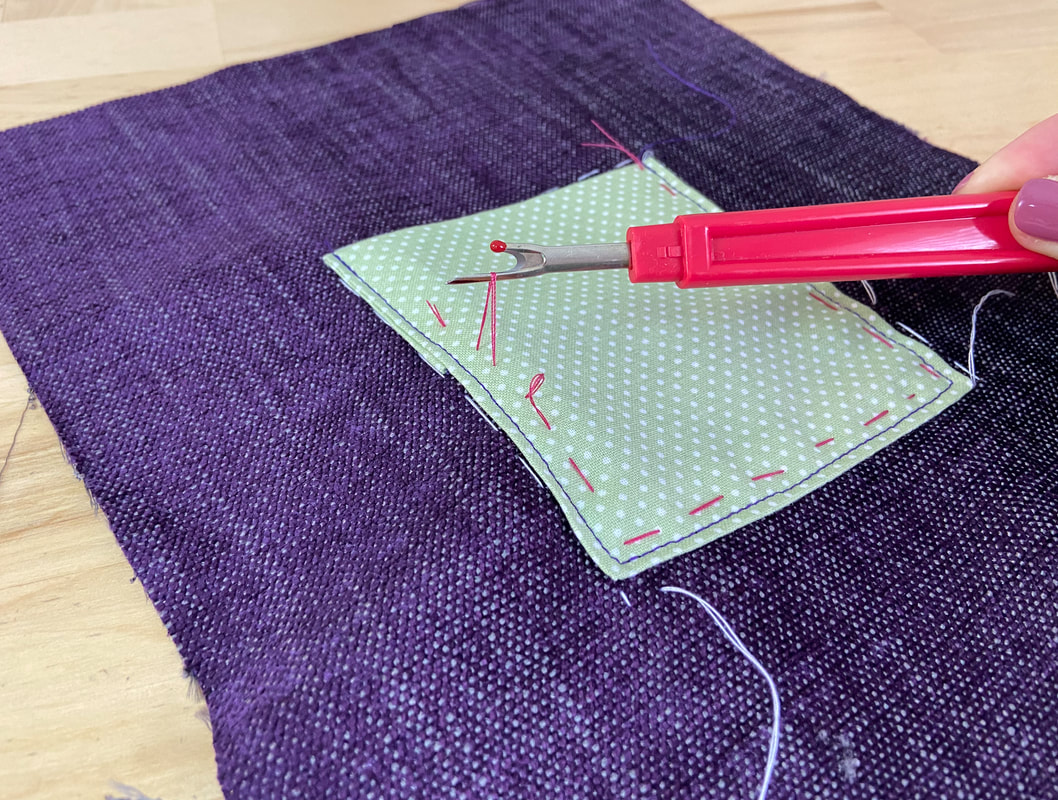
17. Once topstitched, remove the temporary hand basting using a seam ripper.
Picture
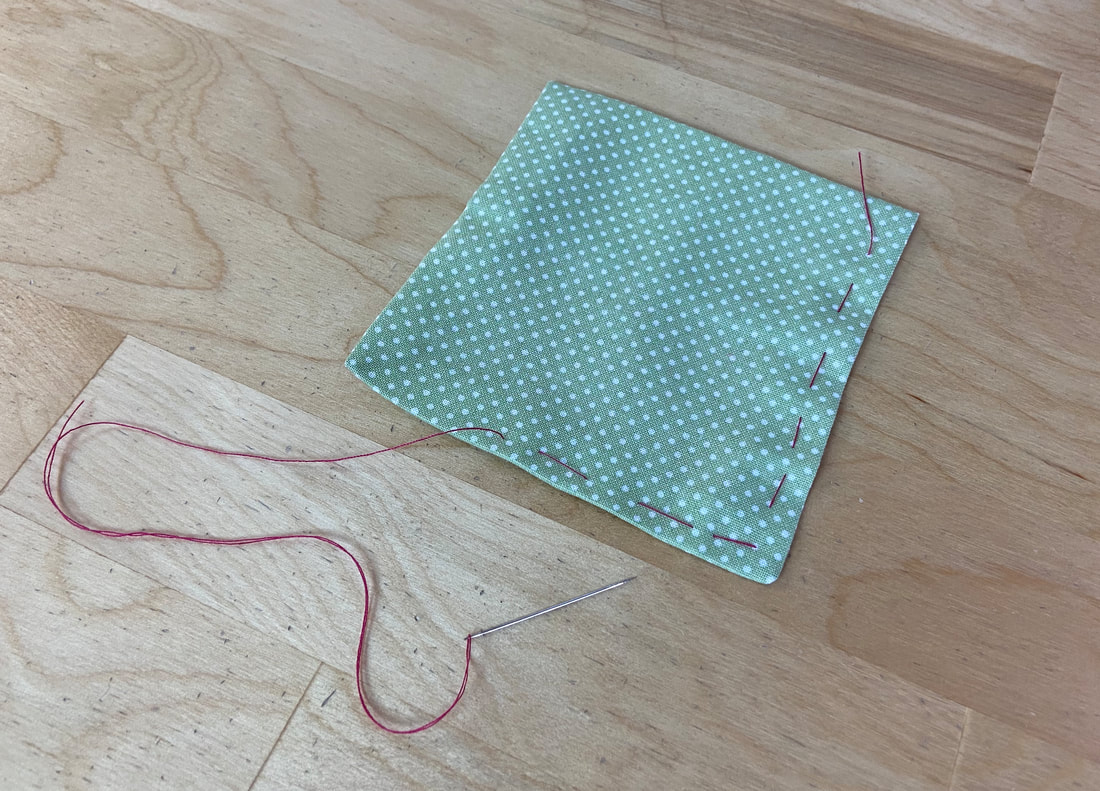
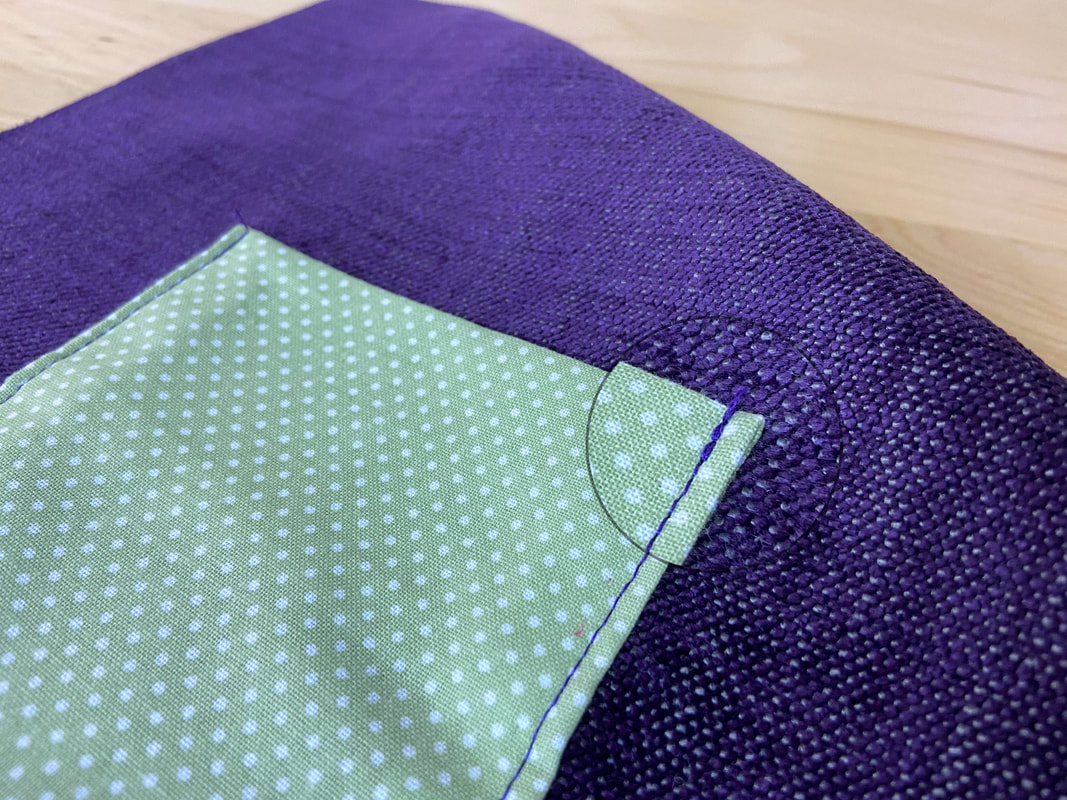
Don’t forget to backstitch both at the beginning and end of your stitch. Since the stitch starts and ends at the pocket opening edge, this area receives a lot of strain during wear/use. Backstitching provides a layer of security. 
However, a backstitch is not enough to ensure complete durability. It is standard procedure to add a tack or some form of other reinforcement at each opening corner. 
You can use an arrowhead tack, a bar tack, or you can whipstitch through each corner to add an extra layer of strength. In many cases, a simple straight stitch reinforcement adds enough durability to the pocket opening.
Picture
In this example, a simple whipstitch is added vertically at each corner. 
Picture
Although not as strong, another technique is to apply interfacing to the garment’s wrong side at each pocket corner location. 
To learn how to apply tacks, follow the steps in this tutorial: Hand-Applied Tack Stitches
To learn more about whipstitching, check out this tutorial: Hand-Applied Overedge Stitches
​For info on interfacing, follow this guide: A Complete Guide on Interfacing
DMCA.com Protection Status
All content, including images and text, may not be copied, replicated, or redistributed without express written permission. This website is regularly screened and monitored for content protection.

Have A Personalized Sewing Question?

Ask It Here

Services

​Custom Apparel
Custom Bridal
​Sewing Tutorials
​

Company

About
Blog

Support

Contact
Terms of Service
DMCA.com Protection Status
© COPYRIGHT 2022. ALL RIGHTS RESERVED.
  • Sewing Tutorials
    • Basics >
      • Aligning Pattern Grainlines To Fabric
      • Preparing Fabrics For Sewing
      • Pinning Sewing Patterns To Fabric
      • Placing Sewing Patterns On Fabric For Cutting
      • Rotary Cutters or Fabric Scissors?
      • Cutting The Sewing Patterns
      • What Are Notches And How To Use Them In The Sewing Process
      • Transferring Notches From Pattern To Fabric
      • Transferring Seamlines to Fabric
      • Staystitching
      • Backstitching: A Complete Guide
      • Hand Basting: A Complete Guide
      • Sewing Continuous Bias Binding
    • Darts >
      • Marking And Transferring Darts To Fabric
      • What Are Darts And Dart Components
      • Folding, Pinning And Hand Basting Darts
      • Handling Dart Excess: Bulk And Tension
      • How To Sew A French Dart
      • How To Sew And Iron Single Pointed Darts
      • How To Sew And Iron Contour Darts
      • Sewing Darts With Decorative/Beaded Fabrics
    • Sewing Seams >
      • ​The Basics Of Seams And Seam Allowance
      • How To Sew A Straight Seam
      • Sewing Curved Seams
      • Sewing Corner Seams
      • Trimming And Grading Seam Excess
      • Notching/Clipping Seam Allowance for Tension Release
      • Sewing Topstitched Seams
      • Sewing Corded Seams
      • Sewing A Slot Seam
      • Sewing A Gathered Seam
      • Sewing Bias Seams
      • Sewing Seams With Ease
      • Sewing Seams With Crossing Seamlines
      • Sewing Unlike Fabric Seams
      • How To Iron Seams: Ironing Tools And Conventions
      • Sewing With Knit Fabrics
      • Understanding Stitch Length And Tension
      • Sewing Unique Fabric Seams
    • Seam Finishes >
      • Seam Finishing Techniques - Overview
      • Applying A Pinked Seam Finish
      • Applying A Bias Bound Seam Finish
      • Serging And Zigzag Seam Finishes
      • Sewing A Self-Bound Seam Finish
      • Sewing A French Seam Finish
      • Sewing A Hong Kong Seam Finish
      • Sewing A Mock French Seam Finish
      • Sewing A Turned-and-Stitched Seam Finish
      • Sewing Overcast Hand-Applied Seam Finishes
      • Sewing A Flat Felled Seam
      • Sewing A Hairline Seam Finish
    • Hem Finishes >
      • Garment Hem Finishes: Overview
      • ​Sewing A Double Fold Hem Finish
      • Sewing A Single Fold Hem Finish
      • Sewing Bound Hem Finishes
      • Sewing An Exposed Double Layer Bound Hem
      • Sewing A Folded-Up Bound Hem with Pre-folded Binding
      • Sewing A Hong Kong Hem Finish
      • Sewing A Band Hem Finish
      • Sewing A Bias Faced Hem Finish
      • Sewing A Twill Tape Hem Finish
      • Sewing A Rolled Hem Finish
      • Sewing A Shaped Hem Facing
      • Using Fusible Hem Tape And Webbing
      • Finishing A Lace Fabric Hem
      • Finishing A Leather Hem
      • Sewing Faced Hem Corners
      • How To Finish Lining At The Hem
      • Finishing Fabric Corners by Mitering >
        • Mitering Fabric Corners With A Full Bias Facing
        • Mitering Fabric Corners With Exposed Binding
      • Interfacing A Hemline: Lined And Unlined Examples
    • Sewing Pockets >
      • Curved Patch Pocket With Flap
      • Unlined Square Patch Pockets
      • Lined Patch Pockets: Two Ways
      • Extension On-Seam Pockets
      • Separate On-Seam Pocket
      • Front Hip Pockets
      • Bound Double Welt Pocket
      • Double Welt Pocket With Flap
      • Self-Welt Pocket (Using Single Fabric Layer)
      • Slanted Welt Pocket (Hand-Stitched)
      • Faced Slash Pockets: Overview >
        • Sewing A Faced Slit Pocket
        • Sewing A Rectangular Slash Pocket
        • Sew A Star-Shaped Faced Pocket
    • Sewing Zippers >
      • Sewing Zippers: General Information
      • Sewing A Centered Zipper
      • Sewing A Lapped Zipper
      • Sewing An Invisible Zipper
      • Sewing A Fly Front Zipper
      • Sewing A Closed-End Exposed Zipper (No Seam)
      • Sewing An Exposed Separating Zipper
      • Sewing Hand Stitched Zipper Applications
      • Sewing A Zipper Underlay
      • Sewing A Placket-Enclosed Separating Zipper
    • Sleeveless Finishes >
      • Sleeveless Armhole Finishes: General Information
      • Finishing Sleeveless Garments with Lining
      • Sewing A Folded-Under Bound Armhole Finish
      • Sewing A Shaped Armhole Facing
      • Finishing Armhole Edges With Exposed Binding
      • Finishing Armhole Edges With Decorative Trim
    • Neckline Finishes >
      • Sewing A Neck Shaped Facing
      • Sewing An All-In-One Neck Facing
      • Neck And Garment Opening Combination Facings >
        • Sewing An Extended Front-Neck Facing
        • Sewing A Separate Neck-Front Facing
      • Sewing A Bias Faced Neckline Finish
      • Sewing A Band Neckline Finish
      • Bound Neckline Finishes: Overview >
        • Sewing A Single Layer Bound Neckline
        • Finishing A Neckline With Pre-Folded Binding
        • Sewing A Double Layer Bound Neckline Finish
      • Sewing A Semi-Stretch Strip Band Neckline
      • Ribbed Neck Band And Classic Turtleneck
      • Decorative Neckline Finishes >
        • Sewing A Neckline With Decorative Inset
        • Sewing A Piped Cording Faced Neckline
        • Sewing Decorative Trim To A Finished Neckline
    • Finishing Facing Edges >
      • Finishing Facing Edges: Overview
      • Folded-And-Topstitched Overedge Facing Finish
      • Sewing A Bound Facing Edge Finish
      • Sewing A Hong Kong Facing Finish
      • Sewing A Rolled Edge Facing Finish
      • Sewing A Twill Tape Facing Edge Finish
      • Sewing An Overedge-Stitch Facing Finish
    • Extras >
      • A Complete Guide on Interfacing
      • Sewing Bound Spaghetti Straps
      • Sewing Spaghetti Straps To A Faced Neckline
      • Sewing Ruffles: Overview
      • Patterning And Sewing A Circle Ruffle
      • Sewing A Gathered Heading Ruffle
      • Sewing Double Layer Gathered Ruffles
      • Sewing A Gathered Ruffle Into A Seam
      • Sewing A Gathered Ruffle To A Fabric Edge
      • Sewing A Fabric Surface Slit
      • Sewing A Slit Seam
      • Hand-Applied Straight Stitches
      • Hand-Applied Blind Stitches
      • Hand-Applied Overedge Stitches
      • Hand-Applied Tack Stitches
      • Hand-Applied Decorative Stitches
  • Custom Apparel
    • Custom Bridal
  • Submit A Sewing Question
  • About
  • Blog