Doina Alexei
  • Sewing Tutorials
    • Basics >
      • Aligning Pattern Grainlines To Fabric
      • Preparing Fabrics For Sewing
      • Pinning Sewing Patterns To Fabric
      • Placing Sewing Patterns On Fabric For Cutting
      • Rotary Cutters or Fabric Scissors?
      • Cutting The Sewing Patterns
      • What Are Notches And How To Use Them In The Sewing Process
      • Transferring Notches From Pattern To Fabric
      • Transferring Seamlines to Fabric
      • Staystitching
      • Backstitching: A Complete Guide
      • Hand Basting: A Complete Guide
      • Sewing Continuous Bias Binding
    • Darts >
      • Marking And Transferring Darts To Fabric
      • What Are Darts And Dart Components
      • Folding, Pinning And Hand Basting Darts
      • Handling Dart Excess: Bulk And Tension
      • How To Sew A French Dart
      • How To Sew And Iron Single Pointed Darts
      • How To Sew And Iron Contour Darts
      • Sewing Darts With Decorative/Beaded Fabrics
    • Sewing Seams >
      • ​The Basics Of Seams And Seam Allowance
      • How To Sew A Straight Seam
      • Sewing Curved Seams
      • Sewing Corner Seams
      • Trimming And Grading Seam Excess
      • Notching/Clipping Seam Allowance for Tension Release
      • Sewing Topstitched Seams
      • Sewing Corded Seams
      • Sewing A Slot Seam
      • Sewing A Gathered Seam
      • Sewing Bias Seams
      • Sewing Seams With Ease
      • Sewing Seams With Crossing Seamlines
      • Sewing Unlike Fabric Seams
      • How To Iron Seams: Ironing Tools And Conventions
      • Sewing With Knit Fabrics
      • Understanding Stitch Length And Tension
      • Sewing Unique Fabric Seams
    • Seam Finishes >
      • Seam Finishing Techniques - Overview
      • Applying A Pinked Seam Finish
      • Applying A Bias Bound Seam Finish
      • Serging And Zigzag Seam Finishes
      • Sewing A Self-Bound Seam Finish
      • Sewing A French Seam Finish
      • Sewing A Hong Kong Seam Finish
      • Sewing A Mock French Seam Finish
      • Sewing A Turned-and-Stitched Seam Finish
      • Sewing Overcast Hand-Applied Seam Finishes
      • Sewing A Flat Felled Seam
      • Sewing A Hairline Seam Finish
    • Hem Finishes >
      • Garment Hem Finishes: Overview
      • ​Sewing A Double Fold Hem Finish
      • Sewing A Single Fold Hem Finish
      • Sewing Bound Hem Finishes
      • Sewing An Exposed Double Layer Bound Hem
      • Sewing A Folded-Up Bound Hem with Pre-folded Binding
      • Sewing A Hong Kong Hem Finish
      • Sewing A Band Hem Finish
      • Sewing A Bias Faced Hem Finish
      • Sewing A Twill Tape Hem Finish
      • Sewing A Rolled Hem Finish
      • Sewing A Shaped Hem Facing
      • Using Fusible Hem Tape And Webbing
      • Finishing A Lace Fabric Hem
      • Finishing A Leather Hem
      • Sewing Faced Hem Corners
      • How To Finish Lining At The Hem
      • Finishing Fabric Corners by Mitering >
        • Mitering Fabric Corners With A Full Bias Facing
        • Mitering Fabric Corners With Exposed Binding
      • Interfacing A Hemline: Lined And Unlined Examples
    • Sewing Pockets >
      • Curved Patch Pocket With Flap
      • Unlined Square Patch Pockets
      • Lined Patch Pockets: Two Ways
      • Extension On-Seam Pockets
      • Separate On-Seam Pocket
      • Front Hip Pockets
      • Bound Double Welt Pocket
      • Double Welt Pocket With Flap
      • Self-Welt Pocket (Using Single Fabric Layer)
      • Slanted Welt Pocket (Hand-Stitched)
      • Faced Slash Pockets: Overview >
        • Sewing A Faced Slit Pocket
        • Sewing A Rectangular Slash Pocket
        • Sew A Star-Shaped Faced Pocket
    • Sewing Zippers >
      • Sewing Zippers: General Information
      • Sewing A Centered Zipper
      • Sewing A Lapped Zipper
      • Sewing An Invisible Zipper
      • Sewing A Fly Front Zipper
      • Sewing A Closed-End Exposed Zipper (No Seam)
      • Sewing An Exposed Separating Zipper
      • Sewing Hand Stitched Zipper Applications
      • Sewing A Zipper Underlay
      • Sewing A Placket-Enclosed Separating Zipper
    • Sleeveless Finishes >
      • Sleeveless Armhole Finishes: General Information
      • Finishing Sleeveless Garments with Lining
      • Sewing A Folded-Under Bound Armhole Finish
      • Sewing A Shaped Armhole Facing
      • Finishing Armhole Edges With Exposed Binding
      • Finishing Armhole Edges With Decorative Trim
    • Neckline Finishes >
      • Sewing A Neck Shaped Facing
      • Sewing An All-In-One Neck Facing
      • Neck And Garment Opening Combination Facings >
        • Sewing An Extended Front-Neck Facing
        • Sewing A Separate Neck-Front Facing
      • Sewing A Bias Faced Neckline Finish
      • Sewing A Band Neckline Finish
      • Bound Neckline Finishes: Overview >
        • Sewing A Single Layer Bound Neckline
        • Finishing A Neckline With Pre-Folded Binding
        • Sewing A Double Layer Bound Neckline Finish
      • Sewing A Semi-Stretch Strip Band Neckline
      • Ribbed Neck Band And Classic Turtleneck
      • Decorative Neckline Finishes >
        • Sewing A Neckline With Decorative Inset
        • Sewing A Piped Cording Faced Neckline
        • Sewing Decorative Trim To A Finished Neckline
    • Finishing Facing Edges >
      • Finishing Facing Edges: Overview
      • Folded-And-Topstitched Overedge Facing Finish
      • Sewing A Bound Facing Edge Finish
      • Sewing A Hong Kong Facing Finish
      • Sewing A Rolled Edge Facing Finish
      • Sewing A Twill Tape Facing Edge Finish
      • Sewing An Overedge-Stitch Facing Finish
    • Extras >
      • A Complete Guide on Interfacing
      • Sewing Bound Spaghetti Straps
      • Sewing Spaghetti Straps To A Faced Neckline
      • Sewing Ruffles: Overview
      • Patterning And Sewing A Circle Ruffle
      • Sewing A Gathered Heading Ruffle
      • Sewing Double Layer Gathered Ruffles
      • Sewing A Gathered Ruffle Into A Seam
      • Sewing A Gathered Ruffle To A Fabric Edge
      • Sewing A Fabric Surface Slit
      • Sewing A Slit Seam
      • Hand-Applied Straight Stitches
      • Hand-Applied Blind Stitches
      • Hand-Applied Overedge Stitches
      • Hand-Applied Tack Stitches
      • Hand-Applied Decorative Stitches
  • Custom Apparel
    • Custom Bridal
  • Submit A Sewing Question
  • About
  • Blog

How To Sew An All-In-One Neckline Facing

What Is An All-In-One Facing?
Picture
An all-in-one facing, also known as a combination facing, includes a full neckline and armhole facings in a single piece. This facing style is easy to sew and convenient for sleeveless blouses that require a facing both at the neckline and armhole edges. 
Picture
For consistency, if a sleeveless garment has a neck facing, then it is recommended that the armholes are also finished with a facing so that all finished edges have no topstitching on the face of the garment.
An all-in-one facing is easy to sew if you follow a few simple consecutive steps. It is used on closed garments with a neckline wide enough to pull the garment on over the head, or on garments that have a center back or side seam opening. In the latter example, it is easiest to sew the facing after the zipper has been inserted, although not impossible to sew after. 
Picture
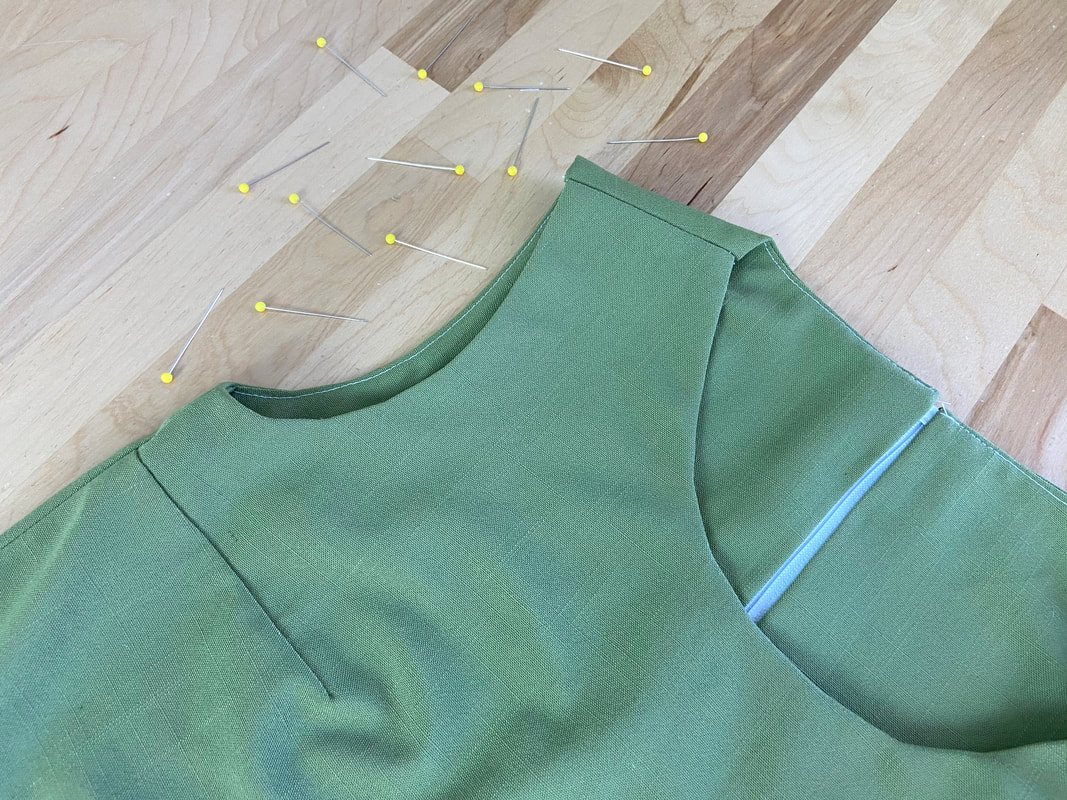
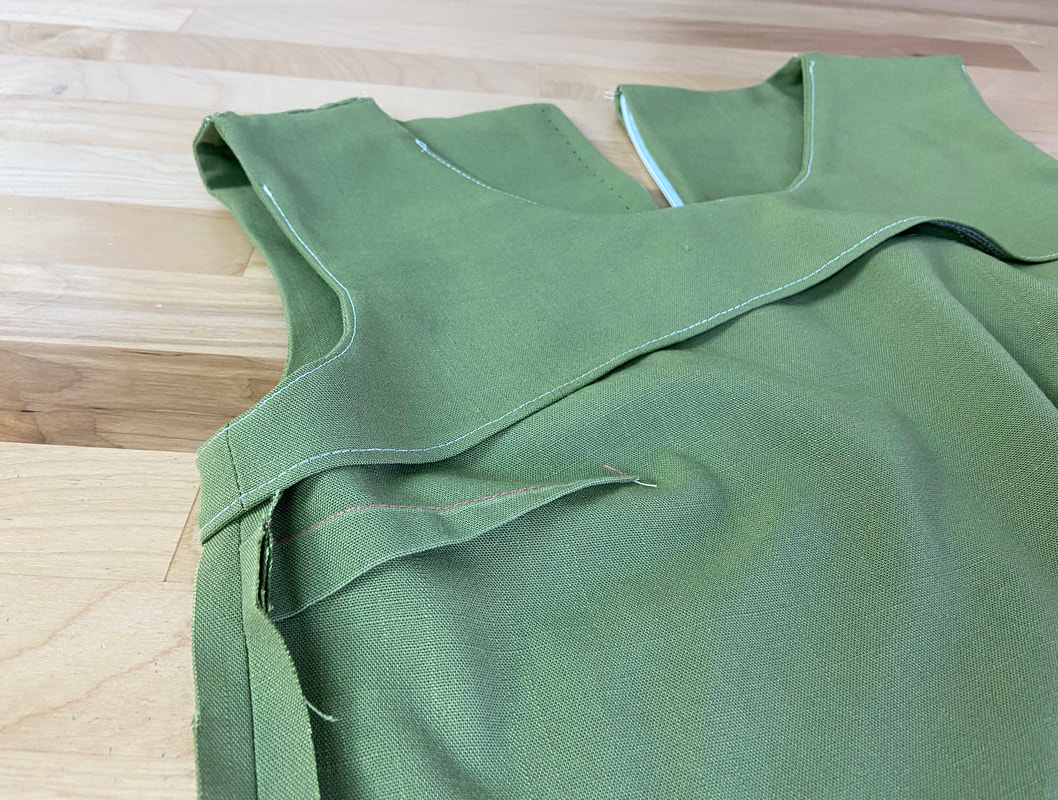
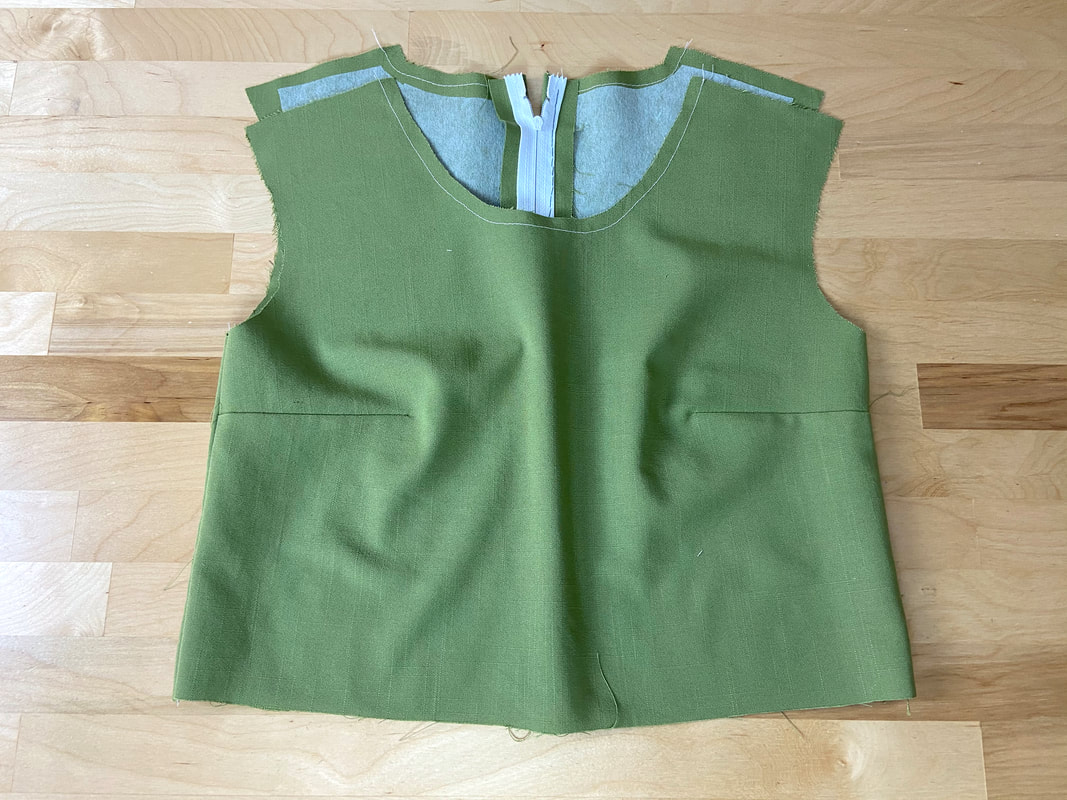
​In the example below, a hand stitched lapped zipper has already been sewn into the center back opening.
Picture
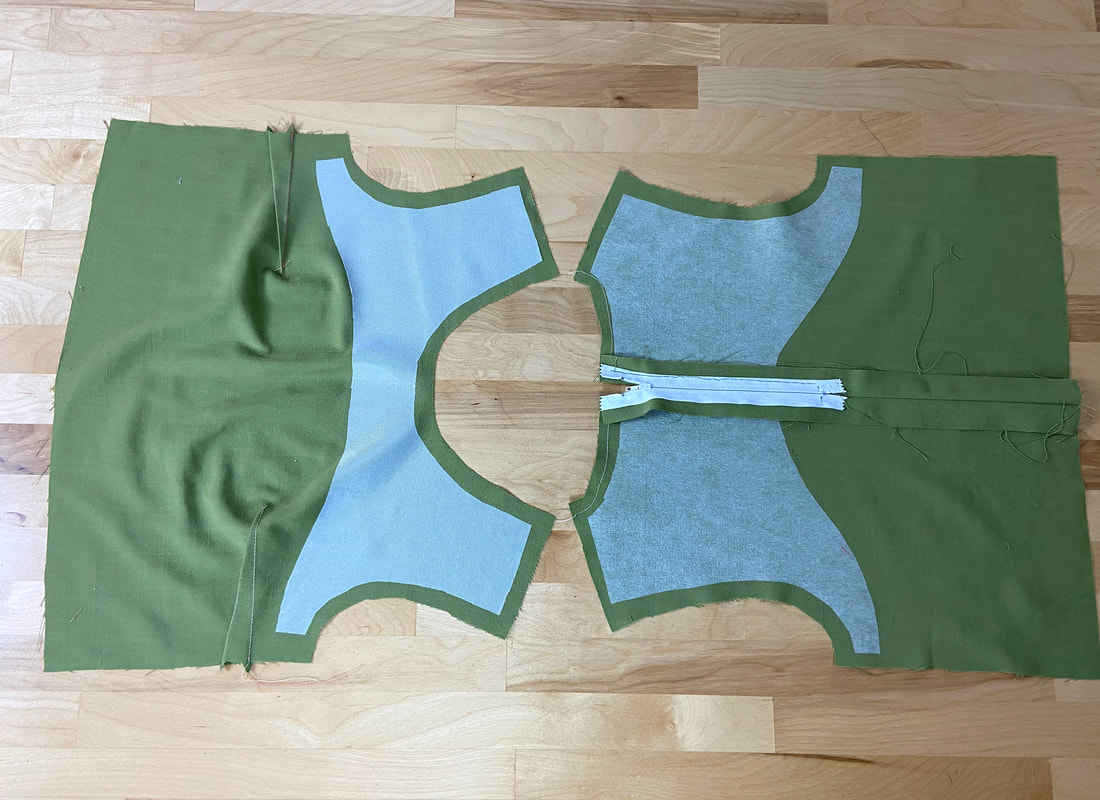
​As is important with all facings, interfacing should back the wrong side of the garment layer or the facing, depending on which of the two needs more structure. If interfacing patterns are not provided in your pattern set, you can use the all-in-one facing pieces to cut out the interfacing portions. 
Picture
After cutting the interfacing, trim its edges down by ½” along all edges- doing so will minimize bulk in the final garment. If working with fusible interfacing, make sure that the adhesive side corresponds to the wrong side of the garment or facing (depending on which is being interfaced).

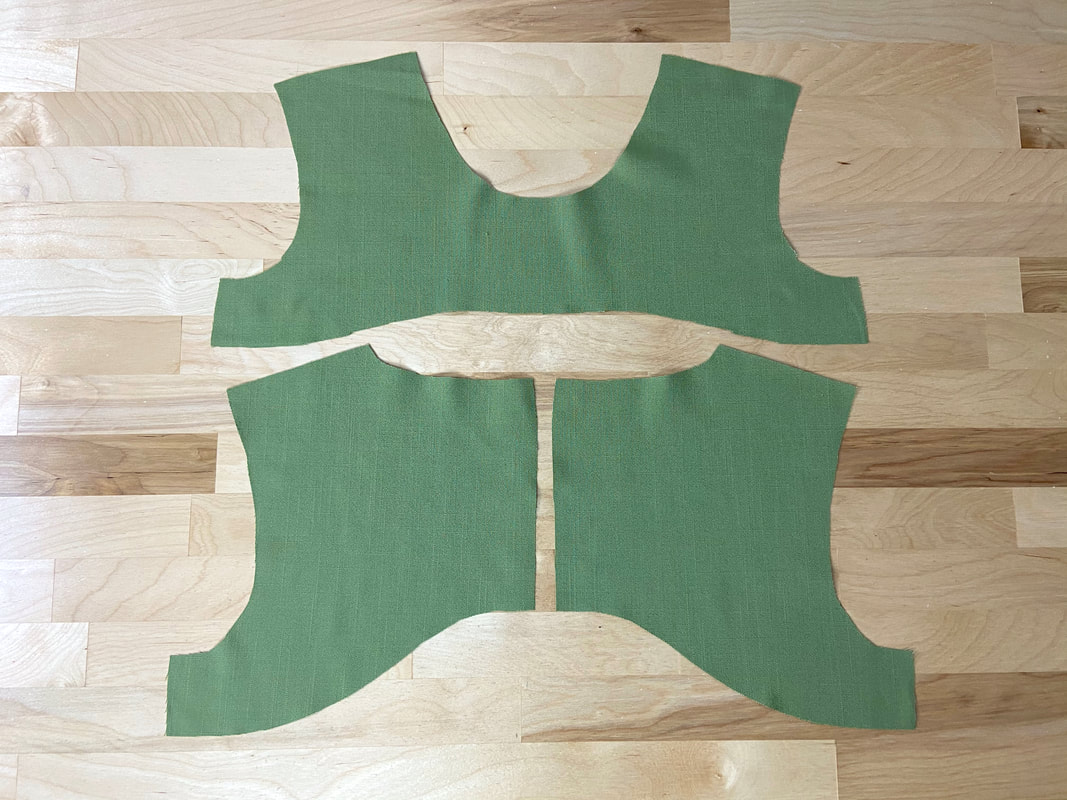
All-In-One Facing Components

Picture
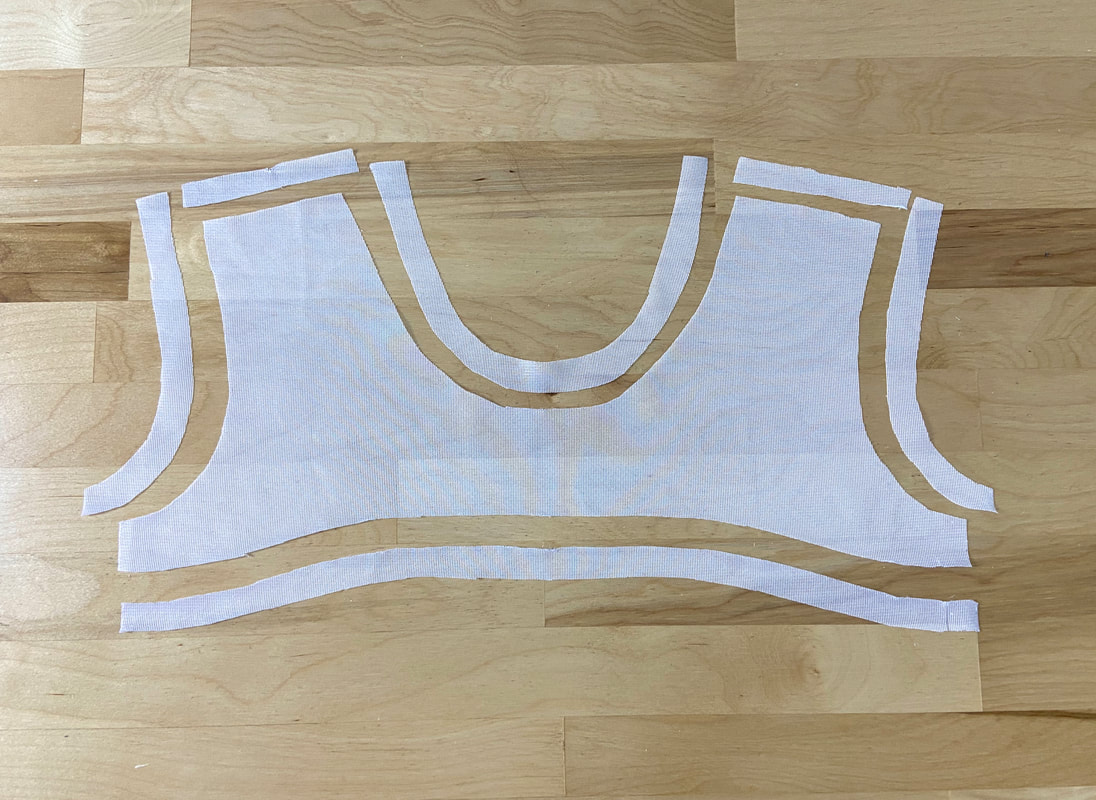
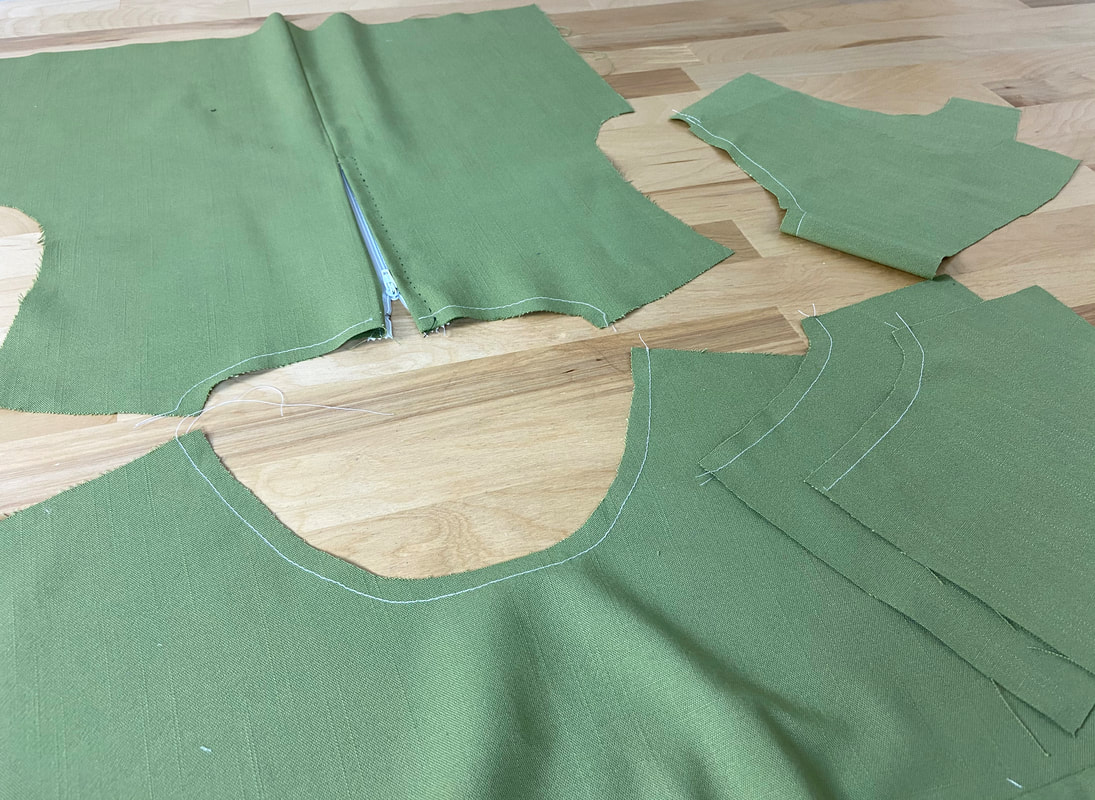
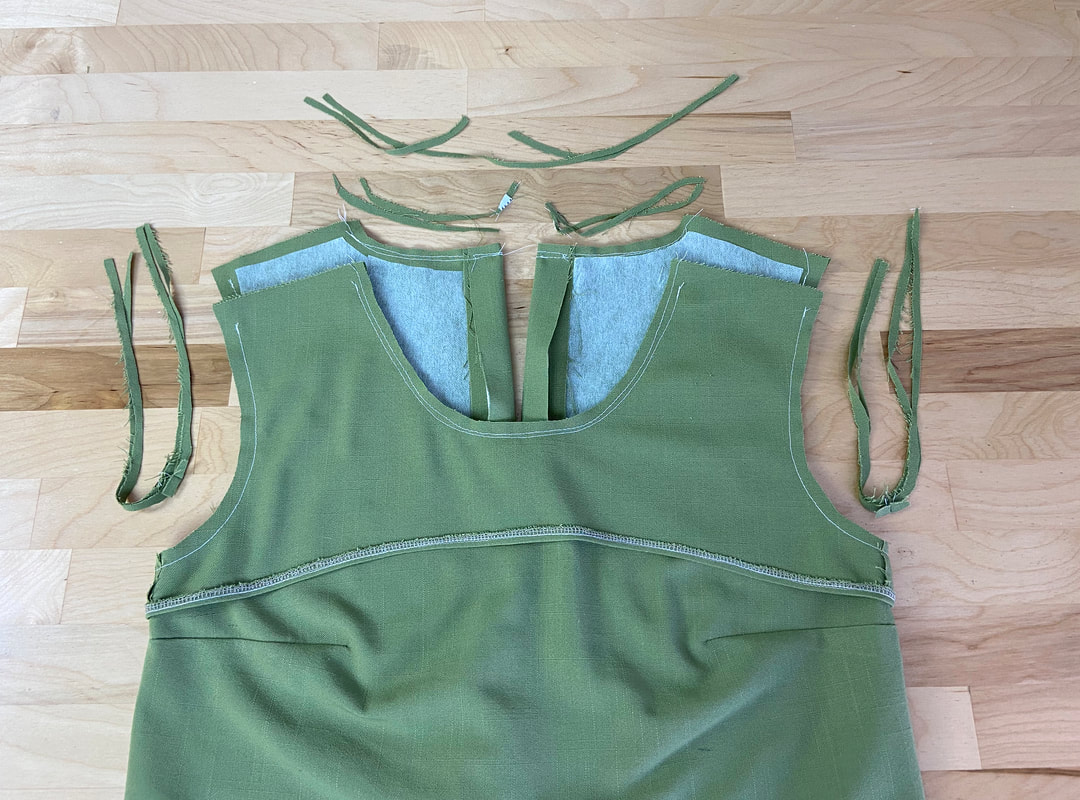
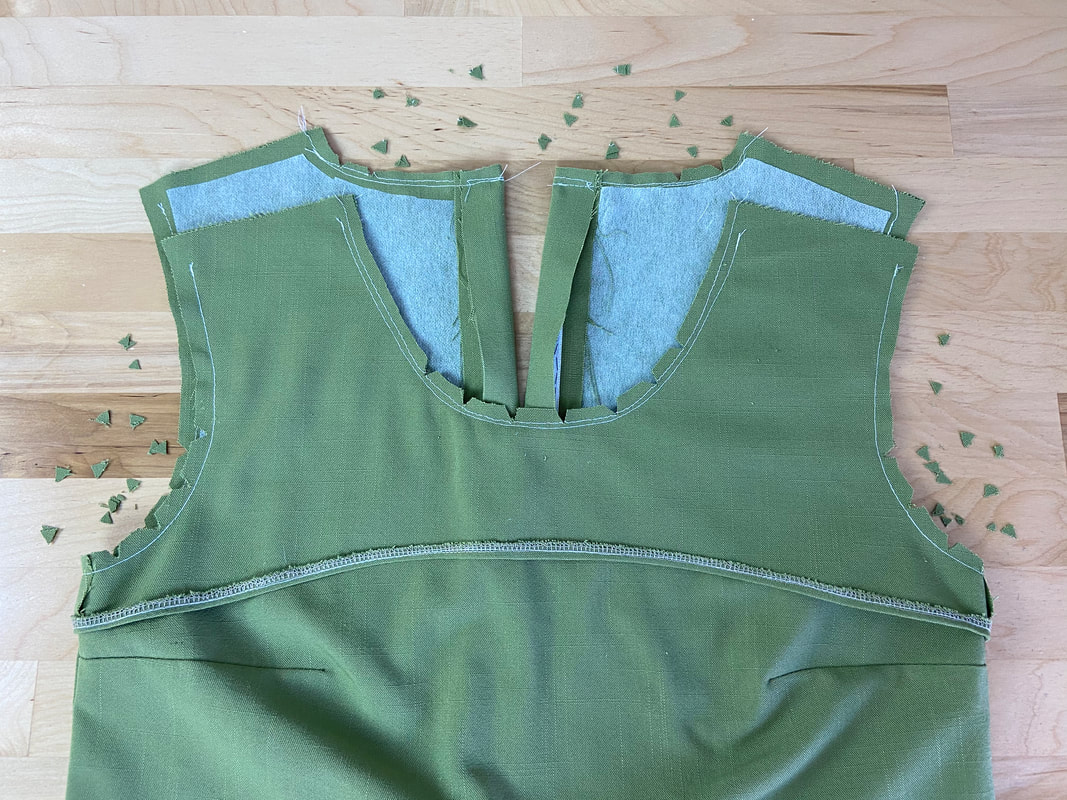
A typical all-in-one facing is comprised of a full front neckline-armhole piece and two identical back pieces. Each back piece serves as the facing for each armhole and half of the back neckline (considering there is a center back opening). 
Picture
​The bottom edge of the facing is usually curved around darts, avoiding full areas on the body (the bust area, for example). The facing should lay flat and not jeopardize the garment’s smoothness at the neckline and armhole edges. An all-in-one facing clean finishes the entire shoulder area, but usually doesn’t extend farther than 2 inches below the under-arm edge.
Since the facing’s bottom portion is a combination of curved and/or square edges, the finishing techniques used should be chosen carefully based on which will work best with both the fabric and the individual shape of the edges. Square corners are the most difficult to clean finish. 
Picture
The best techniques for finishing all-in-one facing edges include overedge stitches like serging/zigzag, binding, and folding and stitching the edges inwards. In this example, a turned-and-stitched finish is used. 
Check out this section on various facing edge finishes: Finishing Facing Edges

How To Attach An All-In-One Facing To The Neckline And Armhole Edges

Picture
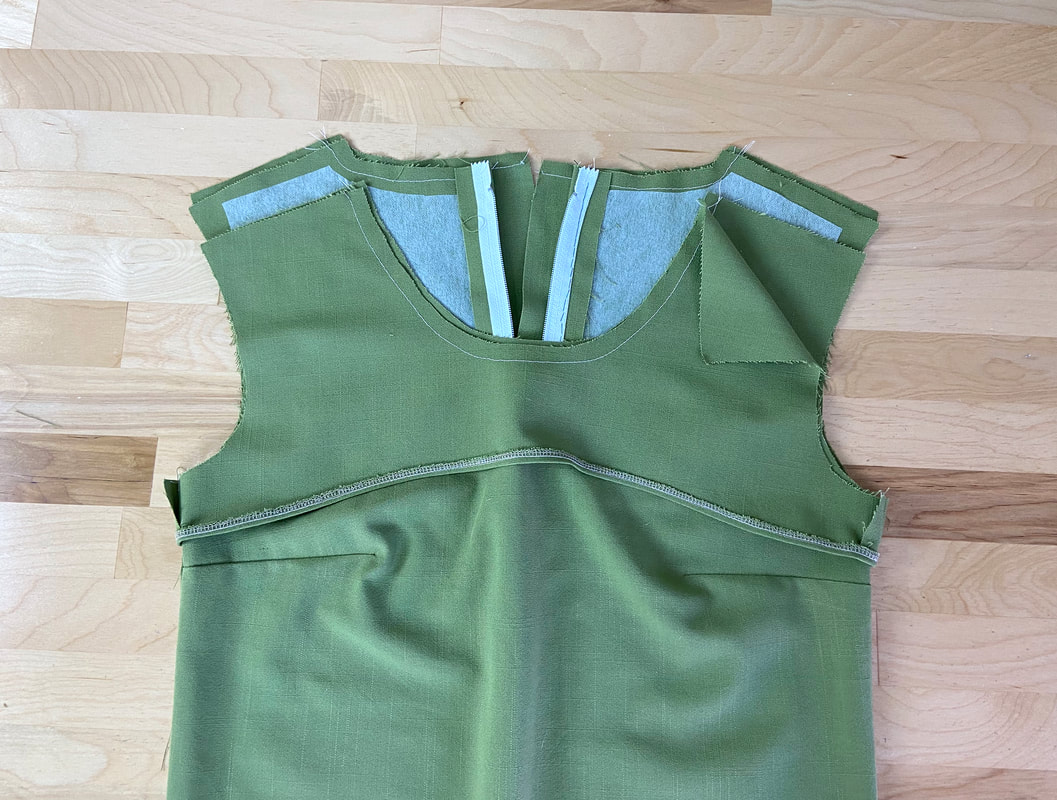
1. Interface the all-in-one facing or the garment layer as shown.
Picture
2. Staystitch along both garment and all-in-one facing edges at ¼” distance from the seam allowance edge.  Staystitching will prevent these vulnerable curves from stretching and losing their shape in the construction process. 
Learn more about staystitching in this tutorial: Staystitching
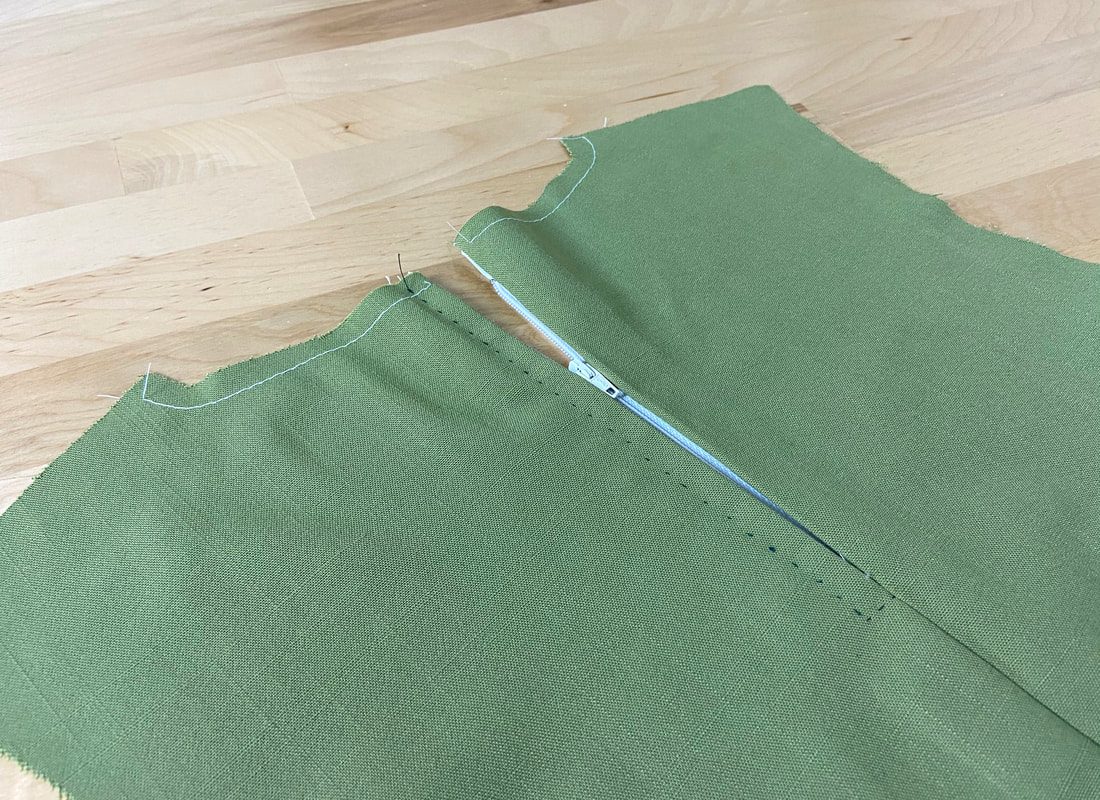
If you haven’t done so already, stitch the center back zipper before the facing is attached- doing so facilitates the sewing process described below.
Picture
3. On the all-in-one facing, align and sew the side seams. Leave the center back opening and shoulder seams unstitched. 
Picture
​After stitching the side seams, press the seam allowance open as show.
Picture
Picture
4. Repeat Step 3 above with the garment, stitching the side seams and ironing the seam allowance edges open. Leave the center back and shoulder seams unstitched. 
Picture
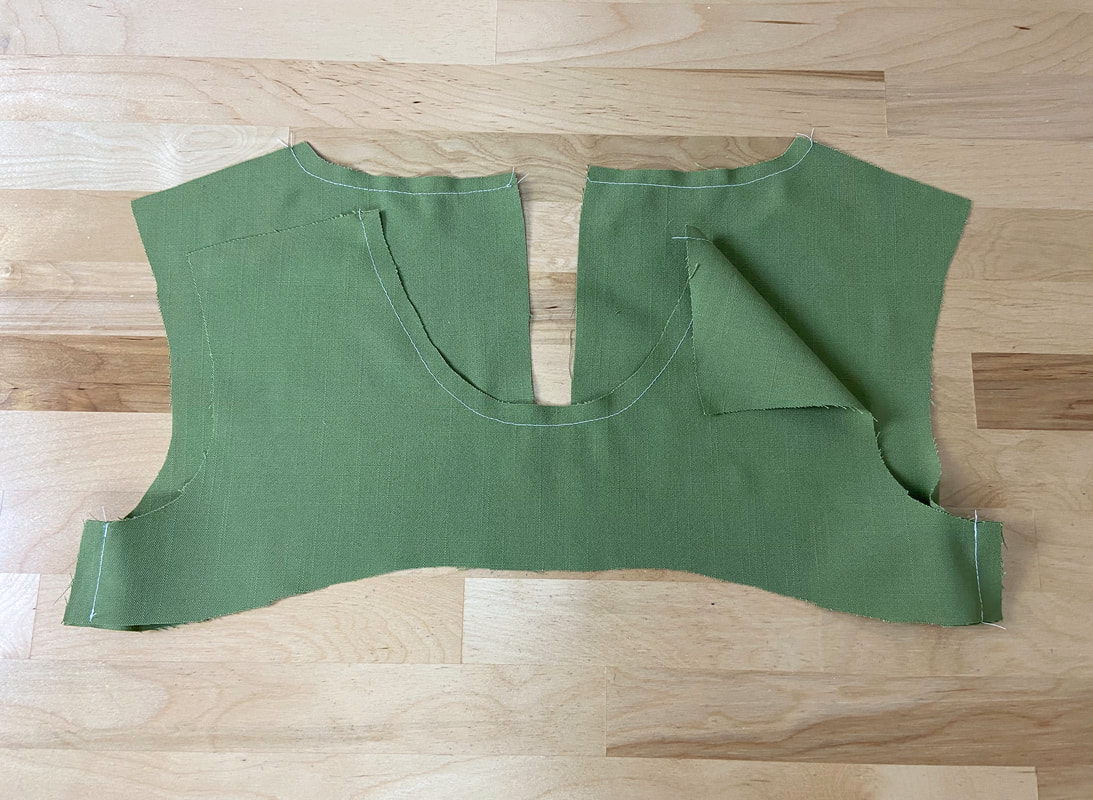
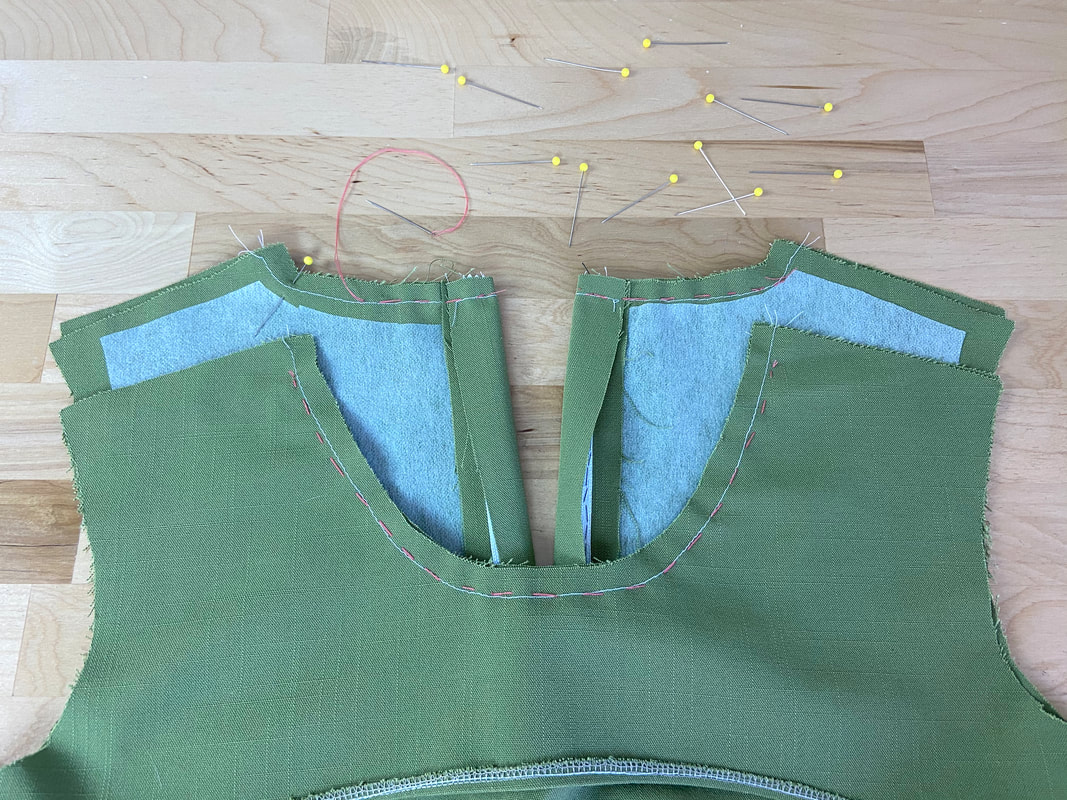
5. With the garment on its face side and all-in-one facing on its wrong side, place the facing on top of the garment, such that all matching edges align. This means armholes, neckline and center back opening edges should overlap and perfectly align.
Picture
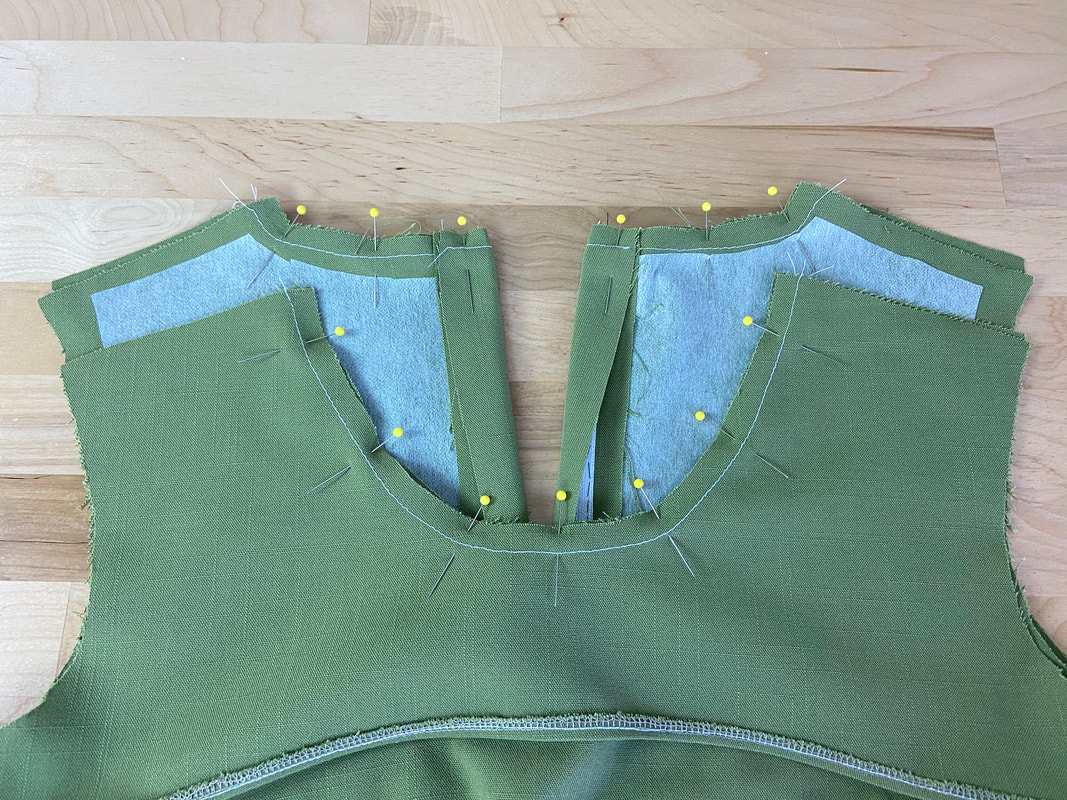
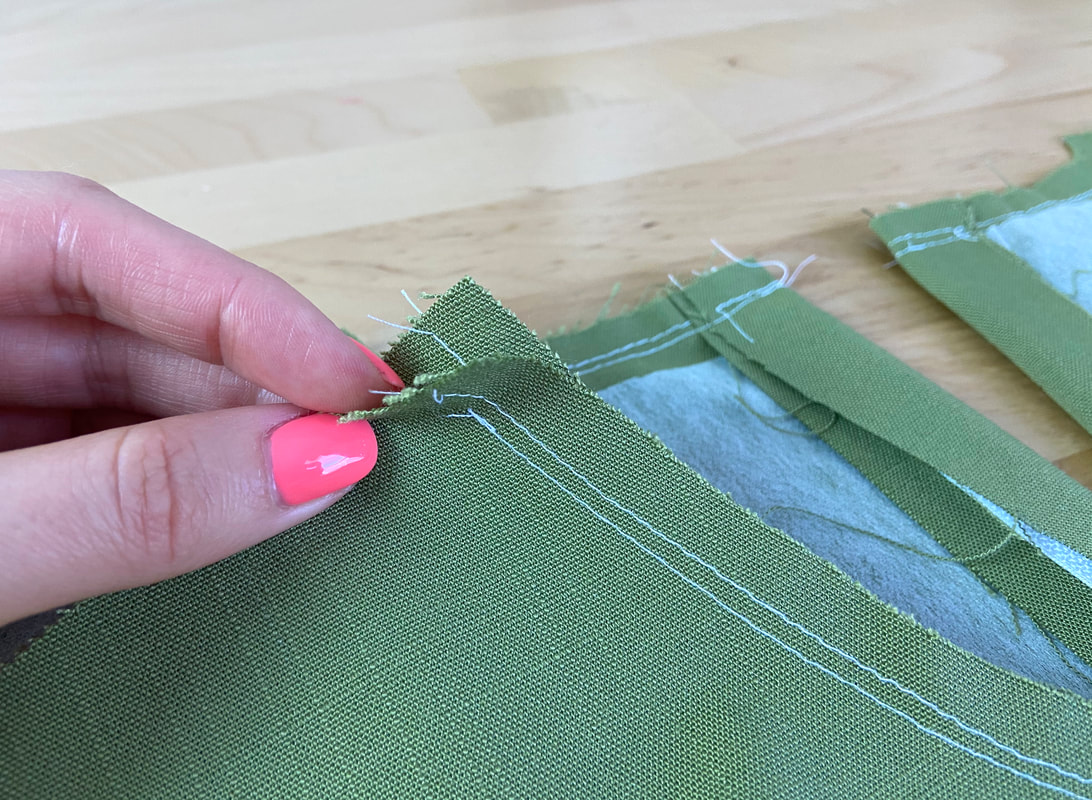
6. Match the front and back facing neckline to the front and respectively, back garment neckline. ​Insert pins perpendicularly.
Picture
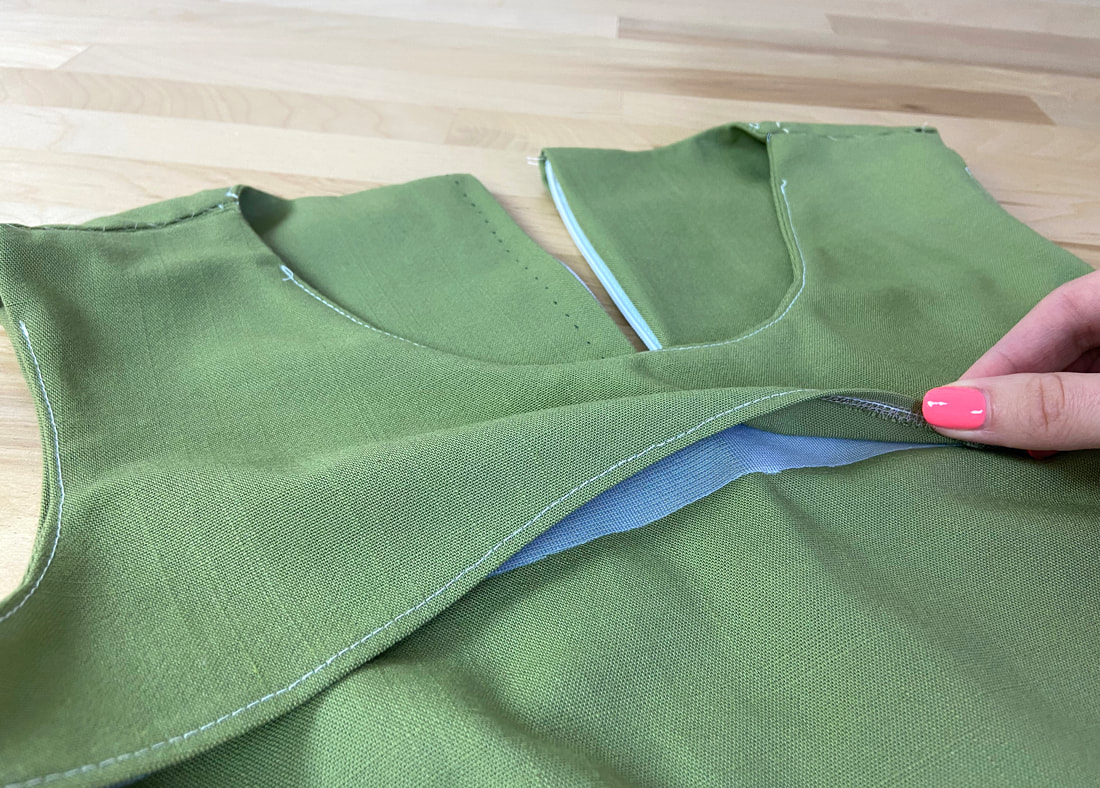
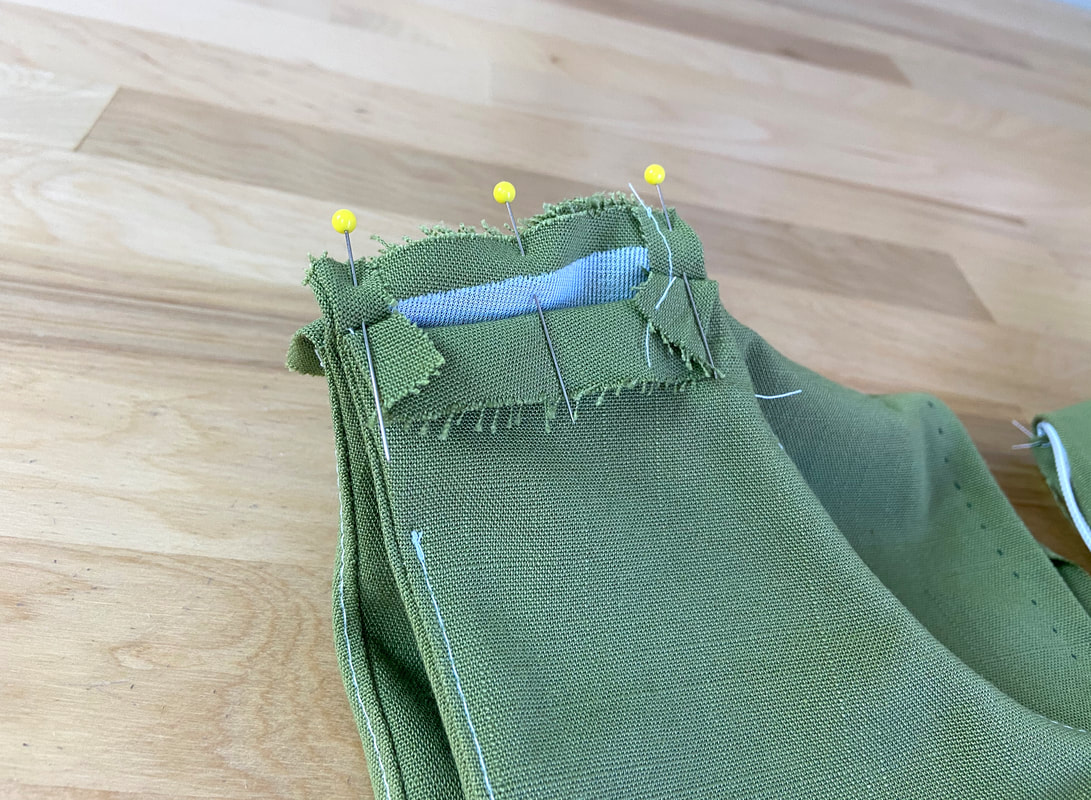
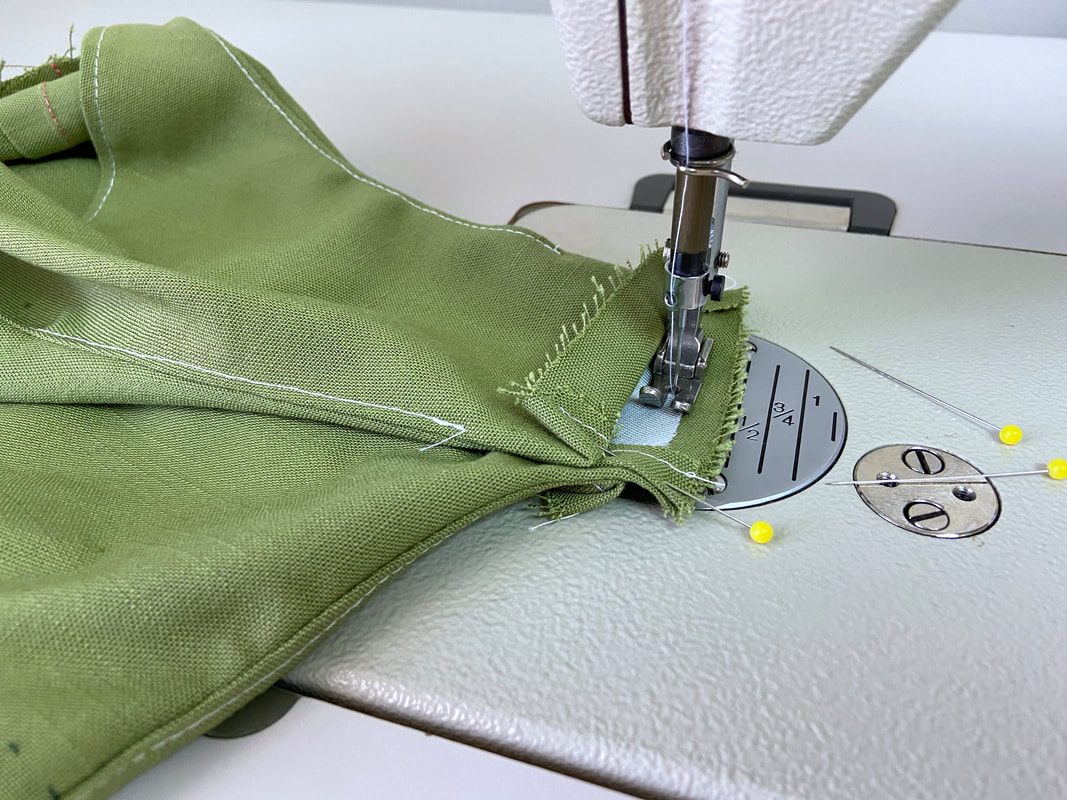
The ends of the back facing pieces should wrap around the zipper opening as shown:
Picture
Hand baste for extra stability if needed. If you hand baste, stop at about ½” from each shoulder seam edge. Do not stitch the neckline layers together past this point (you will see why later). 
Picture
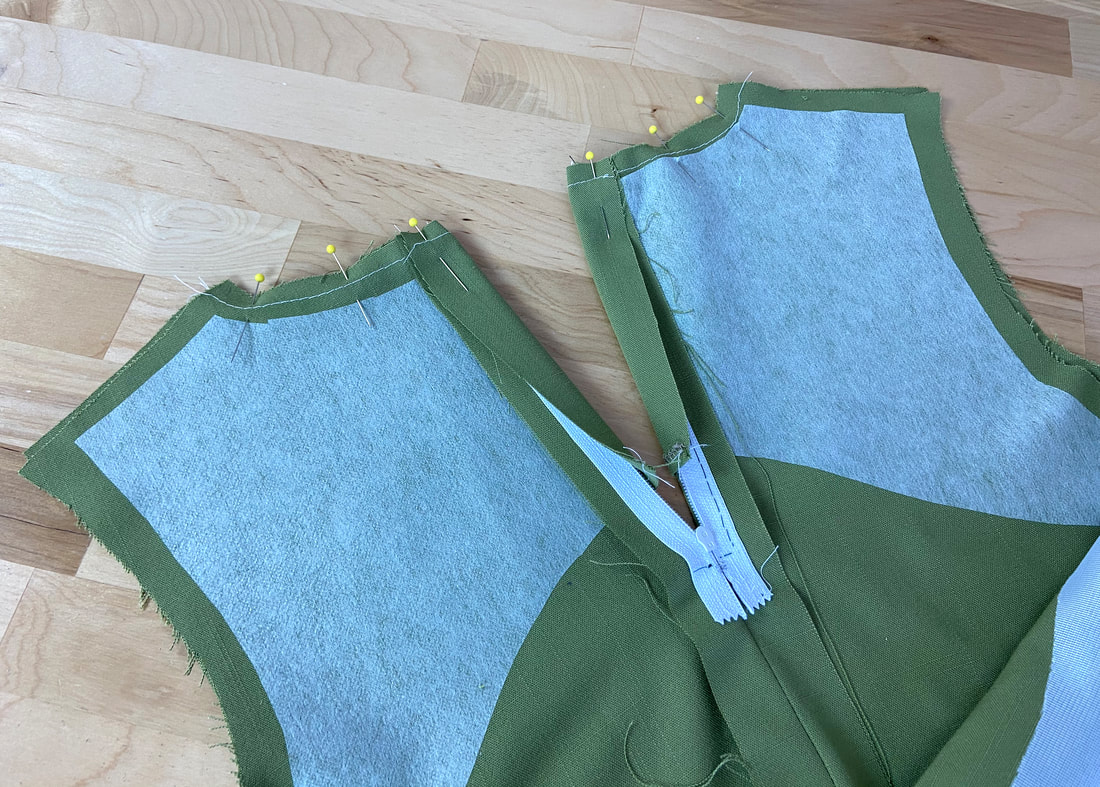
7. Match each garment armhole (front and back) to its corresponding facing armhole. ​​Just as you did with the neckline, insert pins perpendicular to the edge.
Picture
Hand baste to keep the edges securely aligned for machine stitching. Again, stop at ½” from the shoulder seam edge (just as you did at the neckline).
​Pinning and aligning the all-in-one facing and garment together should be fairly easy to do given that the shoulder seams are left unstitched. The facing and garment edges are identical in shape which considerably helps in the alignment and stitching process- no opposite curves to sew!
Picture
8. Starting at the shoulder seam area, stitch each front and back neckline portion. 
Picture
Once stitched, remove basting using a seam ripper. 
Picture
Picture
Remember to start and end your stitch at ½” from the shoulder seam edge as noted above. Backstitch to secure both at the beginning and end of each machine stitch.
Picture
Picture
​9. Next, stitch the facing and garment armholes, again starting and ending at ½” away from the shoulder seam edges as shown.
Picture
Backstitch to reinforce at the beginning and end of the stitch.
Picture
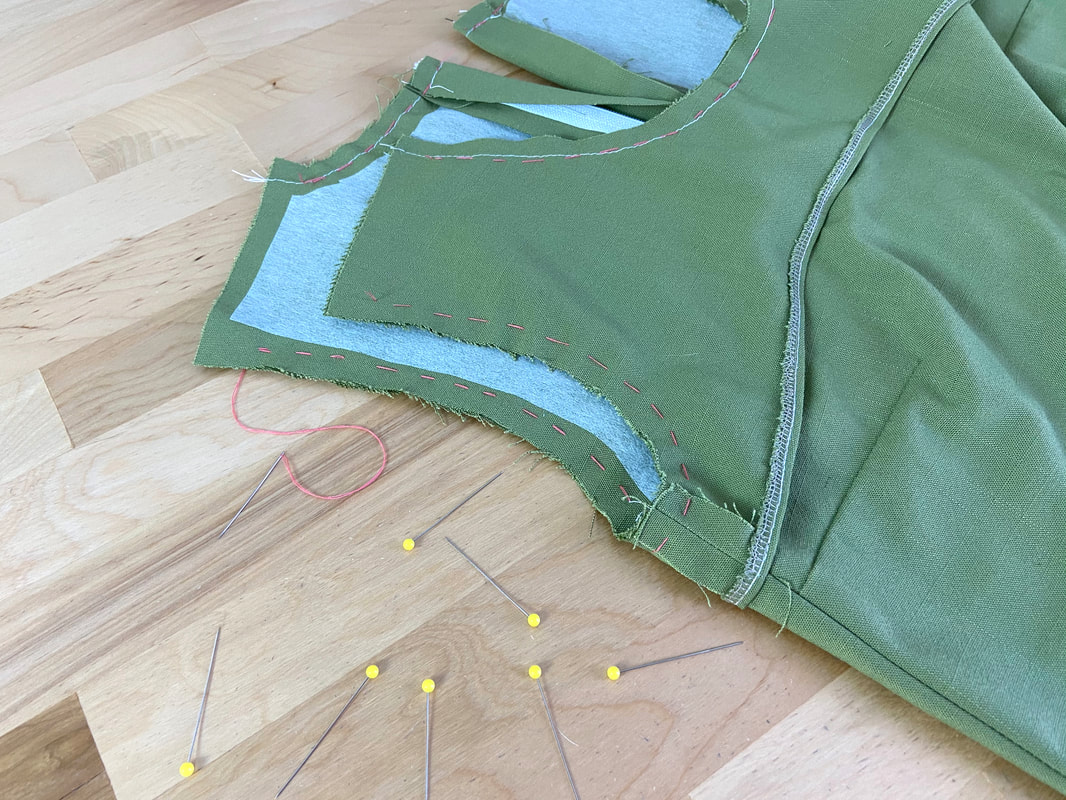
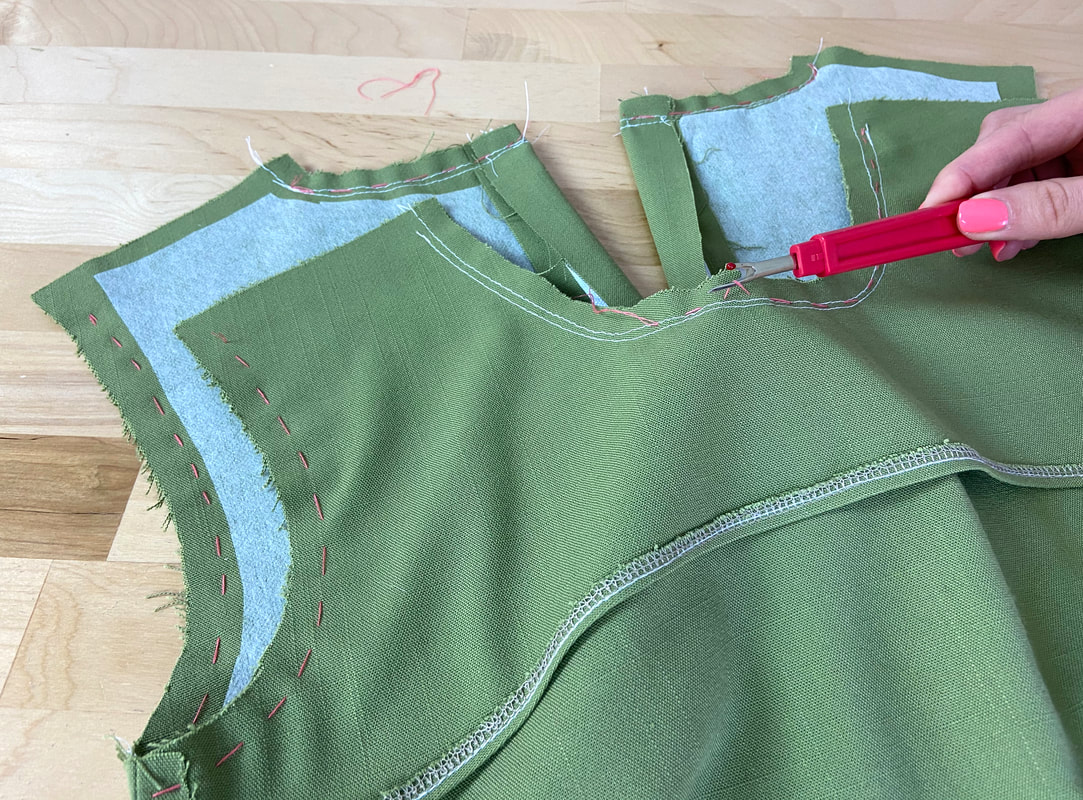
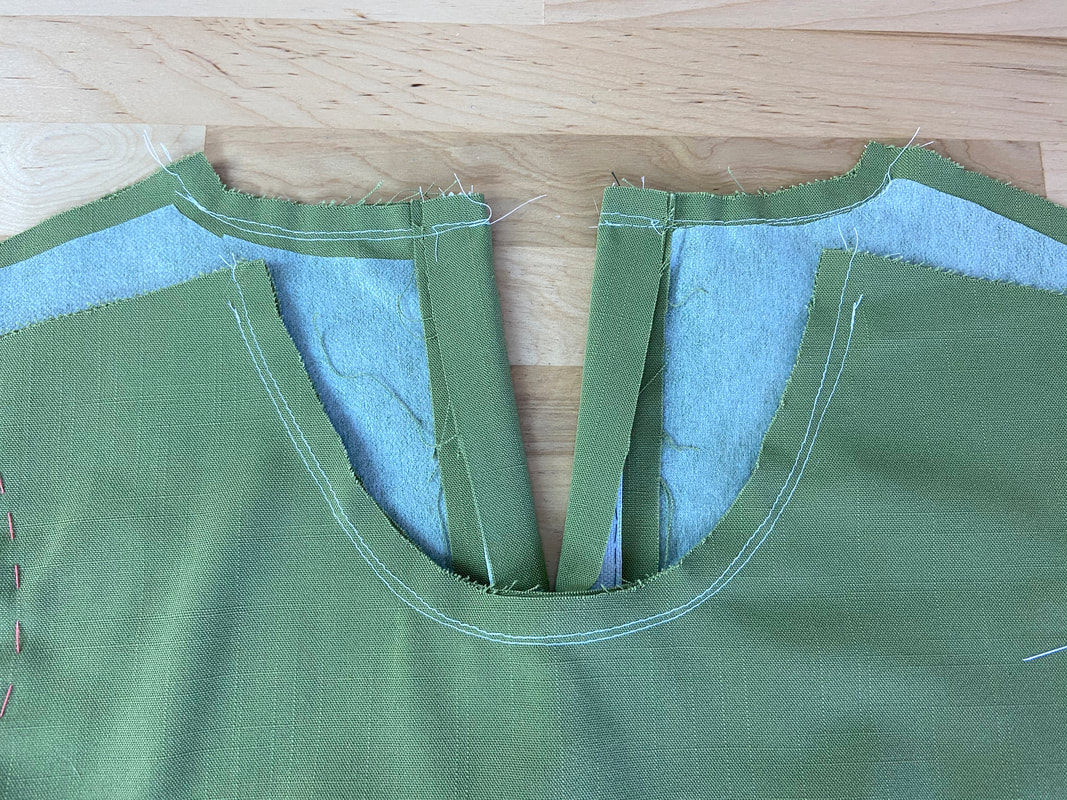
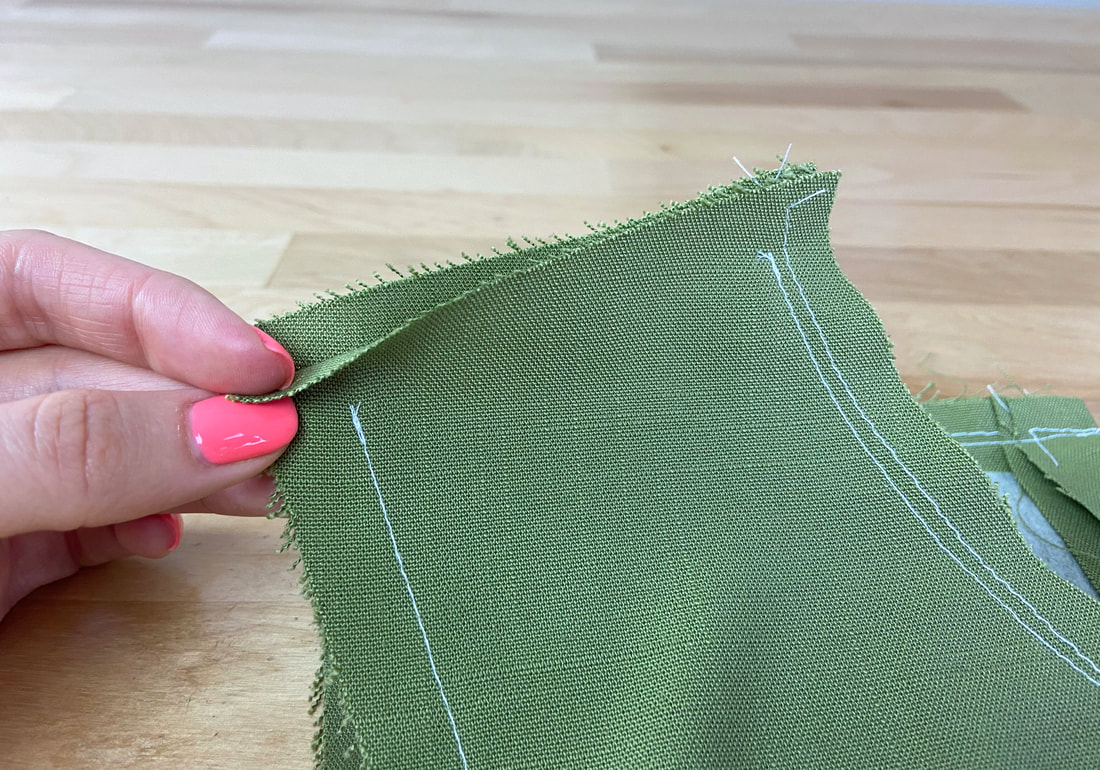
10. Carefully trim all neck and armhole seam allowance edges to approximately half their width. 
If needed to minimize bulk, grade the seam allowance layer corresponding to the facing. Grading means trimming the facing seam allowance layer smaller than the garment one – be careful not to cut too close to the seam stitch or you risk weakening the seamline. ​
Picture
11. Equally important is clipping wedge notches into the seam allowance along the most curved areas. Do so along both neckline and armhole edges.
Picture
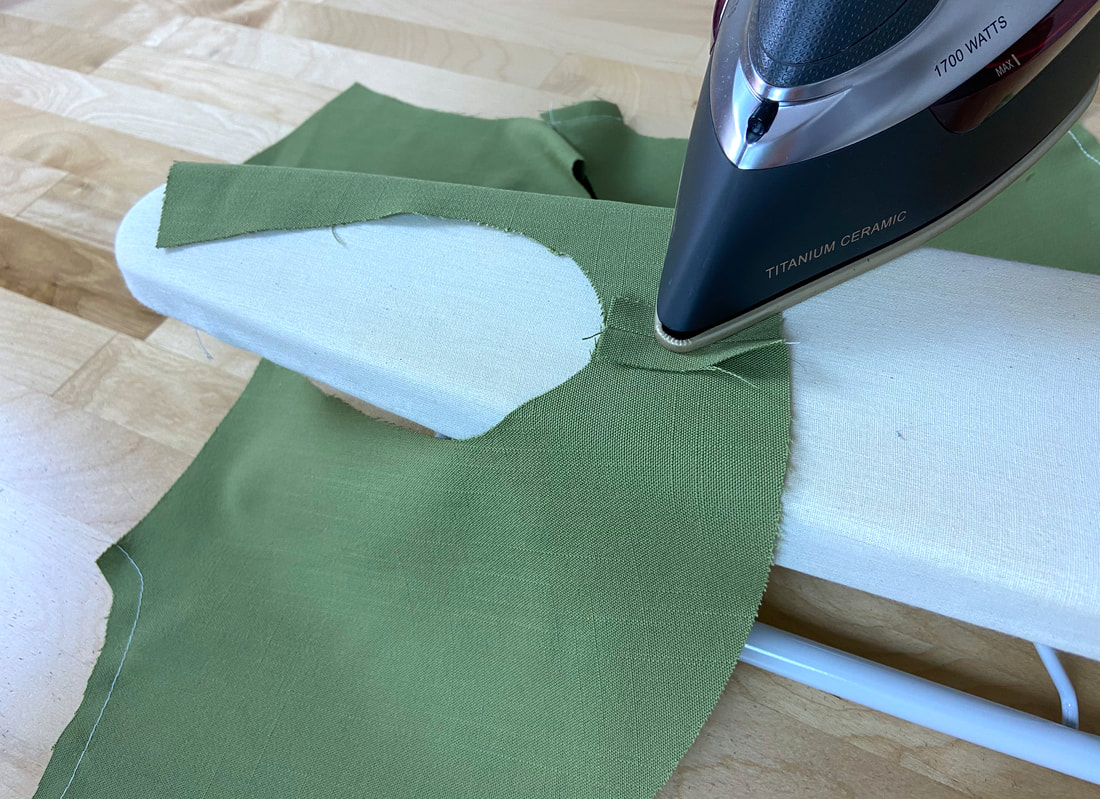
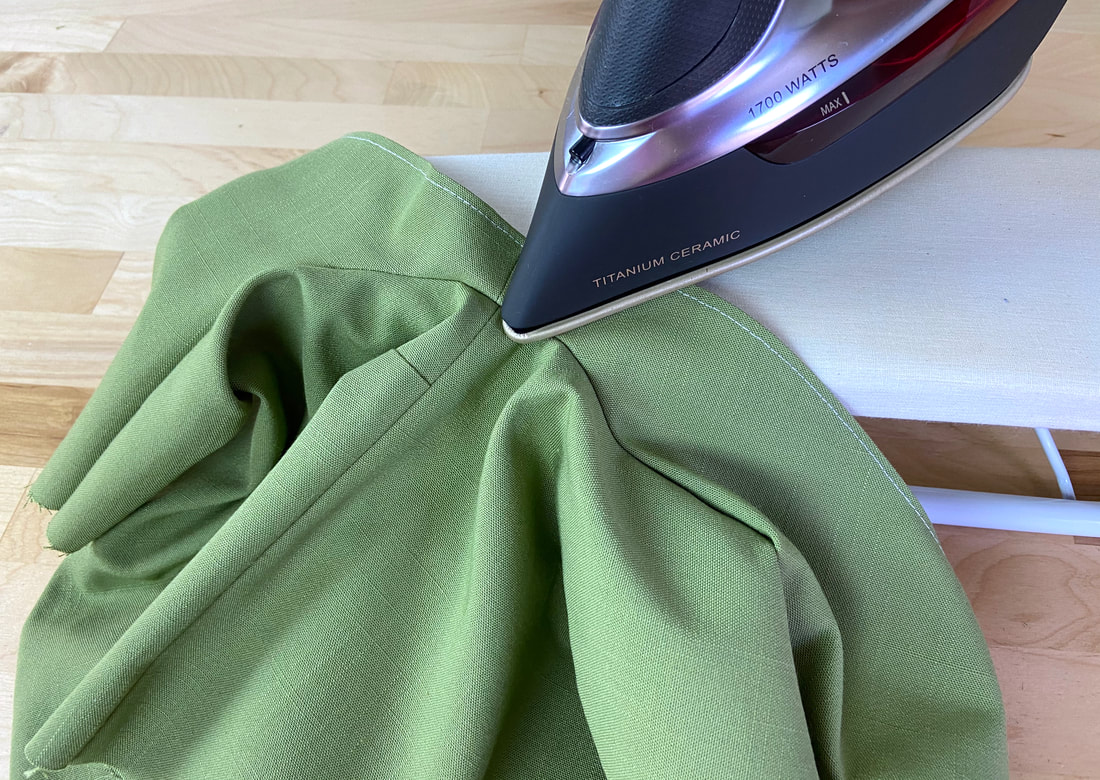
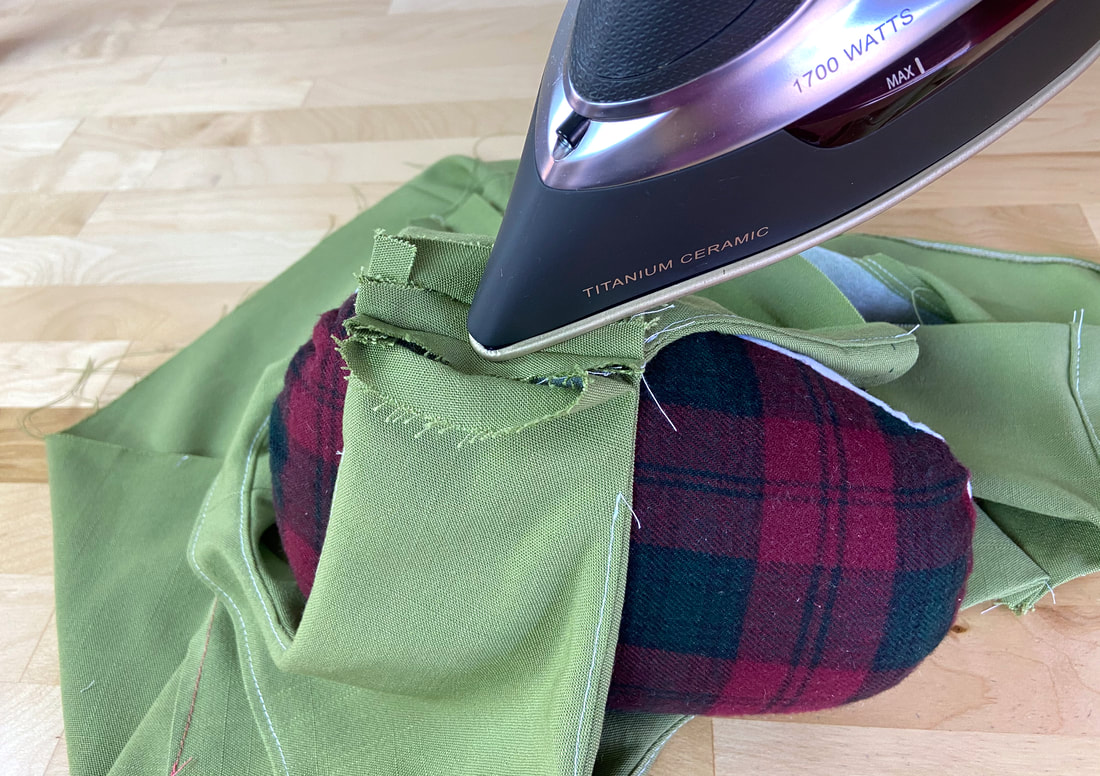
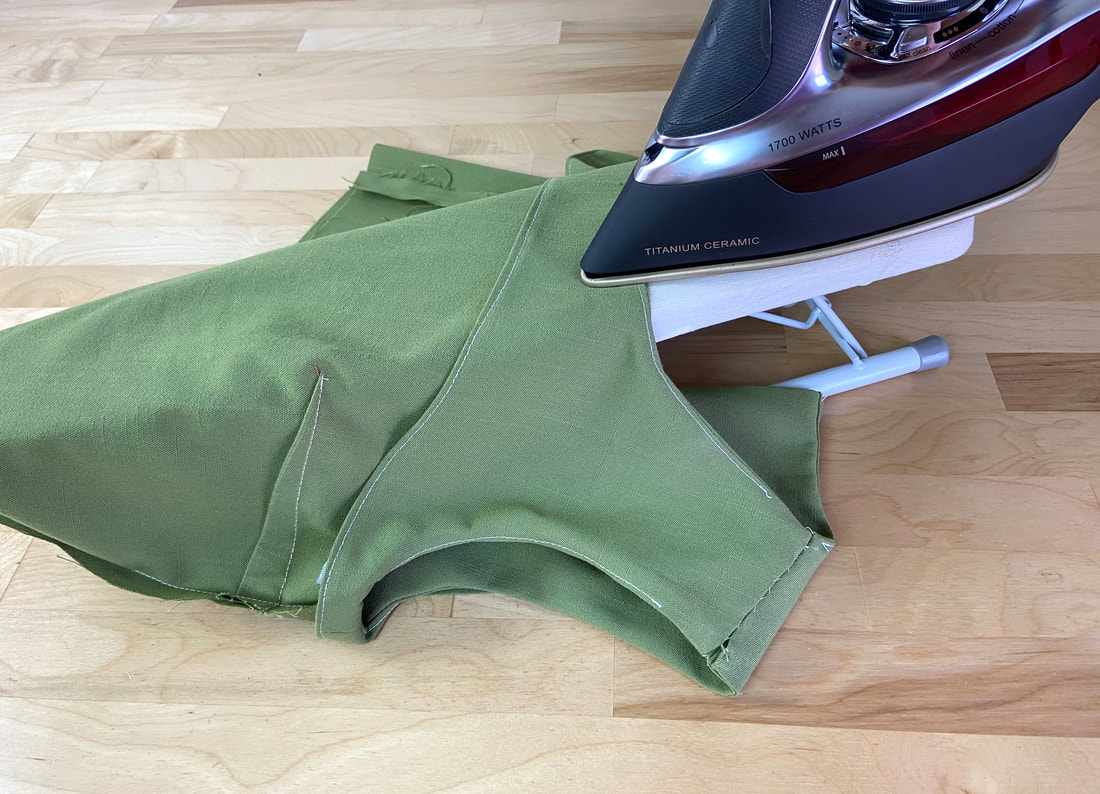
12. When complete, carefully iron the armhole and neckline seams from their face sides, with the facing and all seam allowance layers pointing away from the garment as shown. As you iron, you may need to maneuver around more difficult-to-reach areas like the bottom of the armhole edge, for example. It helps to invest in a tailor's ham or a sleeve board for this purpose. 
Picture
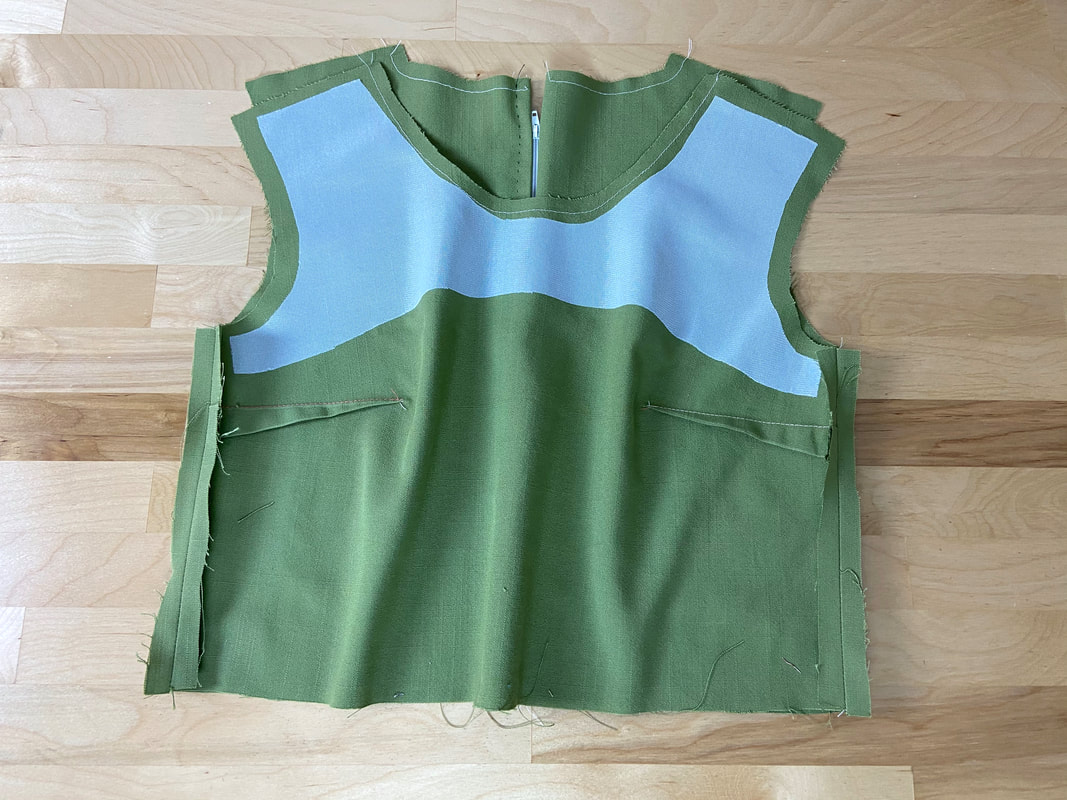
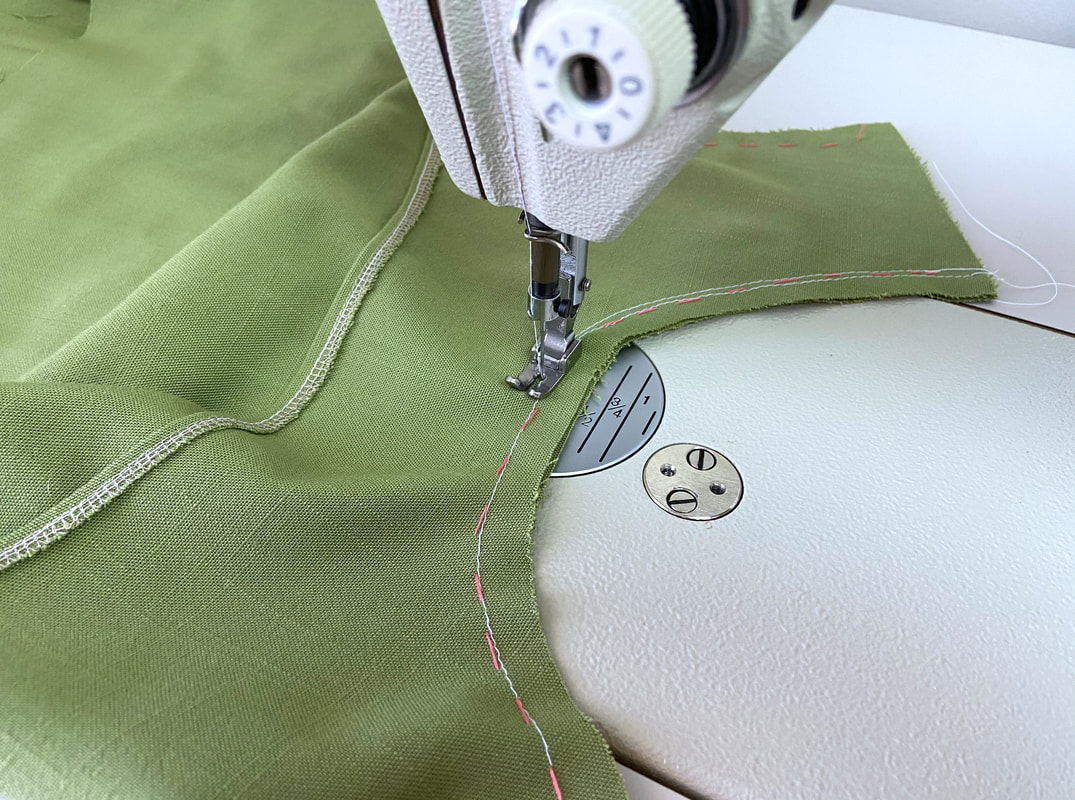
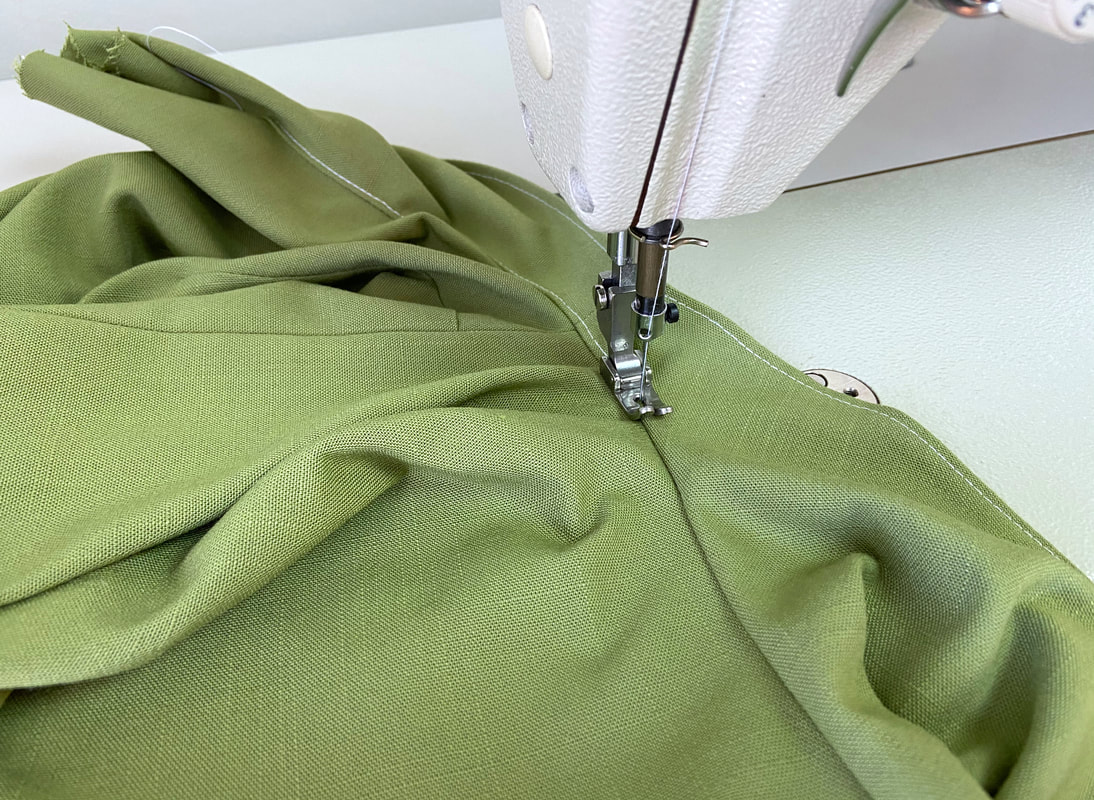
​13. At this point, understitch at about 1/8” away from the facing seam, on top the facing and seam allowance layers underneath. Keep the stitch as smooth and even as you can, and be sure to maintain the seam allowance flat underneath as you stitch- the clipped edges tend to shift if not kept completely flat in the process. 
Picture
14. Next, lets finish the shoulder seams. Turn the garment on its wrong side and pull the facing shoulder seams back a bit. ​In this position, align and pin the garment shoulder seam edges. Repeat on both sides. Without the ½” portion that was left unstitched in the step above, you wouldn’t be able to sew the shoulder seam edges together. ​
Picture
15. Stitch both shoulder seams at the designated seam allowance. Backstitch on both ends of the stitch to secure. 
Picture
16. Trim the seam allowance halfway to minimize bulk, and iron the seam allowance edges open as shown. 
Picture
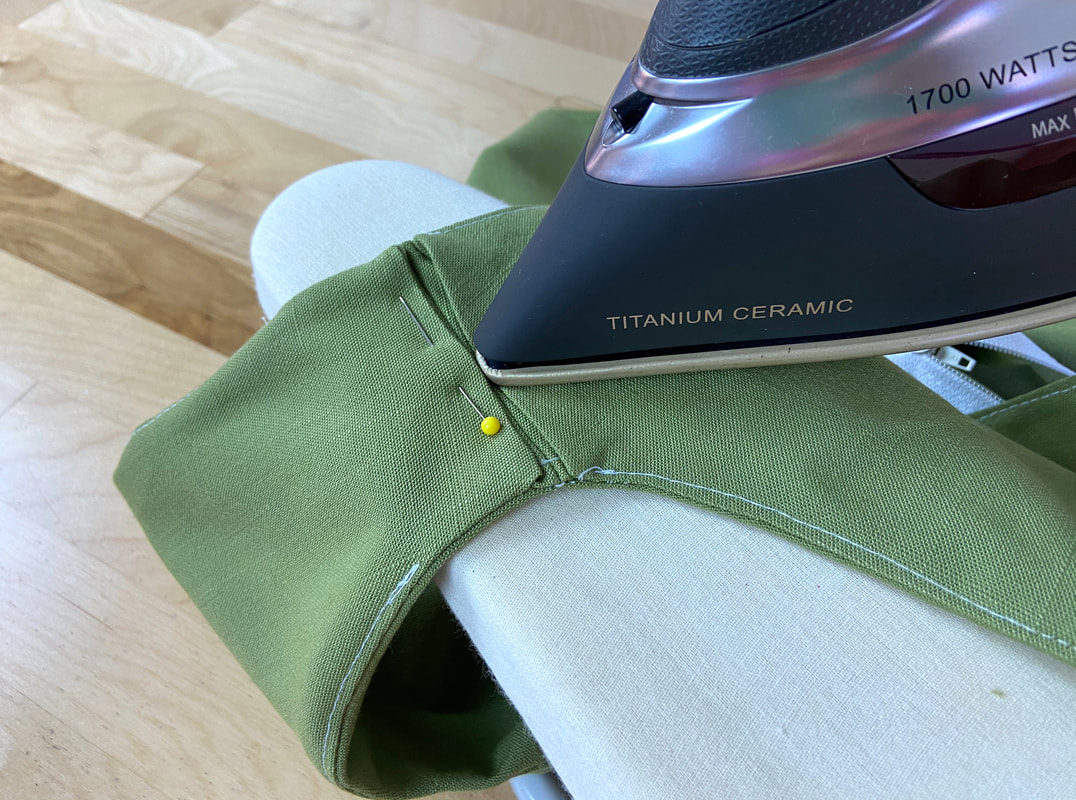
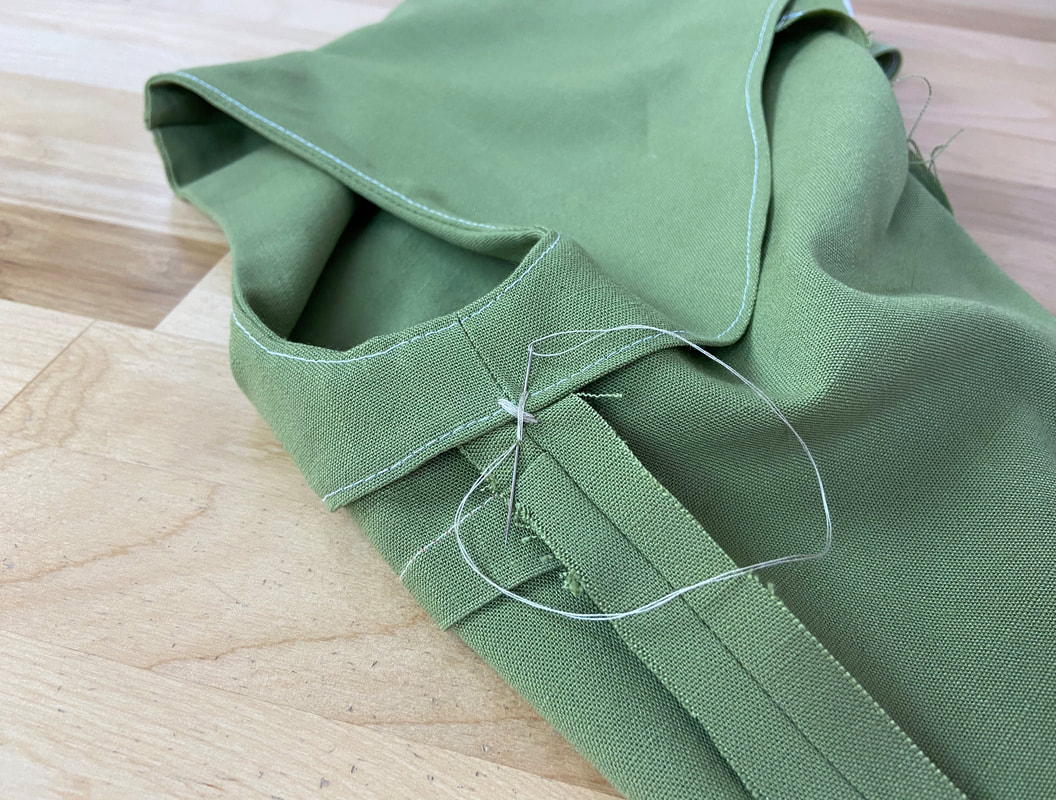
​17. Next, fold the facing shoulder seam edges in such that the folds match with the garment shoulder seamline. Insert a few pins to hold the folded edges in place. 
It may be helpful to first pre-iron the folds before stitching them closed in the steps to follow. 
Picture
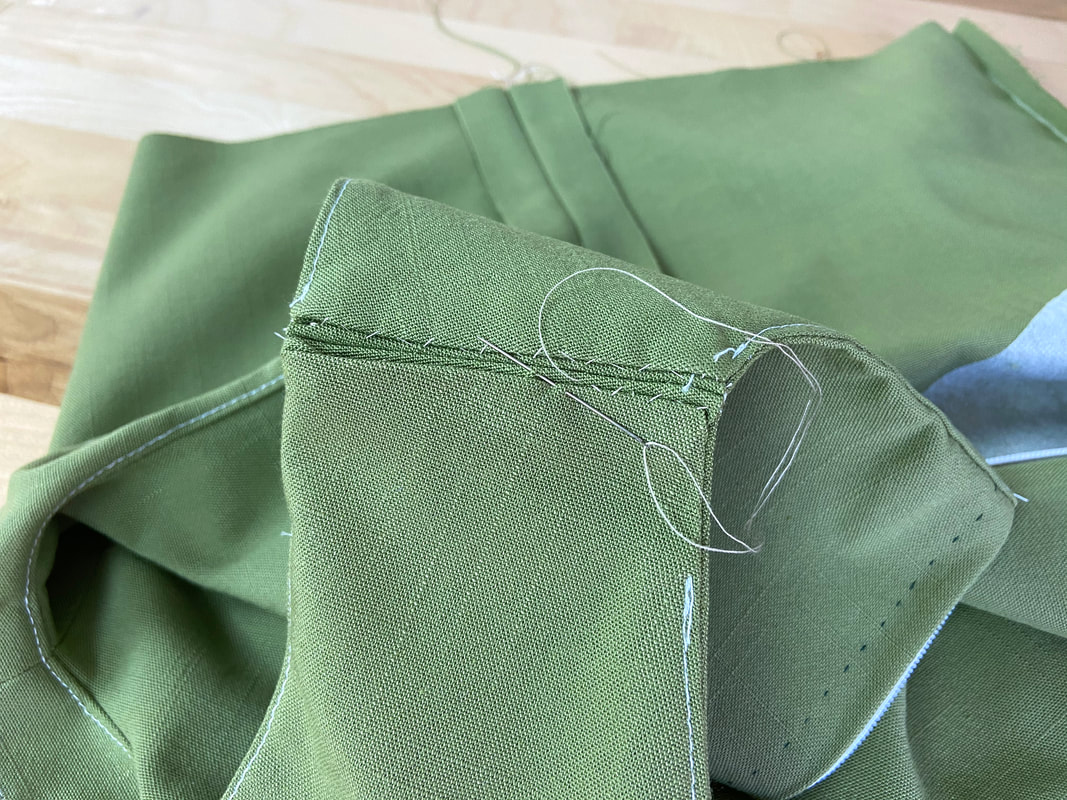
18. Slipstitch the facings shoulder seams closed through the folded edges and garment seam allowance underneath. 
Picture
Once the neck and armhole edges are fully sealed, iron the finished all-in-one facing.  
Picture
Picture
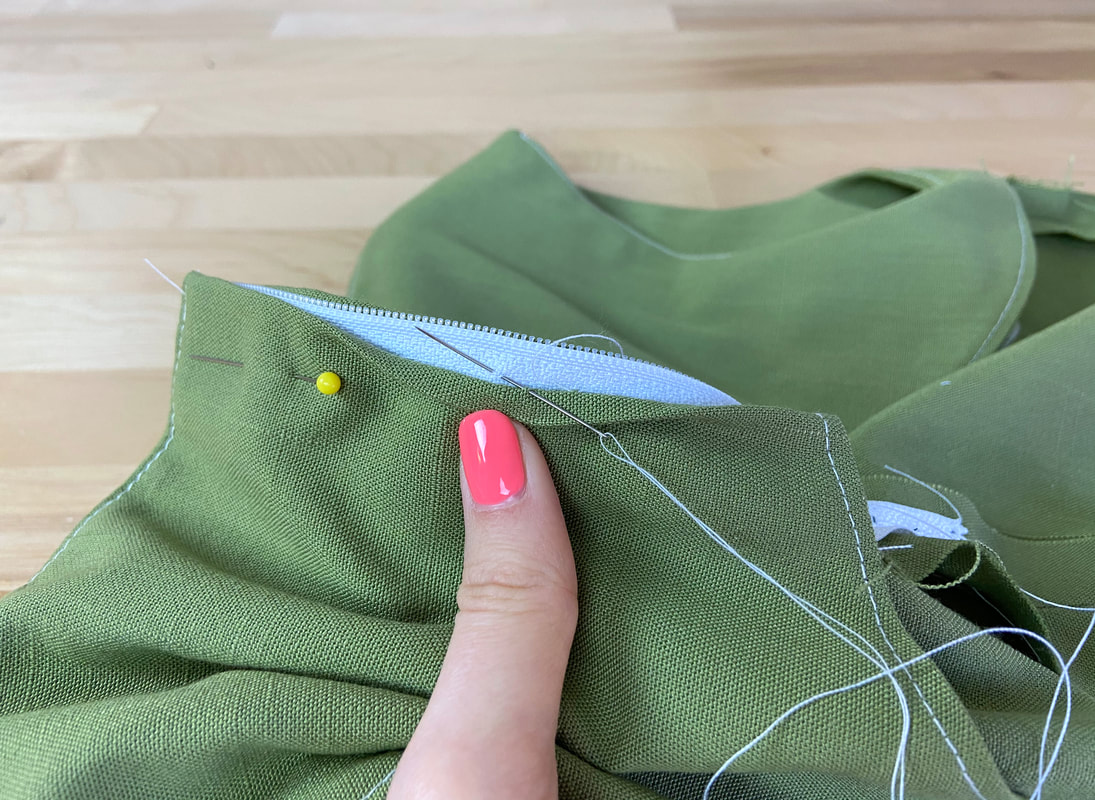
19. To finish the facing at the zipper area, fold and slipstitch the facing edges along each zipper tape portion.
Picture
​20. Last but not least, with the garment still on its wrong side, match the facing and garment side seams and insert a pin through both layers to secure. Whipstitch or cross-tack through the facing edge and garment seam allowance (only) to secure the facing and prevent it from rolling towards the outside of the finished garment. 
DMCA.com Protection Status
All content, including images and text, may not be copied, replicated, or redistributed without express written permission. This website is regularly screened and monitored for content protection.

Have A Personalized Sewing Question?

Ask It Here

Services

​Custom Apparel
Custom Bridal
​Sewing Tutorials
​

Company

About
Blog

Support

Contact
Terms of Service
DMCA.com Protection Status
© COPYRIGHT 2022. ALL RIGHTS RESERVED.
  • Sewing Tutorials
    • Basics >
      • Aligning Pattern Grainlines To Fabric
      • Preparing Fabrics For Sewing
      • Pinning Sewing Patterns To Fabric
      • Placing Sewing Patterns On Fabric For Cutting
      • Rotary Cutters or Fabric Scissors?
      • Cutting The Sewing Patterns
      • What Are Notches And How To Use Them In The Sewing Process
      • Transferring Notches From Pattern To Fabric
      • Transferring Seamlines to Fabric
      • Staystitching
      • Backstitching: A Complete Guide
      • Hand Basting: A Complete Guide
      • Sewing Continuous Bias Binding
    • Darts >
      • Marking And Transferring Darts To Fabric
      • What Are Darts And Dart Components
      • Folding, Pinning And Hand Basting Darts
      • Handling Dart Excess: Bulk And Tension
      • How To Sew A French Dart
      • How To Sew And Iron Single Pointed Darts
      • How To Sew And Iron Contour Darts
      • Sewing Darts With Decorative/Beaded Fabrics
    • Sewing Seams >
      • ​The Basics Of Seams And Seam Allowance
      • How To Sew A Straight Seam
      • Sewing Curved Seams
      • Sewing Corner Seams
      • Trimming And Grading Seam Excess
      • Notching/Clipping Seam Allowance for Tension Release
      • Sewing Topstitched Seams
      • Sewing Corded Seams
      • Sewing A Slot Seam
      • Sewing A Gathered Seam
      • Sewing Bias Seams
      • Sewing Seams With Ease
      • Sewing Seams With Crossing Seamlines
      • Sewing Unlike Fabric Seams
      • How To Iron Seams: Ironing Tools And Conventions
      • Sewing With Knit Fabrics
      • Understanding Stitch Length And Tension
      • Sewing Unique Fabric Seams
    • Seam Finishes >
      • Seam Finishing Techniques - Overview
      • Applying A Pinked Seam Finish
      • Applying A Bias Bound Seam Finish
      • Serging And Zigzag Seam Finishes
      • Sewing A Self-Bound Seam Finish
      • Sewing A French Seam Finish
      • Sewing A Hong Kong Seam Finish
      • Sewing A Mock French Seam Finish
      • Sewing A Turned-and-Stitched Seam Finish
      • Sewing Overcast Hand-Applied Seam Finishes
      • Sewing A Flat Felled Seam
      • Sewing A Hairline Seam Finish
    • Hem Finishes >
      • Garment Hem Finishes: Overview
      • ​Sewing A Double Fold Hem Finish
      • Sewing A Single Fold Hem Finish
      • Sewing Bound Hem Finishes
      • Sewing An Exposed Double Layer Bound Hem
      • Sewing A Folded-Up Bound Hem with Pre-folded Binding
      • Sewing A Hong Kong Hem Finish
      • Sewing A Band Hem Finish
      • Sewing A Bias Faced Hem Finish
      • Sewing A Twill Tape Hem Finish
      • Sewing A Rolled Hem Finish
      • Sewing A Shaped Hem Facing
      • Using Fusible Hem Tape And Webbing
      • Finishing A Lace Fabric Hem
      • Finishing A Leather Hem
      • Sewing Faced Hem Corners
      • How To Finish Lining At The Hem
      • Finishing Fabric Corners by Mitering >
        • Mitering Fabric Corners With A Full Bias Facing
        • Mitering Fabric Corners With Exposed Binding
      • Interfacing A Hemline: Lined And Unlined Examples
    • Sewing Pockets >
      • Curved Patch Pocket With Flap
      • Unlined Square Patch Pockets
      • Lined Patch Pockets: Two Ways
      • Extension On-Seam Pockets
      • Separate On-Seam Pocket
      • Front Hip Pockets
      • Bound Double Welt Pocket
      • Double Welt Pocket With Flap
      • Self-Welt Pocket (Using Single Fabric Layer)
      • Slanted Welt Pocket (Hand-Stitched)
      • Faced Slash Pockets: Overview >
        • Sewing A Faced Slit Pocket
        • Sewing A Rectangular Slash Pocket
        • Sew A Star-Shaped Faced Pocket
    • Sewing Zippers >
      • Sewing Zippers: General Information
      • Sewing A Centered Zipper
      • Sewing A Lapped Zipper
      • Sewing An Invisible Zipper
      • Sewing A Fly Front Zipper
      • Sewing A Closed-End Exposed Zipper (No Seam)
      • Sewing An Exposed Separating Zipper
      • Sewing Hand Stitched Zipper Applications
      • Sewing A Zipper Underlay
      • Sewing A Placket-Enclosed Separating Zipper
    • Sleeveless Finishes >
      • Sleeveless Armhole Finishes: General Information
      • Finishing Sleeveless Garments with Lining
      • Sewing A Folded-Under Bound Armhole Finish
      • Sewing A Shaped Armhole Facing
      • Finishing Armhole Edges With Exposed Binding
      • Finishing Armhole Edges With Decorative Trim
    • Neckline Finishes >
      • Sewing A Neck Shaped Facing
      • Sewing An All-In-One Neck Facing
      • Neck And Garment Opening Combination Facings >
        • Sewing An Extended Front-Neck Facing
        • Sewing A Separate Neck-Front Facing
      • Sewing A Bias Faced Neckline Finish
      • Sewing A Band Neckline Finish
      • Bound Neckline Finishes: Overview >
        • Sewing A Single Layer Bound Neckline
        • Finishing A Neckline With Pre-Folded Binding
        • Sewing A Double Layer Bound Neckline Finish
      • Sewing A Semi-Stretch Strip Band Neckline
      • Ribbed Neck Band And Classic Turtleneck
      • Decorative Neckline Finishes >
        • Sewing A Neckline With Decorative Inset
        • Sewing A Piped Cording Faced Neckline
        • Sewing Decorative Trim To A Finished Neckline
    • Finishing Facing Edges >
      • Finishing Facing Edges: Overview
      • Folded-And-Topstitched Overedge Facing Finish
      • Sewing A Bound Facing Edge Finish
      • Sewing A Hong Kong Facing Finish
      • Sewing A Rolled Edge Facing Finish
      • Sewing A Twill Tape Facing Edge Finish
      • Sewing An Overedge-Stitch Facing Finish
    • Extras >
      • A Complete Guide on Interfacing
      • Sewing Bound Spaghetti Straps
      • Sewing Spaghetti Straps To A Faced Neckline
      • Sewing Ruffles: Overview
      • Patterning And Sewing A Circle Ruffle
      • Sewing A Gathered Heading Ruffle
      • Sewing Double Layer Gathered Ruffles
      • Sewing A Gathered Ruffle Into A Seam
      • Sewing A Gathered Ruffle To A Fabric Edge
      • Sewing A Fabric Surface Slit
      • Sewing A Slit Seam
      • Hand-Applied Straight Stitches
      • Hand-Applied Blind Stitches
      • Hand-Applied Overedge Stitches
      • Hand-Applied Tack Stitches
      • Hand-Applied Decorative Stitches
  • Custom Apparel
    • Custom Bridal
  • Submit A Sewing Question
  • About
  • Blog