Doina Alexei
  • Custom Bridal
  • The Process
  • Our Brides
  • About
  • Sewing Tutorials
    • Basics >
      • Aligning Pattern Grainlines To Fabric
      • Preparing Fabrics For Sewing
      • Pinning Sewing Patterns To Fabric
      • Placing Sewing Patterns On Fabric For Cutting
      • Rotary Cutters or Fabric Scissors?
      • Cutting The Sewing Patterns
      • What Are Notches And How To Use Them In The Sewing Process
      • Transferring Notches From Pattern To Fabric
      • Transferring Seamlines to Fabric
      • Staystitching
      • Backstitching: A Complete Guide
      • Hand Basting: A Complete Guide
      • Sewing Continuous Bias Binding
    • Darts >
      • Marking And Transferring Darts To Fabric
      • What Are Darts And Dart Components
      • Folding, Pinning And Hand Basting Darts
      • Handling Dart Excess: Bulk And Tension
      • How To Sew A French Dart
      • How To Sew And Iron Single Pointed Darts
      • How To Sew And Iron Contour Darts
      • Sewing Darts With Decorative/Beaded Fabrics
    • Sewing Seams >
      • ​The Basics Of Seams And Seam Allowance
      • How To Sew A Straight Seam
      • Sewing Curved Seams
      • Sewing Corner Seams
      • Trimming And Grading Seam Excess
      • Notching/Clipping Seam Allowance for Tension Release
      • Sewing Topstitched Seams
      • Sewing Corded Seams
      • Sewing A Slot Seam
      • Sewing A Gathered Seam
      • Sewing Bias Seams
      • Sewing Seams With Ease
      • Sewing Seams With Crossing Seamlines
      • Sewing Unlike Fabric Seams
      • How To Iron Seams: Ironing Tools And Conventions
      • Sewing With Knit Fabrics
      • Understanding Stitch Length And Tension
      • Sewing Unique Fabric Seams
    • Seam Finishes >
      • Seam Finishing Techniques - Overview
      • Applying A Pinked Seam Finish
      • Applying A Bias Bound Seam Finish
      • Serging And Zigzag Seam Finishes
      • Sewing A Self-Bound Seam Finish
      • Sewing A French Seam Finish
      • Sewing A Hong Kong Seam Finish
      • Sewing A Mock French Seam Finish
      • Sewing A Turned-and-Stitched Seam Finish
      • Sewing Overcast Hand-Applied Seam Finishes
      • Sewing A Flat Felled Seam
      • Sewing A Hairline Seam Finish
    • Hem Finishes >
      • Garment Hem Finishes: Overview
      • ​Sewing A Double Fold Hem Finish
      • Sewing A Single Fold Hem Finish
      • Sewing Bound Hem Finishes
      • Sewing An Exposed Double Layer Bound Hem
      • Sewing A Folded-Up Bound Hem with Pre-folded Binding
      • Sewing A Hong Kong Hem Finish
      • Sewing A Band Hem Finish
      • Sewing A Bias Faced Hem Finish
      • Sewing A Twill Tape Hem Finish
      • Sewing A Rolled Hem Finish
      • Sewing A Shaped Hem Facing
      • Using Fusible Hem Tape And Webbing
      • Finishing A Lace Fabric Hem
      • Finishing A Leather Hem
      • Sewing Faced Hem Corners
      • How To Finish Lining At The Hem
      • Finishing Fabric Corners by Mitering >
        • Mitering Fabric Corners With A Full Bias Facing
        • Mitering Fabric Corners With Exposed Binding
      • Interfacing A Hemline: Lined And Unlined Examples
    • Sewing Pockets >
      • Curved Patch Pocket With Flap
      • Unlined Square Patch Pockets
      • Lined Patch Pockets: Two Ways
      • Extension On-Seam Pockets
      • Separate On-Seam Pocket
      • Front Hip Pockets
      • Bound Double Welt Pocket
      • Double Welt Pocket With Flap
      • Self-Welt Pocket (Using Single Fabric Layer)
      • Slanted Welt Pocket (Hand-Stitched)
      • Faced Slash Pockets: Overview >
        • Sewing A Faced Slit Pocket
        • Sewing A Rectangular Slash Pocket
        • Sew A Star-Shaped Faced Pocket
    • Sewing Zippers >
      • Sewing Zippers: General Information
      • Sewing A Centered Zipper
      • Sewing A Lapped Zipper
      • Sewing An Invisible Zipper
      • Sewing A Fly Front Zipper
      • Sewing A Closed-End Exposed Zipper (No Seam)
      • Sewing An Exposed Separating Zipper
      • Sewing Hand Stitched Zipper Applications
      • Sewing A Zipper Underlay
      • Sewing A Placket-Enclosed Separating Zipper
    • Sleeveless Finishes >
      • Sleeveless Armhole Finishes: General Information
      • Finishing Sleeveless Garments with Lining
      • Sewing A Folded-Under Bound Armhole Finish
      • Sewing A Shaped Armhole Facing
      • Finishing Armhole Edges With Exposed Binding
      • Finishing Armhole Edges With Decorative Trim
    • Neckline Finishes >
      • Sewing A Neck Shaped Facing
      • Sewing An All-In-One Neck Facing
      • Neck And Garment Opening Combination Facings >
        • Sewing An Extended Front-Neck Facing
        • Sewing A Separate Neck-Front Facing
      • Sewing A Bias Faced Neckline Finish
      • Sewing A Band Neckline Finish
      • Bound Neckline Finishes: Overview >
        • Sewing A Single Layer Bound Neckline
        • Finishing A Neckline With Pre-Folded Binding
        • Sewing A Double Layer Bound Neckline Finish
      • Sewing A Semi-Stretch Strip Band Neckline
      • Ribbed Neck Band And Classic Turtleneck
      • Decorative Neckline Finishes >
        • Sewing A Neckline With Decorative Inset
        • Sewing A Piped Cording Faced Neckline
        • Sewing Decorative Trim To A Finished Neckline
    • Finishing Facing Edges >
      • Finishing Facing Edges: Overview
      • Folded-And-Topstitched Overedge Facing Finish
      • Sewing A Bound Facing Edge Finish
      • Sewing A Hong Kong Facing Finish
      • Sewing A Rolled Edge Facing Finish
      • Sewing A Twill Tape Facing Edge Finish
      • Sewing An Overedge-Stitch Facing Finish
    • Extras >
      • A Complete Guide on Interfacing
      • Sewing Bound Spaghetti Straps
      • Sewing Spaghetti Straps To A Faced Neckline
      • Sewing Ruffles: Overview
      • Patterning And Sewing A Circle Ruffle
      • Sewing A Gathered Heading Ruffle
      • Sewing Double Layer Gathered Ruffles
      • Sewing A Gathered Ruffle Into A Seam
      • Sewing A Gathered Ruffle To A Fabric Edge
      • Sewing A Fabric Surface Slit
      • Sewing A Slit Seam
      • Hand-Applied Straight Stitches
      • Hand-Applied Blind Stitches
      • Hand-Applied Overedge Stitches
      • Hand-Applied Tack Stitches
      • Hand-Applied Decorative Stitches

How To Sew A Bias-Faced Neckline Finish

A bias strip neck finish, also called a bias facing, is perhaps one of the easiest of all neckline applications. This technique is perfect for softly curved edges. While simple in its construction process, it does require a bit of hand stitching. 
Picture
In this application, the neckline edge is finished with a fabric strip that is cut on the bias for extra stretch. The bias cut allows the strip to easily shape around curved neck edges. 
In the application process, the bias strip is folded onto itself to provide a clean-finished outer edge. When in folded position, the two lengthwise raw edges meet and are sewn to the neckline edge. All raw edges are then enclosed by the body of the bias strip. 
​Since the bias strip requires folding, it should be cut at double the width, plus two seam allowances to account for stitching the bias edges to the neckline edge. 
Picture
For example, a bias finish that is ½” wide when completed and is sewn into a neckline edge that has ½” seam allowance, should start with a bias fabric strip that is 2” wide (1” for the body of the bias and 1” to account for two ½” seam allowances when the strip is folded onto itself). Follow the same logic using the width of your neckline’s specific seam allowance and how wide you want the final bias application to be. 
​A final bias facing application can range anywhere from ½” to 1” in width. If it exceeds 1”, the bias strip will lose its flexibility and may not mold as well around curved edges. 
Picture
In terms of fabric, a bias neck facing can be cut from the same fabric (but cut diagonally on the bias), or from a lighter-weight fabric. The latter is especially helpful when the garment is made of thick, bulky material.
Speaking of fabric, not all fabrics are suitable with a bias facing finish. Ironically, a bias strip neckline is either used with lightweight, sheer fabrics or garments sewn from heavy, bulky fabrics. 
​Sheers are not compatible with conventional facings since the underside of the facing is visible on the face of the finished garment. A folded bias strip provides a clean, less visible alternative, providing a professional finish both on the face and wrong side of the garment. 
Conversely, a bias neck facing works well for heavy garments for which a conventional facing would add too much bulk. In this case, using a bias strip that is sturdy enough to keep the neckline edges down but thin enough as to not add excess bulk, serves as the perfect neck finish. 
A bias facing is also a great alternative for bias binding, or when a visible topstitch is not desired on the face of the garment. 

Finishing The Neckline Edge With Bias Facing

1. Determine the width of the finished bias strip. Do not exceed 1”.
​In this example, the finished bias facing will be ½” and be sewn into a neckline edge that has ½” seam allowance. Doing the math, the total width of the bias fabric strip to be cut is 2” - seam allowance plus bias facing width x 2.
​To cut the bias strip (s):
Picture
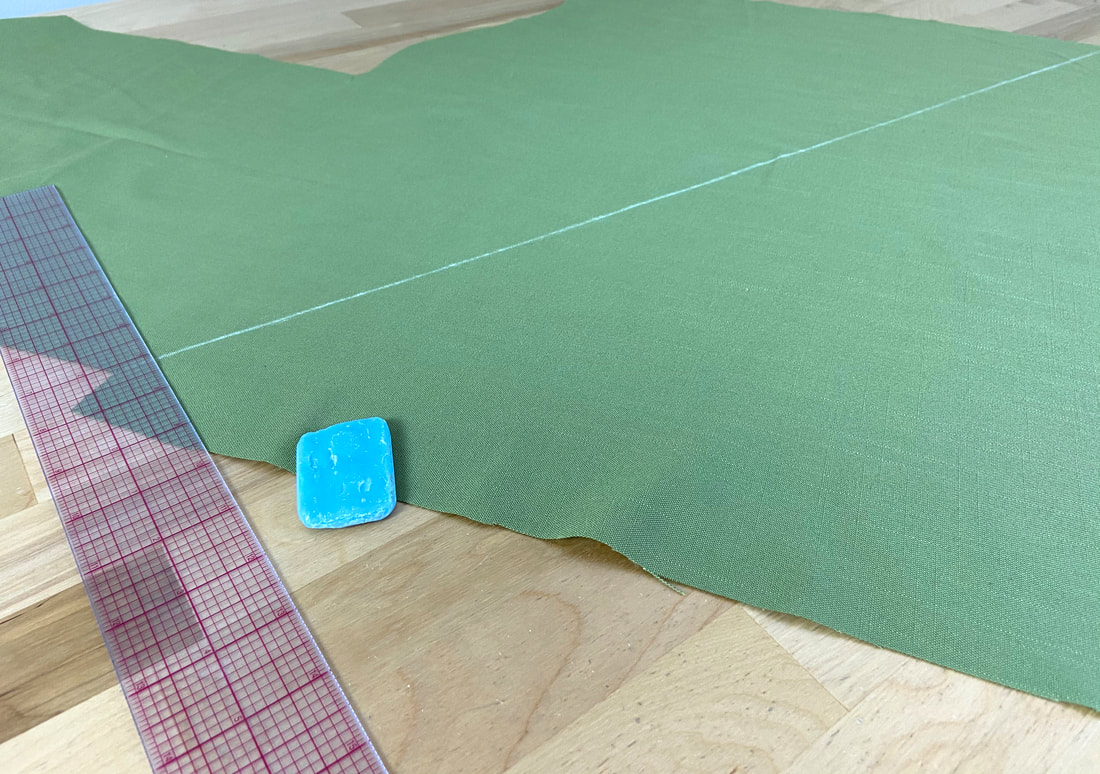
2. Lay the fabric flat on the table and fold the fabric such that its crosswise edge is parallel to the selvage. The fold line created as a result depicts the fabric's bias. Mark down this fold line with tailor’s chalk as shown above.
Picture
3. Next, using a ruler (preferably a marked clear plastic ruler like the one used in this tutorial), draw a parallel line with tailor’s chalk above the first bias line. The distance between the two lines should be 2”. This will mark the initial bias strip. 
If your final bias facing will need to be longer than this initial bias strip, mark additional 2-inch intervals from the second line. These separate pieces are cut individually and can be sewn together to create a continuous bias strip.
Picture
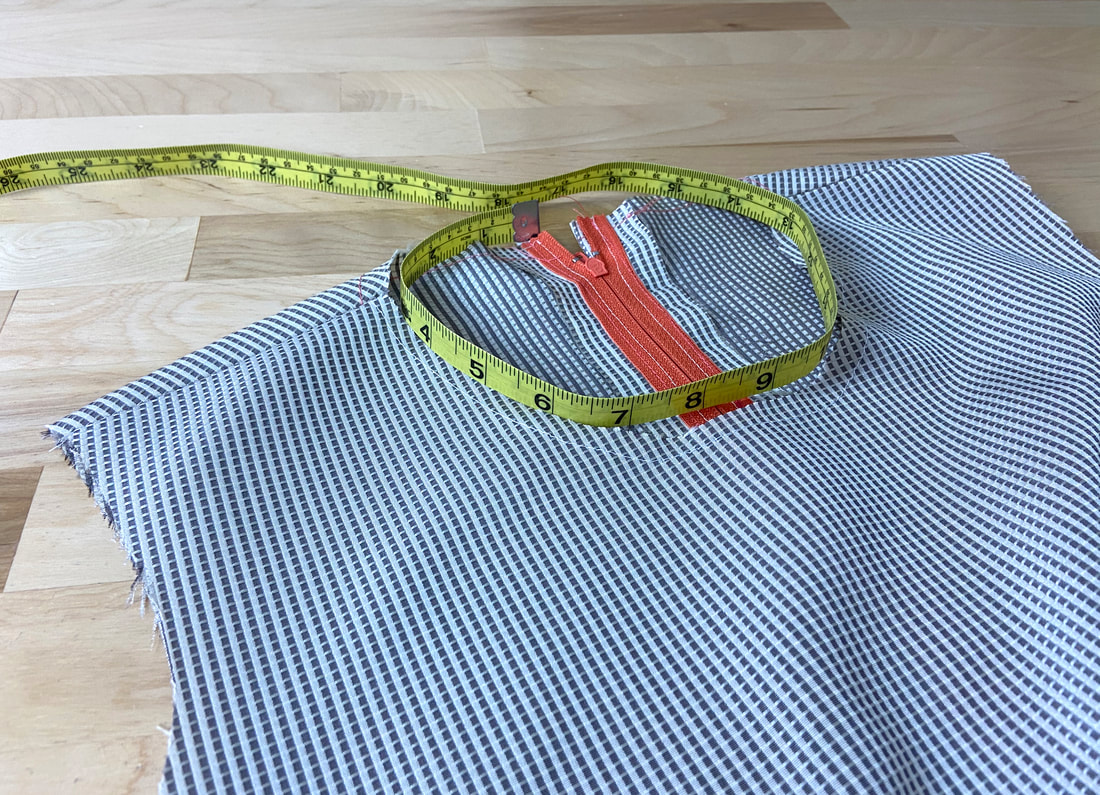
4. To determine the length of the bias strip needed (if not already provided), use a measuring tape to measure around the edge of the neckline and add 2-3” to this measurement. This final number will determine how long the bias strip needs to be for this particular neck finish. 
Picture
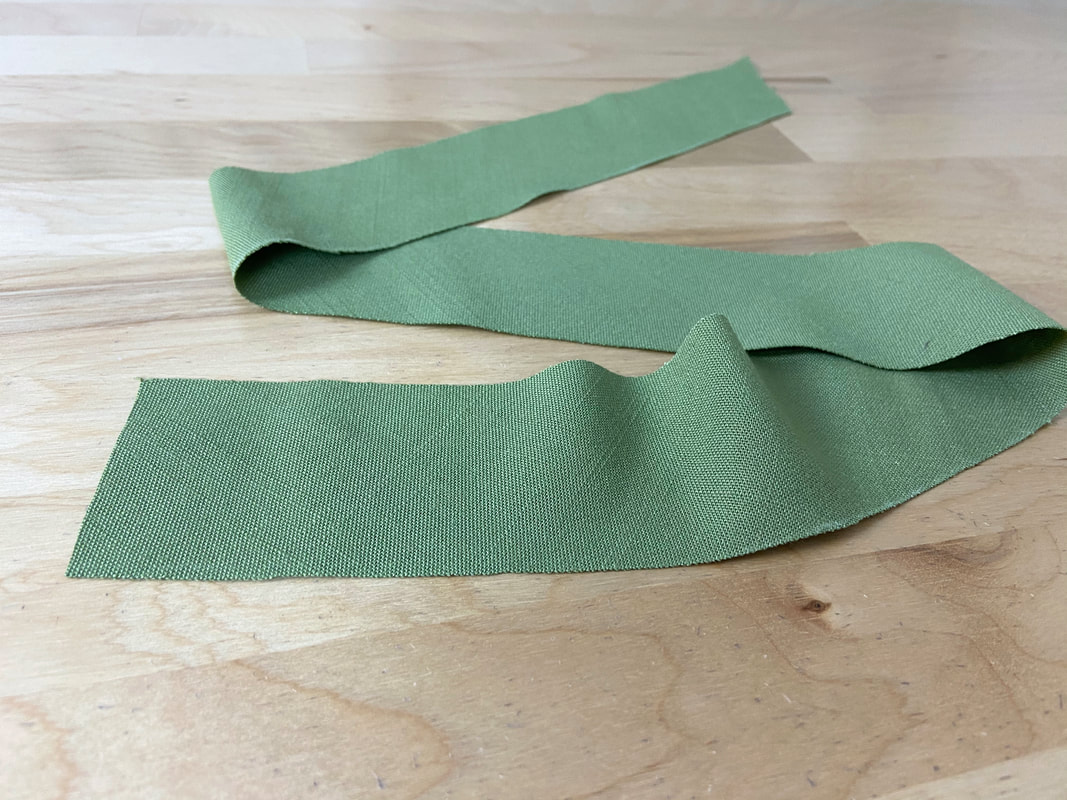
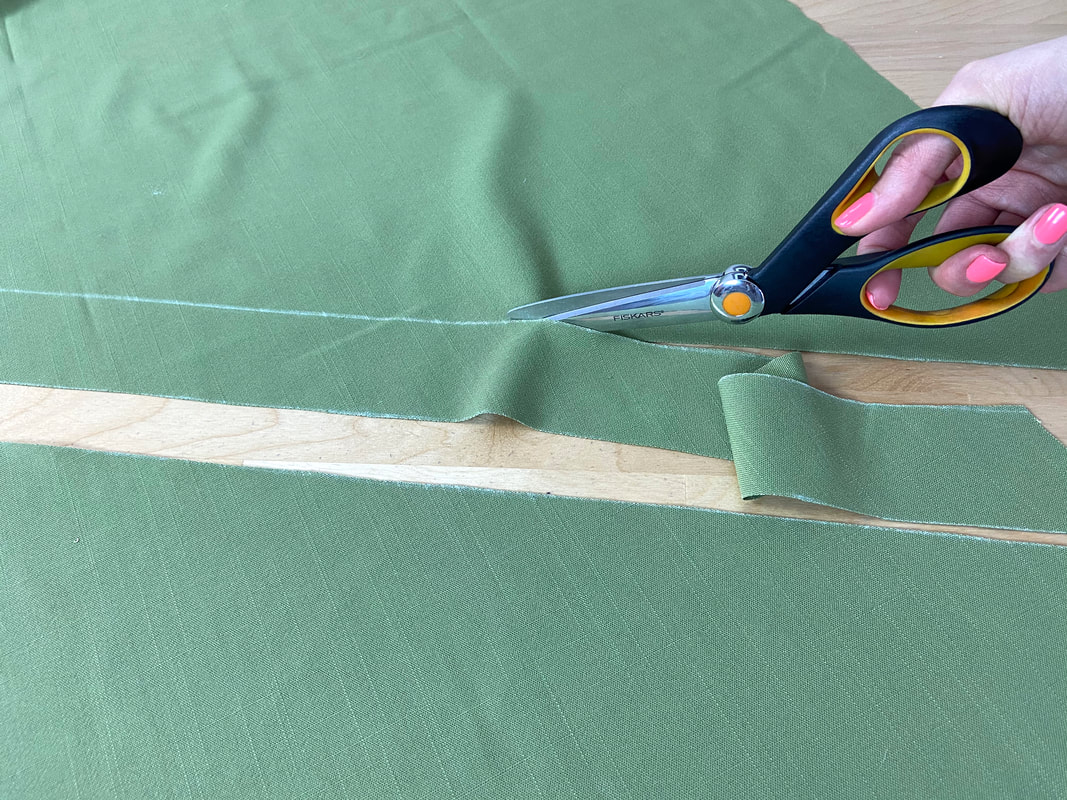
5. Carefully cut along each tailor’s chalk line. If multiple pieces need to be sewn together, do it at this point.
​Use the steps in this tutorial to sew the individual bias strips together: How To Sew Continuous Bias Binding
To attach the bias facing to the neckline:
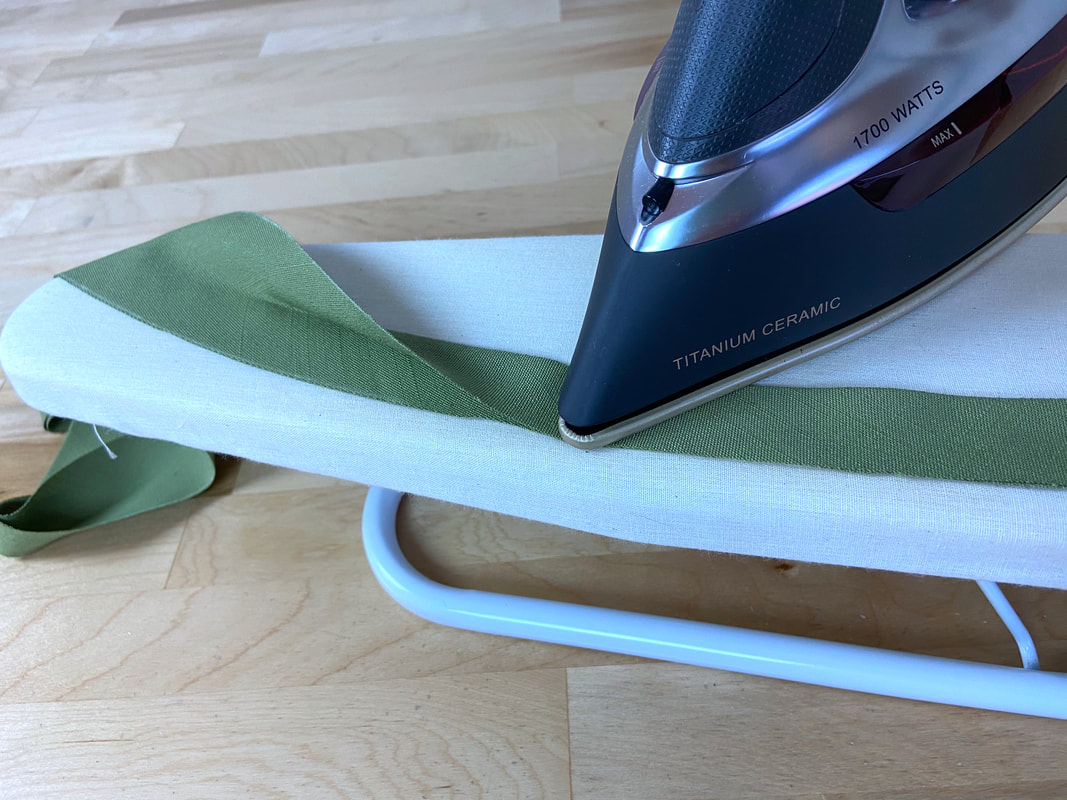
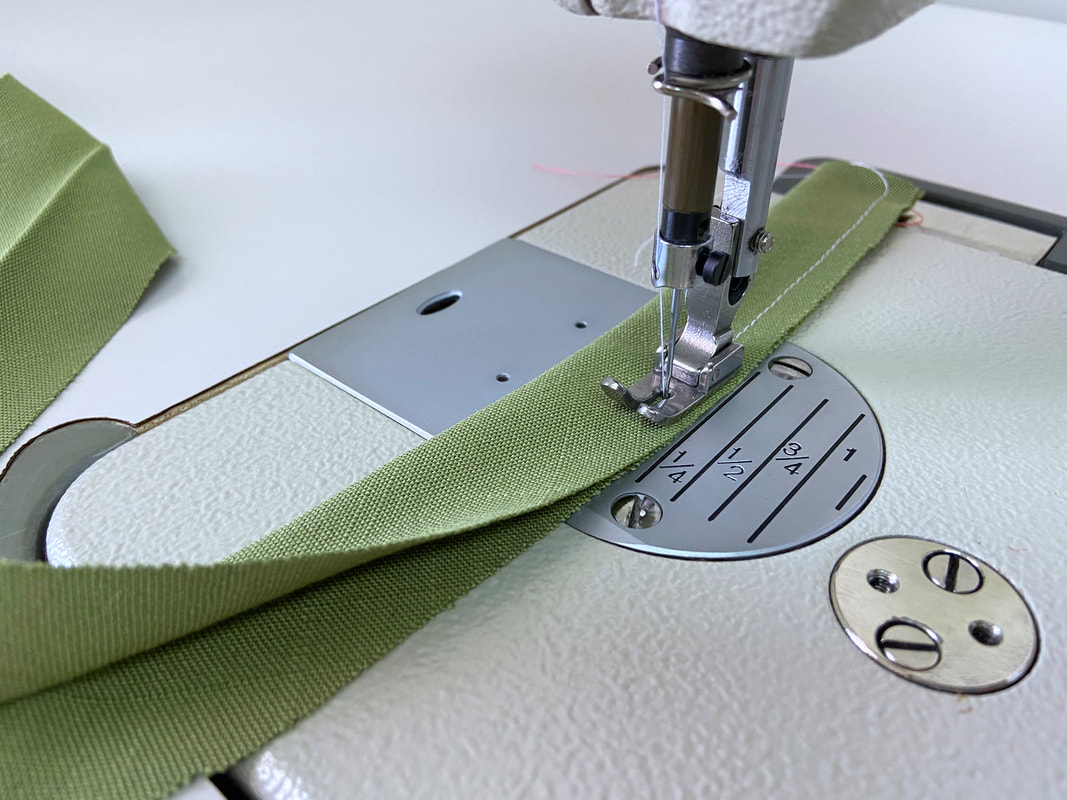
7. Fold the bias fabric strip lengthwise down the middle such that the fabric wrong sides are touching and the lengthwise raw edges are perfectly aligned.
Picture
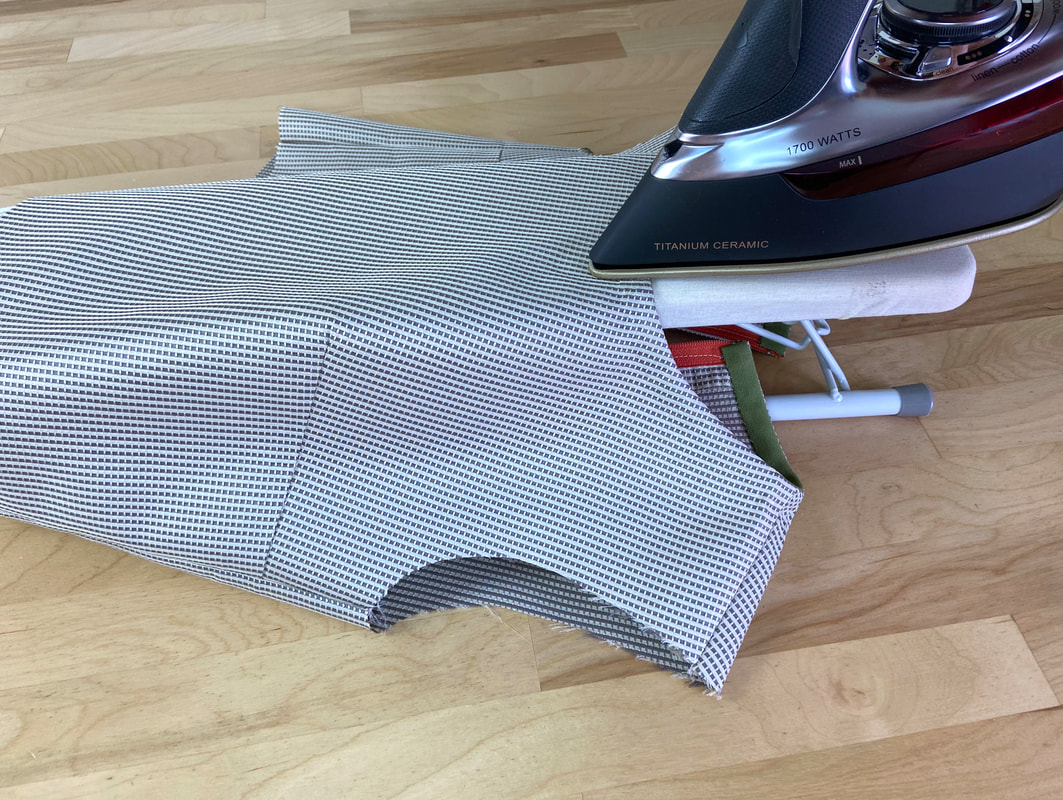
​Iron the folded bias strip to crease the folded line. 
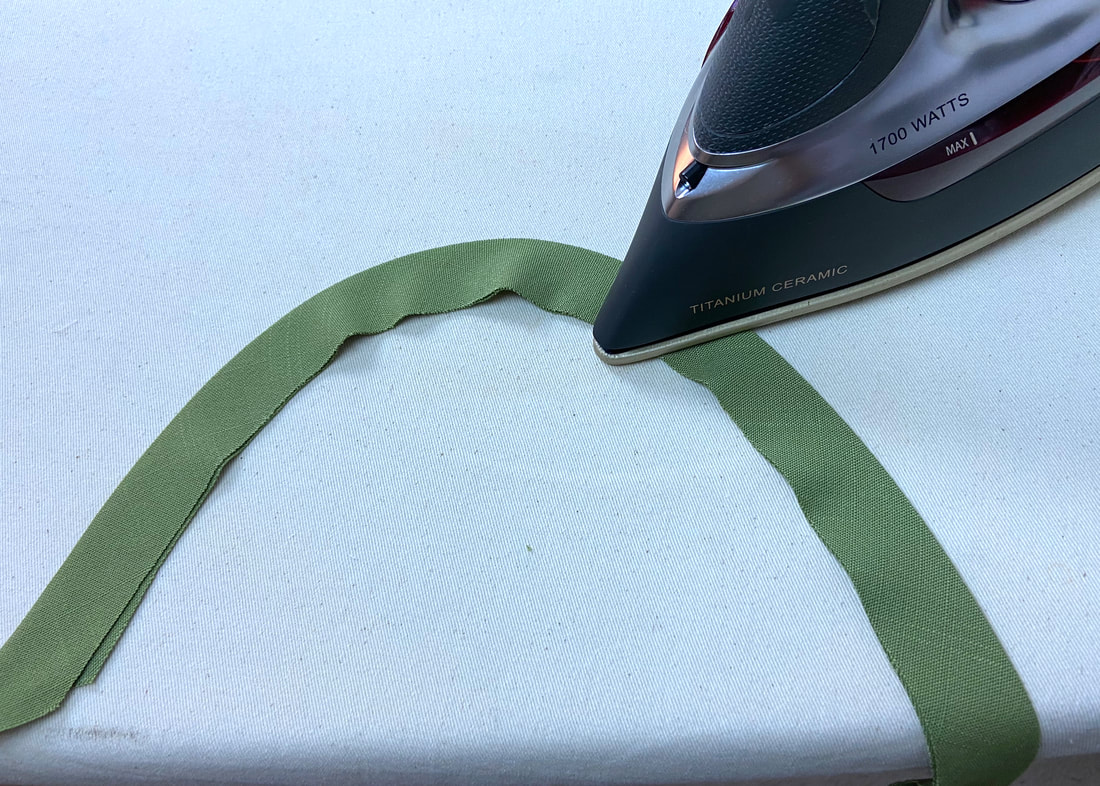
Picture
8. ​As you iron, stretch the bias gently such that it starts to resemble more of a curved shape. Doing this at the ironing stage, shapes the bias facing such that it is easier to align, mold and stitch to the neckline’s curved edge.
Picture
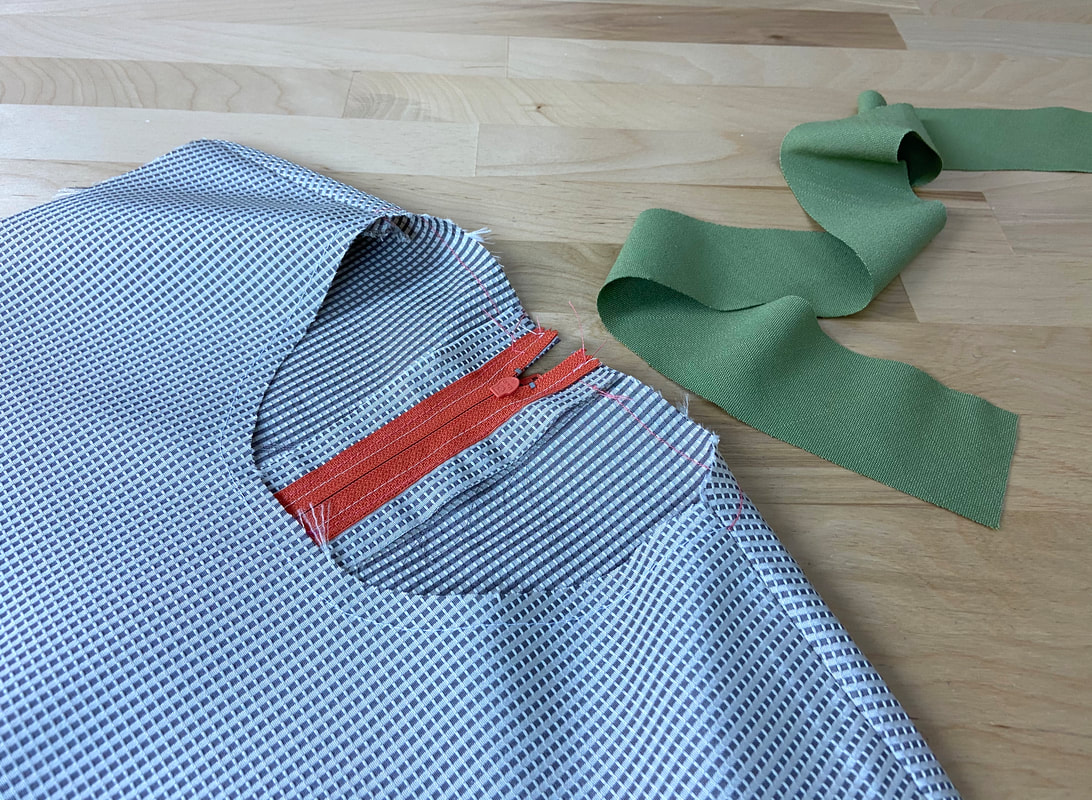
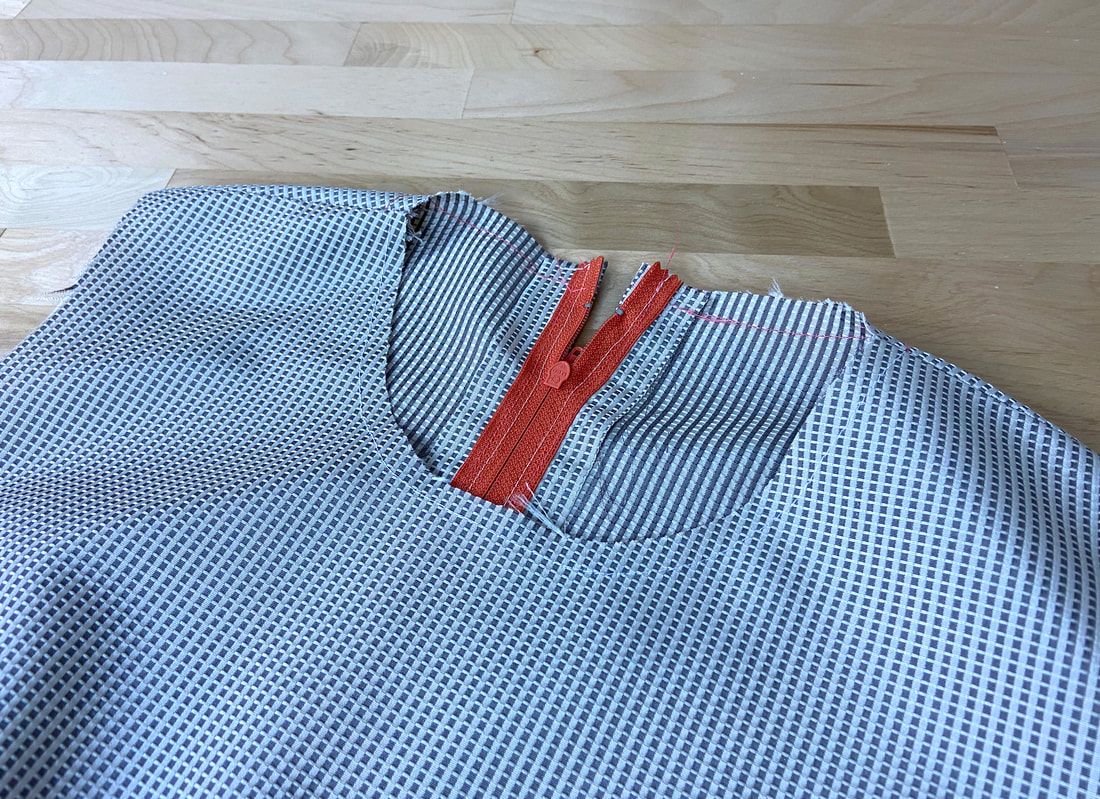
At this point, make sure that the shoulder seams and any zipper closure(s) have been fully sewn and finished before proceeding with attaching the bias facing. 
In this case, the center back zipper has been inserted and the shoulder seams have been stitched, ironed and finished with a serged overedge stitch.
Picture
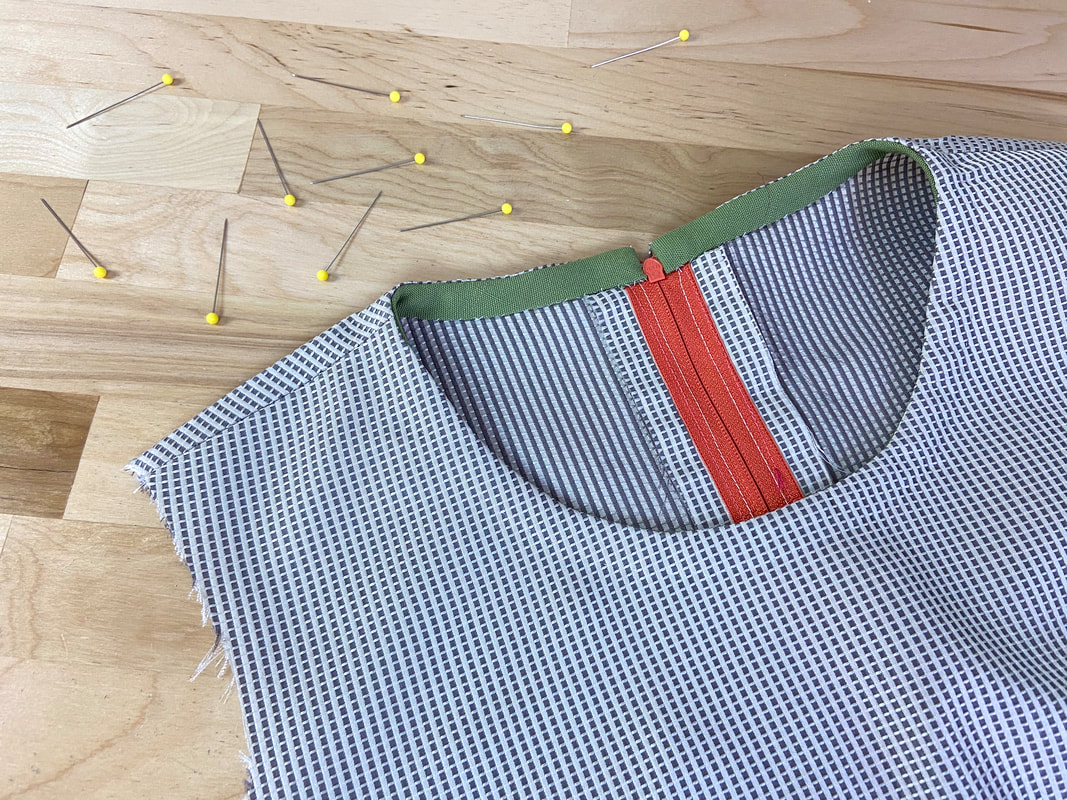
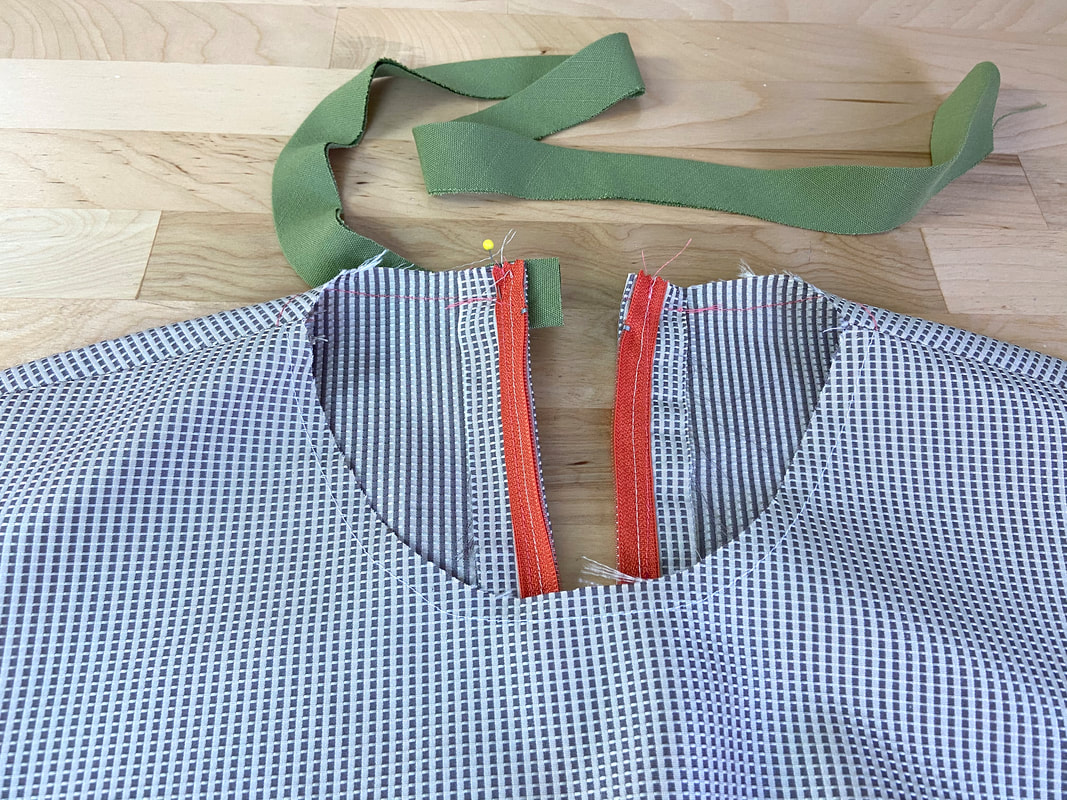
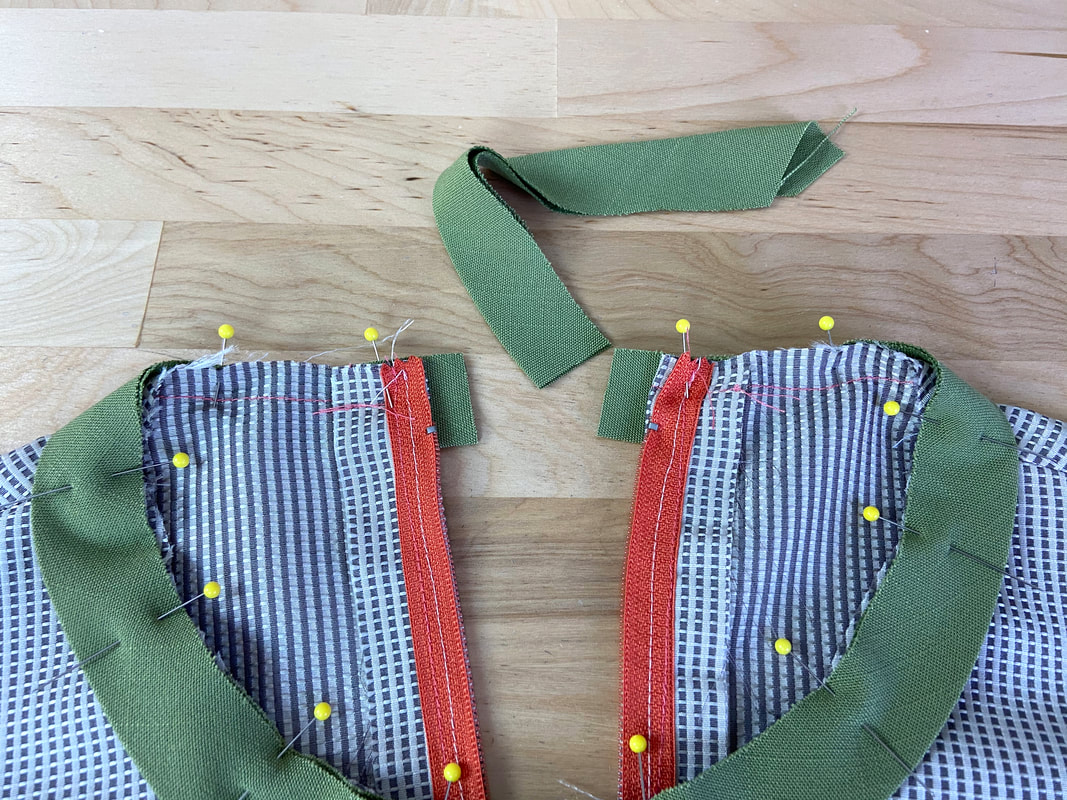
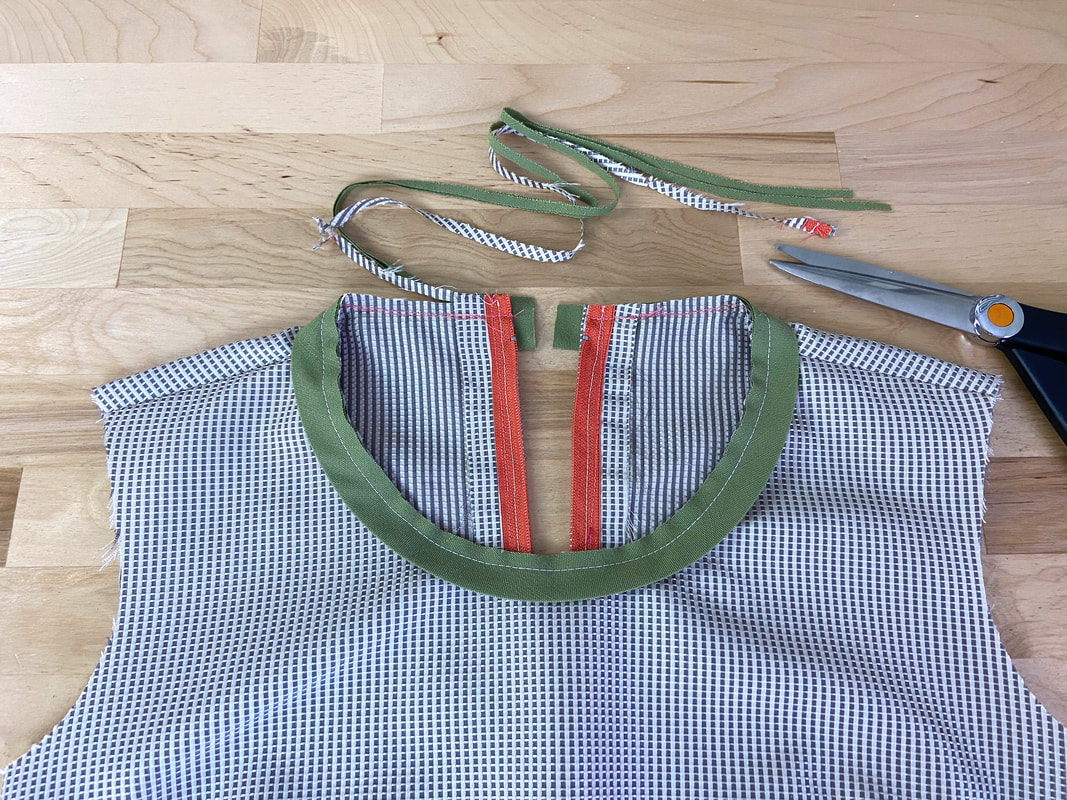
9. Open the zipper, and leaving about 1/2” of excess, align the bias facing to the neckline edge from the right side of the garment as shown. 
Picture
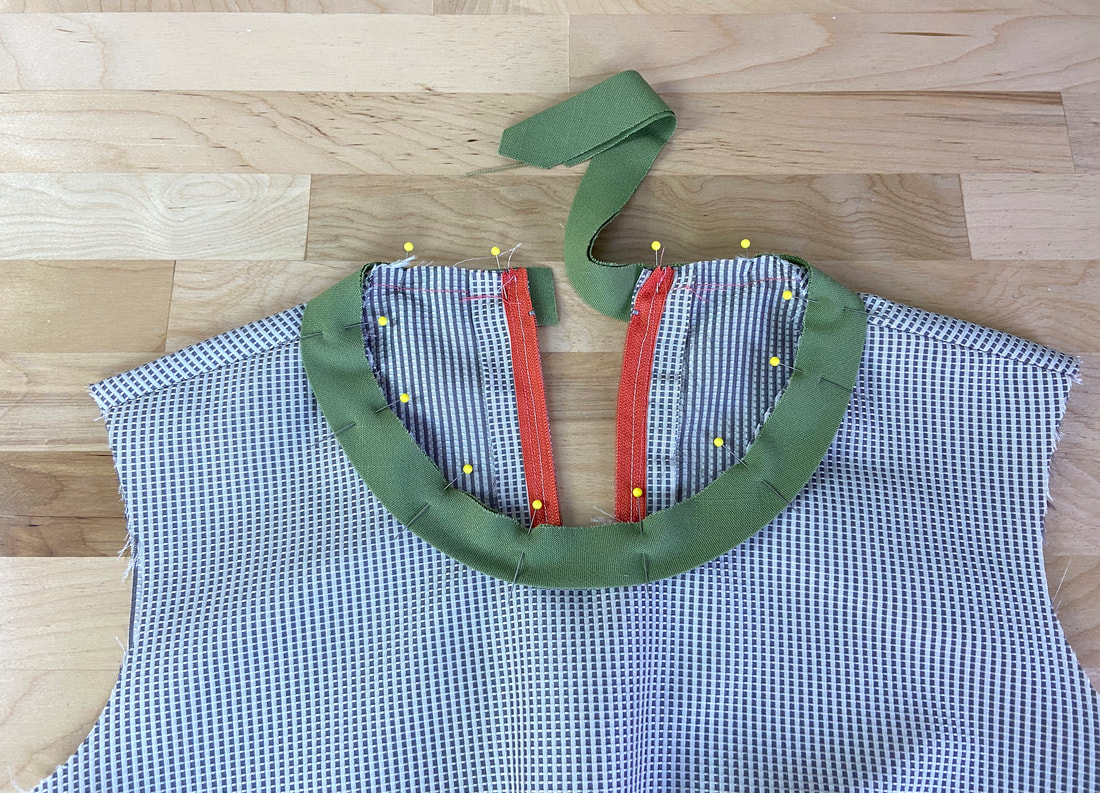
Insert pins perpendicular to the edge as you align the neck and bias edges. Start at one of the zipper’s opening edges and move all the way around the front and back neckline until you arrive at the other zipper opening portion. Keep in mind that all edges have to match up perfectly. 
Pay close attention to the folded bias edges, ensuring that they do not slip away from each other in the alignment and pinning process. ​
Picture
​It may actually be helpful to stitch them together prior to attaching them to the neckline edge, especially if the bias facing is constructed of slippery, thin fabric.
Picture
10. Leave another 1/2” of the bias strip excess at the end, just as you did at the beginning and trim the excess bias strip. 
Picture
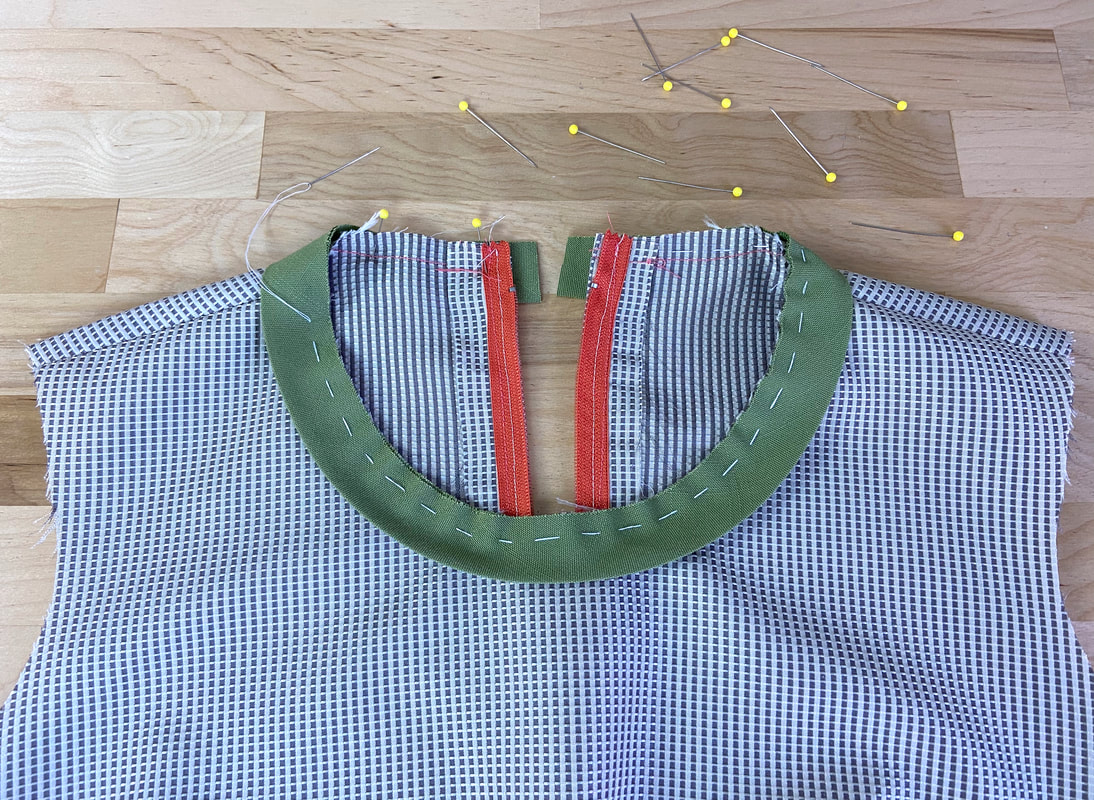
11. To facilitate the stitching process, it is a good idea to hand baste all layers together next to the seamline (stay within the seam allowance) prior to machine stitching.
Picture
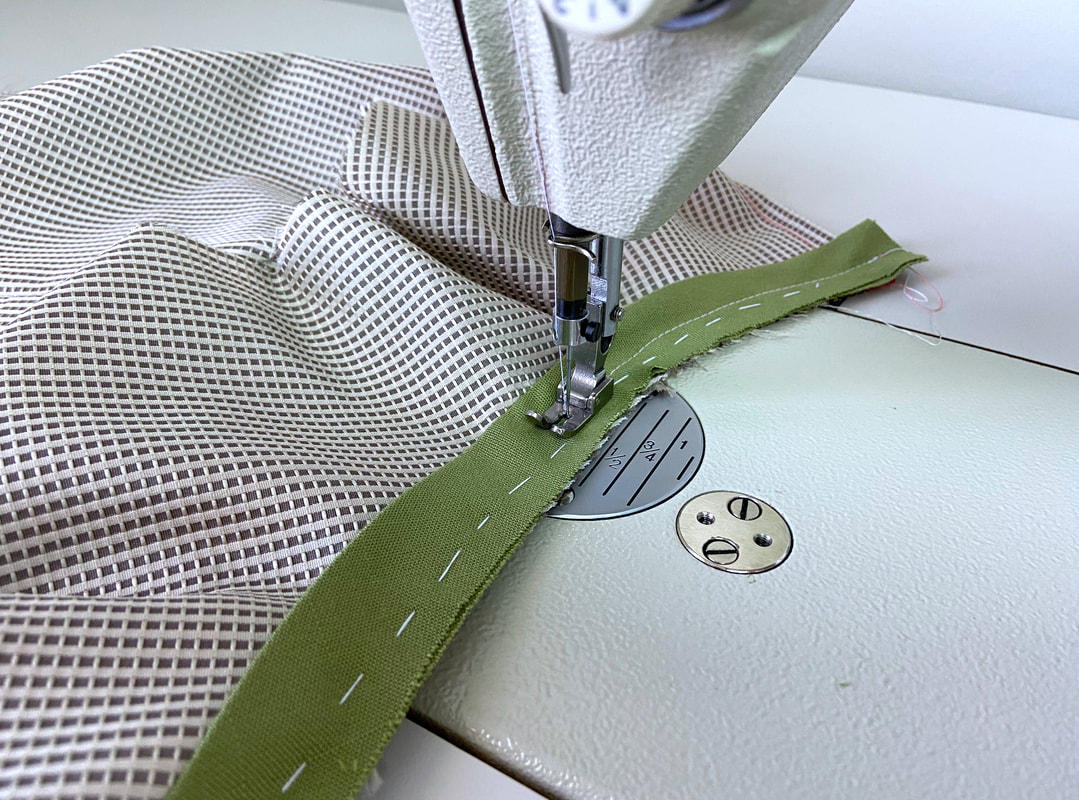
12. Starting on one end of the zipper opening, begin stitching carefully, following the designated seam allowance (1/2” in this case). Keep the curved stitchline smooth and even throughout. Stitch until you arrive at the other end of the zipper opening.
Picture
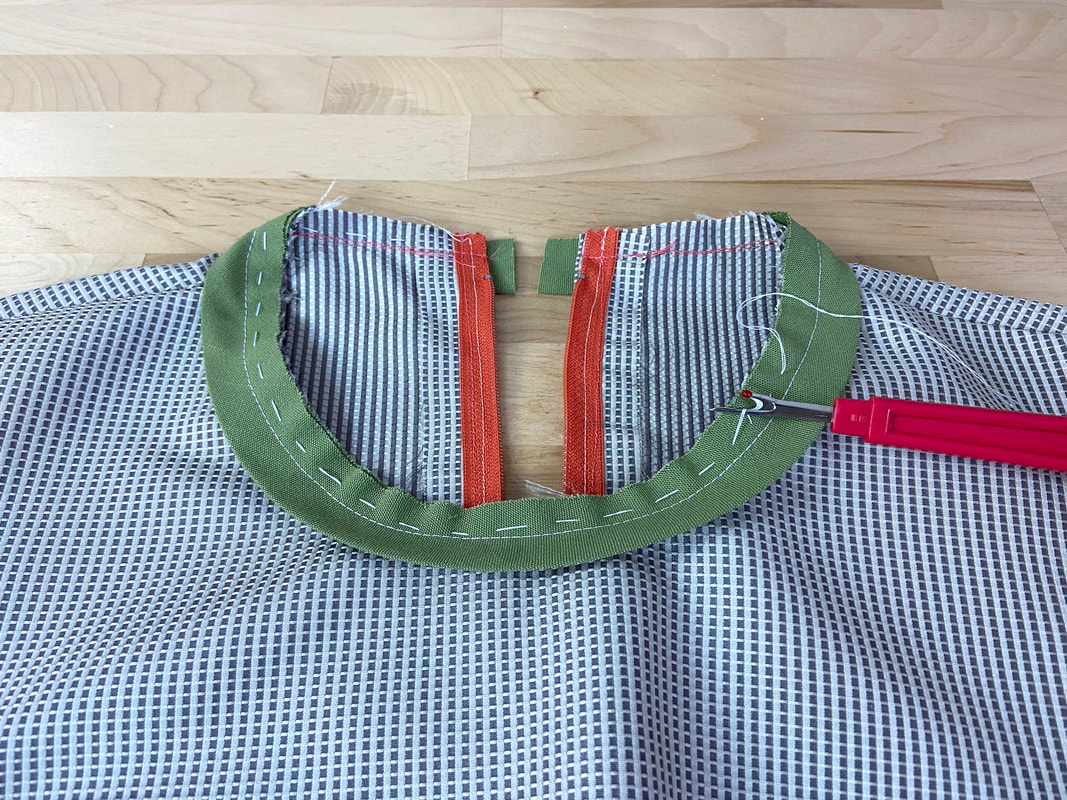
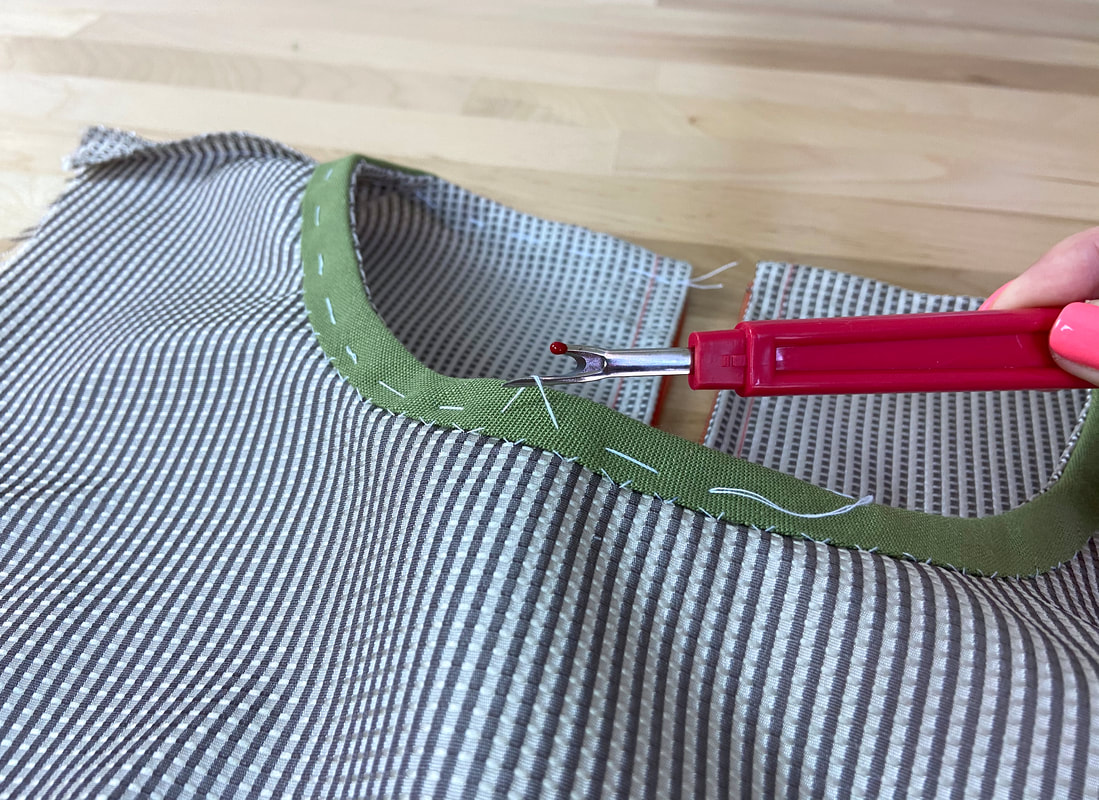
13. Once the stitch is applied, remove the hand basting with a seam ripper.
Picture
14. Trim the seam allowance down to half the width.

Note: You may need to grade the seam allowance by cutting the bias facing seam allowance shorter than the one corresponding to the garment.
Picture
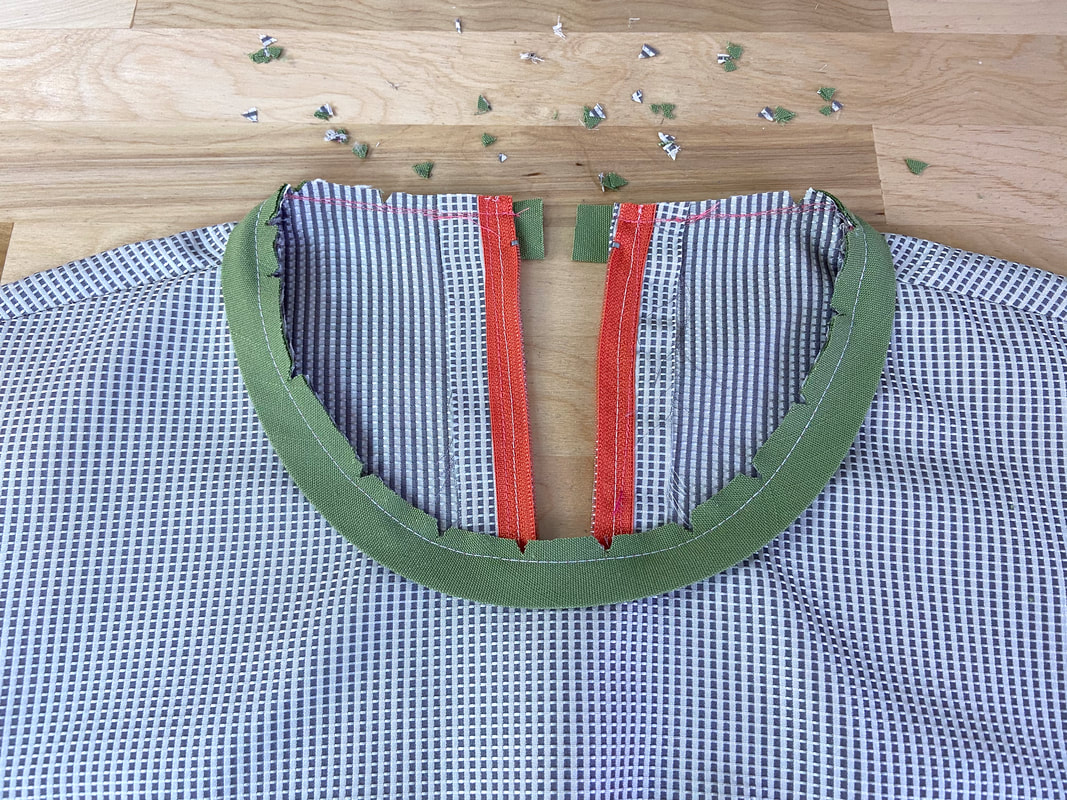
15. Next, clip wedge notches into the neck seam allowance to release tension and minimize bulk. 
Picture
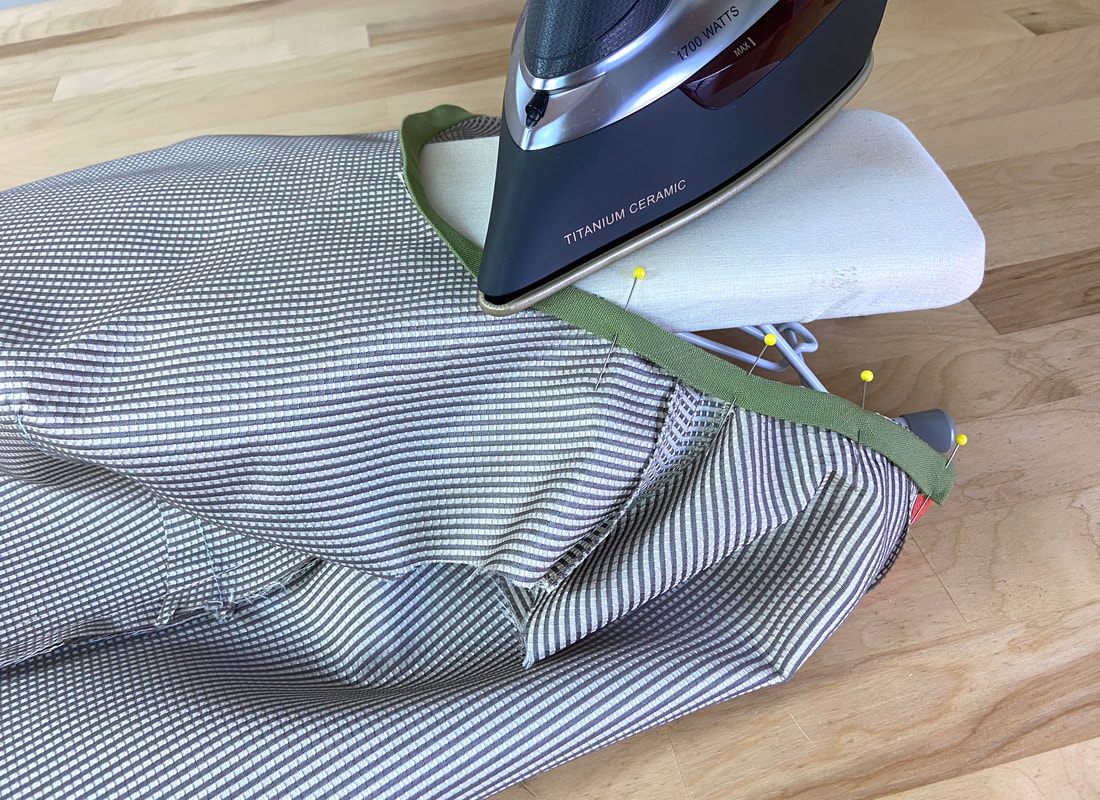
16. Keeping the bias facing and its seam allowances pointing away from the garment, iron the finished neckline seam. It is easiest to iron from the face of the garment as shown.
Picture
Picture
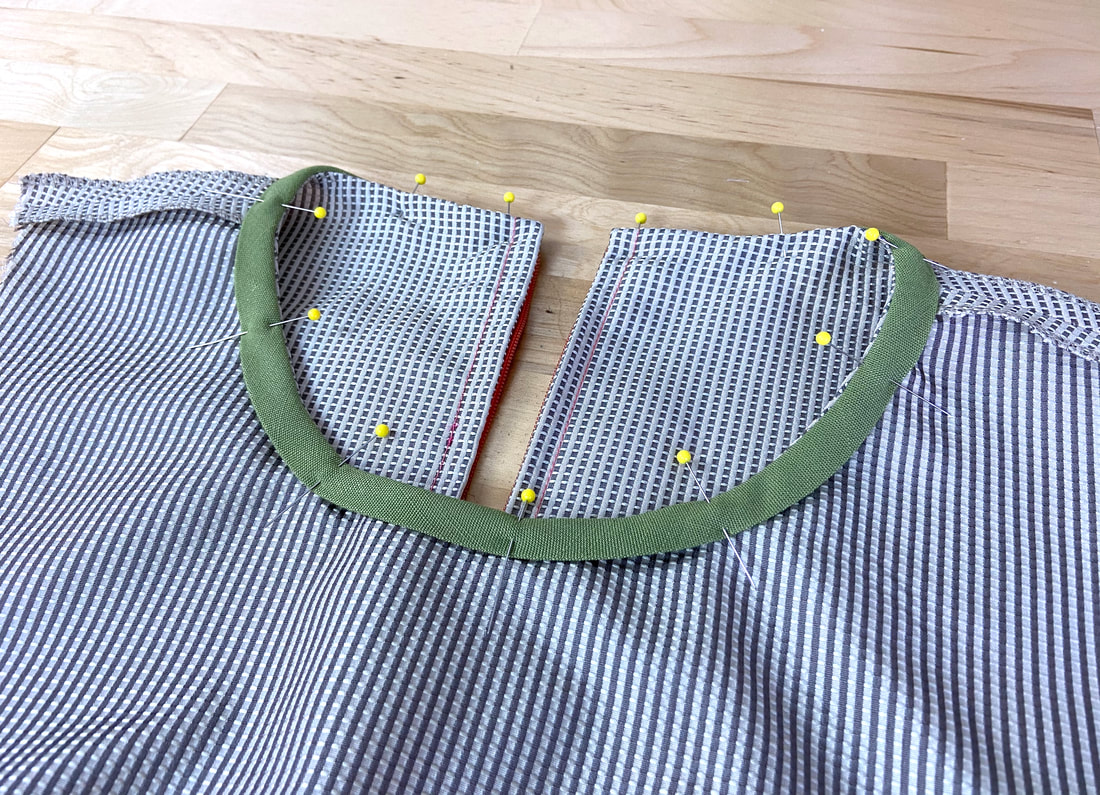
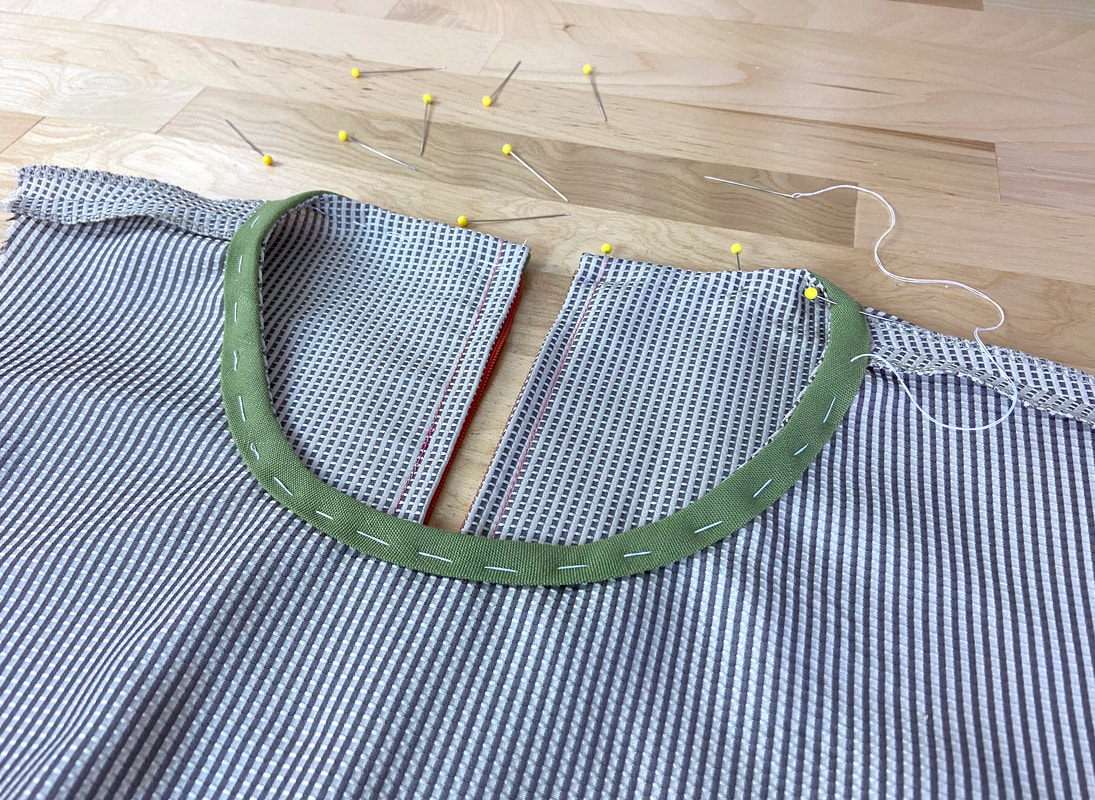
17. Next, fold the bias facing to the inside of the garment in its finished position, and press the finished neckline edge. Insert pins perpendicular to the edge to keep the bias facing down. 
Picture
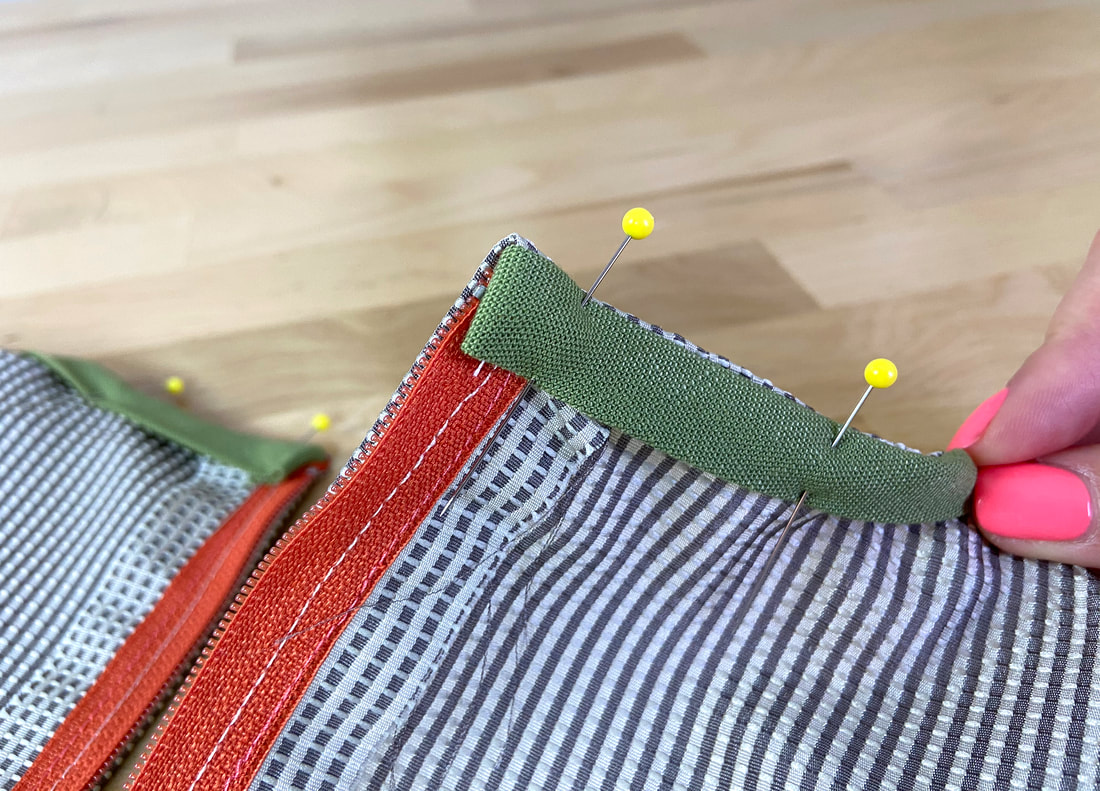
18. At each zipper end, fold and pin the bias strip ends in (as shown above), before positioning the facing down against the garment. 
Picture
Consider hand basting the folded bias strip flat if working with slippery, flimsy fabrics- this is completely up to you and your comfort level.
Picture
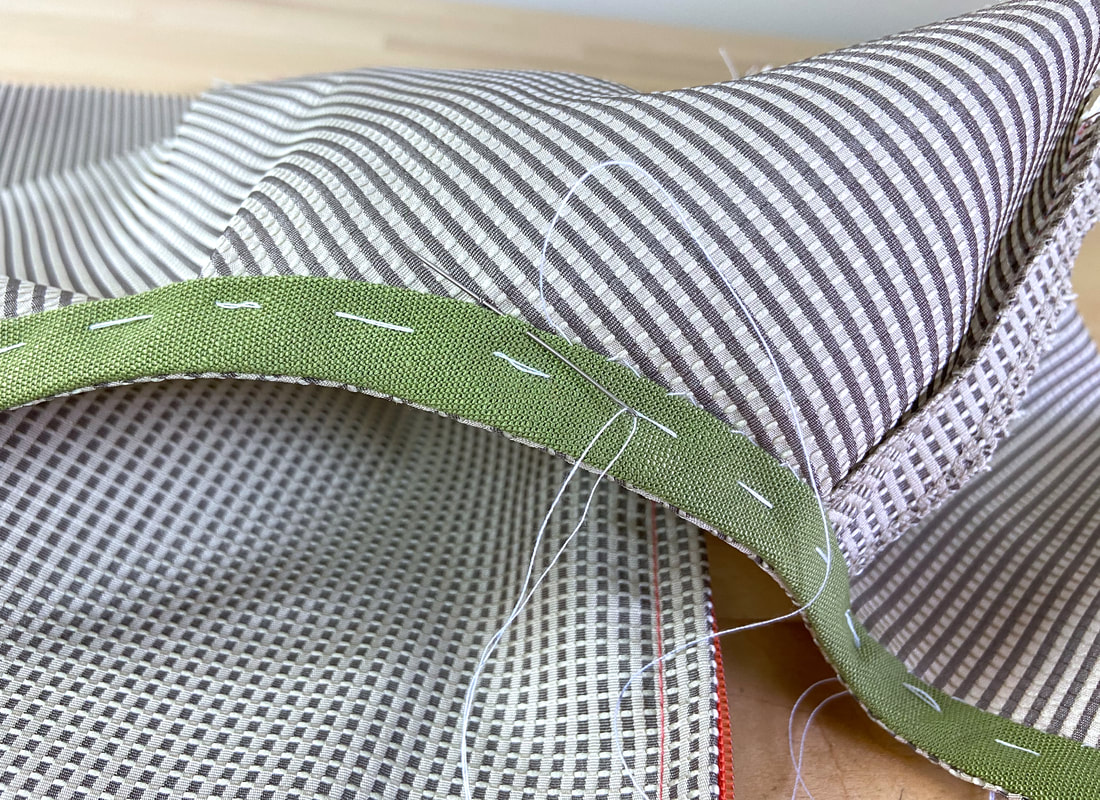
19. Last but not least, slipstitch the folded edge of the bias facing to the wrong side of the garment. Don’t pull too much on the stitch, keeping it as even and “invisible” as possible.
​To learn how to slipstitch, follow the steps in this tutorial: Hand-Applied Blind Stitches
Picture
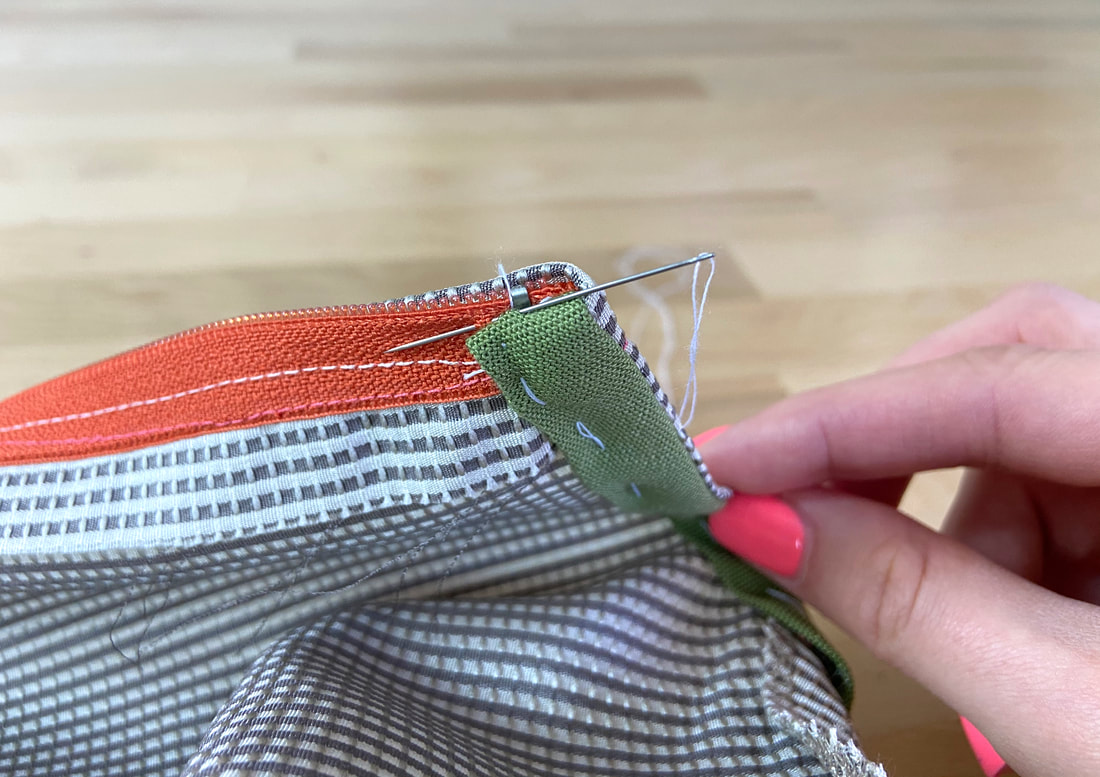
20. Don’t forget to also slipstitch the facing vertically at each zipper end.
Picture
21. Once complete, remove the hand basting using a seam ripper. 
Picture
22. Last but not least, give the finished neckline one last press to complete the application. As always, use a protective cotton cloth if working with a heat sensitive fabric.
DMCA.com Protection Status
All content, including images and text, may not be copied, replicated, or redistributed without express written permission. This website is regularly screened and monitored for content protection.

Services

​Custom Apparel
Custom Bridal
​Sewing Tutorials
​

Company

About
Blog

Support

Contact
Terms of Service
DMCA.com Protection Status
© COPYRIGHT 2024. ALL RIGHTS RESERVED.
  • Custom Bridal
  • The Process
  • Our Brides
  • About
  • Sewing Tutorials
    • Basics >
      • Aligning Pattern Grainlines To Fabric
      • Preparing Fabrics For Sewing
      • Pinning Sewing Patterns To Fabric
      • Placing Sewing Patterns On Fabric For Cutting
      • Rotary Cutters or Fabric Scissors?
      • Cutting The Sewing Patterns
      • What Are Notches And How To Use Them In The Sewing Process
      • Transferring Notches From Pattern To Fabric
      • Transferring Seamlines to Fabric
      • Staystitching
      • Backstitching: A Complete Guide
      • Hand Basting: A Complete Guide
      • Sewing Continuous Bias Binding
    • Darts >
      • Marking And Transferring Darts To Fabric
      • What Are Darts And Dart Components
      • Folding, Pinning And Hand Basting Darts
      • Handling Dart Excess: Bulk And Tension
      • How To Sew A French Dart
      • How To Sew And Iron Single Pointed Darts
      • How To Sew And Iron Contour Darts
      • Sewing Darts With Decorative/Beaded Fabrics
    • Sewing Seams >
      • ​The Basics Of Seams And Seam Allowance
      • How To Sew A Straight Seam
      • Sewing Curved Seams
      • Sewing Corner Seams
      • Trimming And Grading Seam Excess
      • Notching/Clipping Seam Allowance for Tension Release
      • Sewing Topstitched Seams
      • Sewing Corded Seams
      • Sewing A Slot Seam
      • Sewing A Gathered Seam
      • Sewing Bias Seams
      • Sewing Seams With Ease
      • Sewing Seams With Crossing Seamlines
      • Sewing Unlike Fabric Seams
      • How To Iron Seams: Ironing Tools And Conventions
      • Sewing With Knit Fabrics
      • Understanding Stitch Length And Tension
      • Sewing Unique Fabric Seams
    • Seam Finishes >
      • Seam Finishing Techniques - Overview
      • Applying A Pinked Seam Finish
      • Applying A Bias Bound Seam Finish
      • Serging And Zigzag Seam Finishes
      • Sewing A Self-Bound Seam Finish
      • Sewing A French Seam Finish
      • Sewing A Hong Kong Seam Finish
      • Sewing A Mock French Seam Finish
      • Sewing A Turned-and-Stitched Seam Finish
      • Sewing Overcast Hand-Applied Seam Finishes
      • Sewing A Flat Felled Seam
      • Sewing A Hairline Seam Finish
    • Hem Finishes >
      • Garment Hem Finishes: Overview
      • ​Sewing A Double Fold Hem Finish
      • Sewing A Single Fold Hem Finish
      • Sewing Bound Hem Finishes
      • Sewing An Exposed Double Layer Bound Hem
      • Sewing A Folded-Up Bound Hem with Pre-folded Binding
      • Sewing A Hong Kong Hem Finish
      • Sewing A Band Hem Finish
      • Sewing A Bias Faced Hem Finish
      • Sewing A Twill Tape Hem Finish
      • Sewing A Rolled Hem Finish
      • Sewing A Shaped Hem Facing
      • Using Fusible Hem Tape And Webbing
      • Finishing A Lace Fabric Hem
      • Finishing A Leather Hem
      • Sewing Faced Hem Corners
      • How To Finish Lining At The Hem
      • Finishing Fabric Corners by Mitering >
        • Mitering Fabric Corners With A Full Bias Facing
        • Mitering Fabric Corners With Exposed Binding
      • Interfacing A Hemline: Lined And Unlined Examples
    • Sewing Pockets >
      • Curved Patch Pocket With Flap
      • Unlined Square Patch Pockets
      • Lined Patch Pockets: Two Ways
      • Extension On-Seam Pockets
      • Separate On-Seam Pocket
      • Front Hip Pockets
      • Bound Double Welt Pocket
      • Double Welt Pocket With Flap
      • Self-Welt Pocket (Using Single Fabric Layer)
      • Slanted Welt Pocket (Hand-Stitched)
      • Faced Slash Pockets: Overview >
        • Sewing A Faced Slit Pocket
        • Sewing A Rectangular Slash Pocket
        • Sew A Star-Shaped Faced Pocket
    • Sewing Zippers >
      • Sewing Zippers: General Information
      • Sewing A Centered Zipper
      • Sewing A Lapped Zipper
      • Sewing An Invisible Zipper
      • Sewing A Fly Front Zipper
      • Sewing A Closed-End Exposed Zipper (No Seam)
      • Sewing An Exposed Separating Zipper
      • Sewing Hand Stitched Zipper Applications
      • Sewing A Zipper Underlay
      • Sewing A Placket-Enclosed Separating Zipper
    • Sleeveless Finishes >
      • Sleeveless Armhole Finishes: General Information
      • Finishing Sleeveless Garments with Lining
      • Sewing A Folded-Under Bound Armhole Finish
      • Sewing A Shaped Armhole Facing
      • Finishing Armhole Edges With Exposed Binding
      • Finishing Armhole Edges With Decorative Trim
    • Neckline Finishes >
      • Sewing A Neck Shaped Facing
      • Sewing An All-In-One Neck Facing
      • Neck And Garment Opening Combination Facings >
        • Sewing An Extended Front-Neck Facing
        • Sewing A Separate Neck-Front Facing
      • Sewing A Bias Faced Neckline Finish
      • Sewing A Band Neckline Finish
      • Bound Neckline Finishes: Overview >
        • Sewing A Single Layer Bound Neckline
        • Finishing A Neckline With Pre-Folded Binding
        • Sewing A Double Layer Bound Neckline Finish
      • Sewing A Semi-Stretch Strip Band Neckline
      • Ribbed Neck Band And Classic Turtleneck
      • Decorative Neckline Finishes >
        • Sewing A Neckline With Decorative Inset
        • Sewing A Piped Cording Faced Neckline
        • Sewing Decorative Trim To A Finished Neckline
    • Finishing Facing Edges >
      • Finishing Facing Edges: Overview
      • Folded-And-Topstitched Overedge Facing Finish
      • Sewing A Bound Facing Edge Finish
      • Sewing A Hong Kong Facing Finish
      • Sewing A Rolled Edge Facing Finish
      • Sewing A Twill Tape Facing Edge Finish
      • Sewing An Overedge-Stitch Facing Finish
    • Extras >
      • A Complete Guide on Interfacing
      • Sewing Bound Spaghetti Straps
      • Sewing Spaghetti Straps To A Faced Neckline
      • Sewing Ruffles: Overview
      • Patterning And Sewing A Circle Ruffle
      • Sewing A Gathered Heading Ruffle
      • Sewing Double Layer Gathered Ruffles
      • Sewing A Gathered Ruffle Into A Seam
      • Sewing A Gathered Ruffle To A Fabric Edge
      • Sewing A Fabric Surface Slit
      • Sewing A Slit Seam
      • Hand-Applied Straight Stitches
      • Hand-Applied Blind Stitches
      • Hand-Applied Overedge Stitches
      • Hand-Applied Tack Stitches
      • Hand-Applied Decorative Stitches