Doina Alexei
  • Sewing Tutorials
    • Basics >
      • Aligning Pattern Grainlines To Fabric
      • Preparing Fabrics For Sewing
      • Pinning Sewing Patterns To Fabric
      • Placing Sewing Patterns On Fabric For Cutting
      • Rotary Cutters or Fabric Scissors?
      • Cutting The Sewing Patterns
      • What Are Notches And How To Use Them In The Sewing Process
      • Transferring Notches From Pattern To Fabric
      • Transferring Seamlines to Fabric
      • Staystitching
      • Backstitching: A Complete Guide
      • Hand Basting: A Complete Guide
      • Sewing Continuous Bias Binding
    • Darts >
      • Marking And Transferring Darts To Fabric
      • What Are Darts And Dart Components
      • Folding, Pinning And Hand Basting Darts
      • Handling Dart Excess: Bulk And Tension
      • How To Sew A French Dart
      • How To Sew And Iron Single Pointed Darts
      • How To Sew And Iron Contour Darts
      • Sewing Darts With Decorative/Beaded Fabrics
    • Sewing Seams >
      • ​The Basics Of Seams And Seam Allowance
      • How To Sew A Straight Seam
      • Sewing Curved Seams
      • Sewing Corner Seams
      • Trimming And Grading Seam Excess
      • Notching/Clipping Seam Allowance for Tension Release
      • Sewing Topstitched Seams
      • Sewing Corded Seams
      • Sewing A Slot Seam
      • Sewing A Gathered Seam
      • Sewing Bias Seams
      • Sewing Seams With Ease
      • Sewing Seams With Crossing Seamlines
      • Sewing Unlike Fabric Seams
      • How To Iron Seams: Ironing Tools And Conventions
      • Sewing With Knit Fabrics
      • Understanding Stitch Length And Tension
      • Sewing Unique Fabric Seams
    • Seam Finishes >
      • Seam Finishing Techniques - Overview
      • Applying A Pinked Seam Finish
      • Applying A Bias Bound Seam Finish
      • Serging And Zigzag Seam Finishes
      • Sewing A Self-Bound Seam Finish
      • Sewing A French Seam Finish
      • Sewing A Hong Kong Seam Finish
      • Sewing A Mock French Seam Finish
      • Sewing A Turned-and-Stitched Seam Finish
      • Sewing Overcast Hand-Applied Seam Finishes
      • Sewing A Flat Felled Seam
      • Sewing A Hairline Seam Finish
    • Hem Finishes >
      • Garment Hem Finishes: Overview
      • ​Sewing A Double Fold Hem Finish
      • Sewing A Single Fold Hem Finish
      • Sewing Bound Hem Finishes
      • Sewing An Exposed Double Layer Bound Hem
      • Sewing A Folded-Up Bound Hem with Pre-folded Binding
      • Sewing A Hong Kong Hem Finish
      • Sewing A Band Hem Finish
      • Sewing A Bias Faced Hem Finish
      • Sewing A Twill Tape Hem Finish
      • Sewing A Rolled Hem Finish
      • Sewing A Shaped Hem Facing
      • Using Fusible Hem Tape And Webbing
      • Finishing A Lace Fabric Hem
      • Finishing A Leather Hem
      • Sewing Faced Hem Corners
      • How To Finish Lining At The Hem
      • Finishing Fabric Corners by Mitering >
        • Mitering Fabric Corners With A Full Bias Facing
        • Mitering Fabric Corners With Exposed Binding
      • Interfacing A Hemline: Lined And Unlined Examples
    • Sewing Pockets >
      • Curved Patch Pocket With Flap
      • Unlined Square Patch Pockets
      • Lined Patch Pockets: Two Ways
      • Extension On-Seam Pockets
      • Separate On-Seam Pocket
      • Front Hip Pockets
      • Bound Double Welt Pocket
      • Double Welt Pocket With Flap
      • Self-Welt Pocket (Using Single Fabric Layer)
      • Slanted Welt Pocket (Hand-Stitched)
      • Faced Slash Pockets: Overview >
        • Sewing A Faced Slit Pocket
        • Sewing A Rectangular Slash Pocket
        • Sew A Star-Shaped Faced Pocket
    • Sewing Zippers >
      • Sewing Zippers: General Information
      • Sewing A Centered Zipper
      • Sewing A Lapped Zipper
      • Sewing An Invisible Zipper
      • Sewing A Fly Front Zipper
      • Sewing A Closed-End Exposed Zipper (No Seam)
      • Sewing An Exposed Separating Zipper
      • Sewing Hand Stitched Zipper Applications
      • Sewing A Zipper Underlay
      • Sewing A Placket-Enclosed Separating Zipper
    • Sleeveless Finishes >
      • Sleeveless Armhole Finishes: General Information
      • Finishing Sleeveless Garments with Lining
      • Sewing A Folded-Under Bound Armhole Finish
      • Sewing A Shaped Armhole Facing
      • Finishing Armhole Edges With Exposed Binding
      • Finishing Armhole Edges With Decorative Trim
    • Neckline Finishes >
      • Sewing A Neck Shaped Facing
      • Sewing An All-In-One Neck Facing
      • Neck And Garment Opening Combination Facings >
        • Sewing An Extended Front-Neck Facing
        • Sewing A Separate Neck-Front Facing
      • Sewing A Bias Faced Neckline Finish
      • Sewing A Band Neckline Finish
      • Bound Neckline Finishes: Overview >
        • Sewing A Single Layer Bound Neckline
        • Finishing A Neckline With Pre-Folded Binding
        • Sewing A Double Layer Bound Neckline Finish
      • Sewing A Semi-Stretch Strip Band Neckline
      • Ribbed Neck Band And Classic Turtleneck
      • Decorative Neckline Finishes >
        • Sewing A Neckline With Decorative Inset
        • Sewing A Piped Cording Faced Neckline
        • Sewing Decorative Trim To A Finished Neckline
    • Finishing Facing Edges >
      • Finishing Facing Edges: Overview
      • Folded-And-Topstitched Overedge Facing Finish
      • Sewing A Bound Facing Edge Finish
      • Sewing A Hong Kong Facing Finish
      • Sewing A Rolled Edge Facing Finish
      • Sewing A Twill Tape Facing Edge Finish
      • Sewing An Overedge-Stitch Facing Finish
    • Extras >
      • A Complete Guide on Interfacing
      • Sewing Bound Spaghetti Straps
      • Sewing Spaghetti Straps To A Faced Neckline
      • Sewing Ruffles: Overview
      • Patterning And Sewing A Circle Ruffle
      • Sewing A Gathered Heading Ruffle
      • Sewing Double Layer Gathered Ruffles
      • Sewing A Gathered Ruffle Into A Seam
      • Sewing A Gathered Ruffle To A Fabric Edge
      • Sewing A Fabric Surface Slit
      • Sewing A Slit Seam
      • Hand-Applied Straight Stitches
      • Hand-Applied Blind Stitches
      • Hand-Applied Overedge Stitches
      • Hand-Applied Tack Stitches
      • Hand-Applied Decorative Stitches
  • Custom Apparel
    • Custom Bridal
  • Submit A Sewing Question
  • About
  • Blog

How To Sew A Fly Front Zipper Application

What Is A Fly Front Zipper Application
A fly front zipper is perhaps one of the more difficult to sew zippers in dressmaking. Not only does it require additional components like a fly shield and facing, the sewing steps can feel a bit intimidating for sewing beginners. That being said, if you approach a fly front application in consecutive order, you will find that while it involves some additional elements and work, it is fairly straightforward to sew.
Picture
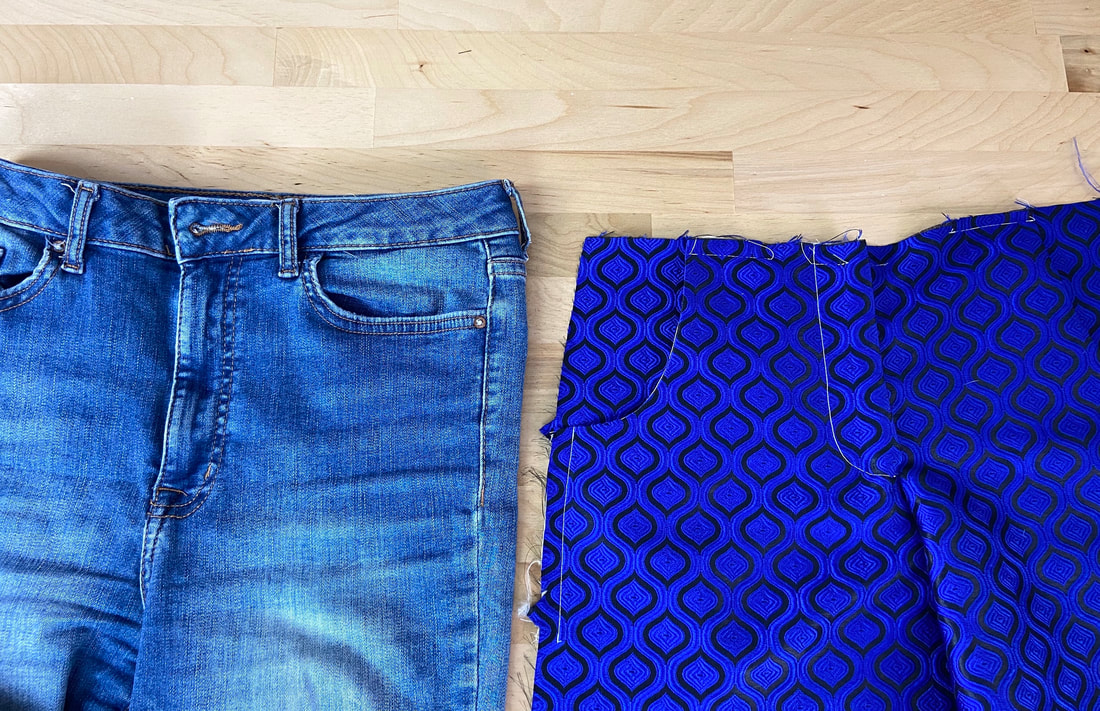
A fly front is conventionally applied to both womens and mens trousers, although also used with womens casual skirts. Conventionally, denim items like jeans, denim skirts and shorts use a fly front zipper as the main means of closure. While this zipper is used with both womenswear and menswear, there is a difference in the way the zipper placket overlaps in both cases: 
Picture
By tailoring rules, in women’s clothing, a fly front zipper laps right over left. In menswear, the placket laps left over right. 
​In the steps below, the right-over-left example is shown. The same exact steps are used for left-over-right applications, with the exception that the fly shield and facing are sewn to the opposite seam edge.
Picture
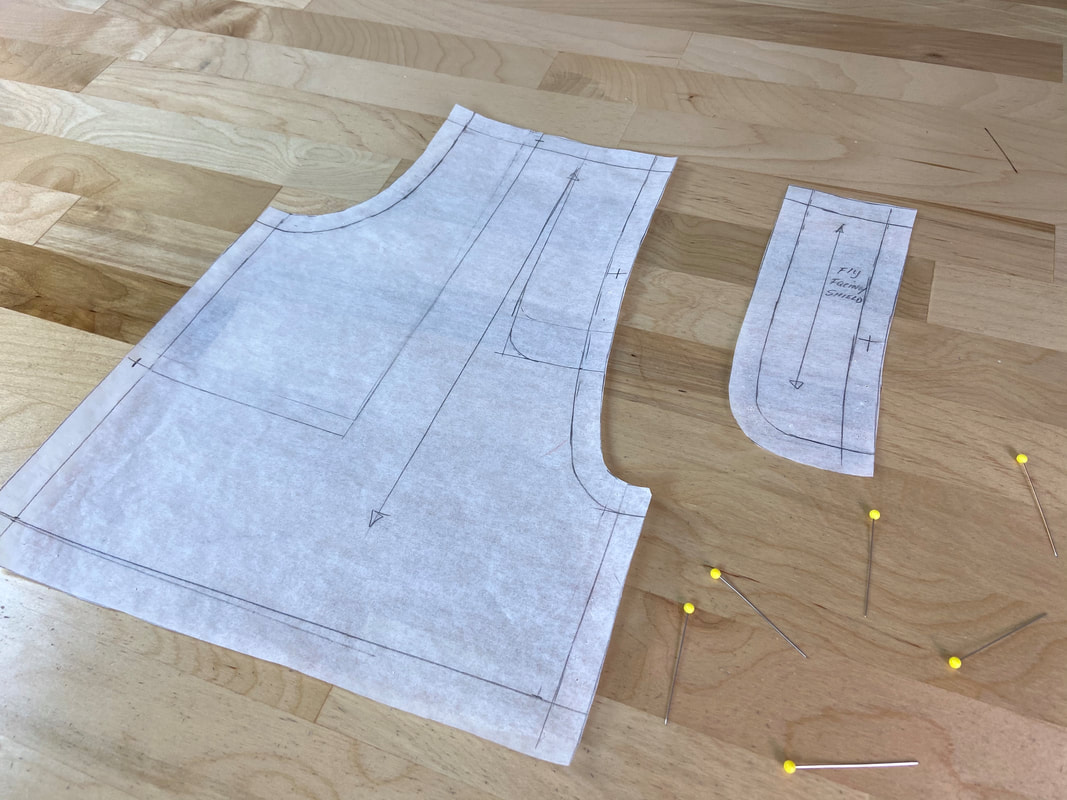
Speaking of the fly facing and fly shield, these patterns should be provided in your pattern set. It is common to use the facing pattern to also cut the fly shield pieces. 
Picture
​The fly facing is usually a single layer of fabric that is interfaced for extra stability, and serves are the backing for the fly placket. 
Picture
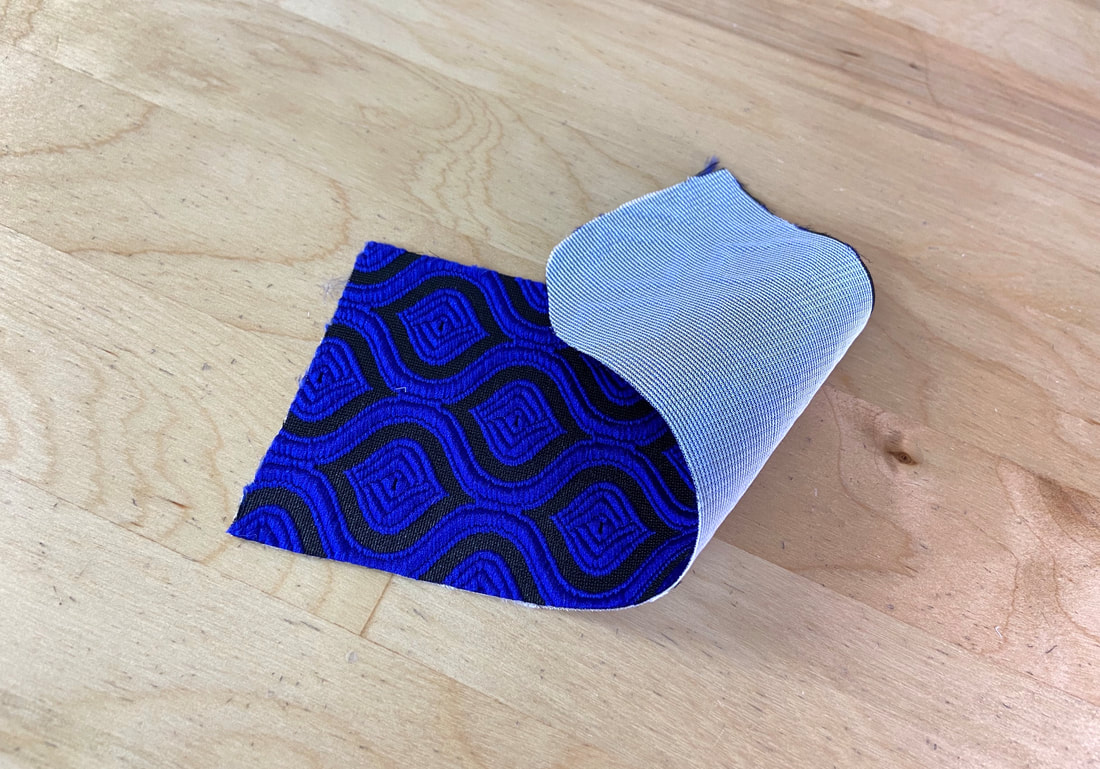
​The fly shield on the other hand, is constructed of two fabric pieces, often identical in shape to the facing, that are sewn together to enclose all raw edges on the inside. The fly shield serves as a protective barrier between the skin and the zipper coils. 
Picture
Both the facing and shield pieces are usually curved along their bottom outer edges. In some cases, the fly shield is constructed of a single fabric layer that is folded in half to self-finish. This is a much faster way to construct a fly shield, and is often used in the construction of jeans and heavier pieces.
Picture
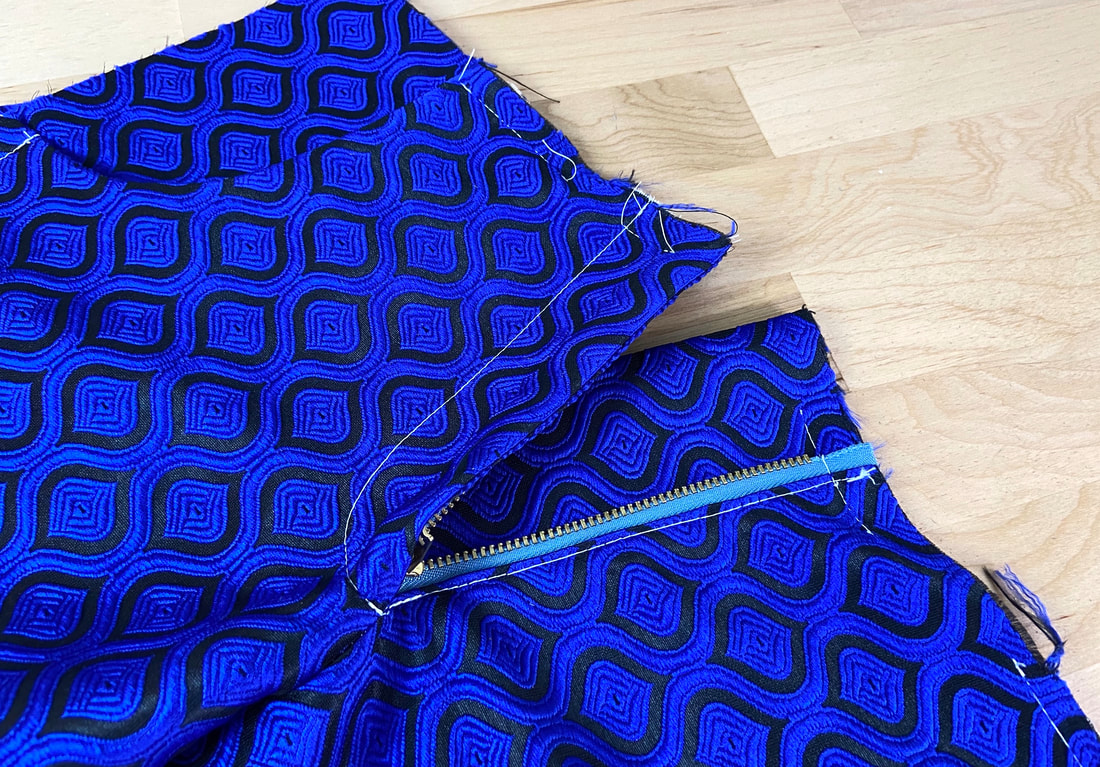
A fly front zipper application requires a shorter zipper length- usually around 5”. These specialized trouser zippers can be purchased at your local fabric store in variety of colors. 
Picture
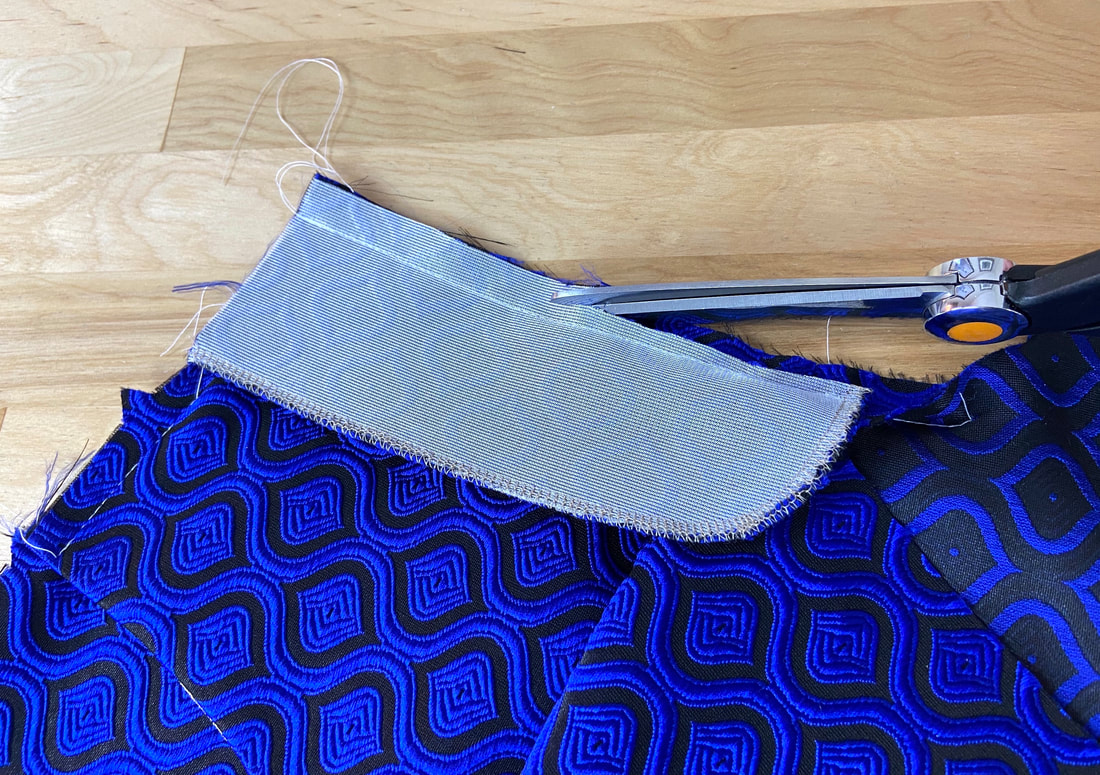
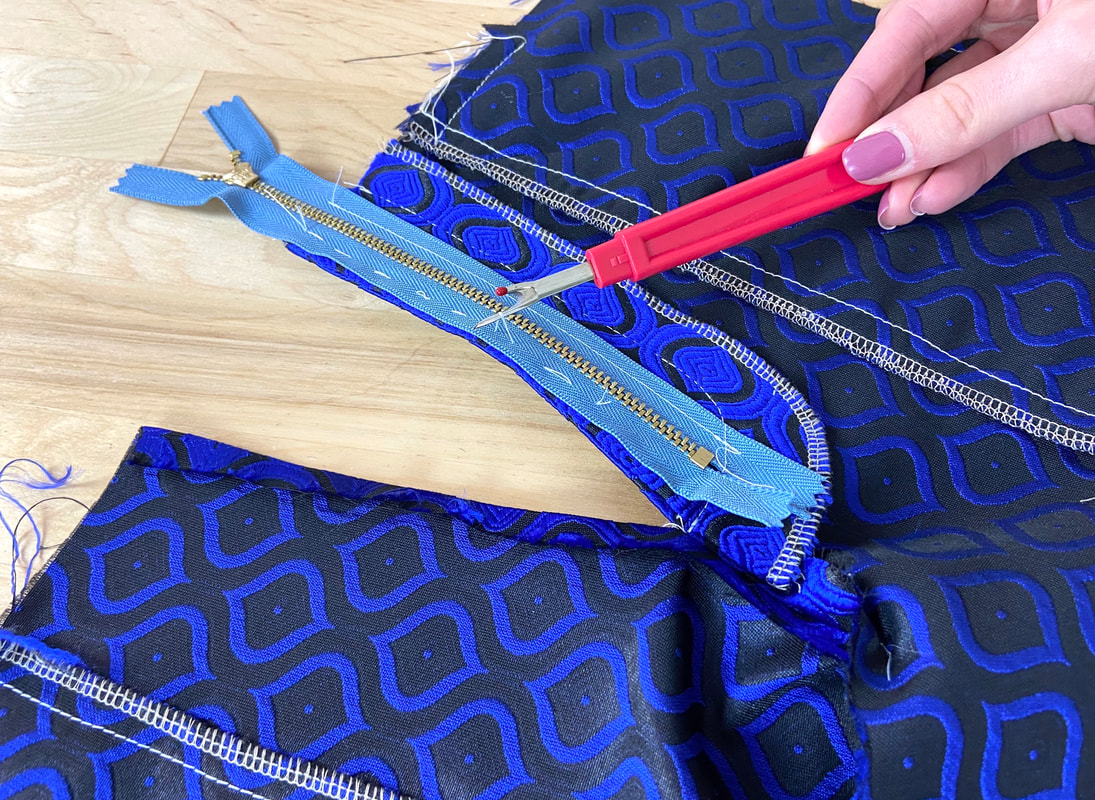
If you can’t find the shorter trouser style, a longer zipper can be trimmed to the needed length during the construction process- an example of this is shown below. ​
Since a fly front application is considered a durable, heavy duty finish, trouser zippers are usually constructed with metal chain. The metal teeth match the durability of the overall application. A regular plastic coil zipper will work just as well but may not provide as much strength over long term use. 

Sewing And Preparing The Fly Shield And Fly Facing

Your pattern set should have provided the pattern pieces for both facing and fly shield. Sometimes, the same pattern is used for both the facing and the zipper shield. 
Picture
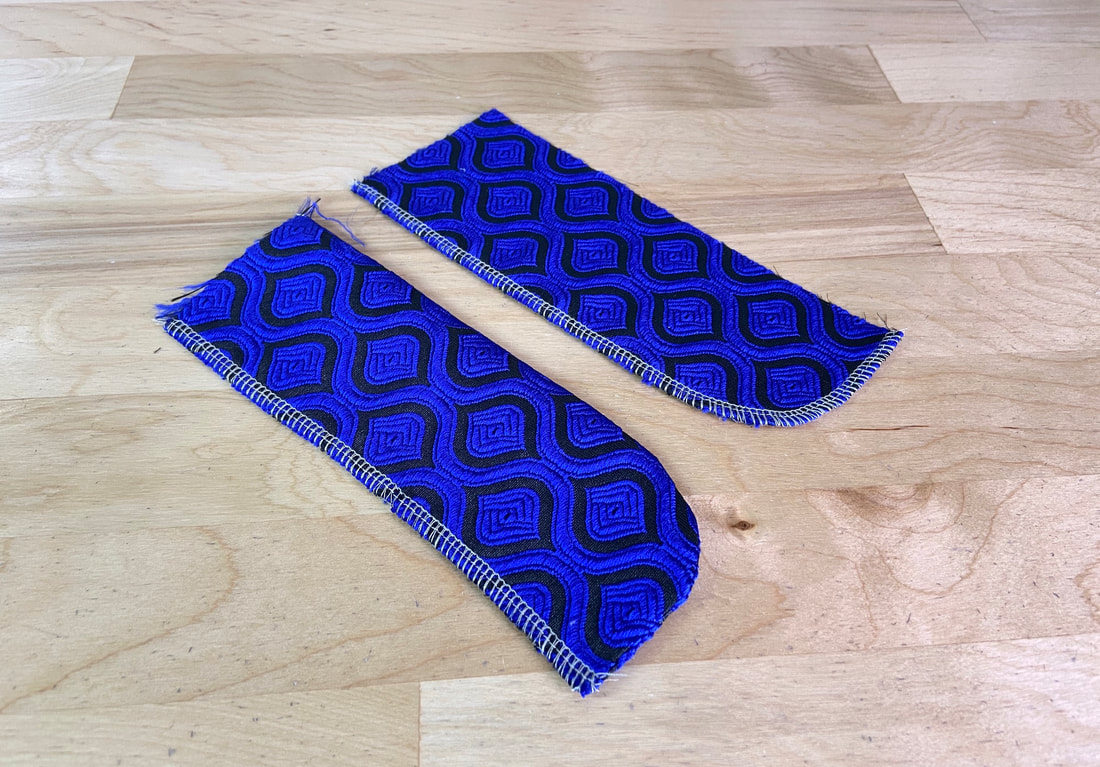
The fly shield requires two pieces: a self and a facing. The two are sewn together to enclose all raw edges. The shield serves the purpose of an underlay providing a barrier between skin and zipper coils. 
 The facing is a single piece, usually interfaced for extra stability. It is used to clean finish the zipper placket.
To sew the fly shield:
Picture
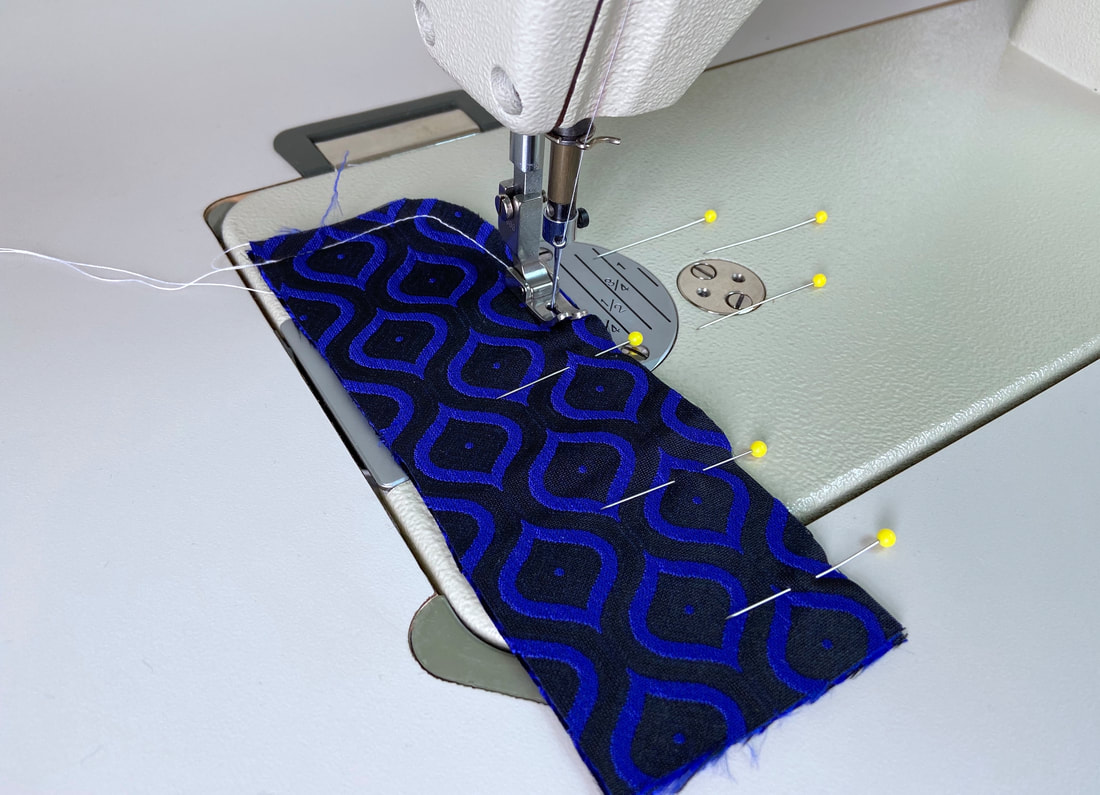
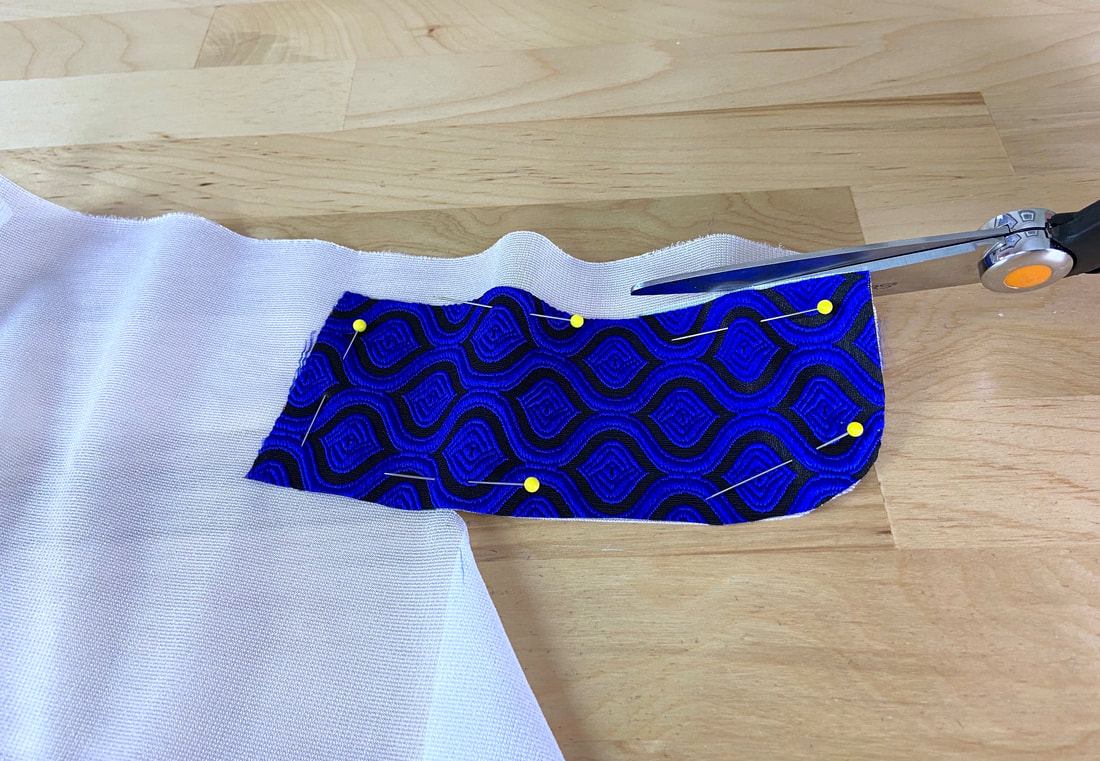
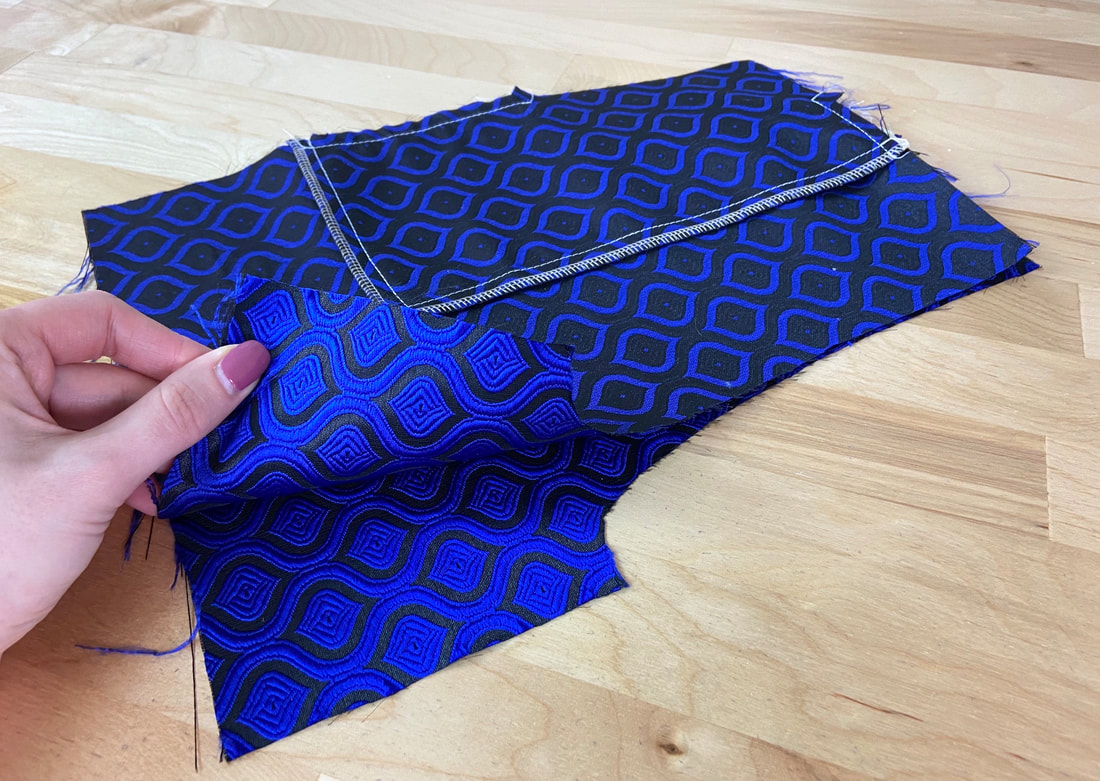
1. Align the two pieces to each other such that the fabric face sides are touching and the outer curved edges match up. ​​Insert pins perpendicularly as shown.
Picture
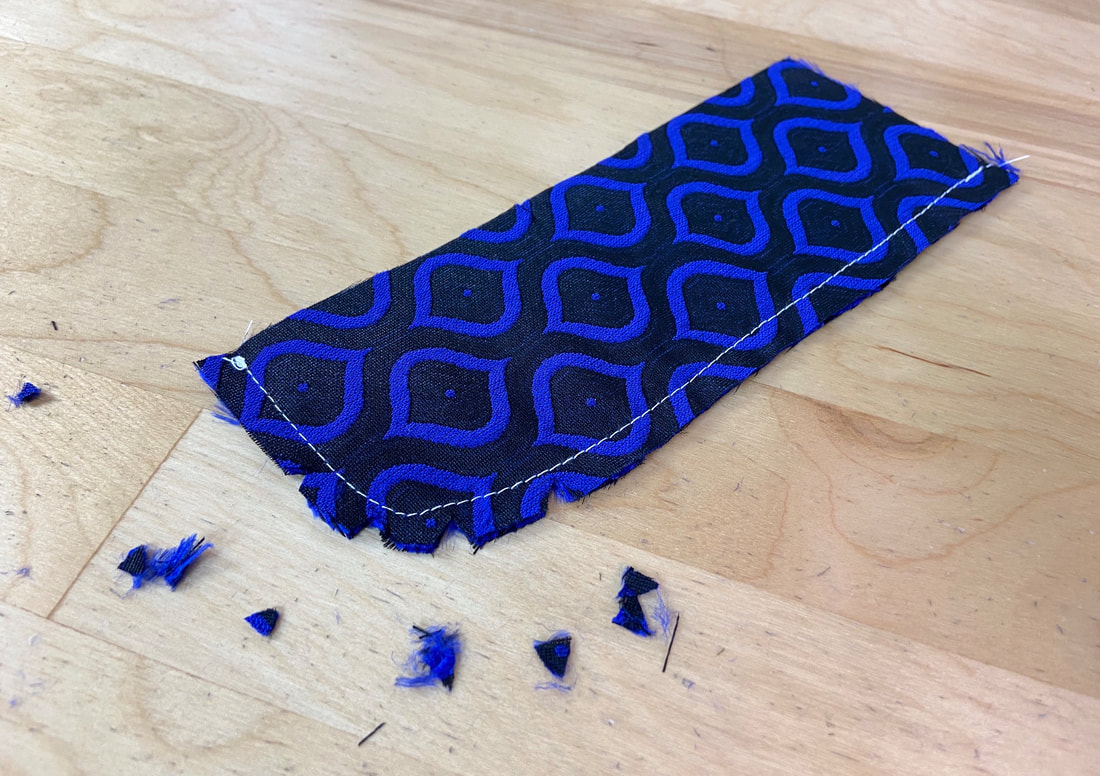
2. Stitch along the curved edge at the designated seam allowance. Leave the top and straight lengthwise edges open.
Picture
3. If the seam allowance is greater than ¼”, trim the seam allowance down to ¼”. Notch the seam allowance with wedge clips to release tension in the curve.
Picture
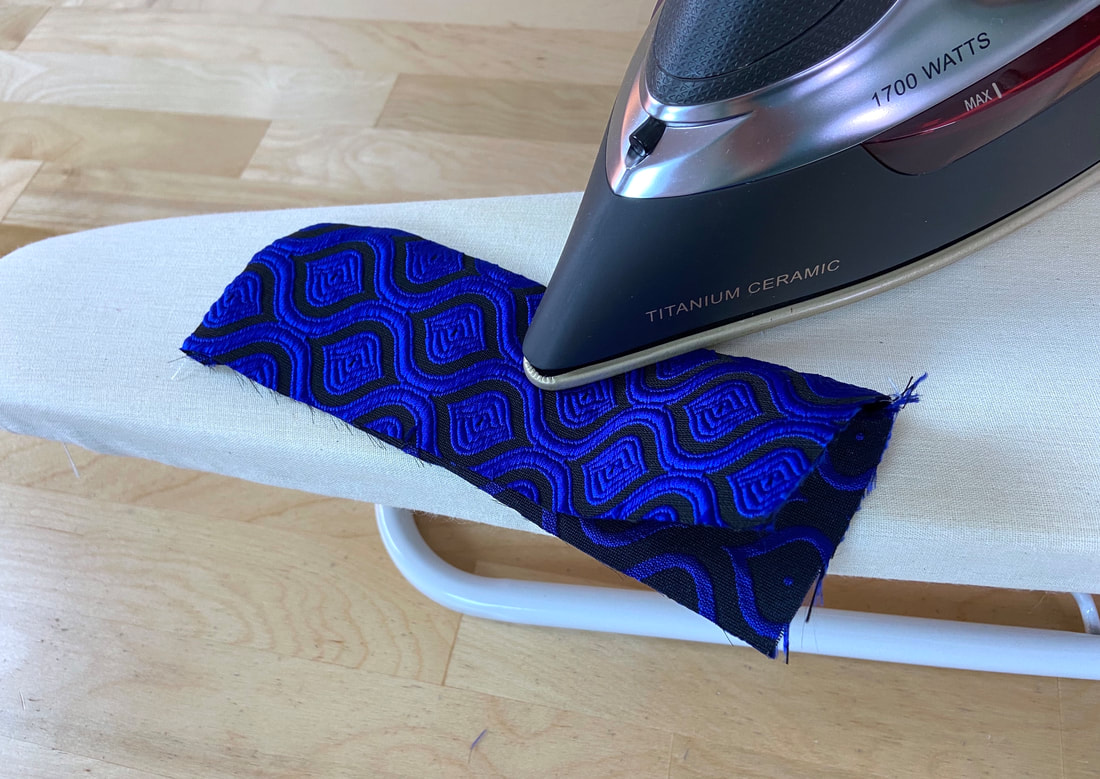
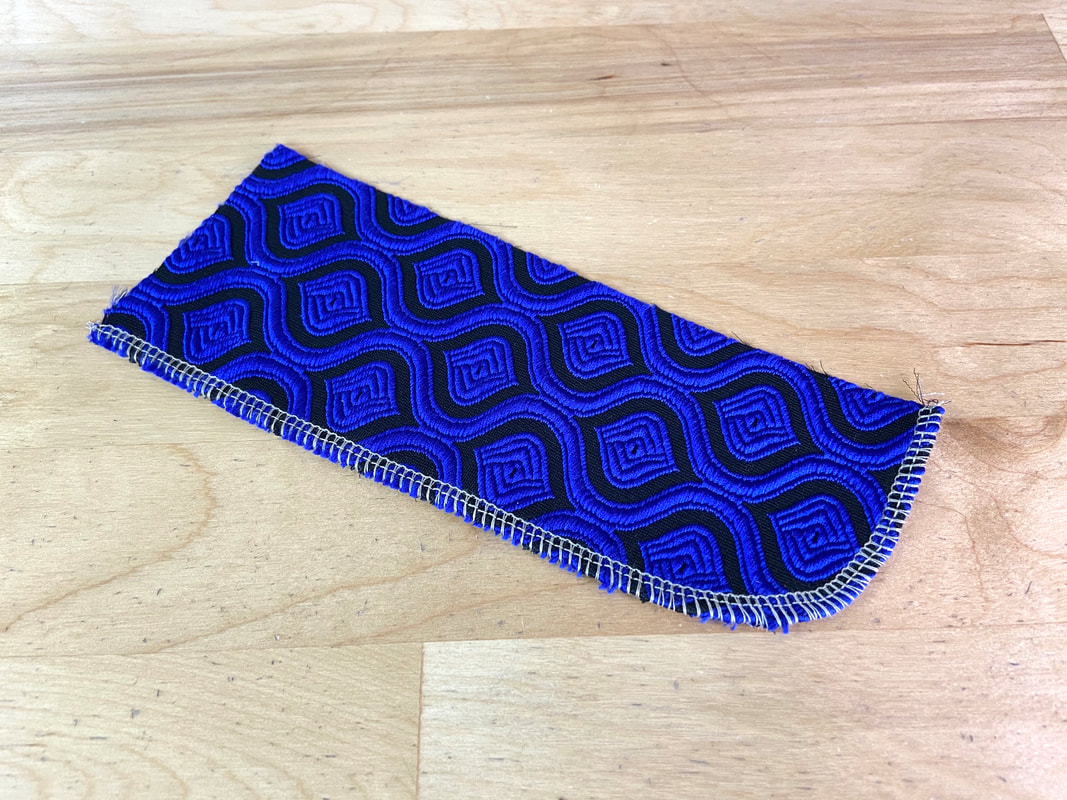
4. Flip the clean finished fly shield on its right side and iron the finished curved edge. All seam allowance edges should be enclosed on the inside.
Picture
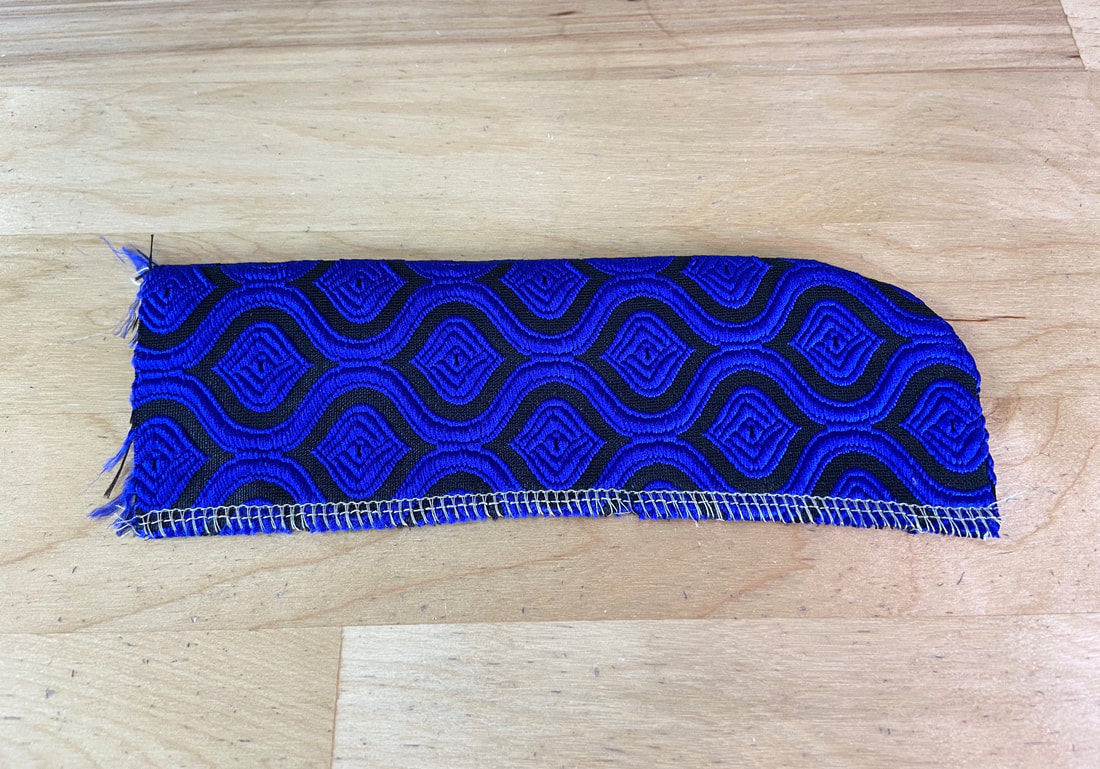
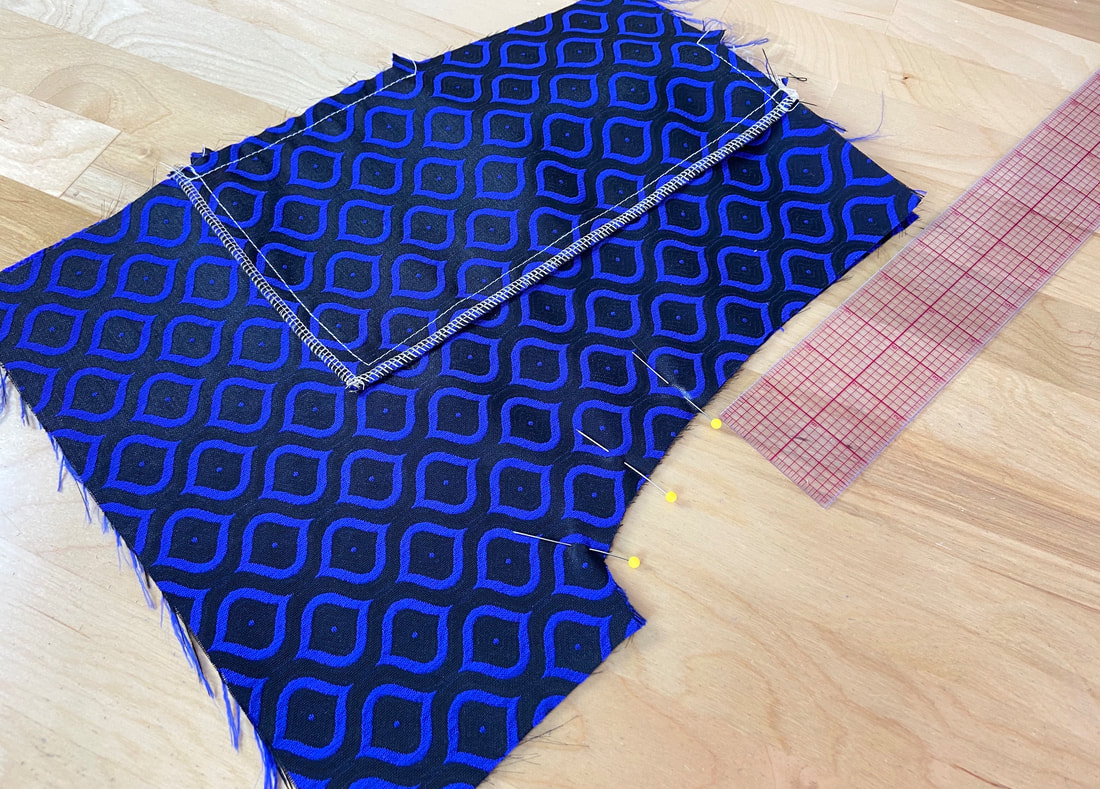
5. Clean finish the lengthwise straight edge (open) either using an overedge stitch (as shown in this tutorial) or by trimming one of the layers down to ¼”, then folding and stitching the longer edge over the trimmed edge.
To prepare the fly facing:
Picture
Picture
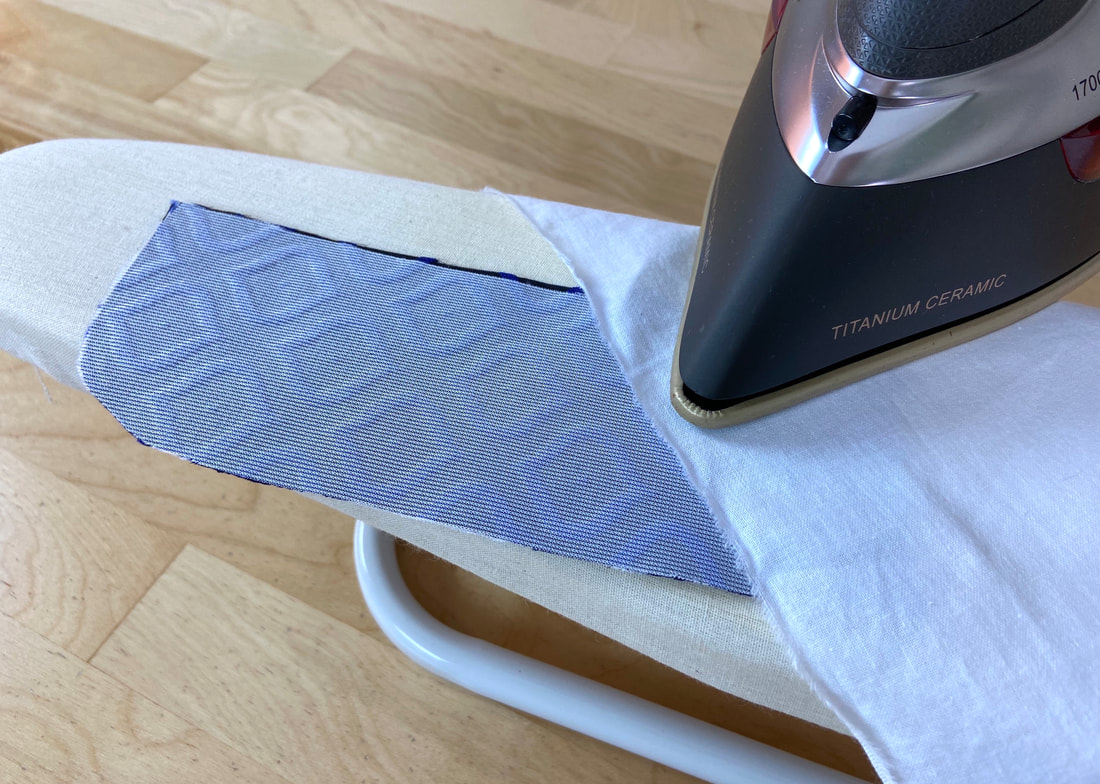
1. To complete the fly facing, cut an identical interfacing piece and fuse it to the facing’s wrong side. 
Picture
Note: You can use the fabric facing piece to align and cut the interfacing.
Picture
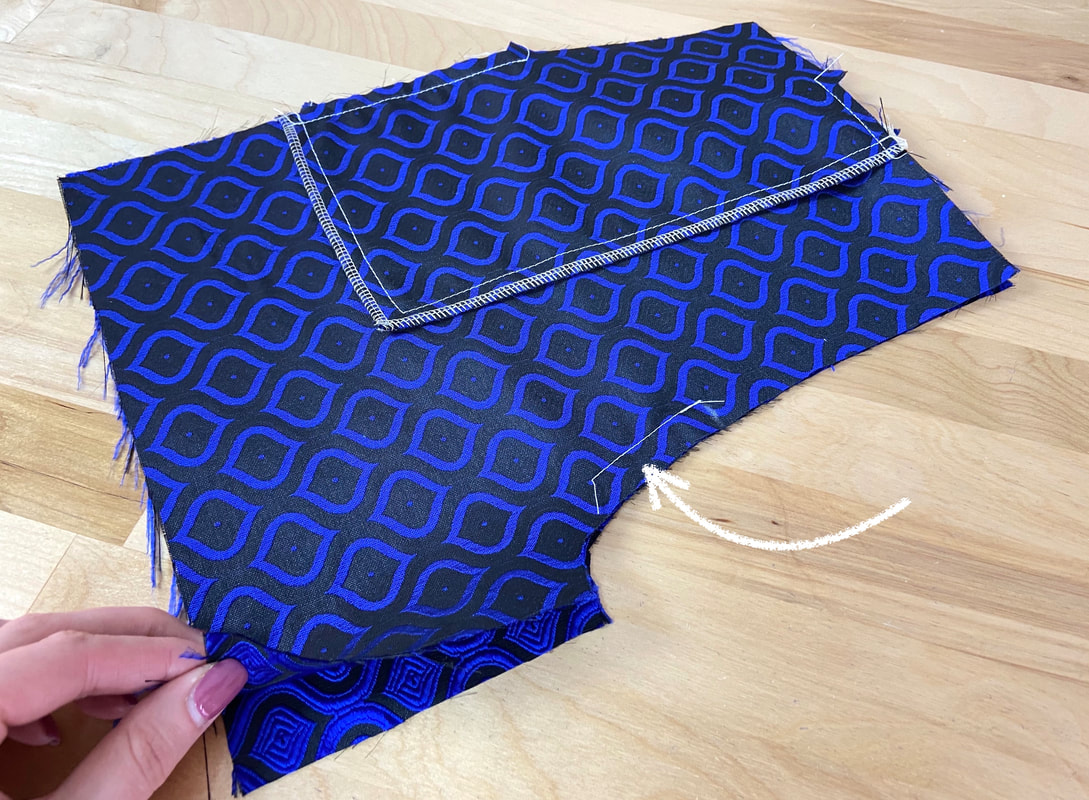
2. Add an overedge stitch to the outer curved edge of the facing to contain any potential fraying.
Picture
Picture
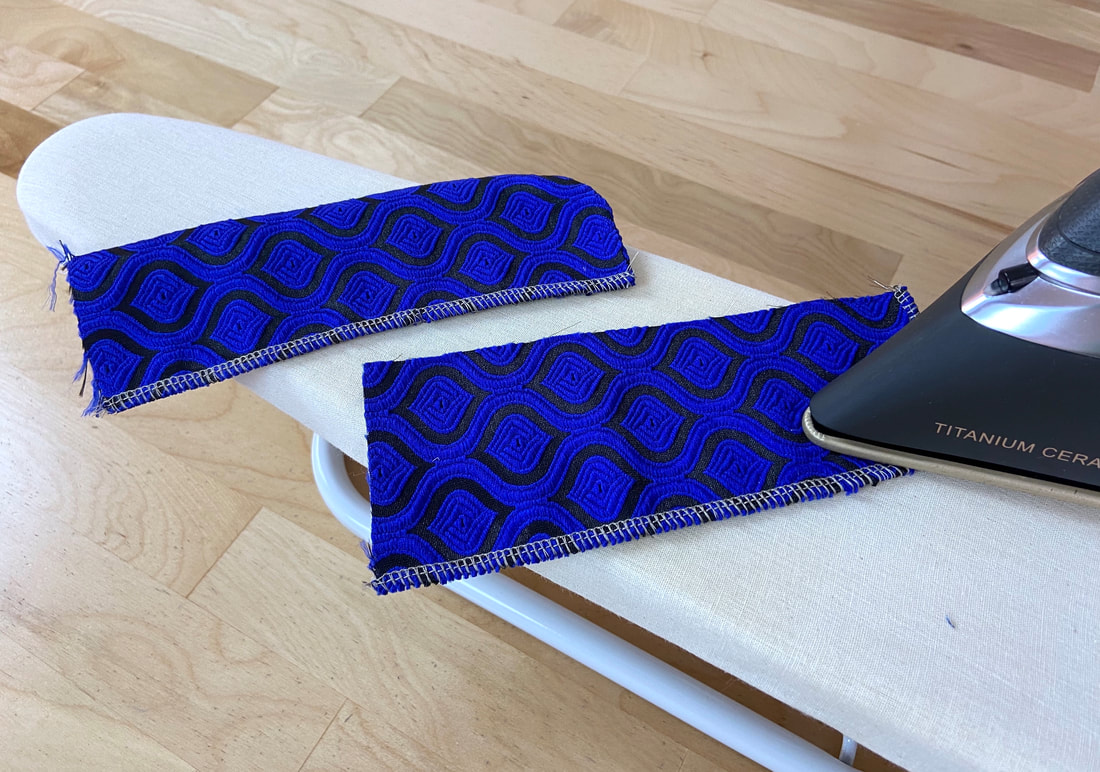
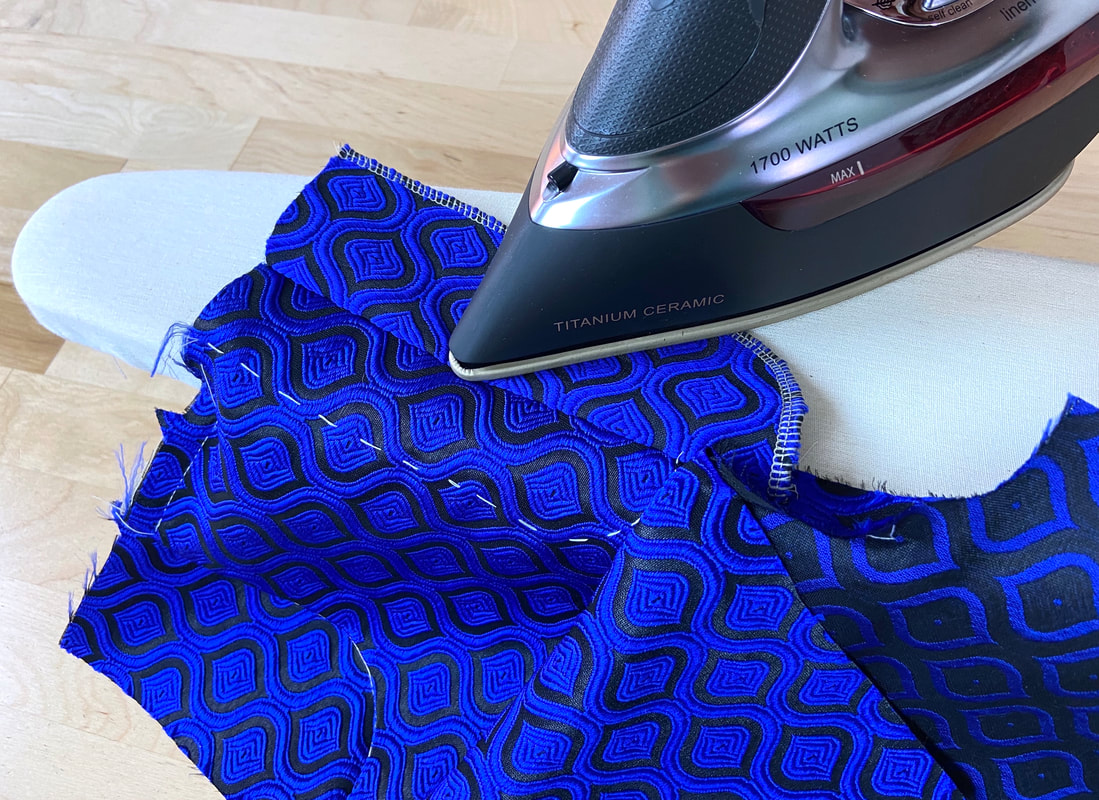
3. As a final step, iron the facing and fly shield to give them a clean, professional finish thus making them easier to work with.
​Set these two pieces aside for now while you work on the trouser zipper opening.

Sewing The Fly Front Zipper Application ​

Picture
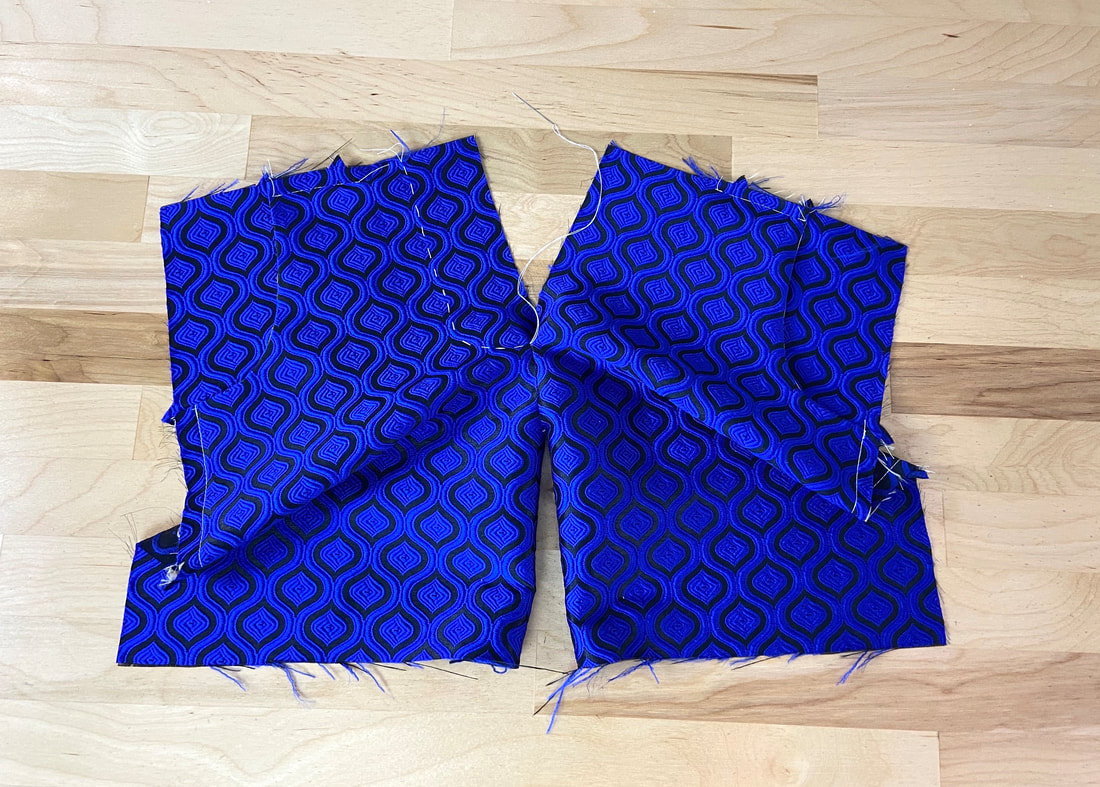
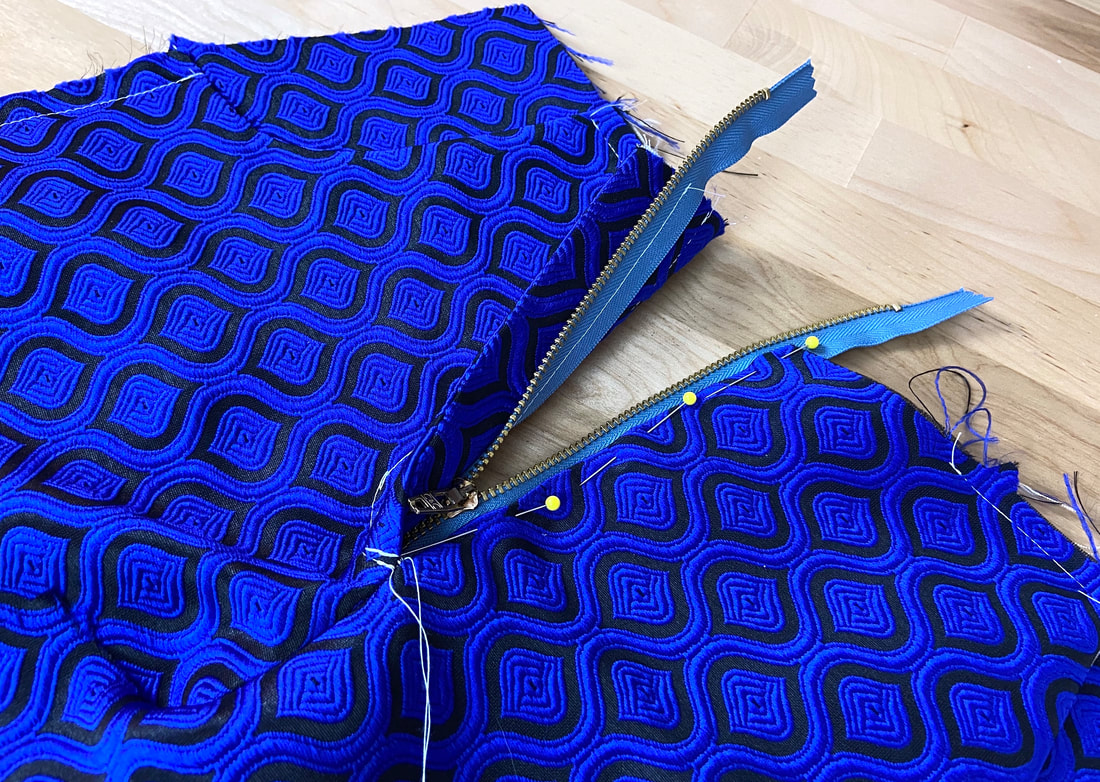
1. To start with, place the left and right front trouser layers together matching the center front crotch seam. 
Picture
​Measure the zipper opening down the center seam as shown, and insert a few pins starting at this location and moving down a few inches. Your sewing patterns will most likely have a designated (notch) at this starting point. 
Picture
Picture
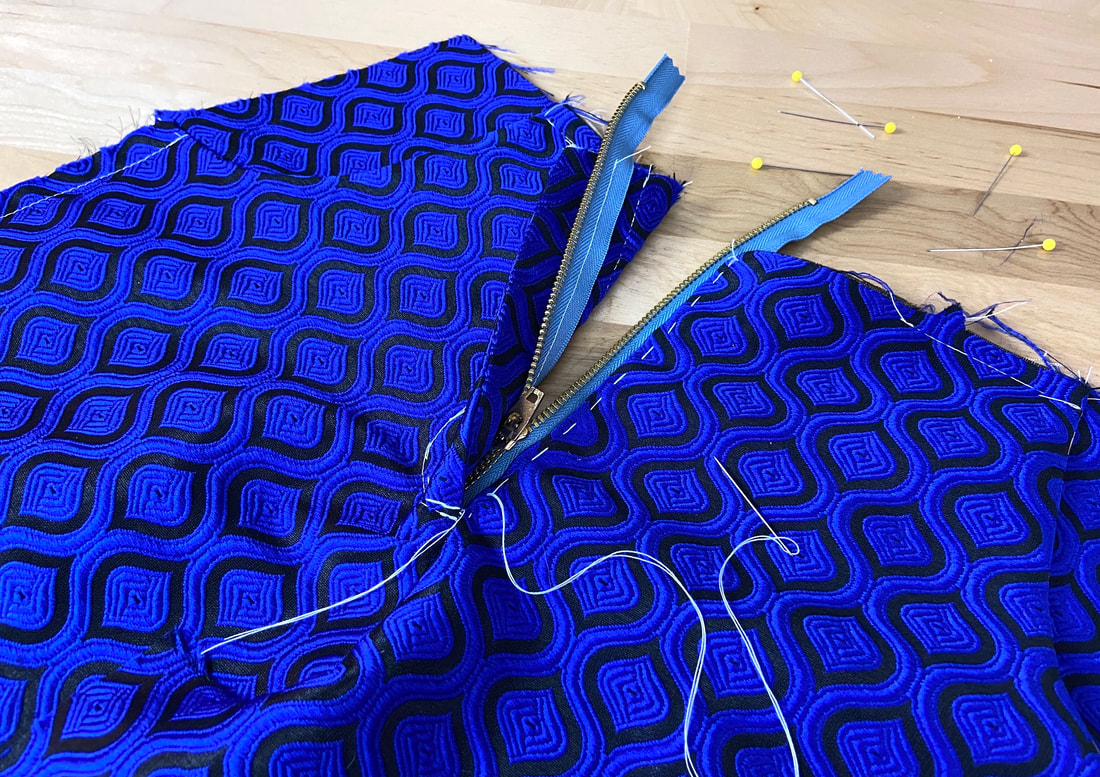
2. From this location, stitch about 1-2” down the crotch seam but not all the way to the inseam. Leaving the end open will allow an easier way to keep the right and left pant layers flat during the zipper application process.
Picture
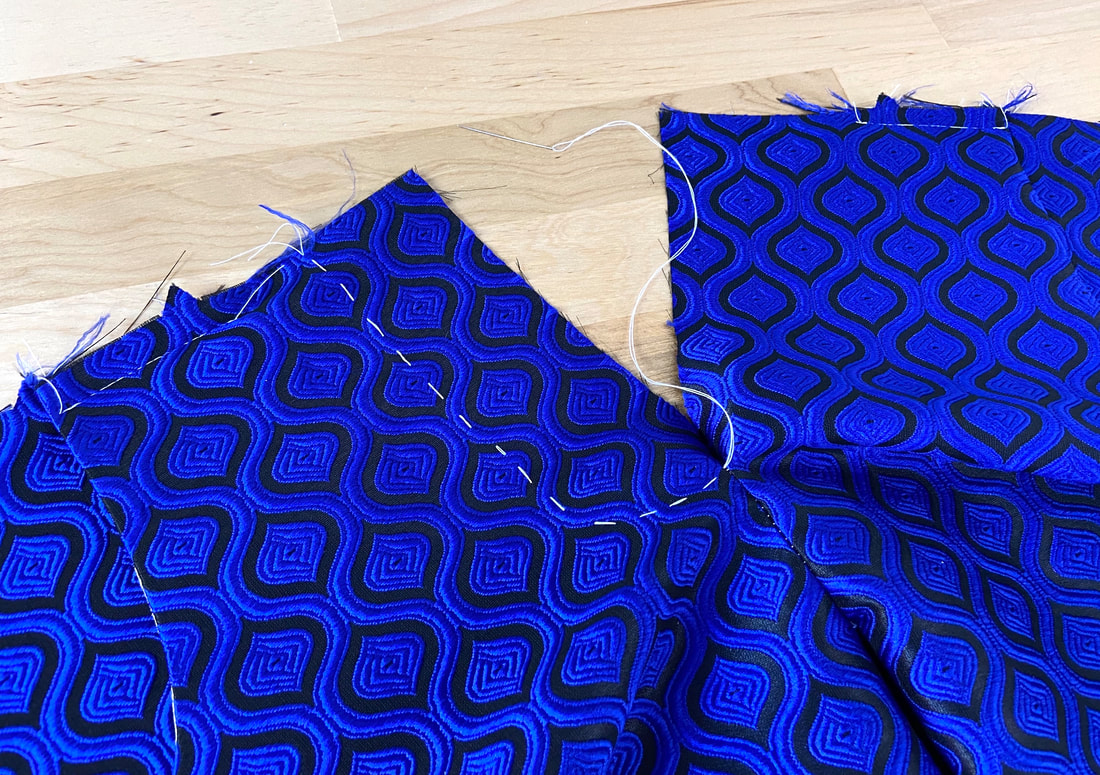
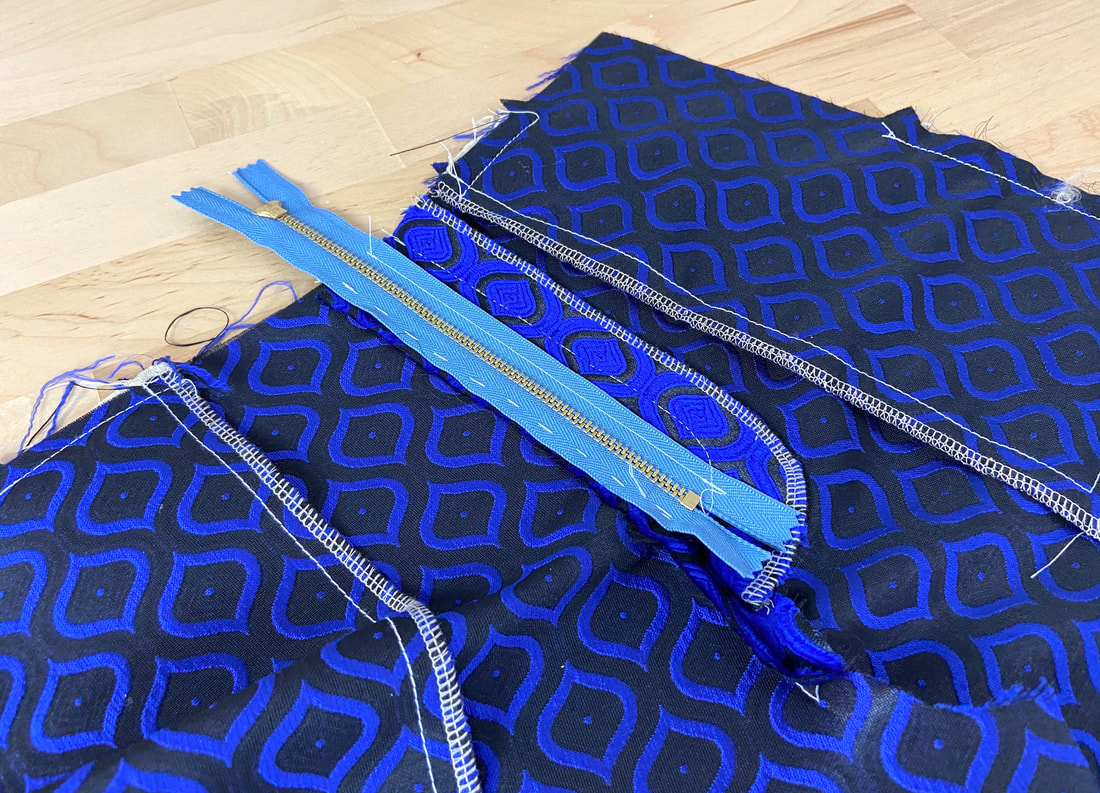
3. Starting at the top of the stitch applied in Step 2 above, mark the fly front placket topstitch with a hand basting stitch as shown. The hand basting will serve as a guide for topstitching the zipper placket later.
Picture
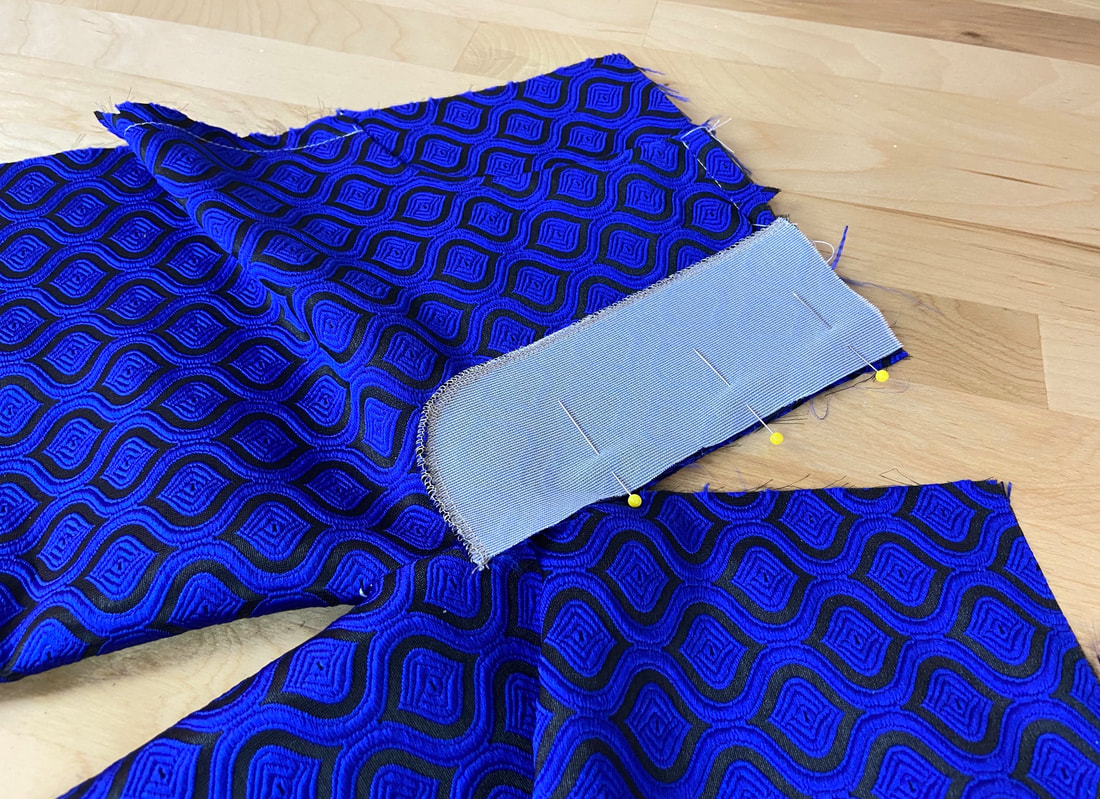
4. Match the fly facing’s lengthwise straight edge to the trouser seam edges that will house the zipper placket. In this case, it is the seam's right side. The facing and trouser face sides should be touching. 
Pin the facing to the seam edge starting at the top and ending along the seam allowance, underneath the seam. 
Picture
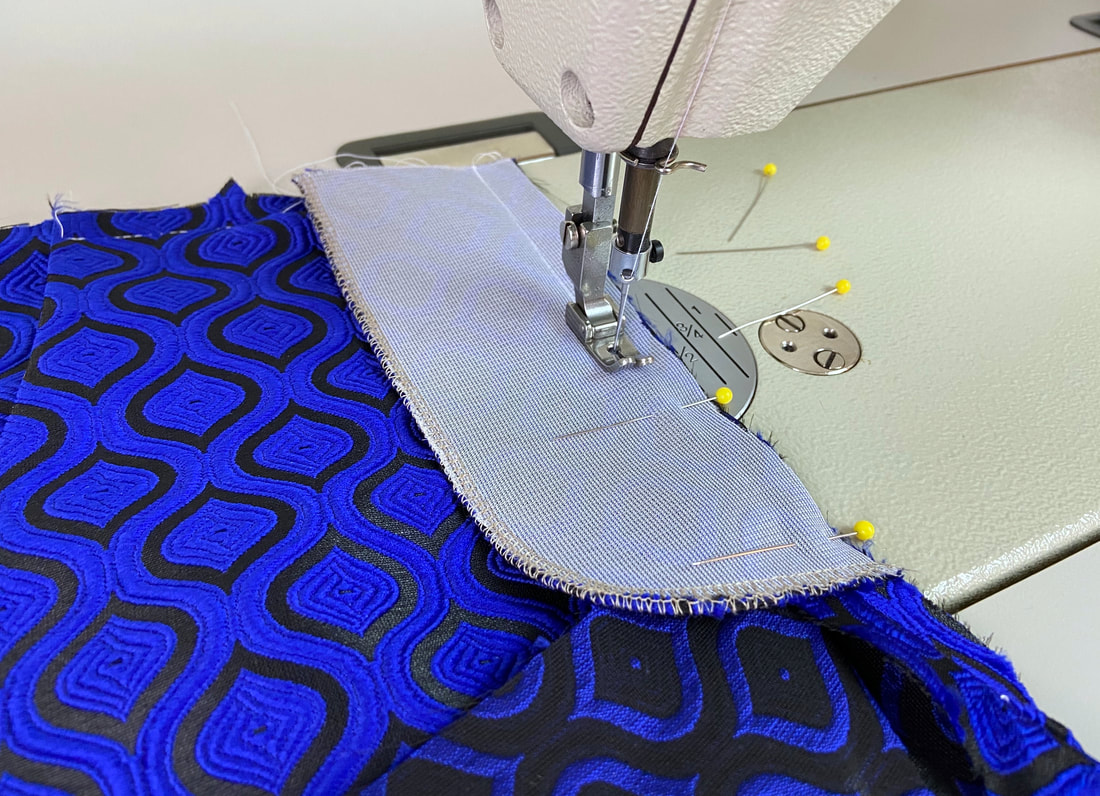
5. Stitch the facing to the seam edge at the designated seam allowance- ½” in this case. 
Picture
Grade the seam allowance, especially if the fabric is bulky.
Picture
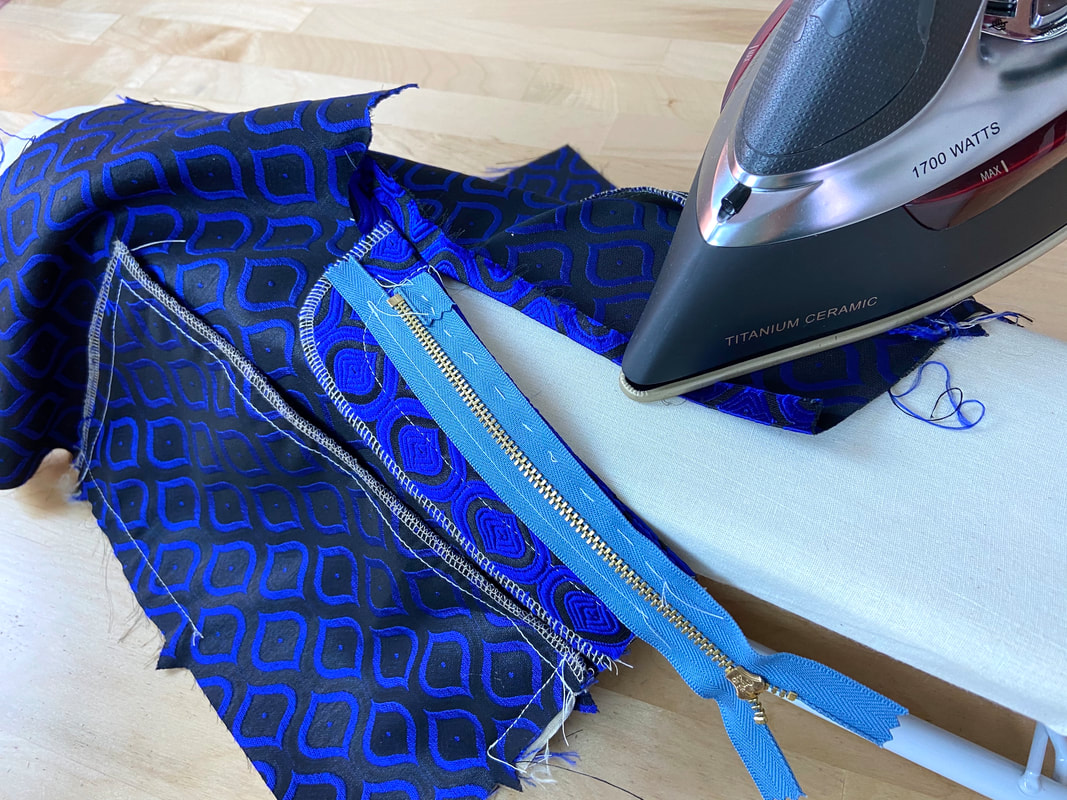
6. Extend the facing and seam allowance away from the garment and iron the seam from the face side as shown. 
Picture
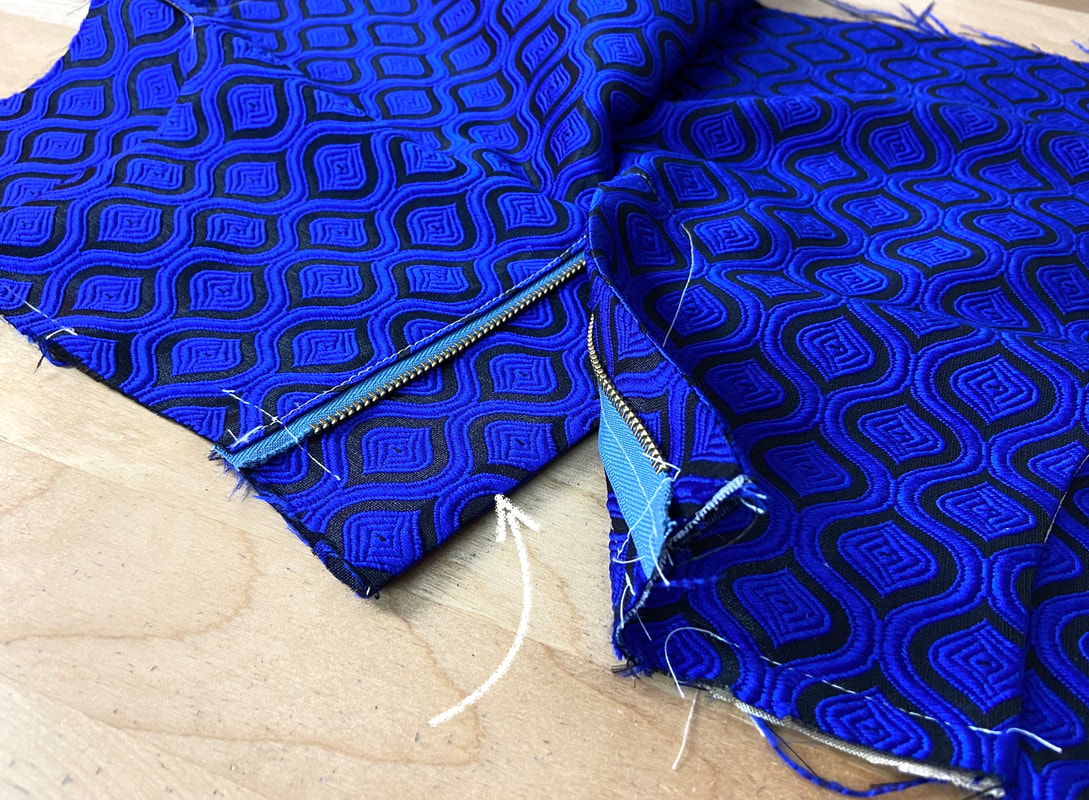
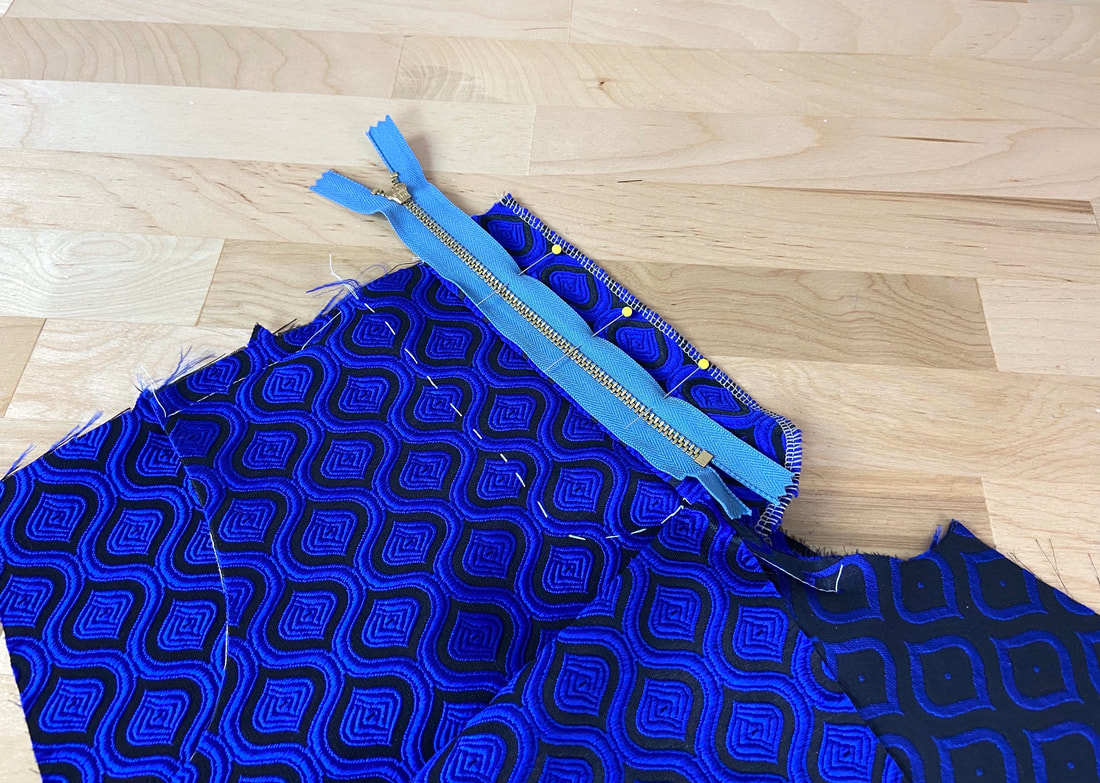
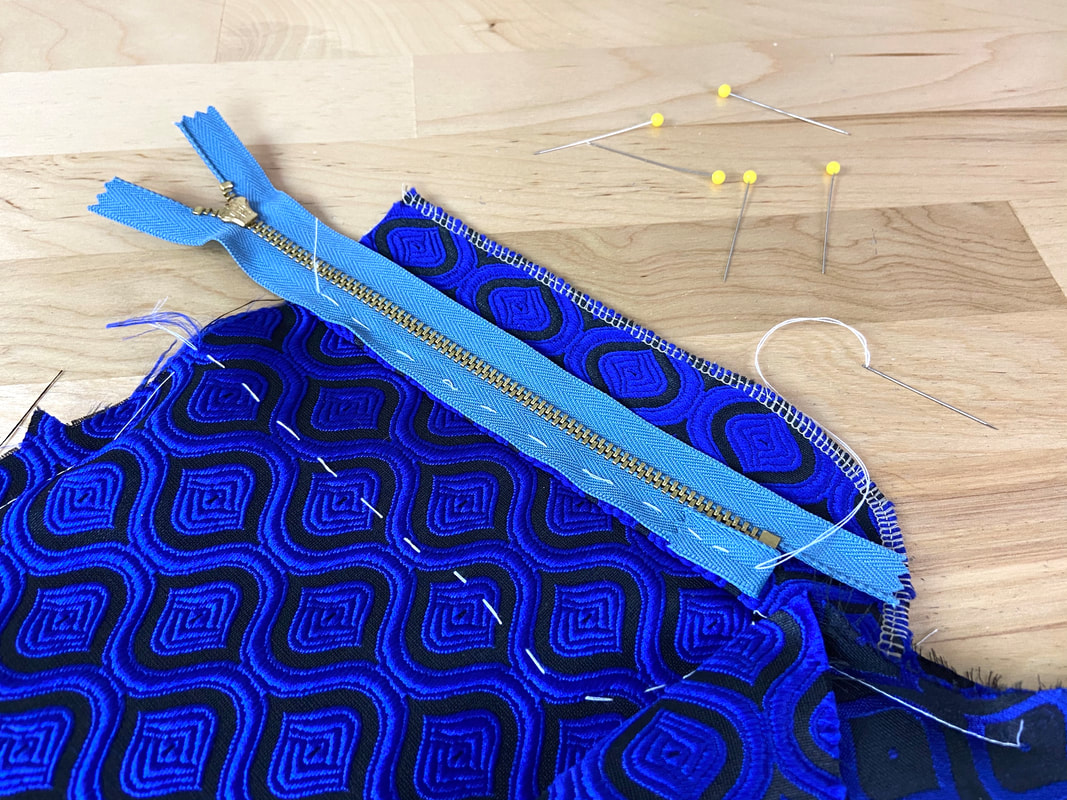
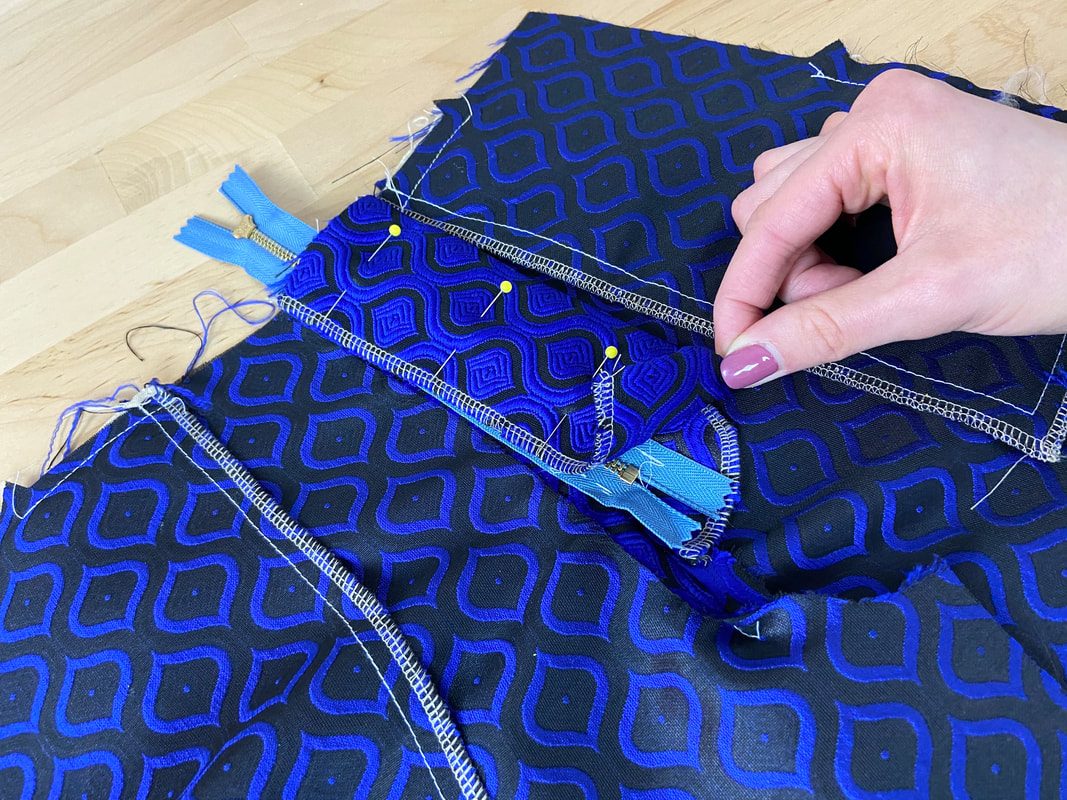
7. Place the zipper face down on the facing layer such that the left edge of the tape aligns with the facing seamline, and the zipper bottom stop is aligned to the end of the marked placket guideline as shown. Insert a few pins through the zipper tape to keep the zipper in this position. 
Picture
You should consider hand basting the left zipper tape to the facing to facilitate the sewing steps below. Fold and hand baste the bottom excess zipper tape up as shown above. 
Picture
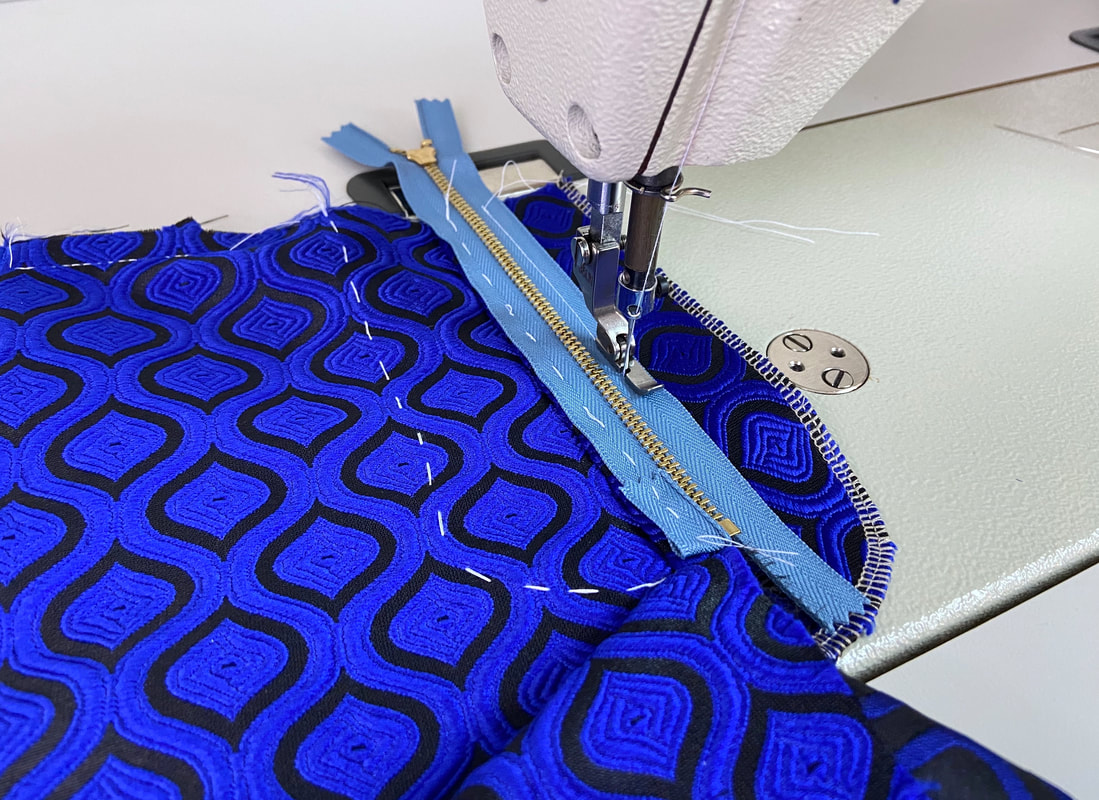
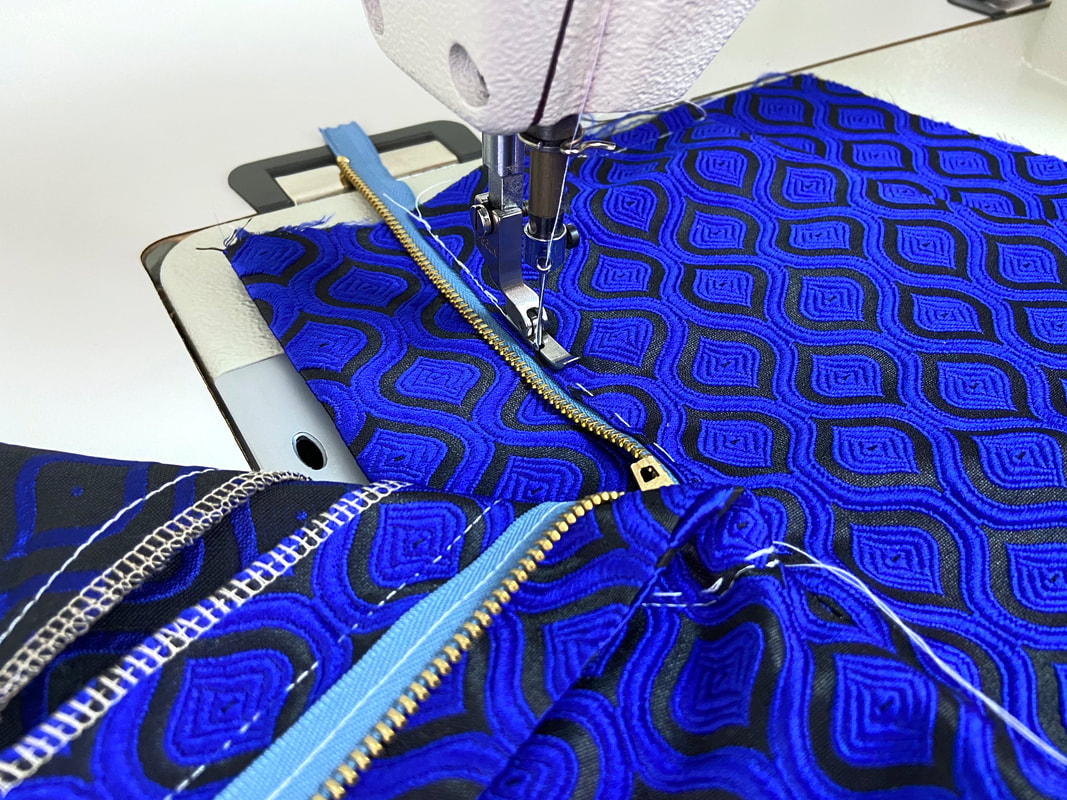
8. Using a zipper presser foot, stitch through the right zipper tape and facing layer next to the zipper coils.
Picture
Picture
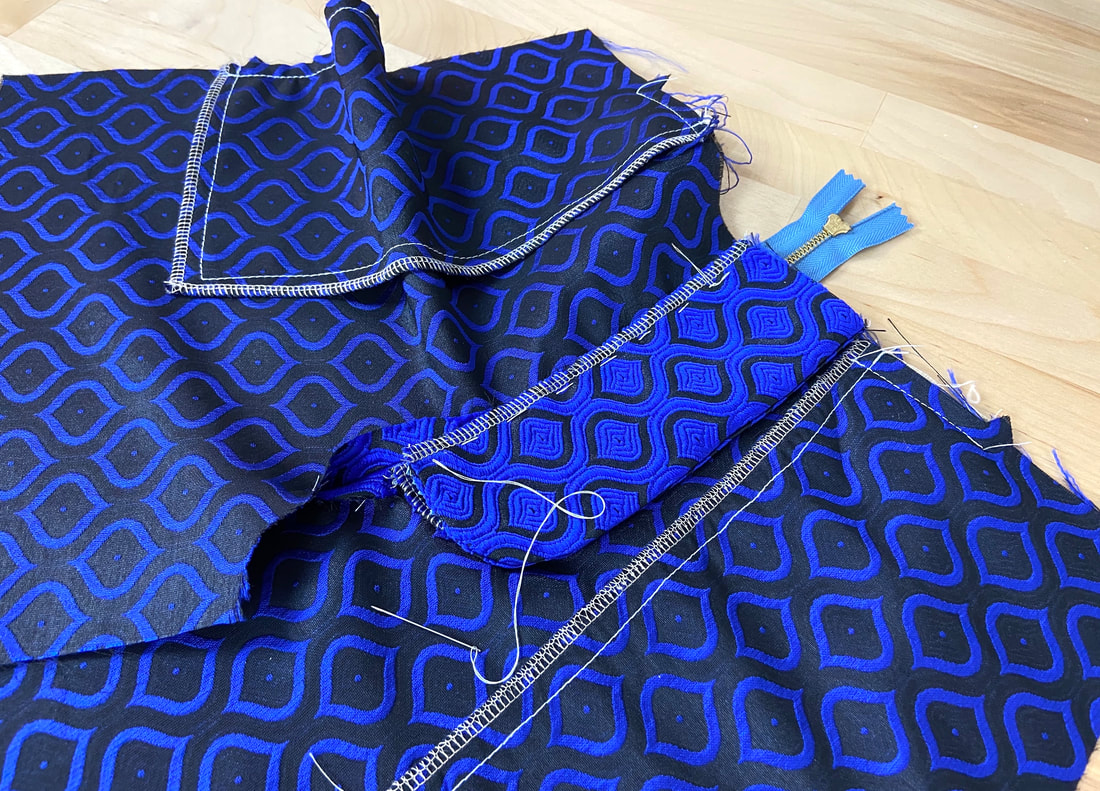
9. Next, flip the facing and zipper (attached to it) toward the inside of the seam and press the folded faced edge in this position. Insert a few pins to keep the facing flat underneath.
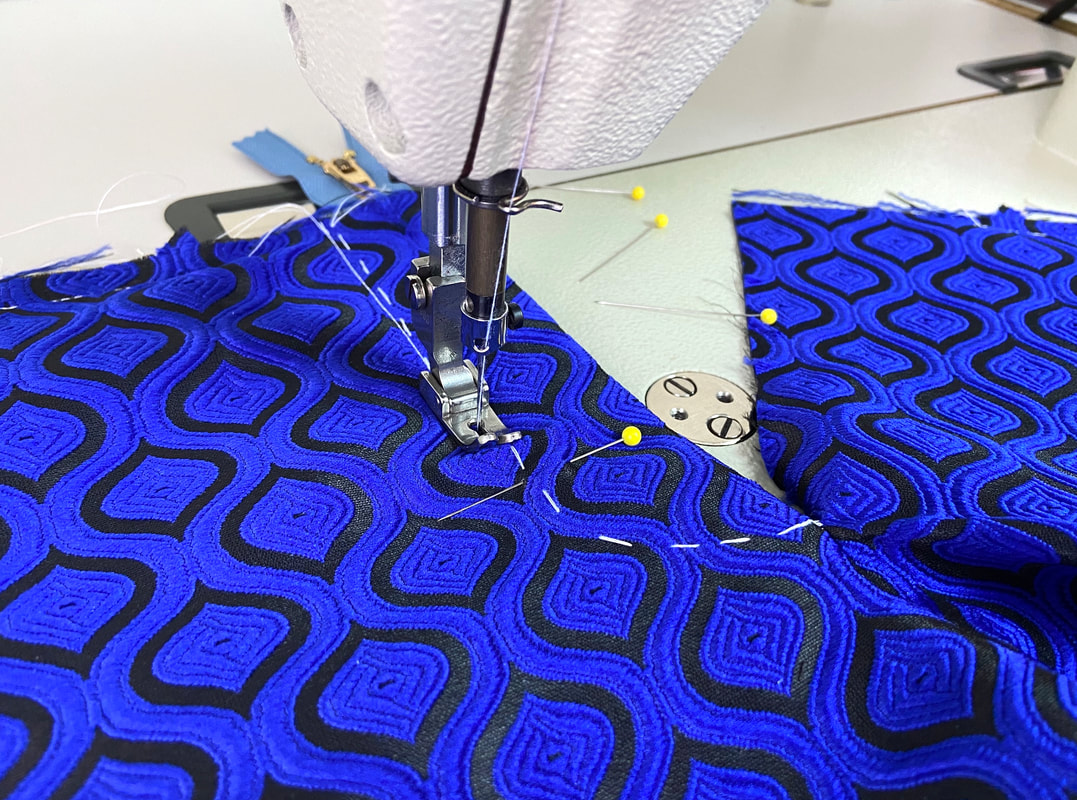
Picture
10. ​Following the hand basting guideline applied in Step 3, topstitch through the garment layer and facing underneath next to the basting as shown. 
Be careful not to catch the zipper tape underneath. This placket topstitch should curve toward the trouser seam and end right below the bottom zipper stop.
Picture
Picture
11. Fold the unstitched seam edge in at about ¼” beyond its seamline and press to crease this fold line.
Picture
Remove the zipper tape hand basting applied in Step 7 above. 
Picture
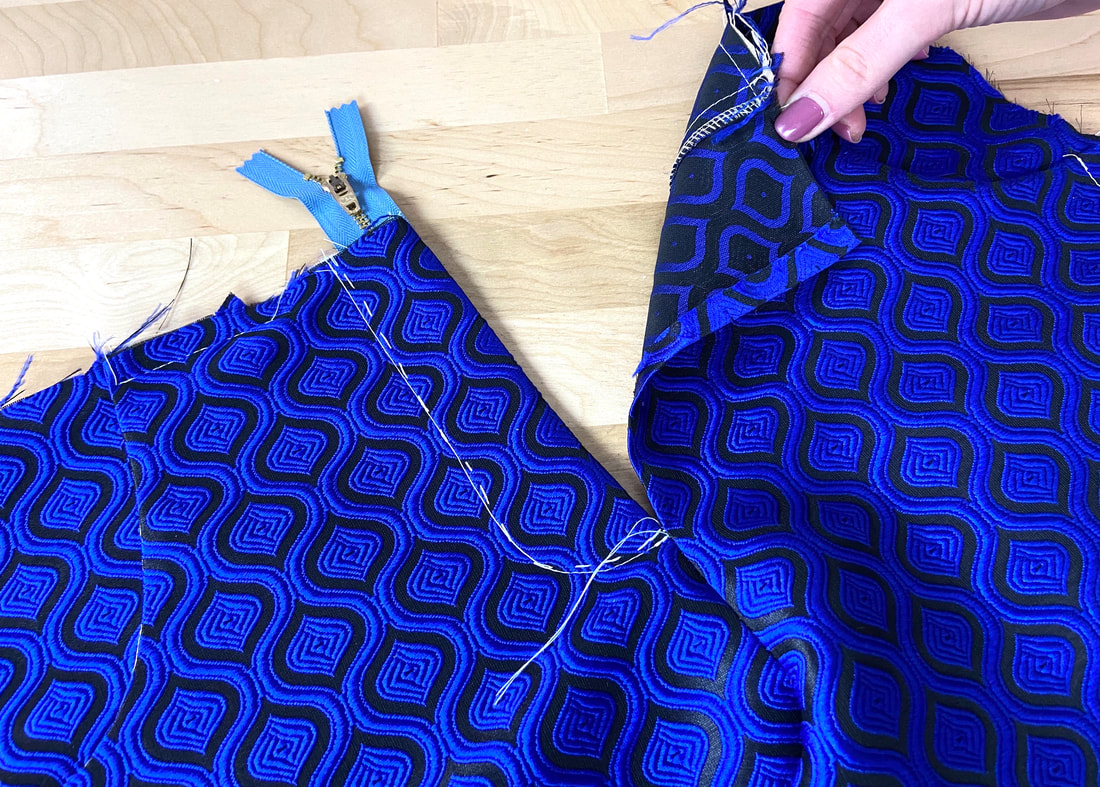
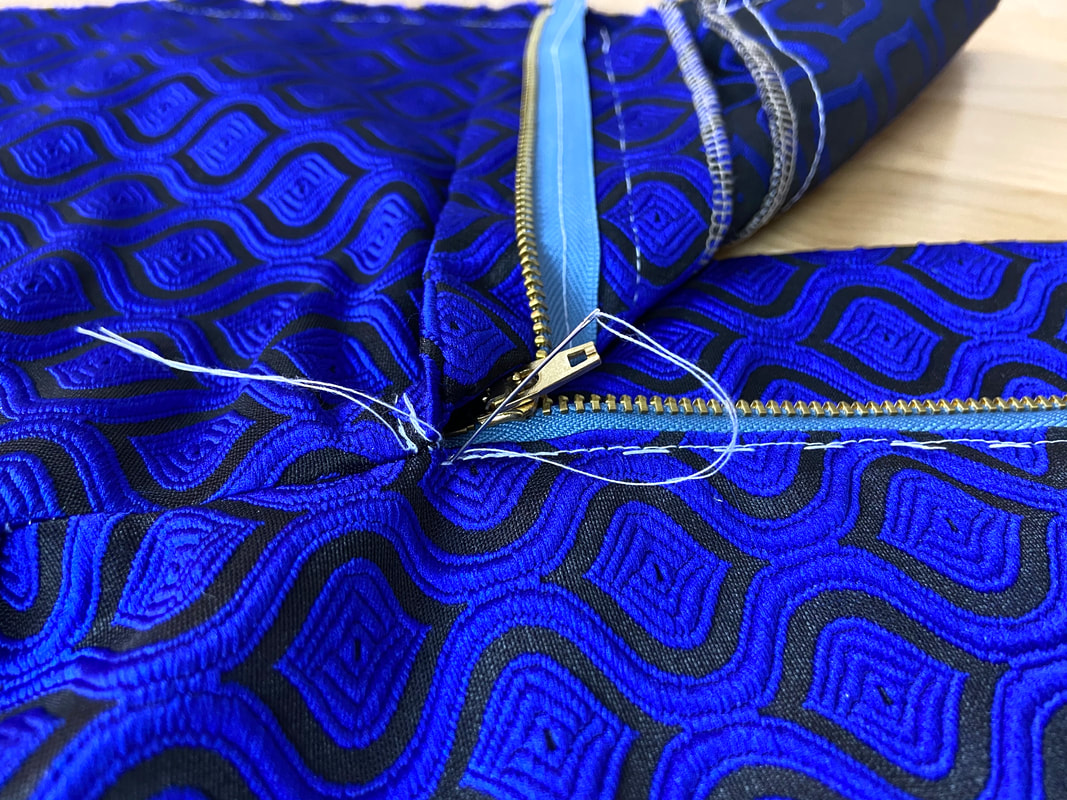
​12. Keeping the zipper open, align the folded seam edge to the unstitched zipper tape on the face side of the zipper as shown. 
Picture
Hand baste the folded seam edge to the zipper tape such that the fold line is next to the zipper coils. When the zipper is closed, the left and right top edges should align perfectly.
Picture
13. Close the zipper and flip the garment on its wrong side as shown. 
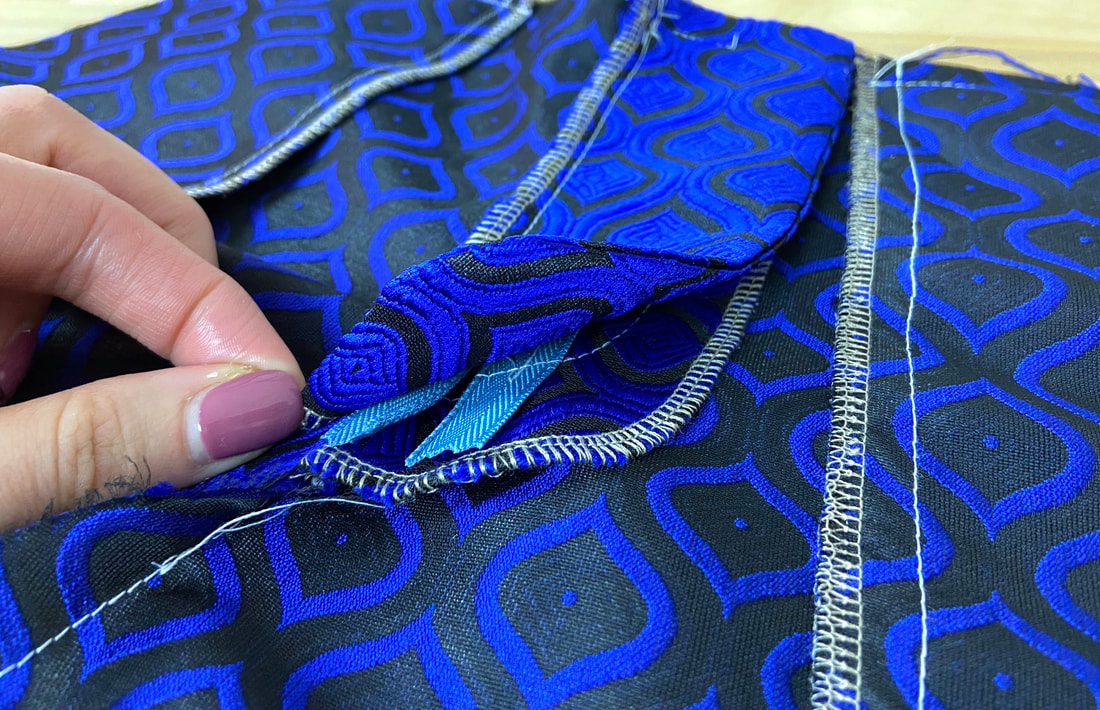
Picture
14. ​Place the fly shield on top of the zipper such that the facing’s curved edge aligns with the fly shield’s curved edge. Insert a few pins to hold. 
Picture
15. ​Hand baste through the fly shield and garment layers down the lengthwise edge at about ¼” away from the edge as shown.
Picture
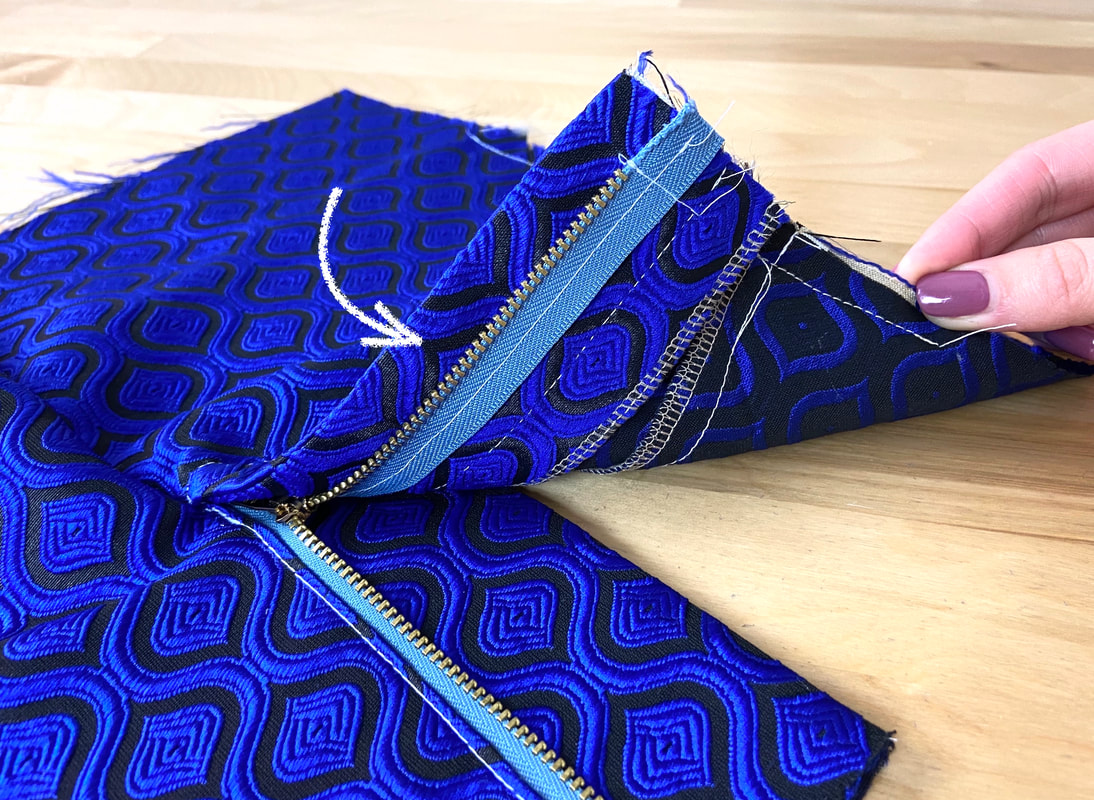
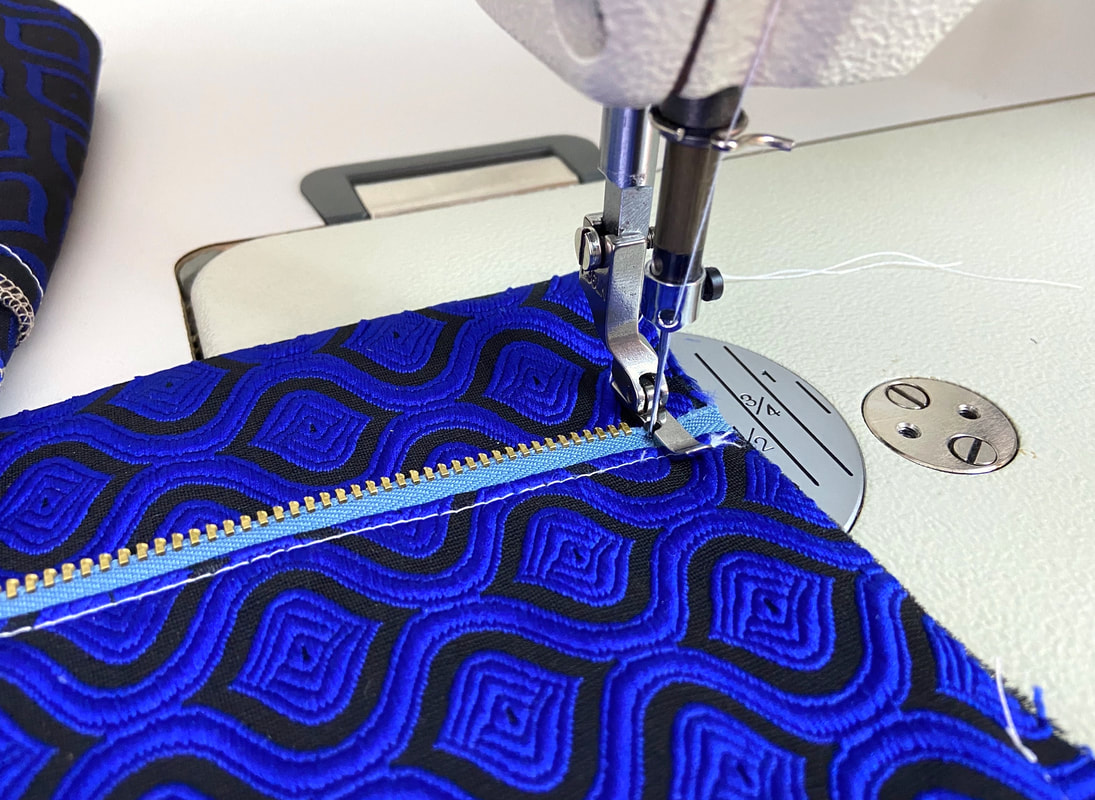
16. Flip the zipper application back on its right side, open the zipper, and using a zipper foot, topstitch next to the basted fold line through all layers of the garment, zipper and fly shield underneath. Stitch from top to bottom as shown. 
Picture
Picture
​When complete, pull all loose threads towards the inside the trousers and tie them to secure.
Picture
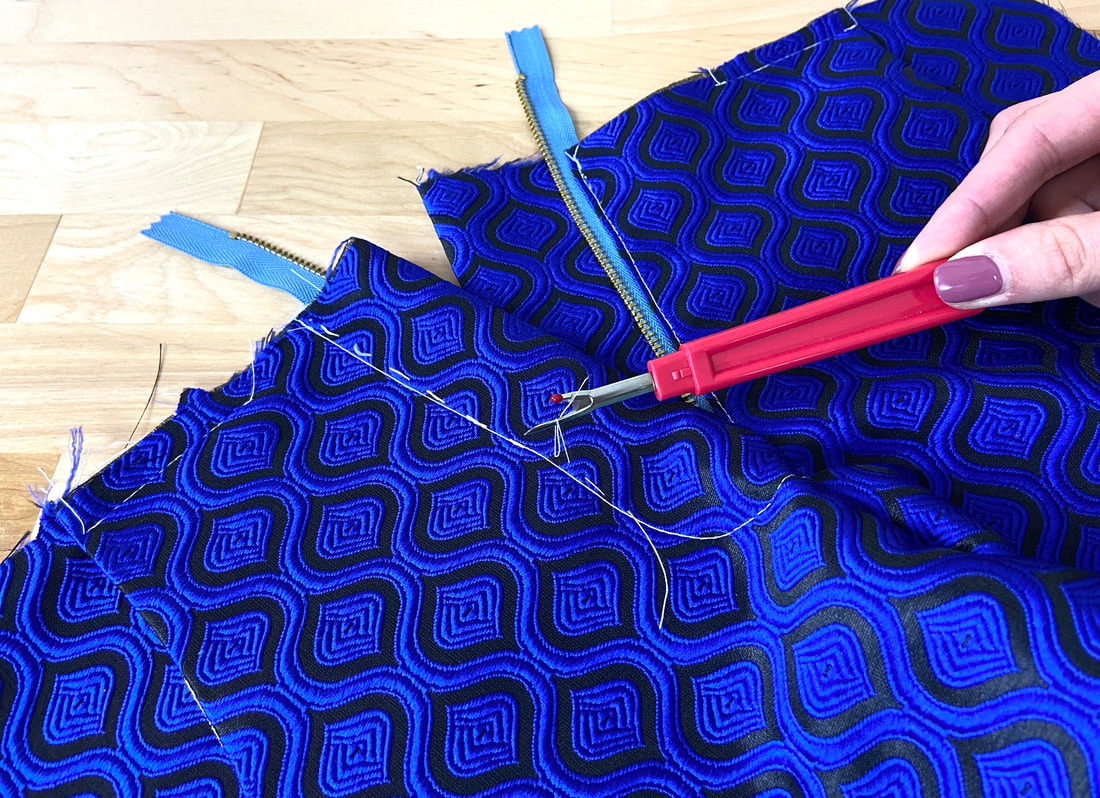
17. Remove all hand basting stitches at this point. 
Picture
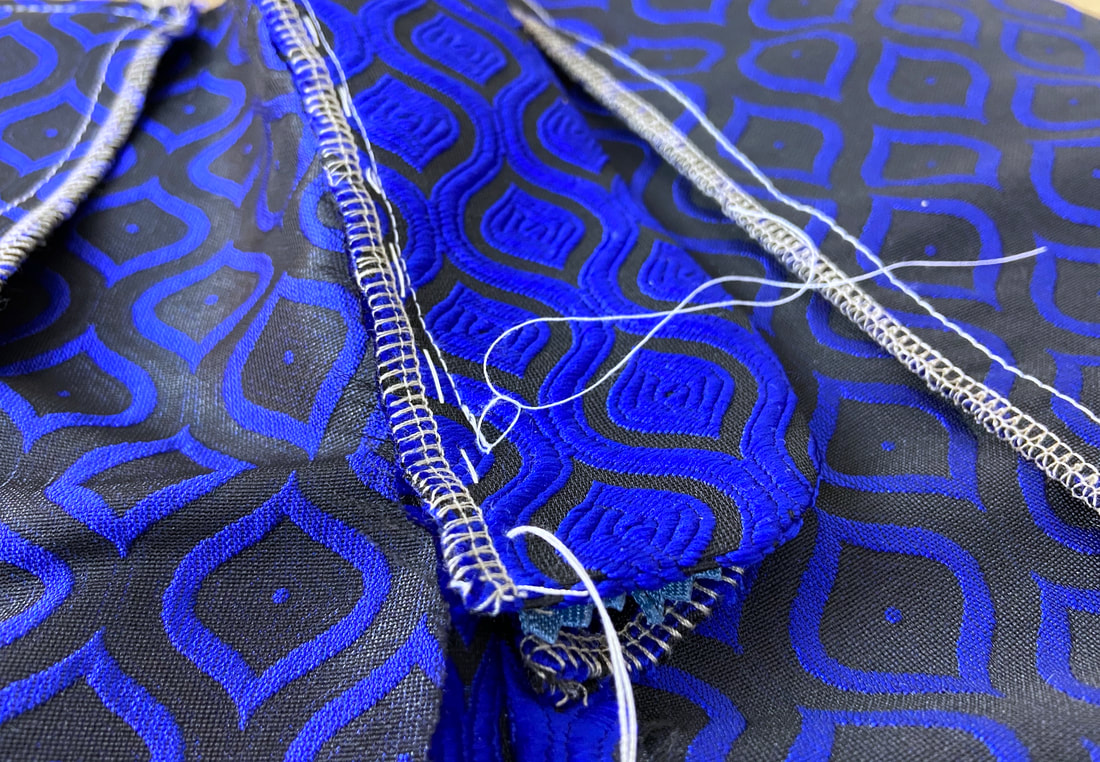
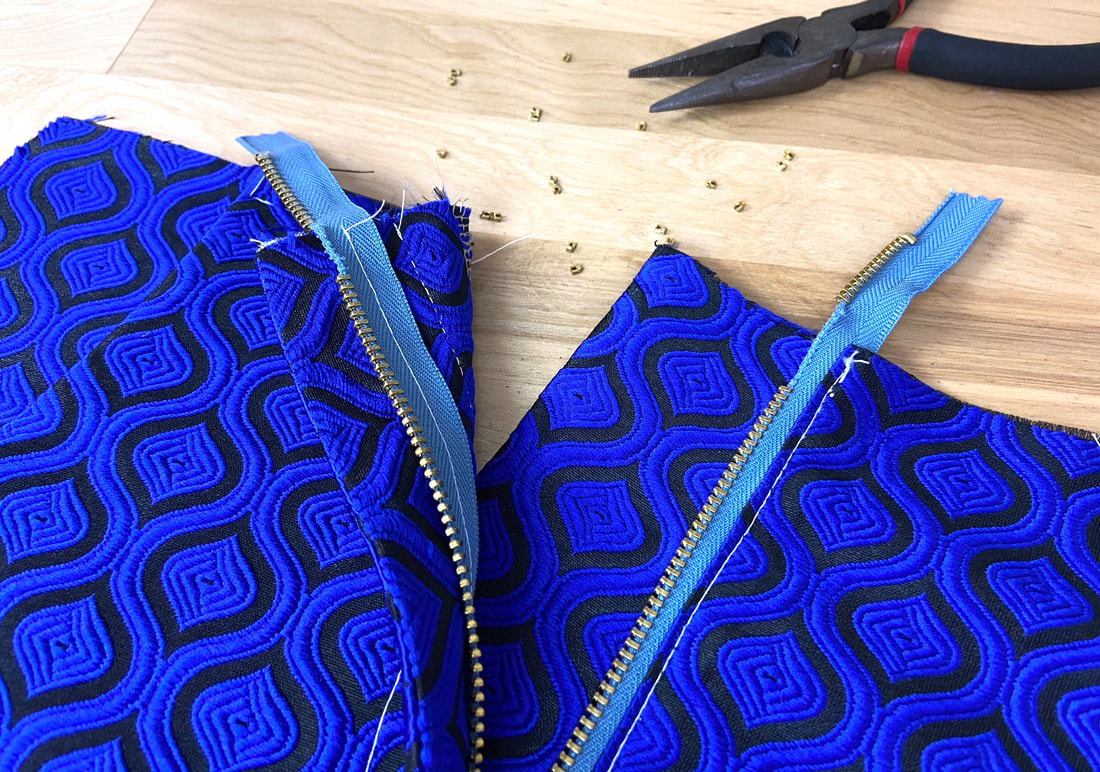
18. To secure the zipper ends at the top, remove individual coils down to the waist seamline on each portion of the open zipper. Use a pair of pliers for this process. ​
Picture
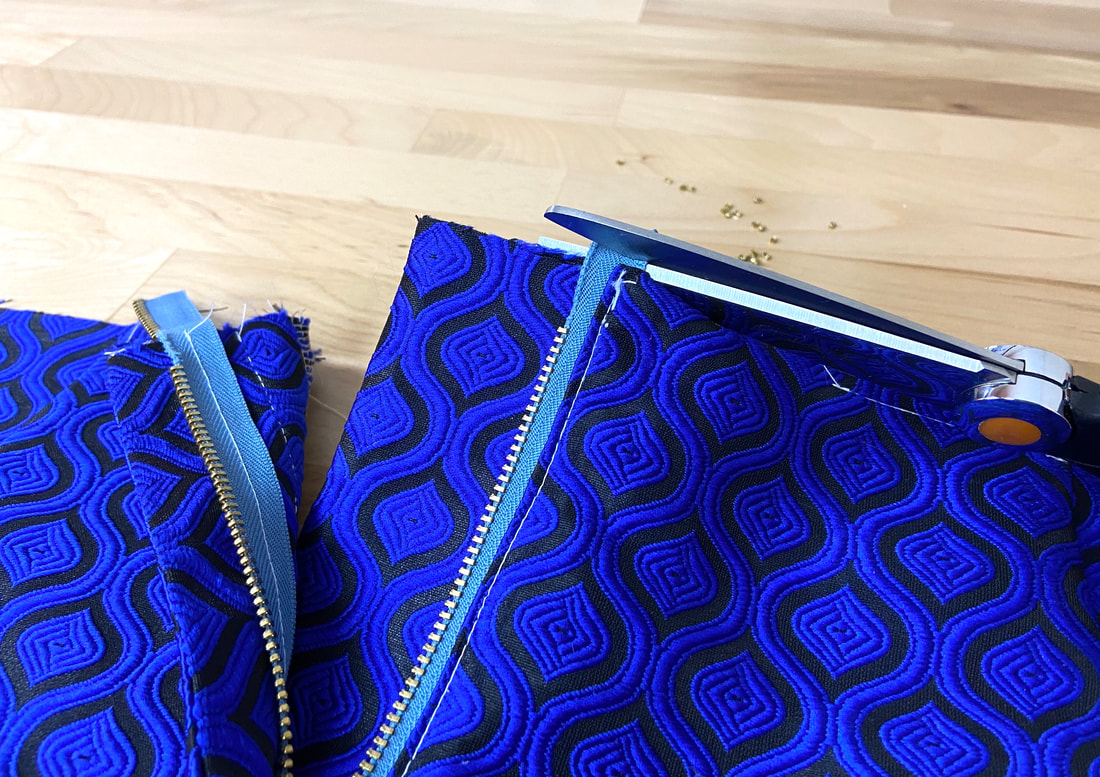
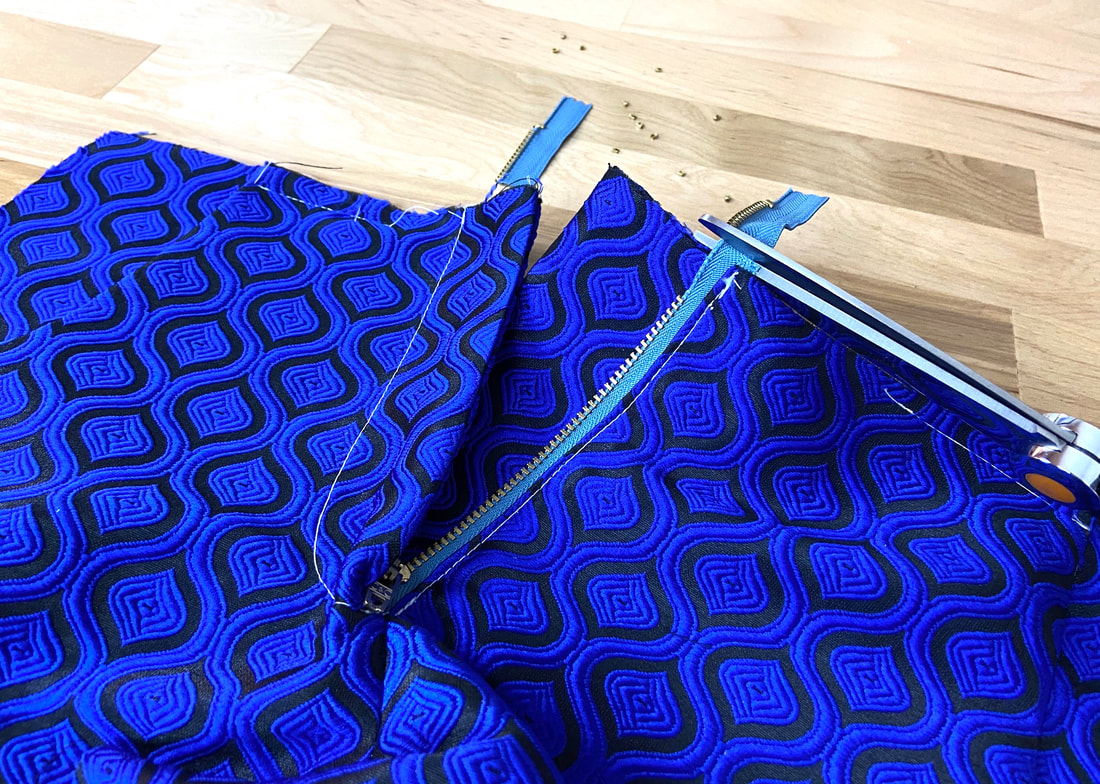
19. Trim the excess zipper ends such that these cut ends align with the top unfinished trouser edge. 
Picture
20. To secure the zipper chain, stitch horizontally across the zipper tape at the waist seamline. 
DMCA.com Protection Status
All content, including images and text, may not be copied, replicated, or redistributed without express written permission. This website is regularly screened and monitored for content protection.

Have A Personalized Sewing Question?

Ask It Here

Services

​Custom Apparel
Custom Bridal
​Sewing Tutorials
​

Company

About
Blog

Support

Contact
Terms of Service
DMCA.com Protection Status
© COPYRIGHT 2022. ALL RIGHTS RESERVED.
  • Sewing Tutorials
    • Basics >
      • Aligning Pattern Grainlines To Fabric
      • Preparing Fabrics For Sewing
      • Pinning Sewing Patterns To Fabric
      • Placing Sewing Patterns On Fabric For Cutting
      • Rotary Cutters or Fabric Scissors?
      • Cutting The Sewing Patterns
      • What Are Notches And How To Use Them In The Sewing Process
      • Transferring Notches From Pattern To Fabric
      • Transferring Seamlines to Fabric
      • Staystitching
      • Backstitching: A Complete Guide
      • Hand Basting: A Complete Guide
      • Sewing Continuous Bias Binding
    • Darts >
      • Marking And Transferring Darts To Fabric
      • What Are Darts And Dart Components
      • Folding, Pinning And Hand Basting Darts
      • Handling Dart Excess: Bulk And Tension
      • How To Sew A French Dart
      • How To Sew And Iron Single Pointed Darts
      • How To Sew And Iron Contour Darts
      • Sewing Darts With Decorative/Beaded Fabrics
    • Sewing Seams >
      • ​The Basics Of Seams And Seam Allowance
      • How To Sew A Straight Seam
      • Sewing Curved Seams
      • Sewing Corner Seams
      • Trimming And Grading Seam Excess
      • Notching/Clipping Seam Allowance for Tension Release
      • Sewing Topstitched Seams
      • Sewing Corded Seams
      • Sewing A Slot Seam
      • Sewing A Gathered Seam
      • Sewing Bias Seams
      • Sewing Seams With Ease
      • Sewing Seams With Crossing Seamlines
      • Sewing Unlike Fabric Seams
      • How To Iron Seams: Ironing Tools And Conventions
      • Sewing With Knit Fabrics
      • Understanding Stitch Length And Tension
      • Sewing Unique Fabric Seams
    • Seam Finishes >
      • Seam Finishing Techniques - Overview
      • Applying A Pinked Seam Finish
      • Applying A Bias Bound Seam Finish
      • Serging And Zigzag Seam Finishes
      • Sewing A Self-Bound Seam Finish
      • Sewing A French Seam Finish
      • Sewing A Hong Kong Seam Finish
      • Sewing A Mock French Seam Finish
      • Sewing A Turned-and-Stitched Seam Finish
      • Sewing Overcast Hand-Applied Seam Finishes
      • Sewing A Flat Felled Seam
      • Sewing A Hairline Seam Finish
    • Hem Finishes >
      • Garment Hem Finishes: Overview
      • ​Sewing A Double Fold Hem Finish
      • Sewing A Single Fold Hem Finish
      • Sewing Bound Hem Finishes
      • Sewing An Exposed Double Layer Bound Hem
      • Sewing A Folded-Up Bound Hem with Pre-folded Binding
      • Sewing A Hong Kong Hem Finish
      • Sewing A Band Hem Finish
      • Sewing A Bias Faced Hem Finish
      • Sewing A Twill Tape Hem Finish
      • Sewing A Rolled Hem Finish
      • Sewing A Shaped Hem Facing
      • Using Fusible Hem Tape And Webbing
      • Finishing A Lace Fabric Hem
      • Finishing A Leather Hem
      • Sewing Faced Hem Corners
      • How To Finish Lining At The Hem
      • Finishing Fabric Corners by Mitering >
        • Mitering Fabric Corners With A Full Bias Facing
        • Mitering Fabric Corners With Exposed Binding
      • Interfacing A Hemline: Lined And Unlined Examples
    • Sewing Pockets >
      • Curved Patch Pocket With Flap
      • Unlined Square Patch Pockets
      • Lined Patch Pockets: Two Ways
      • Extension On-Seam Pockets
      • Separate On-Seam Pocket
      • Front Hip Pockets
      • Bound Double Welt Pocket
      • Double Welt Pocket With Flap
      • Self-Welt Pocket (Using Single Fabric Layer)
      • Slanted Welt Pocket (Hand-Stitched)
      • Faced Slash Pockets: Overview >
        • Sewing A Faced Slit Pocket
        • Sewing A Rectangular Slash Pocket
        • Sew A Star-Shaped Faced Pocket
    • Sewing Zippers >
      • Sewing Zippers: General Information
      • Sewing A Centered Zipper
      • Sewing A Lapped Zipper
      • Sewing An Invisible Zipper
      • Sewing A Fly Front Zipper
      • Sewing A Closed-End Exposed Zipper (No Seam)
      • Sewing An Exposed Separating Zipper
      • Sewing Hand Stitched Zipper Applications
      • Sewing A Zipper Underlay
      • Sewing A Placket-Enclosed Separating Zipper
    • Sleeveless Finishes >
      • Sleeveless Armhole Finishes: General Information
      • Finishing Sleeveless Garments with Lining
      • Sewing A Folded-Under Bound Armhole Finish
      • Sewing A Shaped Armhole Facing
      • Finishing Armhole Edges With Exposed Binding
      • Finishing Armhole Edges With Decorative Trim
    • Neckline Finishes >
      • Sewing A Neck Shaped Facing
      • Sewing An All-In-One Neck Facing
      • Neck And Garment Opening Combination Facings >
        • Sewing An Extended Front-Neck Facing
        • Sewing A Separate Neck-Front Facing
      • Sewing A Bias Faced Neckline Finish
      • Sewing A Band Neckline Finish
      • Bound Neckline Finishes: Overview >
        • Sewing A Single Layer Bound Neckline
        • Finishing A Neckline With Pre-Folded Binding
        • Sewing A Double Layer Bound Neckline Finish
      • Sewing A Semi-Stretch Strip Band Neckline
      • Ribbed Neck Band And Classic Turtleneck
      • Decorative Neckline Finishes >
        • Sewing A Neckline With Decorative Inset
        • Sewing A Piped Cording Faced Neckline
        • Sewing Decorative Trim To A Finished Neckline
    • Finishing Facing Edges >
      • Finishing Facing Edges: Overview
      • Folded-And-Topstitched Overedge Facing Finish
      • Sewing A Bound Facing Edge Finish
      • Sewing A Hong Kong Facing Finish
      • Sewing A Rolled Edge Facing Finish
      • Sewing A Twill Tape Facing Edge Finish
      • Sewing An Overedge-Stitch Facing Finish
    • Extras >
      • A Complete Guide on Interfacing
      • Sewing Bound Spaghetti Straps
      • Sewing Spaghetti Straps To A Faced Neckline
      • Sewing Ruffles: Overview
      • Patterning And Sewing A Circle Ruffle
      • Sewing A Gathered Heading Ruffle
      • Sewing Double Layer Gathered Ruffles
      • Sewing A Gathered Ruffle Into A Seam
      • Sewing A Gathered Ruffle To A Fabric Edge
      • Sewing A Fabric Surface Slit
      • Sewing A Slit Seam
      • Hand-Applied Straight Stitches
      • Hand-Applied Blind Stitches
      • Hand-Applied Overedge Stitches
      • Hand-Applied Tack Stitches
      • Hand-Applied Decorative Stitches
  • Custom Apparel
    • Custom Bridal
  • Submit A Sewing Question
  • About
  • Blog