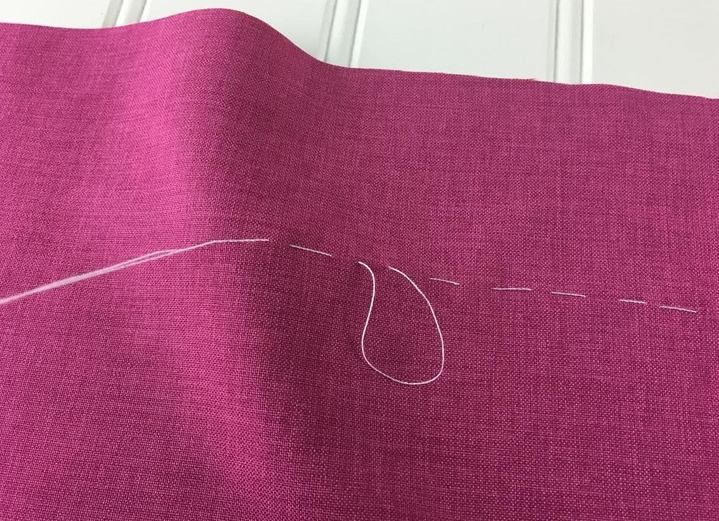
 What Is Basting: Basting is a longer hand or machine stitch that is used as a stabilizer to hold layers of fabric together in the sewing process. It serves as a tool for fitting, quilting, home decor and shaping a variety of different garment finishes like gathers, sleeves and ruffles. Basting is an important tool used in tailoring to maintain structure in the construction process and ensure that everything aligns accurately before receiving a final stitch. A quick basting stitch can save you from having to redo zippers, neckline and armhole facings/lining, and other finishes that require proper alignment. Basting can be comprised of even or uneven stitches. Uneven stitching is a quick way to baste for fitting purposes or to keep layers of fabric together, after which the stitch is removed. Even basting is also a non-permanent stitch but has more control and structure- used on sleeves, gathers, some hems and quilting techniques. Machine Basting: What is it and when to machine baste? Basting on the sewing machine simply requires that you stitch at the highest setting available for the longest stitch. Using a machine for basting is more common for instances when the stitch isn't necessarily removed afterwards. Such finishes include: gathers, set-in sleeves, quilting and hemming. In order to achieve gathers, you must use a basting stitch to bundle the fabric together evenly- this is properly achieved by using a basting stitch on the sewing machine which will ensure that the gathers are spread evenly and hold their shape during the sewing process. Same goes for sewing in a sleeve which requires a pair of basting stitches along the cap's seam allowance in order to give it a 3 dimensional, round shape. Another use for machine basting is aligning zippers before sewing them permanently. If you're a sewing beginner, you'll find that sewing a zipper with the use of pins alone proves to be very tricky. Basting, whether on the machine or by hand, allows you to keep the zipper in place before adding the final stitches.
1 Comment
Drafting sewing patterns may seem a bit intimidating for a sewing beginner but it is actually quite simple if the proper techniques are learned from the beginning. When it comes to pattern-making, you should keep things as simple yet as accurate as possible. There is really no need for complicated, expensive sewing tools. A few basic tools that can tackle a number of jobs is all that's necessary for drafting simple patterns as a sewing beginner. All you need for making a basic sewing pattern is: An 18" clear plastic ruler, an unmarked french curve, a pencil (preferably mechanical) and an eraser. These 4 tools are essential for pattern-makers of all levels, and the good news is, they are easy to find at your local art/crafts store and fairly inexpensive. Want to learn how to sew and make your own patterns? These are the basic sewing tools/supplies you should have. 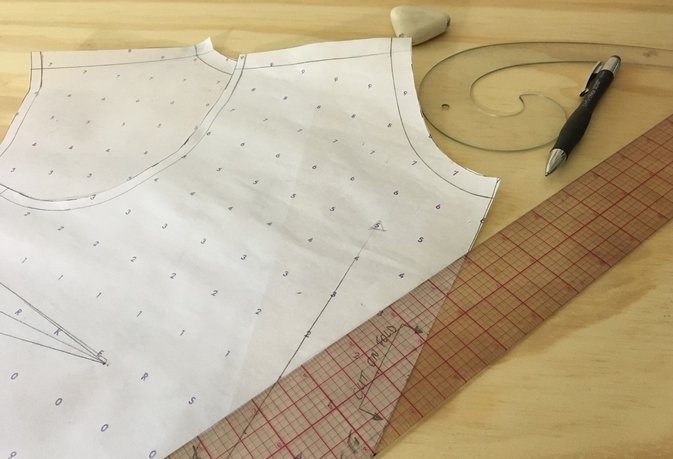 If you already have a front and back pattern of your garment, drafting a facing is actually quite easy. You can use the garment's patterns as a canvas for all your facings. Once they are drafted, all you have to do is transfer them to a separate piece of pattern paper, add seam allowance and they'll be ready for cutting and sewing. In the patterning tutorial bellow, we are working with marked patterning paper. If you don't have access to professional pattern paper, as many beginner dressmakers don't, there are a number of pattern paper substitutes you can use instead. These substitutes are easy to find and won't cost you a fortune. In this patterning tutorial, we are working with Front and Back cut-on-fold patterns. This means that our facings will also be drafted on fold along the Center Front and Center Back. Cutting a Sewing Pattern On Fold is an important sewing technique that will save you space and pattern paper if you make your own clothing at home. Note: You can always turn a cut-on-fold facing pattern into a full pattern by duplicating the cut-on-fold facing thus forming two symmetric sides. It is up to you how wide you want the neck facing to be but make sure it is not so narrow that it flops to the outside of the garment during wear. Below, we'll show you how to draft a round facing that is the same width throughout. You can always play around with the shape of your facings as long as they are drafted accurately to the sewing patterns as shown.
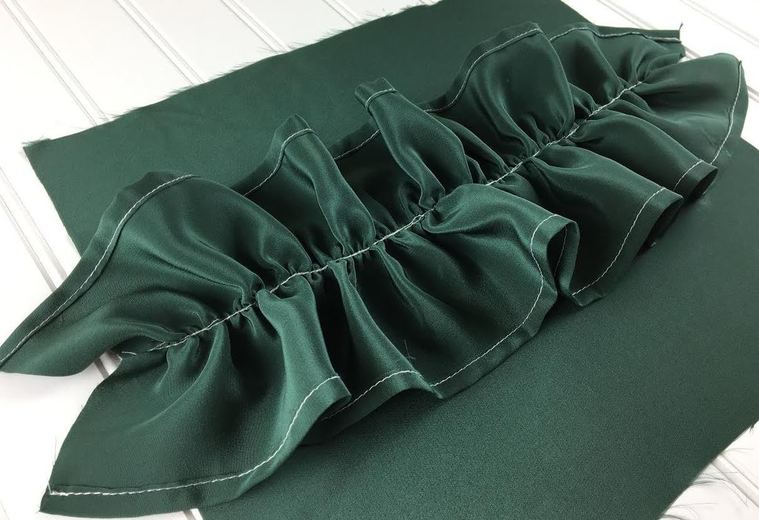 Learning how to sew ruffles as a sewing beginner will help you get a better understanding of fabric fullness and drape. While ruffles are a great way to add a decorative aspect to dresses and blouses, they can also be used to control length and shape around the hem and sleeves. Ruffles can be constructed in a variety of different lengths, fullness and drape. Two Types of Ruffles You Should Know There are two main styles of ruffles that differ in the way they are cut and constructed: Straight ruffles and circular ruffles. Straight ruffles are cut in the shape of a strip and need to be gathered to achieve fullness. 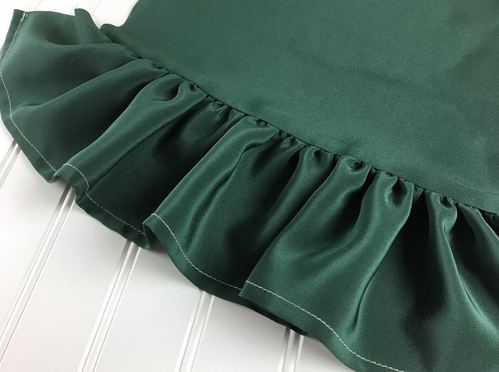 Circular ruffles are cut in a circular shape which provides fullness once the inner edge is straightened and sewn into a seam. If it sounds a bit confusing, don't worry! We'll show you how to cut and sew both of these ruffle styles bellow.
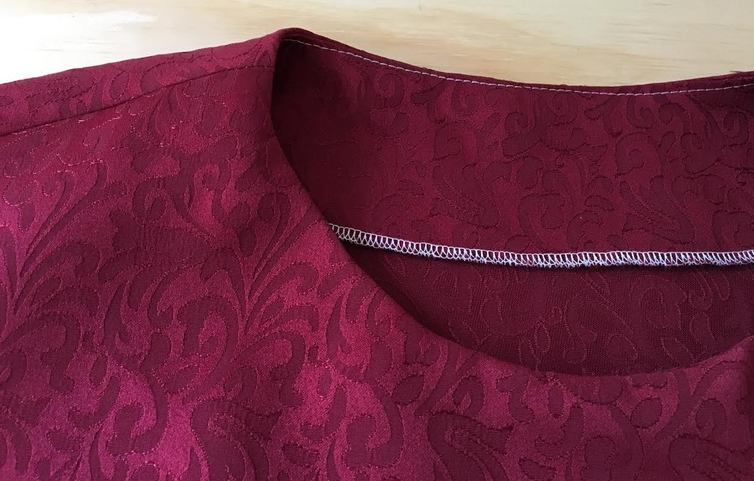 Clean finishing a round neckline with a facing creates a more elevated, tailored look. Facings are a great addition to styles constructed of medium to heavy weight fabrics that are difficult to finish with top-stitched binding. Facings are usually considered a higher quality addition used for styles that are less casual. If you are in the process of learning how to sew, attaching a facing to a round neckline is one of the first sewing techniques you should learn. Once you understand the process needed to achieve a smooth, clean-finished neckline, you can apply a similar method to attach armhole, sleeve cuff and center front facings. Applying a facing will also teach you important techniques like clipping the seam allowance for tension release, stay-stitching and under-stitching, which are equally important in the sewing process. You can learn how to draft a round neckline facing pattern from scratch using your garment's sewing pattern. Learn the step by step process on last week's blog: How To Make A Sewing Pattern For a Round Neckline Facing. Cutting Out The Neckline Facing Patterns In this tutorial, our sewing patterns are drafted to be cut on fold. 1. Fold the fabric parallel to the selvage edge such that the face of the fabric is on the inside of the fold. When cutting on fold, you should always pin and cut your patterns on the wrong side of the fabric. 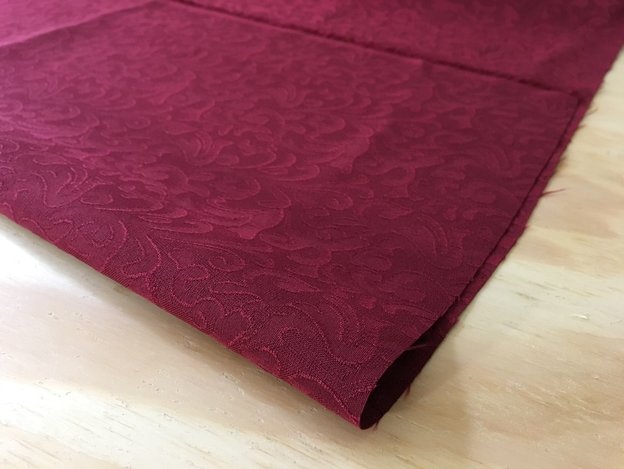 Clipping The Seam Allowance During Sewing: How And When To Use The Fabric Clipping Method.5/16/2017 Learning how to sew is a journey filled with ups and downs and learning from mistakes. The challenge that comes along with it makes sewing one of the more difficult crafts to learn but also intriguing and quite satisfying. Sewing clothing properly is not just about what the finished product looks like on the outside- The sewing techniques applied on the inside and during the construction process equally affect what the final garment will look and feel like. That being said, you should devote a lot of attention to practicing the correct methods during the construction stage. One of them is understanding when and where to snip your fabric at the seam allowance for tension release. 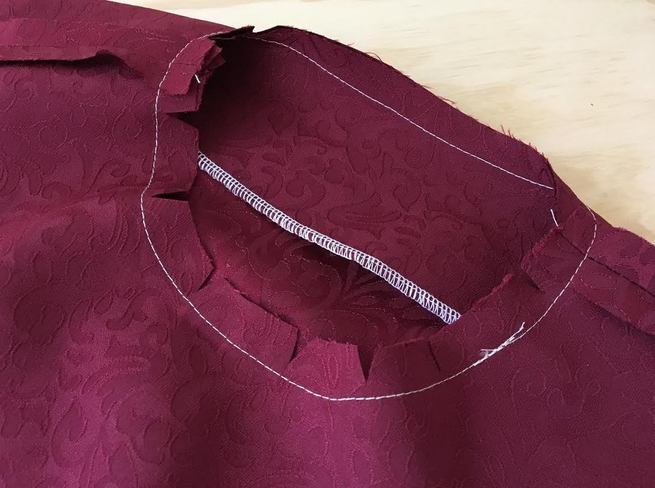 What does "clipping (or snipping) the seam allowance" mean?
Clipping the seam allowance during sewing refers to cutting localized notches or wedges on the inside of the seam allowance in order to release tension along curves, V-shapes and other tight areas on the garment without compromising durability and long-term wear. This is normally used on woven fabrics that don't stretch. It is very rare that knits or high percentage spandex fabrics need to be snipped at the seam allowance because they are flexible enough to release tightness and tension on their own. It is important that in the process of learning how to sew, you understand when and where to clip your fabric correctly and vise versa: what are the places on your garment you should never add "snips" to. Technically, you should always try to have as little cuts on your fabric as possible (even if it's on the inside of the seam allowance) as too many necessary notches/wedges can weaken a garment. As you practice, you'll start to understand the limit to notching only the necessary curved edges of a clothing item for a smooth professional finish.  Rumor has it that sleeping on a silk pillowcase is much easier on the skin, possibly reducing wrinkles and skin irritations during the night. The constant tossing and turning on a regular pillowcase doesn't hurt your skin by any means but it certainly adds to those sleep wrinkles we sometimes end up with in the morning. Although they go away in a matter of minutes (and sometimes even hours), it's always a good idea to stay away from things that unnecessarily wrinkle or irritate the skin, even if only temporarily. If you do a quick Google search for "how to prevent face wrinkles" you'll find that one of the suggestions listed is sleeping on a silk pillowcase. Why? Well, silk fabric has a smooth, soft quality and doesn't form deep fabric wrinkles like cotton does. This allows the face to rest more flat and maintain a smooth surface throughout the night. In addition, silk is made of 100% natural fibers which means it is just as absorbent as cotton, allowing the skin to breath comfortably during the night. Speaking of comfort, silk feels extremely soft and luxurious on the skin which certainly contributes to a better night's sleep. Now let's talk money: Silk is a more expensive fabric which means if you want to switch to silk pillowcases, it might turn out to be a bit of an investment. If you're not ready to dig into your savings just yet, no problem! Being the resourceful, crafty person that you are, you can actually make your own silk pillowcases. All you have to do is get the fabric and take out your trusty sewing machine. We'll show you the easiest way to do so bellow, but first a few things to remember about silk fabric:
|
The Blog:A journey into our design process, sewing tutorials, fashion tips, and all the inspiring people and things we love. 
Doina AlexeiDesigner by trade and dressmaker at heart. I spend most of my days obsessing over new fabrics and daydreaming new ideas. 
Sadie
Executive Assistant & Client Relations Manager Archives
November 2019
Categories
All

|

-
Sewing Tutorials
-
Basics
>
- Aligning Pattern Grainlines To Fabric
- Preparing Fabrics For Sewing
- Pinning Sewing Patterns To Fabric
- Placing Sewing Patterns On Fabric For Cutting
- Rotary Cutters or Fabric Scissors?
- Cutting The Sewing Patterns
- What Are Notches And How To Use Them In The Sewing Process
- Transferring Notches From Pattern To Fabric
- Transferring Seamlines to Fabric
- Staystitching
- Backstitching: A Complete Guide
- Hand Basting: A Complete Guide
- Sewing Continuous Bias Binding
- Darts >
-
Sewing Seams
>
- The Basics Of Seams And Seam Allowance
- How To Sew A Straight Seam
- Sewing Curved Seams
- Sewing Corner Seams
- Trimming And Grading Seam Excess
- Notching/Clipping Seam Allowance for Tension Release
- Sewing Topstitched Seams
- Sewing Corded Seams
- Sewing A Slot Seam
- Sewing A Gathered Seam
- Sewing Bias Seams
- Sewing Seams With Ease
- Sewing Seams With Crossing Seamlines
- Sewing Unlike Fabric Seams
- How To Iron Seams: Ironing Tools And Conventions
- Sewing With Knit Fabrics
- Understanding Stitch Length And Tension
- Sewing Unique Fabric Seams
-
Seam Finishes
>
- Seam Finishing Techniques - Overview
- Applying A Pinked Seam Finish
- Applying A Bias Bound Seam Finish
- Serging And Zigzag Seam Finishes
- Sewing A Self-Bound Seam Finish
- Sewing A French Seam Finish
- Sewing A Hong Kong Seam Finish
- Sewing A Mock French Seam Finish
- Sewing A Turned-and-Stitched Seam Finish
- Sewing Overcast Hand-Applied Seam Finishes
- Sewing A Flat Felled Seam
- Sewing A Hairline Seam Finish
-
Hem Finishes
>
- Garment Hem Finishes: Overview
- Sewing A Double Fold Hem Finish
- Sewing A Single Fold Hem Finish
- Sewing Bound Hem Finishes
- Sewing An Exposed Double Layer Bound Hem
- Sewing A Folded-Up Bound Hem with Pre-folded Binding
- Sewing A Hong Kong Hem Finish
- Sewing A Band Hem Finish
- Sewing A Bias Faced Hem Finish
- Sewing A Twill Tape Hem Finish
- Sewing A Rolled Hem Finish
- Sewing A Shaped Hem Facing
- Using Fusible Hem Tape And Webbing
- Finishing A Lace Fabric Hem
- Finishing A Leather Hem
- Sewing Faced Hem Corners
- How To Finish Lining At The Hem
- Finishing Fabric Corners by Mitering >
- Interfacing A Hemline: Lined And Unlined Examples
-
Sewing Pockets
>
- Curved Patch Pocket With Flap
- Unlined Square Patch Pockets
- Lined Patch Pockets: Two Ways
- Extension On-Seam Pockets
- Separate On-Seam Pocket
- Front Hip Pockets
- Bound Double Welt Pocket
- Double Welt Pocket With Flap
- Self-Welt Pocket (Using Single Fabric Layer)
- Slanted Welt Pocket (Hand-Stitched)
- Faced Slash Pockets: Overview >
-
Sewing Zippers
>
- Sewing Zippers: General Information
- Sewing A Centered Zipper
- Sewing A Lapped Zipper
- Sewing An Invisible Zipper
- Sewing A Fly Front Zipper
- Sewing A Closed-End Exposed Zipper (No Seam)
- Sewing An Exposed Separating Zipper
- Sewing Hand Stitched Zipper Applications
- Sewing A Zipper Underlay
- Sewing A Placket-Enclosed Separating Zipper
- Sleeveless Finishes >
-
Neckline Finishes
>
- Sewing A Neck Shaped Facing
- Sewing An All-In-One Neck Facing
- Neck And Garment Opening Combination Facings >
- Sewing A Bias Faced Neckline Finish
- Sewing A Band Neckline Finish
- Bound Neckline Finishes: Overview >
- Sewing A Semi-Stretch Strip Band Neckline
- Ribbed Neck Band And Classic Turtleneck
- Decorative Neckline Finishes >
- Finishing Facing Edges >
-
Extras
>
- A Complete Guide on Interfacing
- Sewing Bound Spaghetti Straps
- Sewing Spaghetti Straps To A Faced Neckline
- Sewing Ruffles: Overview
- Patterning And Sewing A Circle Ruffle
- Sewing A Gathered Heading Ruffle
- Sewing Double Layer Gathered Ruffles
- Sewing A Gathered Ruffle Into A Seam
- Sewing A Gathered Ruffle To A Fabric Edge
- Sewing A Fabric Surface Slit
- Sewing A Slit Seam
- Hand-Applied Straight Stitches
- Hand-Applied Blind Stitches
- Hand-Applied Overedge Stitches
- Hand-Applied Tack Stitches
- Hand-Applied Decorative Stitches
-
Basics
>
- Custom Bridal
- Custom Apparel
- About
- Blog
 RSS Feed
Services |
Company |
|
