 The separating zipper is perhaps one of the best inventions in dressmaking. Not only are separating zippers extremely functional, they also play an important aesthetic role in fashion design. As opposed to other zipper applications, separating zippers are actually not difficult to sew and a great way for a sewing beginners to get started with zippers. As opposed to conventional, close-end zippers, separating zippers are able to actually disconnect into two pieces. For that reason, they are used along the opening edges of garments that need to separate fully. Most commonly, you'll find separating zippers at the opening of jackets, blazers, cardigans and various styles of tops and bottom. 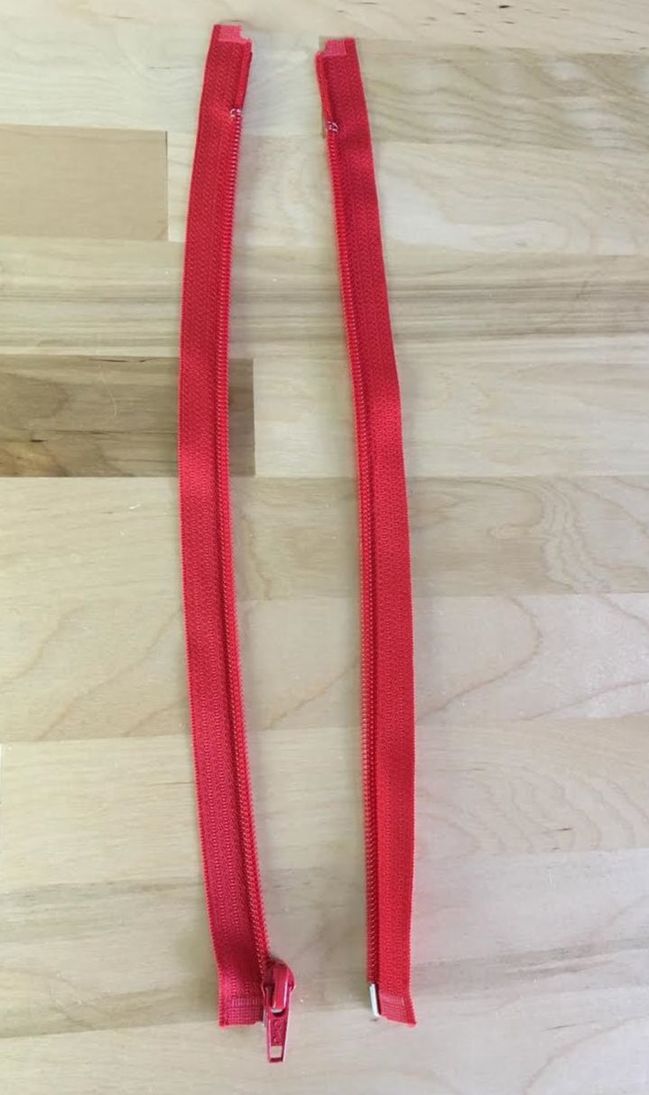 As mentioned above, separating zippers aren't just functional, they also add an aesthetic design element to clothing. Due to the fact that the zipper teeth and half of the zipper tape are usually exposed and visible on the outside of the garment, separating zippers are incorporated visually into the design of the clothing item at hand. This concept is especially true when working with metal zipper teeth which adds a classic contrasting element to the style of a garment. Speaking of separating zipper components, both metal and plastic options are available. Both options are equally as durable and functional. However, plastic zipper teeth (coils) are used when a lighter weight is necessary or desired. Plastic separating zippers also allow for more color flexibility- so if you are working on a project that requires the zipper teeth and tape to match the color of the garment, or perhaps you want to add a color blocking effect with a contrasting color zipper, then plastic separating zippers are the way to go.
Metal separating zippers on the other hand are a bit heavier in weight offering more durability and no risk of the actual coils melting or breaking during ironing and use. Aesthetically, metal separating zippers offer a classic, contrasting element to a garment also serving as an important design element. While you can certainly find metal separating zippers in a variety of colors, only the zipper tape portion is available in color variations- the actual zipper teeth are usually not altered in color and available in metal finishes of gold-tone, nickel or black.
7 Comments
Color is at the forefront of Kailo Chic, a lifestyle and accessories brand that offers vibrant accessories, home goods, decor and beyond. Kailo Chic products brighten any space they are incorporated into, adding a touch of effortless happiness and whimsy. Founded by Kara Whitten in 2005, Kailo Chic developed form a simple, on-the-whim purchase at the fabric store into a full time, nationwide business. Aside from colorful products ranging from accessories to one-of-a-kind vases and wrapping paper, Kara added A Kailo Chic Life blog to the business, featuring unique DYI ideas and crafts that remain true to the brand.  Kara Whitten of Kailo Chic Kara finds everything around her inspiring and it certainly shows in her vibrant work. Behind the beautifully colorful design, there is a uniquely inspiring story. In 2005, she found herself freshly out of college with a chemical engineering degree, a new job, and the task of planning a wedding. Within the first week at her new job, she says she simply freaked out and quit. Somehow, her truly creative and vibrant personality (which shows in every single piece she designs/makes) just couldn't be confined by a having a boss or working a 9-to-5 in a lab for the rest of her life. The brand was born the day she went to the fabric store in search of her wedding dress fabric. While browsing the store, she found a pattern for a unique handbag. She bought some fabric with the little money she had left, went home and made the handbag that same day. This was the very first project that marked the conception of Kailo Chic. Things just naturally snowballed from there- She followed her own process, learned from every experience, and gave the brand the opportunity to grow organically on its own.  Photo courtesy of Kailo Chic In the interview to follow, Kara shares her unique story, incredible love for color, and creative process. Find out what's in store for Kailo Chic next and how she got a successful business off the ground while working a full time job. Her encouraging words are a must-read for those that dream of breaking out a 9-to-5 lifestyle and channel their individual creativity.
Hook and eyes are durable fasteners used as additional reinforcement for a variety of garment openings. Although usually small, they must be durable enough to withstand strain and pulling during wear. For that reason, hook and eyes are made of metal featuring either a nickel or black finish. Since they are designed to be understated visually, these two finishes are the most commonly used in dressmaking. 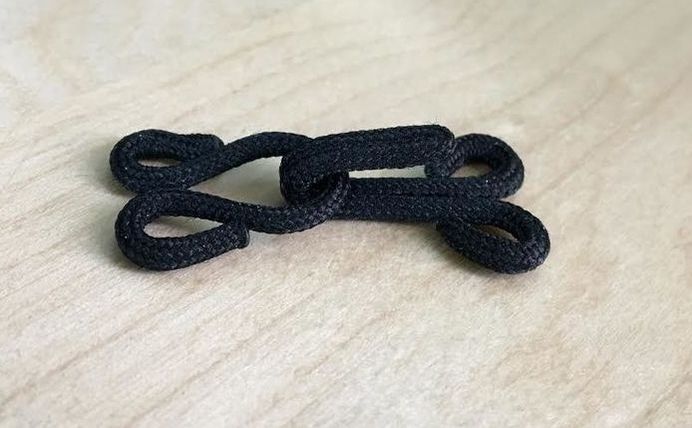 A hook and eye closure comes in two pieces: one serves as the hook while the other is a straight or round shape serving as the eye. Both the hook and the eye have two round holes at each end through which they are permanently sewn to the garment using a whipstitch (see tutorial below). Hook and eyes are usually sewn to the areas of the garment that have some form of underlay- facing or lining. The reason for that is that the fastening stitched should never be visible on the right side of the garment. Thus, they need to be sewn to the underside of the garment only through the underlay layers. Although some clothing items use hook and eyes for the entire opening, hook and eyes are usually localized and added as additional reinforcement, or to help certain edges/areas of a garment stay in place. There are commonly two main types of edges that often require hook and eye additions: Lapped and abutted edges. Lapped edges are those that feature some form of overlapping either through an extension or larger overlapping areas of a garment. This is most commonly seen on traditional lapped waistbands, cuffs, collars and overlapping opening edges. Abutted edges, on the other hand, touch and meet at the same place when adjoined, but they do not overlap. The most common application of hook and eyes along abutted edges is at the top of invisible zippers, the center front opening edge of a clothing item, along specialized styles of cuffs, collars, and waistbands. This morning, as I was browsing through pictures of Kristen Saksa Juen's beautiful ceramics, I inadvertently landed on her Instagram page. A black and white image of clay pieces neatly arranged in a kiln caught my eye. The message adjacent to it made an even more powerful statement as it is a true depiction of Kristen Saksa Juen's journey through her artistic development. She says: " I'm grateful to call myself an artist. Not to say it isn't a lot of hard work that comes with some trade offs. And it took me time, a looong time to even have the courage to say the words 'I am an artist'. But I am so happy and grateful that I get to do this work." As you'll discover in the interview with Kristen below, art was always present in her life even when she wasn't intently pursuing it. That's the thing about art- you don't choose it, it chooses you. A true artist doesn't actively decide to become an artist. Vise versa, your artistic spirit grabs hold of you and doesn't let go until it is explored and pursued.  Kristen Saksa Juen She loves to work with her hands, free-forming and feeling the textures while creating a bond with each material at hand. Kristen sees accidental imperfections as beautiful. To her, what some might perceive as an "imperfection" she sees as a gift that comes from each individual artistic process, creating pieces that are always one-of-a-kind. As opposed to other ceramicists, she does not work on a wheel but rather prefers to hand-mold each piece to her individual artistic rhythm. Her connection to nature is prevalent in her love for naturally vibrant colors, creating unique plant potters, and hand carving nature-inspired prints which she designs to fit within a clean space, both modernizing and refreshing it. She describes her work as "a connection to nature in modern spaces". It took Kristen years to discover herself and become the artist she is today. As you'll notice in her work presented below, she incorporates the natural color of the clay (and its color variations) into the finished product, resulting in pieces that feel earthy yet maintain clean design lines. In the interview to follow, take a journey into the life of a ceramics artist, from the everyday process of designing and making each piece to the challenges and rewards associated with this artistic exploration. When and how did you become interested in pottery/ceramics? I remember being fascinated with ceramics as a child, but it wasn’t until I was in college that I took a couple ceramics classes on the side for fun. My creativity was always something that I thought I would have to satisfy on the side. It took me several more years to have confidence in my artwork, appreciate the value of my creativity, and entertain the idea of working as an artist. When I got back into ceramics and started to develop my own artistic style, I started having so much fun I couldn’t stop. 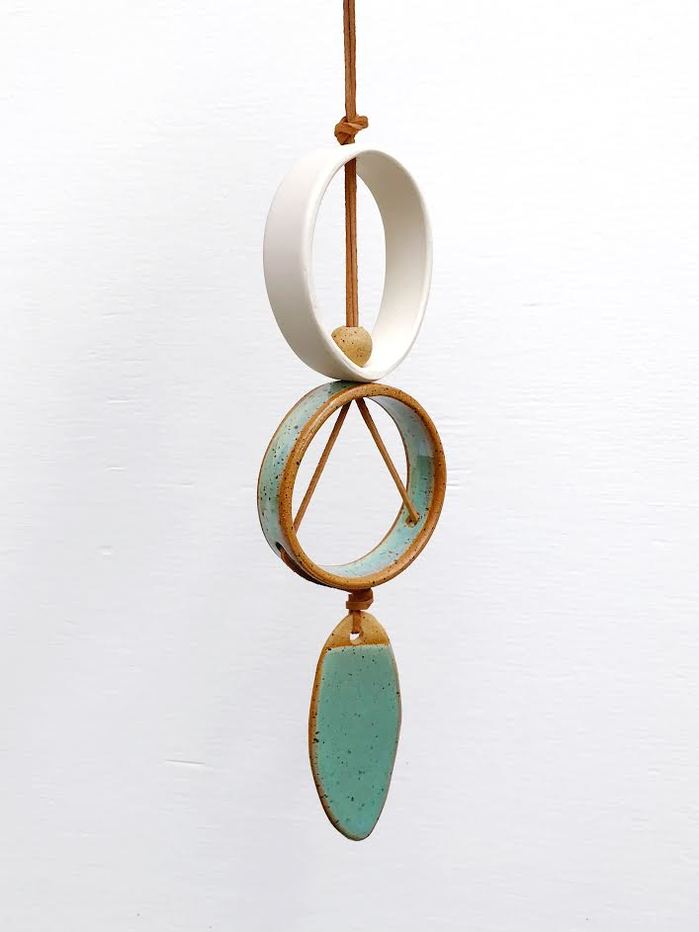 Photo courtesy of Kristen Saksa Juen There is a beautiful earthy, clean quality mixed with architectural structured edges in your work. How do you describe this unique aesthetic and what inspires you artistically in your work? I am inspired by the beauty of nature and my love for the outdoors greatly influences my creativity. I particularly love getting inspiration from mountainous landscapes, and unique plants. I strive to create ceramics that spark a connection with nature for modern spaces. Additionally, I strive to express the beauty I see in the process of working in clay. I love to create items that grow into their own unique character, and to celebrate the beauty of handmade. 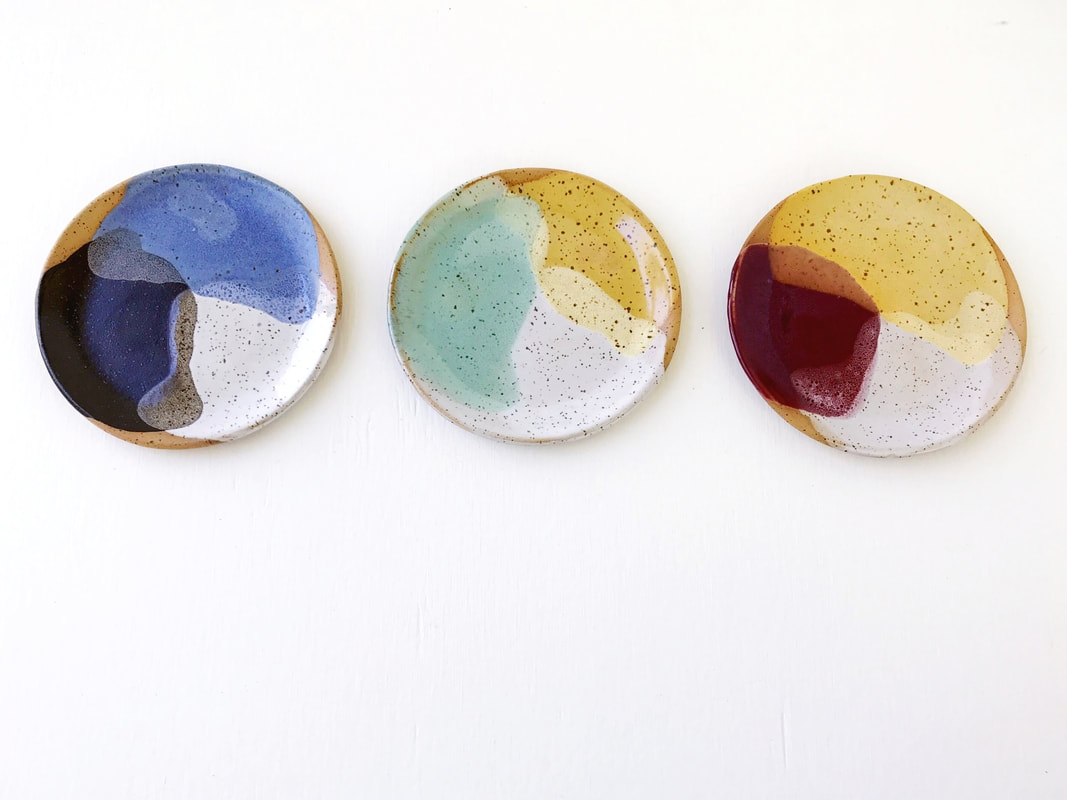 Photo courtesy of Kristen Saksa Juen I love how you use color in your pieces- it makes a statement visually, yet still remains very earthy and natural. Can you describe what color represents to you in your work? I love to use the color of the clay itself as a color in my pallet. Clay by its nature, comes in many earthy tones from white to tan and brown. I enjoy incorporating the color of the ungalzed raw clay into my designs which I think gives my work an additional connection to nature.
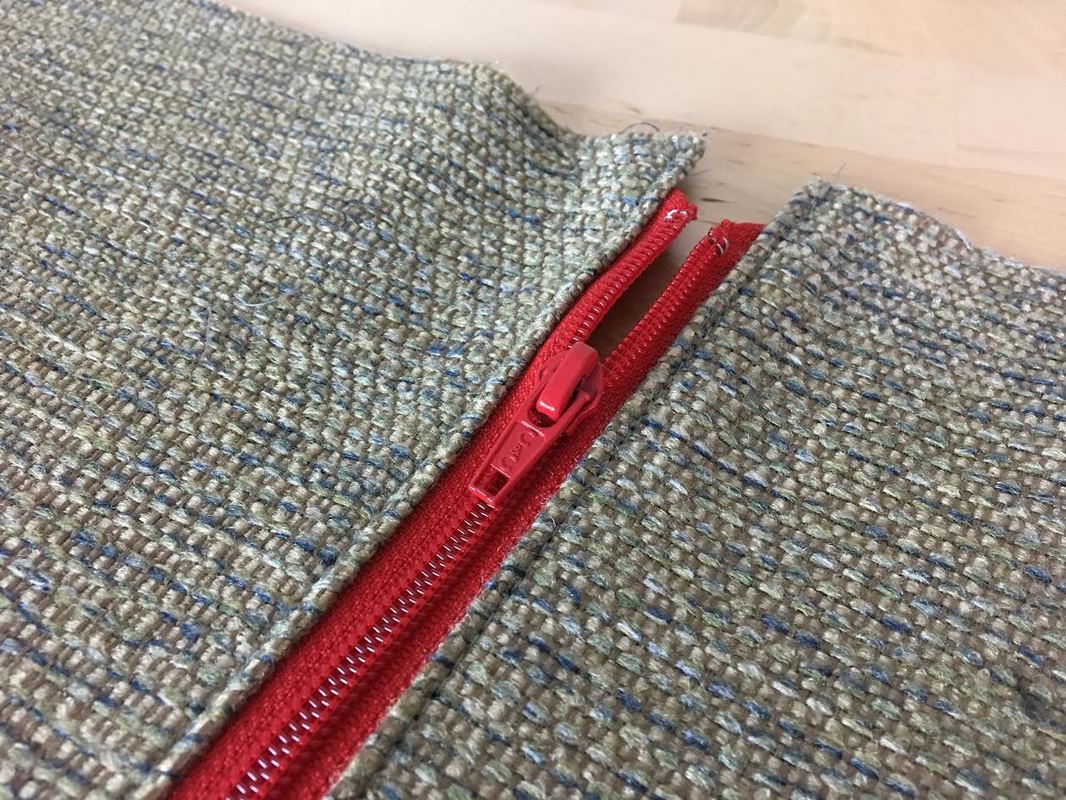
In last week's tutorial, you learned how to shorten close-ended, conventional zippers. This week, we'll take things a bit further by showing you how to shorten a separating zipper. As you might have guessed, shortening a separating zipper takes a bit of extra effort and follows a different process (and logic) than that of a regular, conventional zipper. 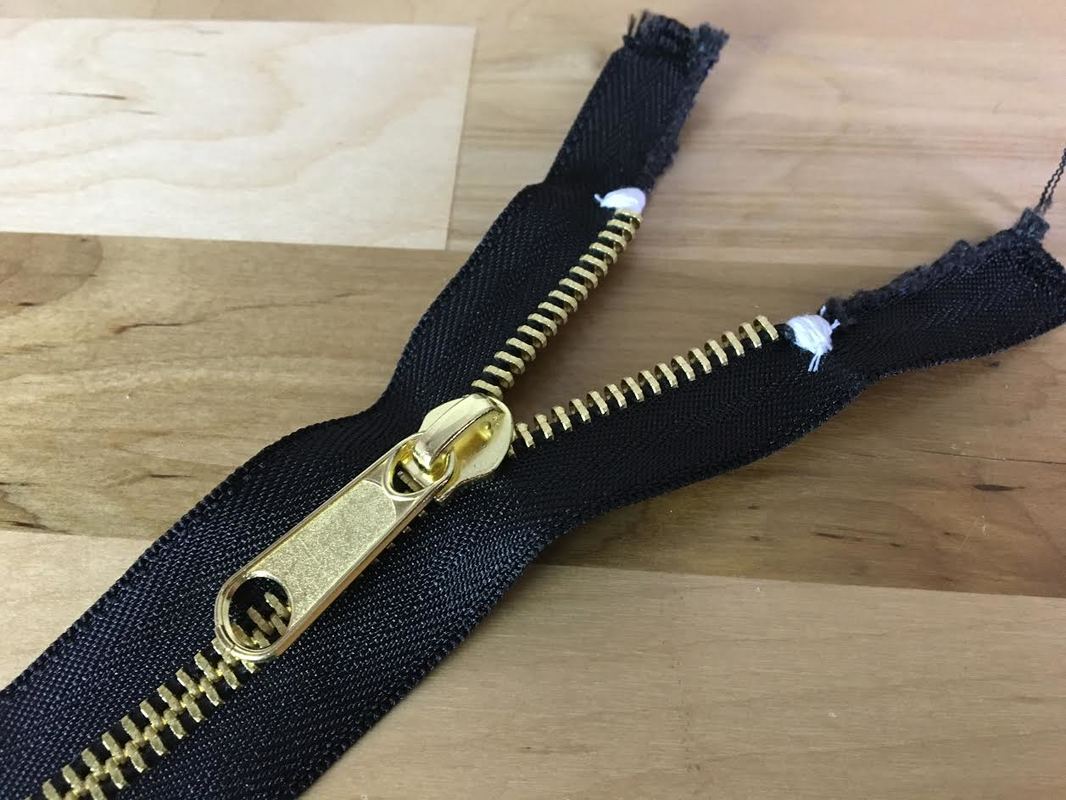 What Are Separating Zippers? Separating zippers are zippers that once fully open, separate into two portions. They are often sewn into the opening of jackets, coats, dresses and other garments that require a complete separation along the edges or seams. Separating zippers normally separate at the bottom, disconnecting one row of zipper teeth from the other. Once completely open and separated, one portion of the zipper tape and teeth houses the zipper slider and puller while the other houses a vertical crimp at the bottom (also called the pin). To close the zipper, this vertical crimp (pin) is inserted into a zipper box slit at the bottom thus allowing the zipper slider to pull the two rows of zipper teeth closed in an upward motion.  Separating zipper components 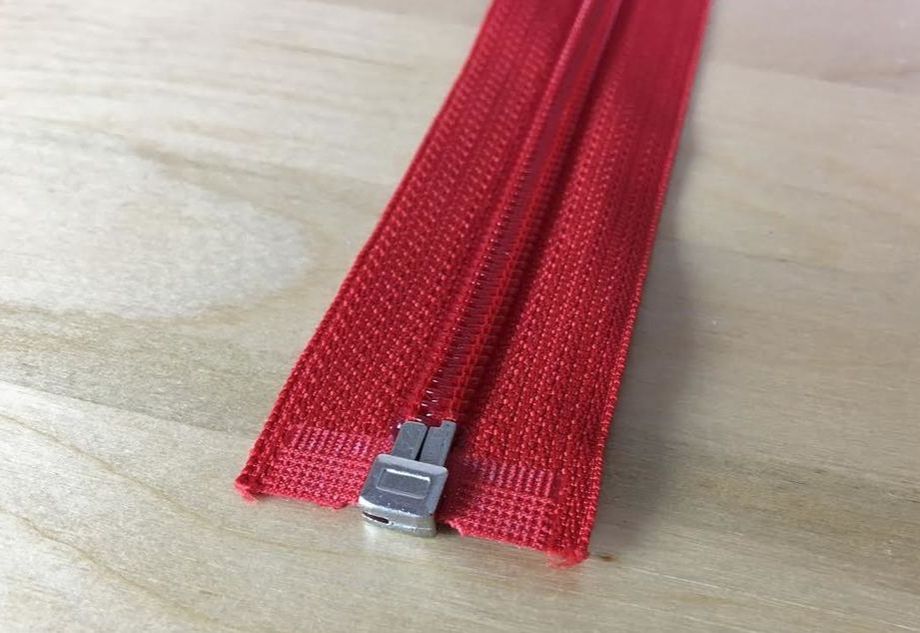 Closed separating zipper bottom Understanding the structure of a separating zipper is very important when it comes to shortening it. Due to the fact that all the functional hardware is located at the bottom, a separating zipper cannot be shortened from the bottom using a whipstitch as you would on a close-end conventional zipper. Since the bottom portion is essential to the operation of a separating zipper, it should be left untouched in the shortening process.
Luna Pines is a jewelry and lifestyle brand sporting a deep connection to nature. Started by Amanda Lachapelle in 2012, it offers natural crystal jewelry that is thoughtfully designed and carefully pieced together to allow the natural elements to truly shine. Every crystal is lovingly handpicked by Amanda herself to create everlasting jewelry that is well-balanced aesthetically and energetically. The brand's name, Luna Pines, gives away the designer's love for nature, implying her strong connection to the moon (luna) and the beautiful pine trees of New England, where she grew up and began her artistic quest. 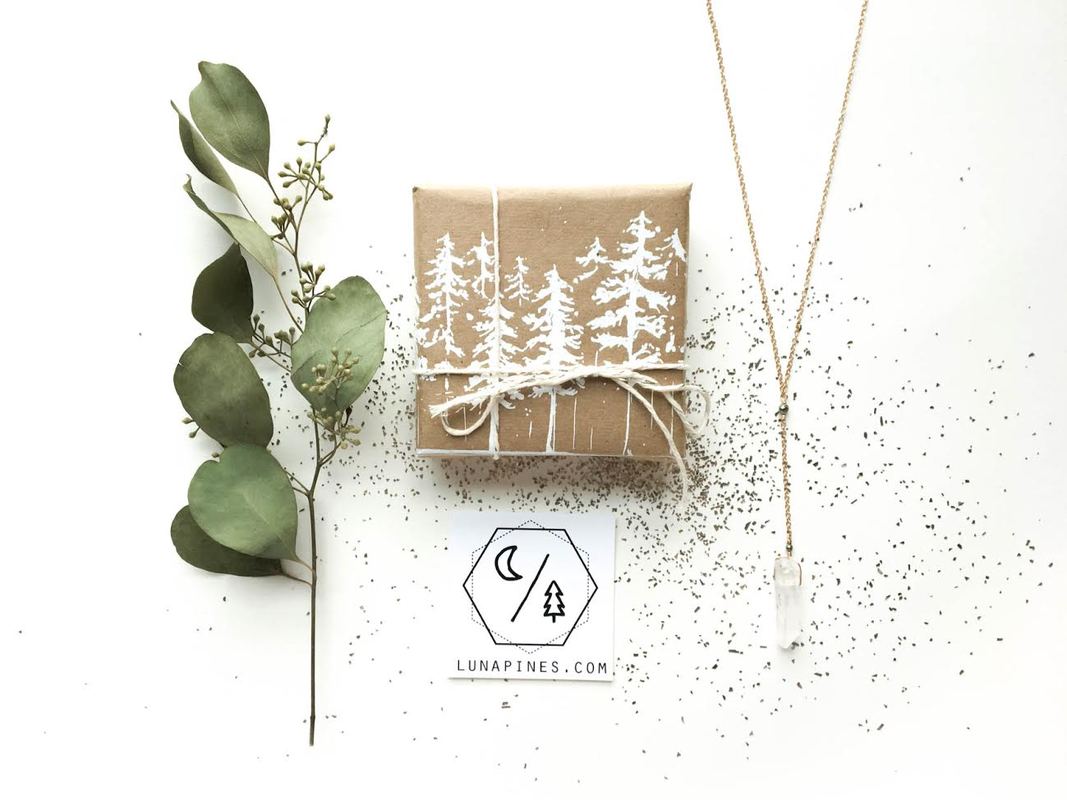 Photo courtesy of Luna Pines What stands apart in Amanda Lachapelle's work is clean design mixed with a pleasantly surprising twist. The attention to detail is evident in her design aesthetic, artistic process and careful branding. As you look at each individual piece, you will always find a unique detail, whether it is in the form of a sweet moon charm or an interesting chain extension, marking the jewelry as uniquely hers. Amanda's multi-faceted design aesthetic represents every element of the brand, from her thoughtful Eco-friendly packaging to her care for using environmentally friendly materials all around. She goes beyond aesthetics, inspiring a socially conscious change using Luna Pines as a voice. 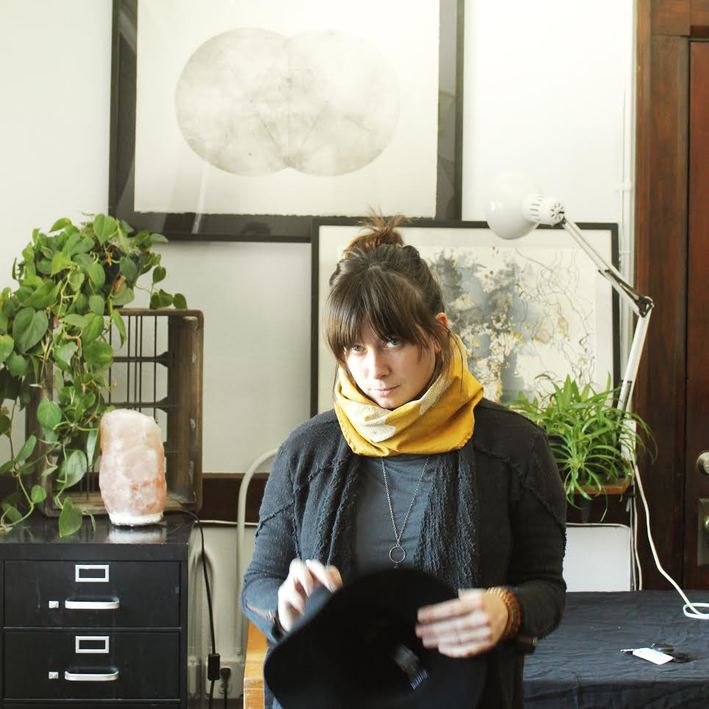 Amanda Lachapelle of Luna Pines Each piece is carefully crafted in her Clinton (MA) studio, where she spends most of her time designing, making jewelry and sometimes finding inspiration among busy days crafting and filling orders. Her studio is where she feels truly happy, motivating her to keep designing and evolving everyday regardless of the challenges or success she attains. As you'll find from the inspiring conversation to follow, Amanda of Luna Pines is a well balanced artist that understands the importance of paralleling her work with her family life, maintaining consistent love and care for both. Explore a story of hard work, dedication and true passion for her work in this week's interview feature with Amanda Lachapelle of Luna Pines. How did the name “Luna Pines” come about? What is its significance/meaning for you and the brand? My friend actually came up with the name for me. I’ve always had a strong connection with the moon and celestial bodies and this has been evident in my work. She suggested “Luna” as a reference to the moon, and “Pines” to acknowledge my New England roots. I had just moved back to Massachusetts from Oaxaca, Mexico, so this name felt like a perfect fit.  Photo courtesy of Luna Pines What is the greatest point of inspiration in your work and how does this connect to your design aesthetic? My greatest point of inspiration comes from the natural world. I’m so fascinated by it! This comes through in my choice of materials. I draw inspiration from everything around me when it comes to designing. Currently, I’m very interested in minimalist style, mid-century modern furniture, and abstract gestural paintings. I think it’s really neat how this influences my work.
|
The Blog:A journey into our design process, sewing tutorials, fashion tips, and all the inspiring people and things we love. 
Doina AlexeiDesigner by trade and dressmaker at heart. I spend most of my days obsessing over new fabrics and daydreaming new ideas. 
Sadie
Executive Assistant & Client Relations Manager Archives
November 2019
Categories
All

|

-
Sewing Tutorials
-
Basics
>
- Aligning Pattern Grainlines To Fabric
- Preparing Fabrics For Sewing
- Pinning Sewing Patterns To Fabric
- Placing Sewing Patterns On Fabric For Cutting
- Rotary Cutters or Fabric Scissors?
- Cutting The Sewing Patterns
- What Are Notches And How To Use Them In The Sewing Process
- Transferring Notches From Pattern To Fabric
- Transferring Seamlines to Fabric
- Staystitching
- Backstitching: A Complete Guide
- Hand Basting: A Complete Guide
- Sewing Continuous Bias Binding
- Darts >
-
Sewing Seams
>
- The Basics Of Seams And Seam Allowance
- How To Sew A Straight Seam
- Sewing Curved Seams
- Sewing Corner Seams
- Trimming And Grading Seam Excess
- Notching/Clipping Seam Allowance for Tension Release
- Sewing Topstitched Seams
- Sewing Corded Seams
- Sewing A Slot Seam
- Sewing A Gathered Seam
- Sewing Bias Seams
- Sewing Seams With Ease
- Sewing Seams With Crossing Seamlines
- Sewing Unlike Fabric Seams
- How To Iron Seams: Ironing Tools And Conventions
- Sewing With Knit Fabrics
- Understanding Stitch Length And Tension
- Sewing Unique Fabric Seams
-
Seam Finishes
>
- Seam Finishing Techniques - Overview
- Applying A Pinked Seam Finish
- Applying A Bias Bound Seam Finish
- Serging And Zigzag Seam Finishes
- Sewing A Self-Bound Seam Finish
- Sewing A French Seam Finish
- Sewing A Hong Kong Seam Finish
- Sewing A Mock French Seam Finish
- Sewing A Turned-and-Stitched Seam Finish
- Sewing Overcast Hand-Applied Seam Finishes
- Sewing A Flat Felled Seam
- Sewing A Hairline Seam Finish
-
Hem Finishes
>
- Garment Hem Finishes: Overview
- Sewing A Double Fold Hem Finish
- Sewing A Single Fold Hem Finish
- Sewing Bound Hem Finishes
- Sewing An Exposed Double Layer Bound Hem
- Sewing A Folded-Up Bound Hem with Pre-folded Binding
- Sewing A Hong Kong Hem Finish
- Sewing A Band Hem Finish
- Sewing A Bias Faced Hem Finish
- Sewing A Twill Tape Hem Finish
- Sewing A Rolled Hem Finish
- Sewing A Shaped Hem Facing
- Using Fusible Hem Tape And Webbing
- Finishing A Lace Fabric Hem
- Finishing A Leather Hem
- Sewing Faced Hem Corners
- How To Finish Lining At The Hem
- Finishing Fabric Corners by Mitering >
- Interfacing A Hemline: Lined And Unlined Examples
-
Sewing Pockets
>
- Curved Patch Pocket With Flap
- Unlined Square Patch Pockets
- Lined Patch Pockets: Two Ways
- Extension On-Seam Pockets
- Separate On-Seam Pocket
- Front Hip Pockets
- Bound Double Welt Pocket
- Double Welt Pocket With Flap
- Self-Welt Pocket (Using Single Fabric Layer)
- Slanted Welt Pocket (Hand-Stitched)
- Faced Slash Pockets: Overview >
-
Sewing Zippers
>
- Sewing Zippers: General Information
- Sewing A Centered Zipper
- Sewing A Lapped Zipper
- Sewing An Invisible Zipper
- Sewing A Fly Front Zipper
- Sewing A Closed-End Exposed Zipper (No Seam)
- Sewing An Exposed Separating Zipper
- Sewing Hand Stitched Zipper Applications
- Sewing A Zipper Underlay
- Sewing A Placket-Enclosed Separating Zipper
- Sleeveless Finishes >
-
Neckline Finishes
>
- Sewing A Neck Shaped Facing
- Sewing An All-In-One Neck Facing
- Neck And Garment Opening Combination Facings >
- Sewing A Bias Faced Neckline Finish
- Sewing A Band Neckline Finish
- Bound Neckline Finishes: Overview >
- Sewing A Semi-Stretch Strip Band Neckline
- Ribbed Neck Band And Classic Turtleneck
- Decorative Neckline Finishes >
- Finishing Facing Edges >
-
Extras
>
- A Complete Guide on Interfacing
- Sewing Bound Spaghetti Straps
- Sewing Spaghetti Straps To A Faced Neckline
- Sewing Ruffles: Overview
- Patterning And Sewing A Circle Ruffle
- Sewing A Gathered Heading Ruffle
- Sewing Double Layer Gathered Ruffles
- Sewing A Gathered Ruffle Into A Seam
- Sewing A Gathered Ruffle To A Fabric Edge
- Sewing A Fabric Surface Slit
- Sewing A Slit Seam
- Hand-Applied Straight Stitches
- Hand-Applied Blind Stitches
- Hand-Applied Overedge Stitches
- Hand-Applied Tack Stitches
- Hand-Applied Decorative Stitches
-
Basics
>
- Custom Bridal
- Custom Apparel
- About
- Blog
 RSS Feed
Services |
Company |
|
