|
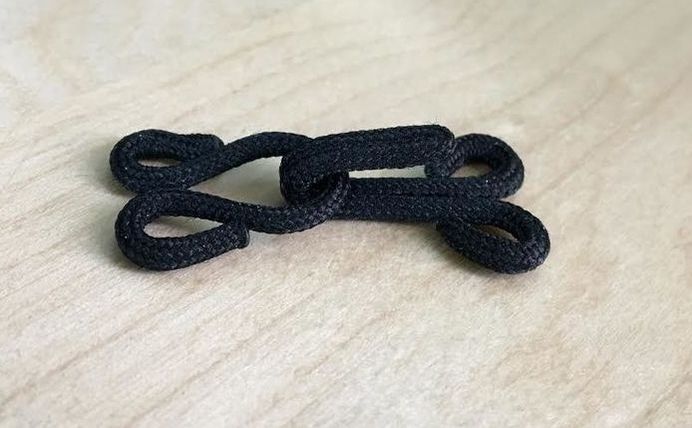
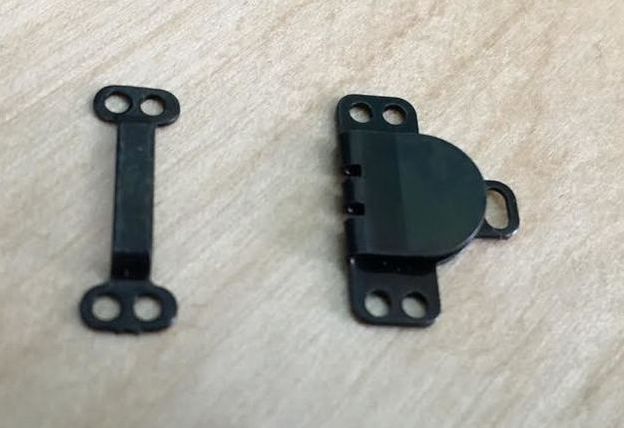
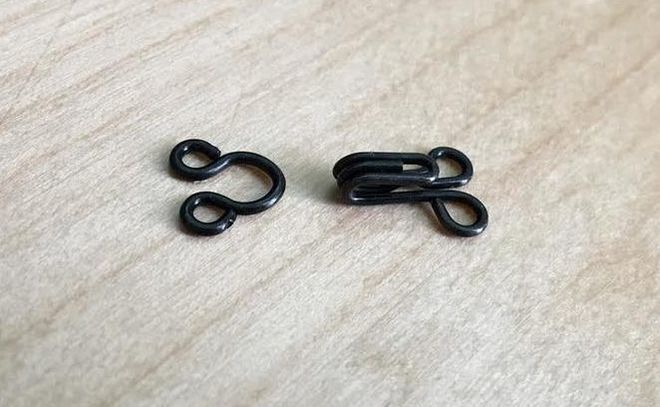
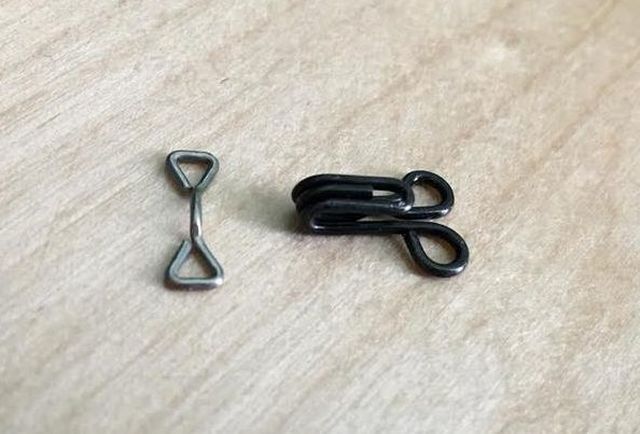
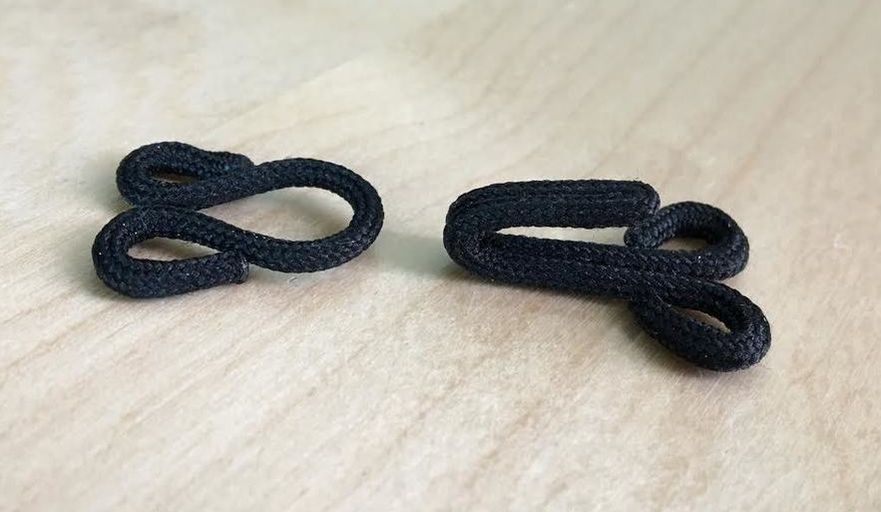
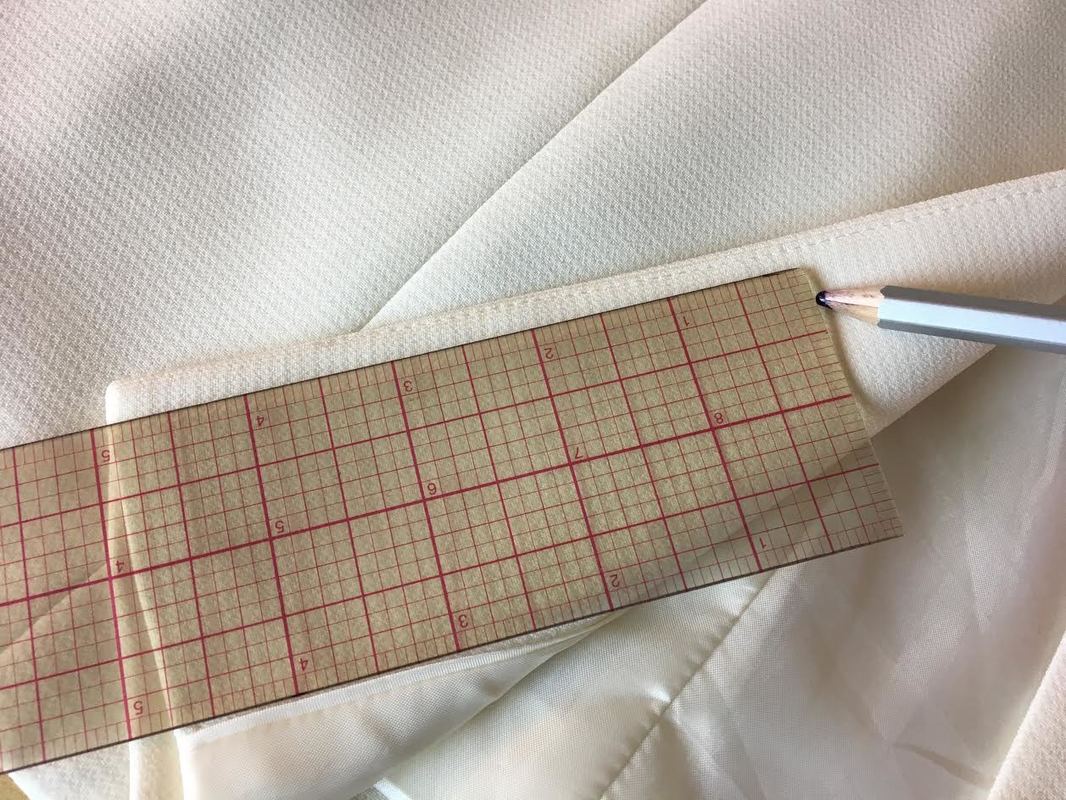
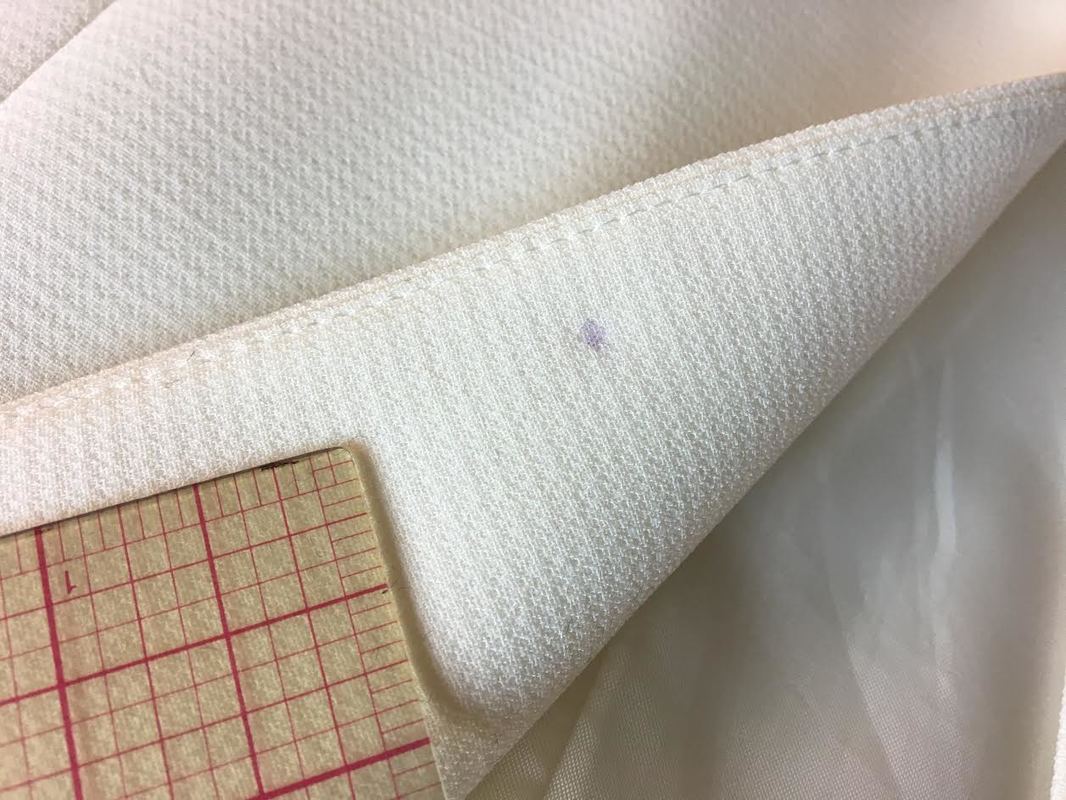
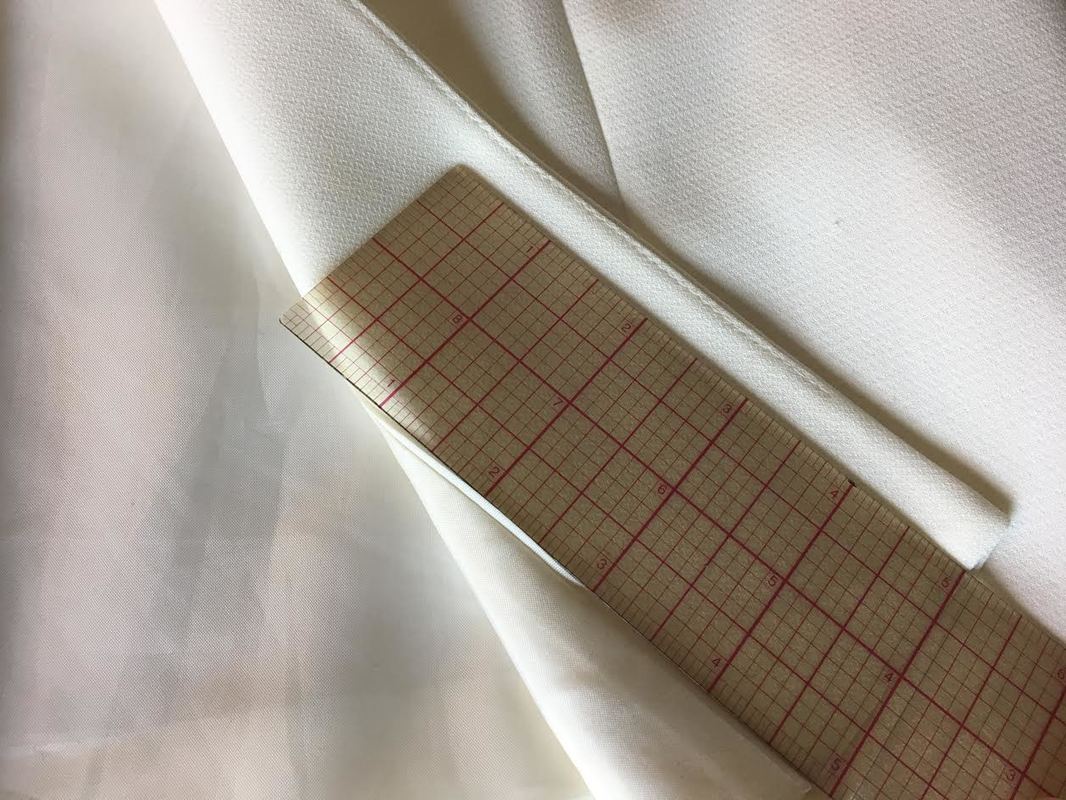
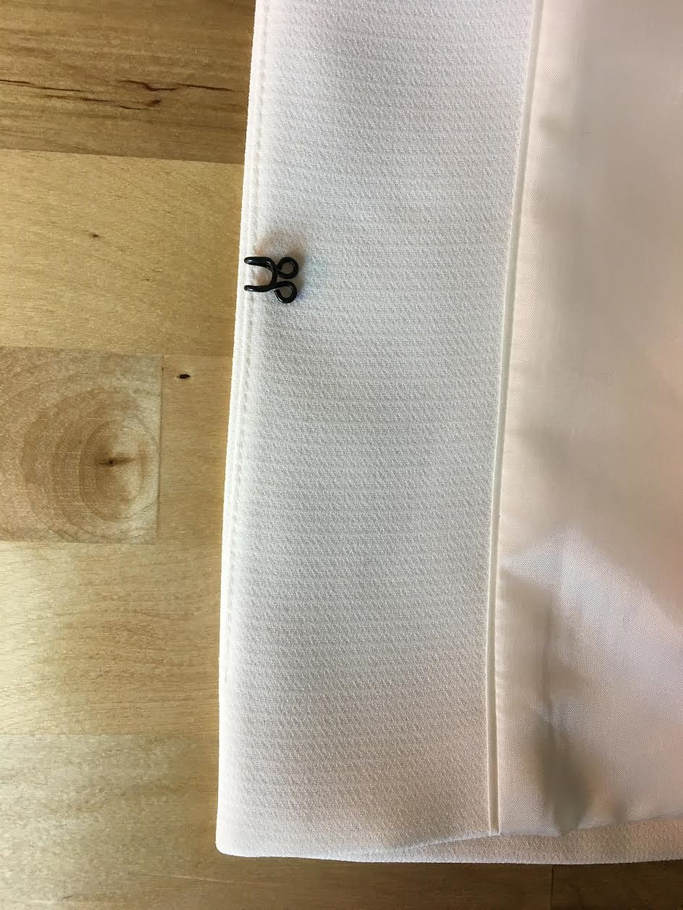
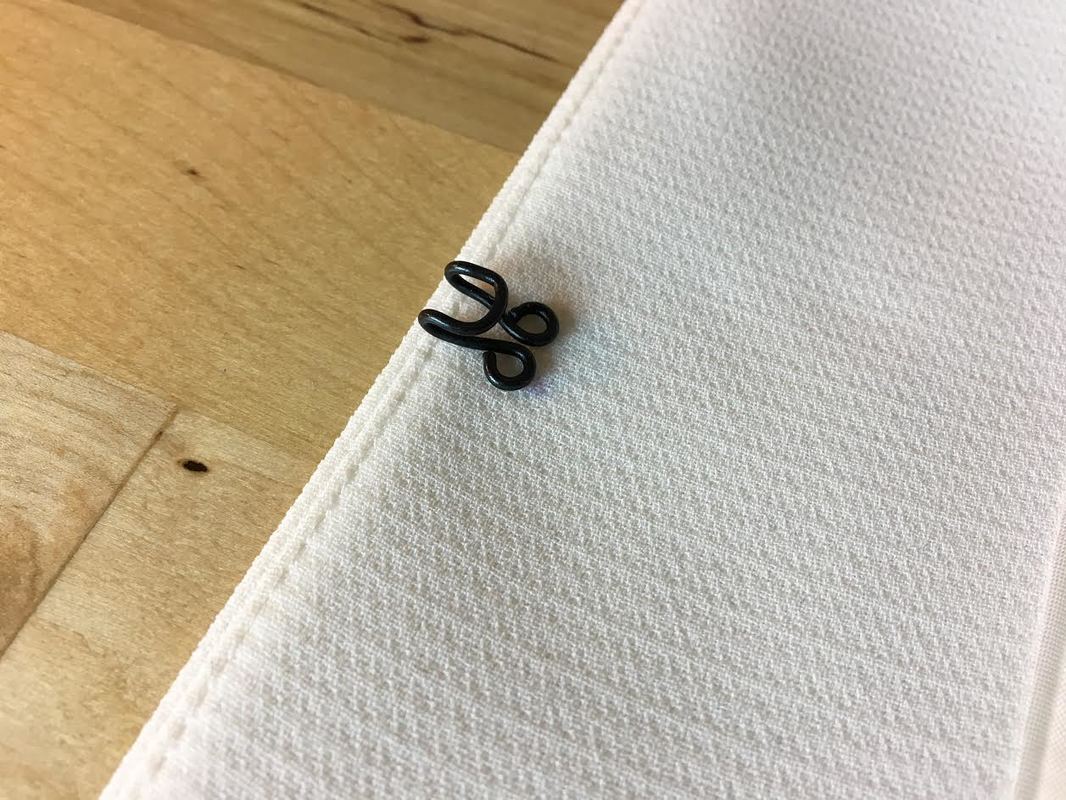
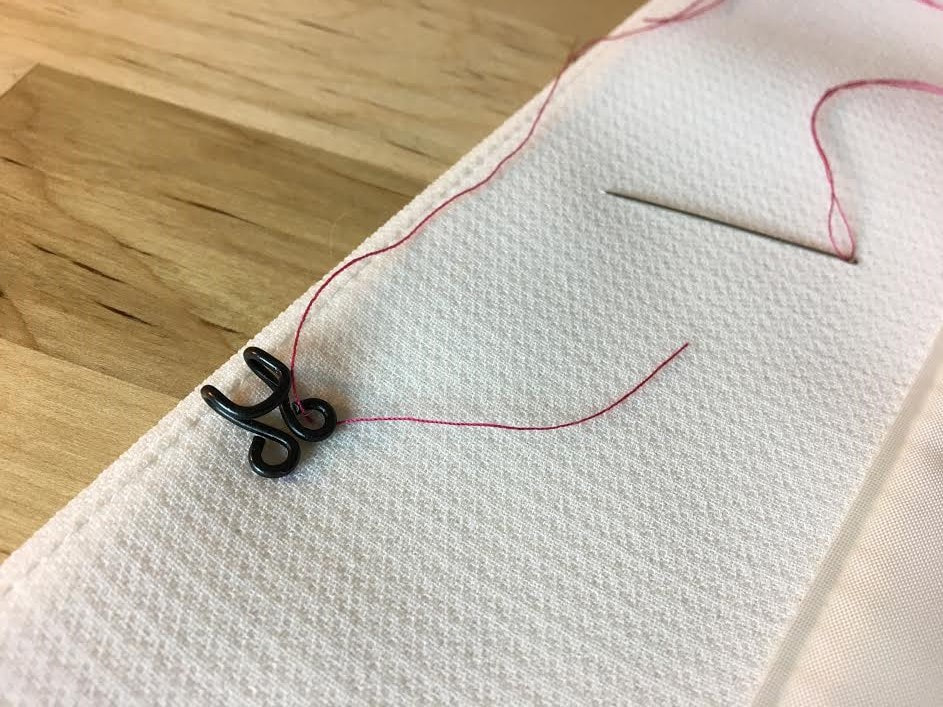
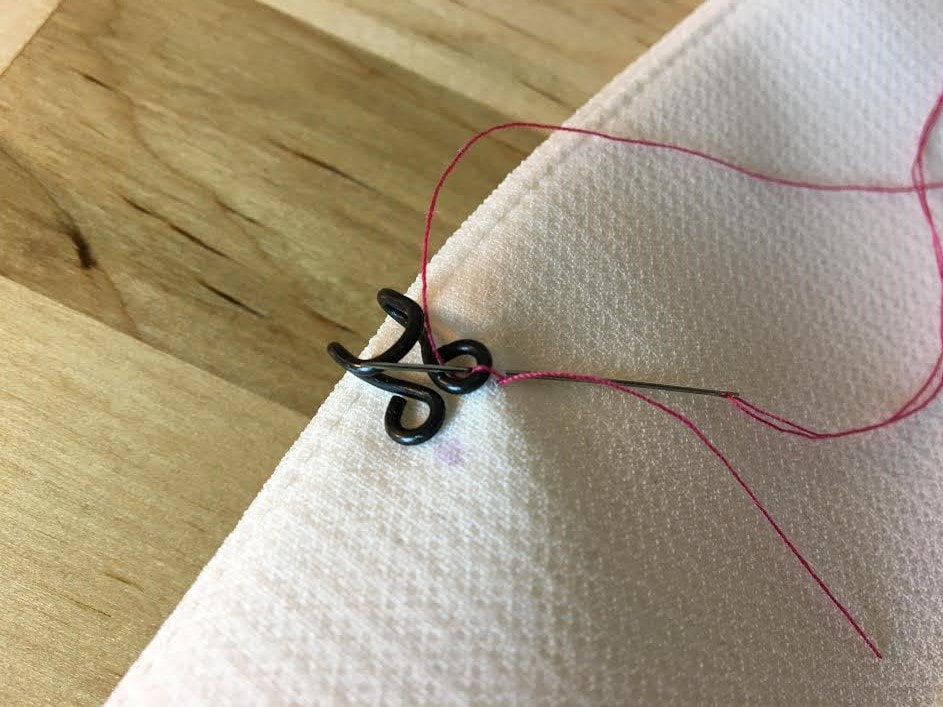
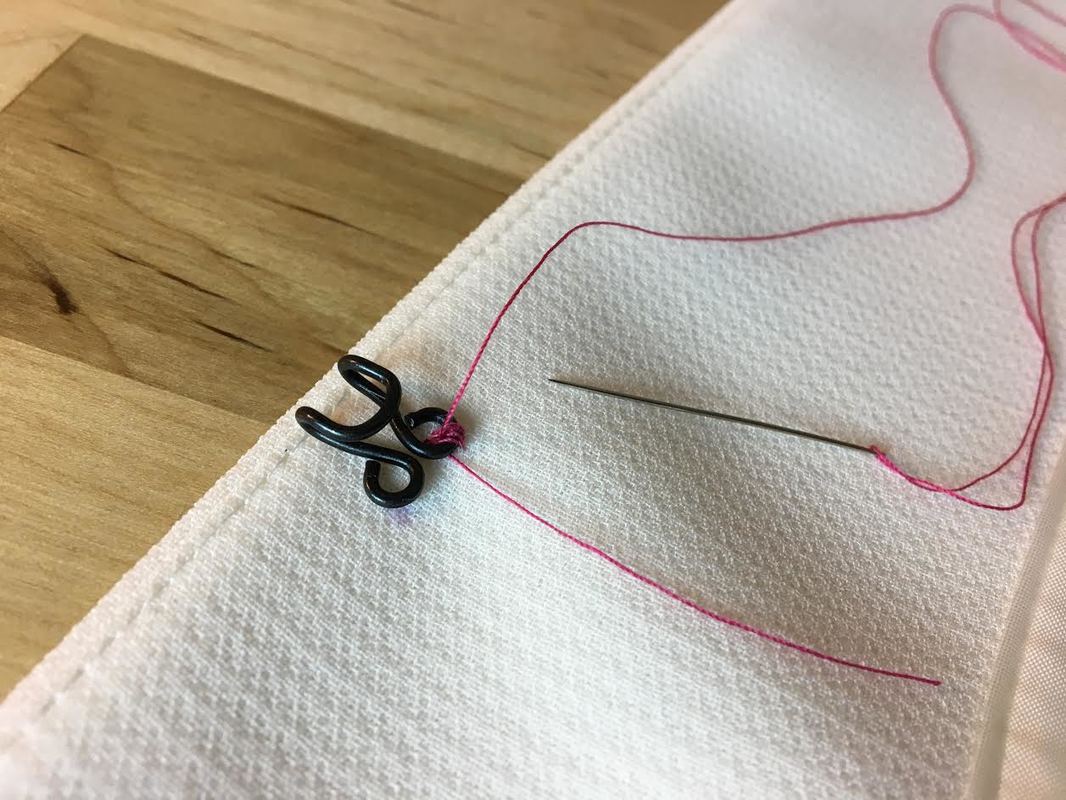
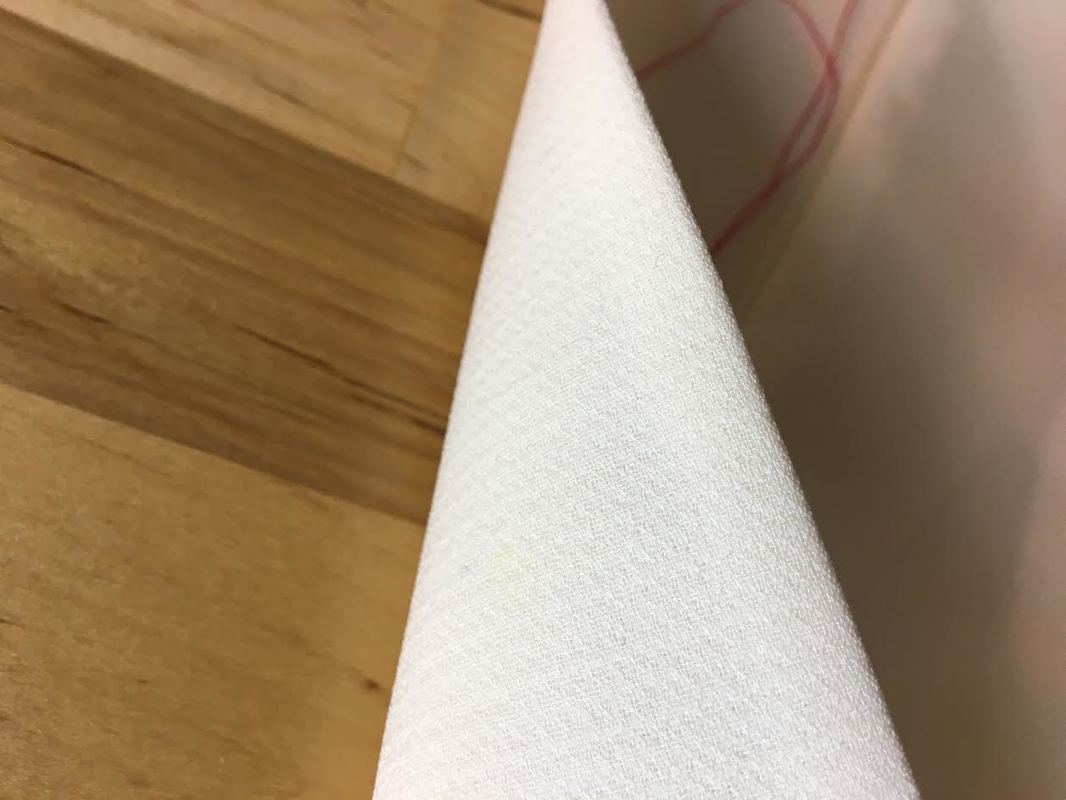
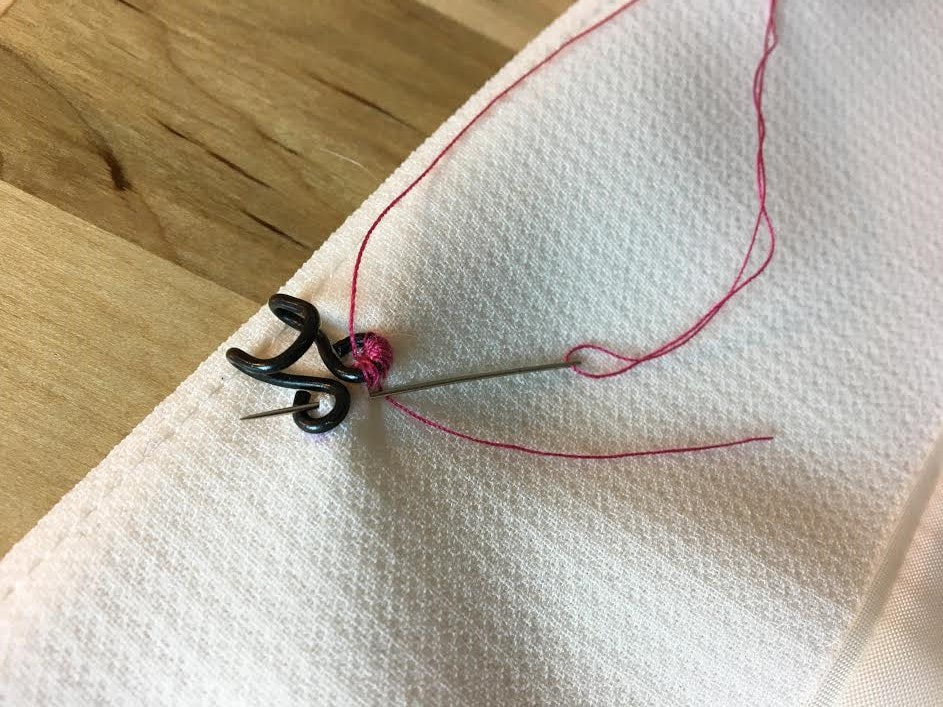
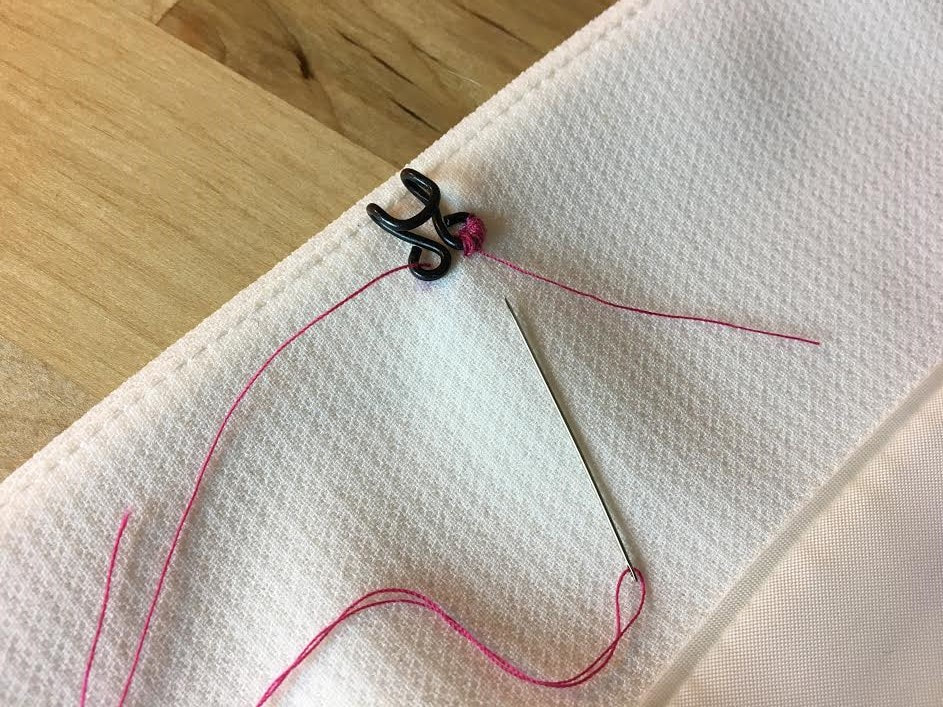
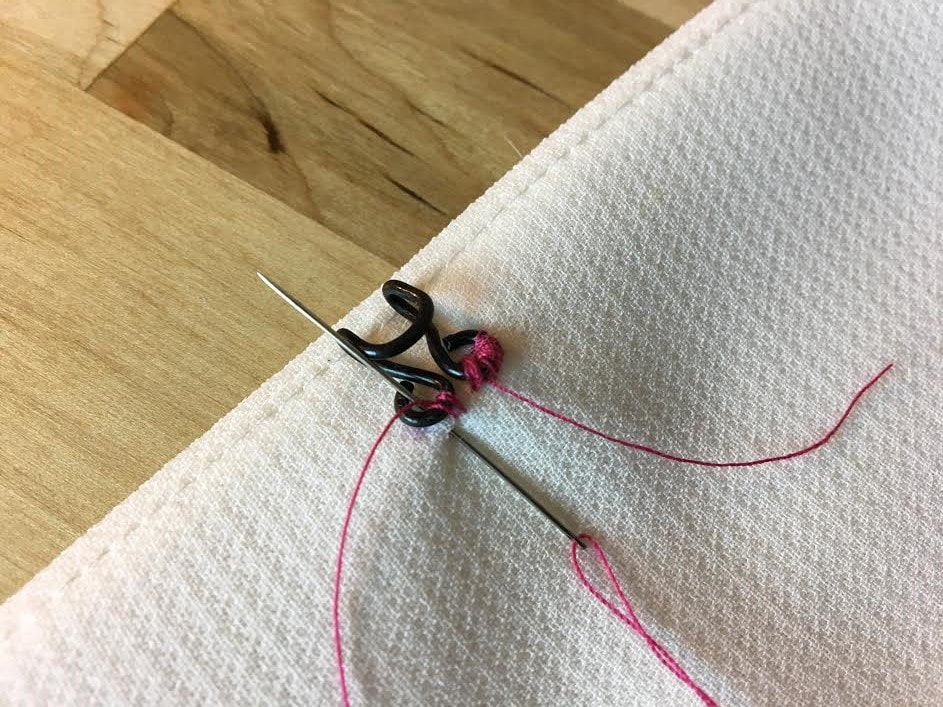
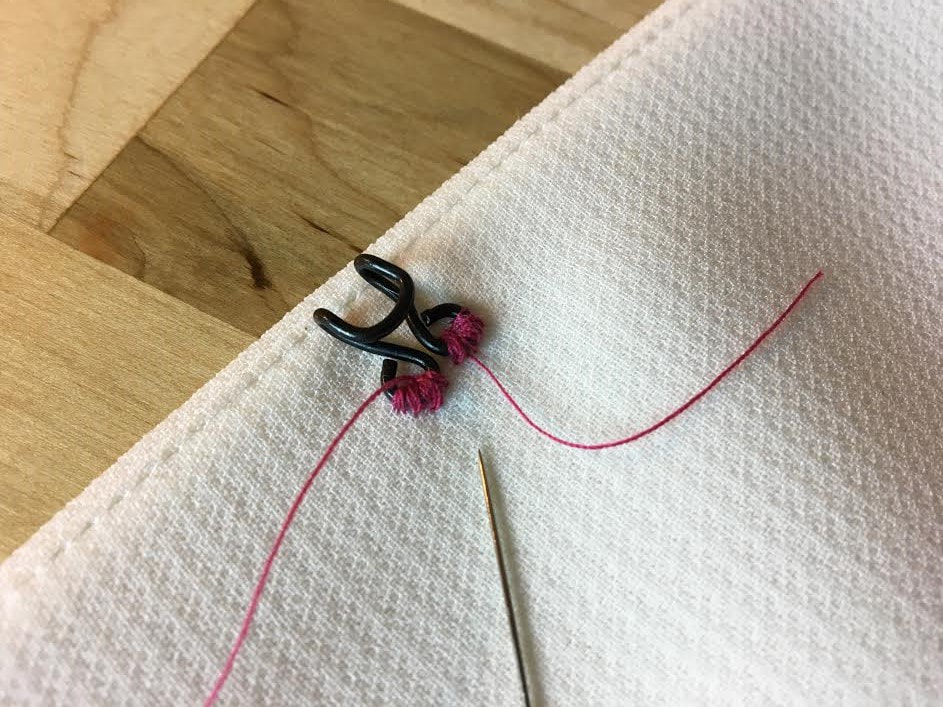
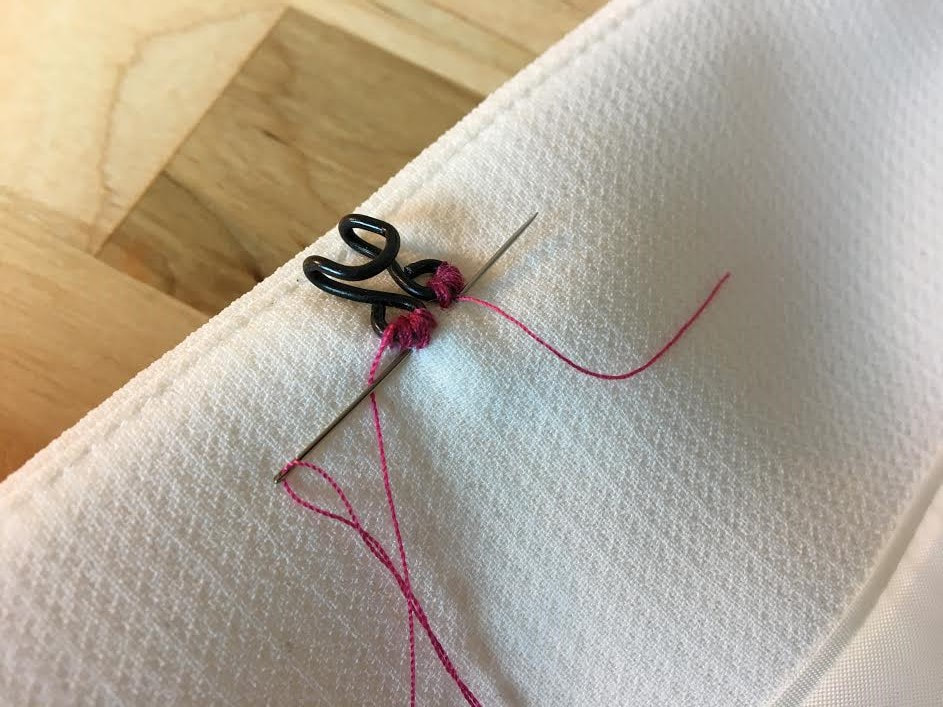
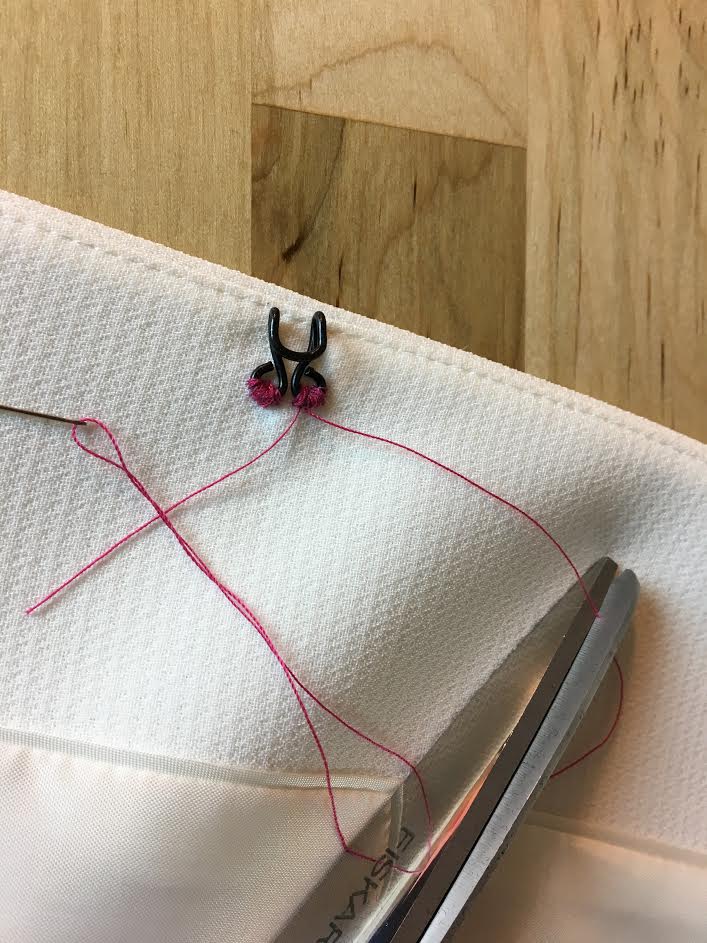
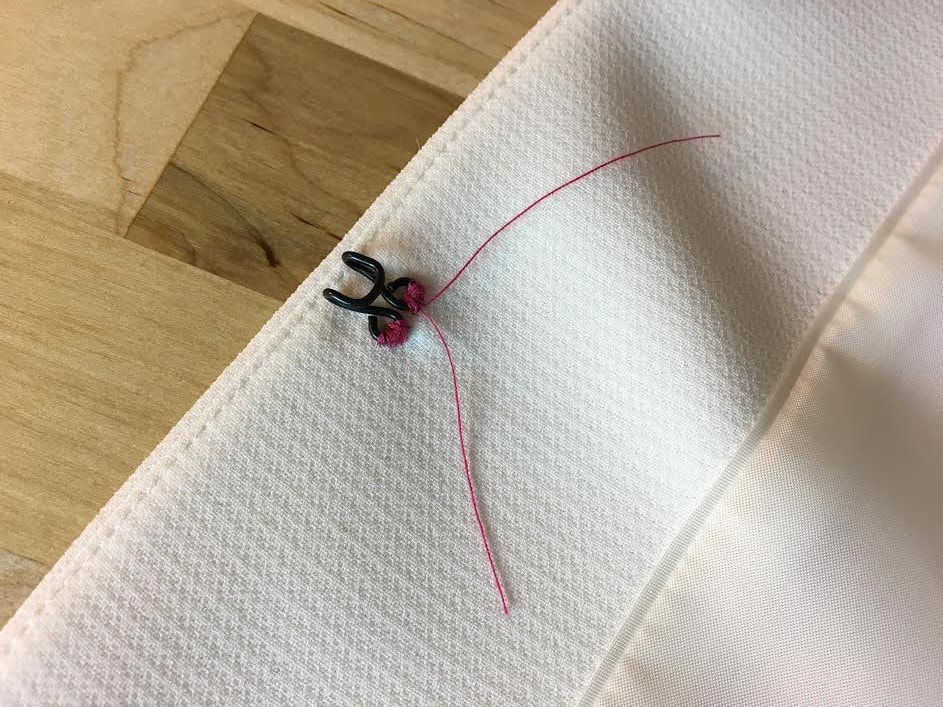
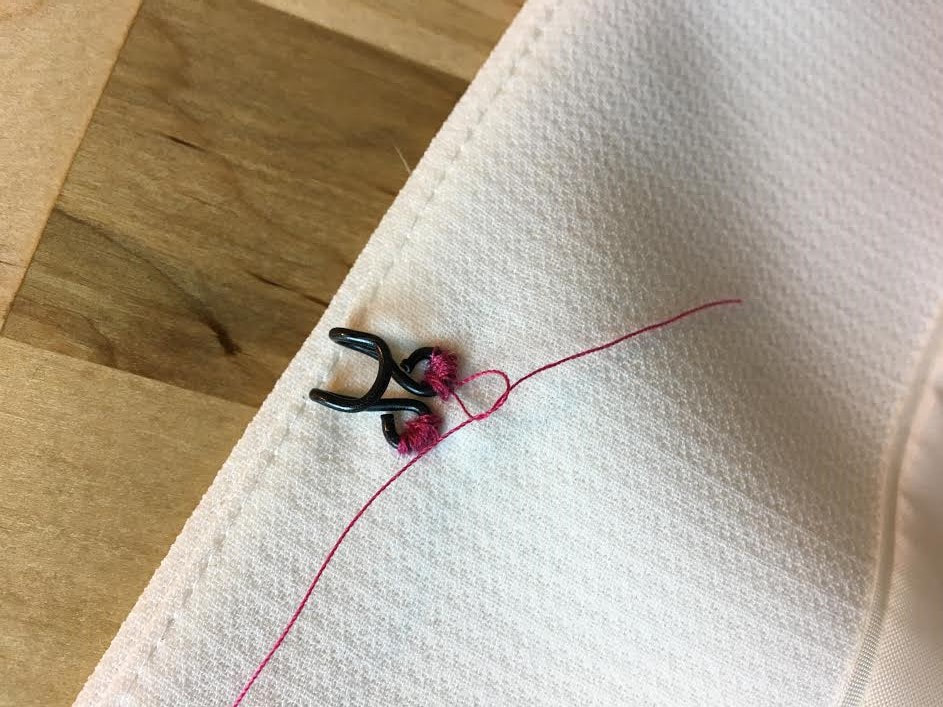
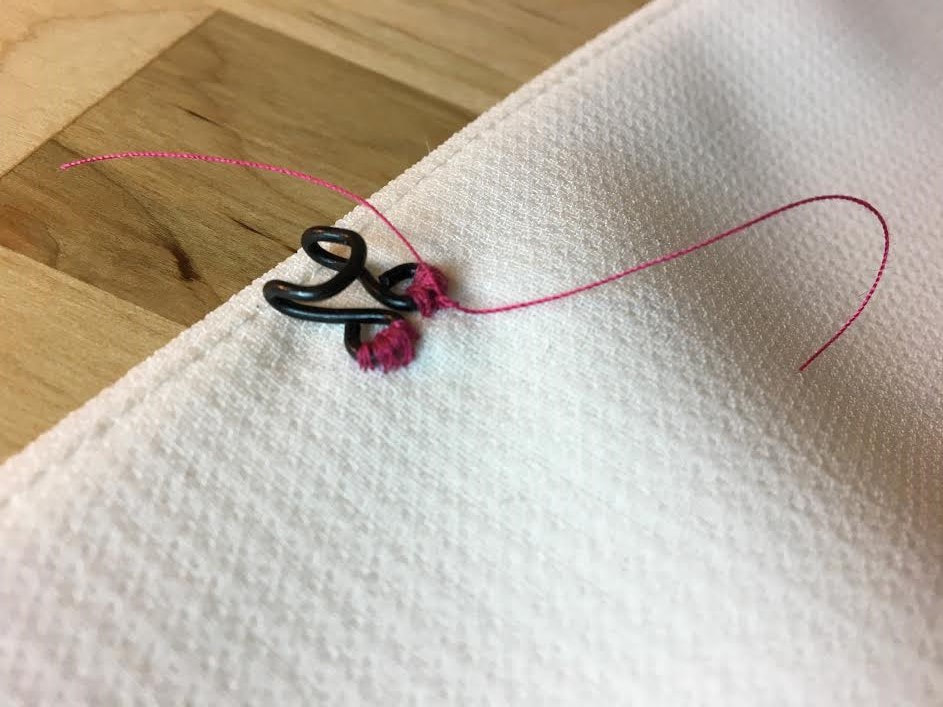
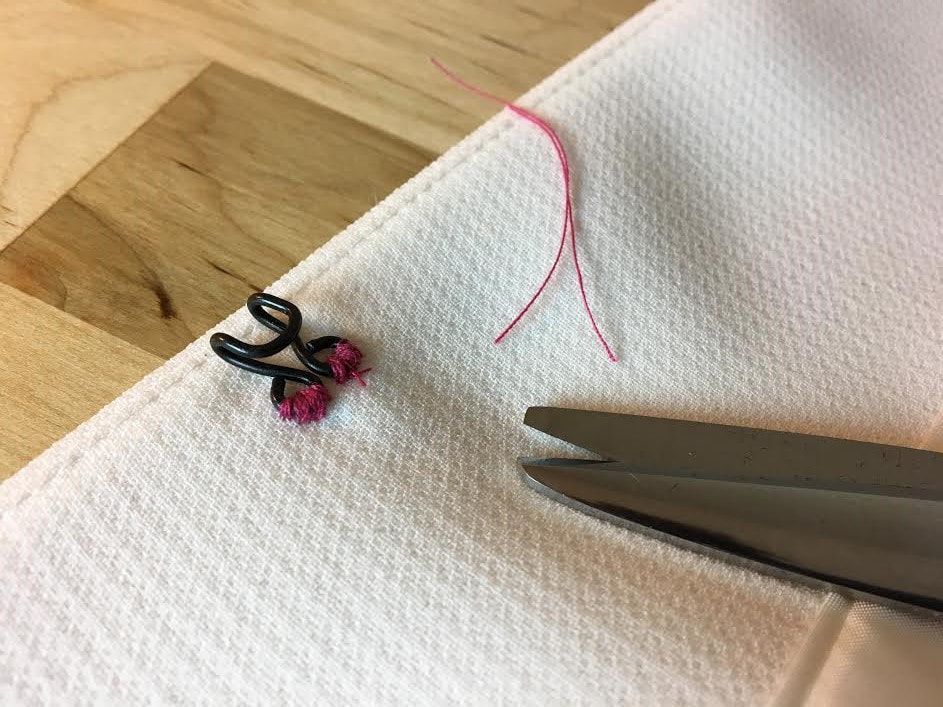
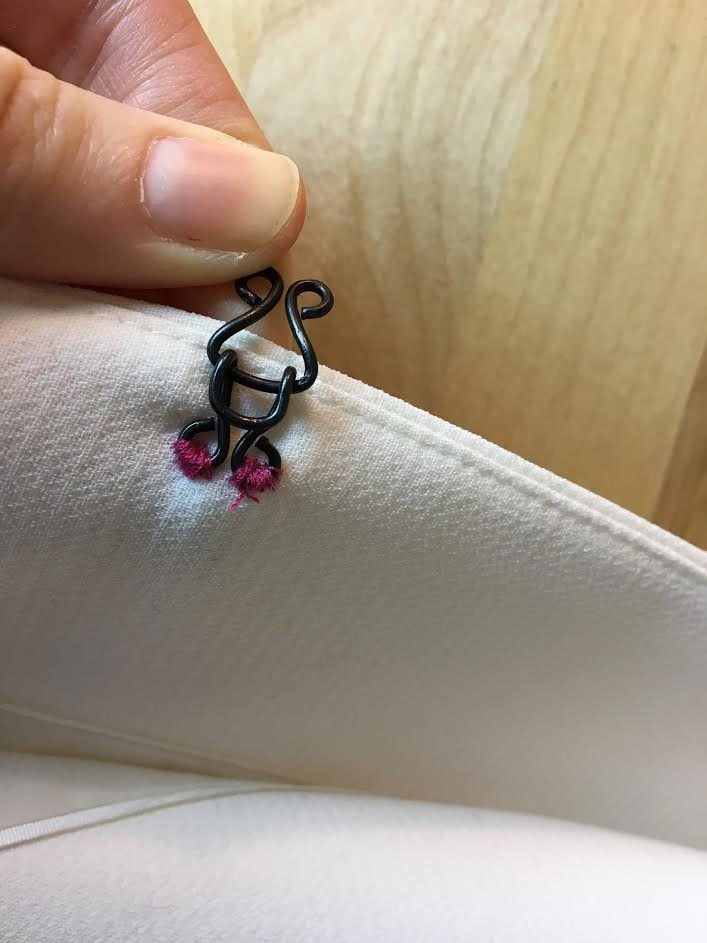
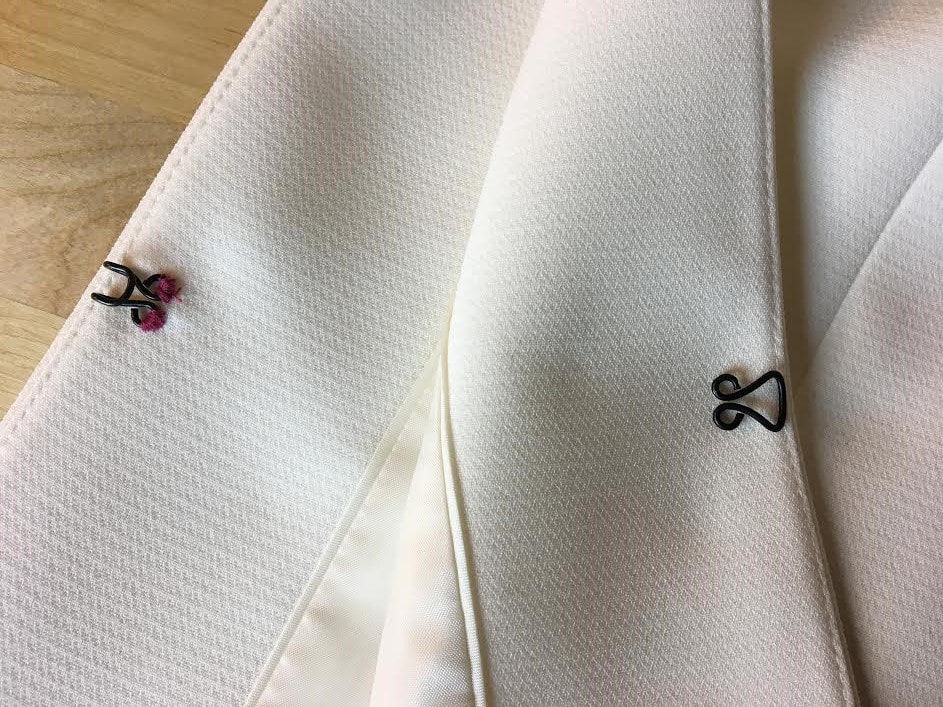
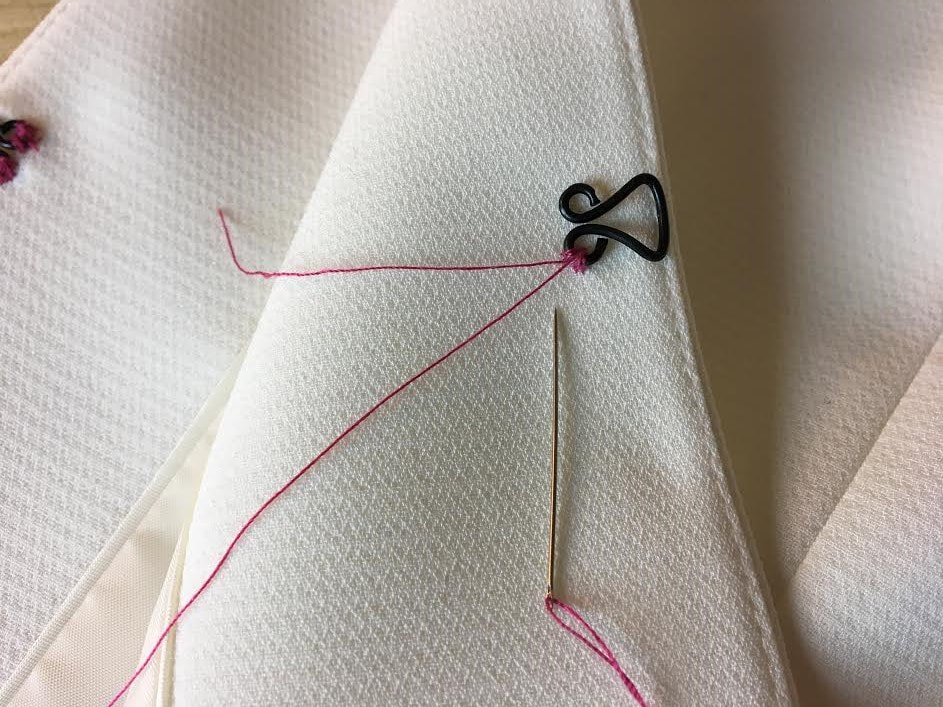
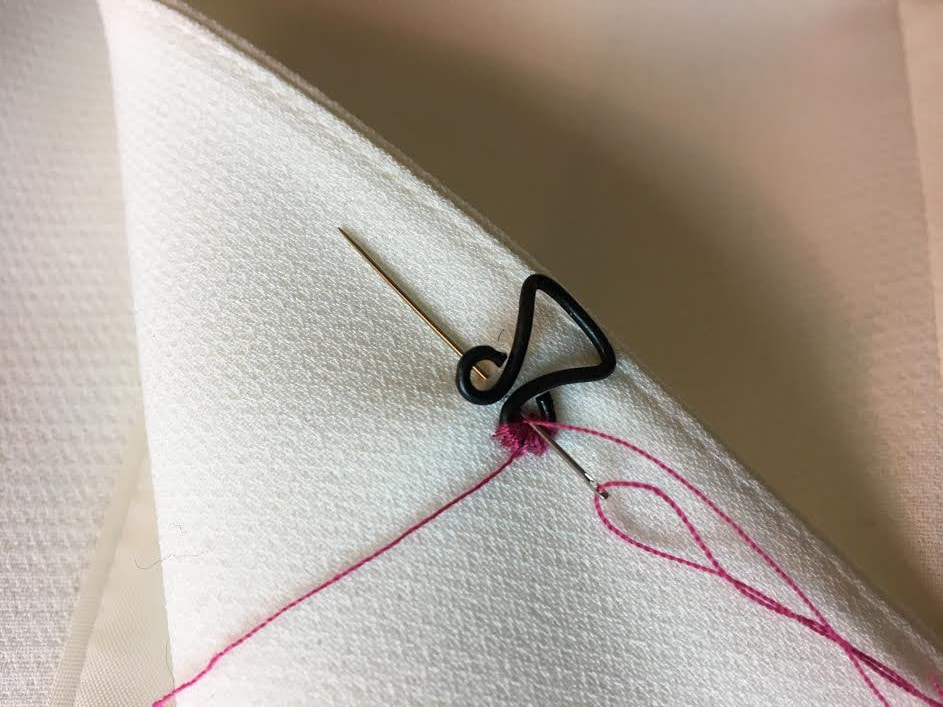
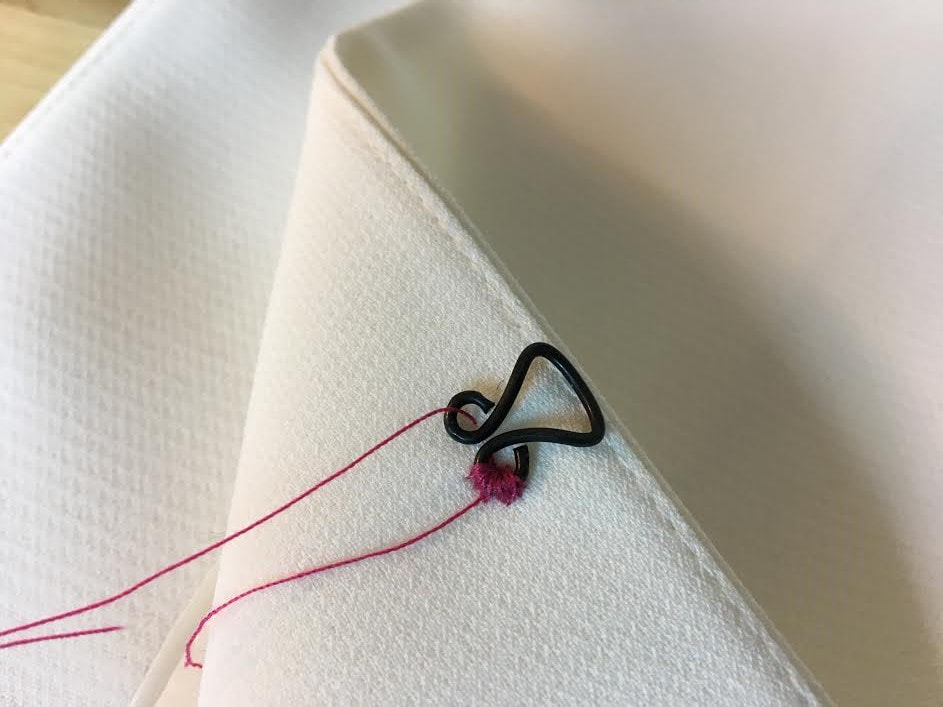
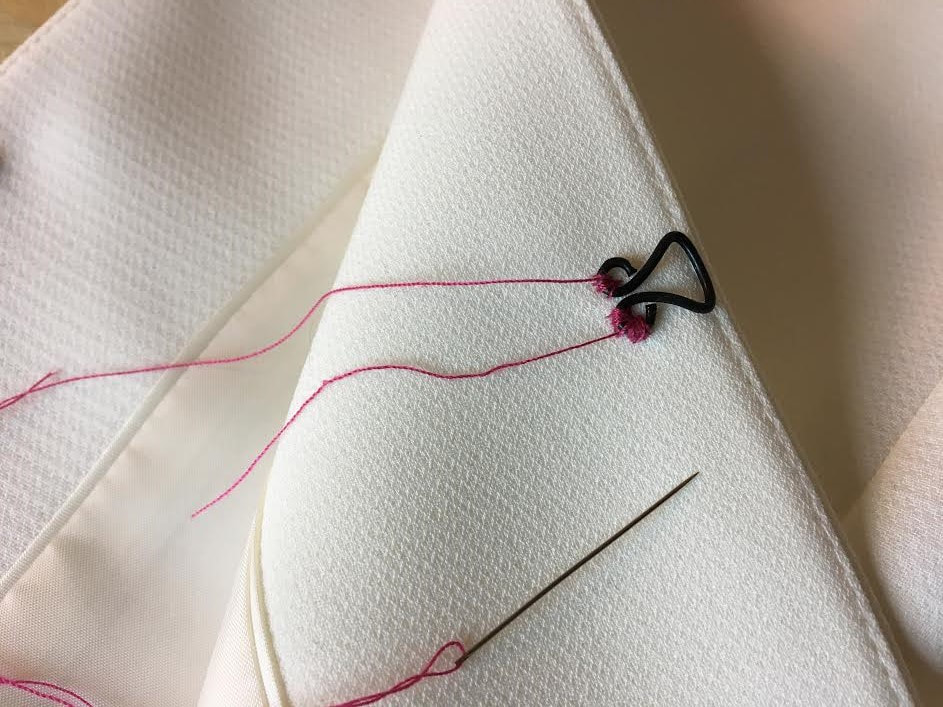
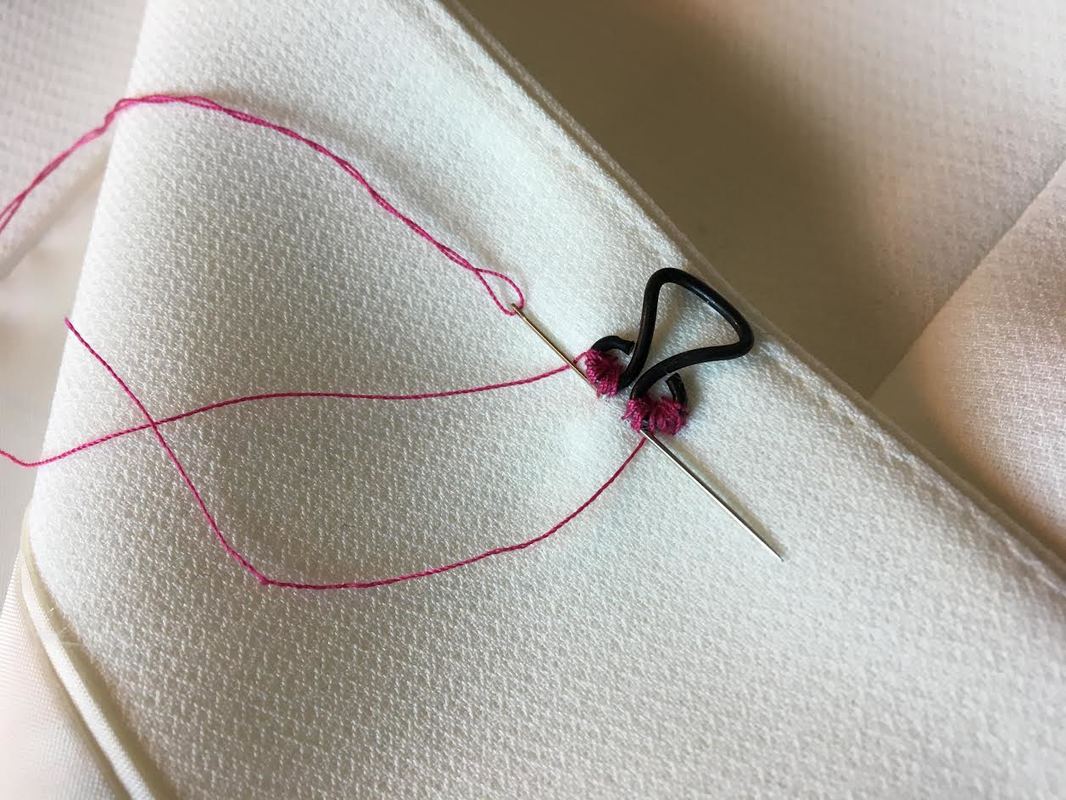
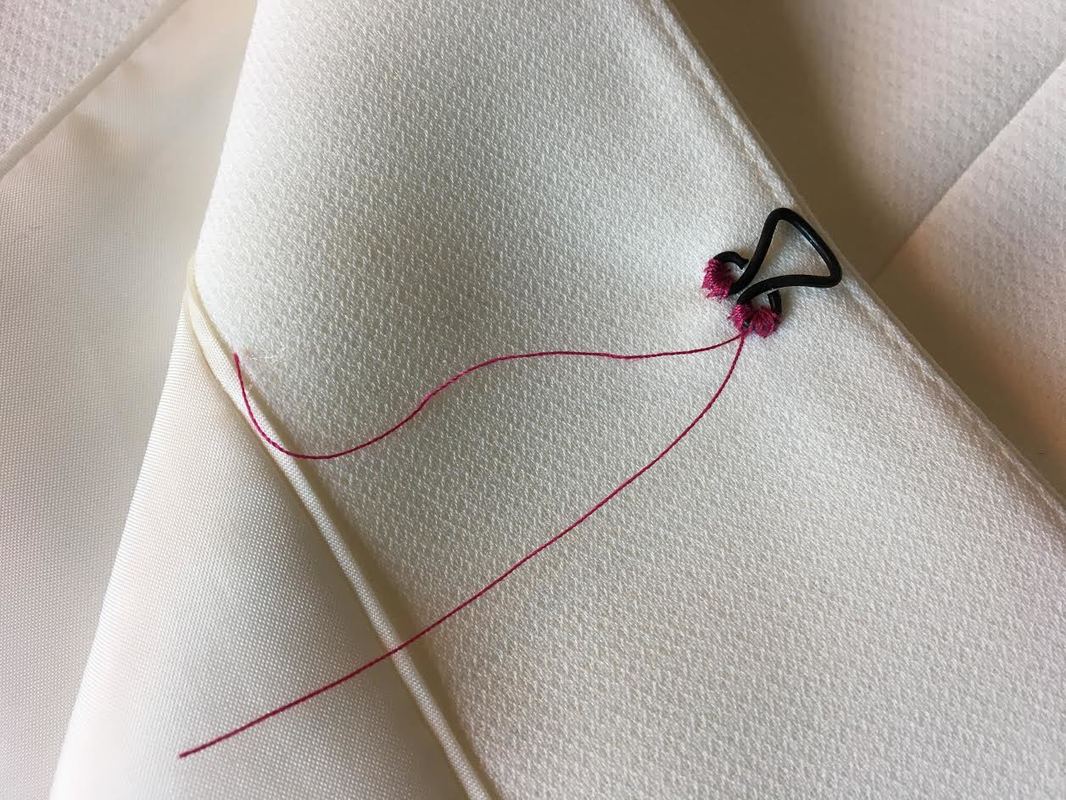
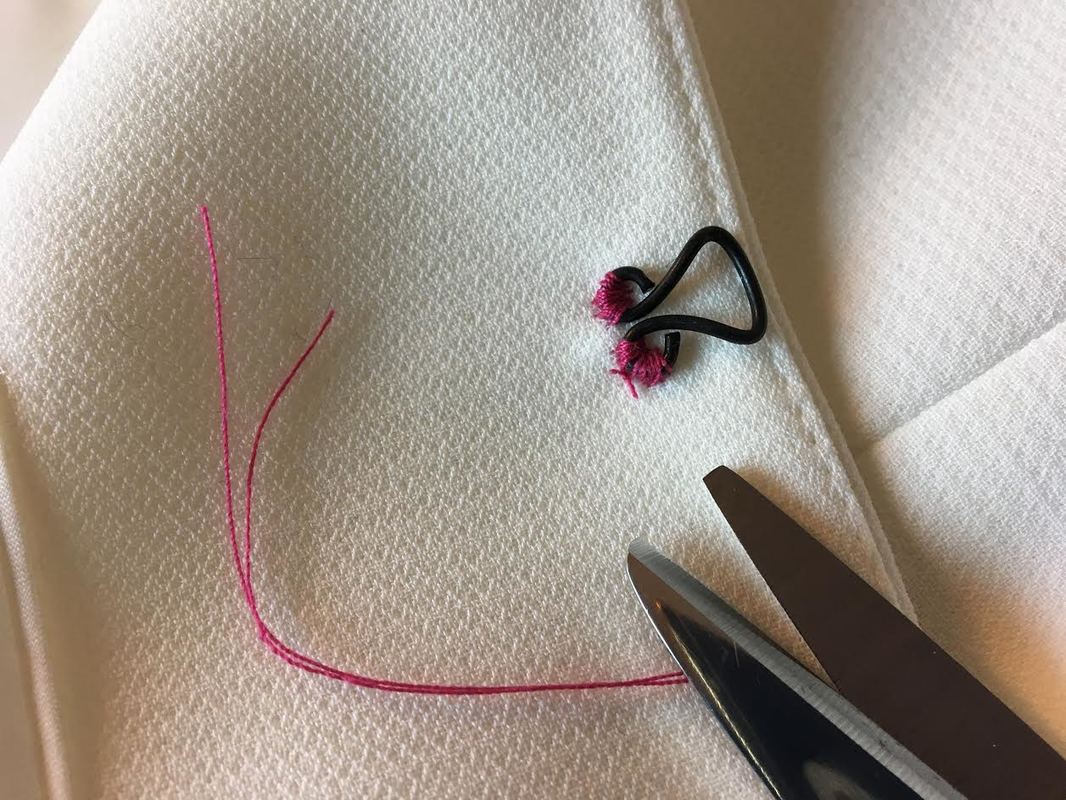
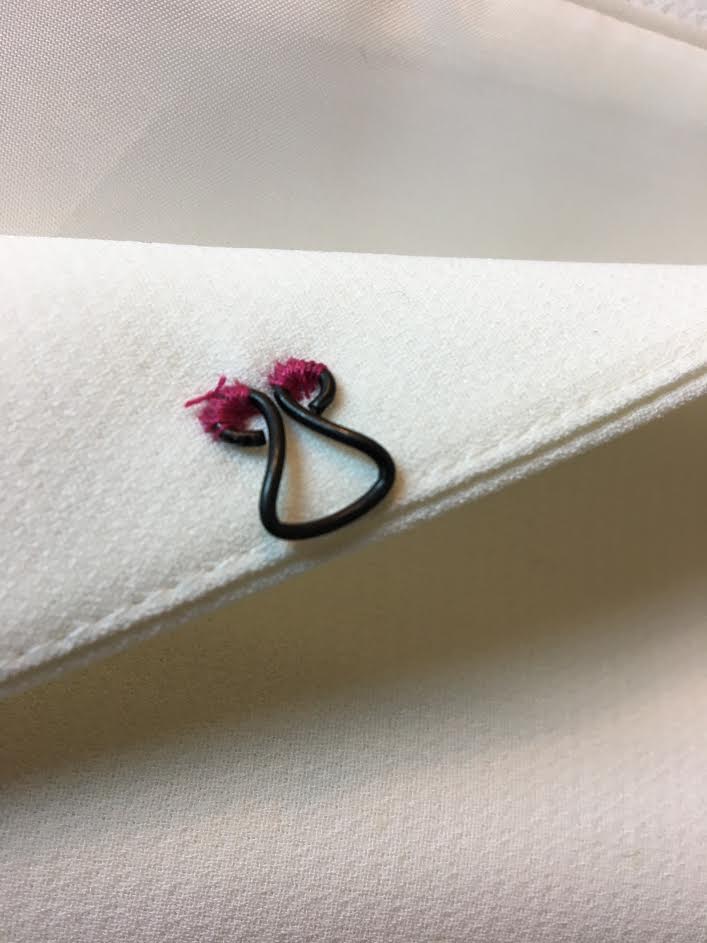
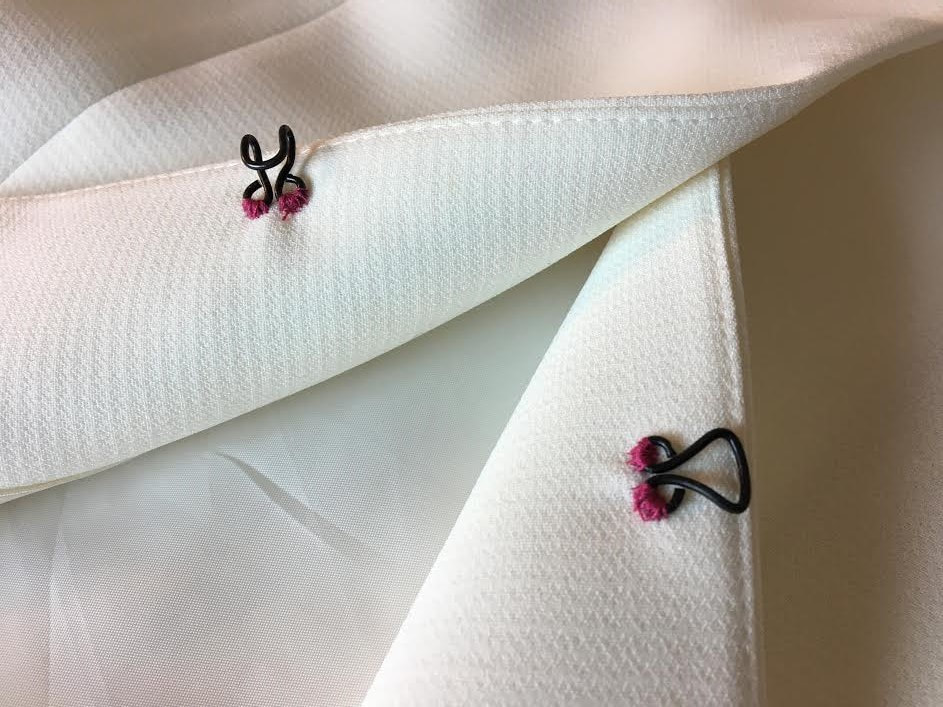
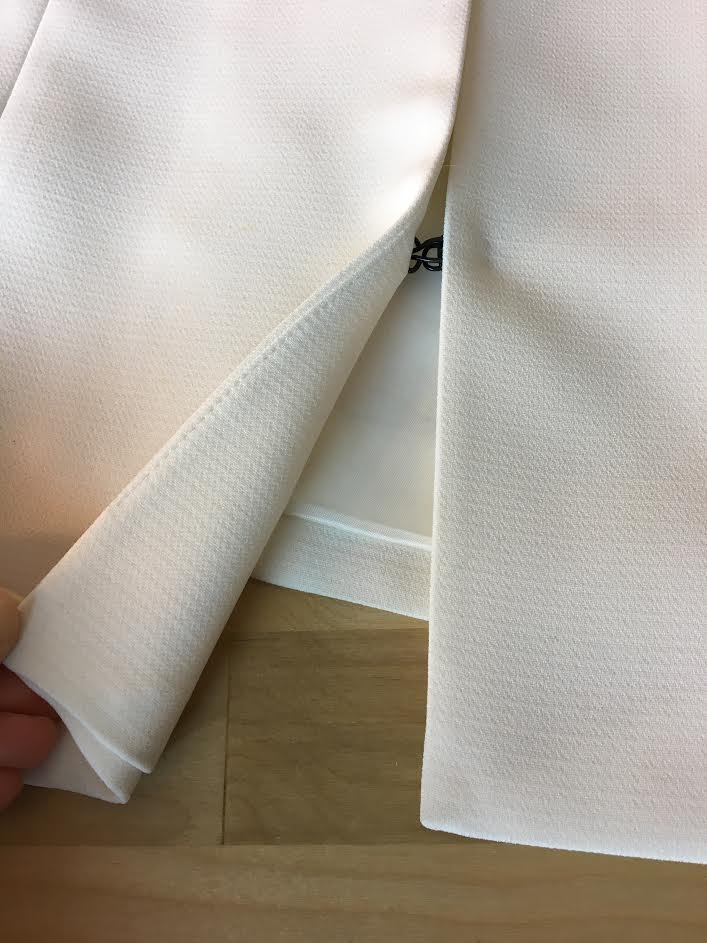
Hook and eyes are durable fasteners used as additional reinforcement for a variety of garment openings. Although usually small, they must be durable enough to withstand strain and pulling during wear. For that reason, hook and eyes are made of metal featuring either a nickel or black finish. Since they are designed to be understated visually, these two finishes are the most commonly used in dressmaking. A hook and eye closure comes in two pieces: one serves as the hook while the other is a straight or round shape serving as the eye. Both the hook and the eye have two round holes at each end through which they are permanently sewn to the garment using a whipstitch (see tutorial below). Hook and eyes are usually sewn to the areas of the garment that have some form of underlay- facing or lining. The reason for that is that the fastening stitched should never be visible on the right side of the garment. Thus, they need to be sewn to the underside of the garment only through the underlay layers. Although some clothing items use hook and eyes for the entire opening, hook and eyes are usually localized and added as additional reinforcement, or to help certain edges/areas of a garment stay in place. There are commonly two main types of edges that often require hook and eye additions: Lapped and abutted edges. Lapped edges are those that feature some form of overlapping either through an extension or larger overlapping areas of a garment. This is most commonly seen on traditional lapped waistbands, cuffs, collars and overlapping opening edges. Abutted edges, on the other hand, touch and meet at the same place when adjoined, but they do not overlap. The most common application of hook and eyes along abutted edges is at the top of invisible zippers, the center front opening edge of a clothing item, along specialized styles of cuffs, collars, and waistbands. Types of Hook and eyes and their application in sewing: Flat hook and eyes: These are used mostly on waistbands due to their durability and flat structure. A flatter, wider style allows for adjoining lapped edges to remain flatter and smoother and have more leverage when closed and opened. These hook and eye styles are designed for lapped edges only. They serve a much more functional purpose than aesthetic and should be placed on the underside of a clothing item. Hook and eyes with round eye: From our brief introduction above, you are already familiar with the structure of a hook and eye closure. While the hook portion is usually the same structure across multiple styles, the eye varies depending on end use. A round eye, as you'll see in the tutorial bellow, is most appropriate for abutted edges- edges that meet and touch but do not overlap. A round structure for the eye portion allows for a more comfortable hook insertion along abutted edges. Hook and eye with straight eye: As opposed to a round eye, a straight eye is most appropriate for use on lapped edges- edges that overlap. The hook portion is sewn to the top overlapping portion while the straight eye is placed on the bottom layer of this overlapping structure. When used on lapped edges, a straight eye allows for a more stable closure preventing the hook from moving around when fastened. Due to the nature of the overlapping layers, the hook is easily inserted through the straight eye portion. Thread covered hook and eyes: Thread covered hook and eyes are usually found in larger options and used in applications where the hook and eye closure is visible on the outside of the clothing item. The thread cover serves a decorative purpose. These closures are often used at the opening edge of jackets, blazers, cardigans, coats etc. If you prefer the look of a thread covered hook and eye and you can't find what you're looking for in stores, you can actually cover a regular hook and eye with thread at home using a blanket stitch. Eye constructed of thread: Although not as durable and maybe not as commonly found, a thread eye is used to replace the traditional round or straight metal eye. It is used in applications where the garment's fabric cannot withstand a metal structure or in situations where the color of the eye has to blend in with the surface of the fabric. You technically can't buy a thread eye at the local fabric/craft store (although they are available in larger styles). Thread eyes are constructed by hand using a blanket stitch or the cording method. The advantage of being able to make them from scratch at home is that you get to decide on size, shape and color. How To Sew a Hook And Eye At The Opening Edge Of a Garment (with facing). In the steps below we'll show you how to sew a hook and eye closure to an abutted edge. As explained above, abutted edges are those that meet at each edge but do not overlap (like lapped edges do). For that reason, a round eye is the most appropriate style to use for this type of closure. 1. Decide and mark the location of the hook and eye on each edge of the garment. There are a few different ways you can do this but in this tutorial, we measured exactly 5" from the bottom edge of the blazer and marked a dot using a fabric marking pencil at this distance. Mark along the edge on the inside of the garment opening as shown above Keep your mark fairly small at about 1/2" away from the edge as shown. If you do not have a fabric marking pencil like the one used in this tutorial, you can use tailors chalk or a dry piece of soap as long as it shows on the fabric you are working with. 2. Repeat the process from Step 1 by measuring 5" from the bottom up along the other edge of the garment. Mark a dot on the inside of the garment as you did in the previous step. The marks on both edges should correspond perfectly to one another when the edges are adjoined. 3. The hook should be sewn to the right side (edge) of the garment. Due to the fact that most people are right-handed, it makes most logical sense to have the hook on the right edge of the garment, since it is the hook that technically does all the work. Align the hook on the inside of the garment (on top of the facing) horizontally at about 1/8" away form the edge. Match one of the holes to the pencil mark using it as a reference for the correct placement and alignment of each hook and respectively eye (as you'll see later). In this tutorial, the bottom hole of the hook corresponds to the pencil mark on the inside of the garment. 4. Holding the hook in place, insert a threaded hand sewing needle through one of the sewing holes of the hook as shown above. Insert the needle only through the facing such that no stitch marks show on the outside of the garment. The thread should be encased between the facing and the front fabric layer of the garment. Leave enough excess thread at the end so that you can clean finish the whipstitch once the hook and eye is complete. A note about thread color: In this tutorial, pink thread is used to display the stitching steps better. However, when sewing a hook and eye closure it is recommended that the thread matches the color of the garment for a clean professional finish. 5. Stitch around the hole of the hook using a whipstitch, while ensuring the hook does not move out of place during this process. Keep the whipstitch as clean and even as possible for a professional finish. You may need to be extra careful to prevent the thread from tangling or accidentally knotting in the process. This is a common issue when whipstitching and can be prevented by either using a shorter piece of thread or coating the thread with beeswax (available at most craft/fabric stores in the thread section). Don't forget: The stitches should only be applied through the facing/underlay and NOT through all the layers of the garment. The right side of the garment should remain stitch-free as shown above. 6. Once the first hole is securely whipstitched in place, move the thread to the other sewing hole by inserting the needle through the facing and the other hole as shown above. This should be done only through the facing/underlay and not through the right side of the garment. If the hook has moved out of place, make sure you align it to be perfectly horizontal and parallel to the garment's edge as shown. 7. Holding the hook in place, whipstitch along the second sewing hole of the hook in the same fashion as you did the first one. Continue whipstitching until the hook is sewn securely in place and the density of the whipstitch in the second hole matches the first one. 8. Insert the needle back through the facing at the area where the stitching was initially started (where the loose end of the thread is). Cut the thread allowing enough distance for both loose thread ends to be hand-tied. Hand-knotting the loose threads will ensure that the whipstitching does not come undone during continuous wear and washing. 9. Simply hand-knot the loose threads 2-3 times tightly as shown above. After knotting, cut the loose thread ends next to the knot but not too close to it, as shown above. Now that the hook is securely sewn in place, it is time to sew the eye portion on the corresponding edge of the garment. If you are a sewing beginner, it often helps to join the hook and eye piece together so that you get a better understanding of how both pieces operate, and the proper way they should be positioned in relation to one another. 10. Following very similar steps to sewing the hook portion above, align the eye horizontally on the inside edge of the garment as shown above. Make sure that just as you did for the hook, the bottom sewing hole of the eye is aligned to the pencil mark present on the garment. 11. Holding the eye securely in place with your hand, whipstitch through one of the sewing holes of the eye, leaving enough excess thread at the end so that it can be hand-knotted later. 12. Once a dense and secure whipstitch is added, insert the needle through the facing/underlay (but not through the face side of the garment!) to the other hole as shown above. Pull the thread through the hole as shown above- this will make it easier to start whipstitching the second portion of the eye. 13. Whipstitch around the second hole of the eye portion, adding even, clean stitches as shown. Make sure to only sew through the facing/underlay and NOT thorough the right side of the garment. The face of the finished garment should not have any stitches. Also make sure that if the eye has moved during the above steps, move it to its proper horizontal position and hold it in place with your hand while applying the first few stitches. Once the second whipstitch is secure and dense enough to match the first one, insert the needle through the facing/overlay bringing the thread back to where you initially started sewing (where the other thread end is). 14. As you did for the hook portion, cut the thread giving yourself enough length to tie both loose ends together. Hand-knot both threads 2-3 times to lock the stitches in place. 15. Cut the loose threads next to the knot but not too close to it or you risk accidentally cutting through or weakening the knot. Use the image above as a reference point. The eye should be placed along the edge as shown only about 1/16"-1/8" away from it. The whipstitching should be even and dense enough to withstand strenuous use of the hook and eyes. As mentioned above, it is recommended that the color of the thread matches that of the garment. Once both hook and eyes are sewn to the opening edge of the garment they should be aligned at exactly the same distance form the bottom. In addition, both should not extend past the edge of the garment but rather at a small distance in. Allowing for a little excess at each edge ensures that when the hook and eye is in closed positioned and the edges are adjoined, the closure is less visible on the outside of the garment. The face of the garment should not have any visible stitches on its right side. For that reason, hook and eyes are added to the areas of the garment that are either faced or lined. When closed the edge should touch but not overlap hiding the hook and eye closure underneath. The bottom edge of both sides should also correspond and meet perfectly at the hem.
1 Comment
|
The Blog:A journey into our design process, sewing tutorials, fashion tips, and all the inspiring people and things we love. Doina AlexeiDesigner by trade and dressmaker at heart. I spend most of my days obsessing over new fabrics and daydreaming new ideas. Sadie
Executive Assistant & Client Relations Manager Archives
November 2019
Categories
All
|
-
Sewing Tutorials
-
Basics
>
- Aligning Pattern Grainlines To Fabric
- Preparing Fabrics For Sewing
- Pinning Sewing Patterns To Fabric
- Placing Sewing Patterns On Fabric For Cutting
- Rotary Cutters or Fabric Scissors?
- Cutting The Sewing Patterns
- What Are Notches And How To Use Them In The Sewing Process
- Transferring Notches From Pattern To Fabric
- Transferring Seamlines to Fabric
- Staystitching
- Backstitching: A Complete Guide
- Hand Basting: A Complete Guide
- Sewing Continuous Bias Binding
- Darts >
-
Sewing Seams
>
- The Basics Of Seams And Seam Allowance
- How To Sew A Straight Seam
- Sewing Curved Seams
- Sewing Corner Seams
- Trimming And Grading Seam Excess
- Notching/Clipping Seam Allowance for Tension Release
- Sewing Topstitched Seams
- Sewing Corded Seams
- Sewing A Slot Seam
- Sewing A Gathered Seam
- Sewing Bias Seams
- Sewing Seams With Ease
- Sewing Seams With Crossing Seamlines
- Sewing Unlike Fabric Seams
- How To Iron Seams: Ironing Tools And Conventions
- Sewing With Knit Fabrics
- Understanding Stitch Length And Tension
- Sewing Unique Fabric Seams
-
Seam Finishes
>
- Seam Finishing Techniques - Overview
- Applying A Pinked Seam Finish
- Applying A Bias Bound Seam Finish
- Serging And Zigzag Seam Finishes
- Sewing A Self-Bound Seam Finish
- Sewing A French Seam Finish
- Sewing A Hong Kong Seam Finish
- Sewing A Mock French Seam Finish
- Sewing A Turned-and-Stitched Seam Finish
- Sewing Overcast Hand-Applied Seam Finishes
- Sewing A Flat Felled Seam
- Sewing A Hairline Seam Finish
-
Hem Finishes
>
- Garment Hem Finishes: Overview
- Sewing A Double Fold Hem Finish
- Sewing A Single Fold Hem Finish
- Sewing Bound Hem Finishes
- Sewing An Exposed Double Layer Bound Hem
- Sewing A Folded-Up Bound Hem with Pre-folded Binding
- Sewing A Hong Kong Hem Finish
- Sewing A Band Hem Finish
- Sewing A Bias Faced Hem Finish
- Sewing A Twill Tape Hem Finish
- Sewing A Rolled Hem Finish
- Sewing A Shaped Hem Facing
- Using Fusible Hem Tape And Webbing
- Finishing A Lace Fabric Hem
- Finishing A Leather Hem
- Sewing Faced Hem Corners
- How To Finish Lining At The Hem
- Finishing Fabric Corners by Mitering >
- Interfacing A Hemline: Lined And Unlined Examples
-
Sewing Pockets
>
- Curved Patch Pocket With Flap
- Unlined Square Patch Pockets
- Lined Patch Pockets: Two Ways
- Extension On-Seam Pockets
- Separate On-Seam Pocket
- Front Hip Pockets
- Bound Double Welt Pocket
- Double Welt Pocket With Flap
- Self-Welt Pocket (Using Single Fabric Layer)
- Slanted Welt Pocket (Hand-Stitched)
- Faced Slash Pockets: Overview >
-
Sewing Zippers
>
- Sewing Zippers: General Information
- Sewing A Centered Zipper
- Sewing A Lapped Zipper
- Sewing An Invisible Zipper
- Sewing A Fly Front Zipper
- Sewing A Closed-End Exposed Zipper (No Seam)
- Sewing An Exposed Separating Zipper
- Sewing Hand Stitched Zipper Applications
- Sewing A Zipper Underlay
- Sewing A Placket-Enclosed Separating Zipper
- Sleeveless Finishes >
-
Neckline Finishes
>
- Sewing A Neck Shaped Facing
- Sewing An All-In-One Neck Facing
- Neck And Garment Opening Combination Facings >
- Sewing A Bias Faced Neckline Finish
- Sewing A Band Neckline Finish
- Bound Neckline Finishes: Overview >
- Sewing A Semi-Stretch Strip Band Neckline
- Ribbed Neck Band And Classic Turtleneck
- Decorative Neckline Finishes >
- Finishing Facing Edges >
-
Extras
>
- A Complete Guide on Interfacing
- Sewing Bound Spaghetti Straps
- Sewing Spaghetti Straps To A Faced Neckline
- Sewing Ruffles: Overview
- Patterning And Sewing A Circle Ruffle
- Sewing A Gathered Heading Ruffle
- Sewing Double Layer Gathered Ruffles
- Sewing A Gathered Ruffle Into A Seam
- Sewing A Gathered Ruffle To A Fabric Edge
- Sewing A Fabric Surface Slit
- Sewing A Slit Seam
- Hand-Applied Straight Stitches
- Hand-Applied Blind Stitches
- Hand-Applied Overedge Stitches
- Hand-Applied Tack Stitches
- Hand-Applied Decorative Stitches
-
Basics
>
- Custom Bridal
- Custom Apparel
- About
- Blog
Services |
Company |
|



 RSS Feed

