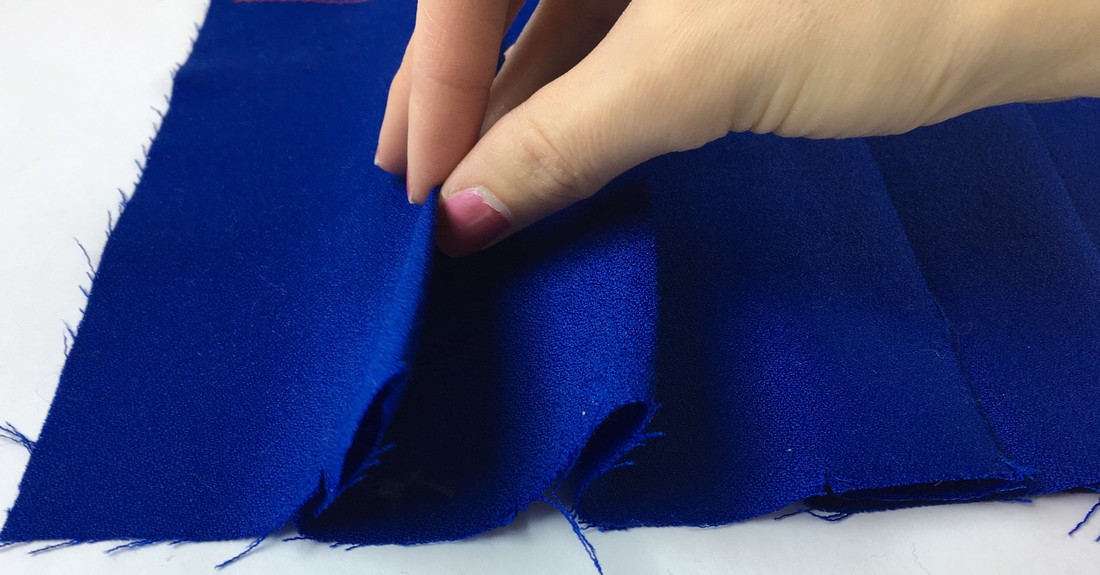
 Pleats are folds of fabric that can appear either in clusters, as a single fold, or continuously. Although pleats may look to be decorative only, they additionally serve the purpose of controlling excess fabric and fullness. Grouped pleats are most commonly seen on skirts and dresses that are more loose fitting, while single pleats are common on a variety of garments from outerwear to tops, bottoms and dresses. On a sewing pattern, pleats are represented by two main lines: a fold line and a second line that the fold line is positioned to, usually called placement line. This means that when you create a pleat, you fold the fold line first and then align this fold to the placement line- this is usually very intuitive and once you get the hang of it, it's also quite fun to do! The crispest and best hanging folds are achieved if the pleats are aligned to the straight grain- Most fabrics are also much easier to fold if the folds are positioned parallel to the grain. We'll discuss a little more about the different pleat finishes and the best fabrics for them below, but first, here are 4 styles of pleats you should know! Basic Pleats You Should Know and How to Fold Them 1. Accordion Pleats- These are pleats that are actually difficult to do at home because your iron doesn't have enough pressing power to really set this style of pleating in place. Accordion pleats are thinner in width and shaped to resemble an accordion. They are usually continuous and are found on lighter-weight fabrics for skirts, dresses and some blouses. Because this pleating style uses an industrial method we wont show you how to do it at home in this tutorial. 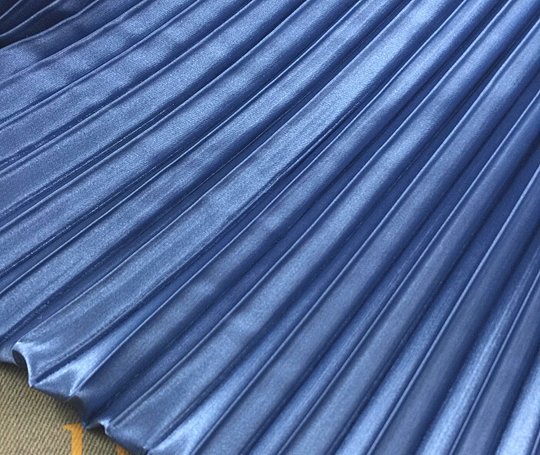 Image via www.aliexpress.com 2. Knife Pleats (also called side pleats) are represented by even, continuous or clustered folds that point to one direction (either left or right). This pleating style is much easier to sew at home than the accordion pleats and can be found either grouped in specific areas of the garment or continuously throughout. Knife pleats are done in a few different styles: -Some garments have clusters of knife pleats pointing in opposite directions, as opposed to the same side all around. -The fold of a side pleat can either start right where another begins, or have some distance in between as displayed below. 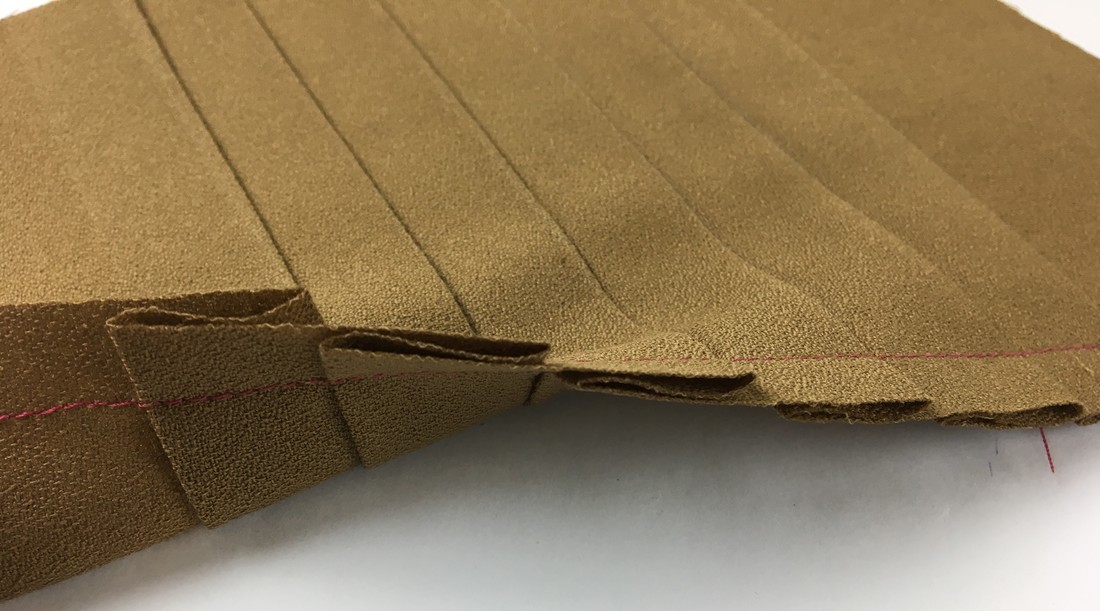 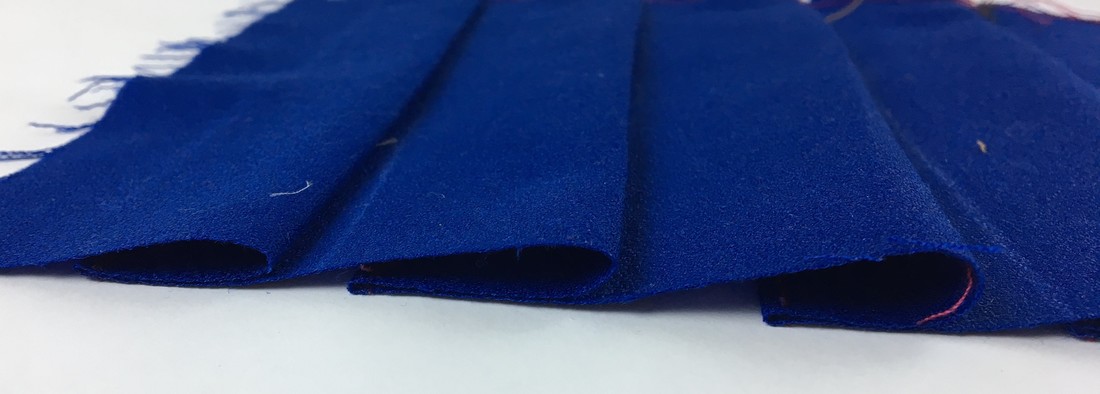
0 Comments
Who says educational gifts are for kids and students only? You should never stop being curious or loose your sense of discovery whether you’re at work or at play. The good news is, there’s an educational aspect to just about any game out there. Whether on a small or a large scale, games and products that stimulate our interest and get our brain thinking are educational whether they are labeled as that or not. For many people who get lost in the day to day routine and lose their purpose and excitement in life, adding something that exercises their brain with a sense of play could be the answer to a better mood and maybe even a newly discovered hobby. While there are many educational games and products out there that are suitable for kids, not many are labeled as "educational" and brain stimulating for adults. Next time you’re searching for the perfect gift for a loved one, throw in a semi-educational but fun product in the mix! There are thousands of great innovative products on the market, but we’ve picked eight ideas we love that might make your search for that perfect gift a little easier: 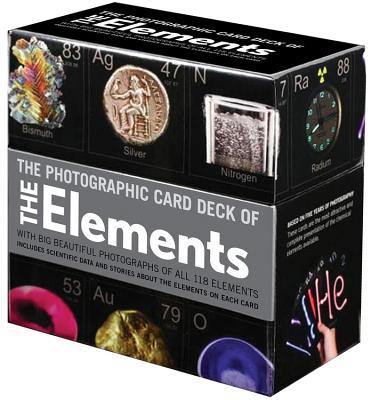 Image via www.booksamillion.com The Elements We all remember that semi-boring periodic table from high school… Thankfully, this deck of cards gives us a new perspective and awakens our interest in taking a look at it again- with some enthusiasm this time. It has bold images of what each element looks like finally giving us a more exciting visual of what we’re learning. Yes, this is a perfect learning tool if you’re struggling to pass that chemistry test in school, but there is also no reason why this shouldn’t be a fun tool for adults that want to awaken their memory. This great way to learn includes scientific facts and data on the back of each card along with stories that will help you remember them better. And speaking of memory, provided also are some additional cards that suggest activities and study tips as well as an explanation of each one of the elements and their arrangement. In the words of Uncommongoods, “ get yours before they Argon!”. Tucks are mostly used for decorative purposes and are a great way to add a high-end design quality to any garment. Tucks are made by straight stitching a fold of fabric. Think of them as pleats whose folds actually get stitched together. Once sewn they are ironed and stay-stitched horizontally in a specific direction according to the design. Some of the most common tucks are pin tucks, dart tucks, blind tucks and spaced tucks. These tucks are very simple and come in different widths and alignments. Because a tuck is represented by a single fold, the width of the tuck is calculated by measuring the distance from the fold to the stitched line. The tuck's fold can be located either on the inside or outside of the garment (according to design specifications). Although most of the tucks mentioned above are used for decorative purposes, dart tucks can also be used to control shape and fullness and sometimes affect the fit of the garment. In this sewing tutorial we'll show you how to transfer tuck markings from your sewing pattern to the fabric as well as how to sew some of the most common tucks listed above! Before we get started on the sewing steps, you should have a better understanding of the most common tucks: Basic Tucks Pin Tucks: Pin tucks are very thin folds of fabric that are stitched and ironed to one side. They are used on lightweight fabrics for blouses and dresses as well as various tailored items like trousers, blazers and jackets. Pin tucks are very narrow and subtle but they make a huge difference to the design of a garment. Although they don't effect fit, pin tucks can give the illusion of a slender, taller figure. 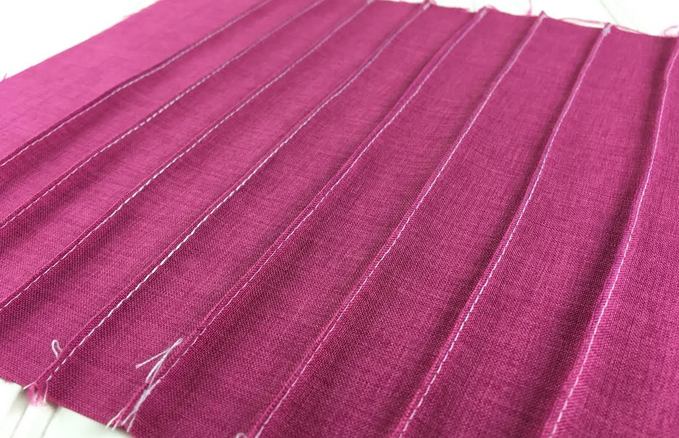 Blind Tucks: As a basic tuck, a regular blind tuck is folded using the same method as a pin tuck but is usually wider and aligned so that the fold of each one of the tucks meet each other. In other words, if you take a look at the raw edge of a blind tucked fabric, you will notice that the next fold starts where the last fold ended as shown below. For that reason, blind tucks are always aligned evenly, maintaining the same distance from fold to fold. 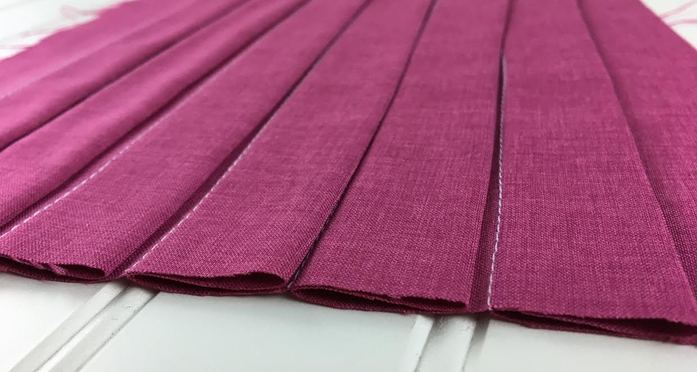 Learning how to sew really comes in handy when it comes to rescuing clothing items that either don’t fit well or are too outdated. The truth is, alterations are actually more difficult to do than sewing a garment from scratch. Why? Because it requires the removal of straight stitches and serging stitches (which can take some time) and you risk throwing off the balance and fit of the whole garment with certain alterations. Remember, a clothing item is made of multiple “puzzle” pieces that need to fit together perfectly in order to achieve the correct fit and drape. The most sensitive areas of a clothing item that requires more of a professional hand are: sleeves, bust area, neckline and armholes. In addition, you should be careful altering an item at the waistline and hip- Not altering these areas correctly could hinder movement and comfort and even make the garment difficult to put on and take off. That being said, there are some basic alterations that won’t throw off the fit and comfort of your clothing! Altering the length and silhouette of tops and bottoms as well as making some style and size adjustments is always a good idea when updating your closet. We will teach you one of the most common alterations: Turning a dress into a blouse by shortening the hem. As an added bonus, we will be adding a rounded, longer hem in the back to modernize the style a bit and teach you a new technique- So let’s get started! 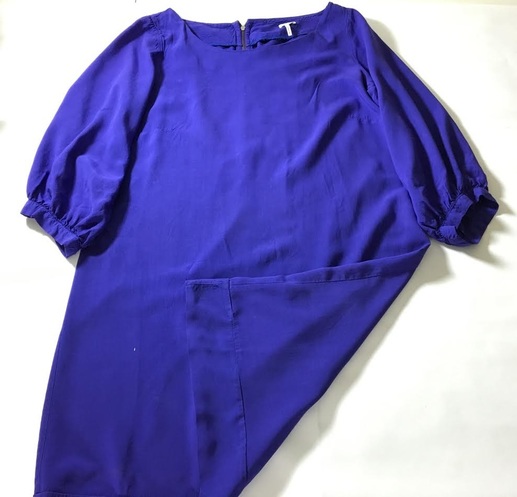 Here is a straight-silhouette dress that we want to turn into a high-low blouse. Step 1: Try on the dress or tunic you want to alter into a blouse and mark with a pencil (preferably a water soluble fabric one) or fabric chalk (if you have it) the new desired length for your blouse. Mark with a horizontal dash. If you’re not sure how long you’d like the blouse to be, you can try a few different lengths by folding the dress up (inwards) and placing a few pins along the edge to hold the fold in place.
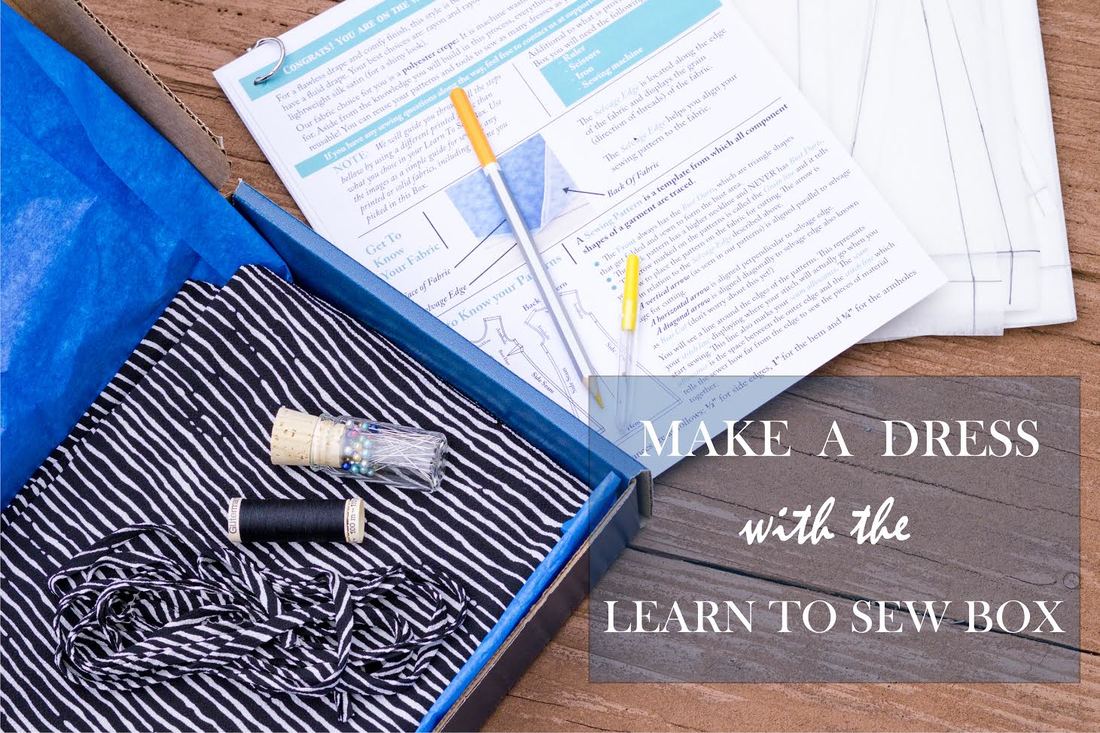 So what is really the easiest way to learn how to sew? So many people would love to learn this craft but very few actually have the patience to get through the semi-confusing, overwhelming initial stage of figuring out sewing patterns and confidently working the sewing machine. Sewing does require some patience and practice, but there is no reason why it should be confusing and overly-complicated. The average person who wants to learn how to sew, doesn’t need to master complex tailoring methods or sew complex garments. The main problem with getting started is where and how? You can go to the fabric store and buy a “simple” sewing pattern and fabric, but things start getting complicated when the sewing pattern is ambiguous and you’re still very confused on the supplies and tools you need to have. It is this frustrating reality that has inspired us to create the Learn to Sew Box: a comprehensive and extremely simple start-to-finish guide for sewing a simple A-line dress. The box includes simple Front and Back sewing patterns in the size of your choice, a beautiful crepe fabric in the print of your choice, and all the sewing supplies you need for the project. As an added bonus, included in the box is an email address which you can contact anytime you run into issues or have additional questions! The awesome thing about it is that everything included (aside from you fabric) is reusable so you can make an infinite number of dresses! The idea is that if you learn how to sew a simple dress from start to finish, you will develop the skills necessary to sew blouses and skirts, moving on to more complicated styles further down the road. In the paragraphs that follow you will have an opportunity to tour the Learn To Sew Box and learn a bit more behind the process of sewing a professional A-line dress from start to finish. 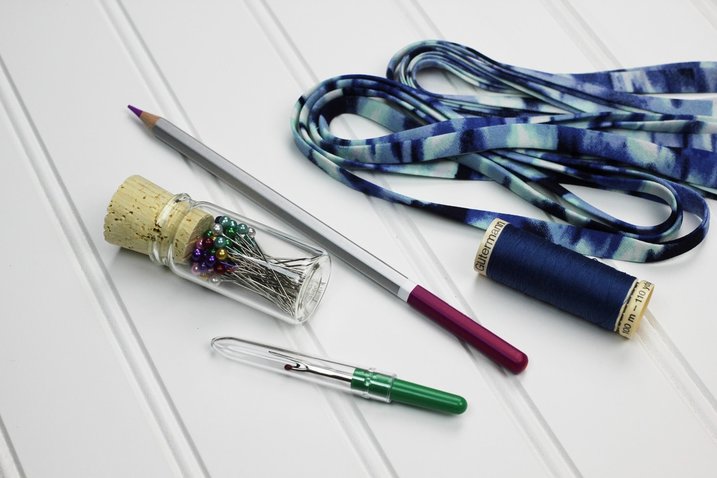 |
The Blog:A journey into our design process, sewing tutorials, fashion tips, and all the inspiring people and things we love. 
Doina AlexeiDesigner by trade and dressmaker at heart. I spend most of my days obsessing over new fabrics and daydreaming new ideas. 
Sadie
Executive Assistant & Client Relations Manager Archives
November 2019
Categories
All

|

-
Sewing Tutorials
-
Basics
>
- Aligning Pattern Grainlines To Fabric
- Preparing Fabrics For Sewing
- Pinning Sewing Patterns To Fabric
- Placing Sewing Patterns On Fabric For Cutting
- Rotary Cutters or Fabric Scissors?
- Cutting The Sewing Patterns
- What Are Notches And How To Use Them In The Sewing Process
- Transferring Notches From Pattern To Fabric
- Transferring Seamlines to Fabric
- Staystitching
- Backstitching: A Complete Guide
- Hand Basting: A Complete Guide
- Sewing Continuous Bias Binding
- Darts >
-
Sewing Seams
>
- The Basics Of Seams And Seam Allowance
- How To Sew A Straight Seam
- Sewing Curved Seams
- Sewing Corner Seams
- Trimming And Grading Seam Excess
- Notching/Clipping Seam Allowance for Tension Release
- Sewing Topstitched Seams
- Sewing Corded Seams
- Sewing A Slot Seam
- Sewing A Gathered Seam
- Sewing Bias Seams
- Sewing Seams With Ease
- Sewing Seams With Crossing Seamlines
- Sewing Unlike Fabric Seams
- How To Iron Seams: Ironing Tools And Conventions
- Sewing With Knit Fabrics
- Understanding Stitch Length And Tension
- Sewing Unique Fabric Seams
-
Seam Finishes
>
- Seam Finishing Techniques - Overview
- Applying A Pinked Seam Finish
- Applying A Bias Bound Seam Finish
- Serging And Zigzag Seam Finishes
- Sewing A Self-Bound Seam Finish
- Sewing A French Seam Finish
- Sewing A Hong Kong Seam Finish
- Sewing A Mock French Seam Finish
- Sewing A Turned-and-Stitched Seam Finish
- Sewing Overcast Hand-Applied Seam Finishes
- Sewing A Flat Felled Seam
- Sewing A Hairline Seam Finish
-
Hem Finishes
>
- Garment Hem Finishes: Overview
- Sewing A Double Fold Hem Finish
- Sewing A Single Fold Hem Finish
- Sewing Bound Hem Finishes
- Sewing An Exposed Double Layer Bound Hem
- Sewing A Folded-Up Bound Hem with Pre-folded Binding
- Sewing A Hong Kong Hem Finish
- Sewing A Band Hem Finish
- Sewing A Bias Faced Hem Finish
- Sewing A Twill Tape Hem Finish
- Sewing A Rolled Hem Finish
- Sewing A Shaped Hem Facing
- Using Fusible Hem Tape And Webbing
- Finishing A Lace Fabric Hem
- Finishing A Leather Hem
- Sewing Faced Hem Corners
- How To Finish Lining At The Hem
- Finishing Fabric Corners by Mitering >
- Interfacing A Hemline: Lined And Unlined Examples
-
Sewing Pockets
>
- Curved Patch Pocket With Flap
- Unlined Square Patch Pockets
- Lined Patch Pockets: Two Ways
- Extension On-Seam Pockets
- Separate On-Seam Pocket
- Front Hip Pockets
- Bound Double Welt Pocket
- Double Welt Pocket With Flap
- Self-Welt Pocket (Using Single Fabric Layer)
- Slanted Welt Pocket (Hand-Stitched)
- Faced Slash Pockets: Overview >
-
Sewing Zippers
>
- Sewing Zippers: General Information
- Sewing A Centered Zipper
- Sewing A Lapped Zipper
- Sewing An Invisible Zipper
- Sewing A Fly Front Zipper
- Sewing A Closed-End Exposed Zipper (No Seam)
- Sewing An Exposed Separating Zipper
- Sewing Hand Stitched Zipper Applications
- Sewing A Zipper Underlay
- Sewing A Placket-Enclosed Separating Zipper
- Sleeveless Finishes >
-
Neckline Finishes
>
- Sewing A Neck Shaped Facing
- Sewing An All-In-One Neck Facing
- Neck And Garment Opening Combination Facings >
- Sewing A Bias Faced Neckline Finish
- Sewing A Band Neckline Finish
- Bound Neckline Finishes: Overview >
- Sewing A Semi-Stretch Strip Band Neckline
- Ribbed Neck Band And Classic Turtleneck
- Decorative Neckline Finishes >
- Finishing Facing Edges >
-
Extras
>
- A Complete Guide on Interfacing
- Sewing Bound Spaghetti Straps
- Sewing Spaghetti Straps To A Faced Neckline
- Sewing Ruffles: Overview
- Patterning And Sewing A Circle Ruffle
- Sewing A Gathered Heading Ruffle
- Sewing Double Layer Gathered Ruffles
- Sewing A Gathered Ruffle Into A Seam
- Sewing A Gathered Ruffle To A Fabric Edge
- Sewing A Fabric Surface Slit
- Sewing A Slit Seam
- Hand-Applied Straight Stitches
- Hand-Applied Blind Stitches
- Hand-Applied Overedge Stitches
- Hand-Applied Tack Stitches
- Hand-Applied Decorative Stitches
-
Basics
>
- Custom Bridal
- Custom Apparel
- About
- Blog
 RSS Feed
Services |
Company |
|
