Doina Alexei
  • Sewing Tutorials
    • Basics >
      • Aligning Pattern Grainlines To Fabric
      • Preparing Fabrics For Sewing
      • Pinning Sewing Patterns To Fabric
      • Placing Sewing Patterns On Fabric For Cutting
      • Rotary Cutters or Fabric Scissors?
      • Cutting The Sewing Patterns
      • What Are Notches And How To Use Them In The Sewing Process
      • Transferring Notches From Pattern To Fabric
      • Transferring Seamlines to Fabric
      • Staystitching
      • Backstitching: A Complete Guide
      • Hand Basting: A Complete Guide
      • Sewing Continuous Bias Binding
    • Darts >
      • Marking And Transferring Darts To Fabric
      • What Are Darts And Dart Components
      • Folding, Pinning And Hand Basting Darts
      • Handling Dart Excess: Bulk And Tension
      • How To Sew A French Dart
      • How To Sew And Iron Single Pointed Darts
      • How To Sew And Iron Contour Darts
      • Sewing Darts With Decorative/Beaded Fabrics
    • Sewing Seams >
      • ​The Basics Of Seams And Seam Allowance
      • How To Sew A Straight Seam
      • Sewing Curved Seams
      • Sewing Corner Seams
      • Trimming And Grading Seam Excess
      • Notching/Clipping Seam Allowance for Tension Release
      • Sewing Topstitched Seams
      • Sewing Corded Seams
      • Sewing A Slot Seam
      • Sewing A Gathered Seam
      • Sewing Bias Seams
      • Sewing Seams With Ease
      • Sewing Seams With Crossing Seamlines
      • Sewing Unlike Fabric Seams
      • How To Iron Seams: Ironing Tools And Conventions
      • Sewing With Knit Fabrics
      • Understanding Stitch Length And Tension
      • Sewing Unique Fabric Seams
    • Seam Finishes >
      • Seam Finishing Techniques - Overview
      • Applying A Pinked Seam Finish
      • Applying A Bias Bound Seam Finish
      • Serging And Zigzag Seam Finishes
      • Sewing A Self-Bound Seam Finish
      • Sewing A French Seam Finish
      • Sewing A Hong Kong Seam Finish
      • Sewing A Mock French Seam Finish
      • Sewing A Turned-and-Stitched Seam Finish
      • Sewing Overcast Hand-Applied Seam Finishes
      • Sewing A Flat Felled Seam
      • Sewing A Hairline Seam Finish
    • Hem Finishes >
      • Garment Hem Finishes: Overview
      • ​Sewing A Double Fold Hem Finish
      • Sewing A Single Fold Hem Finish
      • Sewing Bound Hem Finishes
      • Sewing An Exposed Double Layer Bound Hem
      • Sewing A Folded-Up Bound Hem with Pre-folded Binding
      • Sewing A Hong Kong Hem Finish
      • Sewing A Band Hem Finish
      • Sewing A Bias Faced Hem Finish
      • Sewing A Twill Tape Hem Finish
      • Sewing A Rolled Hem Finish
      • Sewing A Shaped Hem Facing
      • Using Fusible Hem Tape And Webbing
      • Finishing A Lace Fabric Hem
      • Finishing A Leather Hem
      • Sewing Faced Hem Corners
      • How To Finish Lining At The Hem
      • Finishing Fabric Corners by Mitering >
        • Mitering Fabric Corners With A Full Bias Facing
        • Mitering Fabric Corners With Exposed Binding
      • Interfacing A Hemline: Lined And Unlined Examples
    • Sewing Pockets >
      • Curved Patch Pocket With Flap
      • Unlined Square Patch Pockets
      • Lined Patch Pockets: Two Ways
      • Extension On-Seam Pockets
      • Separate On-Seam Pocket
      • Front Hip Pockets
      • Bound Double Welt Pocket
      • Double Welt Pocket With Flap
      • Self-Welt Pocket (Using Single Fabric Layer)
      • Slanted Welt Pocket (Hand-Stitched)
      • Faced Slash Pockets: Overview >
        • Sewing A Faced Slit Pocket
        • Sewing A Rectangular Slash Pocket
        • Sew A Star-Shaped Faced Pocket
    • Sewing Zippers >
      • Sewing Zippers: General Information
      • Sewing A Centered Zipper
      • Sewing A Lapped Zipper
      • Sewing An Invisible Zipper
      • Sewing A Fly Front Zipper
      • Sewing A Closed-End Exposed Zipper (No Seam)
      • Sewing An Exposed Separating Zipper
      • Sewing Hand Stitched Zipper Applications
      • Sewing A Zipper Underlay
      • Sewing A Placket-Enclosed Separating Zipper
    • Sleeveless Finishes >
      • Sleeveless Armhole Finishes: General Information
      • Finishing Sleeveless Garments with Lining
      • Sewing A Folded-Under Bound Armhole Finish
      • Sewing A Shaped Armhole Facing
      • Finishing Armhole Edges With Exposed Binding
      • Finishing Armhole Edges With Decorative Trim
    • Neckline Finishes >
      • Sewing A Neck Shaped Facing
      • Sewing An All-In-One Neck Facing
      • Neck And Garment Opening Combination Facings >
        • Sewing An Extended Front-Neck Facing
        • Sewing A Separate Neck-Front Facing
      • Sewing A Bias Faced Neckline Finish
      • Sewing A Band Neckline Finish
      • Bound Neckline Finishes: Overview >
        • Sewing A Single Layer Bound Neckline
        • Finishing A Neckline With Pre-Folded Binding
        • Sewing A Double Layer Bound Neckline Finish
      • Sewing A Semi-Stretch Strip Band Neckline
      • Ribbed Neck Band And Classic Turtleneck
      • Decorative Neckline Finishes >
        • Sewing A Neckline With Decorative Inset
        • Sewing A Piped Cording Faced Neckline
        • Sewing Decorative Trim To A Finished Neckline
    • Finishing Facing Edges >
      • Finishing Facing Edges: Overview
      • Folded-And-Topstitched Overedge Facing Finish
      • Sewing A Bound Facing Edge Finish
      • Sewing A Hong Kong Facing Finish
      • Sewing A Rolled Edge Facing Finish
      • Sewing A Twill Tape Facing Edge Finish
      • Sewing An Overedge-Stitch Facing Finish
    • Extras >
      • A Complete Guide on Interfacing
      • Sewing Bound Spaghetti Straps
      • Sewing Spaghetti Straps To A Faced Neckline
      • Sewing Ruffles: Overview
      • Patterning And Sewing A Circle Ruffle
      • Sewing A Gathered Heading Ruffle
      • Sewing Double Layer Gathered Ruffles
      • Sewing A Gathered Ruffle Into A Seam
      • Sewing A Gathered Ruffle To A Fabric Edge
      • Sewing A Fabric Surface Slit
      • Sewing A Slit Seam
      • Hand-Applied Straight Stitches
      • Hand-Applied Blind Stitches
      • Hand-Applied Overedge Stitches
      • Hand-Applied Tack Stitches
      • Hand-Applied Decorative Stitches
  • Custom Apparel
    • Custom Bridal
  • Submit A Sewing Question
  • About
  • Blog

Sewing Alterations: How To Make A Blouse Smaller By Taking It In At The Sides.

8/30/2018

8 Comments

 
When it comes to clothing, whether it is women's or menswear, we've all experienced fit issues and size discrepancies at one point or another. For women in particular, these fit issues are a bit more common and complex due the uniqueness of the shapes and curves we all share. The most common of these fit problems often occur at the bust area where some clothing items may often feel too tight or vise versa, unnaturally large. In this week's tutorial we'll address the latter with a tutorial on how to tighten a sleeveless garment at the sides thus decreasing its size at the bust area.

​The example below addresses how to tighten a blouse under each armhole area while keeping the bottom of the blouse intact. This sort of alteration is common when you want to achieve an individualized proportion not offered by the garment at hand. 

How To Measure The Side Seam Excess That Needs To Be Removed

To start with, you'll have to find approximately how much you'd like to take the garment in on the sides.
  • To do this, try on the sleeveless blouse (or dress) and pinch in the equal excess you'd like to remove on each side until the blouse/dress feels comfortable.
  • Insert a pin on both sides, temporarily taking in the necessary excess.
  • Move around a bit to make sure you haven't taken in too much at the sides. If you feel the fit being too tight, loosen up the pins equally on each side until the garment feels comfortable. It is always better to a allow yourself a bit of ease then take in too much fabric. Very important:  Make sure to take in equal amounts on each side- this plays an essential role in the garment fitting properly once altered.
  • When you are confident you've taken enough excess with your pin placement, carefully remove the  garment, leaving the pins inserted on each side.
  • Using a ruler/measuring tape, measure from the edge of the side seam to the pin placement underneath the armhole and note this distance. This measurement will mark the equal amount of excess that needs to be taken out on each side. 
  • Tip: While you can certainly handle this marking and measuring process on your own, it always helps to have someone help with the pinning steps as this needs to be done while the garment is on. 

How To Alter The Side Seams To Make A Blouse (Or Dress) Smaller

Picture
​So let's say you have a blouse or dress that is a bit loose around the bust area (under the armhole) yet the waist and hip area fit just fine. There is actually an easy way to tighten the underarm area on both sides using a stitch blending techniques that wont affect the bottom fit of the garment. Keep in mind that when altering the size of a garment, whether adding or taking in excess, you should always work with the existing seams. Side seams and center back seams in particular are the most convenient and commonly used in the size alteration process. Unless you are a a seasoned dressmaker or there's no appropriate seam to work with, never cut directly through the fabric to make a blouse smaller. In doing so, you risk causing more complex fit issues and difficulty re-finishing the new cut edges. 

Read More
8 Comments

WAAM Industries: An Industrial Brand Making An Impact On The Simple (Yet Important) Aspects Of Our Daily Life.

8/27/2018

0 Comments

 
I am so passionate about brands that aim to make a positive impact on the world, whether through conscious use of materials or multi-functional products that are designed to solve a problem. WAAM Industries (We Are Always On The Move Industries) is a brand that fits this category to a T. This husband and wife team is passionate about each product they design and lovingly bring to life from the ground up. Years ago, Andrew and Hanna Vomhof merged their creativity into the conception of an industrial product brand representative of their lifestyle and belief system. 
Picture
Hanna and Andrew Vomhof of WAAM Industries
Inspired by everything from vintage finds at flea markets and garage sales, each WAAM Industries product is carefully crafted to stand the test of time. The brand sources each material individually to create high quality, natural products featuring a clean, linear design aesthetic. Everything is designed  and manufactured in their Twin Cities, Minnesota work space or at home, where each design receives the attention it deserves. As you browse the brand's featured work below, you'll find that, as stated by the designers themselves, "many of the products at WAAM are based on simple utilitarian objects that play an important role in everyday life but are often over looked." From reusable wooden milk crates and pet bowls to the famous waxed canvas shopping tote and lunch bag, the brand has never deterred from its mission and design aesthetic.

Read More
0 Comments

Sewing Alterations: How To Add a Top Stitched Slit To a Dress Or Skirt.

8/21/2018

2 Comments

 
​Adding a slit to a dress (or skirt) can instantly modernize it and give it a younger look. It is a great way to rescue some of your more outdated styles while simultaneously adding comfort. If you’re in the process of learning how to sew and not yet comfortable with alterations, you can still manage to add a slit to a dress if you follow each sewing step carefully. All you need is an iron, a seam ripper and a sewing machine. Well, thread and scissors will come in handy as well.
Picture
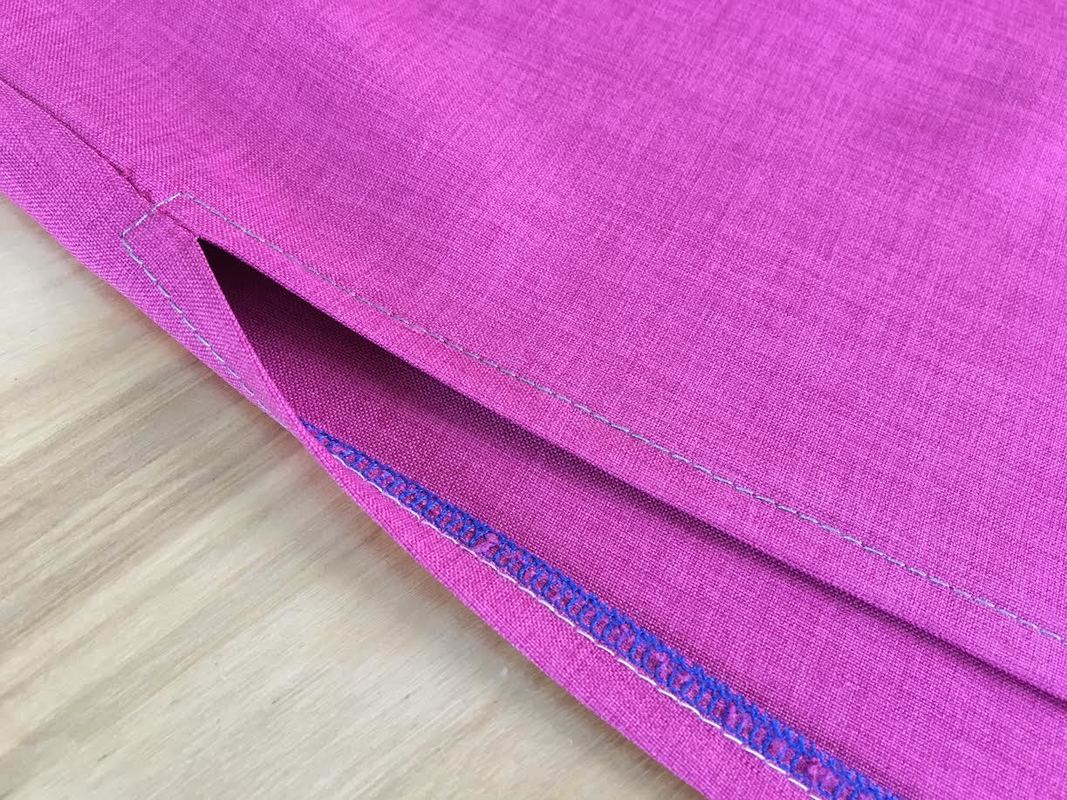
Before we get started, it is important to understand when and where to apply a slit. Keep in mind that slits should only be added into a seam. While cutting a slit directly through the fabric layer is not impossible to achieve, it is very rarely used as it provides a great challenge when it comes to reinforcing the slit opening and blending it in naturally into the garment. In a case as such, if the slit opening is not secured at the top, the slit will continue to rip through the fabric during continuous wear and care. 

That being said, if you want to add a slit to a dress, always work it into an existing seam. If you are lucky to have a seam right where you want the slit, take advantage of it! Otherwise, add the slit into a side seam or the next best option for your particular clothing item. 

Read More
2 Comments

How To Change Overlock Thread Without Re-Threading The Whole Machine

8/10/2018

0 Comments

 
​​Is there a way to change the color of your overlock thread without re-threading your entire machine?
Yes! There absolutely is! And it's super simple to do even for sewing beginners.
​It is so common to feel intimidated by threading an overlock machine. After all, you have to handle 4 spools of thread each having their own separate directions and designated guides. However, if you take each thread step by step, threading a serging machine from scratch is not really all that difficult. As is true for anyone in the process of learning how to sew, practice always makes perfect.
Picture
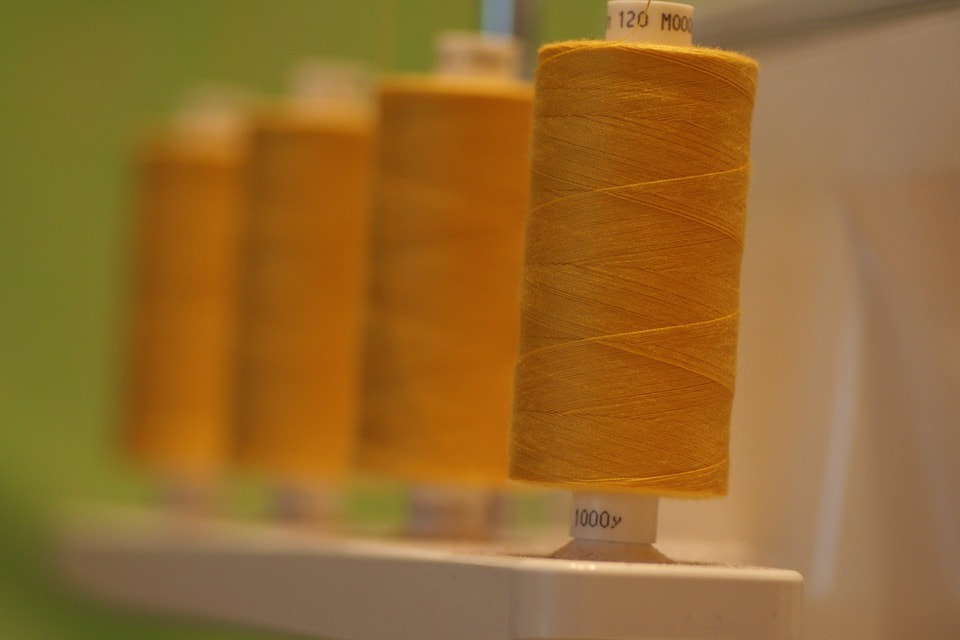
It's also important to keep in mind that working smart is always better than working unnecessarily hard. Being efficient during the sewing process is something you learn with time and continued practice. On that topic, one of the best ways to minimize redundancy and simplify the garment construction process is by using a smart overlock thread-changing technique that does not require you to re-thread the entire machine. Keep in mind that the same technique is applicable to switching threads on both a regular sewing machine and an overlock. This simple thread knotting and pull-through method (described below) will save you lots of time and headache as you focus on more important tasks like learning how to sew that intimidating zipper or set in sleeve. 
​
Below, you'll find a step by step tutorial on how to switch the thread on a serger without actually threading the whole machine form the beginning.

If you are not familiar with how to actually thread a serger altogether, check out this sewing tutorial: How To Thread A Serger/Overlock Machine. Step-By-Step Tutorial With Pictures. 

Read More
0 Comments

How To Stop Fabric Edges From Fraying Using No-Sew Finishing Techniques.

8/9/2018

8 Comments

 
A big part of working with fabrics, whether you are sewing a clothing item or working on a craft project, is using appropriate techniques to contain fraying edges. Unless you're working with fabrics that do not fray, almost all woven fabrics will produce some sort of fraying when cut. If you are not familiar with what fraying is- it is the unraveling of threads or yarns coming undone from the rest of the fabric structure along a cut edge. Anytime you work with fabric, regardless of the project, it is important to keep the fraying contained to a minimum in order to achieve a durable, professional finish. 
Picture

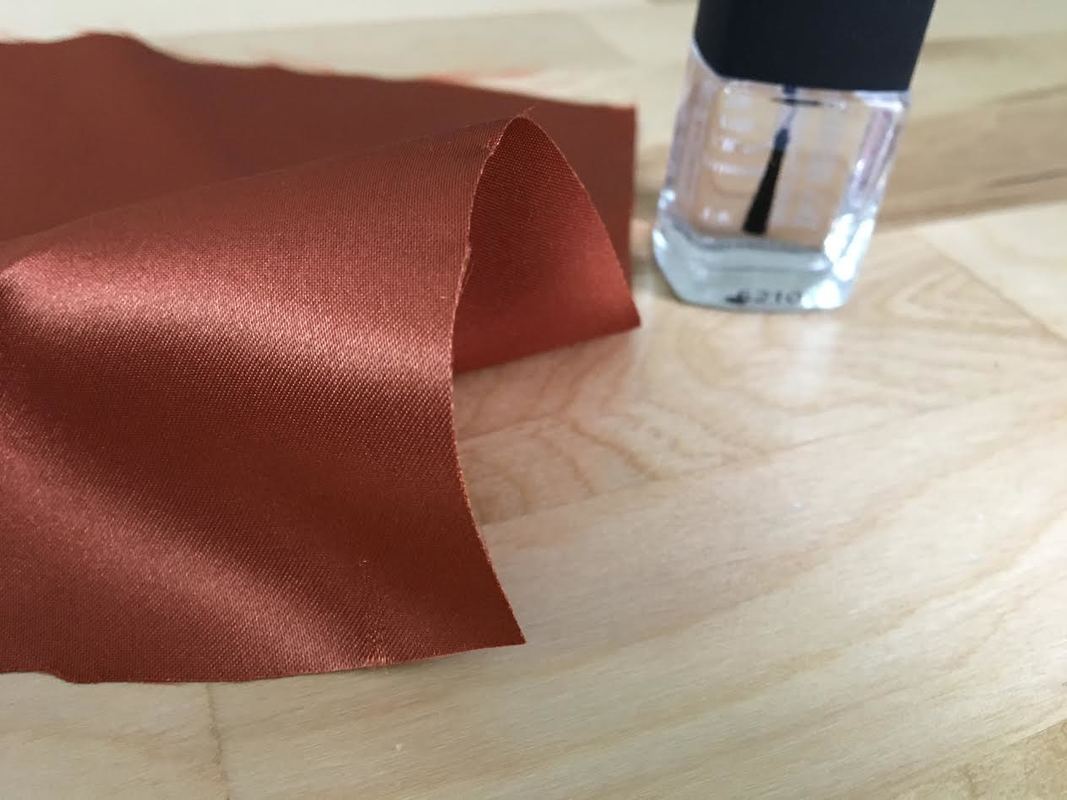
What Is A No-Sew Fabric Finish
There are numerous clean finishing techniques used in dressmaking to contain fabric fraying and finish the edges of seam or hem allowance. Whether it is a serging, ziz zag (on a home sewing machine) or a conventional straight stitch, almost all of them entail the use of stitching. Using some form of stitching to prevent cut fabric edges from unraveling is truly the most effective way to ensure a long lasting, fully-functional result. By contrast, no-sew fabric edge finishes do not use a conventional stitch (whether machine or hand stitch) to contain fraying. 

Read More
8 Comments

How To Thread A Serger/Overlock Sewing Machine: Step-By-Step Tutorial With Pictures.

8/3/2018

0 Comments

 
​An overlock machine, also known as a serger, is a wonderful way to finish off fabric edges. Overlock refers to the type of stitch this machine performs, and it’s commonly used for hemming, finishing, or seaming two fabrics together. 
If you are learning to sew your own garments, you will fall in love with the possibilities of this machine.  It has the ability to elevate a garment with versatile seaming and professional finishing techniques.

Getting Started With Your Overlock Machine
Picture
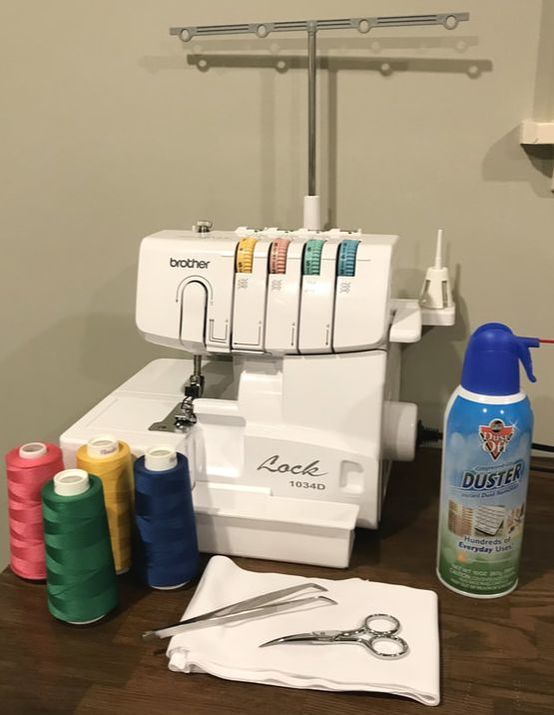
To get started working with your 4-thread serger/overlock machine, you will need a few basic sewing tools:
  • A serger/ overlock machine
  • 4 spools of thread. I prefer cone thread because it rarely gets snagged on the small thread clip that regular spools of thread have.
  • Tweezers- which is commonly included with your overlock machine purchase.
  • Small thread scissors, thread snips, or whatever you are most comfortable using
  • Scrap fabric
  • A can of air (not necessary but really useful to have!)
  • Your Overlock manual (if you have it).

Picture
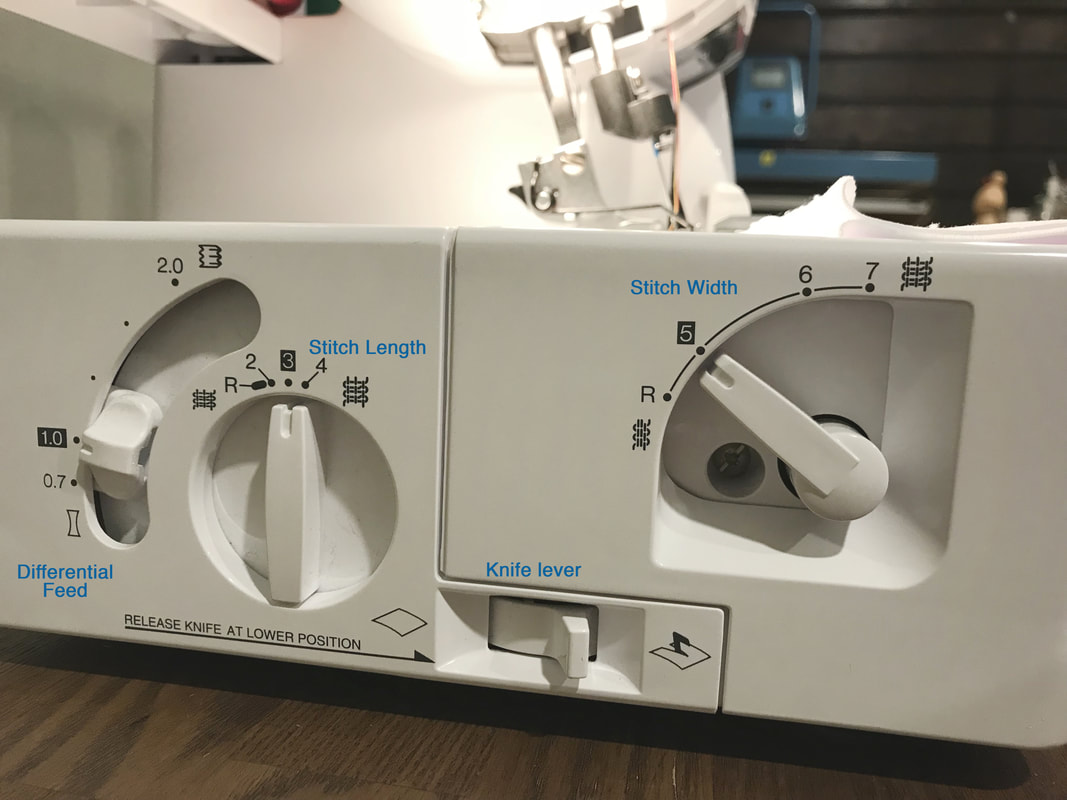
Before threading my overlock machine I always check my settings. Located on the side of the machine are the Stitch Length, Stitch Width, Differential Feed, Blade & Tension Settings.
​
  • Stitch length.  The Stitch Length determines how long you want your stitches to be.​ On my serger, the numbers are in millimeters, including options from 2mm through 4mm. I keep this setting at 3mm unless I’m doing a specialty hem- 3mm is regarded as a standard setting.
  • Stitch Width.  Stitch Width refers to how thick or deep the overlock stitching should be.  The range is 5-7mm.  Since this is not a specialty hem, I keep it at 5mm which is standard.
  • Differential Feed. Differential feed controls the movement of the front and rear feed dogs, essentially, how your feeds pull your fabric through.  I keep this at 1 so the front and rear feed dogs pull the fabric under the foot evenly.  This avoids puckering or gathering in the fabric.
  • Knife or Blade lever.  I always keep my blade down so that the excess fabric is trimmed as I run my fabric through the overlock machine. 

Read More
0 Comments

    The Blog: 

    A journey into our design process, sewing tutorials, fashion tips, and all the inspiring people and things we love.


    Picture

    Doina Alexei 

    Designer by trade and dressmaker at heart.  I spend most of my days obsessing over new fabrics and daydreaming new ideas. 

    Picture
    Sadie
    Executive Assistant &
    Client Relations Manager

    Archives

    November 2019
    October 2019
    August 2019
    July 2019
    June 2019
    May 2019
    March 2019
    February 2019
    January 2019
    December 2018
    November 2018
    October 2018
    September 2018
    August 2018
    July 2018
    June 2018
    May 2018
    April 2018
    March 2018
    February 2018
    January 2018
    December 2017
    November 2017
    October 2017
    September 2017
    August 2017
    July 2017
    June 2017
    May 2017
    April 2017
    March 2017
    February 2017
    January 2017
    December 2016
    November 2016
    October 2016
    September 2016
    August 2016

    Categories

    All
    Fashion
    Ideas & Inspiration
    Inspiration
    Pattern Making
    Pattern-Making
    Sewing
    Textiles

    RSS Feed


      Inspiring stories and sewing tutorials directly to your inbox! 
      ​

    Subscribe

    Picture

Have A Personalized Sewing Question?

Ask It Here

Services

​Custom Apparel
Custom Bridal
​Sewing Tutorials
​

Company

About
Blog

Support

Contact
Terms of Service
DMCA.com Protection Status
© COPYRIGHT 2022. ALL RIGHTS RESERVED.
  • Sewing Tutorials
    • Basics >
      • Aligning Pattern Grainlines To Fabric
      • Preparing Fabrics For Sewing
      • Pinning Sewing Patterns To Fabric
      • Placing Sewing Patterns On Fabric For Cutting
      • Rotary Cutters or Fabric Scissors?
      • Cutting The Sewing Patterns
      • What Are Notches And How To Use Them In The Sewing Process
      • Transferring Notches From Pattern To Fabric
      • Transferring Seamlines to Fabric
      • Staystitching
      • Backstitching: A Complete Guide
      • Hand Basting: A Complete Guide
      • Sewing Continuous Bias Binding
    • Darts >
      • Marking And Transferring Darts To Fabric
      • What Are Darts And Dart Components
      • Folding, Pinning And Hand Basting Darts
      • Handling Dart Excess: Bulk And Tension
      • How To Sew A French Dart
      • How To Sew And Iron Single Pointed Darts
      • How To Sew And Iron Contour Darts
      • Sewing Darts With Decorative/Beaded Fabrics
    • Sewing Seams >
      • ​The Basics Of Seams And Seam Allowance
      • How To Sew A Straight Seam
      • Sewing Curved Seams
      • Sewing Corner Seams
      • Trimming And Grading Seam Excess
      • Notching/Clipping Seam Allowance for Tension Release
      • Sewing Topstitched Seams
      • Sewing Corded Seams
      • Sewing A Slot Seam
      • Sewing A Gathered Seam
      • Sewing Bias Seams
      • Sewing Seams With Ease
      • Sewing Seams With Crossing Seamlines
      • Sewing Unlike Fabric Seams
      • How To Iron Seams: Ironing Tools And Conventions
      • Sewing With Knit Fabrics
      • Understanding Stitch Length And Tension
      • Sewing Unique Fabric Seams
    • Seam Finishes >
      • Seam Finishing Techniques - Overview
      • Applying A Pinked Seam Finish
      • Applying A Bias Bound Seam Finish
      • Serging And Zigzag Seam Finishes
      • Sewing A Self-Bound Seam Finish
      • Sewing A French Seam Finish
      • Sewing A Hong Kong Seam Finish
      • Sewing A Mock French Seam Finish
      • Sewing A Turned-and-Stitched Seam Finish
      • Sewing Overcast Hand-Applied Seam Finishes
      • Sewing A Flat Felled Seam
      • Sewing A Hairline Seam Finish
    • Hem Finishes >
      • Garment Hem Finishes: Overview
      • ​Sewing A Double Fold Hem Finish
      • Sewing A Single Fold Hem Finish
      • Sewing Bound Hem Finishes
      • Sewing An Exposed Double Layer Bound Hem
      • Sewing A Folded-Up Bound Hem with Pre-folded Binding
      • Sewing A Hong Kong Hem Finish
      • Sewing A Band Hem Finish
      • Sewing A Bias Faced Hem Finish
      • Sewing A Twill Tape Hem Finish
      • Sewing A Rolled Hem Finish
      • Sewing A Shaped Hem Facing
      • Using Fusible Hem Tape And Webbing
      • Finishing A Lace Fabric Hem
      • Finishing A Leather Hem
      • Sewing Faced Hem Corners
      • How To Finish Lining At The Hem
      • Finishing Fabric Corners by Mitering >
        • Mitering Fabric Corners With A Full Bias Facing
        • Mitering Fabric Corners With Exposed Binding
      • Interfacing A Hemline: Lined And Unlined Examples
    • Sewing Pockets >
      • Curved Patch Pocket With Flap
      • Unlined Square Patch Pockets
      • Lined Patch Pockets: Two Ways
      • Extension On-Seam Pockets
      • Separate On-Seam Pocket
      • Front Hip Pockets
      • Bound Double Welt Pocket
      • Double Welt Pocket With Flap
      • Self-Welt Pocket (Using Single Fabric Layer)
      • Slanted Welt Pocket (Hand-Stitched)
      • Faced Slash Pockets: Overview >
        • Sewing A Faced Slit Pocket
        • Sewing A Rectangular Slash Pocket
        • Sew A Star-Shaped Faced Pocket
    • Sewing Zippers >
      • Sewing Zippers: General Information
      • Sewing A Centered Zipper
      • Sewing A Lapped Zipper
      • Sewing An Invisible Zipper
      • Sewing A Fly Front Zipper
      • Sewing A Closed-End Exposed Zipper (No Seam)
      • Sewing An Exposed Separating Zipper
      • Sewing Hand Stitched Zipper Applications
      • Sewing A Zipper Underlay
      • Sewing A Placket-Enclosed Separating Zipper
    • Sleeveless Finishes >
      • Sleeveless Armhole Finishes: General Information
      • Finishing Sleeveless Garments with Lining
      • Sewing A Folded-Under Bound Armhole Finish
      • Sewing A Shaped Armhole Facing
      • Finishing Armhole Edges With Exposed Binding
      • Finishing Armhole Edges With Decorative Trim
    • Neckline Finishes >
      • Sewing A Neck Shaped Facing
      • Sewing An All-In-One Neck Facing
      • Neck And Garment Opening Combination Facings >
        • Sewing An Extended Front-Neck Facing
        • Sewing A Separate Neck-Front Facing
      • Sewing A Bias Faced Neckline Finish
      • Sewing A Band Neckline Finish
      • Bound Neckline Finishes: Overview >
        • Sewing A Single Layer Bound Neckline
        • Finishing A Neckline With Pre-Folded Binding
        • Sewing A Double Layer Bound Neckline Finish
      • Sewing A Semi-Stretch Strip Band Neckline
      • Ribbed Neck Band And Classic Turtleneck
      • Decorative Neckline Finishes >
        • Sewing A Neckline With Decorative Inset
        • Sewing A Piped Cording Faced Neckline
        • Sewing Decorative Trim To A Finished Neckline
    • Finishing Facing Edges >
      • Finishing Facing Edges: Overview
      • Folded-And-Topstitched Overedge Facing Finish
      • Sewing A Bound Facing Edge Finish
      • Sewing A Hong Kong Facing Finish
      • Sewing A Rolled Edge Facing Finish
      • Sewing A Twill Tape Facing Edge Finish
      • Sewing An Overedge-Stitch Facing Finish
    • Extras >
      • A Complete Guide on Interfacing
      • Sewing Bound Spaghetti Straps
      • Sewing Spaghetti Straps To A Faced Neckline
      • Sewing Ruffles: Overview
      • Patterning And Sewing A Circle Ruffle
      • Sewing A Gathered Heading Ruffle
      • Sewing Double Layer Gathered Ruffles
      • Sewing A Gathered Ruffle Into A Seam
      • Sewing A Gathered Ruffle To A Fabric Edge
      • Sewing A Fabric Surface Slit
      • Sewing A Slit Seam
      • Hand-Applied Straight Stitches
      • Hand-Applied Blind Stitches
      • Hand-Applied Overedge Stitches
      • Hand-Applied Tack Stitches
      • Hand-Applied Decorative Stitches
  • Custom Apparel
    • Custom Bridal
  • Submit A Sewing Question
  • About
  • Blog