|
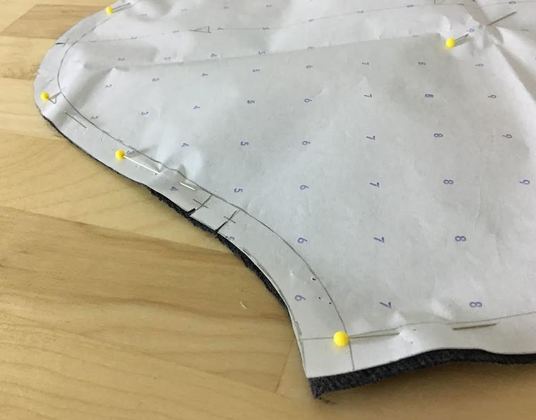
Sewing the most basic of sleeves can be quite a challenge for sewing beginners. Even intermediate dressmakers can sometimes struggle with the construction of a basic sleeves. The challenge? Well, not only do you have to sew within a circular shape (which may feel a bit unnatural), sewing a regular woven sleeve requires the addition of ease (excess for movement) in the sleeve cap.  The sleeve cap has to have a rounded, three-dimensional structure in order to accommodate the shape and movement of the upper arms. This is achieved by adding two very subtle gathering stitches along the edge of the sleeve cap before the sleeve is actually sewn together. Working with these gathering stitches is one of the greatest challenges for sewing beginners as the gathering needs to be invisible on the face of the garment yet achieve a 3-dimensional shape. If it sounds a bit confusing, don't worry! We will walk you through all the steps necessary for achieving this concept below. What is a basic set-in sleeve?A set in sleeve is what you may know as a regular or basic sleeve. It is the most common sleeve style used with woven fabrics. The sleeve itself is sewn and prepped individually after which it is attached to the armhole of the garment. As mentioned above, it requires two rows of gathering stitches along the sleeve cap before the sleeve is actually sewn together. These gathering stitches add excess and allow for proper movement within the sleeve cap adding comfort to the upper arm area. Here are some of the difficulties you are bound to experience in the construction of a regular set in sleeve, especially if you are new to sewing: 1. Stitching along the subtle gathering of the sleeve without actually creating a gathered seam on the face of the garment. 2. Achieving an even look for both sleeves: This is perhaps the most frustrating aspect of sewing sleeves for beginners. The two sleeves will most likely look uneven on your first few tries. This has to do with the direction of the stitch during the sewing process and will solve itself over time as you get more practice. 3. Keeping the fabric edges matched along the most curved underarm area of the sleeves/garment. 4. Working with the front and back notches to match each sleeve to the correct side of the garment. This will feel a bit confusing at the beginning but some tricks we'll share with you bellow will facilitate this process. Sewing knit sleeves vs. woven sleeves: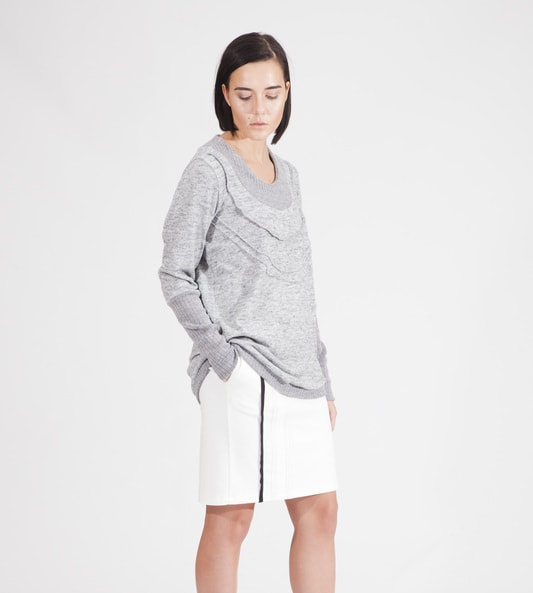 As opposed to woven sleeves, sewing knit sleeves is a bit simpler. Because knits are stretchy, the sleeves do not require ease so you may treat the sleeve seam as you wold any other seam on the garment. As opposed to regular woven sleeves, the sleeve cap edge of knit sleeves are sewn to the garment first then the sleeve seams and side seams are connected with a single stitch. Although this method is simple, keep in mind that it is not recommended for a woven sleeve. Using this method for woven sleeves flattens the underarm area creating aesthetic and fit issues in some garments. Knit sleeves also allow for some room for error as you may stretch the fabric a bit to make it fit within certain edges without jeopardizing the fit and structure of the garment- Knits are always a bit more forgiving in the sewing process than woven fabrics. Sewing a Regular Sleeve: Step-by-Step Process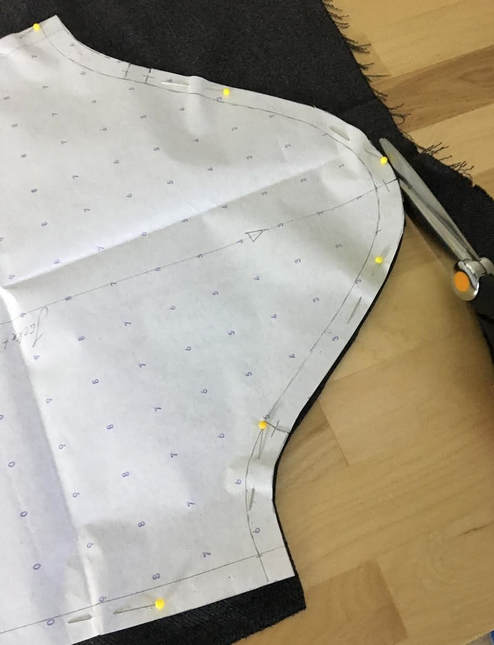 1. Pin and cut out your sleeve patterns. To cut both sleeves at once, it is easiest to fold the fabric in half and cut your sleeve pattern through both layers of fabric. If your fabric has a face side make sure that the right side of the two sleeves are the mirror image of each other. Note that a sleeve pattern should have 3 sets of notches: The center notch is located at the very top of the sleeve cap. It is a single notch that gets aligned with the garment's shoulder seam when the sleeve is attached to the rest of the garment. The front notch: This is a single notch located at the inner curve of the sleeve corresponding to the front underarm. This notch will help you align the sleeve's front to the garment's front. The back notches: As opposed to the front notch, the back is usually marked with double notches to set it apart. The back notches correspond to the back underarm and will aid in matching the back sleeve portion to the back armhole of the garment.
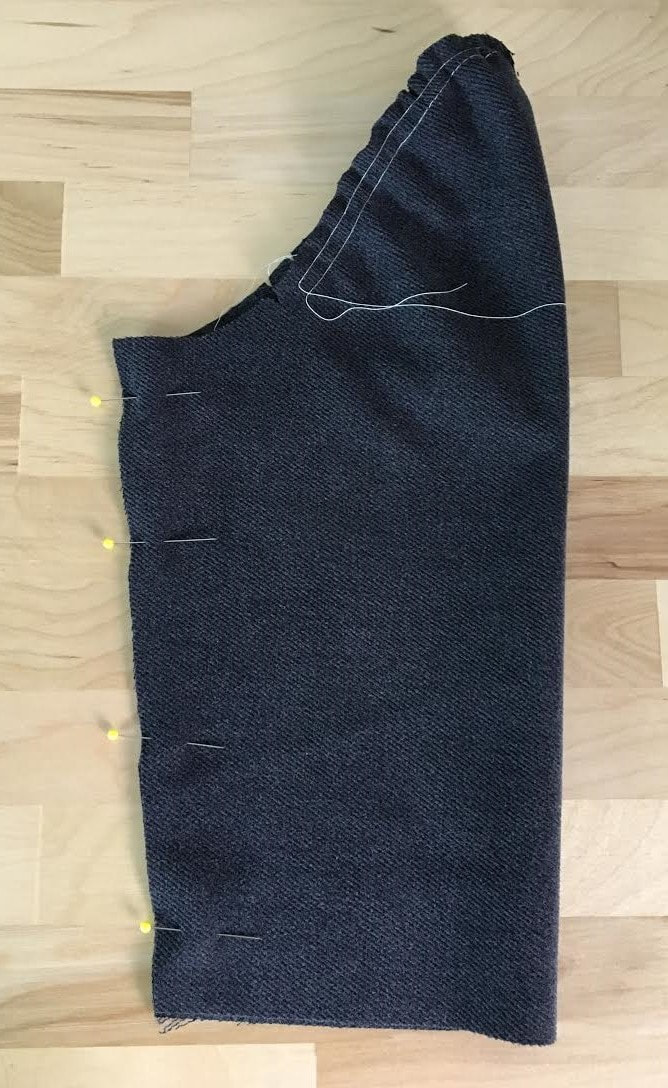
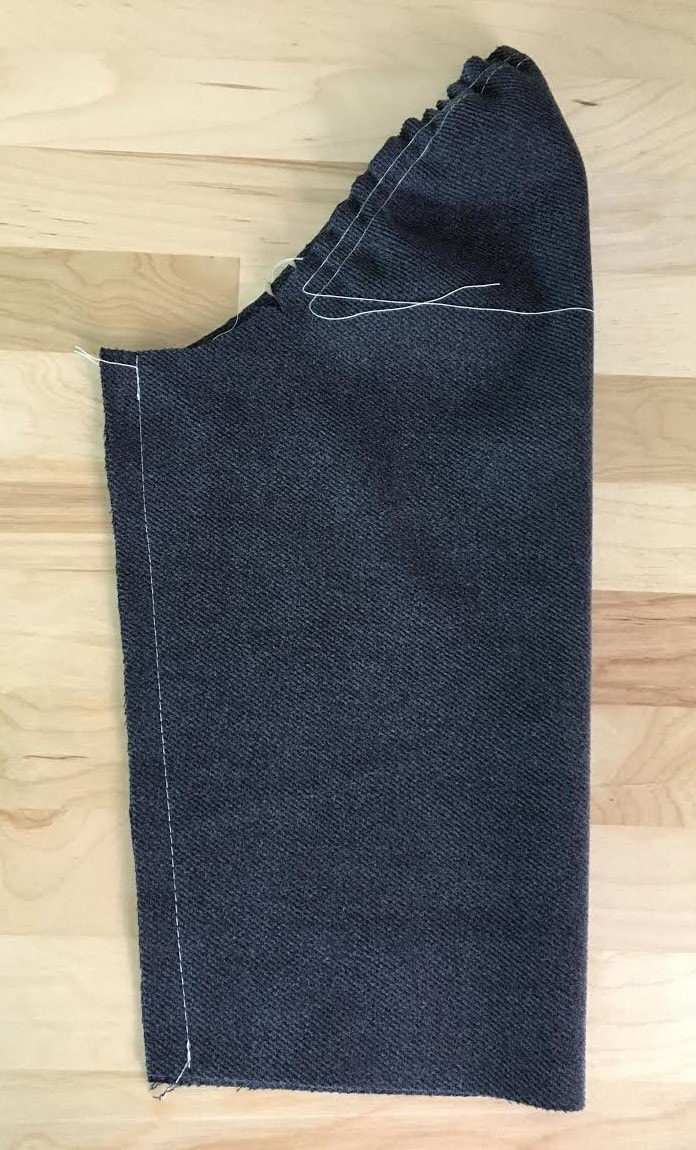
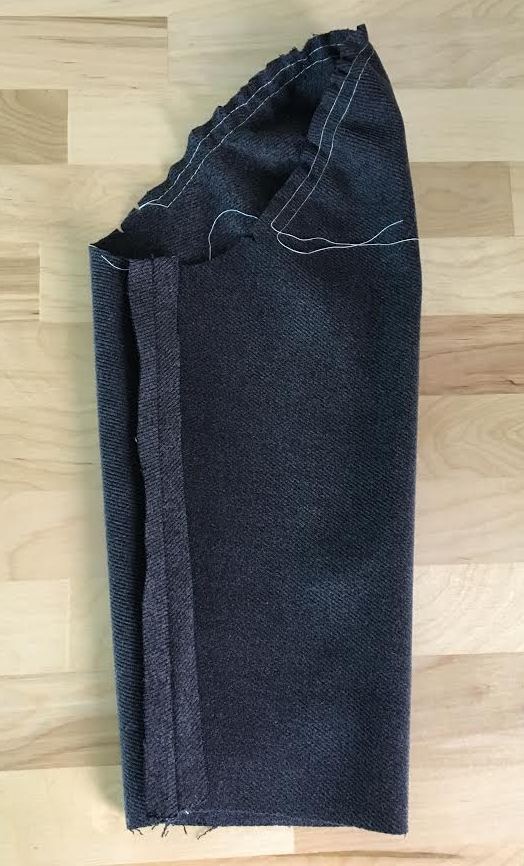
2. It is important that you transfer all the notches from your sewing pattern onto the fabric. Transferring these notches will be essential in matching and aligning the sleeve to the garment in the sewing process. Once the sewing pattern is separated from the fabric pieces, it will be difficult to tell which side of the sleeve should match the front and which side matches the back without these single and double notches. 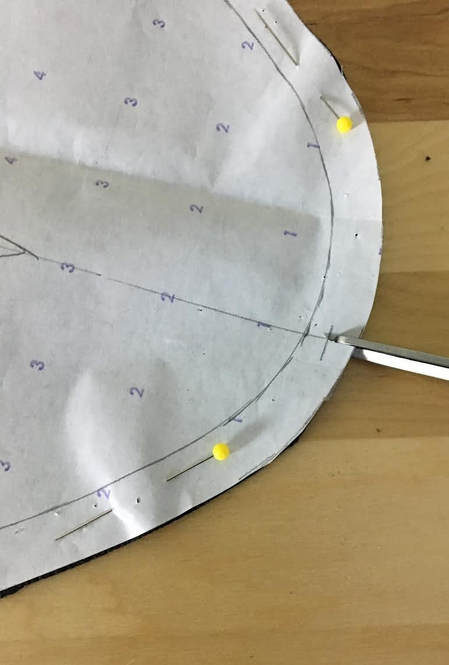 The center notch is essential in properly aligning the center of the sleeve cap to the garment's shoulder seam. If this notch is missing, the sleeve cap ease and sleeve grain will most likely be aligned incorrectly. 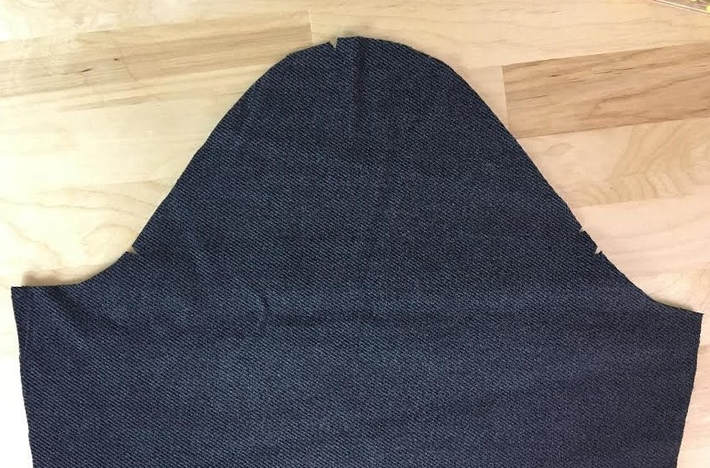 3. Once your notches are transferred to the fabric, remove the sleeve sewing pattern. Note that some sewing patterns feature triangle notches while others have T-dash lines (as displayed in this tutorial). The style of the notches is not important as long as you differentiate between the single front notch and back double notches. 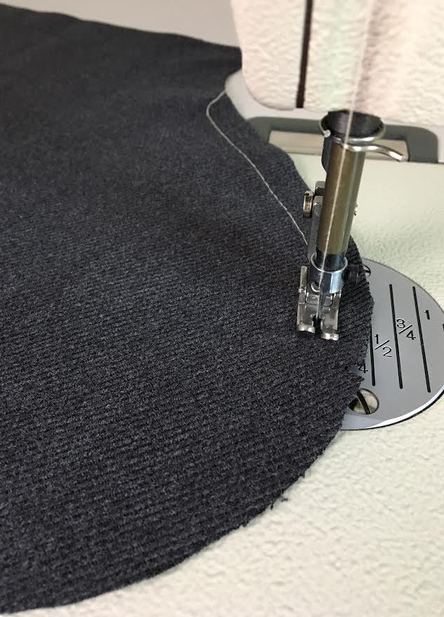 4. Switch the stitch setting on your sewing machine to a basting stitch (longest stitch). Starting at the location of the front notch, apply a basting stitch corresponding with the seam allowance of the sleeve cap edge. Stop the stitch at the double back notches. The seam allowance in this tutorial is 1/2", so this first basting stitch is applied at 1/2" distance from the edge. 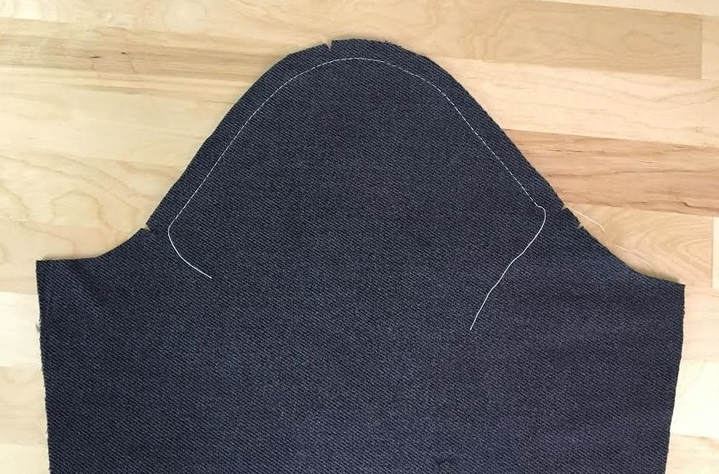 Make sure you leave longer loose threads on each side of the basting stitch to facilitate gathering later in the sewing process. Note that the basting stitch extends from the front notch to the back notches following the curve of the sleeve cap evenly. 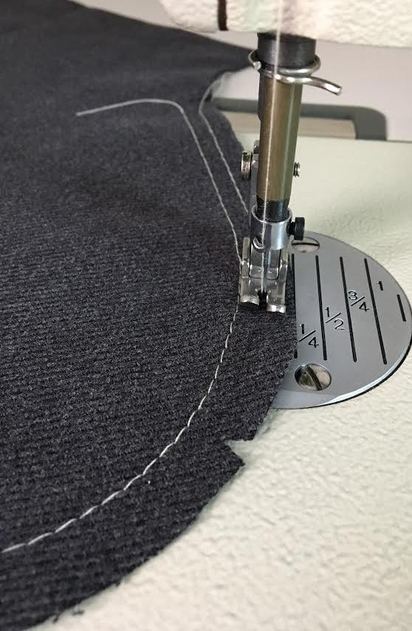 5. Apply a second basting stitch at half the length of the seam allowance from the edge. Use the first basting stitch and the actual edge of the sleeve cap as a guide. Make sure you start and end this second stitch at the same points as the first basting stitch. 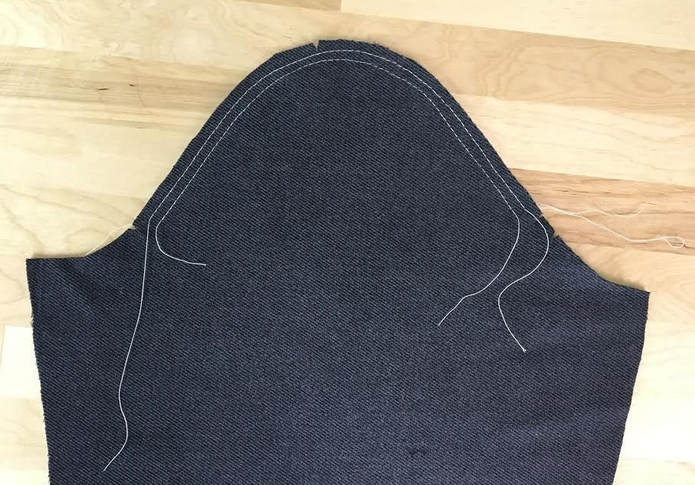 As you did for the first basting stitch, leave enough length in the loose threads to facilitate the gathering process. 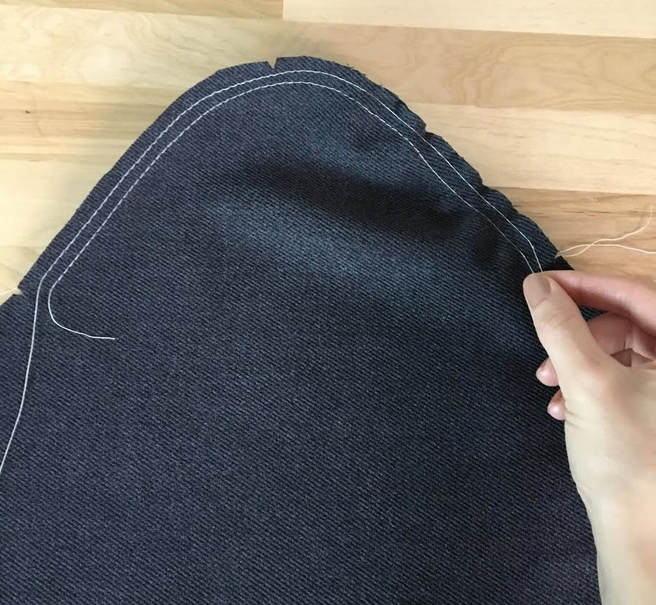 6. Starting on one end, gently pull on both gathering threads simultaneously. Make sure you keep both stitches evenly distributed as you pull. Pull the loose threads until the edge is gently gathered to form a 3-dimensional structure. Keep in mind that this gathering stitch is used for adding ease to the sleeve cap and when sewn, should not resemble and actual gathered seam. 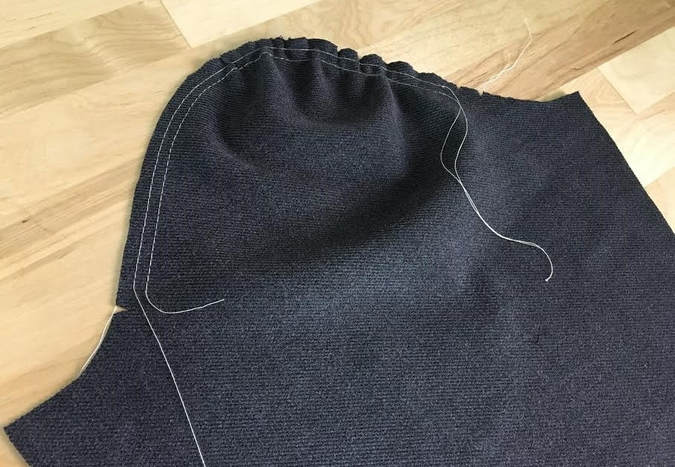 Continue gently pulling the gathering threads until the sleeve cap edge is gathered up to the center notch at the very top. Use your fingers to distribute the gathers evenly. 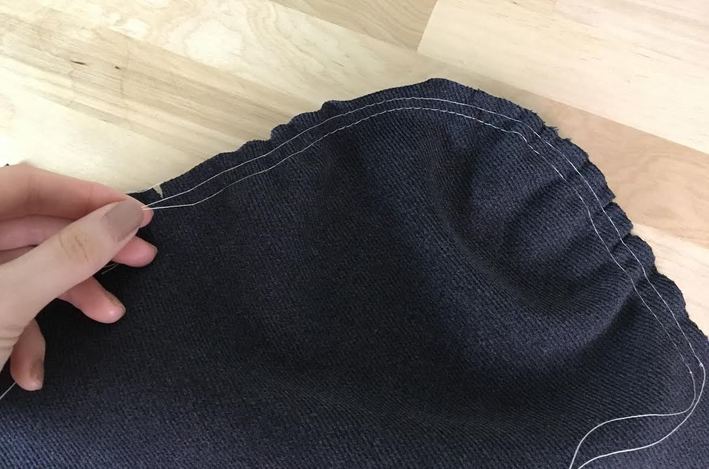 7. Starting at the other end of the gathering stitch, pull the loose threads simultaneously until the edge is subtly gathered up to the center notch as well. 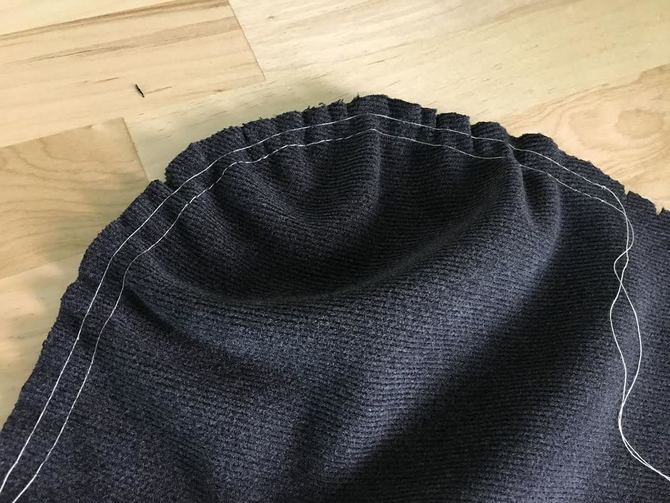 Distribute the gathering evenly along the entire edge of the sleeve cap. Think of this more as creasing rather than gathering. The basting stitches should crease the edge enough to add shape and movement in the sleeve without forming actual gathering. 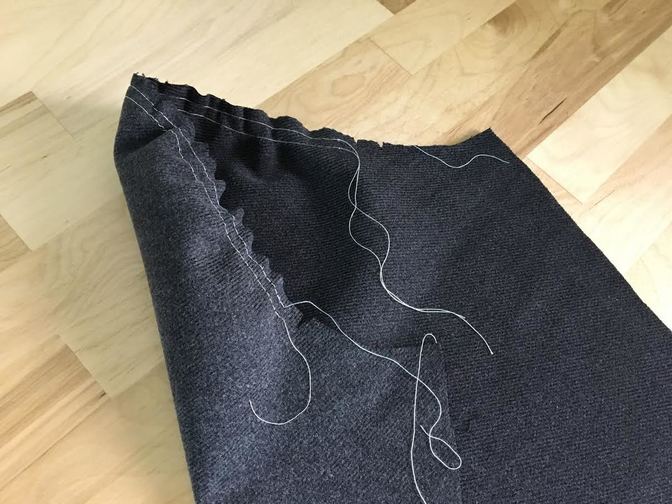 A creased sleeve cap edge will create a three-dimensional structure that replicates the rounded shape of the upper arm and shoulder area. After creasing the two gathering stitches you should be able to see the shape of the sleeve come alive in a more organic structure.
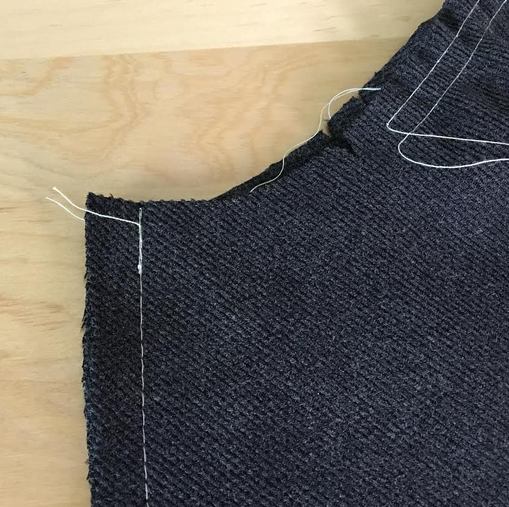 Back-stitch at the end of the stitch especially at the armhole area. Keeping the sleeve seam stable and fully closed will make it much easier to work with when attaching it to the garment's armhole.
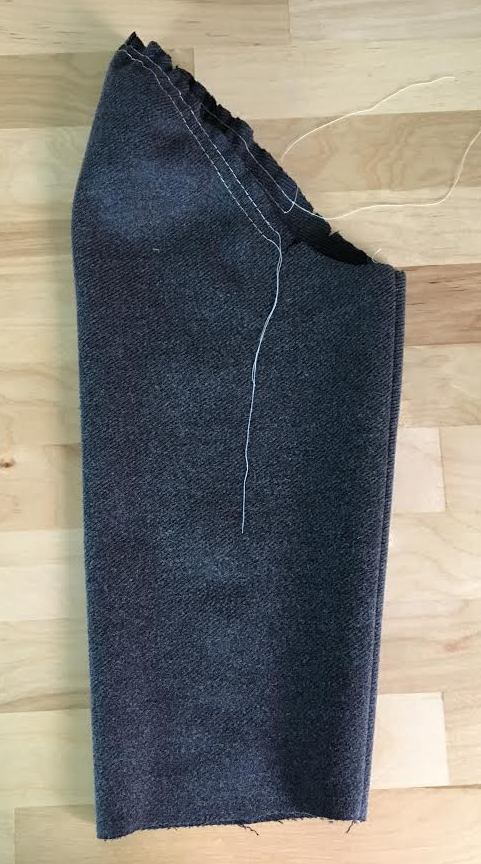
10. Iron the seam allowance open. The easiest way to do this is with a sleeve ironing board. In this tutorial, the seam allowance edges are not clean finished. Keep in mind that ironing the seam allowance open is not necessarily a requirement in all sleeve styles, and it varies depending on the clean finishing method used for the seam. Once ironed, turn the sleeve inside out to expose the face of the sleeve. Keep the sleeve with the right side facing outward throughout the next sewing steps to follow. 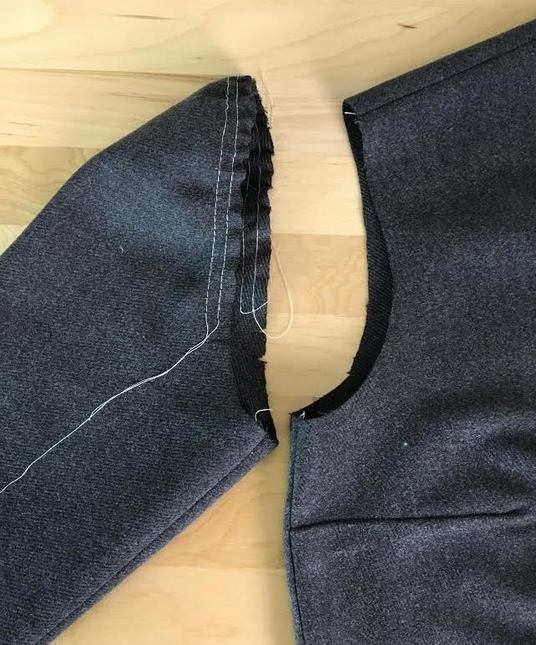 11. Now that the sleeve is sewn and prepped, it is time to attach it to the armhole. Align the sleeve so that the single notch matches the front of the garment and the double back notches correspond to the back. 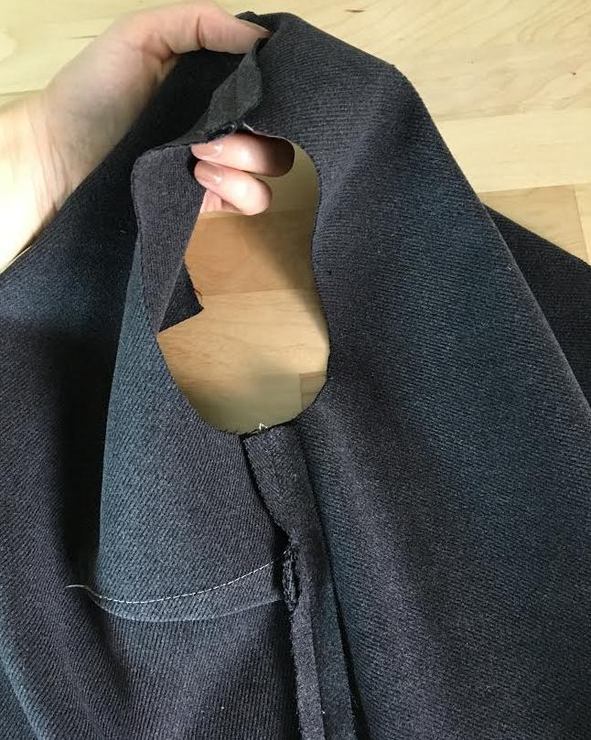 12. Turn the garment inside out but leave the right side of the sleeve facing outwards- Keep this concept in mind as a rule of thumb when sewing sleeves. 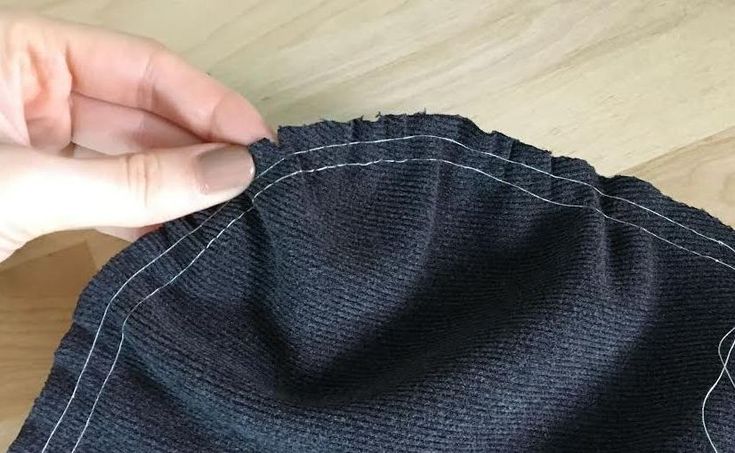 13. Find the center notch at the top of the sleeve cap. As you may remember, this notch is located along the middle of the sleeve cap's gathered edge.
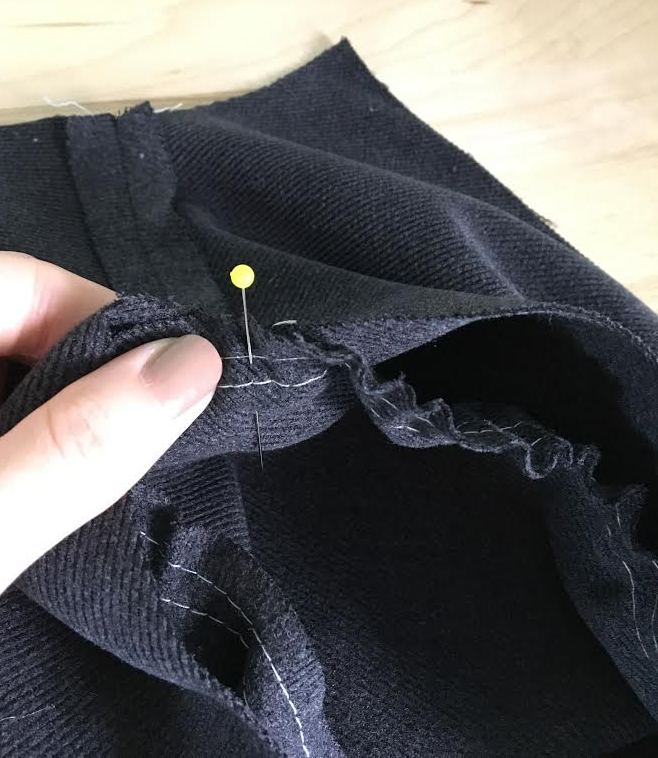
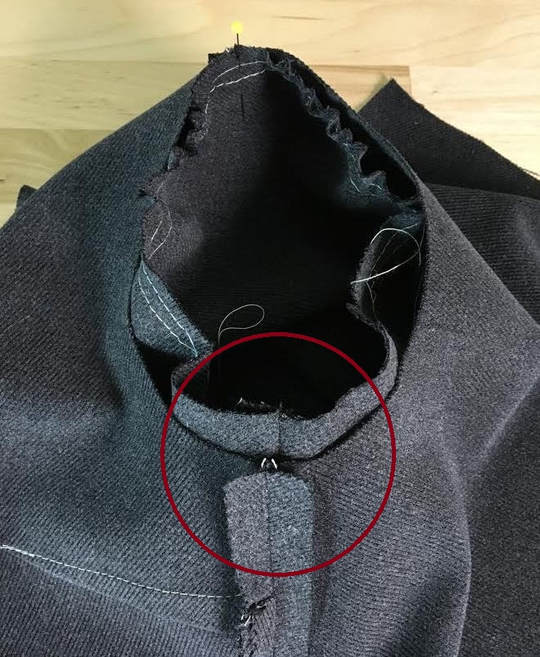 16. Next, match the underarm seams. The sleeve seam should correspond to the garment side seam. Make sure the face sides of both sleeve and garment are touching.  Insert a pin through both seams. Place the pin on the sleeve side and pin perpendicular to the edge. 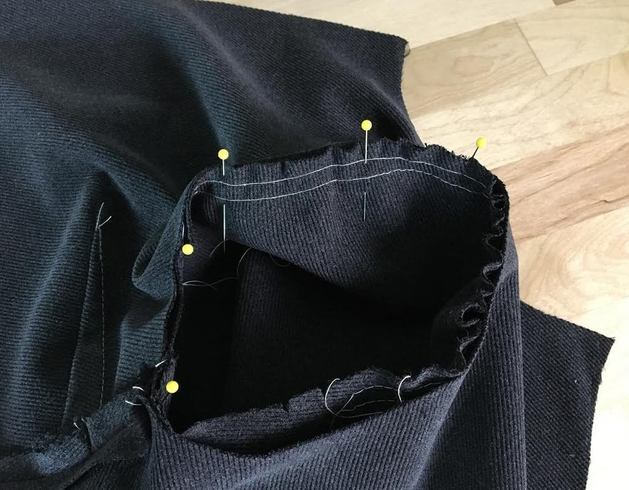 17. Align the edge of the sleeve to the armhole edge and place pins perpendicular to the edge for easy removal in the sewing process. Make sure the gathered edge of the sleeve matches the length of its corresponding armhole edge. Distribute the gathering evenly ensuring there are no folds or puckers on either side. 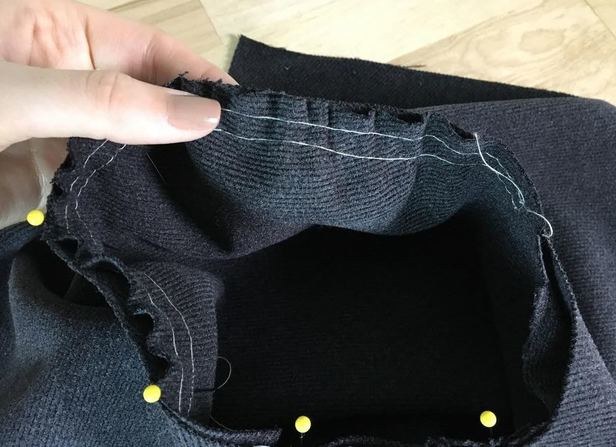 If the gathering is too tight, gently pull to release some of it until it matches the armhole edge. Vise versa, if the gathering is too loose, tighten it by pulling the gathering threads until the edge of the armhole matches the edge of the sleeve cap.  18. Place pins along the entire edge of the seam. To facilitate machine stitching, insert the pins perpendicular to the edge. It is easier to have the pins on the sleeve side as opposed to the garment side-sewing inside a curve is always more comfortable. 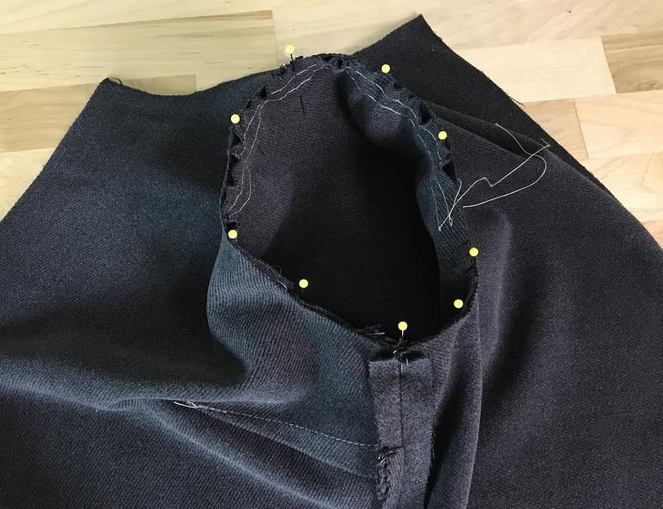 Make sure that all the edges are aligned and held in place properly with pins. Before applying the final stitch, check that the single notch of the sleeve's front matches the front of the garment. On the other end, the double notches should match the back of the garment. If the notches do not match, then the sleeve should be sewn to the opposite armhole. To fix this, simply unpin and switch the two sleeves. You should normally be able to tell in the pinning process whether the front and back are aligned properly because both the sleeve curves and the curve of the garment's armhole will appear to be slightly off. It is good practice to always check that you have everything aligned properly before final stitching as correcting these errors after the sleeve is permanently attached to the garment will be quite a hassle after the fact. 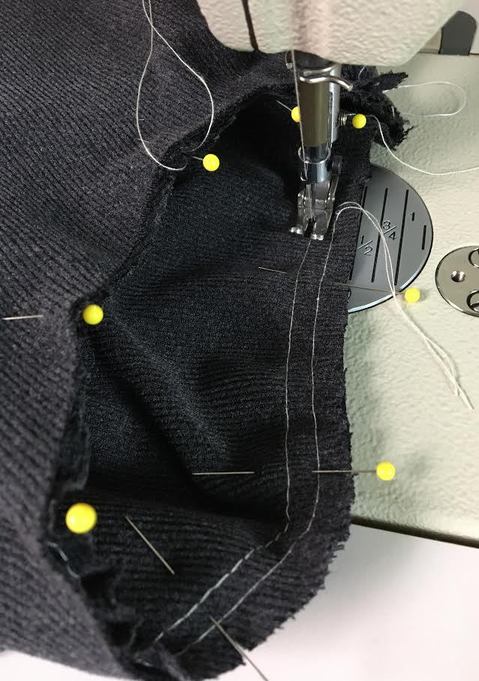 Before applying the final stitch, check your sewing machine settings and make sure you switch from a basting stitch back to a regular stitch. 19. Apply a machine stitch right bellow the first gathering stitch. Try to stay as close to it as possible but make sure the gathered stitch stays on the inside of the garment (always to the right of the final seam stitch). When you get to the gathered part, make sure the creases are evenly positioned along the curve and avoid puckering or actually gathering the seam in the sewing process. This will most likely be a challenge for a sewing beginner and it will certainly take some practice. The goal is to achieve a slightly rounded, 3-dimensional structure along the sleeve cap while avoiding actual gathers or puckers along the seam. 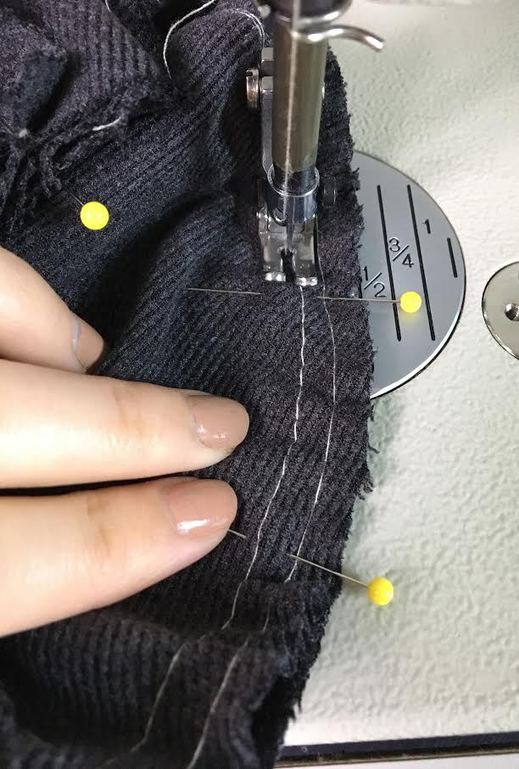 Note: It helps to hold the body of the fabric down during sewing, especially along the gathered edge. This keeps the gathering evenly distributed without puckering while also maintaining the edges properly aligned. It is a good idea to stop a few times during sewing and re-distribute the gathers if you feel they are not even. Use a pin to move the individual creases around more easily. 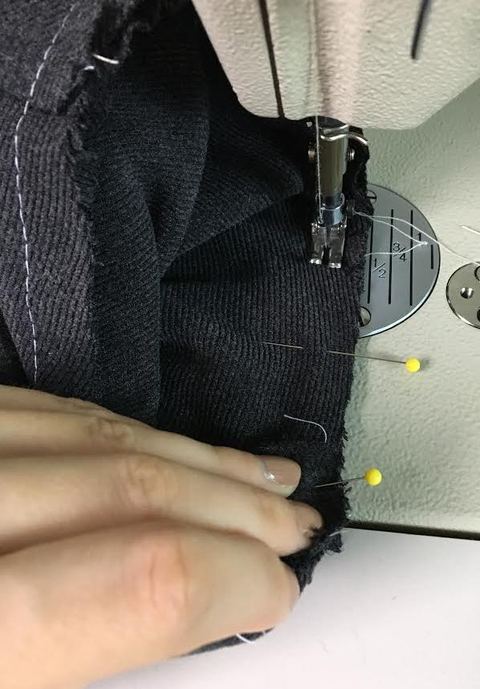 20. When you get to the inner curve of the underarm, pull the fabric as you sew. This is an important aspect of sewing woven sleeves that lack fabric stretch. The underarm is usually the area that requires the most flexibility and strength during wear because it gets pulled excessively during arm movement. Pulling the fabric during sewing will pre-stretch the stitch and allow it to withstand more movement during wear. 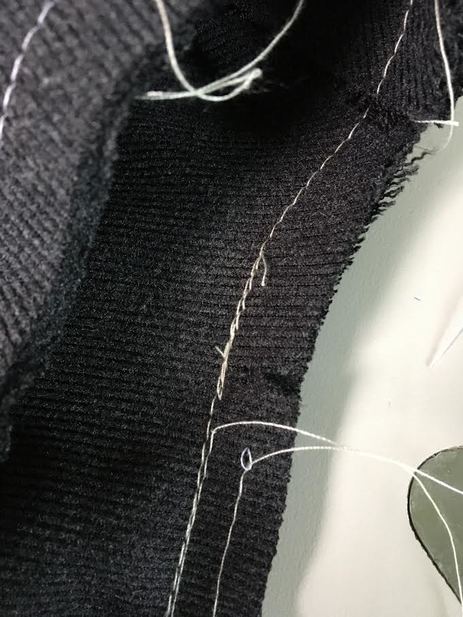 Don't forget to backstitch and/or overlap your stitches once finished. Backstitching keeps the seam stabilized and prevents it from coming apart due to excessive movement during wear. 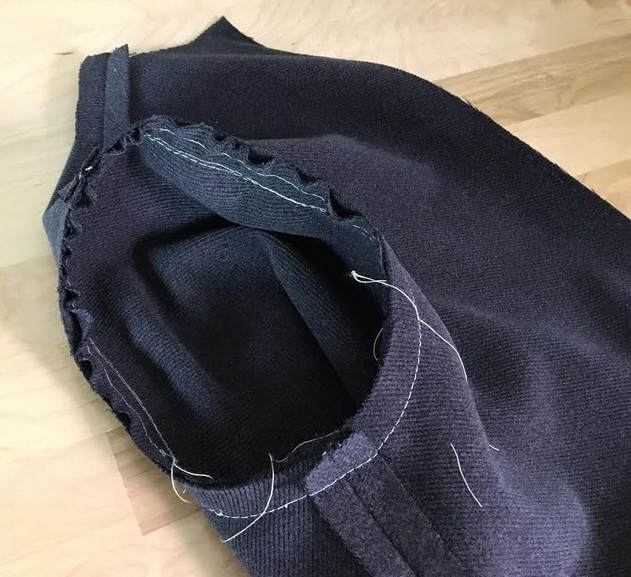 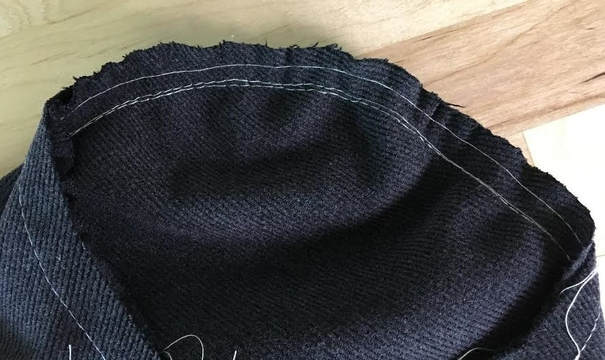 Note the placement of the final seam stitch in close proximity to the first gathering stitch right above it. Equally important, the fabric is creased yet there are no puckers or actual gathers visible along the seam. 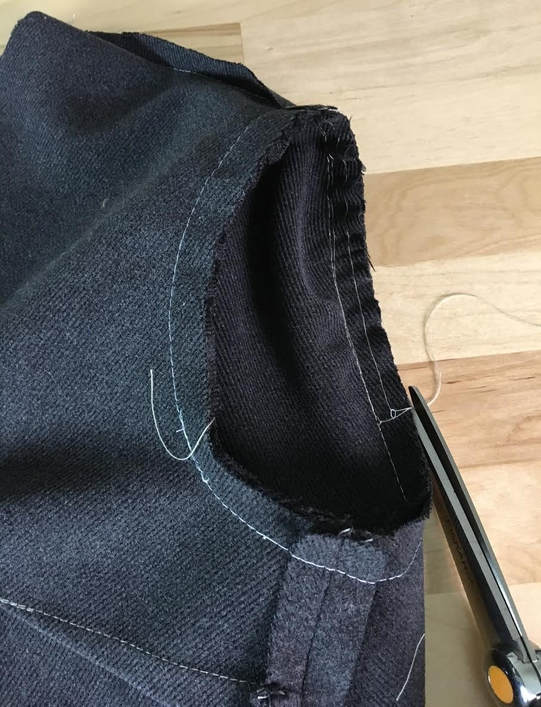 21. Trim the loose threads from the gathering stitches. Use your preferred sewing technique to clean finish the raw edges of the sleeve seam allowance. The easiest is a serging stitch or a dense zi-zag stitch on your home sewing machine. 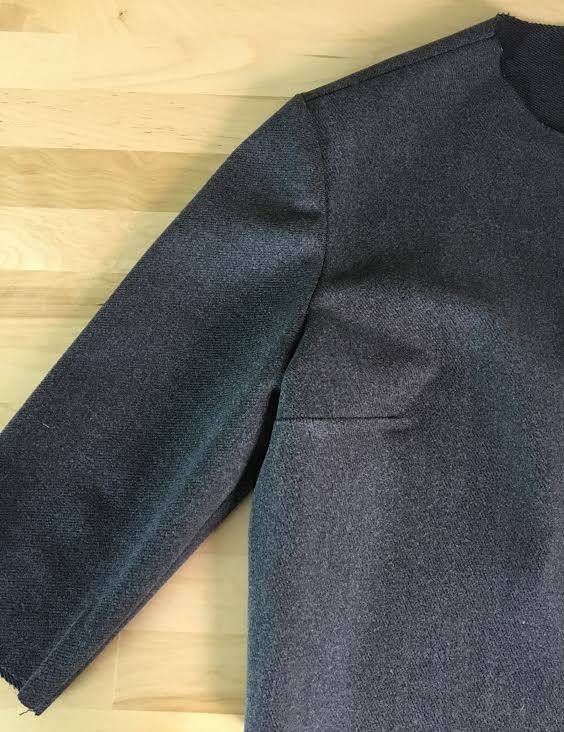 22. Turn the garment on its right side and iron the seam of the sleeve with the seam allowance pointing towards the sleeve. Use a sleeve ironing board for best results.
0 Comments
Leave a Reply. |
The Blog:A journey into our design process, sewing tutorials, fashion tips, and all the inspiring people and things we love. 
Doina AlexeiDesigner by trade and dressmaker at heart. I spend most of my days obsessing over new fabrics and daydreaming new ideas. 
Sadie
Executive Assistant & Client Relations Manager Archives
November 2019
Categories
All

|

-
Sewing Tutorials
-
Basics
>
- Aligning Pattern Grainlines To Fabric
- Preparing Fabrics For Sewing
- Pinning Sewing Patterns To Fabric
- Placing Sewing Patterns On Fabric For Cutting
- Rotary Cutters or Fabric Scissors?
- Cutting The Sewing Patterns
- What Are Notches And How To Use Them In The Sewing Process
- Transferring Notches From Pattern To Fabric
- Transferring Seamlines to Fabric
- Staystitching
- Backstitching: A Complete Guide
- Hand Basting: A Complete Guide
- Sewing Continuous Bias Binding
- Darts >
-
Sewing Seams
>
- The Basics Of Seams And Seam Allowance
- How To Sew A Straight Seam
- Sewing Curved Seams
- Sewing Corner Seams
- Trimming And Grading Seam Excess
- Notching/Clipping Seam Allowance for Tension Release
- Sewing Topstitched Seams
- Sewing Corded Seams
- Sewing A Slot Seam
- Sewing A Gathered Seam
- Sewing Bias Seams
- Sewing Seams With Ease
- Sewing Seams With Crossing Seamlines
- Sewing Unlike Fabric Seams
- How To Iron Seams: Ironing Tools And Conventions
- Sewing With Knit Fabrics
- Understanding Stitch Length And Tension
- Sewing Unique Fabric Seams
-
Seam Finishes
>
- Seam Finishing Techniques - Overview
- Applying A Pinked Seam Finish
- Applying A Bias Bound Seam Finish
- Serging And Zigzag Seam Finishes
- Sewing A Self-Bound Seam Finish
- Sewing A French Seam Finish
- Sewing A Hong Kong Seam Finish
- Sewing A Mock French Seam Finish
- Sewing A Turned-and-Stitched Seam Finish
- Sewing Overcast Hand-Applied Seam Finishes
- Sewing A Flat Felled Seam
- Sewing A Hairline Seam Finish
-
Hem Finishes
>
- Garment Hem Finishes: Overview
- Sewing A Double Fold Hem Finish
- Sewing A Single Fold Hem Finish
- Sewing Bound Hem Finishes
- Sewing An Exposed Double Layer Bound Hem
- Sewing A Folded-Up Bound Hem with Pre-folded Binding
- Sewing A Hong Kong Hem Finish
- Sewing A Band Hem Finish
- Sewing A Bias Faced Hem Finish
- Sewing A Twill Tape Hem Finish
- Sewing A Rolled Hem Finish
- Sewing A Shaped Hem Facing
- Using Fusible Hem Tape And Webbing
- Finishing A Lace Fabric Hem
- Finishing A Leather Hem
- Sewing Faced Hem Corners
- How To Finish Lining At The Hem
- Finishing Fabric Corners by Mitering >
- Interfacing A Hemline: Lined And Unlined Examples
-
Sewing Pockets
>
- Curved Patch Pocket With Flap
- Unlined Square Patch Pockets
- Lined Patch Pockets: Two Ways
- Extension On-Seam Pockets
- Separate On-Seam Pocket
- Front Hip Pockets
- Bound Double Welt Pocket
- Double Welt Pocket With Flap
- Self-Welt Pocket (Using Single Fabric Layer)
- Slanted Welt Pocket (Hand-Stitched)
- Faced Slash Pockets: Overview >
-
Sewing Zippers
>
- Sewing Zippers: General Information
- Sewing A Centered Zipper
- Sewing A Lapped Zipper
- Sewing An Invisible Zipper
- Sewing A Fly Front Zipper
- Sewing A Closed-End Exposed Zipper (No Seam)
- Sewing An Exposed Separating Zipper
- Sewing Hand Stitched Zipper Applications
- Sewing A Zipper Underlay
- Sewing A Placket-Enclosed Separating Zipper
- Sleeveless Finishes >
-
Neckline Finishes
>
- Sewing A Neck Shaped Facing
- Sewing An All-In-One Neck Facing
- Neck And Garment Opening Combination Facings >
- Sewing A Bias Faced Neckline Finish
- Sewing A Band Neckline Finish
- Bound Neckline Finishes: Overview >
- Sewing A Semi-Stretch Strip Band Neckline
- Ribbed Neck Band And Classic Turtleneck
- Decorative Neckline Finishes >
- Finishing Facing Edges >
-
Extras
>
- A Complete Guide on Interfacing
- Sewing Bound Spaghetti Straps
- Sewing Spaghetti Straps To A Faced Neckline
- Sewing Ruffles: Overview
- Patterning And Sewing A Circle Ruffle
- Sewing A Gathered Heading Ruffle
- Sewing Double Layer Gathered Ruffles
- Sewing A Gathered Ruffle Into A Seam
- Sewing A Gathered Ruffle To A Fabric Edge
- Sewing A Fabric Surface Slit
- Sewing A Slit Seam
- Hand-Applied Straight Stitches
- Hand-Applied Blind Stitches
- Hand-Applied Overedge Stitches
- Hand-Applied Tack Stitches
- Hand-Applied Decorative Stitches
-
Basics
>
- Custom Bridal
- Custom Apparel
- About
- Blog


 RSS Feed
Services |
Company |
|
