|
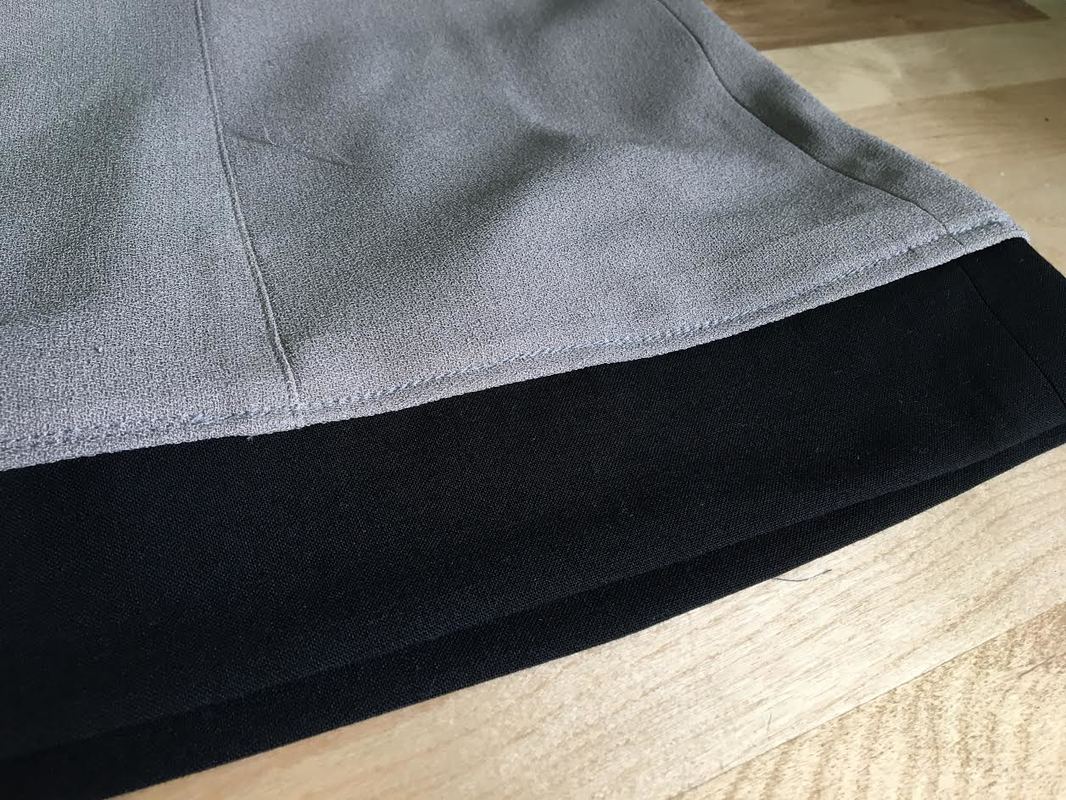
In recent years, fast fashion has forced clothing manufactures to increasingly cut back on materials and production costs in order to maintain their margins. In simple terms, this means that certain cost efficient design and construction techniques have been implemented, whether the consumer notices or not. The most common of these cost adjustments affects the length of a garment. Shortening a clothing item, especially dresses and skirts, uses a bit less fabric when bulk quantities are produced. Making the length shorter and using more affordable trims, linings and hardware are all methods being used to maintain wholesale and retail margins by keeping production and materials costs constant. The length of dresses and skirts are often shortened by an inch or two which in large production lots, can save a lot of money. Have you noticed that the same dress style you may have purchased from a specific brand or retailer used to be a bit longer years ago compared to what you get now? That's no surprise. Due to increasing manufacturing costs, shortening the length of a clothing clothing item is a cost saving technique when large quantities are manufactured. Other times however, clothing items are just designed to be shorter intentionally at the conceptualization stages. That can pose a bit of a problem when these clothing items make it to retail since we're not all made of the same height, right? Perhaps, you are a bit taller than average, and have a hard time finding a dress or skirt of appropriate length. Regardless of what the reason behind it is, the truth is, we've all been in the position where we may shy away from wearing a favorite style just because it is a bit too short. Isn't it frustrating when you find something that is the perfect fit, perfect color, flattering, comfortable but the one shortcoming is in the length? The truth is, shortening a dress or skirt is way easier than lengthening it. When it comes to garment construction, it is always easier to subtract excess fabric then it is to add it once the fabric has been cut and the garment has been sewn. Techniques For Lengthening a Dress (or Skirt):
The techniques used to lengthen a dress depends largely on what sort of hem finishing method has already been applied to it. Some hem finishing techniques, like the lining one featured in the tutorial below, may provide enough excess fabric at the hem to make up the necessary length addition. Other finishes provide very little hem allowance to work with which require the addition of a separate piece of fabric in order for the dress to be lengthened. The latter is true in most cases.
3 Comments
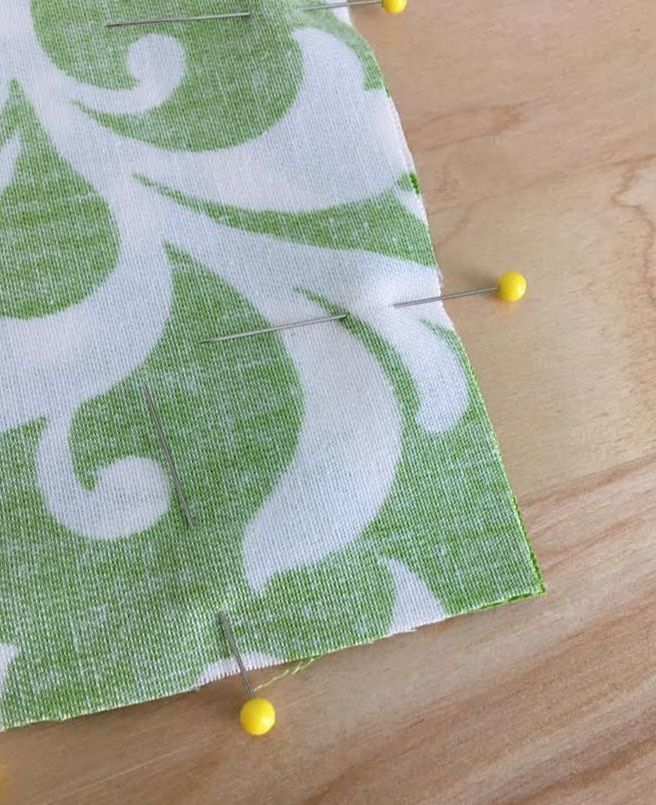
So you know how to sew a straight seam; you know basic methods for clean finishing fabric raw edges; you understand darts, seam allowance and notches; you can clean finish the hem of a garment. You should have no problem sewing a clothing item from start to finish right? Well, for the most part, yes- you only need the basics to sew a basic design. From time to time however, you might find yourself confronting some tricky sewing techniques that can halt your sewing project all together. One of these instance occurs when sewing and clean finishing inner or outer corners. You will most likely encounter cornered seams as such when sewing facings, collars, cuffs, skirt vents, and lining. Other instance not related to garment construction, may include accessories, pillows, pillowcases, etc. Cornered seams are often self-finished, usually involving two layers (or more) of fabric that are turned onto their face side after the stitch that connects them has been applied, thus enclosing the seam allowance and corner's raw edges. To begin with, there are two main challenges involving sewing inner and outer self-finished corners: 1. Making a smooth stitch transition at the corner's point. 2. Clipping and grading the seam allowance to release tension and allow the cornered seam to lay flat and smooth and have defined finish. We'll walk you through both techniques below and show you some tricks pertaining to sewing sharp inner and outer cornered seams that are self-finished (turns onto itself to enclose the raw edges of the seam allowance and the wrong side of the fabric). Pinning and Sewing Self-Finished, Outward Facing Fabric Corners: A self-finished (enclosed) outer corner is very common when sewing faced corners like those of cuffs, collars, skirt/dress vents, or garment opening edges. It is also used quite often in various craft projects that require the raw edges of the fabric to be enclosed within a corner, warranting a clean finish on both sides. Regardless of whether you are currently working on a project as such, sewing and clean finishing an outward-facing corner consisting of 2 layers of fabric is something you should familiarize yourself with. 1. As is true for sewing most seams, when aligning two layers of fabric together to form a self-finished outer corner, always align the face of each fabric layer touching one another (enclosed on the inside) as shown above. The wrong side of the fabric should be facing you on the outside.
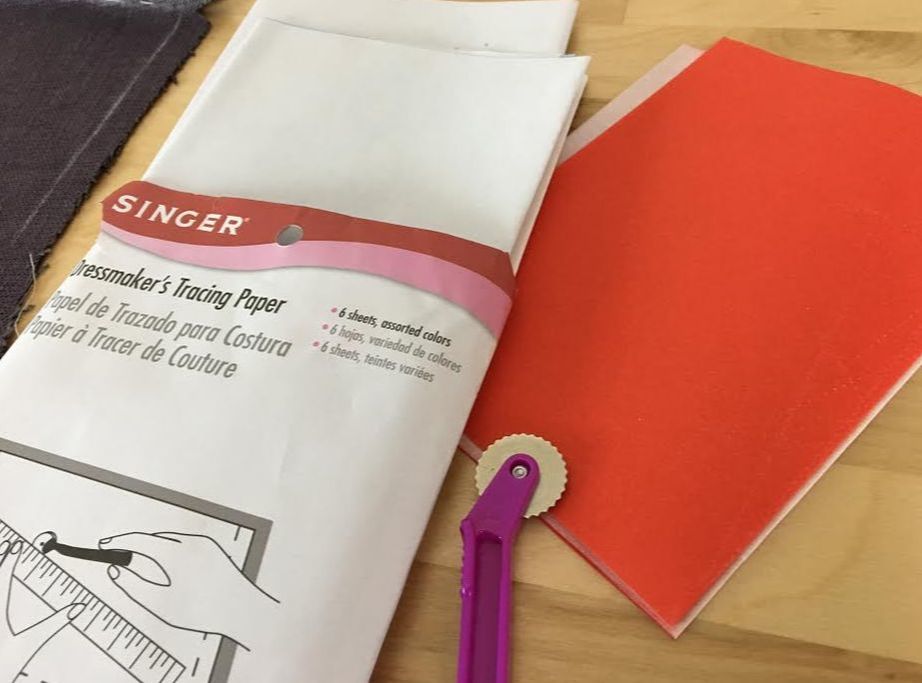
Match the corresponding corners to one another and pin the two layers of fabric perpendicular to the edge as shown above. 1. Transferring sewing lines (seamlines, hemline, dart lines etc.) from pattern onto fabric. Sewing patterns include a lot of important information used in the sewing process. From notches to darts to seam allowance, it can all feel a bit overwhelming if you are sewing beginner. If that is you, don't stress! If you take each pattern annotation one by one, you'll find that the concept of sewing and understanding patterns is actually quite simple. In the beginning stages, after the fabric has been cut according to the sewing patterns, you may not know exactly which information you need to transfer from your pattern pieces onto the fabric pieces. Keep in mind that technically, all notations you see on sewing patterns are fairly important in the construction process. More experienced dressmakers can sew a garment using minimal marks on the actual fabric pieces. They can piece each garment portion together just by looking at the information provided on the patterns. As a beginner however, you'll find that when you cut the sewing patterns out, the fabric pieces become somewhat of a confusing blur once the patterns are unpinned and removed. For that reason, if you are in the beginning stages of learning how to sew, you should transfer the most important pattern notations and sewing lines onto your fabric before attempting to match and stitch the fabric pieces together. You don't have to transfer every single word and line. As a beginner, it is sufficient to transfer these three important sewing notions: Notches, seamlines/hemline, and dart lines. In the line transfer process from pattern onto fabric, you are quite literally replicating the lines from the paper to the fabric. There are various transfer methods you can use depending on the color, thickness and texture of the fabric at hand. We'll walk you through two of the most commonly used (and simple) techniques below. As a rule of thumb, always transfer pattern notations on the wrong side of the fabric. 2 common line-transfer methods from sewing patterns onto fabric: 1. Using tracing paper and a tracing wheel. This method requires the use of fabric tracing paper and a tracing wheel. Whether you choose this method or not, it is a good idea to invest in a tracing wheel and tracing paper as you'll be using them later down the road. You can find both of these items at your local craft/fabric stores. As mentioned above, all seamlines, dart lines and notches should be transferred from your patterns onto the fabric pieces after cutting. Always transfer notations onto the wrong side of the fabric to avoid damaging the face of the garment.
This season I've been on a crusade to create a staple beach accessory that could potentially last a lifetime. As you browse through this website, you'll find that fashion products are a great passion of mine, lovingly inspired by some of my own needs and necessities. I started thinking about the summer season back in February, after all the major holidays are over and you're sort of stuck in limbo, waiting for the weather to warm up. It is during this "vulnerable" time that I often think about that perfect beach vacation. I am lucky enough to be able to take one week-long beach trip a year. When the time finally comes, I scramble a bit to find a few good bathing suits, and over the years, I've learned that at least one good cover up is a must for every beach trip. They are super easy to pack, convenient and effortless when moving between the beach, the hotel, the pool, the boardwalk and so forth- Lots of places to be when you're at the beach, right? Last summer however, I found myself wearing a sarong more than a cover up. I'm not sure if I was trying to maximize my tan or I just fell in love with the feminine fit and drape of a sarong without foregoing coverage. A classic sarong silhouette accentuates and flatters the waistline, while also feeling great around the hips and legs as it blows in the beach wind. As I was testing and designing the microfiber beach towel for this upcoming season, it got me thinking about my own beach habits and what I feel most comfortable wearing and carrying to the beach. I instantly reverted back to this love I've developed for sarongs. Nonetheless, I am not ready to forgo a classic cover up either. So I thought why not have the cake and eat it too by creating an interchangeable, 2-in-1 cover up and sarong that can easily transition from one style to the other at the hand of one simple step. I love to pack light and use products that are durable, functional and serve more than one purpose. Since a beach trip is an occasion where packing smart is a must, the Sarong-to-Cover Up has now become my personal must-have.
|
The Blog:A journey into our design process, sewing tutorials, fashion tips, and all the inspiring people and things we love. Doina AlexeiDesigner by trade and dressmaker at heart. I spend most of my days obsessing over new fabrics and daydreaming new ideas. Sadie
Executive Assistant & Client Relations Manager Archives
November 2019
Categories
All
|
-
Sewing Tutorials
-
Basics
>
- Aligning Pattern Grainlines To Fabric
- Preparing Fabrics For Sewing
- Pinning Sewing Patterns To Fabric
- Placing Sewing Patterns On Fabric For Cutting
- Rotary Cutters or Fabric Scissors?
- Cutting The Sewing Patterns
- What Are Notches And How To Use Them In The Sewing Process
- Transferring Notches From Pattern To Fabric
- Transferring Seamlines to Fabric
- Staystitching
- Backstitching: A Complete Guide
- Hand Basting: A Complete Guide
- Sewing Continuous Bias Binding
- Darts >
-
Sewing Seams
>
- The Basics Of Seams And Seam Allowance
- How To Sew A Straight Seam
- Sewing Curved Seams
- Sewing Corner Seams
- Trimming And Grading Seam Excess
- Notching/Clipping Seam Allowance for Tension Release
- Sewing Topstitched Seams
- Sewing Corded Seams
- Sewing A Slot Seam
- Sewing A Gathered Seam
- Sewing Bias Seams
- Sewing Seams With Ease
- Sewing Seams With Crossing Seamlines
- Sewing Unlike Fabric Seams
- How To Iron Seams: Ironing Tools And Conventions
- Sewing With Knit Fabrics
- Understanding Stitch Length And Tension
- Sewing Unique Fabric Seams
-
Seam Finishes
>
- Seam Finishing Techniques - Overview
- Applying A Pinked Seam Finish
- Applying A Bias Bound Seam Finish
- Serging And Zigzag Seam Finishes
- Sewing A Self-Bound Seam Finish
- Sewing A French Seam Finish
- Sewing A Hong Kong Seam Finish
- Sewing A Mock French Seam Finish
- Sewing A Turned-and-Stitched Seam Finish
- Sewing Overcast Hand-Applied Seam Finishes
- Sewing A Flat Felled Seam
- Sewing A Hairline Seam Finish
-
Hem Finishes
>
- Garment Hem Finishes: Overview
- Sewing A Double Fold Hem Finish
- Sewing A Single Fold Hem Finish
- Sewing Bound Hem Finishes
- Sewing An Exposed Double Layer Bound Hem
- Sewing A Folded-Up Bound Hem with Pre-folded Binding
- Sewing A Hong Kong Hem Finish
- Sewing A Band Hem Finish
- Sewing A Bias Faced Hem Finish
- Sewing A Twill Tape Hem Finish
- Sewing A Rolled Hem Finish
- Sewing A Shaped Hem Facing
- Using Fusible Hem Tape And Webbing
- Finishing A Lace Fabric Hem
- Finishing A Leather Hem
- Sewing Faced Hem Corners
- How To Finish Lining At The Hem
- Finishing Fabric Corners by Mitering >
- Interfacing A Hemline: Lined And Unlined Examples
-
Sewing Pockets
>
- Curved Patch Pocket With Flap
- Unlined Square Patch Pockets
- Lined Patch Pockets: Two Ways
- Extension On-Seam Pockets
- Separate On-Seam Pocket
- Front Hip Pockets
- Bound Double Welt Pocket
- Double Welt Pocket With Flap
- Self-Welt Pocket (Using Single Fabric Layer)
- Slanted Welt Pocket (Hand-Stitched)
- Faced Slash Pockets: Overview >
-
Sewing Zippers
>
- Sewing Zippers: General Information
- Sewing A Centered Zipper
- Sewing A Lapped Zipper
- Sewing An Invisible Zipper
- Sewing A Fly Front Zipper
- Sewing A Closed-End Exposed Zipper (No Seam)
- Sewing An Exposed Separating Zipper
- Sewing Hand Stitched Zipper Applications
- Sewing A Zipper Underlay
- Sewing A Placket-Enclosed Separating Zipper
- Sleeveless Finishes >
-
Neckline Finishes
>
- Sewing A Neck Shaped Facing
- Sewing An All-In-One Neck Facing
- Neck And Garment Opening Combination Facings >
- Sewing A Bias Faced Neckline Finish
- Sewing A Band Neckline Finish
- Bound Neckline Finishes: Overview >
- Sewing A Semi-Stretch Strip Band Neckline
- Ribbed Neck Band And Classic Turtleneck
- Decorative Neckline Finishes >
- Finishing Facing Edges >
-
Extras
>
- A Complete Guide on Interfacing
- Sewing Bound Spaghetti Straps
- Sewing Spaghetti Straps To A Faced Neckline
- Sewing Ruffles: Overview
- Patterning And Sewing A Circle Ruffle
- Sewing A Gathered Heading Ruffle
- Sewing Double Layer Gathered Ruffles
- Sewing A Gathered Ruffle Into A Seam
- Sewing A Gathered Ruffle To A Fabric Edge
- Sewing A Fabric Surface Slit
- Sewing A Slit Seam
- Hand-Applied Straight Stitches
- Hand-Applied Blind Stitches
- Hand-Applied Overedge Stitches
- Hand-Applied Tack Stitches
- Hand-Applied Decorative Stitches
-
Basics
>
- Custom Bridal
- Custom Apparel
- About
- Blog
Services |
Company |
|


 RSS Feed

