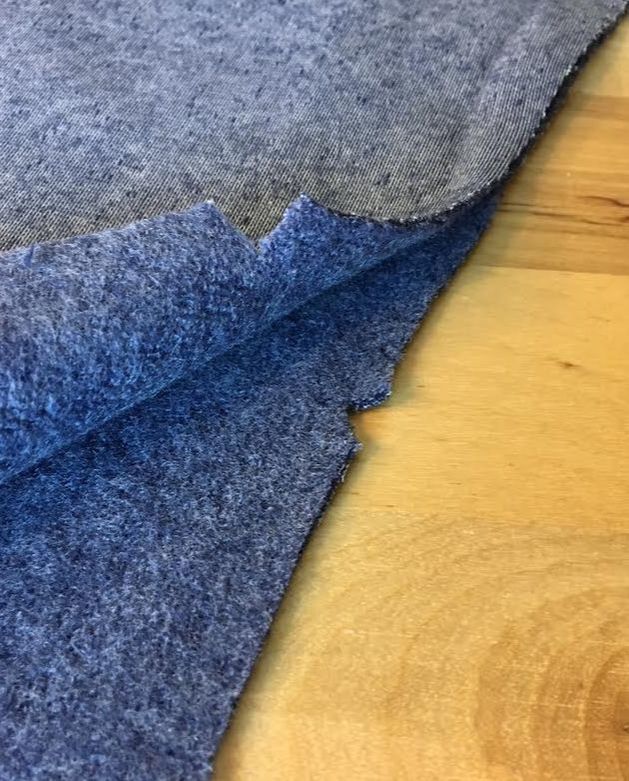
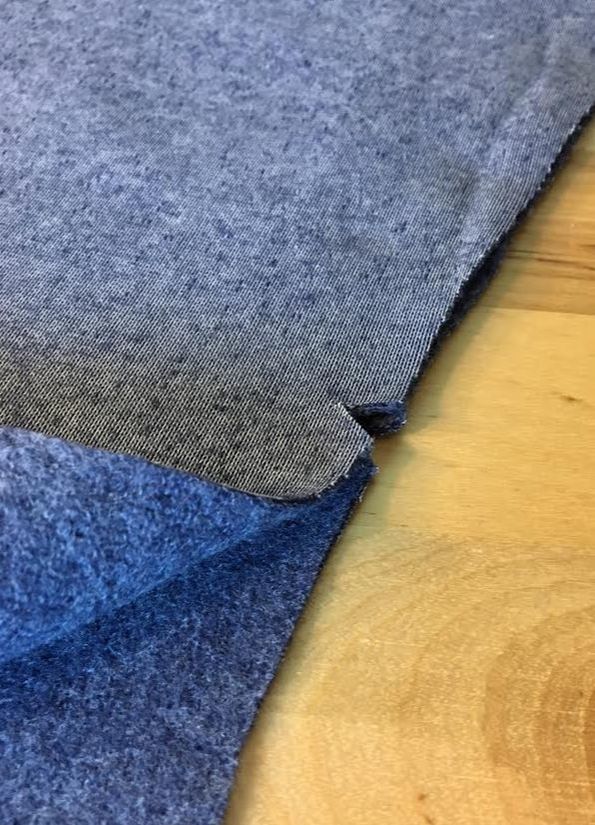
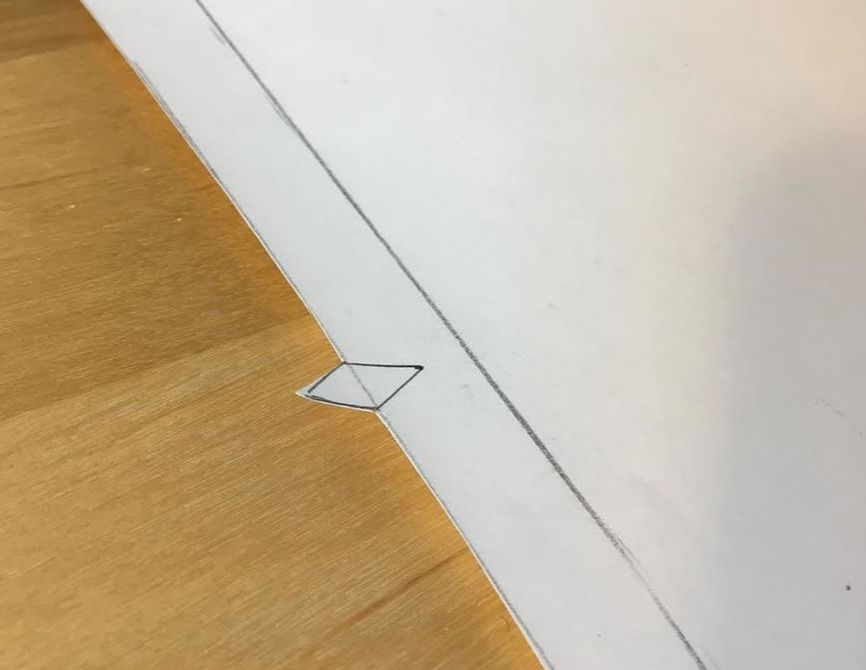
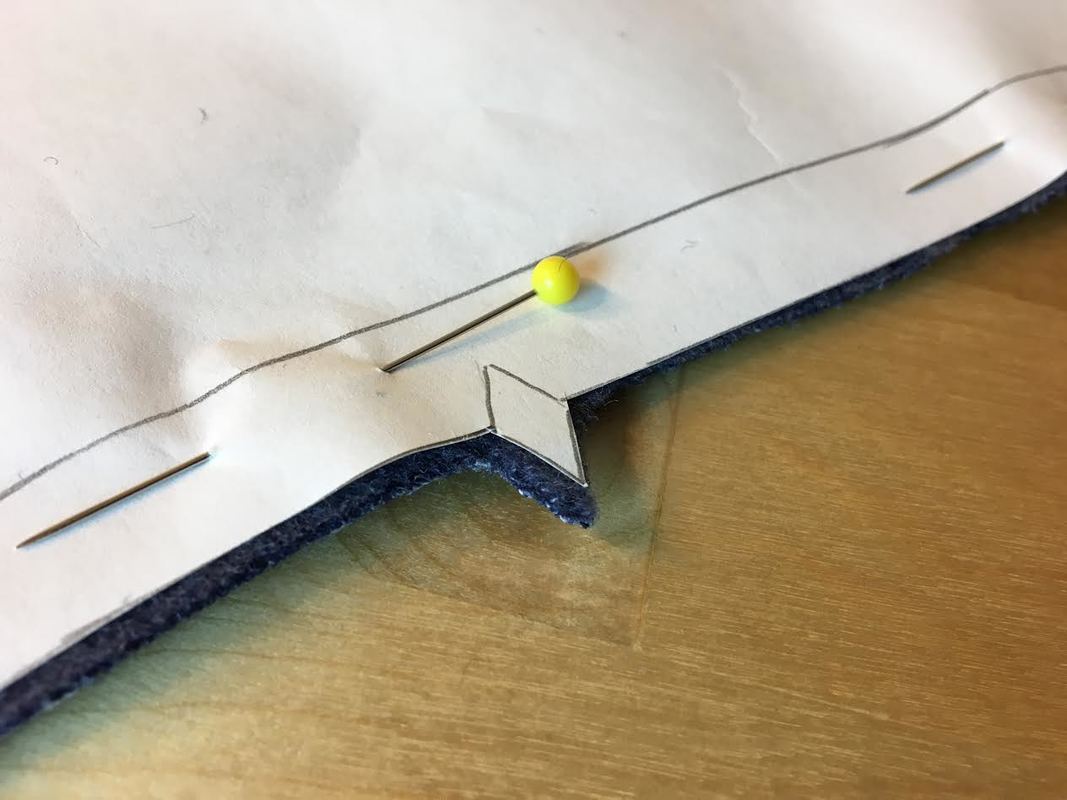
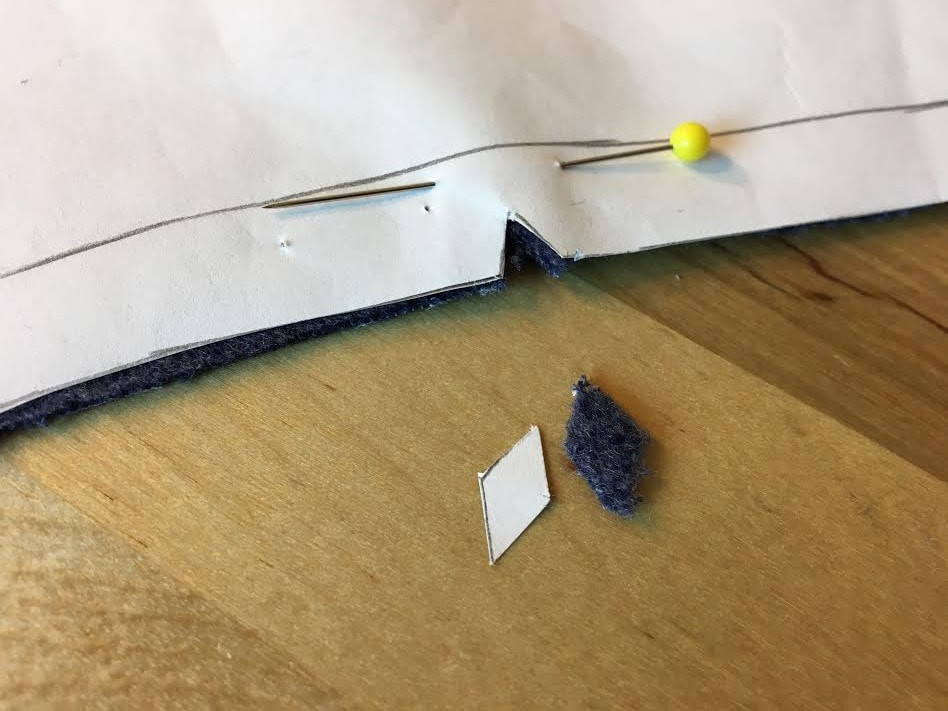
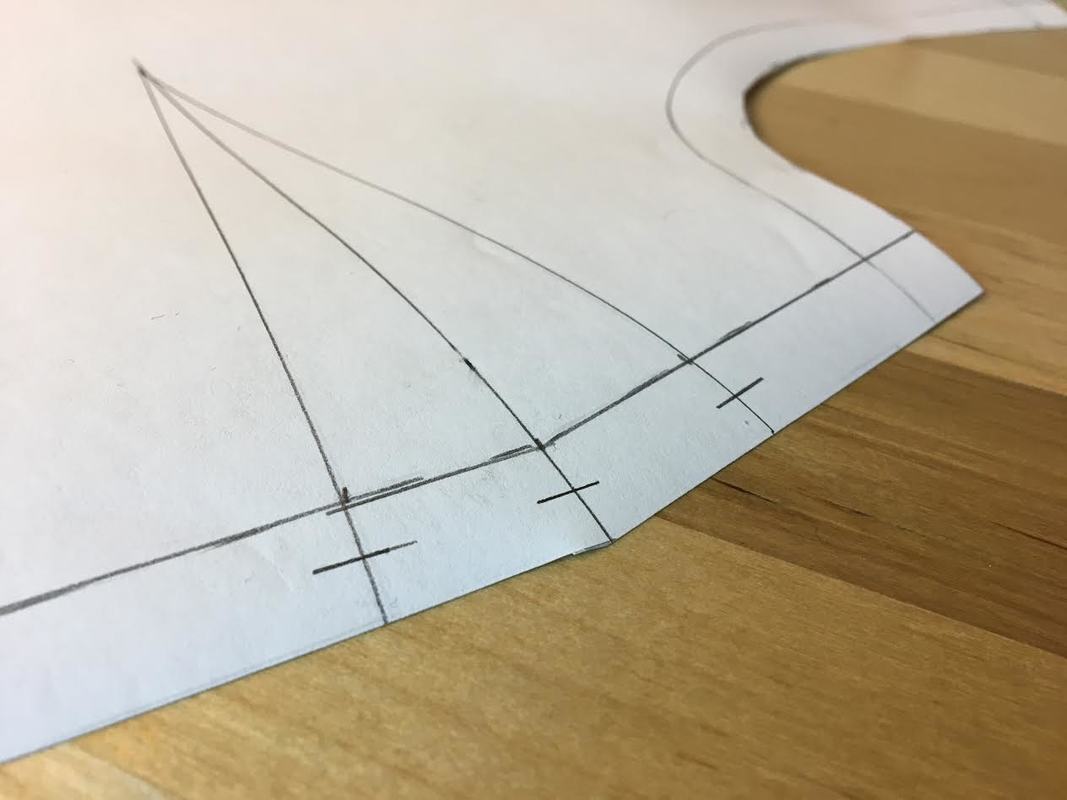
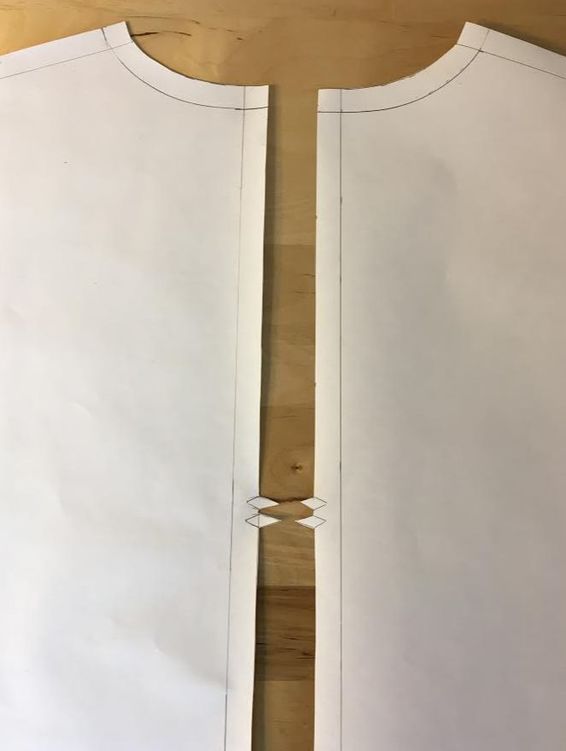
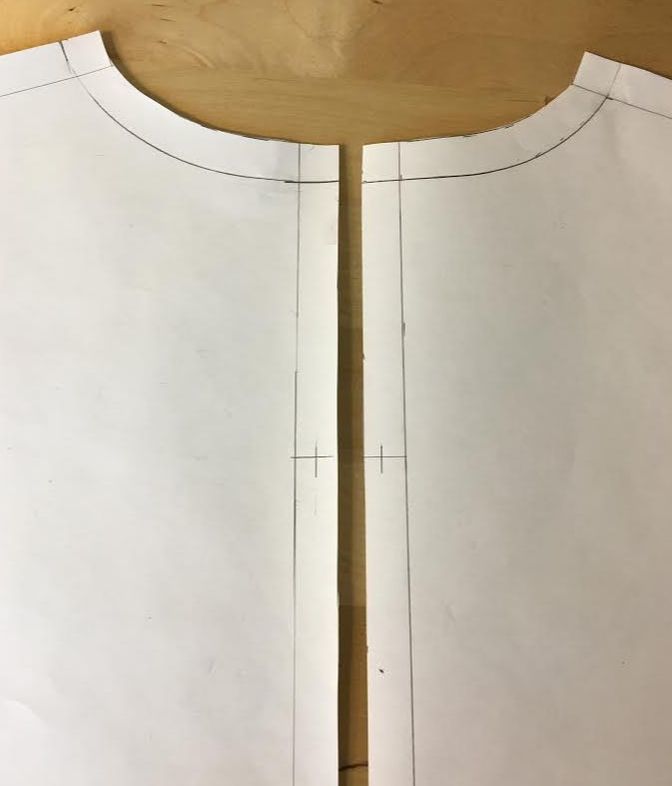
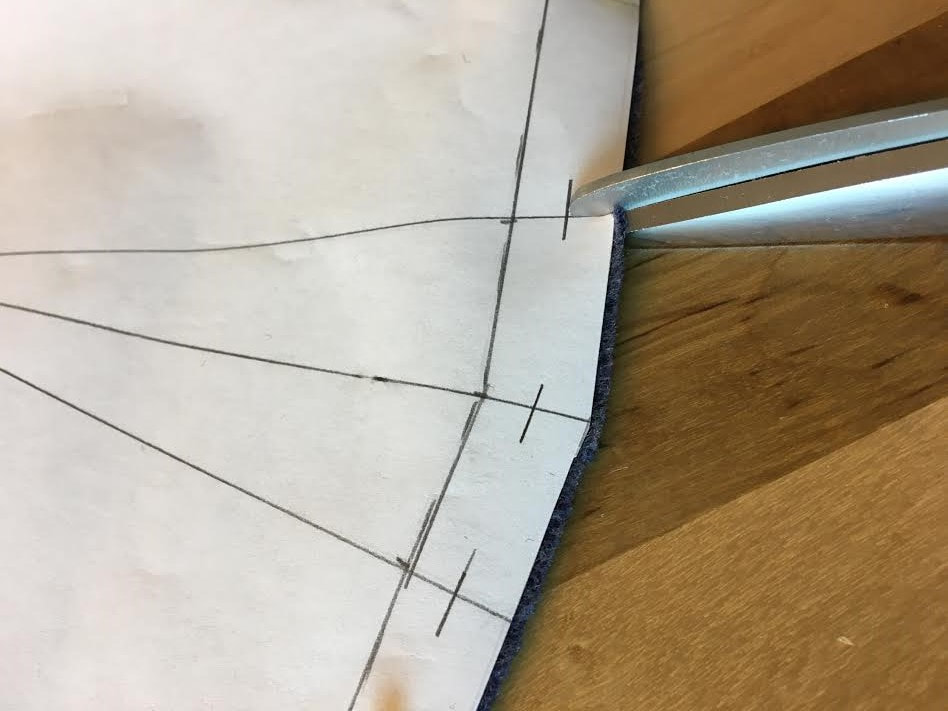
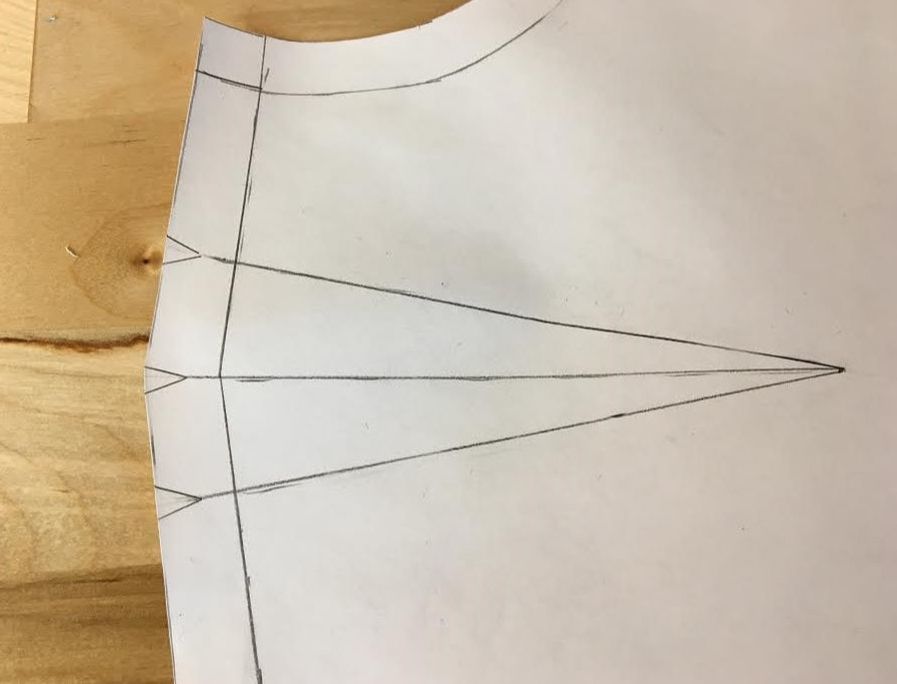
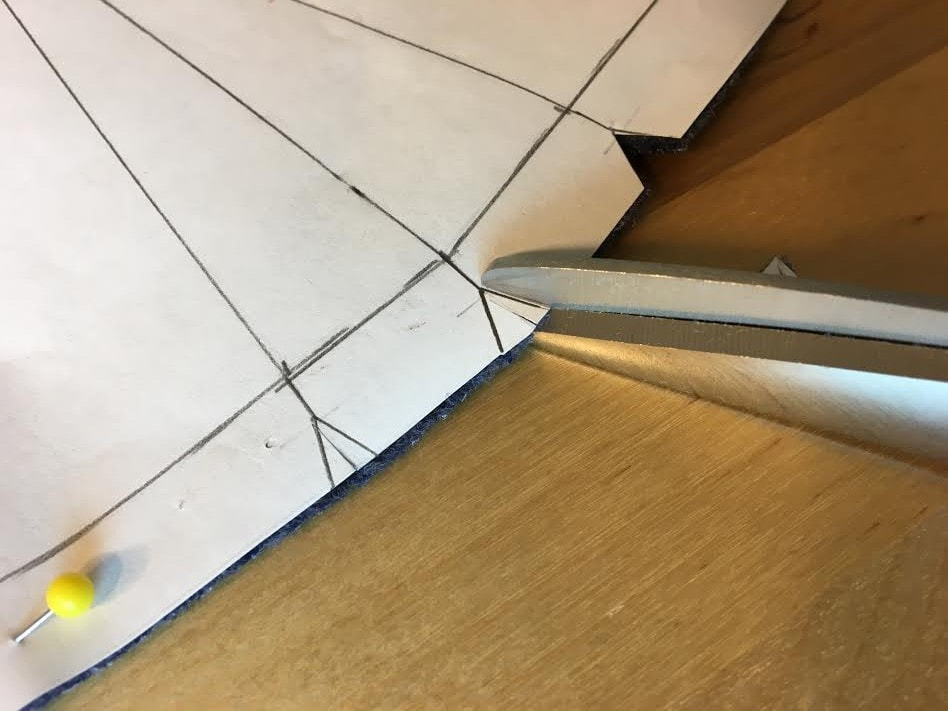
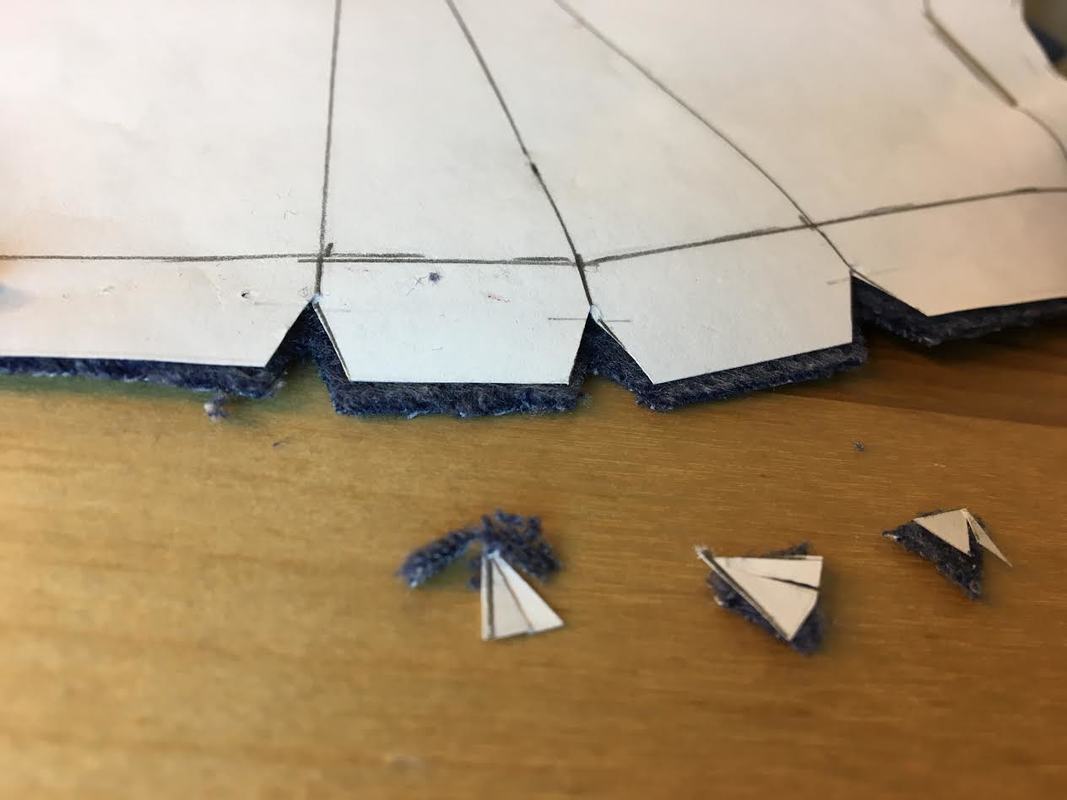
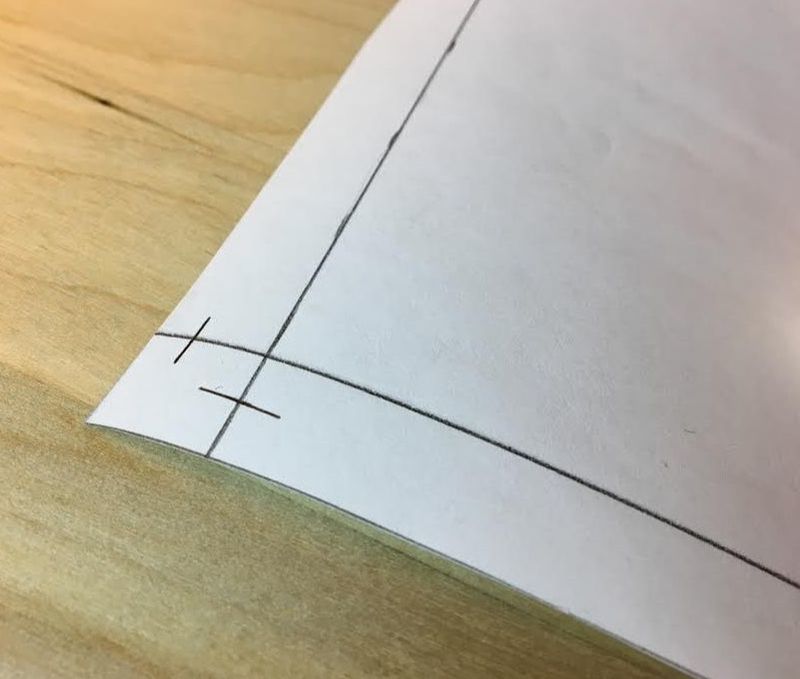
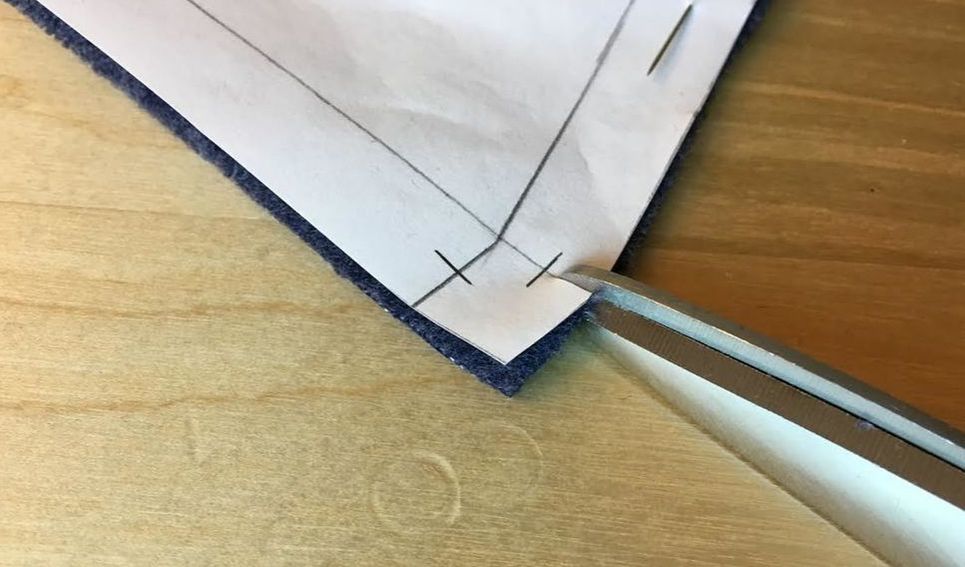
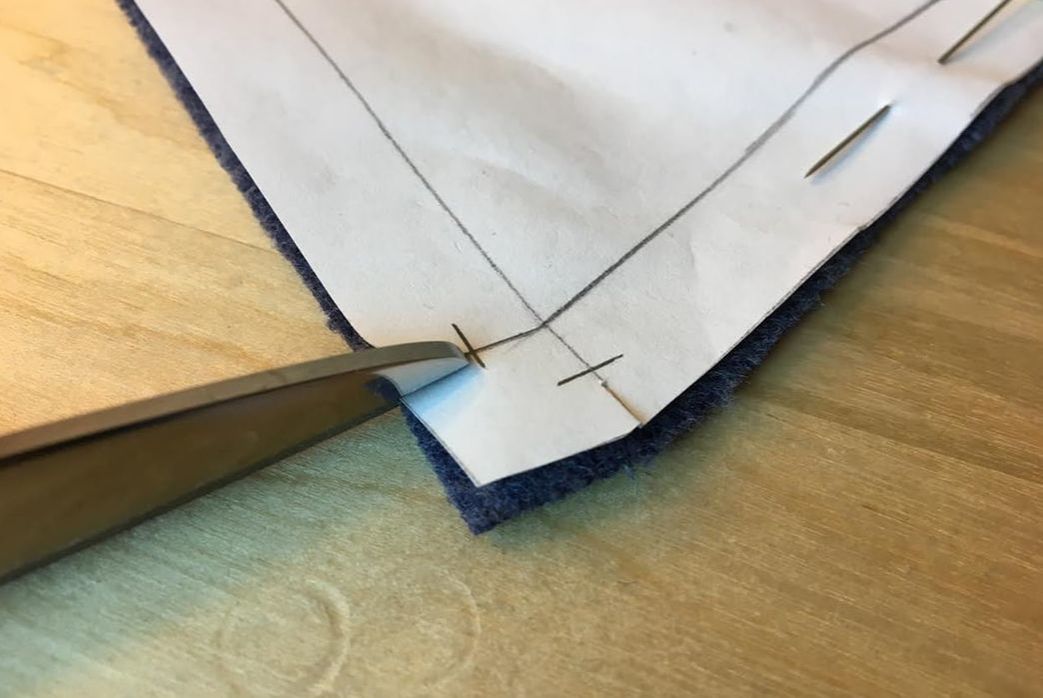
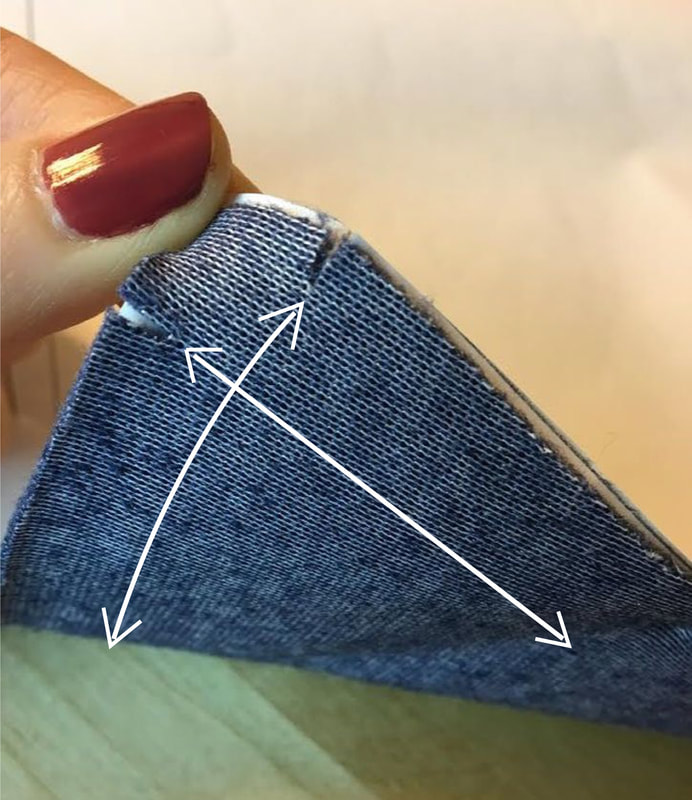
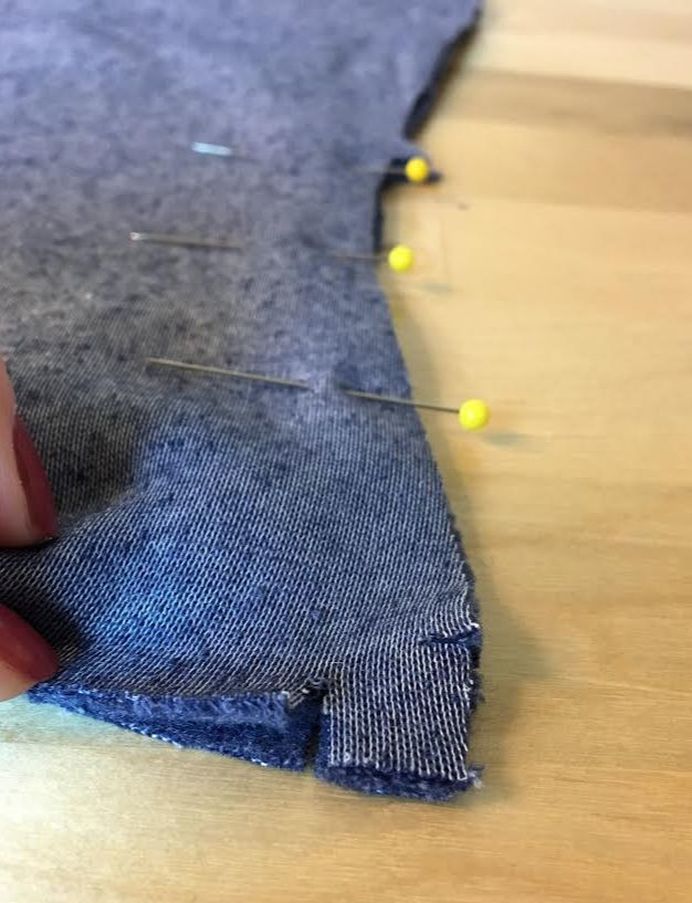
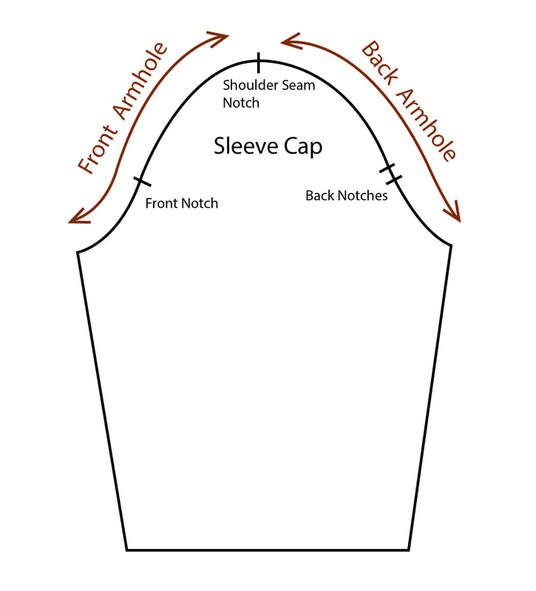
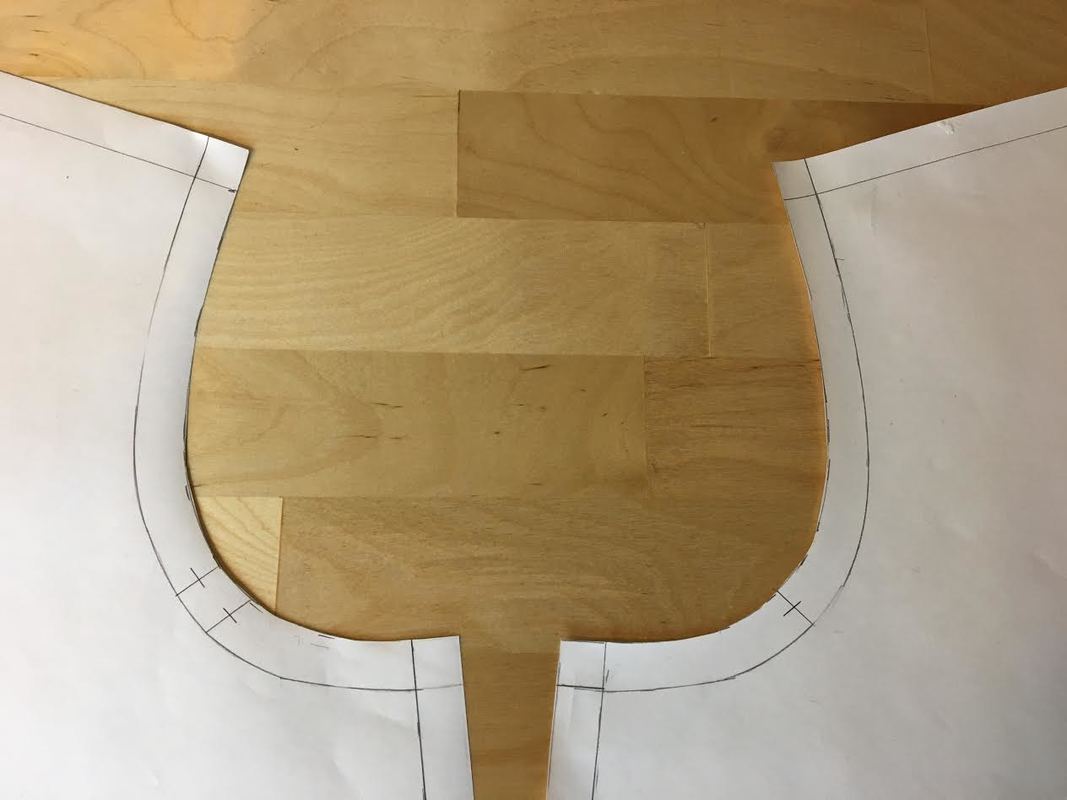
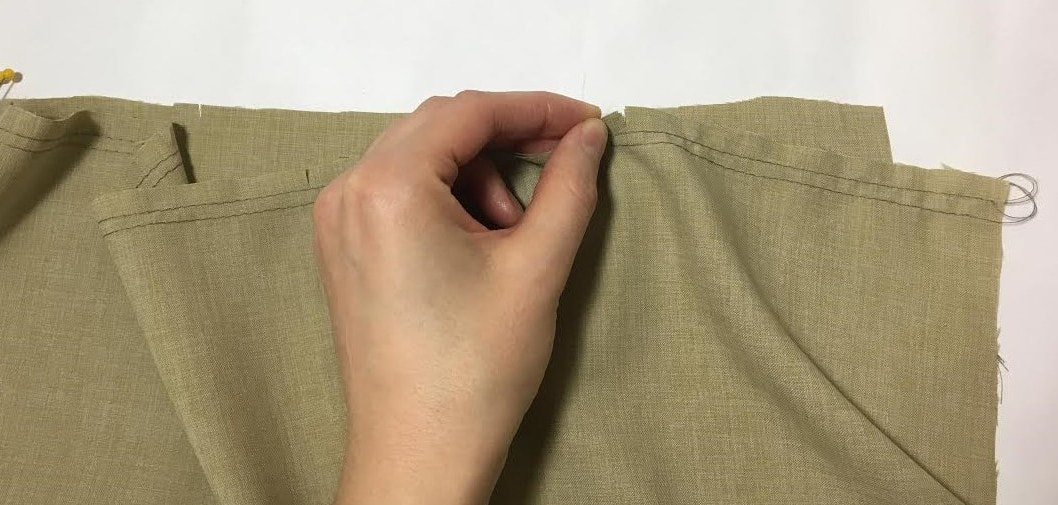
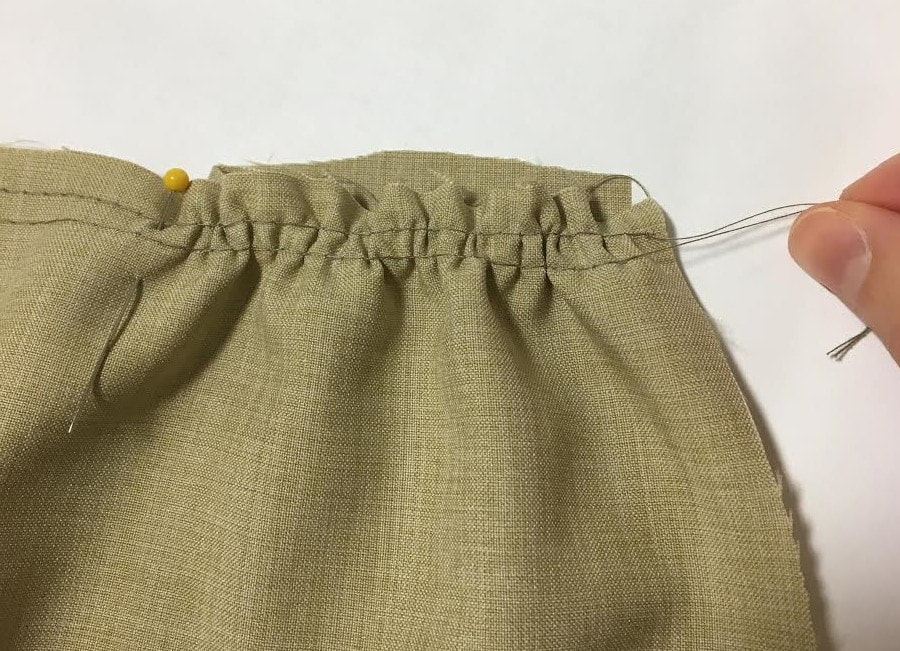
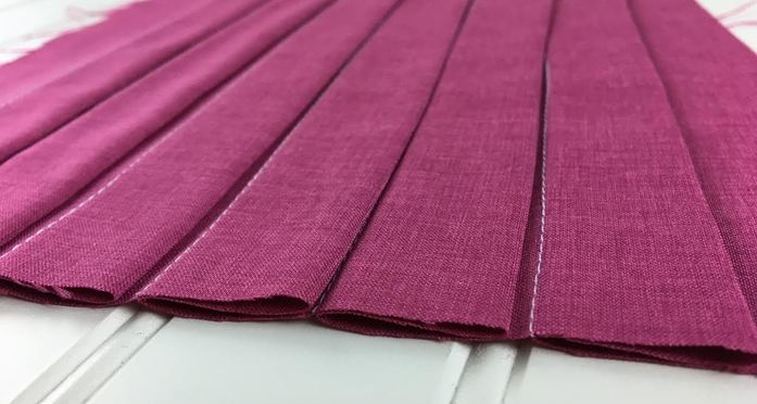
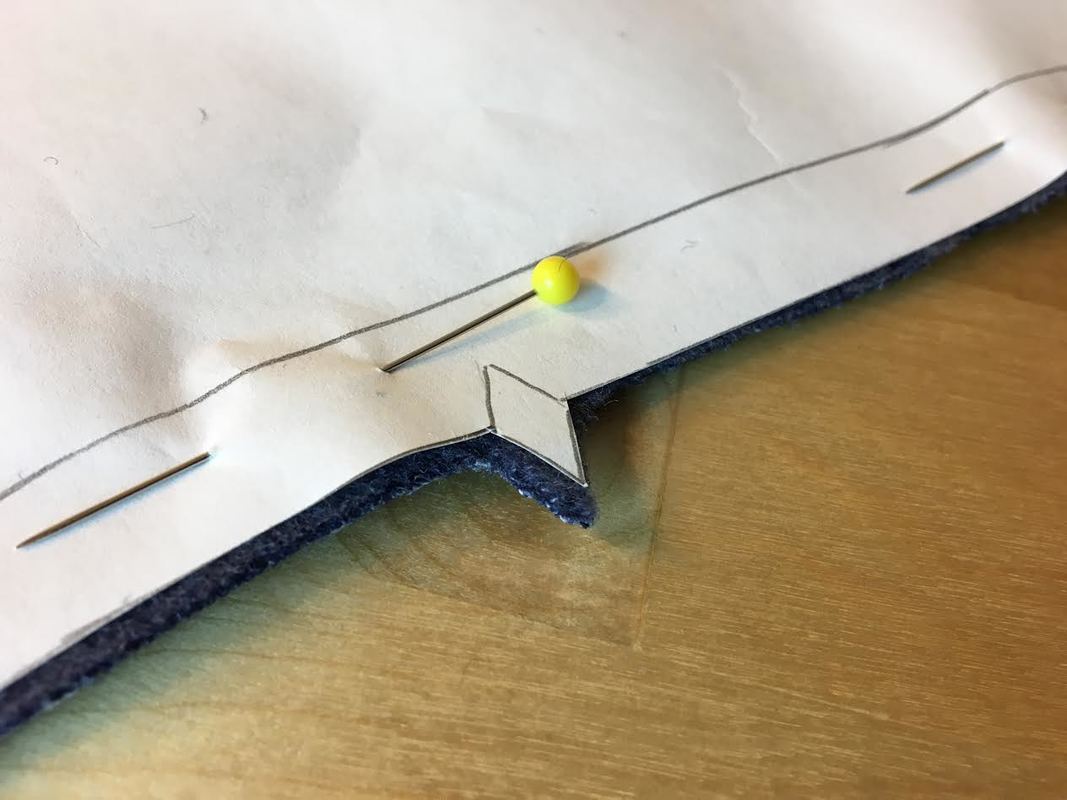
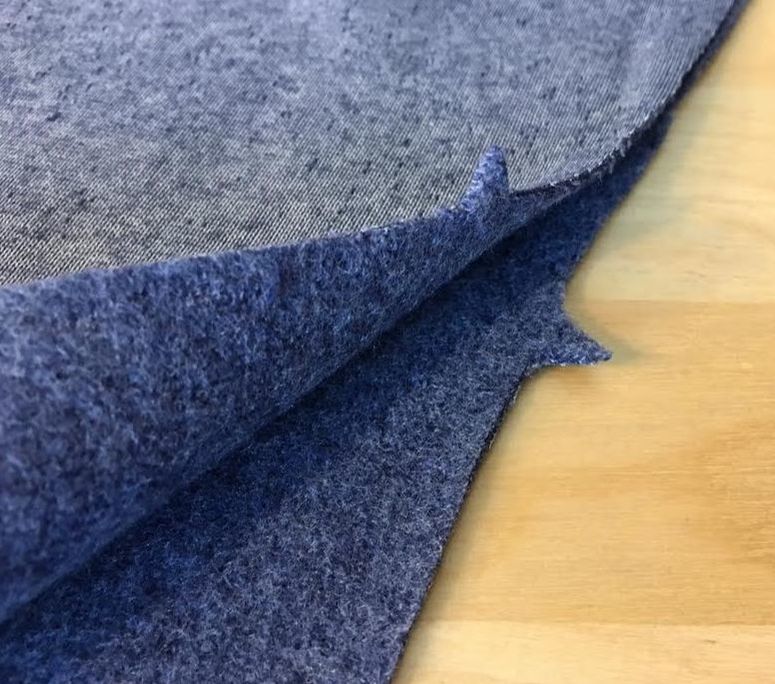
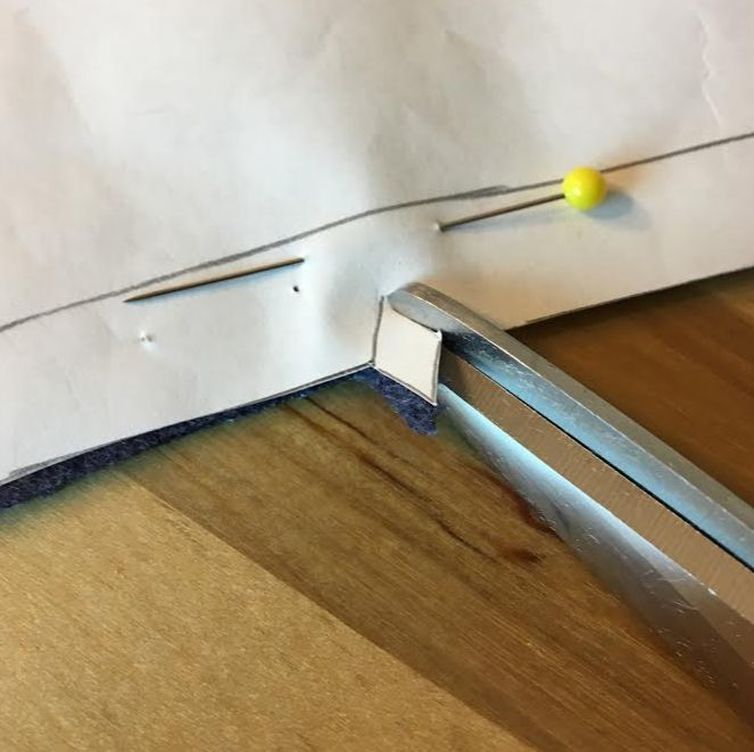
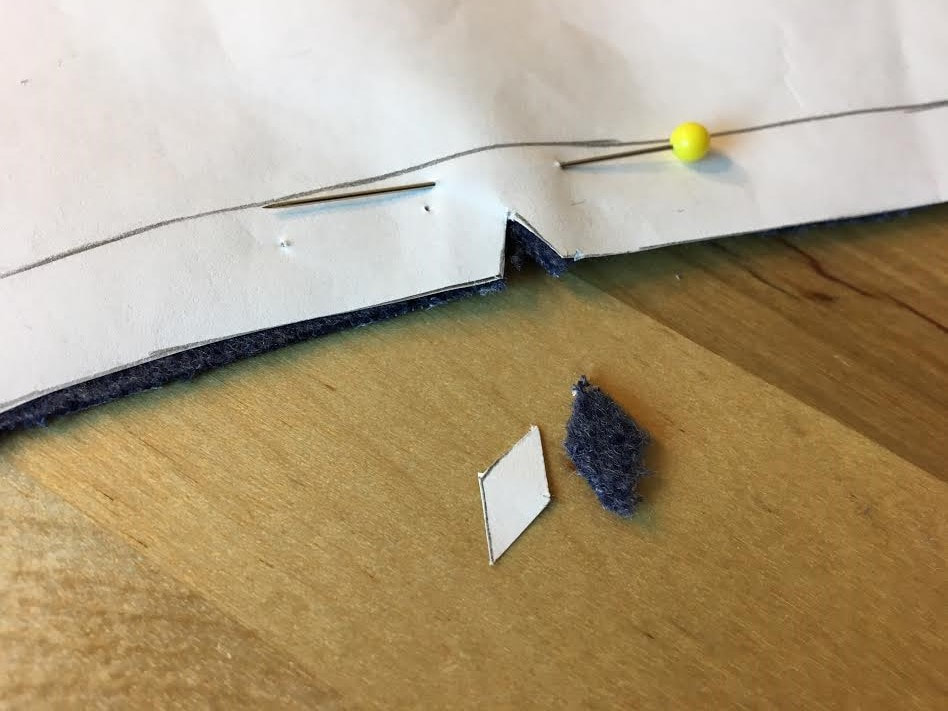
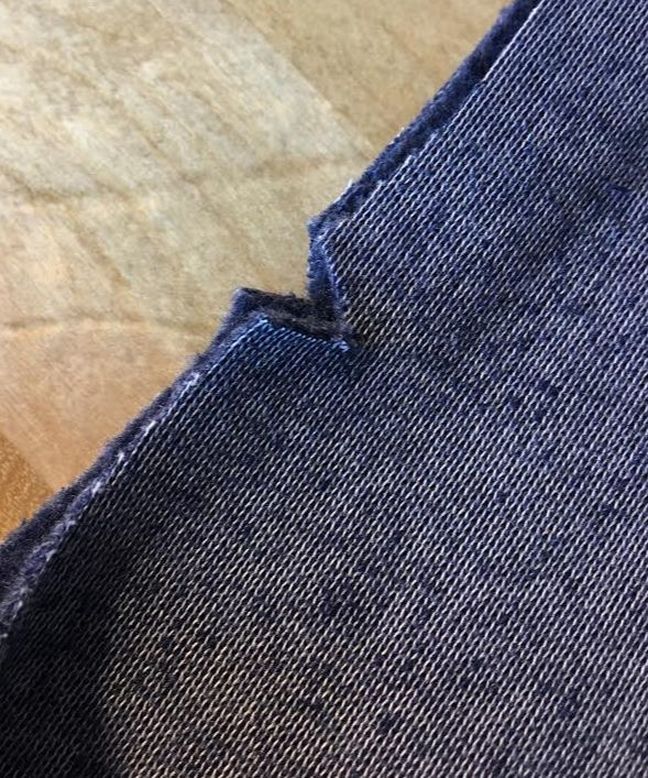
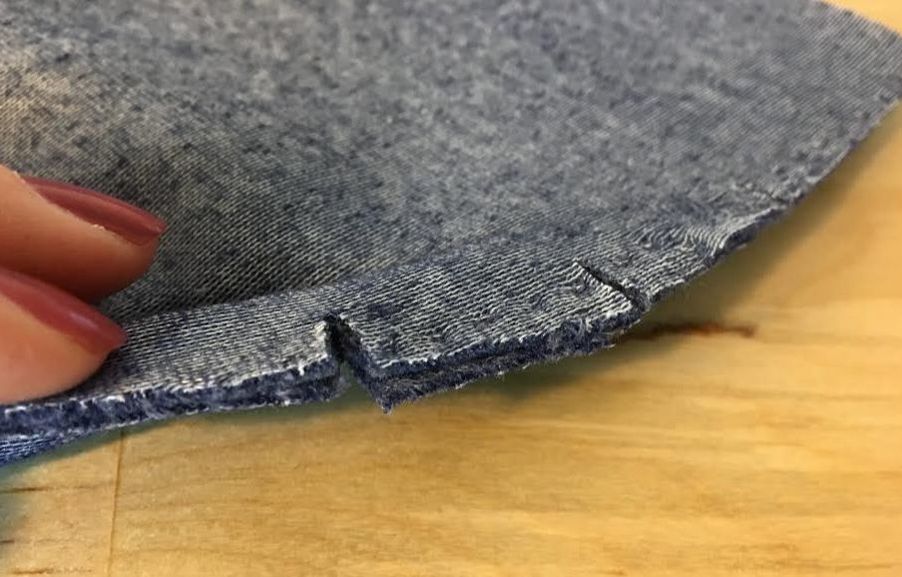
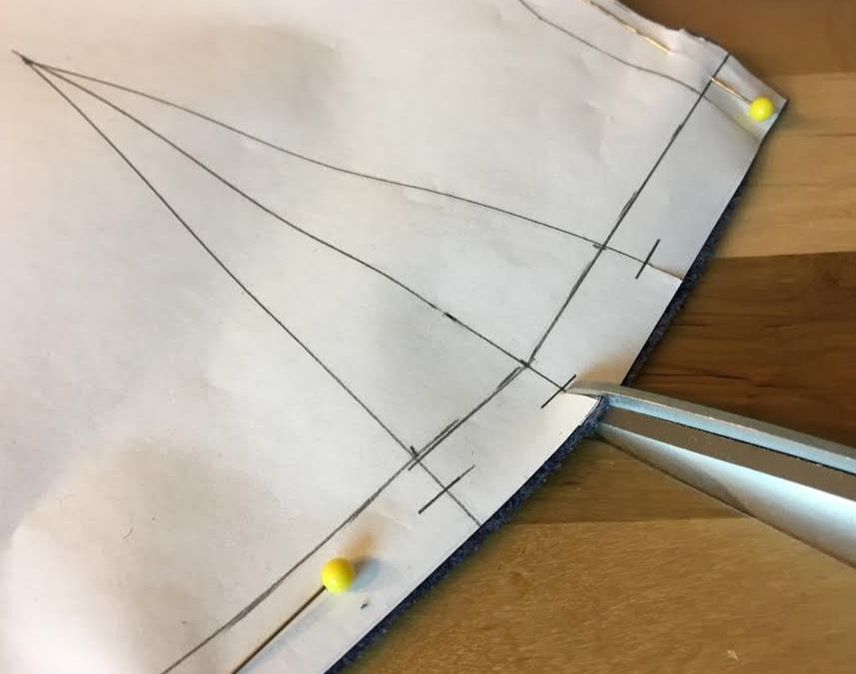
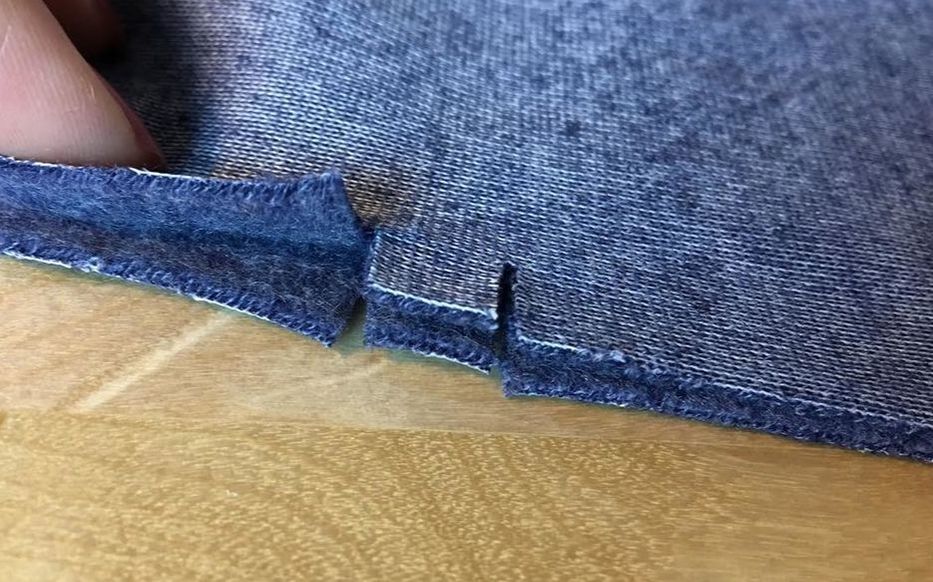
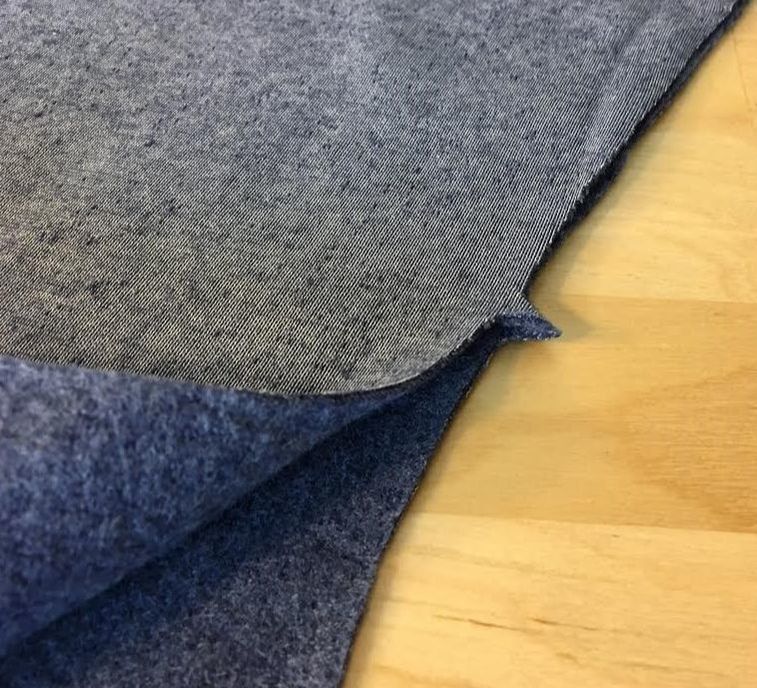
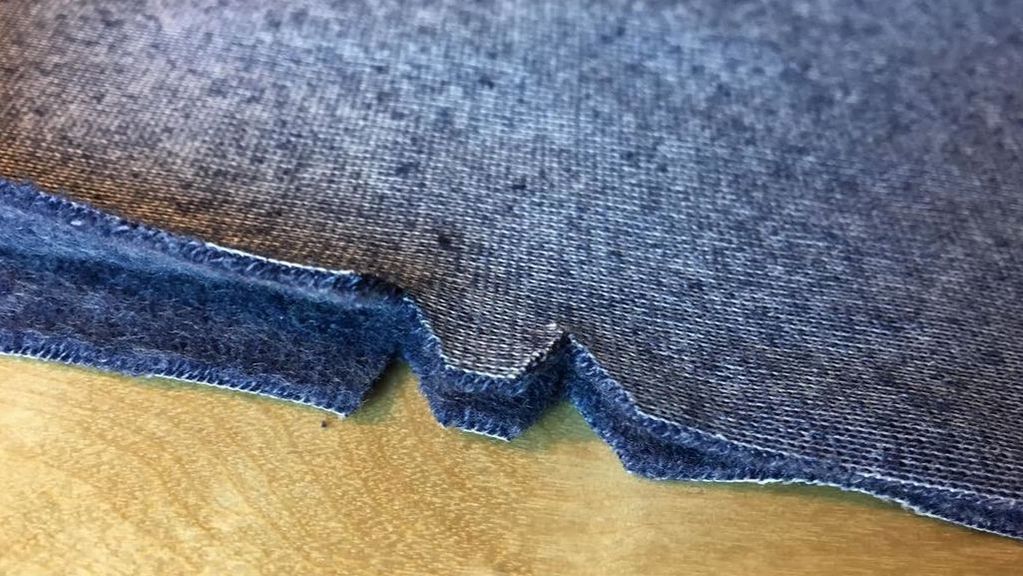
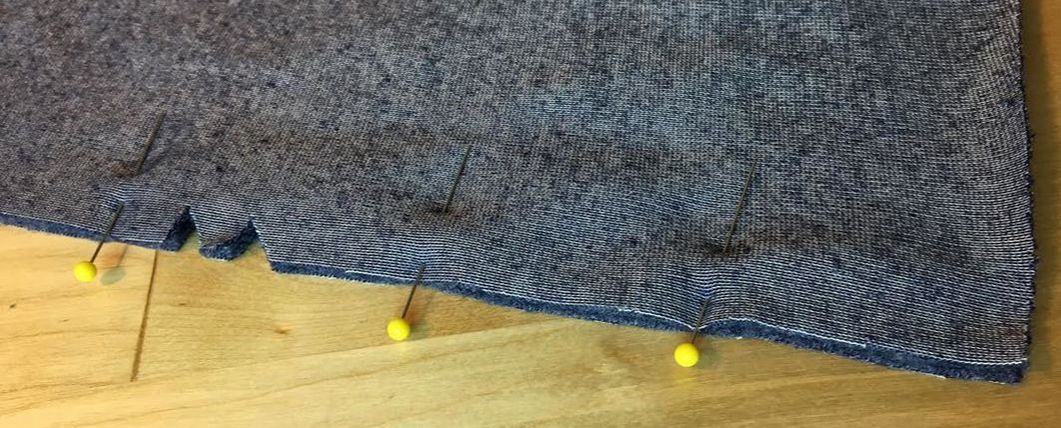
What Are Notches And How Are They Used In Sewing: Everything You Need To Know As A Sewing Beginner.3/1/2018 What are notches and how are they used in sewing and pattern making? Notches are clips or wedges cut into the seam allowance in order to facilitate matching and sewing the corresponding seams during garment construction. In other words, you can figure out which fabric pieces should be pieced together to form the seam by matching the corresponding notches to one other. Notches are extremely important in the sewing process. All fabric components of a garment should be marked such that each seam is easy to piece together once the patterns are removed. It is much easier to figure out which edges should be sewn to one another when you are looking at the marked patterns. However, once the fabric pieces are cut and the patterns are removed, a lot of important marks and lines are often lost visually, and you are left with fabric pieces that can appear a bit confusing, especially to the untrained eye. Transferring notches from the patterns onto fabric will ensure that that each edge is properly aligned and the front and back pieces are not mismatched during sewing. Notches are always marked into the seam allowance, stopping at less than halfway through the width of the seam allowance itself. They become hidden on the inside of the garment once it is complete, and are used for construction purposes only. Keep in mind- individual notches that are added to seam edges are strictly used to facilitate sewing and they should not add any form of tension release or affect the fit and look of the clothing item being constructed. Specialized notches and wedges used for release tension are cut in groups along more curved areas of a seam, and are applied much closer to the seam-line. To learn more about tension release notches/wedges, check out this sewing tutorial: Clipping The Seam Allowance During Sewing: How And When To Use The Fabric Clipping Method. Types Of Notches On Sewing Patterns Triangle shaped notches-wedges: These style notches are found mainly on commercial patterns and most commonly used by home dressmakers. Triangle notches require to be cut in a v-shaped wedge which makes them most visible during the pinning process. For that reason, they are the preferred method for sewing beginners as they are easier to see during pinning and stitching. A single triangle notch Nevertheless, triangle or v-shaped notches take a bit longer to cut- you have to be very careful not to cut too far through the seam line in the process since it requires the cutting of a very specific triangular shape. There are two different ways to cut triangle notches (both methods are demonstrated bellow): inwards or outwards. Outward cut triangular notch Cutting the notch outwards creates an outward triangular fabric extension and is better for sewing beginners as it leaves less room for error such as accidentally cutting too far into the seam allowance (too close to the seam line). They take you a bit of extra time to cut but they are certainly worth it when it comes time to actually putting the garment together. Inward cut triangular notch Vise versa, marking triangle notches inwards requires that you cut a triangular shape out of the seam allowance which entails you to be very careful as to how far you cut into the fabric. To cut inward notches correctly, follow the angular lines on the pattern very carefully and always cut using just the top of the scissors as shown. Always keep in mind that notches should only be cut at about half-way through the seam allowance from the edge of the fabric inwards- they are never marked too close to the actual seam line. "T" shaped notches (clips/slits) - "T" shaped notches are marked with two simple criss-cross lines: A horizontal line extends from the edge into the seam allowance with a vertical line intersecting it to mark how far into the seam allowance to clip with the scissors (usually about half-way in). These notches are simple and faster to draw and cut, and used mainly in the fashion industry on the industrial level. "T" shaped notches on a single pointed bust dart. Due to the fact that you can conveniently cut a small clip through the fabric as opposed to having to carve out an actual wedge, "T" shaped notches are used a lot by intermediate and more advanced dressmakers to save time and facilitate the patterning and sewing process. If you plan on getting into pattern-making yourself, we suggest you work with "T" shaped notches as they are much faster and easier to mark and will save you some time in the fabric transfer process. Difference Between Front and Back Notches In Sewing: Once you have separated the sewing patterns from the fabric pieces, it is good practice to separate the back pieces form the front pieces before starting the pinning and sewing process. Notches will help you do this much easier. How? To help in identifying the fabric pieces, back notches and front notches are marked slightly different: Front notches are marked with a single notch while those located on the back pieces are marked with double notches. Single notches are used to mark both front and back pieces at the side seam Keep in mind that front and back seams that are sewn together (usually side seams) are marked with a single notch- so even though one of the pieces belongs to the back of the garment, a single notch is used to match both front and back together. It is also possible to have triple notches or even four notch groups in sewing. This is used when a garment has so many style lines that it requires extra sets of differentiating notches in order to match each seam properly. You don't have to worry about these too much as a sewing beginner since they are used for more complicated designs and seams. Notches are not only used to match and align regular seams. They are also used in a variety of other situations that require sewing marks. The following are some instances that require (or benefit from) the addition of notches: Transferring dart marks from pattern onto fabric (at the seam allowance). Applying notches at the end of each dart line as shown below will allow you to fold and sew the dart more accurately. Even if the entire dart is transferred by other means, such as tracing paper or tailors chalk, having notches within the seam allowance at the widest part of the dart allows for more precise sewing and seam alignment. Transferring "T" notches to the fabric by clipping the notch on each dart line. This will mark the beginning of the dart's widest part A single pointed bust dart marked with triangle notches on each end. Transferring the triangular notches with an inward wedge on each dart leg. The wedge clips will mark the beginning of each dart leg and make the widest portion of the dart easy to fold and more visible during sewing. Marking the seam allowance along the fabric edge. Marking notches at each corner of the pattern will give you a guide as to what the seam allowance along each edge of the fabric pieces is. As mentioned above, once the sewing patterns are cut and separated form the fabric pieces, you lose some visual information in the process- actual seam lines are not usually transferred from pattern onto fabric which means that you may forget what the seam allowance at each edge is. For that reason, corner notches are used to provide a guide as to the seam allowance along each edge so that you don't have to go back to the patterns and search for this information. "T" shaped notches are used to mark each corner of the pattern as shown above in order to transfer the seam allowance from pattern onto fabric. Clip each notch up to the vertical dash mark through both paper pattern and fabric underneath. Be careful not to cut past the intersecting dash mark. The clips applied at each corner of the fabric piece will serve as a guide for the correct seam allowance along each edge once the patterns are removed. When sewing the seam, the sewing machine needle will be aligned with the location of the notch clip thus ensuring that you always sew at the correct distance from the edge. Using notches to differentiate between front and back pieces and matching complicated style lines. As discussed above, the number of notches and how they are grouped together allows you to set apart the front and back pieces. We introduced you to this concept above but to reiterate some of the more important points discussed: Front pieces are designated with single notches. Back pieces feature double notches. Front and back edges that are sewn together are marked with single notches. Notches grouped in sets of 3 or 4 are used when the garment has multiple seams on either the front or the back of the garment and they need to be set apart from other seams located on the same side. These sets of notches allow you to find each matching edge much faster, especially when sewing more complicated garments with a multitude of decorative seams or style lines. Using notches to align and sew sleeves. This is an instance where differentiating between single front notches and double back notches is key. If you are a sewing beginner, you might not be too familiar with sleeves yet but to give you a general idea of how notches are used in sleeve sewing, take a look at a sleeve pattern below: The sleeve cap has 3 sets of notches: The two inner curves represent the front and respectively the back seam edges of the sleeve. The portion that corresponds to the back is marked with double notches while the one inner curve that corresponds to the front is marked with a single notch. At the top of the sleeve cap, there is another single notch that is crucial in aligning the sleeve correctly. This notch is matched to the shoulder seam on the garment in order to properly align the sleeve and distribute the sleeve cap ease. If you want to learn how to sew a regular set in sleeve, check out this step-by-step tutorial: How To Sew A Regular Set-In Sleeve: Step-by-Step Guide For Beginners. On the garment itself, the back and front armholes should also be marked with matching notches: 2 notches on the back and 1 notch for the front (image above). The sleeve is pinned into the armhole of the garment and the single and double notches will help you align the front and back portion of the sleeve accordingly. Due to the fact that the sleeve pattern has two curves that look almost identical, not transferring the front and back notches will make it very difficult to know which side of the sleeve corresponds to the back of the garment and which side belongs to the front. Using notches to mark pleats, gathers and tucks. You may not realize how crucial notches are when it comes to sewing gathers, pleats and tucks until you attempt to tackle these sewing techniques without using them. When it comes to these applications, notches are used in slightly different ways but are just as equally important. For example, spaced notches are applied to each edge of a gathered seam in order to facilitate distributing the gathers equally. The notches are matched first, after which the gathering is pulled evenly to fit within the non-gathered edge. The notches in this case allow you to match the seam and fabric grainline correctly while facilitating the gathering process. Each fold has a "T" notch within the seam allowance along the edge. In the case of pleats and tucks, notches aid in the folding process, allowing for evenly positioned pleats or tucks. Even if you use other means to transfer the pleat or tuck lines from pattern onto fabric (tailors chalk, tailors tacks or tracing paper), having clipped notches marked at the beginning of each fold line (within the seam allowance) allows for a faster and more accurate pleat/tuck alignment and folding. How To Transfer Notches From Pattern To Fabric As discussed above, there are two types of notches: Triangular and "T" shaped notches. You should always exercise caution when clipping notches regardless of the type of notches you are working with- Don't cut too close to the seam line, and remain within halfway through the seam allowance from the edge of the fabric. Follow the steps below to learn how to transfer these two types of notches: Marking triangular shaped notches or wedges. There are two ways to cut these and it is up to you which one you choose: Inwards or outwards. It is important to note however, that cutting triangular notches outwards is much safer, minimizing the risk of accidentally cutting too far into the seam allowance. To mark a notch outwards, carefully follow the angular lines of the notch cutting through the fabric accordingly. It might be a bit time consuming, but it is worth it in facilitating the sewing process later. Outward-cut triangular notches are very visible along the edge of the fabric which makes them easy to spot and work with for sewing beginners. Once the seam is pieced together, the triangular notches should overlap perfectly on top of each other. To cut a triangular notch inwards, cut along the inner angle through both pattern and fabric underneath, following the lines of the notch very carefully. Use just the top edge of your scissors in the process- it helps to invest in a good pair of fabric scissors as it will give you more control over each cut line. Be very careful not to cut too close to the seam line. It is always safer to cut shorter than the triangular shape of the notch than to cut past it. Once the fabric edges are aligned to form the seam, the inward notches should overlap perfectly on top of each other forming an inward-cut V shape. "T" shaped notches, although not used on commercial store-bought patterns, are much faster and easier to cut. Once transferred to fabric, they might not have the same visibility as triangular notches, but they are much simpler and faster to mark on fabric, minimizing room for error. To transfer a "T" shaped notch onto fabric, simply clip through the horizontal line stopping at the vertical "T" dash mark as shown. Snip through both the paper pattern and fabric underneath. Be cautious not to clip past the vertical line as this risks jeopardizing the seam line. Use the tip of your scissors to avoid cutting too close to the actual seam line. Matching Notches During Pinning And Seam Stitching: As discussed above, once the garment pieces are cut, it helps to separate the front from the back fabric pieces first. Next, find the corresponding edges for each seam by aligning and matching the notches. Always match and pin the notches first, before pinning the rest of the seam together. This will prevent any misalignment due to fabric stretching and will also speed up the pinning process. As noted above, triangular notches are more visible than "T" notches, which are marked with a simple snip through at the edge of the fabric. Depending on the type of fabric you are working with, you may have to gently pull along the edges of the fabric in order to locate these notches. Matching outward triangle notches on a side seam. Matching double triangle notches cut inward on a back seam- double notches are sued on back seams. Once the seam is pinned together, the notches should overlap and each corner should align perfectly.
3 Comments
Futurehope Obioma
3/27/2021 12:37:45 am
This piece is so helpful. As stated in the introduction, it captured all that one need to know about notching. As a sewing beginner, it really helped to clarify many of the gray areas I have about notching with its generous picture illustrations.
Reply
Leave a Reply. |
The Blog:A journey into our design process, sewing tutorials, fashion tips, and all the inspiring people and things we love. Doina AlexeiDesigner by trade and dressmaker at heart. I spend most of my days obsessing over new fabrics and daydreaming new ideas. Sadie
Executive Assistant & Client Relations Manager Archives
November 2019
Categories
All
|
-
Sewing Tutorials
-
Basics
>
- Aligning Pattern Grainlines To Fabric
- Preparing Fabrics For Sewing
- Pinning Sewing Patterns To Fabric
- Placing Sewing Patterns On Fabric For Cutting
- Rotary Cutters or Fabric Scissors?
- Cutting The Sewing Patterns
- What Are Notches And How To Use Them In The Sewing Process
- Transferring Notches From Pattern To Fabric
- Transferring Seamlines to Fabric
- Staystitching
- Backstitching: A Complete Guide
- Hand Basting: A Complete Guide
- Sewing Continuous Bias Binding
- Darts >
-
Sewing Seams
>
- The Basics Of Seams And Seam Allowance
- How To Sew A Straight Seam
- Sewing Curved Seams
- Sewing Corner Seams
- Trimming And Grading Seam Excess
- Notching/Clipping Seam Allowance for Tension Release
- Sewing Topstitched Seams
- Sewing Corded Seams
- Sewing A Slot Seam
- Sewing A Gathered Seam
- Sewing Bias Seams
- Sewing Seams With Ease
- Sewing Seams With Crossing Seamlines
- Sewing Unlike Fabric Seams
- How To Iron Seams: Ironing Tools And Conventions
- Sewing With Knit Fabrics
- Understanding Stitch Length And Tension
- Sewing Unique Fabric Seams
-
Seam Finishes
>
- Seam Finishing Techniques - Overview
- Applying A Pinked Seam Finish
- Applying A Bias Bound Seam Finish
- Serging And Zigzag Seam Finishes
- Sewing A Self-Bound Seam Finish
- Sewing A French Seam Finish
- Sewing A Hong Kong Seam Finish
- Sewing A Mock French Seam Finish
- Sewing A Turned-and-Stitched Seam Finish
- Sewing Overcast Hand-Applied Seam Finishes
- Sewing A Flat Felled Seam
- Sewing A Hairline Seam Finish
-
Hem Finishes
>
- Garment Hem Finishes: Overview
- Sewing A Double Fold Hem Finish
- Sewing A Single Fold Hem Finish
- Sewing Bound Hem Finishes
- Sewing An Exposed Double Layer Bound Hem
- Sewing A Folded-Up Bound Hem with Pre-folded Binding
- Sewing A Hong Kong Hem Finish
- Sewing A Band Hem Finish
- Sewing A Bias Faced Hem Finish
- Sewing A Twill Tape Hem Finish
- Sewing A Rolled Hem Finish
- Sewing A Shaped Hem Facing
- Using Fusible Hem Tape And Webbing
- Finishing A Lace Fabric Hem
- Finishing A Leather Hem
- Sewing Faced Hem Corners
- How To Finish Lining At The Hem
- Finishing Fabric Corners by Mitering >
- Interfacing A Hemline: Lined And Unlined Examples
-
Sewing Pockets
>
- Curved Patch Pocket With Flap
- Unlined Square Patch Pockets
- Lined Patch Pockets: Two Ways
- Extension On-Seam Pockets
- Separate On-Seam Pocket
- Front Hip Pockets
- Bound Double Welt Pocket
- Double Welt Pocket With Flap
- Self-Welt Pocket (Using Single Fabric Layer)
- Slanted Welt Pocket (Hand-Stitched)
- Faced Slash Pockets: Overview >
-
Sewing Zippers
>
- Sewing Zippers: General Information
- Sewing A Centered Zipper
- Sewing A Lapped Zipper
- Sewing An Invisible Zipper
- Sewing A Fly Front Zipper
- Sewing A Closed-End Exposed Zipper (No Seam)
- Sewing An Exposed Separating Zipper
- Sewing Hand Stitched Zipper Applications
- Sewing A Zipper Underlay
- Sewing A Placket-Enclosed Separating Zipper
- Sleeveless Finishes >
-
Neckline Finishes
>
- Sewing A Neck Shaped Facing
- Sewing An All-In-One Neck Facing
- Neck And Garment Opening Combination Facings >
- Sewing A Bias Faced Neckline Finish
- Sewing A Band Neckline Finish
- Bound Neckline Finishes: Overview >
- Sewing A Semi-Stretch Strip Band Neckline
- Ribbed Neck Band And Classic Turtleneck
- Decorative Neckline Finishes >
- Finishing Facing Edges >
-
Extras
>
- A Complete Guide on Interfacing
- Sewing Bound Spaghetti Straps
- Sewing Spaghetti Straps To A Faced Neckline
- Sewing Ruffles: Overview
- Patterning And Sewing A Circle Ruffle
- Sewing A Gathered Heading Ruffle
- Sewing Double Layer Gathered Ruffles
- Sewing A Gathered Ruffle Into A Seam
- Sewing A Gathered Ruffle To A Fabric Edge
- Sewing A Fabric Surface Slit
- Sewing A Slit Seam
- Hand-Applied Straight Stitches
- Hand-Applied Blind Stitches
- Hand-Applied Overedge Stitches
- Hand-Applied Tack Stitches
- Hand-Applied Decorative Stitches
-
Basics
>
- Custom Bridal
- Custom Apparel
- About
- Blog
Services |
Company |
|



 RSS Feed

