4 Ways To Lay Out a Sewing Pattern For Cutting: Understanding Fabric Grain And The Selvage Edge.12/29/2017 The most important steps in the process of making a clothing item comes at the beginning with the drafting of the sewing pattern then cutting it properly according to its grainline. If you are a sewing beginner, you might feel a bit overwhelmed by some of the terms used when discussing the process of aligning, pinning and cutting a sewing pattern. 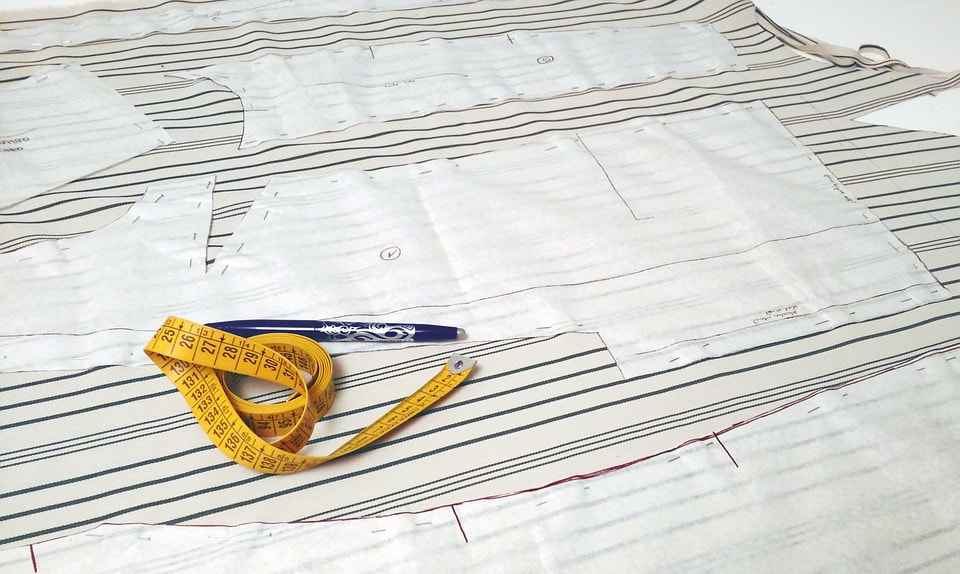 Via Pixabay Terms like grainline, selvage edge, cut edge, or cut-on-fold can all seem like a big blur for someone who is just starting out. However, once you understand the importance of these elements when preparing your fabric and eventually cutting your sewing patterns, you'll be glad you put in some extra effort to understand them. Below, we'll walk you through 4 basic ways to align and cut your sewing patterns according to fabric grain but first, lets start with the basic understanding of grainline and selvage edge- the two most important elements used in the fabric cutting process. The grainline on a sewing pattern is depicted by a double pointed arrow. It is positioned within the body of the sewing pattern (as opposed to the edge) and essential in the pattern alignment process. The grainline on the sewing pattern should match the grain of the fabric which can be identified using the selvage edge. Here it is, another term- the selvage edge is depicted by the finished lengthwise edges of the fabric piece. These edges do not fray and are used as a guide in the pattern cutting process. 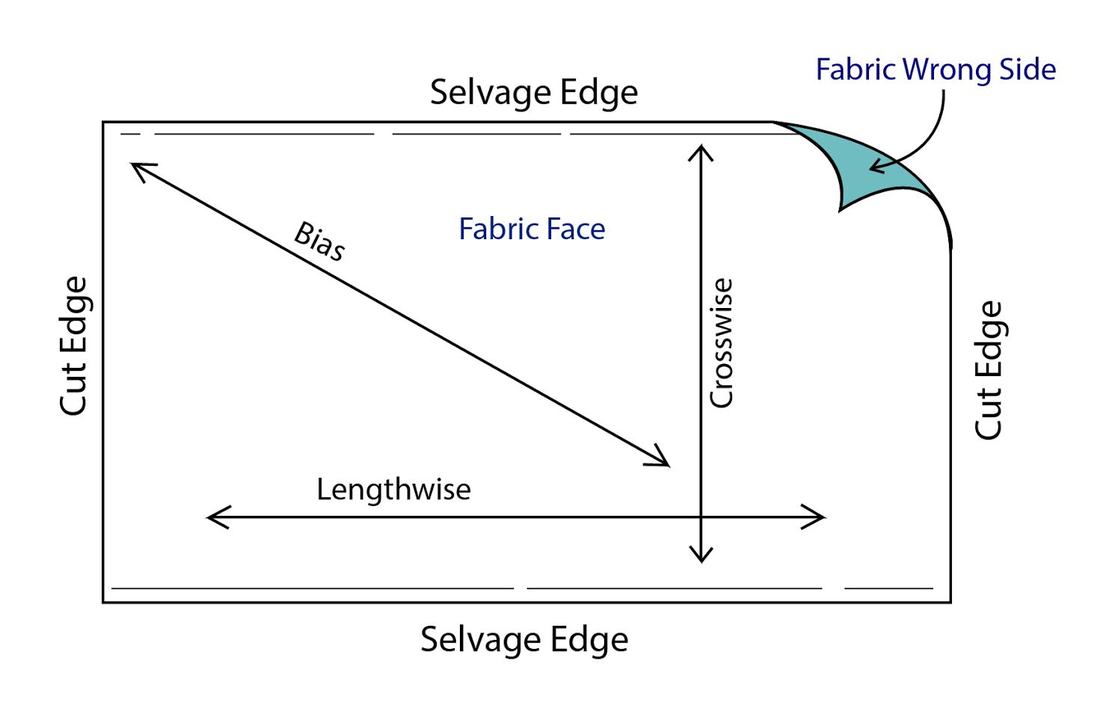 When the fabric is taken off the bolt or roll, you'll notice it is woven such that it has two selvage edges on both its lengthwise sides. Vise versa, the width edges perpendicular to the selvage edge are called cut edges representing the direction in which fabric is cut off the bolt or roll. At the fabric store, the length of the fabric (in yards) is measured along the selvage edge and cut perpendicular to it (cut edge). It is incorrect to cut a fabric piece along the selvage edges as this edge should remain intact and is an essential tool for aligning your sewing patterns in the sewing process correctly. Lengthwise Grain: How to Align A Sewing Pattern On The Lengthwise Grain. The lengthwise grain of fabric is positioned parallel to the selvage edge. Due to the nature of the lengthwise grain's durability and drape, this is the most common direction in which sewing patterns are cut. The first step in understanding whether your sewing patterns are meant to be cut on the lengthwise grain or otherwise is by identifying the grainline mark on the sewing pattern. As mentioned above, this is depicted by a double pointed arrow positioned somewhere within the body of the sewing pattern. This arrow is essential in pattern-making and pattern-cutting thus you will seldom come across a professional sewing pattern that doesn't have a grainline marking. Once you identify this arrow (grainline), note its placement in relation to the top and bottom of the garment- A lengthwise grainline will extend vertically on the pattern, pointing towards the neckline/shoulder seams at the top and the garment's hem at the bottom. 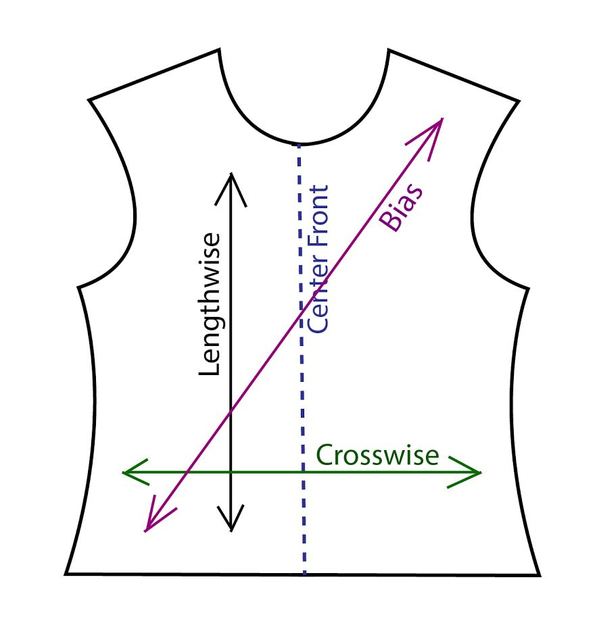 A lengthwise grainline is also (almost always) parallel to the Center Front/Back. The Center Front/Back is a vertical line, whether visible or invisible on the sewing pattern, that represents the center-most vertical line mark at the front and back of a clothing item. It is important that you understand the concept of these two center lines as they determine the correct balance, size and proportion of the garment and used a lot as the starting point in the pattern-making, cutting and draping process. Once you've determined the grainline of your sewing pattern, align the sewing pattern on the fabric such that the grainline on the sewing pattern is parallel to the selvage edge of the fabric. This is actually the #1 rule of aligning a sewing pattern to the fabric correctly: Always place the sewing pattern such that the double pointed arrow on the sewing pattern (grainline) is in parallel relation to the selvage edge. 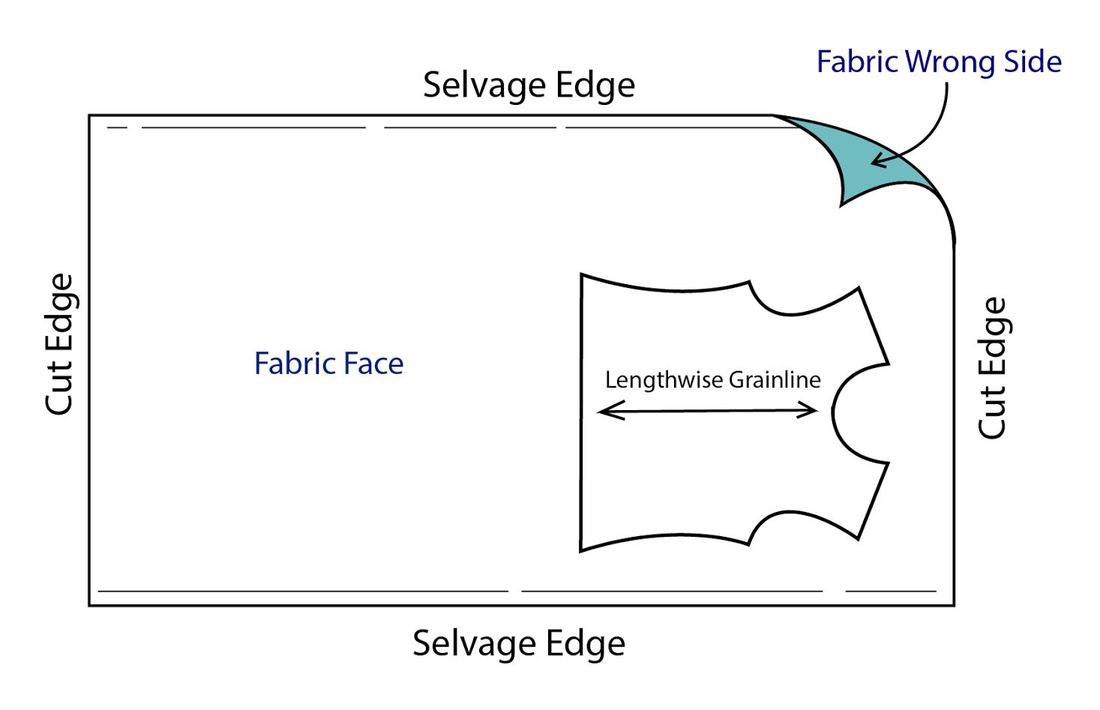 The most accurate way to do so is by using a ruler. Measure from one end of the grainline (arrow) to the selvage edge and place a pin through both pattern and fabric to secure this placement. Next, measure the same length from the selvage edge to the other end of the grainline (arrow) and place a second pin through both layers to secure. Pin the rest of the pattern at the seam allowance and cut it out carefully. Crosswise Grain: How To Align A Sewing Pattern On The Crosswise Grain. As opposed to lengthwise grain, the crosswise grain of fabric is located perpendicular to the selvage edge. Although most pattern pieces are cut on the lengthwise grain, some sewing patterns require to be cut crosswise on fabric. This is mostly done when attempting to fit as many pattern pieces as possible on a smaller fabric space. In other cases, patterns may be cut on the crosswise grain if the pattern or weave perpendicular to the selvage edge is more desirable for the design at hand. Crosswise and lengthwise stretch is also taken in consideration when deciding on the pattern's cutting direction. If cutting the sewing pattern on the crosswise grain allows for more stretch in the finished garment, then a crosswise cut may end up being the more appropriate choice.  For the most part however, the crosswise grain of fabric is a bit weaker and features a different drape than the lengthwise grain, especially when it comes to woven fabrics. This difference in drape can negatively affect the fit and comfort of a clothing item once sewn. For that reason, it is usually recommended that most sewing patterns are cut on the lengthwise grain (parallel to the selvage edge). To identify whether the sewing pattern at hand displays a crosswise grainline, find the double pointed arrow marked on the pattern as described above. As opposed to a lengthwise grainline, a crosswise grainline will extend horizontally from one side seam to the other, perpendicular to center front or center back. Vise versa, the lengthwise grainline extends from the top of the clothing item to the hem, parallel to the center back and center front. 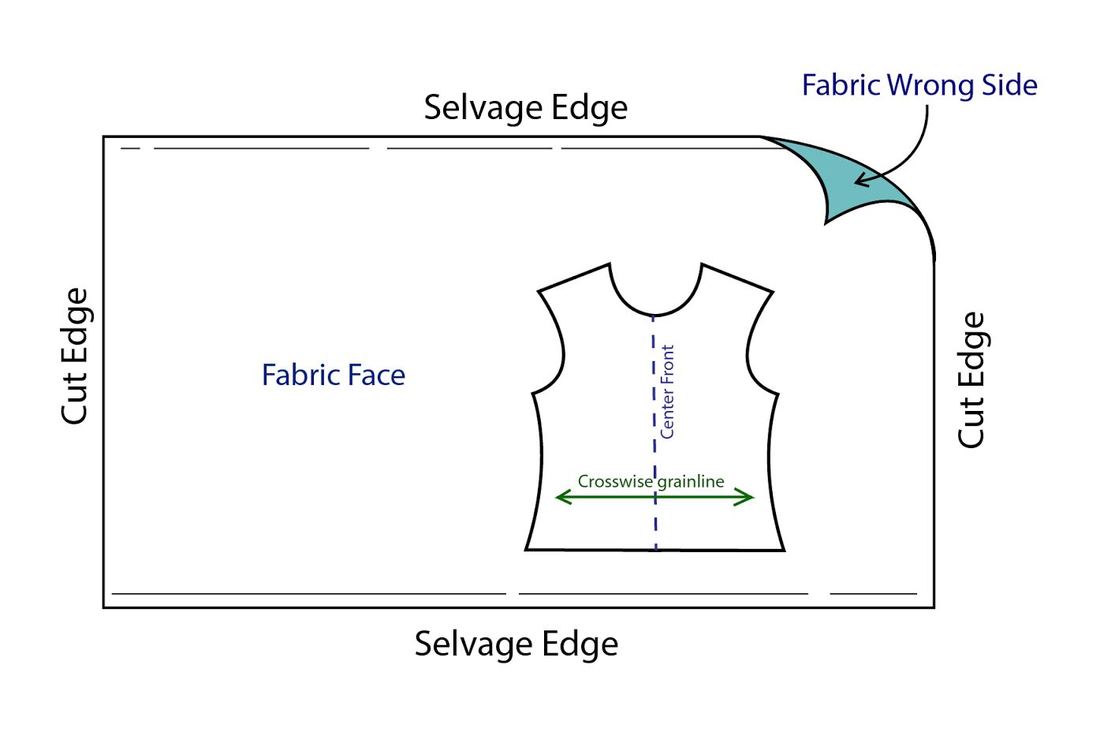 To align a pattern on the crosswise grain simply position the arrow of the grainline parallel to the selvage edge as described above. You will notice that while the grainline on the pattern remains parallel to the selvage edge, the direction of the garment pattern itself is different than that of a lengthwise grain placement- The pattern piece is perpendicular in relation to the selvage edge. Without overwhelming you with too many terms, keep in mind that the woven threads that are parallel to the selvage edge (lengthwise grain) are called weft and and those that are perpendicular to the selvage edge (crosswise grain) are called warp. Weft= Threads on lengthwise grain Warp= Threads on crosswise grain Bias Cut: Aligning A Pattern On The Fabric Bias A bias grainline can sometimes be a bit confusing for sewing beginners, but if you follow the same logic as described above and work with the selvage edge of fabric, you'll find that a bias cut is just as simple. The bias represents the diagonal direction within the fabric, and is positioned at 45 degrees in relation to the selvage edge. You might wonder why you would ever need to cut a sewing pattern on the bias. Well, bias cuts are actually used a lot more often than you think, mainly in evening wear/bridal and for making bias binding. While it is more costly due to the fact that it requires the use of more fabric yardage, it allows for a beautiful drape with added stretch even for those woven fabrics that completely lack stretch along the lengthwise and crosswise grains. Don't believe us? Try this experiment: Pull a woven fabric vertically along the selvage and note it's stretch. Now do the same horizontally on the fabric, perpendicular to the selvage edge. You'll notice that the lengthwise flexibility of a woven fabric is usually identical to its crosswise. Now, stretch the fabric diagonally from one corner to the opposite corner- notice the stretch? The intersection of the threads diagonally allow for more movement and increased comfort. 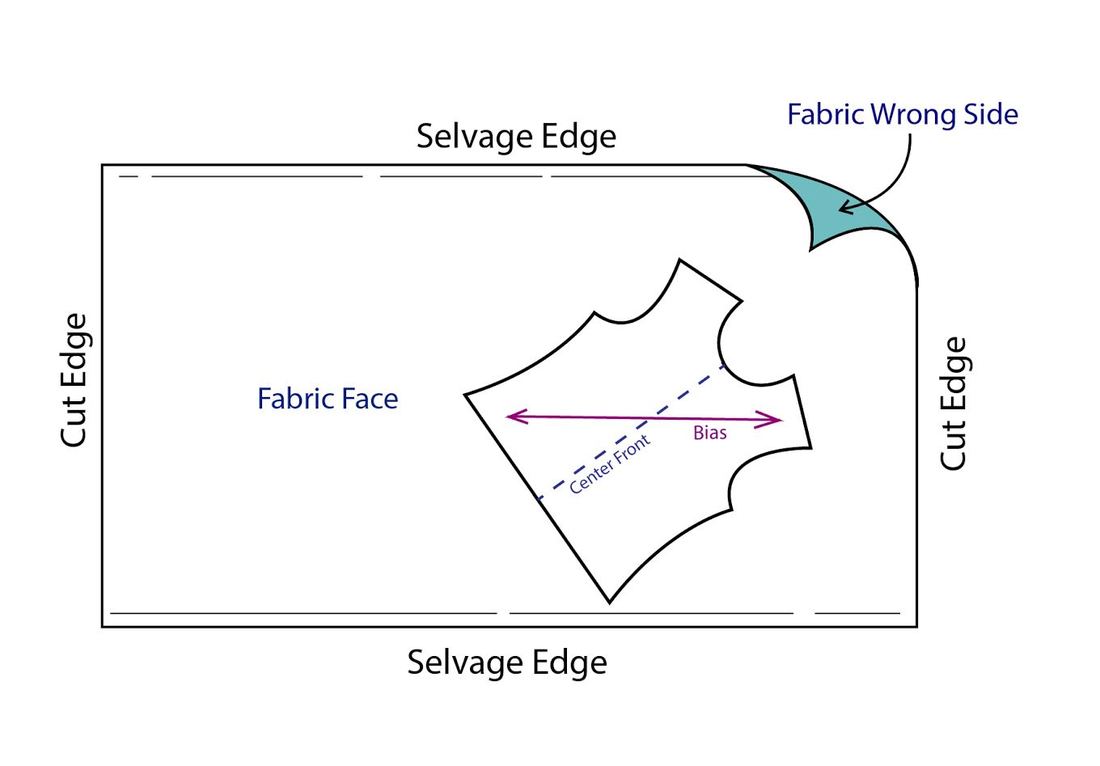 A bias grainline is positioned diagonally on a sewing pattern at a 45 degree angle in relation to the center front/back line. It points from one corner to the opposite corner of the pattern piece intersecting the lengthwise and crosswise grainlines. To align a bias pattern piece on fabric, follow the steps described above by aligning the arrow mark on the pattern parallel to the selvage edge of the fabric. Make sure you position the grainline at exactly the same distance from the selvage edge throughout- use a ruler for precision. You'll notice that aligning the bias grainline parallel to the selvage edge will automatically position the pattern piece diagonally on the fabric. This is the beauty of grainlines- once they are marked on the pattern piece, all you have to do is place them parallel to the fabric's selvage edge and you'll always achieve the correct alignment. Cut on fold: Cutting a Sewing Pattern On Fold Cutting a pattern on fold is conveniently used when limited on work space, to save pattern paper, or simply for cutting comfort. Keep in mind that not all pattern pieces can be cut on fold. In the case of an asymmetric design or when the fabric is too difficult to handle or cut while folded, cutting patterns on fold is not an option. Vise versa, in the case of a pattern piece that has symmetric sides separated by a straight line (usually center front or center back), cutting on fold can be quite convenient. A cut on fold mark on the sewing pattern is usually depicted by a double arrow pointing downwards towards the edge that is aligned with the fabric fold (see image bellow). As is true for all pattern cutting methods, it is important to look at the grainline on the sewing pattern before determining whether to fold the pattern crosswise or lengthwise. Follow the directions above to determine the grainline's direction in relation to the selvage edge. A lengthwise fold as shown below is the most common of the two. A lengthwise fold is generally more stable, easier to measure and align.  When folding the fabric lengthwise, make sure the distance from the fold to the selvage edge is exactly the same throughout. This is important in achieving the proper cut and fit and avoiding off-grain comfort issues in the final garment. Once the fabric has been folded, align the cut-on-fold edge with the fold on the fabric- they should be perfectly matched and overlapping. Once the pattern piece has been cut and the pins are removed, you'll notice that opening the folded fabric results in two identical, symmetric sides. For a step by step guide on how to fold, pin and cut a sewing pattern on fold, check out our tutorial: Cutting a Sewing Pattern On Fold. 
16 Comments
MS BJ Lawrence
11/7/2019 09:53:58 am
on fabrics where you can't tell the right side from the wrong, which way does the selvage edge roll ? 12/9/2019 06:23:20 am
Great questions! When both sides of the fabric look the same, it is up to you which side you'd like to use as your face. Sometimes (although not always) the selvage edge can actually give you a hint as to what side was intended as the face at the manufacturing level. If the selvage has any marks or writing on it, the side this is visible on is considered the official face of the fabric. Hope this helps!
Cynthia Dotson
11/11/2022 06:15:43 pm
I really liked your explanation about where the grains are in the
alphaeus kaarukua
3/8/2024 11:48:52 pm
parallel to the cut edge
Sanchez B
5/19/2020 07:12:42 am
Such wonderful & helpful info!! Thank you!! 8/12/2020 05:52:58 am
Thank you for your kind words! I’m so glad you enjoyed the tutorial!
Joyce Mo
8/12/2020 02:41:59 am
Thank you so much for your easy to understand. 8/12/2020 05:50:39 am
Thank you so much Joyce! I am so glad you found the info helpful!!
luisa belda
8/17/2020 06:41:45 pm
Good day.
Julia Richmond
11/10/2020 04:20:29 pm
I want to recover my sofa cushions with 11 ounce Belgian linen. The fabric is quite heavy, almost like duck canvas would be much more economical to cut the pattern on the crosswise grain. The fabric has no obvious grain. Do you think I could do it? 11/10/2020 04:39:16 pm
Hi Julia! Absolutely- a crosswise grain will definitely work for your project!
Linda
11/18/2021 04:59:35 pm
So is the illustration of the top with the crosswise grain placed incorrectly with the crosswise arrow pointing the same direction as the lengthwise grain? Instead of perpendicular? 4/30/2022 05:19:12 am
Thank you for explaining that the bias denotes the diagonal direction within the fabric. I have clothes that need repair but I don't know how to sew. I better look for a sewing shop near my place to give my clothes a new look.
Malena
10/19/2022 11:14:41 pm
Hello Doina , 12/10/2022 05:39:33 am
It's great that this article talked that you should ensure proper alignment and sewing processes for workers to provide safety. Last night, my friend told me he was planning to buy bulk orders of construction vest that has a high-vision function to implement safety in their construction jobs. He asked if I had any idea what would be the best option to consider. Thanks to this helpful article, I'll tell him he can consult a trusted workwear service as they can provide information about their products.
Joni Tanaka
7/29/2023 04:56:14 pm
If a pattern sleeve is supposed to be cut on the horizontal grainline, would it be alright to cut it on the bias if I don't have enough fabric to cut it on the horizontal grainline. The width of the fabric is narrow, so the pattern fits better on the bias. The fabric is a lightweight cotton voile. Leave a Reply. |
The Blog:A journey into our design process, sewing tutorials, fashion tips, and all the inspiring people and things we love. 
Doina AlexeiDesigner by trade and dressmaker at heart. I spend most of my days obsessing over new fabrics and daydreaming new ideas. 
Sadie
Executive Assistant & Client Relations Manager Archives
November 2019
Categories
All

|

-
Sewing Tutorials
-
Basics
>
- Aligning Pattern Grainlines To Fabric
- Preparing Fabrics For Sewing
- Pinning Sewing Patterns To Fabric
- Placing Sewing Patterns On Fabric For Cutting
- Rotary Cutters or Fabric Scissors?
- Cutting The Sewing Patterns
- What Are Notches And How To Use Them In The Sewing Process
- Transferring Notches From Pattern To Fabric
- Transferring Seamlines to Fabric
- Staystitching
- Backstitching: A Complete Guide
- Hand Basting: A Complete Guide
- Sewing Continuous Bias Binding
- Darts >
-
Sewing Seams
>
- The Basics Of Seams And Seam Allowance
- How To Sew A Straight Seam
- Sewing Curved Seams
- Sewing Corner Seams
- Trimming And Grading Seam Excess
- Notching/Clipping Seam Allowance for Tension Release
- Sewing Topstitched Seams
- Sewing Corded Seams
- Sewing A Slot Seam
- Sewing A Gathered Seam
- Sewing Bias Seams
- Sewing Seams With Ease
- Sewing Seams With Crossing Seamlines
- Sewing Unlike Fabric Seams
- How To Iron Seams: Ironing Tools And Conventions
- Sewing With Knit Fabrics
- Understanding Stitch Length And Tension
- Sewing Unique Fabric Seams
-
Seam Finishes
>
- Seam Finishing Techniques - Overview
- Applying A Pinked Seam Finish
- Applying A Bias Bound Seam Finish
- Serging And Zigzag Seam Finishes
- Sewing A Self-Bound Seam Finish
- Sewing A French Seam Finish
- Sewing A Hong Kong Seam Finish
- Sewing A Mock French Seam Finish
- Sewing A Turned-and-Stitched Seam Finish
- Sewing Overcast Hand-Applied Seam Finishes
- Sewing A Flat Felled Seam
- Sewing A Hairline Seam Finish
-
Hem Finishes
>
- Garment Hem Finishes: Overview
- Sewing A Double Fold Hem Finish
- Sewing A Single Fold Hem Finish
- Sewing Bound Hem Finishes
- Sewing An Exposed Double Layer Bound Hem
- Sewing A Folded-Up Bound Hem with Pre-folded Binding
- Sewing A Hong Kong Hem Finish
- Sewing A Band Hem Finish
- Sewing A Bias Faced Hem Finish
- Sewing A Twill Tape Hem Finish
- Sewing A Rolled Hem Finish
- Sewing A Shaped Hem Facing
- Using Fusible Hem Tape And Webbing
- Finishing A Lace Fabric Hem
- Finishing A Leather Hem
- Sewing Faced Hem Corners
- How To Finish Lining At The Hem
- Finishing Fabric Corners by Mitering >
- Interfacing A Hemline: Lined And Unlined Examples
-
Sewing Pockets
>
- Curved Patch Pocket With Flap
- Unlined Square Patch Pockets
- Lined Patch Pockets: Two Ways
- Extension On-Seam Pockets
- Separate On-Seam Pocket
- Front Hip Pockets
- Bound Double Welt Pocket
- Double Welt Pocket With Flap
- Self-Welt Pocket (Using Single Fabric Layer)
- Slanted Welt Pocket (Hand-Stitched)
- Faced Slash Pockets: Overview >
-
Sewing Zippers
>
- Sewing Zippers: General Information
- Sewing A Centered Zipper
- Sewing A Lapped Zipper
- Sewing An Invisible Zipper
- Sewing A Fly Front Zipper
- Sewing A Closed-End Exposed Zipper (No Seam)
- Sewing An Exposed Separating Zipper
- Sewing Hand Stitched Zipper Applications
- Sewing A Zipper Underlay
- Sewing A Placket-Enclosed Separating Zipper
- Sleeveless Finishes >
-
Neckline Finishes
>
- Sewing A Neck Shaped Facing
- Sewing An All-In-One Neck Facing
- Neck And Garment Opening Combination Facings >
- Sewing A Bias Faced Neckline Finish
- Sewing A Band Neckline Finish
- Bound Neckline Finishes: Overview >
- Sewing A Semi-Stretch Strip Band Neckline
- Ribbed Neck Band And Classic Turtleneck
- Decorative Neckline Finishes >
- Finishing Facing Edges >
-
Extras
>
- A Complete Guide on Interfacing
- Sewing Bound Spaghetti Straps
- Sewing Spaghetti Straps To A Faced Neckline
- Sewing Ruffles: Overview
- Patterning And Sewing A Circle Ruffle
- Sewing A Gathered Heading Ruffle
- Sewing Double Layer Gathered Ruffles
- Sewing A Gathered Ruffle Into A Seam
- Sewing A Gathered Ruffle To A Fabric Edge
- Sewing A Fabric Surface Slit
- Sewing A Slit Seam
- Hand-Applied Straight Stitches
- Hand-Applied Blind Stitches
- Hand-Applied Overedge Stitches
- Hand-Applied Tack Stitches
- Hand-Applied Decorative Stitches
-
Basics
>
- Custom Bridal
- Custom Apparel
- About
- Blog
 RSS Feed
Services |
Company |
|
