|
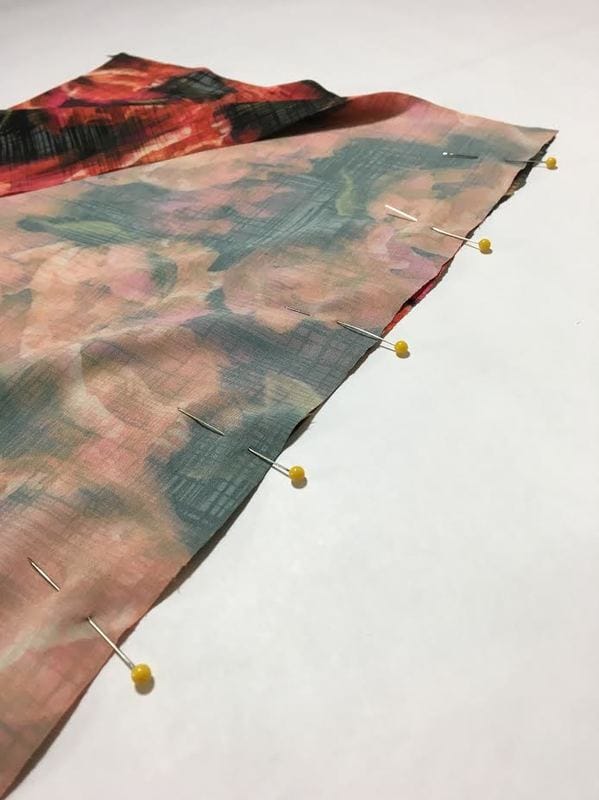
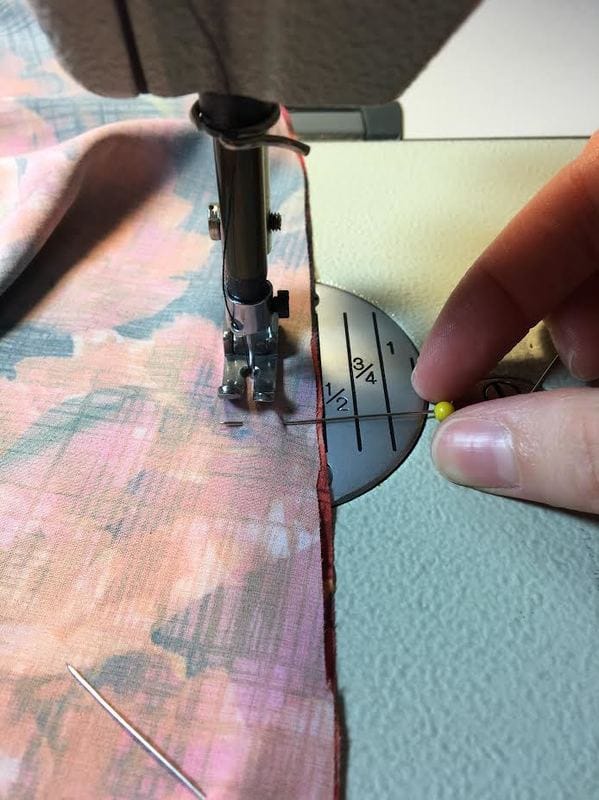
If you’re in the beginning stages of learning how to sew, even stitching together a simple seam can be confusing. Sewing is overwhelming for many people mainly because they don’t start the right way. There is too much overwhelming information out there and without some serious sewing courses, it is difficult to know where to start. For that reason, we put together the Learn To Sew Box, which includes full size patterns in your choice of size, your choice of fabric, and the main sewing supplies you need to sew a dress from start to finish- The box will not only teach you how to sew, it will also give you the satisfaction of wearing a dress you made in your perfect size! Giving you a sneak peek into the Learn to Sew Box, we put together a step by step guide to sewing a seam properly following three important rules! Once you know these rules you can apply them to any kind of seams, garment details, pockets etc.- anything you wish to sew! 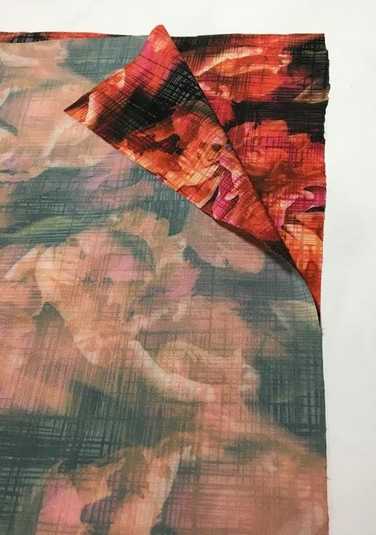 Rule #1: When stitching a seam together the face of both fabric pieces should be touching. This is a simple rule that will ensure you don’t have to worry about sewing on the wrong side of the fabric. When you’re pinning together the seams getting it ready for stitching, make sure the face of the fabric on both pieces is touching. When your seam is stitched, the clean side of the seam will correspond to the face of the fabric and the excess seam allowance will remain on the inside of the garment, corresponding to the back side of your fabric. If you get used to following this rule, you will never need to redo any seams just because of a simple error in sewing on the wrong side. How do you know what is traditionally considered the face side of the fabric? You can figure it out visually by comparing what side has the more detailed weaving or vibrant color. However, it is actually up to you what side of the fabric you want to use for the garment you’re sewing- Don’t be intimidated by what is “supposed” to be the face of the fabric. If you really like a fabric’s look on the back better than the front, feel free to use that as the face of your garment. Additionally, for many solid and print fabrics that look the same on both sides, this rule doesn’t apply. Rule #2: Pins should be placed horizontally along the seam before stitching. When you put two pieces of fabric together to create a seam they must be matched and briefly stabilized in place with pins. This keeps the seam perfectly aligned and connected before receiving a final machine stitch at a specific seam allowance (distance from the edge). Many self-taught sewing enthusiast and beginners don’t pay attention to the direction of the pins when putting a seam together, but it is actually quite important. The direction of your pins is not only a factor that influences how efficiently you sew, but it also affects the safety and correct alignment of the fabric. For that reason, pins should be placed horizontally along a seam and not vertically. Why is this such a big deal? Well first and foremost, when you’re running a stitch on your machine, you should be able to comfortably (and conveniently) remove each pin one by one right before the needle approaches it. When the pins are aligned horizontally this is very easy and safe to do! Speaking of safety, if your pins are aligned vertically you will most likely prick your fingers occasionally as you hold and move the fabric under the presser-foot. A horizontal positioning of pins is less likely to hurt you due to the way they are placed in relation to your hands. In addition, placing the pins horizontally maintains a much stronger seam alignment and stability, stopping the two pieces of fabric from bulking and sliding up and down (which often happens when the pins are inserted vertically).
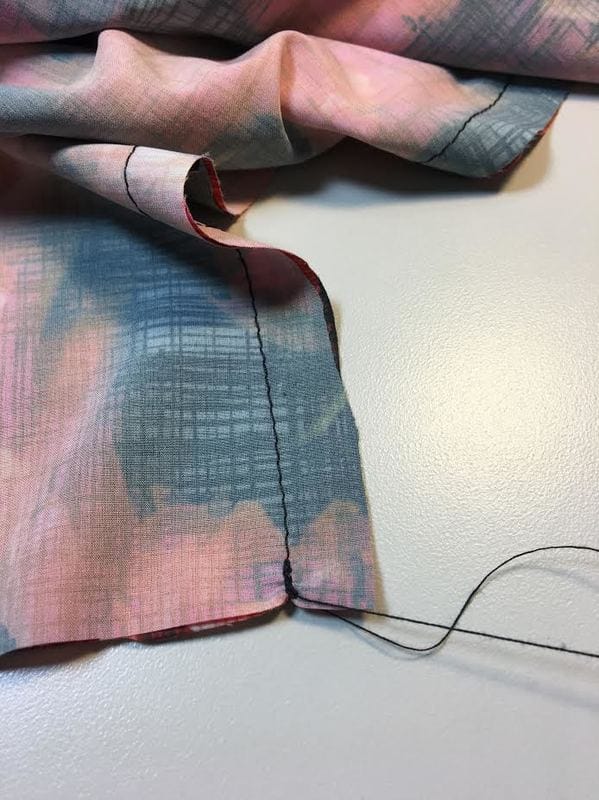
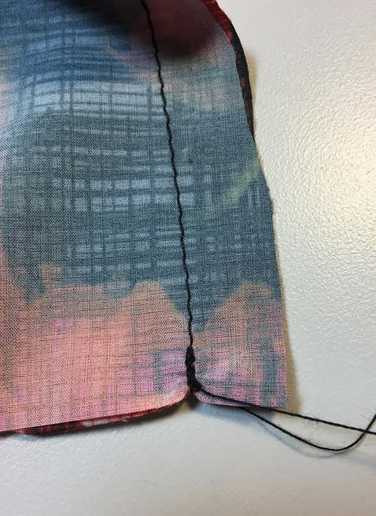
Rule #3: Back-stitch the beginning and end of your each seam, unless your sewing machine has tension issues. The phrase above probably sounds very confusing to the sewing beginner so we’ll try to break it down for you. Back-stitching is when you reverse a stitch on your sewing machine or by hand in order to lock it in place, thus stopping it from coming apart. This is necessary for most stitches in order to maintain durability. It might seem like an extra step, but once you get into the habit of starting and finishing your regular machine stitches with a backstitch it becomes very natural. There are some stitches that don’t necessarily require backstitching. For example, sewing a hem can be finished by overlapping the end portion of the stitch with the beginning. However, for good measure and because you should develop good-quality habits from the start, we recommend that you back-stitch all your seams. Read our tutorial on backstitching to learn more about how to back-stitch by hand and using a sewing machine.
There is nonetheless a factor that could influence whether you back-stitch both at the beginning and end of the stitch. If you notice that your sewing machine is pulling and wrinkling the stitch even slightly, it might have some tension issues or need to be readjusted. You can look into fixing this either in your manual or by finding some information online. What happens with a straight stitch when your machine has tension problems and you back-stitch both at the beginning AND end of the stitch is that there’s no way to release the stitch wrinkles so the seam itself ends up looking bulky and wrinkled. A way to prevent this issue is to backstitch only at the beginning or only at the end of your stitch, and then iron the wrinkles out towards the end that’s not backstitched.
3 Comments
Nicola
6/13/2020 11:51:00 pm
Hi. I’ve recently become a real fan of your blog with the exception of difficulty in finding a topic so I’m writing this question in hopes that this post is close enough to my issue. 6/15/2020 01:32:50 pm
Hi Nicola! Thank you for your comment- what a great question! It could be a number of things causing this issue so the best way to tackle it is to eliminate what is "not" casing it. Start by re-threading your machine. Sometimes that seems to fix some invisible tension issues you may not be aware of. If you are still experiencing the issue, manually adjusting your upper machine tension and testing with the same fabric may help. If you know 100% that your machine tension is not causing the puckering, test-stitch your rayon fabric in different directions across the grain. Rayon is notorious for stretching out of shape when cut on the bias (diagonal against selvage edge)- see if that could be causing the issue. Stitch vertical, horizontal and diagonal on a scrap of the same fabric (and same amount of layers) and see if you notice a difference. Another thing you can try is to adjust the actual stitch length on your machine- try a shorter or longer stitch in relation to what you are currently using. You mentioned you are allowing the fabric to feed into the machine- try to hold it at a slight tension on both sides as you feed the fabric layers (but do not pull) and see if that helps. It will take a bit of experimentation but I hope you find the culprit! Since you are not experiencing this issue with other fabrics (just the rayon and your zipper) it is most likely the stitch tension on your machine in relation to the fabric type. Hope this helps and good luck! Doina
Shehnaz
7/24/2023 12:17:08 pm
I’m trying to make simple skirt for th very first time. Iv Bort the pattern but stil trying to undadtand the whole pattern. Etc. Once Iv sussed the pattern I belv Iv cracked it. For me sewing is actually the easy bit. I was an experienced machinist years ago. But I worked for firms tht usually made coats. An Iv Neva eva made any proper clothes. I thort it’s toooo hard. Il Neva b able to make it. But the other day. I wanted simple nade to measure Dre’s. He charged me £25 to make it. Plus th fabric cost me £35. £60 for basic simple Dre’s. Tht was anoying. Wish I cud make simple stuf myself. So now I’m tryin to make simple skirt. Leave a Reply. |
The Blog:A journey into our design process, sewing tutorials, fashion tips, and all the inspiring people and things we love. 
Doina AlexeiDesigner by trade and dressmaker at heart. I spend most of my days obsessing over new fabrics and daydreaming new ideas. 
Sadie
Executive Assistant & Client Relations Manager Archives
November 2019
Categories
All

|

-
Sewing Tutorials
-
Basics
>
- Aligning Pattern Grainlines To Fabric
- Preparing Fabrics For Sewing
- Pinning Sewing Patterns To Fabric
- Placing Sewing Patterns On Fabric For Cutting
- Rotary Cutters or Fabric Scissors?
- Cutting The Sewing Patterns
- What Are Notches And How To Use Them In The Sewing Process
- Transferring Notches From Pattern To Fabric
- Transferring Seamlines to Fabric
- Staystitching
- Backstitching: A Complete Guide
- Hand Basting: A Complete Guide
- Sewing Continuous Bias Binding
- Darts >
-
Sewing Seams
>
- The Basics Of Seams And Seam Allowance
- How To Sew A Straight Seam
- Sewing Curved Seams
- Sewing Corner Seams
- Trimming And Grading Seam Excess
- Notching/Clipping Seam Allowance for Tension Release
- Sewing Topstitched Seams
- Sewing Corded Seams
- Sewing A Slot Seam
- Sewing A Gathered Seam
- Sewing Bias Seams
- Sewing Seams With Ease
- Sewing Seams With Crossing Seamlines
- Sewing Unlike Fabric Seams
- How To Iron Seams: Ironing Tools And Conventions
- Sewing With Knit Fabrics
- Understanding Stitch Length And Tension
- Sewing Unique Fabric Seams
-
Seam Finishes
>
- Seam Finishing Techniques - Overview
- Applying A Pinked Seam Finish
- Applying A Bias Bound Seam Finish
- Serging And Zigzag Seam Finishes
- Sewing A Self-Bound Seam Finish
- Sewing A French Seam Finish
- Sewing A Hong Kong Seam Finish
- Sewing A Mock French Seam Finish
- Sewing A Turned-and-Stitched Seam Finish
- Sewing Overcast Hand-Applied Seam Finishes
- Sewing A Flat Felled Seam
- Sewing A Hairline Seam Finish
-
Hem Finishes
>
- Garment Hem Finishes: Overview
- Sewing A Double Fold Hem Finish
- Sewing A Single Fold Hem Finish
- Sewing Bound Hem Finishes
- Sewing An Exposed Double Layer Bound Hem
- Sewing A Folded-Up Bound Hem with Pre-folded Binding
- Sewing A Hong Kong Hem Finish
- Sewing A Band Hem Finish
- Sewing A Bias Faced Hem Finish
- Sewing A Twill Tape Hem Finish
- Sewing A Rolled Hem Finish
- Sewing A Shaped Hem Facing
- Using Fusible Hem Tape And Webbing
- Finishing A Lace Fabric Hem
- Finishing A Leather Hem
- Sewing Faced Hem Corners
- How To Finish Lining At The Hem
- Finishing Fabric Corners by Mitering >
- Interfacing A Hemline: Lined And Unlined Examples
-
Sewing Pockets
>
- Curved Patch Pocket With Flap
- Unlined Square Patch Pockets
- Lined Patch Pockets: Two Ways
- Extension On-Seam Pockets
- Separate On-Seam Pocket
- Front Hip Pockets
- Bound Double Welt Pocket
- Double Welt Pocket With Flap
- Self-Welt Pocket (Using Single Fabric Layer)
- Slanted Welt Pocket (Hand-Stitched)
- Faced Slash Pockets: Overview >
-
Sewing Zippers
>
- Sewing Zippers: General Information
- Sewing A Centered Zipper
- Sewing A Lapped Zipper
- Sewing An Invisible Zipper
- Sewing A Fly Front Zipper
- Sewing A Closed-End Exposed Zipper (No Seam)
- Sewing An Exposed Separating Zipper
- Sewing Hand Stitched Zipper Applications
- Sewing A Zipper Underlay
- Sewing A Placket-Enclosed Separating Zipper
- Sleeveless Finishes >
-
Neckline Finishes
>
- Sewing A Neck Shaped Facing
- Sewing An All-In-One Neck Facing
- Neck And Garment Opening Combination Facings >
- Sewing A Bias Faced Neckline Finish
- Sewing A Band Neckline Finish
- Bound Neckline Finishes: Overview >
- Sewing A Semi-Stretch Strip Band Neckline
- Ribbed Neck Band And Classic Turtleneck
- Decorative Neckline Finishes >
- Finishing Facing Edges >
-
Extras
>
- A Complete Guide on Interfacing
- Sewing Bound Spaghetti Straps
- Sewing Spaghetti Straps To A Faced Neckline
- Sewing Ruffles: Overview
- Patterning And Sewing A Circle Ruffle
- Sewing A Gathered Heading Ruffle
- Sewing Double Layer Gathered Ruffles
- Sewing A Gathered Ruffle Into A Seam
- Sewing A Gathered Ruffle To A Fabric Edge
- Sewing A Fabric Surface Slit
- Sewing A Slit Seam
- Hand-Applied Straight Stitches
- Hand-Applied Blind Stitches
- Hand-Applied Overedge Stitches
- Hand-Applied Tack Stitches
- Hand-Applied Decorative Stitches
-
Basics
>
- Custom Bridal
- Custom Apparel
- About
- Blog
 RSS Feed
Services |
Company |
|
