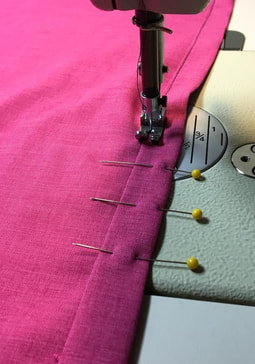
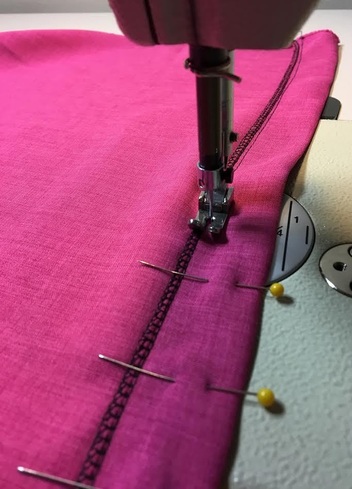
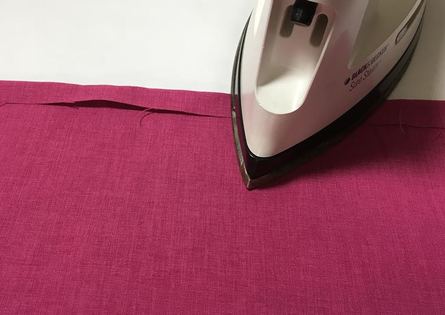
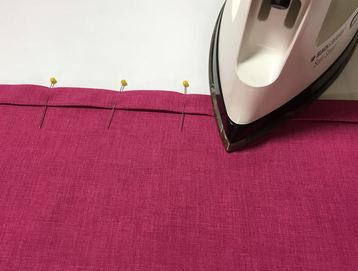
 Whether you’re sewing a dress, top or bottom, every clothing item requires some sort of clean hem finishing. How you choose to clean-finish the hem of a garment is really up to you, but close attention should be paid to the kind of fabric you are using and what style you are sewing. If you are a beginner dressmaker and are still learning fabric drape and simple sewing finishing methods, the information bellow will come in handy when you’re confronted with completing the hem. 1. Double Fold and Stitch (Machine Stitched Hem)This is the most common hem finish and the one that works best with almost all fabrics. It is simple to do and does not require many steps. As you practice sewing more often, you will find little ways to do things that work best for you. In the steps bellow, we’ll show you the easiest way to achieve a clean machine stitched hem (double folded). 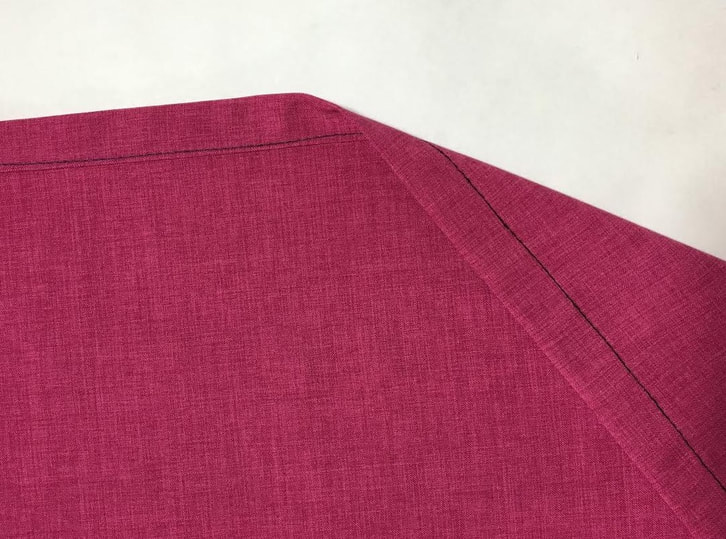 How to sew: First, think about how much hem allowance you have. Hem allowance is the distance from raw edge to the actual dress length, which allows you to clean finish the raw edge at the bottom of a garment. In our sample bellow, the hem allowance is 1”. If you are beginner, we recommend giving yourself a 1" hem allowance on most hems- it is easy to manage and gives you enough excess to work with in case you make a mistake.  Step 1: Fold hem at ½” towards the inside of the garment and iron it down as you fold. Do this until you've created an even fold along the entire hem. Step 2: Fold once more at ½” (this will use up the entire 1” seam allowance) along the hem to enclose the raw edge, and iron as you fold. Secure the fold with pins as you fold and iron. Place the pins horizontally along the hem for faster and easier stitching on the machine- Horizontally-placed pins are easier and safer to remove as you sew. 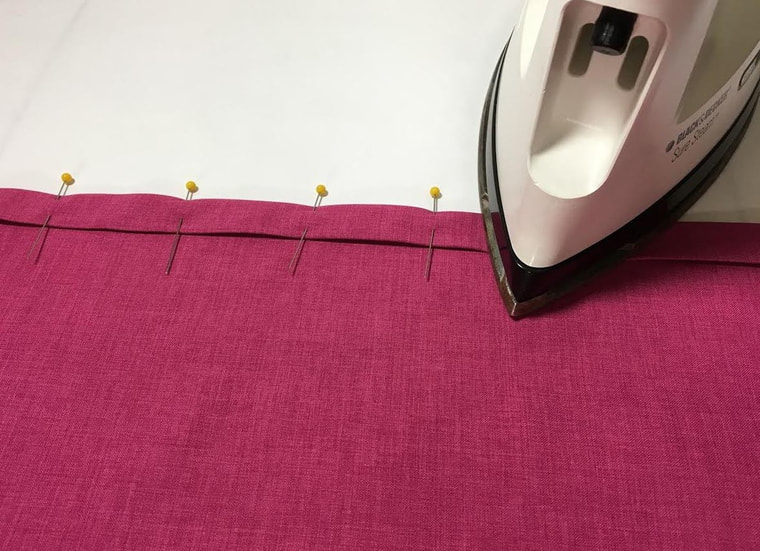
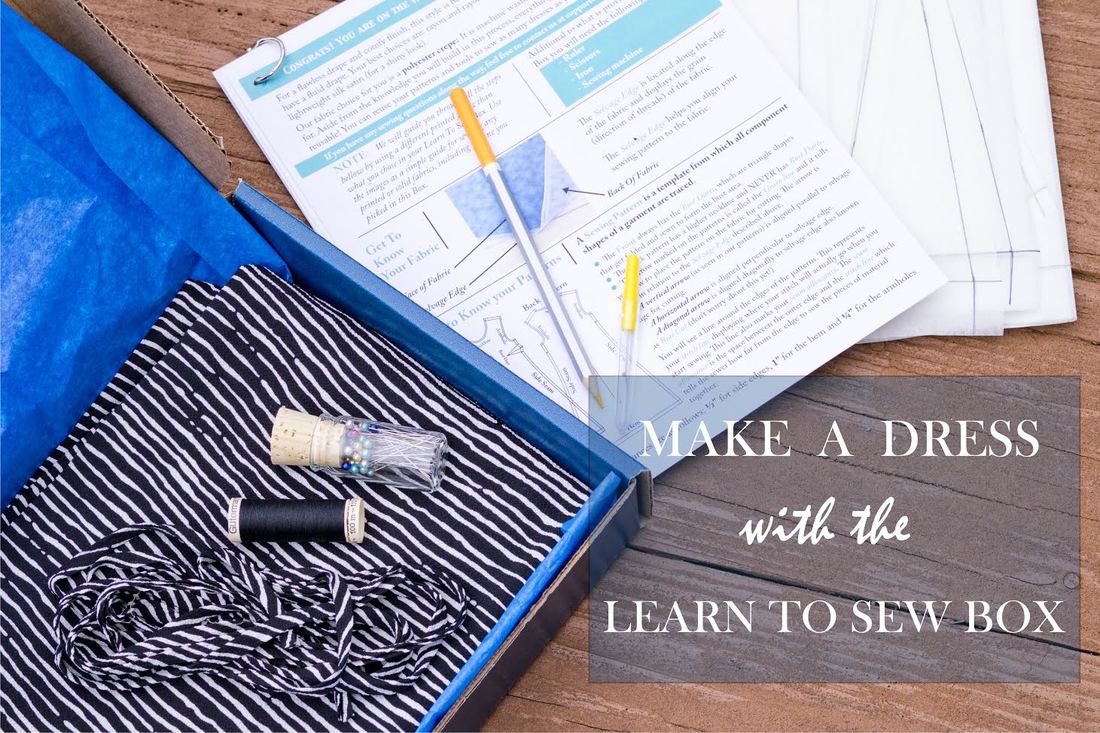
Get hands on experience sewing the double folded hem with the Learn To Sew Box, which provides the fabric and supplies to sew a dress from start to finish on your own and includes the machine stitched, double folded hem 2. Serge-Fold-Stitch: Clean Finishing the Hem Using the Zig Zag Stitch or Overlock MachineA serged/overlock hem finish is probably the easiest and most affordable you’ll come across. This finish will work best if you own an overlock machine. If you don’t, a zig zag stitch will work just as well depending on the fabric. We recommend not using a zig zag stitch on delicate fabrics like silks and various chiffons because it could make the hem wrinkled and bulky, sometimes even catching and pulling on the fine weave of the fabric and damaging it. 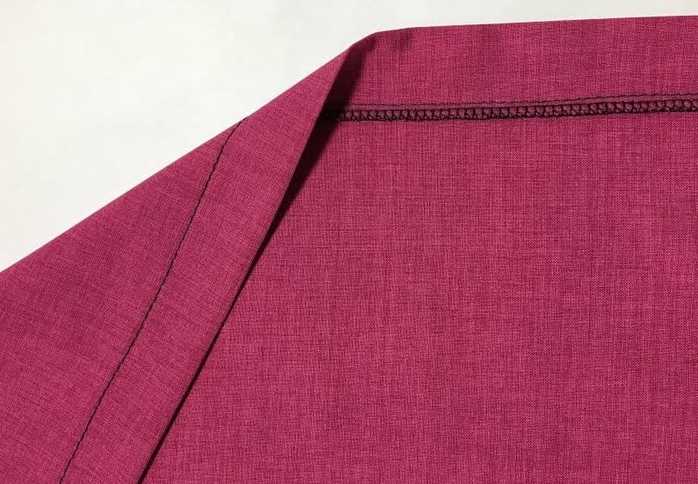 How to Sew: Step 1: Serge (on a serging/overlock machine) or Zig Zag along the raw edge of the hem. 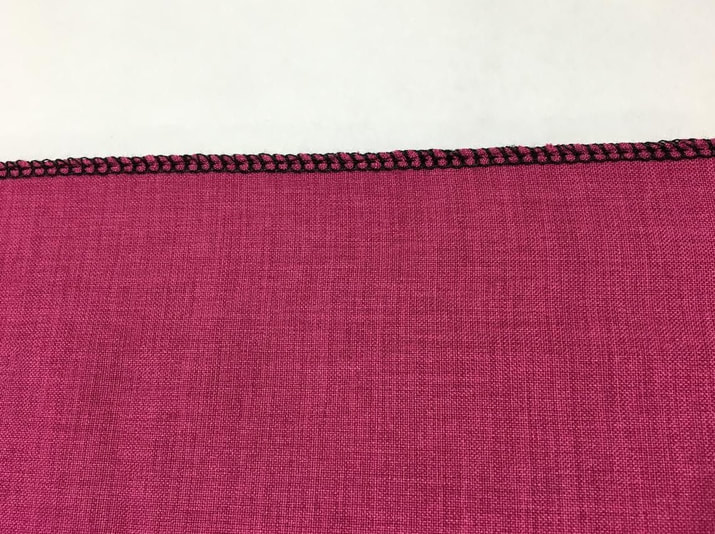 Step 2: Our sample’s hem allowance is 1”- Fold serged or zig-zagged edge inward (towards the inside of the garment) at 1"- the measurement of the entire hem allowance. Iron as you fold and pin at key areas to secure the fold in place. 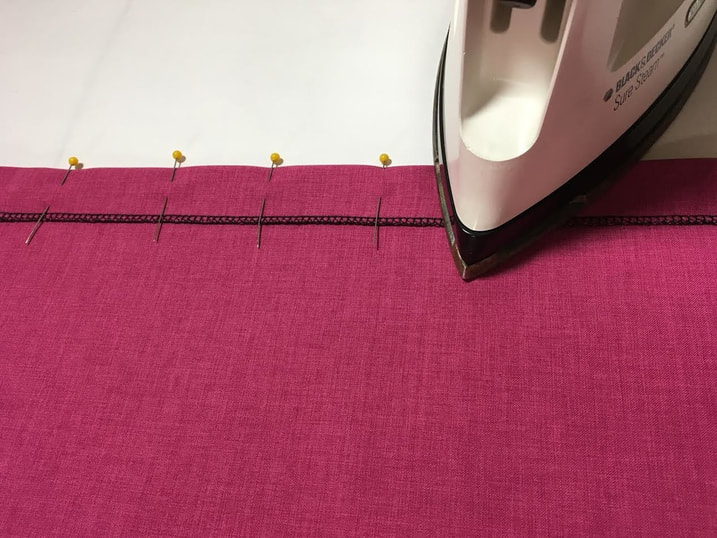
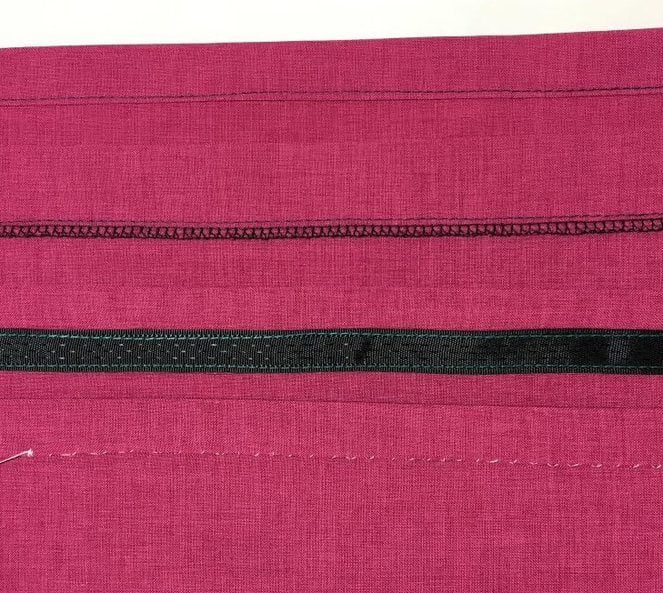
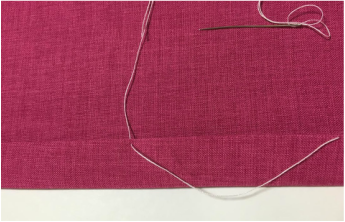
3. Using Hem Tape or Twill TapeUsing a hem tape or a twill tape to finish the raw edges of a hem is usually a little more time consuming and a bit more expensive. However, this method results in a professional finish and works great on evening dresses, skirts, and unlined blazers. This hem finish is not as common anymore because of its higher manufacturing cost, but it is definitely a finish you should get to know well and apply it to the pieces you feel would fit it best. You can buy hem tape or twill tape at your local fabric craft store. It is usually located where all the zippers and threads are and it will come in a packet that is clearly marked. There are a few different widths you can purchase but as a beginner, you should stick to the most commonly used: 5/8” or ½” . The hem tapes at the craft fabric stores are usually iron-on. We recommend sewing them in as described below for a durable finish even if the label reads iron-on.  How to Sew: Note: Hem allowance in the sample bellow is at 1” Step 1: Take the hem tape and align it along the edge of the garment on the FACE side of the fabric as shown below. Start pinning the hem tape to the raw edge of the garment, positioning the edge of the tape at about 1/8” above the actual raw edge of the garment’s hem. This will ensure that the raw edge of your garment is securely enclosed by the hem tape. 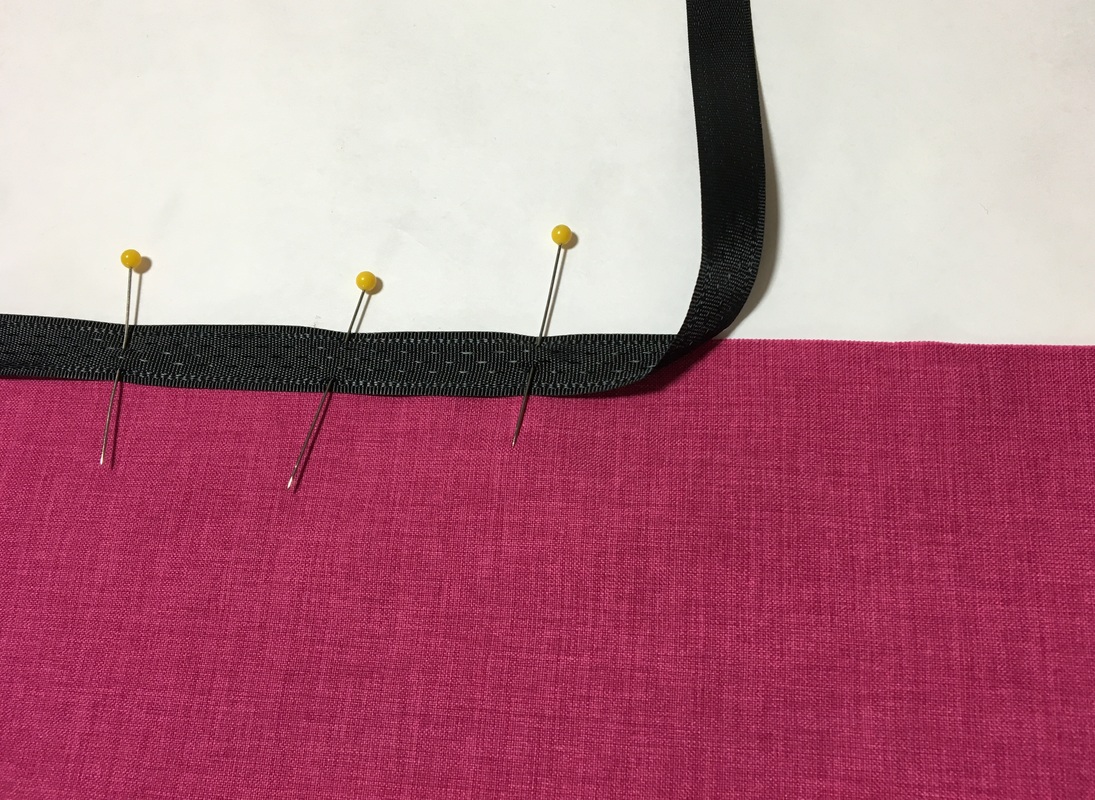 Step 2: Once the hem tape is pinned in place, sew a stitch directly on top of the hem tape's edge as shown below thus stitching the tape and fabric together. Use the hem tape’s edge as a guide - See image below. 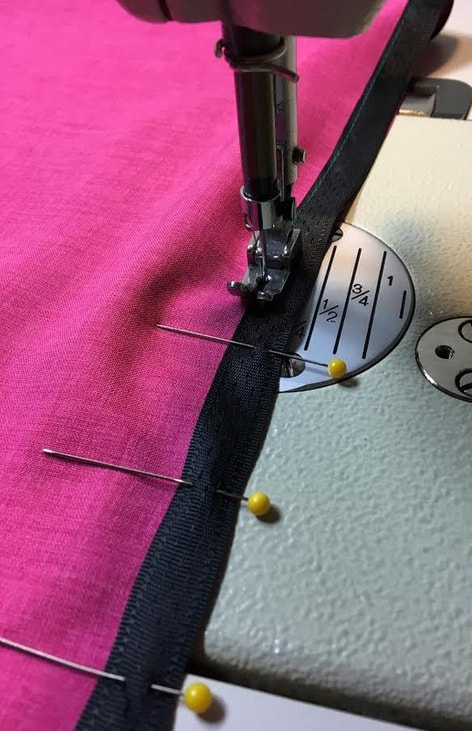 Step 3. Fold the edge of the garment's hem at 1” towards the inside of the garment as shown bellow. Iron as you fold and pin occasionally along the hem tape to secure the fold in place. 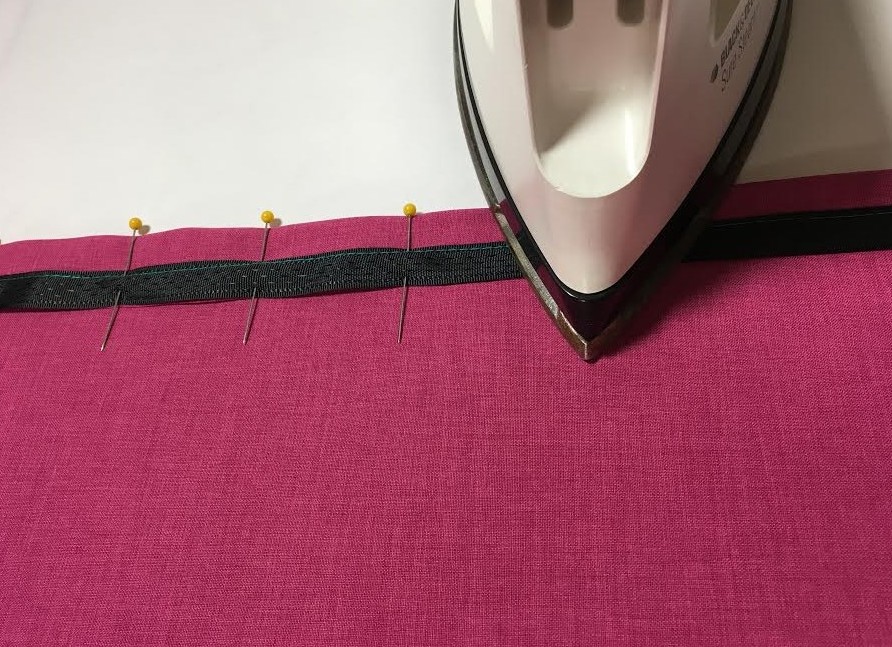 Step 4: Stitch along the second edge of the hem tape while using it as a guide. This will enclose the raw edge of the hem in between the two hem tape stitches. Once finished, don’t forget to backstitch or overlap your stitches to lock the threads in place, and iron the completed hem for a professional finish. 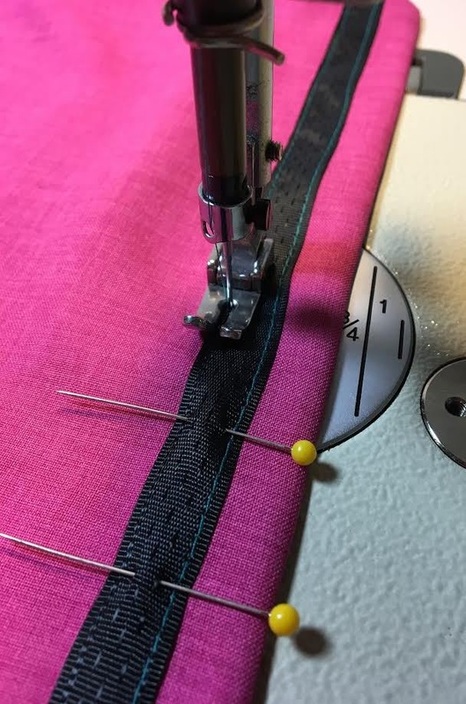 4. A Blind Stitch Hem FinishA blind stitch was traditionally done by hand and used to be one of the most expensive, high-quality finishes on dresses, skirts, outerwear and business suits. Today, developments in technology has equipped even some of the simplest home sewing machines with the ability to do this via machine. This however, requires you to use a special presser-foot which you’ll have to purchase in addition to what's provided in your sewing machine kit. It will also take some time to get the hang of completing a blind stitch on your machine. In order to understand this hem finish better, every beginner sewer should learn how to do it by hand. The sole purpose of the bind stitch is to create a clean finish that does not display a stitch line on the outside of the garment. This is another finish that is not as common today as it used to be due to higher manufacturing costs. It is considered more of a tailored finish which makes it the most appropriate for business suits, evening wear and more dressy items in general. I bet you’re now wondering how to sew one… No problem, follow the steps below and remember that practice (and patience!) makes perfect. 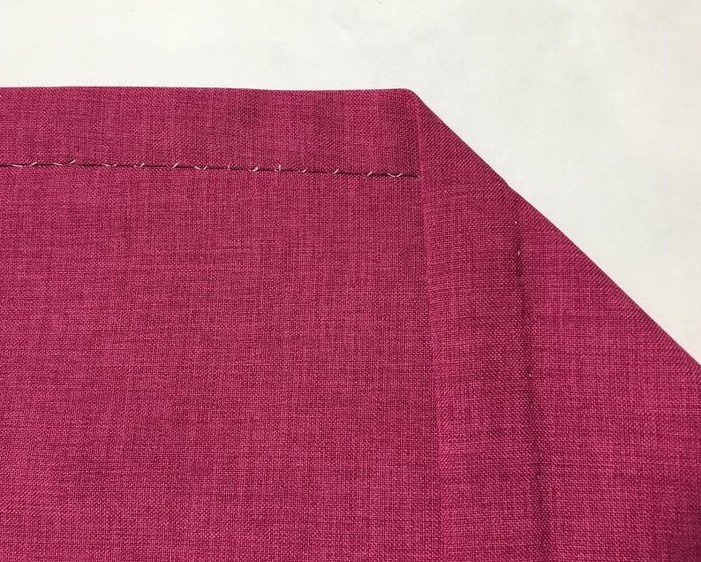 How To Sew: Note: Our sample has a seam allowance of 1”
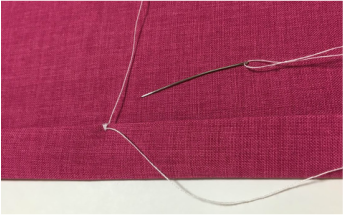
Step 3: Now that you have your hem prepped it is time to blind stitch (by hand!). Take your threaded sewing needle, and starting anywhere along the fold sew a few times in place to lock the stitch. Use the two images below for refference
Step 4: Catch about 1 or 2 threads from the fabric above the fold as shown in the image bellow. 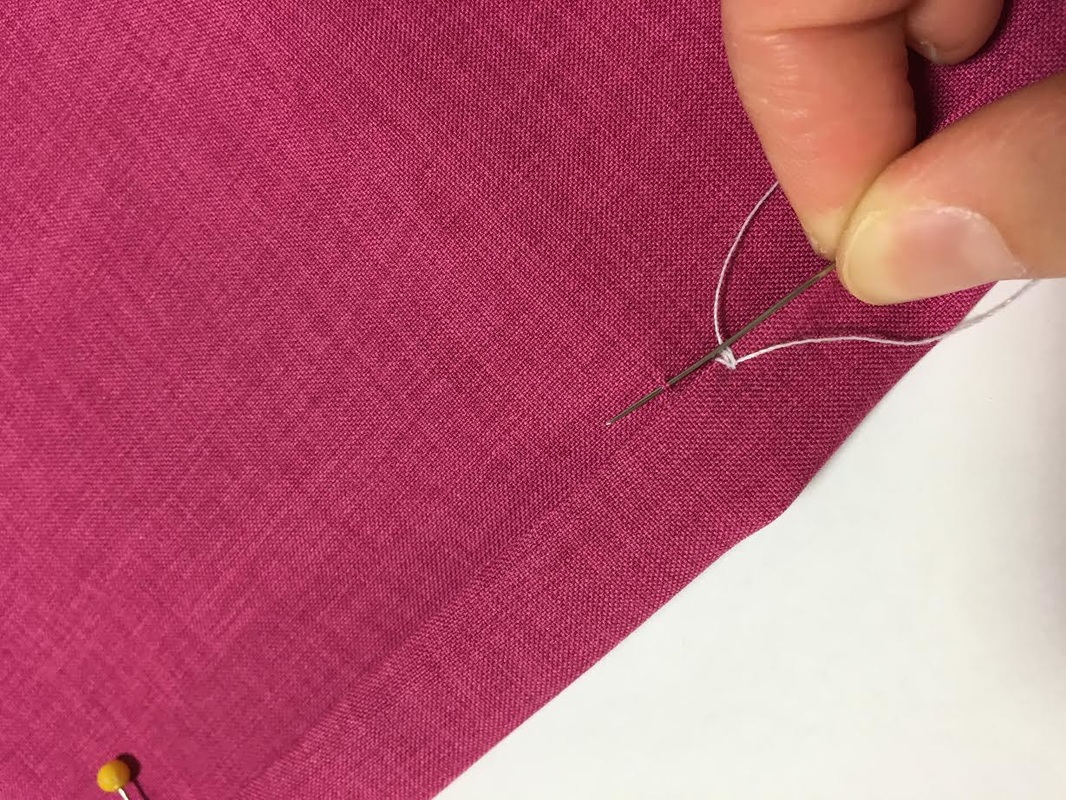 Step 5: Stitch horizontally through the edge of the fold below at about 1/8" as shown. 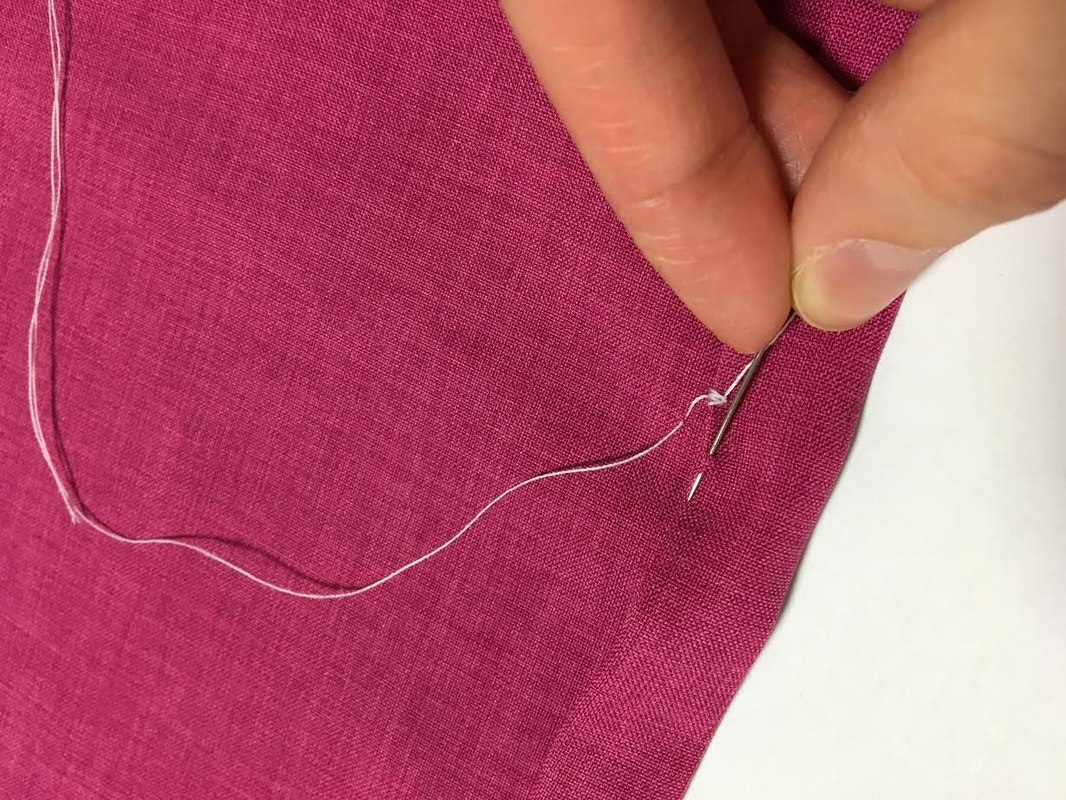 These two consecutive steps should look like a little upside-down V shape as pictured bellow. 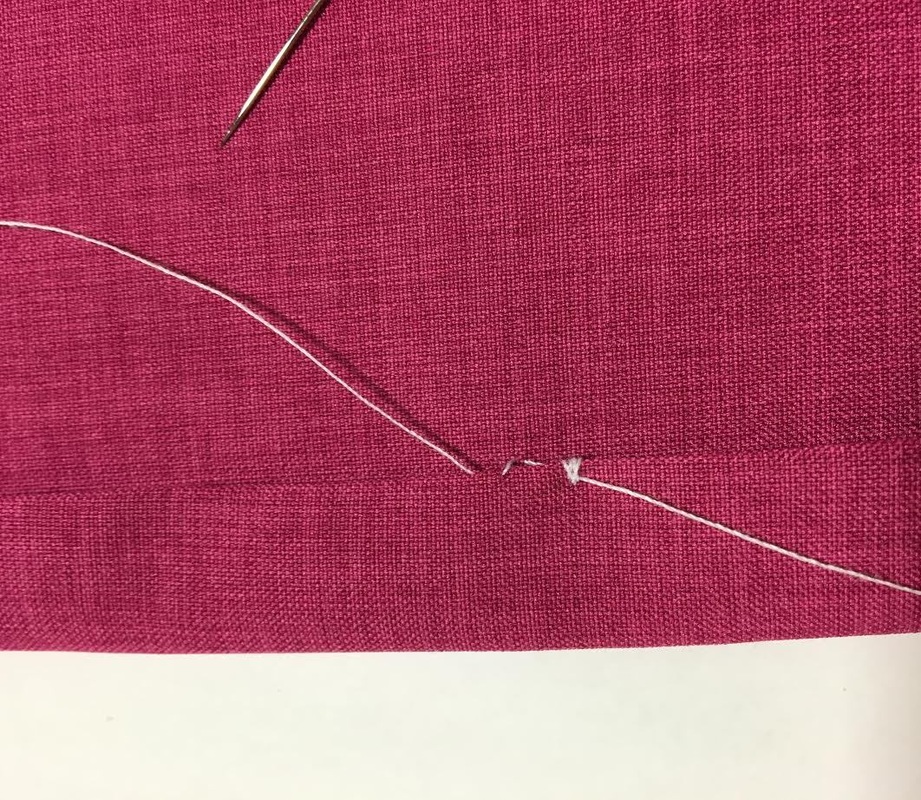 Step 6: Repeat the two steps described above until the blind hem is complete. The end result should be a stitch-less hem on the face of the garment and a fold that is secure in place on the inside. You shouldn’t be able to see too much of the sewing thread on either sides of the garment. Blind stitching takes lots of patience and practice but the end result is a very smooth, high quality finish. 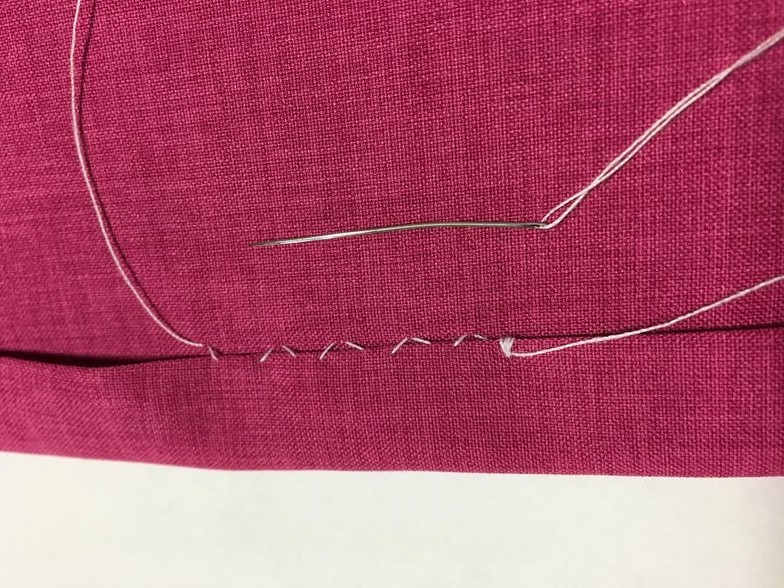
0 Comments
Leave a Reply. |
The Blog:A journey into our design process, sewing tutorials, fashion tips, and all the inspiring people and things we love. 
Doina AlexeiDesigner by trade and dressmaker at heart. I spend most of my days obsessing over new fabrics and daydreaming new ideas. 
Sadie
Executive Assistant & Client Relations Manager Archives
November 2019
Categories
All

|

-
Sewing Tutorials
-
Basics
>
- Aligning Pattern Grainlines To Fabric
- Preparing Fabrics For Sewing
- Pinning Sewing Patterns To Fabric
- Placing Sewing Patterns On Fabric For Cutting
- Rotary Cutters or Fabric Scissors?
- Cutting The Sewing Patterns
- What Are Notches And How To Use Them In The Sewing Process
- Transferring Notches From Pattern To Fabric
- Transferring Seamlines to Fabric
- Staystitching
- Backstitching: A Complete Guide
- Hand Basting: A Complete Guide
- Sewing Continuous Bias Binding
- Darts >
-
Sewing Seams
>
- The Basics Of Seams And Seam Allowance
- How To Sew A Straight Seam
- Sewing Curved Seams
- Sewing Corner Seams
- Trimming And Grading Seam Excess
- Notching/Clipping Seam Allowance for Tension Release
- Sewing Topstitched Seams
- Sewing Corded Seams
- Sewing A Slot Seam
- Sewing A Gathered Seam
- Sewing Bias Seams
- Sewing Seams With Ease
- Sewing Seams With Crossing Seamlines
- Sewing Unlike Fabric Seams
- How To Iron Seams: Ironing Tools And Conventions
- Sewing With Knit Fabrics
- Understanding Stitch Length And Tension
- Sewing Unique Fabric Seams
-
Seam Finishes
>
- Seam Finishing Techniques - Overview
- Applying A Pinked Seam Finish
- Applying A Bias Bound Seam Finish
- Serging And Zigzag Seam Finishes
- Sewing A Self-Bound Seam Finish
- Sewing A French Seam Finish
- Sewing A Hong Kong Seam Finish
- Sewing A Mock French Seam Finish
- Sewing A Turned-and-Stitched Seam Finish
- Sewing Overcast Hand-Applied Seam Finishes
- Sewing A Flat Felled Seam
- Sewing A Hairline Seam Finish
-
Hem Finishes
>
- Garment Hem Finishes: Overview
- Sewing A Double Fold Hem Finish
- Sewing A Single Fold Hem Finish
- Sewing Bound Hem Finishes
- Sewing An Exposed Double Layer Bound Hem
- Sewing A Folded-Up Bound Hem with Pre-folded Binding
- Sewing A Hong Kong Hem Finish
- Sewing A Band Hem Finish
- Sewing A Bias Faced Hem Finish
- Sewing A Twill Tape Hem Finish
- Sewing A Rolled Hem Finish
- Sewing A Shaped Hem Facing
- Using Fusible Hem Tape And Webbing
- Finishing A Lace Fabric Hem
- Finishing A Leather Hem
- Sewing Faced Hem Corners
- How To Finish Lining At The Hem
- Finishing Fabric Corners by Mitering >
- Interfacing A Hemline: Lined And Unlined Examples
-
Sewing Pockets
>
- Curved Patch Pocket With Flap
- Unlined Square Patch Pockets
- Lined Patch Pockets: Two Ways
- Extension On-Seam Pockets
- Separate On-Seam Pocket
- Front Hip Pockets
- Bound Double Welt Pocket
- Double Welt Pocket With Flap
- Self-Welt Pocket (Using Single Fabric Layer)
- Slanted Welt Pocket (Hand-Stitched)
- Faced Slash Pockets: Overview >
-
Sewing Zippers
>
- Sewing Zippers: General Information
- Sewing A Centered Zipper
- Sewing A Lapped Zipper
- Sewing An Invisible Zipper
- Sewing A Fly Front Zipper
- Sewing A Closed-End Exposed Zipper (No Seam)
- Sewing An Exposed Separating Zipper
- Sewing Hand Stitched Zipper Applications
- Sewing A Zipper Underlay
- Sewing A Placket-Enclosed Separating Zipper
- Sleeveless Finishes >
-
Neckline Finishes
>
- Sewing A Neck Shaped Facing
- Sewing An All-In-One Neck Facing
- Neck And Garment Opening Combination Facings >
- Sewing A Bias Faced Neckline Finish
- Sewing A Band Neckline Finish
- Bound Neckline Finishes: Overview >
- Sewing A Semi-Stretch Strip Band Neckline
- Ribbed Neck Band And Classic Turtleneck
- Decorative Neckline Finishes >
- Finishing Facing Edges >
-
Extras
>
- A Complete Guide on Interfacing
- Sewing Bound Spaghetti Straps
- Sewing Spaghetti Straps To A Faced Neckline
- Sewing Ruffles: Overview
- Patterning And Sewing A Circle Ruffle
- Sewing A Gathered Heading Ruffle
- Sewing Double Layer Gathered Ruffles
- Sewing A Gathered Ruffle Into A Seam
- Sewing A Gathered Ruffle To A Fabric Edge
- Sewing A Fabric Surface Slit
- Sewing A Slit Seam
- Hand-Applied Straight Stitches
- Hand-Applied Blind Stitches
- Hand-Applied Overedge Stitches
- Hand-Applied Tack Stitches
- Hand-Applied Decorative Stitches
-
Basics
>
- Custom Bridal
- Custom Apparel
- About
- Blog
 RSS Feed
Services |
Company |
|
