|
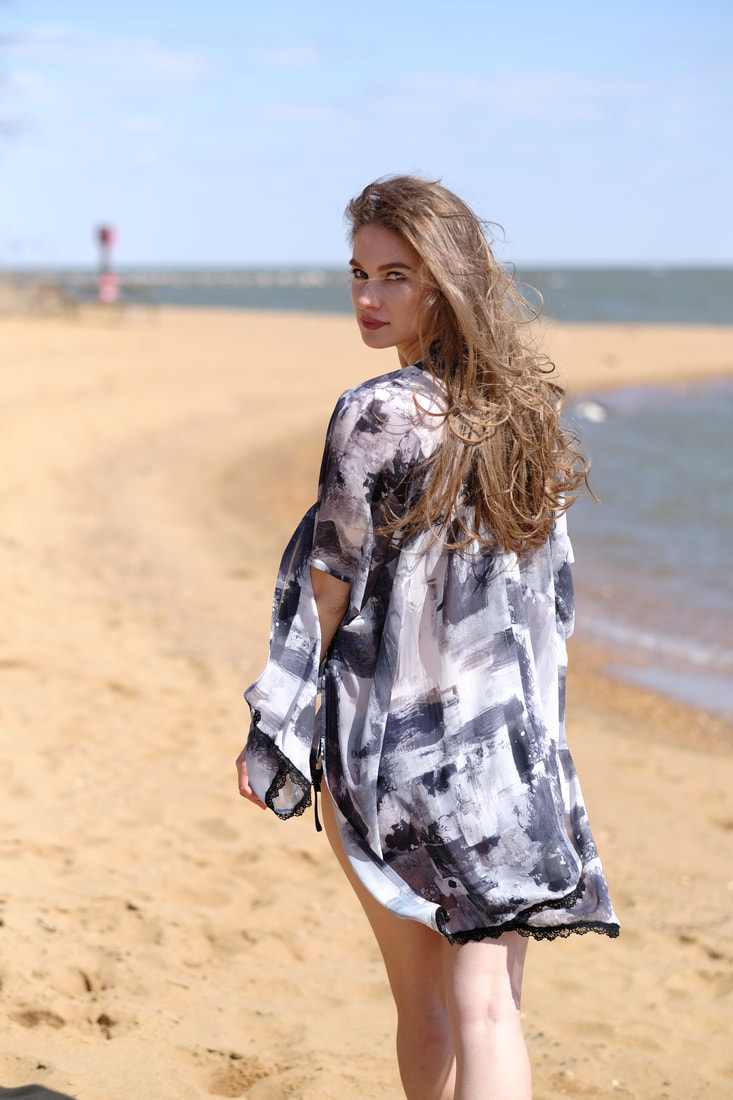
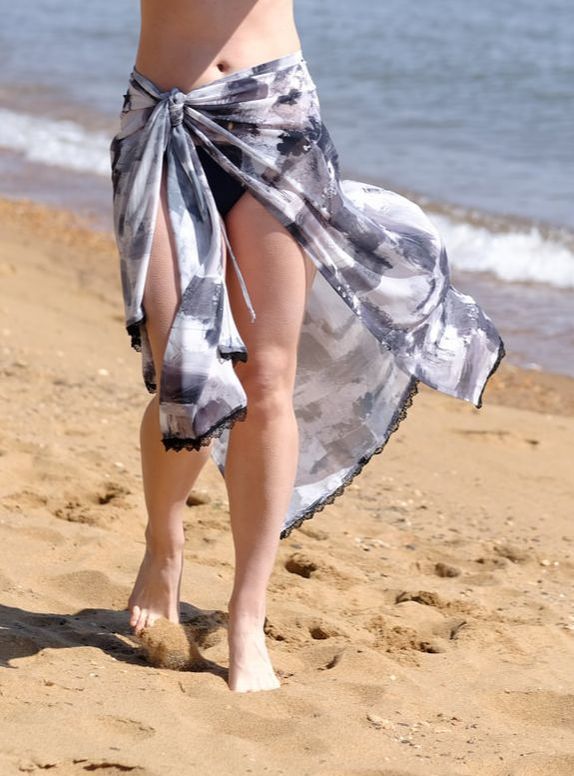
This season I've been on a crusade to create a staple beach accessory that could potentially last a lifetime. As you browse through this website, you'll find that fashion products are a great passion of mine, lovingly inspired by some of my own needs and necessities. I started thinking about the summer season back in February, after all the major holidays are over and you're sort of stuck in limbo, waiting for the weather to warm up. It is during this "vulnerable" time that I often think about that perfect beach vacation. I am lucky enough to be able to take one week-long beach trip a year. When the time finally comes, I scramble a bit to find a few good bathing suits, and over the years, I've learned that at least one good cover up is a must for every beach trip. They are super easy to pack, convenient and effortless when moving between the beach, the hotel, the pool, the boardwalk and so forth- Lots of places to be when you're at the beach, right? Last summer however, I found myself wearing a sarong more than a cover up. I'm not sure if I was trying to maximize my tan or I just fell in love with the feminine fit and drape of a sarong without foregoing coverage. A classic sarong silhouette accentuates and flatters the waistline, while also feeling great around the hips and legs as it blows in the beach wind. 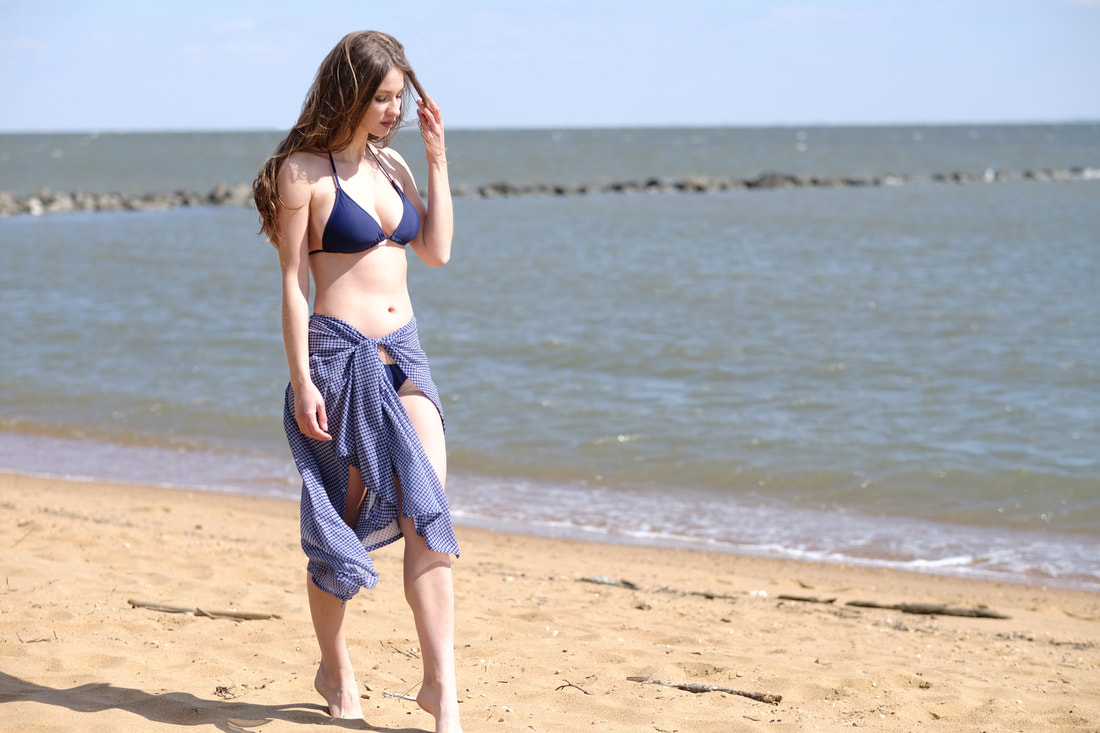 As I was testing and designing the microfiber beach towel for this upcoming season, it got me thinking about my own beach habits and what I feel most comfortable wearing and carrying to the beach. I instantly reverted back to this love I've developed for sarongs. Nonetheless, I am not ready to forgo a classic cover up either. So I thought why not have the cake and eat it too by creating an interchangeable, 2-in-1 cover up and sarong that can easily transition from one style to the other at the hand of one simple step. I love to pack light and use products that are durable, functional and serve more than one purpose. Since a beach trip is an occasion where packing smart is a must, the Sarong-to-Cover Up has now become my personal must-have. The Transformation From Sarong To Classic Beach Cover Up There is no point in creating a convertible garment if it is not going to look authentic and be fully functional regardless of what form it takes. When the Sarong-to-Cover Up is in cover up from, it provides a classic draped silhouette that is just as comfortable as it is flattering. The asymmetric hem adds that whimsical, blow-in-the-wind structure that is often so desirable in a classic beach cover up.
While it works and fits like a classic cover up, the Sarong-To-Cover Up features a small snap at each side that is almost invisible. Unsnap the snap closures and you've got yourself a fully functional sarong! Opening the cover up's side seams allows the front pieces to transform into a tying mechanism for the sarong. The difference between this convertible sarong and a regular sarong is that the tie extensions are longer, which provides a fuller, more draped effect. For that same reason, the knot creates a beautiful, feminine style, allowing for the allusion of cascading ruffles at the front. Aesthetically, it is somewhat of a step-up from a conventional sarong. Printed Chiffon: The Perfect Beach Cover Up/Sarong Material. Chiffon is one of those fabrics that sports a combination of some of the most desirable characteristics: high-draping, soft, comfortable, available in a variety of prints and colors, and very easy to care for. Given my love for easy-to-care-for materials, it was a no brainier that a printed chiffon would enhance the Sarong-To-Cover Up design. Here's the thing, when you're at the beach, your beach accessories inadvertently receive a lot of wear and tear whether you consciously notice it or not. I don't know about you, but when I'm at the beach I find that either someone's sitting on my cover up, it is occasionally getting blown away by the wind, or is semi-submerged in sand to stop it from being blown away in the wind. 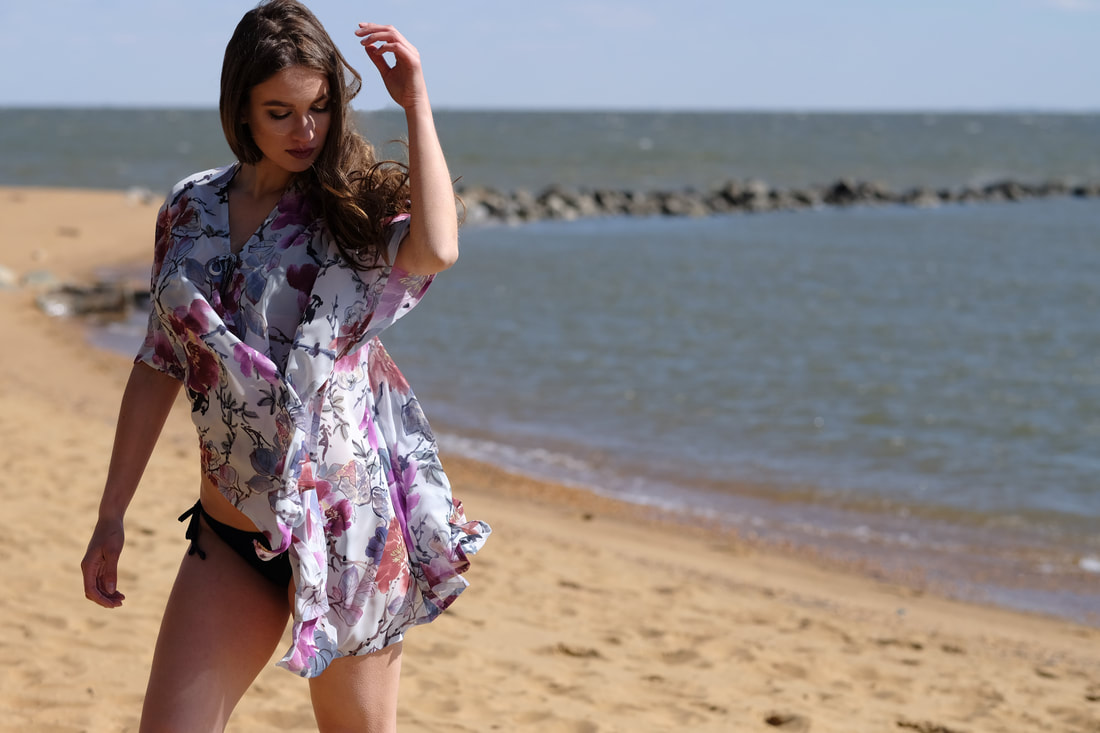 Beach accessories and products take a lot of beating, and they should be constructed to withstand it season after season. It is with that mission in mind that I decided it has to be a poly chiffon. Only a poly chiffon can be thrown in the washing machine over and over again without incurring damage or discoloration. Poly chiffon can be pulled and worn continuously without loosing its drape and weave structure. With just the right amount of transparency and a thin, lightweight nature, chiffon makes the perfect fabric choice for a beach cover up or sarong. It doesn't hurt that fabric manufactures offer thousands of prints and color options, allowing you to find your own style and preferred color combinations. I looked through dozens of prints until I found three that I felt balanced each other out, while each providing a different style to fit every woman's preference. 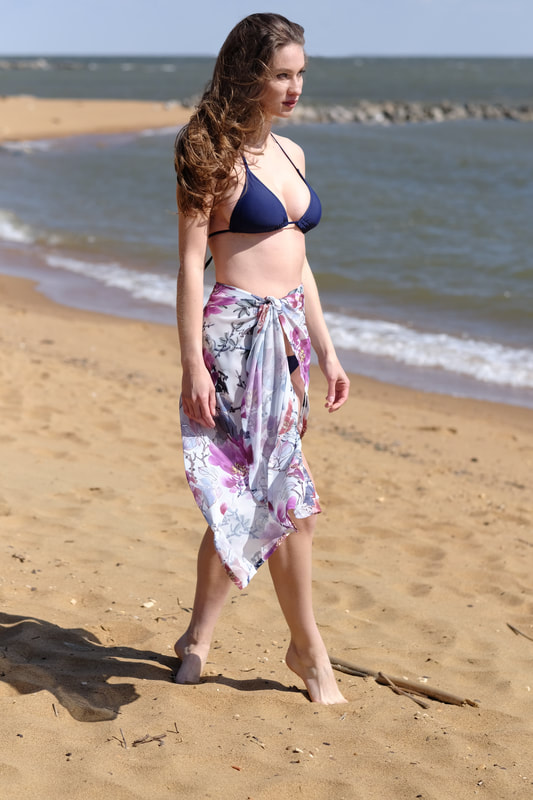 A floral is always a must of course, so as the first option, I opted for a feminine, large floral print with magenta, pink, light blue and light gray undertones. For those that love a classic black and prefer a more modern feel to their wardrobe, a gray watercolor print with a black lace trim provides the perfect black and white balance. I often find myself attracted to asymmetric, organic, and visually-textured prints so this gray watercolor chiffon is one I personally fell in love with. 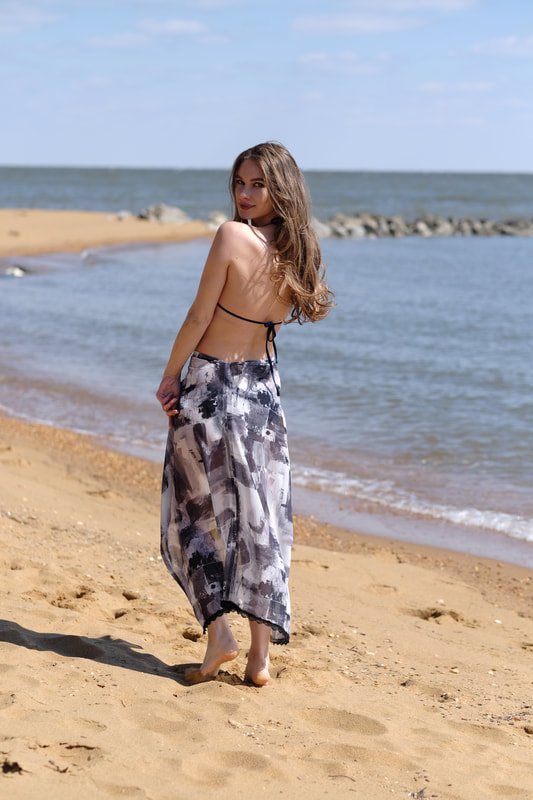 Finally, a small repeating print in classic blue with small burgundy and white polka dot accents. It reads as a mini-checkered print but as you look closer, it is actually a tastefully designed polka dot. This is one of those prints I would love to have in a blouse, a dress, a skirt, or even a pair of summer palazzo pants- Just a classic print that fits within any design, and adjusts to any setting. 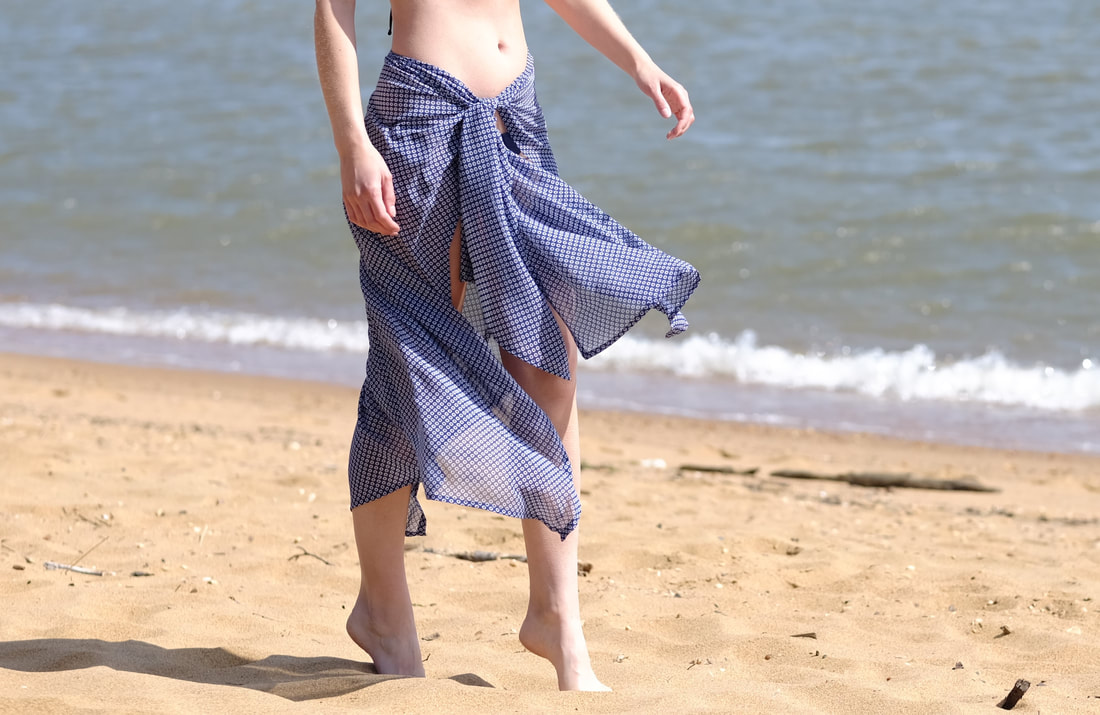 All three prints provide just the right amount of coverage and drape, remaining flattering to all body types and skin tones. Durability-Focused Construction Techniques. Since we are on the topic of durability and function (which I could talk about forever), I spent some time weighing my sewing/construction options. When in the process of designing a clothing item, especially one that is technically a beach product, applying the most durable sewing techniques, without compromising aesthetics and fit, is at the forefront of building a long lasting product. 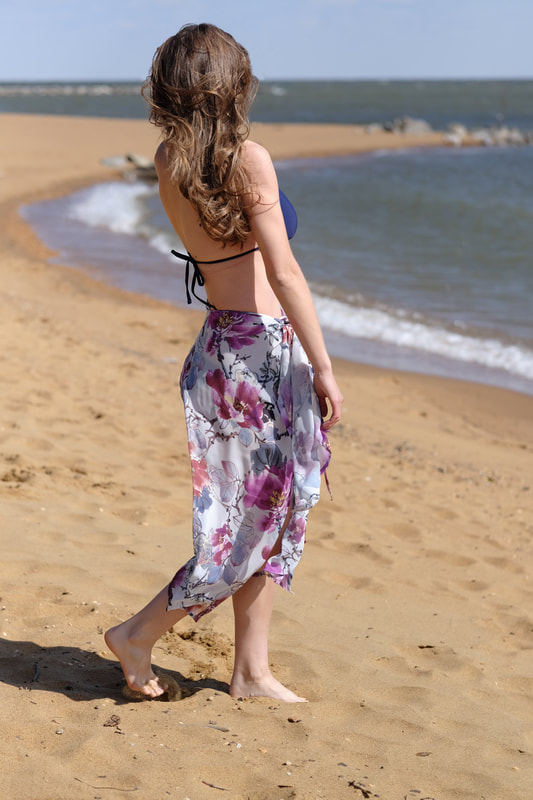 My ultimate goal was a Sarong-To-Cover Up that could truly last a lifetime. After a bit of testing to find what sewing methods would provide the most durability over time, I came up with a solution: every edge and seam is double folded and stitched for durability. No serging stitches are used, which means the raw edge of each fabric piece is enclosed within itself for maximum use and endurance. The same is true for the hemline, which is also double folded and topstitched to enclose the fabric's raw edges. The double fold provides stronger seams, no risk of fraying, and the ability to withstand wear and regular washing machine cycles over time. These specialized seams contribute to a sarong that does not incur any damage when pulled and tied around the waist in a sturdy double knot. On that same note, when the convertible sarong is in cover up form, there are two front ties that allow you to wear the cover up closed as desired. These ties are inserted into the front double folded edges and directionally topstitched again for durability. At the end of each tie, a silver plated bead stop weighs them just enough to provide function and stability. Aesthetically, these tubular silver plated bead stops add just the right amount of luxury to an everyday beach style. The Interchangeable Size and Adjustable Fit. In the fashion design and construction process, there is nothing more important than fit and size. Regardless of what it is, if it doesn't fits- I don't sits (just my personal design moto). But really, I can't even remember how many clothing items I've spent money on just to leave them gathering dust in my closet for years because the fit was off. In my own design work, I've made it a point to try as hard as possible to avoid fit issues, whether dealing with length or size discrepancies. When building the Sarong-To-Cover Up I wanted to give the wearer an interchangeable option where a looser or tighter fit is desired. When it comes to chiffon cover ups in general, I personally like to size up because I enjoy a looser drape. Others prefer a more true to size, tighter fit. For that reason, this convertible cover up was created in two sizes which are potentially interchangeable according to desired fit. This sizing option also allows for an XS and an XL option. 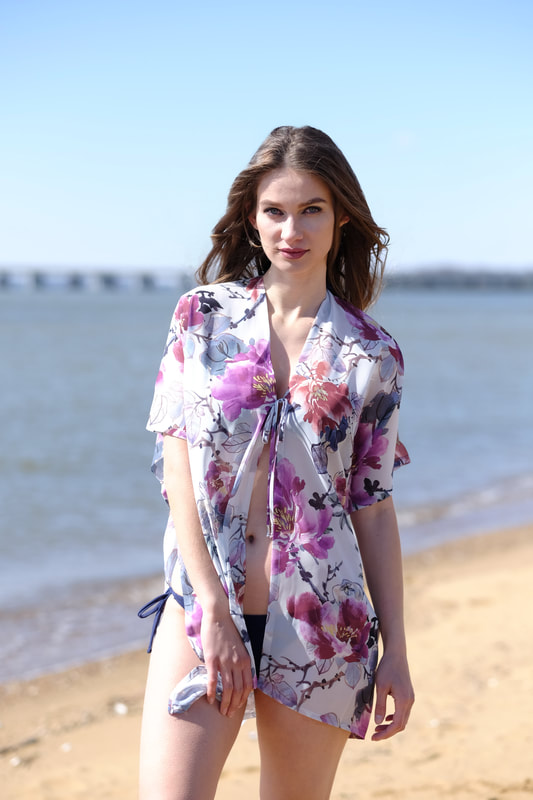 So here's how it works, if you wear an XS, you should opt for the XS/S option. If you usually wear a Small, you can choose between the XS/S and M/L/XL depending on whether you like a looser, highly-draped cover up or one that fits you more true to size. If you wear a Medium, you can interchange between the XS/S and M/L/XL if you prefer a less draped cover up or vise versa. For L and XL, choose the M/L/XL option which will naturally adjust accordingly. (The Sarong-To-Cover Up sizing is based on US Women's Size Guidelines) 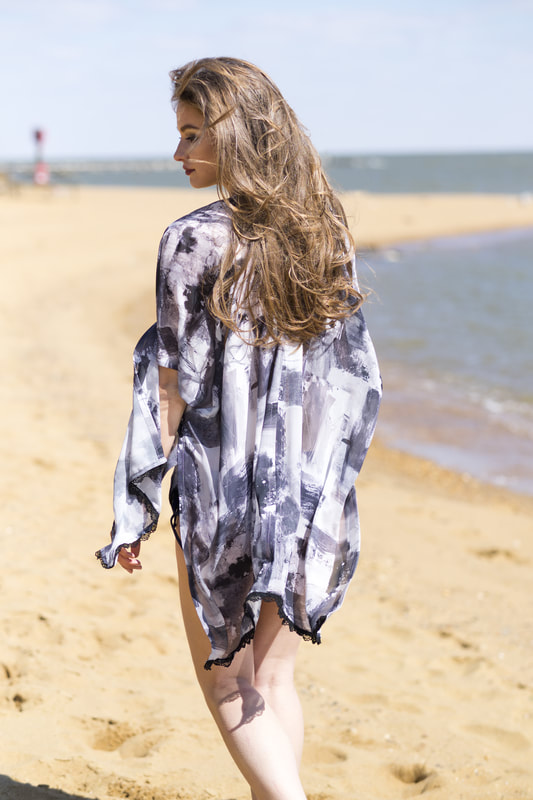 The design itself contributes to this idea of size interchangeably due to the fact that the arm openings are large and drape over the shoulders, while the body itself is wide enough to adjust to different shapes and sizes. The fact that the side seams are held together with snaps alone, fit adjustable slits are created on each side providing a flattering and comfortably draping feel. The Aesthetics: Subtle Yet Significant Design Elements. A clothing item's aesthetics are just as important as its construction attributes. These two major elements should complement each other perfectly, allowing for a well balanced garment. The silhouette of the Sarong-To-Cover Up drapes beautifully on the body, forming an symmetric hem. Speaking of the hem, the hemline provides the look of a handkerchief hem which is playful yet remains flattering. I've always loved the idea of a beach cover up with a more asymmetric hemline- something about how it blows in the wind that makes it look luxurious and breathtaking. In the case of the Sarong-To-Cover Up design, the sides include slits which encourage more drape, movement and flow. Needless to say, that is never a bad look on the beach.  The extended armhole openings drape over the shoulders to provide just enough coverage without compromising movement. Each one of the 3 prints garners to a separate feel, whether a beach floral or an artsy watercolor print. Of course the devil is always in the details: The gray watercolor print includes a black lace trim along its hem, elevating the uniqueness of the design. When in cover up form, the Sarong-To-Cover Up features front ties which allow you to wear it closed as desired. Each tie includes a silver plated bead stop on each end providing increased functionality and a bit of luxury.
1 Comment
|
The Blog:A journey into our design process, sewing tutorials, fashion tips, and all the inspiring people and things we love. 
Doina AlexeiDesigner by trade and dressmaker at heart. I spend most of my days obsessing over new fabrics and daydreaming new ideas. 
Sadie
Executive Assistant & Client Relations Manager Archives
November 2019
Categories
All

|

-
Sewing Tutorials
-
Basics
>
- Aligning Pattern Grainlines To Fabric
- Preparing Fabrics For Sewing
- Pinning Sewing Patterns To Fabric
- Placing Sewing Patterns On Fabric For Cutting
- Rotary Cutters or Fabric Scissors?
- Cutting The Sewing Patterns
- What Are Notches And How To Use Them In The Sewing Process
- Transferring Notches From Pattern To Fabric
- Transferring Seamlines to Fabric
- Staystitching
- Backstitching: A Complete Guide
- Hand Basting: A Complete Guide
- Sewing Continuous Bias Binding
- Darts >
-
Sewing Seams
>
- The Basics Of Seams And Seam Allowance
- How To Sew A Straight Seam
- Sewing Curved Seams
- Sewing Corner Seams
- Trimming And Grading Seam Excess
- Notching/Clipping Seam Allowance for Tension Release
- Sewing Topstitched Seams
- Sewing Corded Seams
- Sewing A Slot Seam
- Sewing A Gathered Seam
- Sewing Bias Seams
- Sewing Seams With Ease
- Sewing Seams With Crossing Seamlines
- Sewing Unlike Fabric Seams
- How To Iron Seams: Ironing Tools And Conventions
- Sewing With Knit Fabrics
- Understanding Stitch Length And Tension
- Sewing Unique Fabric Seams
-
Seam Finishes
>
- Seam Finishing Techniques - Overview
- Applying A Pinked Seam Finish
- Applying A Bias Bound Seam Finish
- Serging And Zigzag Seam Finishes
- Sewing A Self-Bound Seam Finish
- Sewing A French Seam Finish
- Sewing A Hong Kong Seam Finish
- Sewing A Mock French Seam Finish
- Sewing A Turned-and-Stitched Seam Finish
- Sewing Overcast Hand-Applied Seam Finishes
- Sewing A Flat Felled Seam
- Sewing A Hairline Seam Finish
-
Hem Finishes
>
- Garment Hem Finishes: Overview
- Sewing A Double Fold Hem Finish
- Sewing A Single Fold Hem Finish
- Sewing Bound Hem Finishes
- Sewing An Exposed Double Layer Bound Hem
- Sewing A Folded-Up Bound Hem with Pre-folded Binding
- Sewing A Hong Kong Hem Finish
- Sewing A Band Hem Finish
- Sewing A Bias Faced Hem Finish
- Sewing A Twill Tape Hem Finish
- Sewing A Rolled Hem Finish
- Sewing A Shaped Hem Facing
- Using Fusible Hem Tape And Webbing
- Finishing A Lace Fabric Hem
- Finishing A Leather Hem
- Sewing Faced Hem Corners
- How To Finish Lining At The Hem
- Finishing Fabric Corners by Mitering >
- Interfacing A Hemline: Lined And Unlined Examples
-
Sewing Pockets
>
- Curved Patch Pocket With Flap
- Unlined Square Patch Pockets
- Lined Patch Pockets: Two Ways
- Extension On-Seam Pockets
- Separate On-Seam Pocket
- Front Hip Pockets
- Bound Double Welt Pocket
- Double Welt Pocket With Flap
- Self-Welt Pocket (Using Single Fabric Layer)
- Slanted Welt Pocket (Hand-Stitched)
- Faced Slash Pockets: Overview >
-
Sewing Zippers
>
- Sewing Zippers: General Information
- Sewing A Centered Zipper
- Sewing A Lapped Zipper
- Sewing An Invisible Zipper
- Sewing A Fly Front Zipper
- Sewing A Closed-End Exposed Zipper (No Seam)
- Sewing An Exposed Separating Zipper
- Sewing Hand Stitched Zipper Applications
- Sewing A Zipper Underlay
- Sewing A Placket-Enclosed Separating Zipper
- Sleeveless Finishes >
-
Neckline Finishes
>
- Sewing A Neck Shaped Facing
- Sewing An All-In-One Neck Facing
- Neck And Garment Opening Combination Facings >
- Sewing A Bias Faced Neckline Finish
- Sewing A Band Neckline Finish
- Bound Neckline Finishes: Overview >
- Sewing A Semi-Stretch Strip Band Neckline
- Ribbed Neck Band And Classic Turtleneck
- Decorative Neckline Finishes >
- Finishing Facing Edges >
-
Extras
>
- A Complete Guide on Interfacing
- Sewing Bound Spaghetti Straps
- Sewing Spaghetti Straps To A Faced Neckline
- Sewing Ruffles: Overview
- Patterning And Sewing A Circle Ruffle
- Sewing A Gathered Heading Ruffle
- Sewing Double Layer Gathered Ruffles
- Sewing A Gathered Ruffle Into A Seam
- Sewing A Gathered Ruffle To A Fabric Edge
- Sewing A Fabric Surface Slit
- Sewing A Slit Seam
- Hand-Applied Straight Stitches
- Hand-Applied Blind Stitches
- Hand-Applied Overedge Stitches
- Hand-Applied Tack Stitches
- Hand-Applied Decorative Stitches
-
Basics
>
- Custom Bridal
- Custom Apparel
- About
- Blog
 RSS Feed
Services |
Company |
|
