|
Adding a slit to a dress (or skirt) can instantly modernize it and give it a younger look. It is a great way to rescue some of your more outdated styles while simultaneously adding comfort. If you’re in the process of learning how to sew and not yet comfortable with alterations, you can still manage to add a slit to a dress if you follow each sewing step carefully. All you need is an iron, a seam ripper and a sewing machine. Well, thread and scissors will come in handy as well. 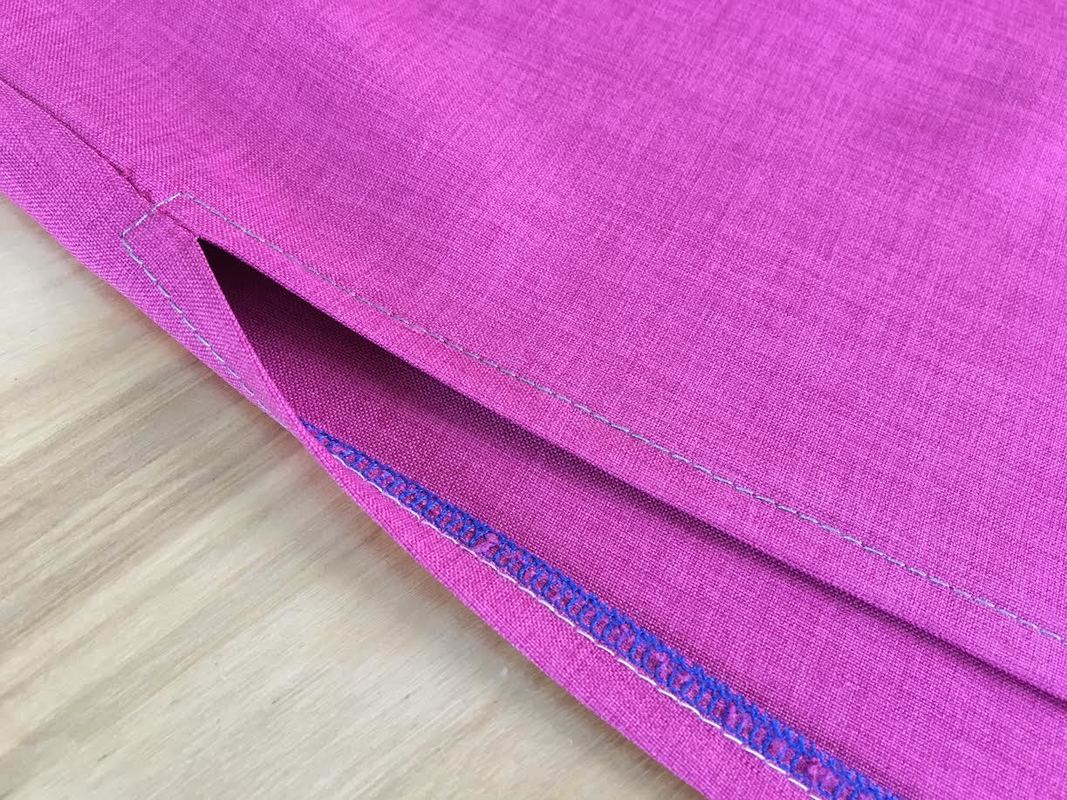 Before we get started, it is important to understand when and where to apply a slit. Keep in mind that slits should only be added into a seam. While cutting a slit directly through the fabric layer is not impossible to achieve, it is very rarely used as it provides a great challenge when it comes to reinforcing the slit opening and blending it in naturally into the garment. In a case as such, if the slit opening is not secured at the top, the slit will continue to rip through the fabric during continuous wear and care. That being said, if you want to add a slit to a dress, always work it into an existing seam. If you are lucky to have a seam right where you want the slit, take advantage of it! Otherwise, add the slit into a side seam or the next best option for your particular clothing item. How To Measure The Slit Opening Length: Two Methods It is really up to you how you want to measure the desired slit opening length on your garment. Of course, it is always easier to have someone help you with this task while the clothing item is on, but there's no reason why you shouldn't be able to do this on your own. The first method is to mark the desired length with a pin while the garment is on. To do this, try the dress on, and insert the pin along the seam where you’d like the slit to stop. Leave the pin in and carefully take the dress off. Turn the dress inside out and mark a line at the location where the pin is showing through (on the wrong side of the garment) using a a water soluble pencil or tailor's chalk. Once marked, remove the pin. As you'll see in the steps to follow, you will pretty much be working on the wrong side of the garment the entire time until the slit is complete. The second method (used below) is to use a ruler or measuring tape to measure the desired slit length while the garment is still on and then mark this measurement on the wrong side of the seam while the garment is on your work table. This method works best if you have someone that can help in the measuring process or when you know about how long the slit should be without even having to try the garment on. Regardless of which method you choose, use the steps provided below as a general guide to insert a slit into any seam.
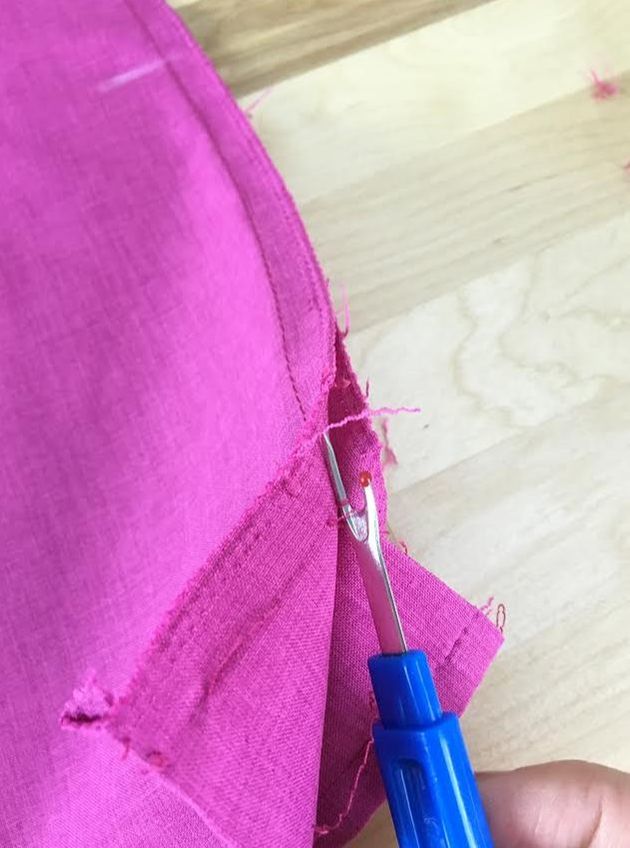
In this tutorial, we'll be adding a slit to one of the side seams of a dress. You can use the technique described below to insert a slit into any vertical seam regardless of where it is located on the garment. 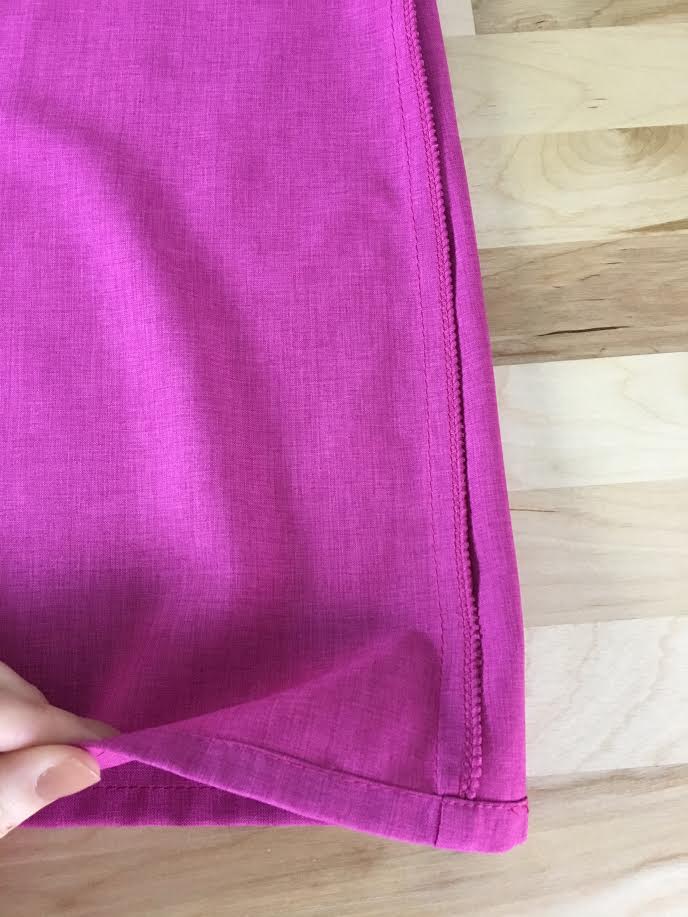 1. To start with, turn the dress inside out to expose the wrong side of the seam. 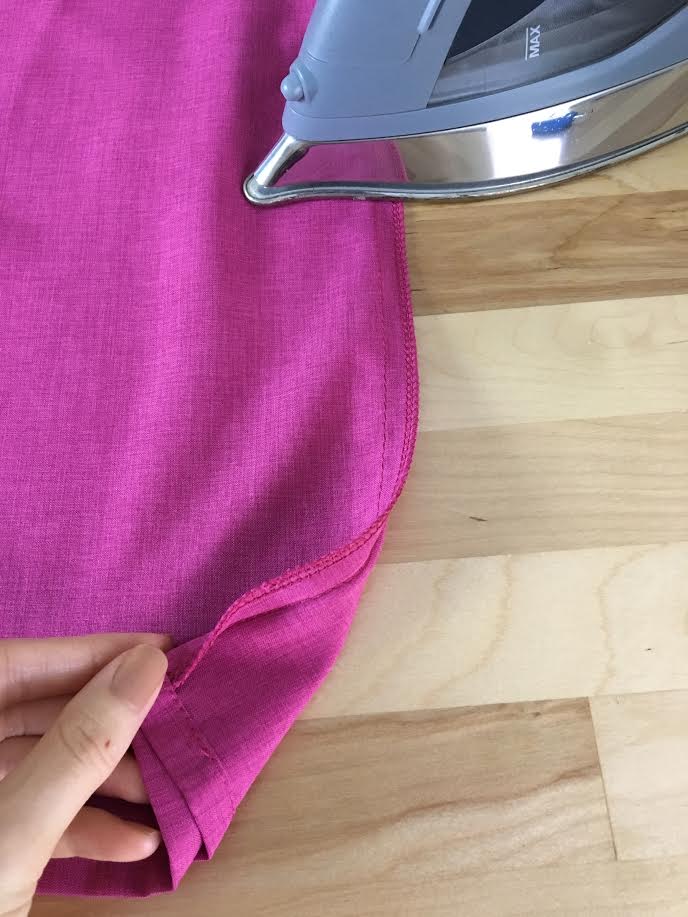 2. To make it a bit easier to work with, iron the seam allowance flat. Remember to use the appropriate heat setting on your iron for the fabric at hand. You'll find that almost all seams in a finished garment are ironed flat, either in a single direction or with the seam allowance split and ironed down the middle. Regardless of which it is, always iron both layers of the seam allowance flat as shown above to help the fabric return to its original position. 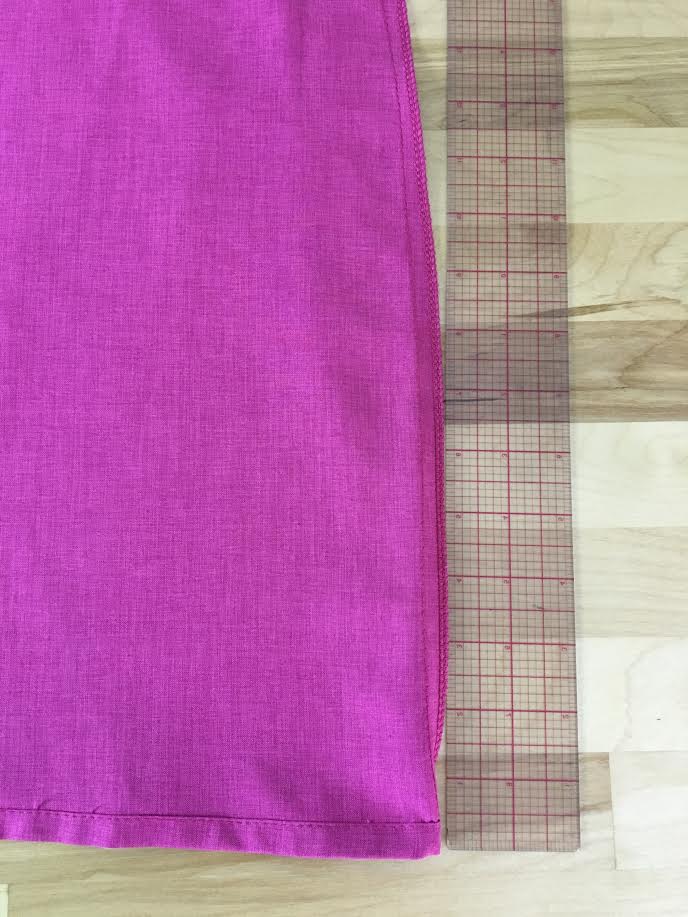 3. If you have a specific slit measurement, place your ruler parallel to the seam, carefully aligning it to the very bottom edge of the garment. In this tutorial, the final slit will be 9" long. 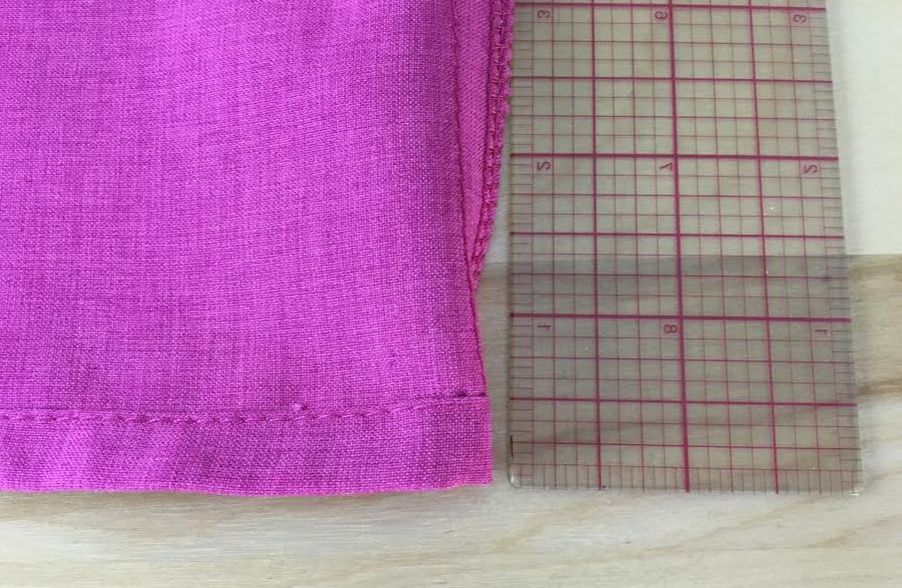 Align the starting point of the ruler with the very bottom edge of the dress hem. In this tutorial, we are using a clear pattern making ruler marked down to the 1/16". If you don't already have this ruler, we recommend you invest in one! They are easy to find at most fabric/craft and art stores and fairly affordable. Of course, you can also use a measuring tape or any other ruler of your choice for this step. 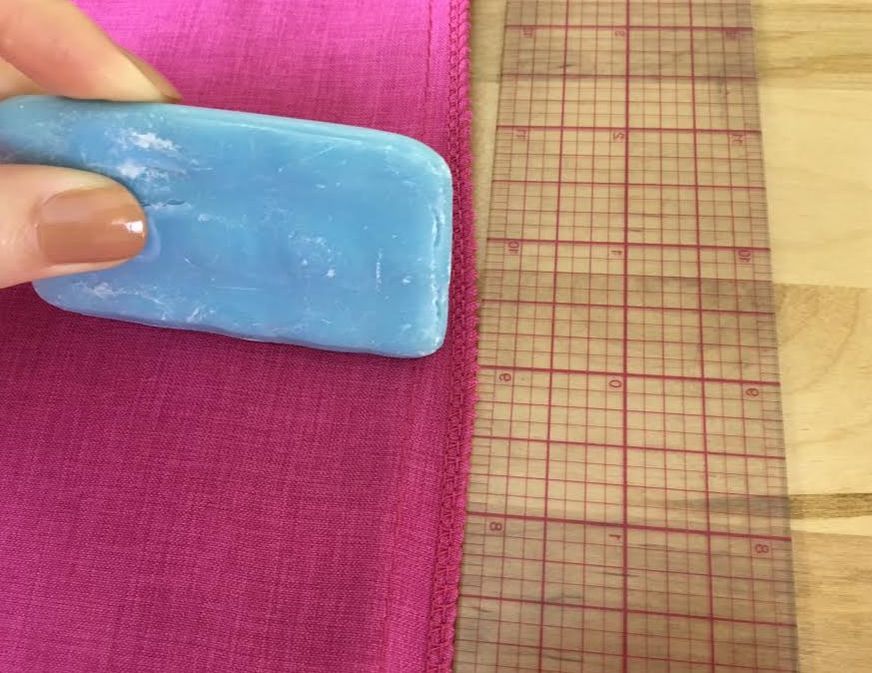 4. Keeping the ruler aligned (be careful not to accidentally shift it), use tailors chalk or a water soluble pencil to mark where you would like the slit to start. In other words, mark the length of the desired slit. Tip: If you do not have any tailor's chalk, use a piece of dry soap. It works on almost all fabrics, being gentle and very easy to remove. 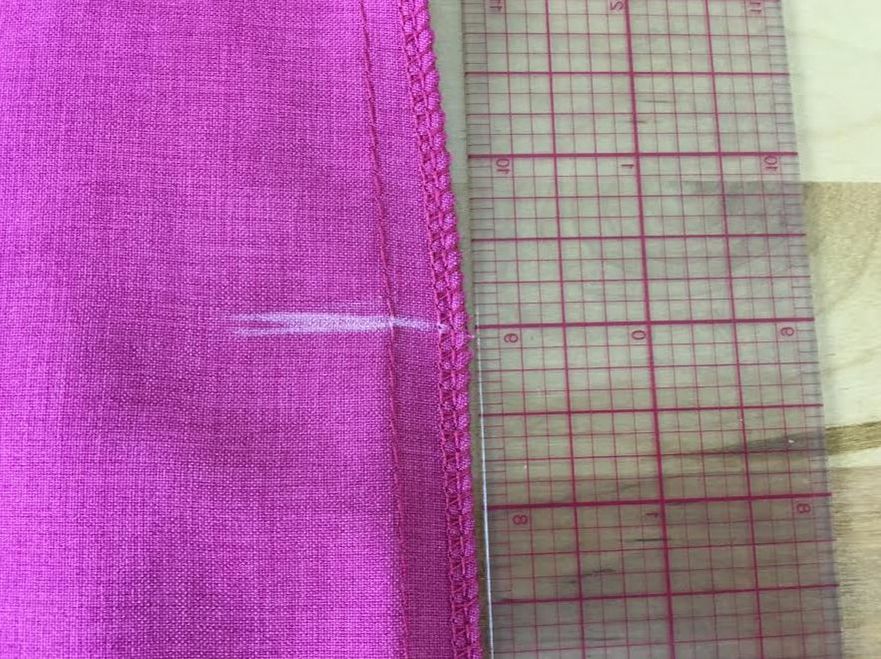 In this tutorial, the dress slit opening is 9" long. Mark a pronounced horizontal line as shown above. 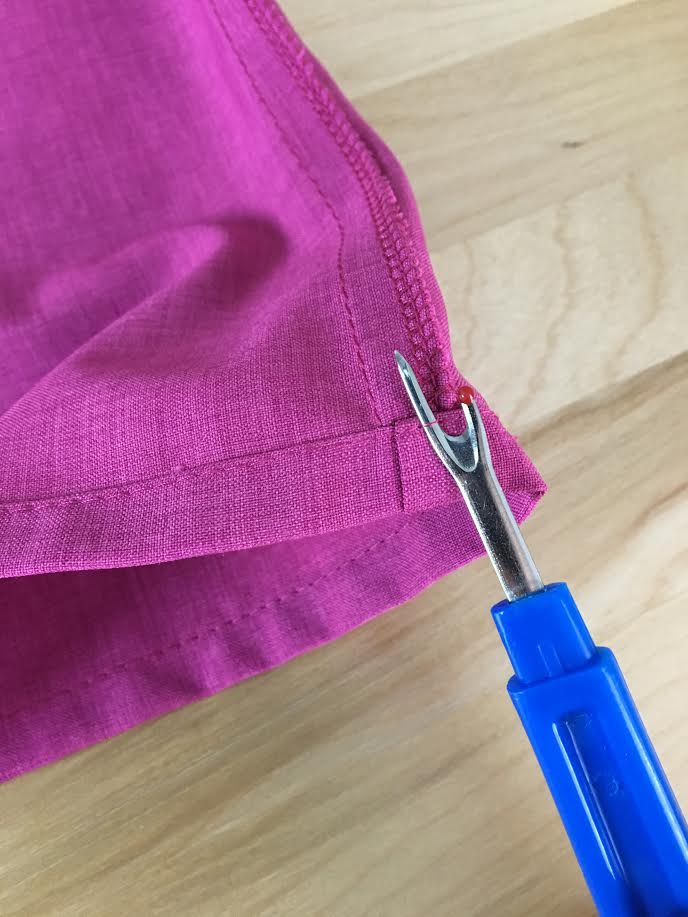 5. Now for the fun part! Starting the process of separating the two fabric layers into a slit. Starting at the hem, undo the hem stitching about 2" on either side of the vertical seam using a seam ripper. Taking out a portion of the hem stitching will allow enough room to undo the actual seam stitches in the steps to follow. 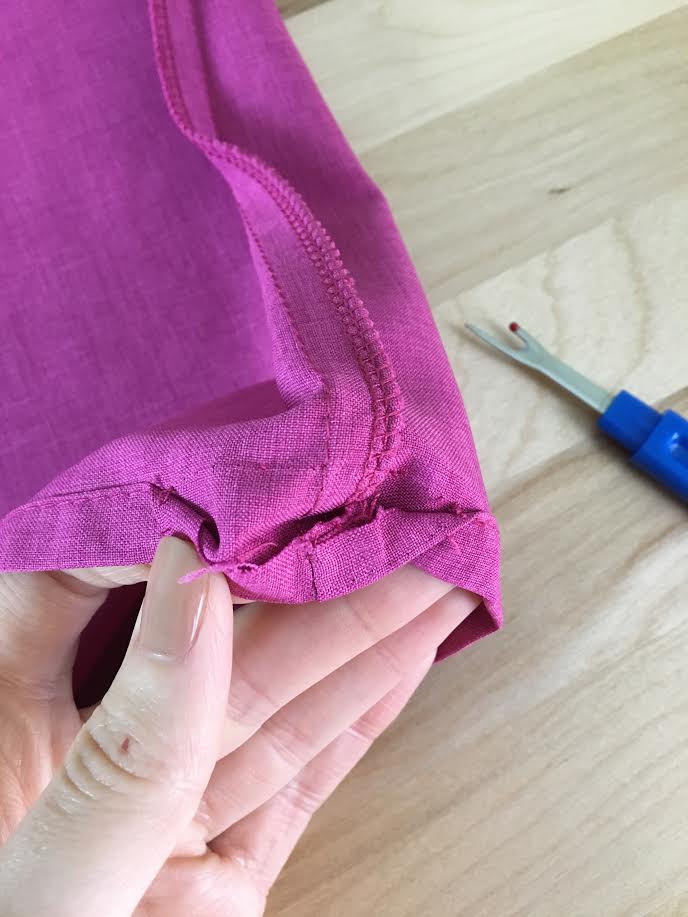 In this example, the hem is a conventional double folded top-stitched style. Yours may be a bit different, whether it is serged, folded and top stitched or perhaps clean finished with a blind stitch. Regardless of what technique is used, take out a portion of the stitching using a seam ripper, allowing for 2"-3" of space on both sides of the seam as shown above. 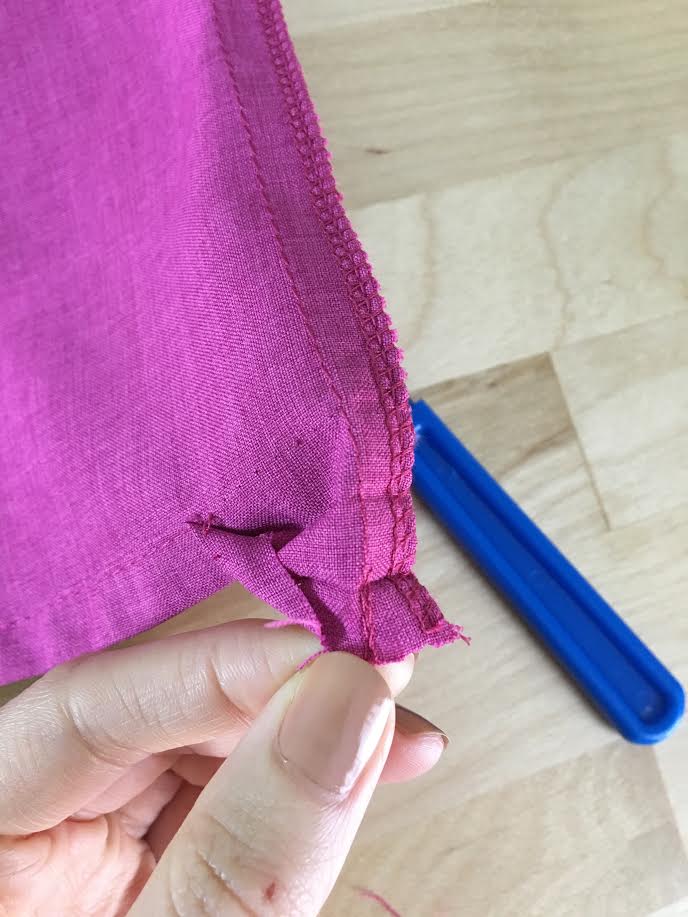 Now that a portion of the hem is unstitched, you can straighten the rest of the seam out all the way down to its bottom edge as shown above. 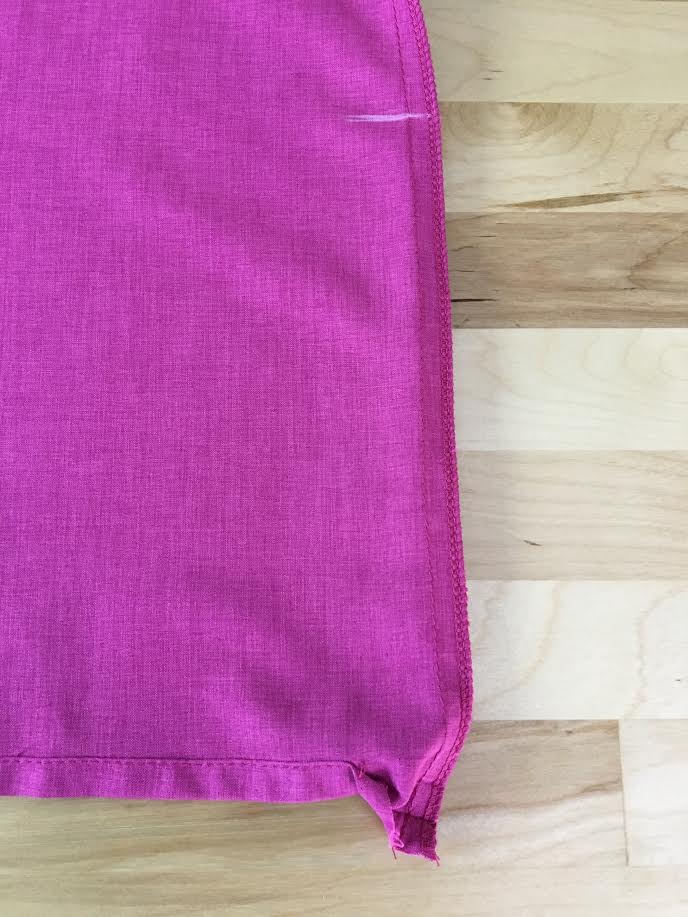 You should now be able to see the entire seam edge, from the chalk mark line all the way to the very bottom fabric edge. 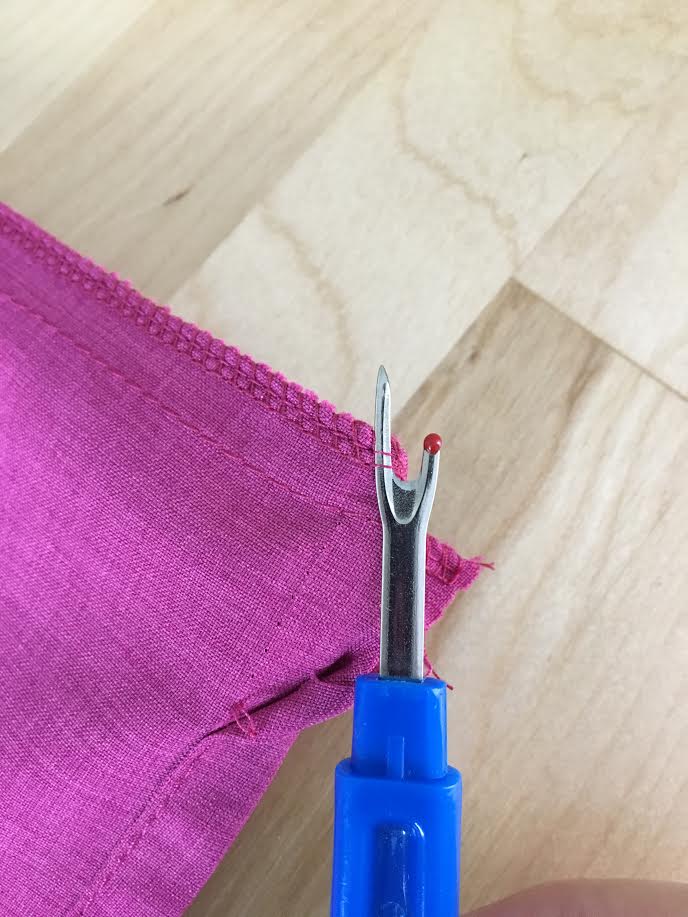 6. If your seam allowance finish includes and overlock/serging stitch (most common), remove it first using your seam ripper. If you are having difficulty removing the serging, check out this step-by-step tutorial on how to remove overlock stitching: How To Remove An Overlock/Serged Stitch. 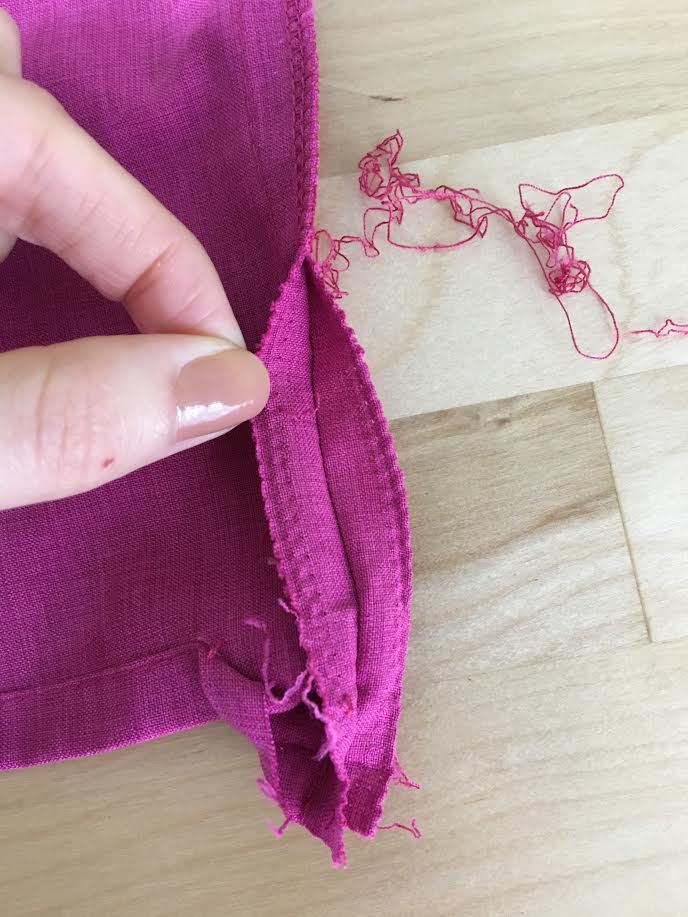 As you remove the overlock stitch, the seam allowance layers should easily separate. If your garment does not feature a serging stitch as a finish, use your seam ripper and carefully take out all the stitches associated with the seam/seam allowance until the two layers of fabric separate. 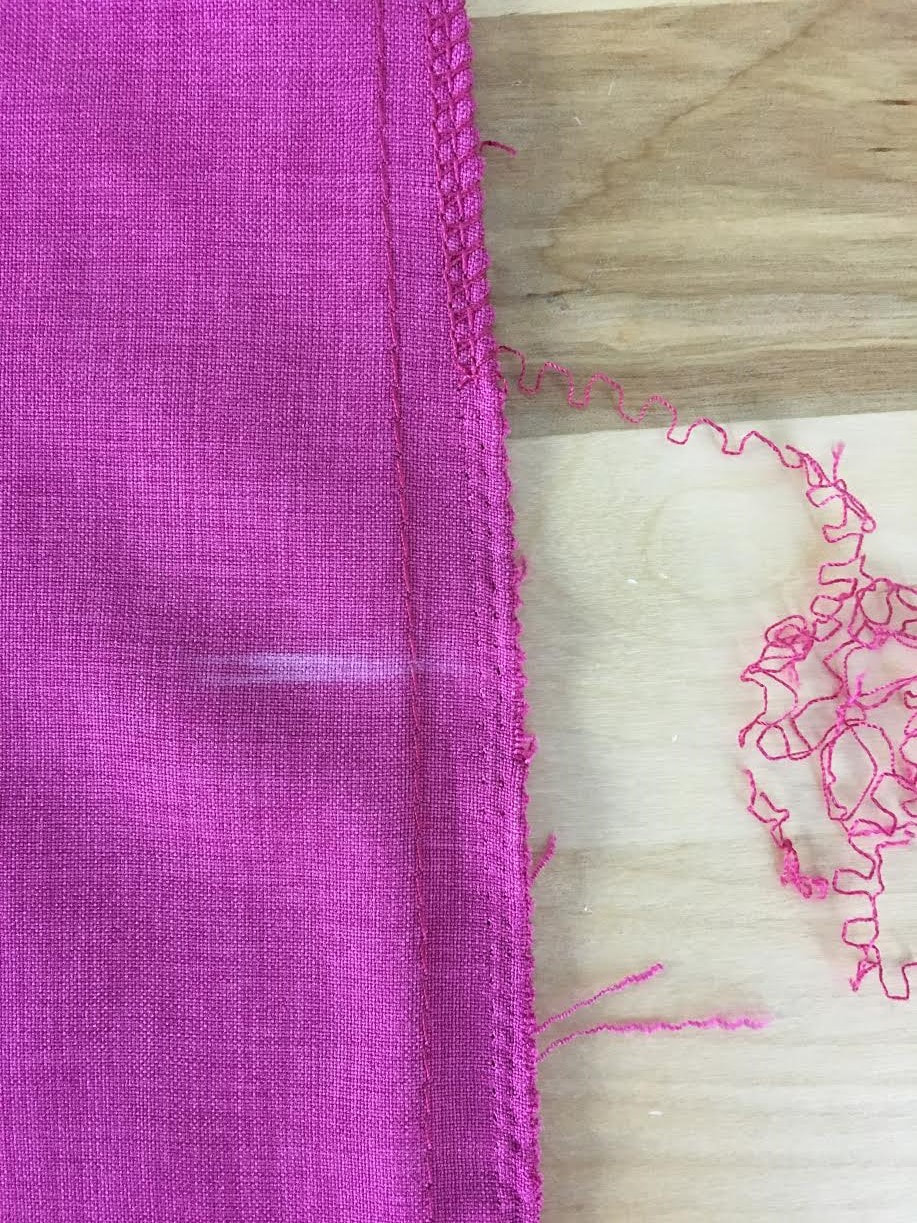 Remove the serging stitch about 1"-2" past the beginning of the slit opening mark (horizontal chalk mark). Doing so will allow you to maintain a flatter, cleaner slit opening in the steps to follow. 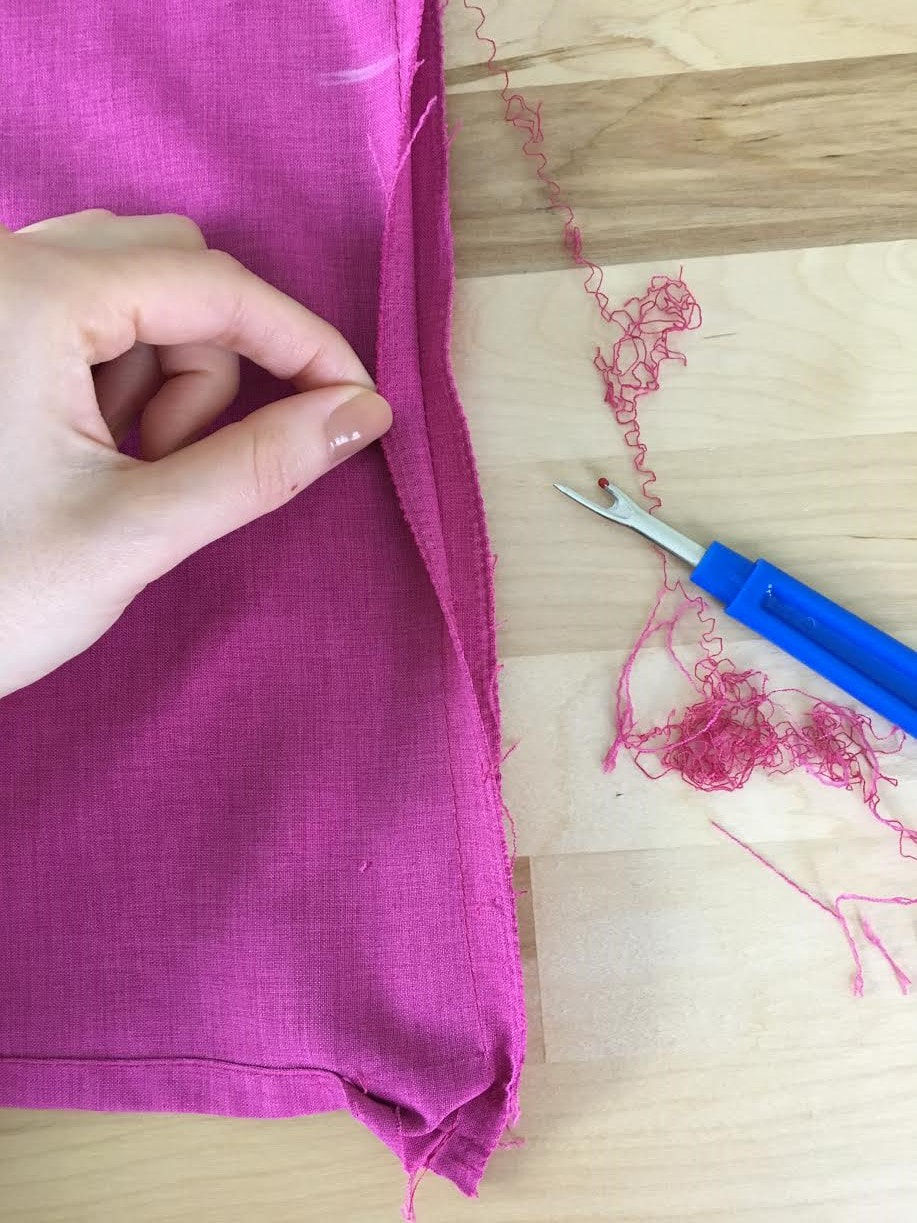 Now that all the overlock stitching is removed, the seam allowance layers should separate as shown above. Make sure you remove any loose threads that are still stuck to the fabric edges (very common with removing overlock stitches).
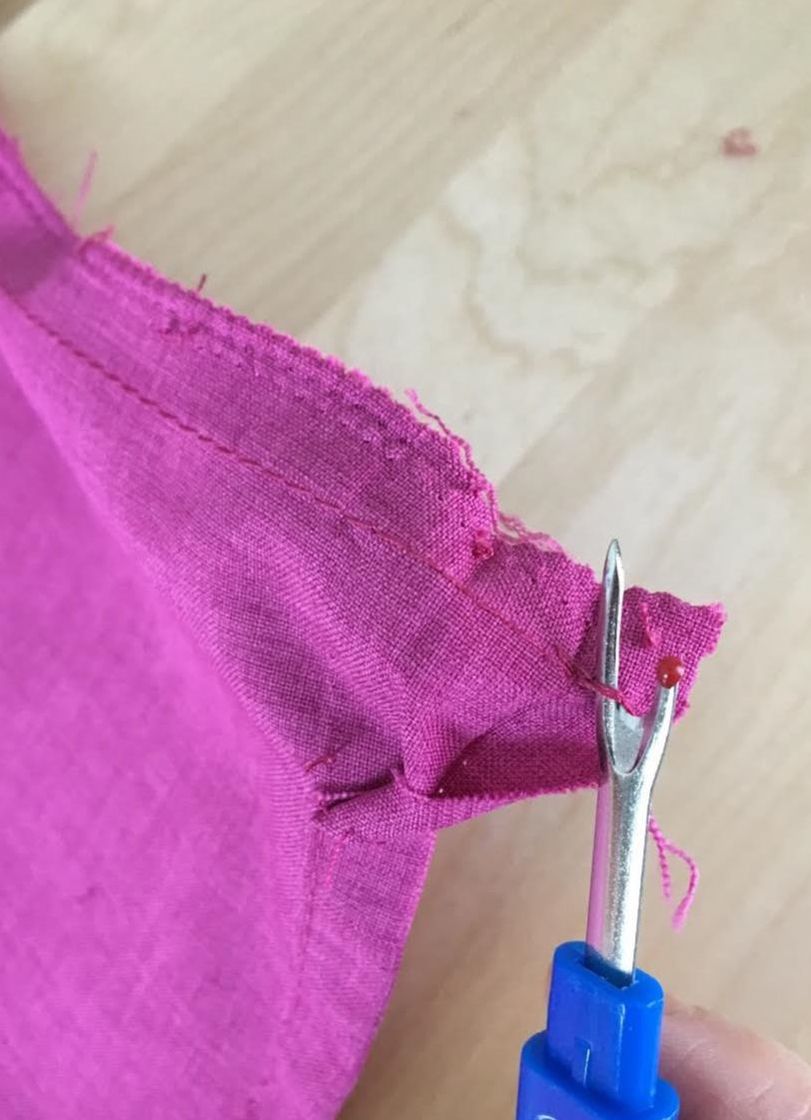
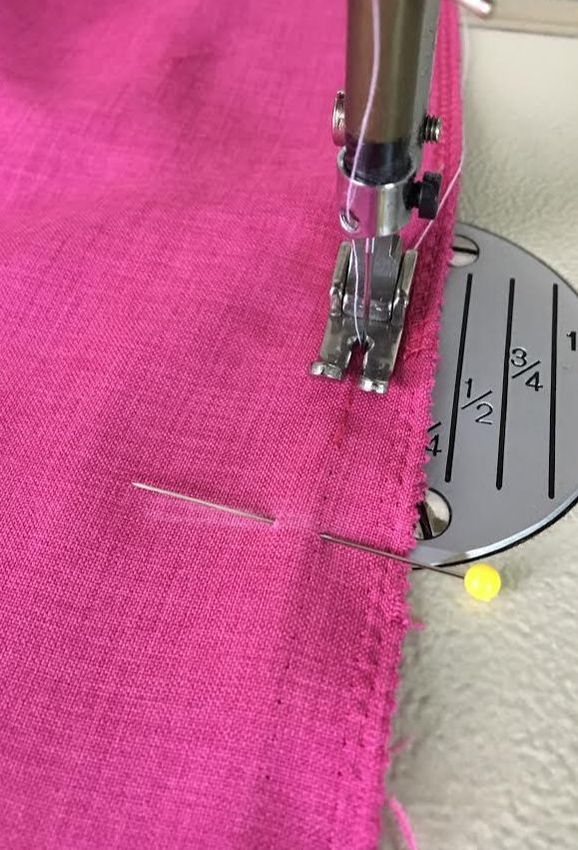
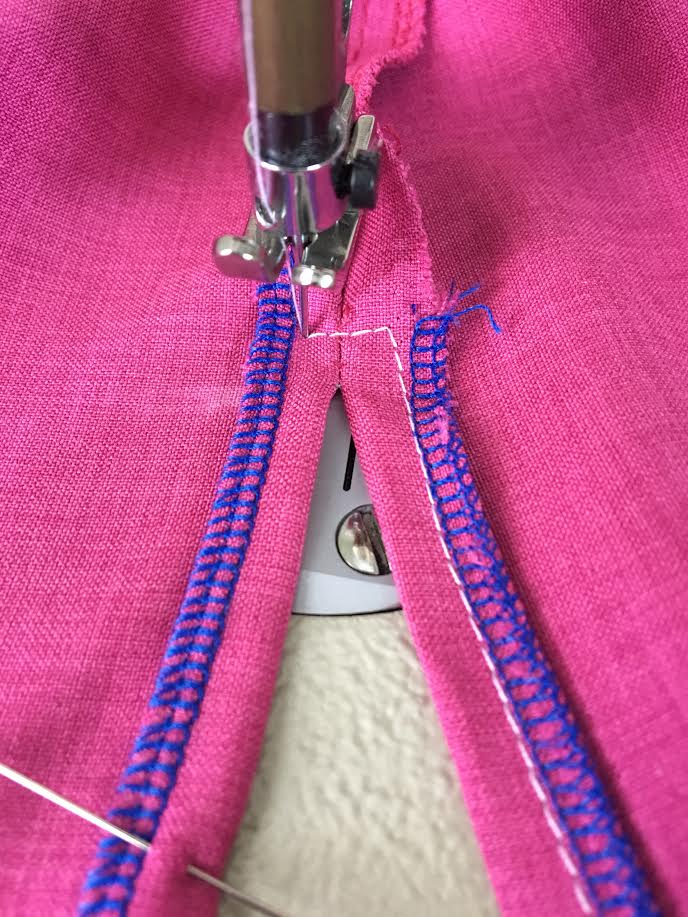
7. Working from the bottom up, remove the straight stitch using your seam ripper. Gently cut and pull the seam open every 2-3 stitches as shown above. This will separate the fabric layers and ultimately form the slit opening. 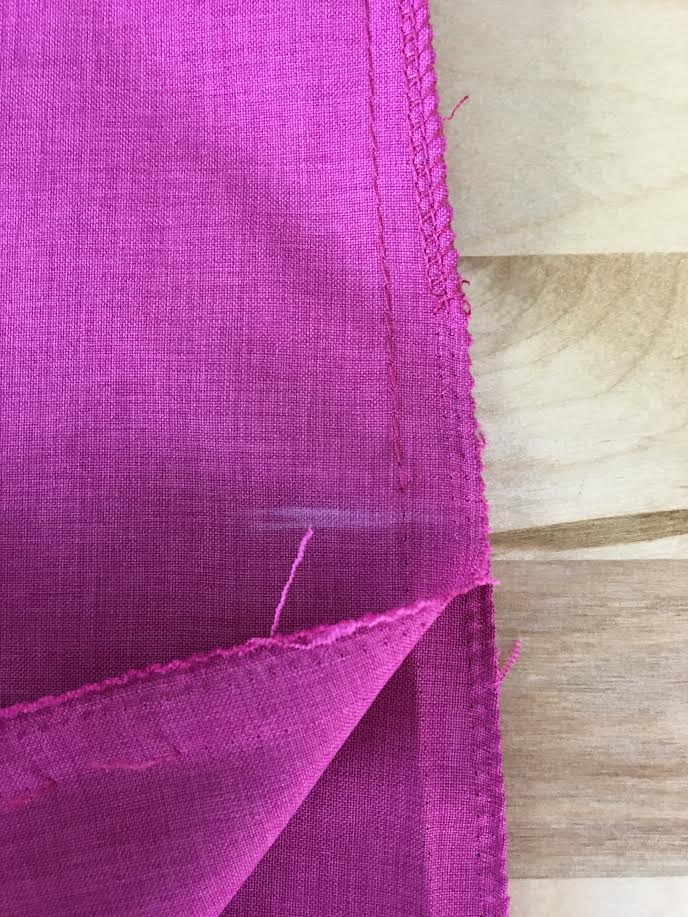 Remove the seam straight stitch right up to the horizontal mark as shown above.  You should now see your slit starting to form! Of course, you are not quite done yet. You still need to re-finish the edges and the hem on each of the fabric layers. 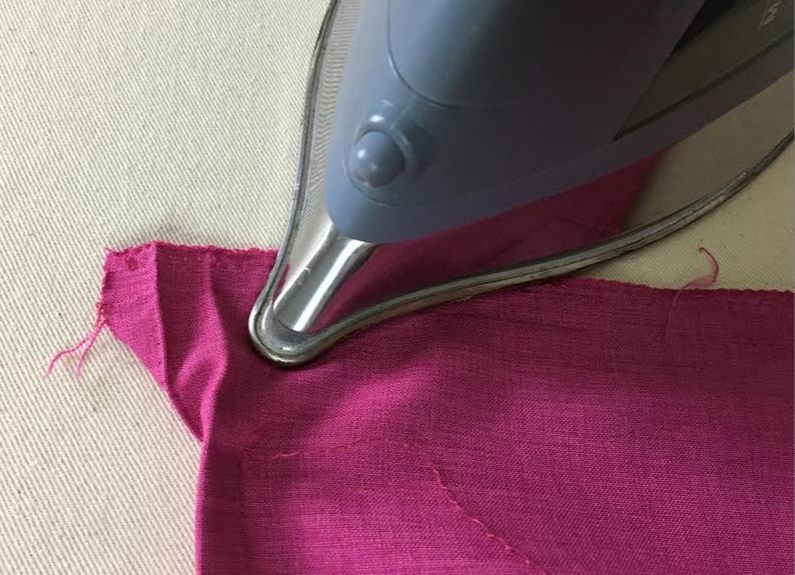 8. To facilitate the steps to follow below, iron the edges of the slit opening at the hem to flatten the hem fold lines as shown above. 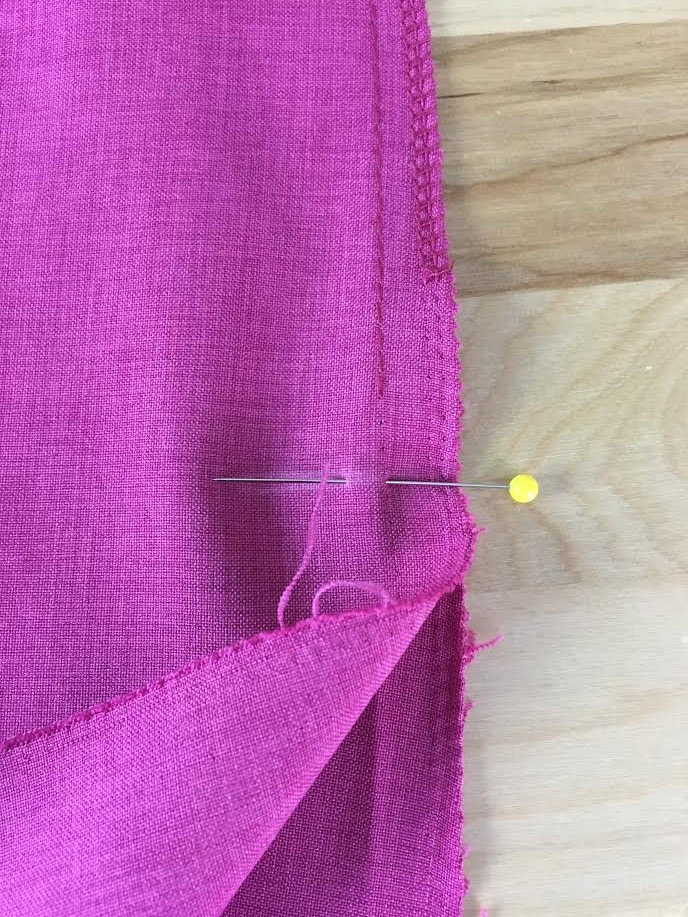 At the top of the slit opening, you will notice that the stitch is coming undone when pulled. Since this is an area that naturally gets pulled during wear, it is crucial to reinforce it with extra stitching. The best way to to do this is by applying a machine backstitch that blends in with the existing stitch line of the seam. Note: You can also backstitch by hand to reinforce the slit opening by following the steps in this tutorial: How To Backstitch By Hand Or Using Your Sewing Machine.
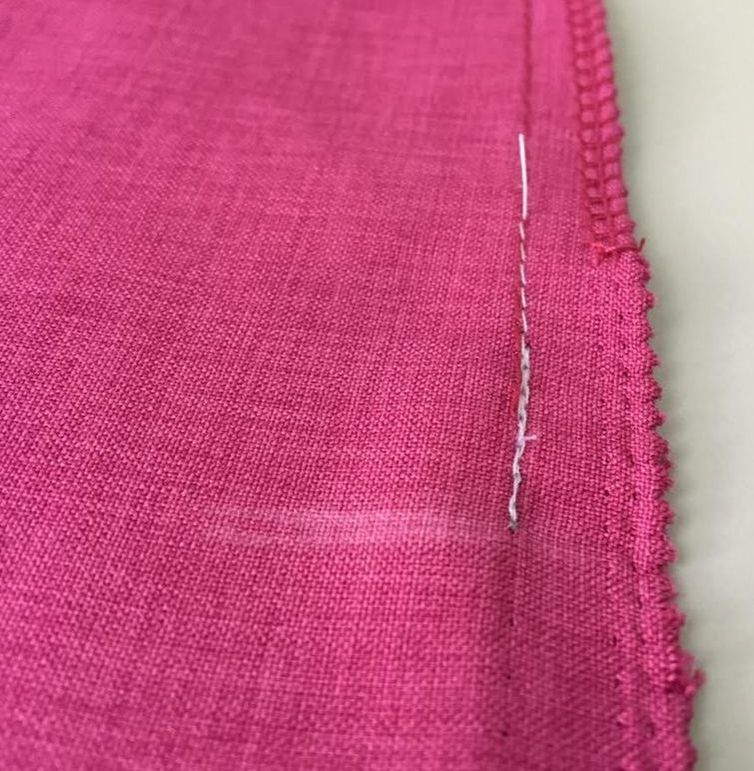
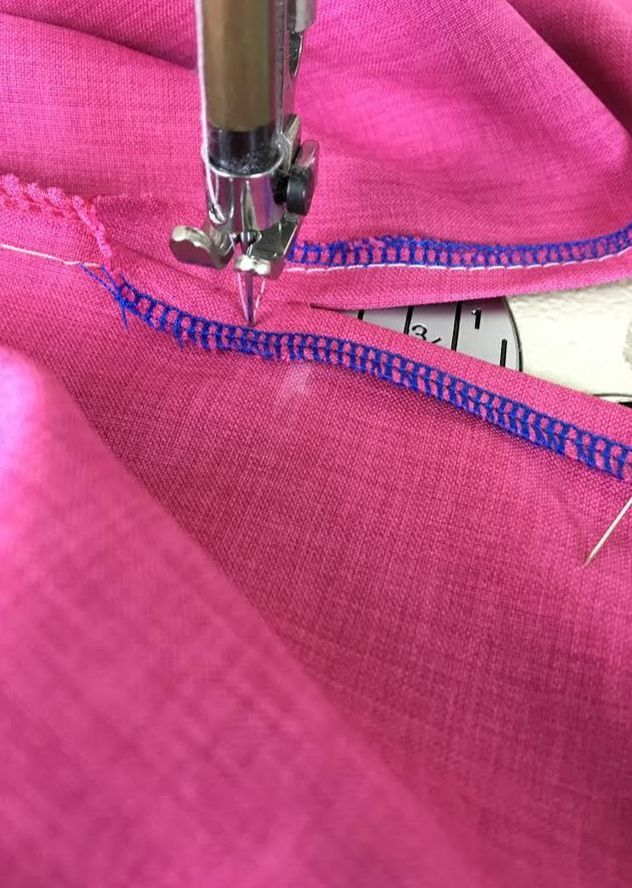
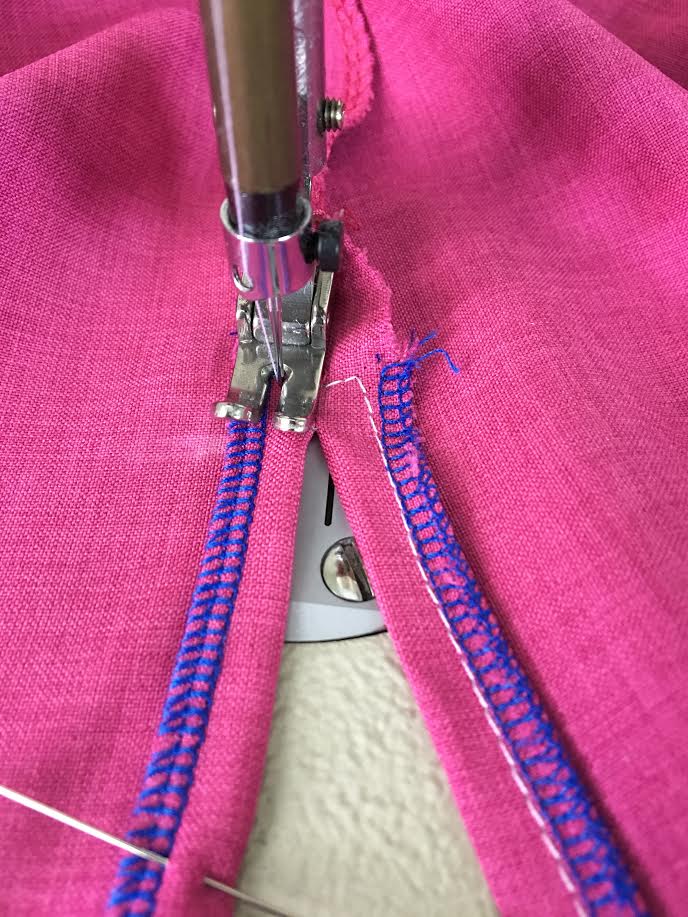
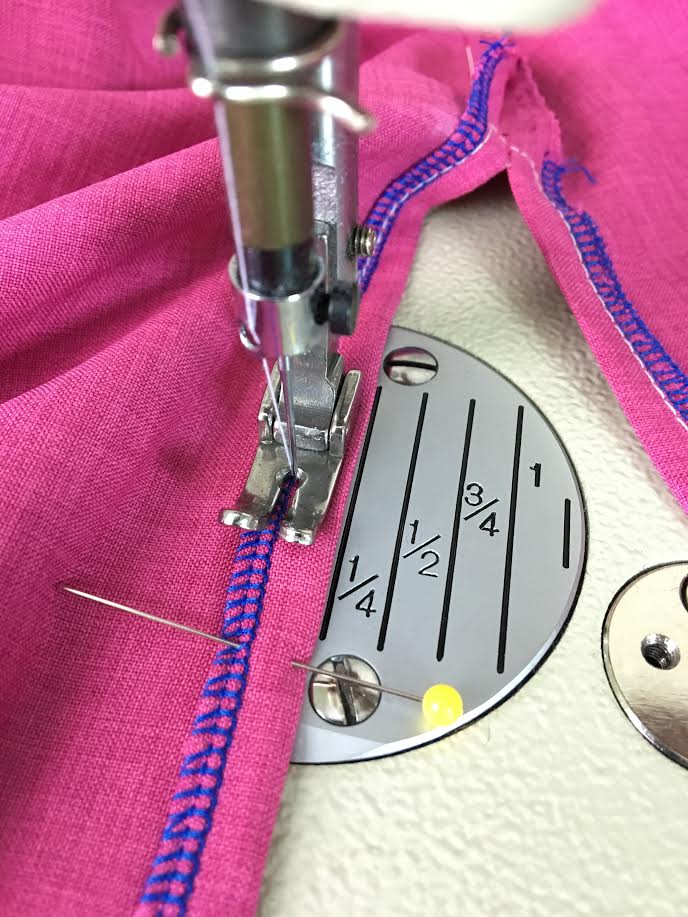
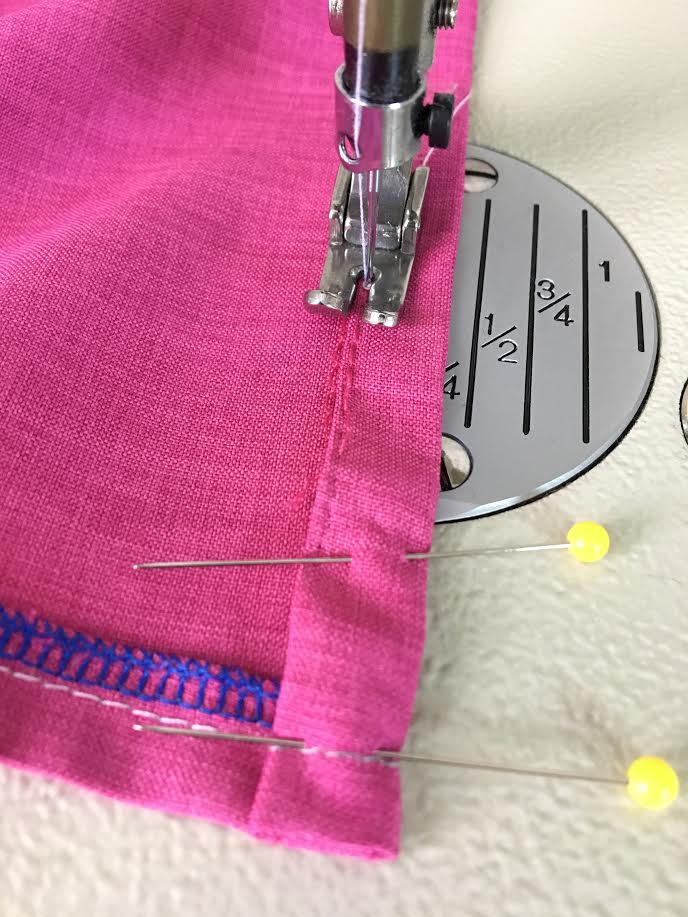
9. Starting on top of the existing stitch, sew down to the horizontal chalk mark and backsticth to reinforce this area. The backsticth should be positioned right above the chalk mark as shown above. When the slit is pulled apart, the stitching should not come loose or come undone at the slit opening. 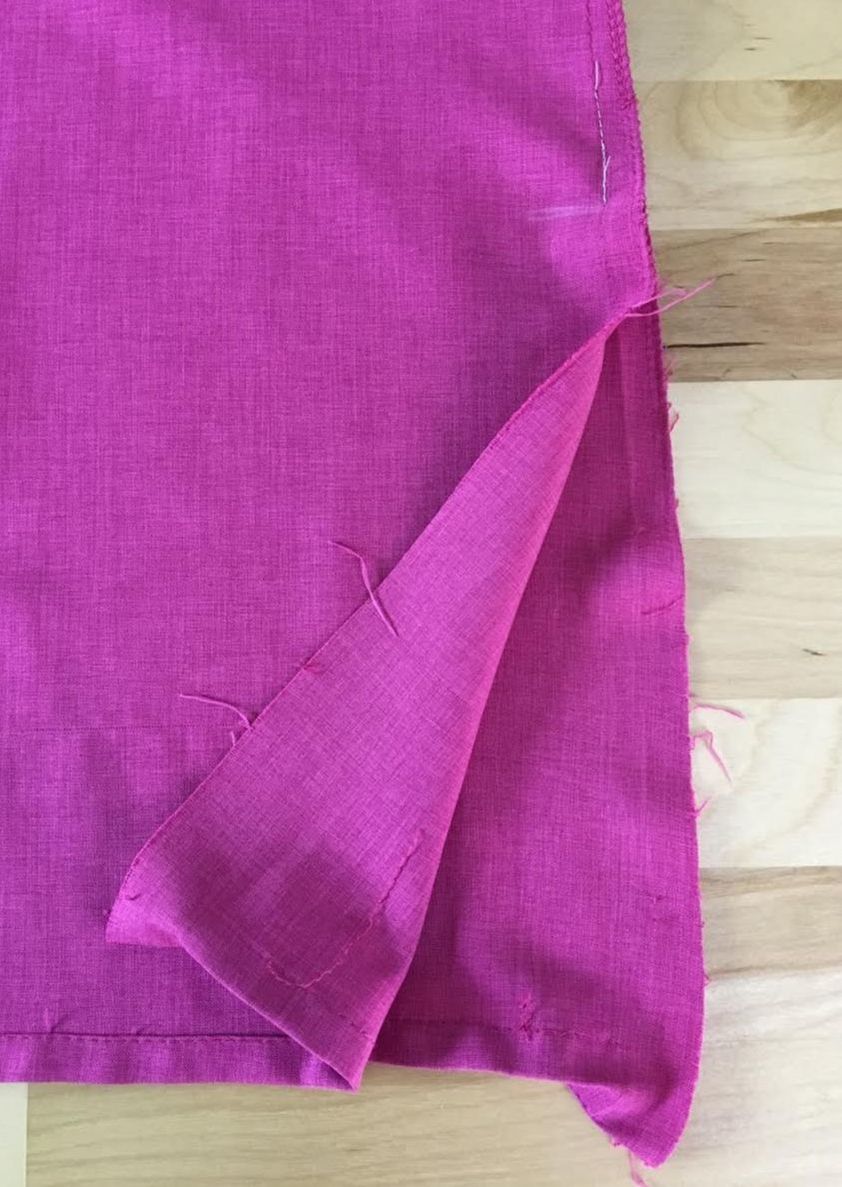 Now that the slit opening is reinforced, it's time to clean finish the raw edges of the slit opening. For a quick finish, you can use a zig zag on your home sewing machine along both raw edges. If you have a serging machine, a serged stitch will work even better! 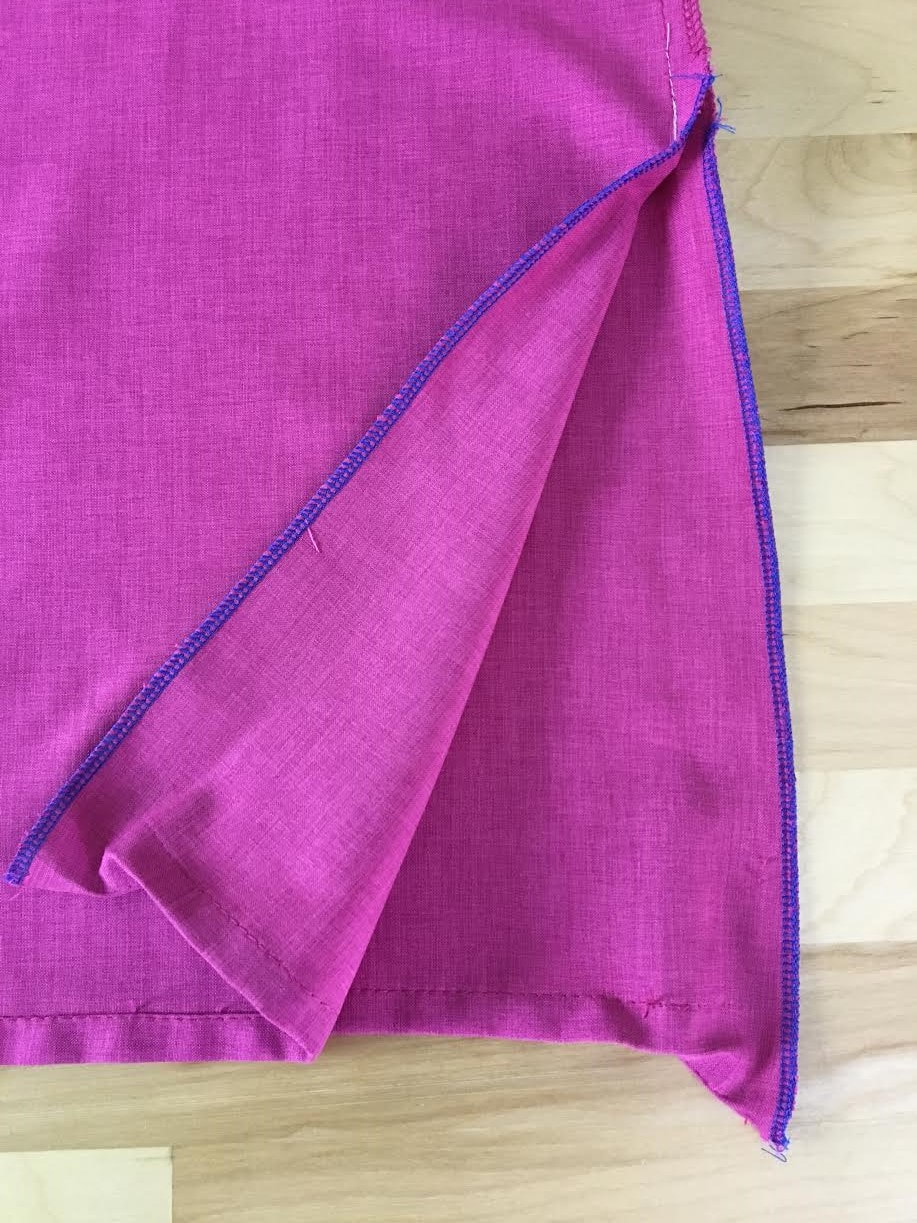 10. Starting at the bottom of the dress, apply the serging (or zig zag stitch) along the raw edge of both fabric layers. 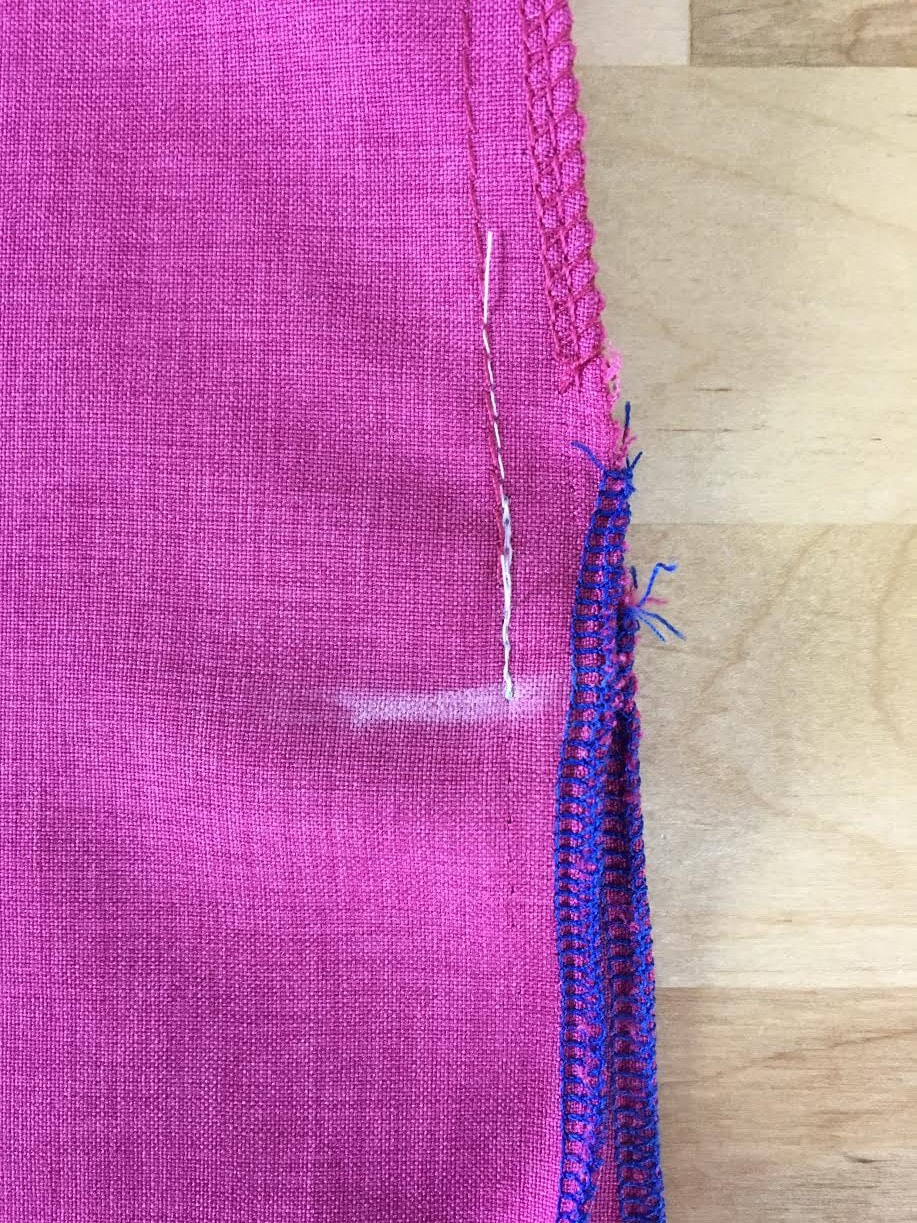 As you get to the top, try to stitch as close as possible to the existing finish (in this case, the serging stitch). This may feel a little bit unnatural to do, but your goal is to try to seal as much of the raw fabric edge as you can. Of course, if your seam allowance is finished separately, simply blend in the serging with the existing finish on each edge. In this example however, the two layers of the seam allowance at the top are serged together, thus blending in the serging on each slit layer may feel a bit tricky. 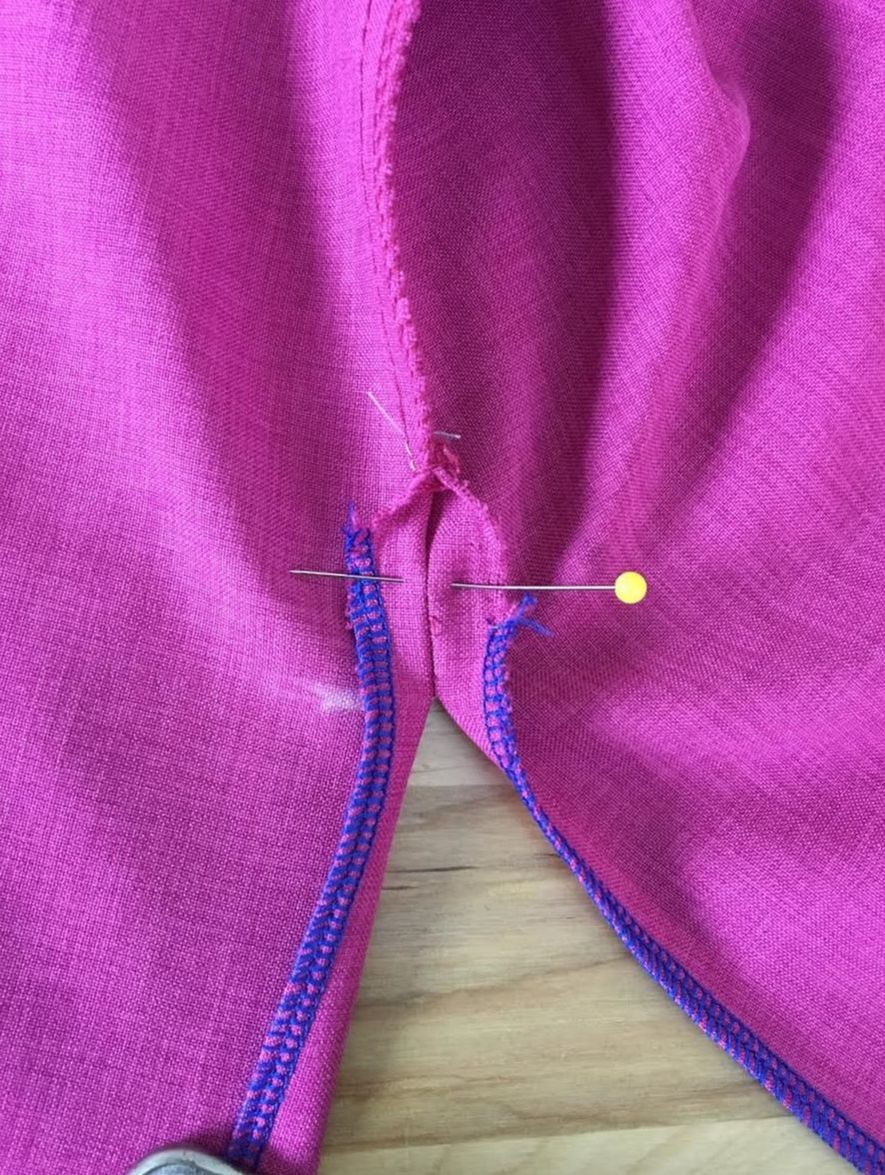 11. Insert a pin at about 1/2" up from the slit opening to keep the two seam allowance layers open at the top (shown above). 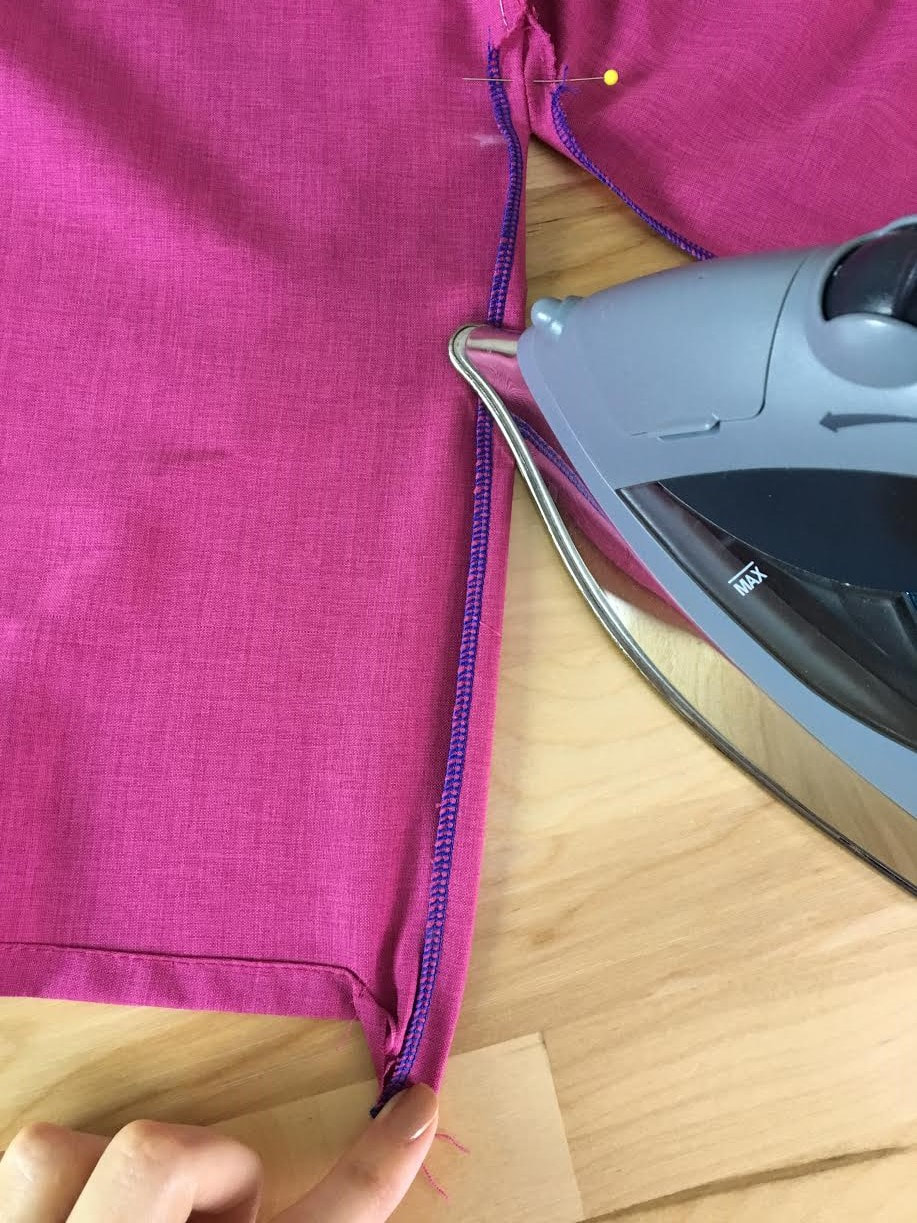 12. Once the seam is secured at the top, fold and iron each edge of the slit opening in towards the wrong side of the garment at the existing seam allowance (1/2" in this tutorial), 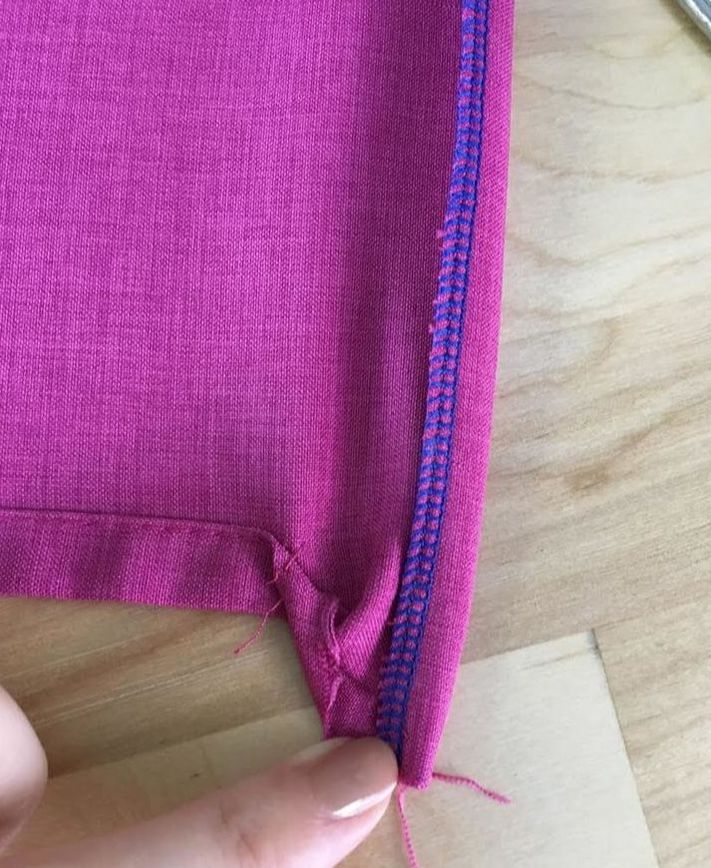 Make sure you fold and iron the slit layers in the same manner all the way down to the very bottom of the fabric as shown in the image above. You'll find that doing this will facilitate the hem-refinishing process later.  Both slit opening layers should now be securely folded at the same seam allowance all the way to the very bottom of the garment.  12. To keep these folded layers in place in preparation for machine stitching, insert pins perpendicular to the folded edges on the wrong side of the garment as shown above.  13. Working on the wrong side of the garment, start machine stitching from bottom of one slit layer such that the fold line is aligned to the seam allowance guide on your sewing machine (or the right of the needle) as shown above.  Continue stitching up following either the serging or seam allowance guides evenly throughout. Since this stitch will appear as a topstitch on the right side of the slit, it should be straight and evenly positioned along the slit opening.  Sew at about 1/2" past the slit opening as shown above. To switch direction, lift the presser foot while keeping the machine needle fully inserted (shown above). 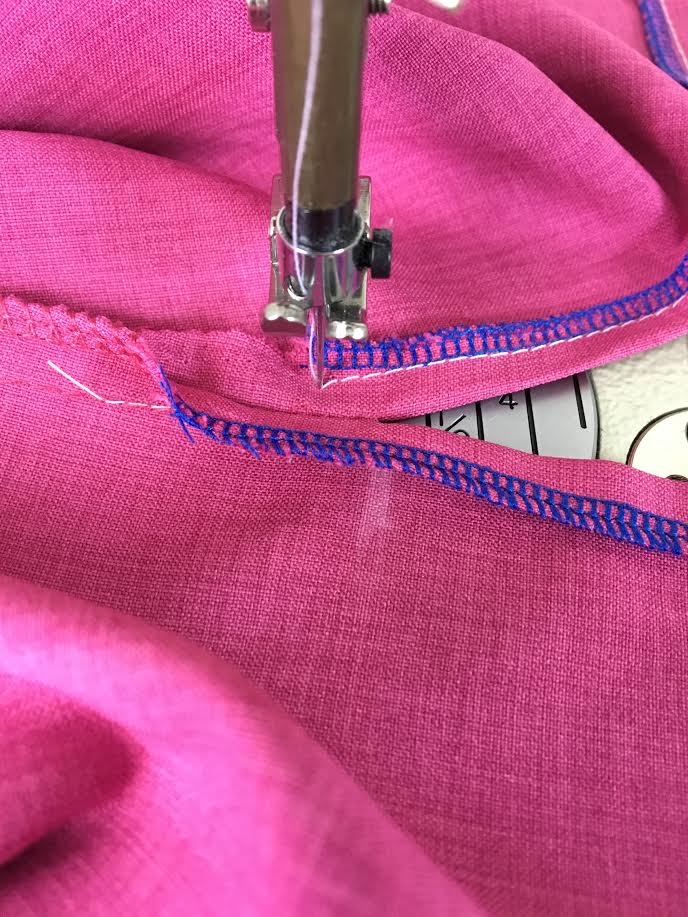 Leaving the needle inserted through all fabric layers, turn the entire garment such that the stitch direction is now positioned horizontal at a 90 degree angle in relation to the vertical stitch. 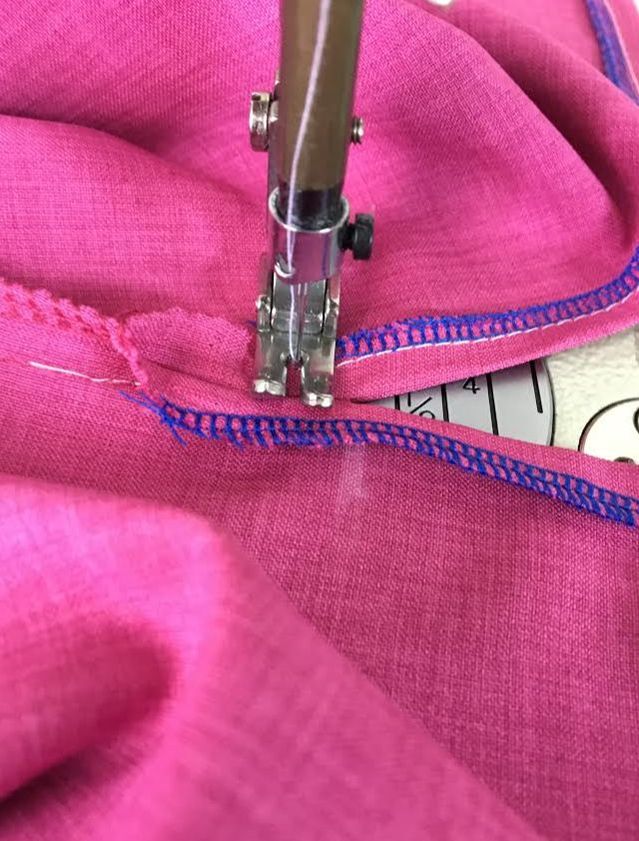 Drop the presser foot and continue stitching straight, stopping at an even distance from the seam on the other side. Aligning this stitch evenly may take a few tries especially if you are a sewing beginner! Don't get disappointed if you have to re-do it a couple of times. It is all part of the learning process.
Lift the presser foot again, and leaving the needle inserted through all layers of fabric underneath, switch stitch direction again at a 90 degree angle. To do this, move the entire garment such that the stitch direction is now moving from the top to the bottom of the slit with the fold line aligned to the right of needle.
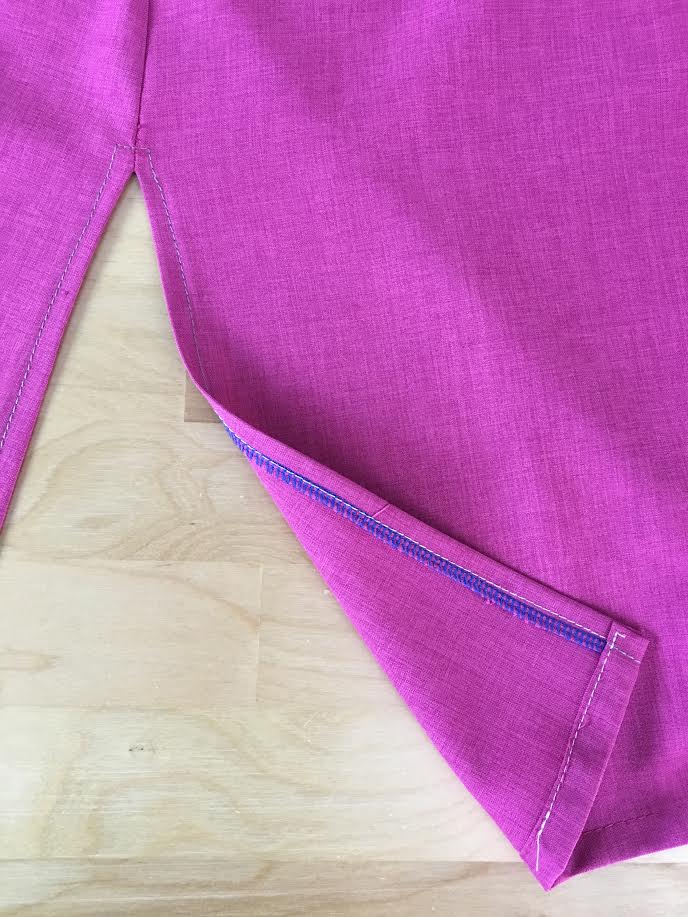
Drop the presser foot again and continue stitching towards the bottom of the garment. Follow the same distance from the folded edge as you did for the other slit edge. 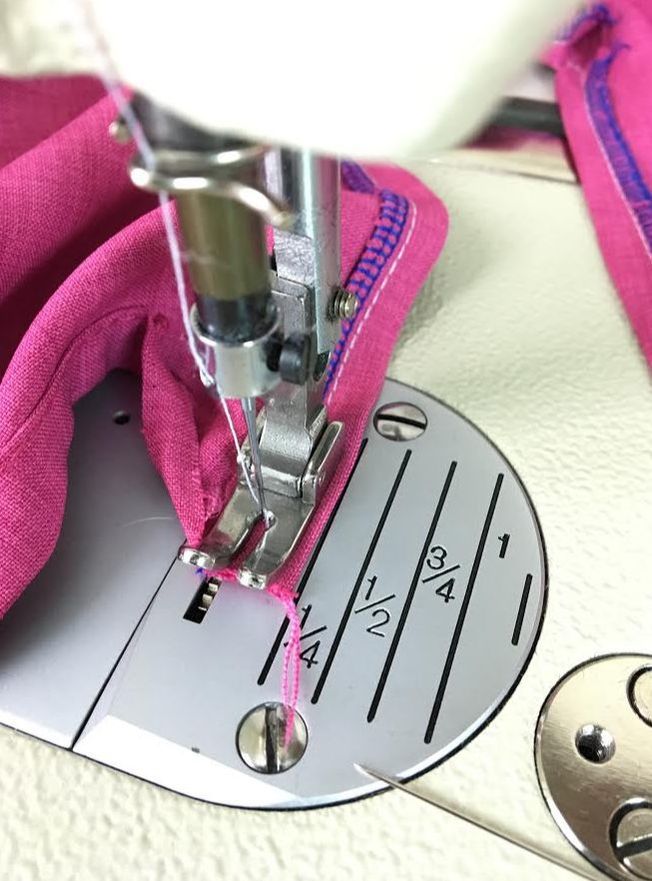 Stitch all the way down to the bottom of the garment, stopping at the raw fabric edge as shown. 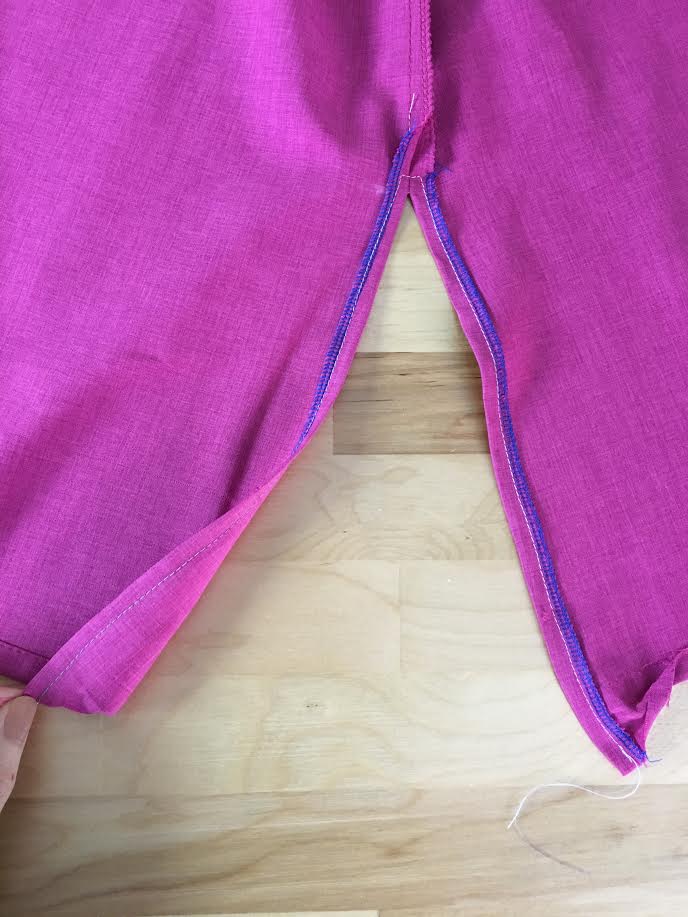 Now that the vertical slit opening edges are clean finished, all that's left is to re-finish the hem.
14. To re-finish the hemline, you will have to replicate the existing hem finish as closely as you can. In this example, the hem is double folded and top-stitched. To start with, fold the horizontal bottom edge in twice following the existing hem as shown above. 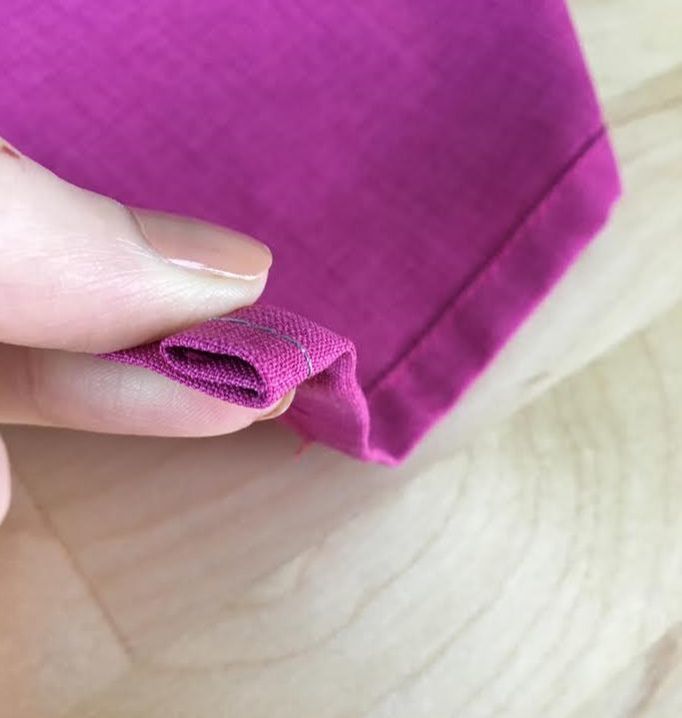 Make sure the fabric raw edge is not visible on the sides of the slit opening, and is fully enclosed in the double fold. 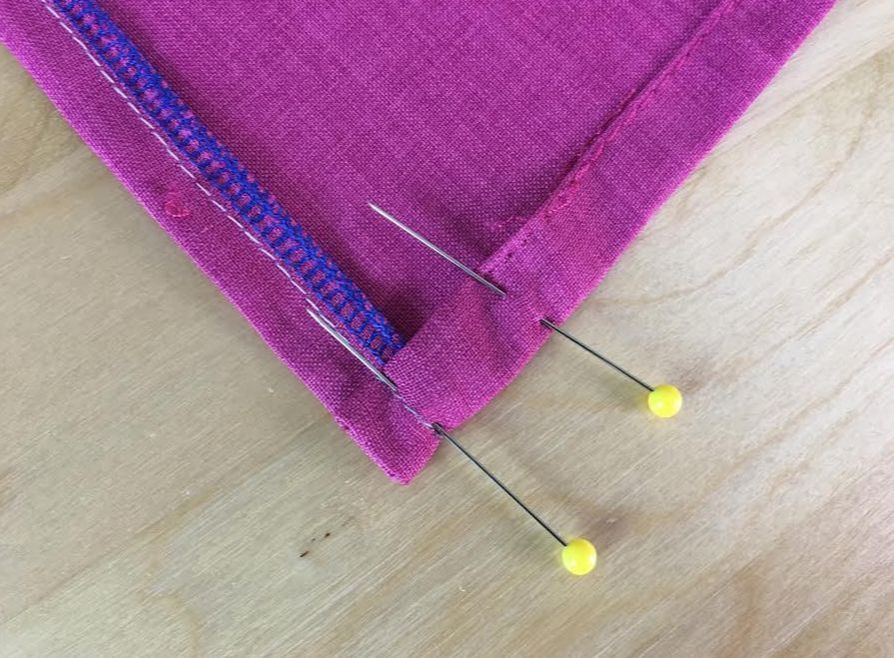 15. Once the hem is re-folded, insert a couple of pins perpendicular to the bottom edge as shown above. The pins will keep the fold in place during machine stitching. 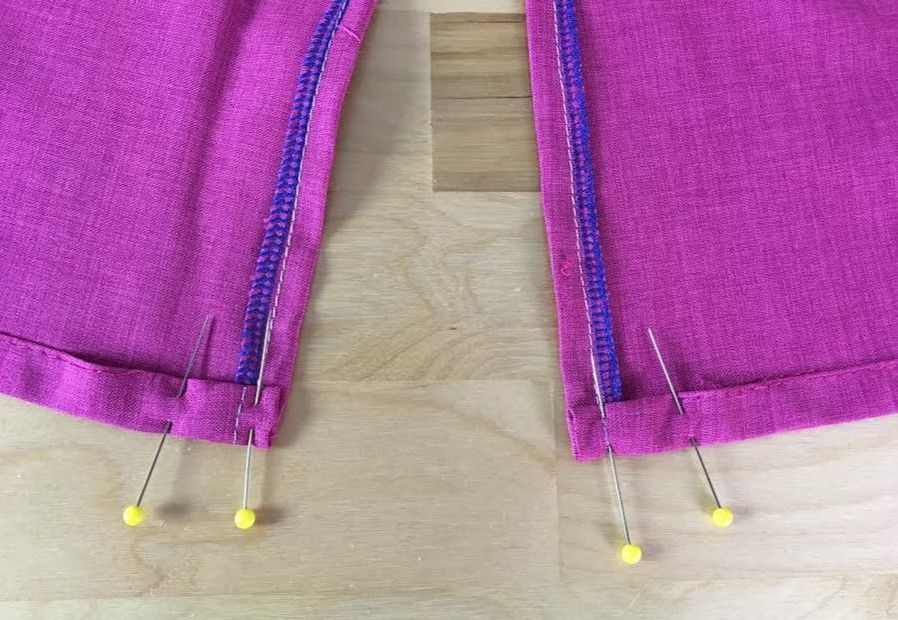 15. Repeat the folding and pining process on both sides of the slit opening. Make sure the re-folded hem blends in with the garment's existing hem.
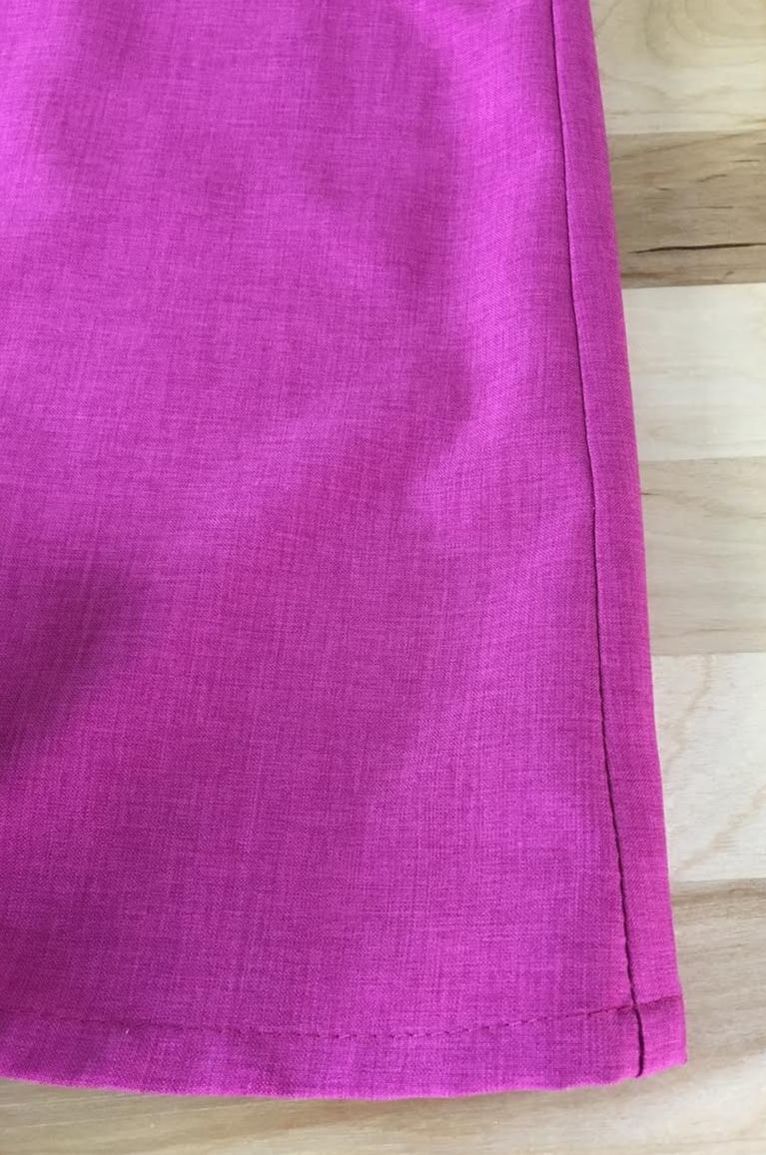
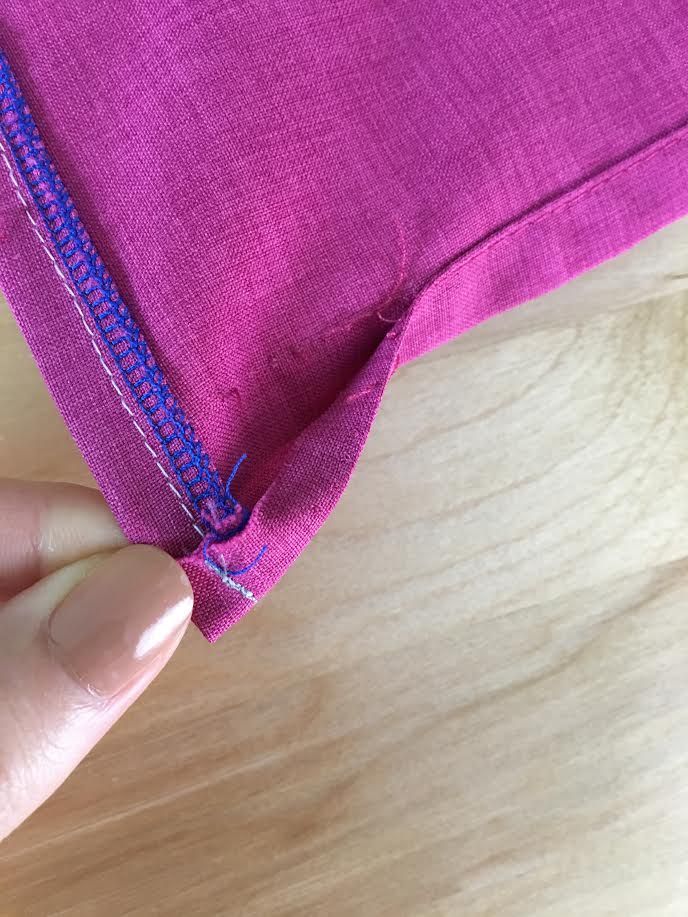
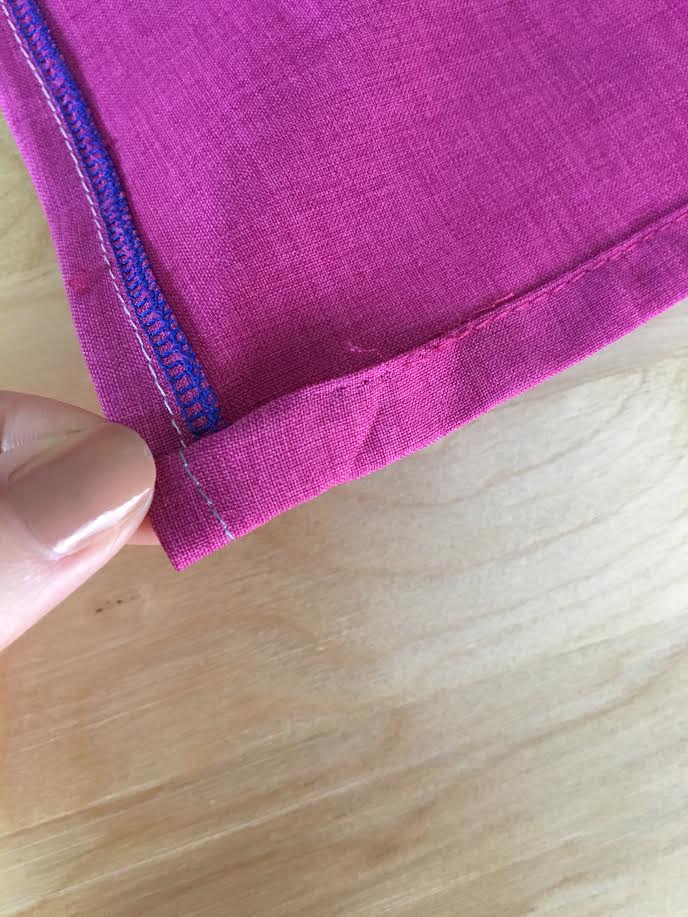
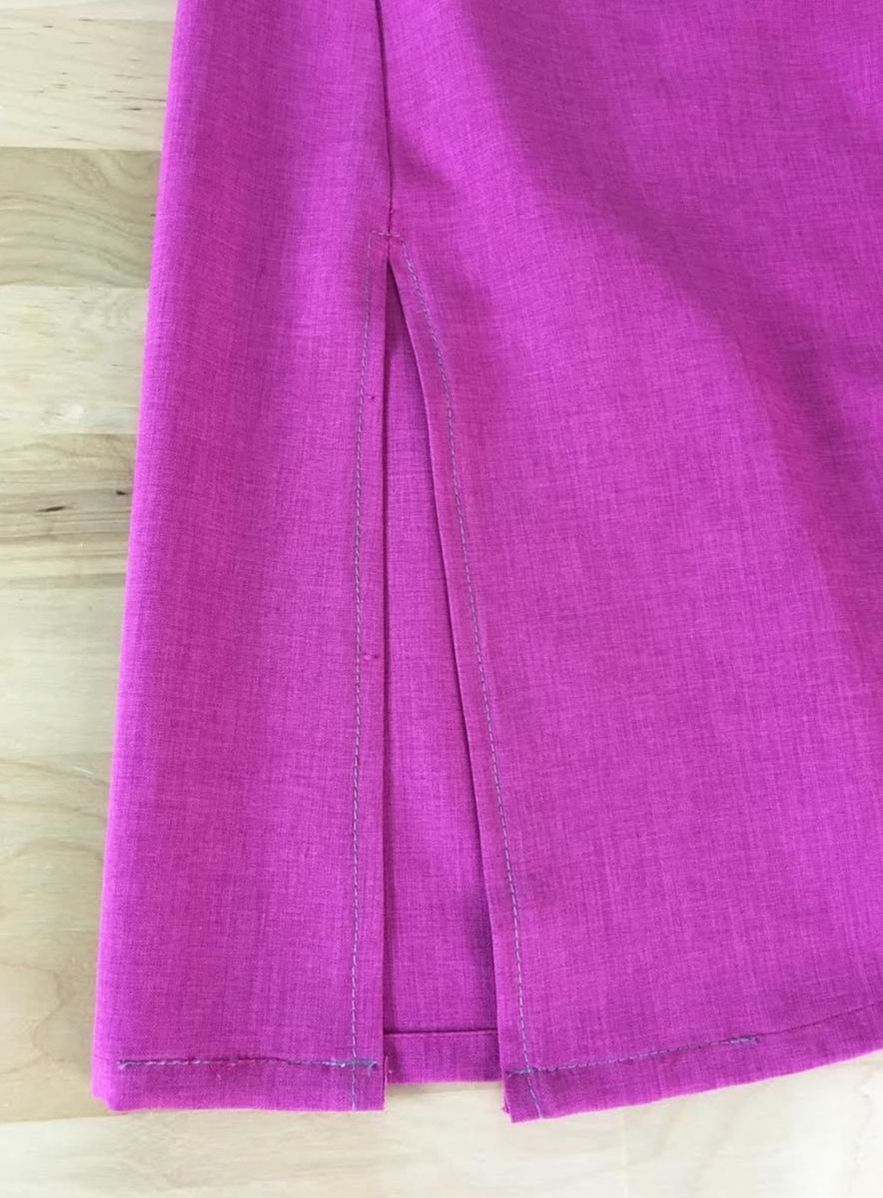
16. Starting on top of the existing hem stitch, straight stitch toward the slit opening edge, blending in the existing hem stitch as shown above. Work on the wrong side of the garment and use the upper fold as a guide during stitching. 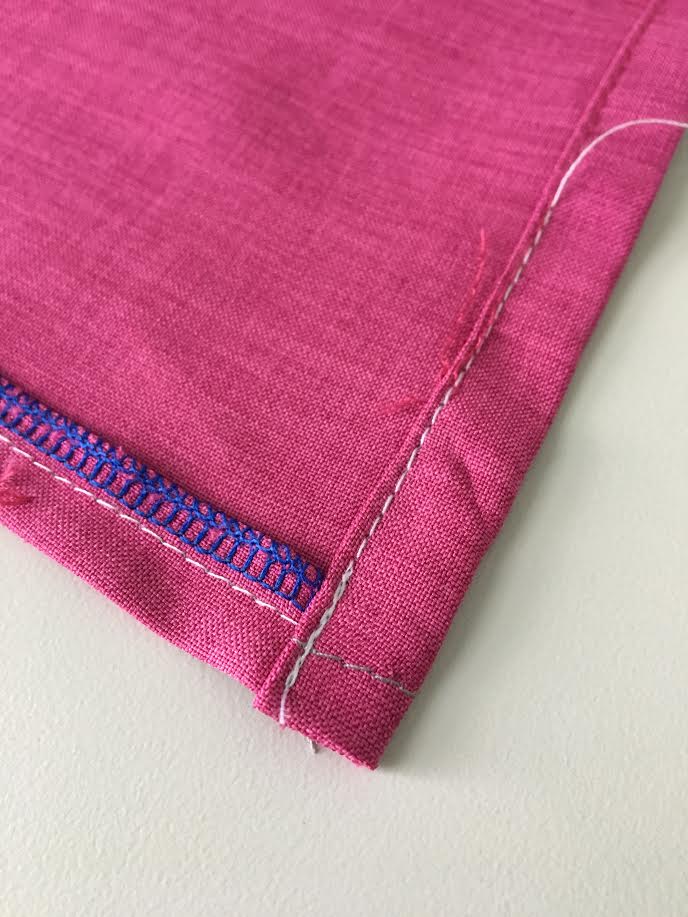 Make sure to backstitch at the slit edge and overlap the straight stitches to secure and blend them into the existing hem. 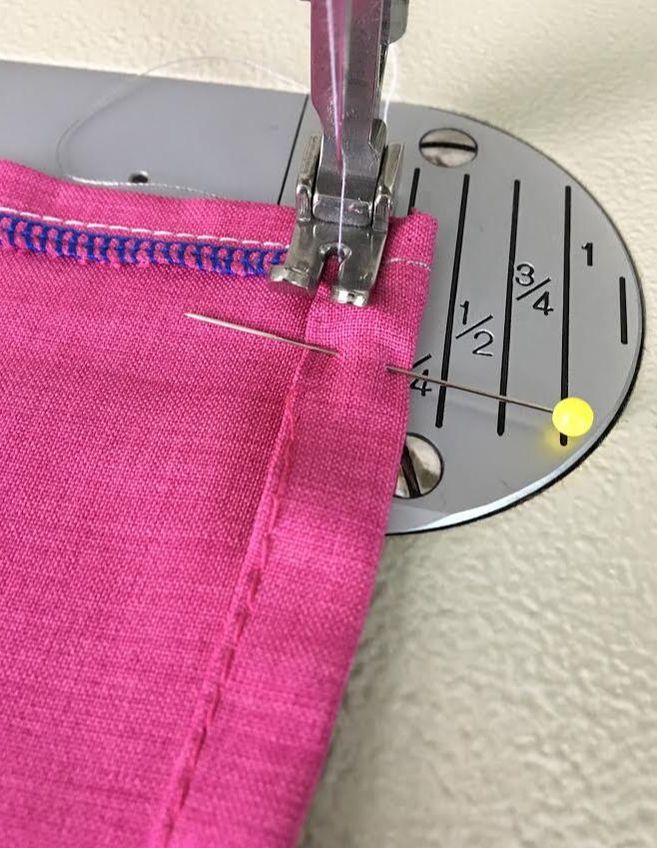 17. Repeat the stitching process described above on the other side of the slit opening. Also note that since you'll be stitching with the wrong side of the garment facing up, the stitch direction will be different on both sides of the slit. One end will start at the edge of the slit (as shown in the image above) the other will start on top of the existing hem stitch as shown in Step 16 above. 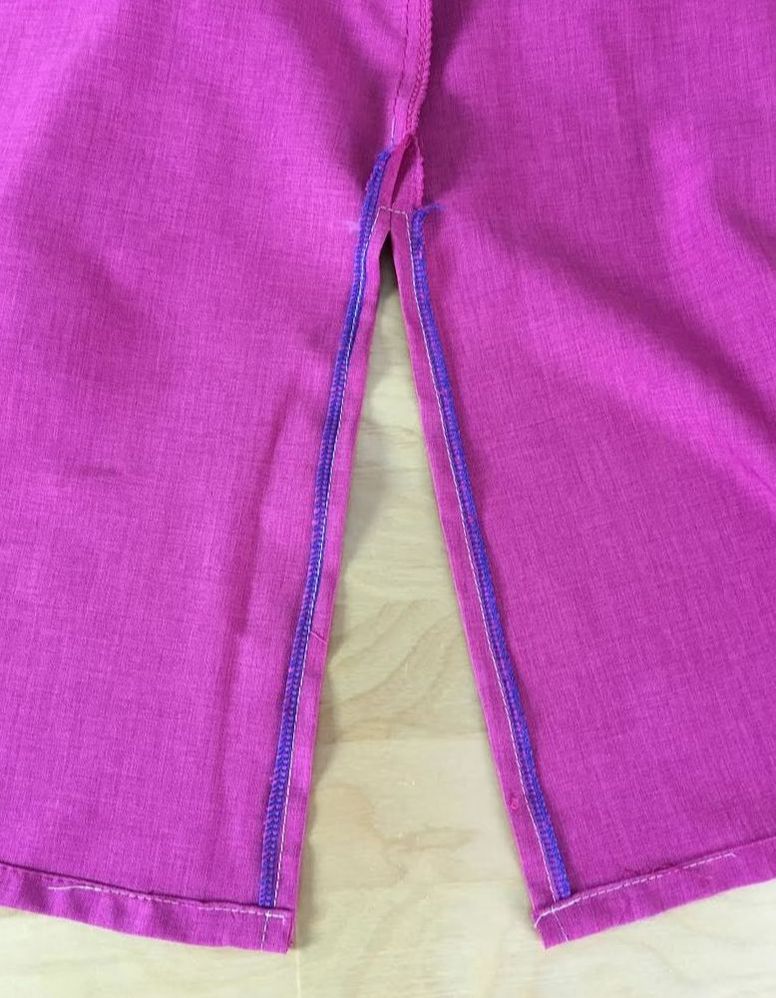 The slit is now complete! If you followed all the steps above, the slit should be durable enough to withstand long term wear and blend into the garment naturally. 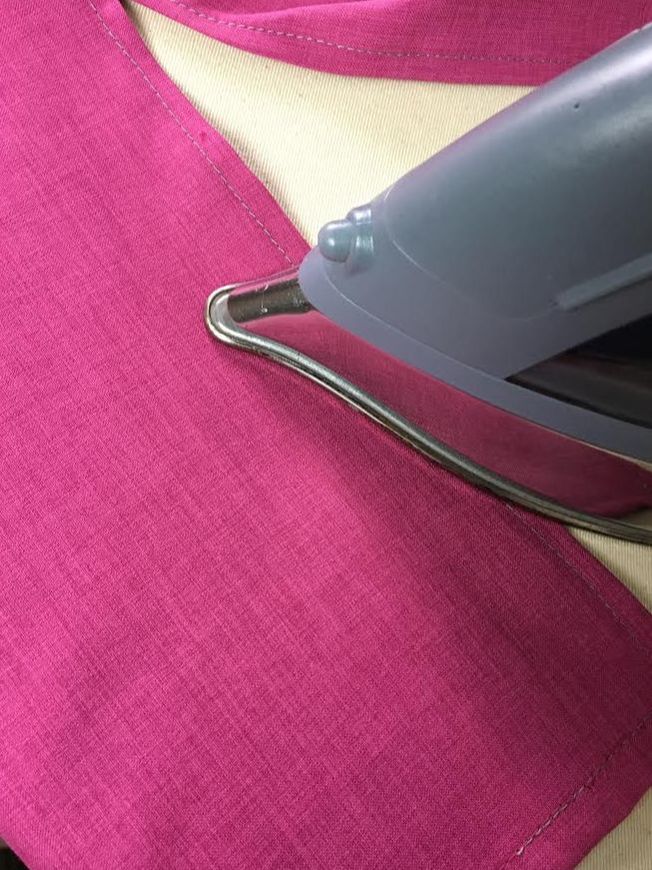 As a last step, it is very important that you give the newly sewn slit a last press to ensure a flat, professional finish. Iron the layers of the slit as well as the top portion of the seam on the face side of the garment as shown above. 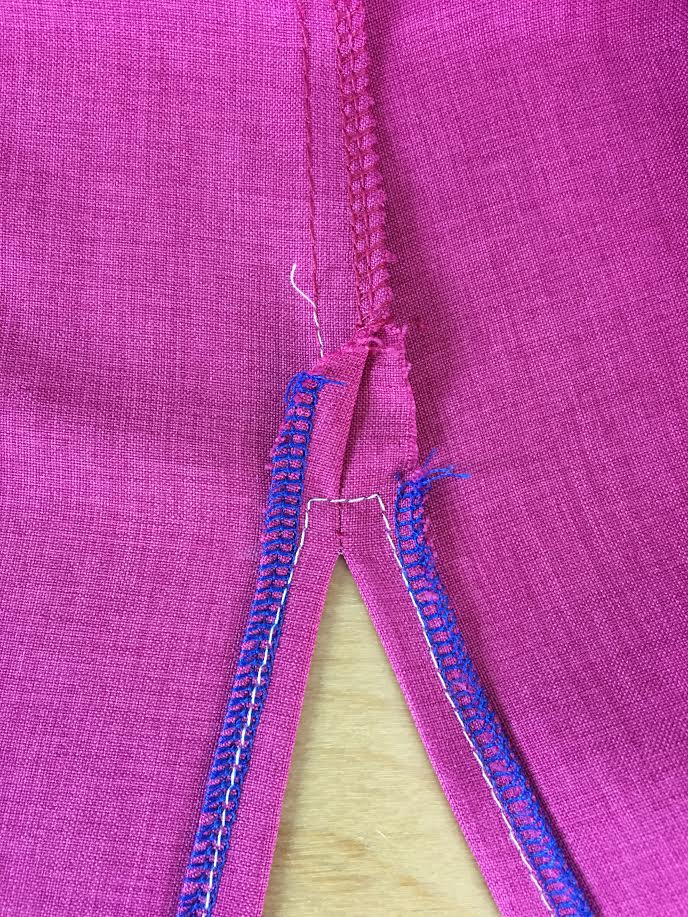 If the seam allowance is finished closed at the top (such as the one in this tutorial), the seam allowance of the slit opening should be ironed at an angle as shown above. This will ensure that the slit lays flat and blends into the closed seam at the top.
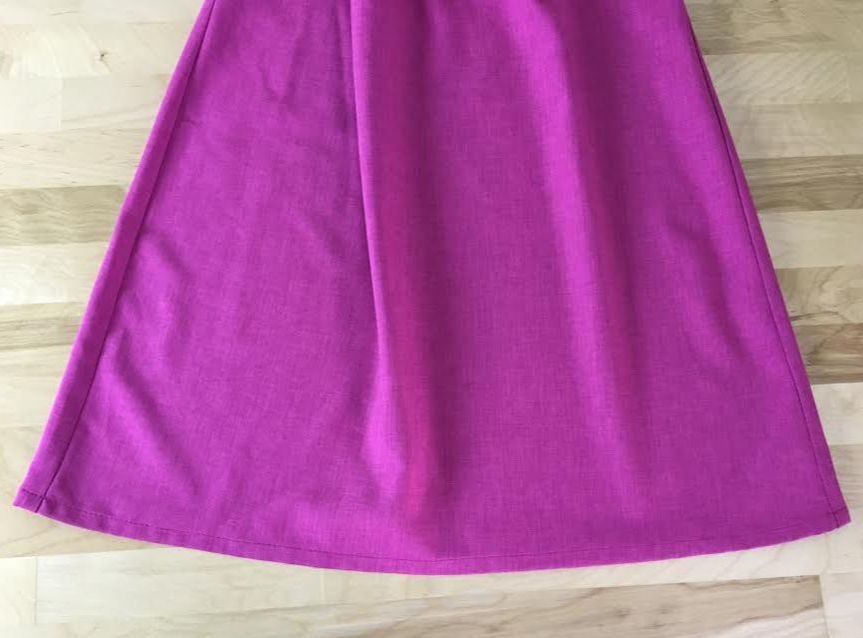
Once ironed, the final slit will lay flat and blend in smoothly into the seam. From a functional perspective, the slit top opening should also be durable enough to withstand pulling and stretching during movement. Note: In this tutorial, contrast thread is used for all stitches in order to make them more visible. In practice, you should always match the color of the thread to that of the fabric or the existing stitches. Doing so will provide a professional finish that blends into the current design and hides small stitching errors. 
3 Comments
Marissa Black
2/15/2021 04:12:53 am
Thank you for this beautiful tutorial! Having each step illustrated makes things so easy to follow. Now I'm excited to use this technique on my future projects!
Jewell Luke
10/15/2021 02:40:47 pm
Hey, I'm wondering is there a way to prevent the slit from curling outwards. I can't get the edges to lay flat no matter what I do.
Sahin
4/13/2023 04:54:31 pm
Thank you , Every step is very visible and helpful. Leave a Reply. |
The Blog:A journey into our design process, sewing tutorials, fashion tips, and all the inspiring people and things we love. 
Doina AlexeiDesigner by trade and dressmaker at heart. I spend most of my days obsessing over new fabrics and daydreaming new ideas. 
Sadie
Executive Assistant & Client Relations Manager Archives
November 2019
Categories
All

|

-
Sewing Tutorials
-
Basics
>
- Aligning Pattern Grainlines To Fabric
- Preparing Fabrics For Sewing
- Pinning Sewing Patterns To Fabric
- Placing Sewing Patterns On Fabric For Cutting
- Rotary Cutters or Fabric Scissors?
- Cutting The Sewing Patterns
- What Are Notches And How To Use Them In The Sewing Process
- Transferring Notches From Pattern To Fabric
- Transferring Seamlines to Fabric
- Staystitching
- Backstitching: A Complete Guide
- Hand Basting: A Complete Guide
- Sewing Continuous Bias Binding
- Darts >
-
Sewing Seams
>
- The Basics Of Seams And Seam Allowance
- How To Sew A Straight Seam
- Sewing Curved Seams
- Sewing Corner Seams
- Trimming And Grading Seam Excess
- Notching/Clipping Seam Allowance for Tension Release
- Sewing Topstitched Seams
- Sewing Corded Seams
- Sewing A Slot Seam
- Sewing A Gathered Seam
- Sewing Bias Seams
- Sewing Seams With Ease
- Sewing Seams With Crossing Seamlines
- Sewing Unlike Fabric Seams
- How To Iron Seams: Ironing Tools And Conventions
- Sewing With Knit Fabrics
- Understanding Stitch Length And Tension
- Sewing Unique Fabric Seams
-
Seam Finishes
>
- Seam Finishing Techniques - Overview
- Applying A Pinked Seam Finish
- Applying A Bias Bound Seam Finish
- Serging And Zigzag Seam Finishes
- Sewing A Self-Bound Seam Finish
- Sewing A French Seam Finish
- Sewing A Hong Kong Seam Finish
- Sewing A Mock French Seam Finish
- Sewing A Turned-and-Stitched Seam Finish
- Sewing Overcast Hand-Applied Seam Finishes
- Sewing A Flat Felled Seam
- Sewing A Hairline Seam Finish
-
Hem Finishes
>
- Garment Hem Finishes: Overview
- Sewing A Double Fold Hem Finish
- Sewing A Single Fold Hem Finish
- Sewing Bound Hem Finishes
- Sewing An Exposed Double Layer Bound Hem
- Sewing A Folded-Up Bound Hem with Pre-folded Binding
- Sewing A Hong Kong Hem Finish
- Sewing A Band Hem Finish
- Sewing A Bias Faced Hem Finish
- Sewing A Twill Tape Hem Finish
- Sewing A Rolled Hem Finish
- Sewing A Shaped Hem Facing
- Using Fusible Hem Tape And Webbing
- Finishing A Lace Fabric Hem
- Finishing A Leather Hem
- Sewing Faced Hem Corners
- How To Finish Lining At The Hem
- Finishing Fabric Corners by Mitering >
- Interfacing A Hemline: Lined And Unlined Examples
-
Sewing Pockets
>
- Curved Patch Pocket With Flap
- Unlined Square Patch Pockets
- Lined Patch Pockets: Two Ways
- Extension On-Seam Pockets
- Separate On-Seam Pocket
- Front Hip Pockets
- Bound Double Welt Pocket
- Double Welt Pocket With Flap
- Self-Welt Pocket (Using Single Fabric Layer)
- Slanted Welt Pocket (Hand-Stitched)
- Faced Slash Pockets: Overview >
-
Sewing Zippers
>
- Sewing Zippers: General Information
- Sewing A Centered Zipper
- Sewing A Lapped Zipper
- Sewing An Invisible Zipper
- Sewing A Fly Front Zipper
- Sewing A Closed-End Exposed Zipper (No Seam)
- Sewing An Exposed Separating Zipper
- Sewing Hand Stitched Zipper Applications
- Sewing A Zipper Underlay
- Sewing A Placket-Enclosed Separating Zipper
- Sleeveless Finishes >
-
Neckline Finishes
>
- Sewing A Neck Shaped Facing
- Sewing An All-In-One Neck Facing
- Neck And Garment Opening Combination Facings >
- Sewing A Bias Faced Neckline Finish
- Sewing A Band Neckline Finish
- Bound Neckline Finishes: Overview >
- Sewing A Semi-Stretch Strip Band Neckline
- Ribbed Neck Band And Classic Turtleneck
- Decorative Neckline Finishes >
- Finishing Facing Edges >
-
Extras
>
- A Complete Guide on Interfacing
- Sewing Bound Spaghetti Straps
- Sewing Spaghetti Straps To A Faced Neckline
- Sewing Ruffles: Overview
- Patterning And Sewing A Circle Ruffle
- Sewing A Gathered Heading Ruffle
- Sewing Double Layer Gathered Ruffles
- Sewing A Gathered Ruffle Into A Seam
- Sewing A Gathered Ruffle To A Fabric Edge
- Sewing A Fabric Surface Slit
- Sewing A Slit Seam
- Hand-Applied Straight Stitches
- Hand-Applied Blind Stitches
- Hand-Applied Overedge Stitches
- Hand-Applied Tack Stitches
- Hand-Applied Decorative Stitches
-
Basics
>
- Custom Bridal
- Custom Apparel
- About
- Blog

 RSS Feed
Services |
Company |
|
