|
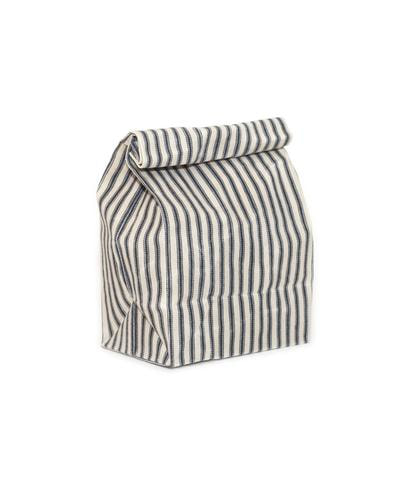
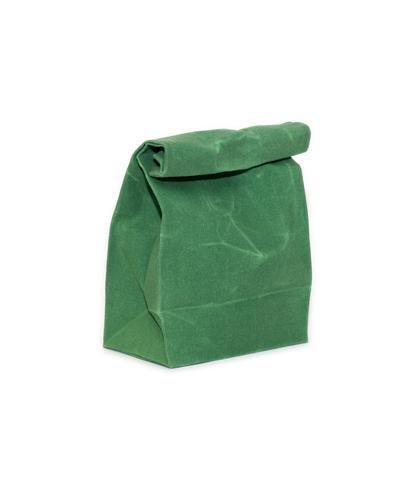
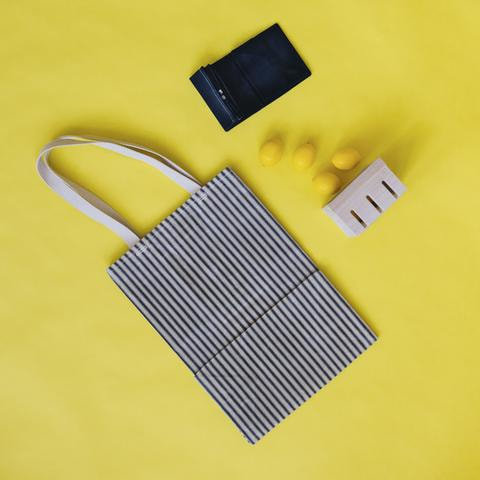
I am so passionate about brands that aim to make a positive impact on the world, whether through conscious use of materials or multi-functional products that are designed to solve a problem. WAAM Industries (We Are Always On The Move Industries) is a brand that fits this category to a T. This husband and wife team is passionate about each product they design and lovingly bring to life from the ground up. Years ago, Andrew and Hanna Vomhof merged their creativity into the conception of an industrial product brand representative of their lifestyle and belief system. 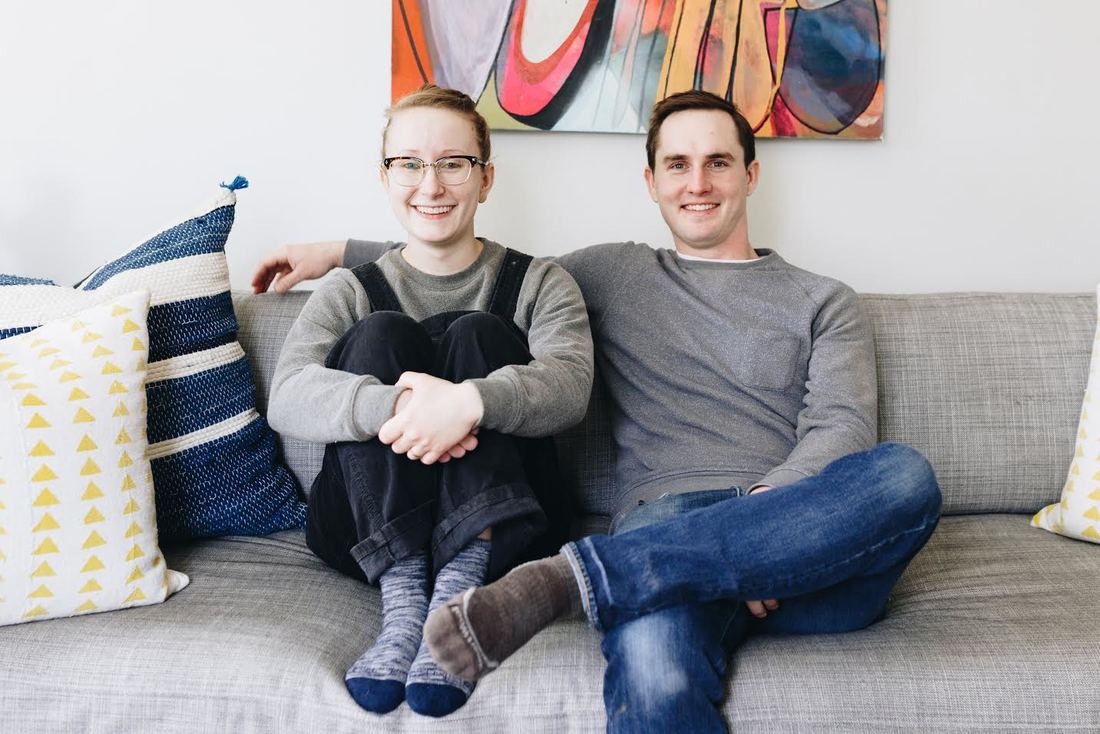 Hanna and Andrew Vomhof of WAAM Industries Inspired by everything from vintage finds at flea markets and garage sales, each WAAM Industries product is carefully crafted to stand the test of time. The brand sources each material individually to create high quality, natural products featuring a clean, linear design aesthetic. Everything is designed and manufactured in their Twin Cities, Minnesota work space or at home, where each design receives the attention it deserves. As you browse the brand's featured work below, you'll find that, as stated by the designers themselves, "many of the products at WAAM are based on simple utilitarian objects that play an important role in everyday life but are often over looked." From reusable wooden milk crates and pet bowls to the famous waxed canvas shopping tote and lunch bag, the brand has never deterred from its mission and design aesthetic. In the interview to follow, Hanna of WAAM Industries tells us a bit more about the brand's story from conception to its success today, inspiring those that have a similar passion for product design. 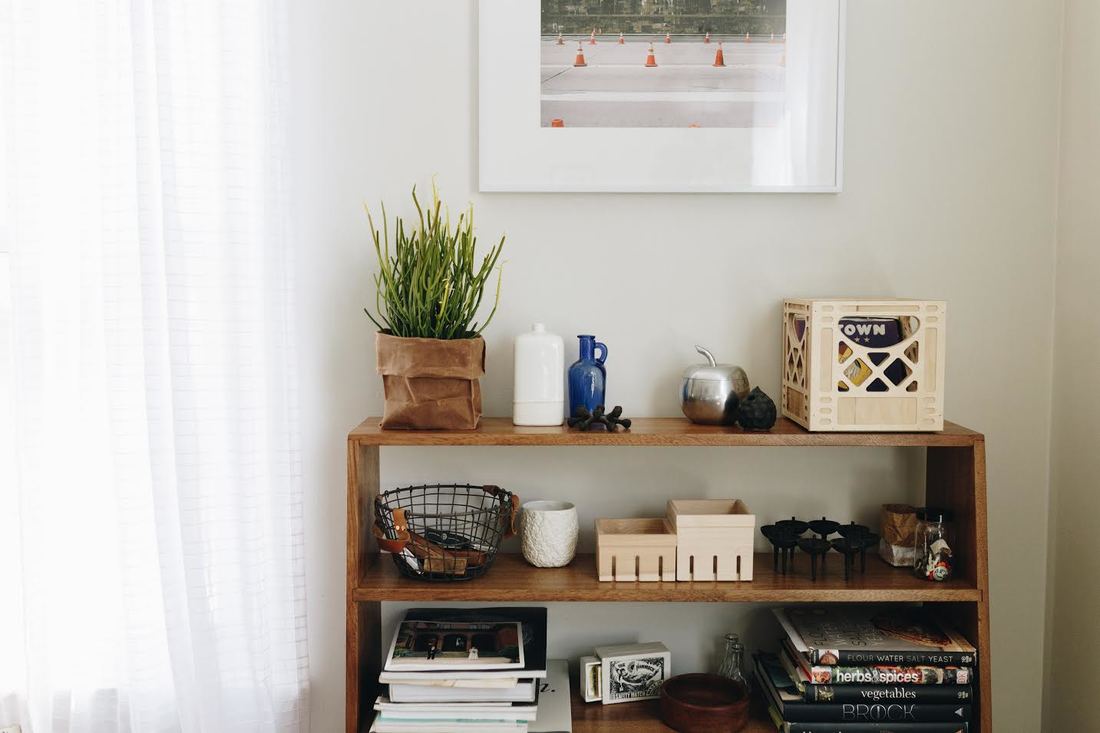 "We Are Always Moving" – how did this slogan became part of the brand's name and what does it represent? WAAM has always been a company on the move. Whether we're designing new products to solve a problem or traveling the country, we are always moving. On that same topic, what is the brand’s message and mission? We design and create products with intention while also making sure they can last the test of time.  Who is behind WAAM industries? Tell us a bit about your background and what inspired you to come together and create this meaningful, industrial brand? Andrew began WAAM Industries in 2012. His background is in sculpture. He designed the Wooden Milk Crate, our line of Tinder Blocks and our Shellphone Loudspeaker. As a sculptor his work was always very industrial and beautiful and that aesthetic translated well in to the first line of products. I (Hanna) worked behind the scenes for awhile, but decided to leave my retail management position and join him full time in 2016. With my experience in sales and photography, and his experience in design and sculpture the brand really came to life. 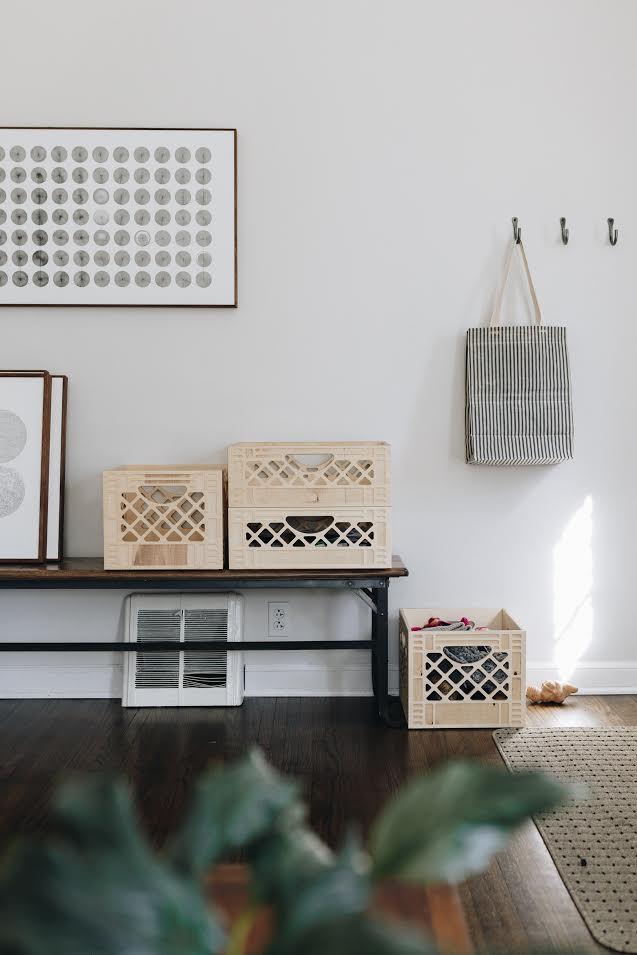 Describe your personal design process. How are the ideas born, and what is the main point of inspiration behind these unique ideas? We are antique and treasure hunters. Many of our products are replicas of classic objects such as the milk crate, lunch tray or the classic paper bag. We wanted to recreate those 'everyday objects' and make them more structurally sound and visually pleasing, yet with an unexpected twist.
I’m curious about the physical process associated with building each product- Where is everything produced/manufactured and how do you split each task? Our products are all produced and manufactured in the Twin Cities of Minnesota. Most days you'll find Andrew and I working side by side in the wood shop building crates, boxes and custom products, or at home working on our waxed canvas line. We work with a local company for the construction of the bags, but our hands still touch each item as we complete all the finishing work by hand. Andrew's main focus is designing and production plan, while I focus on production assembly, shipping and communication. 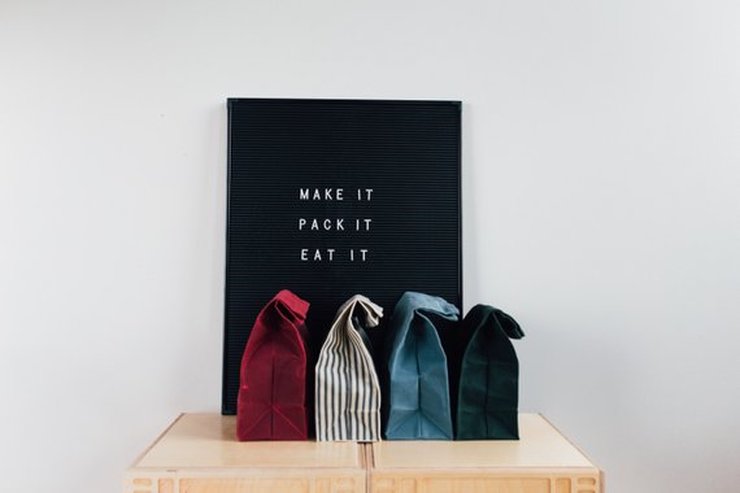 "Many of our products are replicas of classic objects such as the milk crate, lunch tray or the classic paper bag." What are some of your favorite materials and processes to work with and why? This is a hard one! We really love all of the materials we work with. At the start of WAAM, our strongest focus was on lumber, but we were very excited to add the textile side shortly after. I think this definitely depends on the day. Some days it's really fun to go to the wood shop and leave caked full of sawdust, while other days it's nice to work with your hands and make the perfect bag.
Tell us about the mission (and passion) to use ecofriendly, US-sourced materials and how do you see this impacting your industry and the world today? We hope that our mission of creating products with intention will make our consumers think about their personal consumerism. Personally, our mission and the mission of many other small US based businesses is the reduction of waste and awareness of the fast fashion industry. Although it may cost more to purchase from a small business, we hope that the construction and longevity of our products, as well as, the direct relationship between the customer and maker is enticing. 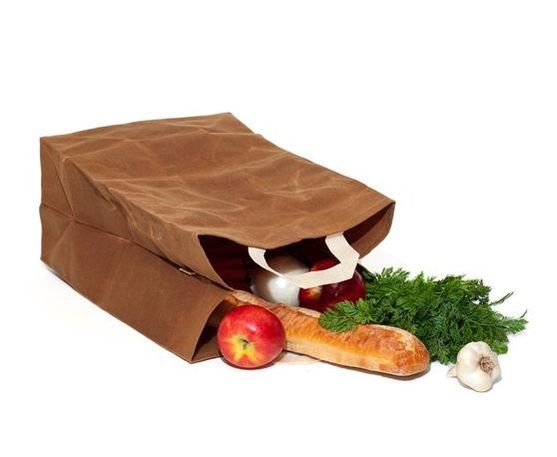 "Some days it's really fun to go to the wood shop and leave caked full of sawdust, while other days it's nice to work with your hands and make the perfect bag. " What have been some of the greatest challenges you’ve had to face since the brand’s conception and how did you overcome them? Being a small business is often challenging, as you grow you'll always find the next hurdle. For us we: huddle often, come up with game plans, seek new ideas to keep our brand fresh, and travel.  How do you balance your time and what keeps you motivated in your work? As a husband and wife team we've worked together to find a balance. For us the solution is early hours (6 or 7AM-late afternoon) in order for us to enjoy our other hobbies and time with friends and family. We're always motivated by the finish line, nothing is more satisfying than seeing a stack of crates, a large order of bags or a group of packages headed to the post office! 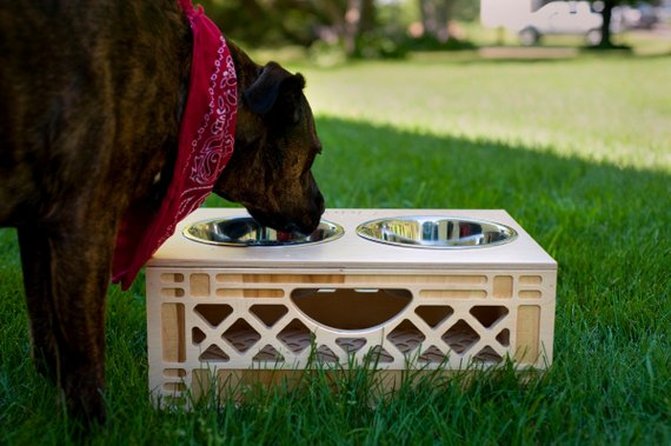 What is next for WAAM industries? Where would you like to see the brand years from now? We hope to re-home WAAM Industries in the next few years to a shop of it's own. We've been in an industrial wood shop for the last 6 years and are excited to build a studio to better suit our needs. We'd love for the company to become a household name in years to come. 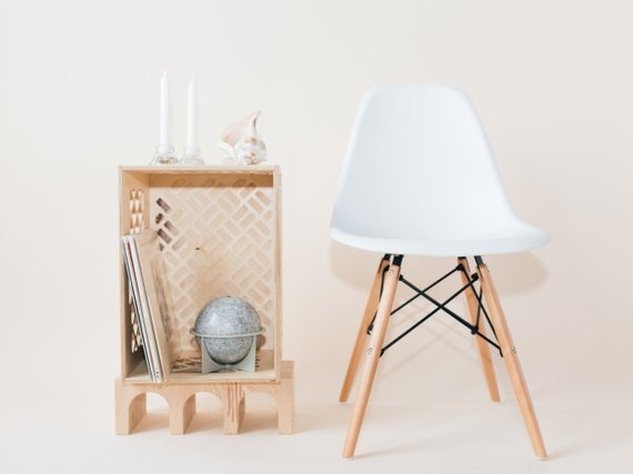 What advice do you give to someone who dreams of building a brand similar to yours? Stay focused and don't give up! " Personally, our mission and the mission of many other small US based businesses is the reduction of waste and awareness of the fast fashion industry. "
0 Comments
Leave a Reply. |
The Blog:A journey into our design process, sewing tutorials, fashion tips, and all the inspiring people and things we love. 
Doina AlexeiDesigner by trade and dressmaker at heart. I spend most of my days obsessing over new fabrics and daydreaming new ideas. 
Sadie
Executive Assistant & Client Relations Manager Archives
November 2019
Categories
All

|

-
Sewing Tutorials
-
Basics
>
- Aligning Pattern Grainlines To Fabric
- Preparing Fabrics For Sewing
- Pinning Sewing Patterns To Fabric
- Placing Sewing Patterns On Fabric For Cutting
- Rotary Cutters or Fabric Scissors?
- Cutting The Sewing Patterns
- What Are Notches And How To Use Them In The Sewing Process
- Transferring Notches From Pattern To Fabric
- Transferring Seamlines to Fabric
- Staystitching
- Backstitching: A Complete Guide
- Hand Basting: A Complete Guide
- Sewing Continuous Bias Binding
- Darts >
-
Sewing Seams
>
- The Basics Of Seams And Seam Allowance
- How To Sew A Straight Seam
- Sewing Curved Seams
- Sewing Corner Seams
- Trimming And Grading Seam Excess
- Notching/Clipping Seam Allowance for Tension Release
- Sewing Topstitched Seams
- Sewing Corded Seams
- Sewing A Slot Seam
- Sewing A Gathered Seam
- Sewing Bias Seams
- Sewing Seams With Ease
- Sewing Seams With Crossing Seamlines
- Sewing Unlike Fabric Seams
- How To Iron Seams: Ironing Tools And Conventions
- Sewing With Knit Fabrics
- Understanding Stitch Length And Tension
- Sewing Unique Fabric Seams
-
Seam Finishes
>
- Seam Finishing Techniques - Overview
- Applying A Pinked Seam Finish
- Applying A Bias Bound Seam Finish
- Serging And Zigzag Seam Finishes
- Sewing A Self-Bound Seam Finish
- Sewing A French Seam Finish
- Sewing A Hong Kong Seam Finish
- Sewing A Mock French Seam Finish
- Sewing A Turned-and-Stitched Seam Finish
- Sewing Overcast Hand-Applied Seam Finishes
- Sewing A Flat Felled Seam
- Sewing A Hairline Seam Finish
-
Hem Finishes
>
- Garment Hem Finishes: Overview
- Sewing A Double Fold Hem Finish
- Sewing A Single Fold Hem Finish
- Sewing Bound Hem Finishes
- Sewing An Exposed Double Layer Bound Hem
- Sewing A Folded-Up Bound Hem with Pre-folded Binding
- Sewing A Hong Kong Hem Finish
- Sewing A Band Hem Finish
- Sewing A Bias Faced Hem Finish
- Sewing A Twill Tape Hem Finish
- Sewing A Rolled Hem Finish
- Sewing A Shaped Hem Facing
- Using Fusible Hem Tape And Webbing
- Finishing A Lace Fabric Hem
- Finishing A Leather Hem
- Sewing Faced Hem Corners
- How To Finish Lining At The Hem
- Finishing Fabric Corners by Mitering >
- Interfacing A Hemline: Lined And Unlined Examples
-
Sewing Pockets
>
- Curved Patch Pocket With Flap
- Unlined Square Patch Pockets
- Lined Patch Pockets: Two Ways
- Extension On-Seam Pockets
- Separate On-Seam Pocket
- Front Hip Pockets
- Bound Double Welt Pocket
- Double Welt Pocket With Flap
- Self-Welt Pocket (Using Single Fabric Layer)
- Slanted Welt Pocket (Hand-Stitched)
- Faced Slash Pockets: Overview >
-
Sewing Zippers
>
- Sewing Zippers: General Information
- Sewing A Centered Zipper
- Sewing A Lapped Zipper
- Sewing An Invisible Zipper
- Sewing A Fly Front Zipper
- Sewing A Closed-End Exposed Zipper (No Seam)
- Sewing An Exposed Separating Zipper
- Sewing Hand Stitched Zipper Applications
- Sewing A Zipper Underlay
- Sewing A Placket-Enclosed Separating Zipper
- Sleeveless Finishes >
-
Neckline Finishes
>
- Sewing A Neck Shaped Facing
- Sewing An All-In-One Neck Facing
- Neck And Garment Opening Combination Facings >
- Sewing A Bias Faced Neckline Finish
- Sewing A Band Neckline Finish
- Bound Neckline Finishes: Overview >
- Sewing A Semi-Stretch Strip Band Neckline
- Ribbed Neck Band And Classic Turtleneck
- Decorative Neckline Finishes >
- Finishing Facing Edges >
-
Extras
>
- A Complete Guide on Interfacing
- Sewing Bound Spaghetti Straps
- Sewing Spaghetti Straps To A Faced Neckline
- Sewing Ruffles: Overview
- Patterning And Sewing A Circle Ruffle
- Sewing A Gathered Heading Ruffle
- Sewing Double Layer Gathered Ruffles
- Sewing A Gathered Ruffle Into A Seam
- Sewing A Gathered Ruffle To A Fabric Edge
- Sewing A Fabric Surface Slit
- Sewing A Slit Seam
- Hand-Applied Straight Stitches
- Hand-Applied Blind Stitches
- Hand-Applied Overedge Stitches
- Hand-Applied Tack Stitches
- Hand-Applied Decorative Stitches
-
Basics
>
- Custom Bridal
- Custom Apparel
- About
- Blog

 RSS Feed
Services |
Company |
|
