|
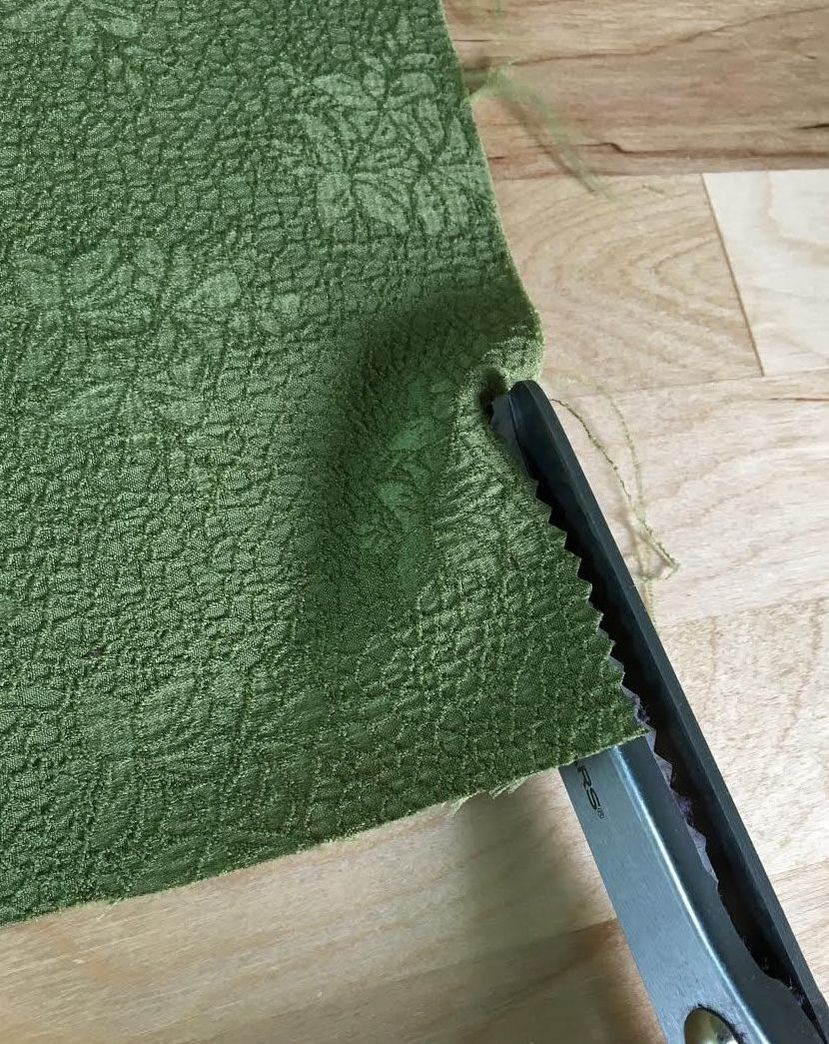
A big part of working with fabrics, whether you are sewing a clothing item or working on a craft project, is using appropriate techniques to contain fraying edges. Unless you're working with fabrics that do not fray, almost all woven fabrics will produce some sort of fraying when cut. If you are not familiar with what fraying is- it is the unraveling of threads or yarns coming undone from the rest of the fabric structure along a cut edge. Anytime you work with fabric, regardless of the project, it is important to keep the fraying contained to a minimum in order to achieve a durable, professional finish. 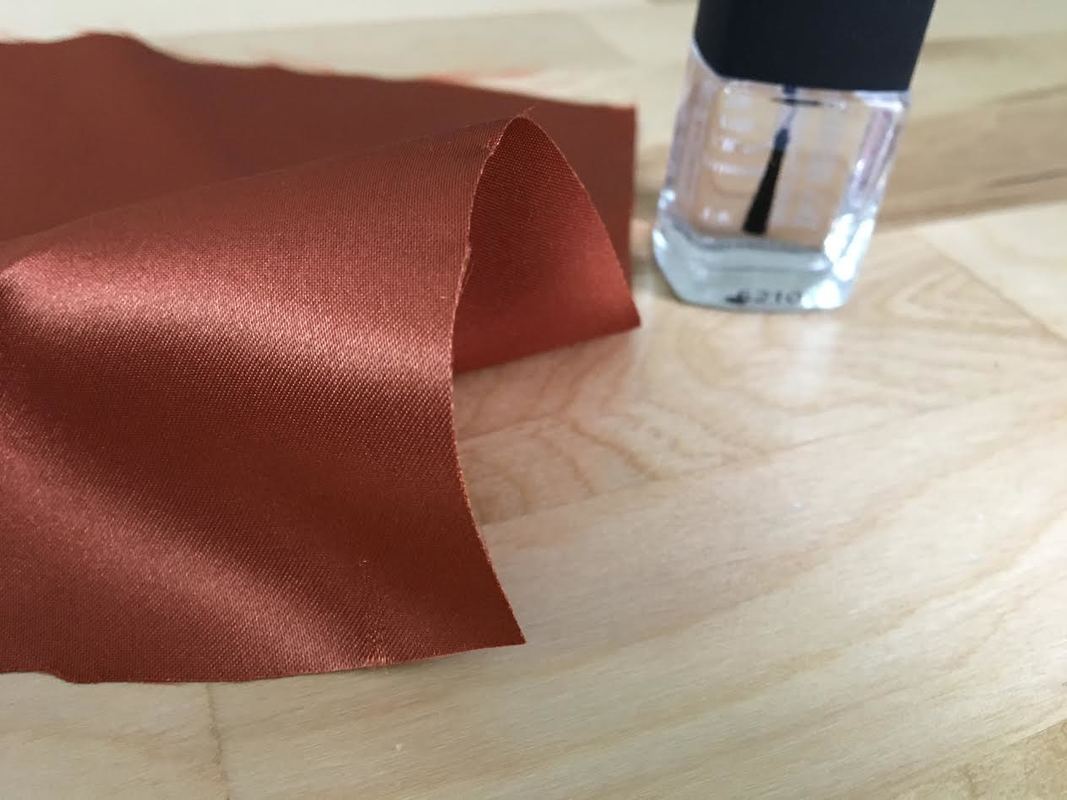 What Is A No-Sew Fabric Finish There are numerous clean finishing techniques used in dressmaking to contain fabric fraying and finish the edges of seam or hem allowance. Whether it is a serging, ziz zag (on a home sewing machine) or a conventional straight stitch, almost all of them entail the use of stitching. Using some form of stitching to prevent cut fabric edges from unraveling is truly the most effective way to ensure a long lasting, fully-functional result. By contrast, no-sew fabric edge finishes do not use a conventional stitch (whether machine or hand stitch) to contain fraying. When To Use No Sew Finishes No-sew finishing is very rarely used in dressmaking since it doesn't always result in a long term, durable finish. However, they are extremely convenient for containing unraveling edges on fabrics that are difficult to clean finish using a stitch, or fabric cording and strips that cannot otherwise take on conventional stitching as a clean finish. That being said, if you are trying to cut some corners and use no-sew finishes on the seam allowance or hem of a clothing item, we recommend taking a very close look at the long term care and wear of the garment at hand. You may be able to get away with it for a one-time wear item or one that will not be washed in a regular washing machine. These are important factors to consider when deciding whether to use a no-sew finish and if so, what technique should be used based on the fabric and design at hand. While no-sew clean finishing techniques may not always be appropriate for apparel construction, they are an incredible tool for crafts and home decor projects, especially if you do not have a sewing machine or serger. Any time you need to prevent fabric edges from fraying, consider the 4 no-sew techniques listed below as they may save you lots of time and headache in the sewing/crafting process. Option 1: Using Nail Polish To Seal Fraying Edges Of Thin Fabrics Using nail polish to contain fraying fabric edges is an easy, effective and quite inexpensive technique. It works best when used with thin, lightweight fabrics. As you'll see below, a thin layer of nail polish is applied along the fabric's cut edge. Once the nail polish dries, the unraveling threads are sealed and locked in place. Keep in mind however, that the nail polish technique does not work on all fabrics. A thick, highly textured textile will not withstand the nail polish application and the fraying may persist. A rule of thumb is to only use nail polish on thin, densely woven fabrics that are lightweight. 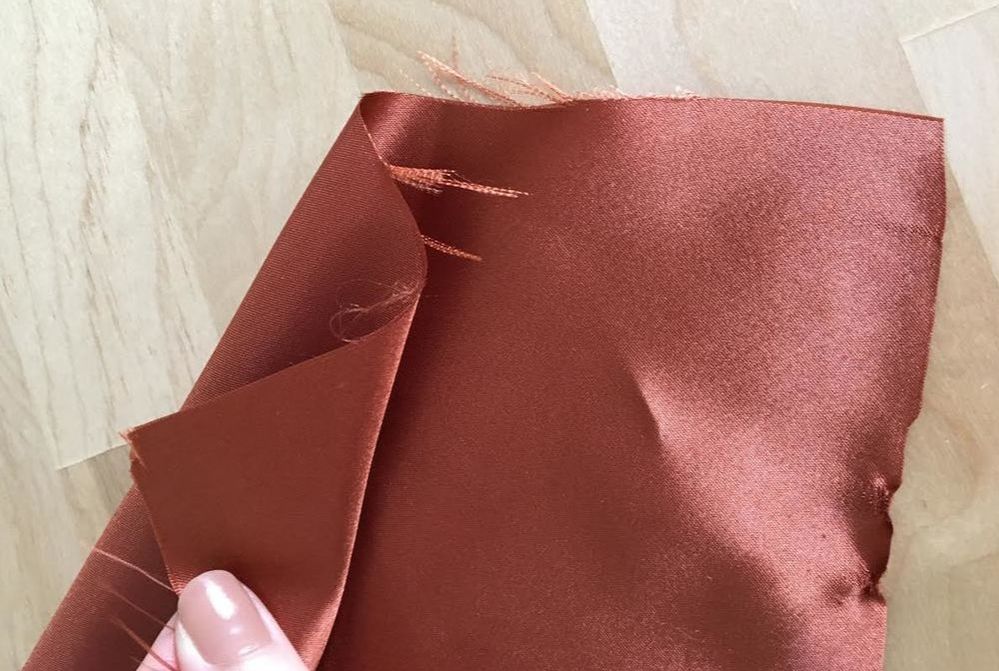 The densely woven poly satin fabric shown above has some extensive fraying along its cut edges. This satin textile is thin and dense enough to take on the nail polish technique efficiently. 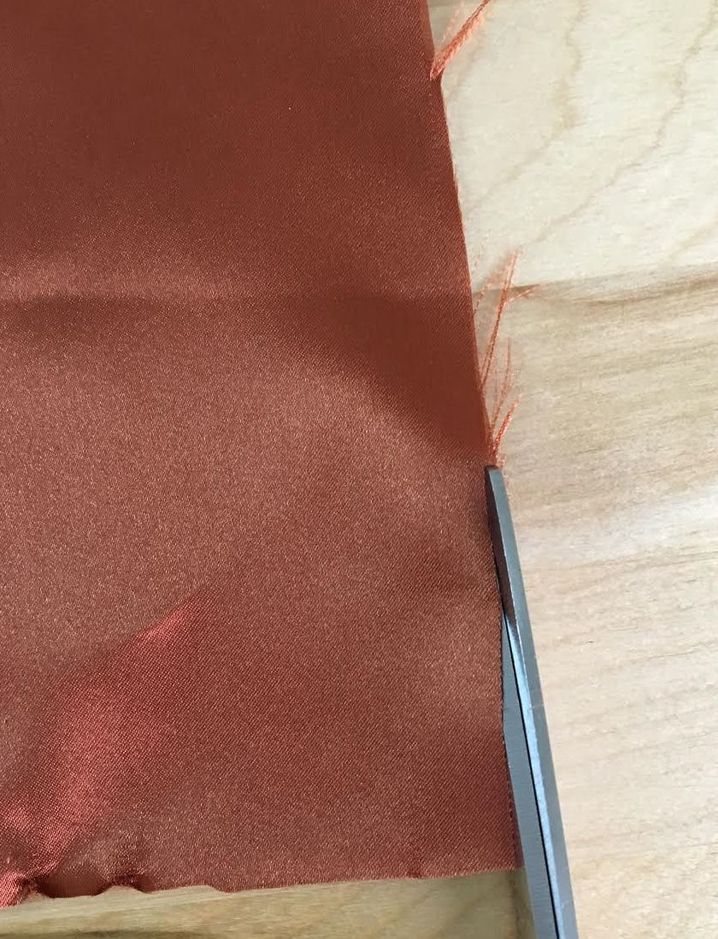 1. It is recommended that before applying the coat of nail polish, the edge is trimmed to remove some of the hanging threads. This will give you a clean edge to work with avoiding some of the mess potentially caused by coating the loose threads with nail polish. All you have to do is cut very close to the edge to smooth it out, thus removing any excess fraying. 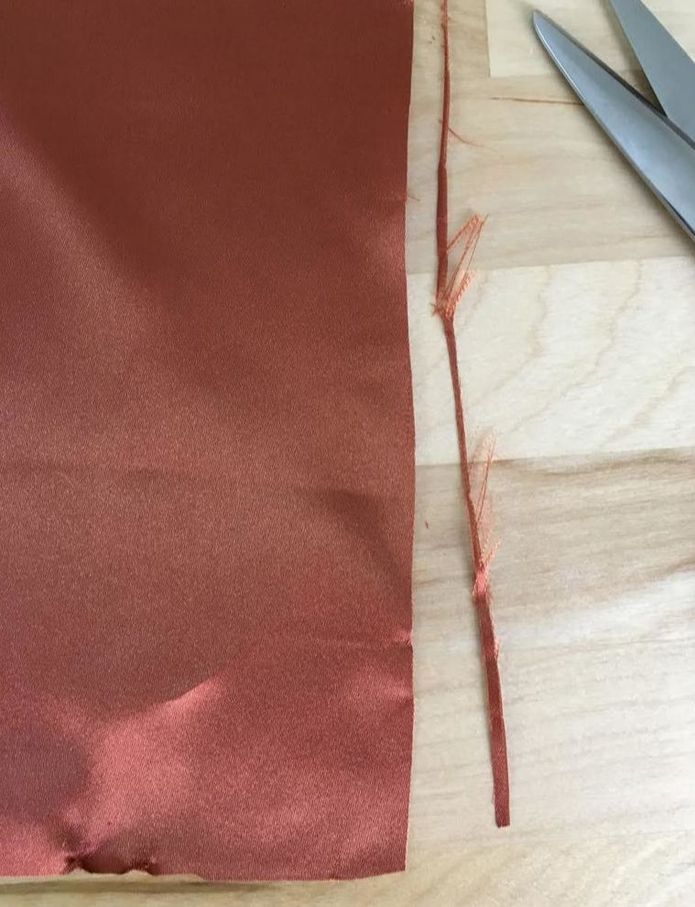 Once trimmed, you have a clean straight edge to work with. Try not to handle this cut edge too much until the nail polish is applied. You want to prevent additional fraying and maintain the smooth edge as much as you can until the nail polish coat is set in. 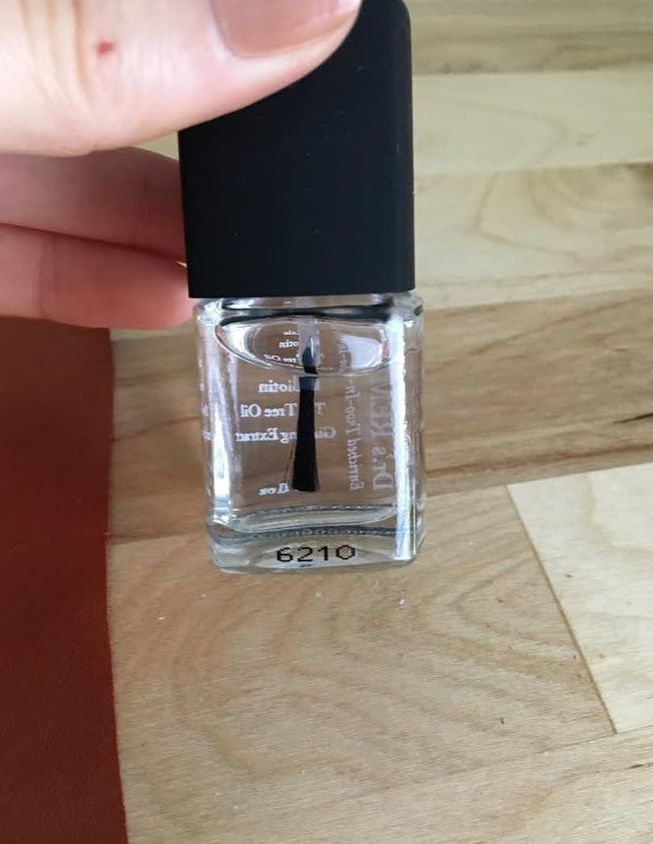 In this tutorial, we're using a conventional clear nail polish. Any color nail polish will basically give you the same results. If you want to match the color of the nail polish to that of the fabric, you may achieve a finish that blends into the edge and is less noticeable. It is really up to you what brand of nail polish or what color you choose. 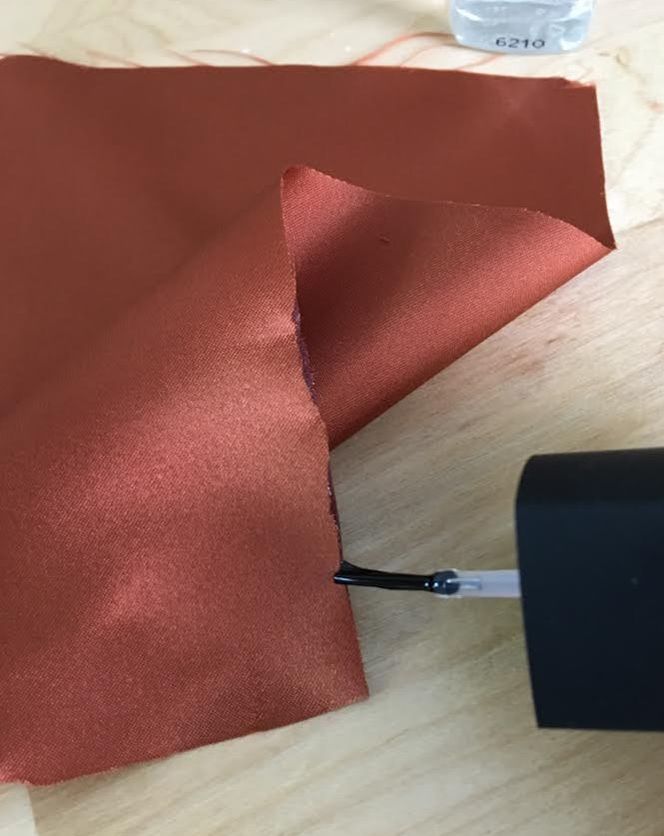 2. Carefully run the brush over the fabric's edge making sure to apply the nail polish just to the very edge. Apply it in multiple strokes and make sure not to load the brush too much or you risk accidentally staining the fabric surface (or your work table!) . 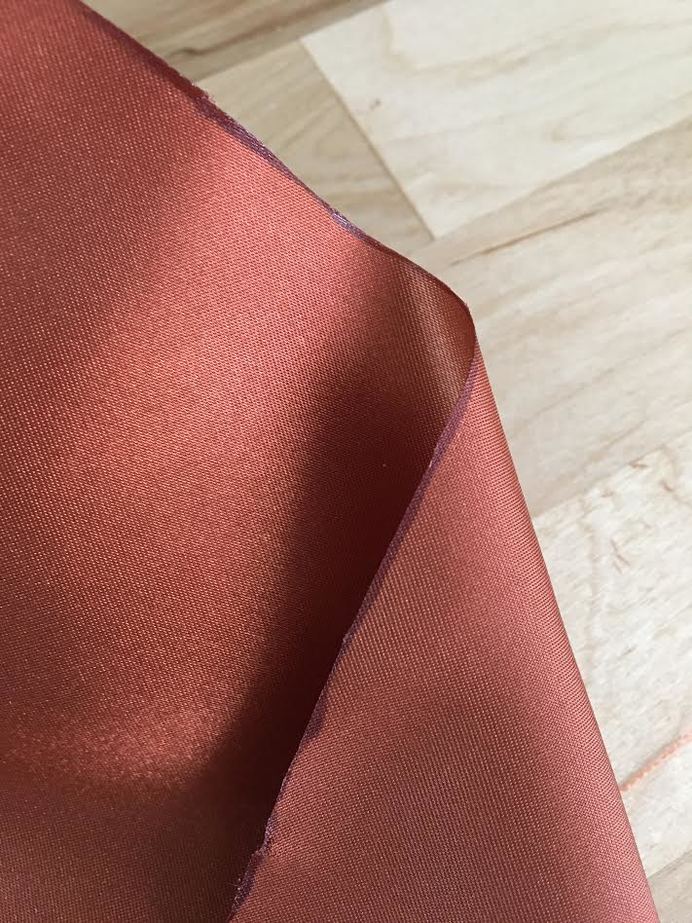 3. After the application, let the nail polish dry for about 5-10 minutes before using the fabric. Allowing the nail polish to dry completely will ensure that the threads are sealed all the way. 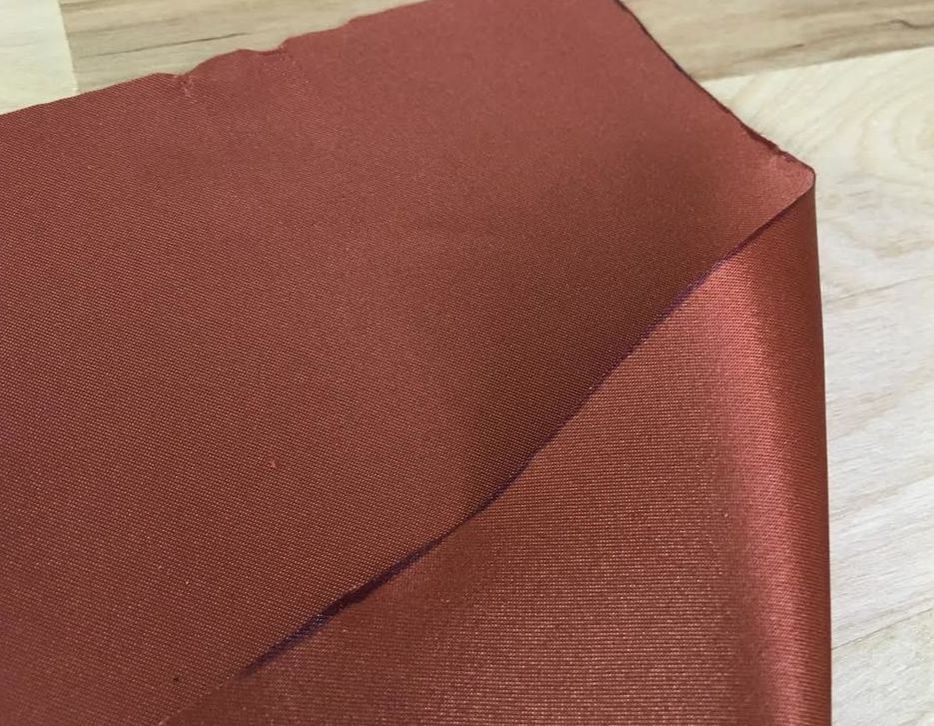 Once the nail polish is fully dry, test the fabric's edge to make sure it does not continue to fray anywhere. If fraying persist in some spots, apply a bit more nail polish at those areas and allow the nail polish to dry again before finally using the fabric. You'll find that if used properly, this convenient no-sew technique is highly effective and long lasting. Option 2: Stop Fraying By Burning Synthetic (Only) Fabric Edges Before getting started on the burning technique, it is very important that you keep these 3 important precautions in mind: 1. Burning the edges to contain fraying should only be done on fabrics you know 100% are synthetic. Synthetic textiles, like polyester and nylon, are made of the same polymer that plastic is made from . This means that as opposed to burning, they will melt similar to plastic. If unsure whether your fabric is 100% synthetic, test a scrap over the sink (or a fire proof surface) and make sure it melts and not actually burn. If you find that the fabric burns as opposed to melt, this means it is either a natural-synthetic blend or 100% natural. Cotton, silk, bamboo, rayon (viscose), wool are all natural fiber contents that will cause the fabric to burn. For textiles consisting of these natural combinations, the no-sew burning technique will not work. 2. Do not use this technique on lengthier fabric edges. It should only be used on very short fabric edges (ideally not longer than 1") such as cording edges, binding ends, or the ends of thin fabric strips. 3. Last but not least, always work over the sink or other flame-proof surfaces when sealing fabrics with an open flame. It is also extremely important that if you've never applied this finish before, you test a scrap piece of the original fabric first, before working on the final project. 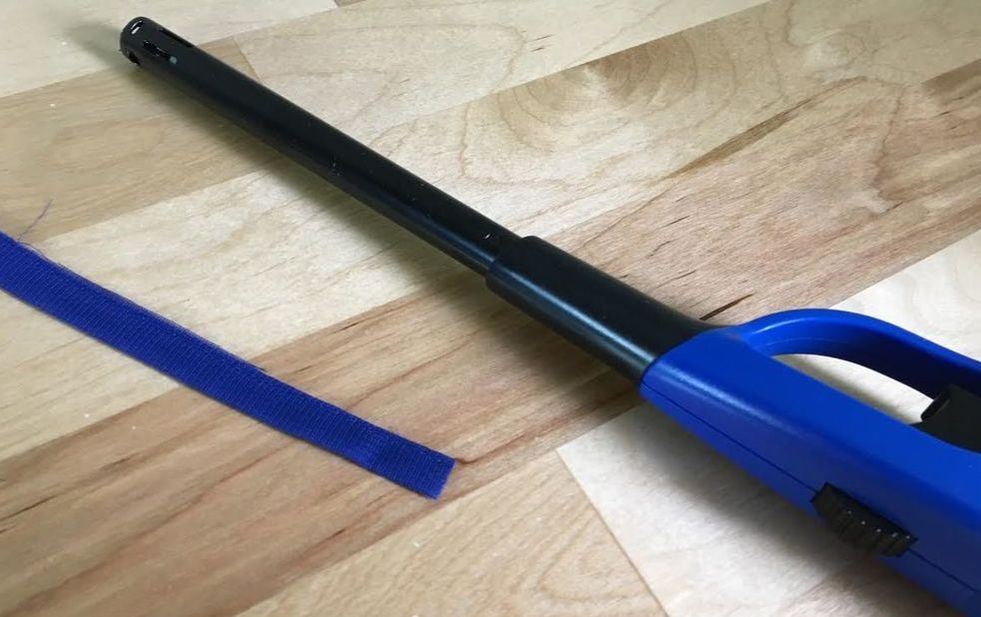 In the steps to follow, we'll seal the fraying ends of a thin fabric strip using the no sew burning technique. To stay in the safe zone, use an all purpose lighter as opposed to matches or other difficult-to-control fire sources. 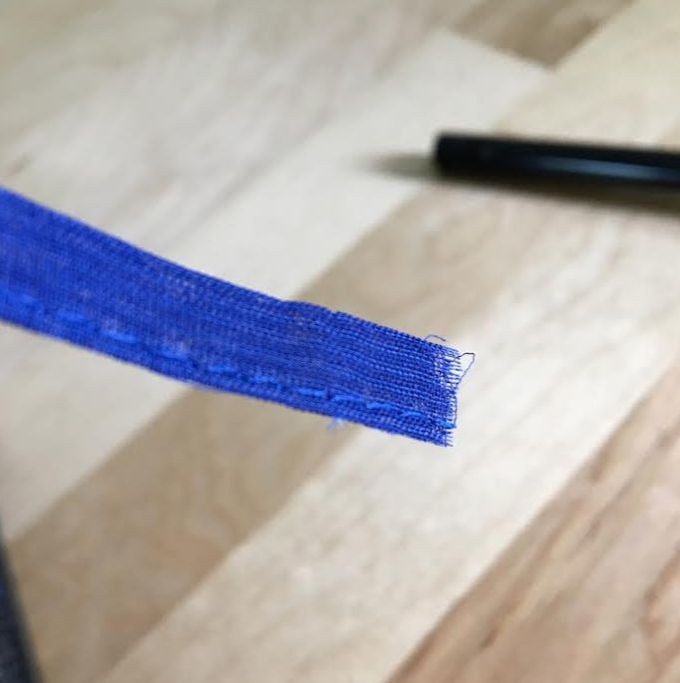 Shown above- the end of the fabric strip is fraying extensively, causing the threads to unravel. 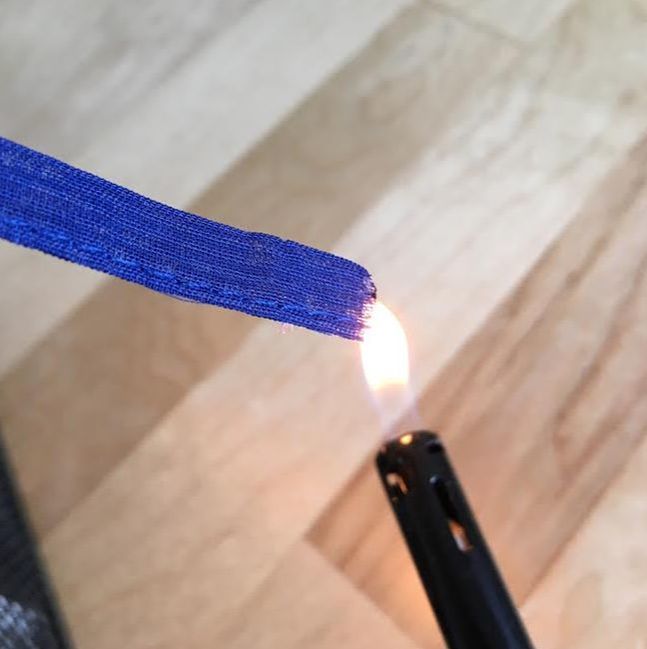 Holding the fabric strip with one hand, light the lighter with the other and run the fabric edge through the flame no longer than 1 second. You'll find that synthetic fabric edges will melt very fast, so just a split second of flame exposure is usually enough to give you an effective result. Remember, all you are trying to do is seal the unraveling edge while burning as little of the fabric strip as possible. 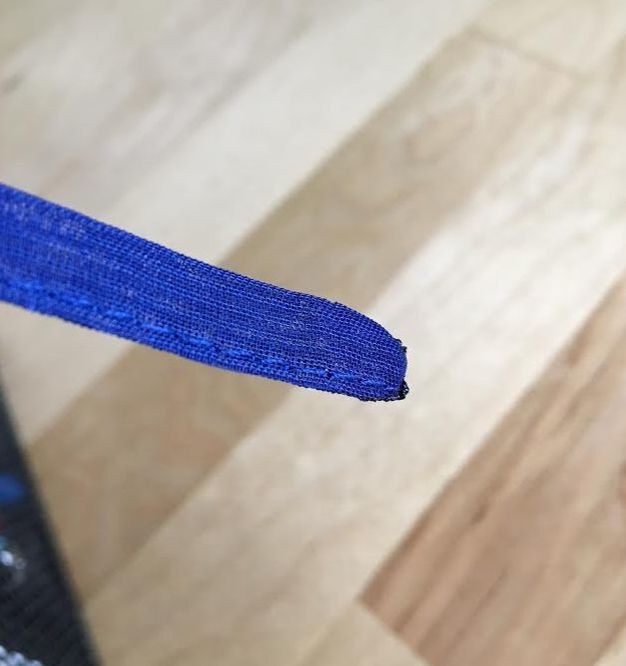 The melted edge forms a hard plastic-like coating which prevents further fraying. If you leave the fabric strip over the flame for too long, this plastic bubbly buildup will become very pronounced and bulky. If you can afford to loose some of the length, you can always re-cut the end to remove the bulky melted part and run it over the flame again for just a split second to re-seal the unraveling edge. Option 3: Using Fabric Pinking Sheers To Contain Fraying Every crafter and dressmaker, whether a beginner or more advanced, is familiar with the magic of the pinking sheers. Using pinking sheers to prevent fabric edges from fraying is a great technique both functionally and aesthetically. Leaving perfectly zig zaged edges, a good pair of pinking sheers is a must have tool for a variety of crafts as well as some apparel applications. Although it stops the fraying on most fabrics, the pinking no-sew technique is not always recommended for sewing apparel since it doesn't necessarily withstand long term wear and care. However, if you are sewing a garment for one time use, or perhaps a clothing item that will not be washed in a conventional washing machine, you can get away with using pinking sheers as a clean finishing technique. 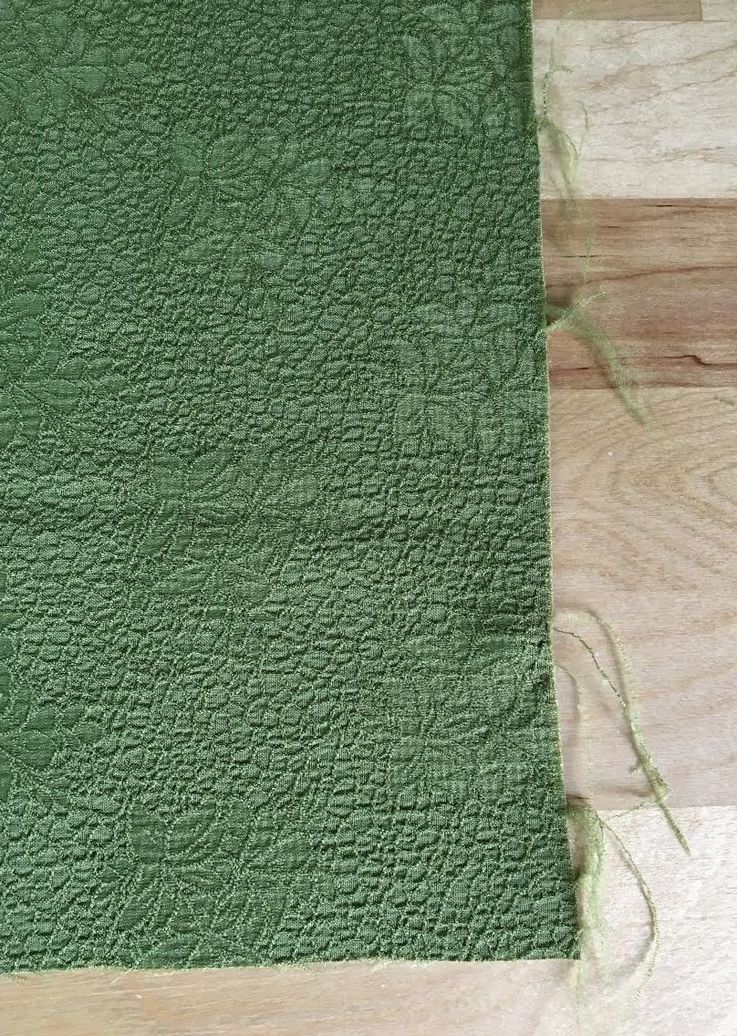 As opposed to the nail polish and burning no-sew methods described above, pinking fraying edges can be done on almost all types of fabrics across longer lengths. It is fast, easy and fairly effective technique. In this tutorial, a more textured medium weight fabric is used. As shown in the image above, the cut edge frays quite a bit causing the threads to unravel extensively. 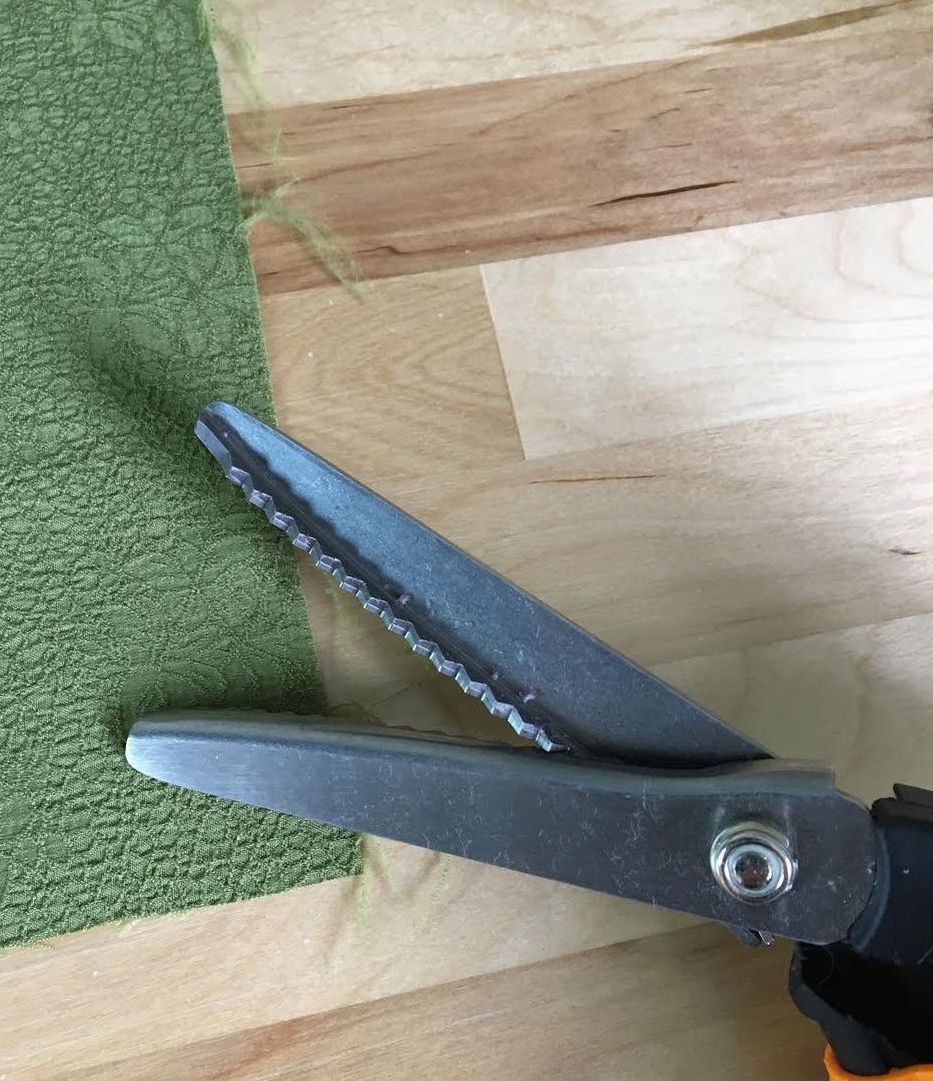 You may need to experiment with a few pinking sheer brands and styles before settling on one that you really like. The heavier duty ones (usually a bit more pricey) tend to last longer and provide a smoother finish. There is definitely a trial and error associated with choosing pinking sheers- you'll find that some of them may not work as well on certain fabrics, especially after extended use. You may also experience some issues using pinking sheers on densely woven satin fabrics (high sheen), some chiffon fabrics, or very textured boucle fabrics that fray a lot.
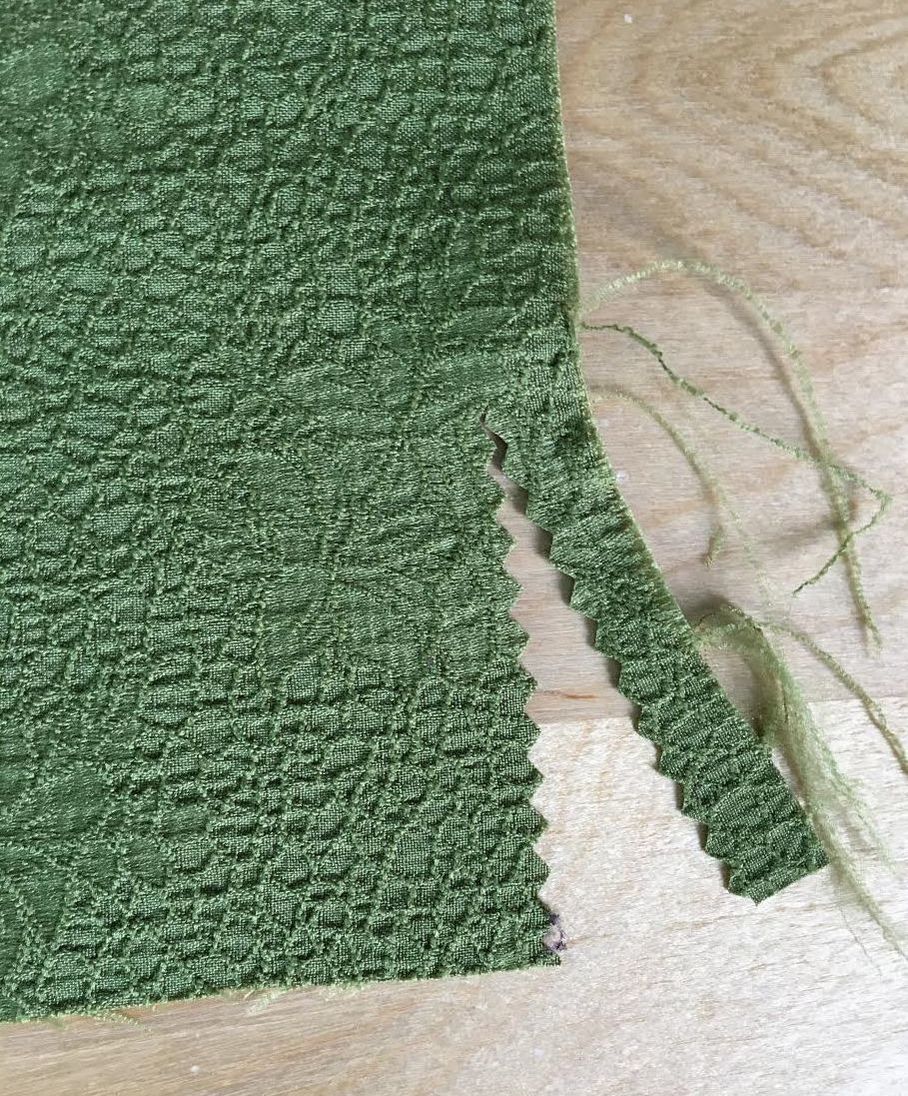
To apply the pinking, use your pinking sheers to cut straight along the fabric edge. Make sure to stay close to the actual edge but not so close that you blend in with the unraveling threads. You should see a smooth, crisp zig zag cut along the newly cut edge as shown in the image above. 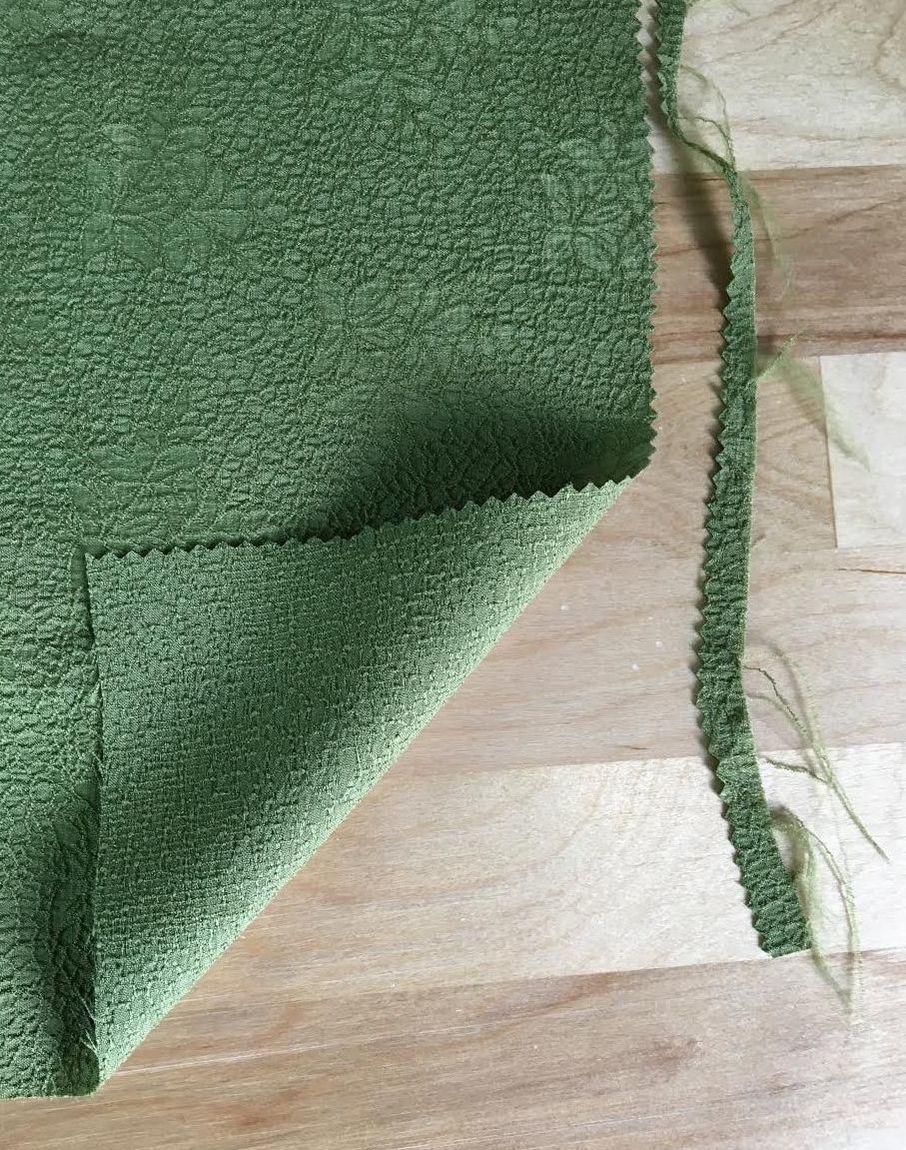 Continue cutting with your pinking sheers following the edge of the fabric as a guide. It may feel a bit uncomfortable switching from one cut to the other as you'll feel very tempted to align the zig zag pattern perfectly as you cut. This is not bad practice if you want to archive an even zig zag pattern (especially when using pinking for aesthetic purposes). However, if you are pinking the edge of a longer fabric piece, it is OK if the zig zag pattern is not perfectly even at the transition points between cuts- this should not effect the pinking's anti-fraying capabilities. So how exactly does this zig zag cut prevent fraying? Well, the nature of the vertically aligned V shapes form threads of graduating sizes that basically block on another from unraveling. So at the smallest point of the V, the length of the threads are very small and as they move in towards the V's wider part, they become longer- this composition prevents the woven threads from loosening up and unraveling further. Option 4: Using Adhesive Iron-On Hem Tape To Clean Finish Fabric Raw Edges Adhesive or fusible iron-on hem tape is an effective edge finishing techniques for projects where the fabric edge is enclosed within a fold. This technique entails that you give yourself enough length at the fabric's edges to be able to actually fold it in, so keep in mind that enough fabric allowance should be allocated for this no-sew technique. Fusible iron-on hem tape is sometimes used in apparel as a quick hem finishing solution. The tape itself is enclosed within the fabric layers, then a hot iron is applied to melt the hem tape glue and bond the fabric layers together. That being said, keep in mind that fusible hem tape is not suitable for all fabric types and all designs. Once the heat from the iron is applied, the melted fusible glue may show through the fabric on the face of the garment, especially when working with less textured, shinny fabrics. In addition, sheer or semi sheer fabrics do not work well with iron-on hem tape as the glue particles will often bleed through the fabric surface. Another important aspect to consider is that fusible hem tape can add some stiffness to the finished fabric edge. This means that if you are sewing a garment that has a flowey drape, fusible hem tape may hinder the fluid drape and flexibility in the final application. It is always good practice to test a portion of the fabric you are working with prior to sewing the clothing item. So when should fusible/adhesive hem tape be used? In apparel, use it when finishing structured edges or the hem of more tailored, structured garment that will not be affected by the added stiffness. However, if at all possible, try to avoid using fusible hem tape when sewing clothing altogether as it may come undone or lose its structure over long term washing cycles. On the other hand, iron-on fusible hem tape is a perfect addition to craft and home decor projects, providing a clean and effective tool for folding and bonding fabric layers together. 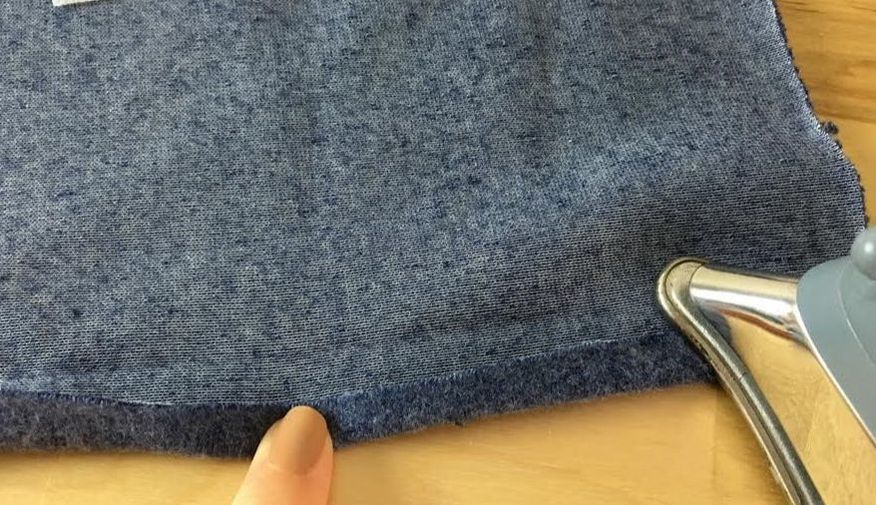 1. To use fusible iron-on hem tape on a conventional double folded edge finish you should first, pre-fold and iron the fabric edge once. Make sure to fold the edge in towards the wrong side of the fabric as shown above. Pre-folding and ironing edges in advance provides some easy to follow guideline that facilitate the construction steps to follow. 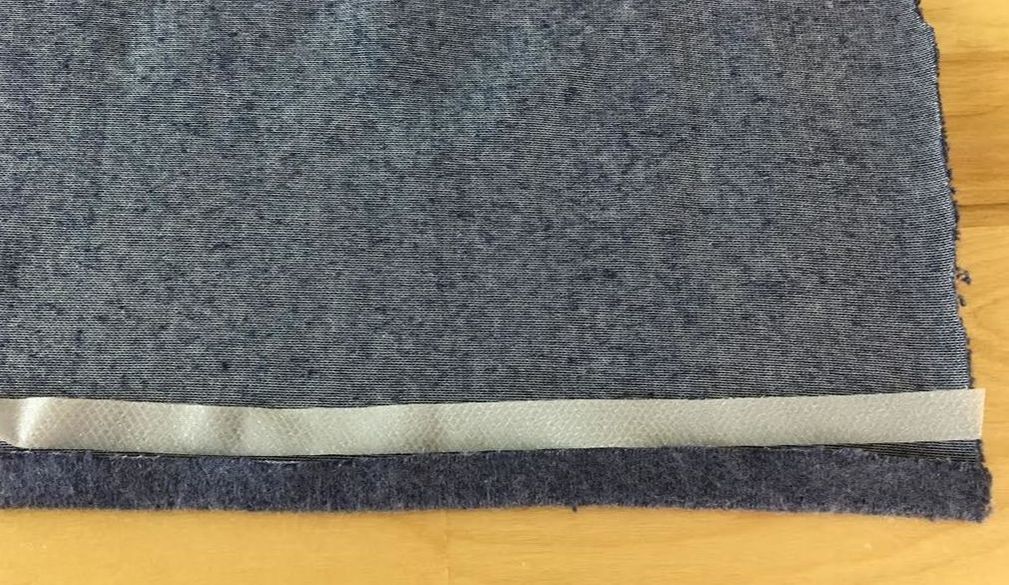 2. Once the first fold is set, align the iron-on hem tape with the fabric's edge as shown above. As far as what iron-on fusible hem tape you should use, this really depends on the size of the fold and the fabric you are working with. Thicker, more textured fabrics may require a larger width hem tape with increased bonding capabilities. Vise versa, a thinner, shorter width hem tape will be more appropriate for light to medium weight fabrics. If unsure, always read the package label and make your choice according to your fabric and sewing project at hand. 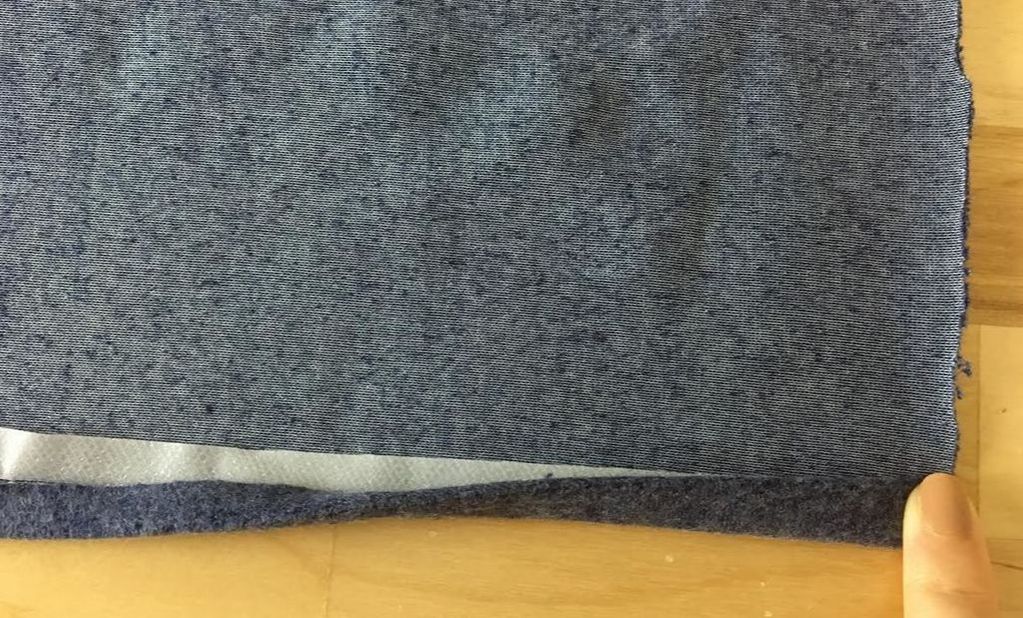 3. Fold once more to enclose the fusible hem tape and the fabric edge on the inside. Keep in mind that you should not be able to see the fusible tape at all- it should remain hidden between the folded fabric layers. 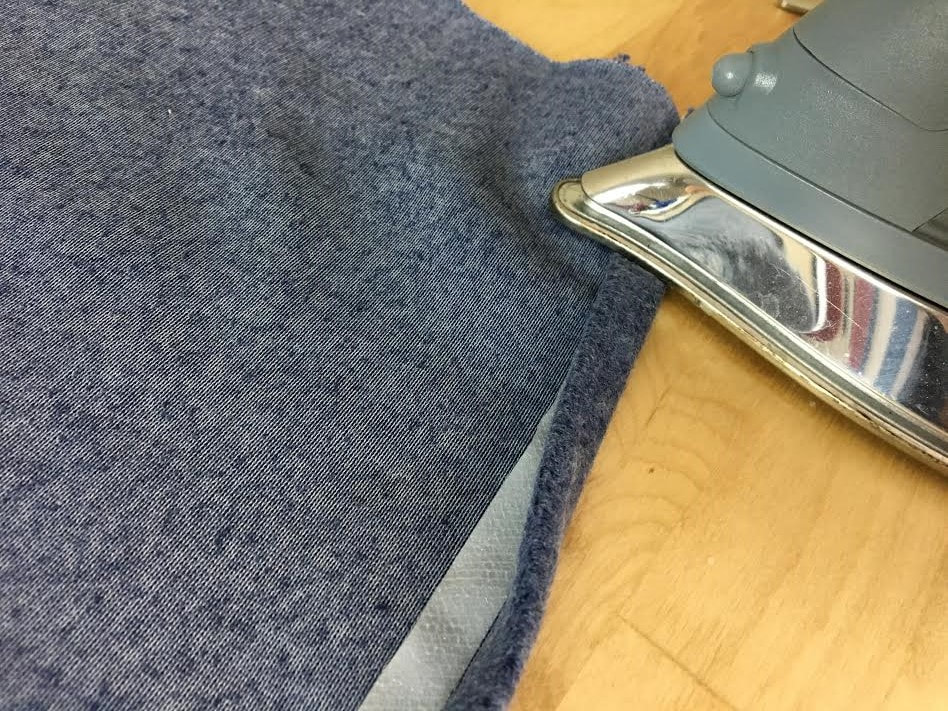 4. To bond the layers of the fold together, iron on top of the folded fabric edge as shown above. The glue particles in fusible hem tape will melt and permanently adhere the fabric layers together. As far as ironing power, use the highest heat that your fabric allows for. 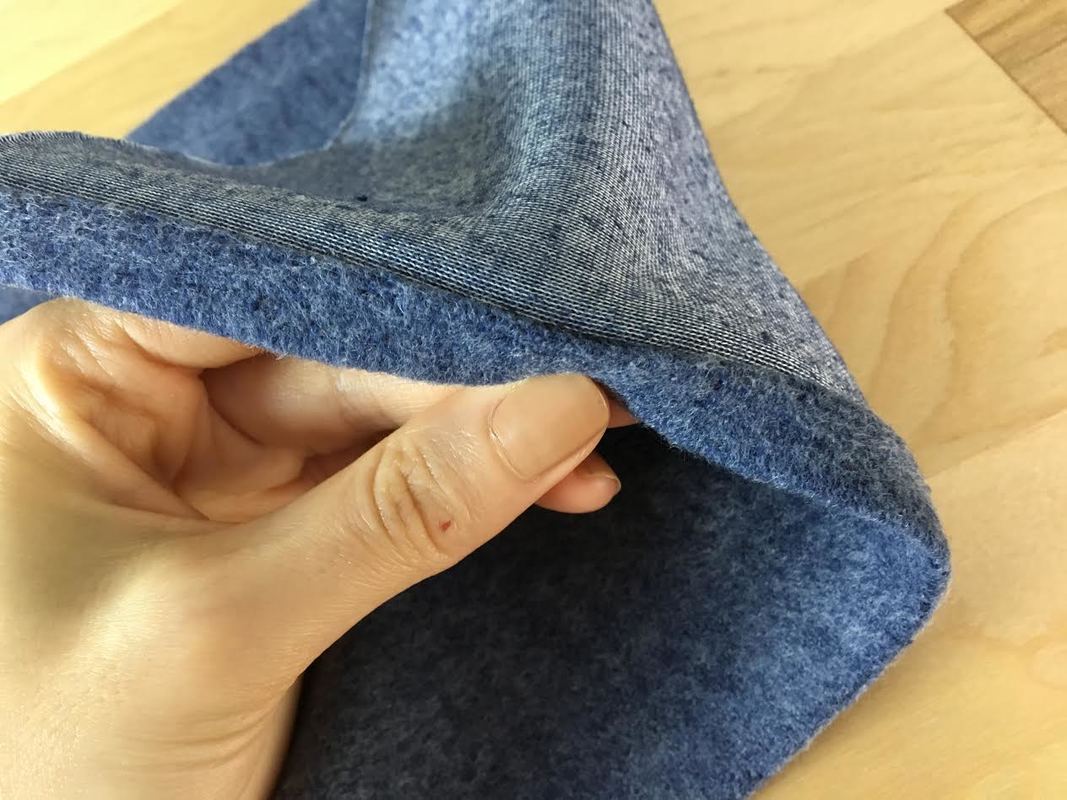 Once the hem tape is applied, the fold should be permanently glued in place and the hem tape itself should not be visible along any portion of the folded edge. If some areas appear to be weaker and not fully bonded, iron them again ensuring that the second time around, enough heat is applied to completely melt the hem tape's fusible glue particles.  Fabrics that take on fusible hem tape best are those that are thicker and more textured in nature. Textiles that have a rougher, textured surface hide the bleed-through from the hem tape while also working well with the tape's bonding glue. 
9 Comments
Mary
12/7/2019 11:40:48 pm
I plan on redoing my coat's faux leather strip lining (that is now cracked and scratchy on the skin) from the collar, following down along the zipper, to the hem. Instead of sewing the lining I have been toying with the idea of first measuring the area, cutting a piece, using a spray bond to prep it, then after securing it from shifting, ironing it onto the cracked faux leather lining. Do you think this might work? 12/9/2019 06:11:58 am
Hi Mary! Great question. I like your idea of spray bonding the faux leather; however, I suggest no ironing as this will melt the faux leather. What I suggest doing instead is finding the best spray adhesive for the faux leather surface and after carefully cutting the new strip and aligning it to the worn out area with this spray bond, apply pressure with a flat surface (like a heavy book) to bond over night. Hope this works!
Karen Leaderer
3/29/2021 09:29:31 am
I would like to shorten/ or reduce the width of many long scarves. Some are cotton and some are rayon, and others are not labled.
Suzanne
7/10/2021 05:44:59 am
Easiest way is to check if scarf has a hem already. If not then check if edges are rough and course indicating fabric was heat sealed using heat or such as No Fray solution. 7/29/2021 08:12:15 pm
This is one of the best tutorials I have seen in a while. It is super informative, well written, and accompanied with great photos-thank you! I want to "upcycle" a silk blouse I bought at a thirft store by turning the sleeves into fringe. I want to cut the existing sleeves into thin strips, but am not sure what to do to prevent them from fraying extensivley ,especially after washing. Do you have any recommendations as to what to use? I can see that burning is not a good option becasue it is not synthetic, but the strips will be too thin to use hem tape. That leaves nail polish or pinking shears. Unless you have other suggestions? I think sewing each strip will be tedious work, so I'm hoping to avoid that. Thanks in advance for any suggestions!
Cely
8/30/2021 07:20:18 pm
Would the nail polish work on lace? I'm looking to buy lace curtains online and don't want them to hem the edges as they charge for it.
I needed some general fabric information.. Your site, this page specifically was perfect. Really well documented and complete. Very impressed. Good job. 100 points awarded :) 9/22/2022 09:30:38 pm
It is an excellent technique everyone should get if they are in sewing. Can you tell me something about bamboo fabric sewing?
Nelly van den Boogaard
11/23/2023 02:47:53 am
Ik ben een Quiltster,en doe veel appliceren Leave a Reply. |
The Blog:A journey into our design process, sewing tutorials, fashion tips, and all the inspiring people and things we love. 
Doina AlexeiDesigner by trade and dressmaker at heart. I spend most of my days obsessing over new fabrics and daydreaming new ideas. 
Sadie
Executive Assistant & Client Relations Manager Archives
November 2019
Categories
All

|

-
Sewing Tutorials
-
Basics
>
- Aligning Pattern Grainlines To Fabric
- Preparing Fabrics For Sewing
- Pinning Sewing Patterns To Fabric
- Placing Sewing Patterns On Fabric For Cutting
- Rotary Cutters or Fabric Scissors?
- Cutting The Sewing Patterns
- What Are Notches And How To Use Them In The Sewing Process
- Transferring Notches From Pattern To Fabric
- Transferring Seamlines to Fabric
- Staystitching
- Backstitching: A Complete Guide
- Hand Basting: A Complete Guide
- Sewing Continuous Bias Binding
- Darts >
-
Sewing Seams
>
- The Basics Of Seams And Seam Allowance
- How To Sew A Straight Seam
- Sewing Curved Seams
- Sewing Corner Seams
- Trimming And Grading Seam Excess
- Notching/Clipping Seam Allowance for Tension Release
- Sewing Topstitched Seams
- Sewing Corded Seams
- Sewing A Slot Seam
- Sewing A Gathered Seam
- Sewing Bias Seams
- Sewing Seams With Ease
- Sewing Seams With Crossing Seamlines
- Sewing Unlike Fabric Seams
- How To Iron Seams: Ironing Tools And Conventions
- Sewing With Knit Fabrics
- Understanding Stitch Length And Tension
- Sewing Unique Fabric Seams
-
Seam Finishes
>
- Seam Finishing Techniques - Overview
- Applying A Pinked Seam Finish
- Applying A Bias Bound Seam Finish
- Serging And Zigzag Seam Finishes
- Sewing A Self-Bound Seam Finish
- Sewing A French Seam Finish
- Sewing A Hong Kong Seam Finish
- Sewing A Mock French Seam Finish
- Sewing A Turned-and-Stitched Seam Finish
- Sewing Overcast Hand-Applied Seam Finishes
- Sewing A Flat Felled Seam
- Sewing A Hairline Seam Finish
-
Hem Finishes
>
- Garment Hem Finishes: Overview
- Sewing A Double Fold Hem Finish
- Sewing A Single Fold Hem Finish
- Sewing Bound Hem Finishes
- Sewing An Exposed Double Layer Bound Hem
- Sewing A Folded-Up Bound Hem with Pre-folded Binding
- Sewing A Hong Kong Hem Finish
- Sewing A Band Hem Finish
- Sewing A Bias Faced Hem Finish
- Sewing A Twill Tape Hem Finish
- Sewing A Rolled Hem Finish
- Sewing A Shaped Hem Facing
- Using Fusible Hem Tape And Webbing
- Finishing A Lace Fabric Hem
- Finishing A Leather Hem
- Sewing Faced Hem Corners
- How To Finish Lining At The Hem
- Finishing Fabric Corners by Mitering >
- Interfacing A Hemline: Lined And Unlined Examples
-
Sewing Pockets
>
- Curved Patch Pocket With Flap
- Unlined Square Patch Pockets
- Lined Patch Pockets: Two Ways
- Extension On-Seam Pockets
- Separate On-Seam Pocket
- Front Hip Pockets
- Bound Double Welt Pocket
- Double Welt Pocket With Flap
- Self-Welt Pocket (Using Single Fabric Layer)
- Slanted Welt Pocket (Hand-Stitched)
- Faced Slash Pockets: Overview >
-
Sewing Zippers
>
- Sewing Zippers: General Information
- Sewing A Centered Zipper
- Sewing A Lapped Zipper
- Sewing An Invisible Zipper
- Sewing A Fly Front Zipper
- Sewing A Closed-End Exposed Zipper (No Seam)
- Sewing An Exposed Separating Zipper
- Sewing Hand Stitched Zipper Applications
- Sewing A Zipper Underlay
- Sewing A Placket-Enclosed Separating Zipper
- Sleeveless Finishes >
-
Neckline Finishes
>
- Sewing A Neck Shaped Facing
- Sewing An All-In-One Neck Facing
- Neck And Garment Opening Combination Facings >
- Sewing A Bias Faced Neckline Finish
- Sewing A Band Neckline Finish
- Bound Neckline Finishes: Overview >
- Sewing A Semi-Stretch Strip Band Neckline
- Ribbed Neck Band And Classic Turtleneck
- Decorative Neckline Finishes >
- Finishing Facing Edges >
-
Extras
>
- A Complete Guide on Interfacing
- Sewing Bound Spaghetti Straps
- Sewing Spaghetti Straps To A Faced Neckline
- Sewing Ruffles: Overview
- Patterning And Sewing A Circle Ruffle
- Sewing A Gathered Heading Ruffle
- Sewing Double Layer Gathered Ruffles
- Sewing A Gathered Ruffle Into A Seam
- Sewing A Gathered Ruffle To A Fabric Edge
- Sewing A Fabric Surface Slit
- Sewing A Slit Seam
- Hand-Applied Straight Stitches
- Hand-Applied Blind Stitches
- Hand-Applied Overedge Stitches
- Hand-Applied Tack Stitches
- Hand-Applied Decorative Stitches
-
Basics
>
- Custom Bridal
- Custom Apparel
- About
- Blog
 RSS Feed
Services |
Company |
|
