|
When it comes to clothing, whether it is women's or menswear, we've all experienced fit issues and size discrepancies at one point or another. For women in particular, these fit issues are a bit more common and complex due the uniqueness of the shapes and curves we all share. The most common of these fit problems often occur at the bust area where some clothing items may often feel too tight or vise versa, unnaturally large. In this week's tutorial we'll address the latter with a tutorial on how to tighten a sleeveless garment at the sides thus decreasing its size at the bust area. The example below addresses how to tighten a blouse under each armhole area while keeping the bottom of the blouse intact. This sort of alteration is common when you want to achieve an individualized proportion not offered by the garment at hand. How To Measure The Side Seam Excess That Needs To Be RemovedTo start with, you'll have to find approximately how much you'd like to take the garment in on the sides.
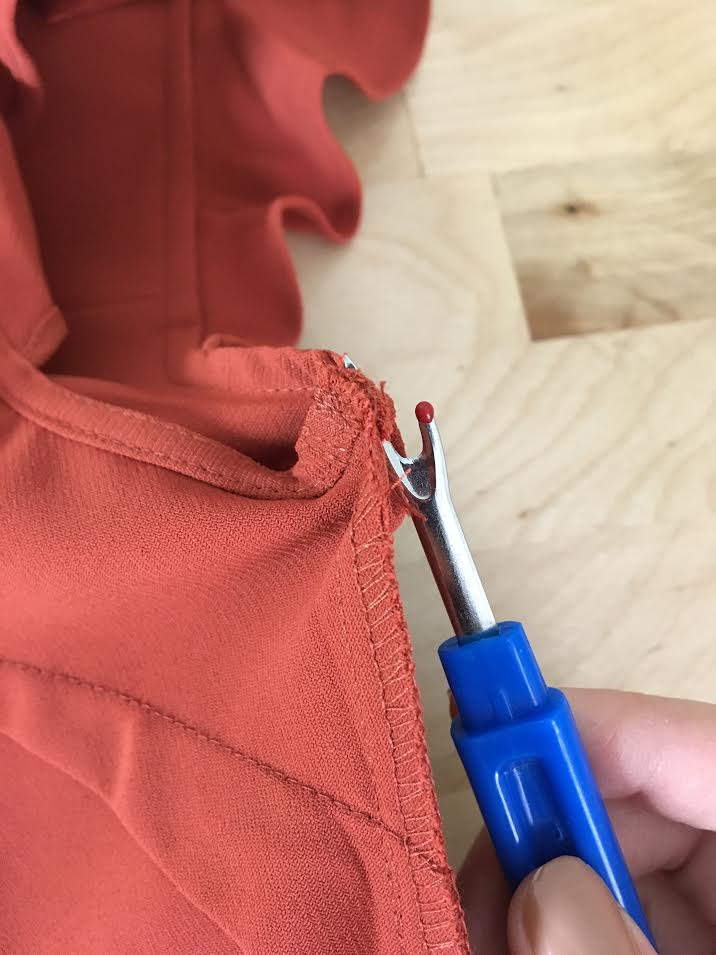
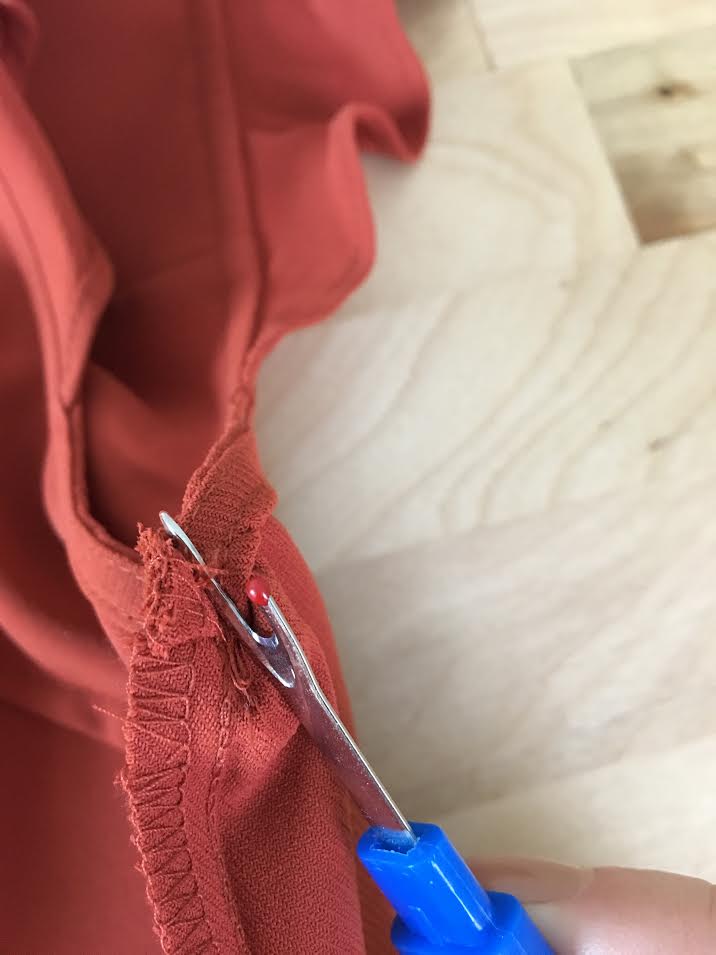
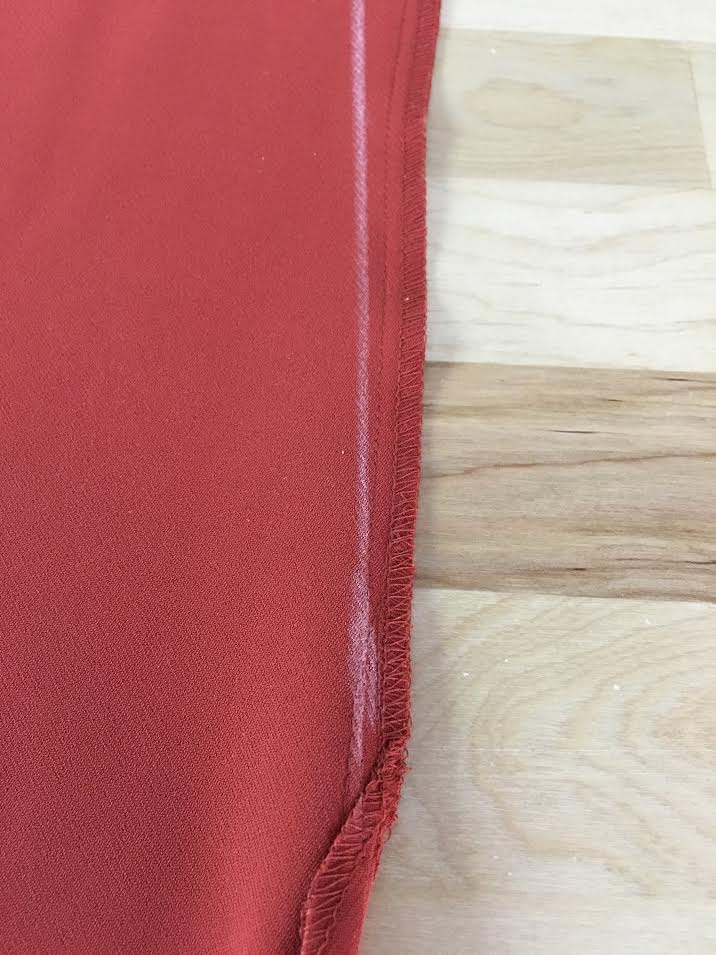
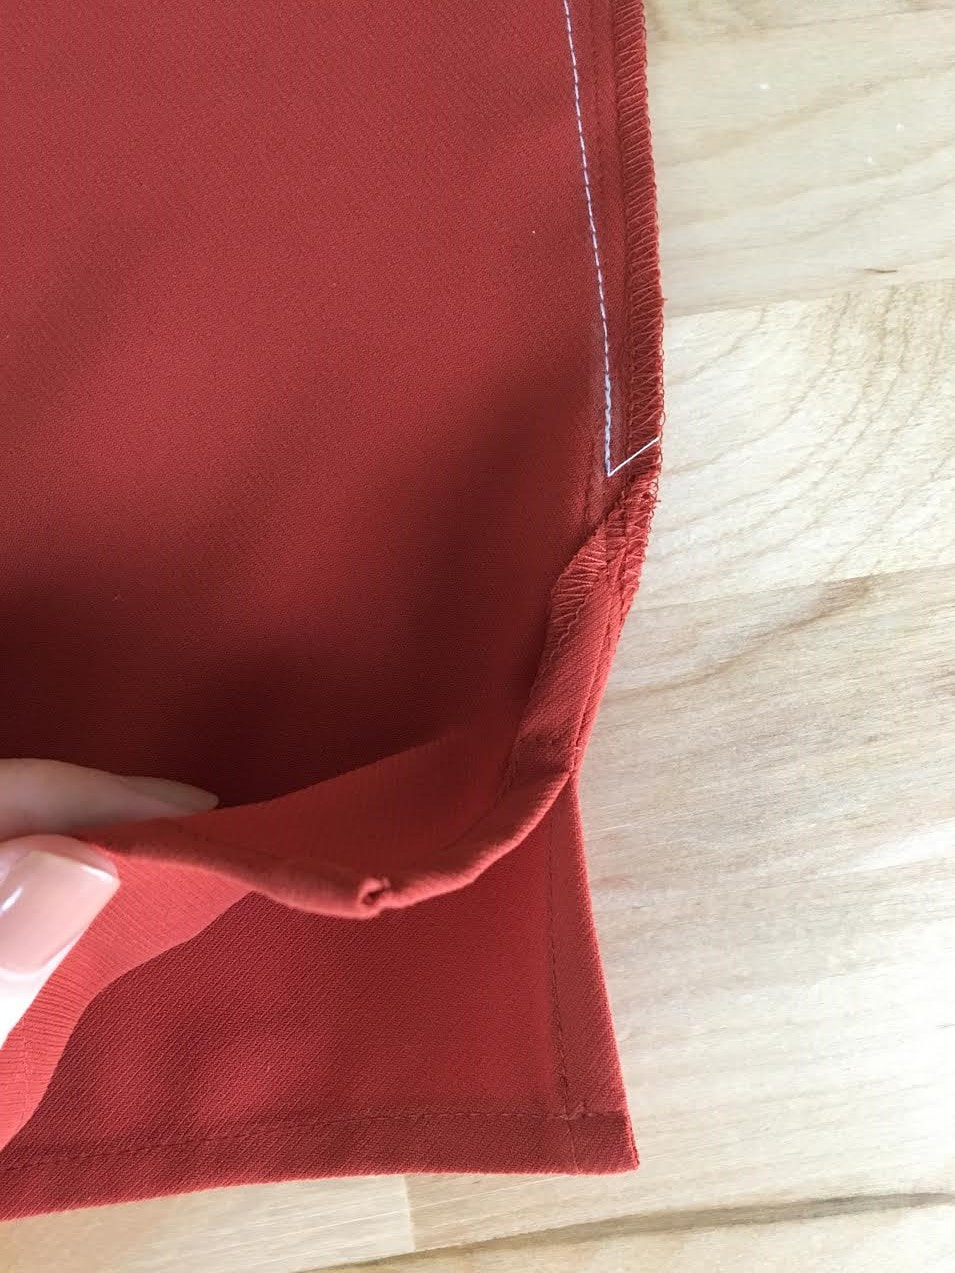
How To Alter The Side Seams To Make A Blouse (Or Dress) Smaller So let's say you have a blouse or dress that is a bit loose around the bust area (under the armhole) yet the waist and hip area fit just fine. There is actually an easy way to tighten the underarm area on both sides using a stitch blending techniques that wont affect the bottom fit of the garment. Keep in mind that when altering the size of a garment, whether adding or taking in excess, you should always work with the existing seams. Side seams and center back seams in particular are the most convenient and commonly used in the size alteration process. Unless you are a a seasoned dressmaker or there's no appropriate seam to work with, never cut directly through the fabric to make a blouse smaller. In doing so, you risk causing more complex fit issues and difficulty re-finishing the new cut edges. 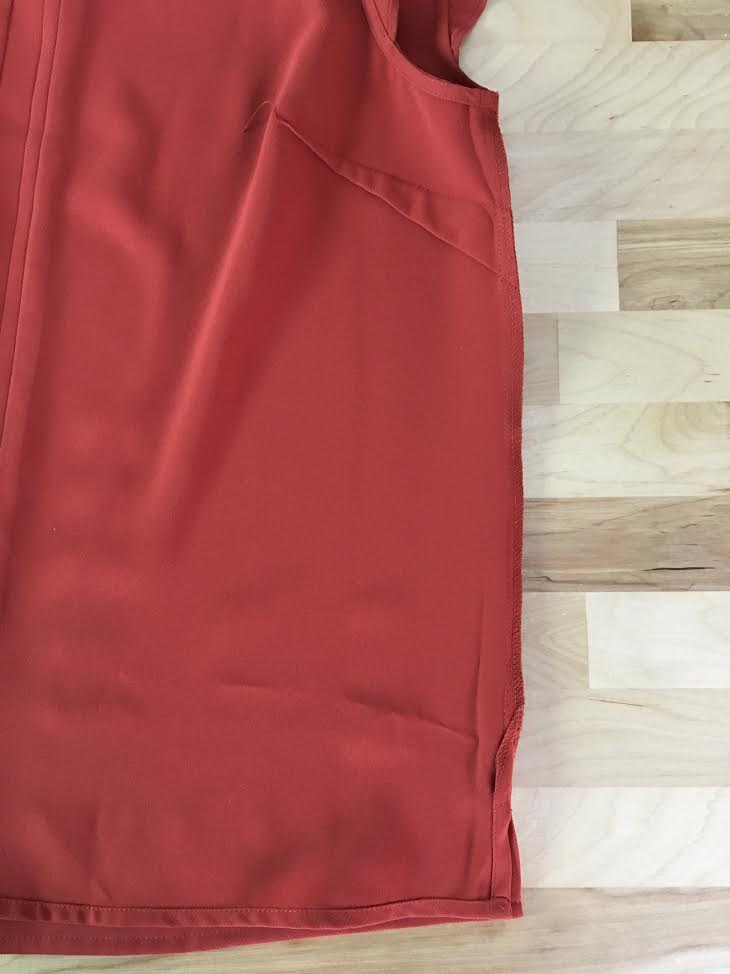 1. To start with, turn the blouse inside out so that you have access to the wrong side of the seam and seam allowance. You'll be working on the wrong side of the garment for the entirety of this tutorial. 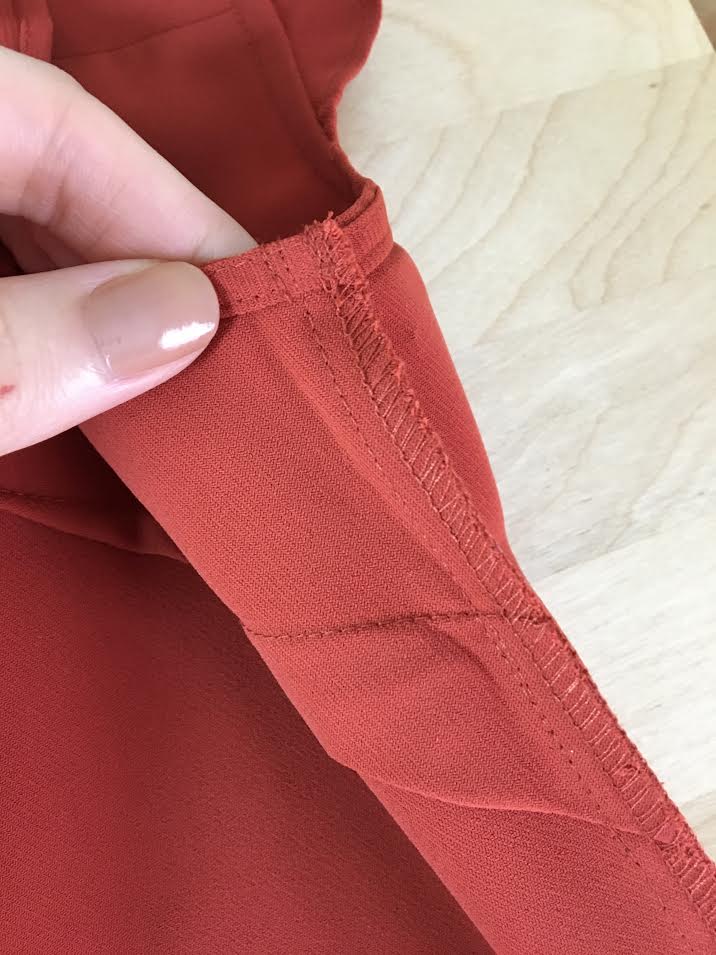 Take a close look at the clean finishing technique used on the garment you are altering. When altering the bust area, pay special attention to the underarm area. In this example, the raw edges of the seam allowance are clean finished with an overlock (serging) stitch. At the armhole, the seam allowance it stitched and reinforced in one direction.
2. To facilitate the alteration process, you will have to undo this reinforcement stitch so that the seam allowance lays completely flat. For this step, use your seam ripper to remove some of the stitches that are holding the seam allowance down.
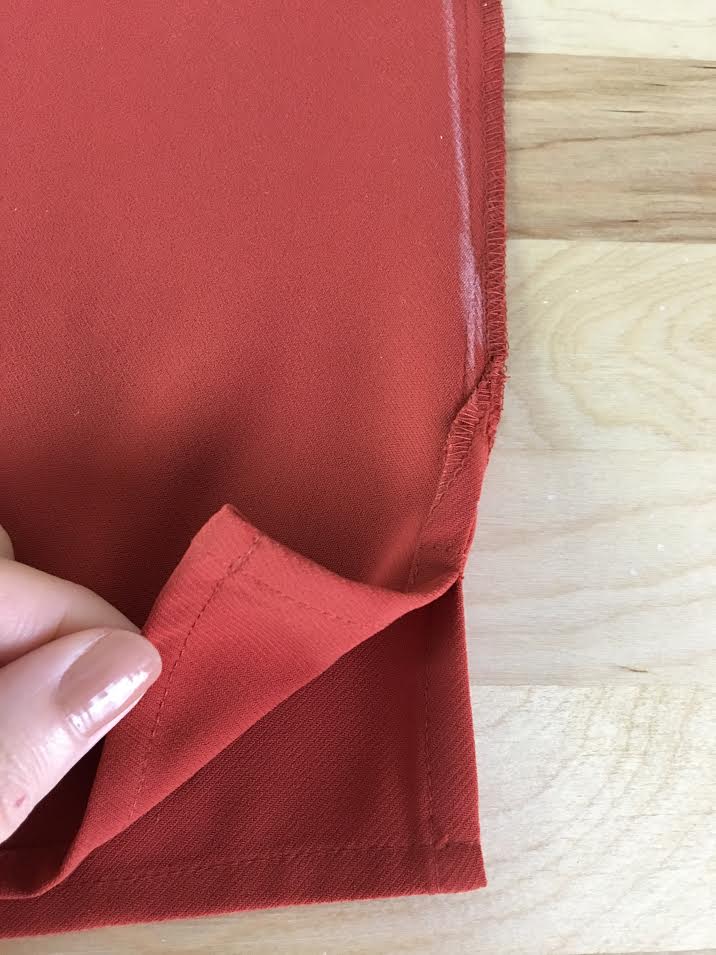
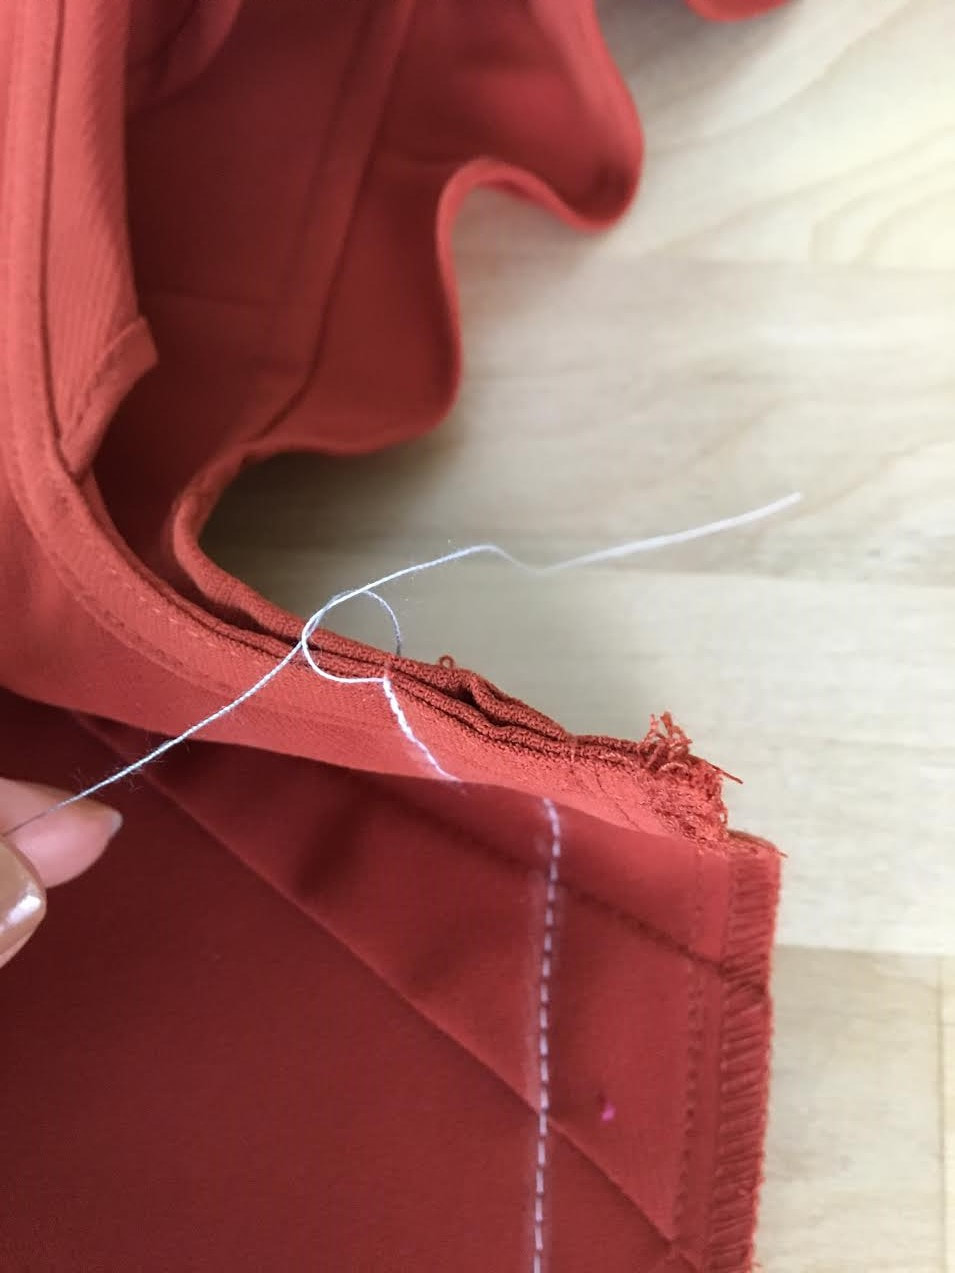
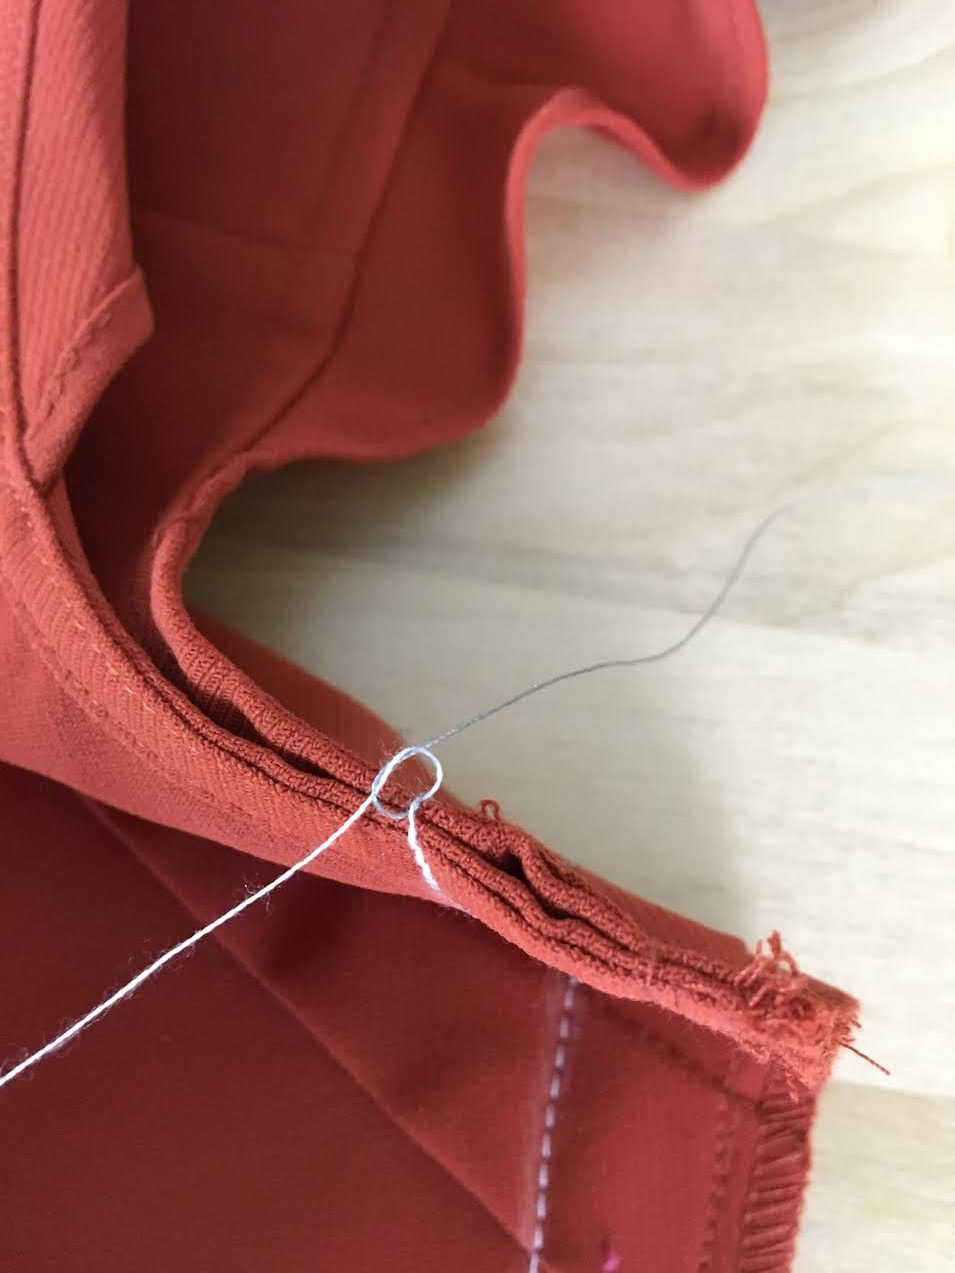
Once these reinforcement stitches are removed, you should have more control over the entire length of the seam allowance which should now be laying flat all the way from the armhole area to the bottom. 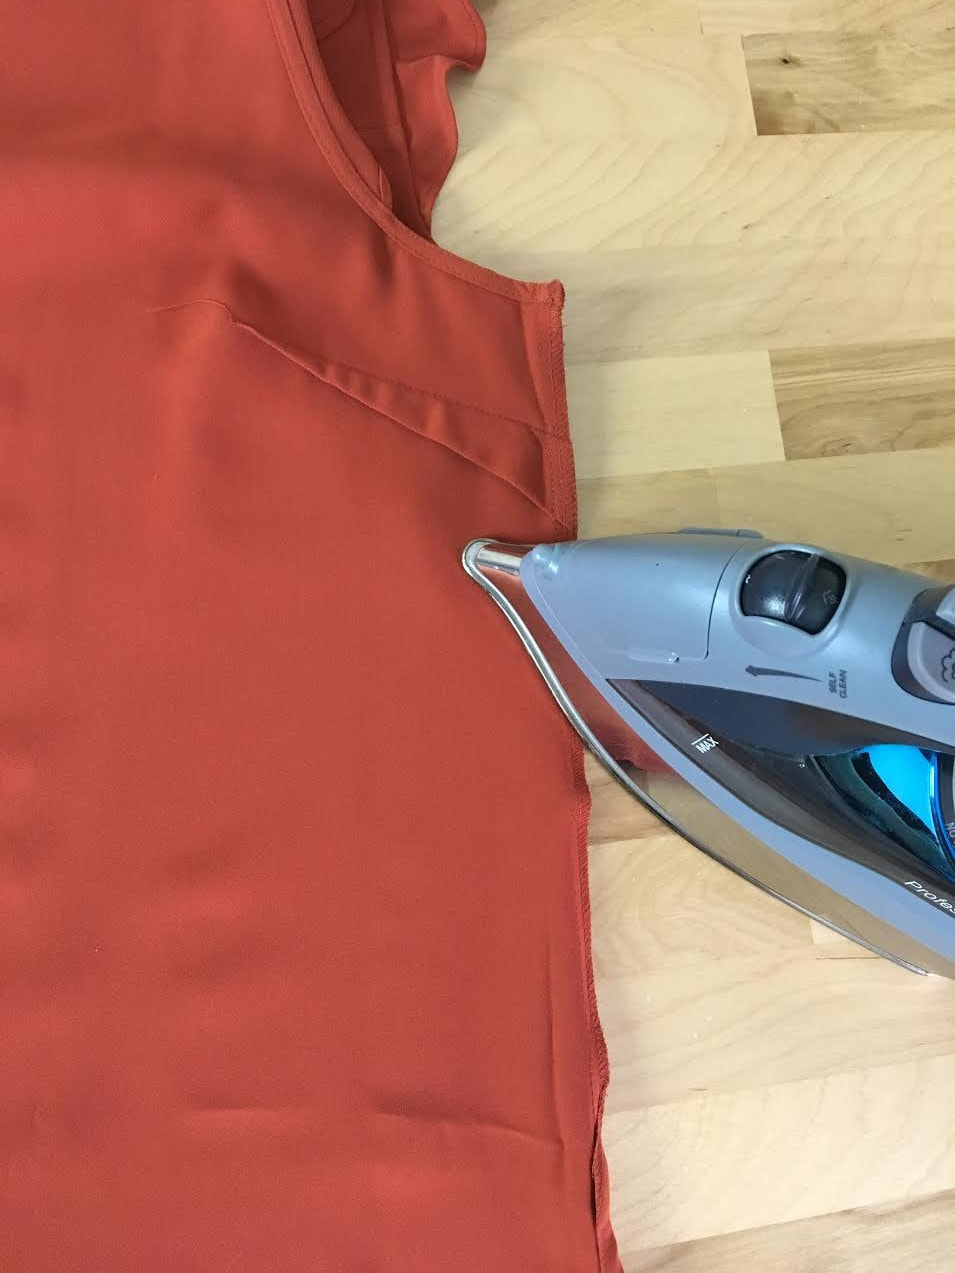 3. To facilitate the steps to come, iron down the seam allowance as shown above to keep it flat during the marking and sewing steps below. 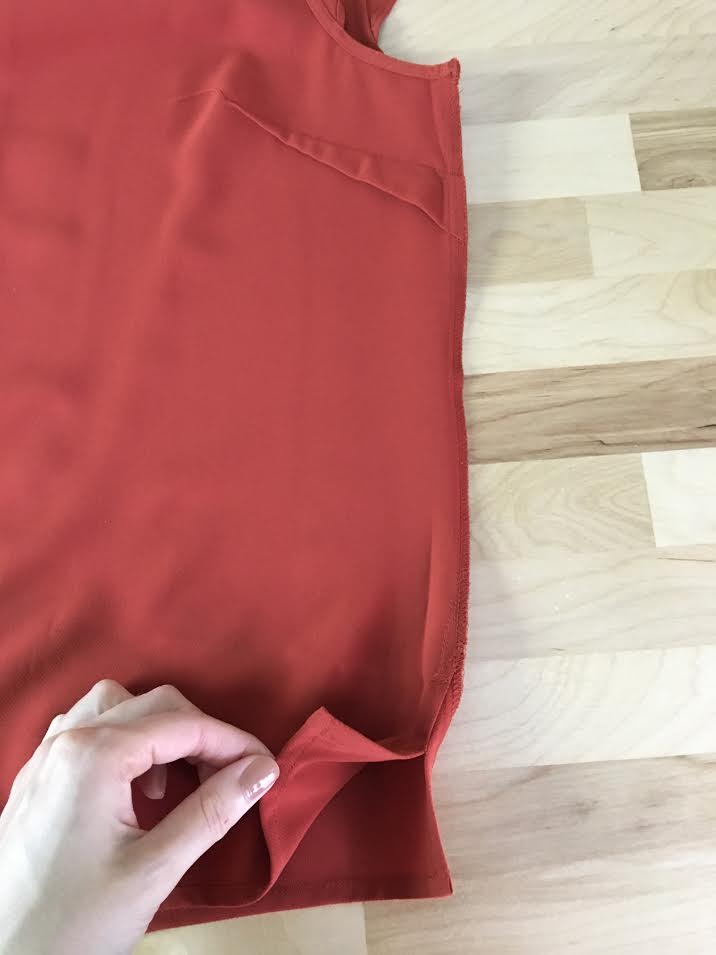 In this tutorial, the blouse features a small slit at the bottom of each side seam. We wont be altering the slit at all but rather blend in the new stitch with this existing slit as shown below. 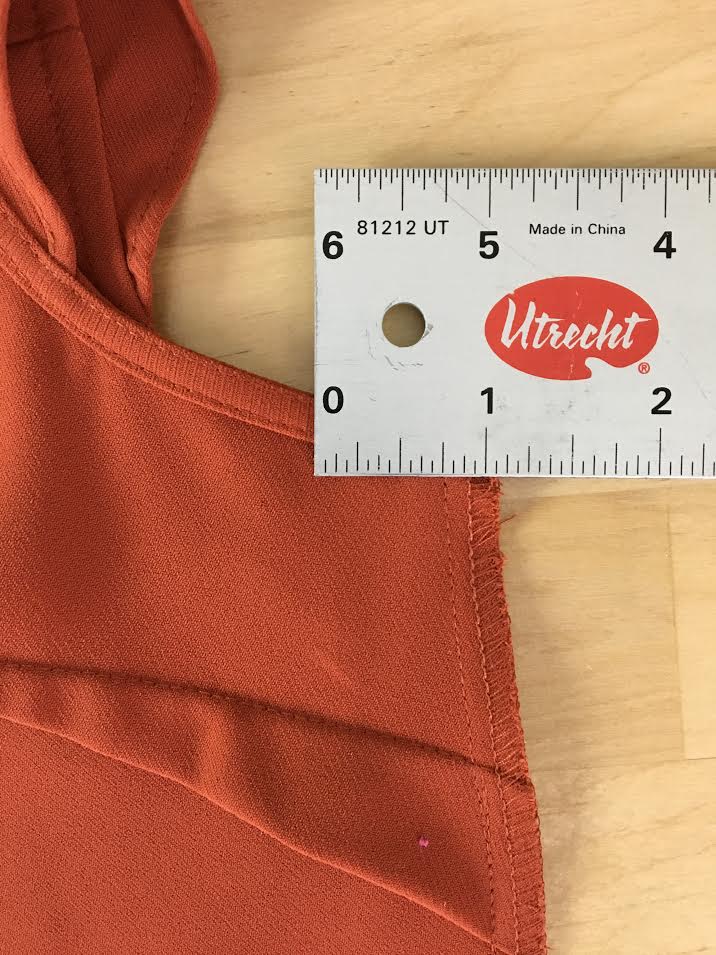 4. We're taking in about 3/4" on each side of the blouse. Using a ruler (or measuring tape), measure from the existing seam stitch inward at 3/4" (or whatever your specified measurement is) at the bottom armhole area as shown above. 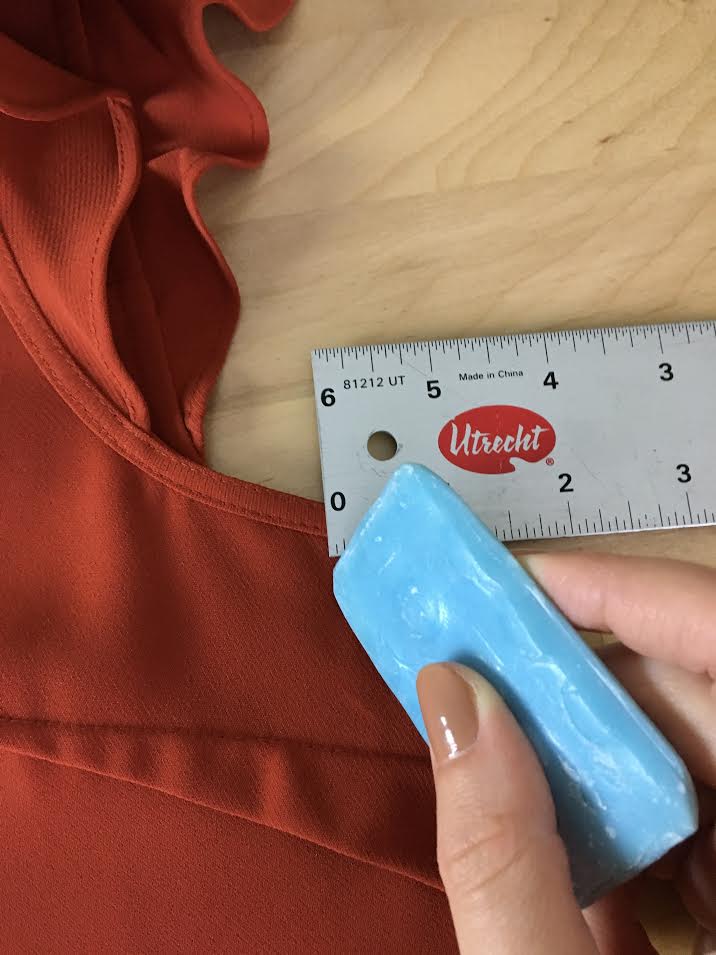 5. Using tailors chalk (or a piece of dry soap!) mark a vertical dash line at the 3/4" mark. 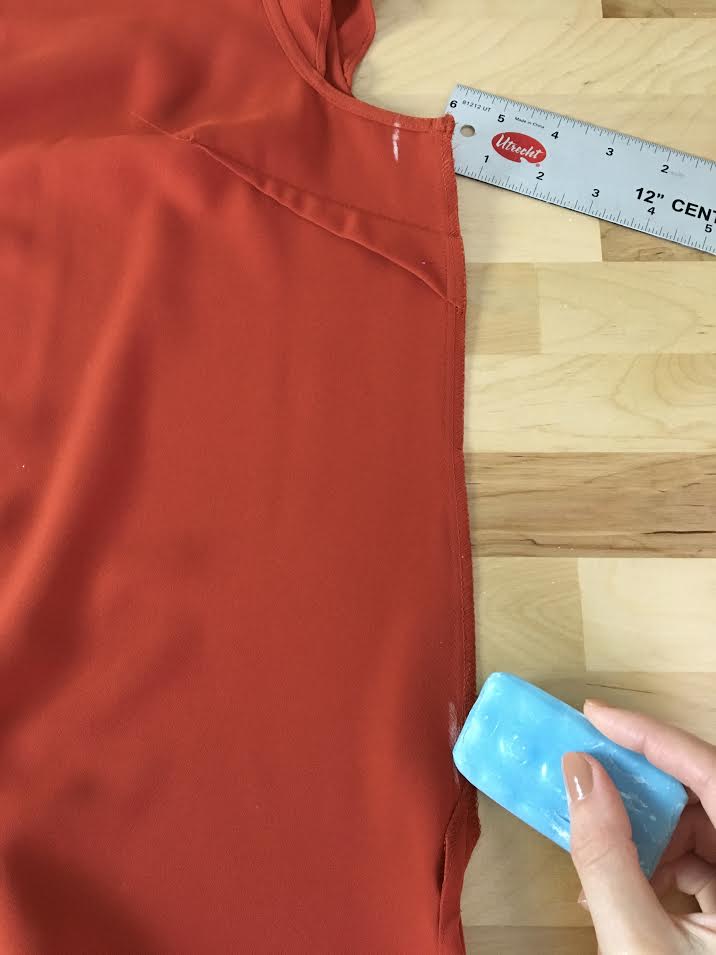 As noted above, the new stitch will blend into the existing seam stitch at the bottom. The blending area depends on how the garment fits and where along the seam does it not require any tightening or adjustment. In this case, the blending area is right above the slit. This means that everything above the slit will be tightened gradually from the slit up. 6. To mark the precise blending point, use your tailors chalk to mark directly on top of the existing stitch (at the blend-in area) as shown in the image above. 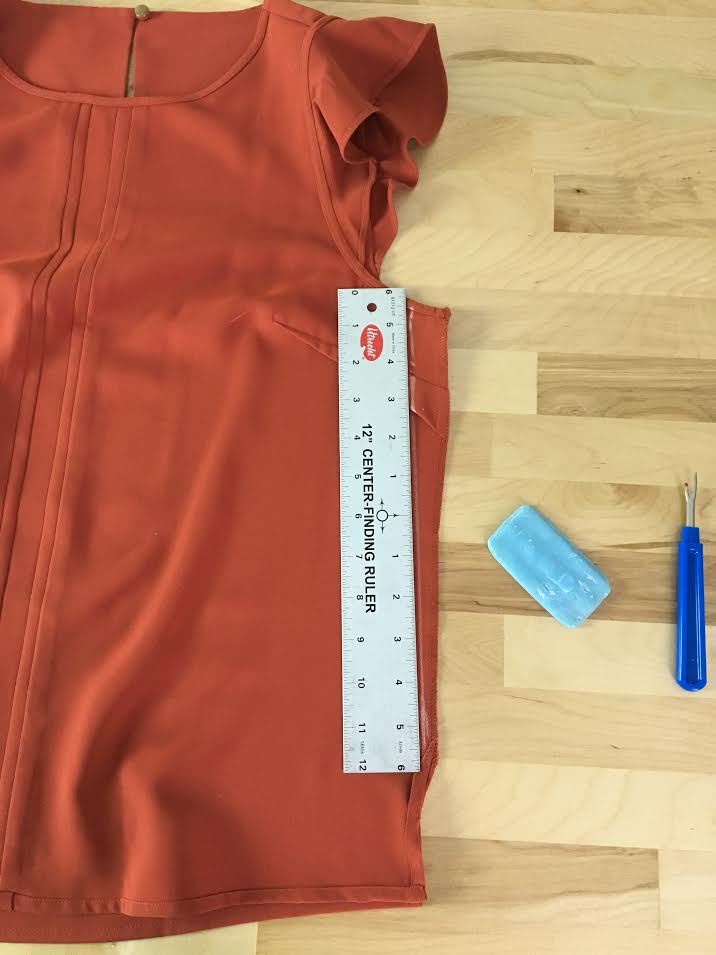 7. Using a ruler, connect the top vertical mark at the armhole area to the bottom vertical chalk mark at the stitch blending area. 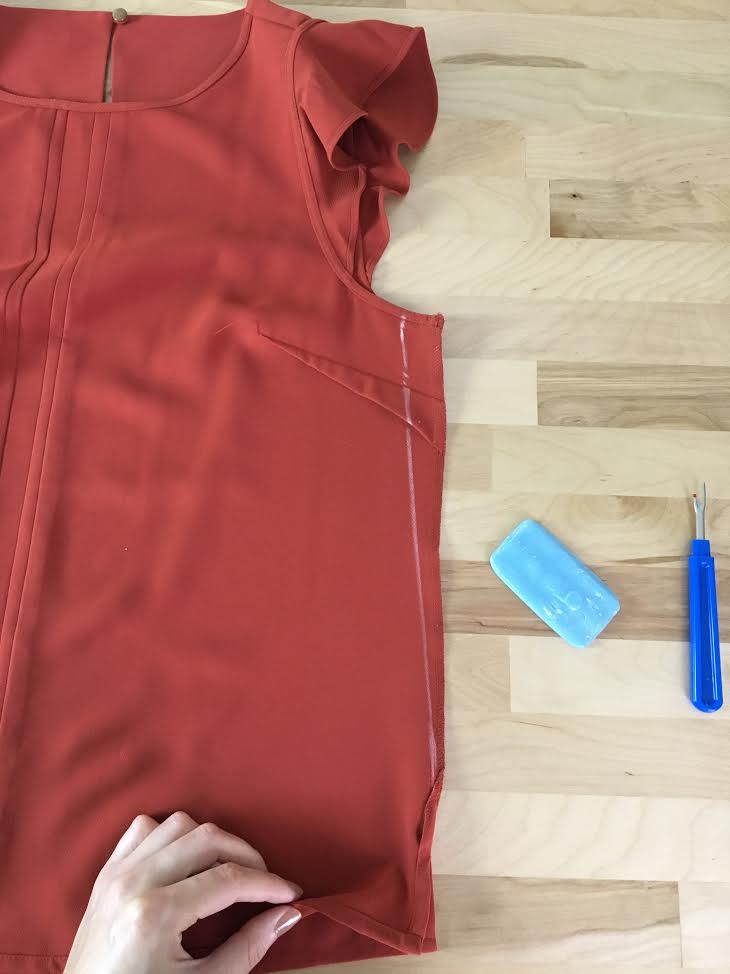 Draw a straight line from the top mark to the bottom mark- this straight line represents the new, altered seam and you'll stitch directly on top of it.
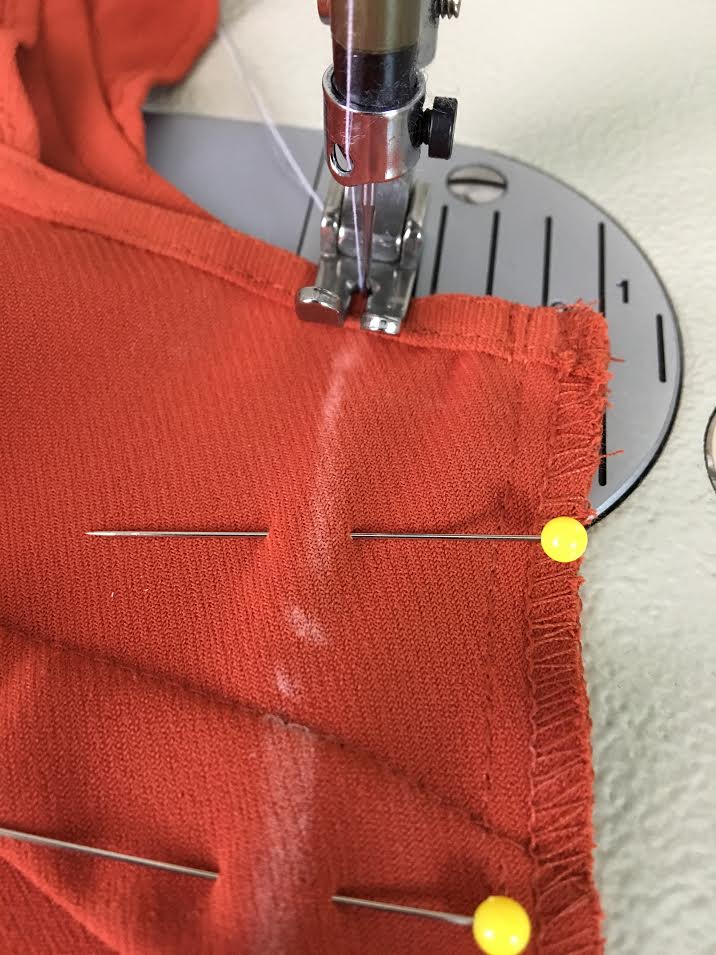
Make sure that this temporary chalk line blends into the existing bottom stitch (above slit) smoothly. 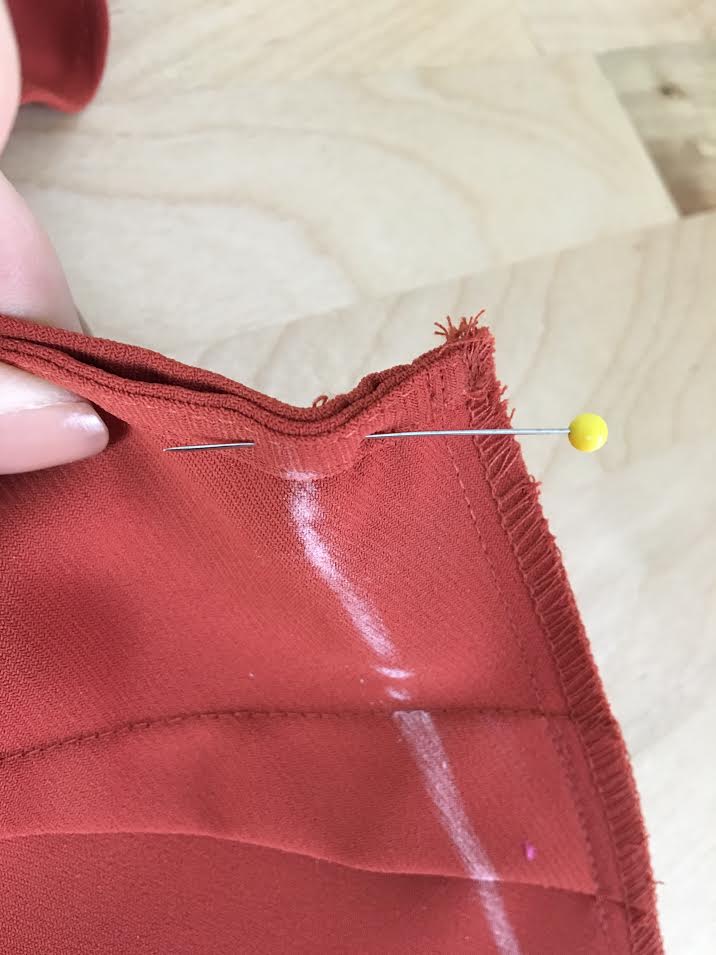 8. Starting at the armhole, align the armhole edges on top of each other such that the top edges are corresponding to one another perfectly. To hold this alignment in place, insert a pin through all layers of the front and back armhole perpendicular to the blouse's side edge as shown above. 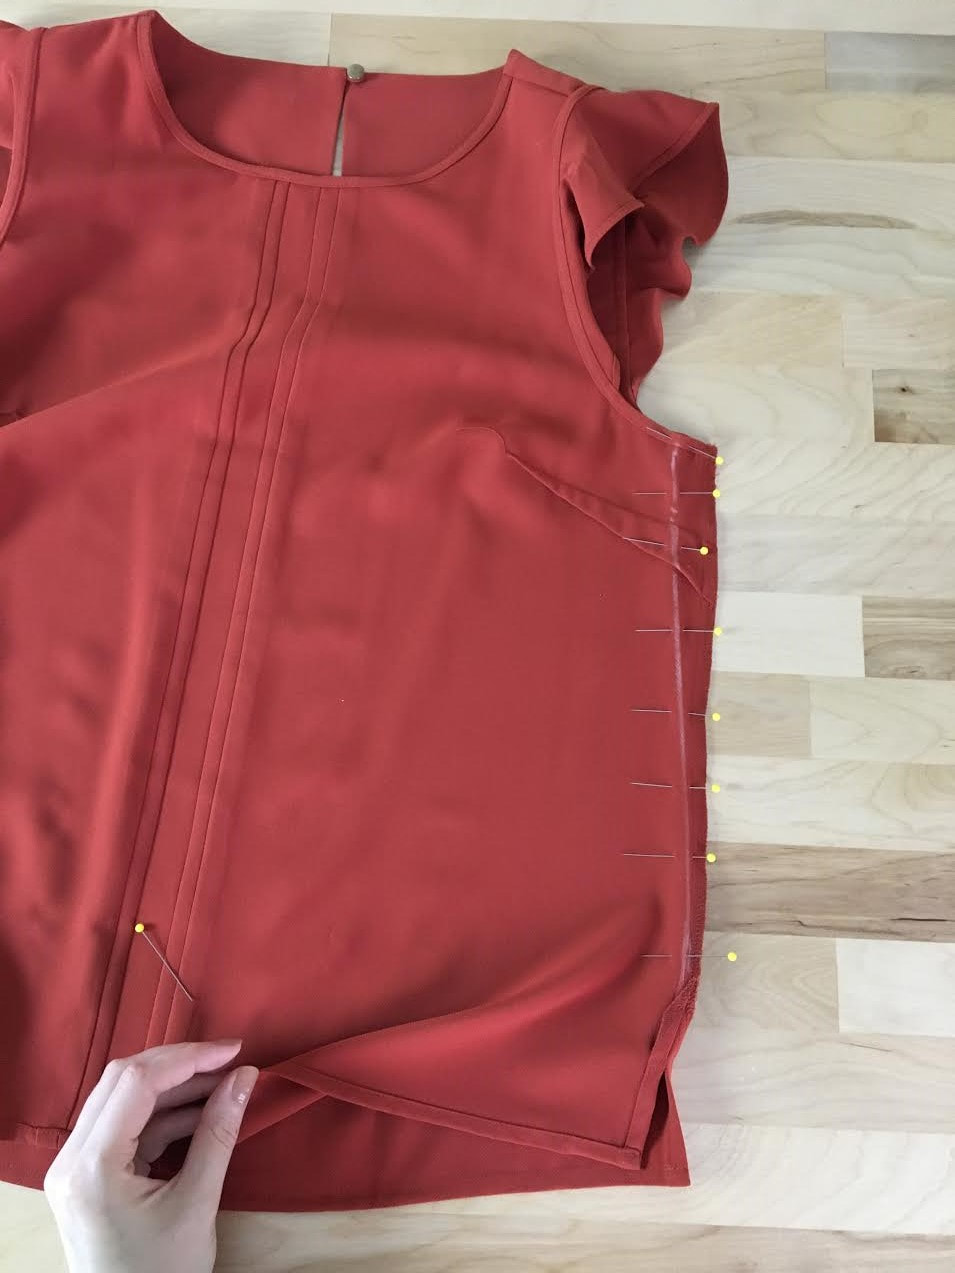 Next, pin perpendicular to the rest of the seam allowance edge and the chalk line as shown in the image above. 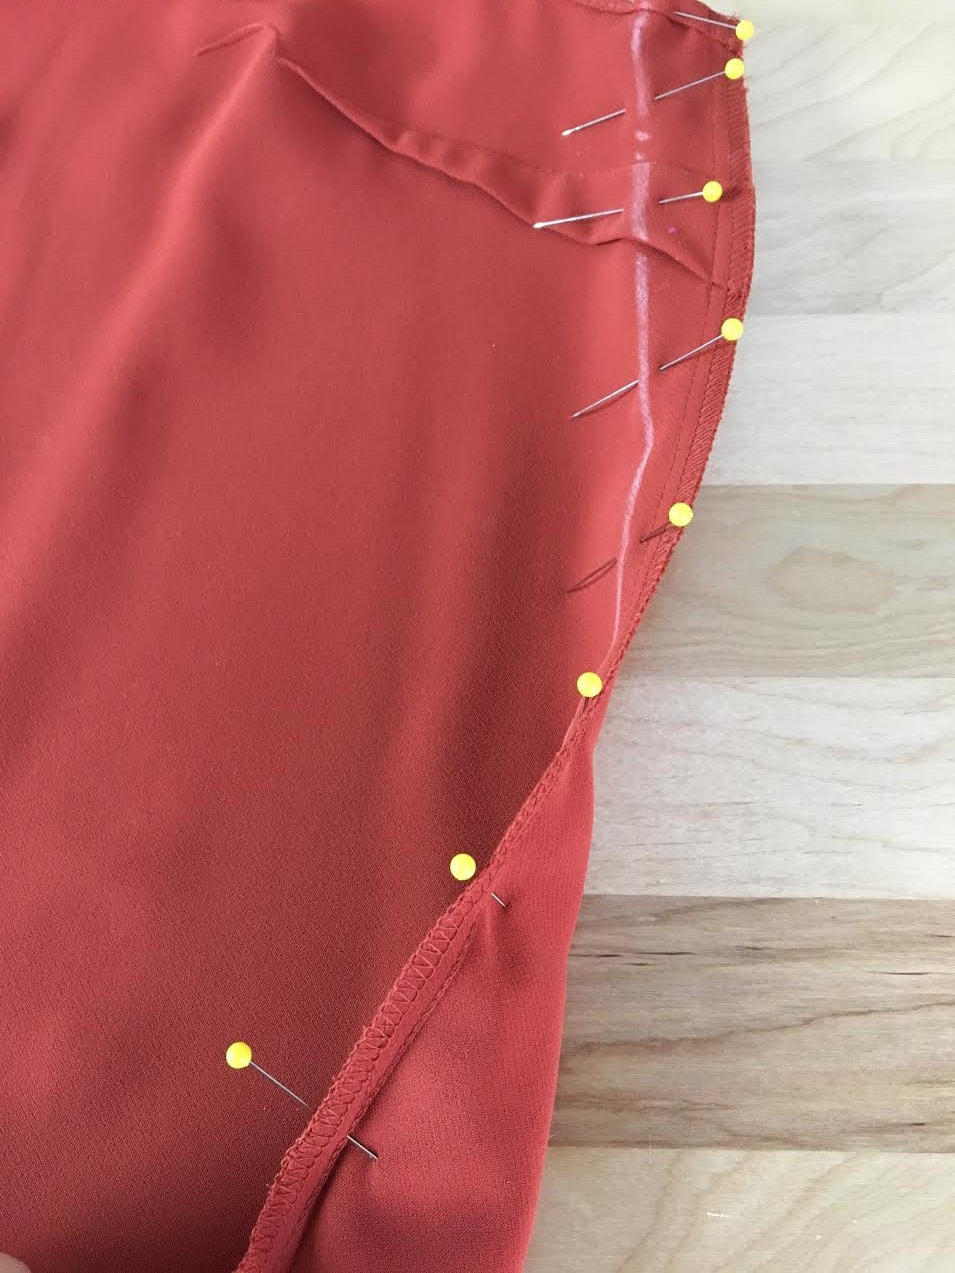 Stabilizing the two layers of fabric with pins keeps them aligned and stable during the machine stitching process.
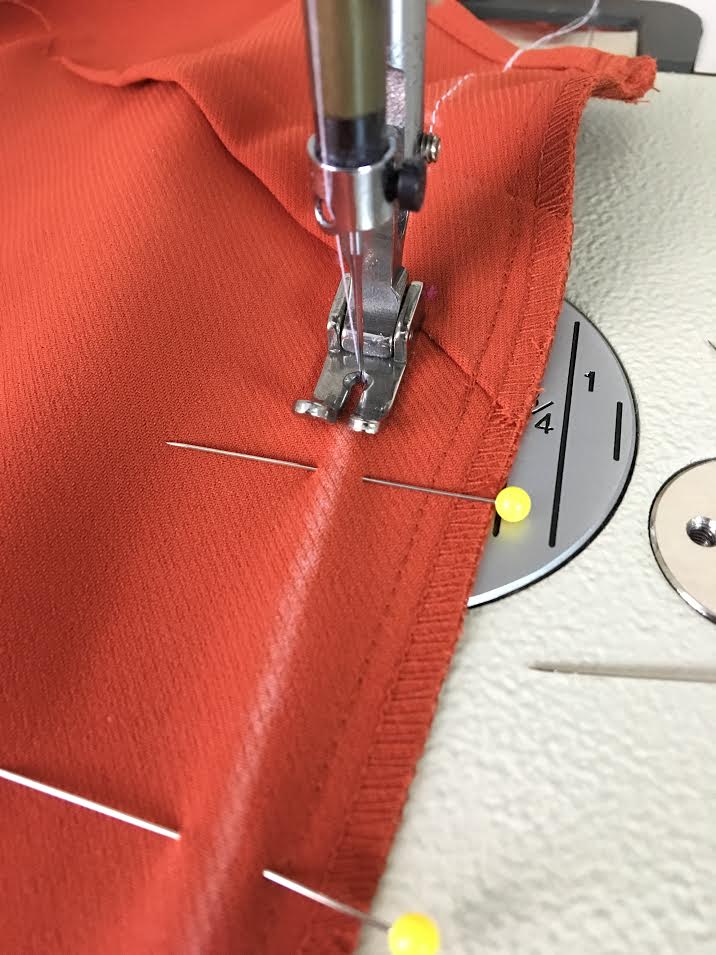
9. Starting at the armhole area, stitch through the binding layers directly on top of the white chalk mark making sure the top armhole edges remain perfectly aligned in the process. It is recommended that you backstitch at the beginning of your stitch. If you choose not to backstitch, you should knot the loose threads once the stitch is finalized to prevent it from unraveling during wear and care. 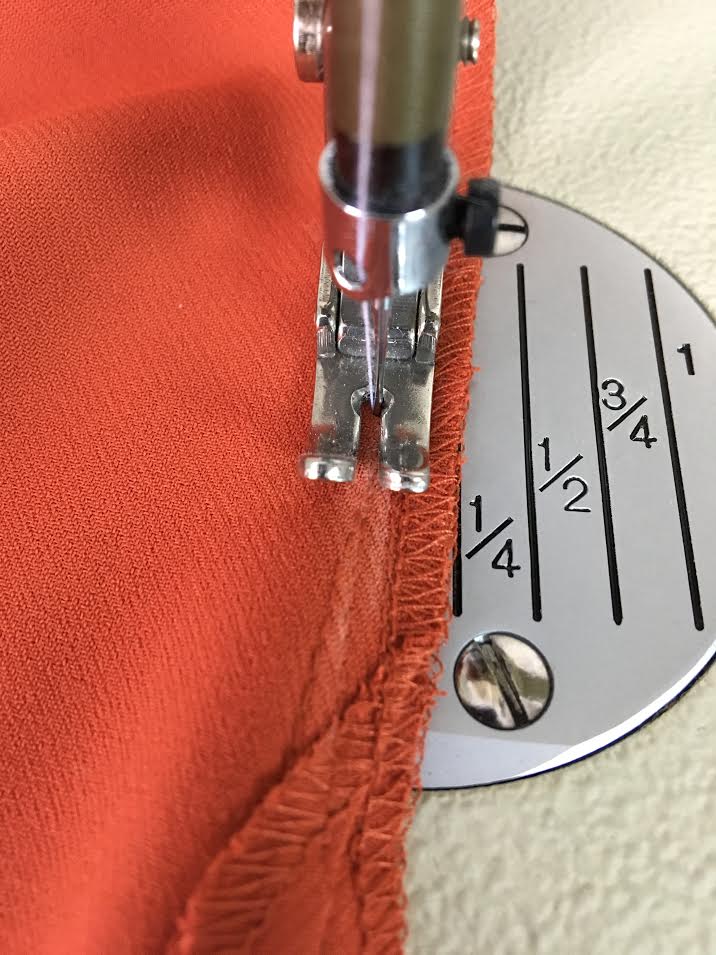 When you arrive at the bottom blending area, blend your stitch into the existing straight stitch gradually, overlapping the two stitches for a smooth transition.
In this example, the stitch was reinforced with machine backstitching. If you did not apply a backstitch at the beginning of your machine stitch, make sure to tie the loose threads into a double knot in order to prevent it from coming undone. As a precaution however, it is actually a good idea to knot the loose threads regardless of whether you backstitched on your machine or not. 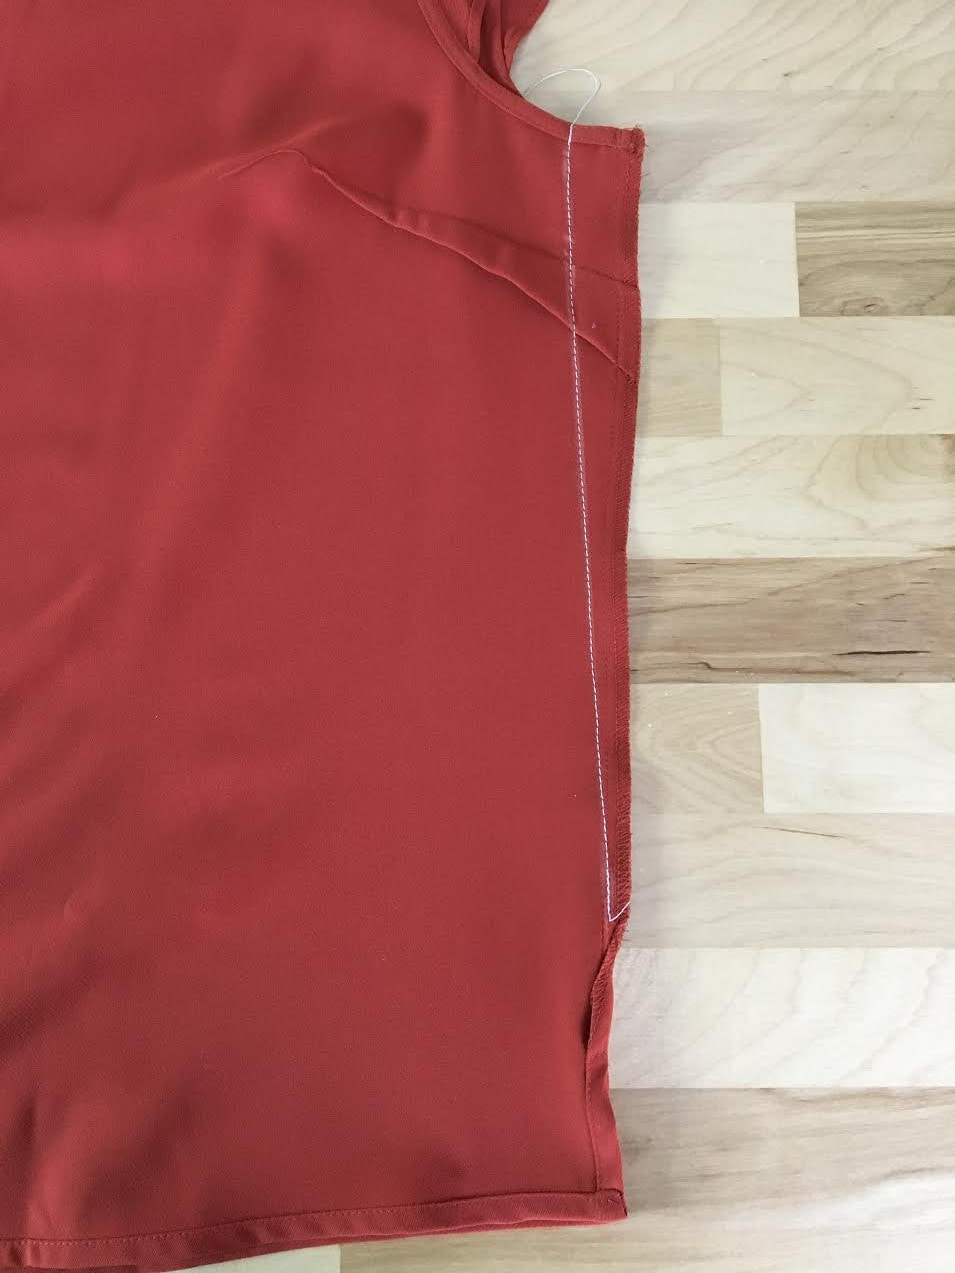 The new seam is now complete! You should have a smooth straight line that takes in fabric at the armhole area and blends in gradually towards the bottom of the blouse. All that's left to do now is trim and refinish the seam allowance.
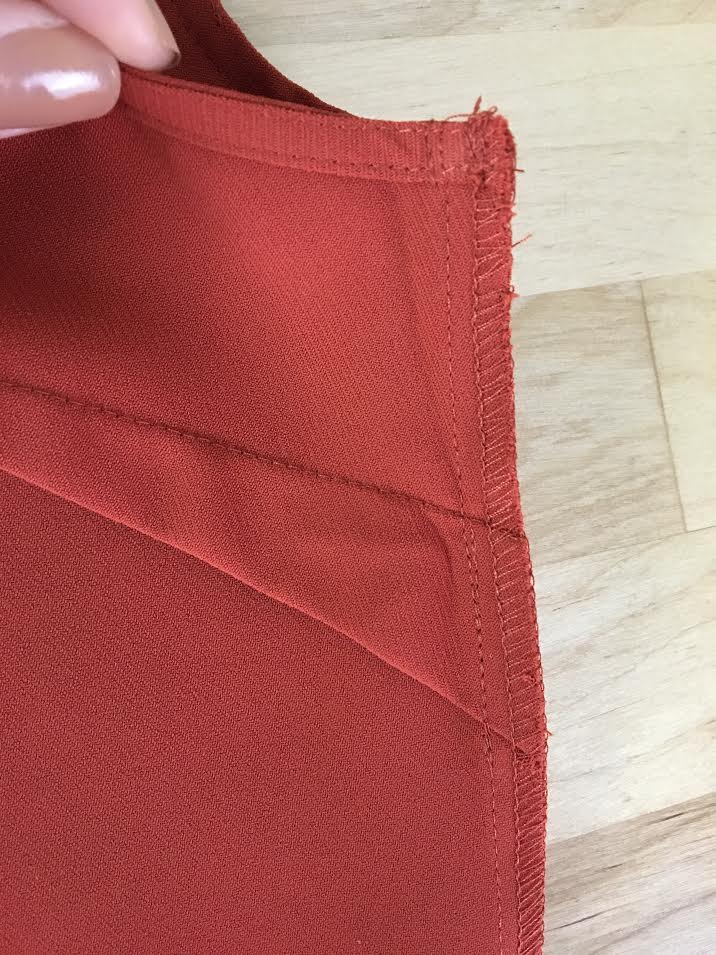
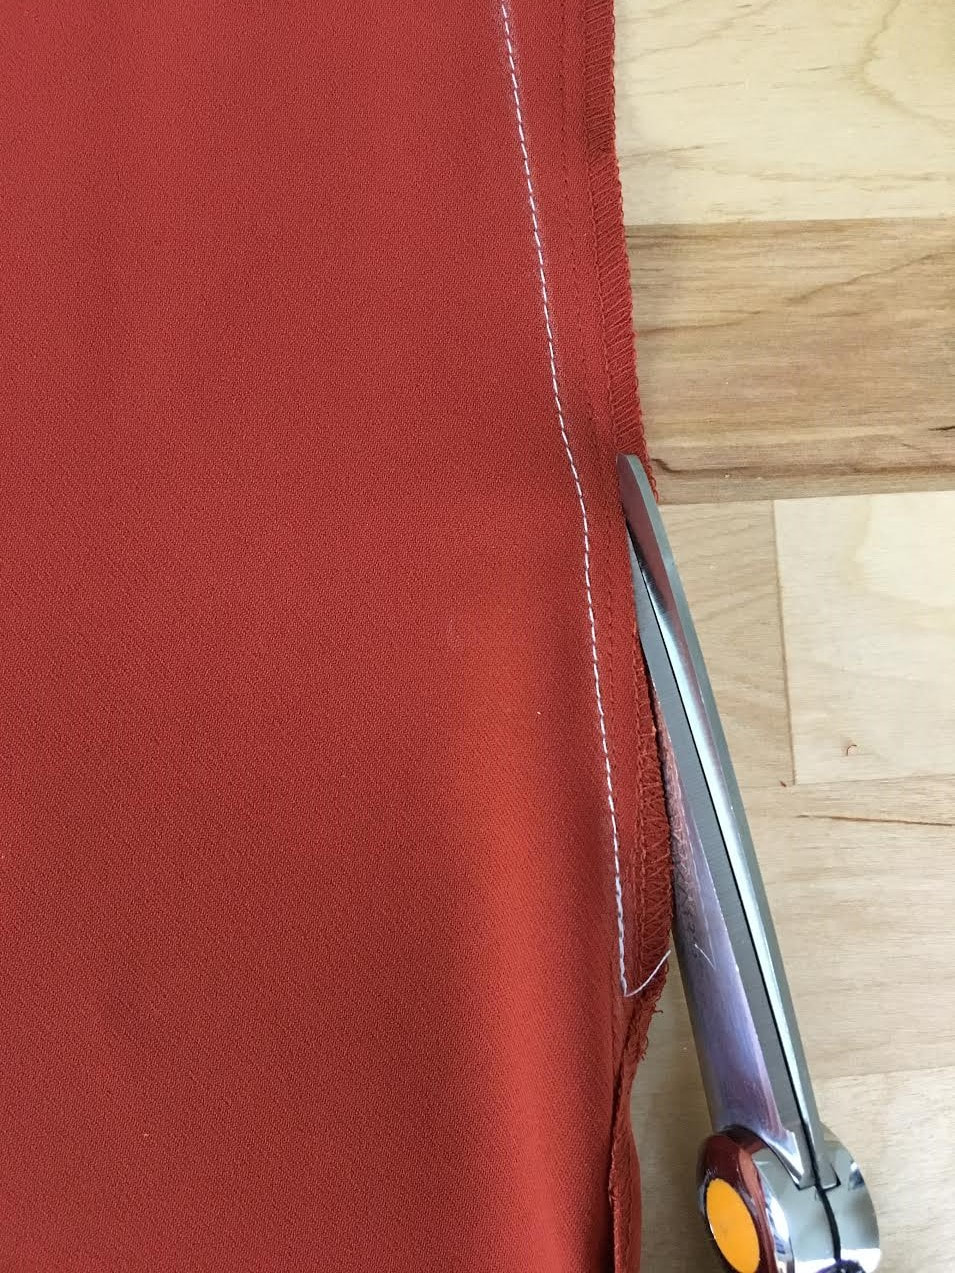
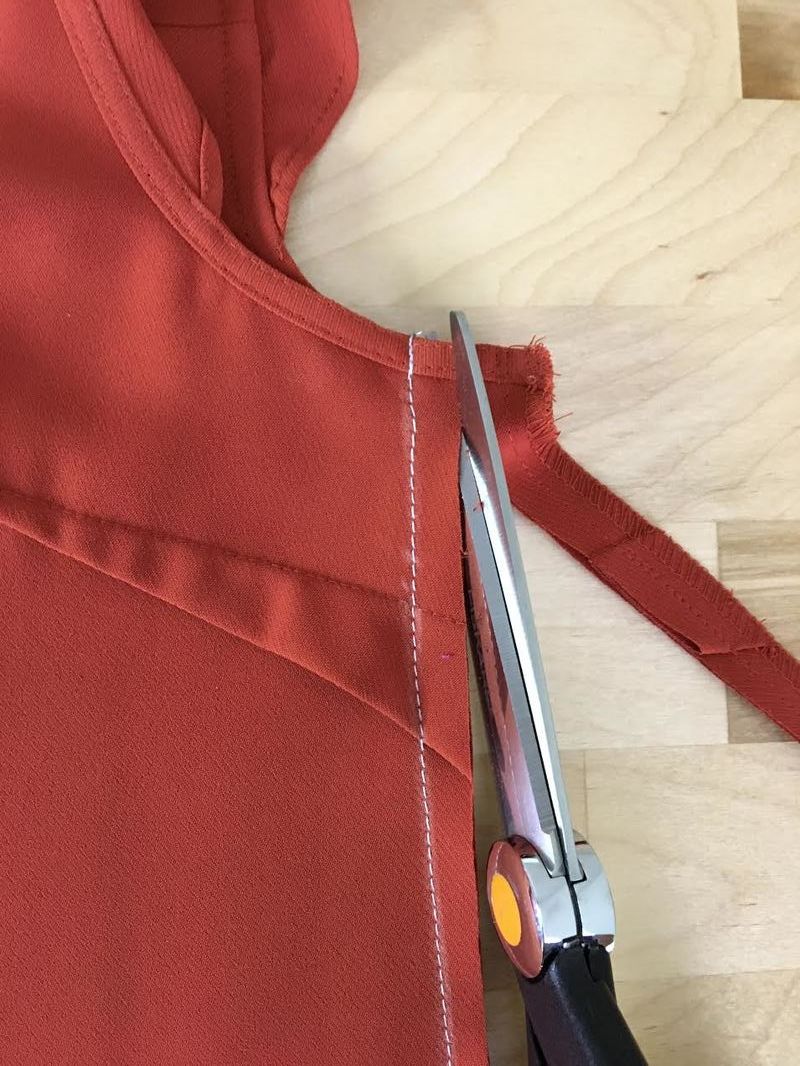
10. Starting at the blended area and moving towards the wider portion at the top, where the seam allowance is thicker, trim the excess fabric at about 1/2" away from the new stitch line 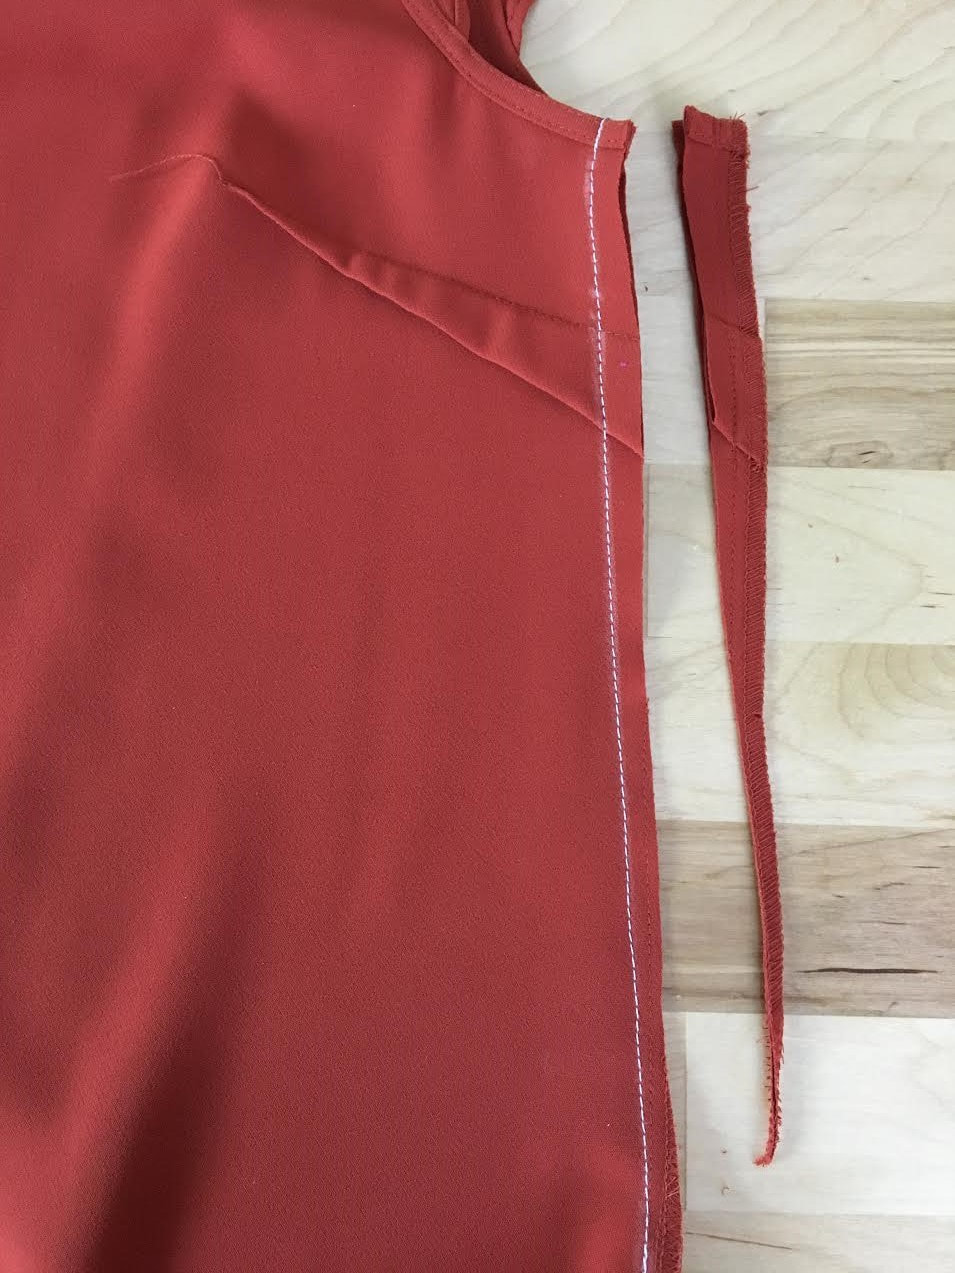 For a professional finish, trim evenly maintaining the same distance from the new stitch line throughout. This will form the new seam allowance.
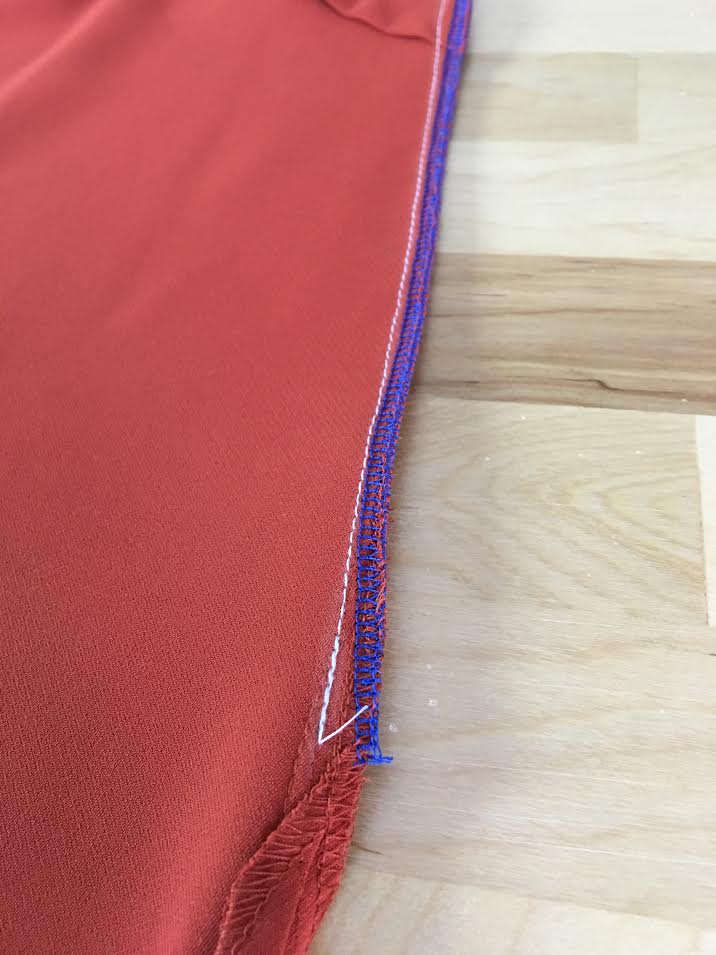
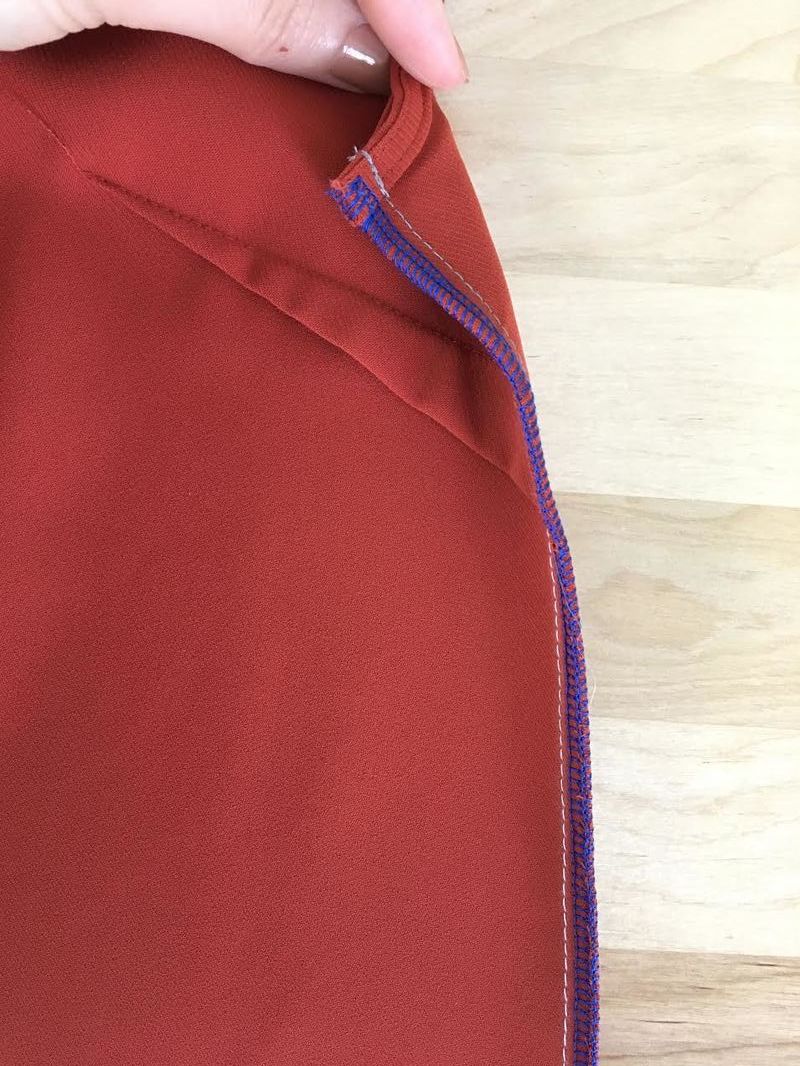
11. As is true for any type of seam allowance, its raw edges need to be clean finished using an appropriate clean finishing technique. The easiest and most common is an overlock stitch or in your case, it may be a zig zag stitch on your home sewing machine. In this tutorial, the overlock stitch is applied to seal the raw edges of both seam allowance layers together, smoothly blending in with any existing finishes along the seam. 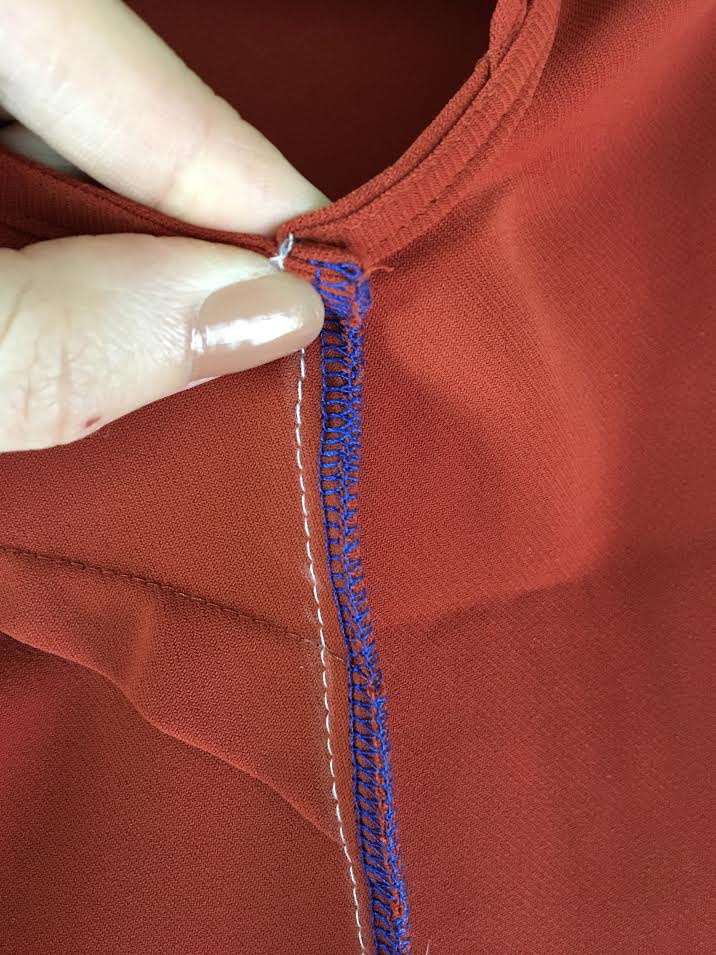 As a final step, it is important to reinforce the seam allowance in a single direction as was done initially. Doing so maintains a flat seam and prevents the seam allowance from showing at the armhole area. 12. To start with, direct the seam allowance (at the armhole area) towards the back of the garment as shown above. During this step, it also helps to iron the entire seam flat in order to keep its seam allowance pointing in a single direction. Conventionally, side seam allowance should be directed towards the back of the garment. 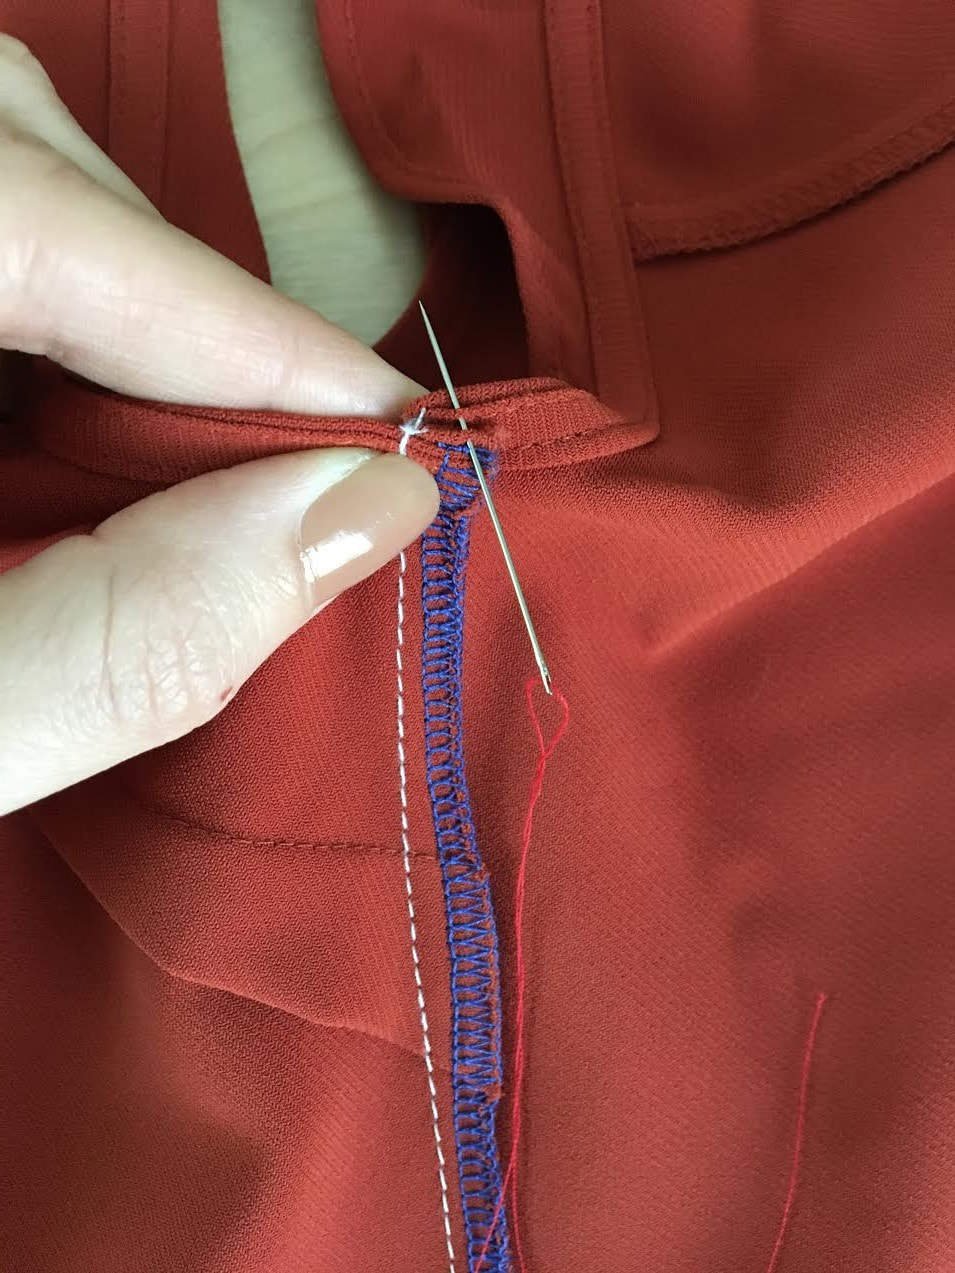 13. To keep the top edges of the seam allowance laying flat at the armhole, use a hand sewing needle and matching color thread to apply a few tack stitches between the seam allowance and the armhole binding as shown above. Insert the needle through the very top of the seam allowance and then again through a small portion of the binding edge on the underside of the armhole. This hand stitch should blend into the fabric/color and not be visible on the right side of the blouse. 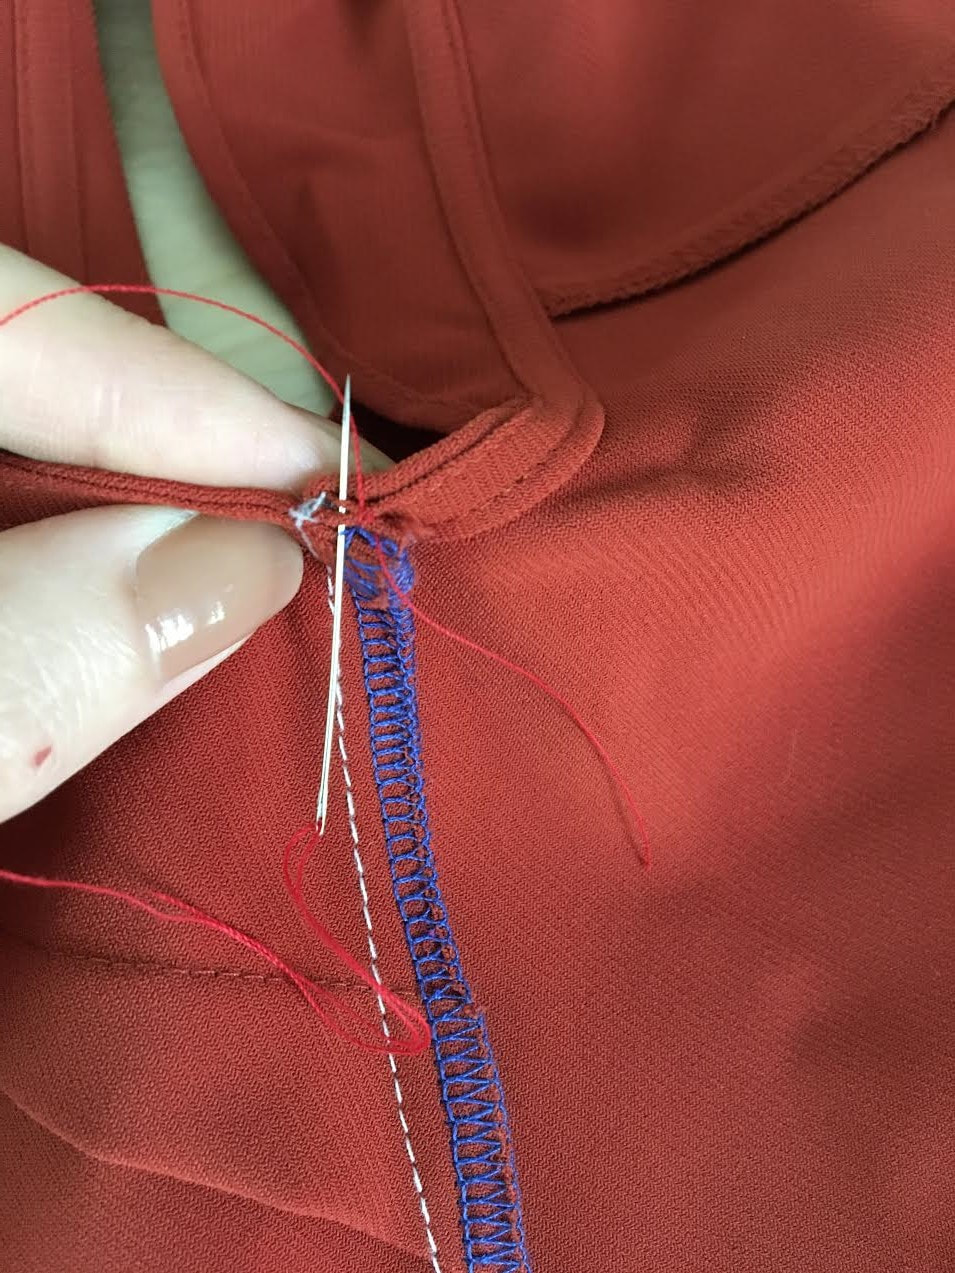 To apply the tack stitch, stitch in place until you feel that the layered stitch will be strong enough to keep the seam allowance in place through continuous wear and care. 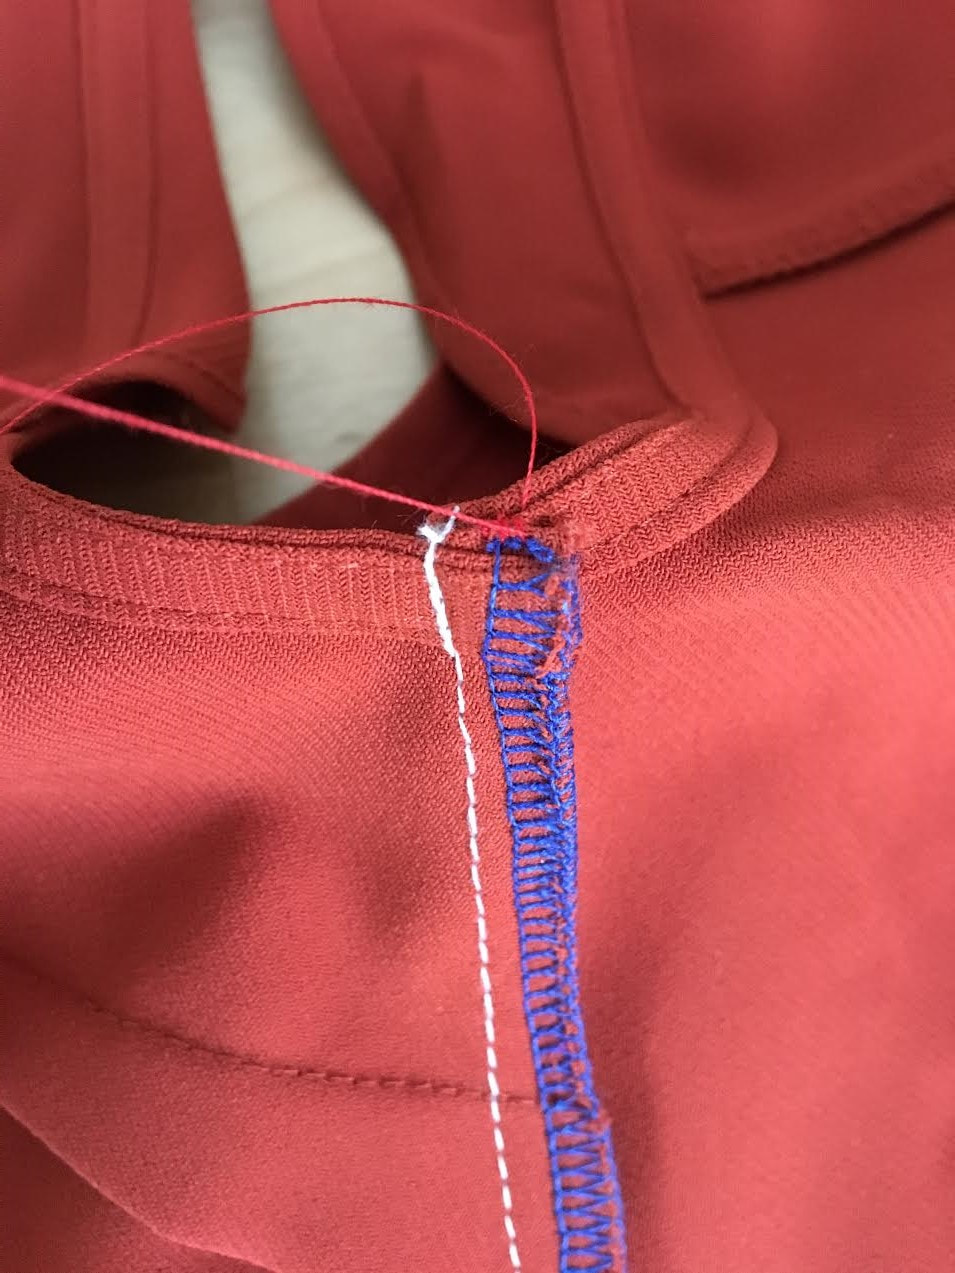 Once the tack hand stitch is applied, it is again good practice to double knot the loose threads in order to prevent them from coming undone with future use.  14. Trim the loose threads close to the knot but not so close that it jeopardizes its durability. As mentioned, the seam allowance should point towards the back of the blouse. Repeat the process on the other side seam making sure to take in an equal amount on both sides. This is a very important concept when making a clothing item smaller (or larger). The garment should be perfectly balanced having exactly the same intake on both sides. 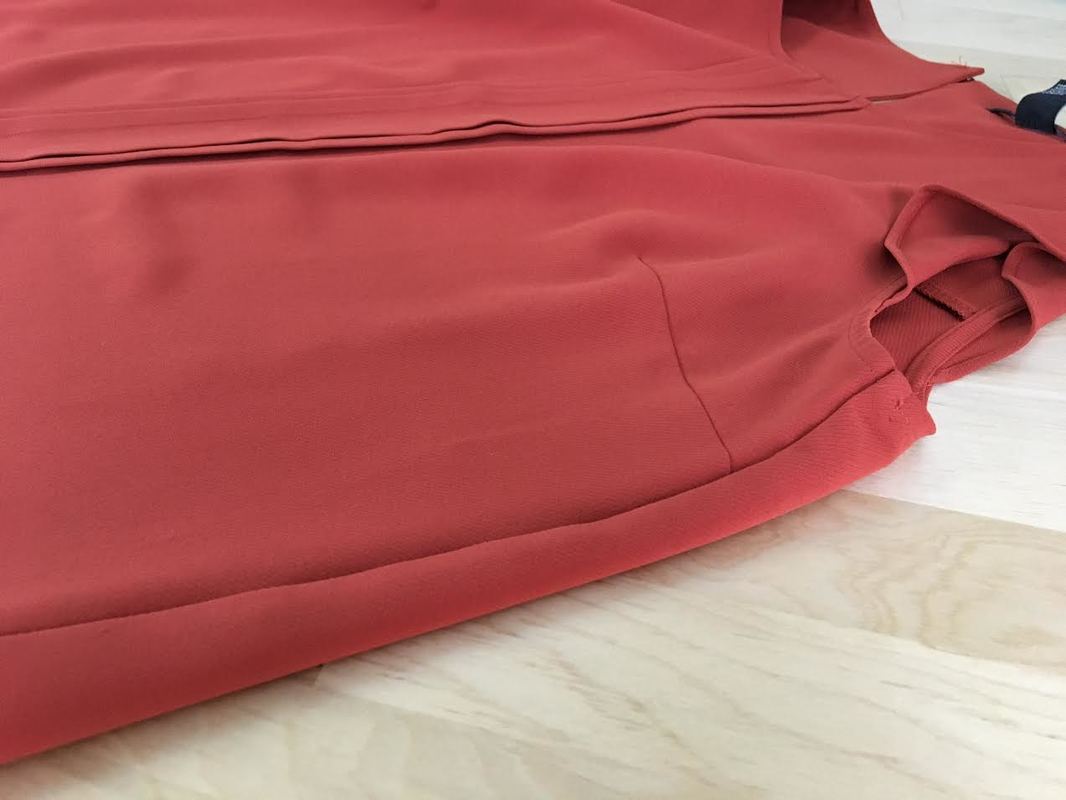 For a clean professional finish and as a final step, always iron the seam on the face of the blouse. Doing so will ensure a flat seam finish which eliminates bulk and keeps the seam allowance pointing towards the back of the blouse throughout. 
12 Comments
2/15/2021 03:59:07 am
I must thank you for such a beautifully explained manner to reduce the size of a blouse. A friend of mine who thinks I'm a seamstress because I make my own clothes (very amateur) has asked me to reduce the size of a couple of blouses! (Gulp) But now thanks to you I have it all there explained. In my bookmarks forever!
Sue
4/17/2021 09:49:42 pm
Thank you for this amazing tutorial! I can sew, but don't care for alterations. I knew there was an easy trick, because my seamstress said, "we have an easy trick for that". Now I know the trick. I'm bookmarking your page, reading more. Thanks again!
Jessica
7/4/2021 12:33:31 am
Thank you for this very easy to follow tutorial. I was searching for directions on how to do this on a top with ruffles and could not find anything. Can I follow this technique and just blend the ruffle end to the new seam line?
Doina Alexei
7/4/2021 04:15:38 am
Hi Jessica,
Colleen Douglas
4/12/2022 10:16:11 pm
This tutorial is so helpful. I now have the confidence to adjust two beautiful sleeveless blouses that I could only buy in a large size. 4/20/2022 01:24:51 am
I found it interesting when you said that due to the individuality of the shapes, there are fit problems that are a bit more typical. My wifey told me last night that she was hoping to find a custom sewing service that could do a custom football apron for our children, and she asked me if I had any idea what would be the best option to do. Thanks to this informative article, I’ll be sure to tell her that we can try to consult a trusted custom sewing service as they can provide more info about the process.
Gloria Gann
6/6/2022 11:42:35 am
I haven't sewn in years, but lost weight and need to reduce blouses by several inches. I put this off until I read this tutorial. Now I'll be able to wear those blouses from the back of my closet!
Cleve-it is for the female (big busted) very busy business woman who is always on the run, traveling a lot.
Trudy
6/21/2023 08:49:43 am
I have read in sewing pattern instructions that when sewing a sleeveless shirt or dress, the “Armhole edges are finished AFTER the shoulder and side seams have been fully sewn, finished and ironed”. Should the armhole binding first be disconnected where the side seam adjustments are being made and then reattached (after being trimmed smaller) after the side seam is fully adjusted……..to alleviate extra bulkiness? This is my first time taking in the side seams of a finished dress. Thank you for your assistance.
Donna
9/18/2023 03:48:05 pm
I have recently been shopping in thrift stores specifically looking for tops that I can alter to fit me. A lot of times I come across brand new, never worn items at a very reduced price.
Jami
7/15/2024 06:01:49 pm
Thank you for the tutorial! I tried to follow it but it seems that the darting is now in the wrong place on the top and there is fabric bunching up at the sides. Do you have any tips on how to adjust the darts? Leave a Reply. |
The Blog:A journey into our design process, sewing tutorials, fashion tips, and all the inspiring people and things we love. 
Doina AlexeiDesigner by trade and dressmaker at heart. I spend most of my days obsessing over new fabrics and daydreaming new ideas. 
Sadie
Executive Assistant & Client Relations Manager Archives
November 2019
Categories
All

|

-
Sewing Tutorials
-
Basics
>
- Aligning Pattern Grainlines To Fabric
- Preparing Fabrics For Sewing
- Pinning Sewing Patterns To Fabric
- Placing Sewing Patterns On Fabric For Cutting
- Rotary Cutters or Fabric Scissors?
- Cutting The Sewing Patterns
- What Are Notches And How To Use Them In The Sewing Process
- Transferring Notches From Pattern To Fabric
- Transferring Seamlines to Fabric
- Staystitching
- Backstitching: A Complete Guide
- Hand Basting: A Complete Guide
- Sewing Continuous Bias Binding
- Darts >
-
Sewing Seams
>
- The Basics Of Seams And Seam Allowance
- How To Sew A Straight Seam
- Sewing Curved Seams
- Sewing Corner Seams
- Trimming And Grading Seam Excess
- Notching/Clipping Seam Allowance for Tension Release
- Sewing Topstitched Seams
- Sewing Corded Seams
- Sewing A Slot Seam
- Sewing A Gathered Seam
- Sewing Bias Seams
- Sewing Seams With Ease
- Sewing Seams With Crossing Seamlines
- Sewing Unlike Fabric Seams
- How To Iron Seams: Ironing Tools And Conventions
- Sewing With Knit Fabrics
- Understanding Stitch Length And Tension
- Sewing Unique Fabric Seams
-
Seam Finishes
>
- Seam Finishing Techniques - Overview
- Applying A Pinked Seam Finish
- Applying A Bias Bound Seam Finish
- Serging And Zigzag Seam Finishes
- Sewing A Self-Bound Seam Finish
- Sewing A French Seam Finish
- Sewing A Hong Kong Seam Finish
- Sewing A Mock French Seam Finish
- Sewing A Turned-and-Stitched Seam Finish
- Sewing Overcast Hand-Applied Seam Finishes
- Sewing A Flat Felled Seam
- Sewing A Hairline Seam Finish
-
Hem Finishes
>
- Garment Hem Finishes: Overview
- Sewing A Double Fold Hem Finish
- Sewing A Single Fold Hem Finish
- Sewing Bound Hem Finishes
- Sewing An Exposed Double Layer Bound Hem
- Sewing A Folded-Up Bound Hem with Pre-folded Binding
- Sewing A Hong Kong Hem Finish
- Sewing A Band Hem Finish
- Sewing A Bias Faced Hem Finish
- Sewing A Twill Tape Hem Finish
- Sewing A Rolled Hem Finish
- Sewing A Shaped Hem Facing
- Using Fusible Hem Tape And Webbing
- Finishing A Lace Fabric Hem
- Finishing A Leather Hem
- Sewing Faced Hem Corners
- How To Finish Lining At The Hem
- Finishing Fabric Corners by Mitering >
- Interfacing A Hemline: Lined And Unlined Examples
-
Sewing Pockets
>
- Curved Patch Pocket With Flap
- Unlined Square Patch Pockets
- Lined Patch Pockets: Two Ways
- Extension On-Seam Pockets
- Separate On-Seam Pocket
- Front Hip Pockets
- Bound Double Welt Pocket
- Double Welt Pocket With Flap
- Self-Welt Pocket (Using Single Fabric Layer)
- Slanted Welt Pocket (Hand-Stitched)
- Faced Slash Pockets: Overview >
-
Sewing Zippers
>
- Sewing Zippers: General Information
- Sewing A Centered Zipper
- Sewing A Lapped Zipper
- Sewing An Invisible Zipper
- Sewing A Fly Front Zipper
- Sewing A Closed-End Exposed Zipper (No Seam)
- Sewing An Exposed Separating Zipper
- Sewing Hand Stitched Zipper Applications
- Sewing A Zipper Underlay
- Sewing A Placket-Enclosed Separating Zipper
- Sleeveless Finishes >
-
Neckline Finishes
>
- Sewing A Neck Shaped Facing
- Sewing An All-In-One Neck Facing
- Neck And Garment Opening Combination Facings >
- Sewing A Bias Faced Neckline Finish
- Sewing A Band Neckline Finish
- Bound Neckline Finishes: Overview >
- Sewing A Semi-Stretch Strip Band Neckline
- Ribbed Neck Band And Classic Turtleneck
- Decorative Neckline Finishes >
- Finishing Facing Edges >
-
Extras
>
- A Complete Guide on Interfacing
- Sewing Bound Spaghetti Straps
- Sewing Spaghetti Straps To A Faced Neckline
- Sewing Ruffles: Overview
- Patterning And Sewing A Circle Ruffle
- Sewing A Gathered Heading Ruffle
- Sewing Double Layer Gathered Ruffles
- Sewing A Gathered Ruffle Into A Seam
- Sewing A Gathered Ruffle To A Fabric Edge
- Sewing A Fabric Surface Slit
- Sewing A Slit Seam
- Hand-Applied Straight Stitches
- Hand-Applied Blind Stitches
- Hand-Applied Overedge Stitches
- Hand-Applied Tack Stitches
- Hand-Applied Decorative Stitches
-
Basics
>
- Custom Bridal
- Custom Apparel
- About
- Blog


 RSS Feed
Services |
Company |
|
