|
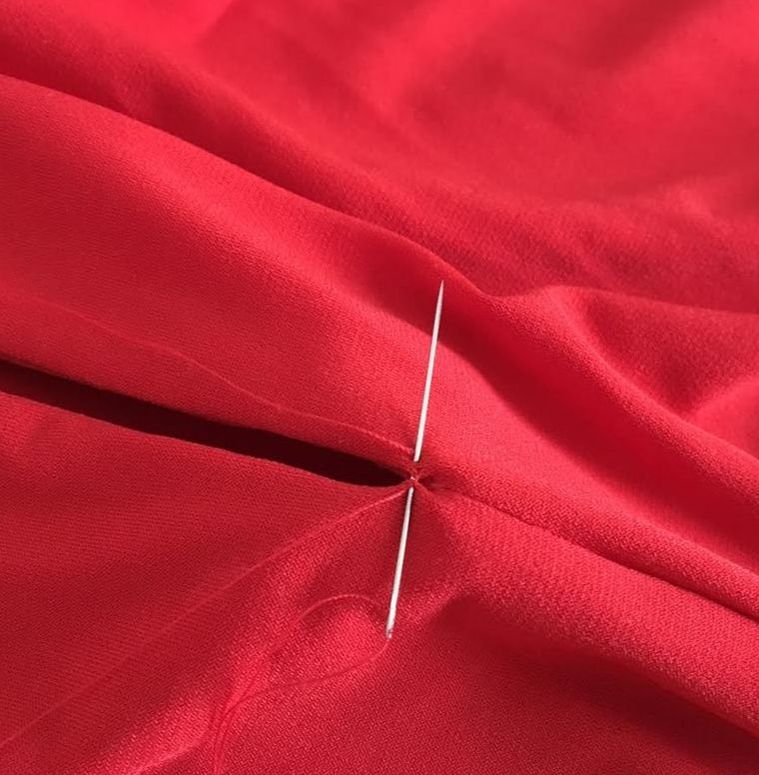
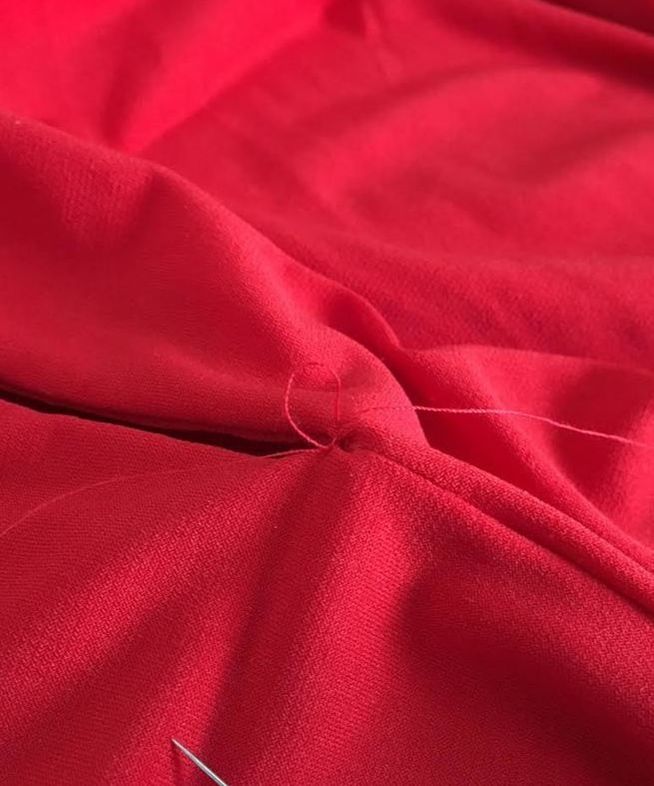
It is often difficult to resist a clothing item that features a slit. Whether it is added in the front or the side seam of a garment, a slit is both feminine and sexy, modernizing a clothing item while adding comfort. A slit is a design element that serves both a functional and aesthetic purpose. Slits are always added into some form of seam, whether at the front, back or side of the garment. It is very rare that you'll find a slit cut into the fabric and not actually inserted into a seam. If a slit is cut directly into the fabric and not an open extension of a seam, the slit wont lay flat, will open uncomfortably, or rip at the top during wear. 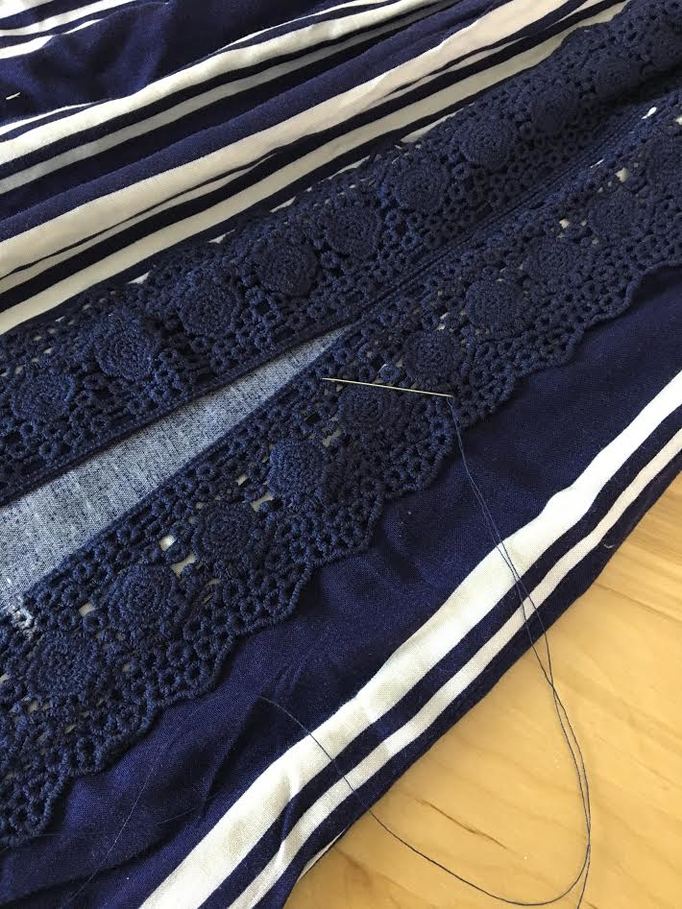 Just as you would with any seam, slits need to be clean-finished and reinforced by using the appropriate clean finishing method. This can range from serging and folding, double folding and top stitching, using a facing or adding binding along the slit opening edges. Regardless of what the finish is, the slit should blend into the rest of the seam smoothly without disrupting the fit and structure of the garment. This means that the clean finishing method used for slits should not be so bulky or heavy as to jeopardize the comfort and function of the clothing item at hand. Have you ever fallen in love with a dress or a skirt featuring a slit only to find that the slit is a bit too high for everyday wear? Due to the fact that all of us have different body types, this problem is more common than you would think. You might find yourself in a situation where the slit itself forces you to wear the garment in a very limited setting, being either too risky or maybe too inappropriate for certain occasions (like work, for example). Thankfully, there is an easy fix! You can close any slit by any distance necessary using a simple hand stitch described in the sewing tutorial below. As you'll learn in the steps to follow, a hand stitch very similar to a blind slip stitch will be your saving grace when it comes to closing/lowering almost all slit styles. The best part? This method does not require a sewing machine and it is durable and invisible once applied, blending into the seam and keeping it flat throughout. In the second portion of this tutorial, we'll show you how to use the same stitching method on necklines that are cut too low. Although this method doesn't work on all neckline styles, low cut tops and dresses that extend from an actual seam (such as the blouse used in this tutorial) are similar in construction to slits and can be closed using the hand stitch described in this tutorial. How To Lower Or Close A Dress/Skirt Slit Without A Sewing Machine 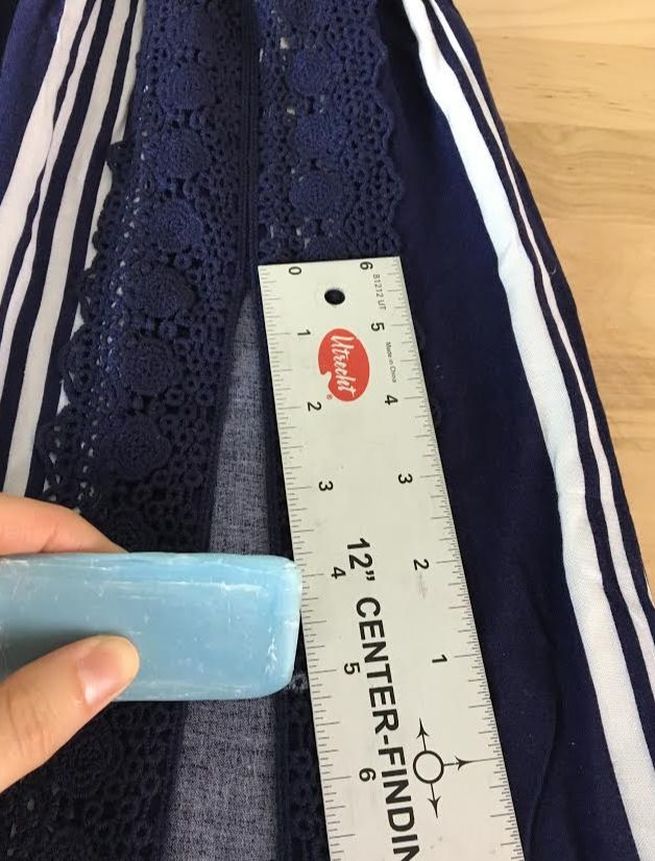 1. Starting at the opening of the slit, measure the length of the slit you would like to have closed. You can use a ruler to measure this new length or simply mark the new desired slit opening while the garment is still on. Place a pin or a horizontal tailor's chalk mark along one of the slit edges as shown above. In this tutorial, we will be closing the slit by 5". 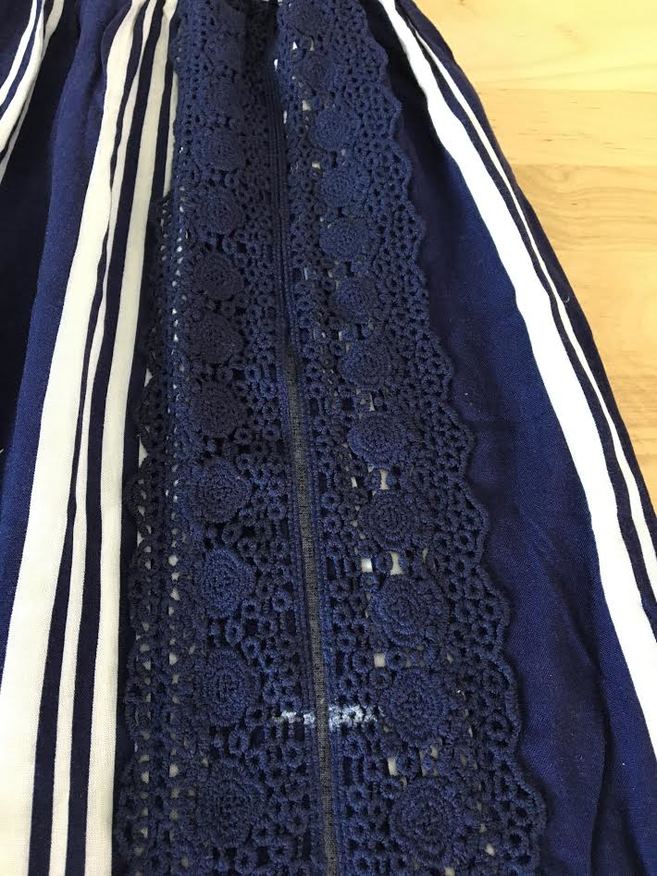 Align the edges of the slit next to each other such that they meet but don't overlap. Think of these adjoining edges as the continuation of the closed seam at the top. To make sure you have everything aligned properly later on, transfer the chalk mark on the other edge of the slit as shown above 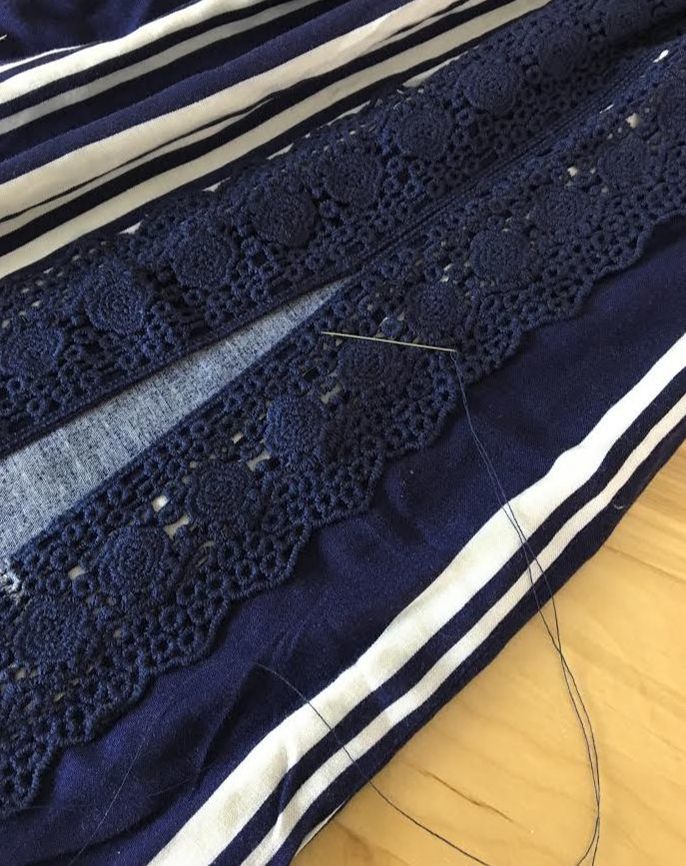 2. Thread a hand sewing needle with thread that matches the color of the dress fabric perfectly- this will ensure that the stitch is invisible on both wrong and right side of garment once the slit is closed. 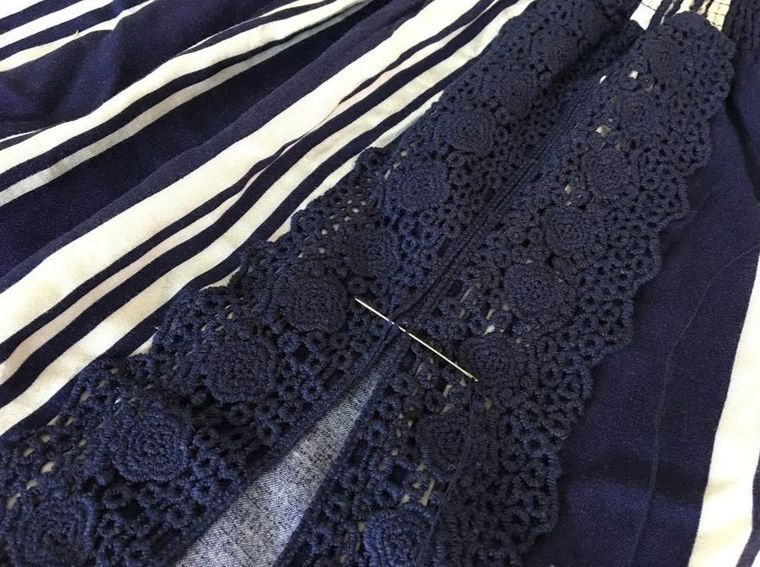 Starting at the top of the slit where the slit opens, insert the needle horizontally through both edges of the slit as shown above. Make sure you catch just a small amount of the very edge on each side. 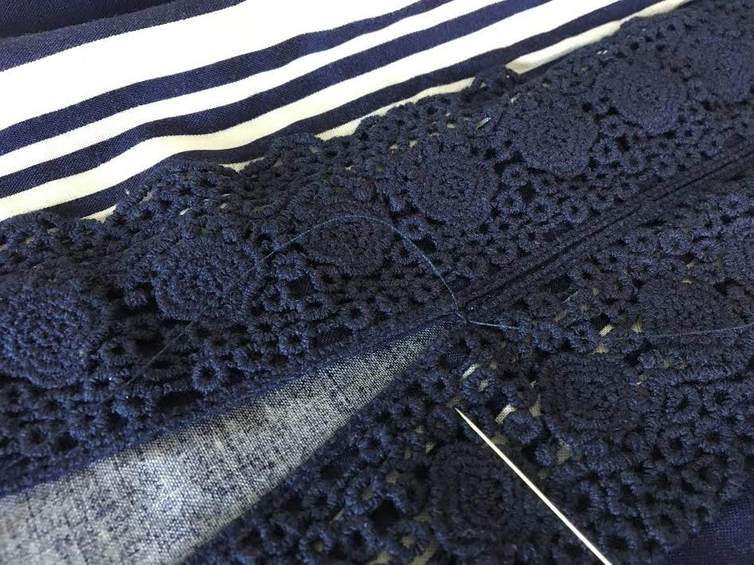 3. Whipstich the thread a few times in place to lock the thread. Whipstitching is a hand stitch achieved by simply looping hand-sewn stitches in place until even, durable layers are achieved. 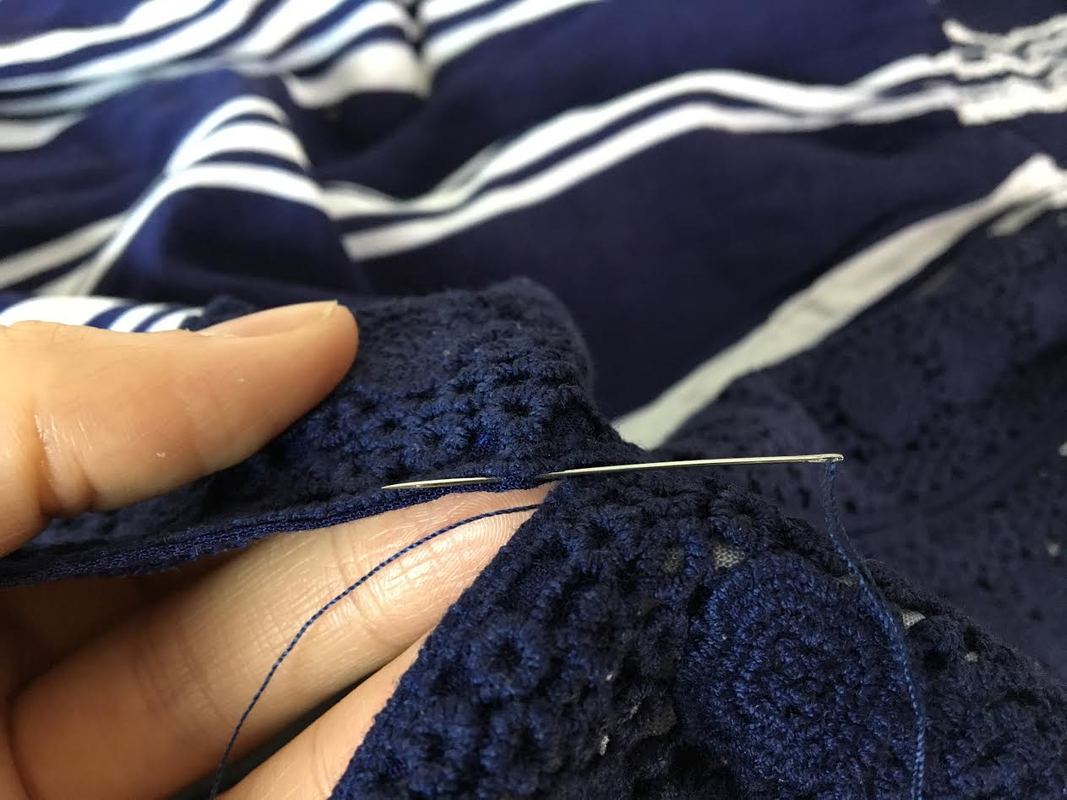 4. Next, insert the needle through one of the edges of the slit at about 1/8" distance lengthwise. This is very similar to a blind stitch in the fact that the needle is inserted right at the edge of the fabric fold such that the thread is hidden in between the two fabric layers of the fold. 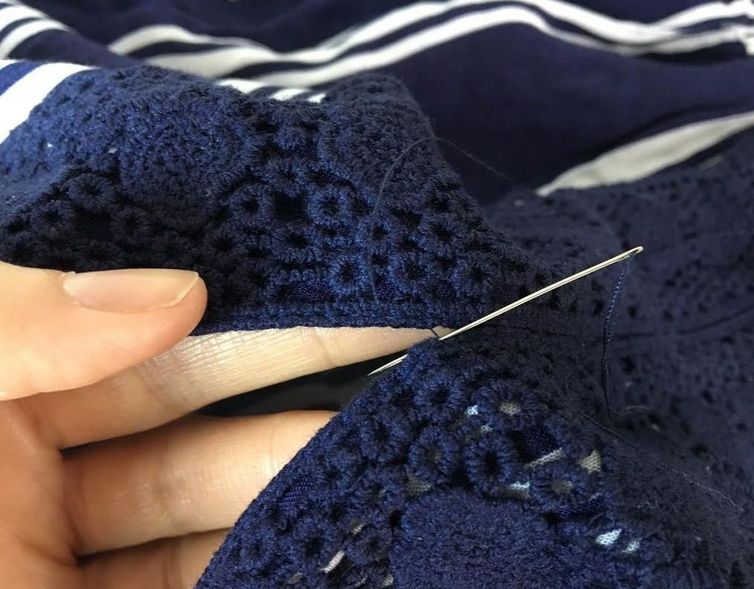 5. Repeat the stitch described above on the other edge of the slit, moving down towards the bottom. 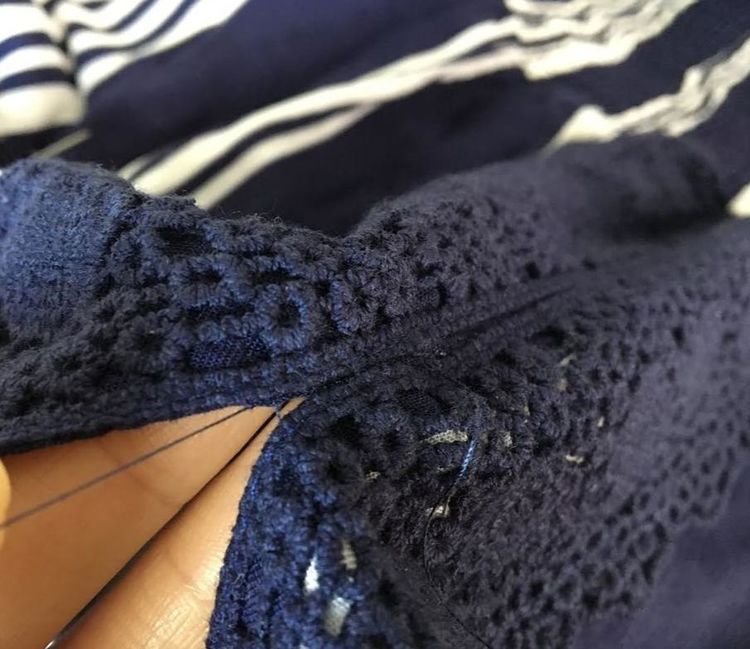 As displayed above, this blind stitch should not be visible on the surface of the garment but only it between the two adjoining edges if they are pulled apart. 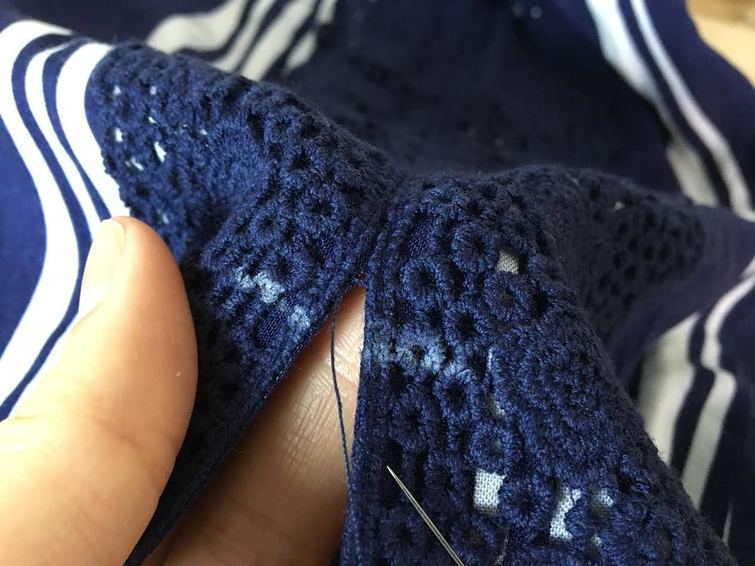 6. Continue blind stitching from edge to edge until you arrive at the chalk marks designated for the new slit opening as shown. 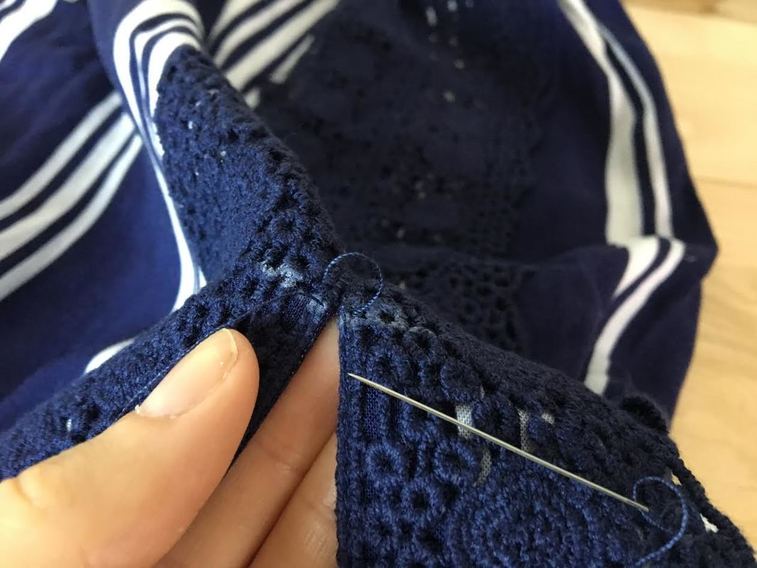 7. When you arrive at the tailor chalk marks, add a small whipstitch just as you did at the beginning, in order to lock the stitch in place. It is very important that the blind stitch is reinforced at the new slit opening due to the fact that this area receives a lot of strain during wear. If the hand stitch is not locked in place properly, it will unravel causing the slit to open during movement and/or washing. 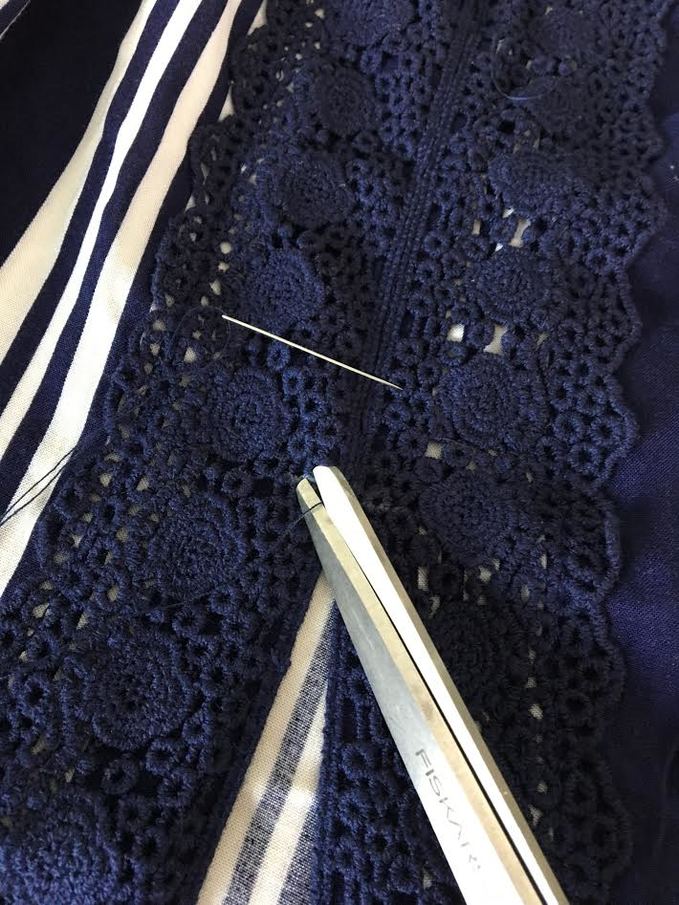 Once the stitch is reinforced, cut the thread next to the whip-stitch but not so close that you accidentally damage it.  The lower slit opening is now complete! You should not be able to notice the transition between the existing stitch at the top and the new hand-applied blind stitch at the bottom. The new slit opening should blend in smoothly without any stitching threads visible on the outside of the garment. How To Close or Shorten A Low Cut Neckline 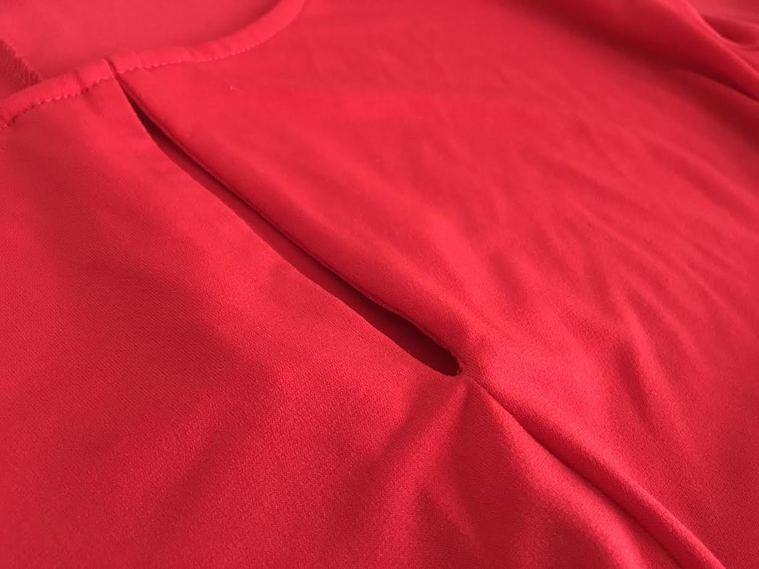 As briefly mentioned above, the blind stitch method works on neckline slits that are sewn into a seam, such as the one displayed above. The edges should not create fit issues or distort the smoothness of the front once adjoined. Only use this method if the V-neckline or slit edges are able to naturally touch without affecting the structure of the garment.
1. Begin at the lower closed end of the slit neckline and sew in place from edge to edge a few times to lock the thread in place. As you might have guessed from reading through the dress tutorial steps above, this is called a whipstitch. 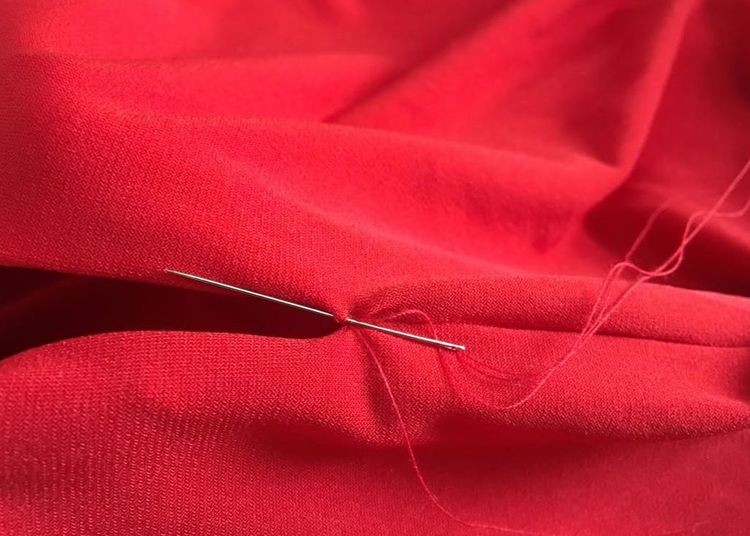 2. Insert the needle through one of the slit edges at about 1/8" distance lengthwise such that the thread remains invisible on the outside of the garment, and falls between the facing and self layers as shown above. 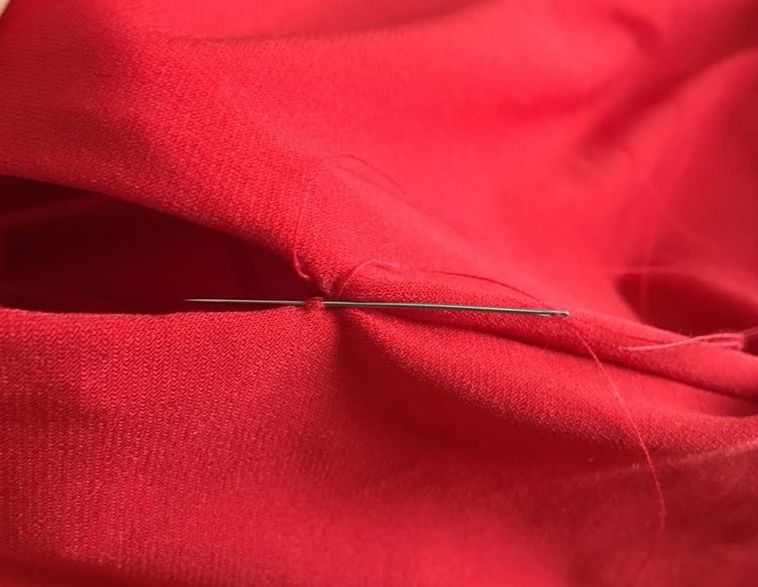 3. Next, repeat the step described above by inserting the needle at 1/8" distance lengthwise through the opposite edge of the opening. This will bring the adjoining edges together while keeping the thread invisible on both the right and wrong sides of the garment.  4. Continue stitching from edge to edge carefully connecting the neckline together and ensuring that the thread remains hidden within each folded edge.  Don't pull the thread too hard while applying these blind stitches or you risk wrinkling the seam. Hand stitch until you arrive at the desired neckline height. 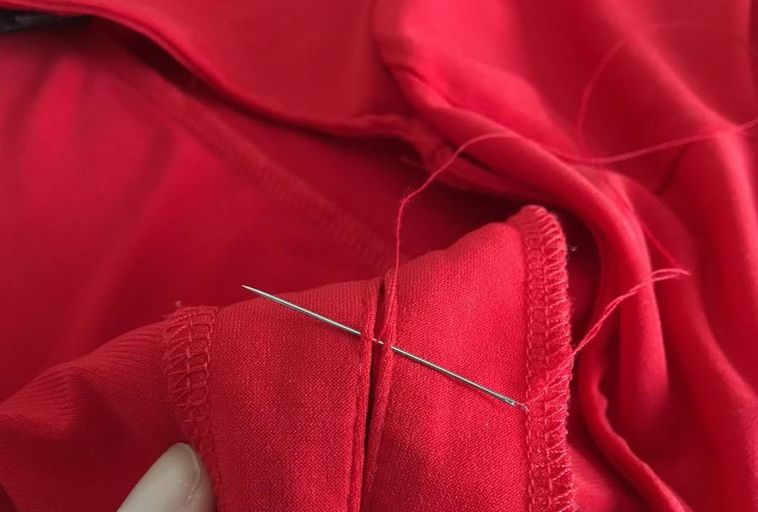 5. Turn the garment inside out and insert the needle through both edges as shown above. As you did for the dress slit above, apply a whipstitch in order to lock the hand-applied blind stitch in place and prevent it from unraveling during wear. 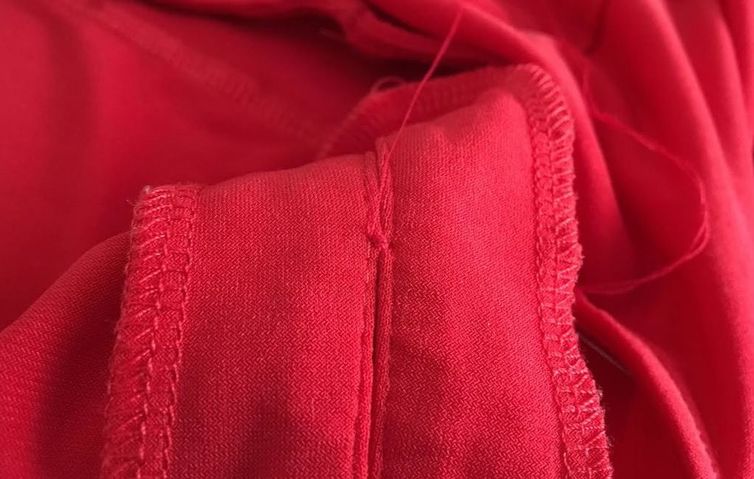 To do this, stitch in place a few times until the thread is secured and won't come undone once the thread is cut. If you are unsure how dense the whipstitch should be, use the image above as a reference. A good rule to keep in mind is that a whipstitch used to lock the thread in place should be dense enough to withstand long term wear and care but not so dense as to create bulkiness or affect the smoothness of the garment. Trust your instincts on this one!
8 Comments
Ruth
6/30/2018 03:57:29 am
How do I stitch a front slit in a stretchy pencil dress without making it look homemade??? 7/2/2018 09:41:07 am
Hi Ruth!
Betty Lou Ferris
7/7/2020 08:08:50 am
I have a dress with a front left side slit than is curved at the top and open. Not on a seam. It is too high. It is a fancy dress with an over lace cape. And the basic dress is stretch polyester, navy blue and the colors are hard to match. Do you have any suggestions?
Lindsay
8/6/2020 03:20:53 pm
Do you have a before/after photo of the red top? 8/7/2020 08:33:53 am
Hi Lindsay! I will look through and see if I can find some good before and after photos of the blouse - will add them to the blog post!
Lindsay
8/12/2020 05:35:46 pm
Thank you!!!
Michelle Shannon
9/11/2021 09:40:50 pm
I guess I missed what was used to fill the slit, it appears to be lace edging….
Lizzy
11/23/2021 02:45:47 pm
Can you show me how to open a slit (make it higher). I have an evening gown with a liner. It has a thigh slit in the seam. I had to hem the dress 4 inches, so now the slit needs to be higher. It’s urgent! Wearing the dress this weekend. Thanks. Leave a Reply. |
The Blog:A journey into our design process, sewing tutorials, fashion tips, and all the inspiring people and things we love. 
Doina AlexeiDesigner by trade and dressmaker at heart. I spend most of my days obsessing over new fabrics and daydreaming new ideas. 
Sadie
Executive Assistant & Client Relations Manager Archives
November 2019
Categories
All

|

-
Sewing Tutorials
-
Basics
>
- Aligning Pattern Grainlines To Fabric
- Preparing Fabrics For Sewing
- Pinning Sewing Patterns To Fabric
- Placing Sewing Patterns On Fabric For Cutting
- Rotary Cutters or Fabric Scissors?
- Cutting The Sewing Patterns
- What Are Notches And How To Use Them In The Sewing Process
- Transferring Notches From Pattern To Fabric
- Transferring Seamlines to Fabric
- Staystitching
- Backstitching: A Complete Guide
- Hand Basting: A Complete Guide
- Sewing Continuous Bias Binding
- Darts >
-
Sewing Seams
>
- The Basics Of Seams And Seam Allowance
- How To Sew A Straight Seam
- Sewing Curved Seams
- Sewing Corner Seams
- Trimming And Grading Seam Excess
- Notching/Clipping Seam Allowance for Tension Release
- Sewing Topstitched Seams
- Sewing Corded Seams
- Sewing A Slot Seam
- Sewing A Gathered Seam
- Sewing Bias Seams
- Sewing Seams With Ease
- Sewing Seams With Crossing Seamlines
- Sewing Unlike Fabric Seams
- How To Iron Seams: Ironing Tools And Conventions
- Sewing With Knit Fabrics
- Understanding Stitch Length And Tension
- Sewing Unique Fabric Seams
-
Seam Finishes
>
- Seam Finishing Techniques - Overview
- Applying A Pinked Seam Finish
- Applying A Bias Bound Seam Finish
- Serging And Zigzag Seam Finishes
- Sewing A Self-Bound Seam Finish
- Sewing A French Seam Finish
- Sewing A Hong Kong Seam Finish
- Sewing A Mock French Seam Finish
- Sewing A Turned-and-Stitched Seam Finish
- Sewing Overcast Hand-Applied Seam Finishes
- Sewing A Flat Felled Seam
- Sewing A Hairline Seam Finish
-
Hem Finishes
>
- Garment Hem Finishes: Overview
- Sewing A Double Fold Hem Finish
- Sewing A Single Fold Hem Finish
- Sewing Bound Hem Finishes
- Sewing An Exposed Double Layer Bound Hem
- Sewing A Folded-Up Bound Hem with Pre-folded Binding
- Sewing A Hong Kong Hem Finish
- Sewing A Band Hem Finish
- Sewing A Bias Faced Hem Finish
- Sewing A Twill Tape Hem Finish
- Sewing A Rolled Hem Finish
- Sewing A Shaped Hem Facing
- Using Fusible Hem Tape And Webbing
- Finishing A Lace Fabric Hem
- Finishing A Leather Hem
- Sewing Faced Hem Corners
- How To Finish Lining At The Hem
- Finishing Fabric Corners by Mitering >
- Interfacing A Hemline: Lined And Unlined Examples
-
Sewing Pockets
>
- Curved Patch Pocket With Flap
- Unlined Square Patch Pockets
- Lined Patch Pockets: Two Ways
- Extension On-Seam Pockets
- Separate On-Seam Pocket
- Front Hip Pockets
- Bound Double Welt Pocket
- Double Welt Pocket With Flap
- Self-Welt Pocket (Using Single Fabric Layer)
- Slanted Welt Pocket (Hand-Stitched)
- Faced Slash Pockets: Overview >
-
Sewing Zippers
>
- Sewing Zippers: General Information
- Sewing A Centered Zipper
- Sewing A Lapped Zipper
- Sewing An Invisible Zipper
- Sewing A Fly Front Zipper
- Sewing A Closed-End Exposed Zipper (No Seam)
- Sewing An Exposed Separating Zipper
- Sewing Hand Stitched Zipper Applications
- Sewing A Zipper Underlay
- Sewing A Placket-Enclosed Separating Zipper
- Sleeveless Finishes >
-
Neckline Finishes
>
- Sewing A Neck Shaped Facing
- Sewing An All-In-One Neck Facing
- Neck And Garment Opening Combination Facings >
- Sewing A Bias Faced Neckline Finish
- Sewing A Band Neckline Finish
- Bound Neckline Finishes: Overview >
- Sewing A Semi-Stretch Strip Band Neckline
- Ribbed Neck Band And Classic Turtleneck
- Decorative Neckline Finishes >
- Finishing Facing Edges >
-
Extras
>
- A Complete Guide on Interfacing
- Sewing Bound Spaghetti Straps
- Sewing Spaghetti Straps To A Faced Neckline
- Sewing Ruffles: Overview
- Patterning And Sewing A Circle Ruffle
- Sewing A Gathered Heading Ruffle
- Sewing Double Layer Gathered Ruffles
- Sewing A Gathered Ruffle Into A Seam
- Sewing A Gathered Ruffle To A Fabric Edge
- Sewing A Fabric Surface Slit
- Sewing A Slit Seam
- Hand-Applied Straight Stitches
- Hand-Applied Blind Stitches
- Hand-Applied Overedge Stitches
- Hand-Applied Tack Stitches
- Hand-Applied Decorative Stitches
-
Basics
>
- Custom Bridal
- Custom Apparel
- About
- Blog
 RSS Feed
Services |
Company |
|
