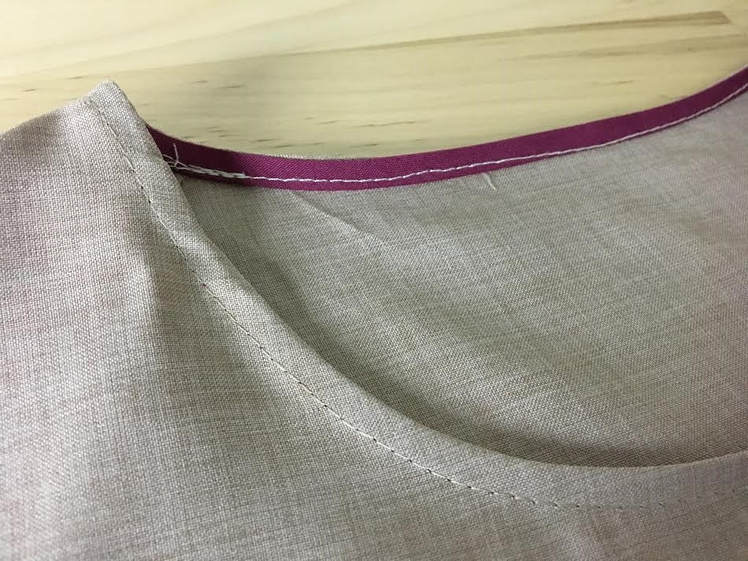
 Binding is perhaps one of the most commonly used sewing techniques to clean finish curved edges of necklines and armholes. It is a multifaceted tool used both in apparel and quilting to encase raw fabric edges for both functional and decorative purposes. With regards to apparel, you'll find that binding is used on almost all lightweight to medium weight fabrics as it provides a less bulky, inexpensive and easy-to-work-with technique. Bound finishes are considered a bit on the casual side stylistically due to he fact that there is a visible top stitch on the face of the garment on almost every application. What is binding? Binding is constructed of a strip (or strips of) fabric that are cut on the bias (diagonally to the grain line) and folded to encase fabric edges. Due to the fact that it is mostly used along curved edges, binding requires to be cut on the bis as this provides enough stretch and flexibility to mold along more curved edges. Don't believe us? Take larger piece of fabric and stretch it vertically, horizontally and diagonally in relation to the selvage edge. You'll notice that when the fabric is pulled diagonally it provides a lot more flexibility even though the fabric itself lacks stretch. Keep in mind that this concept works mainly with regards to woven fabrics and may not be relevant to knits that feature a lot more stretch crosswise (horizontally). 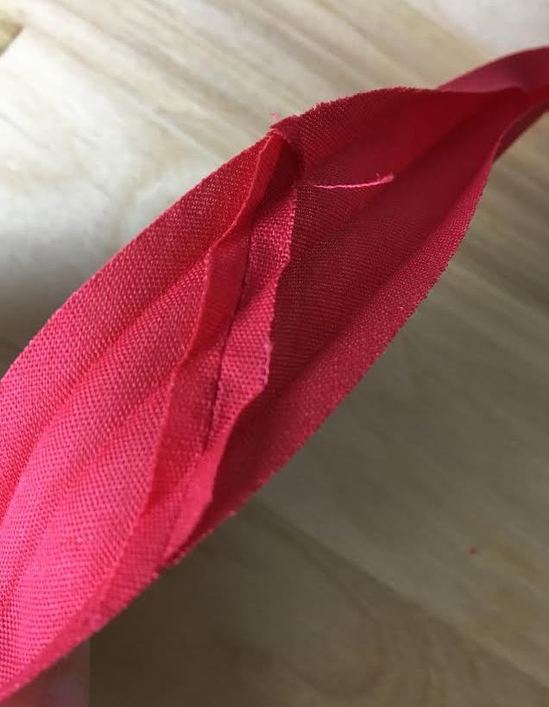 Binding has to be continuous such that there are no unnecessary interruptions in the application process. To make continuous binding, the strips are sewn together using diagonal seams. The continuous binding strip is then pre-folded so that it is easier to work with during the sewing process. The binding can be folded in a couple of different styles depending on the finish it is used for. The most common options you'll come across at the fabric store are double fold and single fold binding styles. There are actually some specialty presser feet you can purchase that feed the strip and fold it automatically in the sewing process without the need for pre-folding. If you find yourself using binding finishes very often, it might be a good idea to look into a binding presser foot as this will save you a ton of time (and maybe some frustration) in the process. If you are a sewing beginner however, keep in mind that you should learn how to apply a pre-folded bound finish by hand first as this will give you a basic understanding of how bound finishes work. 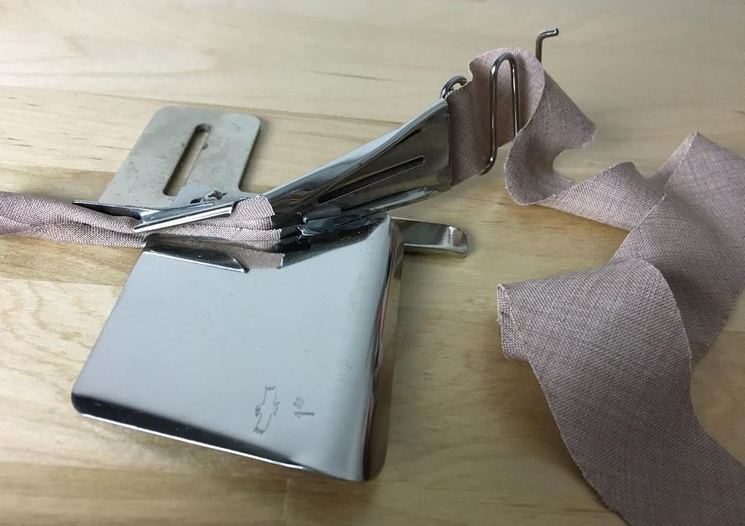 That being said, there is a range of pre-folded and pre-cut binding available on the market. If you have some basic experience with sewing apparel and crafts, you have probably already used pre-made binding at point. It is available in almost all fabric stores (and some craft stores) and comes in a variety of different widths and folds. Single folded and double folded binding are the two you'll come across most and both used in quilting and apparel.  Double folded binding is folded three times. Both strip edges are folded in towards a center line such that they touch but do not overlap, after which the strip is folded again down the middle to encase these two raw edges. 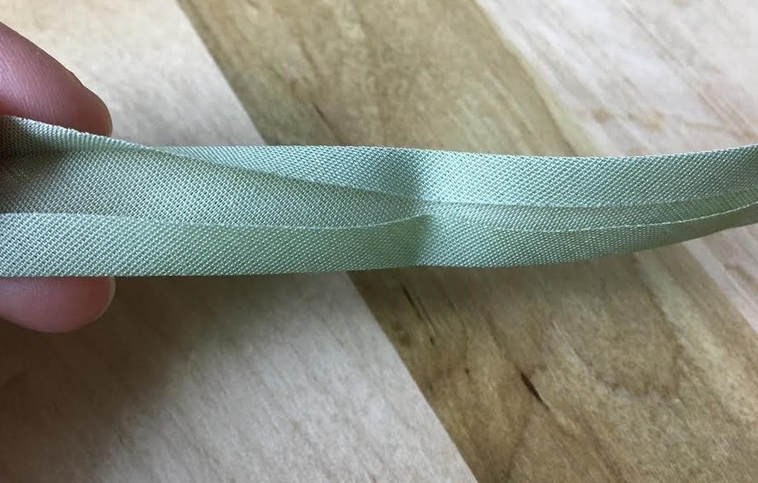 In single folded binding, the raw edges of the strip are folded in at the same distance meeting at the center line but as opposed to double folded binding, single folded binding is not folded again down the middle to encase the strip edges. You might also come across binding that is folded such that the edges overlap each other and only a single raw edge is encased in the fold. This binding style is often used to clean finish outer raw edges like those of necklines and armholes. The reason one of the raw edges of the strip stays exposed is due to the fact that when the edge of the garment neckline (or armhole) is folded, the raw edge of the binding is actually enclosed in the neckline fold. What this does is minimize thickness and bulk by eliminating an extra binding layer. If it sounds a bit confusing, don't worry! As you gain more experience with applying binding to different types of fabric you will get a better understanding of this concept, and what style of binding fold is appropriate to use with what finish. Generally, binding should be constructed of the same fabric as the garment itself as this will allow for a less visible, more professional finish. Case in point, if you walk over to your closest right now, you'll find that 99% of your clothing items that use binding as a finish fetaure binding made of the same fabric. You can actually make your own double folded or single folded binding at home by cutting strips of the matching fabric at the desired width and pre-folding it with an iron. Keep in mind that it will take a bit of time and some patience to make your own binding as opposed to buying pre-made one at the store. Nevertheless, if you are after a more professional, store-bought look it might be well worth it. Plus, the experience will prove to be quite useful as as you experiment with more advanced sewing techniques. How To Sew Double Fold Binding To a Round Neckline  In this tutorial, we'll be using a store bought cotton binding that is 1/4" in width when folded. A 1/4" width is a standard size used on almost all lighter weight fabrics. For more curved edges, it is recommended that you use a smaller width binding as this will allow for a smoother finish. When it comes to working with double folded binding, keep in mind that the width of the folded binding should correspond to the seam allowance of the edge it is being sewn to. If is sounds a bit confusing, the steps to folow will help you understand this concept a bit better. 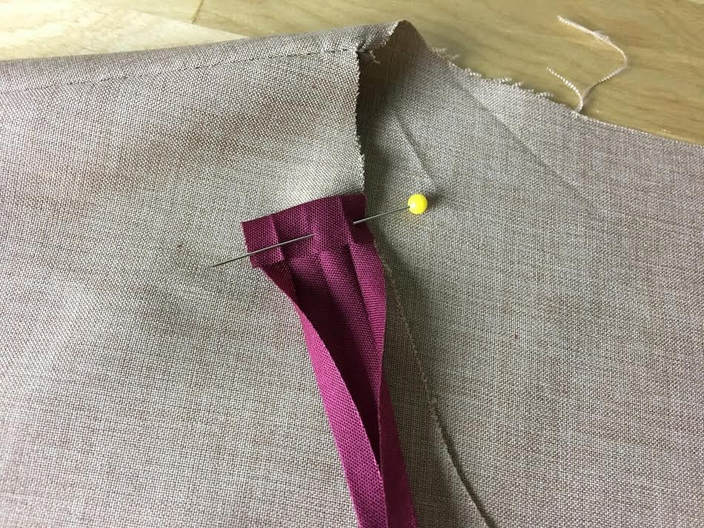 1. Open all the folds of the pre-folded binding. There are 3 distinct fold lines positioned at an even distance from one another along the binding strip. Fold one of the edges of the binding in at about 1/4" and pin it to the neckline's edge as shown above. Make sure the inside of the binding is facing up such that both the face of the binding and right side of the garment are touching. It is up to you where the binding starts along the neckline's edge as long as you start by folding the binding in for a clean finished look. 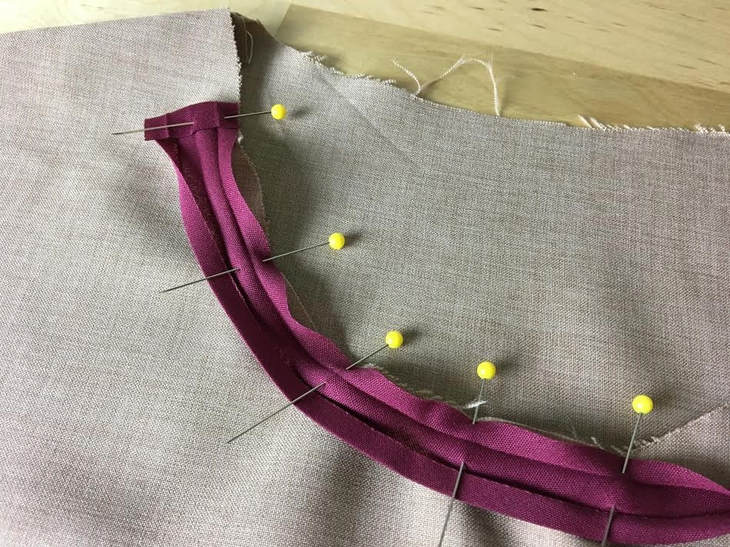 2. Align and pin the edge of the binding to the rest of the neckline's edge. Place the pins perpendicular to the edge with the pin ball aligned to the right side of the neckline edge- this will make it easier for the pin to be removed during the sewing process thus preventing any accidental pin pricks. 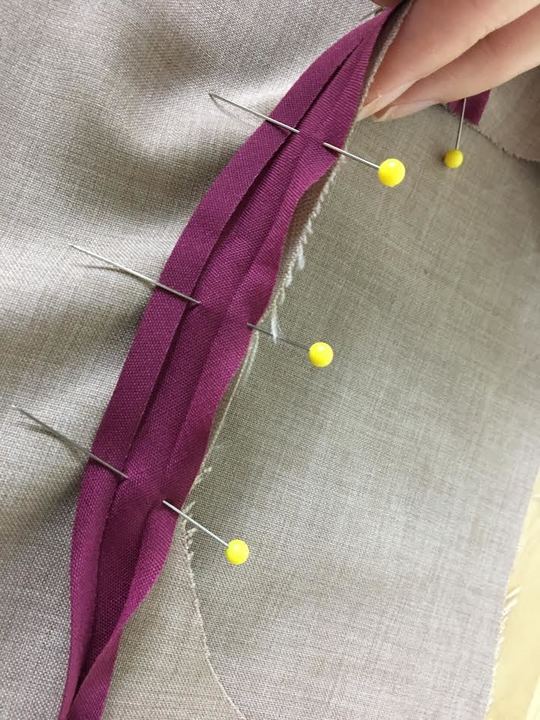 As you pin, make sure you align both edges to each other evenly. It might be a bit of a challenge to do this when pinning along the most curved areas of the neckline. If necessary, use denser pin placement to keep the binding in place properly along more tricky areas. 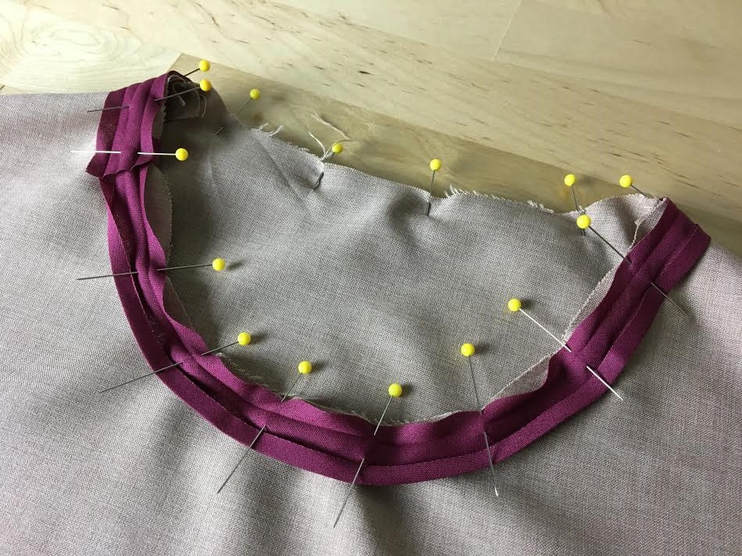 3. Pin the rest of the binding until you've reached the beginning of the finding featuring the initial fold from Step 1. Tip: Don't cut the binding until after you've entirely pinned it along the neckline. This will prevent measuring errors or discrepancies caused by the fabric stretching in the pinning process. Always cut the binding only after you've reached the initial folded edge, and allow about 1/2" to 1" in overlapping excess. 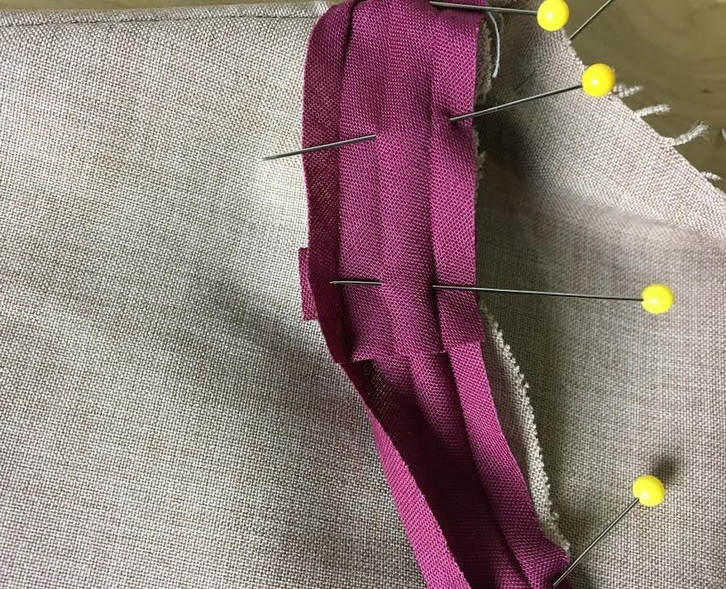 4. Place the binding extension on top of the initial fold as shown above and pin to secure. 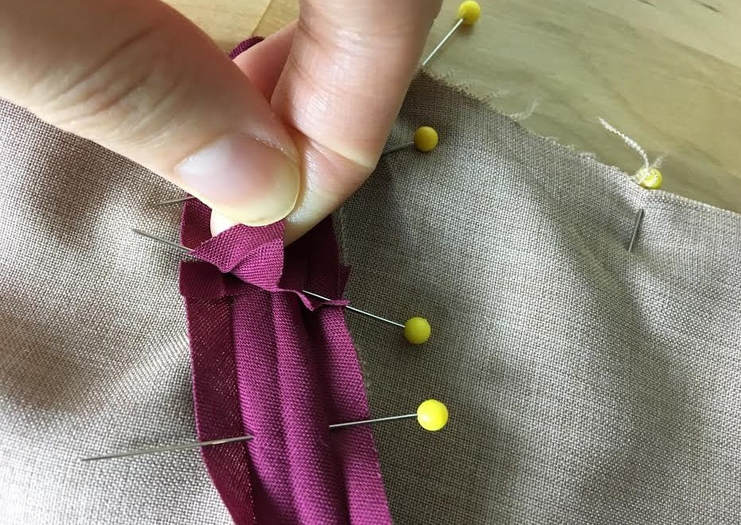 Overlapping the raw edge on top of the folded binding edge (as shown above) will encase the raw edge allowing just the fold to show on the outside. 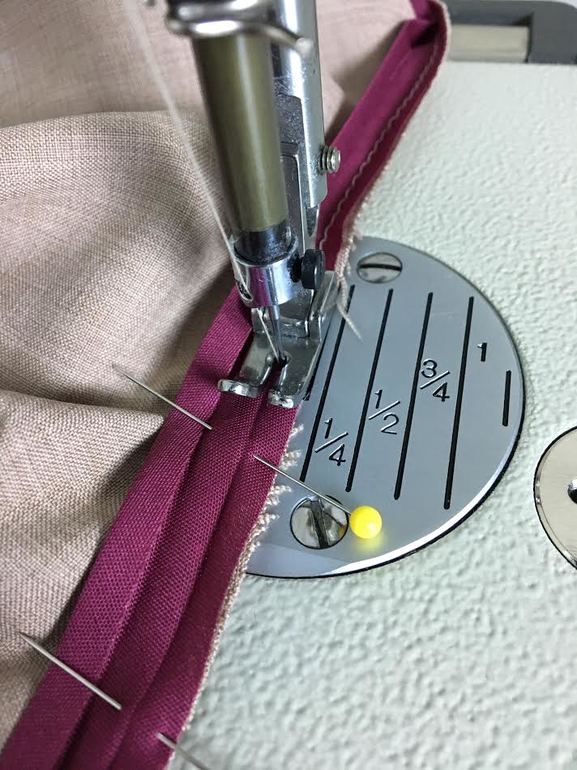 5. Apply a straight stitch just slightly to the right of the fold as displayed above. Stitching very close to the fold but not directly on it will allow the binding to fold effortlessly over the raw edge. However, if you don't feel quite comfortable with your sewing machine yet, you can stitch directly on the fold as this is often much easier to sewing beginners. Make sure the edge of the binding is aligned to the edge of the neckline at all times during the stitching process. It may be a bit more tricky to sew the binding along the most curved areas- Be patient and stitch slower when reaching more abrupt curves. 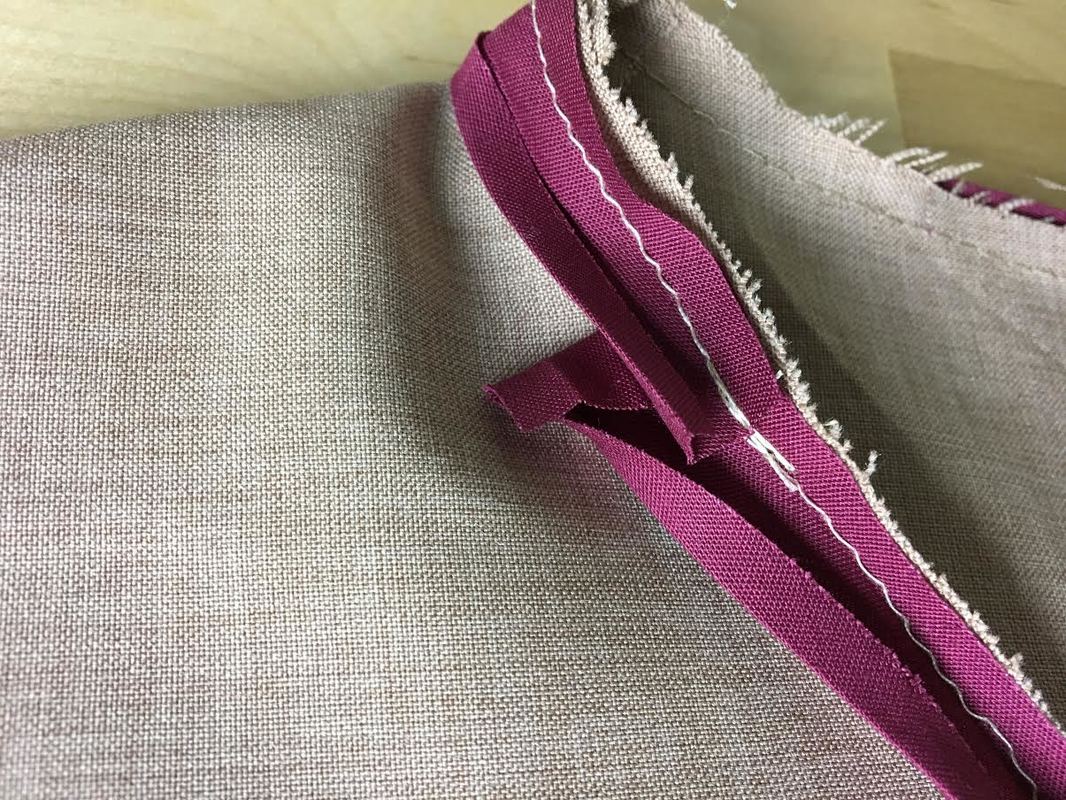 Keep the binding edges evenly overlapped and backstitch at the end of your stitch for a more durable finish. 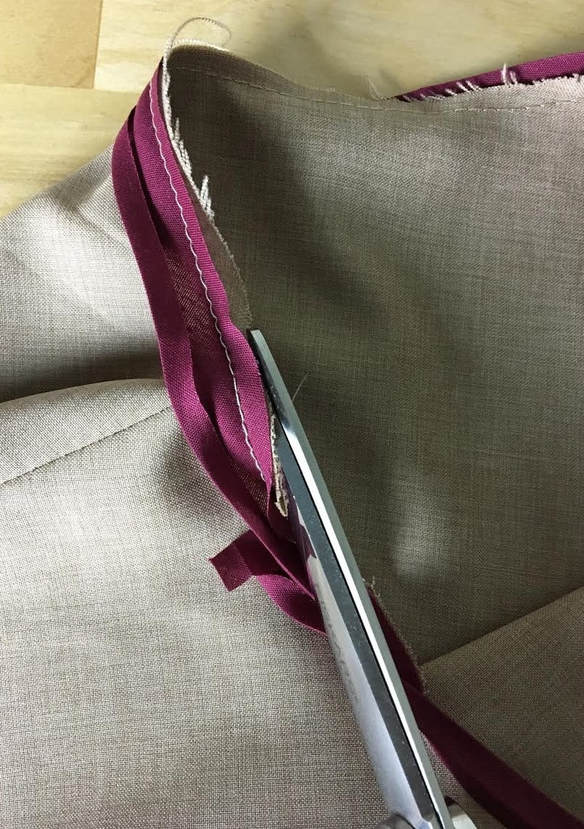 It is a good idea to trim any raw neckline edges that are protruding out from the edge. Doing so will minimize bulk when the binding is folded over the neckline edge. 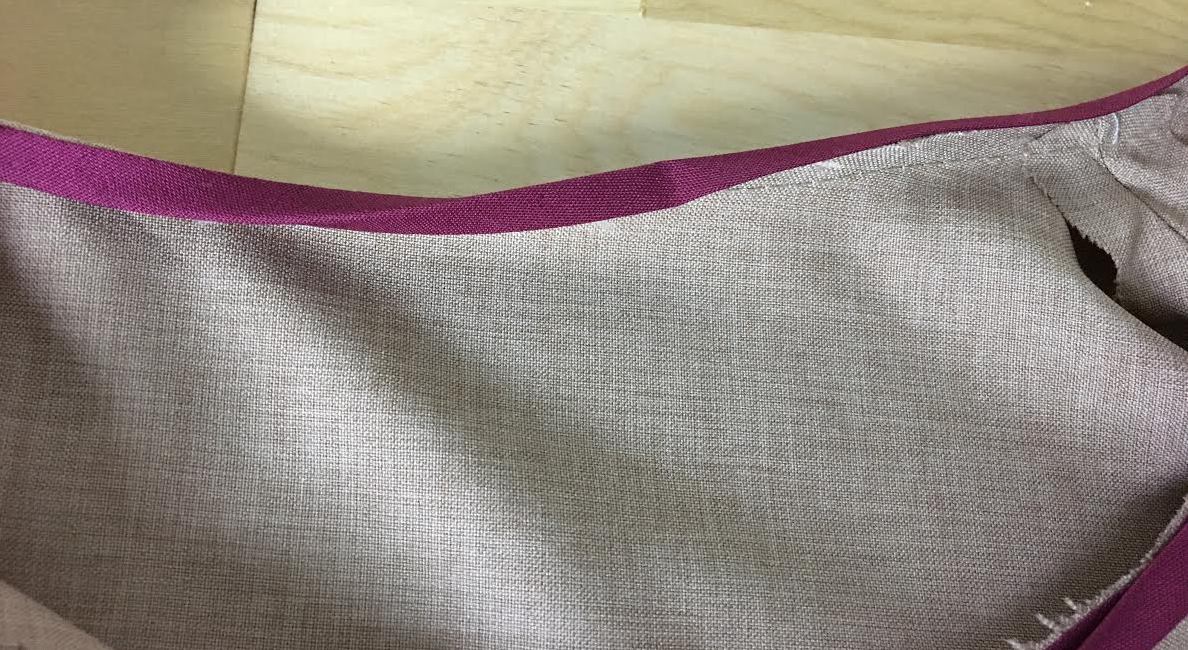 6. Fold the binding over the raw edge once, then fold it in one more time towards the inside of the garment. You'll find that with a pre-folded binding (especially that made of cotton) this is quite easy to do since the binding naturally folds over the raw edge of the fabric. 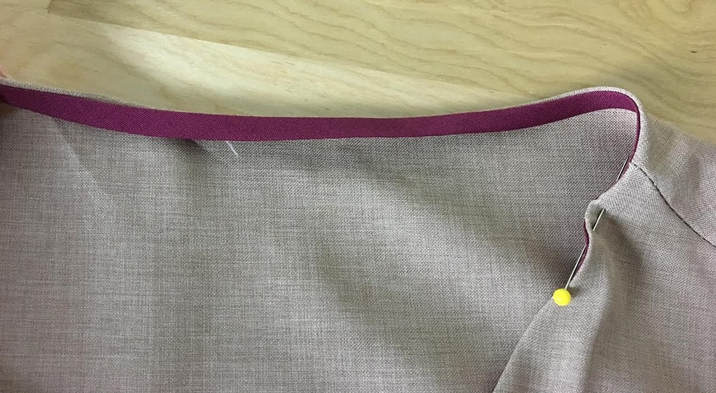 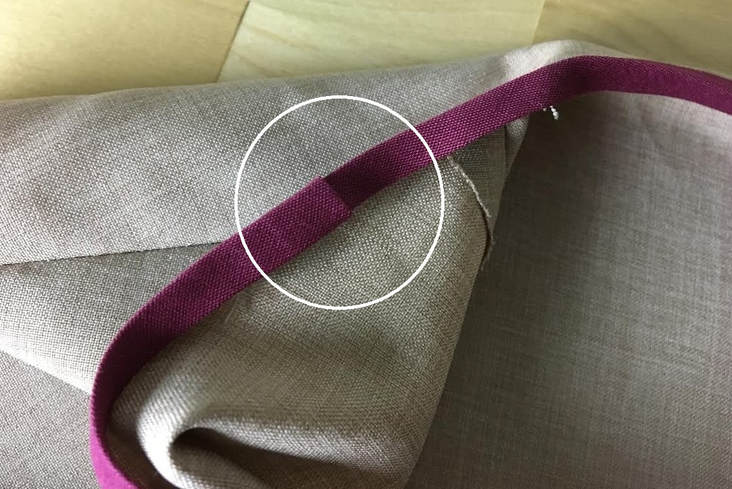 The folded binding edge hides the second raw edge for a clean finish. Once folded towards the inside of the garment the fold will blend in giving the look of one continuous binding piece. 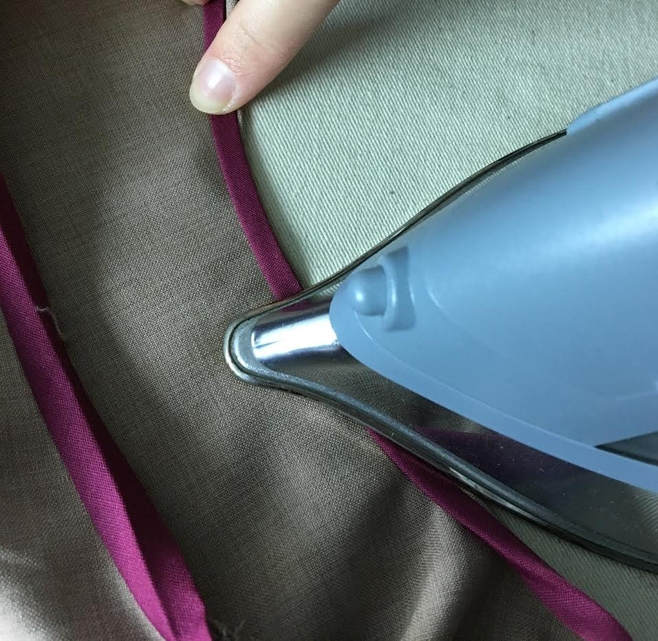 7. Iron the edge of the neckline with the biding positioned towards the inside of the garment. This will keep the binding stable and facing inwards thus making it much easier to pin and stitch. 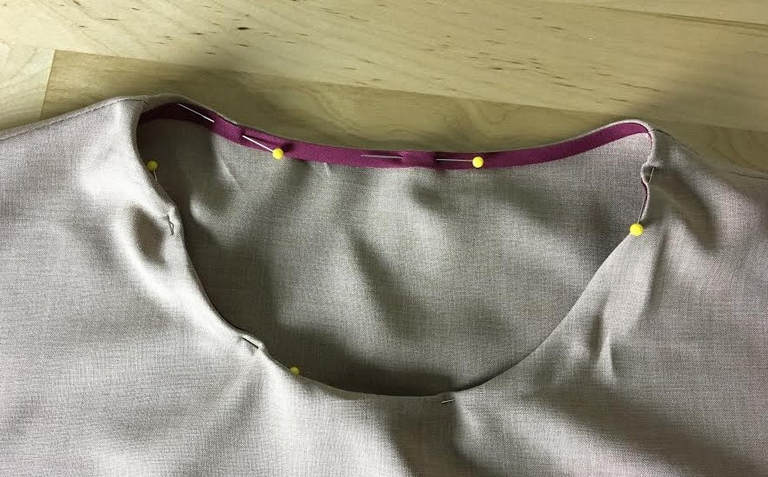 8. Pin the binding in place. Generally, pins should always be placed perpendicular the edge. In this case however, because of the thickness of the fabric layers in the binding and neckline and the small binding width, it is more comfortable to place the pins parallel to the edge as shown above. Pin on top of the binding as this is the side that will be facing you during machine stitching. 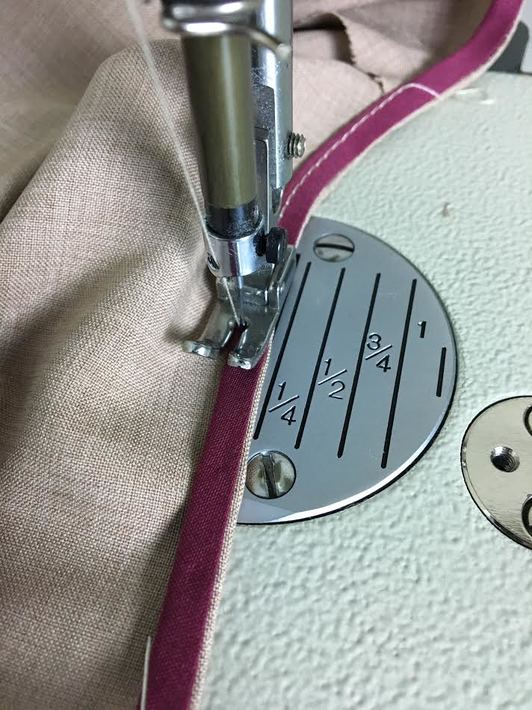 9. Stitch on top of the binding at about 1/16"-1/8" away from the binding's edge. Use the binding's folded edge as a guide. Don't forget to backstitch for a durable finish. 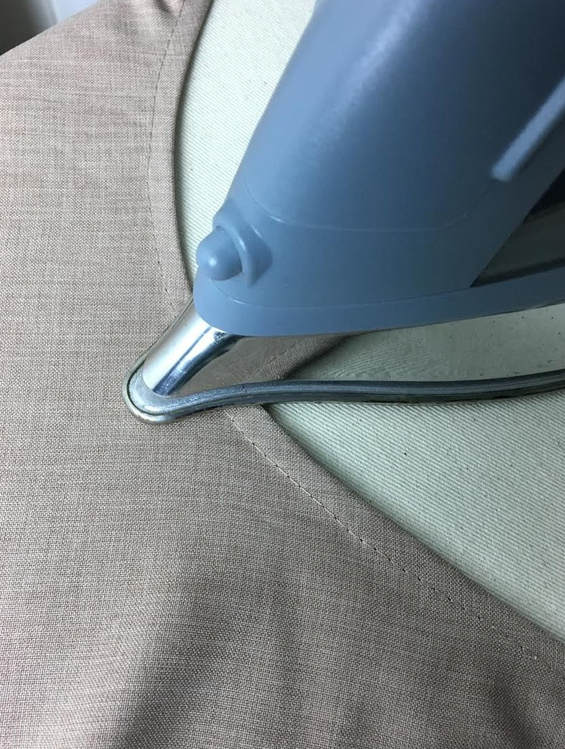 10. Iron the finished neckline on the face of the garment. Use the thinner edge of the ironing board to facilitate the ironing process especially along the most curved areas. 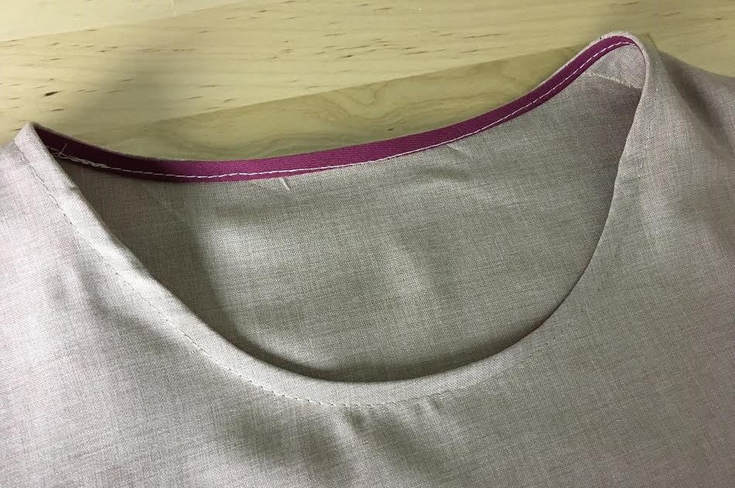 It may take a few tries to achieve a perfectly sewn bound neckline. If you keep practicing, you will eventually be able to sew binding effortlessly in just a single try.
0 Comments
Leave a Reply. |
The Blog:A journey into our design process, sewing tutorials, fashion tips, and all the inspiring people and things we love. 
Doina AlexeiDesigner by trade and dressmaker at heart. I spend most of my days obsessing over new fabrics and daydreaming new ideas. 
Sadie
Executive Assistant & Client Relations Manager Archives
November 2019
Categories
All

|

-
Sewing Tutorials
-
Basics
>
- Aligning Pattern Grainlines To Fabric
- Preparing Fabrics For Sewing
- Pinning Sewing Patterns To Fabric
- Placing Sewing Patterns On Fabric For Cutting
- Rotary Cutters or Fabric Scissors?
- Cutting The Sewing Patterns
- What Are Notches And How To Use Them In The Sewing Process
- Transferring Notches From Pattern To Fabric
- Transferring Seamlines to Fabric
- Staystitching
- Backstitching: A Complete Guide
- Hand Basting: A Complete Guide
- Sewing Continuous Bias Binding
- Darts >
-
Sewing Seams
>
- The Basics Of Seams And Seam Allowance
- How To Sew A Straight Seam
- Sewing Curved Seams
- Sewing Corner Seams
- Trimming And Grading Seam Excess
- Notching/Clipping Seam Allowance for Tension Release
- Sewing Topstitched Seams
- Sewing Corded Seams
- Sewing A Slot Seam
- Sewing A Gathered Seam
- Sewing Bias Seams
- Sewing Seams With Ease
- Sewing Seams With Crossing Seamlines
- Sewing Unlike Fabric Seams
- How To Iron Seams: Ironing Tools And Conventions
- Sewing With Knit Fabrics
- Understanding Stitch Length And Tension
- Sewing Unique Fabric Seams
-
Seam Finishes
>
- Seam Finishing Techniques - Overview
- Applying A Pinked Seam Finish
- Applying A Bias Bound Seam Finish
- Serging And Zigzag Seam Finishes
- Sewing A Self-Bound Seam Finish
- Sewing A French Seam Finish
- Sewing A Hong Kong Seam Finish
- Sewing A Mock French Seam Finish
- Sewing A Turned-and-Stitched Seam Finish
- Sewing Overcast Hand-Applied Seam Finishes
- Sewing A Flat Felled Seam
- Sewing A Hairline Seam Finish
-
Hem Finishes
>
- Garment Hem Finishes: Overview
- Sewing A Double Fold Hem Finish
- Sewing A Single Fold Hem Finish
- Sewing Bound Hem Finishes
- Sewing An Exposed Double Layer Bound Hem
- Sewing A Folded-Up Bound Hem with Pre-folded Binding
- Sewing A Hong Kong Hem Finish
- Sewing A Band Hem Finish
- Sewing A Bias Faced Hem Finish
- Sewing A Twill Tape Hem Finish
- Sewing A Rolled Hem Finish
- Sewing A Shaped Hem Facing
- Using Fusible Hem Tape And Webbing
- Finishing A Lace Fabric Hem
- Finishing A Leather Hem
- Sewing Faced Hem Corners
- How To Finish Lining At The Hem
- Finishing Fabric Corners by Mitering >
- Interfacing A Hemline: Lined And Unlined Examples
-
Sewing Pockets
>
- Curved Patch Pocket With Flap
- Unlined Square Patch Pockets
- Lined Patch Pockets: Two Ways
- Extension On-Seam Pockets
- Separate On-Seam Pocket
- Front Hip Pockets
- Bound Double Welt Pocket
- Double Welt Pocket With Flap
- Self-Welt Pocket (Using Single Fabric Layer)
- Slanted Welt Pocket (Hand-Stitched)
- Faced Slash Pockets: Overview >
-
Sewing Zippers
>
- Sewing Zippers: General Information
- Sewing A Centered Zipper
- Sewing A Lapped Zipper
- Sewing An Invisible Zipper
- Sewing A Fly Front Zipper
- Sewing A Closed-End Exposed Zipper (No Seam)
- Sewing An Exposed Separating Zipper
- Sewing Hand Stitched Zipper Applications
- Sewing A Zipper Underlay
- Sewing A Placket-Enclosed Separating Zipper
- Sleeveless Finishes >
-
Neckline Finishes
>
- Sewing A Neck Shaped Facing
- Sewing An All-In-One Neck Facing
- Neck And Garment Opening Combination Facings >
- Sewing A Bias Faced Neckline Finish
- Sewing A Band Neckline Finish
- Bound Neckline Finishes: Overview >
- Sewing A Semi-Stretch Strip Band Neckline
- Ribbed Neck Band And Classic Turtleneck
- Decorative Neckline Finishes >
- Finishing Facing Edges >
-
Extras
>
- A Complete Guide on Interfacing
- Sewing Bound Spaghetti Straps
- Sewing Spaghetti Straps To A Faced Neckline
- Sewing Ruffles: Overview
- Patterning And Sewing A Circle Ruffle
- Sewing A Gathered Heading Ruffle
- Sewing Double Layer Gathered Ruffles
- Sewing A Gathered Ruffle Into A Seam
- Sewing A Gathered Ruffle To A Fabric Edge
- Sewing A Fabric Surface Slit
- Sewing A Slit Seam
- Hand-Applied Straight Stitches
- Hand-Applied Blind Stitches
- Hand-Applied Overedge Stitches
- Hand-Applied Tack Stitches
- Hand-Applied Decorative Stitches
-
Basics
>
- Custom Bridal
- Custom Apparel
- About
- Blog
 RSS Feed
Services |
Company |
|
