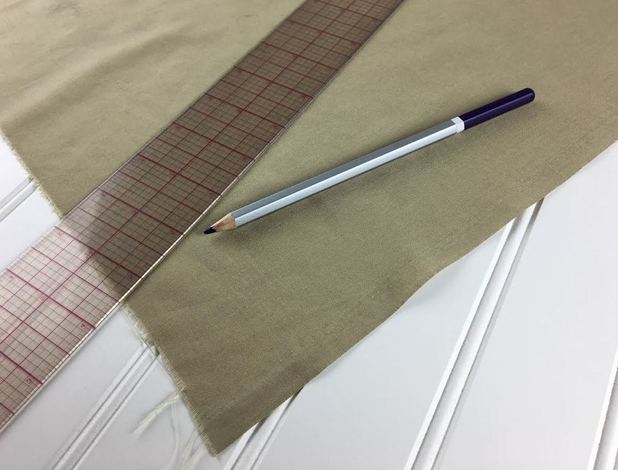
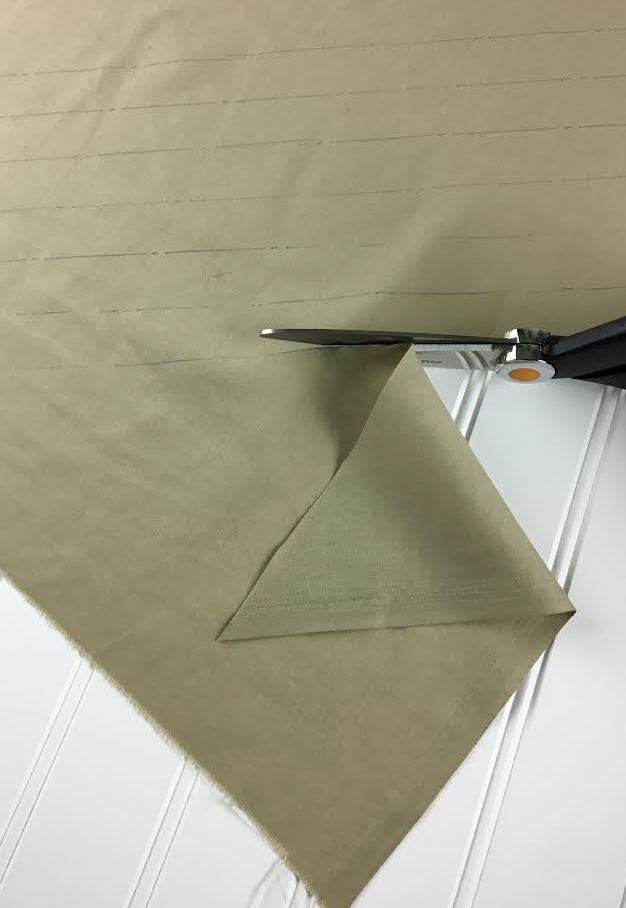
 The most common way to clean finish necklines, armholes, seams and other raw edges is by using double folded bias binding. It is affordable and actually quite easy to work with once you get some practice. Binding (also called bias tape) is cut on the bias, diagonal to the selvage edge. Binding needs to be cut on the bias due to the fact that it requires semi-stretch and more flexibility to mold easily along curved edges. The bias of woven fabrics provides natural stretch and a more draped, luxurious feel. Diagonally cut binding is also much easier to work with and easy to pin and handle during machine stitching. How to Make Continuous Bias Double Folded Binding Hand-in-hand with learning how to cut and fold your own binding is also learning the correct way to make continuous binding. Continuous binding features diagonal seams that connect fabric strips together, thus forming binding at any desired length. Using a single strip of binding, as opposed to separate ones, results in an easier sewing process with less interruptions, saving more fabric and creating a smooth, less bulky bound finish. Just as it is cut, the seams that connect the fabric strips together are also sewn diagonally on the bias. You can find double folded binding at your local fabric/craft store. It comes in a few different widths and colors and if you're just looking for a quick finish, you might find exactly what you're looking for. Pre-folded binding available at fabric or craft stores is usually made of 100% cotton with a stiffer feel simply because it is meant for use with quilting rather than dressmaking. That is not to say that you can't use it to finish raw edges on dresses or blouses. You might run into a few issues however, if you are working with a very fine, lightweight fabric that cannot withstand the stiffness of pre-bought cotton binding. Usually, lighter weight silk fabrics, chiffon and some crepe de chines will require a very soft, pliable binding to match the rest of the fabric's fluidity and drape. So what do you do? The answer is quite simple- make your own double folded binding from your choice of fabric (usually the same as the garment you're sewing) in whatever width and length you need! Bellow, we'll show you how to sew 1/4"-wide continuous double folded binding out of 1" strips of bias cut fabric. 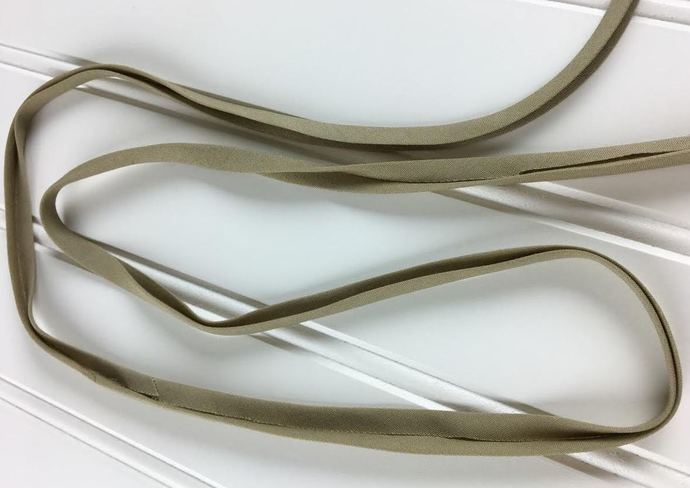 Calculating the width of the initial fabric strip. In order to find the total width of the initial fabric strip you need to decide the width of the final folded binding. If you're working with lightweight, fine fabrics applied to finishing curved edges like the neckline and armholes, you should stick to a 1/4" folded binding. A thinner binding will make it much easier to sew around the really round edges and create a much smoother, wrinkle-free finish. A double folded binding is folded 3 times in order to achieve the correct raw edge enclosure. The two raw edges of the strip are folded in once each then folded again down the center in order to fully enclose both raw edges. This means that the total measurement of your initial binding strip (before folding) is: the width of the final folded binding times 4. In our case, 1/4" x 4 = 1". You can use this formula to calculate the strip measurement of any double folded binding of your choice. Marking and Cutting the Fabric Binding Strips For this step, you will need a clear 18" marked, plastic ruler (like the one pictured below) and a water soluble (fabric) pencil. Note: If you don't own an 18", clear plastic ruler that is marked down to the 1/16th of an inch, we highly recommend you get one. They are reasonably priced and easy to find in any art or fabric store. Because of its flexibility and detailed measurements, this is the standard ruler used in the fashion industry for pattern making and measuring.  As mentioned above, keep in mind your binding fabric strips have to be cut diagonal to the grain of the fabric (bias cut). The grain of the fabric corresponds to the selvage edge, thus a diagonal grain (bias) is aligned diagonally to the selvage edge. It is important that you have a good understanding of grain lines and are able to recognize and use the selvage of any fabric. 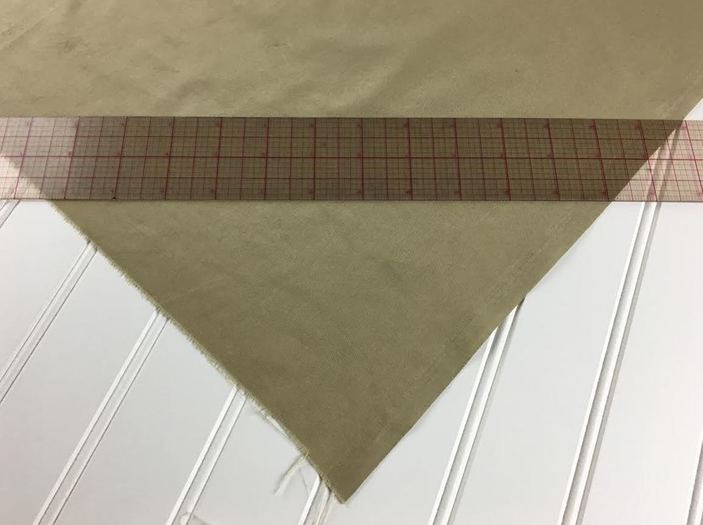 1. Start at one corner of your fabric and position your ruler diagonal to the selvage edge. This will form a triangle shape at the bottom as displayed in the image above. 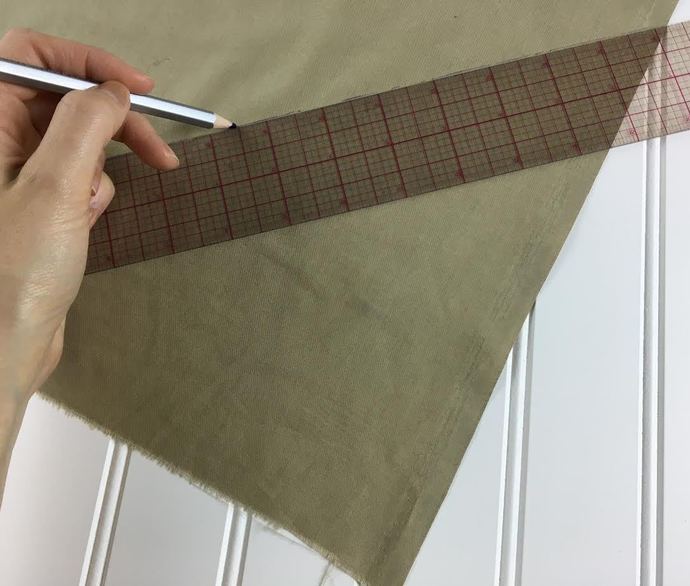 2. Using a fabric marking pencil (or any water soluble pencil), draw a straight line on the bias (diagonal to the selvage edge) following the ruler placement from Step 1. 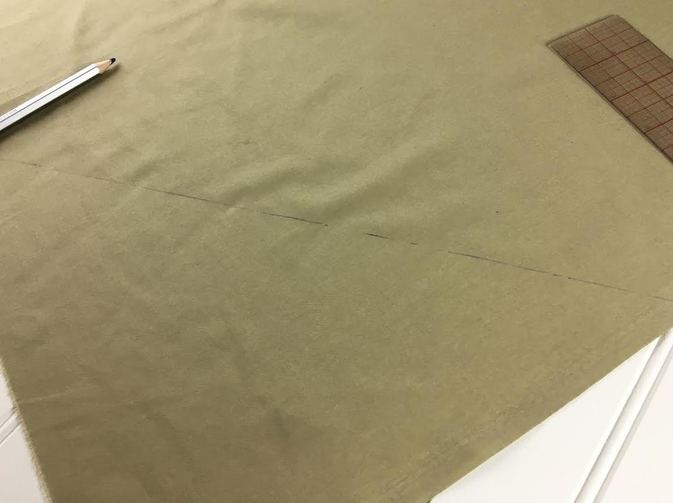 This initial line will serve as a building block for the rest of the fabric strips.  3. Position the ruler so that it's 1" line is right on top of the pencil line you just marked, and draw a second line at exactly 1" up, following the edge of the ruler. This is where working with a marked, clear plastic ruler is really important- it allows you to see the markings underneath when positioning the ruler on top of the fabric. 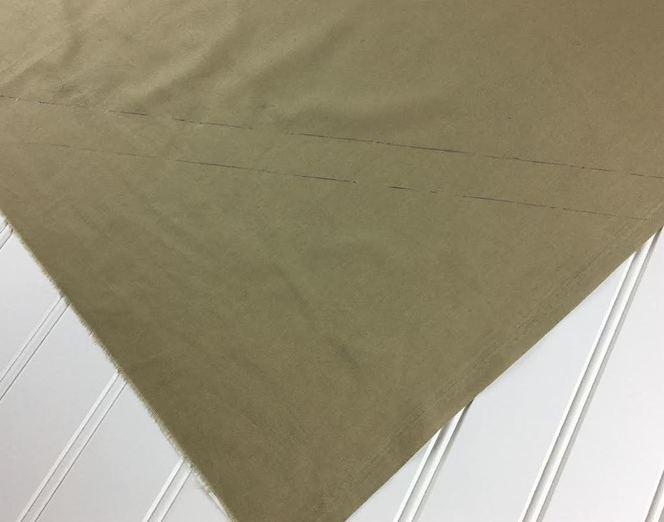 This results in a perfectly measured, even 1" inch strip. Tip: If your fabric is a bit flimsy and more difficult to mark on, you can add 1/8" excess to the 1" strip. What this does is add some extra ease to cover the possibility of any measuring errors caused by working with difficult to handle fabrics. The theory is basically that if you make a mistake, it is better to have a bit of extra fabric than not enough. 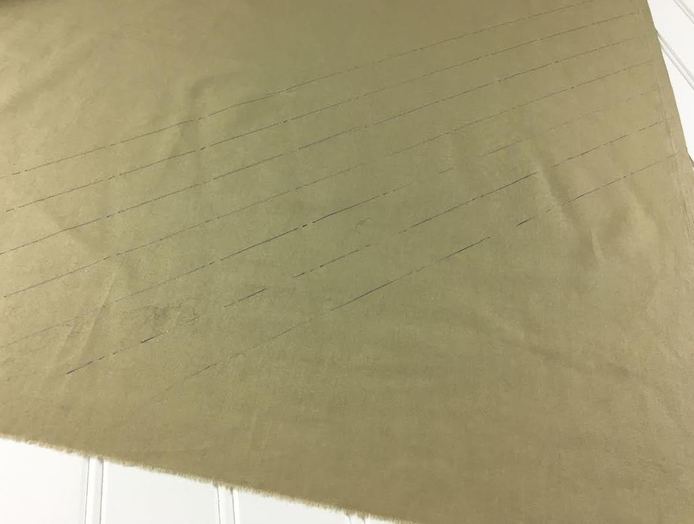 4. Continue adding straight lines at 1" increments with your ruler using the last line as a guide. Mark as many strips of fabric as necessary for your project.
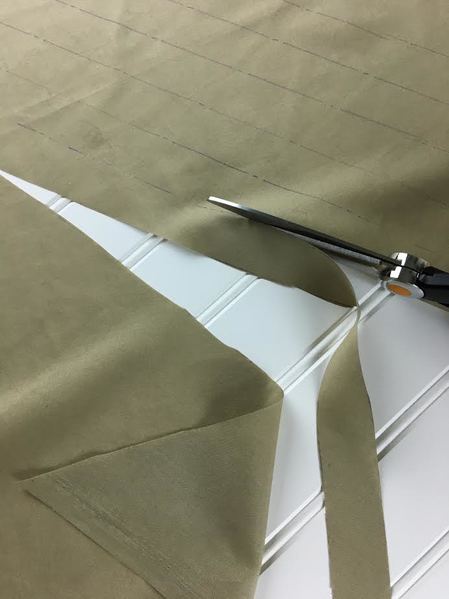
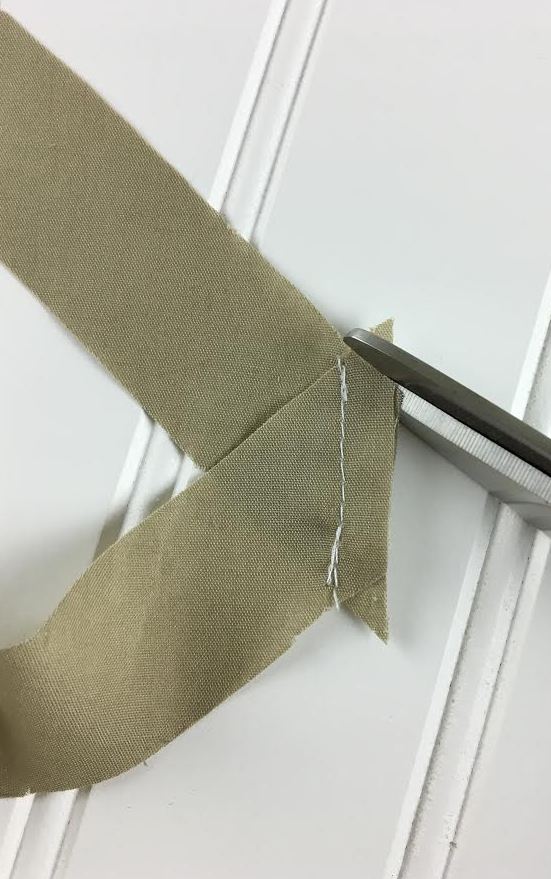
5. Using a good pair of scissors, cut each fabric strip using the pencil lines as a guide. Take your time and be careful to cut evenly across as this will effect the quality of the final bias binding. 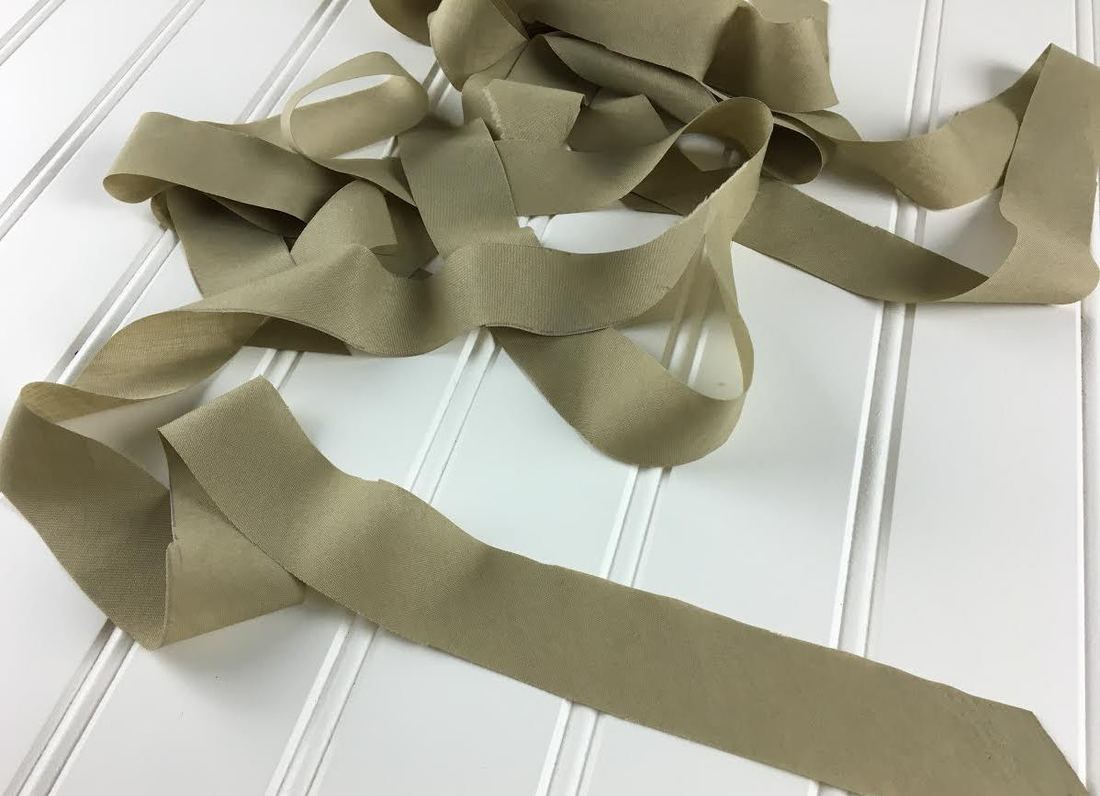 Once all the fabric strips are cut, you will need to sew them together along the bias to create continuous binding. We'll show you how below. 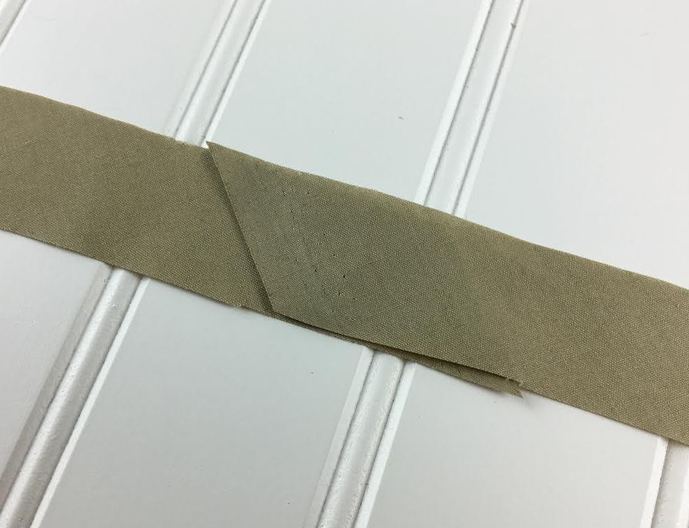 6. Align and overlap the edge of a fabric strip to the edge of another as shown above- The selvage edge of the fabric is still noticeable on the top strip. 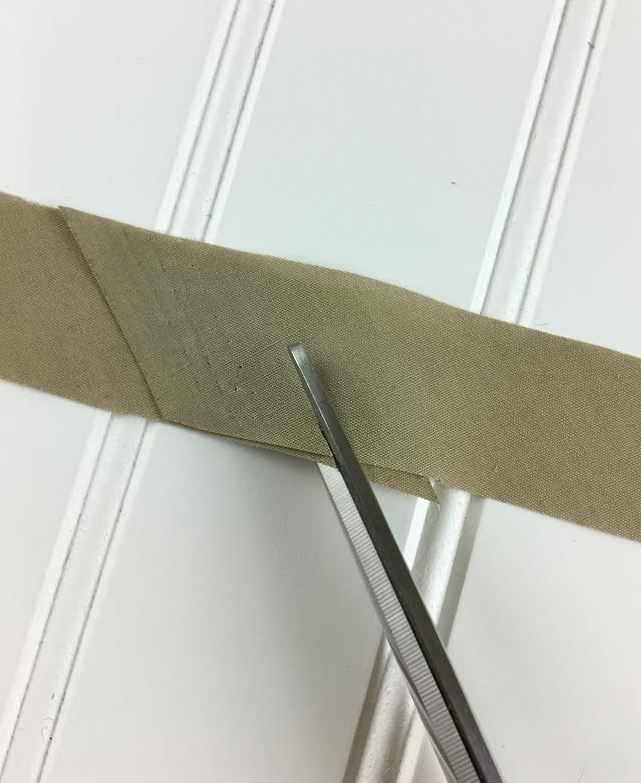 7. Making sure the two layers remain overlapped and in place, cut diagonally through both layers of the fabric parallel to the selvage edge as displayed above. 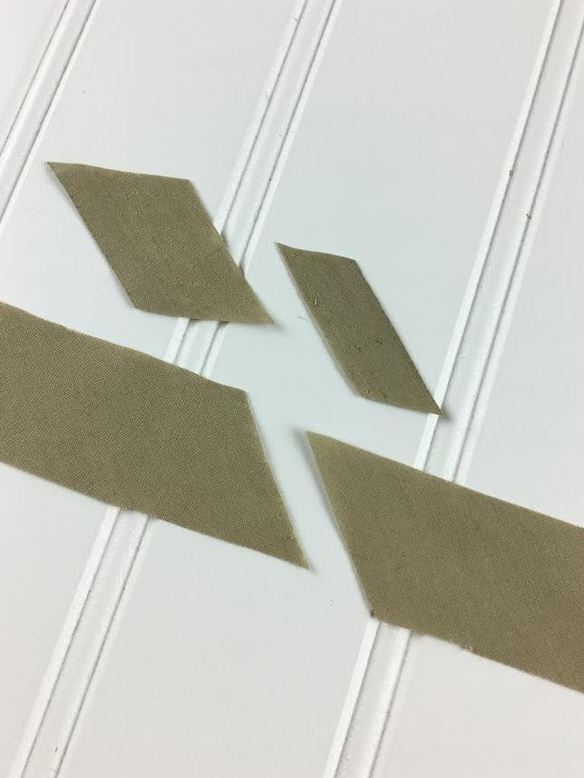 The trimmed fabric strip edges are clean and cut perfectly on the bias ready to be stitched together. 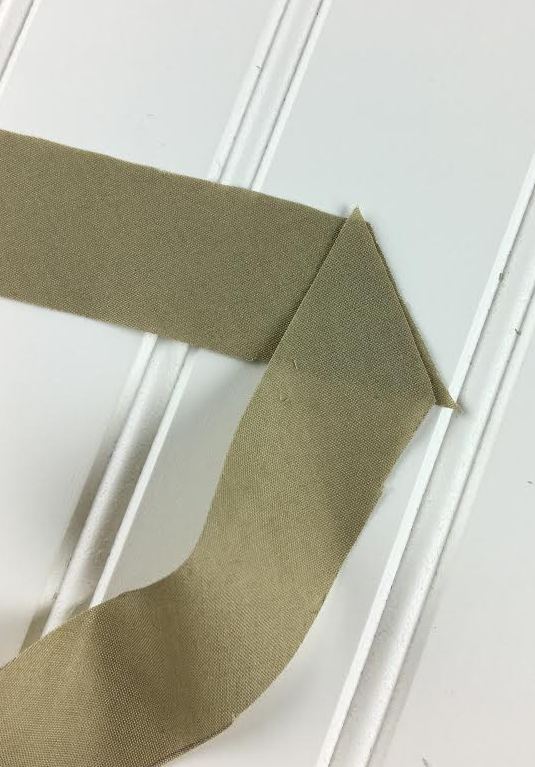 8. Align the newly trimmed edges of the two fabric strips as displayed above. This alignment might feel a little out of the ordinary since the top edges don't match, but it is actually the correct way to attach binding fabric strips. 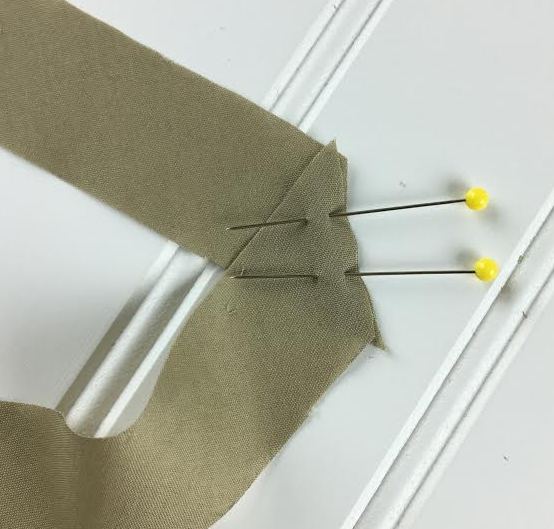 9. Pin the two edges together to keep them in place during sewing. 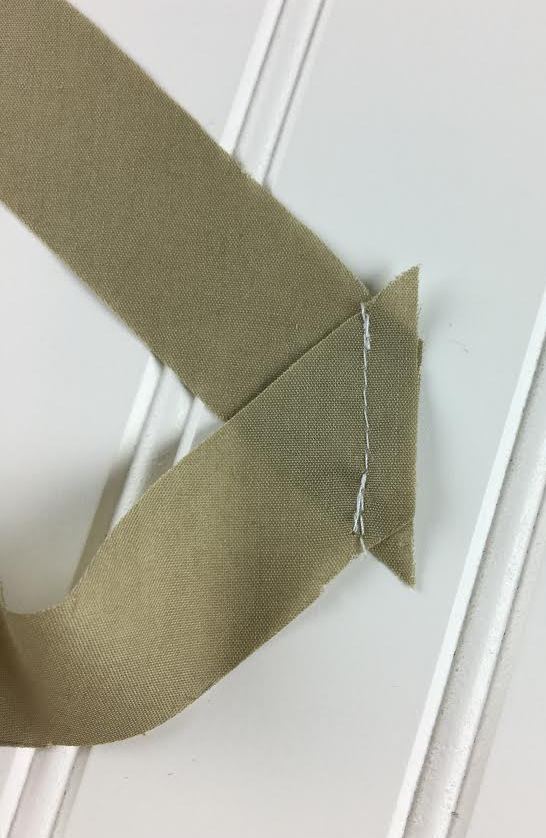 10. Stitch on your sewing machine at 1/4" seam allowance and carefully back-stitch on both ends of the stitch.
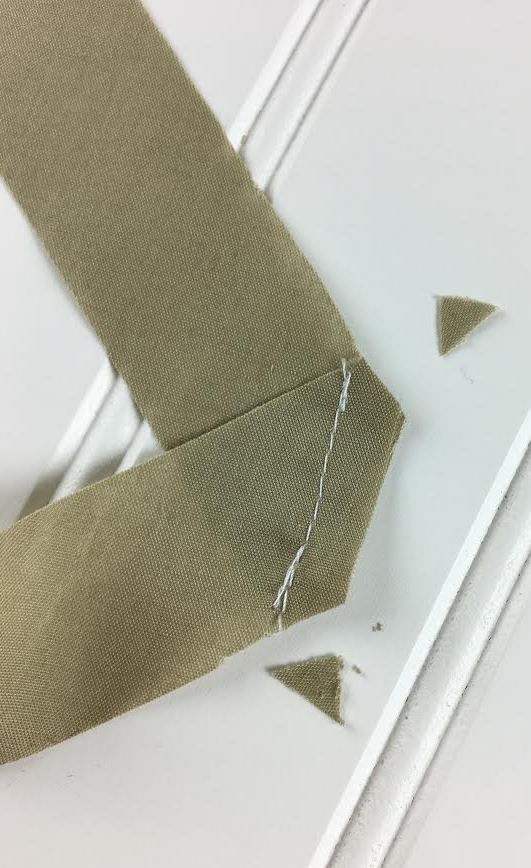
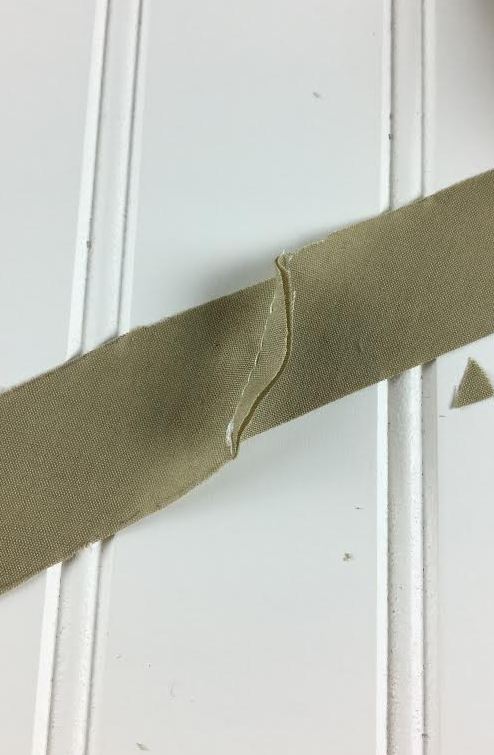
11. Trim the excess fabric corners at the top as displayed in the images above.
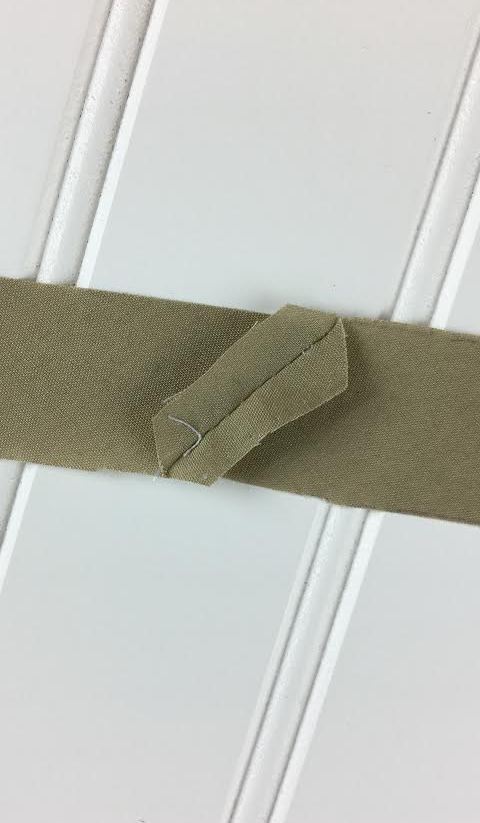
12. Iron the seam open. Repeat the method described above to sew the rest of the binding strips together before the folding stage. Folding and Ironing Double Folded Bias Binding The last stage of completing your binding is to fold it in place using an iron. Make sure your iron uses some steam and is programmed to the right setting (depending on your fabric). 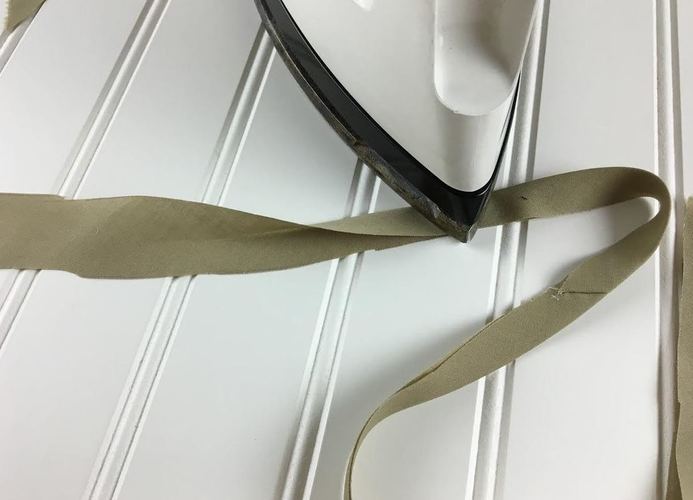 Step 1: Fold the strip in half lengthwise and iron this fold down. 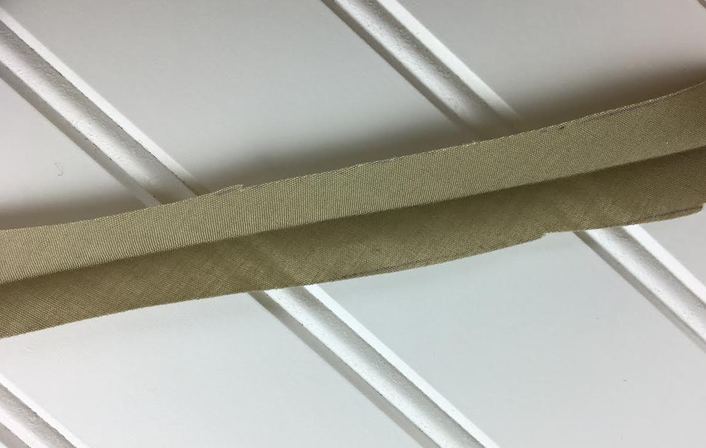 This center fold line will serve as a guide for folding in the two lengthwise raw edges. 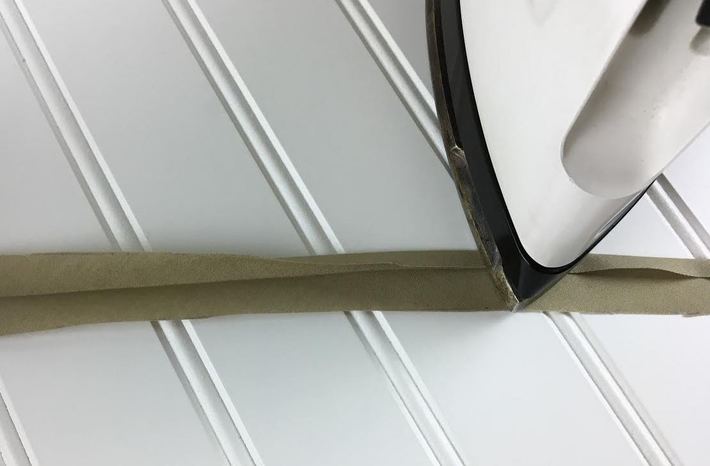 Step 2: Open the folded fabric strip, and fold one of the raw edges towards the center aligning it with the center fold line as shown. Iron down this fold. 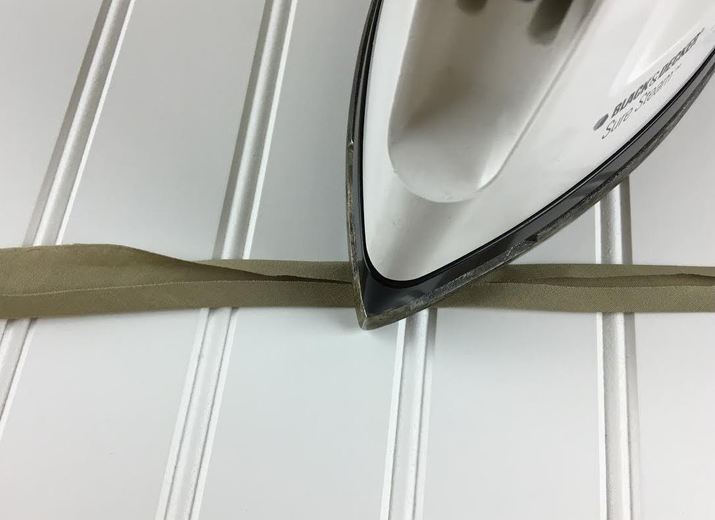 Step 3: Fold the the second edge in, also aligning it with the center fold line. Iron as you fold again. 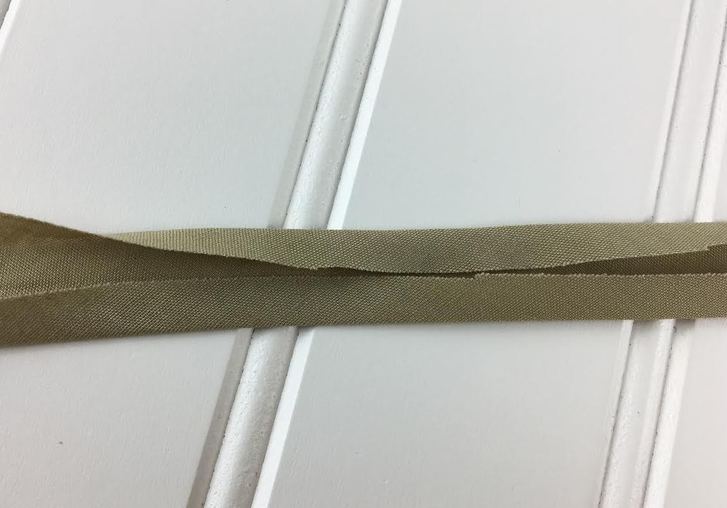 The raw edges of the fabric strip should be aligned right next to each other, touching but not overlapping. 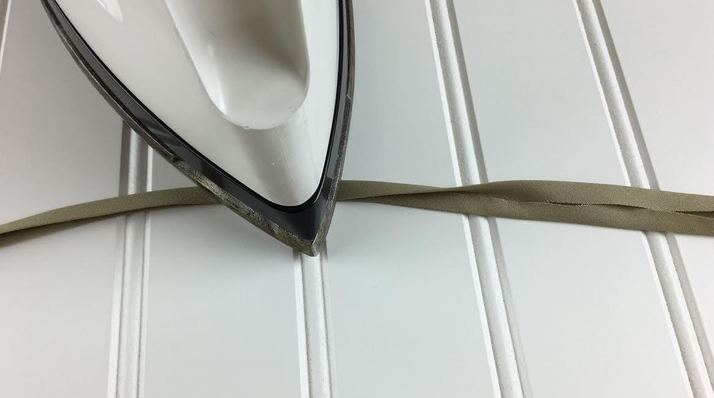 Step 4: Finally, fold down the center again making sure the raw edges of the fabric strip are enclosed inside at the same distance from the edge. Iron down this final center fold. 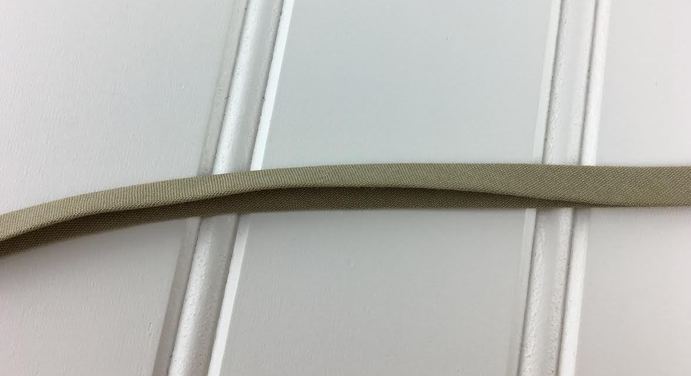 Ironing each fold individually ensures that the bias binding remains folded once finished. If you are having trouble keeping the binding folded in place, use a higher setting on your iron and/or fabric spray starch. 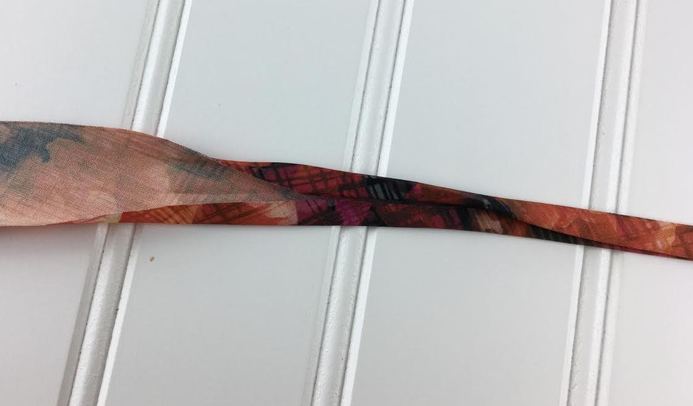 When working with fabrics that have a face and a wrong side, make sure that you fold the bias binding so that the wrong side of the fabric is on the inside of the fold. Also pay attestation when sewing the initial fabric strips together- the raw edges of the seam should be pointing towards the wrong side of the fabric/inside the folded binding. 
0 Comments
Leave a Reply. |
The Blog:A journey into our design process, sewing tutorials, fashion tips, and all the inspiring people and things we love. 
Doina AlexeiDesigner by trade and dressmaker at heart. I spend most of my days obsessing over new fabrics and daydreaming new ideas. 
Sadie
Executive Assistant & Client Relations Manager Archives
November 2019
Categories
All

|

-
Sewing Tutorials
-
Basics
>
- Aligning Pattern Grainlines To Fabric
- Preparing Fabrics For Sewing
- Pinning Sewing Patterns To Fabric
- Placing Sewing Patterns On Fabric For Cutting
- Rotary Cutters or Fabric Scissors?
- Cutting The Sewing Patterns
- What Are Notches And How To Use Them In The Sewing Process
- Transferring Notches From Pattern To Fabric
- Transferring Seamlines to Fabric
- Staystitching
- Backstitching: A Complete Guide
- Hand Basting: A Complete Guide
- Sewing Continuous Bias Binding
- Darts >
-
Sewing Seams
>
- The Basics Of Seams And Seam Allowance
- How To Sew A Straight Seam
- Sewing Curved Seams
- Sewing Corner Seams
- Trimming And Grading Seam Excess
- Notching/Clipping Seam Allowance for Tension Release
- Sewing Topstitched Seams
- Sewing Corded Seams
- Sewing A Slot Seam
- Sewing A Gathered Seam
- Sewing Bias Seams
- Sewing Seams With Ease
- Sewing Seams With Crossing Seamlines
- Sewing Unlike Fabric Seams
- How To Iron Seams: Ironing Tools And Conventions
- Sewing With Knit Fabrics
- Understanding Stitch Length And Tension
- Sewing Unique Fabric Seams
-
Seam Finishes
>
- Seam Finishing Techniques - Overview
- Applying A Pinked Seam Finish
- Applying A Bias Bound Seam Finish
- Serging And Zigzag Seam Finishes
- Sewing A Self-Bound Seam Finish
- Sewing A French Seam Finish
- Sewing A Hong Kong Seam Finish
- Sewing A Mock French Seam Finish
- Sewing A Turned-and-Stitched Seam Finish
- Sewing Overcast Hand-Applied Seam Finishes
- Sewing A Flat Felled Seam
- Sewing A Hairline Seam Finish
-
Hem Finishes
>
- Garment Hem Finishes: Overview
- Sewing A Double Fold Hem Finish
- Sewing A Single Fold Hem Finish
- Sewing Bound Hem Finishes
- Sewing An Exposed Double Layer Bound Hem
- Sewing A Folded-Up Bound Hem with Pre-folded Binding
- Sewing A Hong Kong Hem Finish
- Sewing A Band Hem Finish
- Sewing A Bias Faced Hem Finish
- Sewing A Twill Tape Hem Finish
- Sewing A Rolled Hem Finish
- Sewing A Shaped Hem Facing
- Using Fusible Hem Tape And Webbing
- Finishing A Lace Fabric Hem
- Finishing A Leather Hem
- Sewing Faced Hem Corners
- How To Finish Lining At The Hem
- Finishing Fabric Corners by Mitering >
- Interfacing A Hemline: Lined And Unlined Examples
-
Sewing Pockets
>
- Curved Patch Pocket With Flap
- Unlined Square Patch Pockets
- Lined Patch Pockets: Two Ways
- Extension On-Seam Pockets
- Separate On-Seam Pocket
- Front Hip Pockets
- Bound Double Welt Pocket
- Double Welt Pocket With Flap
- Self-Welt Pocket (Using Single Fabric Layer)
- Slanted Welt Pocket (Hand-Stitched)
- Faced Slash Pockets: Overview >
-
Sewing Zippers
>
- Sewing Zippers: General Information
- Sewing A Centered Zipper
- Sewing A Lapped Zipper
- Sewing An Invisible Zipper
- Sewing A Fly Front Zipper
- Sewing A Closed-End Exposed Zipper (No Seam)
- Sewing An Exposed Separating Zipper
- Sewing Hand Stitched Zipper Applications
- Sewing A Zipper Underlay
- Sewing A Placket-Enclosed Separating Zipper
- Sleeveless Finishes >
-
Neckline Finishes
>
- Sewing A Neck Shaped Facing
- Sewing An All-In-One Neck Facing
- Neck And Garment Opening Combination Facings >
- Sewing A Bias Faced Neckline Finish
- Sewing A Band Neckline Finish
- Bound Neckline Finishes: Overview >
- Sewing A Semi-Stretch Strip Band Neckline
- Ribbed Neck Band And Classic Turtleneck
- Decorative Neckline Finishes >
- Finishing Facing Edges >
-
Extras
>
- A Complete Guide on Interfacing
- Sewing Bound Spaghetti Straps
- Sewing Spaghetti Straps To A Faced Neckline
- Sewing Ruffles: Overview
- Patterning And Sewing A Circle Ruffle
- Sewing A Gathered Heading Ruffle
- Sewing Double Layer Gathered Ruffles
- Sewing A Gathered Ruffle Into A Seam
- Sewing A Gathered Ruffle To A Fabric Edge
- Sewing A Fabric Surface Slit
- Sewing A Slit Seam
- Hand-Applied Straight Stitches
- Hand-Applied Blind Stitches
- Hand-Applied Overedge Stitches
- Hand-Applied Tack Stitches
- Hand-Applied Decorative Stitches
-
Basics
>
- Custom Bridal
- Custom Apparel
- About
- Blog
 RSS Feed
Services |
Company |
|
