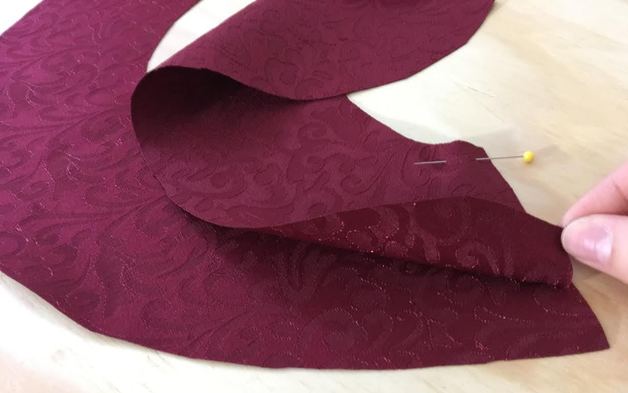
 Clean finishing a round neckline with a facing creates a more elevated, tailored look. Facings are a great addition to styles constructed of medium to heavy weight fabrics that are difficult to finish with top-stitched binding. Facings are usually considered a higher quality addition used for styles that are less casual. If you are in the process of learning how to sew, attaching a facing to a round neckline is one of the first sewing techniques you should learn. Once you understand the process needed to achieve a smooth, clean-finished neckline, you can apply a similar method to attach armhole, sleeve cuff and center front facings. Applying a facing will also teach you important techniques like clipping the seam allowance for tension release, stay-stitching and under-stitching, which are equally important in the sewing process. You can learn how to draft a round neckline facing pattern from scratch using your garment's sewing pattern. Learn the step by step process on last week's blog: How To Make A Sewing Pattern For a Round Neckline Facing. Cutting Out The Neckline Facing Patterns In this tutorial, our sewing patterns are drafted to be cut on fold. 1. Fold the fabric parallel to the selvage edge such that the face of the fabric is on the inside of the fold. When cutting on fold, you should always pin and cut your patterns on the wrong side of the fabric.  2. Align the cut-on-fold line of your Front sewing pattern (Center Front) to the fabric's fold. Pin the pattern in place at the seam allowance through both layers of fabric. Here's a quick reminder on how to correctly pin and cut a sewing pattern. 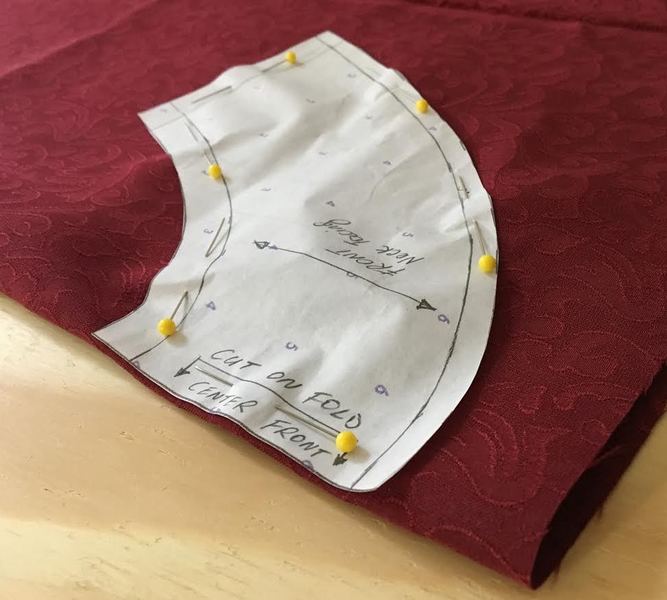 3. Repeat this step with the back facing, aligning the Center Back fold line to the fabric's fold and pinning through both layers of fabric. 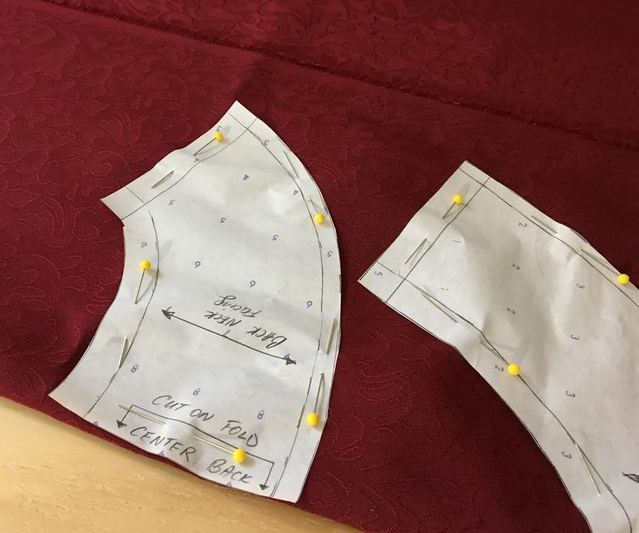 4. Cut out the facings carefully around all curved edges. 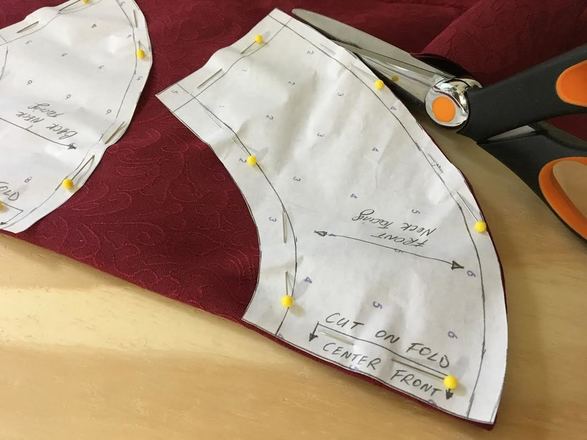 The facing's edge should be a smooth curved line and cut precisely to the sewing pattern. 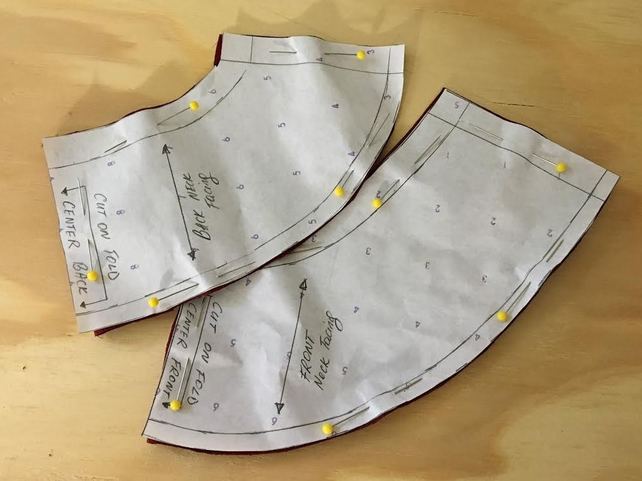 5. Remove the pins and unfold the facings. You will notice that in a classic round neckline, the front facing is always more curved than the back. Understanding this will help you correctly position the facing to the raw edge of the neckline. 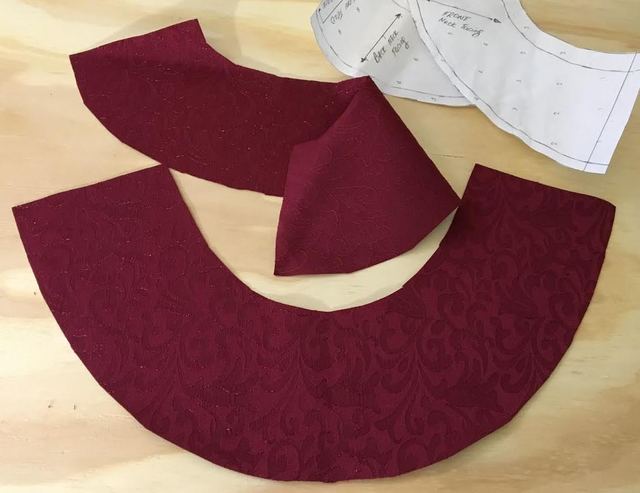 Sewing The Neck Facing 6. Pin shoulder edges of the front and back facings together so that the face of both fabric layers are touching (the wrong side of the fabric should be on the outside).
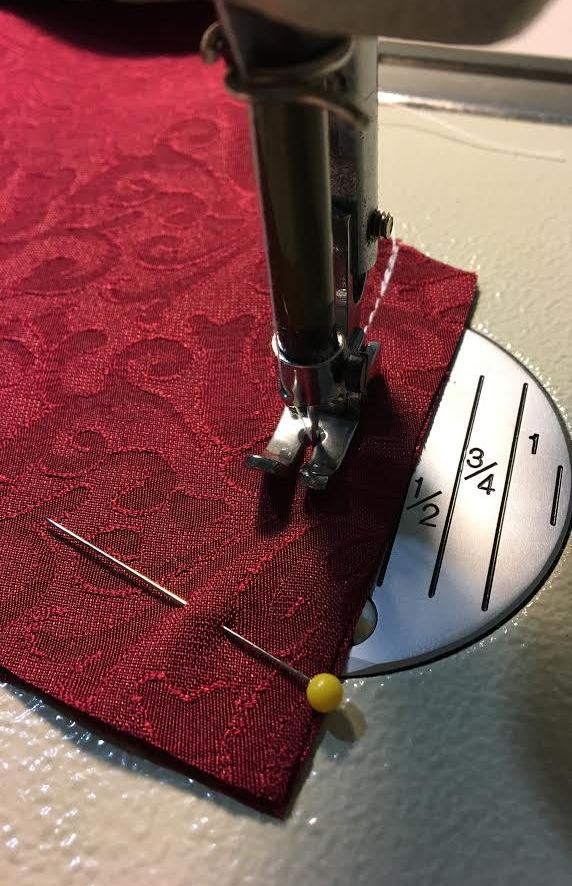
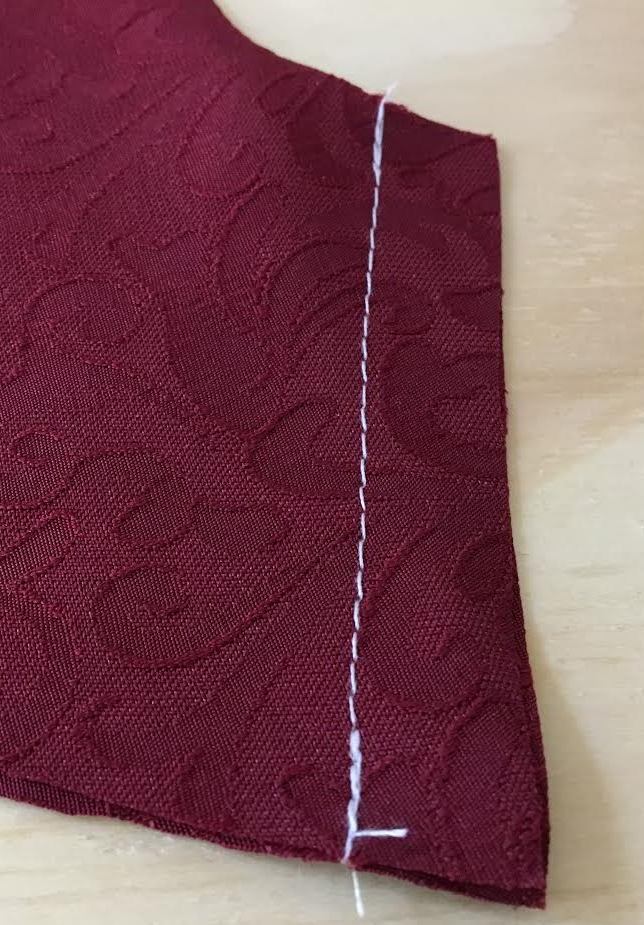
For more stability and easy removal during sewing, apply the pins perpendicular to the seam. 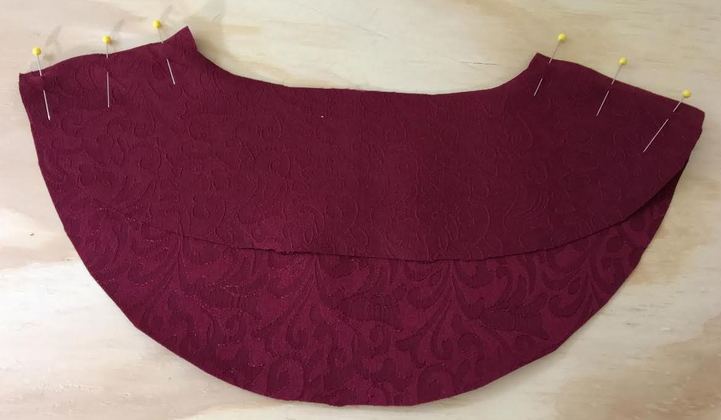 7. Machine stitch both shoulder seams at the correct seam allowance (our seam allowance is 1/2"). Don't forget to back-stitch on your sewing machine at the beginning and end of the stitch.
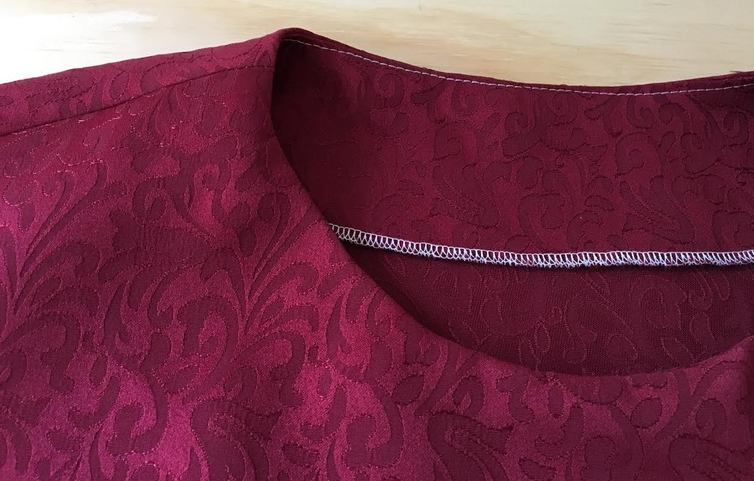
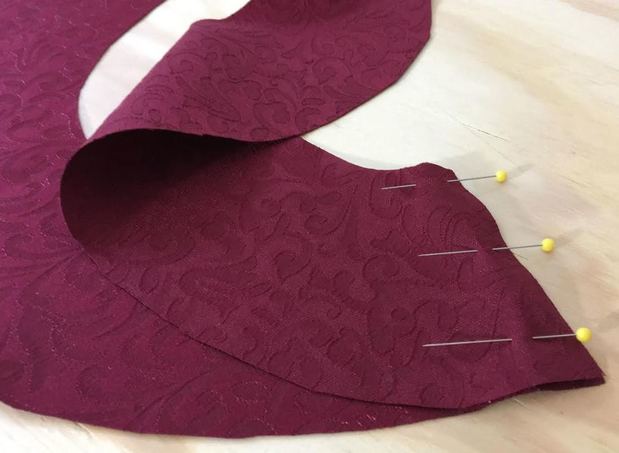
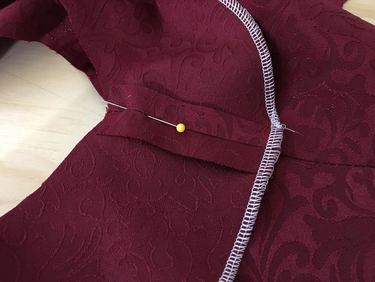
8. Iron the seam allowance open on the inside of the facing. 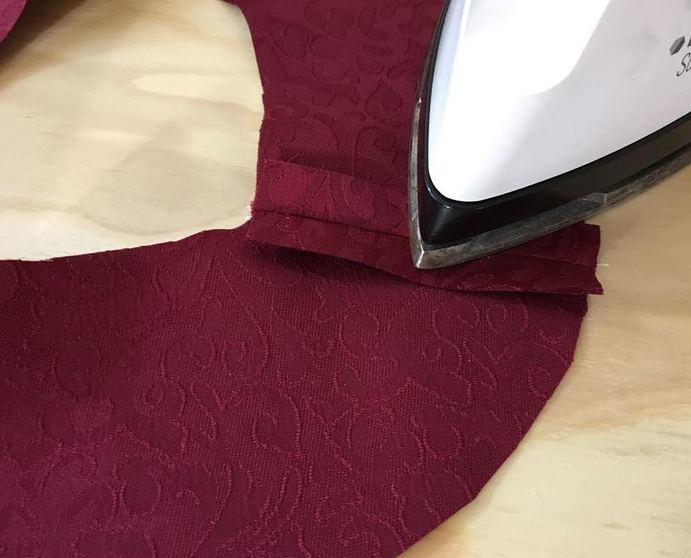 9. Once the facing's shoulder seams are connected and ironed, apply a finishing method to the bottom raw edge of the facing. Depending on the fabric you are working with, the most common techniques for clean finishing a facing's raw edge is by serging, with a baby hem (for lightweight fabrics), binding, or machine stitching. You may also use a zig-zag stitch on your home sewing machine but make sure your machine is set at the correct tension balance for the fabric being used. 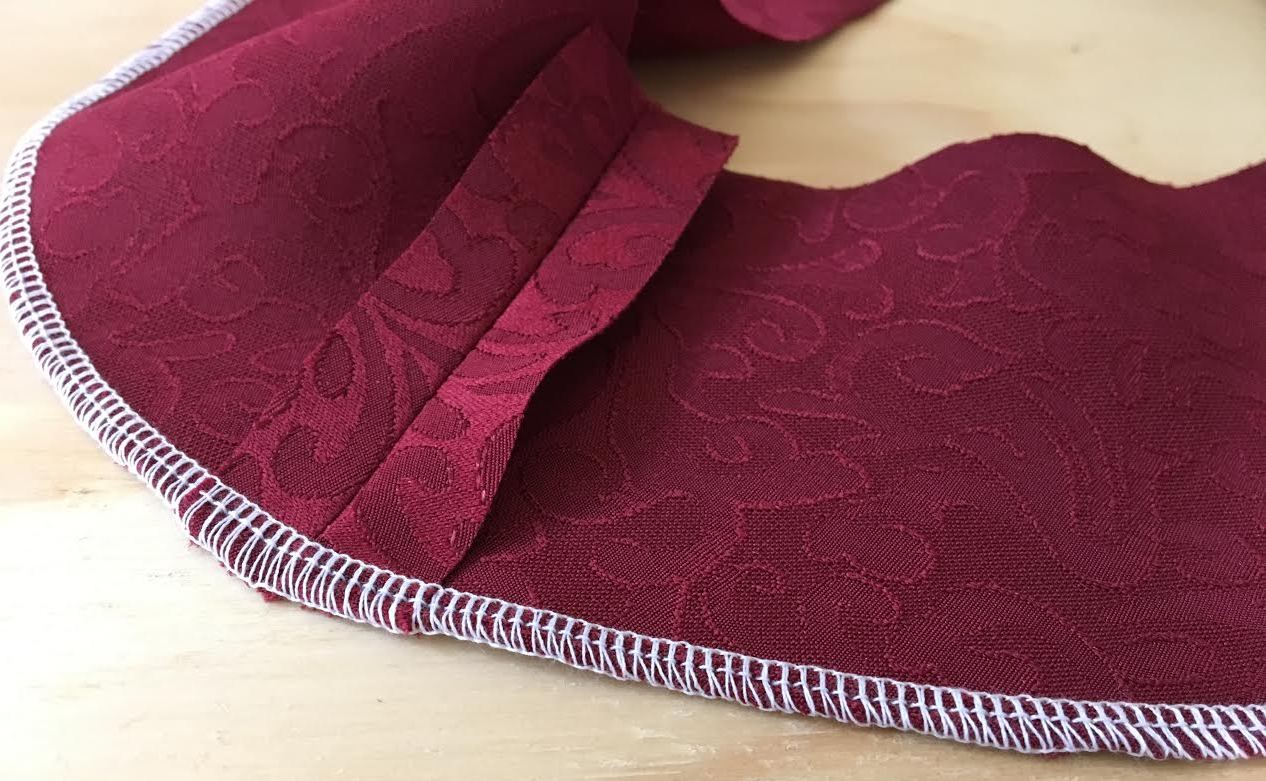 We clean finished our facing's raw edge with a serging stitch along the bottom. Do not clean finish the inner circle of the facing- this edge will be sewn to the neckline's raw edge and does not require serging or any other finishing technique. 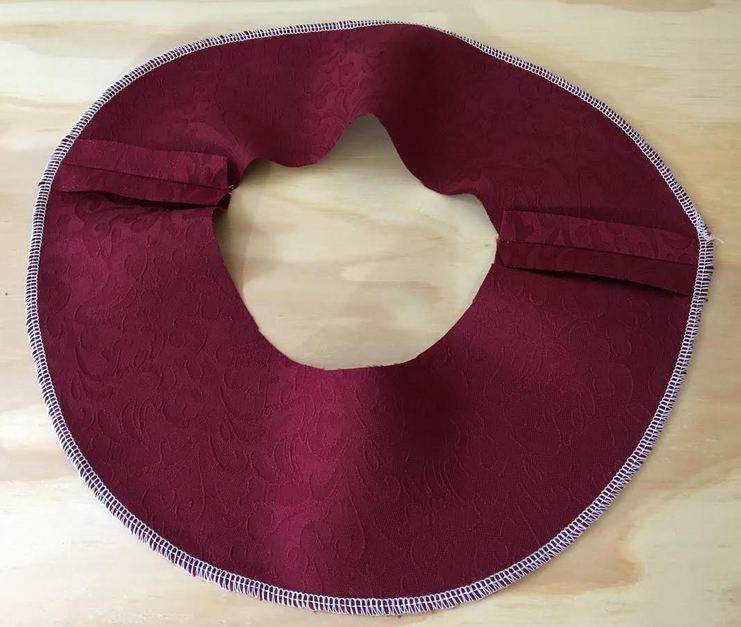 10. Pin the facing's raw edge to the neckline's edge starting at the shoulder seams. Match the shoulder seams of the garment perfectly to the facing's shoulder seams and place a pin through both seams. Make sure the right sides of the fabric are touching. The shoulder seams should be matched accurately.
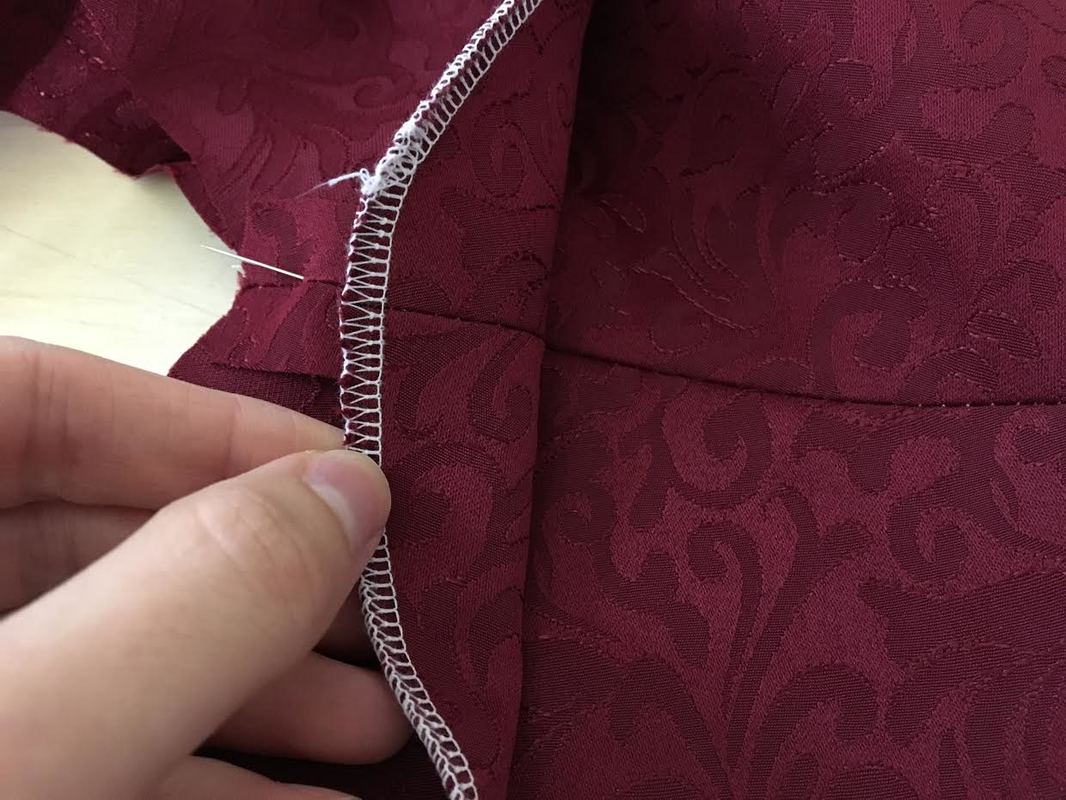
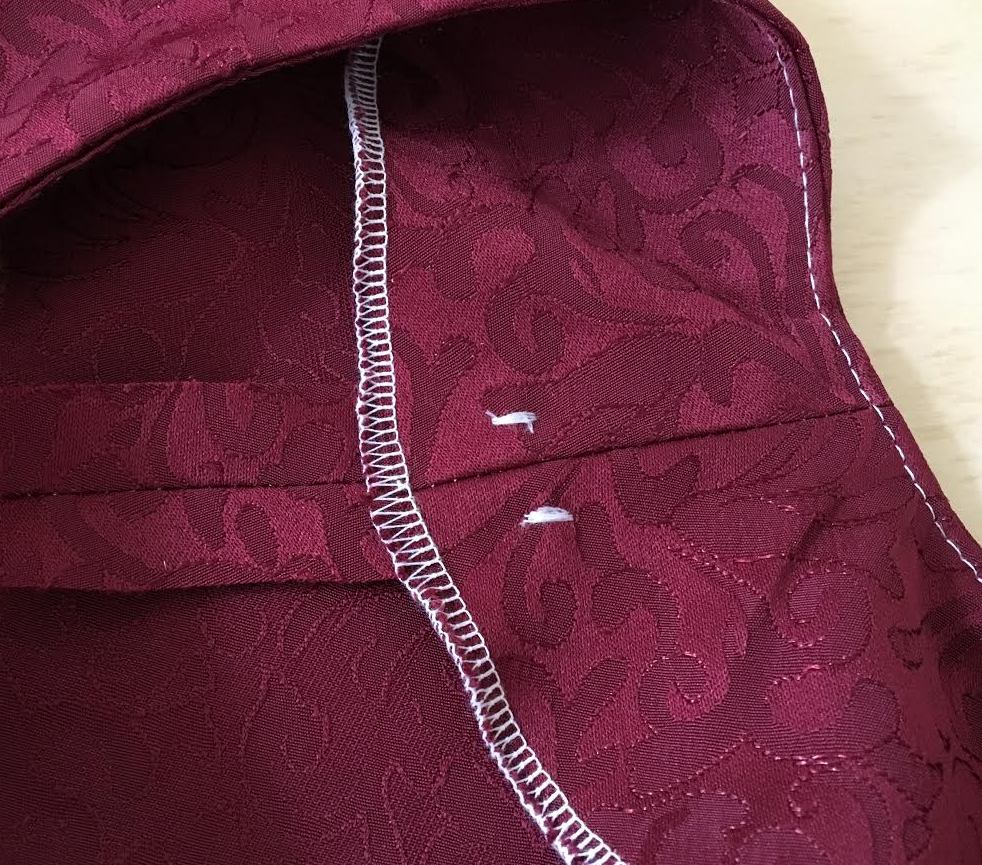
11. Once you've stabilized the shoulder seams, apply pins perpendicularly along the rest of the neckline's raw edge. 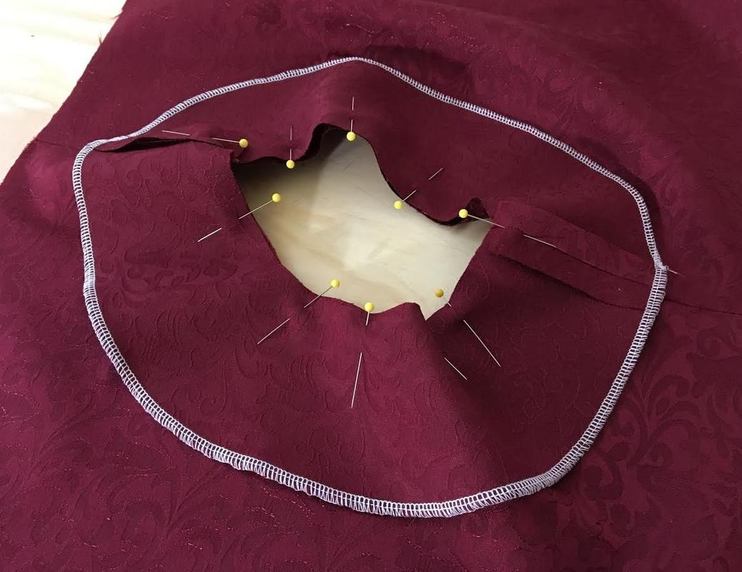 12. Machine stitch along the neckline's edge at the correct seam allowance (1/2" in our tutorial). This will take some practice along the more curved edge of the neckline. How smooth this stitch line is will ultimately determine the final shape of the neckline, so take your time and be cautious when applying this stitch. 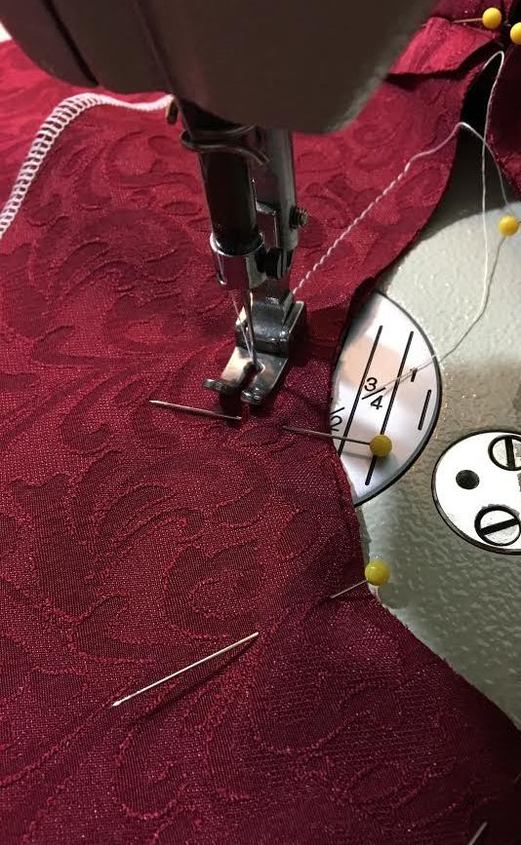 The final result should be a smooth, curved stitch maintaining the correct seam allowance throughout. 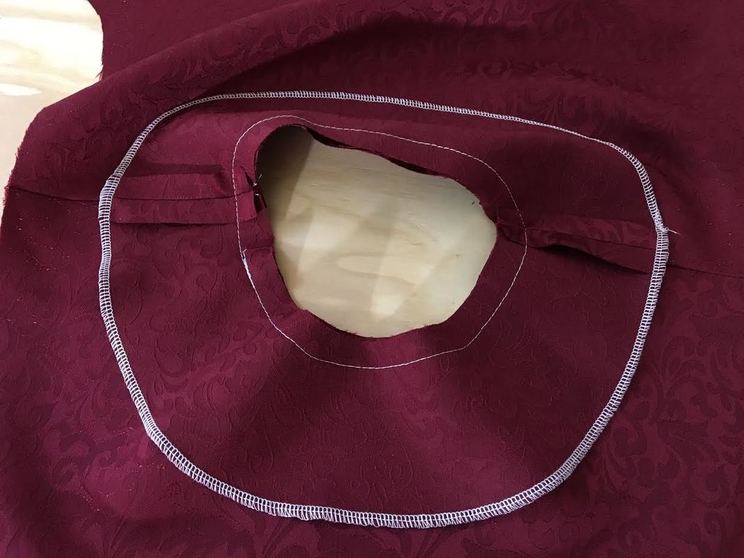 13. Clip the seam allowance with your scissors at the more curved areas using a wedge clip to release tension along the more curved areas of the neckline. Be careful not to cut through the actual stitch- the snip should be placed at about 1 mm away from the stitch. 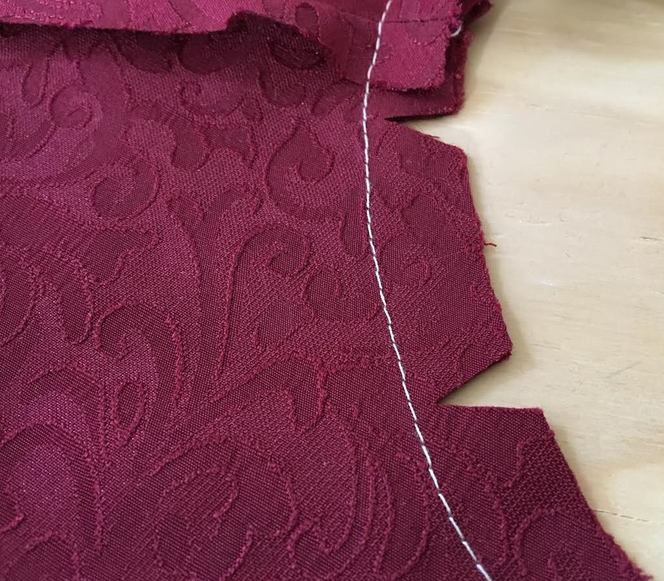 For added tension release add a few notch clips along the back neckline and between the already clipped wedges where needed. Be careful not to over clip the fabric- this could weaken the seam and create a less-durable, unstable edge. 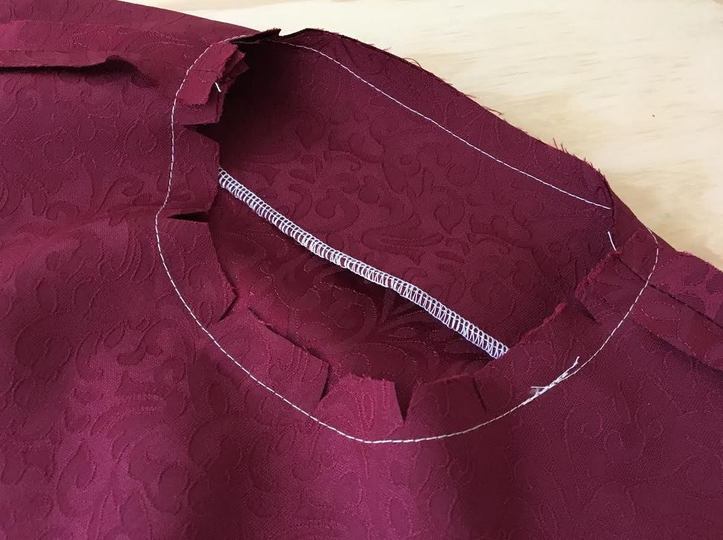 14. Iron the facing's seam pointing away from the garment as shown bellow. This step will prepare the facing for staystitching, which is a necessary step in ensuring that the facing lays flat on the inside of the garment and the neckline's edges are consistently smooth throughout. 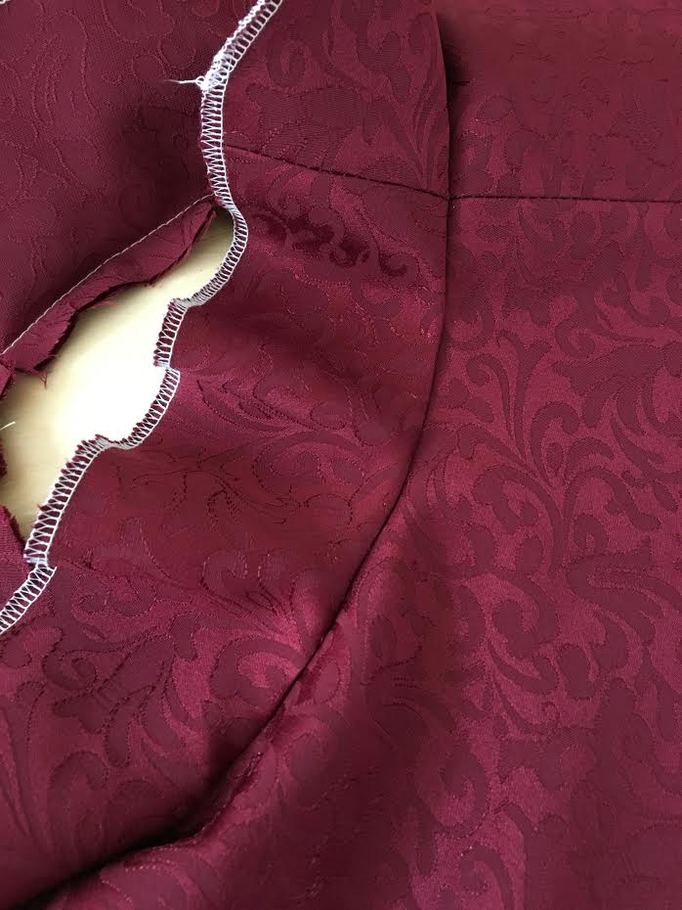 The seam allowance should be pointing towards the facing. 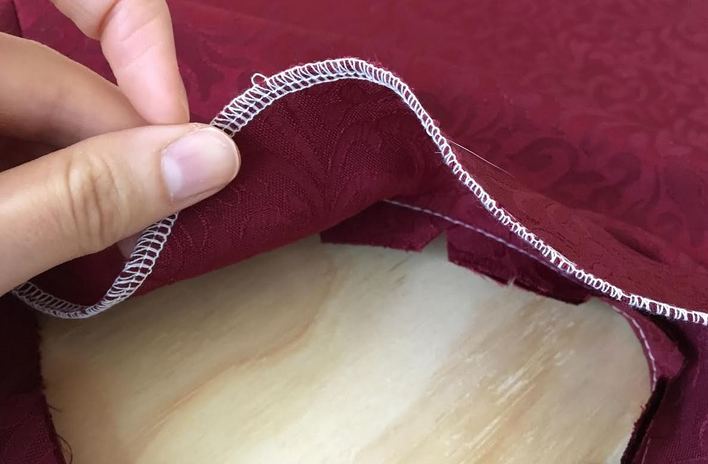 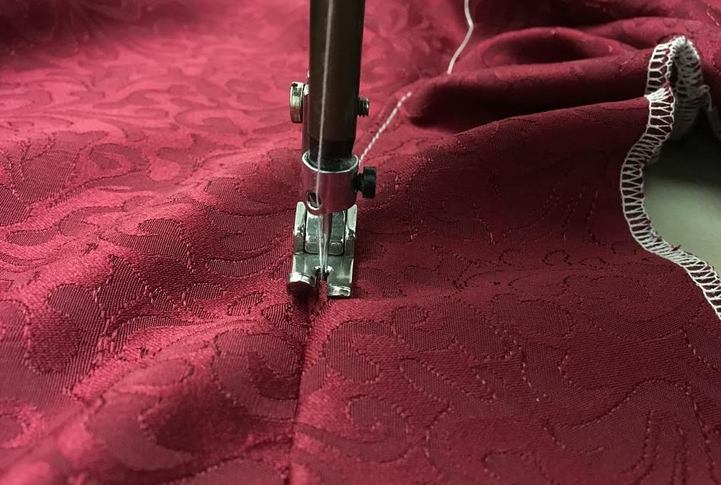 15. Stitch on top of the facing though the seam allowance on the back, at about 1/8" away from the seam. This is called understitching which ensure that the facing lays flat pointing towards the inside of the garment. It will take some time to get a perfectly even understitch if you are a sewing beginner but remember that practice makes perfect! The more even the understitch is, the smoother the edge of the neckline will be. 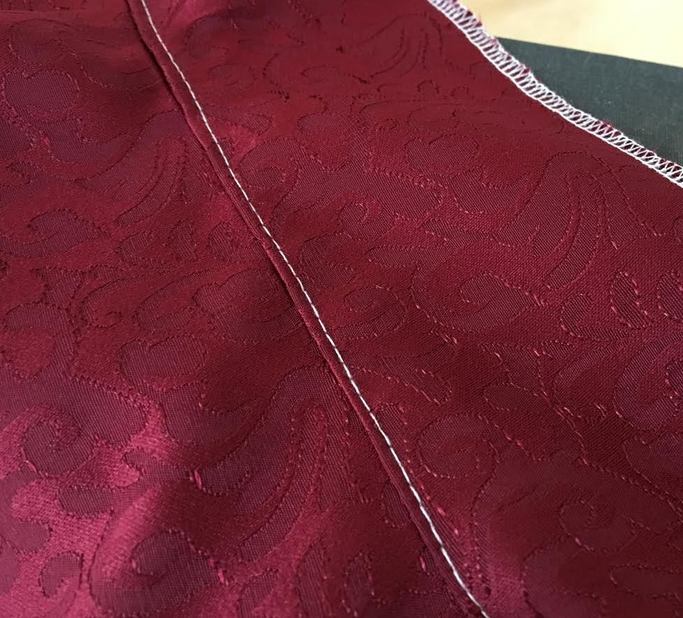 16. Move the facing to the inside of the garment and iron the neckline's edge. 17. As a final step, it is necessary that you tack the facing at the seams on the inside of the garment. This means applying a loop stitch through the facing and garment's seam allowance to stabilize the facing ensuring that it stays on the inside of the garment permanently. 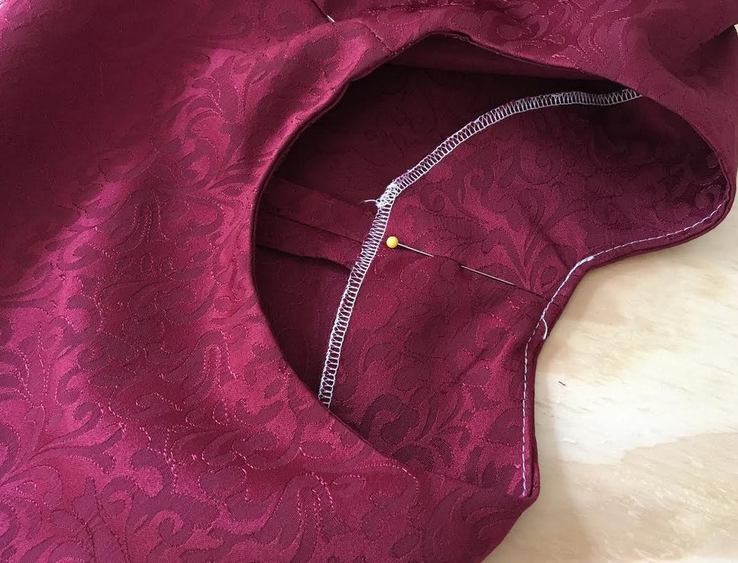 Match the facing's seams to the garment's seams on the inside and place a pin through to stabilize. 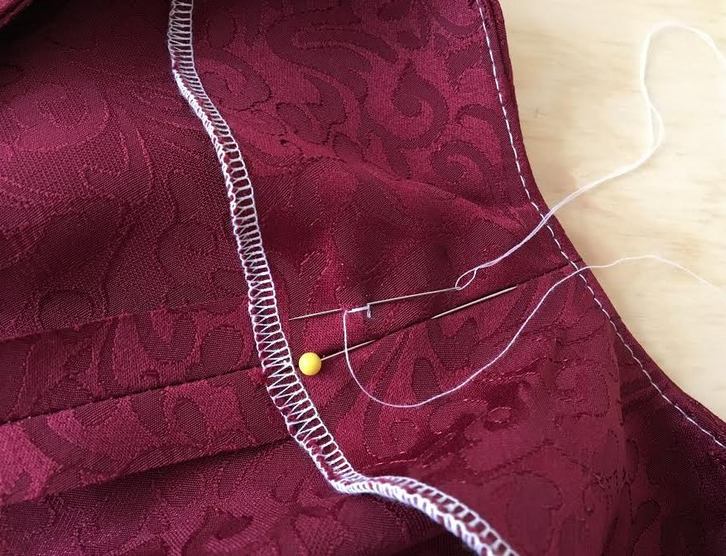 Keeping the pin inserted, hand stitch in place a few times attaching the facing to the garment's seam allowance. Repeat this step on both sides of the seam allowance as shown bellow. Don't forget to remove the pin once done.
Use the tacking method described above on all the garment's seams. This will result in a stable, flat facing that wont flip to the outside during wash and wear. 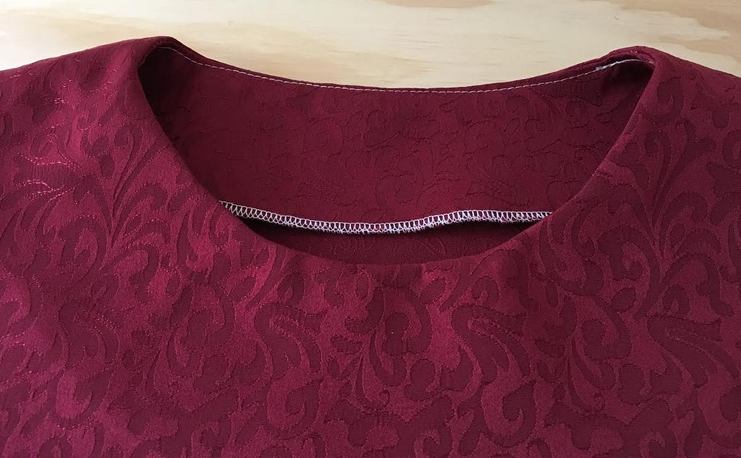 
8 Comments
Tracy
6/8/2019 12:19:37 am
Thank you so much for such a thorough guide to sewing these necklines....it's taken me A LOT of practice to get a perfect neckilne!! The one mistake I found I was making was that I was stretching / even gently pulling the fabric when sewing the neckline onto the body. Even the slightest "pull" will put it all out of place. I now let the machine take the fabric through and never pull or stretch the fabric. It makes such a difference. Never give up sewers, it does take practice but it's so worth it. Happy sewing!! 7/11/2019 08:00:29 am
Hi Tracy!!
janet
4/28/2020 04:37:50 am
Thank you, Thank you, After 60yrs { I'm 80} of frustration, tears and thrown away efforts, you have made it so easy. Have dusted off my machine and made a dress with a perfect neckline !!! 4/28/2020 01:13:40 pm
Hi Janet, 6/2/2020 01:21:12 pm
thank you so much the infomation in the details helped me so much I am getting my confidence back. Your sewing is very rare!!! 6/2/2020 01:23:01 pm
Hi Linda!! Thank you! I’m so glad it helped you get your confidence back- keep sewing! Leave a Reply. |
The Blog:A journey into our design process, sewing tutorials, fashion tips, and all the inspiring people and things we love. 
Doina AlexeiDesigner by trade and dressmaker at heart. I spend most of my days obsessing over new fabrics and daydreaming new ideas. 
Sadie
Executive Assistant & Client Relations Manager Archives
November 2019
Categories
All

|

-
Sewing Tutorials
-
Basics
>
- Aligning Pattern Grainlines To Fabric
- Preparing Fabrics For Sewing
- Pinning Sewing Patterns To Fabric
- Placing Sewing Patterns On Fabric For Cutting
- Rotary Cutters or Fabric Scissors?
- Cutting The Sewing Patterns
- What Are Notches And How To Use Them In The Sewing Process
- Transferring Notches From Pattern To Fabric
- Transferring Seamlines to Fabric
- Staystitching
- Backstitching: A Complete Guide
- Hand Basting: A Complete Guide
- Sewing Continuous Bias Binding
- Darts >
-
Sewing Seams
>
- The Basics Of Seams And Seam Allowance
- How To Sew A Straight Seam
- Sewing Curved Seams
- Sewing Corner Seams
- Trimming And Grading Seam Excess
- Notching/Clipping Seam Allowance for Tension Release
- Sewing Topstitched Seams
- Sewing Corded Seams
- Sewing A Slot Seam
- Sewing A Gathered Seam
- Sewing Bias Seams
- Sewing Seams With Ease
- Sewing Seams With Crossing Seamlines
- Sewing Unlike Fabric Seams
- How To Iron Seams: Ironing Tools And Conventions
- Sewing With Knit Fabrics
- Understanding Stitch Length And Tension
- Sewing Unique Fabric Seams
-
Seam Finishes
>
- Seam Finishing Techniques - Overview
- Applying A Pinked Seam Finish
- Applying A Bias Bound Seam Finish
- Serging And Zigzag Seam Finishes
- Sewing A Self-Bound Seam Finish
- Sewing A French Seam Finish
- Sewing A Hong Kong Seam Finish
- Sewing A Mock French Seam Finish
- Sewing A Turned-and-Stitched Seam Finish
- Sewing Overcast Hand-Applied Seam Finishes
- Sewing A Flat Felled Seam
- Sewing A Hairline Seam Finish
-
Hem Finishes
>
- Garment Hem Finishes: Overview
- Sewing A Double Fold Hem Finish
- Sewing A Single Fold Hem Finish
- Sewing Bound Hem Finishes
- Sewing An Exposed Double Layer Bound Hem
- Sewing A Folded-Up Bound Hem with Pre-folded Binding
- Sewing A Hong Kong Hem Finish
- Sewing A Band Hem Finish
- Sewing A Bias Faced Hem Finish
- Sewing A Twill Tape Hem Finish
- Sewing A Rolled Hem Finish
- Sewing A Shaped Hem Facing
- Using Fusible Hem Tape And Webbing
- Finishing A Lace Fabric Hem
- Finishing A Leather Hem
- Sewing Faced Hem Corners
- How To Finish Lining At The Hem
- Finishing Fabric Corners by Mitering >
- Interfacing A Hemline: Lined And Unlined Examples
-
Sewing Pockets
>
- Curved Patch Pocket With Flap
- Unlined Square Patch Pockets
- Lined Patch Pockets: Two Ways
- Extension On-Seam Pockets
- Separate On-Seam Pocket
- Front Hip Pockets
- Bound Double Welt Pocket
- Double Welt Pocket With Flap
- Self-Welt Pocket (Using Single Fabric Layer)
- Slanted Welt Pocket (Hand-Stitched)
- Faced Slash Pockets: Overview >
-
Sewing Zippers
>
- Sewing Zippers: General Information
- Sewing A Centered Zipper
- Sewing A Lapped Zipper
- Sewing An Invisible Zipper
- Sewing A Fly Front Zipper
- Sewing A Closed-End Exposed Zipper (No Seam)
- Sewing An Exposed Separating Zipper
- Sewing Hand Stitched Zipper Applications
- Sewing A Zipper Underlay
- Sewing A Placket-Enclosed Separating Zipper
- Sleeveless Finishes >
-
Neckline Finishes
>
- Sewing A Neck Shaped Facing
- Sewing An All-In-One Neck Facing
- Neck And Garment Opening Combination Facings >
- Sewing A Bias Faced Neckline Finish
- Sewing A Band Neckline Finish
- Bound Neckline Finishes: Overview >
- Sewing A Semi-Stretch Strip Band Neckline
- Ribbed Neck Band And Classic Turtleneck
- Decorative Neckline Finishes >
- Finishing Facing Edges >
-
Extras
>
- A Complete Guide on Interfacing
- Sewing Bound Spaghetti Straps
- Sewing Spaghetti Straps To A Faced Neckline
- Sewing Ruffles: Overview
- Patterning And Sewing A Circle Ruffle
- Sewing A Gathered Heading Ruffle
- Sewing Double Layer Gathered Ruffles
- Sewing A Gathered Ruffle Into A Seam
- Sewing A Gathered Ruffle To A Fabric Edge
- Sewing A Fabric Surface Slit
- Sewing A Slit Seam
- Hand-Applied Straight Stitches
- Hand-Applied Blind Stitches
- Hand-Applied Overedge Stitches
- Hand-Applied Tack Stitches
- Hand-Applied Decorative Stitches
-
Basics
>
- Custom Bridal
- Custom Apparel
- About
- Blog

 RSS Feed
Services |
Company |
|
