|
An overlock machine, also known as a serger, is a wonderful way to finish off fabric edges. Overlock refers to the type of stitch this machine performs, and it’s commonly used for hemming, finishing, or seaming two fabrics together. If you are learning to sew your own garments, you will fall in love with the possibilities of this machine. It has the ability to elevate a garment with versatile seaming and professional finishing techniques. Getting Started With Your Overlock Machine 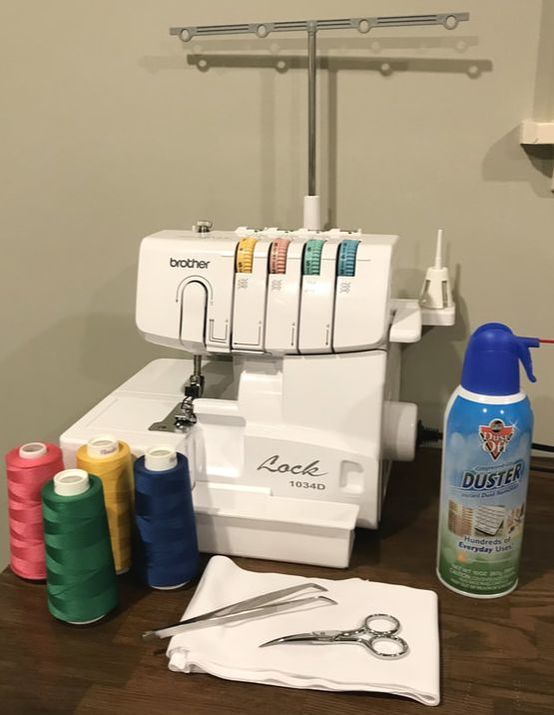 To get started working with your 4-thread serger/overlock machine, you will need a few basic sewing tools:
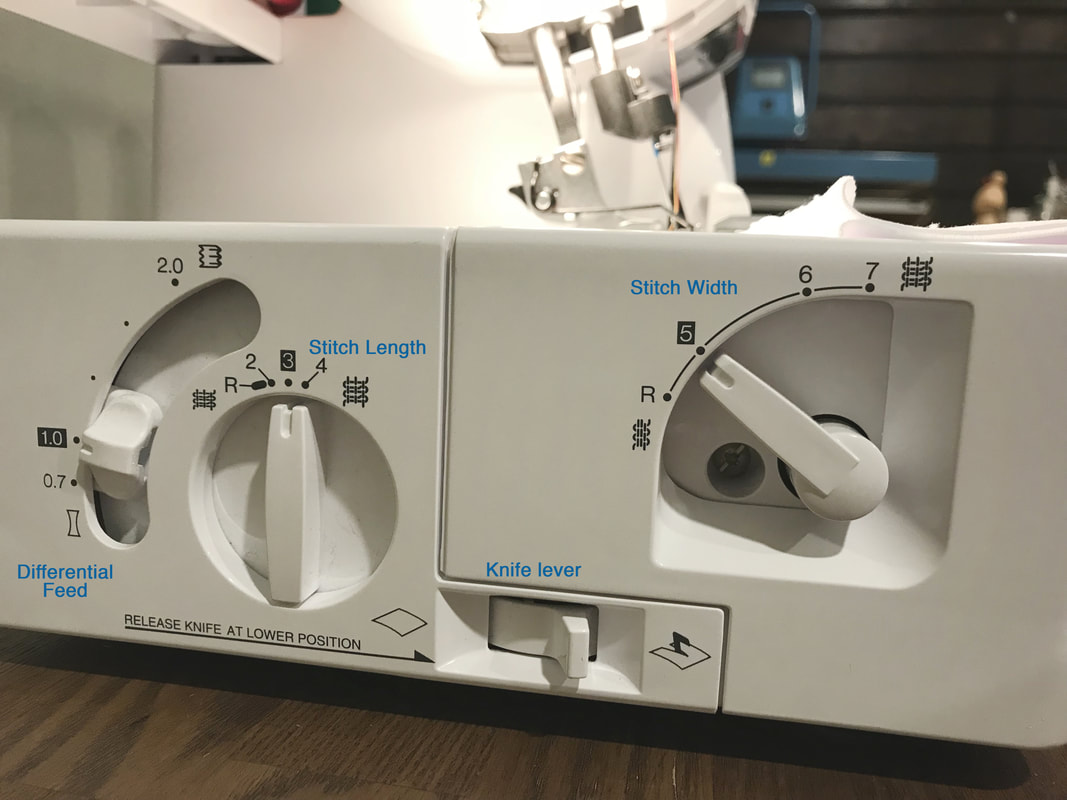 Before threading my overlock machine I always check my settings. Located on the side of the machine are the Stitch Length, Stitch Width, Differential Feed, Blade & Tension Settings.
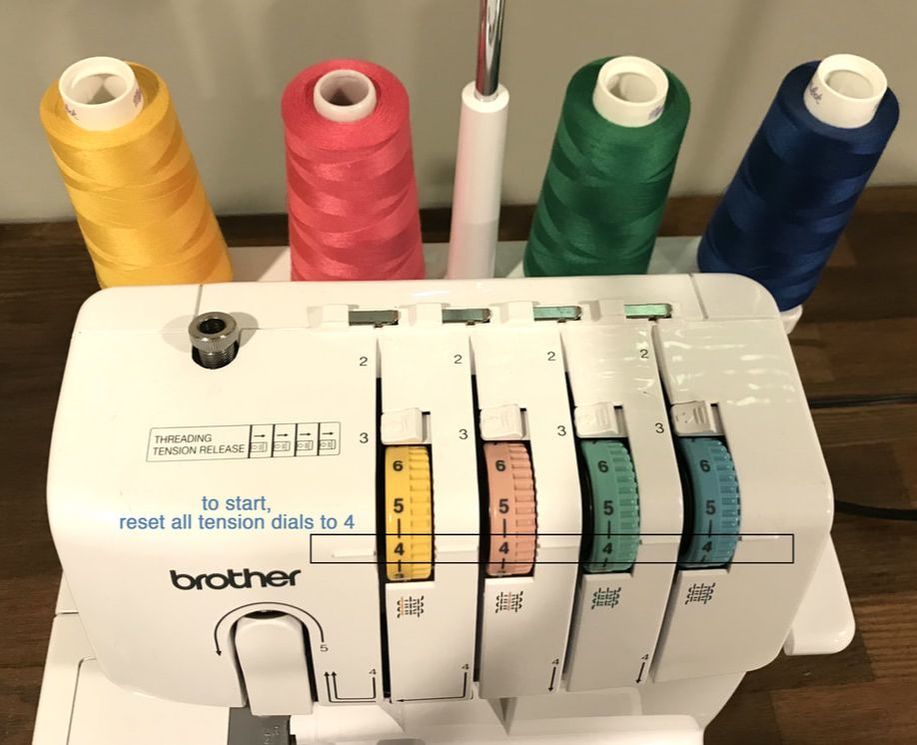
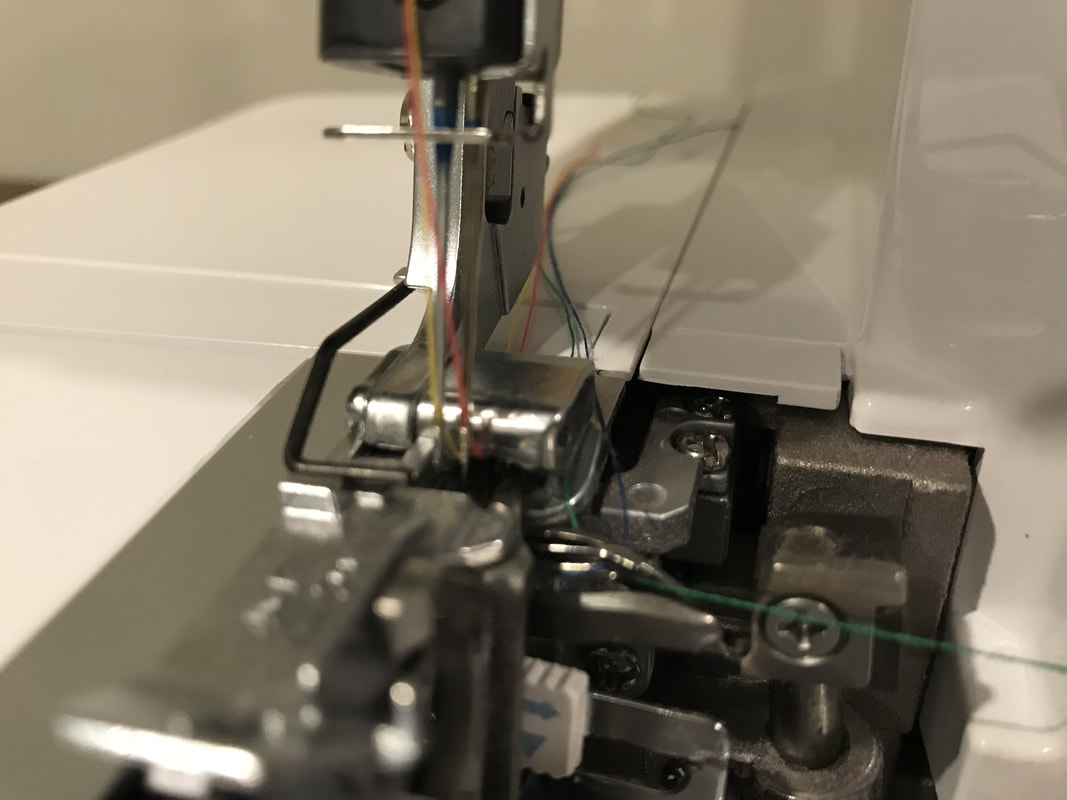
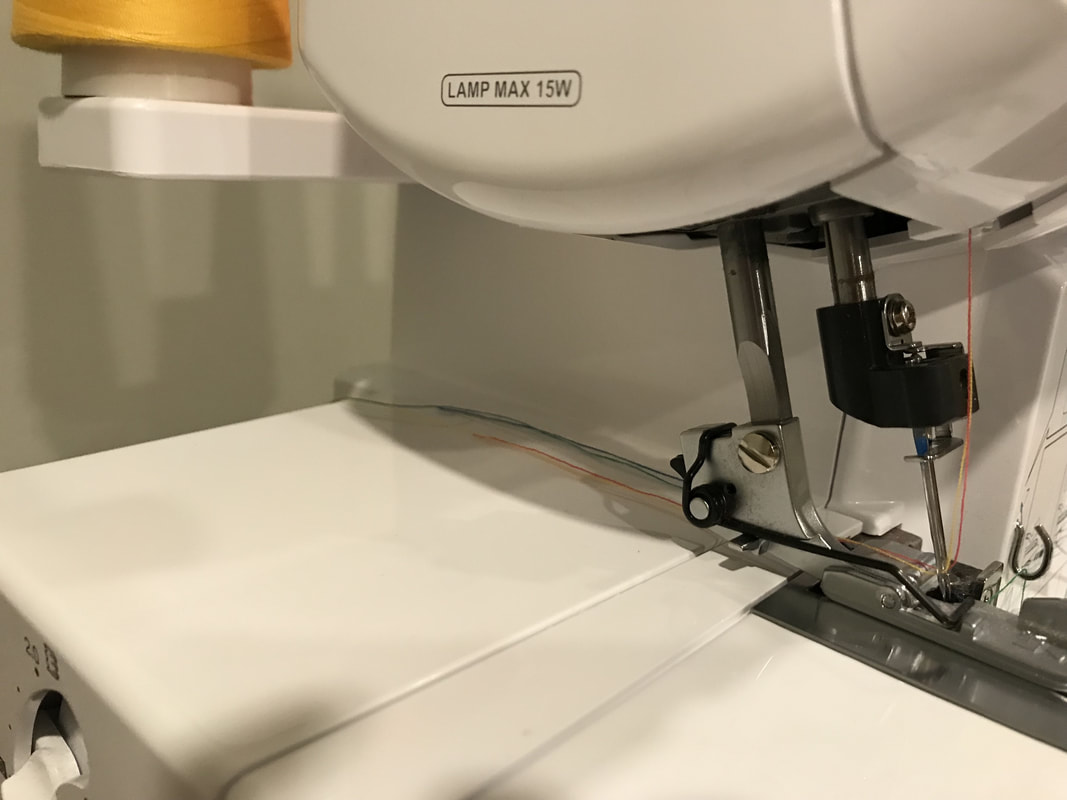
Threading A 4-thread Overlock Machine Now that we’ve checked our settings, we are finally ready to thread a 4-thread overlock machine. *For this demo I am using 4 different thread colors that coordinate with the 4 colors of my tension dials. This will help later, when adjusting the tension and determining what dials need to be adjusted.* Place all 4 spools of cone thread on each spool pin and extend your thread tree (this is the extender with your spool pins). **Most overlock machines have instructions marked clearly on the machine of how to thread each individual machine. Your machine may differ slightly from the below. Always consult your manual for the most accurate explanation. ** Threading The Left Needle On The Overlock Machine: 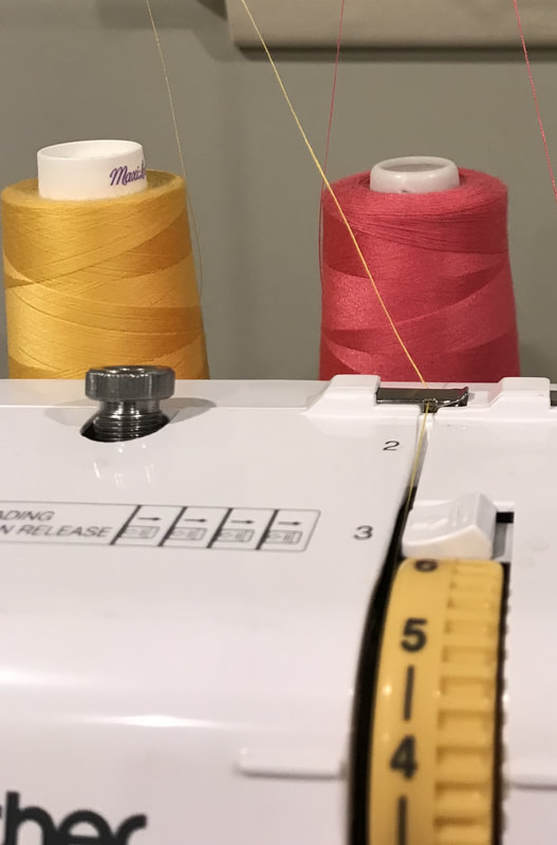 Taking my first thread (yellow), I start the process by threading the left needle. 1. Go through the 1st guide hole located in the thread tree. Continue to pull the thread through the 1st guide located on the top of the machine as shown in the image above. Always follow your machine markings if you have them. 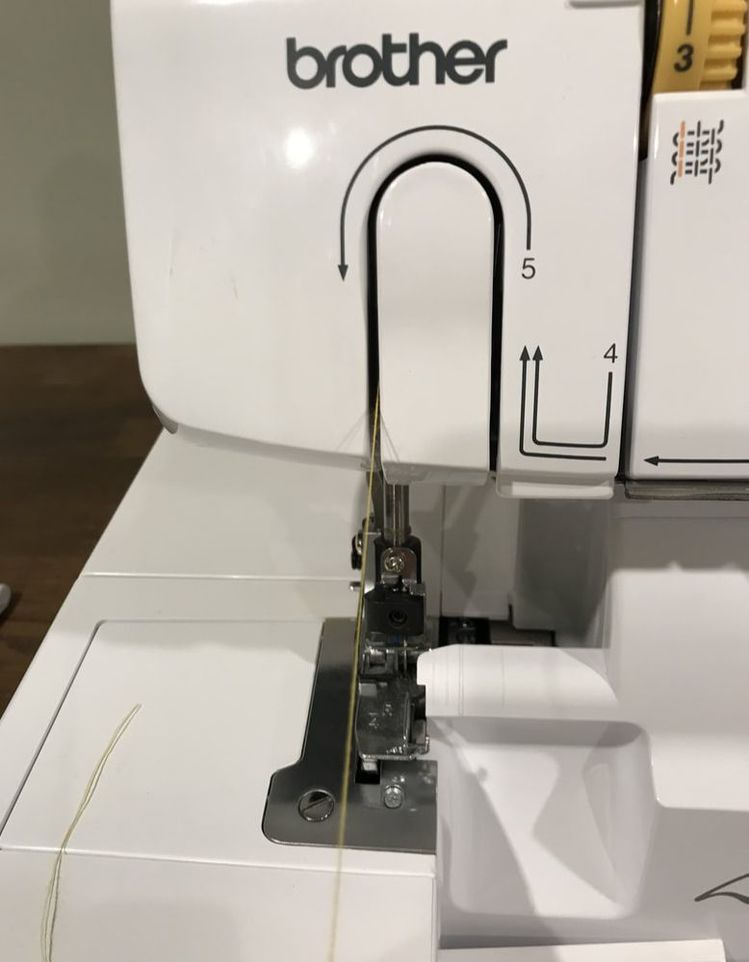 2. Pull your thread through the tension disc (located in the slot next to your 1st thread dial) and follow the instructions marked on the machine by pulling the thread up and around the channel. When your thread is in the above position, you are ready to thread the needle.  3. Thread the 1st needle (left needle) by threading front to back. Use your tweezers if that helps. 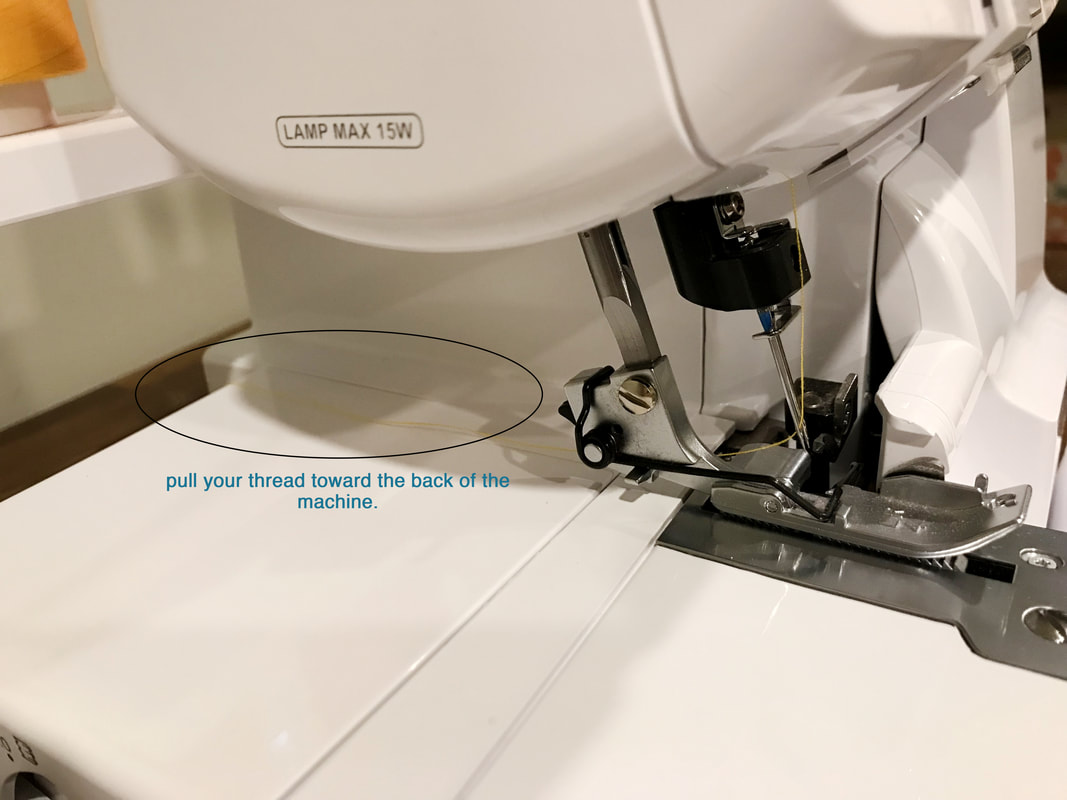 4. Once the thread is through the needle, use your tweezers to pull it toward the back of the machine. Threading The Right Needle On Your Overlock Machine:  Taking my 2nd thread (pink), I continue by threading the right needle. 1. Go through the 2nd guide hole located in the thread tree. Continue to pull the thread through the 2nd guide located on the top of the machine (shown above). Again, always follow your machine's markings if you have them. 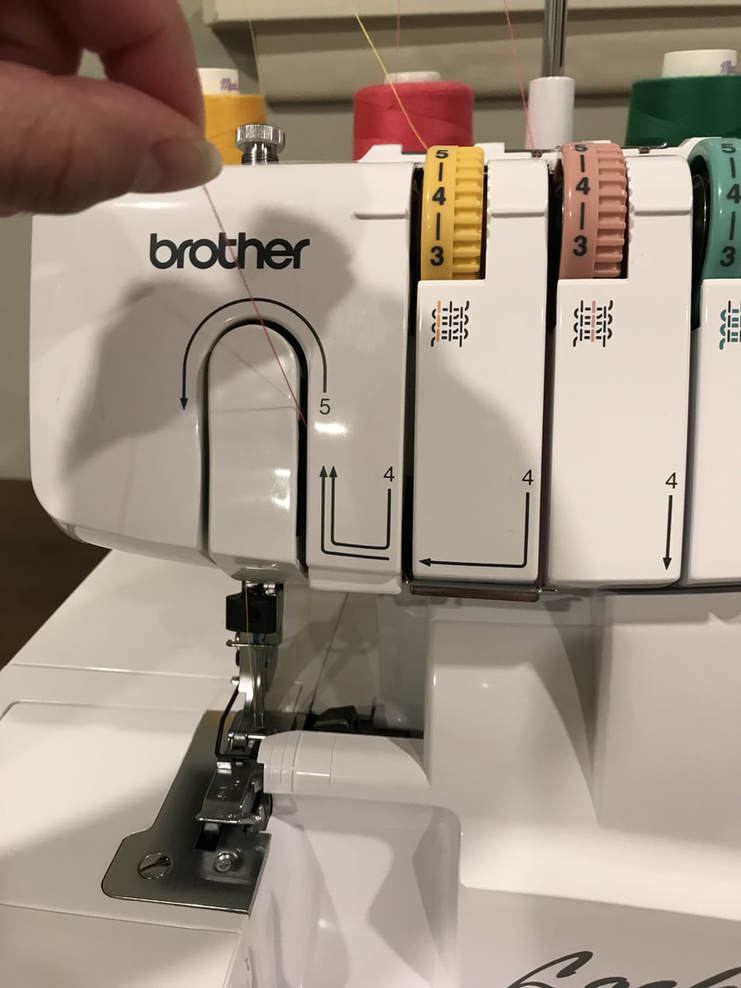 3. Pull your thread through the tension disc (located in the slot next to your 2nd thread dial), and follow the instructions marked on the machine by pulling the thread up and around the channel, same as you did with the left needle. 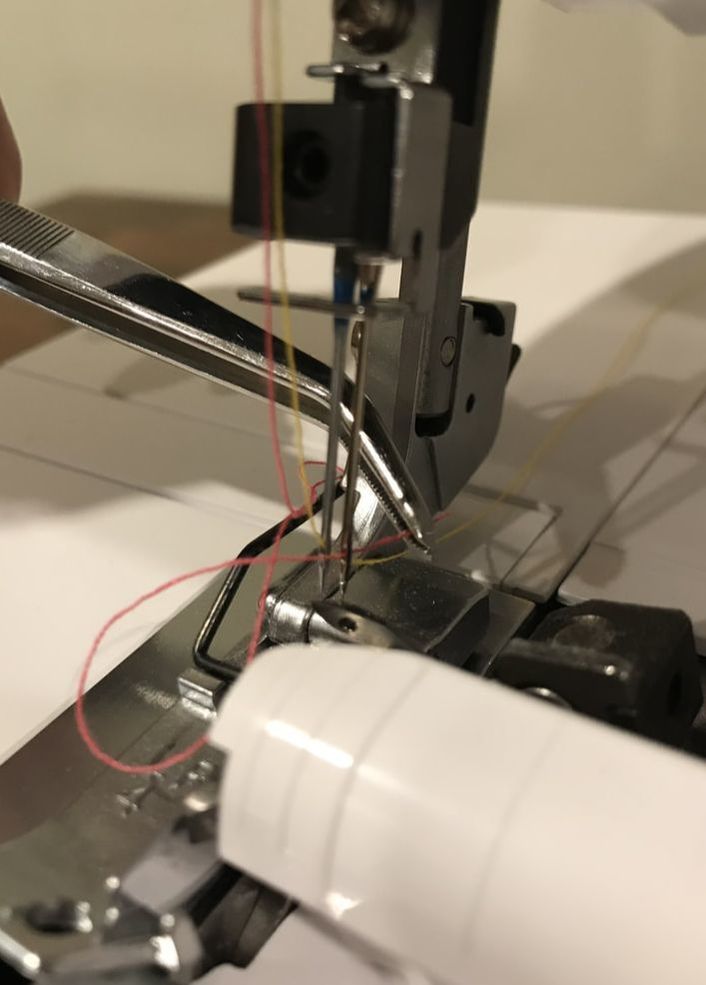 4. Thread the 2nd needle (right needle) by inserting the thread in front-to-back direction. Once the thread is through the needle, use your tweezers to pull the thread toward the back of the machine. 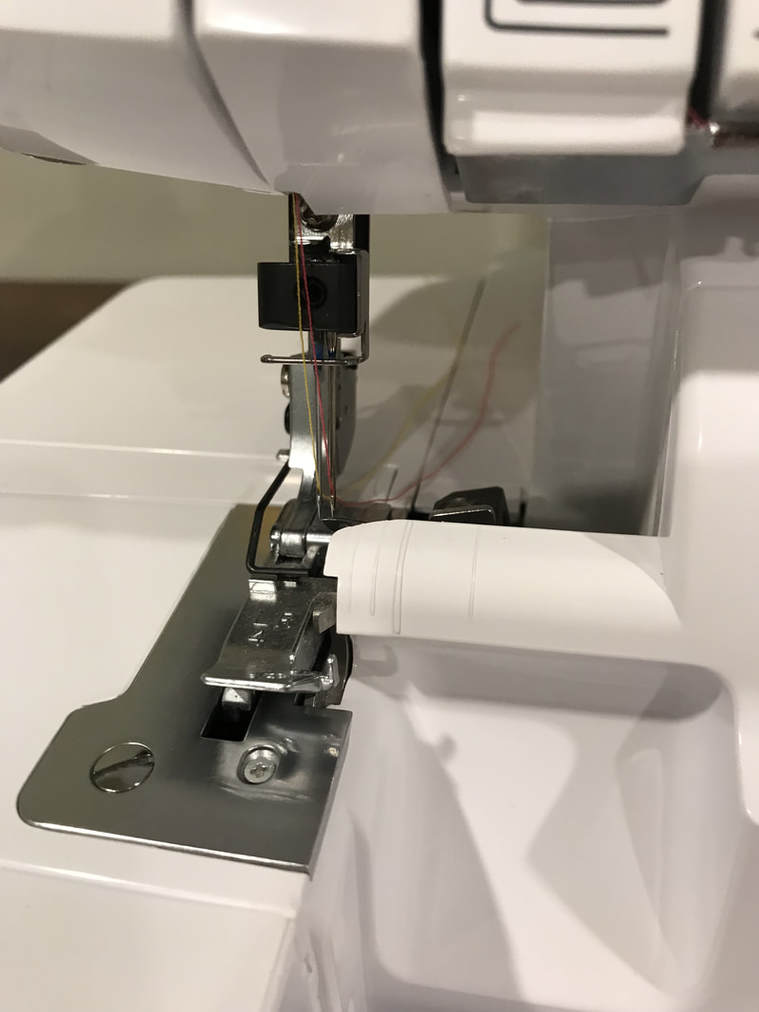 Both the 1st (yellow) and 2nd (pink) threads should now be lined up together toward the back of the machine. Threading The Upper Looper On An Overlock Machine: 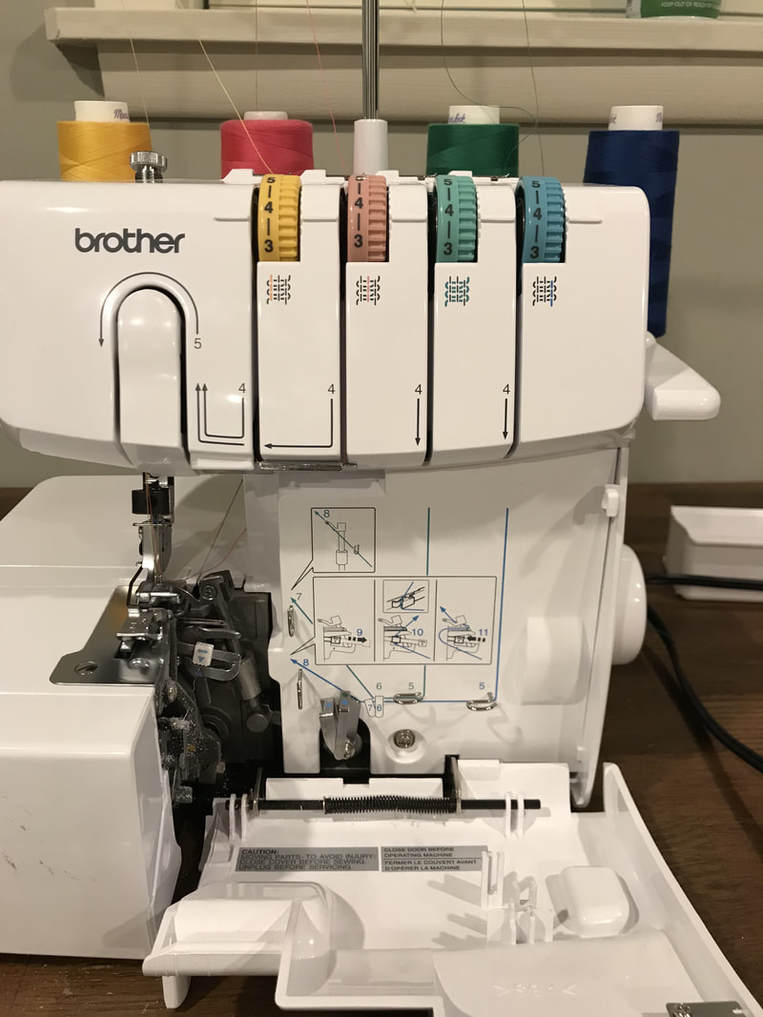 To access the Upper and Lower Looper, remove your trim trap and pull back your front cover. When I slide my front cover open, there is a diagram showing how to thread the Upper and Lower loopers (shown above). Your machine diagram may differ slightly from mine so be sure to follow your machine's diagram for the most accurate threading. 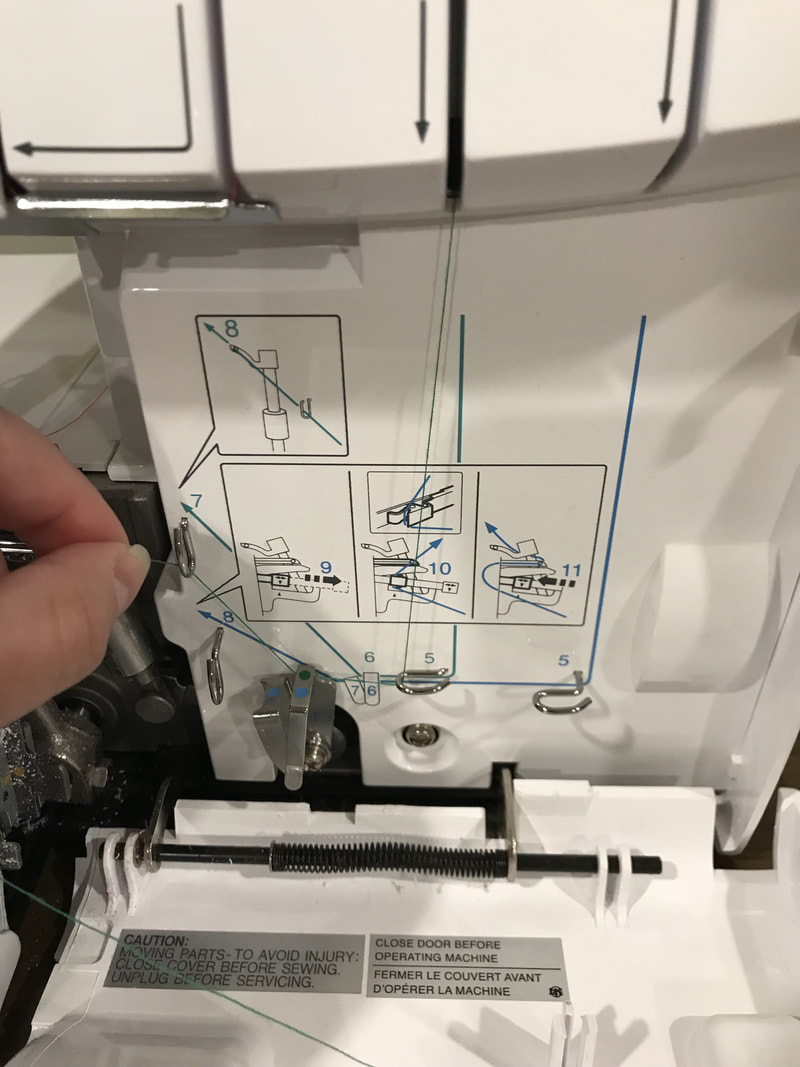 Using the 3rd thread (green), we’re ready to thread the 3rd needle, also known as the upper looper. 1. As you did for the first two threads, go through the 3rd guide hole located in the thread tree and continue to pull the thread through the 3rd guide located on the top of the machine. Next, pull your thread through the tension disc (located in the slot next to your 3rd thread dial) and follow the instructions marked on the machine by pulling the thread through the series of guides located under the front cover (shown in the image above). 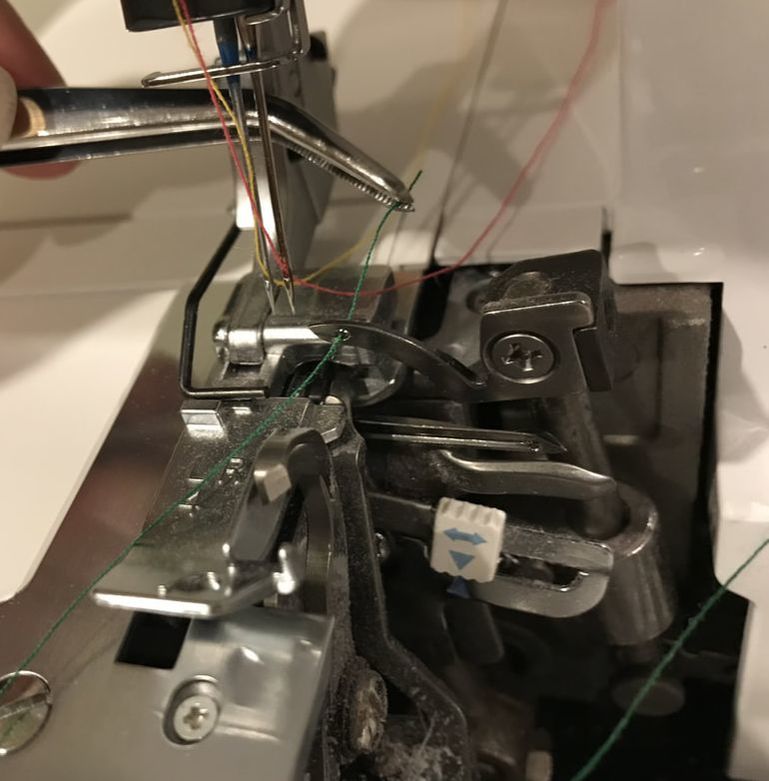 3. Once you are through all the guides, it's time to thread the Upper Looper needle. Using tweezers, pull the thread front to back as shown above 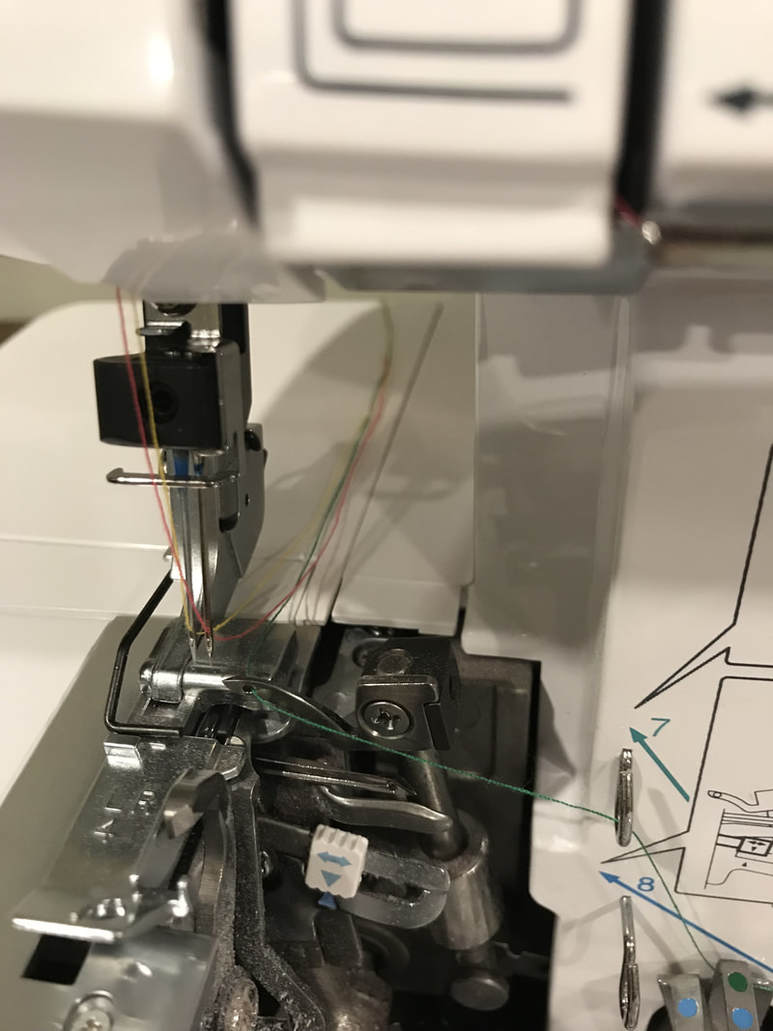 4. Once you are through the Upper Looper needle, pull your thread to the back of the machine just as you did in the preceding steps. Threading The Lower Looper On Your Overlock Machine: Working with my 4th and final thread (blue), we’re ready to thread the lower looper. 1. Again, go through the 4th guide hole located in the thread tree and continue to pull the thread through the 4th guide (located on the top of the machine). Pull the thread through the tension disc located in the slot next to the 4th thread dial. 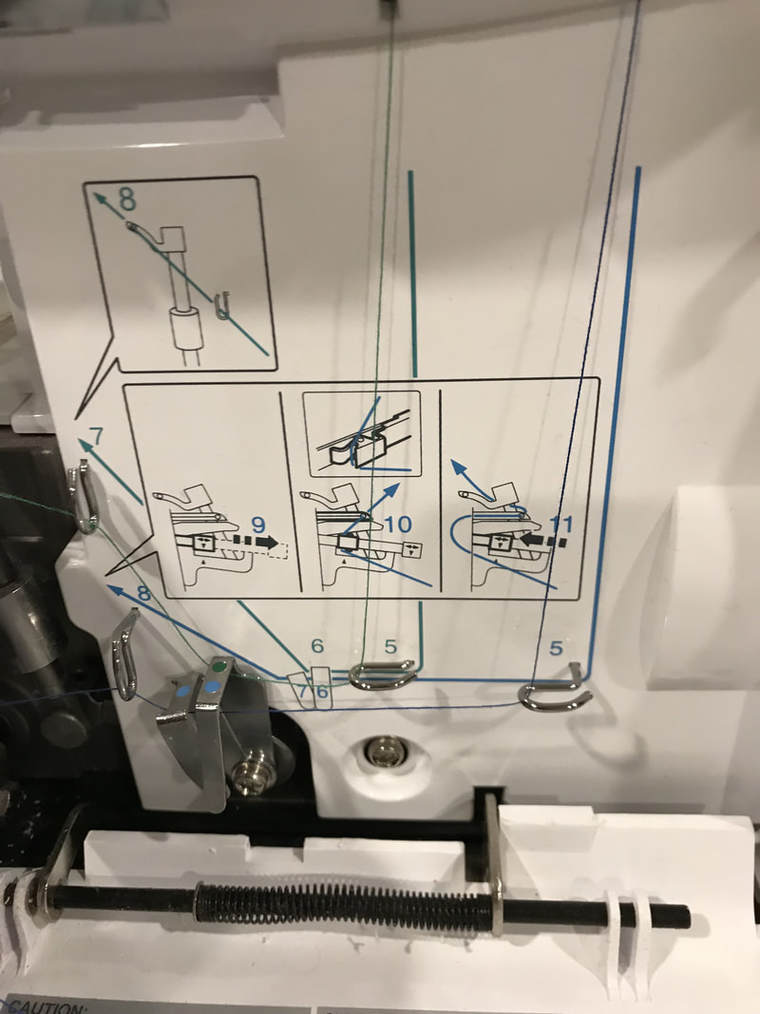 2. Next, carefully follow the instructions marked on the machine by pulling the thread though the series of guides located under the front cover as shown above. Keep in mind that your overlook's diagram may look a little different so make sure you follow it accordingly. Once you've made it through all the guides, the Lower Looper needle is ready to be threaded. Traditionally, the Lower Looper needle has 2 holes to thread. My machine has an auto thread guide that does the 1st needle hole for you. If unsure, follow your machine's manual to see what the best way to thread the Lower Looper is in your particular case. 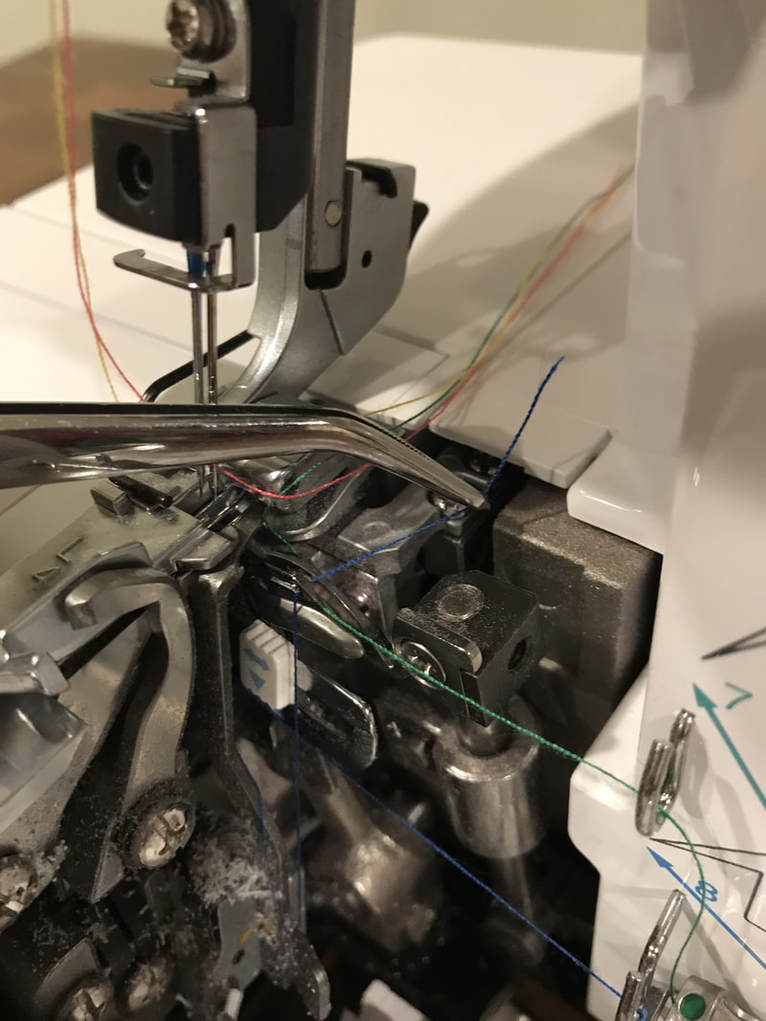 3. Once you thread the Lower Looper needle, use the tweezers to pull the thread to the back of the machine. The lower looper thread (blue) should be positioned on top of the upper looper thread (green) as shown above.
4. After threading the Upper and Lower needles, close the front cover and put the trim tray back in place. All 4 threads should be lined up towards the back of the machine now. 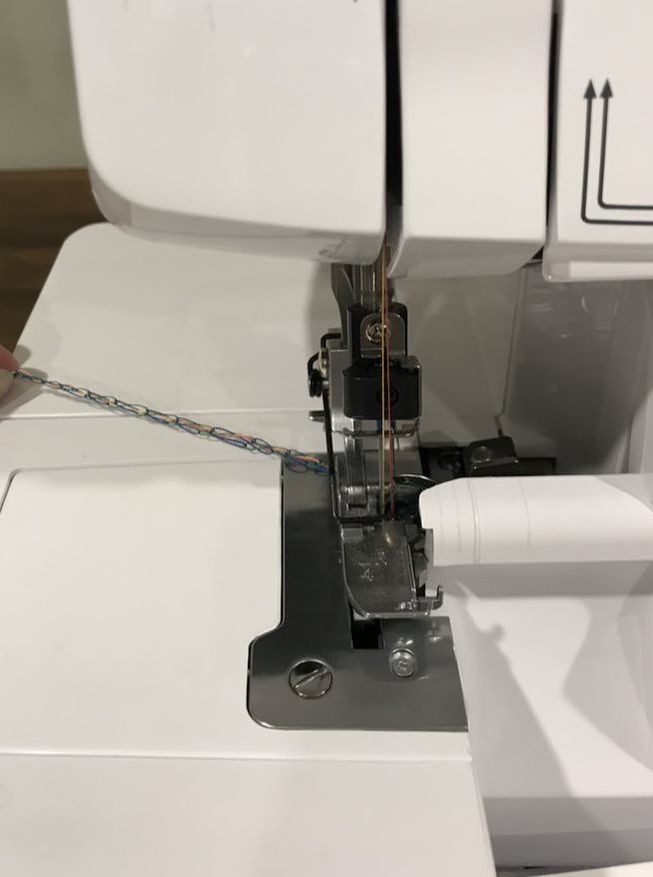 5. Before you start stitching, lift your presser foot with the lever, take all 4 threads and guide them under the presser foot. Make sure to keep them all pulled towards the back. Turn your power on and slowly step on your pedal to run the thread through. This creates a thread chain as shown in the image above. 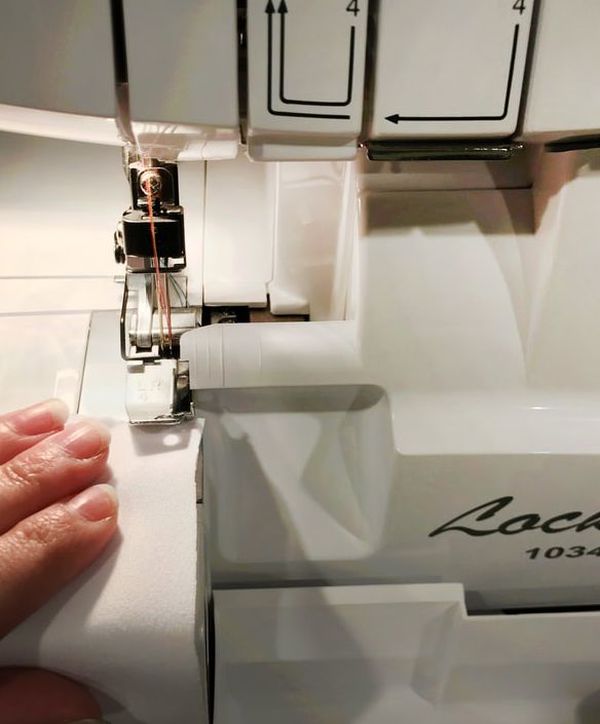 6. Once you have confirmation that all your threads ran through and there is no breakage, get your scrap fabric out. Line up your fabric with the edge of the machine. If the blade is down, the overlock will trim off the fabric excess as it sews. The trimmings will then collect in the trim trap. 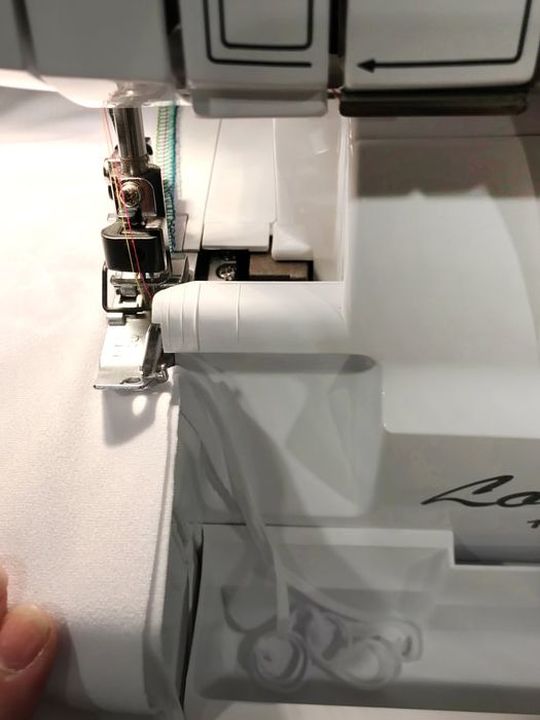 Press the pedal slowly and run your fabric through the overlock as shown above. When you have a good section of overlock stitching to look at, remove the fabric from your machine to review your tension. To understand the basics of overlock stitch tension, follow the guidelines below. Reviewing The Serging Stitch And Fixing Tension Issues On The Overlock Machine Always check the front, back and side views of your overlock stitches before serging the final garment. Doing so will allow you to set your tension dials to the correct setting as well as find any machine issues that need to be addressed. Performing The Initial Check: 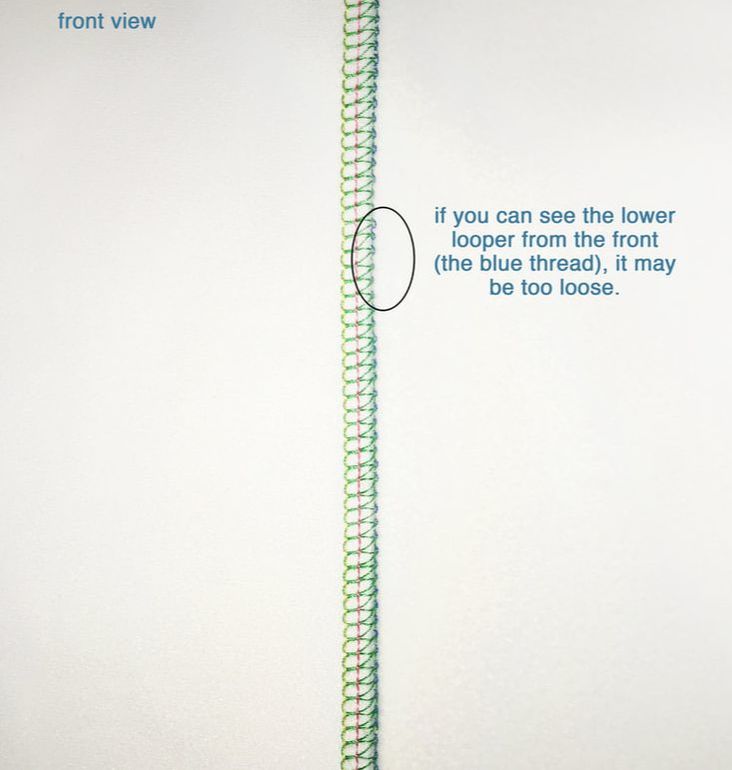 From the front view: My yellow and pink threads look OK. However, you can see the blue thread is peeking out from the underside of the fabric. This indicates that it needs to be tightened up a little by adjusting the blue tension dial on the machine. The green thread looks OK from this view. 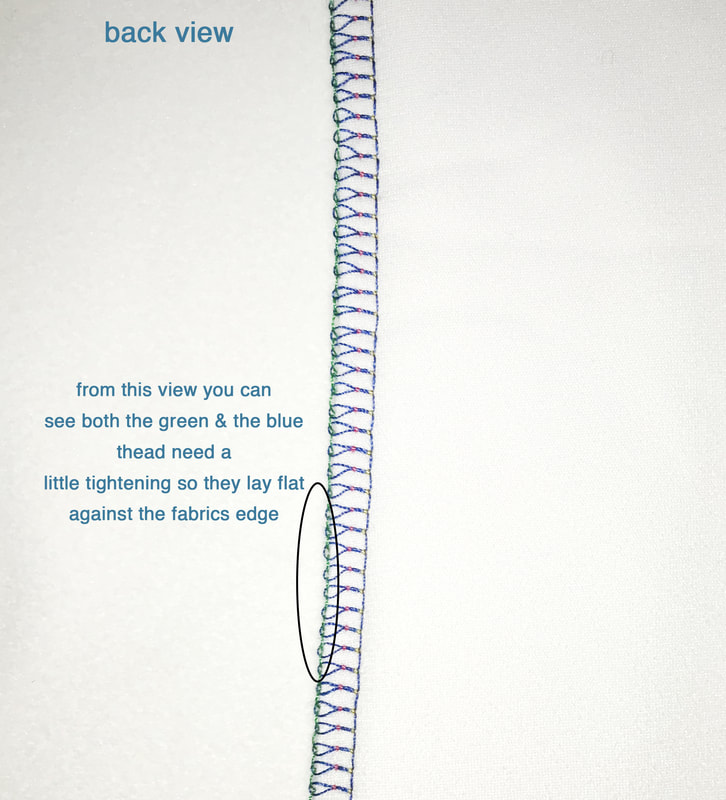 From the back view: The yellow and pink threads still look OK. No adjustments are needed on the tension. However, the green thread is very noticeable and looks a bit loose, confirming that this thread does need to be tightened up a bit. 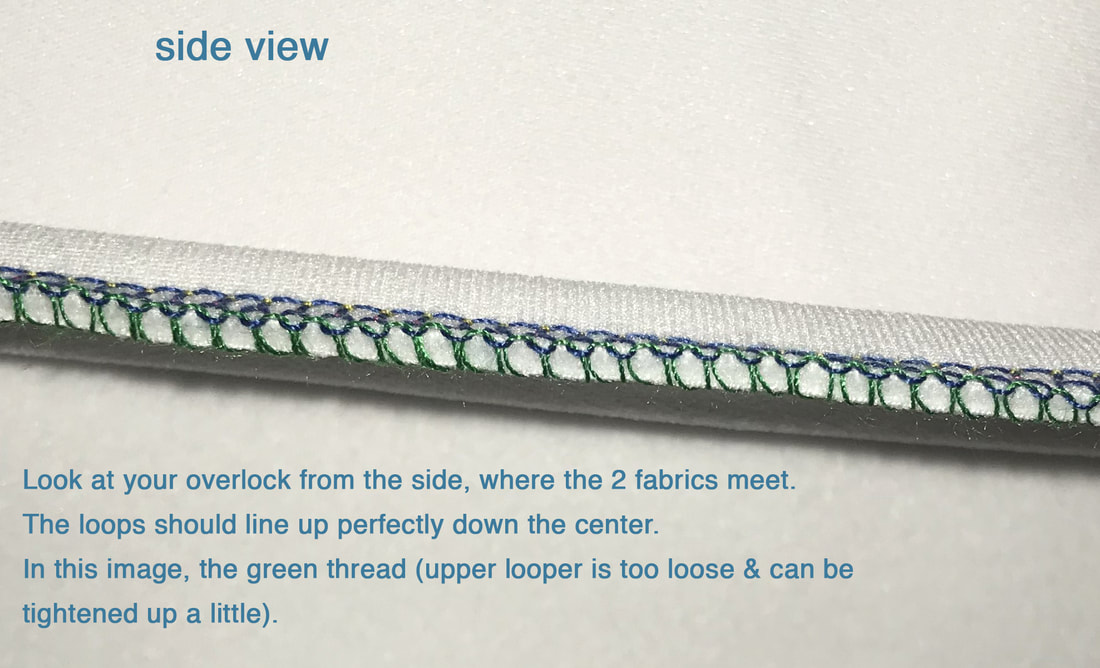 The side view: Since I couldn’t tell from the back view if the blue thread was really OK, I re-checked it from the side view. The loops should run perfectly down the center of my 2 fabrics. As you can see in the image above, they do not align quite perfectly. The Fix: I am going to tighten the tension on both the green and blue thread (upper and lower loopers) to 4.5- only a slight increase. After running the fabric through the overlock again, I feel OK with these settings. The adjusted serging stitch is shown below. After Adjusting The Tension Setting: 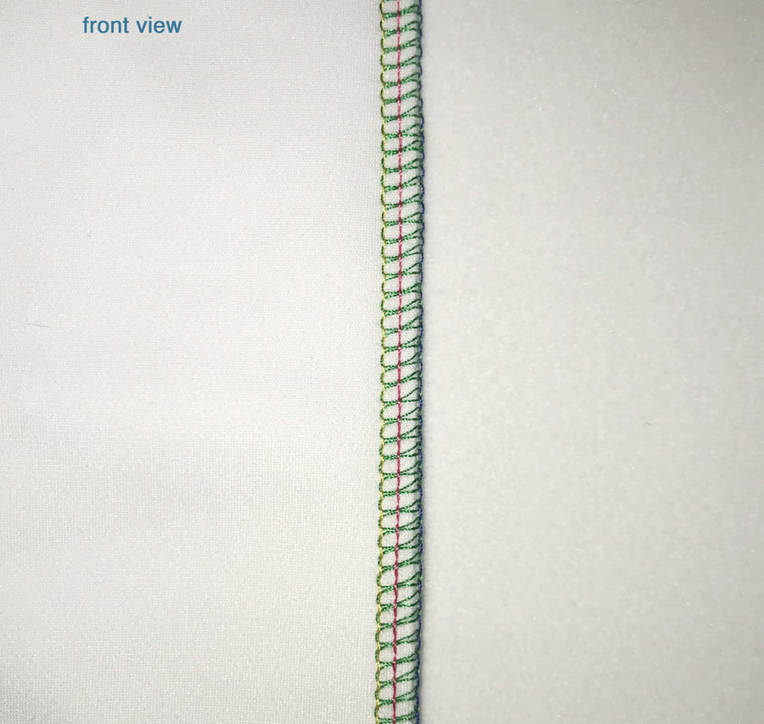 Adjusted front view: The blue thread from the back no longer peeks along the fabric's edge. 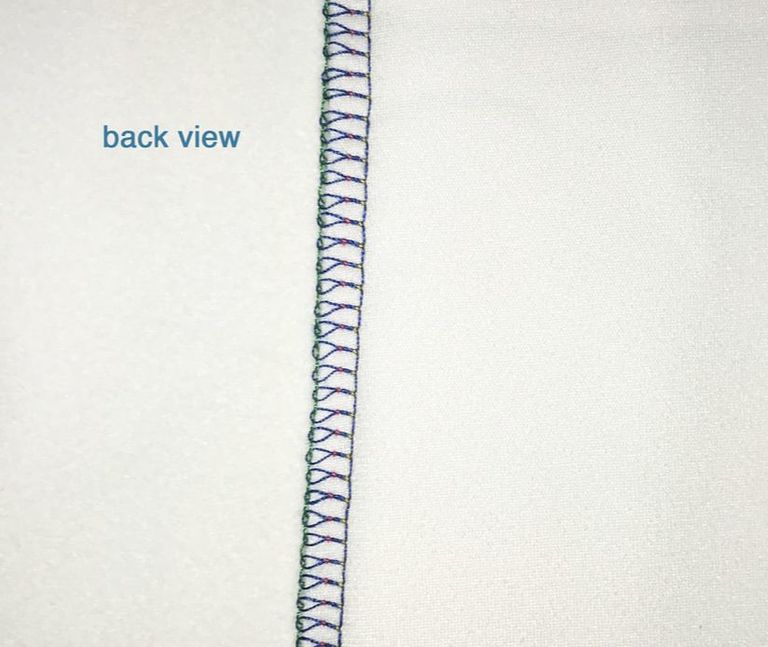 Adjusted back view: The green thread loops are not as loose and are aligned evenly along the edge of the fabric. 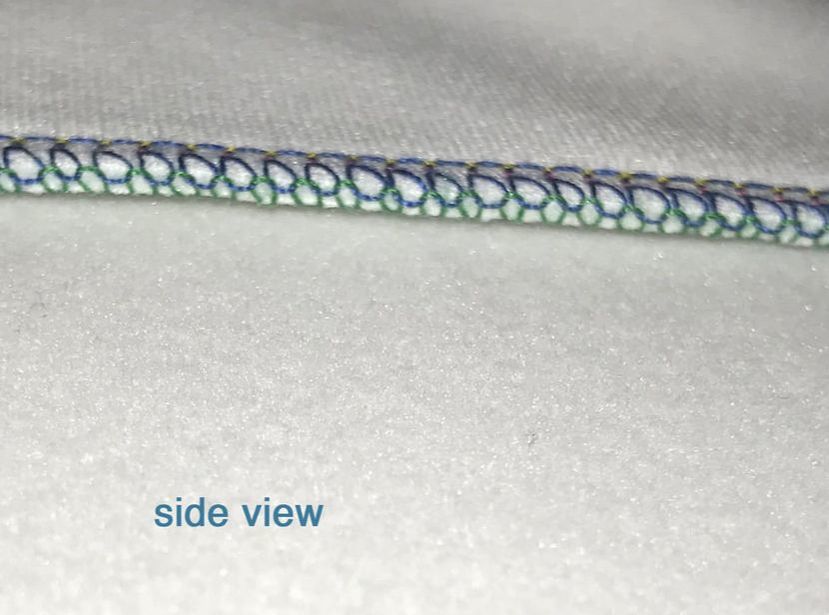 Adjusted side view: The serging stitch lays flat against the 2 fabric edges. Each loop looks evenly positioned. 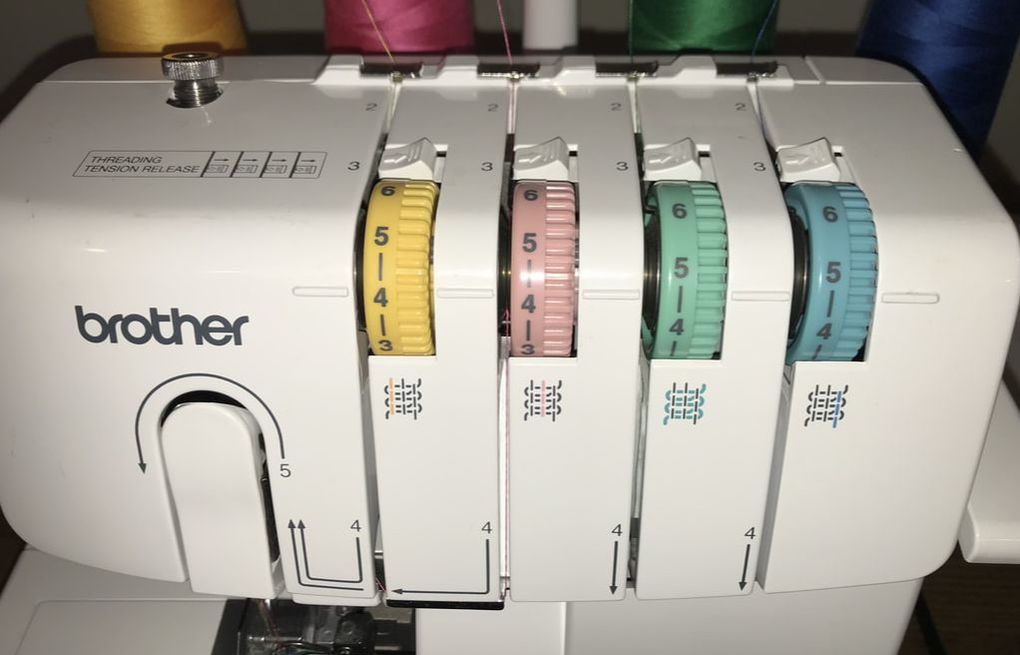 After reviewing the serging stitch and making all necessary adjustments, the final tension settings on my overlock are: 4 - 4 - 4.5 - 4.5 Now that the tension settings are ok, you are ready to use your overlock! Want to learn how to remove an existing overlock stitch? Check out this tutorial: How To Remove An Overlock/Serged Stitch
0 Comments
Leave a Reply. |
The Blog:A journey into our design process, sewing tutorials, fashion tips, and all the inspiring people and things we love. 
Doina AlexeiDesigner by trade and dressmaker at heart. I spend most of my days obsessing over new fabrics and daydreaming new ideas. 
Sadie
Executive Assistant & Client Relations Manager Archives
November 2019
Categories
All

|

-
Sewing Tutorials
-
Basics
>
- Aligning Pattern Grainlines To Fabric
- Preparing Fabrics For Sewing
- Pinning Sewing Patterns To Fabric
- Placing Sewing Patterns On Fabric For Cutting
- Rotary Cutters or Fabric Scissors?
- Cutting The Sewing Patterns
- What Are Notches And How To Use Them In The Sewing Process
- Transferring Notches From Pattern To Fabric
- Transferring Seamlines to Fabric
- Staystitching
- Backstitching: A Complete Guide
- Hand Basting: A Complete Guide
- Sewing Continuous Bias Binding
- Darts >
-
Sewing Seams
>
- The Basics Of Seams And Seam Allowance
- How To Sew A Straight Seam
- Sewing Curved Seams
- Sewing Corner Seams
- Trimming And Grading Seam Excess
- Notching/Clipping Seam Allowance for Tension Release
- Sewing Topstitched Seams
- Sewing Corded Seams
- Sewing A Slot Seam
- Sewing A Gathered Seam
- Sewing Bias Seams
- Sewing Seams With Ease
- Sewing Seams With Crossing Seamlines
- Sewing Unlike Fabric Seams
- How To Iron Seams: Ironing Tools And Conventions
- Sewing With Knit Fabrics
- Understanding Stitch Length And Tension
- Sewing Unique Fabric Seams
-
Seam Finishes
>
- Seam Finishing Techniques - Overview
- Applying A Pinked Seam Finish
- Applying A Bias Bound Seam Finish
- Serging And Zigzag Seam Finishes
- Sewing A Self-Bound Seam Finish
- Sewing A French Seam Finish
- Sewing A Hong Kong Seam Finish
- Sewing A Mock French Seam Finish
- Sewing A Turned-and-Stitched Seam Finish
- Sewing Overcast Hand-Applied Seam Finishes
- Sewing A Flat Felled Seam
- Sewing A Hairline Seam Finish
-
Hem Finishes
>
- Garment Hem Finishes: Overview
- Sewing A Double Fold Hem Finish
- Sewing A Single Fold Hem Finish
- Sewing Bound Hem Finishes
- Sewing An Exposed Double Layer Bound Hem
- Sewing A Folded-Up Bound Hem with Pre-folded Binding
- Sewing A Hong Kong Hem Finish
- Sewing A Band Hem Finish
- Sewing A Bias Faced Hem Finish
- Sewing A Twill Tape Hem Finish
- Sewing A Rolled Hem Finish
- Sewing A Shaped Hem Facing
- Using Fusible Hem Tape And Webbing
- Finishing A Lace Fabric Hem
- Finishing A Leather Hem
- Sewing Faced Hem Corners
- How To Finish Lining At The Hem
- Finishing Fabric Corners by Mitering >
- Interfacing A Hemline: Lined And Unlined Examples
-
Sewing Pockets
>
- Curved Patch Pocket With Flap
- Unlined Square Patch Pockets
- Lined Patch Pockets: Two Ways
- Extension On-Seam Pockets
- Separate On-Seam Pocket
- Front Hip Pockets
- Bound Double Welt Pocket
- Double Welt Pocket With Flap
- Self-Welt Pocket (Using Single Fabric Layer)
- Slanted Welt Pocket (Hand-Stitched)
- Faced Slash Pockets: Overview >
-
Sewing Zippers
>
- Sewing Zippers: General Information
- Sewing A Centered Zipper
- Sewing A Lapped Zipper
- Sewing An Invisible Zipper
- Sewing A Fly Front Zipper
- Sewing A Closed-End Exposed Zipper (No Seam)
- Sewing An Exposed Separating Zipper
- Sewing Hand Stitched Zipper Applications
- Sewing A Zipper Underlay
- Sewing A Placket-Enclosed Separating Zipper
- Sleeveless Finishes >
-
Neckline Finishes
>
- Sewing A Neck Shaped Facing
- Sewing An All-In-One Neck Facing
- Neck And Garment Opening Combination Facings >
- Sewing A Bias Faced Neckline Finish
- Sewing A Band Neckline Finish
- Bound Neckline Finishes: Overview >
- Sewing A Semi-Stretch Strip Band Neckline
- Ribbed Neck Band And Classic Turtleneck
- Decorative Neckline Finishes >
- Finishing Facing Edges >
-
Extras
>
- A Complete Guide on Interfacing
- Sewing Bound Spaghetti Straps
- Sewing Spaghetti Straps To A Faced Neckline
- Sewing Ruffles: Overview
- Patterning And Sewing A Circle Ruffle
- Sewing A Gathered Heading Ruffle
- Sewing Double Layer Gathered Ruffles
- Sewing A Gathered Ruffle Into A Seam
- Sewing A Gathered Ruffle To A Fabric Edge
- Sewing A Fabric Surface Slit
- Sewing A Slit Seam
- Hand-Applied Straight Stitches
- Hand-Applied Blind Stitches
- Hand-Applied Overedge Stitches
- Hand-Applied Tack Stitches
- Hand-Applied Decorative Stitches
-
Basics
>
- Custom Bridal
- Custom Apparel
- About
- Blog

 RSS Feed
Services |
Company |
|
