|
In last week's tutorial, you learned how to shorten close-ended, conventional zippers. This week, we'll take things a bit further by showing you how to shorten a separating zipper. As you might have guessed, shortening a separating zipper takes a bit of extra effort and follows a different process (and logic) than that of a regular, conventional zipper. 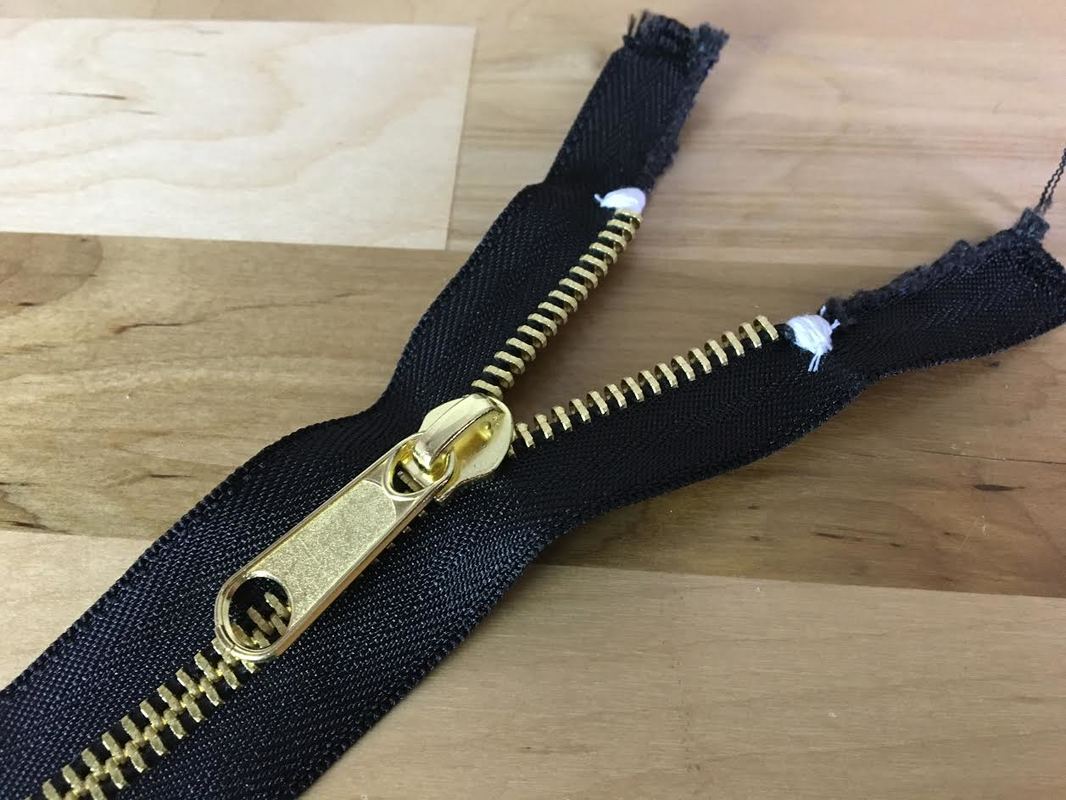 What Are Separating Zippers? Separating zippers are zippers that once fully open, separate into two portions. They are often sewn into the opening of jackets, coats, dresses and other garments that require a complete separation along the edges or seams. Separating zippers normally separate at the bottom, disconnecting one row of zipper teeth from the other. Once completely open and separated, one portion of the zipper tape and teeth houses the zipper slider and puller while the other houses a vertical crimp at the bottom (also called the pin). To close the zipper, this vertical crimp (pin) is inserted into a zipper box slit at the bottom thus allowing the zipper slider to pull the two rows of zipper teeth closed in an upward motion.  Separating zipper components 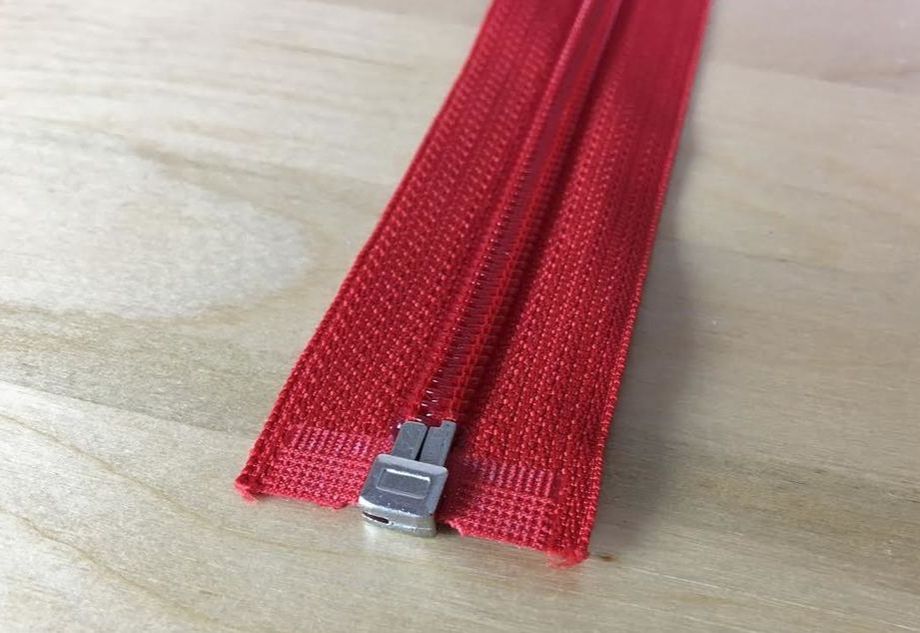 Closed separating zipper bottom Understanding the structure of a separating zipper is very important when it comes to shortening it. Due to the fact that all the functional hardware is located at the bottom, a separating zipper cannot be shortened from the bottom using a whipstitch as you would on a close-end conventional zipper. Since the bottom portion is essential to the operation of a separating zipper, it should be left untouched in the shortening process. 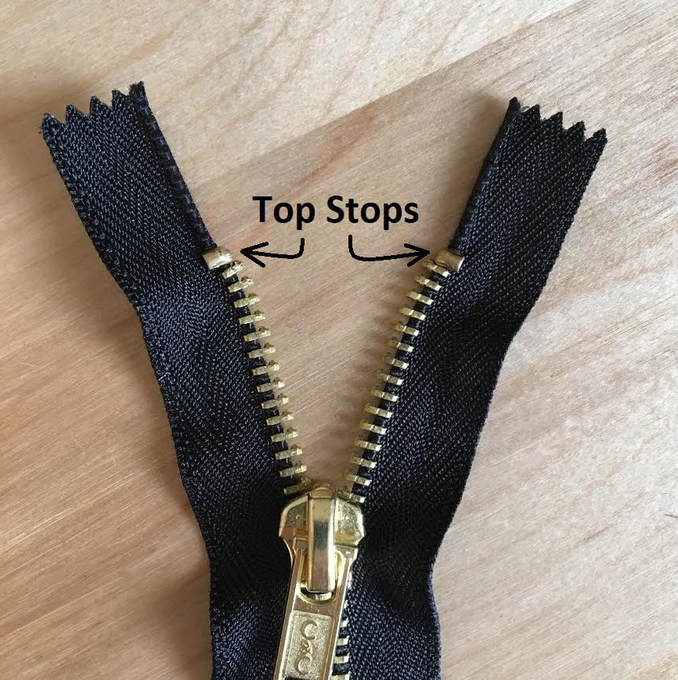 As noted above, the bottom portion of a separating zipper ensures that the zipper fully separates and can respectively be closed functionally. At the top end of the separating zipper you'll notice a larger crimp located on each edge of the zipper tape right above each row of zipper teeth. These two crimps serve as the top zipper stops, preventing the zipper tab from sliding off the zipper teeth track when it is fully closed. In addition, these two zipper stops also play an important role in preventing the zipper slider from getting stuck in place at the top. Noting this difference between the top and bottom of a separating zipper should be enough to convince you that since the top portion has less hardware and a much simpler mechanism, it will be much easier to work with than the bottom. For that reason, separating zippers are always shortened from the top. As you'll see in the tutorial to follow, shortening a separating zipper (whether metal or plastic) requires the use of pliers and a bit of pulling force to remove each zipper tooth/coil individually, always starting at the top and moving downwards. Separating zippers come in a variety of different sizes and styles. Due to the fact that they are used most often for jacket openings, your local fabric/craft store will most likely carry mostly longer lengths, ranging from 16-30+ inches. Separating zipper are available with both metal and plastic zipper teeth. Whichever one you choose depends on the design and project at hand, but keep in mind that weight and bulkiness should be taken in consideration. Larger metal coils are heavier and better suited for heavyweight items. Plastic coils are usually lighter in weight even if the coils (zipper teeth) have a larger size. Plastic coils are used when a lighter weight is desired or when the design calls for the zipper teeth to be of a specific color. Metal zippers don't blend in as much as plastic ones do allowing for less color flexibility when it comes to the zipper teeth. Regardless of the differences, both plastic and metal zipper teeth in a separating zipper should be fairly durable. You will get to experience the actual strength of both plastic and metal zipper coils in the zipper-shortening steps bellow. A separating zipper will need to be shortened when: - A shorter length is not available in stores for your specific project. - You have miss-measured the zipper length needed and the garment is already sewn. In this case, you can remove a few zipper coils to adjust the size according to the miss-matched garment opening which is often more efficient than re-sewing the entire clothing item. - The top of the zipper is damaged or does not allow the zipper tab to be pulled appropriately. If you'd rather not throw away the damaged zipper and wish to re-purpose it at a shorter length, you can shorten it by removing the coils past the damaged part. How To Shorten a Metal Separating Zipper By Hand 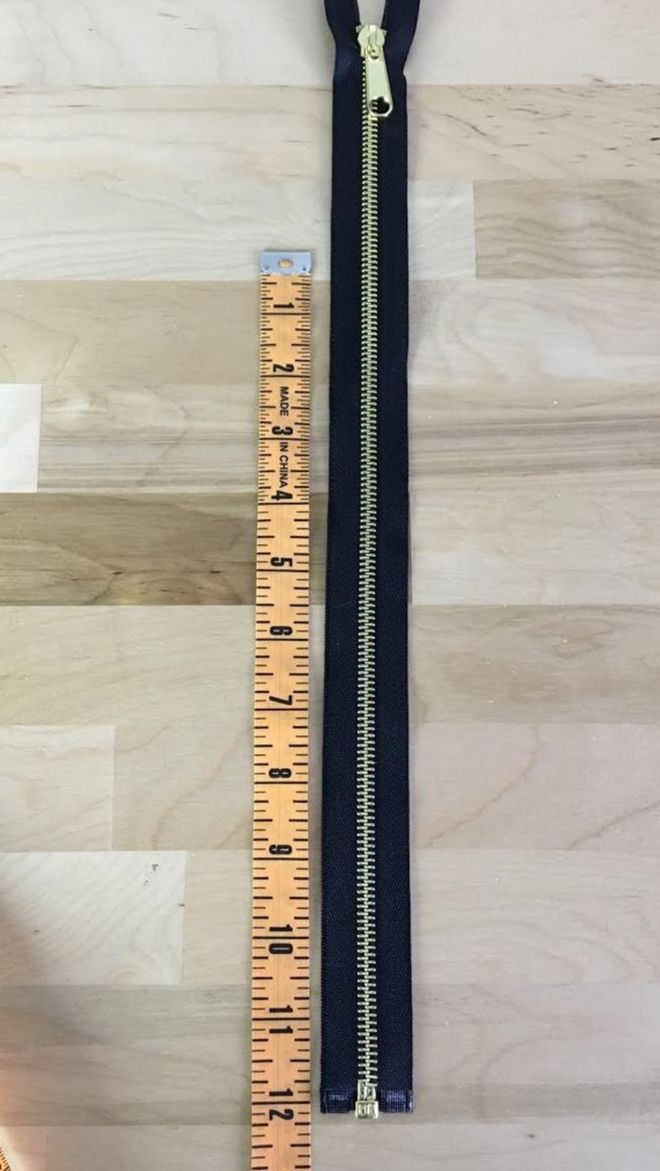 1. Measure from the bottom up at the desired length for the new separating zipper. In this tutorial, a 16" separating zipper is shortened to 12".  2. Mark a horizontal line using tailors chalk (or a piece of dry soap) on each zipper tape portion as shown. This will temporarily mark the new length of the separating zipper so you can use it as a guide in the shortening process. 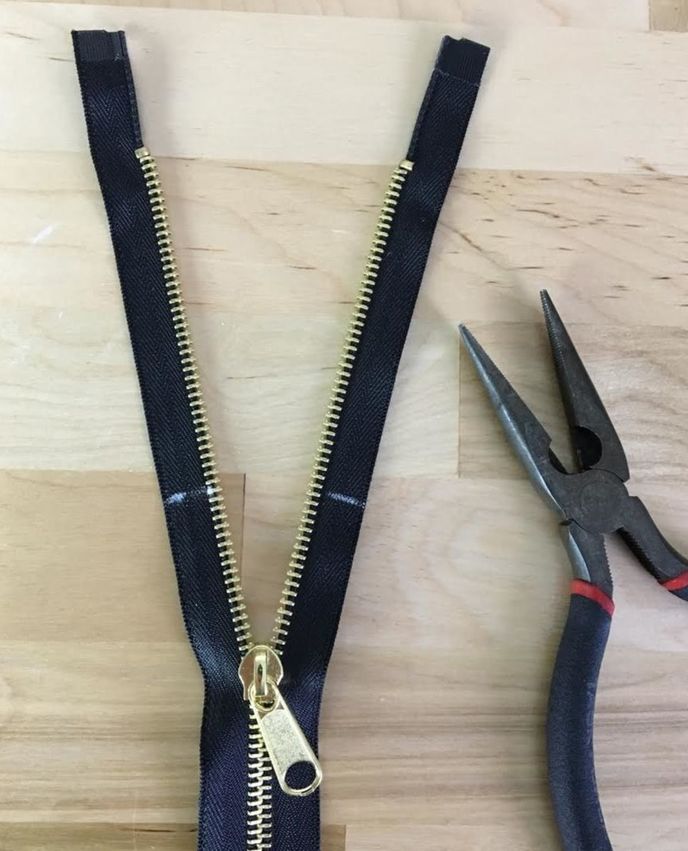 3. Open the zipper teeth past the marked horizontal lines as show. For the steps to follow, you will need to use a small set of pliers to remove each individual zipper coil. 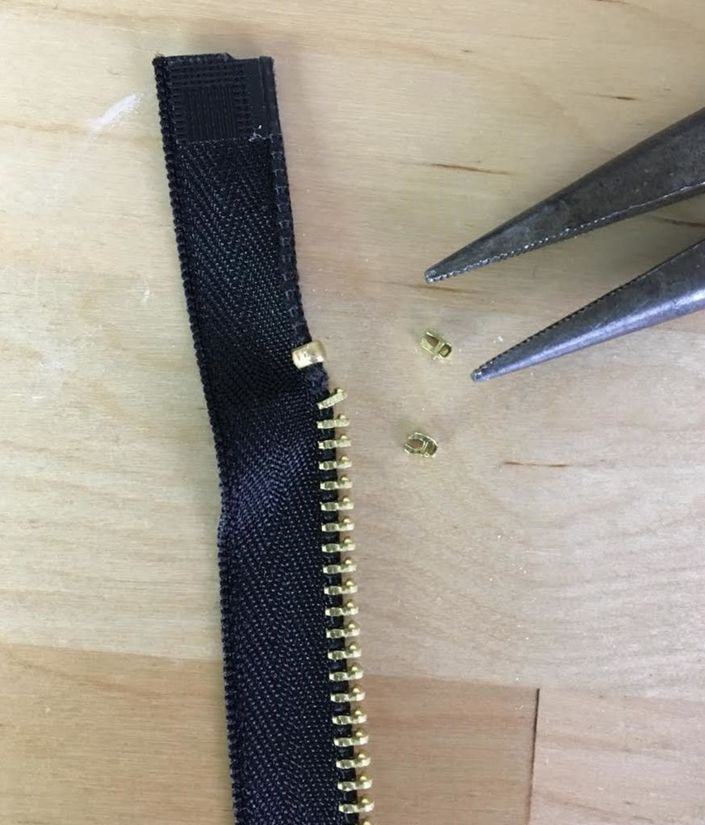 4. If you are shortening the zipper by just a couple of inches, you can start removing each zipper coil one by one starting at the top zipper stops and pulling each one using the tip of the pliers. Simply grab onto the tip of the coil and apply a bit of force in the opposite direction to pull it out. It might take a little bit of practice to get the right grasp and figure out how much force is needed to pull the coils out. Each coil is like a little crimp that is attached to the edge of the zipper tape. Pulling the coil weakens the crimped section thus separating itself from the tape's edge. 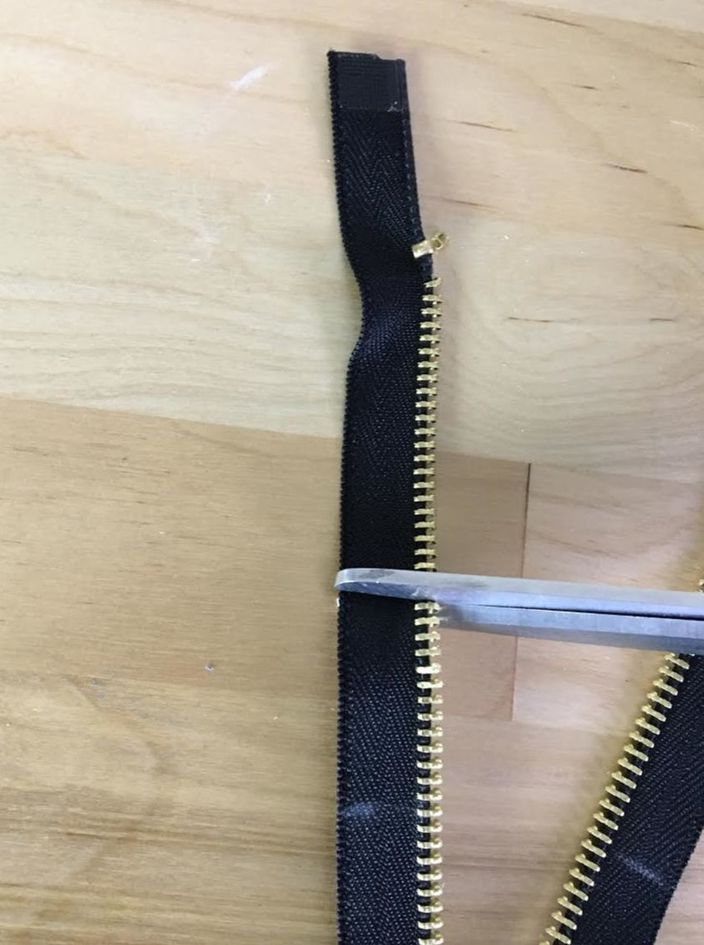 5. If you are shortening the separating zipper by a longer length, it may be easier to actually trim the zipper first so that you have less coils to remove. You will notice that as you start doing this, it is not always as easy as it seems. You have to be very careful not to hurt yourself or damage the zipper in the process. Having less coils to remove is often more efficient. Simply cut about 2" above the white tailor's chalk marks as shown above. Use a regular pair of scissors and cut between two of the coils through the fabric only and not directly on top of the zipper coils (teeth). 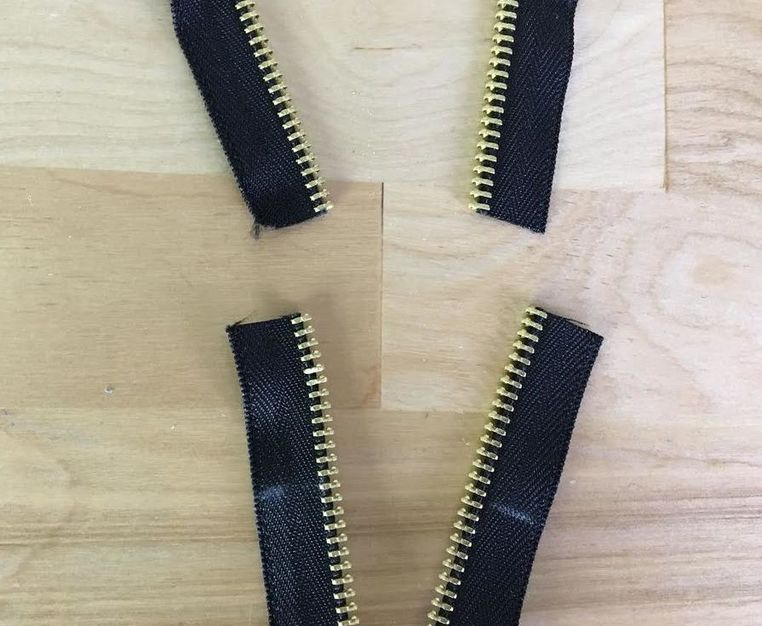 Trim both sides evenly as shown above. 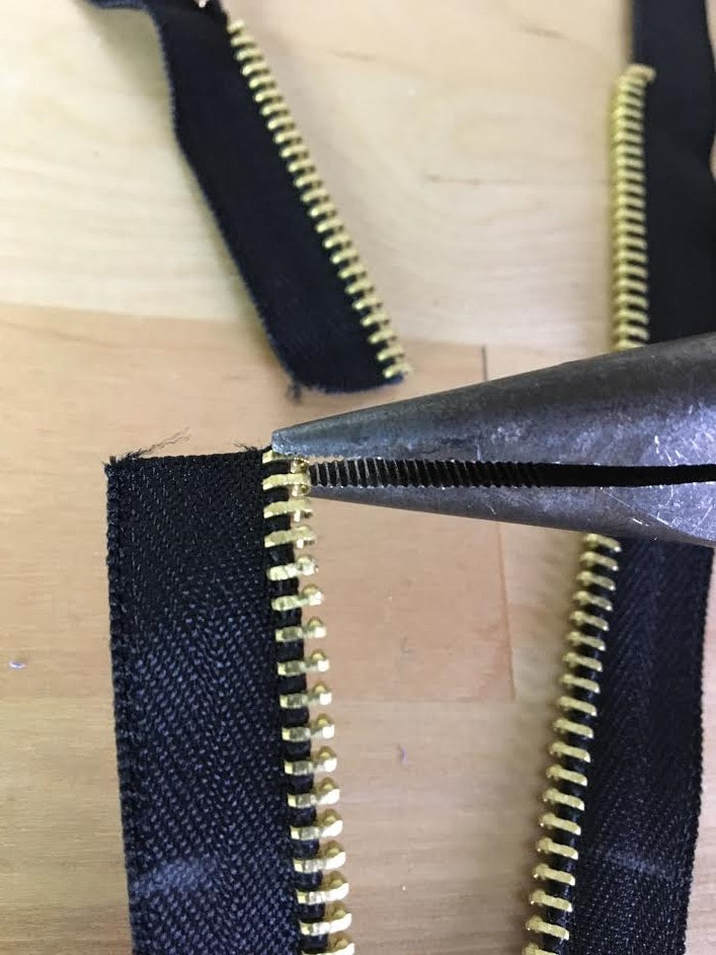 6. Grab onto the tip of the coil with your pliers and pull it off the zipper tape in the opposite direction. Be very careful not to pull too much vertically for the first couple of coils as this can cause the zipper tape edge to severely unravel where it was cut at the very top.  As mentioned above, once the tape is cut, be gentle with the cut edges to ensure they don't unravel too much. You can use flame from a lighter or match to carefully burn the edges a bit thus locking the weave and preventing the threads from unraveling further. Only do this if you are sure the zipper tape is made of synthetic fibers (true for most). Natural fibers like cotton, silk and linen will not melt but burn, so you risk actually burning the entire zipper tape if not careful.  7. Continue pulling out the zipper teeth or coils one by one until you reach the tailor's chalk mark as shown above. As mentioned above, it will take a bit of practice to get the right grasp and force using your pliers. It works best to grab only the very tip of the coil so that you are not actually holding the coil's crimped portion down and preventing it from being easily removed. Hold the rest of the zipper securely in your other hand. 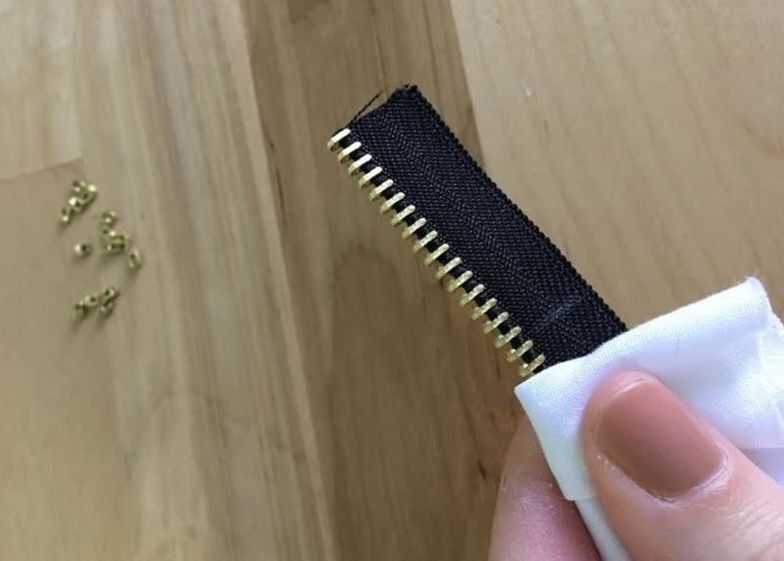 As you hold the rest of the zipper in your hand while pulling each coil out, you'll find that these little metal coils can be quite sharp and leave scratches on your fingers. To protect your hands, wrap some scrap fabric around the zipper teeth where your hand is holding the zipper. This will not only protect your skin from accidental damage it will also make the whole coil removal process easier and much more comfortable. 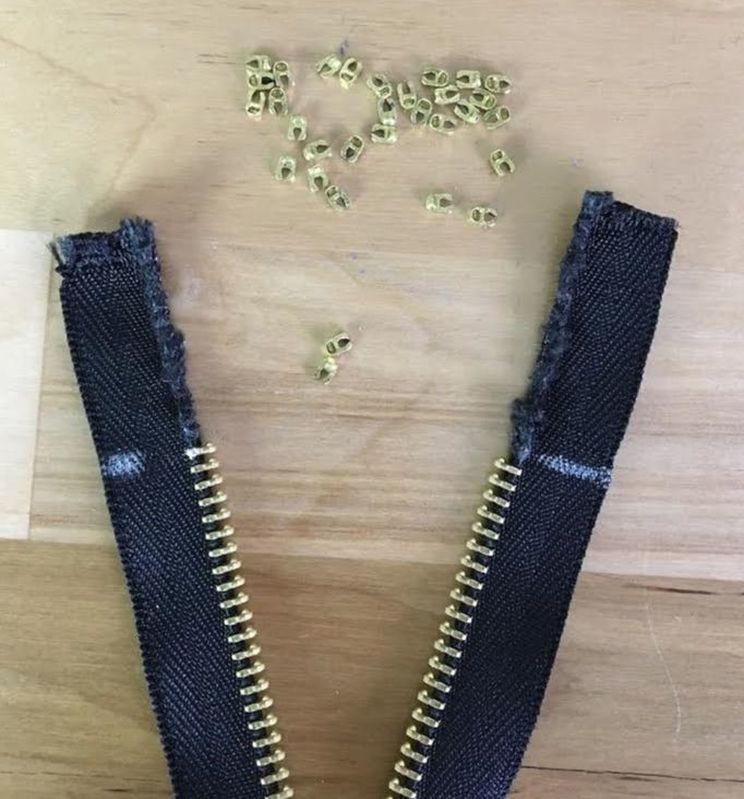 Make sure that the coils are removed evenly allowing the zipper teeth to start at the same distance along both zipper tape edges. Follow the tailor's chalk guideline accurately as shown. The zipper is now shortened. However, there is still a last addition necessary in order to ensure the zipper functions properly - it does not get stuck at the top and the zipper slider does not slide off the zipper teeth track all together. It is recommended to hand sew little zipper stops at each end of the zipper teeth using a whipstitch as shown below. If you were able to save the original zipper stops from the zipper's top ends, you can try to crimp them back onto the zipper tape using pliers. In most cases however, the actual plastic/metal zipper stops will either be too difficult to remove or become damaged in the removal process. 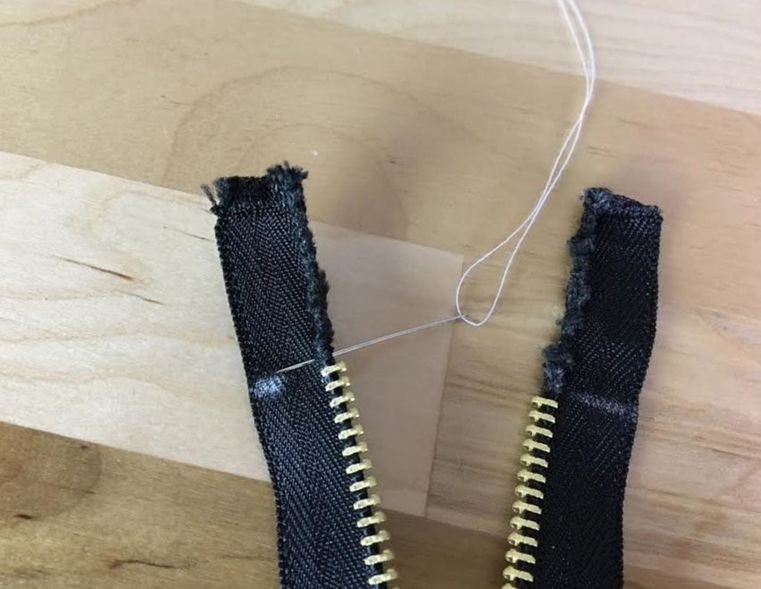 8. To hand sew a zipper stop: Thread a hand sewing needle and double the thread. Insert the needle through the edge of the zipper tape right next to the top zipper coil as shown above. In this tutorial, white thread is used in order to display the stitch better. However, it is recommended that the color of the thread matches that of the zipper tape for a clean, professional finish. 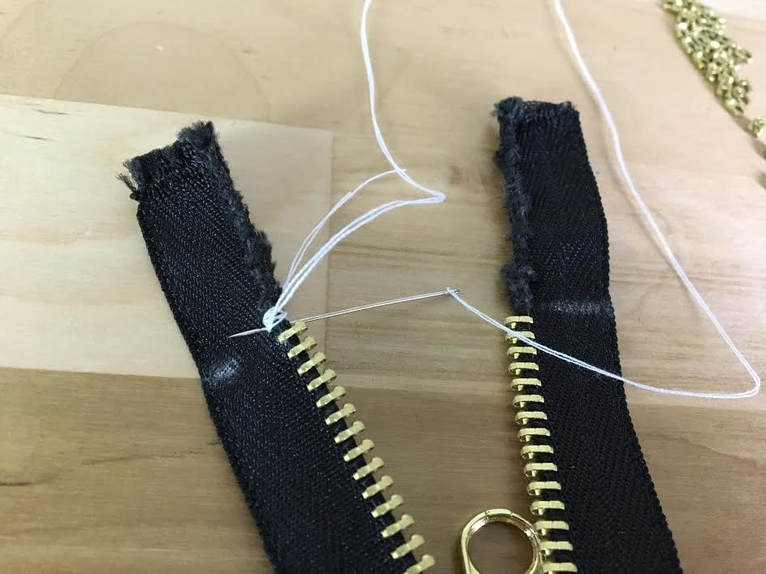 9. Whipstich (or stitch in place) at this area maintaining clean, even stitching. 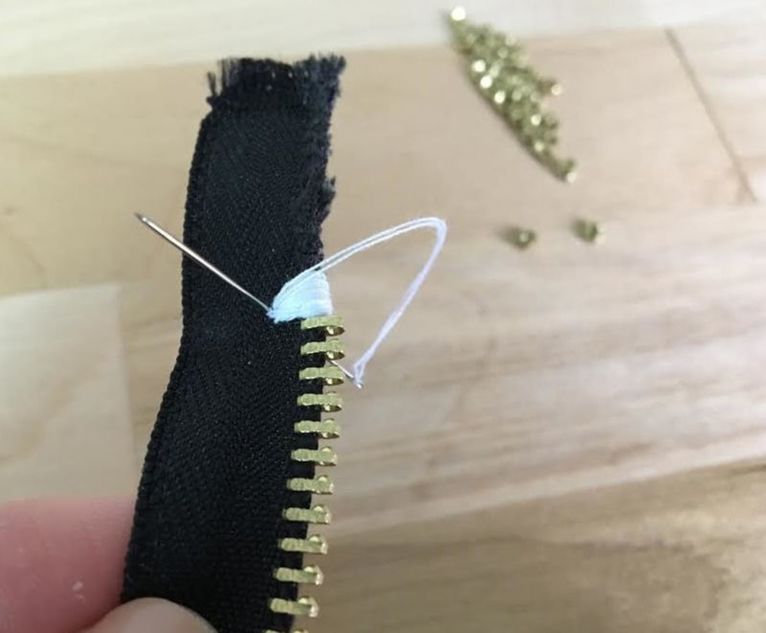 Whipstitch until the stitch layers are raised enough to stop the zipper slider from moving past it. 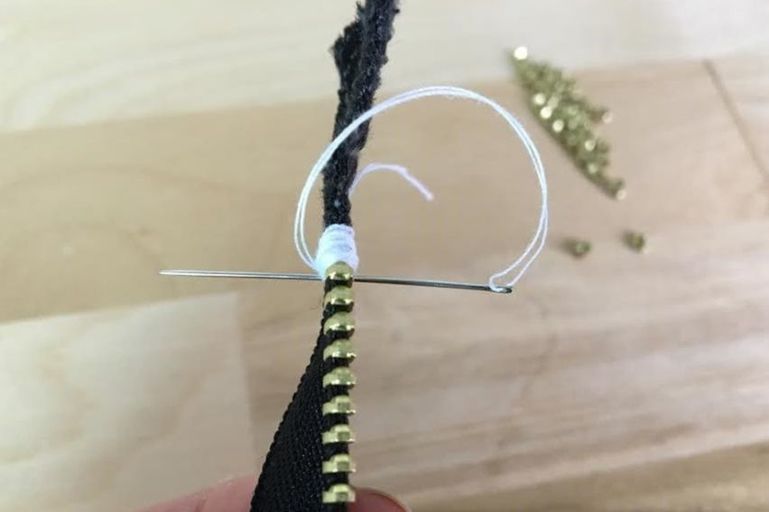 If you are unsure how thick to make the hand sewn zipper stop, look at it in relation to the actual coils. A good rule to follow is that the zipper stop should always be more raised (or thicker) than the actual zipper coils. You can also test the zipper slider against the hand sewn stop but be careful not to get the slider stuck. In case this happens and you can't lower the zipper slider, pull on each zipper tape in opposite directions- this should hopefully get the slider unstuck and moving towards the bottom. 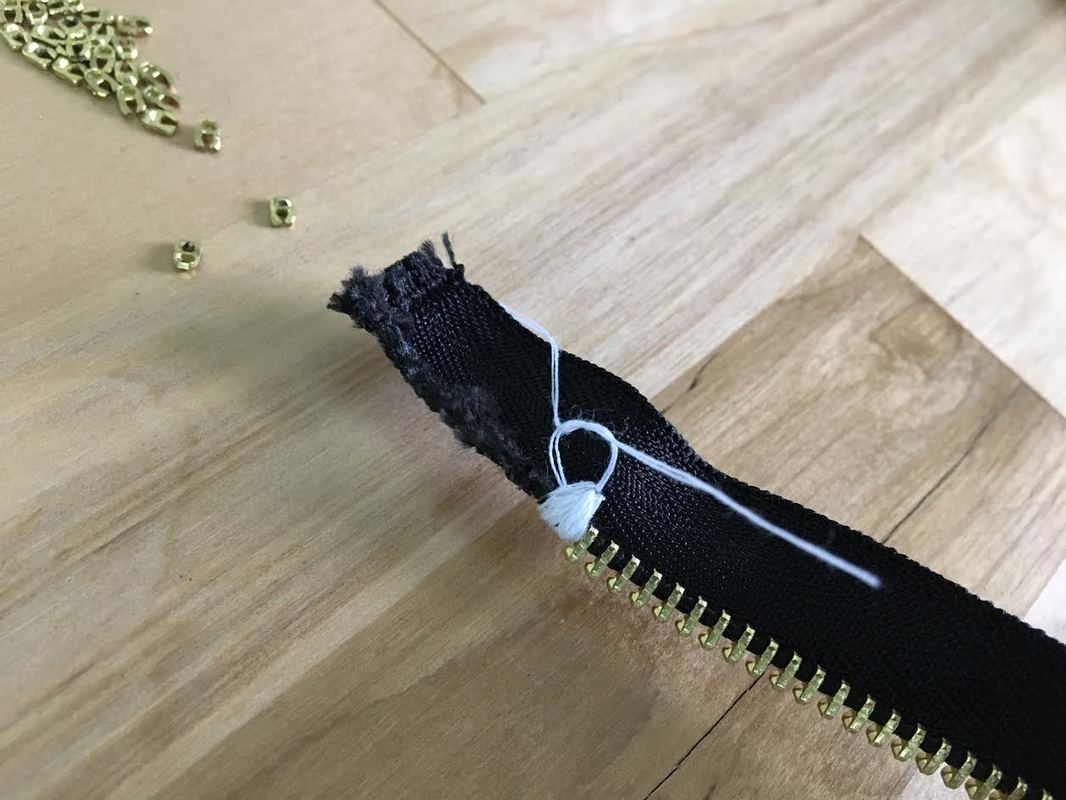 11. Once you are certain the hand-sewn zipper stop is thick enough and fully functional, cut and hand-knot both ends of the double thread as shown above. This will lock the stitch in place creating a durable finish. 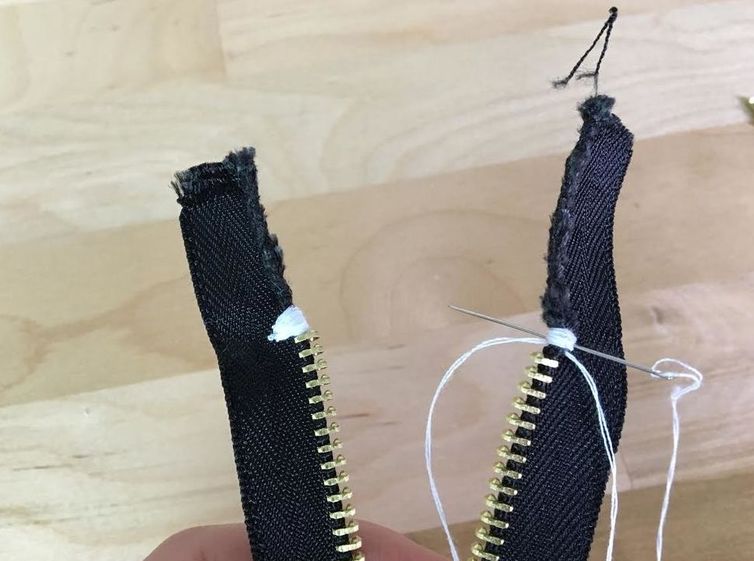 12. Apply a whipstitch to the edge of the other zipper tape, right above the zipper teeth as shown. 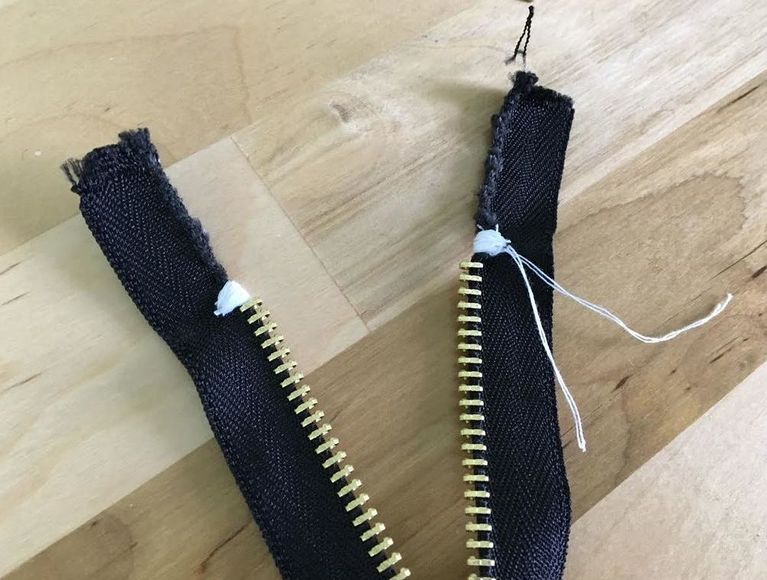 13. Once the same thickness and consistency is achieved, cut the double thread and knot it to secure the stitch as you did previously. 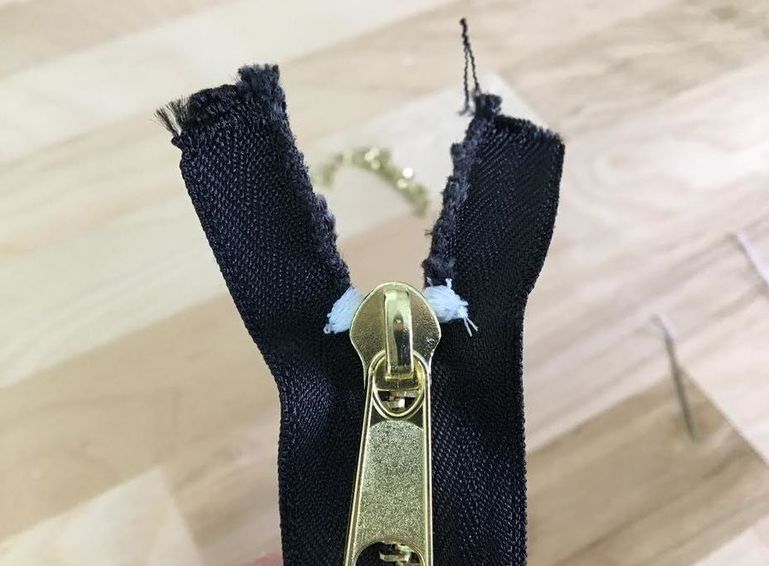 The zipper slider is now fully secured and should not move past the zipper teeth when the zipper is closed. In addition, the hand-sewn stops prevent the slider from getting stuck at the top ensuring a smooth opening/closing. Shortening a Plastic Separating Zipper By Hand 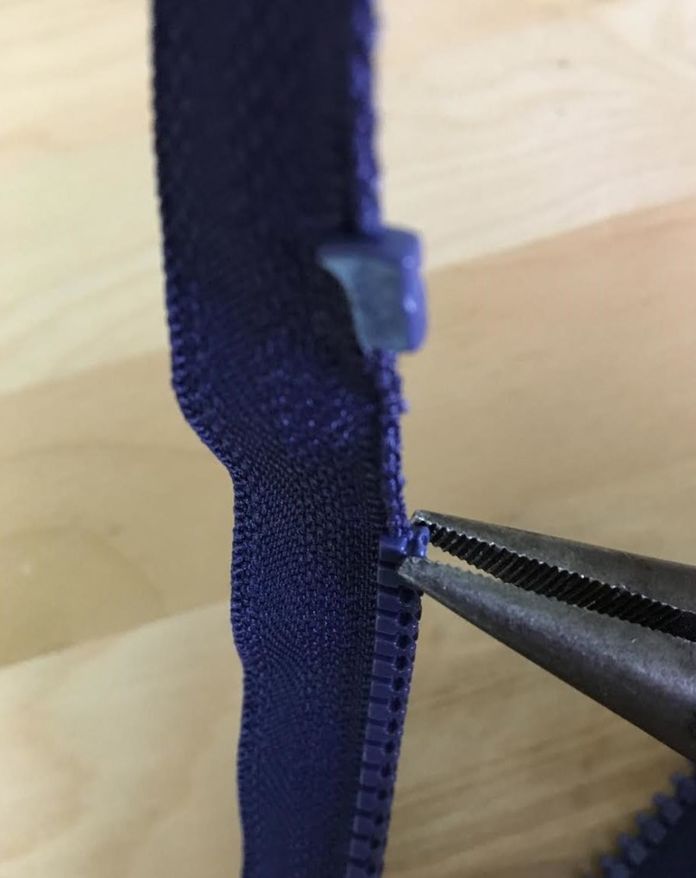 To shorten a separating zipper that has plastic zipper teeth, use the same method by pulling out each coil individually using small pliers. The coils will come out easier if you grab onto the very tip of the zipper coil and avoid pressing down on the portion of the coil that is actually crimped to the zipper tape. 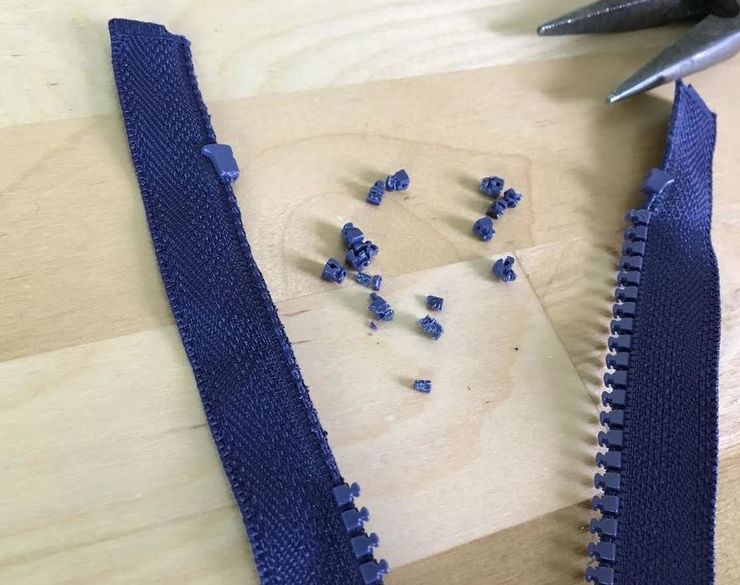 Once the zipper has been shortened according the specified length, trim the zipper tape at about 2 inches up from the zipper teeth. Just as you did for the metal separating zipper above, don't forget to add a thick whipstitch on each end of the zipper teeth using matching color thread, thus creating a set of functional hand-sewn top stops. 
6 Comments
Aurora
7/27/2019 08:50:25 am
Good advice. I thought that could be done from the top but was unsure. This site popped up while I was shopping for a zipper but they were too long. I'm glad it popped up, now I know how to do the adjustment properly. Thank you for this post 7/29/2019 01:53:02 pm
Hi Aurora! So glad you found his tutorial helpful! Yes, it's really tricky finding the perfect length zipper in the perfect color so this shortening technique is super convenient.
Laura
11/22/2019 06:52:01 pm
I appreciate your tutorial and think that it will be very helpful in the future, but might it not be more practical to remove the teeth from the chalk line to the cutting line before cutting it? That way you wouldn't have to worry about the cut edge unraveling. 12/9/2019 06:17:46 am
Hi Laura! That is a great point and yes, it will absolutely maintain the edges from unraveling. I left myself about an extra 1/2" excess at each end which I usually trim off once complete. It really comes down to how you prefer to work. Sometimes when shortening very long separating zippers, it may feel more comfortable to trim the ends first. Thanks so much for sharing this technique!!
Cathey d harris
6/28/2021 04:15:55 am
Thankful for this read, it was referred to me by someone in Switzerland on patternreview
Gail
1/18/2023 03:01:58 pm
Thanks very much for this useful post. I'm making a corset as part of a costume and want it to zip up on the side of the garment. Now I know how to do it with a separating zipper. Thanks again! Leave a Reply. |
The Blog:A journey into our design process, sewing tutorials, fashion tips, and all the inspiring people and things we love. 
Doina AlexeiDesigner by trade and dressmaker at heart. I spend most of my days obsessing over new fabrics and daydreaming new ideas. 
Sadie
Executive Assistant & Client Relations Manager Archives
November 2019
Categories
All

|

-
Sewing Tutorials
-
Basics
>
- Aligning Pattern Grainlines To Fabric
- Preparing Fabrics For Sewing
- Pinning Sewing Patterns To Fabric
- Placing Sewing Patterns On Fabric For Cutting
- Rotary Cutters or Fabric Scissors?
- Cutting The Sewing Patterns
- What Are Notches And How To Use Them In The Sewing Process
- Transferring Notches From Pattern To Fabric
- Transferring Seamlines to Fabric
- Staystitching
- Backstitching: A Complete Guide
- Hand Basting: A Complete Guide
- Sewing Continuous Bias Binding
- Darts >
-
Sewing Seams
>
- The Basics Of Seams And Seam Allowance
- How To Sew A Straight Seam
- Sewing Curved Seams
- Sewing Corner Seams
- Trimming And Grading Seam Excess
- Notching/Clipping Seam Allowance for Tension Release
- Sewing Topstitched Seams
- Sewing Corded Seams
- Sewing A Slot Seam
- Sewing A Gathered Seam
- Sewing Bias Seams
- Sewing Seams With Ease
- Sewing Seams With Crossing Seamlines
- Sewing Unlike Fabric Seams
- How To Iron Seams: Ironing Tools And Conventions
- Sewing With Knit Fabrics
- Understanding Stitch Length And Tension
- Sewing Unique Fabric Seams
-
Seam Finishes
>
- Seam Finishing Techniques - Overview
- Applying A Pinked Seam Finish
- Applying A Bias Bound Seam Finish
- Serging And Zigzag Seam Finishes
- Sewing A Self-Bound Seam Finish
- Sewing A French Seam Finish
- Sewing A Hong Kong Seam Finish
- Sewing A Mock French Seam Finish
- Sewing A Turned-and-Stitched Seam Finish
- Sewing Overcast Hand-Applied Seam Finishes
- Sewing A Flat Felled Seam
- Sewing A Hairline Seam Finish
-
Hem Finishes
>
- Garment Hem Finishes: Overview
- Sewing A Double Fold Hem Finish
- Sewing A Single Fold Hem Finish
- Sewing Bound Hem Finishes
- Sewing An Exposed Double Layer Bound Hem
- Sewing A Folded-Up Bound Hem with Pre-folded Binding
- Sewing A Hong Kong Hem Finish
- Sewing A Band Hem Finish
- Sewing A Bias Faced Hem Finish
- Sewing A Twill Tape Hem Finish
- Sewing A Rolled Hem Finish
- Sewing A Shaped Hem Facing
- Using Fusible Hem Tape And Webbing
- Finishing A Lace Fabric Hem
- Finishing A Leather Hem
- Sewing Faced Hem Corners
- How To Finish Lining At The Hem
- Finishing Fabric Corners by Mitering >
- Interfacing A Hemline: Lined And Unlined Examples
-
Sewing Pockets
>
- Curved Patch Pocket With Flap
- Unlined Square Patch Pockets
- Lined Patch Pockets: Two Ways
- Extension On-Seam Pockets
- Separate On-Seam Pocket
- Front Hip Pockets
- Bound Double Welt Pocket
- Double Welt Pocket With Flap
- Self-Welt Pocket (Using Single Fabric Layer)
- Slanted Welt Pocket (Hand-Stitched)
- Faced Slash Pockets: Overview >
-
Sewing Zippers
>
- Sewing Zippers: General Information
- Sewing A Centered Zipper
- Sewing A Lapped Zipper
- Sewing An Invisible Zipper
- Sewing A Fly Front Zipper
- Sewing A Closed-End Exposed Zipper (No Seam)
- Sewing An Exposed Separating Zipper
- Sewing Hand Stitched Zipper Applications
- Sewing A Zipper Underlay
- Sewing A Placket-Enclosed Separating Zipper
- Sleeveless Finishes >
-
Neckline Finishes
>
- Sewing A Neck Shaped Facing
- Sewing An All-In-One Neck Facing
- Neck And Garment Opening Combination Facings >
- Sewing A Bias Faced Neckline Finish
- Sewing A Band Neckline Finish
- Bound Neckline Finishes: Overview >
- Sewing A Semi-Stretch Strip Band Neckline
- Ribbed Neck Band And Classic Turtleneck
- Decorative Neckline Finishes >
- Finishing Facing Edges >
-
Extras
>
- A Complete Guide on Interfacing
- Sewing Bound Spaghetti Straps
- Sewing Spaghetti Straps To A Faced Neckline
- Sewing Ruffles: Overview
- Patterning And Sewing A Circle Ruffle
- Sewing A Gathered Heading Ruffle
- Sewing Double Layer Gathered Ruffles
- Sewing A Gathered Ruffle Into A Seam
- Sewing A Gathered Ruffle To A Fabric Edge
- Sewing A Fabric Surface Slit
- Sewing A Slit Seam
- Hand-Applied Straight Stitches
- Hand-Applied Blind Stitches
- Hand-Applied Overedge Stitches
- Hand-Applied Tack Stitches
- Hand-Applied Decorative Stitches
-
Basics
>
- Custom Bridal
- Custom Apparel
- About
- Blog
 RSS Feed
Services |
Company |
|
