|
In sewing, you will often find yourself having to make certain adjustments to zippers depending on the garment at hand. One of the most common alterations you'll need to learn right from the beginning is how to shorten a zipper. 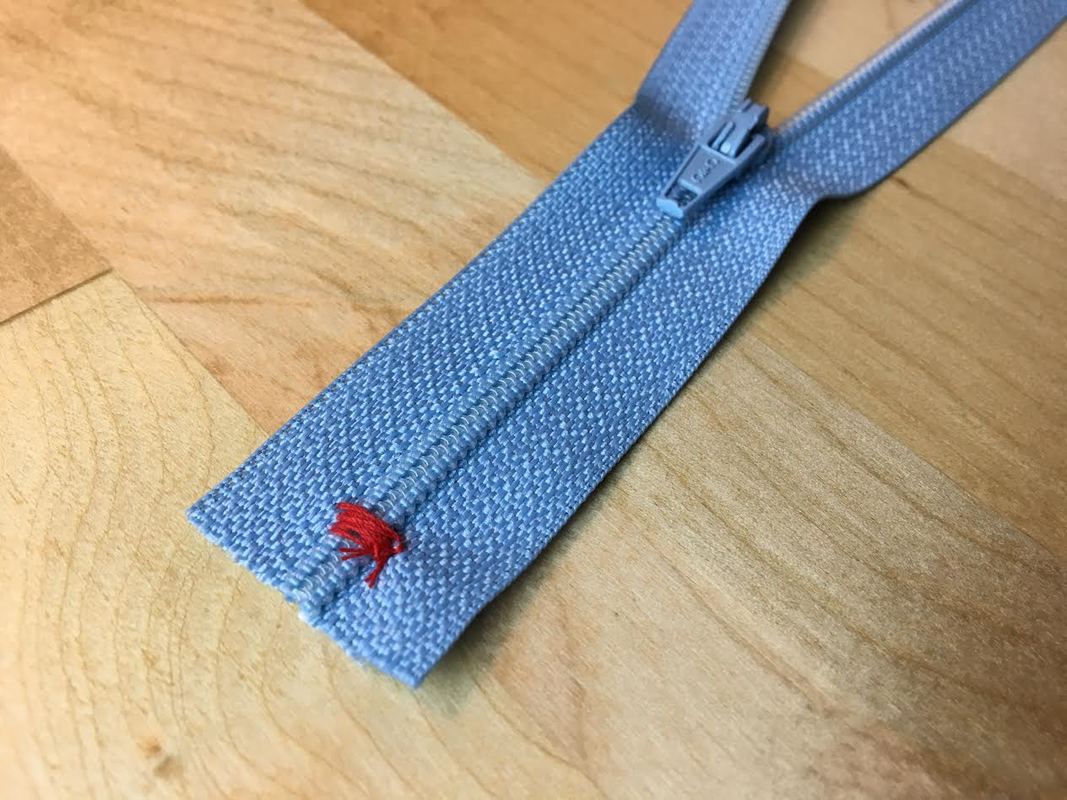 When Is It Necessary To Shorten a Zipper You'll be surprised how often you might find yourself needing to shorten a zipper as you start making your own clothing. The most common issue that requires shortening of course, is (naturally) the zipper being too long for the designated zipper application on your garment. Due to the fact that on a commercial scale, zippers are mostly found in 5 inch increments, you'll often need to buy a long zipper and shorten it to fit your own sewing requirements. So that being said, there are really two situations that will probably require you to shorten a zipper by hand in dressmaking:
In both of these cases, always buy a zipper that is the next size up or longer because chances are, you can always shorten it by hand. Do not buy a zipper that is shorter than the length you need even if it is only by 1 or 2 inches- You can shorten most zippers at home (including separating zipper which are a bit more complicated to shorten) but you cannot lengthen a zipper. In addition, you should always allow yourself about an inch of excess at the bottom of the zipper to account for any sewing techniques that might restrict the zipper bottom once sewn into the garment. On that same note, if you are a sewing beginner and lack the experience to sew zippers, you may find that if the edge of the fabric is not either reinforce properly with interfacing or at least stay-stitched to prevent stretching during the zipper application process, these fabric edges (along which the zipper is sewn) might stretch slightly which will then effect the length of the zipper opening on the garment. Needless to say- when in doubt, always purchase a longer zipper. Another situation that will most likely require you to shorten a zipper is if you find the correct length but not the desired color for the clothing item you are sewing. Keep in mind that it is good practice to always match the color of your zipper as close as possible to the color of the garment, unless you are after a more color-blocked look. Matching the zipper color to the garment will result in a much cleaner look, and because the colors blend in, some errors made during the construction process will appear more hidden visually. Due to the fact that zippers can be shortened at home, it is standard practice to first find the correct matching color and then see if that particular color zipper is available in the length you need. In the case where you cannot find the right size, it is perfectly OK (if not recommended) to get a longer length and shorten it at home using the steps described below. Other cases that require a zipper to be shortened is when the bottom of the zipper adds too much bulk to the inside of the garment and needs to be trimmed. In this case, the zipper might not necessarily become shortened but rather the very bottom zipper teeth and zipper tape are trimmed to eliminate excess which often requires the zipper teeth to be cut. Anytime the zipper teeth are cut, they need to first be reinforced (using the method described below) to prevent the zipper from separating from the bottom up. The sewing technique used to shorten zippers is also used for this trimming method. Trimming zipper ends in order to eliminate bulk may be necessary if the the bottom of the zipper overlaps seams, pockets, or multiple layers of fabric on the inside of the garment once it is sewn in. Having the extra bottom length may add unnecessary thickness and bulk, often causing a clothing item to feel uncomfortable and not fit smoothly. What type of Zippers can be shortened at home: Almost all closed-end zipper can be shortened at home using the whipstitch method described bellow. This includes both regular conventional zippers and invisible zippers with both plastic and metal zipper teeth. However, due to the fact that you have to cut through the actual zipper teeth, it is important to use the right tools on metal zipper teeth to avoid damaging your fabric scissors or accidentally hurting yourself in the process. On the other hand, separating zippers (which are designed to fully separate once unzipped), cannot be shortened or altered using the simple hand stitching method described below, regardless of whether they feature plastic or metal zipper teeth. Shortening a separating zipper will require a bit more work involving some pliers (and a bit of physical effort) to actually remove the individual teeth on the zipper. Separating zippers are also altered from the top as opposed to the bottom. Shortening both metal and plastic separating zippers is done very often on the industrial level using a special zipper shortening machine in just seconds. Since it requires a bit more effort- we'll show you how to shorten a separating zipper in next week's zipper aletring tutorial. To learn how to sew a lapped zipper check out: How To Sew a Lapped Zipper: The Easy Way. To learn how to sew an invisible zipper check out: The Easiest Way To Sew An Invisible Zipper Using A Regular Zipper Foot. Get familiar with the 5 most common zipper applications in sewing here: 5 Types of Zipper Applications You Should Know As a Sewing Beginner. How To Shorten a Regular Conventional Zipper 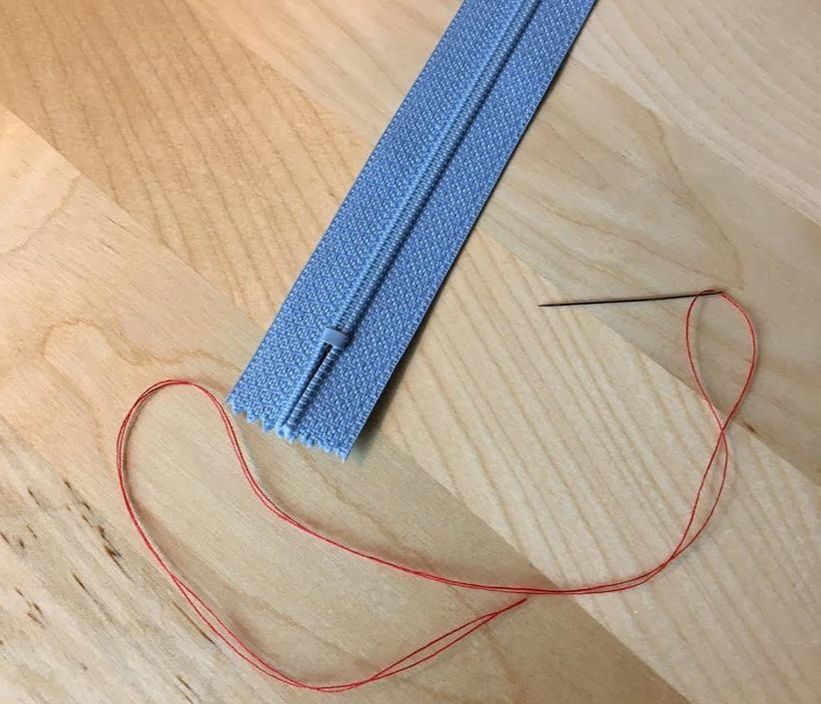 1. Thread a hand sewing needle with double the thread as shown above. Having the extra thickness will allow for a more durable finish and speed up the process for applying the stitch. Note: It is recommended to match the color of the thread to the color of the zipper for a clean, professional finish. We are using red thread in this tutorial so that you can see the stitch applications steps better. 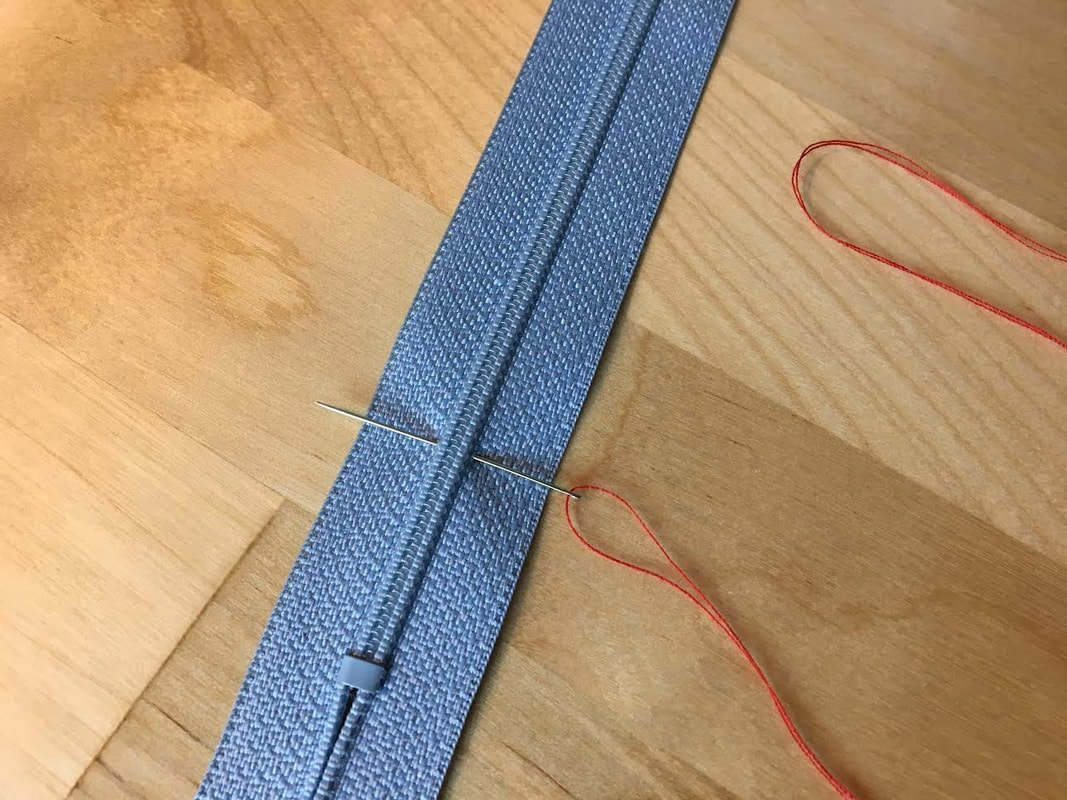 2. Determine how much you need to shorten the zipper by measuring it accordingly from the bottom up, or from the top down. Insert the needle through the zipper tape on both sides of the closed zipper teeth as shown above. Do not insert the needle through the actual zipper teeth, but stay as close as possible to each side of the closed teeth as shown. 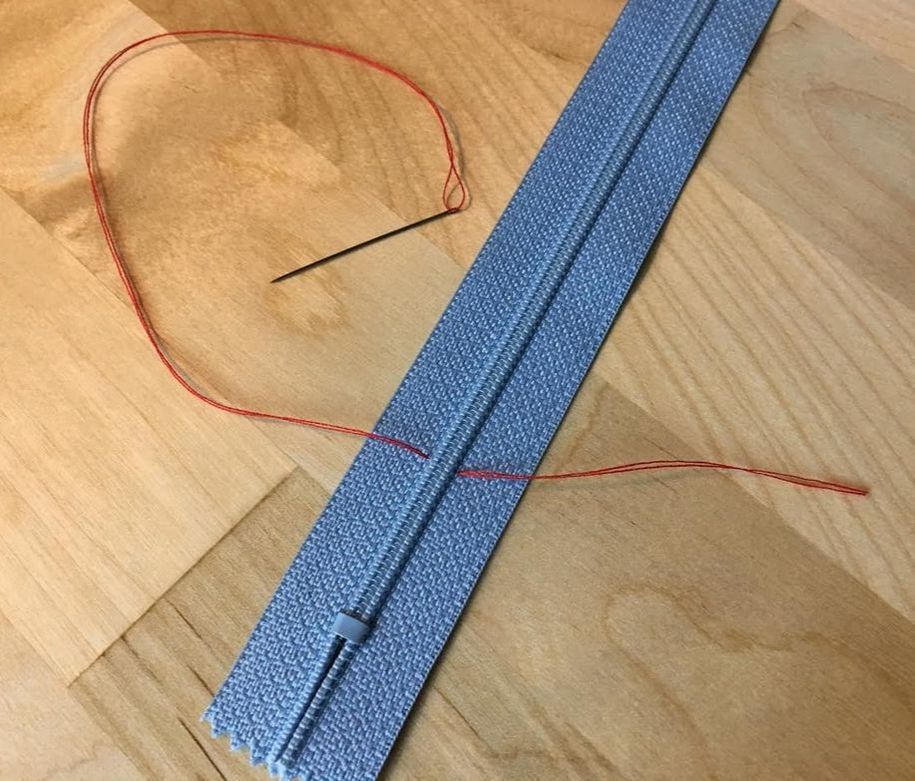 Leave some excess at the end of the thread so that you have enough extra length to lock the stitch in place once complete- about 3 inches should be enough. 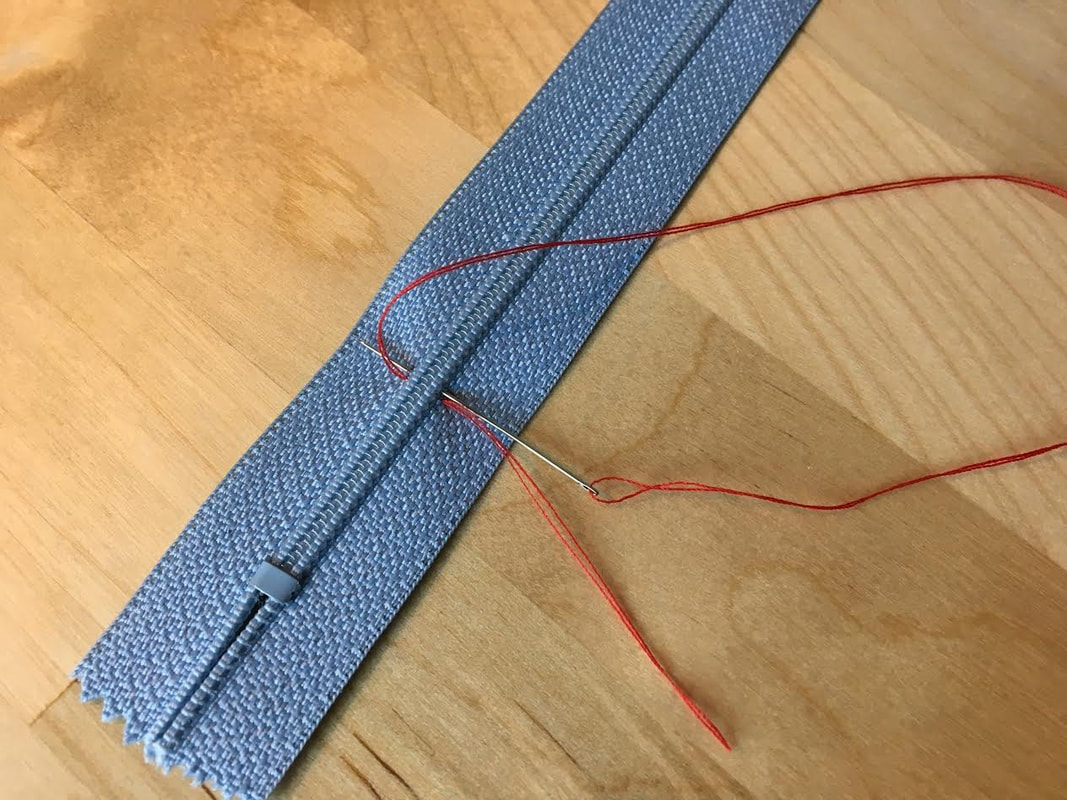 3. Insert the needle back through where you initially started the stitch, looping over the zipper teeth as shown. 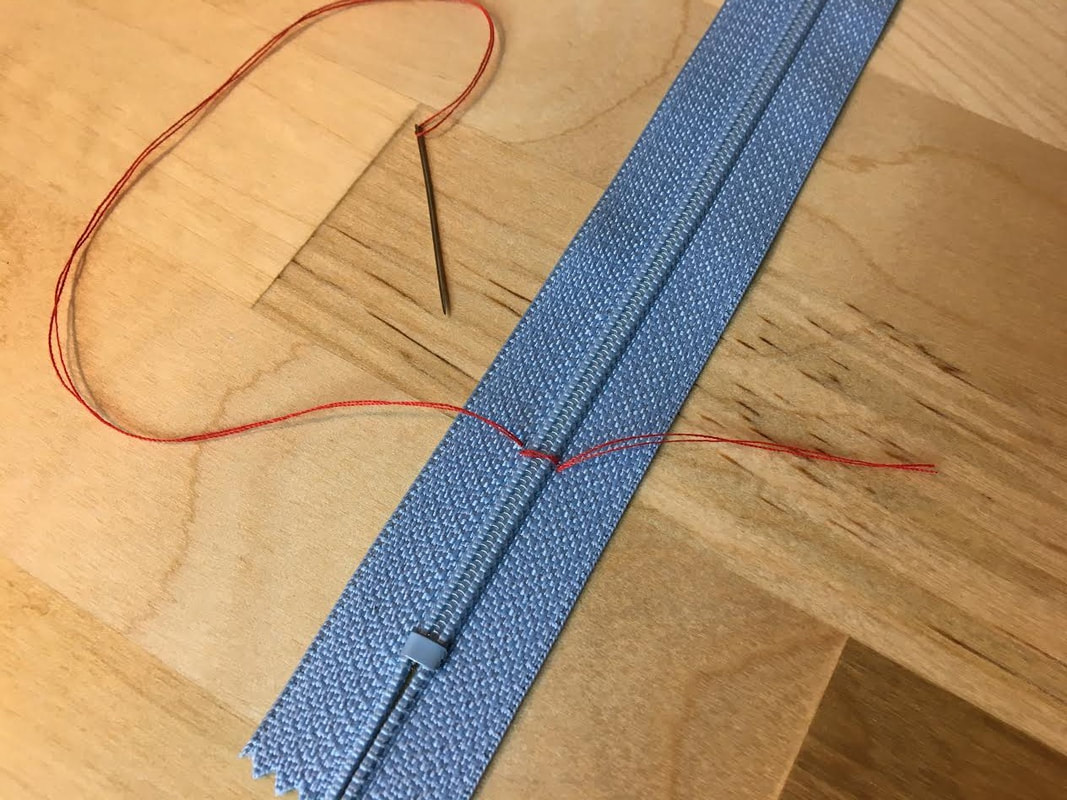 Pull the thread to achieve a tight stitch around the zipper teeth. A tighter stitch will ensure that the zipper teeth remain permanently closed once the zipper is trimmed and shortened. 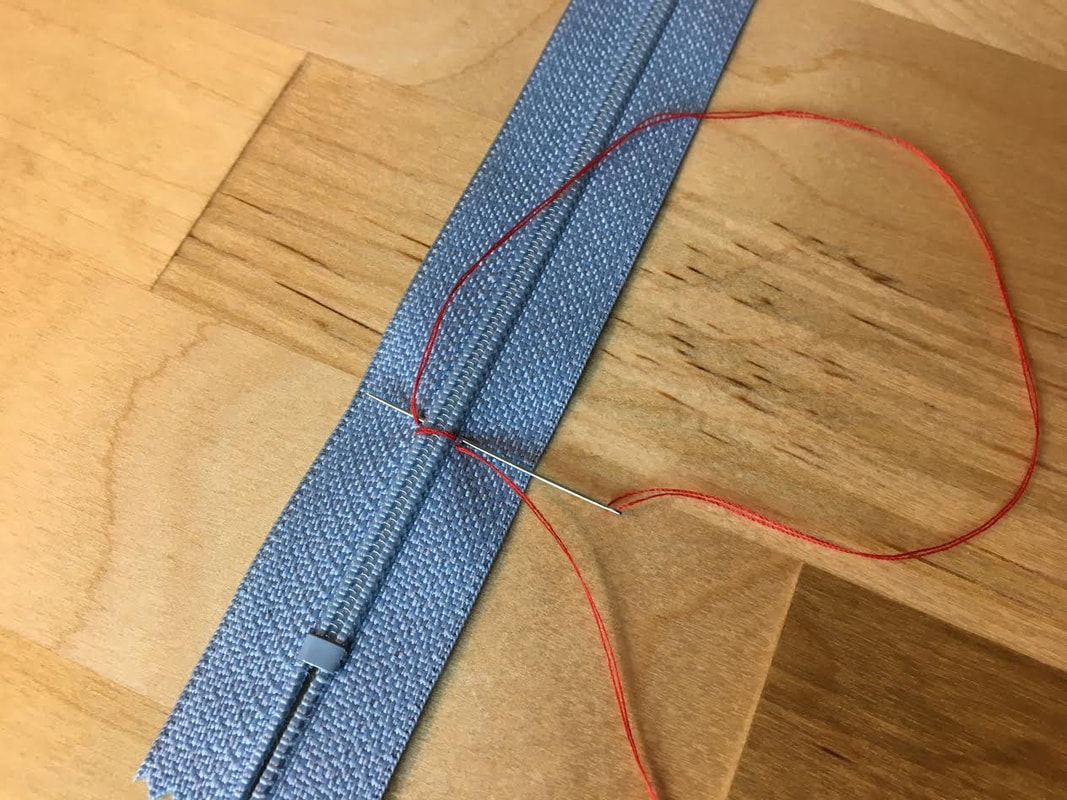 4. Repeat the stitching process from the step above looping over the same area where the stitch already exists. This is called a whipstitch. Stay as close as possible to either side of the closed zipper teeth but be careful not to stitch through the actual teeth themselves. 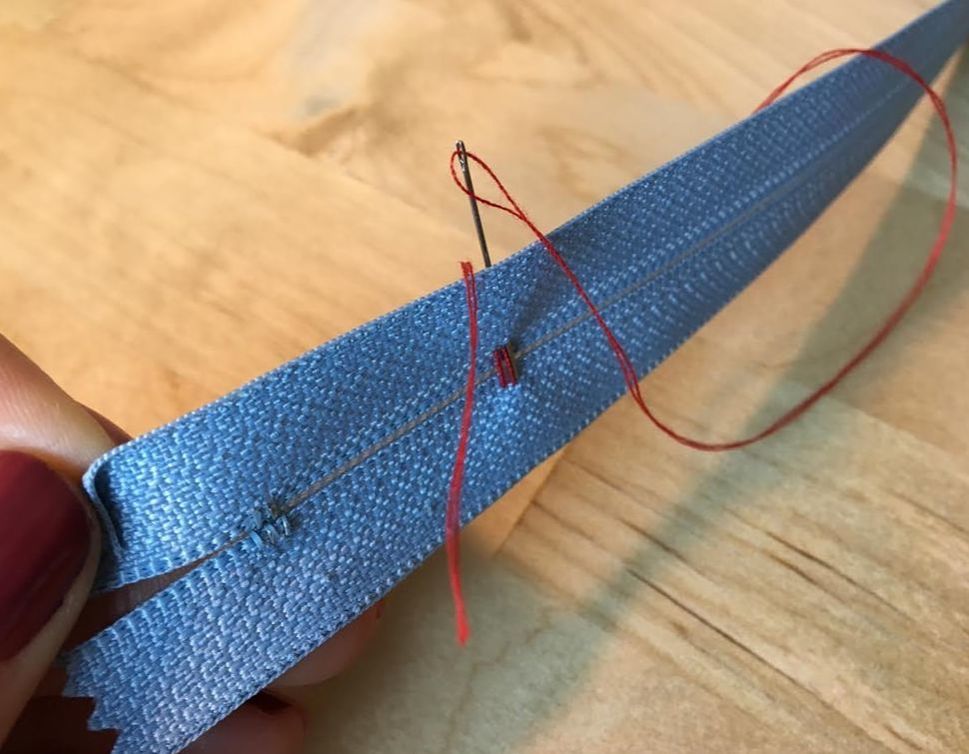 You should be stitching around the zipper teeth to include both the face and back of the zipper as shown. This stitch will keep the zipper teeth closed and prevent them from coming undone once the zipper is cut to be shortened. 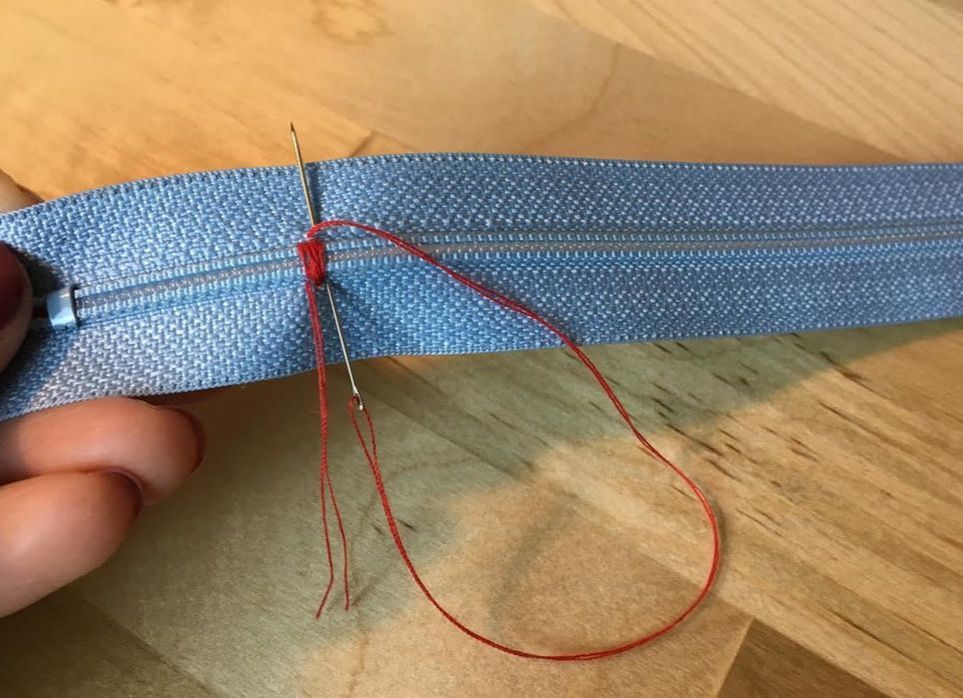 5. Continue stitching in place around the zipper teeth until you have a durable amount of stitched layers to efficiently keep the zipper teeth closed. 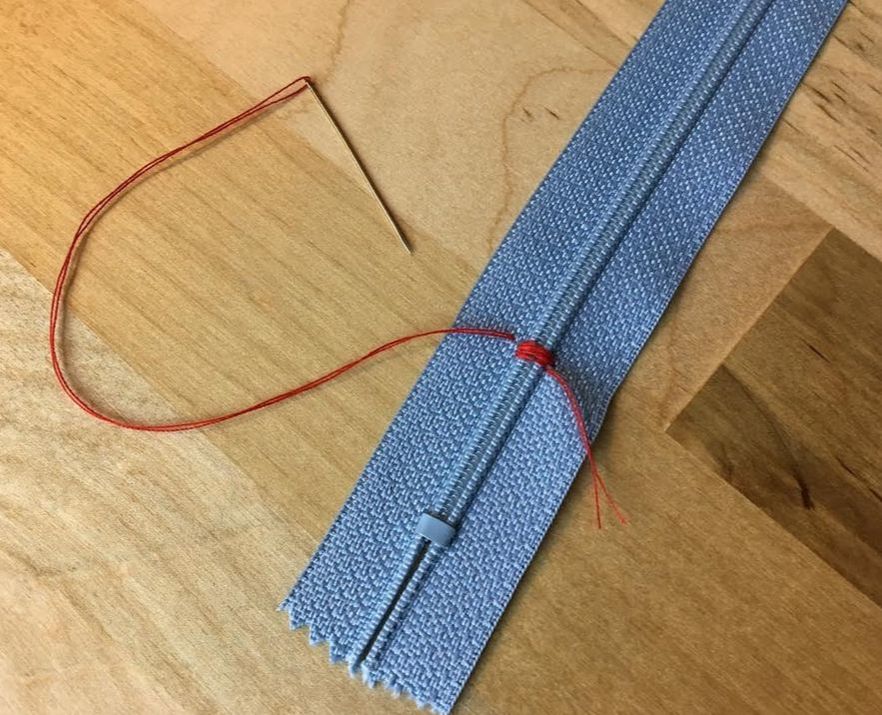 If you are unsure when the whipstitch is actually complete, use the image above as reference. About 5-10 stitches should be enough to lock the zipper teeth properly depending on how thick they are. 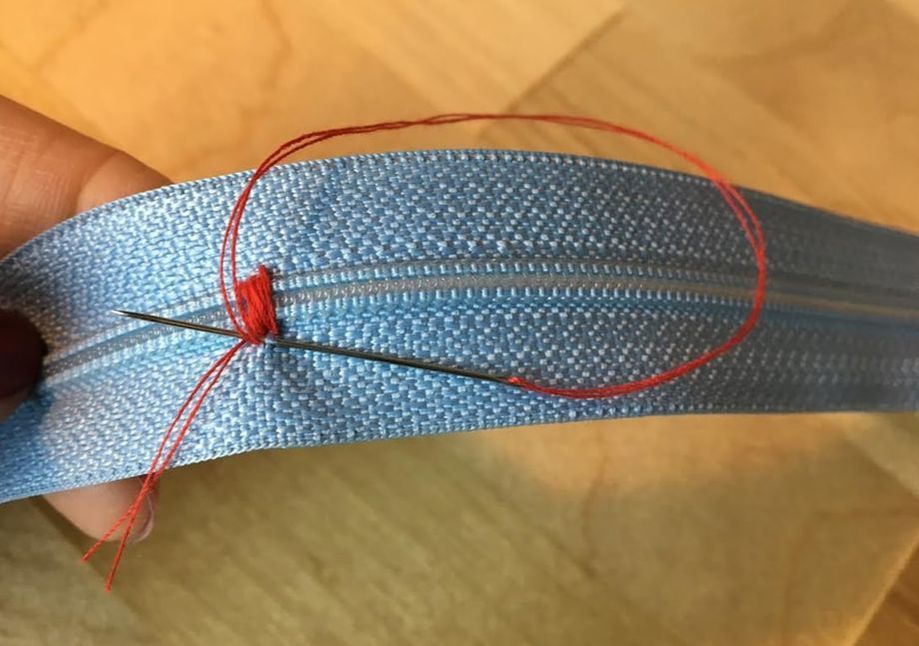 6. To lock the actual whipstitch in place and prevent it from unraveling, insert the needle through the zipper tape at the location where the initial loose thread is hanging as shown. 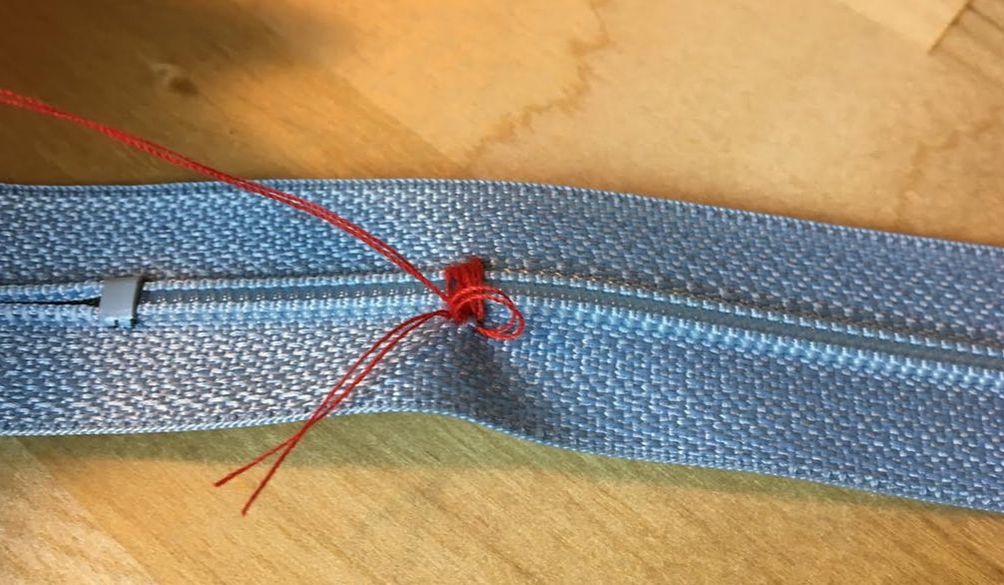 Apply a short single stitch in place as shown above- this stitch will securely move both ends of the thread together so you can hand-knot them and close the stitch. 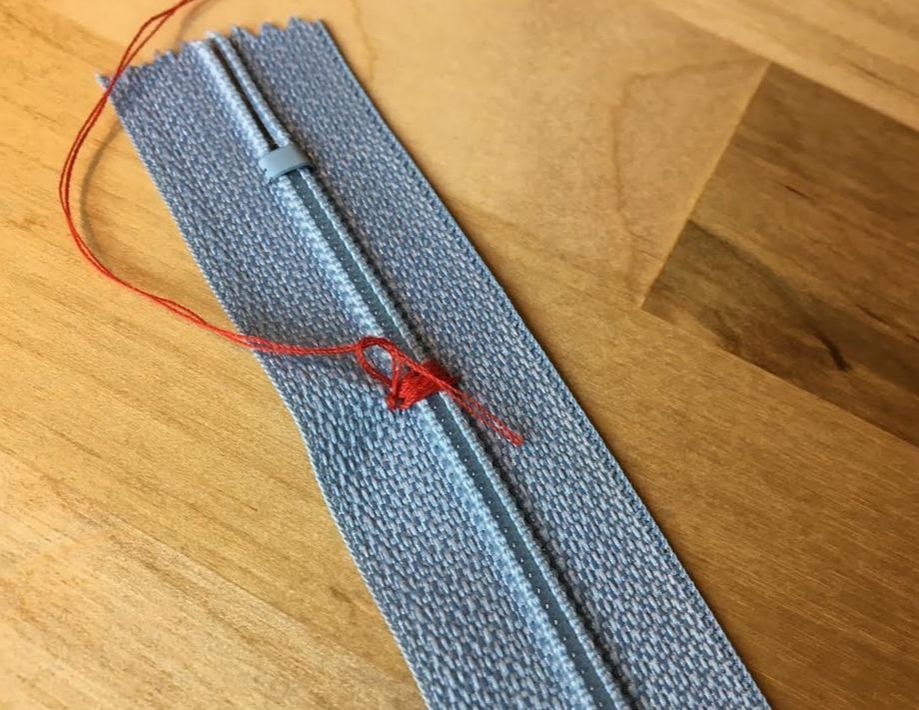 7. Cut the thread but leave yourself enough room on the end as you did in Step 1. Hand-knot the loose threads together twice in order to lock the stitch in place thus preventing it from coming undone during wear. 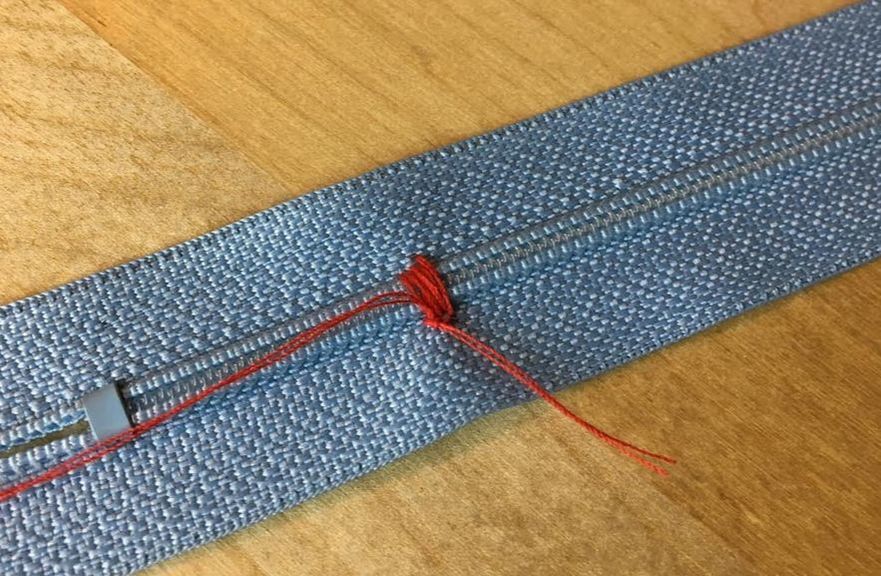 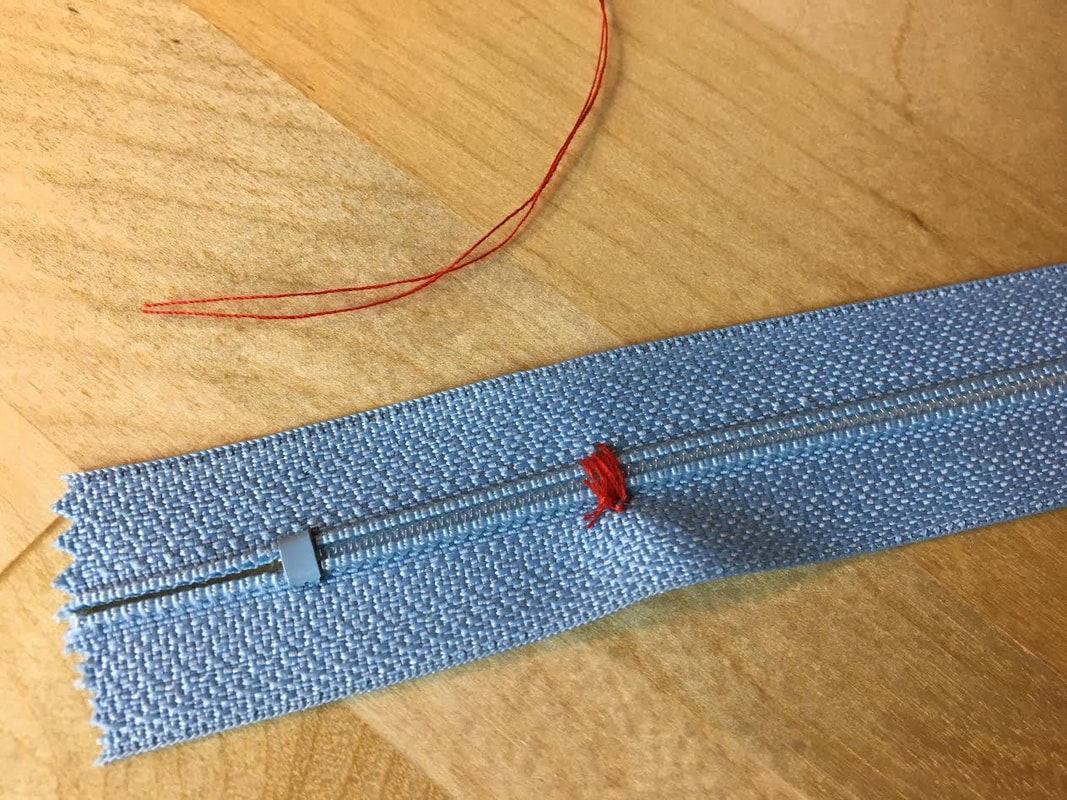 Cut the loose threads next to the knot but be careful not to cut too close to the knot itself or you risk weakening it or even accidentally cutting through it. 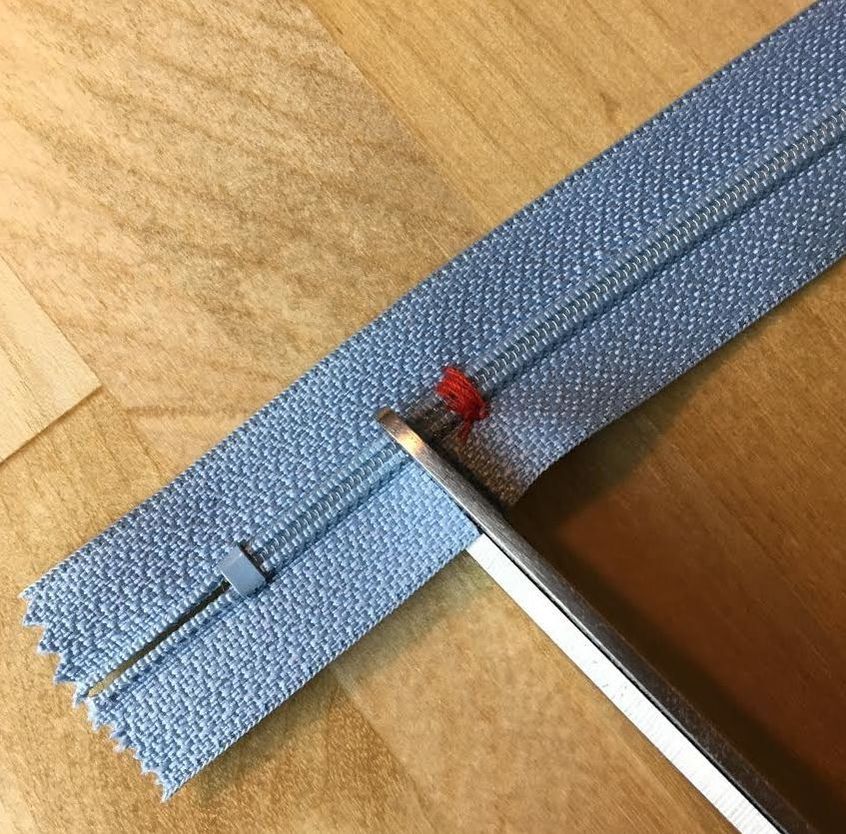 8. Trim the bottom end of the zipper at about 1/2" away from the whipstitch. If you would rather not use your fabric scissors to cut directly through the plastic zipper teeth, you can cut through both sides of the zipper tape using the fabric scissors first and then use a pair of paper scissors to cut the actual zipper teeth separately. 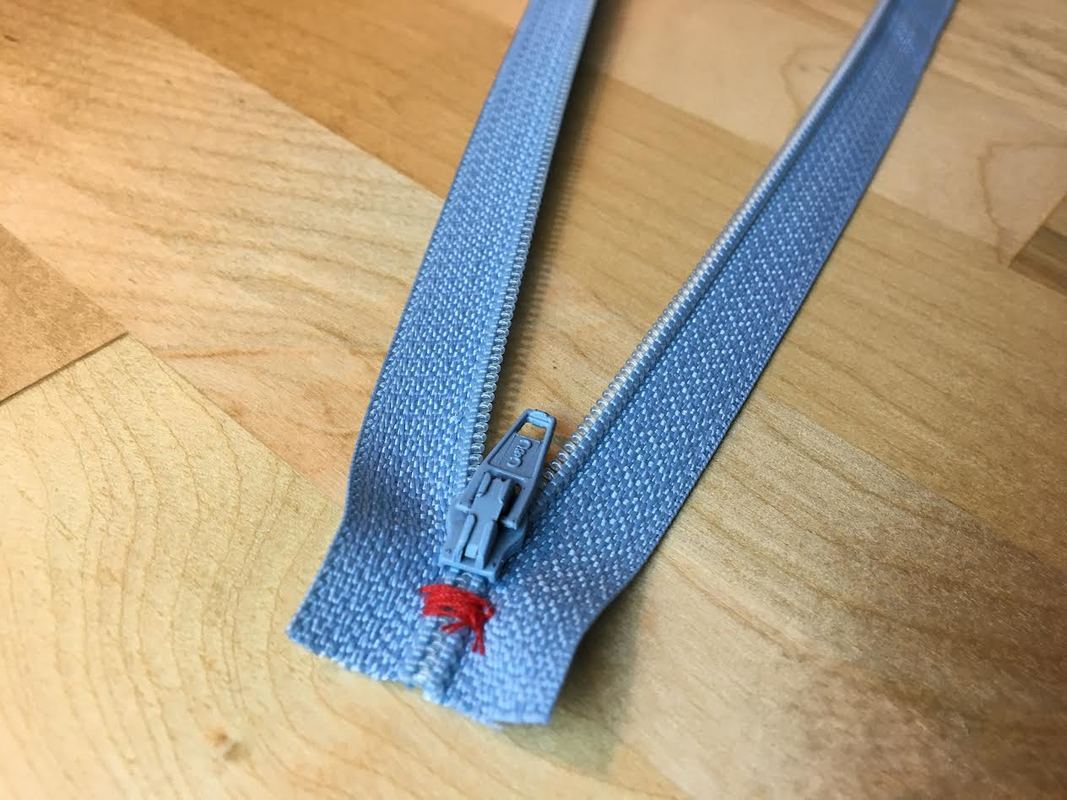 The zipper is now fully shortened. The looping hand stitch (whipstitch) prevents the zipper teeth from opening at the bottom, also serving as a zipper stop. Closing a Zipper On Both Ends- Used For Dress Zipper Plackets. When inserting a regular zipper into a seam that is closed on both ends, it is good practice to also close the zipper tape at the top opening of the zipper in order to facilitate the sewing process and achieve a smooth finish throughout the seam. The hand stitch used to achieve this is very similar to the one applied in the process of shortening a zipper. However, instead of the zipper teeth being stitched closed, this particular whipstitch is inserted through the edge of each zipper tape, above the zipper stop. This technique is commonly used at the top of conventional zippers that get sewn into the side seam of dresses and tops using featuring a flap/placket. Stitching the zipper tape closed at the top is also beneficial when sewing purses and clutches that feature a zipper opening. It keeps the zipper tape in place giving it more stability during pining and sewing. It also eliminates gaps at the top opening of the zipper when the zipper is in closed position on the garment. Keeping the zipper tape edges together at the top creates a much smoother finish both on the face and wrong side of the garment. 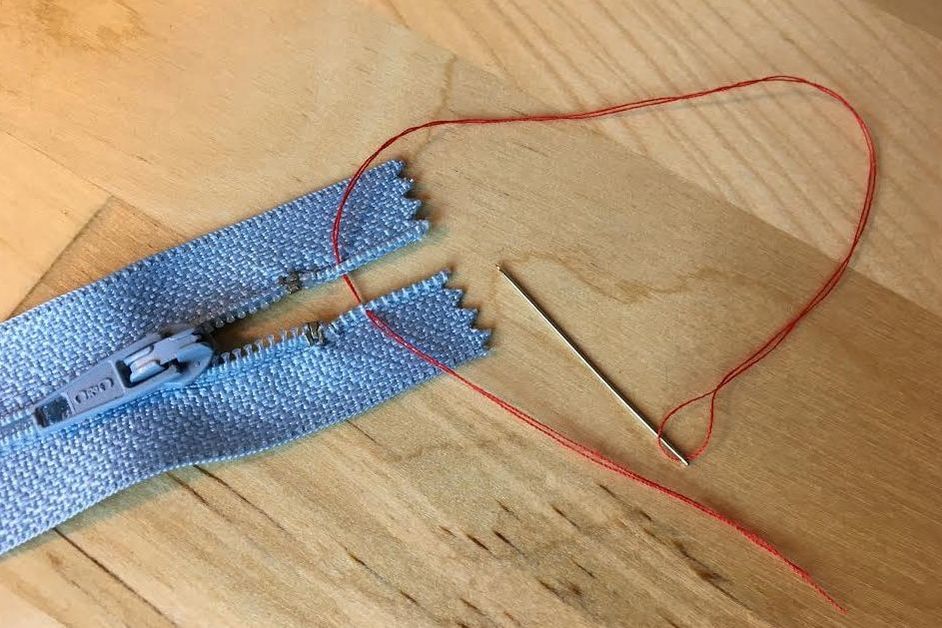 1. Insert the needle through both edges of the zipper tape, at about 1/2" up from the zipper stops as shown above. It helps to keep the zipper closed during this process. As you did for shortening the zipper above, leave enough length on the end of the thread so you can hand-knot it once complete. 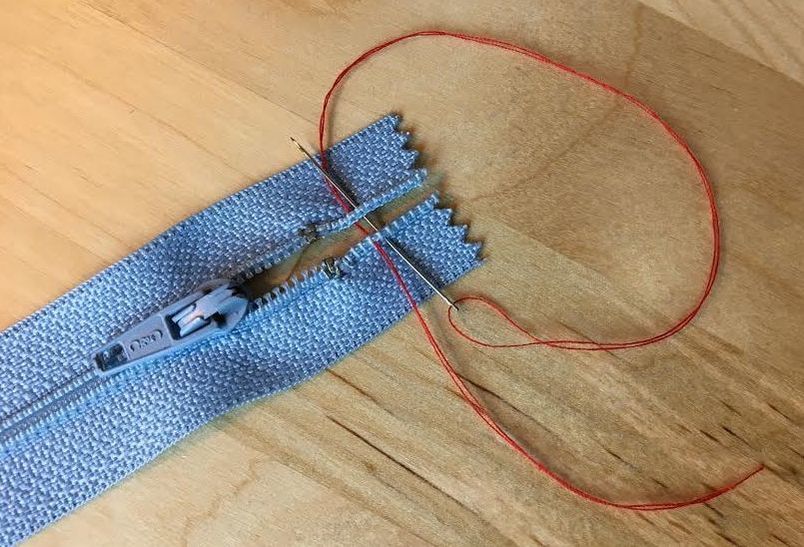 2. Stitch back through were you inserted the first stitch, and loop over both edges of the zipper tape thus pulling them together. 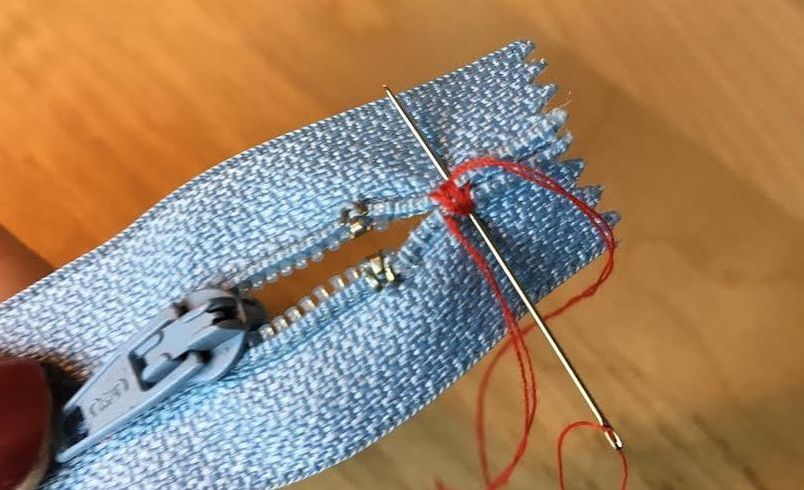 3. Continue stitching in place (or whipstitching) until a durable connection is achieved. Don't pull too much on each stitch- try to maintain both sides of the zipper tape as flat as you can. This will ensure a smooth finish along the seam of the garment once the zipper is sewn in. 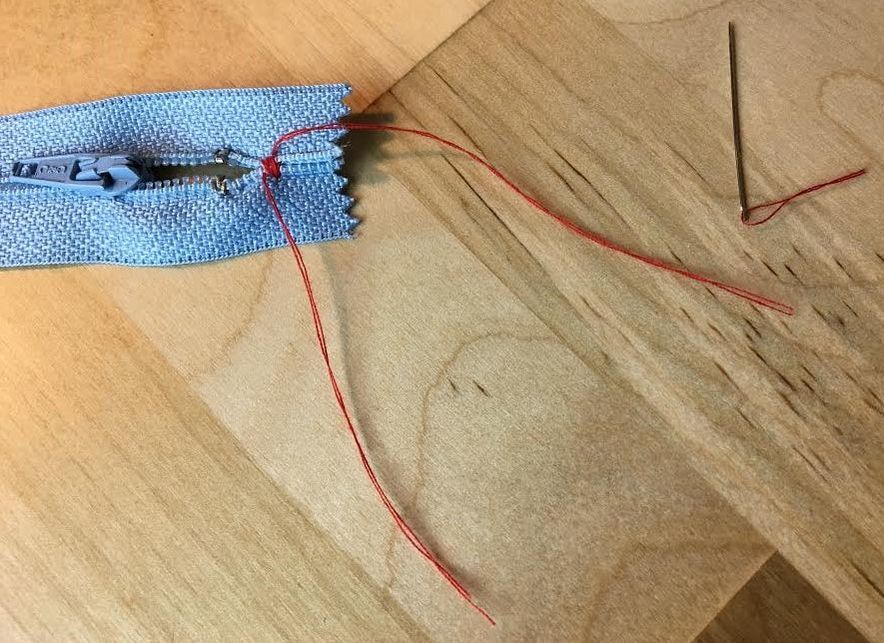 4. Once the stitch is finalized, cut the thread connected to the needle as shown, making sure to give yourself enough length to hand-knot both loose ends of the thread as shown in the step to follow. 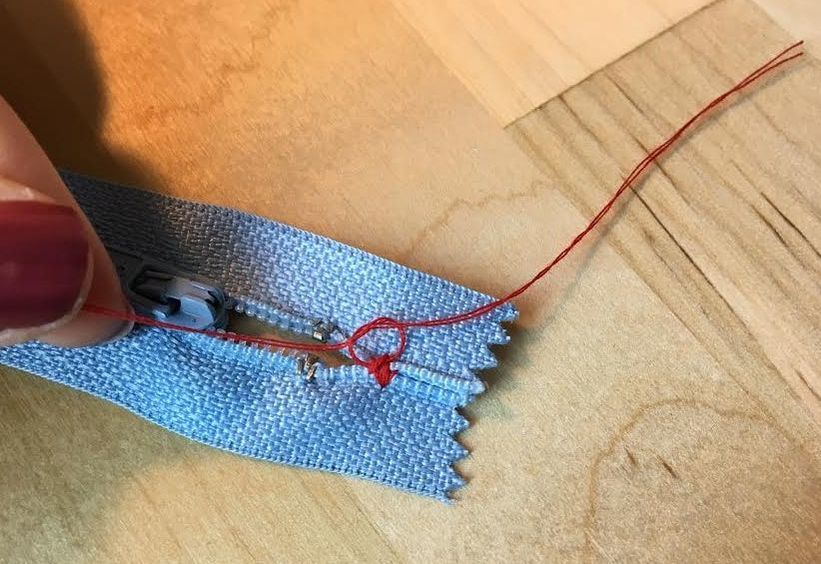 5. Hand-knot both loose ends of the thread a couple of times (2 times should be enough) in order to securely lock the stitch in place. 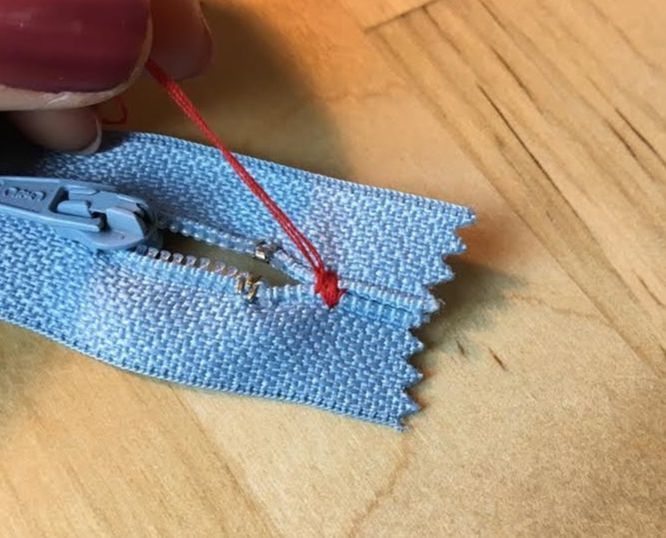 Knotting the loose threads about 2-3 times should work well enough to efficiently lock the hand stitch in place. 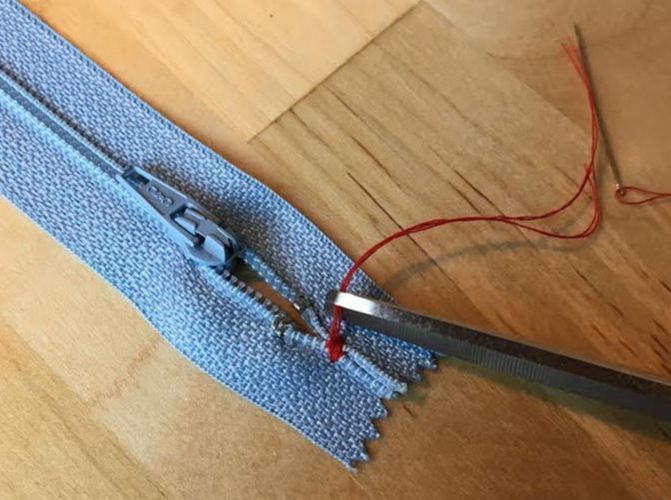 Cut the threads next to the knot at about 1/8" away from it. You should be very careful not to cut too close to the knot as this may weaken it. On the same note, be careful not to accidentally cut through the actual knot during this process.  The zipper is now ready to be sewn into a close-ended placket seam. The whipstitch that connects the edges of the zipper tape together should allow both edges of the zipper tape to remain flat without pulling on them too tightly. 
0 Comments
Leave a Reply. |
The Blog:A journey into our design process, sewing tutorials, fashion tips, and all the inspiring people and things we love. 
Doina AlexeiDesigner by trade and dressmaker at heart. I spend most of my days obsessing over new fabrics and daydreaming new ideas. 
Sadie
Executive Assistant & Client Relations Manager Archives
November 2019
Categories
All

|

-
Sewing Tutorials
-
Basics
>
- Aligning Pattern Grainlines To Fabric
- Preparing Fabrics For Sewing
- Pinning Sewing Patterns To Fabric
- Placing Sewing Patterns On Fabric For Cutting
- Rotary Cutters or Fabric Scissors?
- Cutting The Sewing Patterns
- What Are Notches And How To Use Them In The Sewing Process
- Transferring Notches From Pattern To Fabric
- Transferring Seamlines to Fabric
- Staystitching
- Backstitching: A Complete Guide
- Hand Basting: A Complete Guide
- Sewing Continuous Bias Binding
- Darts >
-
Sewing Seams
>
- The Basics Of Seams And Seam Allowance
- How To Sew A Straight Seam
- Sewing Curved Seams
- Sewing Corner Seams
- Trimming And Grading Seam Excess
- Notching/Clipping Seam Allowance for Tension Release
- Sewing Topstitched Seams
- Sewing Corded Seams
- Sewing A Slot Seam
- Sewing A Gathered Seam
- Sewing Bias Seams
- Sewing Seams With Ease
- Sewing Seams With Crossing Seamlines
- Sewing Unlike Fabric Seams
- How To Iron Seams: Ironing Tools And Conventions
- Sewing With Knit Fabrics
- Understanding Stitch Length And Tension
- Sewing Unique Fabric Seams
-
Seam Finishes
>
- Seam Finishing Techniques - Overview
- Applying A Pinked Seam Finish
- Applying A Bias Bound Seam Finish
- Serging And Zigzag Seam Finishes
- Sewing A Self-Bound Seam Finish
- Sewing A French Seam Finish
- Sewing A Hong Kong Seam Finish
- Sewing A Mock French Seam Finish
- Sewing A Turned-and-Stitched Seam Finish
- Sewing Overcast Hand-Applied Seam Finishes
- Sewing A Flat Felled Seam
- Sewing A Hairline Seam Finish
-
Hem Finishes
>
- Garment Hem Finishes: Overview
- Sewing A Double Fold Hem Finish
- Sewing A Single Fold Hem Finish
- Sewing Bound Hem Finishes
- Sewing An Exposed Double Layer Bound Hem
- Sewing A Folded-Up Bound Hem with Pre-folded Binding
- Sewing A Hong Kong Hem Finish
- Sewing A Band Hem Finish
- Sewing A Bias Faced Hem Finish
- Sewing A Twill Tape Hem Finish
- Sewing A Rolled Hem Finish
- Sewing A Shaped Hem Facing
- Using Fusible Hem Tape And Webbing
- Finishing A Lace Fabric Hem
- Finishing A Leather Hem
- Sewing Faced Hem Corners
- How To Finish Lining At The Hem
- Finishing Fabric Corners by Mitering >
- Interfacing A Hemline: Lined And Unlined Examples
-
Sewing Pockets
>
- Curved Patch Pocket With Flap
- Unlined Square Patch Pockets
- Lined Patch Pockets: Two Ways
- Extension On-Seam Pockets
- Separate On-Seam Pocket
- Front Hip Pockets
- Bound Double Welt Pocket
- Double Welt Pocket With Flap
- Self-Welt Pocket (Using Single Fabric Layer)
- Slanted Welt Pocket (Hand-Stitched)
- Faced Slash Pockets: Overview >
-
Sewing Zippers
>
- Sewing Zippers: General Information
- Sewing A Centered Zipper
- Sewing A Lapped Zipper
- Sewing An Invisible Zipper
- Sewing A Fly Front Zipper
- Sewing A Closed-End Exposed Zipper (No Seam)
- Sewing An Exposed Separating Zipper
- Sewing Hand Stitched Zipper Applications
- Sewing A Zipper Underlay
- Sewing A Placket-Enclosed Separating Zipper
- Sleeveless Finishes >
-
Neckline Finishes
>
- Sewing A Neck Shaped Facing
- Sewing An All-In-One Neck Facing
- Neck And Garment Opening Combination Facings >
- Sewing A Bias Faced Neckline Finish
- Sewing A Band Neckline Finish
- Bound Neckline Finishes: Overview >
- Sewing A Semi-Stretch Strip Band Neckline
- Ribbed Neck Band And Classic Turtleneck
- Decorative Neckline Finishes >
- Finishing Facing Edges >
-
Extras
>
- A Complete Guide on Interfacing
- Sewing Bound Spaghetti Straps
- Sewing Spaghetti Straps To A Faced Neckline
- Sewing Ruffles: Overview
- Patterning And Sewing A Circle Ruffle
- Sewing A Gathered Heading Ruffle
- Sewing Double Layer Gathered Ruffles
- Sewing A Gathered Ruffle Into A Seam
- Sewing A Gathered Ruffle To A Fabric Edge
- Sewing A Fabric Surface Slit
- Sewing A Slit Seam
- Hand-Applied Straight Stitches
- Hand-Applied Blind Stitches
- Hand-Applied Overedge Stitches
- Hand-Applied Tack Stitches
- Hand-Applied Decorative Stitches
-
Basics
>
- Custom Bridal
- Custom Apparel
- About
- Blog
 RSS Feed
Services |
Company |
|
