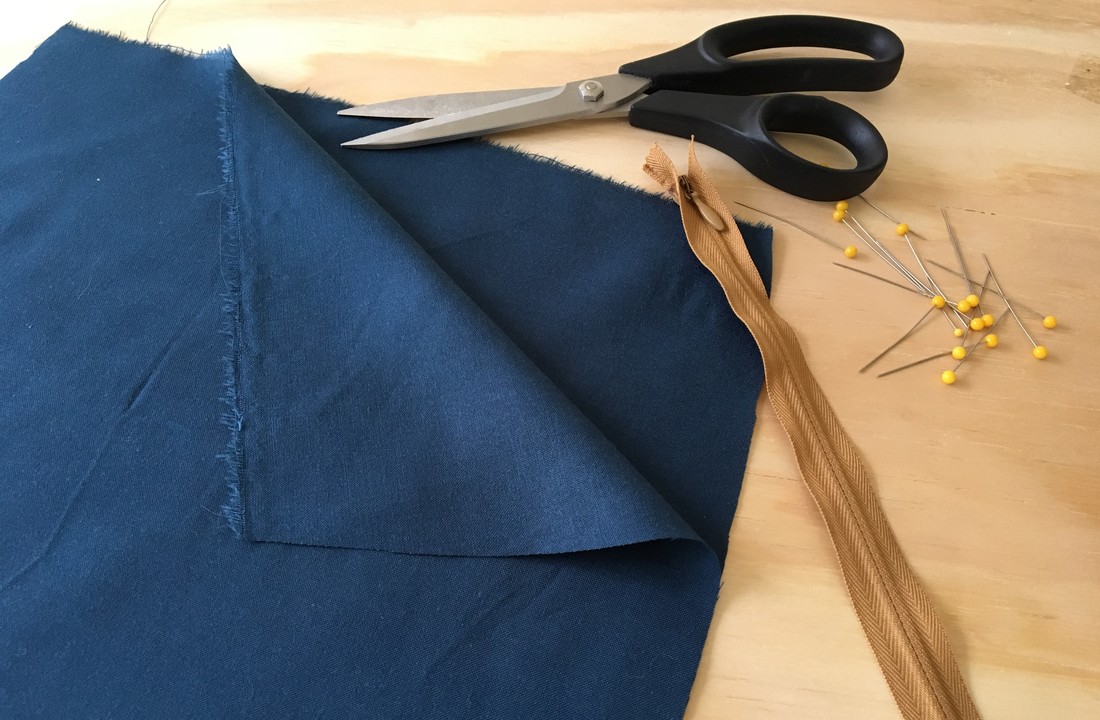
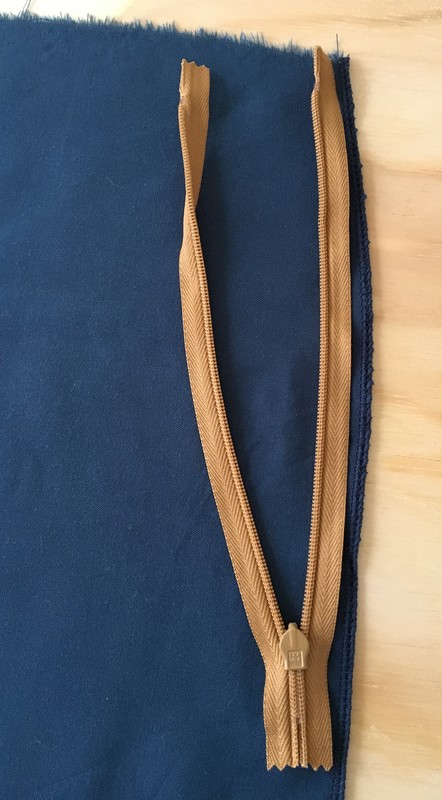
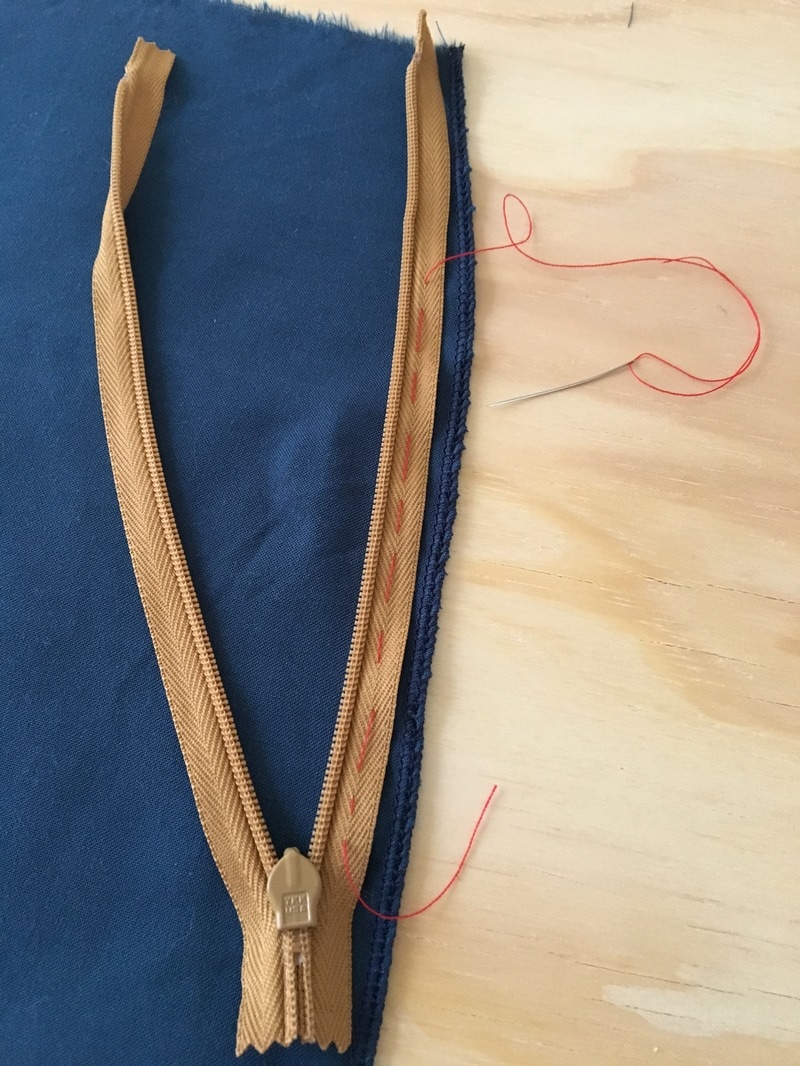
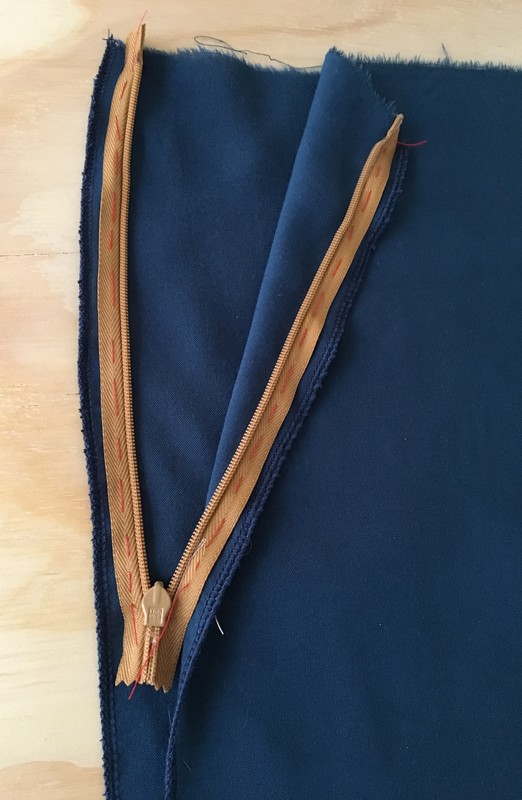
 Zippers can sometimes seem very intimidating to sew and we often choose to avoid them instead of confronting them head on. Sewing a zipper can be a real challenge when you are in the beginning stages of learning how to sew. However, just like all the best things in life, nothing comes without a little bit of patience and lots of practice. We’ll cover how to sew various styles of zippers in future blog posts. For now however, sewing an invisible zipper might be just what you’ll need in order to break that initial fear of setting in a zipper as a beginner. You’re probably wondering why we think invisible zippers are the best to get started with… Well, they aren’t necessarily “easy” but they follow a minimal amount of steps that also happen to be pretty simple. That is not to say you won’t need some trial an error to adjust and make some mistakes, but an invisible zipper will give you far less headaches than a front-fly zipper or a lapped zipper. Another upside to learning how to sew an invisible zipper first is the fact that it is the most versatile of all zippers- It works just as well on bottoms as it does on fitted dresses and tops. As a matter of fact, it is probably used on dresses and tops about 90% of the time and as a sewing beginner, you’ll most likely begin your journey by learning how to sew dresses and tops first. This means that mastering the invisible zipper first, will save you the headache when you’re looking for an easy, fast way to add a garment closure for many of your future projects. So now that we've talked you into loving invisible zippers, it is only fair to also teach you how to sew one! Sewing an invisible zipper requires the use of a specialized presser foot. Your home sewing machine may not be equipped with one which will require you to buy it individually. Luckily, our tutorial will teach you how to sew an invisible zipper using a regular presser foot which is certainly included with your initial sewing machine purchase. If you're curious, here's what an invisible zipper foot looks like: A regular zipper foot is simple and easy to use and as long as your zipper tape is aligned properly, the stitch will slide through effortlessly. Pictured below, it is easy to use on other types of zippers as well as sewing piping or narrow trims. 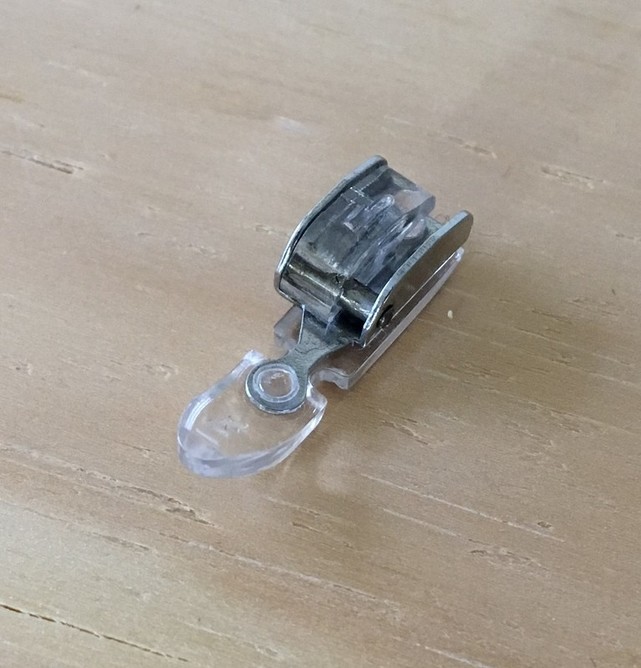 Sewing A Regular Invisible Zipper An invisible zipper is sewn to a regular seam and requires no top stitches on the face of the garment. Once closed, it appears as a regular seam with only the tab visible at the top. Depending on the zipper tape width, always work with 5/8"-1/2" seam allowance. Step 1: Clean finish the seams's raw edges individually. You need to do this first because once the zipper is sewn in, it is a lot more difficult to handle the fabric's raw edges individually. An overlock stitch (or zig-zag on a home sewing machine) should work well as a finish because it will minimize bulk and allow for a smoother seam on the face of the garment. 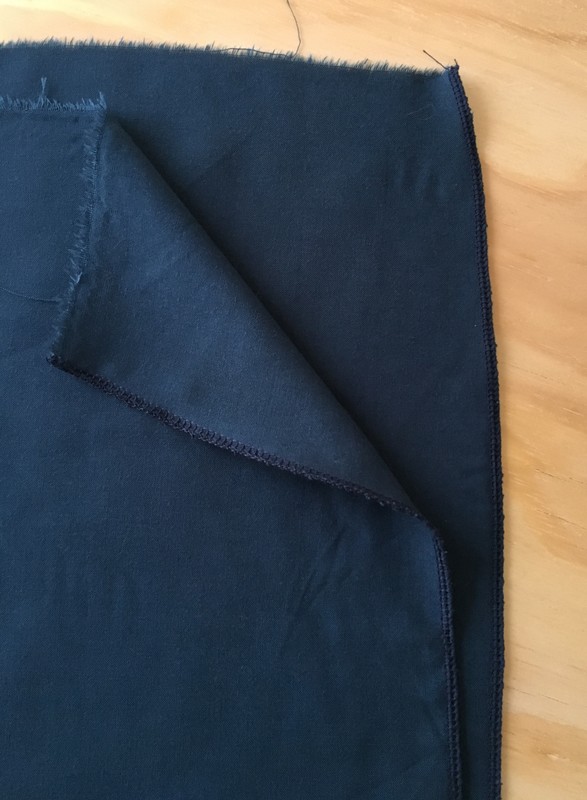 Step 2: Align the zipper's top stop at 1/2" bellow the fabric's top edge as shown below. Invisible zippers already come with a 1/2" extended tape portion at the top so you can just align the top edges of the tape to the top edge of the garment. 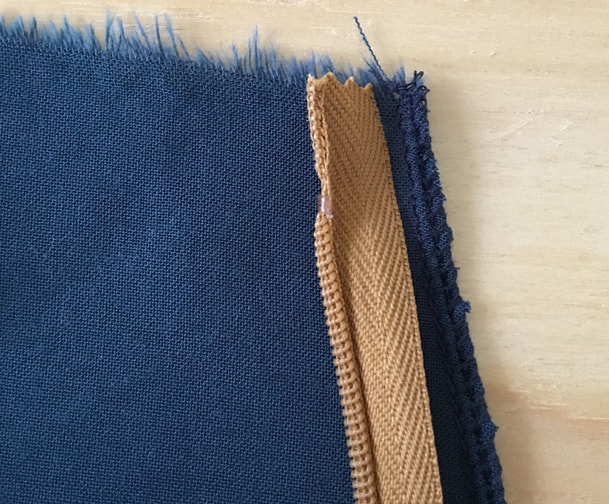 Step 3: Next, align the zipper tape face down along the edge of the fabric, making sure the right side of the fabric is facing you. In this case, our seam allowance is 1/2" and the zipper tape width is 5/8"- this means that our zipper tape needs to be positioned about an 1/8" away from the fabric's edge. If your zipper tape happens to be the same width as the seam allowance, align the tape's edge to the fabric's edge. Using a hand sewing needle and contrast thread, hand baste the zipper tape to the fabric to stabilize it.
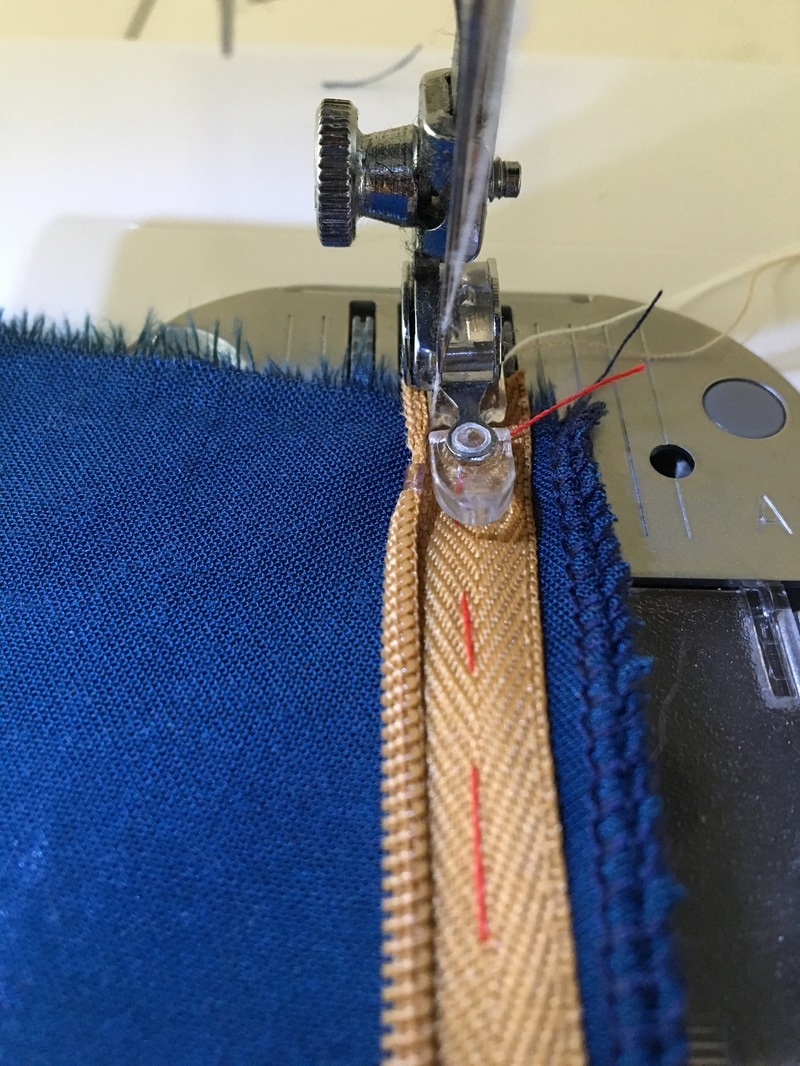
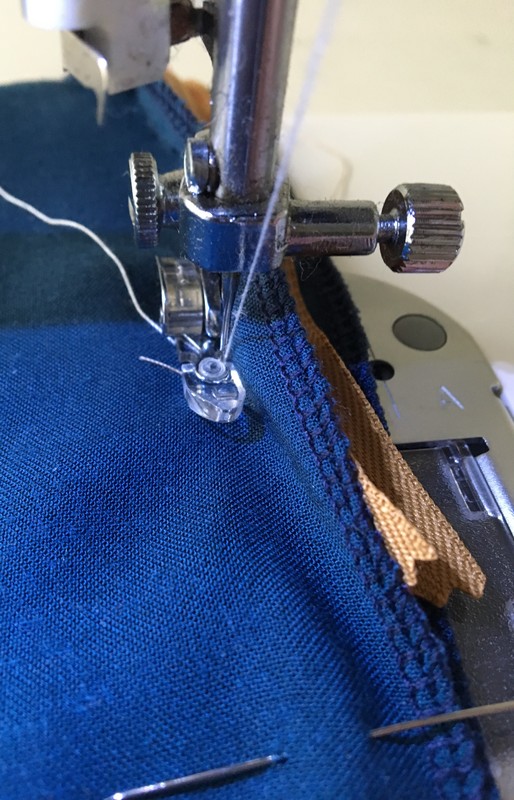
Step 4: On your sewing machine, switch the zipper foot so that the side of the sewing needle corresponds to the zipper teeth as shown below. Begin stitching in the gap right behind the zipper teeth as you hold the gap at the back of the zipper teeth open. You should be sewing right behind the zipper teeth in the gap opening. Back-stitch at the end of your stitch.
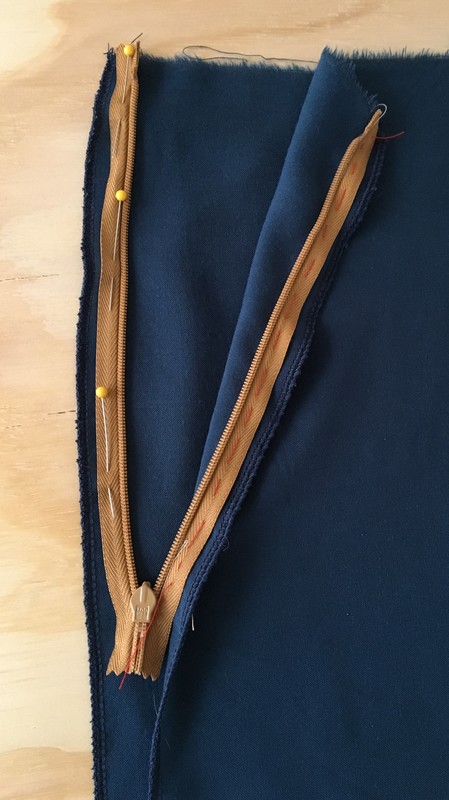
Once your machine stitch is complete, you shouldn't be able to see a stitch on top of the zipper tape without opening the gap behind the zipper teeth as this stitch is hidden by them. However, when you look on the back side of the fabric you should see a straight machine stitch as displayed below. 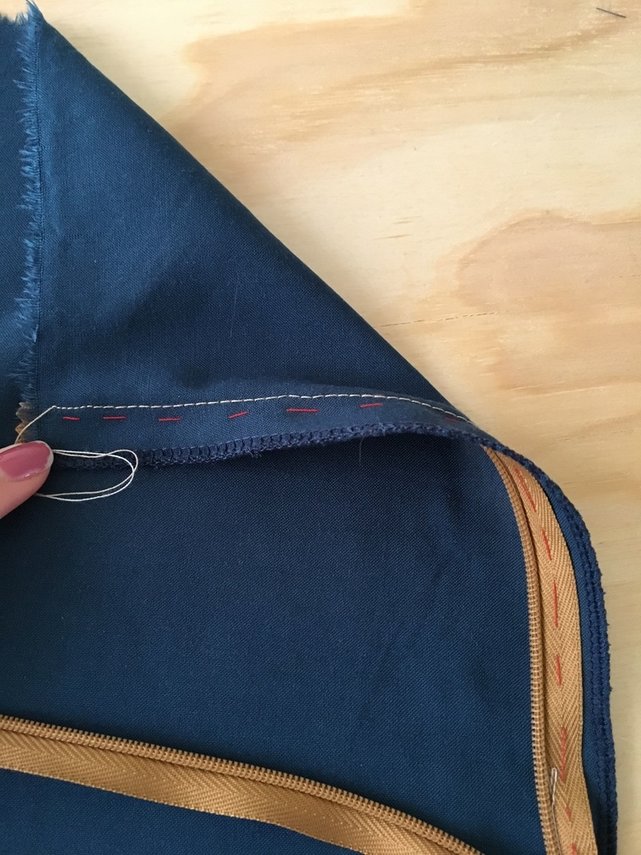 Step 5: Take the other piece of fabric, and align it so that the right sides of both fabric pieces are touching. This will inevitably align your invisible zipper in the correct position to the other edge, making sure the zipper's face side is facing down. Align this second edge as described in the first steps above. You may also pin it in place to make it easier to baste. Hand baste the zipper tape in place as done previously.
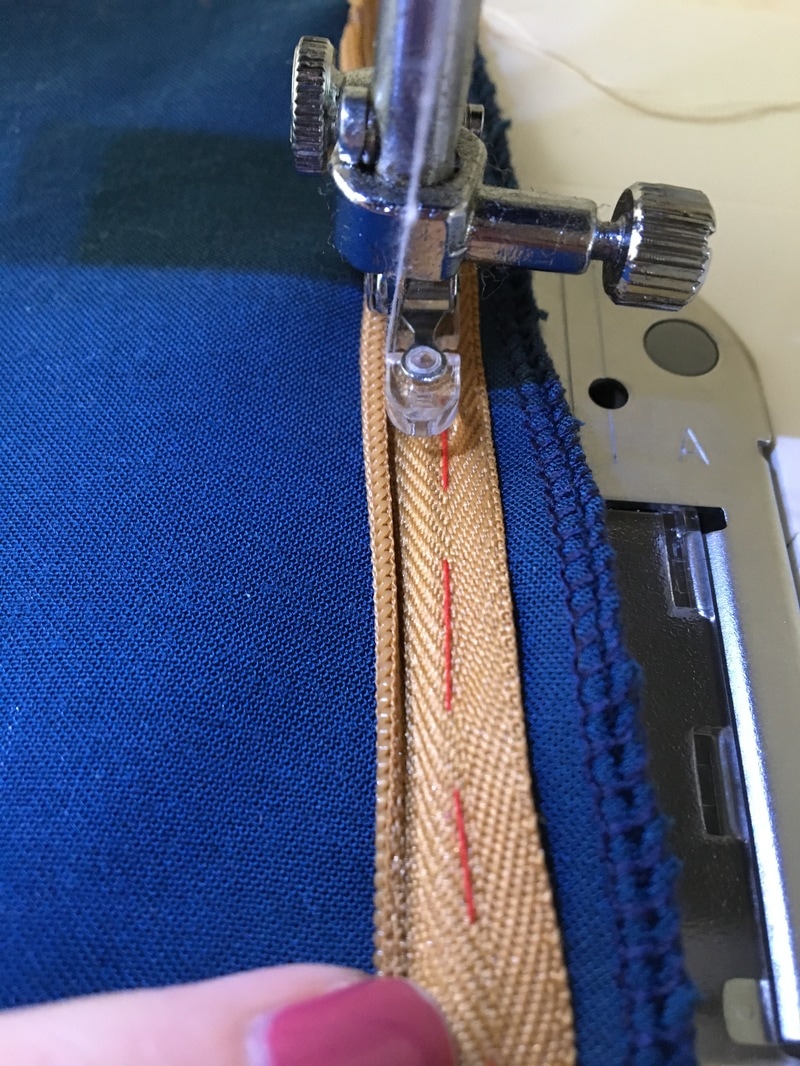
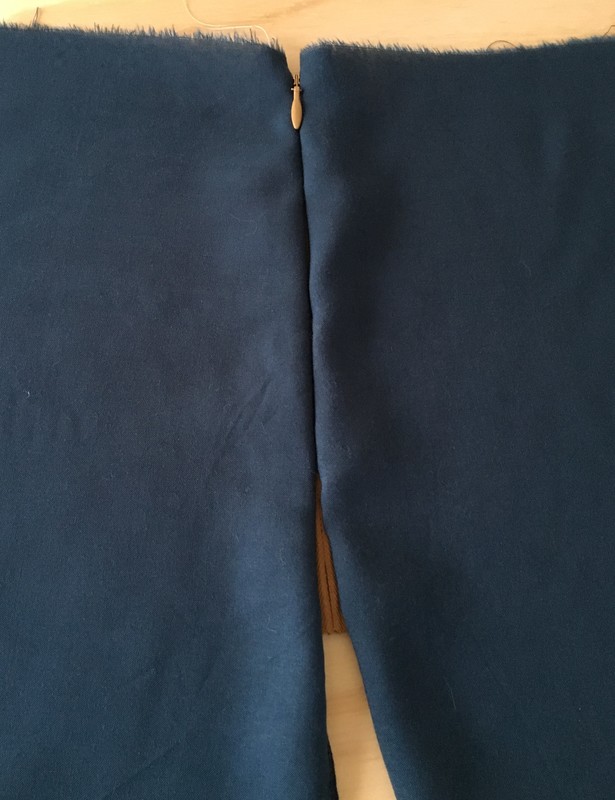
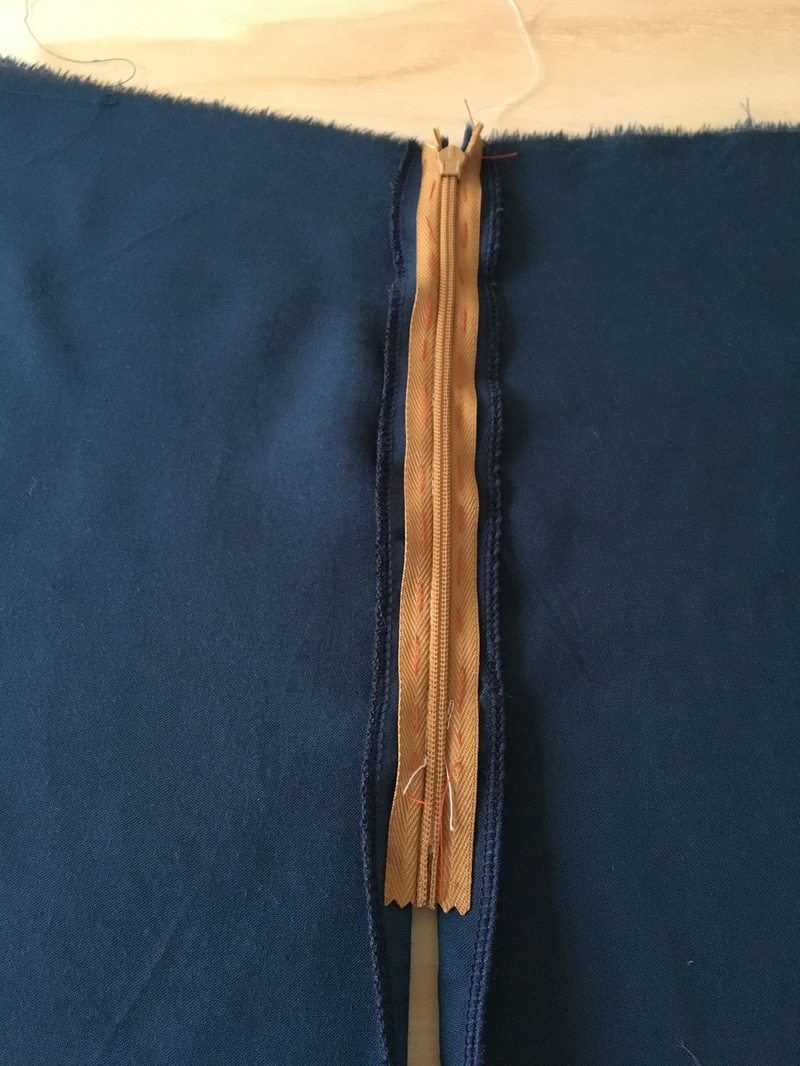
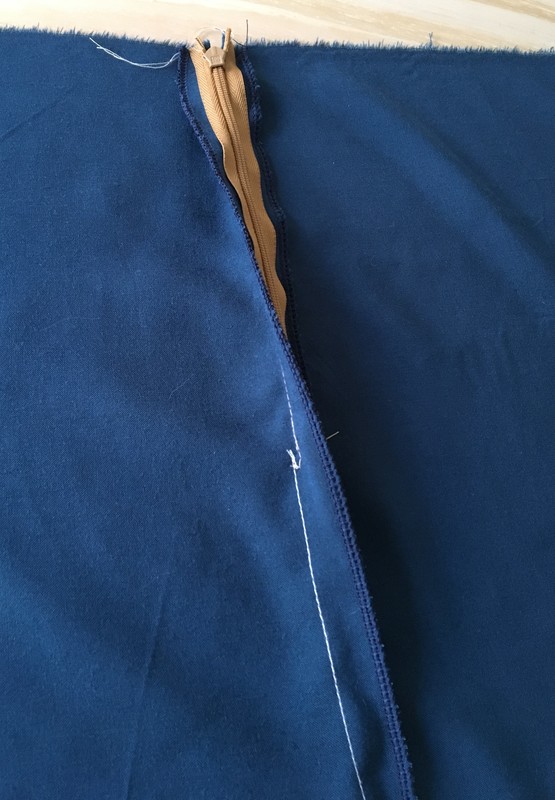
Step 6: Switch your zipper foot so that the sewing needle is aligned on the opposite side, thus matching the new zipper teeth placement. Stitch from top down in the gap behind the zipper teeth while holding it open with your hand as you sew. Back-stitch when reaching the bottom of the zipper. This will take some practice, so don't be afraid to go very slow, or take out uneven stitches with a seam ripper if you are unhappy with how they turn out! When it comes to zippers, practice makes perfect! 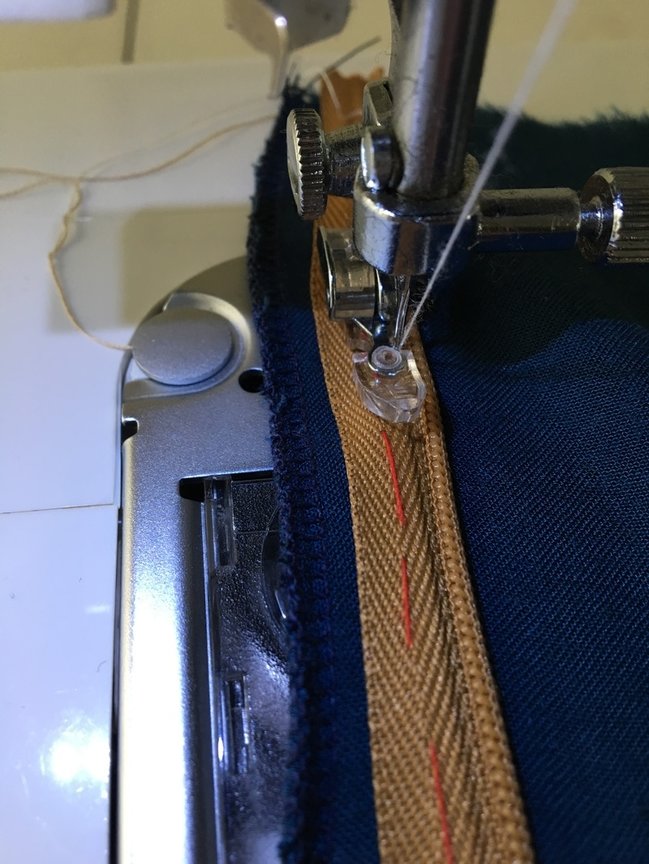 Step 7: Your zipper is now sewn in place! Here's what it should look like on both sides. The face of your garment should look like a regular seam with only the zipper tab showing. The inside of the garment displays the zipper facing down and aligned evenly along the edge of the fabric.
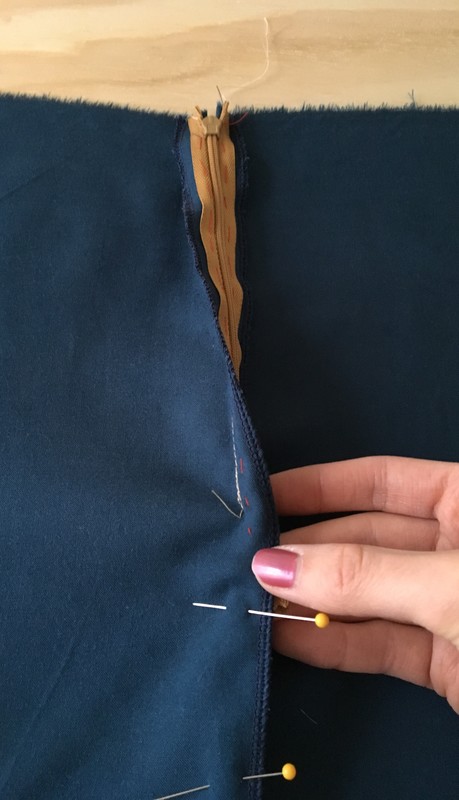
Step 8: It's now time to finish the rest of the seam! Note that when sewing an invisible zipper, as opposed to other zipper styles, you complete the seam after applying the zipper. On the inside of the garment, match the seam allowance and place a few pins horizontally to hold the two fabric pieces together the way you would normally do when sewing a regular seam. Using your zipper foot again, begin stitching through the two fabric layers, making sure not to catch the zipper but as close to the zipper's end as possible. Begin this machine stitch with a back-stitch for a more durable finish. This does take some practice so don't get disappointed if you don't get it right on the first try! Note: If you don't feel comfortable back-stitching so close to the zipper (while making sure not to catch it) you can hand back-stitch instead once you finish sewing the seam together. Stitch with your zipper foot only about 2" down, then switch to a regular presser foot to sew the rest of the seam.
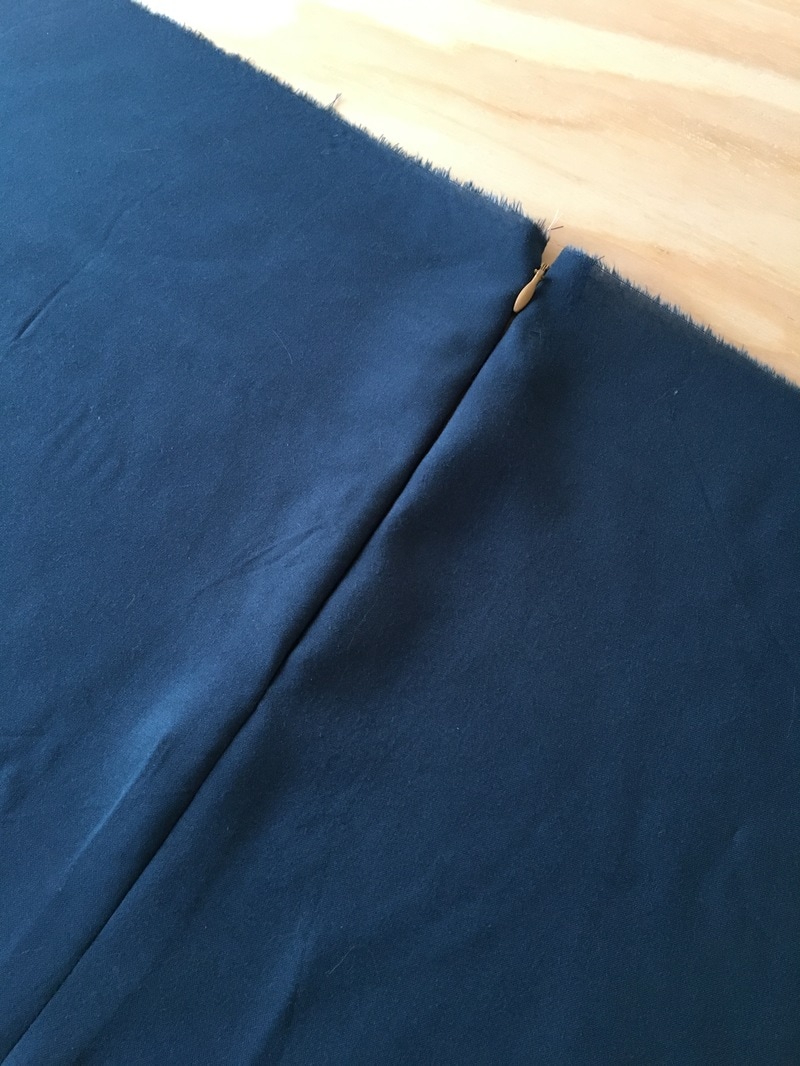
Step 9: You can now remove your basting and clean finish the inside of your seam by cutting loose threads or hand back-stitch if necessary.
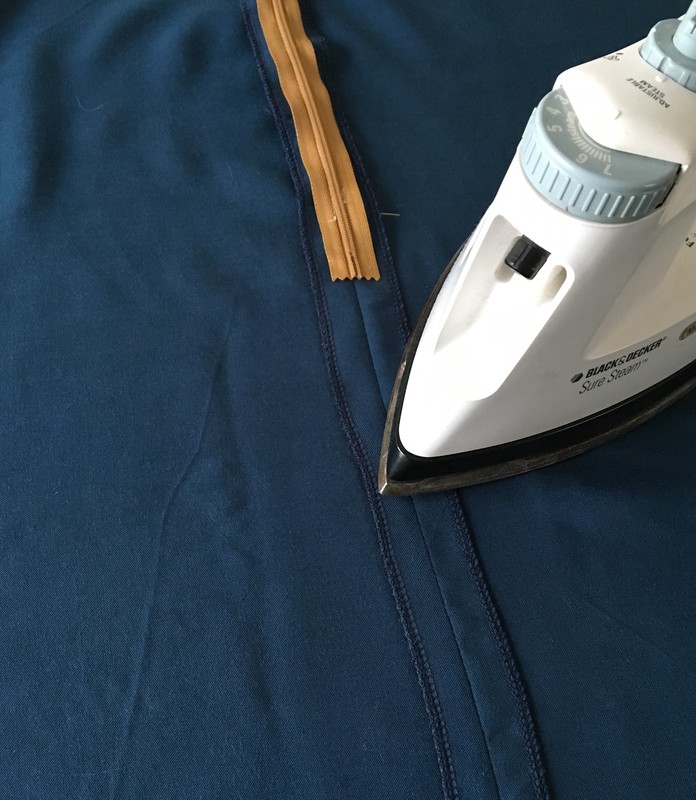
Step 10: As a last step, iron the seam open on the inside of the garment. Your invisible zipper is now complete!
0 Comments
Leave a Reply. |
The Blog:A journey into our design process, sewing tutorials, fashion tips, and all the inspiring people and things we love. 
Doina AlexeiDesigner by trade and dressmaker at heart. I spend most of my days obsessing over new fabrics and daydreaming new ideas. 
Sadie
Executive Assistant & Client Relations Manager Archives
November 2019
Categories
All

|

-
Sewing Tutorials
-
Basics
>
- Aligning Pattern Grainlines To Fabric
- Preparing Fabrics For Sewing
- Pinning Sewing Patterns To Fabric
- Placing Sewing Patterns On Fabric For Cutting
- Rotary Cutters or Fabric Scissors?
- Cutting The Sewing Patterns
- What Are Notches And How To Use Them In The Sewing Process
- Transferring Notches From Pattern To Fabric
- Transferring Seamlines to Fabric
- Staystitching
- Backstitching: A Complete Guide
- Hand Basting: A Complete Guide
- Sewing Continuous Bias Binding
- Darts >
-
Sewing Seams
>
- The Basics Of Seams And Seam Allowance
- How To Sew A Straight Seam
- Sewing Curved Seams
- Sewing Corner Seams
- Trimming And Grading Seam Excess
- Notching/Clipping Seam Allowance for Tension Release
- Sewing Topstitched Seams
- Sewing Corded Seams
- Sewing A Slot Seam
- Sewing A Gathered Seam
- Sewing Bias Seams
- Sewing Seams With Ease
- Sewing Seams With Crossing Seamlines
- Sewing Unlike Fabric Seams
- How To Iron Seams: Ironing Tools And Conventions
- Sewing With Knit Fabrics
- Understanding Stitch Length And Tension
- Sewing Unique Fabric Seams
-
Seam Finishes
>
- Seam Finishing Techniques - Overview
- Applying A Pinked Seam Finish
- Applying A Bias Bound Seam Finish
- Serging And Zigzag Seam Finishes
- Sewing A Self-Bound Seam Finish
- Sewing A French Seam Finish
- Sewing A Hong Kong Seam Finish
- Sewing A Mock French Seam Finish
- Sewing A Turned-and-Stitched Seam Finish
- Sewing Overcast Hand-Applied Seam Finishes
- Sewing A Flat Felled Seam
- Sewing A Hairline Seam Finish
-
Hem Finishes
>
- Garment Hem Finishes: Overview
- Sewing A Double Fold Hem Finish
- Sewing A Single Fold Hem Finish
- Sewing Bound Hem Finishes
- Sewing An Exposed Double Layer Bound Hem
- Sewing A Folded-Up Bound Hem with Pre-folded Binding
- Sewing A Hong Kong Hem Finish
- Sewing A Band Hem Finish
- Sewing A Bias Faced Hem Finish
- Sewing A Twill Tape Hem Finish
- Sewing A Rolled Hem Finish
- Sewing A Shaped Hem Facing
- Using Fusible Hem Tape And Webbing
- Finishing A Lace Fabric Hem
- Finishing A Leather Hem
- Sewing Faced Hem Corners
- How To Finish Lining At The Hem
- Finishing Fabric Corners by Mitering >
- Interfacing A Hemline: Lined And Unlined Examples
-
Sewing Pockets
>
- Curved Patch Pocket With Flap
- Unlined Square Patch Pockets
- Lined Patch Pockets: Two Ways
- Extension On-Seam Pockets
- Separate On-Seam Pocket
- Front Hip Pockets
- Bound Double Welt Pocket
- Double Welt Pocket With Flap
- Self-Welt Pocket (Using Single Fabric Layer)
- Slanted Welt Pocket (Hand-Stitched)
- Faced Slash Pockets: Overview >
-
Sewing Zippers
>
- Sewing Zippers: General Information
- Sewing A Centered Zipper
- Sewing A Lapped Zipper
- Sewing An Invisible Zipper
- Sewing A Fly Front Zipper
- Sewing A Closed-End Exposed Zipper (No Seam)
- Sewing An Exposed Separating Zipper
- Sewing Hand Stitched Zipper Applications
- Sewing A Zipper Underlay
- Sewing A Placket-Enclosed Separating Zipper
- Sleeveless Finishes >
-
Neckline Finishes
>
- Sewing A Neck Shaped Facing
- Sewing An All-In-One Neck Facing
- Neck And Garment Opening Combination Facings >
- Sewing A Bias Faced Neckline Finish
- Sewing A Band Neckline Finish
- Bound Neckline Finishes: Overview >
- Sewing A Semi-Stretch Strip Band Neckline
- Ribbed Neck Band And Classic Turtleneck
- Decorative Neckline Finishes >
- Finishing Facing Edges >
-
Extras
>
- A Complete Guide on Interfacing
- Sewing Bound Spaghetti Straps
- Sewing Spaghetti Straps To A Faced Neckline
- Sewing Ruffles: Overview
- Patterning And Sewing A Circle Ruffle
- Sewing A Gathered Heading Ruffle
- Sewing Double Layer Gathered Ruffles
- Sewing A Gathered Ruffle Into A Seam
- Sewing A Gathered Ruffle To A Fabric Edge
- Sewing A Fabric Surface Slit
- Sewing A Slit Seam
- Hand-Applied Straight Stitches
- Hand-Applied Blind Stitches
- Hand-Applied Overedge Stitches
- Hand-Applied Tack Stitches
- Hand-Applied Decorative Stitches
-
Basics
>
- Custom Bridal
- Custom Apparel
- About
- Blog

 RSS Feed
Services |
Company |
|
