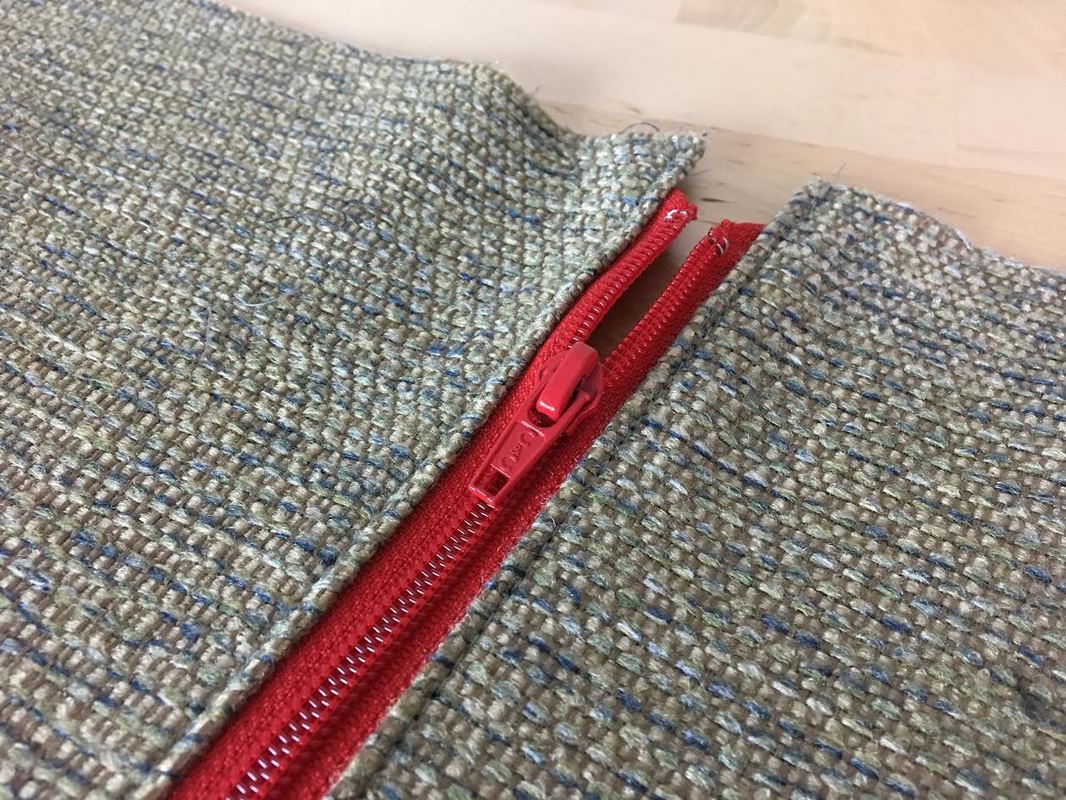
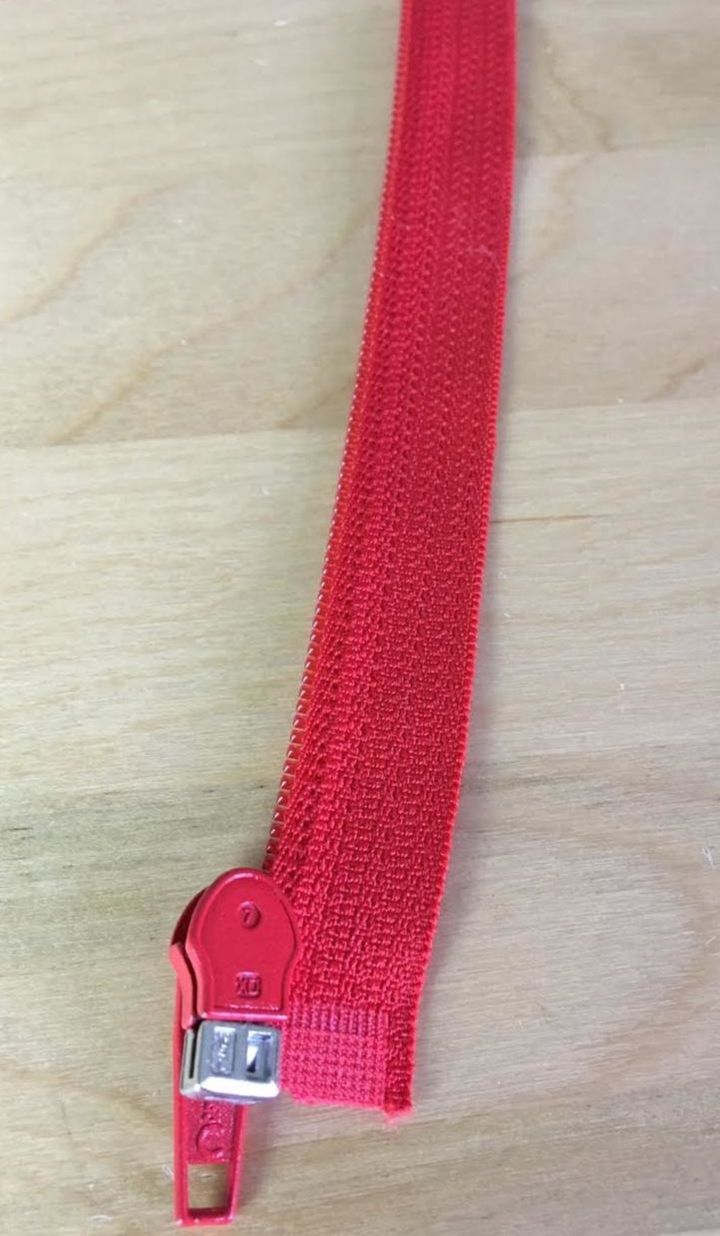
 The separating zipper is perhaps one of the best inventions in dressmaking. Not only are separating zippers extremely functional, they also play an important aesthetic role in fashion design. As opposed to other zipper applications, separating zippers are actually not difficult to sew and a great way for a sewing beginners to get started with zippers. As opposed to conventional, close-end zippers, separating zippers are able to actually disconnect into two pieces. For that reason, they are used along the opening edges of garments that need to separate fully. Most commonly, you'll find separating zippers at the opening of jackets, blazers, cardigans and various styles of tops and bottom. 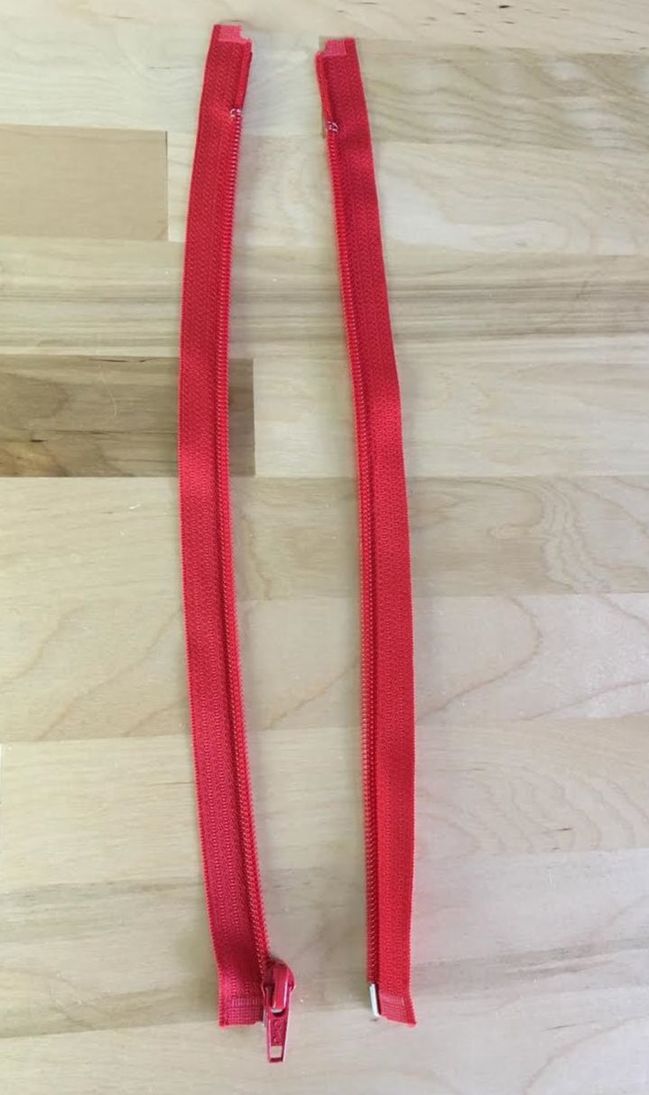 As mentioned above, separating zippers aren't just functional, they also add an aesthetic design element to clothing. Due to the fact that the zipper teeth and half of the zipper tape are usually exposed and visible on the outside of the garment, separating zippers are incorporated visually into the design of the clothing item at hand. This concept is especially true when working with metal zipper teeth which adds a classic contrasting element to the style of a garment. Speaking of separating zipper components, both metal and plastic options are available. Both options are equally as durable and functional. However, plastic zipper teeth (coils) are used when a lighter weight is necessary or desired. Plastic separating zippers also allow for more color flexibility- so if you are working on a project that requires the zipper teeth and tape to match the color of the garment, or perhaps you want to add a color blocking effect with a contrasting color zipper, then plastic separating zippers are the way to go. Metal separating zippers on the other hand are a bit heavier in weight offering more durability and no risk of the actual coils melting or breaking during ironing and use. Aesthetically, metal separating zippers offer a classic, contrasting element to a garment also serving as an important design element. While you can certainly find metal separating zippers in a variety of colors, only the zipper tape portion is available in color variations- the actual zipper teeth are usually not altered in color and available in metal finishes of gold-tone, nickel or black. Both metal and plastic separating zippers are available in a variety of sizes. Due to the flexibility of working with plastic, plastic coils come in different shapes and sizes depending on the sewing application. You might notice however, that most craft/fabric stores carry separating zippers in longer lengths. This is due to the fact that separating zippers are usually sewn to front garment openings which normally requires a longer length. If you are looking for a shorter separating zipper and can't find it at your local craft store, you can always shorten it at home to the desired size. It will take a pair of pliers and a bit of effort but it is certainly doable. To learn how to shorten a separating zipper by hand, follow this step-by-step tutorial: How To Shorten A Metal And Plastic Separating Zipper. Before getting started on how to sew a separating zipper below, it is really important that you understand the basic structure of a separating zipper. Not only will this help with aligning and sewing the zipper into the garment correctly, it will also make it easier to choose the correct zipper for the clothing item being sewn. 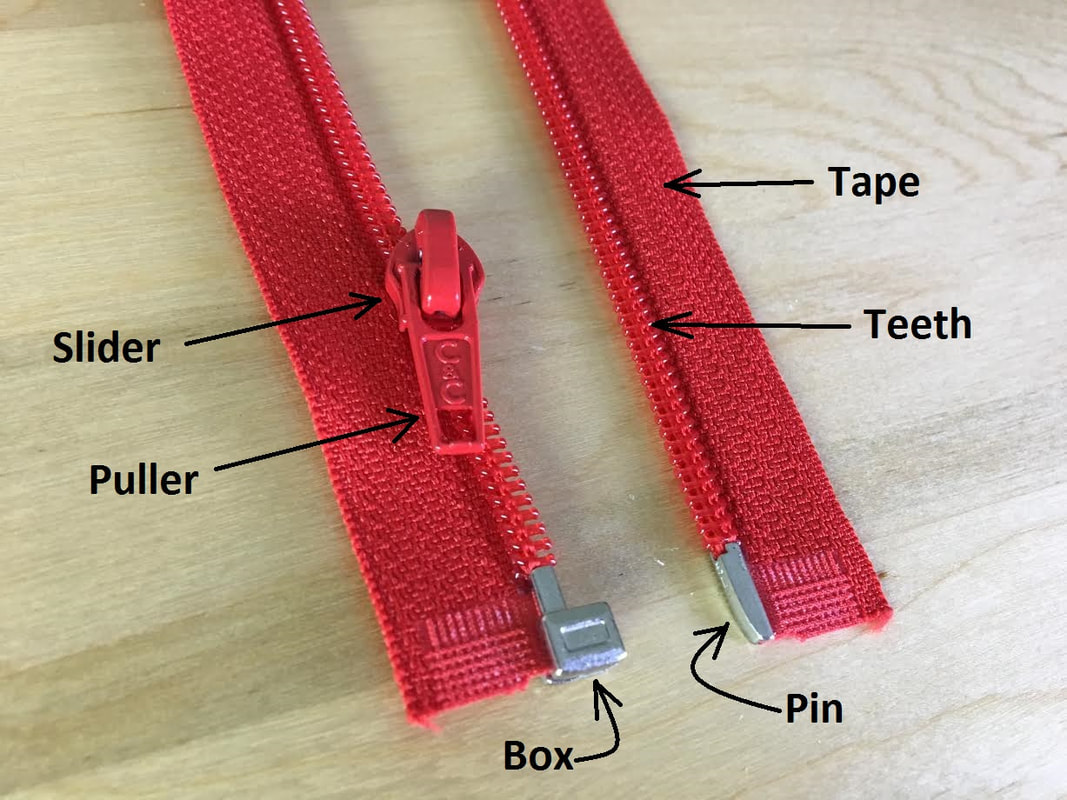 The zipper slider and pulling tab are recognizable elements across all styles of zippers. The difference between a separating zipper and a conventional close-ended zipper consists in the addition of the box (a square shaped structure) at the bottom of the zipper on on side, and the pin (a long crimp) on the other. It is the mechanism of these two elements that allows the zipper to open and separate fully. 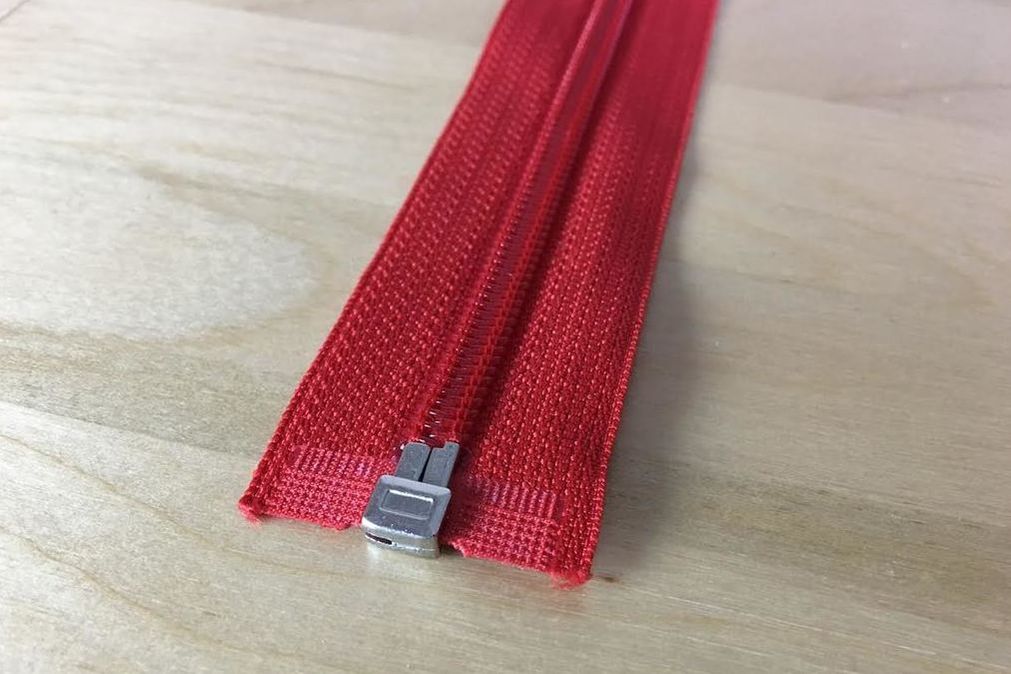 Of course, you already know how a separating zipper is closed: The slider is positioned next to the box while the pin is inserted through both the slider and box at the bottom allowing the slider to pull the zipper teeth closed with the help of the pulling tab. What is important for you to learn in the process of sewing a separating zipper is distinguishing between the face and the wrong side of the zipper. In addition, making sure that you are able to recognize the bottom portion of each zipper piece is important during alignment. If you've never sewn a separating zipper before, you might find yourself a bit confused between the zipper stop at the top and the pin at the bottom which could result in sewing the zipper upside down. To avoid this issues, follow the simple steps bellow to mark each tape portion of the separating zipper.
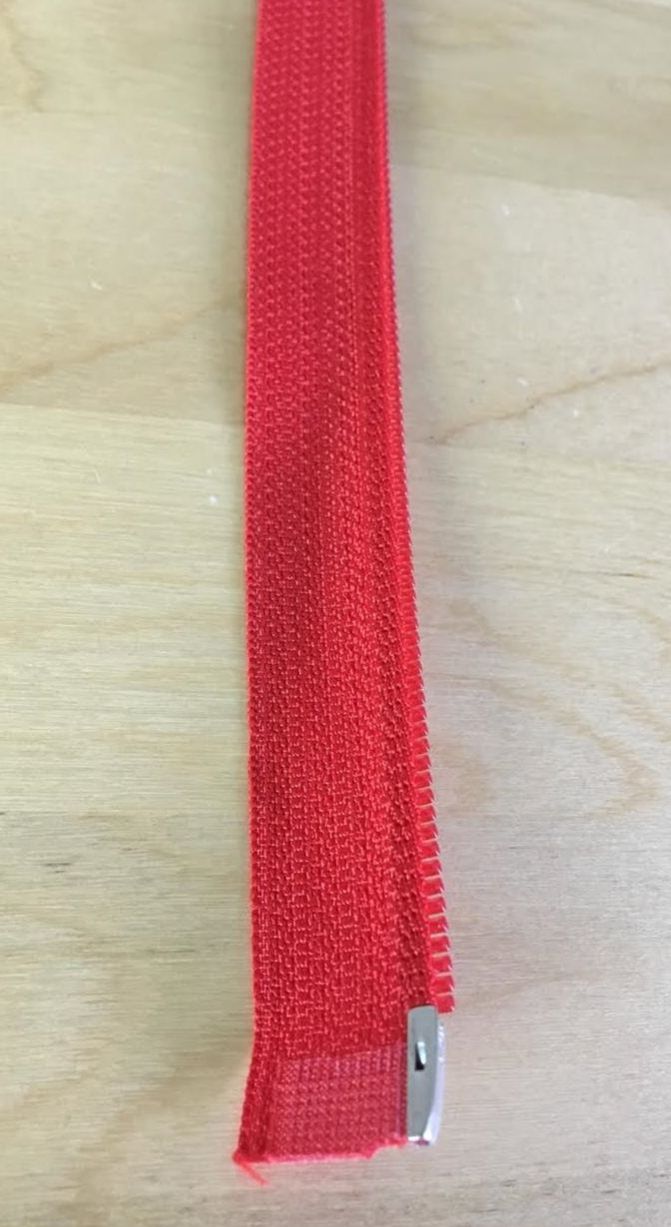
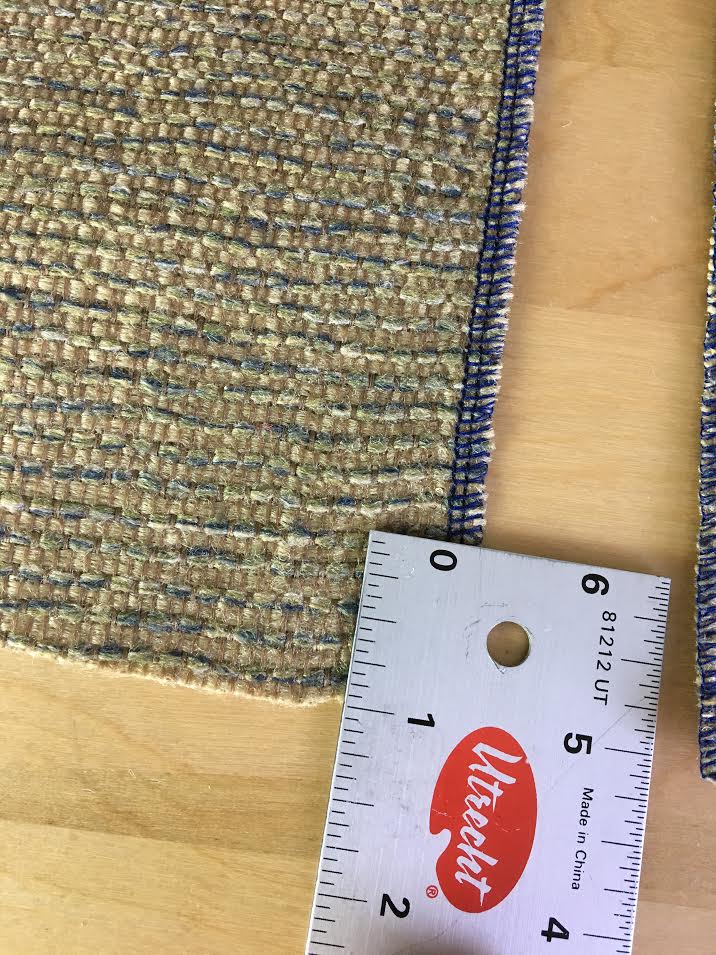
Just like fabric, zippers have a face side and a wrong side. In the images above, the wrong side of each zipper portion is displayed. You'll notice that the zipper teeth are less visible on the wrong side than they are on the face. Another indication of course is that the pulling tab is not visible on the wrong side of the zipper. Looking at the other zipper portion however, you might get a bit confused as to which is the wrong and right side since the pin looks almost identical on both sides. In many cases, there is a little stamp on the pin (as noticeable in the image above) serving as a pretty straight forward indication that you are looking at the wrong side. However, if you have never sewn a separating zipper before, follow the steps in the tutorial below to quickly mark the wrong side of each zipper portion- This will save you from making common alignment mistakes that often force sewing beginners into a complete redo. How To Sew A Top Stitched Separating Zipper First and foremost, let's mark each portion of the zipper tape on the wrong side of the zipper- you'll see why we need to do this as we get to the alignment portion of this sewing tutorial. 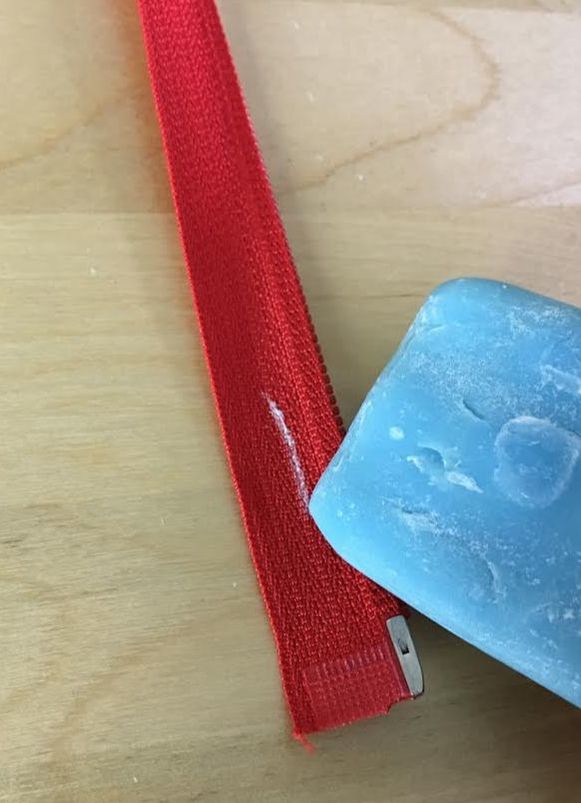 1. Use tailor's chalk (or a piece of dry soap) and add a simple vertical mark on the zipper tape on the wrong side of each portion of the zipper. Add each mark at at the bottom of the zipper pieces as shown below. 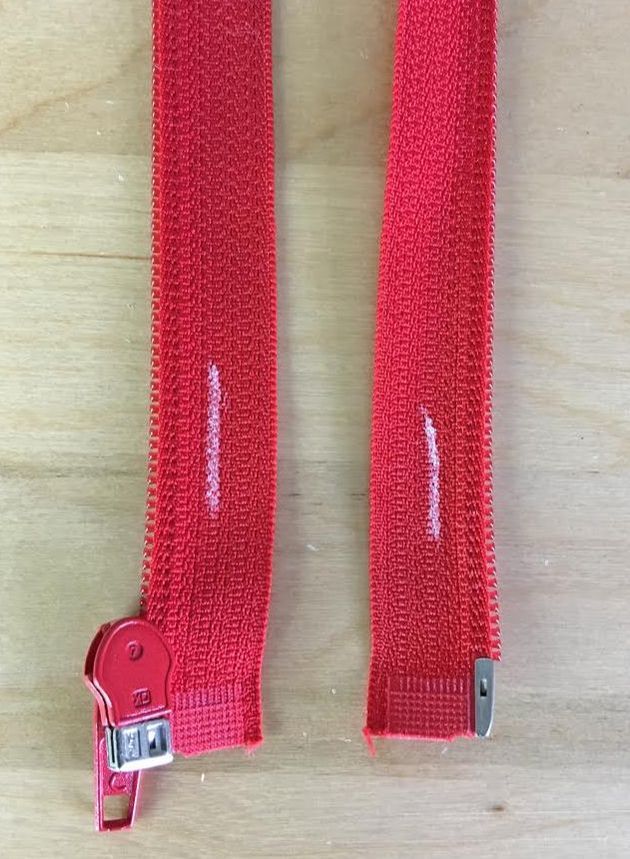 These marks will help you align the zipper to the garment correctly and save you time in the process. It is always good practice to mark at the bottom of each zipper tape on the wrong side as this will ensure that you don't accidentally sew one of the zipper portions upside down.  Now that your separating zipper is all prepped for alignment, place the edges of the garment next to each other such that the right side of the fabric is facing up. 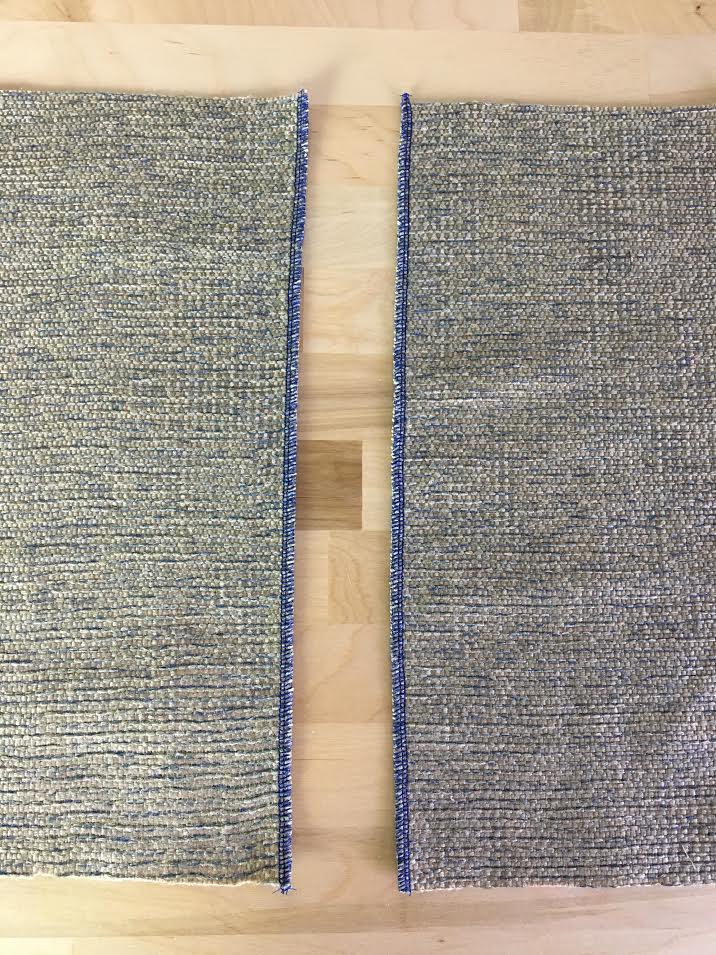 2. Before aligning the zipper, clean-finish the raw edges of the fabric first. Due to the fact that this method does not use a facing and will be turned and top-stitched (as you'll see below), you should clean-finish the edges first, before sewing the zipper. It is simply much easier to do this initially than having to navigate around the zipper tape and zipper slider afterwards. In this tutorial, a serging stitch was used as a clean finishing method. As an alternative, you can use a zig zag stitch on your home sewing machine or any other clean-finishing method you prefer. To learn more about various types of clean fabric raw edge finishing methods check out out this tutorial: How To Clean Finish Seam Raw Edges: 4 Ways. 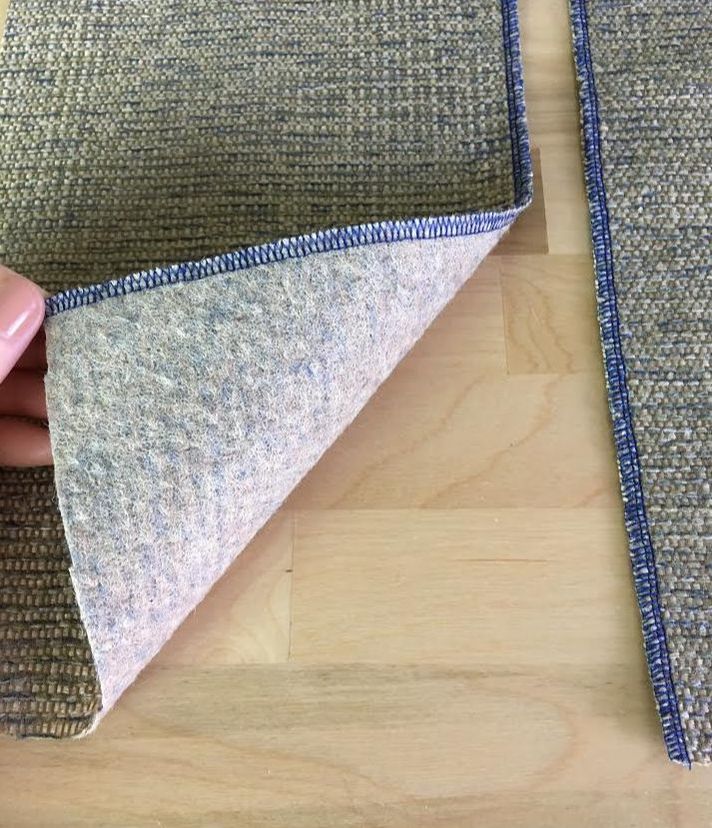 As mentioned above, you will be working on the right side of the garment so make sure the face of the fabric is pointing up, towards you. Also make sure that the separating zipper length corresponds to the length of the garment edges, allowing for enough distance at the top and the bottom of the garment for the raw edges to be finished properly. In this example, we've allowed for 1" of excess at both top and bottom of the fabric.
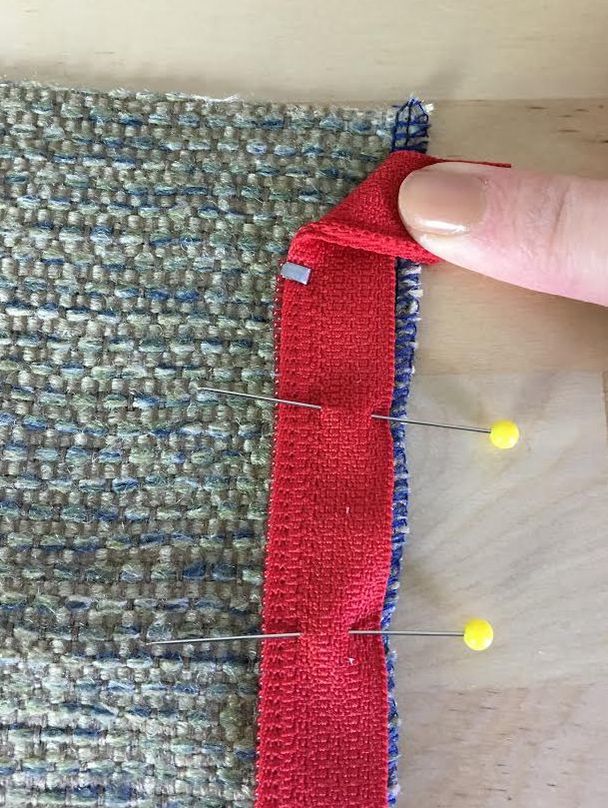
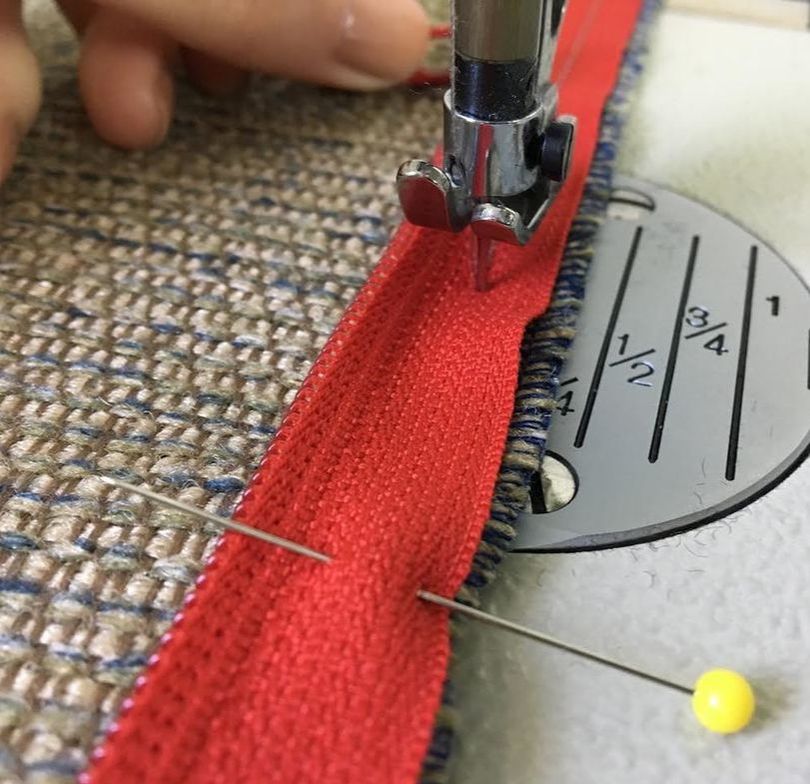
3. Measure from the bottom edge of the fabric up at 1" (or whatever your bottom hem allowance is) along the clean finished edge of the fabric, and mark with a horizontal line using tailor's chalk or a piece of dry soap as shown above. 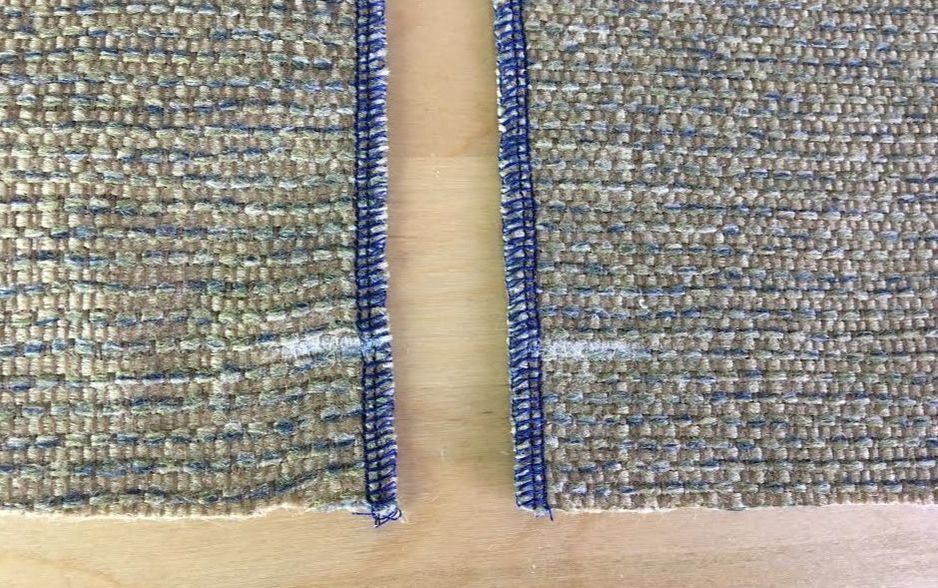 Repeat this step on the other edge of the fabric such that when both edges are placed next to each other, both horizontal lines align perfectly as shown. 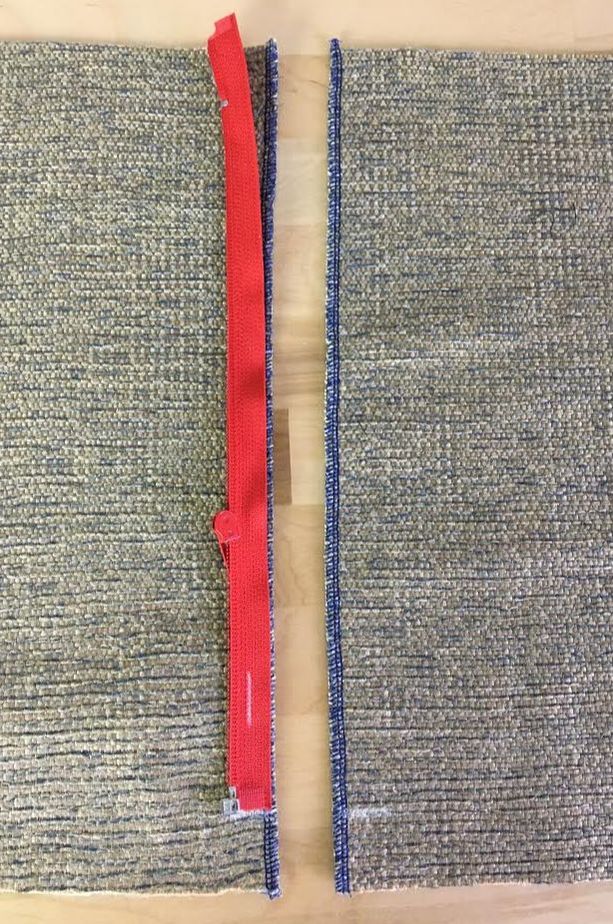 4. Place the zipper portion housing the slider along the edge of the fabric with the zipper's wrong side facing up. Both right side of the fabric and right side of the zipper should be touching as shown above. Align the bottom edge of the zipper to the horizontal mark on the fabric as shown above. 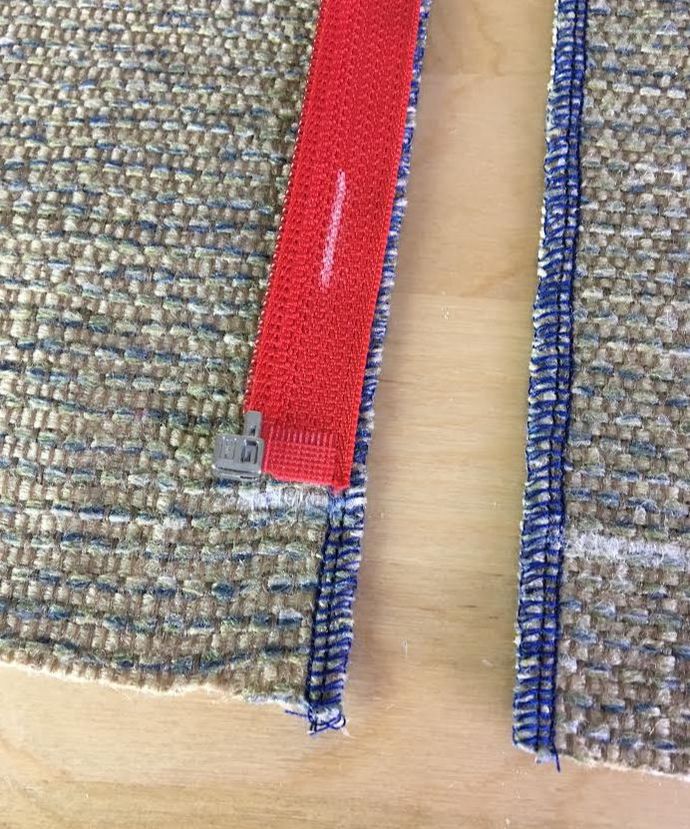 This zipper alignment should be easy to achieve since you marked the wrong side of the zipper with tailor's chalk in Step 1. In addition, placing the mark at the bottom portion of the zipper tape makes it easier to align by matching it to the bottom portion of the garment. 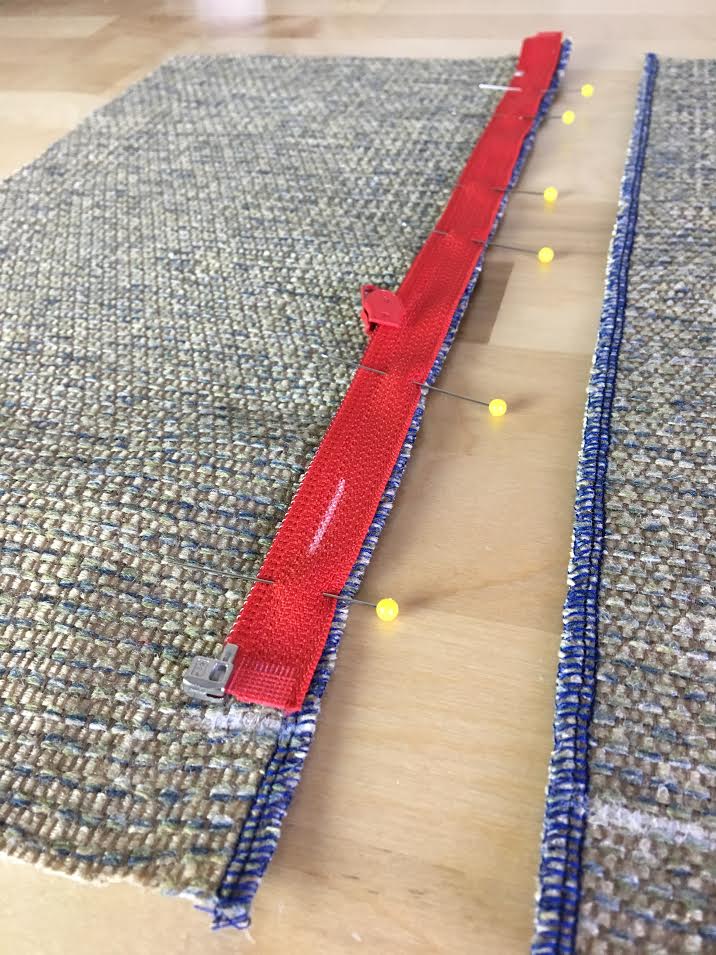 5. Insert pins horizontally (perpendicular to the edge) through the zipper tape and fabric edge as shown. Seam allowance is an important factor to mention here: The seam allowance of the fabric edges should correspond to the stitch that connects the zipper tape to this edge. Due to the fact that we'll be sewing down the middle of the zipper tape (at 1/4" away from the edge), the seam allowance of the fabric should also be 1/4". If lets say, the seam allowance of the garment edge sis 1/2" or larger, make sure you move the zipper over so that the stitch that connects the zipper tape and the garment's edge corresponds to this 1/2" seam line. 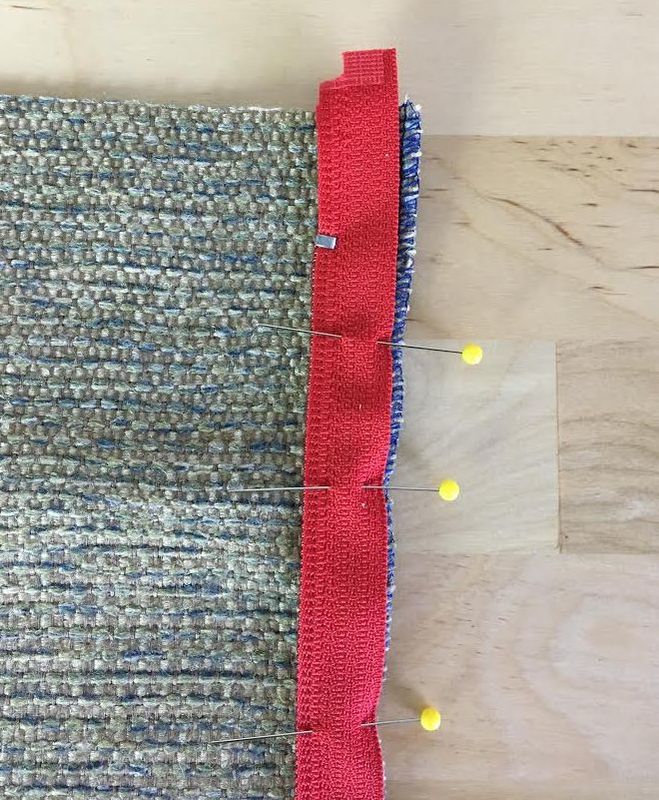 At the top portion of the zipper, you'll find some excess zipper tape above the top zipper stop as shown above. This zipper tape excess will have to be folded for a clean, professional finish.
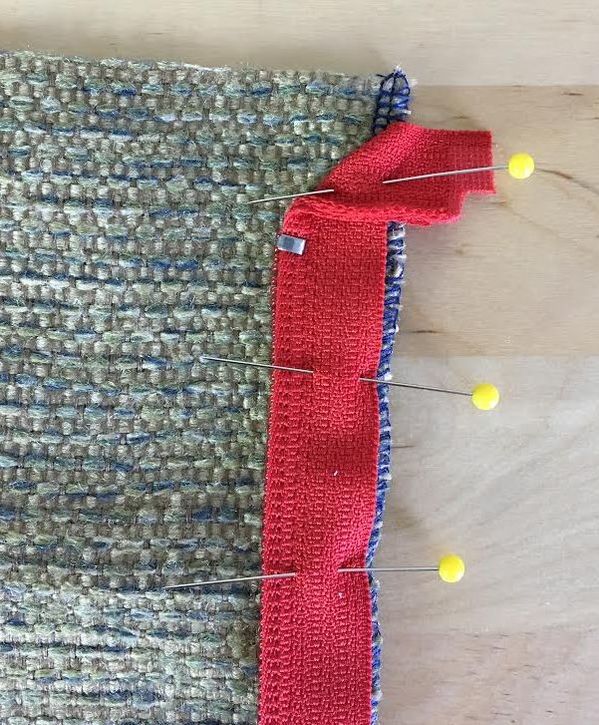
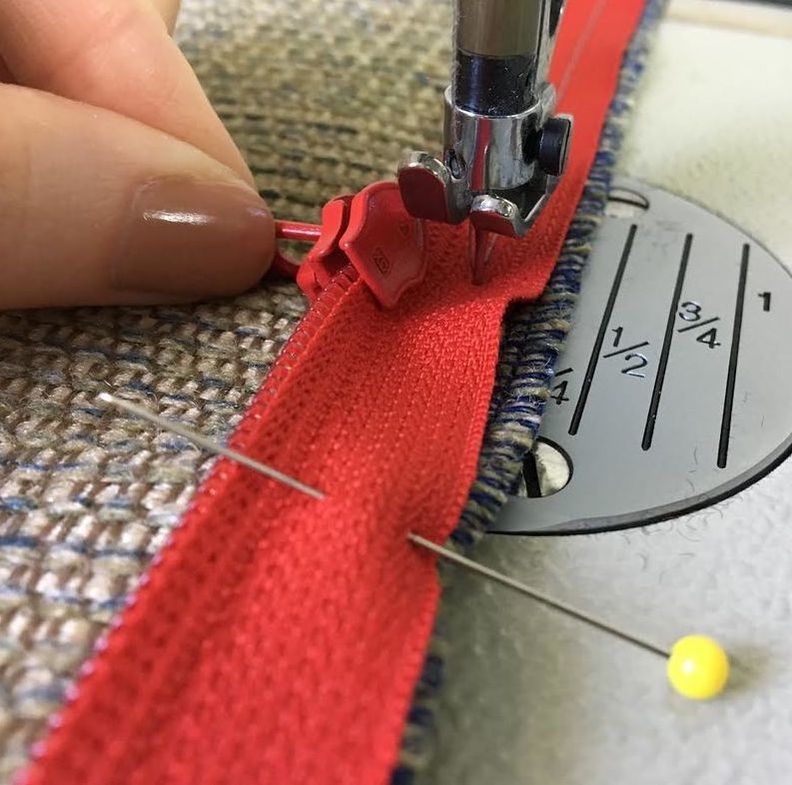
6. Fold the excess zipper tape towards the edge of the garment (as shown above) and insert a pin horizontally to hold this fold in place. You'll see that once the zipper application is complete, this fold will correspond to the underside of the garment. 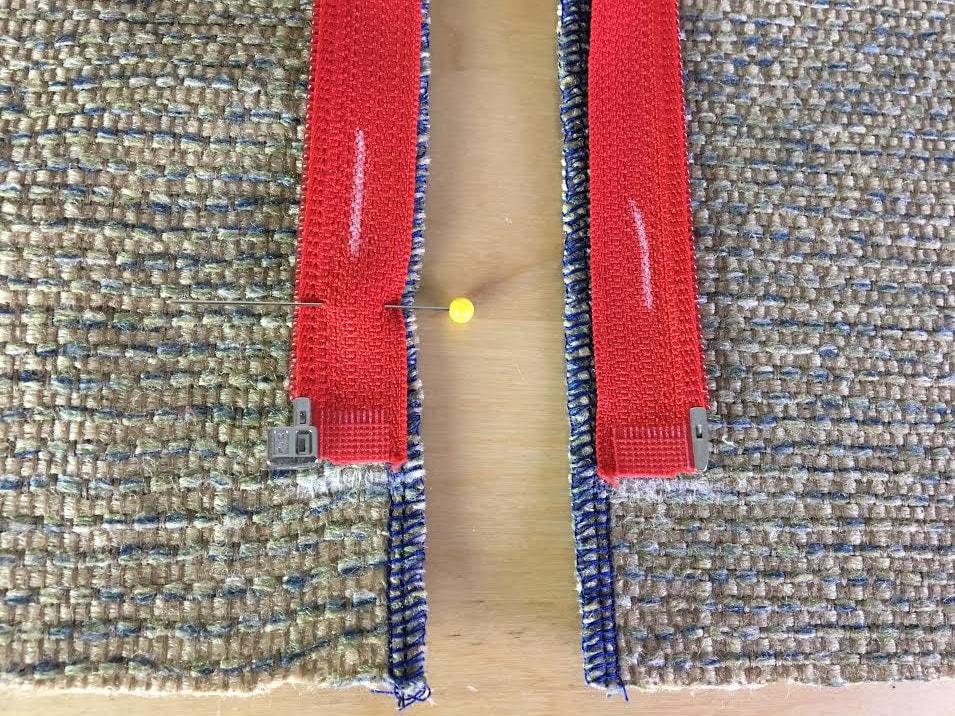 7. Align the other portion of the separating zipper to the second edge of the garment making sure the bottom edge of the zipper is aligned perfectly to the horizontal tailor's chalk mark (white) on the fabric. Just as you did for the other zipper piece, make sure the right side of the zipper is touching the face of the fabric such that the wrong side of the zipper is facing up, towards the outside. This should be pretty easy to do by following the chalk mark on the zipper tape as shown above.  8. Insert pins horizontally, perpendicular to the edge through the zipper tape and the fabric underneath. 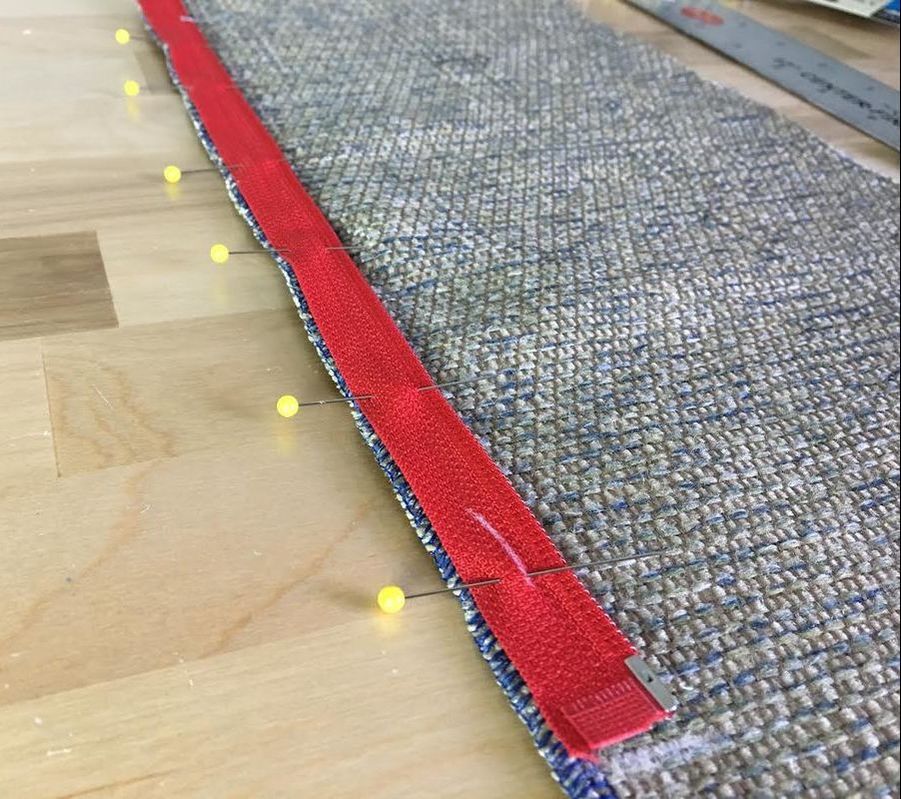 Again, don't forget to align the zipper according to the seam allowance on the garment. Since the fabric edge seam allowance in this tutorial is 1/4" and we will be sewing at 1/4" distance from the zipper tape edge, the edge of both fabric and zipper tape are aligned and correspond to each other as shown above. 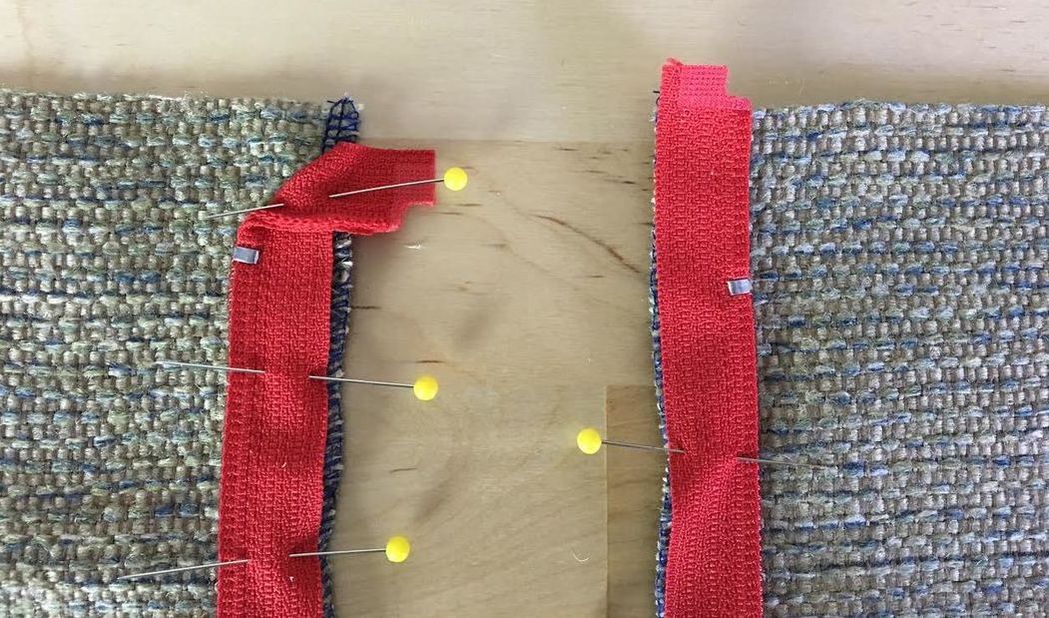 After the second portion of the zipper is pinned to the fabric edge, you'll have tape excess above the top stop of the zipper as you did for the other zipper piece. 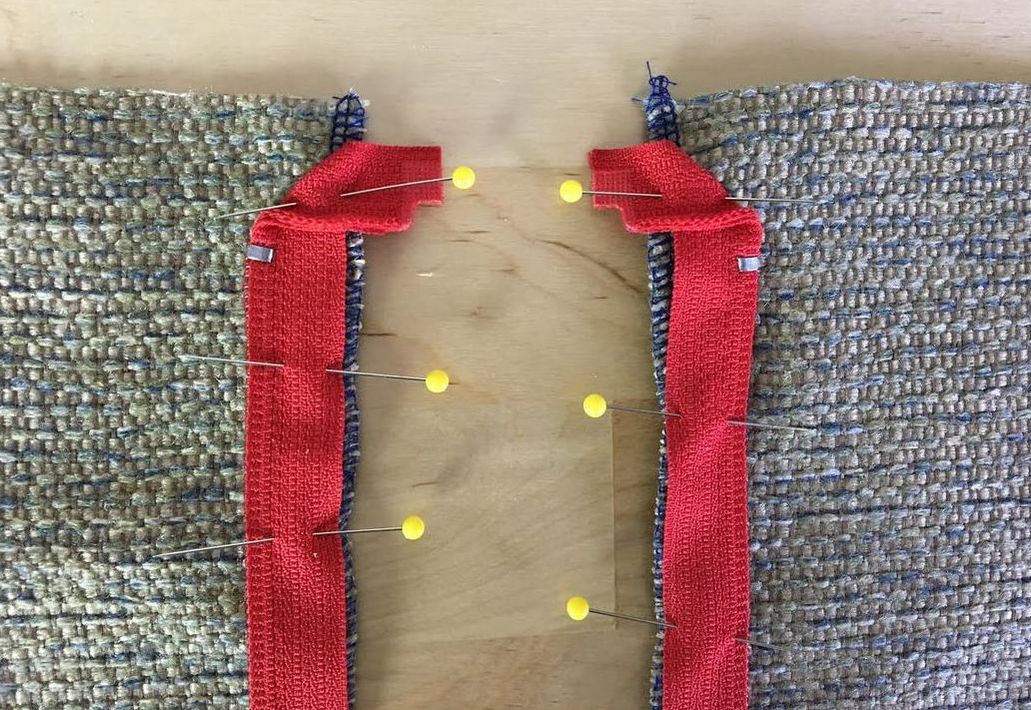 9. Just as you did previously, fold the zipper tape excess towards the edge of the fabric as shown above and pin horizontally in order to keep this fold in place. 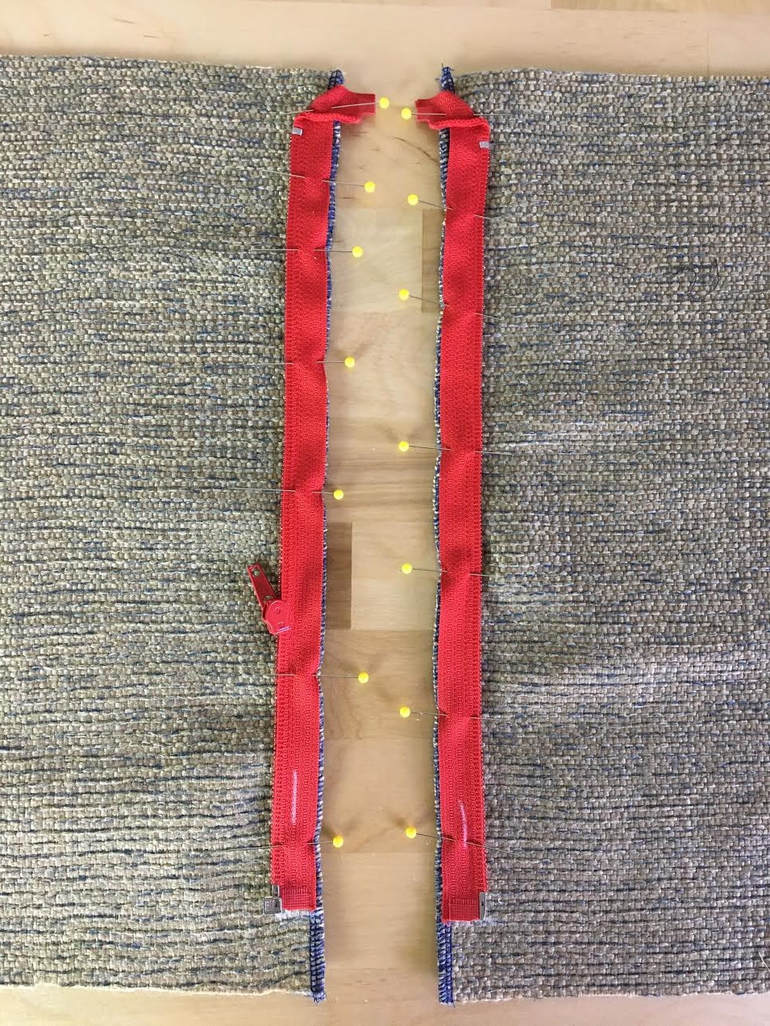 Now that both portions of the separating zipper are pinned to each corresponding edge of the garment, it is ready to be permanently stitched. Before stitching however, let's double check that the alignment and all the necessary initial elements are executed correctly: - The bottom edges of both zipper pieces are aligned to each of the horizontal tailor's chalk marks on the fabric such that they both correspond to one another perfectly when placed next to each other. - The wrong side of both zipper pieces are facing up, with the face of the fabric touching the face of each zipper piece. This is further supported by the fact that both zipper tape white lines marked with tailor's chalk in Step 1 are visible and both located at the bottom of the zipper. - Having both white marks (on the zipper tape) located at the bottom portion of the zipper pieces ensures that neither of the zipper pieces will be erroneously sewn upside down. - Looking at the top alignment: The excess zipper tape on each end of the zipper pieces is folded towards each corresponding edge of the fabric, ending at the same location along each fabric edges as shown. If all the above criteria is followed and receives a check-mark, you can now permanently stitch the zipper with peace of mind! Note for sewing beginners: If you don't yet feel comfortable sewing zipper edges that are reinforced with pins, it may be easier to hand baste the zipper tape to the fabric before machine stitching. To learn more about hand basting zippers check out this tutorial: Easiest Way To Sew An Invisible Zipper Using A Regular Zipper Foot. Not sure what basting is? Check out this blog post for the full breakdown: What Is Basting? How And When To Use It. 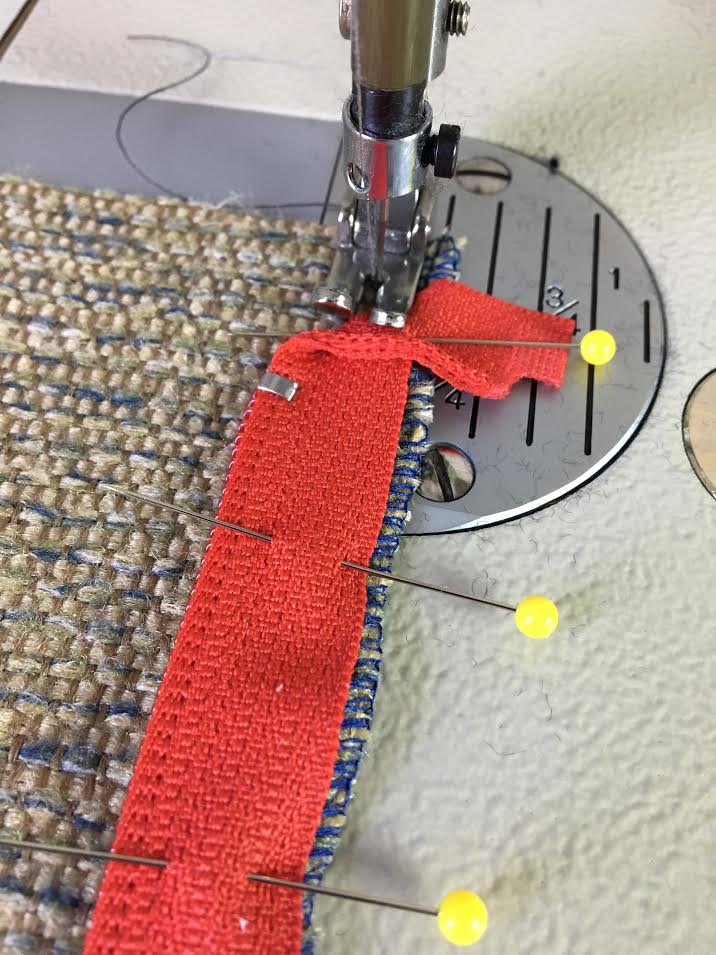 10. Starting at the top edge, stitch at halfway along the zipper tape. Remove each pin as you approach it- DO NOT STITCH THROUGH THE PINS! You may need to keep the zipper tape fold in place with your fingers during the initial stitching process. 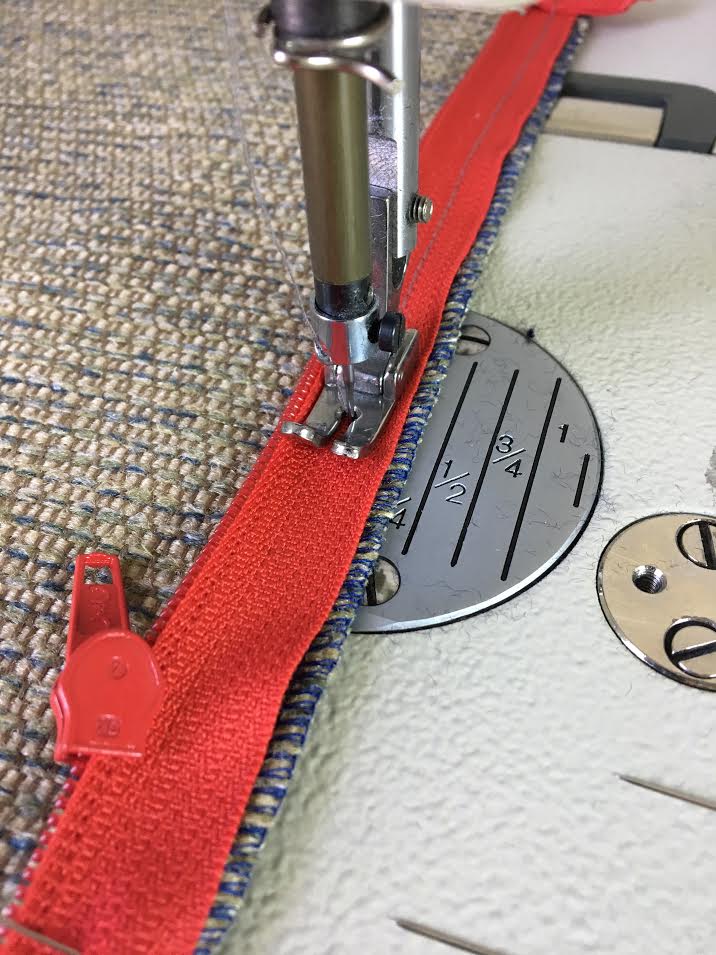 Continue stitching at the correct seam allowance until you arrive at the area where the zipper slider is located. Before continuing, you will have to move it out of the way so that it doesn't clash with the presser foot on your sewing machine. 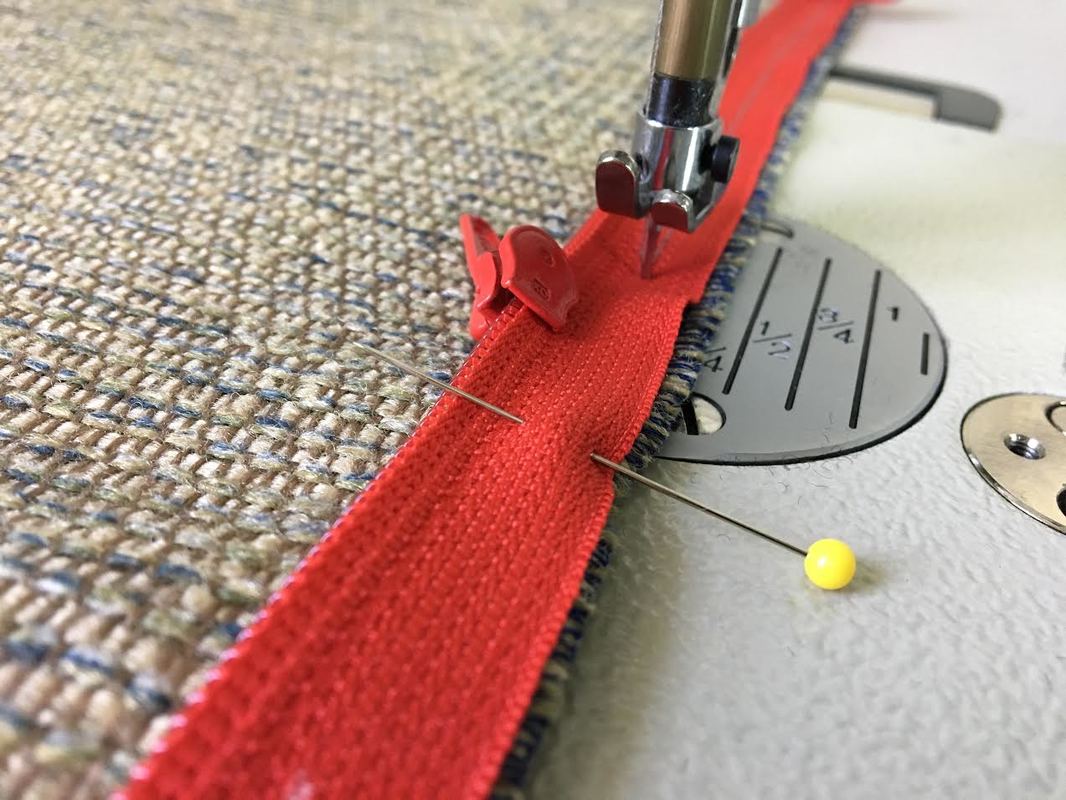 To move the slider up: Insert the machine needle through both zipper tape and fabric and leaving the needle inserted, lift the presser foot as shown above.
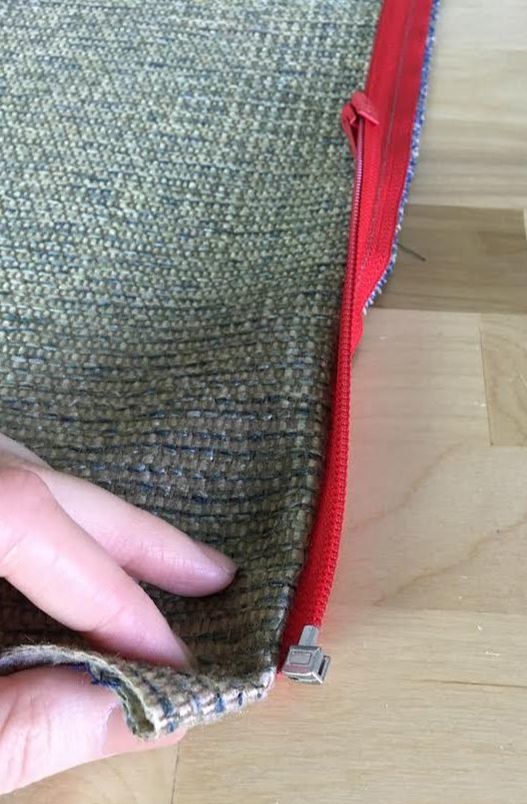
Keeping the presser foot lifted in its upward positions, simply move the slider up past the needle towards the area that has already been stitched. 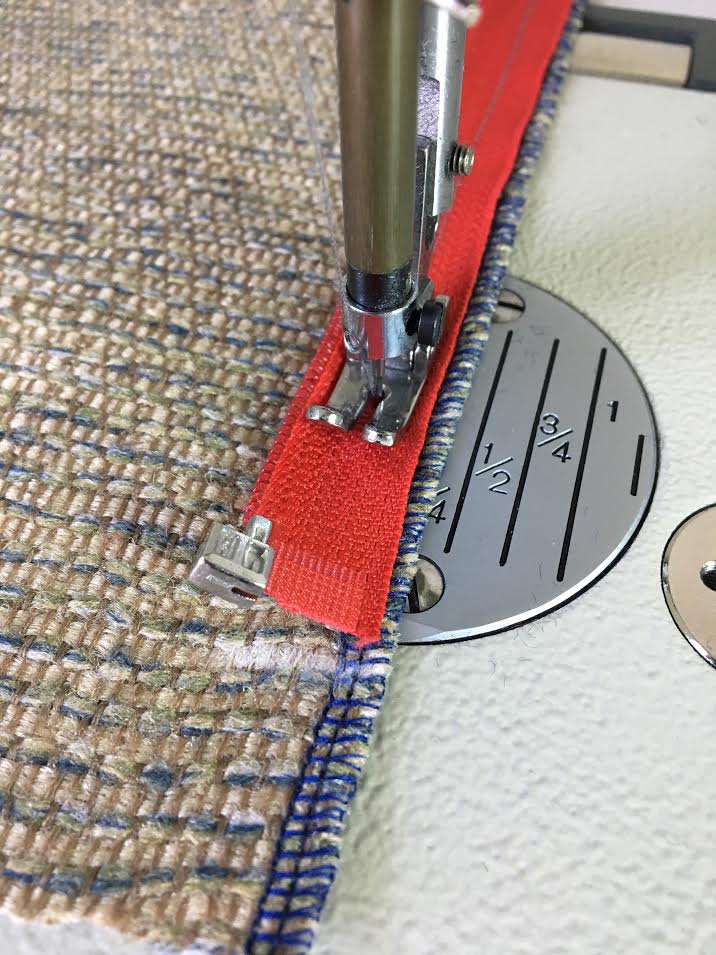 Drop the presser foot and continue stitching at the designated seam allowance, maintaining a straight smooth stitch throughout. 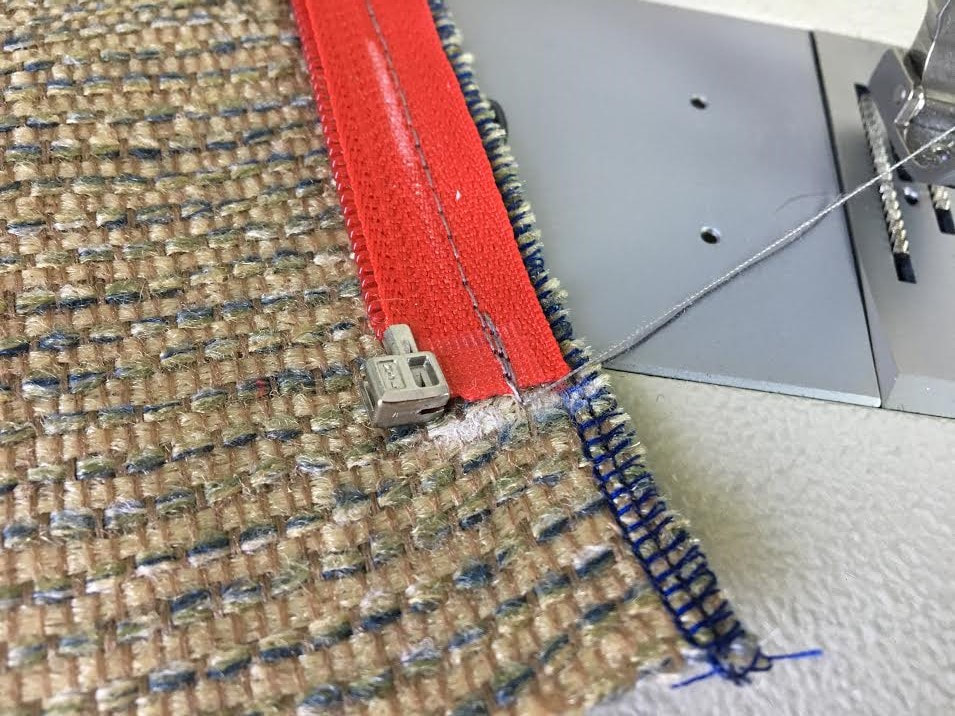 Be careful as you get to the bottom portion of the zipper as the zipper box can sometimes get in the way of the needle. Try to keep the tape as stable as possible as you sew through this end of the zipper tape. Backstitch at the end of the stitch as shown above thus reinforcing it for a durable finish. 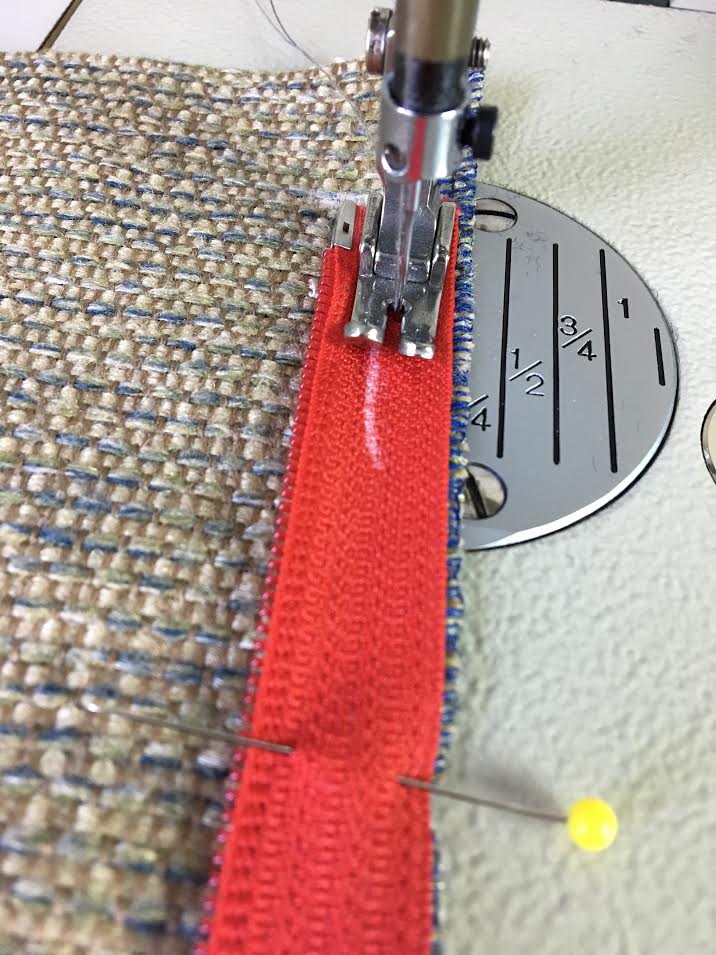 11. On the other piece of the fabric, start from the bottom and stitch through the zipper tape and fabric layer at hallway along the zipper tape as shown. The reason you are starting from the bottom and sewing up is that the edges of the fabric and zipper tape have to correspond to the seam allowance guide on the sewing machine. A rule of thumb about machine seam stitching is that the edges of the fabric should always be positioned to the right side of the machine needle, aligning to one of the seam allowance guides. 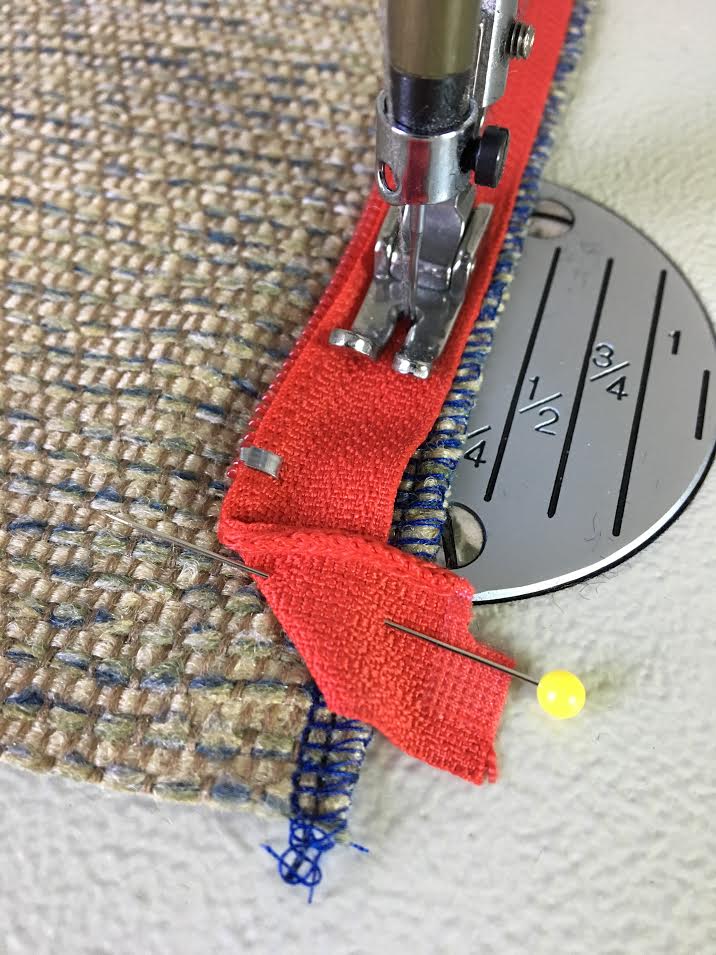 Continue stitching until you reach the top of the zipper tape. Remove each pin as you approach it and remember to never sew directly through the pins! Since this second piece of the separating zipper doesn't have a slider, you don't have to worry about lifting the presser foot and moving it out of the way. 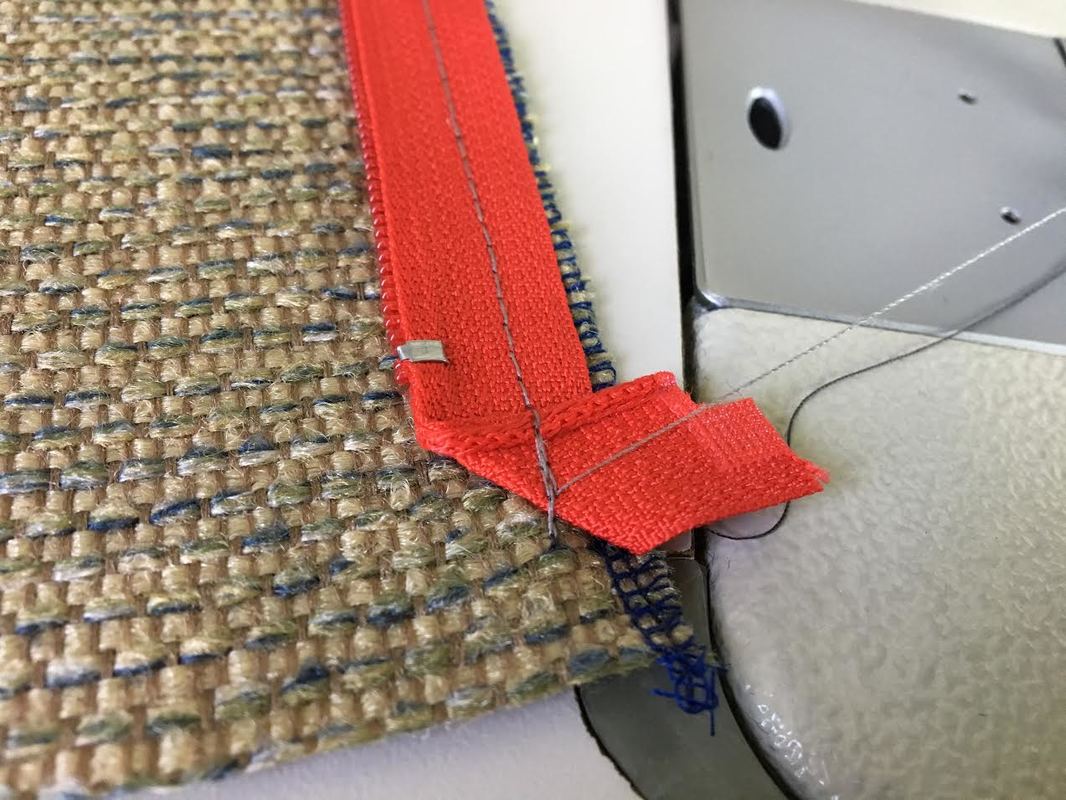 When you get to the top, remove the pin and stitch through the zipper tape fold as shown above. You may need to hold this fold in place with your hand during the stitching process to prevent it from moving. Backstitch to at the end of the stitch to reinforce. 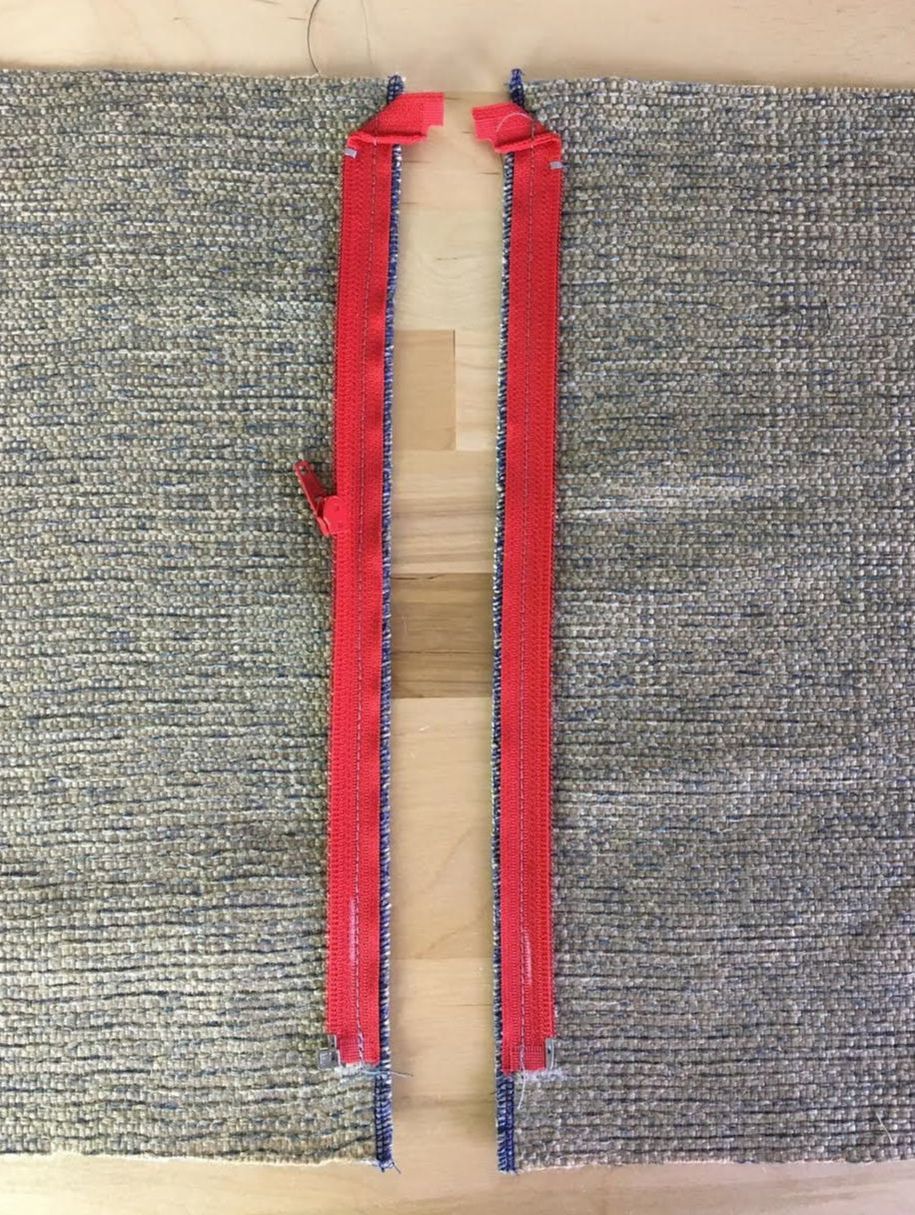 The separating zipper is now permanently connected to the adjoining edges of the garment- Just a few more finishing touches and the separating zipper is complete! 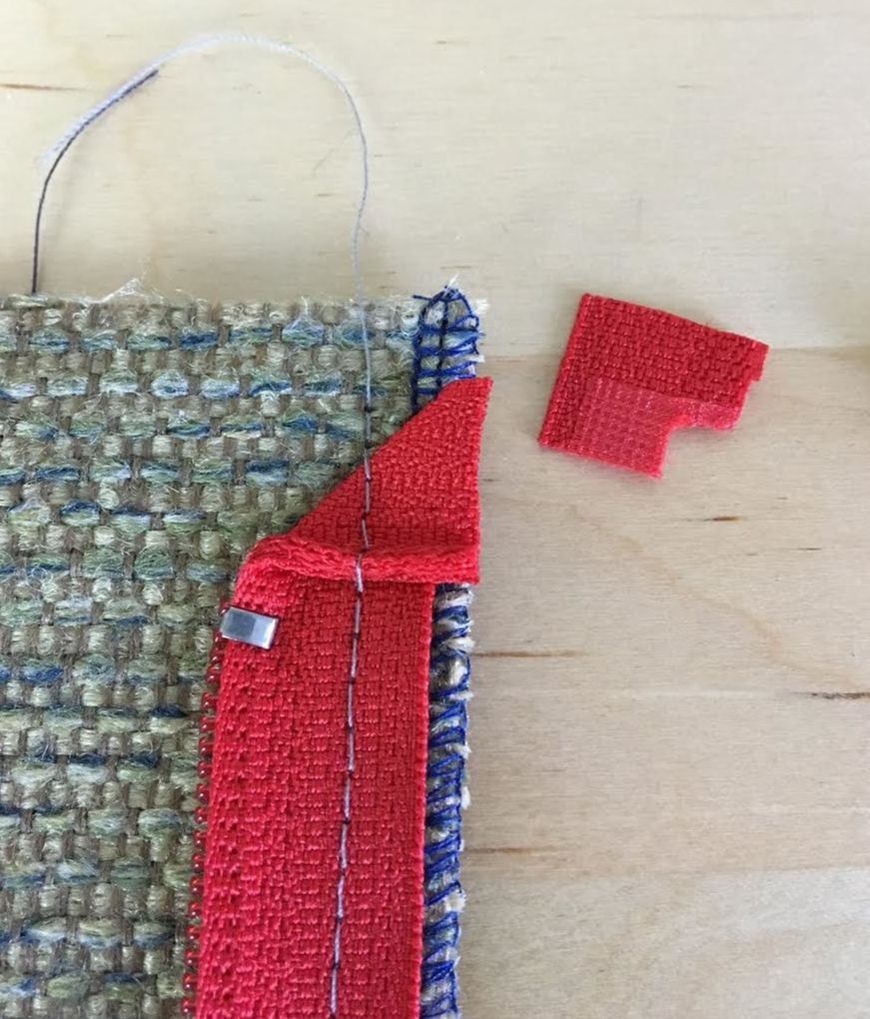 12. At the top of the zipper pieces, cut the excess zipper tape that extends past the edge of the fabric as shown above. Use the actual edge of the fabric as a guide. 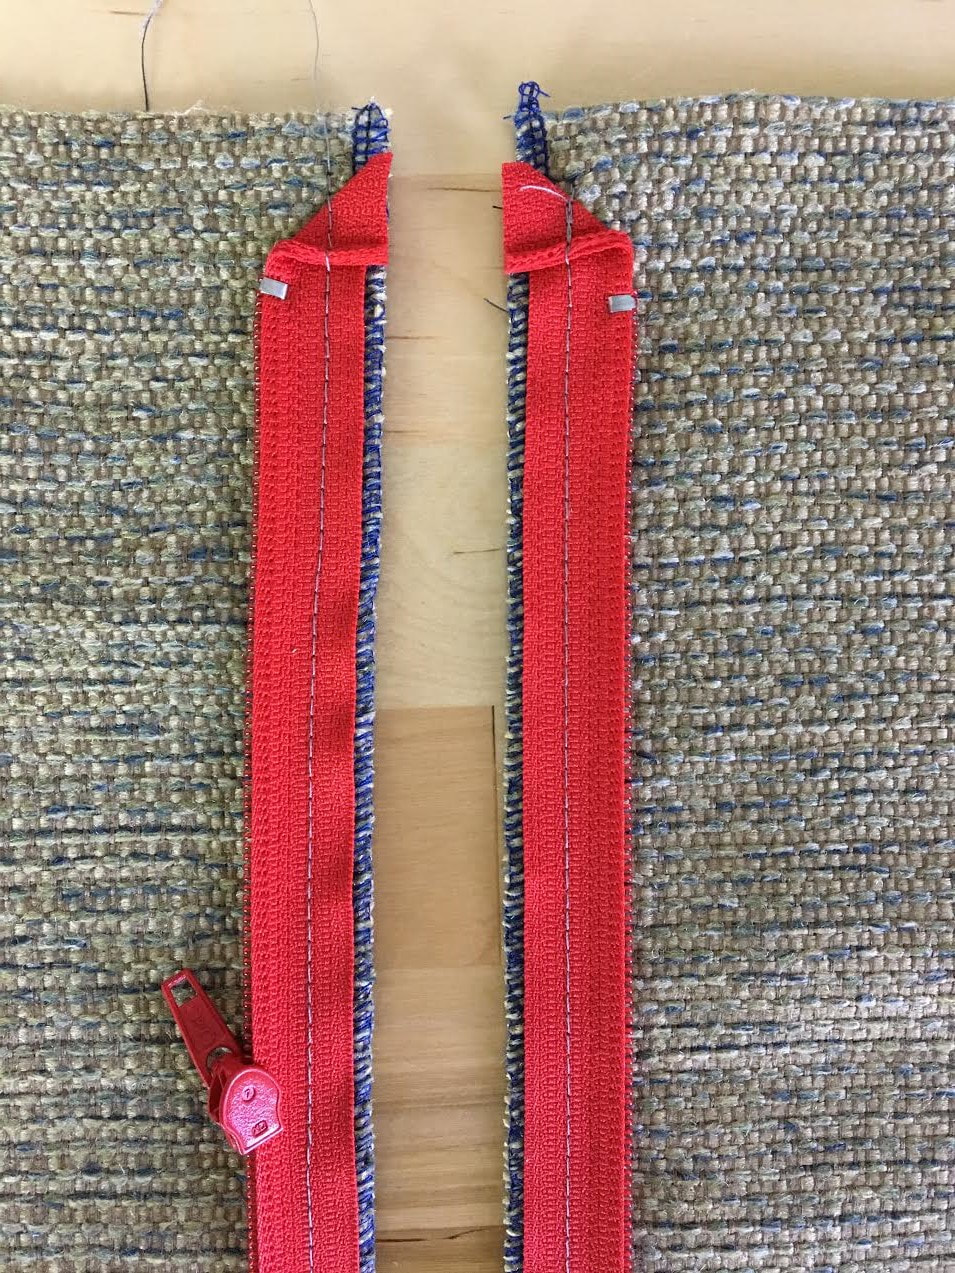 Repeat this step on the other portion of the zipper. Trimming the excess tape will remove unnecessary excess and minimize bulk.
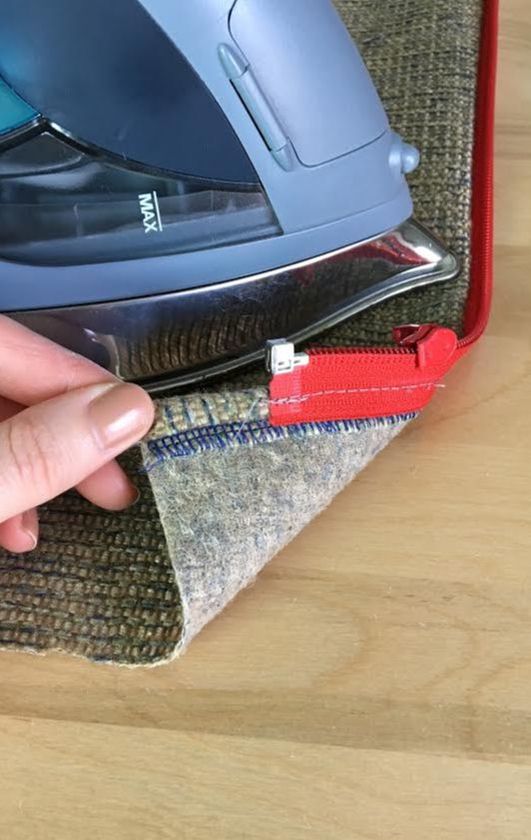
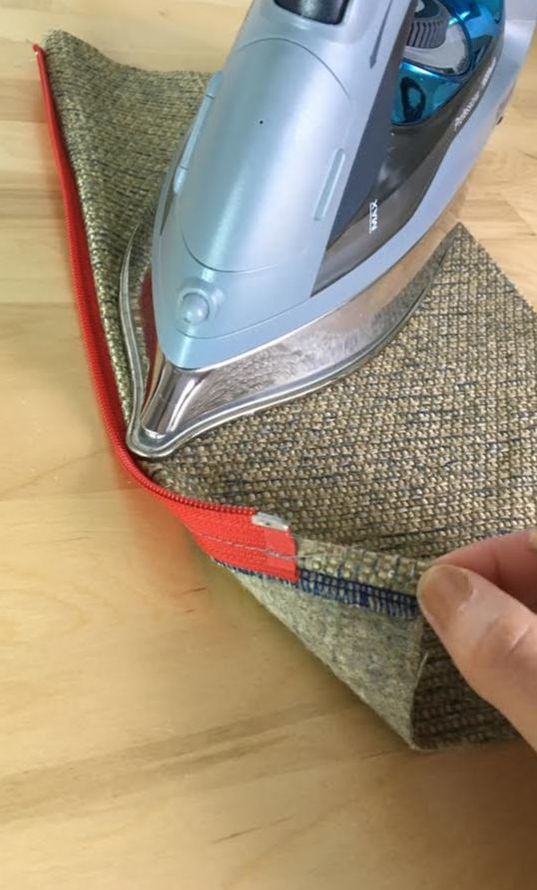
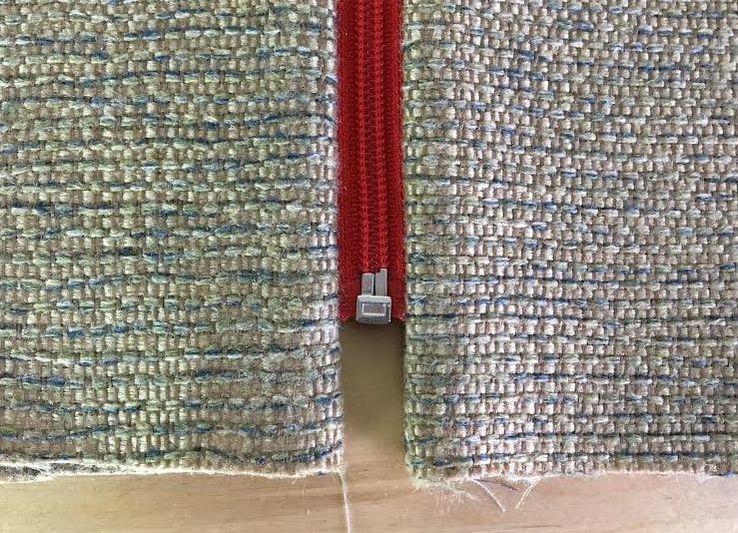
13. Next, fold the zipper tape towards the wrong side of the fabric (inside of the garment) as shown above. Being very careful not to touch the plastic zipper teeth, iron on top of the fold right next to the zipper teeth. This will stabilize the fold and make it much easier to topstitch. It is very important that if you are working with plastic zipper teeth, the hot plate of the iron doesn't touch the plastic coils or you risk melting them. In the case of metal zipper teeth, it is OK to touch the coils. However, you should still try to iron just on the fold and not directly on top of the zipper teeth.
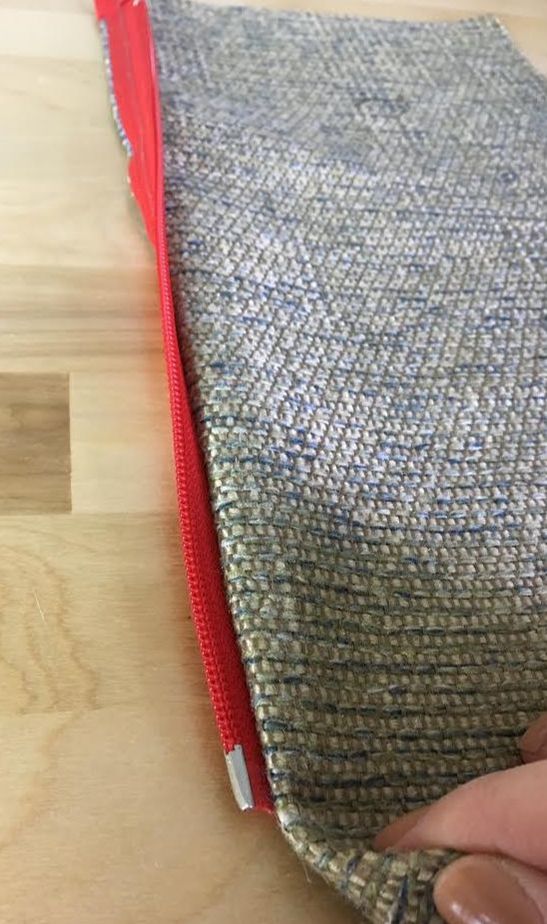
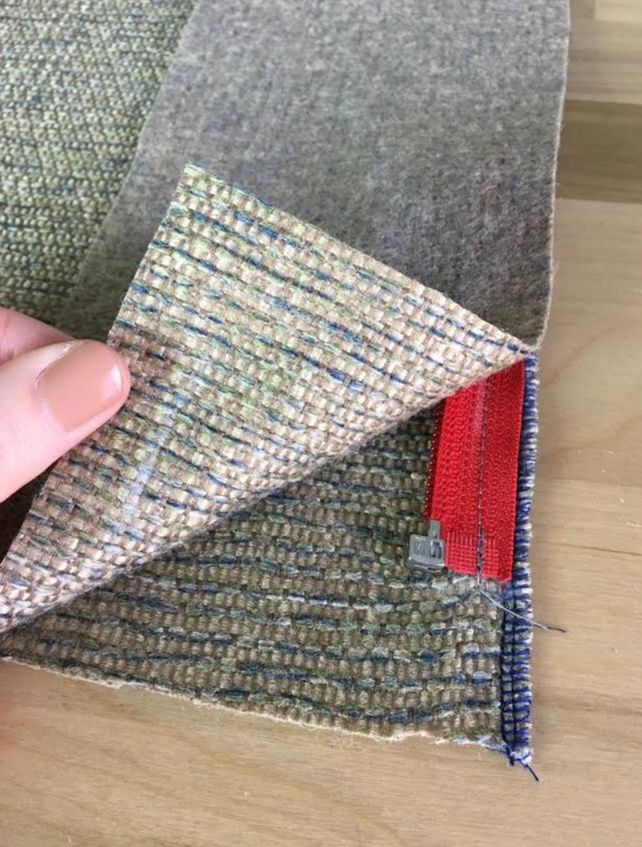
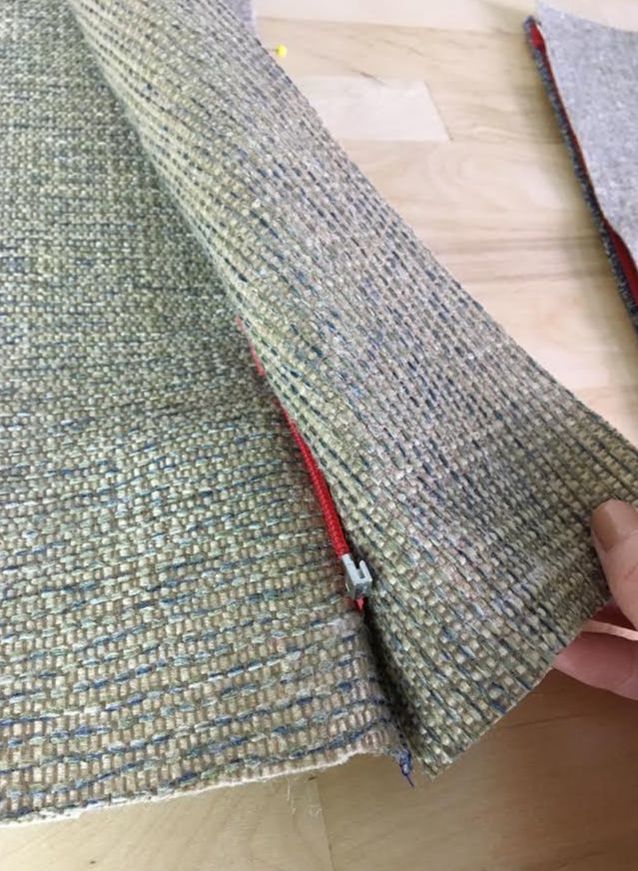
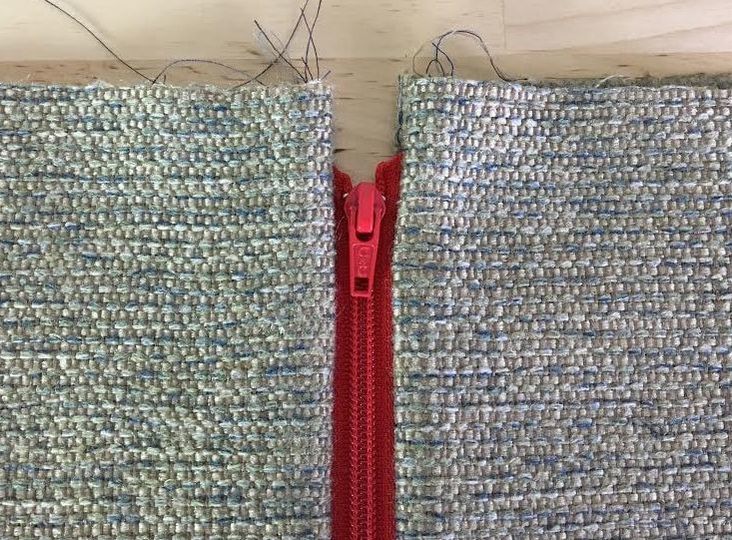
Repeat the same folding and ironing step on the other portion of the garment as shown above. 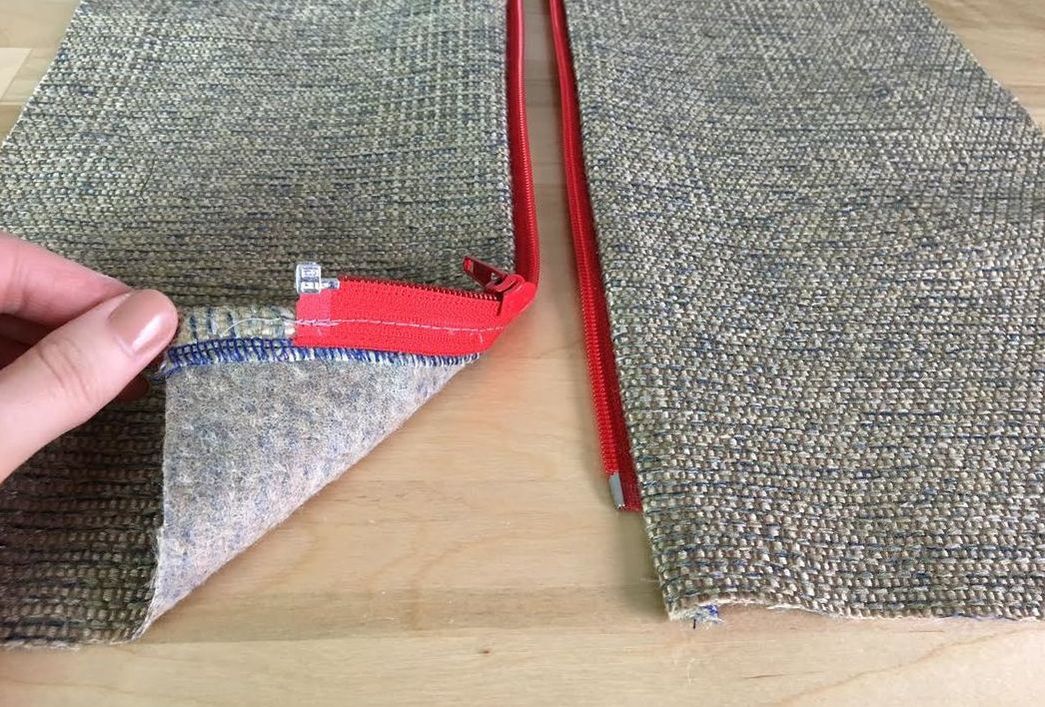 Although you could technically leave the separating zipper here and not add the top-stitching, it is recommended that you reinforce the seam allowance and zipper tape with a top-stitch for a more durable, functional and professional finish. If the topstitching isn't added, you'll find that the seam allowance will flip towards the zipper teeth, especially after washing. This will require the fold to be re-ironed after every wash cycle which can become somewhat of a grueling task. 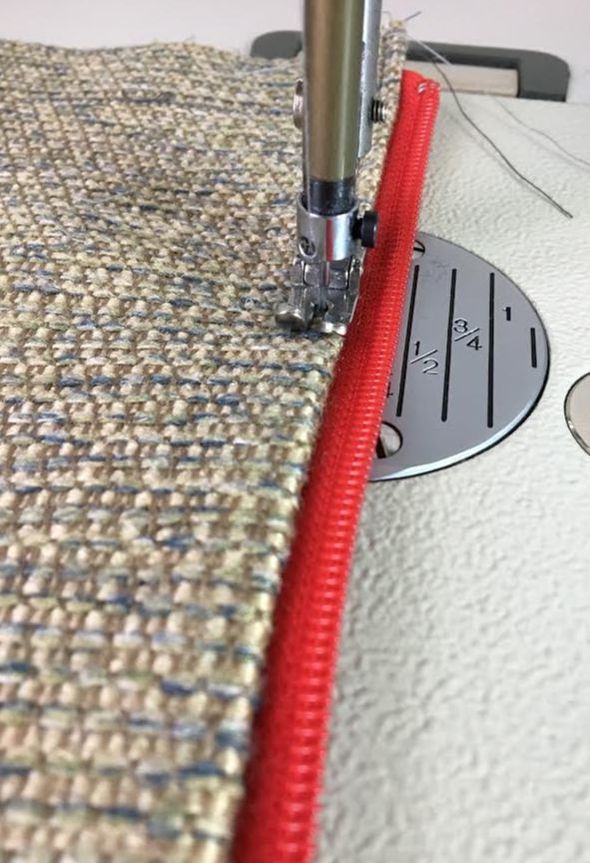 14. Machine stitch on the face of the garment at about 1/8" away from the seam line as shown above. You should be stitching through the seam allowance and zipper tape underneath. 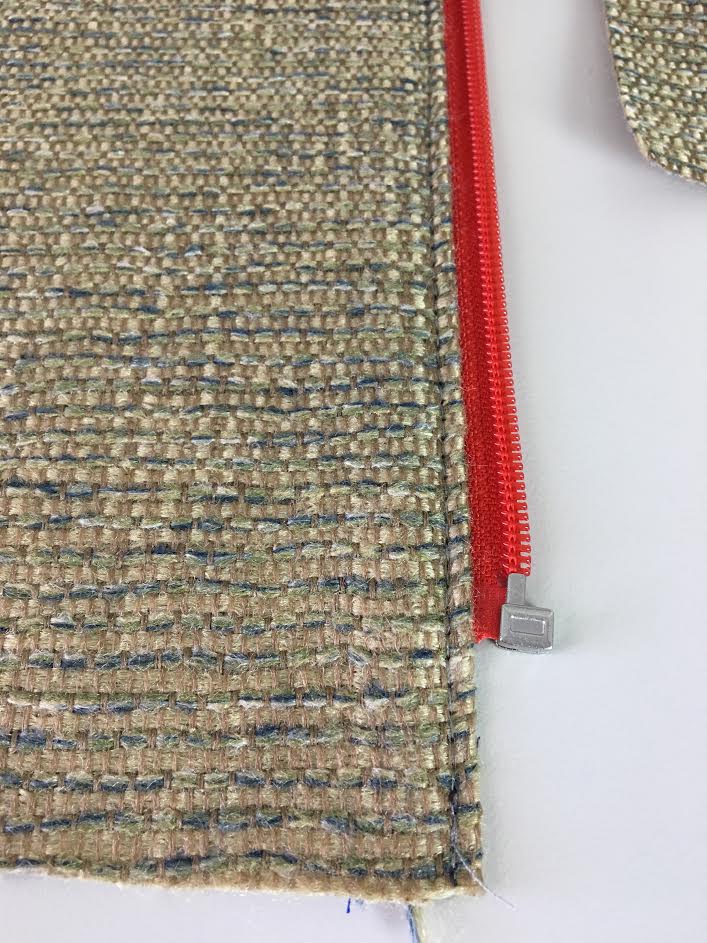 Keep your topstitch as even as possible following the same distance from the seam line throughout. 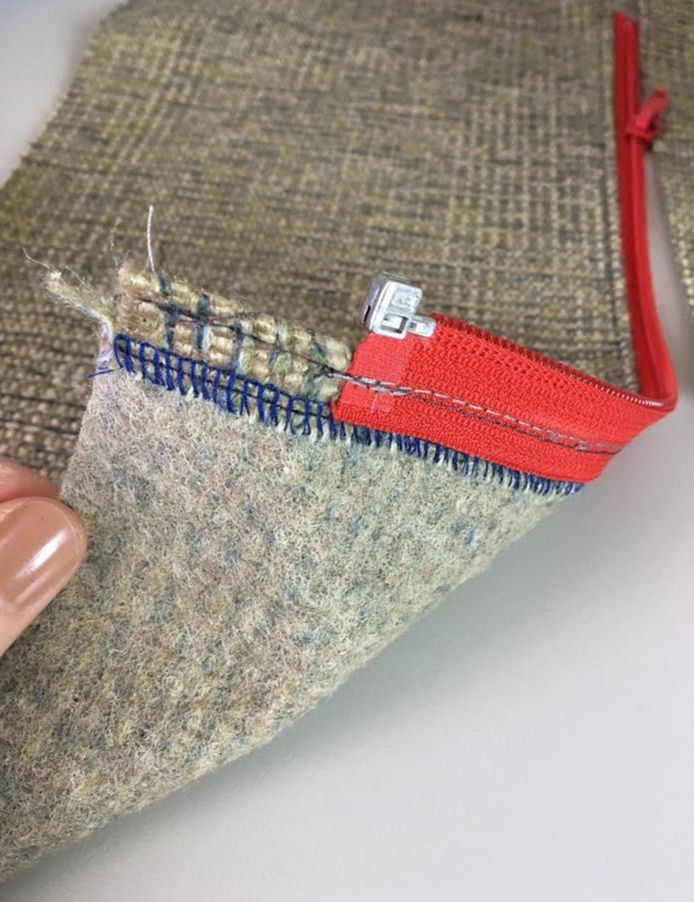 The topstitch will maintain the seam allowance permanently pointing towards the inside of the garment which will prevent it from getting in the way of the zipper teeth during use. This topstitch will also eliminate the need for re-ironing. 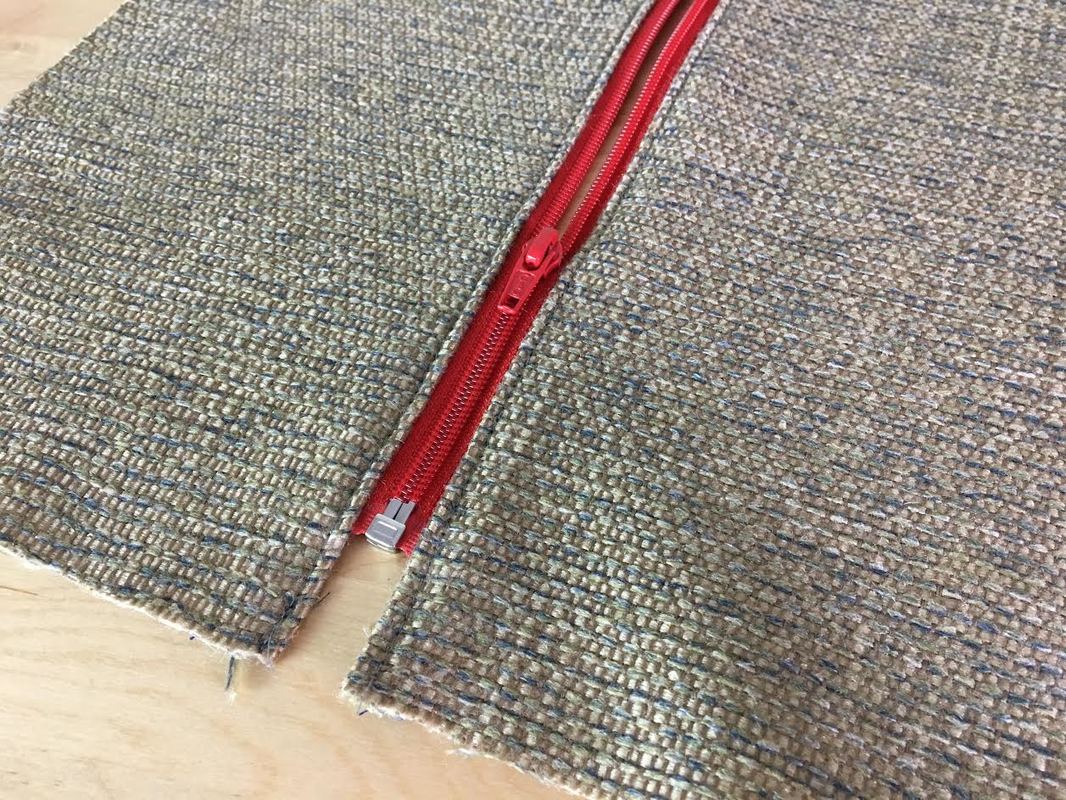 The top-stitched separating zipper is now complete! Once closed, all the edges should align perfectly, and the zipper tape should be evenly aligned in relation to each fabric edge. As a finishing touch, you can iron on top of the stitching for a professional finish- be careful not to iron directly on top of the plastic coils. How To Sew A Separating Zipper With A Facing Sewing a separating zipper into a faced edge is a very common application in coats, jackets, blazers and bottoms. It is actually quite easy to do resulting in a clean, tailored application.
1. Once the separating zipper pieces have been sewn to each corresponding edge of the garment as described in the steps above, align the edge of the facing to the edge of the garment such that both right sides of the fabric are touching and the separating zipper is sandwiched in between as shown. 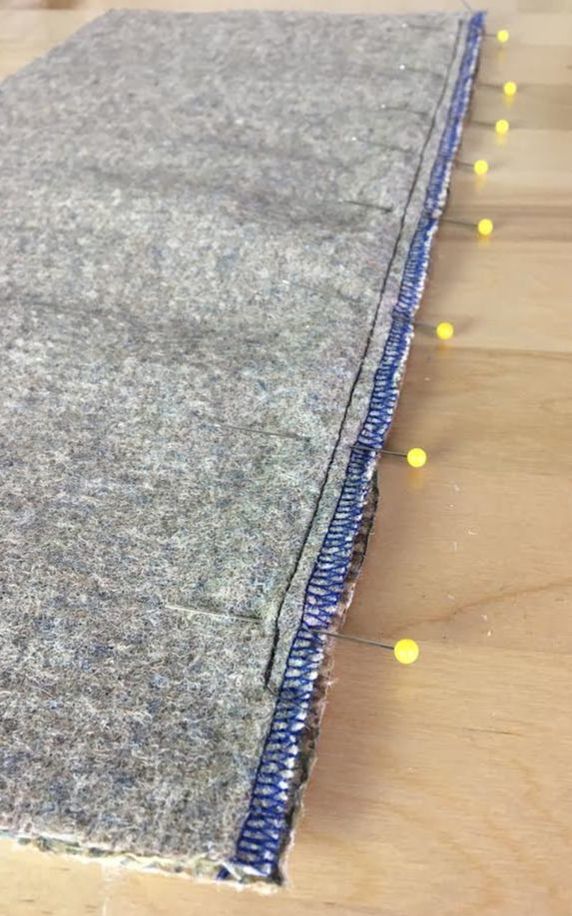 2. Turn both fabric layers over such that the existing stitch from the zipper application is visible and facing up. Insert pins horizontally through both layers of fabric and the zipper tape in between. Make sure the edges are aligned accurately throughout. 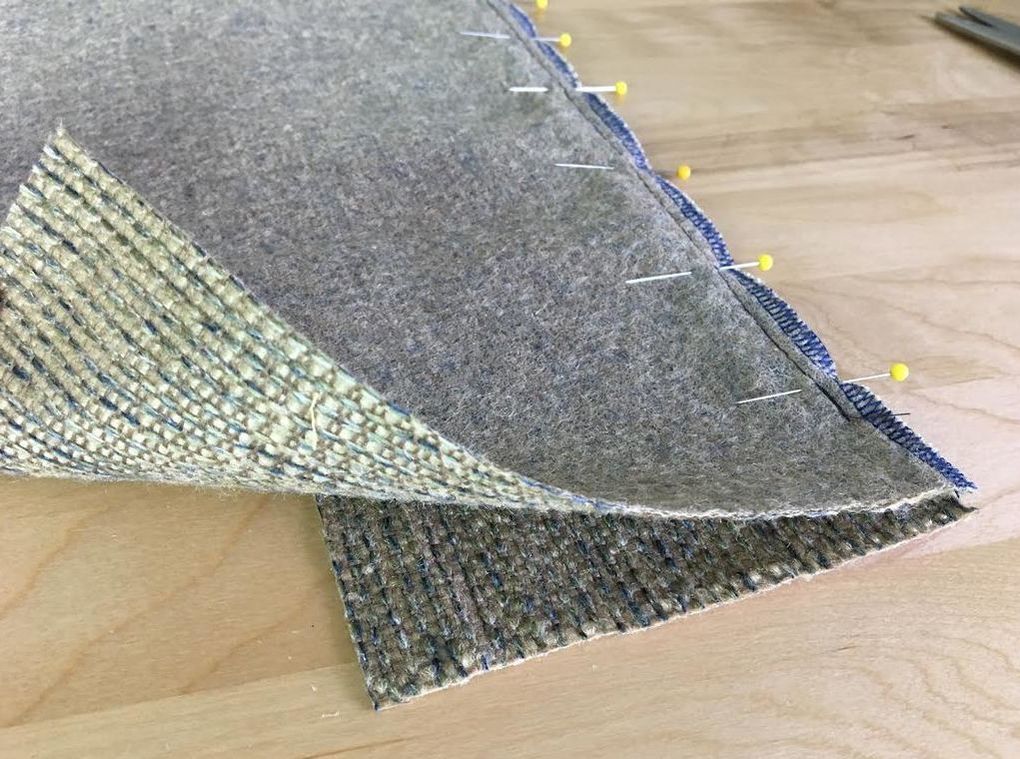 The facing should be positioned underneath as shown above. The reason this existing stitch should be facing upwards is that it will be used as a guide in the stitching process to follow. 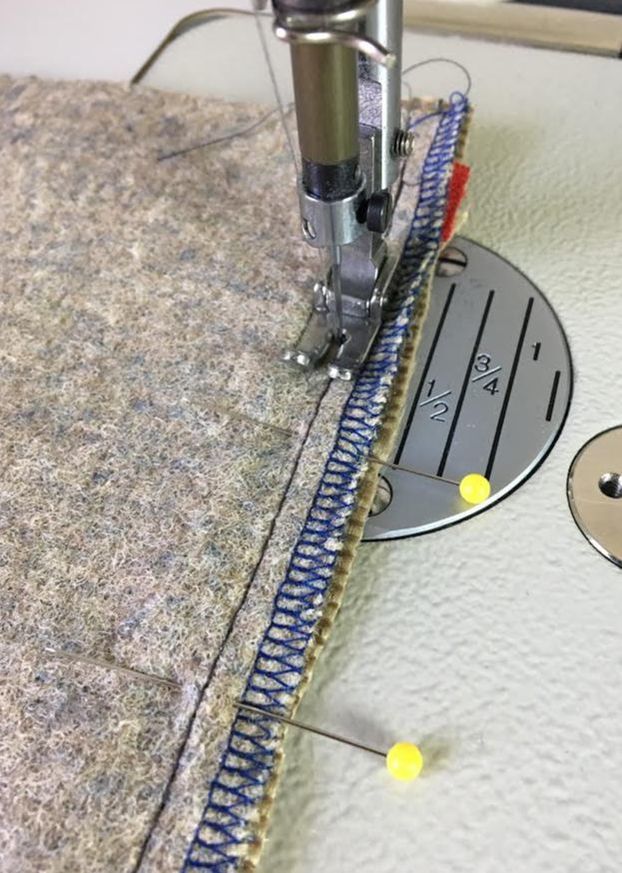 3. Machine stitch to the left of the existing zipper stitch, staying very close to it. This will ensure that no stitches are visible on the zipper tape once the garment is complete. The existing zipper stitch also serves as an easy to follow guide for the facing stitch application, minimizing error and allowing you to follow the correct seam allowance without looking at the machine seam allowance guide. 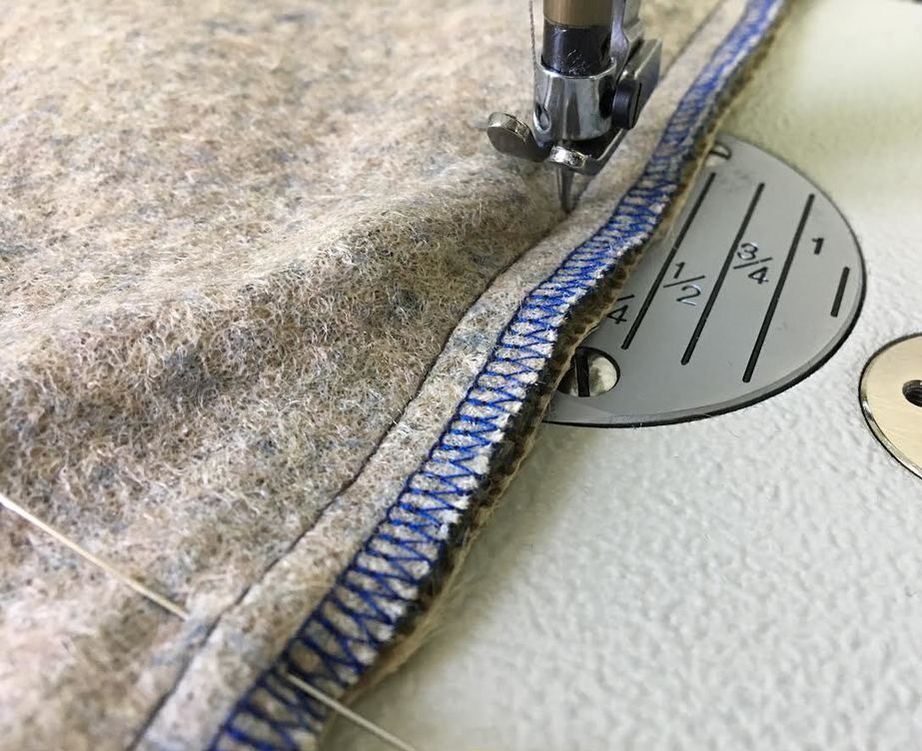 4. Right before you reach the location of the zipper slider, you will have to move it out of the way so that it doesn't get in the way of stitching. To do this, follow the steps described above by keeping the needle inserted through all layers of the fabric and lifting the presser foot. 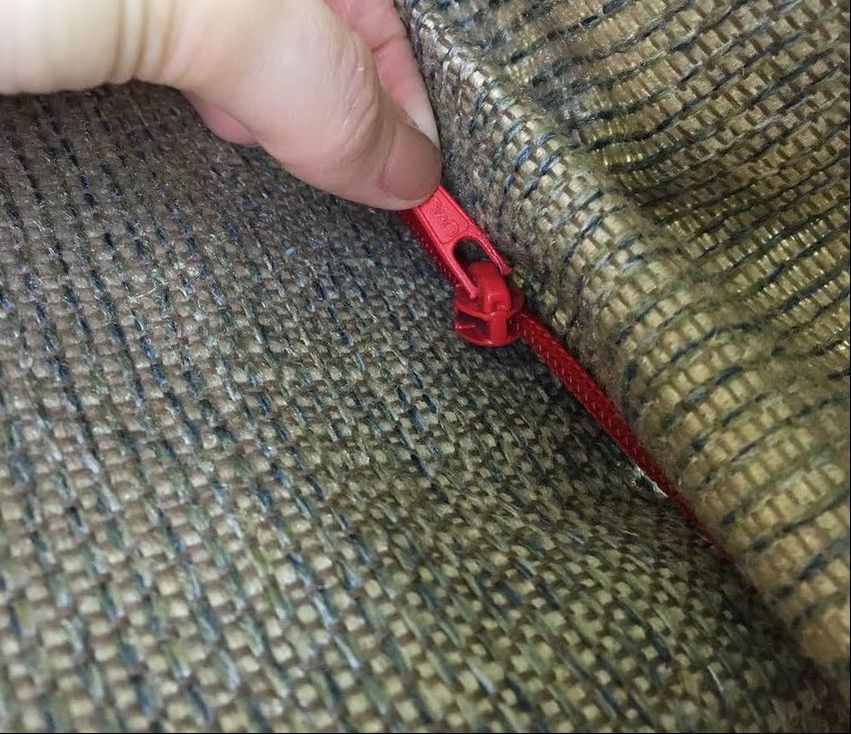 Next, go in between the facing and self layer and move the slider up past the inserted needle towards the area that has already been stitched. 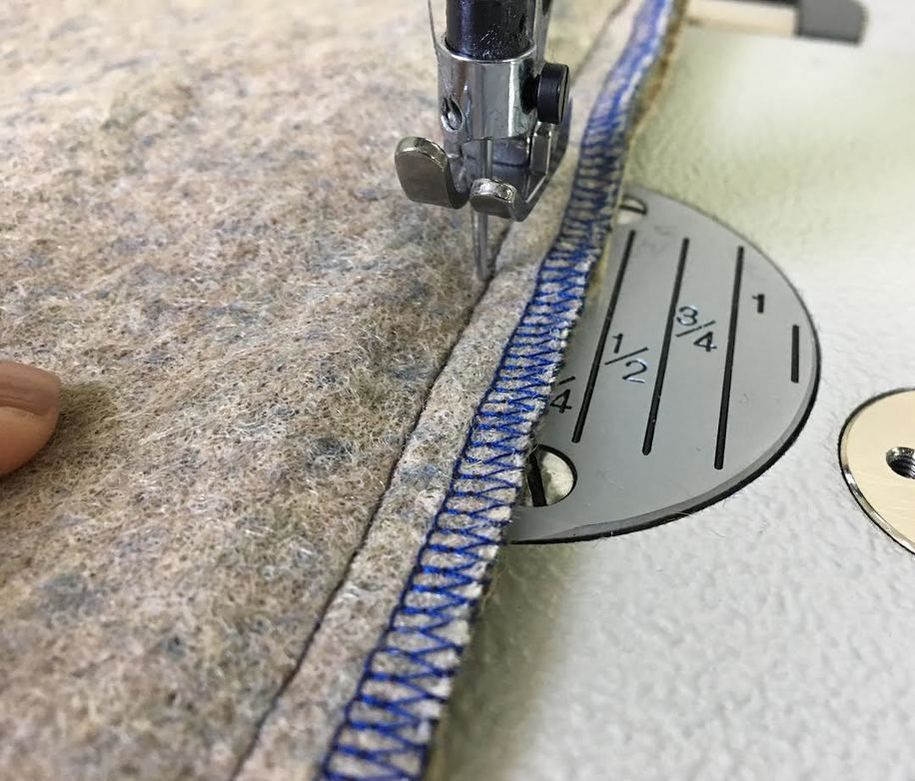 Now that the slider is out of the way, drop the presser foot and continue stitching until the facing is permanently connected. 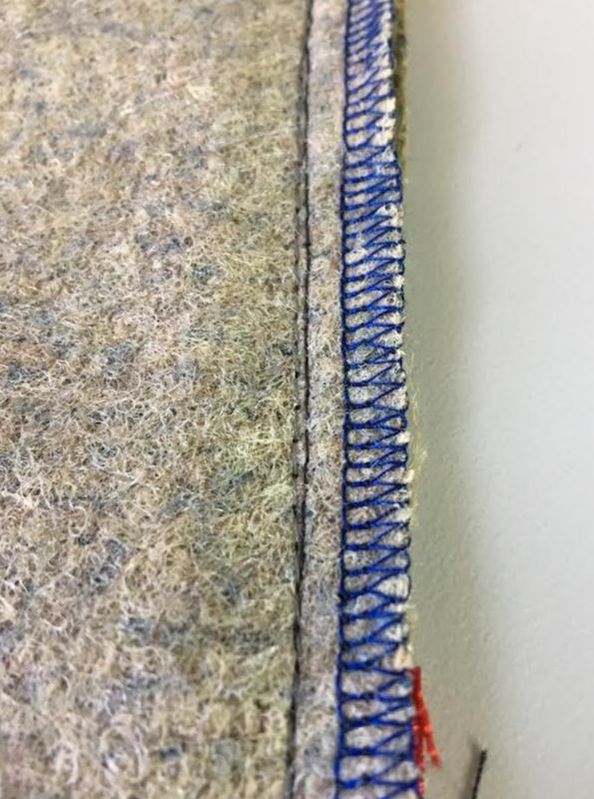 The image above shows a closeup of the two stitches in relation to one another. The black stitch is the existing zipper stitch while the gray one is the stitch applied to connect the facing to the garment. As you can see, the stitches are very close to each other but not overlapping. The grey stitch is positioned to the left of the black stitch which will ensure that when the seam is opened, the black stitch is enclosed on the inside of the garment. Applying this stitch may take some practice if you are a sewing beginner. As a shortcut, you can stitch directly on top the black stitch. The existing black stitch will serve as a precise stitching guide while still remaining enclosed by the seam line once the facing is complete. 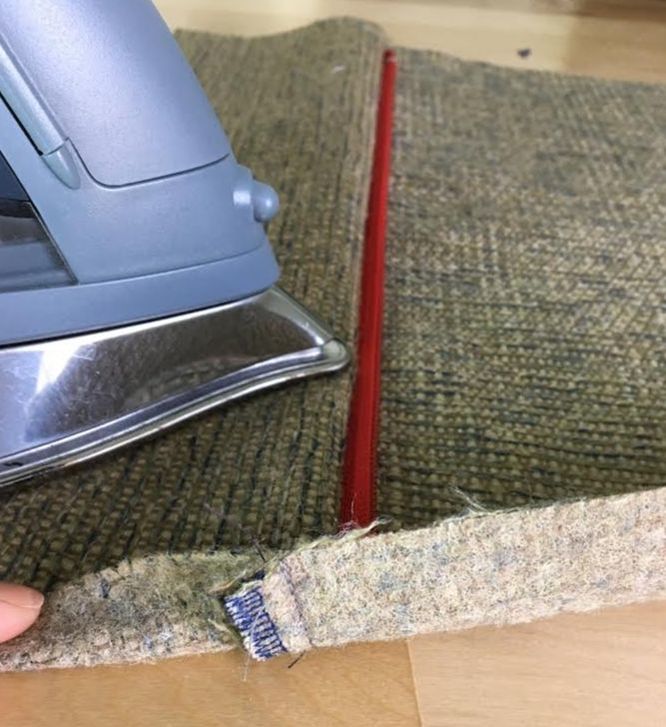 5. Next, you will have to apply an understitch to the facing. The understitch will prevent the facing from rolling to outside of the garment ensuring a clean, smooth finish. First, iron the facing seamline with the seam allowance pointing towards the facing as shown above. Do not iron directly on top of the zipper teeth (especially if working with a plastic zipper). 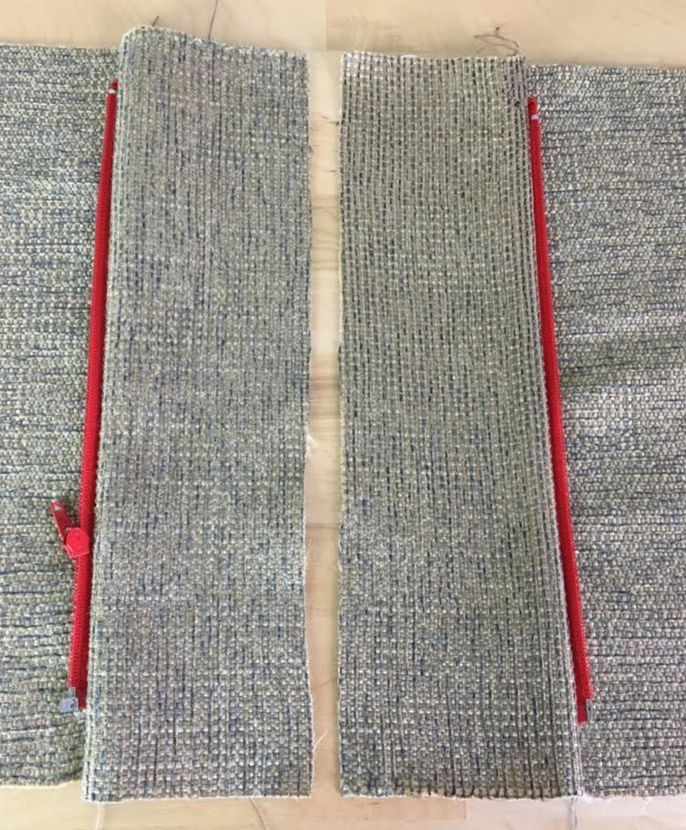 Once both facing seam-lines are ironed with the seam allowance pointing towards the facing, you can add the understitch. 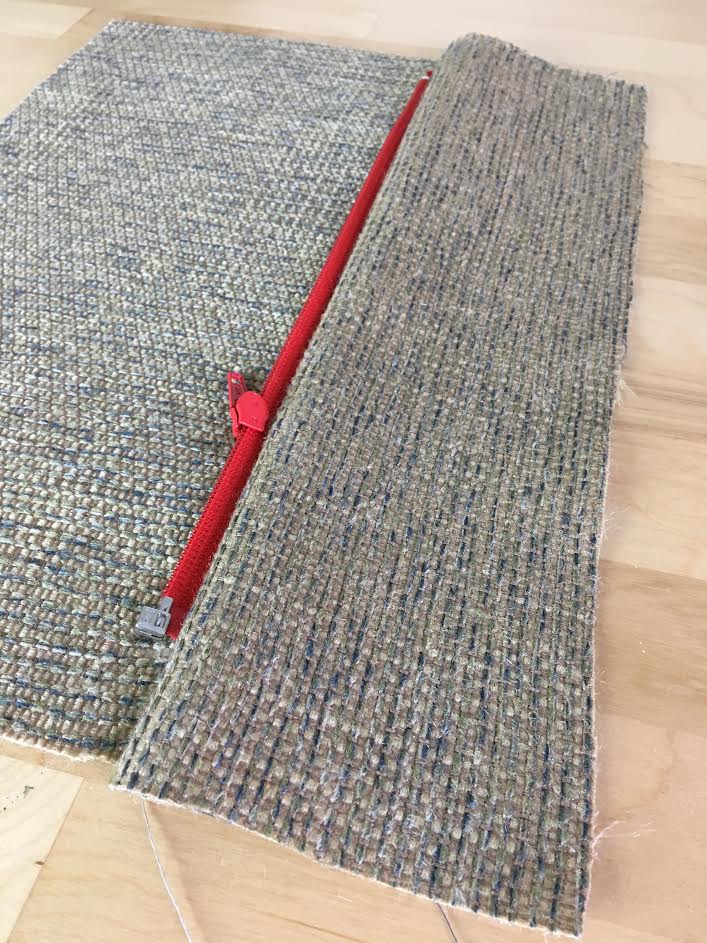 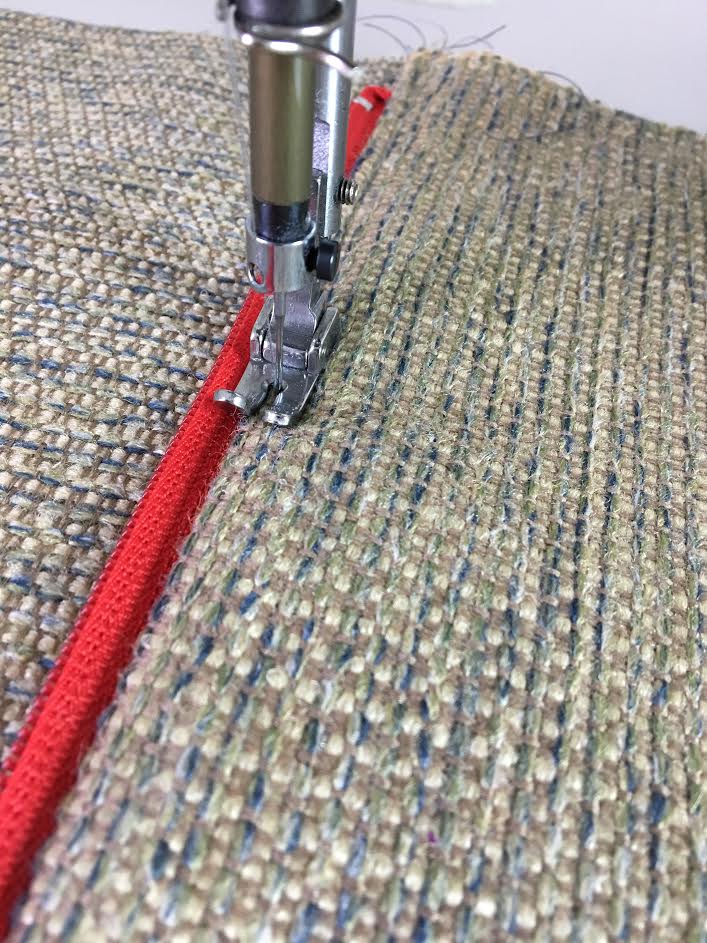 6. Sew directly on top of the facing through the seam allowance and zipper tape layers underneath at about 1/8" away from the seamline as shown. Use the seamline or the zipper tape as a guide. 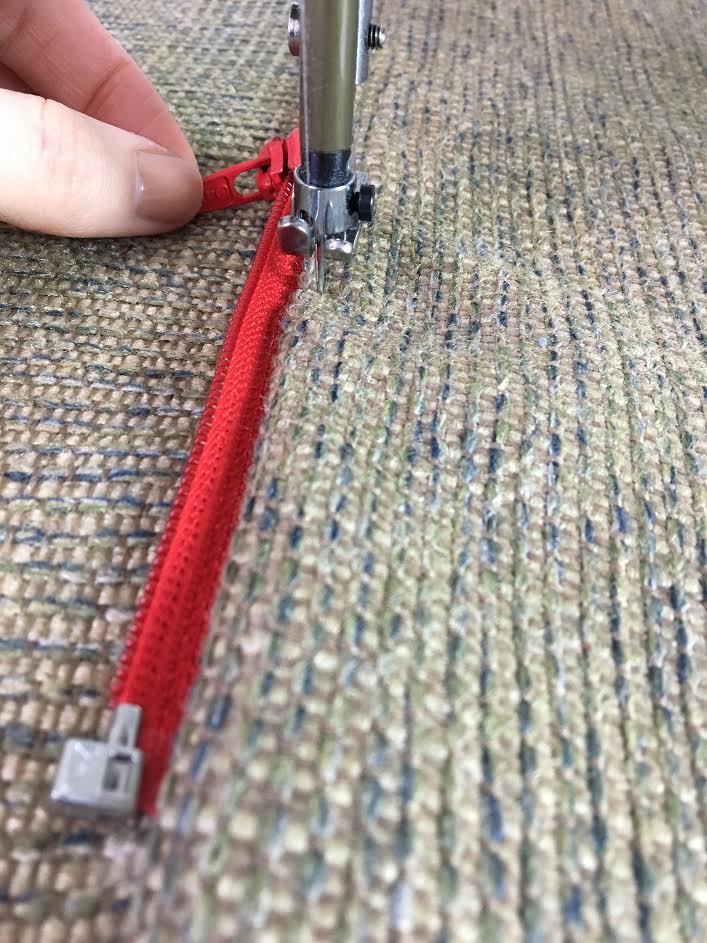 For the portion that has the slider, use the presser foot lifting method described above to move the slider up past the needle towards the already stitched area. 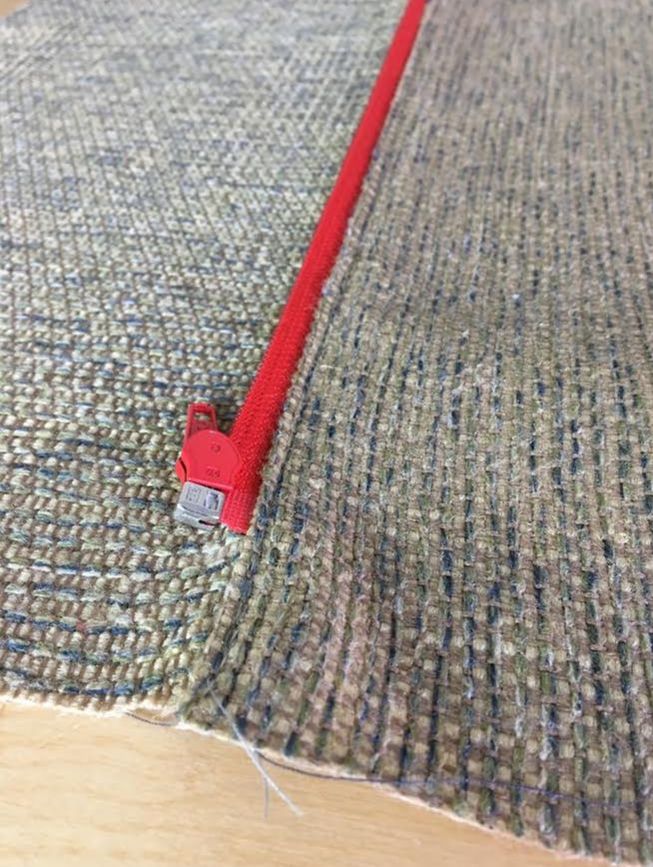 Although not very visible in the image above (since the grey thread blends into the fabric), the understitch should be evenly applied throughout and encompass all layers of zipper tape and seam allowance underneath. 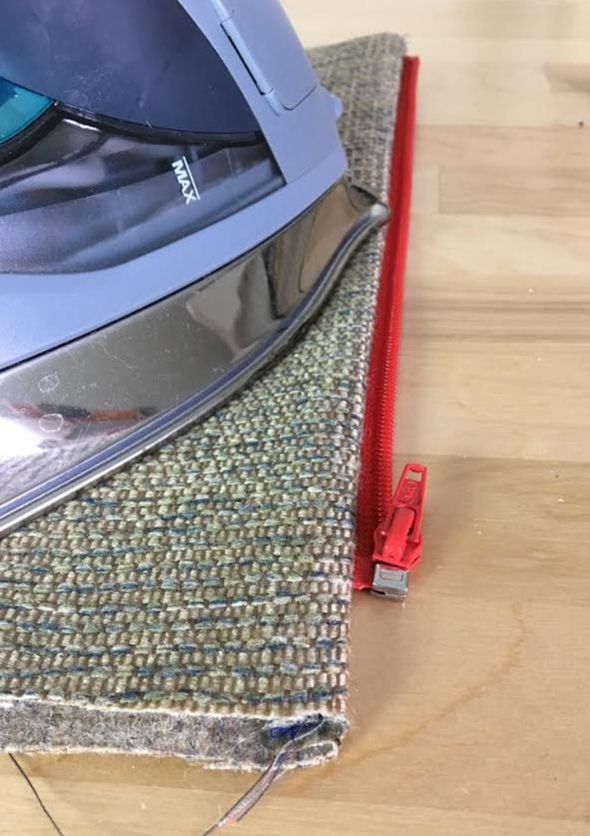 7. As a final step, fold the facing towards the inside of the garment and iron on top of the seamline for a smooth, professional clean finish. 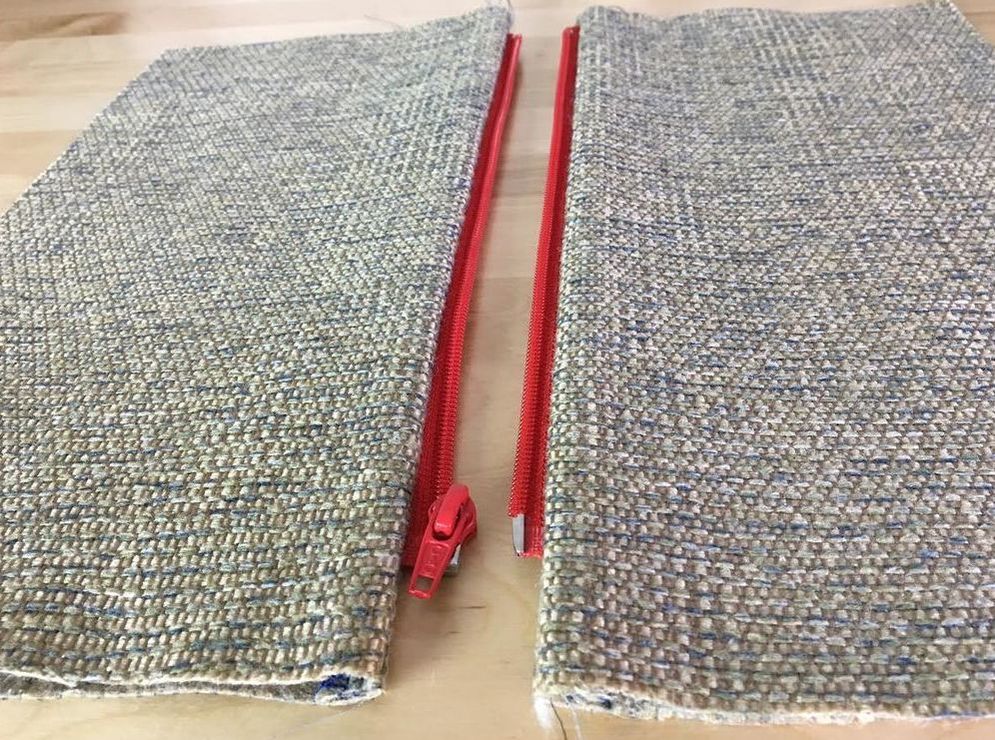
The faced separating zipper is now complete! Both bottom and top edges should align when the zipper is in closed position and there should be no visible stitches on the zipper tape.  If you look on the inside of the garment, you should be able to see the understitch on the facing layers at 1/8" away from the zipper tape. Don't skip the understitching step- this stitch will be crucial in keeping the facing laying flat and smooth and out of the way of the zipper teeth when opened and closed. 
7 Comments
Emily Cromwell
8/18/2020 09:25:33 pm
Hi! I am not sure if you will see this. This tutorial has been super helpful for me. I am installing a separating zipper with a facing on a dress, I am wondering if I should also topstitch down the serged edge of the facing? I have a RTW jacket that has an additional line of topstitching 1" away from the zipper. Is it common to just leave the facing as it is in your tutorial? 8/19/2020 09:23:59 am
Hi Emily! I am so glad you found this tutorial helpful! I would say not to top stitch through the garment AND facing layer underneath. If you want to add top stitching, apply it before the facing goes on but leave the facing as is unless you are under-stitching the facing layer alone to stabilize it. To keep the facing laying flat ironing will do the trick! Hope this helps!! Doina
Emily Cromwell
8/19/2020 04:39:36 pm
Ok great, thank you so so much!
Reginald Wang
4/8/2021 09:34:05 pm
Hi, this is a nicely written illustrated tutorial, but my question is about “concealed” zippers. Your tutorial is about “exposed” zipper, but many jackets have the self fabric/leather (and the facing on the inside) completely covering the teeth of the zipper, so that once zipped, you can’t see the teeth from the front view. I’ve encountered challenge with what foot of machine to use because the foot always squeeeeeze the teeth out when doing the top stitching, so the facing and self edges never get to align with the teeth.
Pat Sjobeck
3/3/2021 01:40:22 pm
I could use your knowledge - I replaced a plastic separating zipper in a men's jacket. The zipper seems to align up correctly, but the zipper seems to get stuck all the time. There does not seemed to be anything in the way. Do you have any suggestions on how to fix this?
Sarah
3/4/2023 10:04:27 am
Thank you so much for this super detailed tutorial! Having never installed a zipper before, I needed more help than was provided in the jacket pattern that I'm working from. I haven't started on the actual garment yet, but I just did a test run of the assembly of the waistband/lining/exterior/zipper, and feel so much more confident about it now. Leave a Reply. |
The Blog:A journey into our design process, sewing tutorials, fashion tips, and all the inspiring people and things we love. 
Doina AlexeiDesigner by trade and dressmaker at heart. I spend most of my days obsessing over new fabrics and daydreaming new ideas. 
Sadie
Executive Assistant & Client Relations Manager Archives
November 2019
Categories
All

|

-
Sewing Tutorials
-
Basics
>
- Aligning Pattern Grainlines To Fabric
- Preparing Fabrics For Sewing
- Pinning Sewing Patterns To Fabric
- Placing Sewing Patterns On Fabric For Cutting
- Rotary Cutters or Fabric Scissors?
- Cutting The Sewing Patterns
- What Are Notches And How To Use Them In The Sewing Process
- Transferring Notches From Pattern To Fabric
- Transferring Seamlines to Fabric
- Staystitching
- Backstitching: A Complete Guide
- Hand Basting: A Complete Guide
- Sewing Continuous Bias Binding
- Darts >
-
Sewing Seams
>
- The Basics Of Seams And Seam Allowance
- How To Sew A Straight Seam
- Sewing Curved Seams
- Sewing Corner Seams
- Trimming And Grading Seam Excess
- Notching/Clipping Seam Allowance for Tension Release
- Sewing Topstitched Seams
- Sewing Corded Seams
- Sewing A Slot Seam
- Sewing A Gathered Seam
- Sewing Bias Seams
- Sewing Seams With Ease
- Sewing Seams With Crossing Seamlines
- Sewing Unlike Fabric Seams
- How To Iron Seams: Ironing Tools And Conventions
- Sewing With Knit Fabrics
- Understanding Stitch Length And Tension
- Sewing Unique Fabric Seams
-
Seam Finishes
>
- Seam Finishing Techniques - Overview
- Applying A Pinked Seam Finish
- Applying A Bias Bound Seam Finish
- Serging And Zigzag Seam Finishes
- Sewing A Self-Bound Seam Finish
- Sewing A French Seam Finish
- Sewing A Hong Kong Seam Finish
- Sewing A Mock French Seam Finish
- Sewing A Turned-and-Stitched Seam Finish
- Sewing Overcast Hand-Applied Seam Finishes
- Sewing A Flat Felled Seam
- Sewing A Hairline Seam Finish
-
Hem Finishes
>
- Garment Hem Finishes: Overview
- Sewing A Double Fold Hem Finish
- Sewing A Single Fold Hem Finish
- Sewing Bound Hem Finishes
- Sewing An Exposed Double Layer Bound Hem
- Sewing A Folded-Up Bound Hem with Pre-folded Binding
- Sewing A Hong Kong Hem Finish
- Sewing A Band Hem Finish
- Sewing A Bias Faced Hem Finish
- Sewing A Twill Tape Hem Finish
- Sewing A Rolled Hem Finish
- Sewing A Shaped Hem Facing
- Using Fusible Hem Tape And Webbing
- Finishing A Lace Fabric Hem
- Finishing A Leather Hem
- Sewing Faced Hem Corners
- How To Finish Lining At The Hem
- Finishing Fabric Corners by Mitering >
- Interfacing A Hemline: Lined And Unlined Examples
-
Sewing Pockets
>
- Curved Patch Pocket With Flap
- Unlined Square Patch Pockets
- Lined Patch Pockets: Two Ways
- Extension On-Seam Pockets
- Separate On-Seam Pocket
- Front Hip Pockets
- Bound Double Welt Pocket
- Double Welt Pocket With Flap
- Self-Welt Pocket (Using Single Fabric Layer)
- Slanted Welt Pocket (Hand-Stitched)
- Faced Slash Pockets: Overview >
-
Sewing Zippers
>
- Sewing Zippers: General Information
- Sewing A Centered Zipper
- Sewing A Lapped Zipper
- Sewing An Invisible Zipper
- Sewing A Fly Front Zipper
- Sewing A Closed-End Exposed Zipper (No Seam)
- Sewing An Exposed Separating Zipper
- Sewing Hand Stitched Zipper Applications
- Sewing A Zipper Underlay
- Sewing A Placket-Enclosed Separating Zipper
- Sleeveless Finishes >
-
Neckline Finishes
>
- Sewing A Neck Shaped Facing
- Sewing An All-In-One Neck Facing
- Neck And Garment Opening Combination Facings >
- Sewing A Bias Faced Neckline Finish
- Sewing A Band Neckline Finish
- Bound Neckline Finishes: Overview >
- Sewing A Semi-Stretch Strip Band Neckline
- Ribbed Neck Band And Classic Turtleneck
- Decorative Neckline Finishes >
- Finishing Facing Edges >
-
Extras
>
- A Complete Guide on Interfacing
- Sewing Bound Spaghetti Straps
- Sewing Spaghetti Straps To A Faced Neckline
- Sewing Ruffles: Overview
- Patterning And Sewing A Circle Ruffle
- Sewing A Gathered Heading Ruffle
- Sewing Double Layer Gathered Ruffles
- Sewing A Gathered Ruffle Into A Seam
- Sewing A Gathered Ruffle To A Fabric Edge
- Sewing A Fabric Surface Slit
- Sewing A Slit Seam
- Hand-Applied Straight Stitches
- Hand-Applied Blind Stitches
- Hand-Applied Overedge Stitches
- Hand-Applied Tack Stitches
- Hand-Applied Decorative Stitches
-
Basics
>
- Custom Bridal
- Custom Apparel
- About
- Blog

 RSS Feed
Services |
Company |
|
