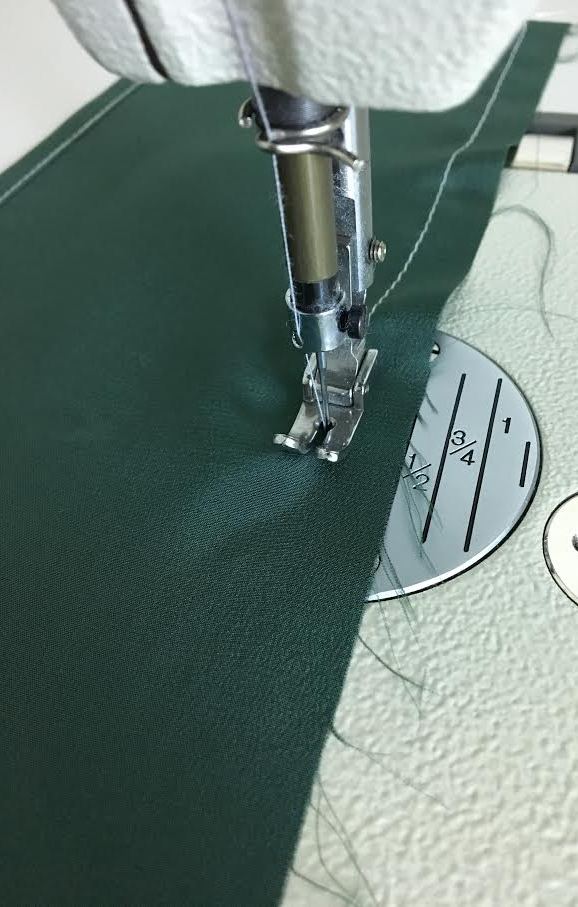
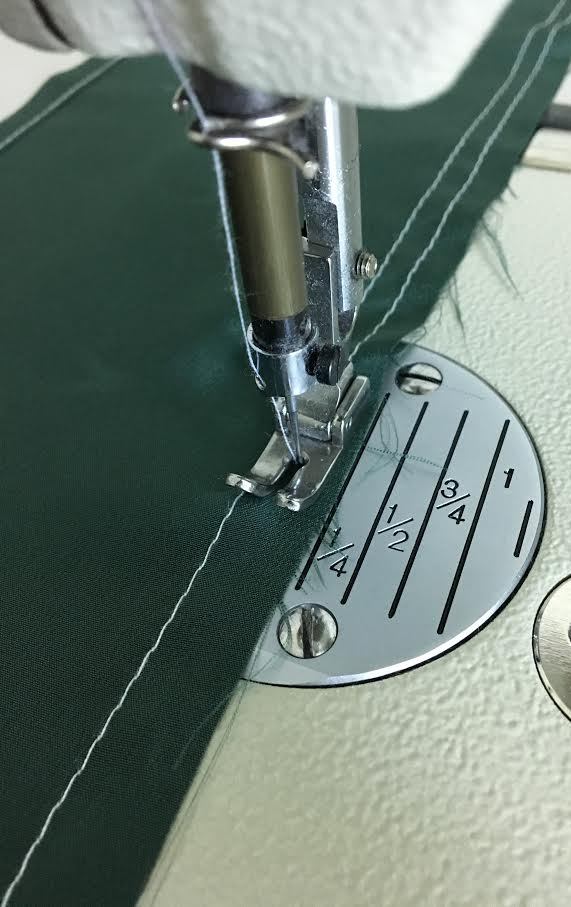
 Learning how to sew ruffles as a sewing beginner will help you get a better understanding of fabric fullness and drape. While ruffles are a great way to add a decorative aspect to dresses and blouses, they can also be used to control length and shape around the hem and sleeves. Ruffles can be constructed in a variety of different lengths, fullness and drape. Two Types of Ruffles You Should Know There are two main styles of ruffles that differ in the way they are cut and constructed: Straight ruffles and circular ruffles. Straight ruffles are cut in the shape of a strip and need to be gathered to achieve fullness. 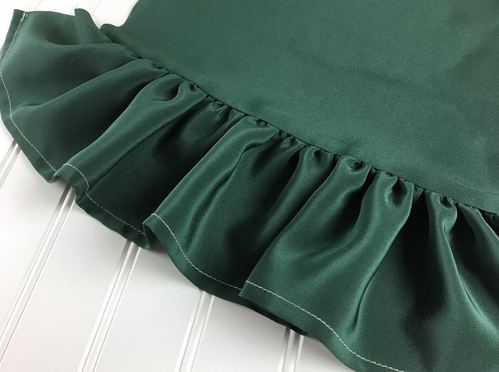 Circular ruffles are cut in a circular shape which provides fullness once the inner edge is straightened and sewn into a seam. If it sounds a bit confusing, don't worry! We'll show you how to cut and sew both of these ruffle styles bellow.  Gathered Straight Ruffles As perhaps the easiest of the two, it requires you to cut the ruffle into a straight strip which is gathered to achieve fullness. If you are sewing beginner this is a great way to practice gathering simultaneously to learning how to sew a ruffle. A plain ruffle is the most commonly used straight ruffle and features a single finished hem edge and a second gathered edge that gets sewn into a seam (or another raw edge). This ruffle style is mostly used for apparel products and is very easy to cut and sew.  A double ruffle has two finishes hems on opposite ends but the gathering stitch is applied right along the middle of the two edges. The gathering is then either top-stitched to the garment or another reinforcement like twill tape or binding. A double ruffle is great for achieving double the fullness of a regular ruffle in lighter-weight fabrics featuring a fluid drape. It is also a great way to apply an ornamental double row of ruffles to more structured fabrics.  A heading ruffle has two finished hems and is gathered at a shorter distance from one of the hems. As opposed to a plain ruffle, a ruffle with a heading is not sewn into a seam but rather forms two reflecting ruffles of different sizes using gathering alone. To set the gathering in place it is then top stitched to the garment or to a strip of twill tape or binding. Although this type of ruffle is also used in apparel, it is most commonly found on drapery and decorative upholstery items. 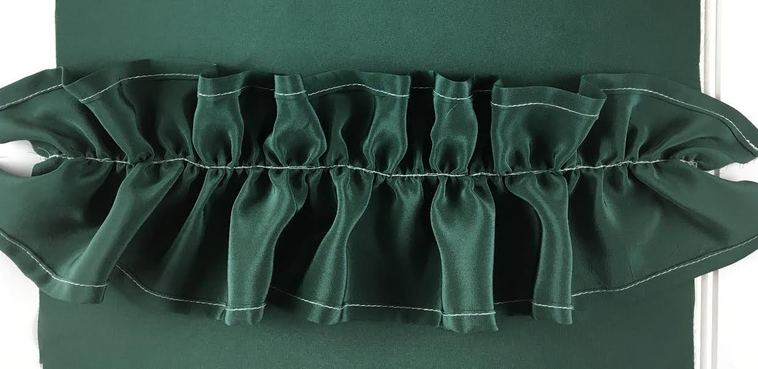 Clean Finishing a Ruffle Hem When clean finishing ruffles you should keep in mind that the backside of the fabric will be visible from certain angles or during movement. This means that both face and back side of fabric should be completely clean finished. A baby hem, which is double folded and top-stitched at 1/8"-1/4" intervals, is the most common way to finish ruffle hems. For a more luxurious feel or when the ruffle's back side requires less visibility, a self-facing can be used. A ruffle that is self-faced is basically folded onto itself to hide the wrong side of the fabric and usually used on fine, lightweight fabrics. Hem tape, twill tape and binding can also be used to finish ruffle hems, but these finishes are usually more appropriate for medium to heavy weight fabrics that are thicker and have more structure. 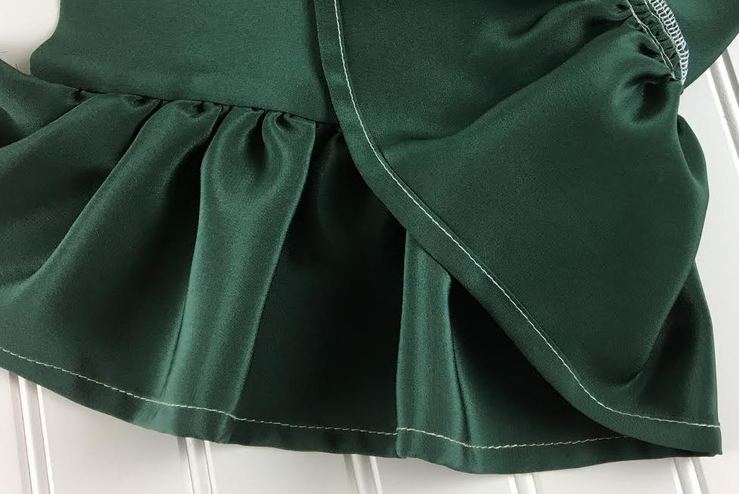 Sewing A Straight Ruffle Decide the ruffle strip's length. In order to determine how long the initial fabric strip should be, ask yourself how much fullness you need/want your gathered ruffle to have? Normally, for a fully gathered ruffle you need about twice the measurement of the finished length- meaning, you need twice more excess than the seam or raw edge you are sewing the ruffle to. However, you could do less or more excess depending on the fabric and the fullness desired. A general rule is that a finer, wider ruffle should be fuller thus requiring more excess fabric. In this sewing tutorial we are working with a ruffle that is 2.5 times the original length. 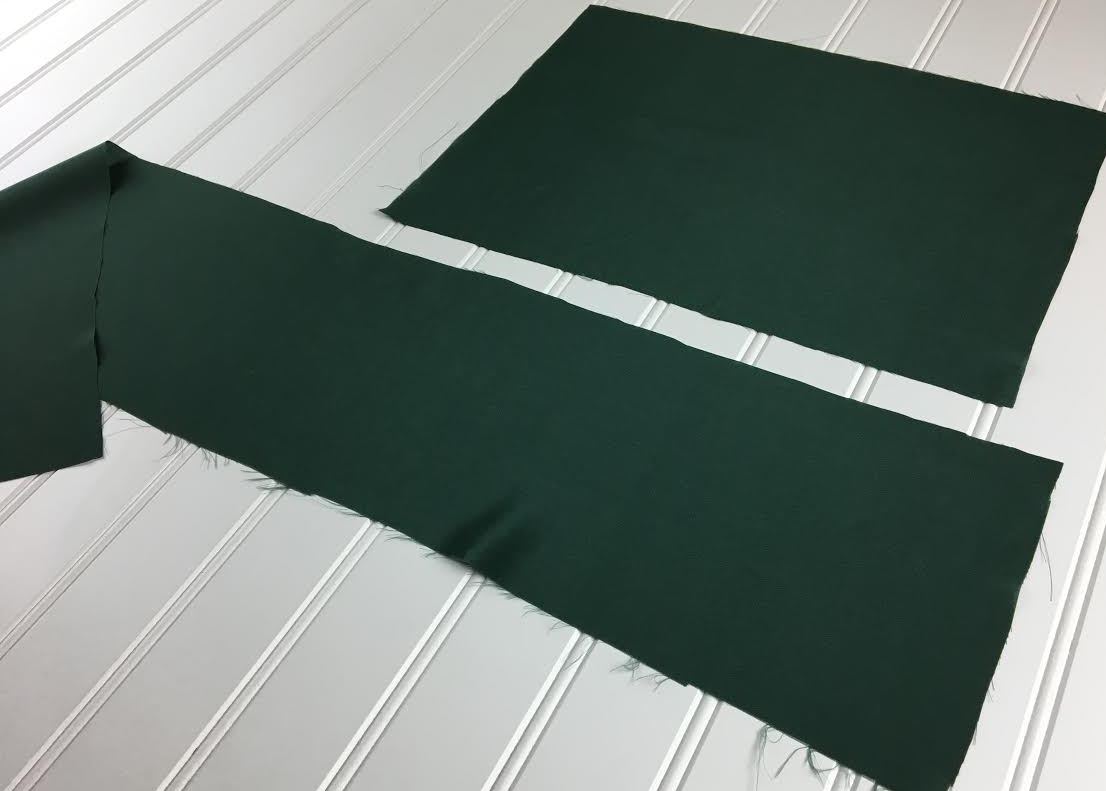 In the image above, the ruffle strip is 2.5 inches longer than the seam it gets sewn to above. Once the longer piece (ruffle) is gathered, it is sewn into the edge of the non-gathered piece next to it. Finish the ruffle's hem first! Our ruffle hem/seam allowance is 1/2" and we are working with a lighter-weight fabric. In this case, a double folded machine stitch will work best for clean finishing the hem's raw edge. 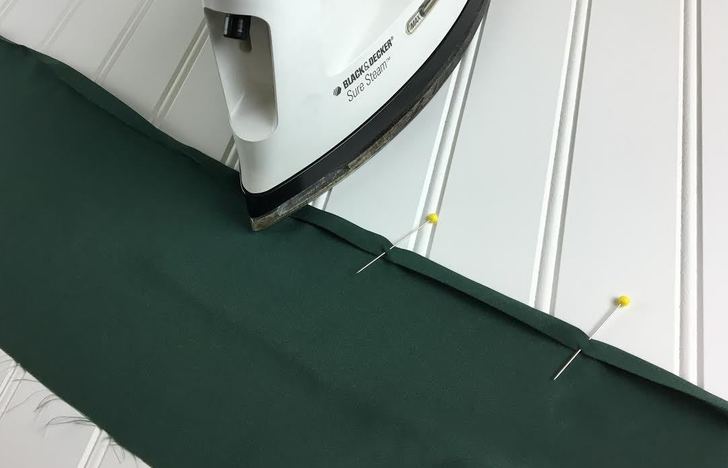 1. Turn one of the lengthwise raw edges in towards the wrong side of the fabric (inside of garment) at 1/4" and iron as you fold. Fold once more at 1/4", iron as you fold and place a few pins along the edge to keep the fold in place. 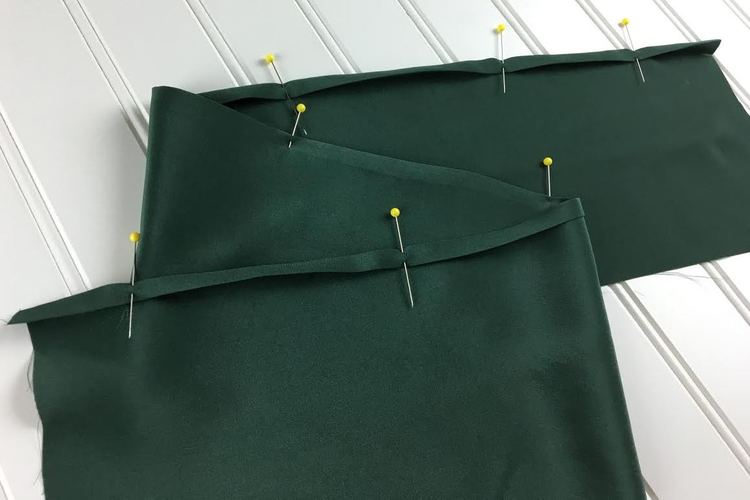 Place the pins perpendicular along the fold for easy removal during stitching.  2. Machine stitch along the fold (on the wrong side of the fabric) using the fold line as a guide. 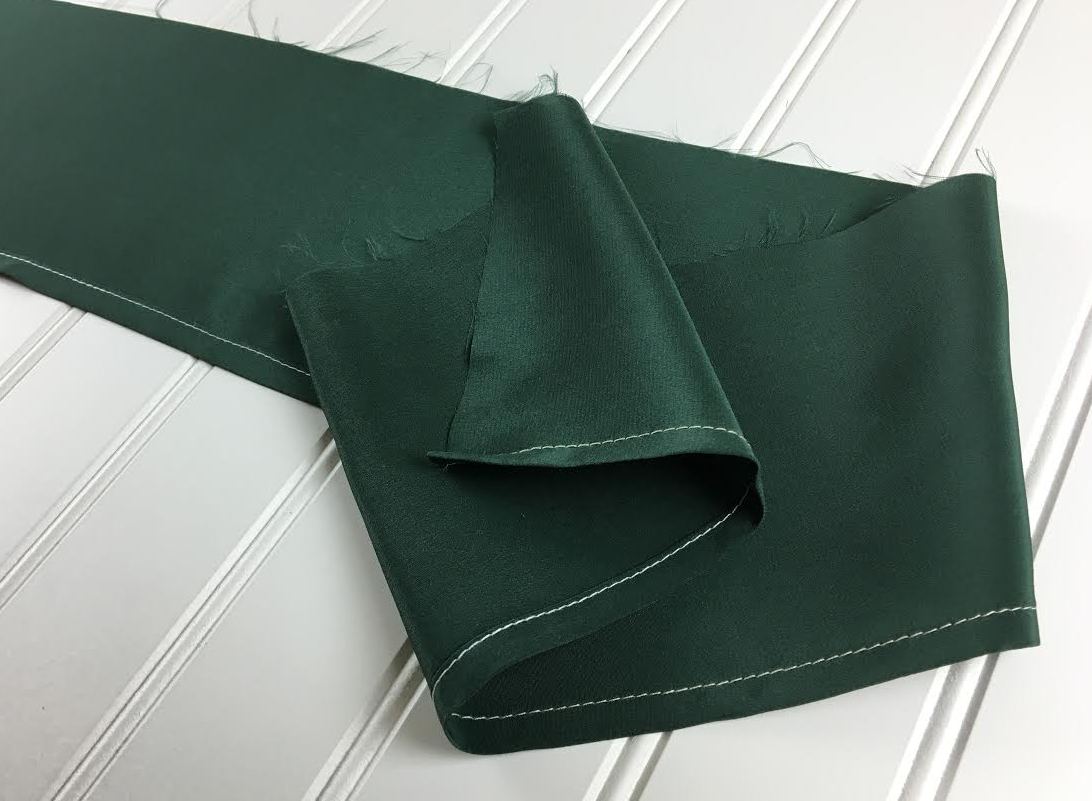 The ruffle's hem is now complete. The reason the hem is finished first is due to the fact that it's raw edge is more difficult to work with once the ruffle is gathered and sewn into the seam. Add two gathering stitches. 3. Set your sewing machine to a basting stitch and machine stitch at about 1/2" down from the remaining raw edge. The reason why the first basting stitch is applied at 1/2" down from the edge is because that is our seam allowance. If you are working with a different seam allowance, use that measurement instead.
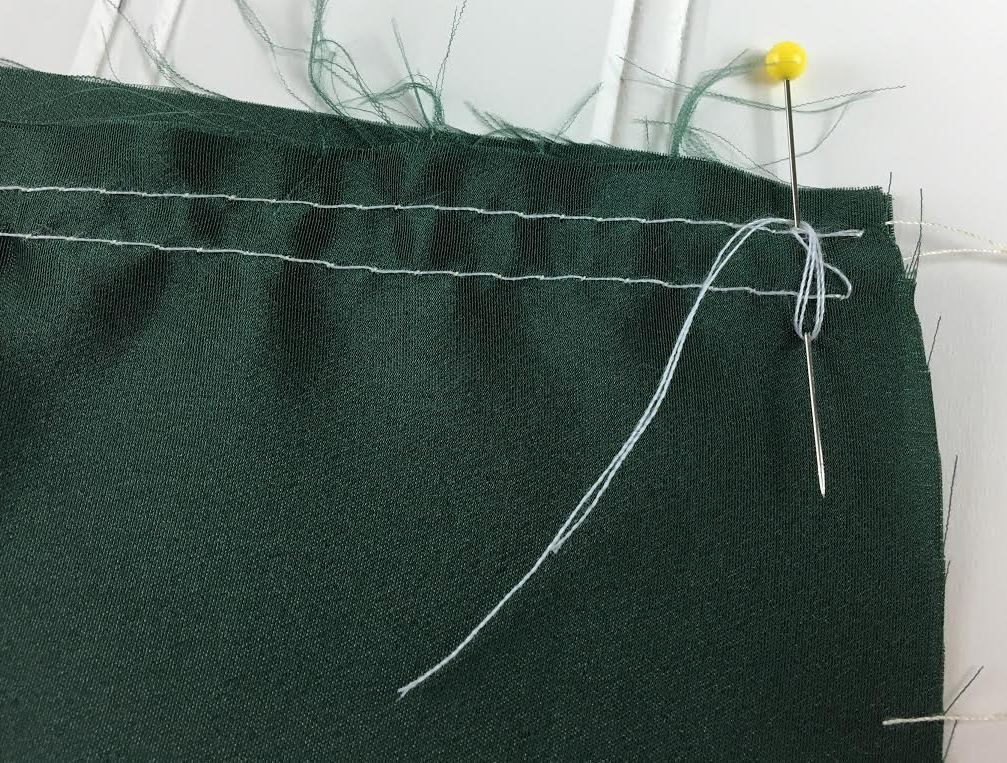
4. Apply a second basting stitch at half the distance between the raw edge and the first basting stitch- 1/4" in our case. 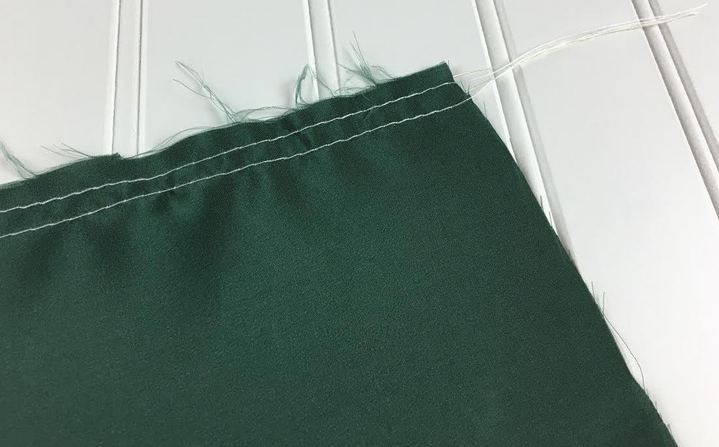 Allow enough excess thread at the beginning and end of the basting stitches to facilitate gathering. 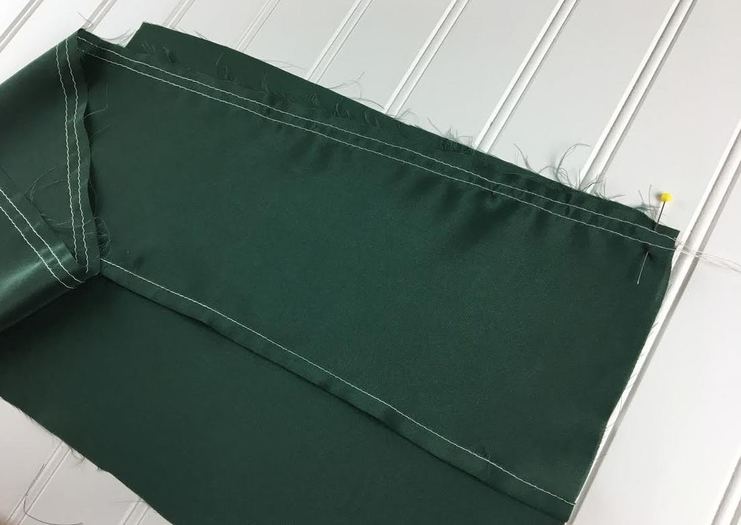 5. Align the ruffle's edge to the corresponding seam edge making sure the face of the fabric is touching, and insert a pin at one end to keep the two layers together.
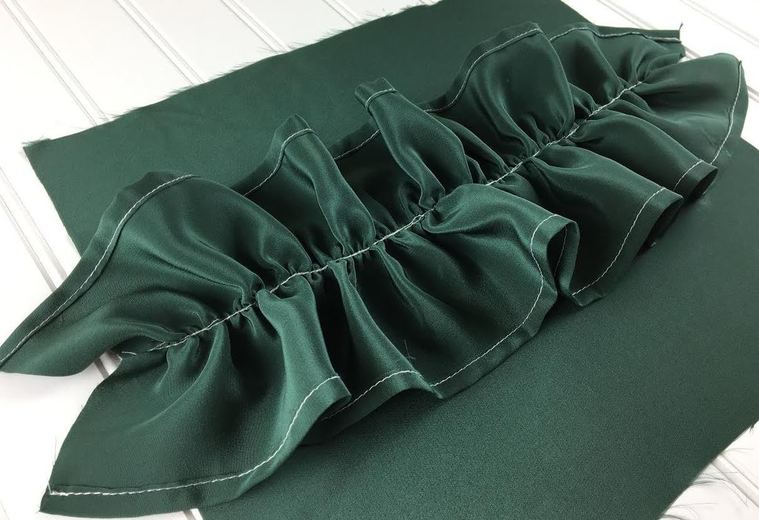
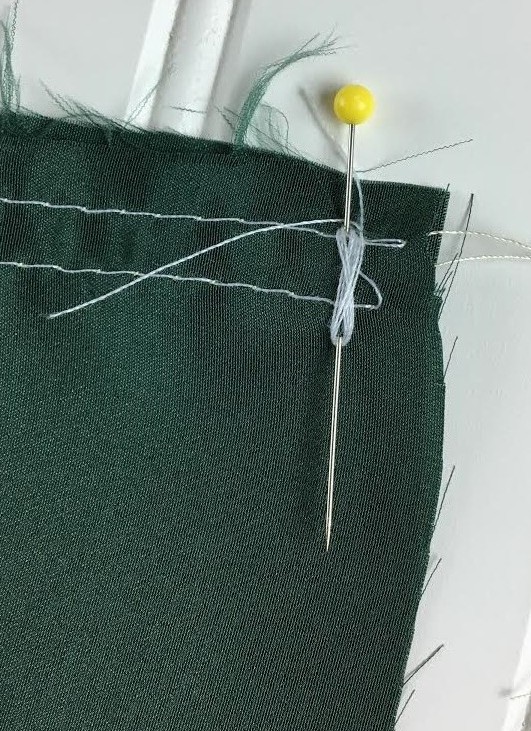
6. Wrap the loose stitch threads around the pin as shown above. This will keep the basting stitch from coming out when the thread is pulled from the opposite end during gathering. Just wrap the thread up and down in a crisscrossing motion until the stitch is stabilized.  7. Begin pulling the two threads on the opposite end of the ruffle carefully, spreading the gathering evenly as you pull. 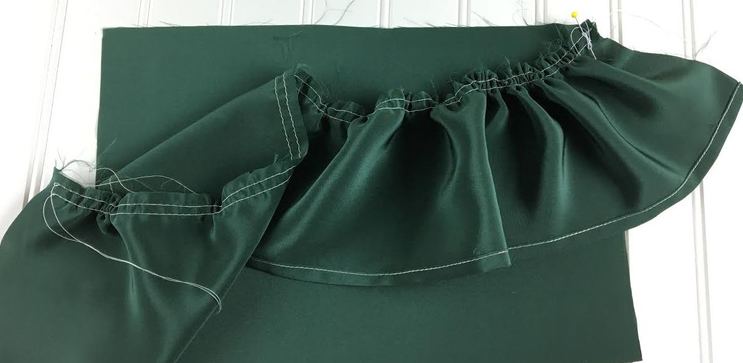 When forming the ruffle, your goal is to achieve evenly distributed gathering that is exactly the length of the edge it is sewn to. The easiest way to gather a more dense ruffle is to first pull the gathering all the way to the opposite end, then keep pulling the basting threads to add gathering until the desired length is achieved. 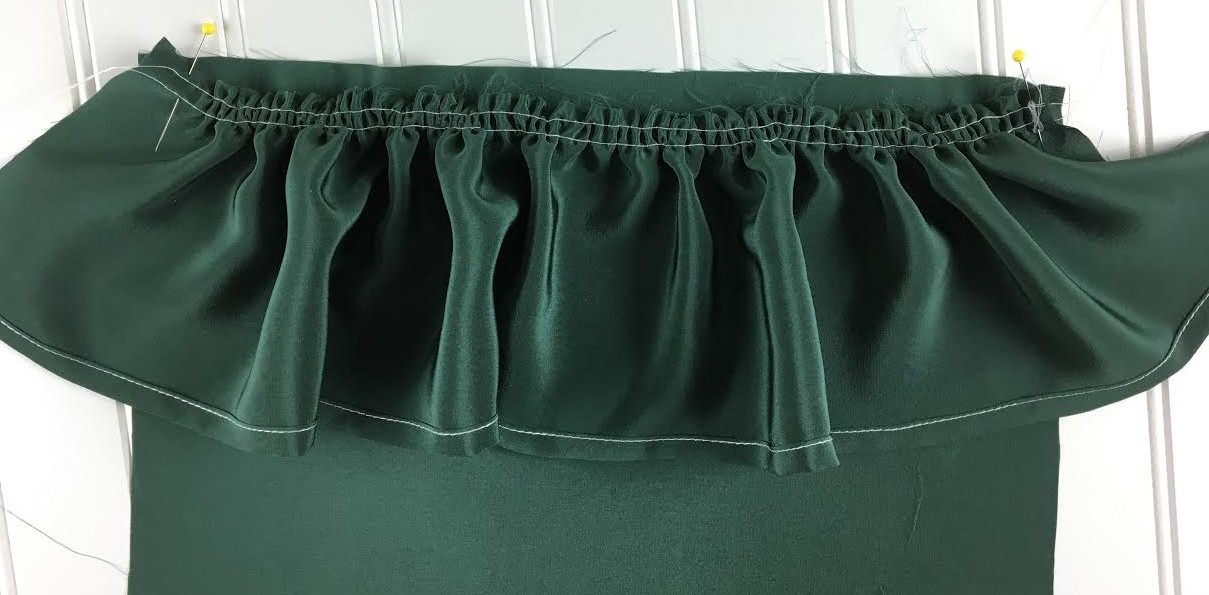 8. Once the correct length is achieved, use a pin or your fingers to distribute the gathering evenly throughout and add pin to hold the two layers in place on the other end.
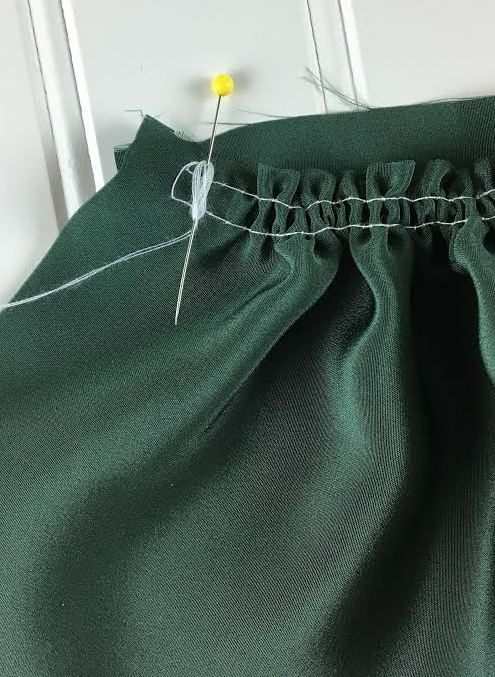
9. Repeat the step described above by wrapping the loose threads of the basting stitch around the pin to lock the basting in place. This will stop the gathering from coming undone and allow you to pin the rest of the seam together evenly. 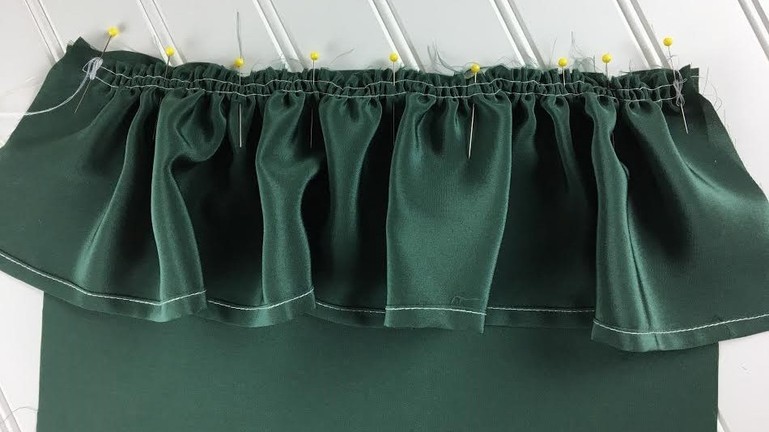 10. Pin the seam together horizontally making sure the gathering remains evenly distributed and the raw edges are aligned properly. 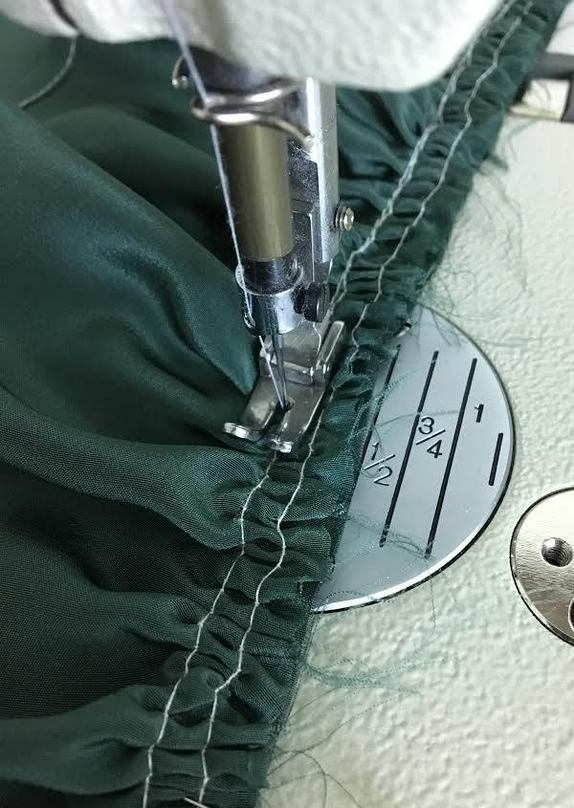 11. Making sure your sewing machine is set at a regular stitch now (not basting), apply a straight stitch right bellow the bottom gathering stitch. Use the bottom gathering stitch as a guide and sew consistently bellow it and as close to it as possible. 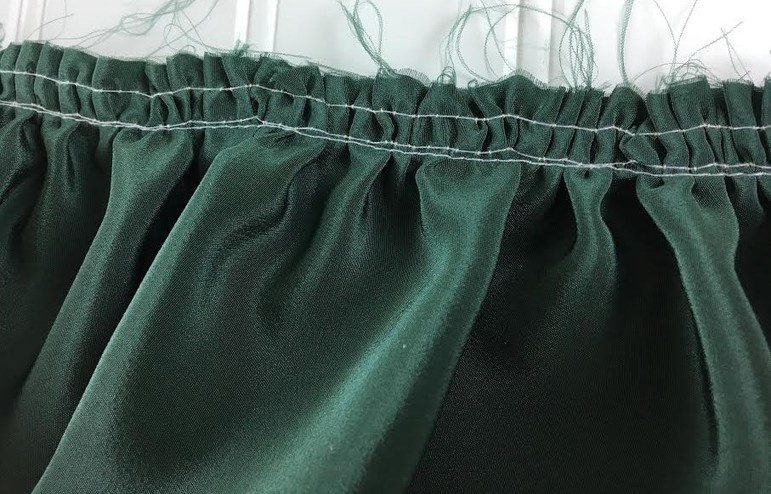 As shown above, the gathering stitch remains consistently above the regular seam stitch. 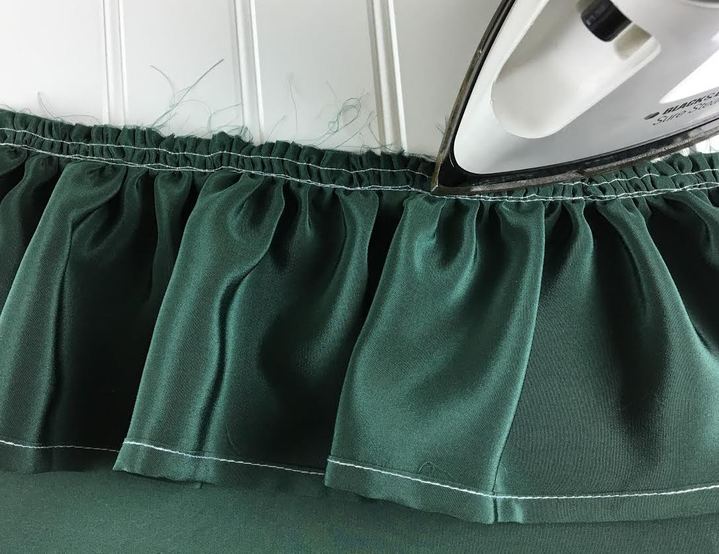 12. Iron ONLY the seam allowance and never directly on top of the ruffle. Ironing on top of gathering loses fullness and flattens the gathered seam. 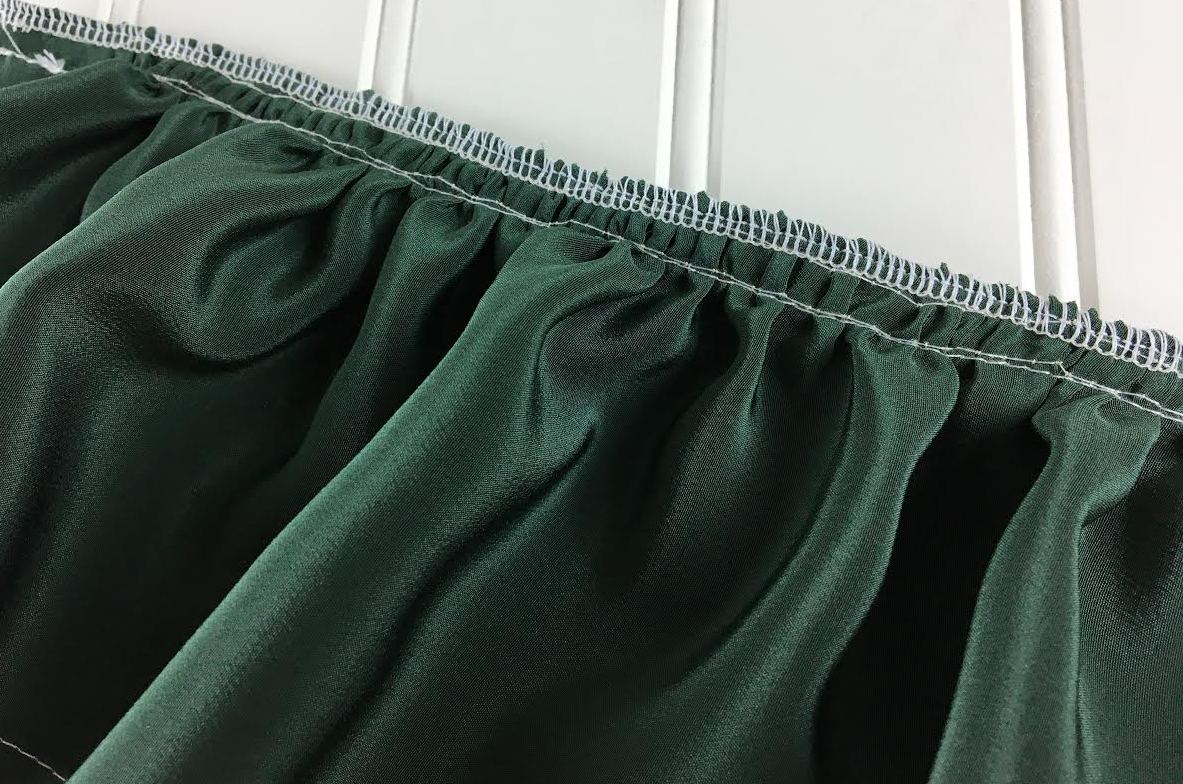 13. Clean finish the raw edge of the seam allowance. We've used a serging stitch, but if you don't have a serging machine you can use a regular zig zag stitch on your home sewing machine. However, make sure your zig zag stitch is set at the densest setting. Other options for clean finishing ruffle seams are by using binding or a french seam (in some cases). 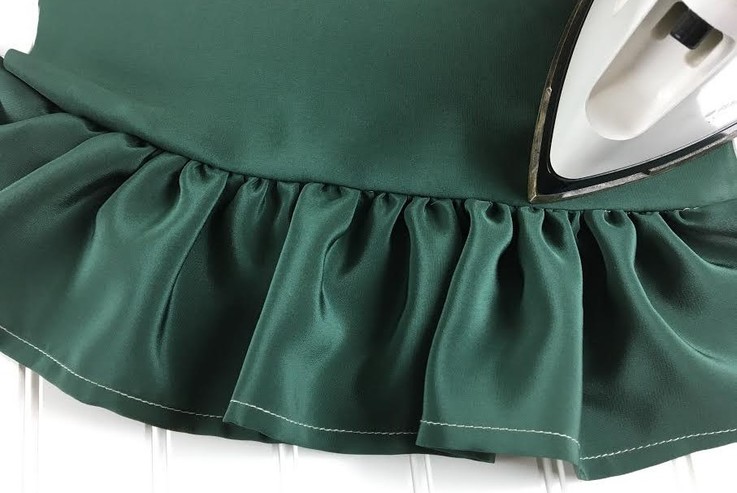 14. Iron the seam with the seam allowance pointing away from the ruffle as shown above. This will ensure that the seam stays flat while the ruffle gathering maintains its fullness. 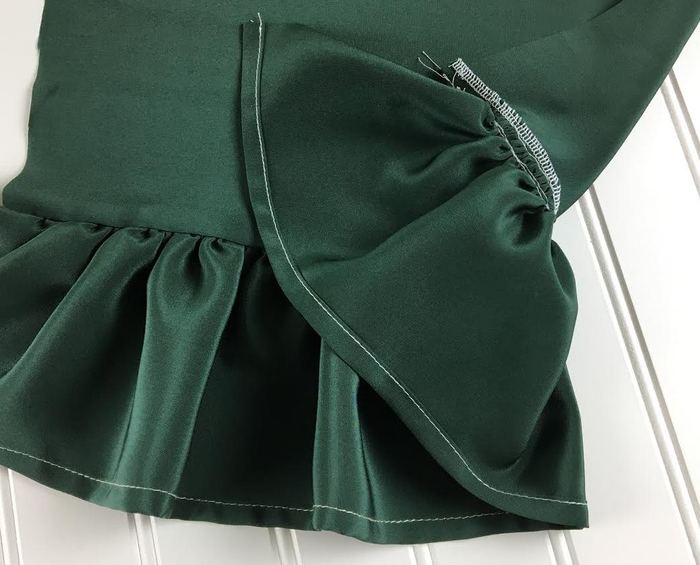 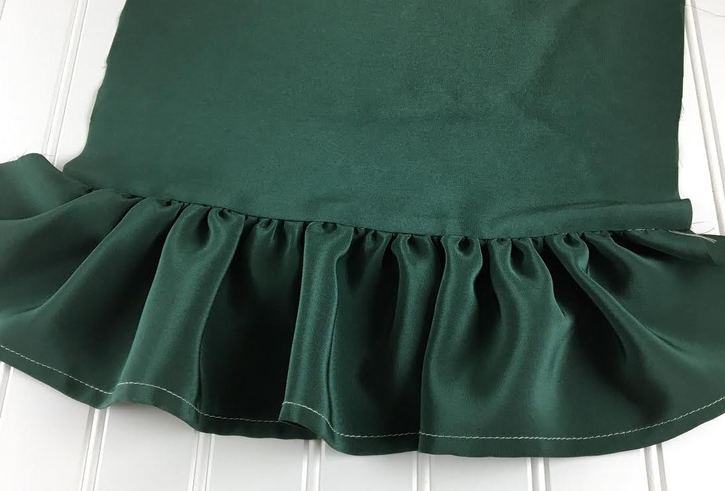 Circular Ruffles As opposed to straight ruffles, circular ruffles are cut in the shape of a larger circle which has another smaller circle cut in the center of it. When the edge of the inner circle is straightened the body of the fabric creates a clean, beautifully draping ruffle. Because the fabric is cut in a circular shape, the ruffle is able to encompass all directions of the grain including the bias, which gives each ruffle fold a luxurious look/feel. Sewing a Circular Ruffle  The inner curve will be sewn to a straight edge. When the inner curve is straightened, it forms a set of softly draping ruffles without the use of gathering. Because the hem of a circle ruffle is curved, it requires a hem finish that is most appropriate for curved edges. The most commonly used techniques are a baby hem, or a bound finish which uses double folded binding constructed of matching fabric. We will be using a baby hem for clean finishing our circle ruffle. A baby hem uses the technique of a regular double folded machine stitch hem but the folds are very thin- 1/8" wide or less per fold. It works best on curved edges of lightweight fabrics because smaller folds are easier to manipulate along curved edges thus resulting in a smoother, more even finish.  Our seam allowance for the circle ruffle is 1/4" on both inner and outer curves. A smaller seam allowance is easier to work with around curved edges. 1. Fold the outer curved edge of the ruffle at 1/8" once towards the wrong side of the fabric (inside of garment) and iron to keep the fold in place. Fold once more at 1/8" to enclose the raw edge- iron and pin this final fold to stabilize for stitching. Because the raw edges are curved, it will take some practice to get the folds smooth and even. Your first baby hem wont be perfect but remember to be patient and keep practicing!  2. Machine stitch right above the fold line using it as a guide. For a smoother stitch, go slower along the most curved areas.  The baby hem should have a consistently smooth stitch line placed at the same distance from the edge throughout. 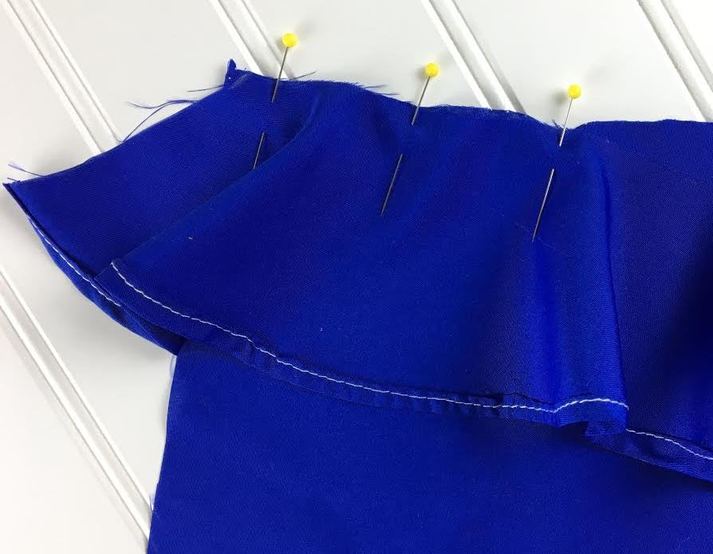 3. Starting at one end, pin the inner curve of the circle ruffle to the straight edge of the seam making sure the face of the fabric is touching (the wrong side of the ruffle should be facing the outside). This is when you'll first start to notice the ruffle form. 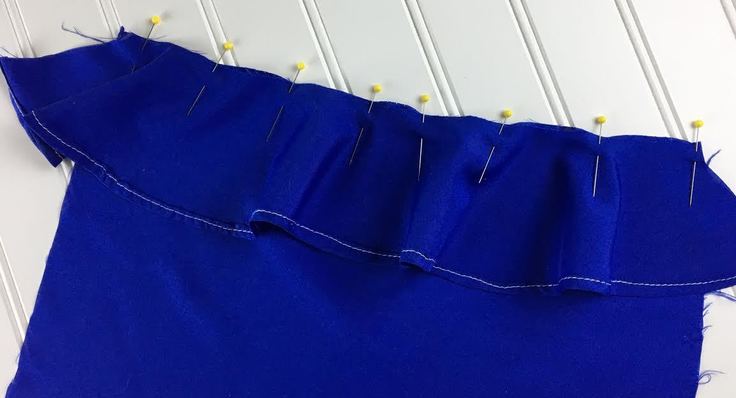 4. Continue pinning perpendicular to the edge until the entire seam is pinned and the two layers of fabric are attached. 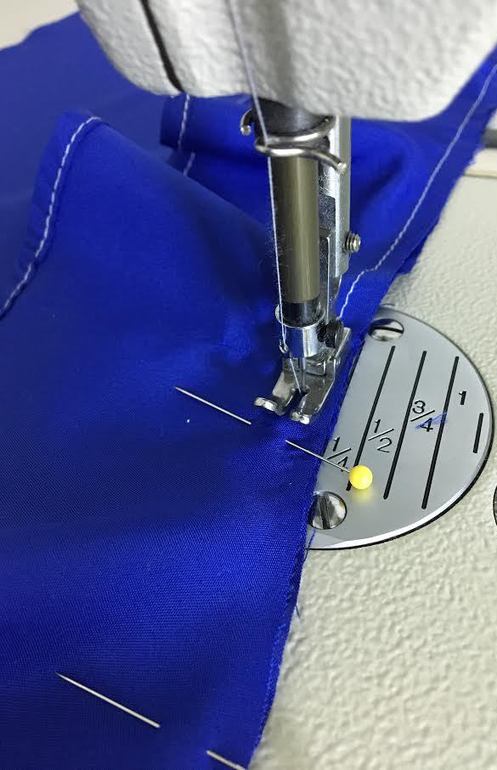 5. Stitch the seam at 1/4" seam allowance. As mentioned above, we are using 1/4" seam allowance on the ruffle's edges. A smaller seam allowance is recommended for circle ruffles because it is easier to work with along curved edges. It will create less tension in the seam and not require manually clipping the seam allowance for tension release. 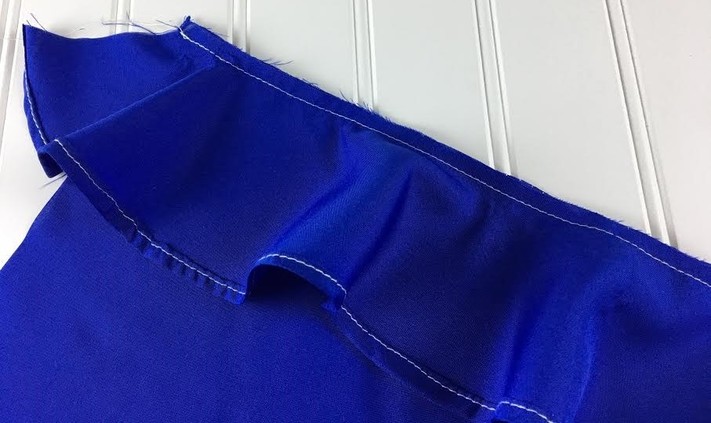 6. Finish the ruffle seam's raw edge with your chosen finishing technique. The easiest and least expensive is by using a serging or zig zag stitch. This also minimizes bulk and allows for the seam to lay flatter on the outside of the garment. A matching fabric, bound finish may also be used. 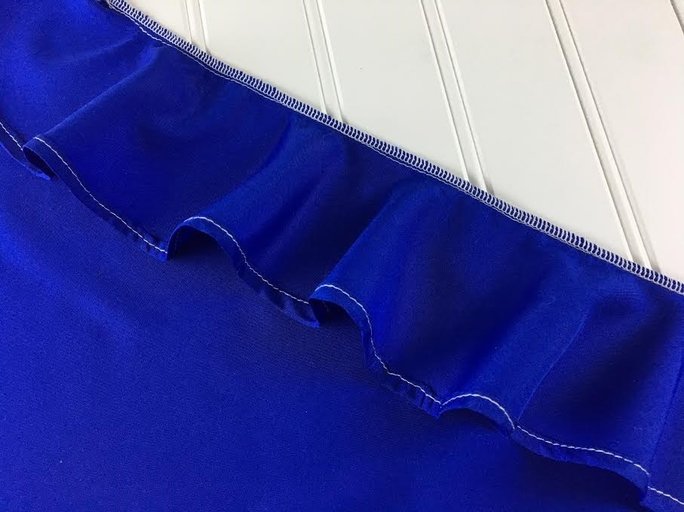 As displayed above, we've applied a serging stitch along the edge of the ruffle seam to clean finish it. 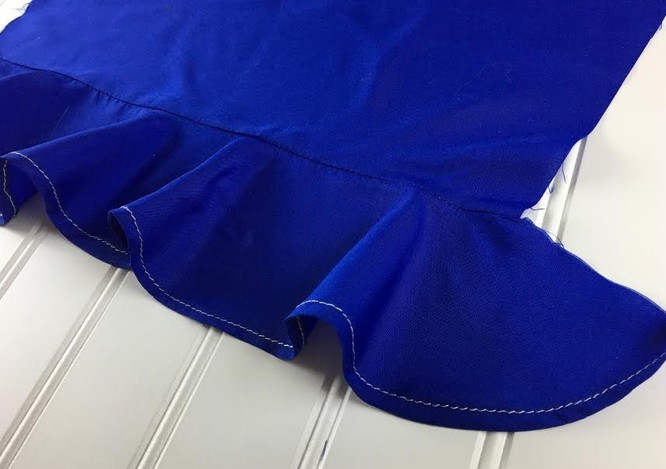 7. As a final step, iron the ruffle's seam with the seam allowance pointing up, away from the ruffle. This will ensure that the ruffle drapes well and maintain a smooth seam on the face of the garment. 
2 Comments
Nadia
5/10/2018 12:52:39 pm
Thank you for this great tutorial on ruffles. I wanted to know if you want to add a ruffle where there is no seam e.g. diagnally on a skirt front then do you stitch it on top or do you create a seam and stich it in between the fabric. What in your opinion is the way to do this? Thanks 5/11/2018 06:30:43 am
That is a great question/suggestion Nadia! You can certainly sew a ruffle to the surface of fabric and not necessarily into a seam. However, it can be a bit more time consuming having to clean finish the ruffle raw edge that will be sewn to the skirt front (for example) and making sure this edge is not visible on the right side of the skirt. A circular ruffle will be much easier to sew in this way- I would suggest that you maintain a smaller seam allowance along the ruffle edge that will be sewn to the garment (1/4" should be good enough). Clean finish it with a zig zag stitch or serging stitch (if you have an overlock machine). Next, sew the ruffle to the desired fabric surface at the ruffle’s 1/4" seam allowance such that the face of the ruffle and face of the garment's fabric are touching. To keep the ruffle pointing down and hiding the zig-zag edge underneath, topstitch on the right side of the ruffle, very close to the seamline, capturing the seam allowance underneath. For a gathered ruffle you can try using the double ruffle method described above but sew it to the surface of the skirt. You can also use binding to clean finish the raw edge of the gathered ruffle before sewing it to the surface of the garment. I will gladly post a tutorial walking you though these steps- Thanks for your suggestion! Leave a Reply. |
The Blog:A journey into our design process, sewing tutorials, fashion tips, and all the inspiring people and things we love. 
Doina AlexeiDesigner by trade and dressmaker at heart. I spend most of my days obsessing over new fabrics and daydreaming new ideas. 
Sadie
Executive Assistant & Client Relations Manager Archives
November 2019
Categories
All

|

-
Sewing Tutorials
-
Basics
>
- Aligning Pattern Grainlines To Fabric
- Preparing Fabrics For Sewing
- Pinning Sewing Patterns To Fabric
- Placing Sewing Patterns On Fabric For Cutting
- Rotary Cutters or Fabric Scissors?
- Cutting The Sewing Patterns
- What Are Notches And How To Use Them In The Sewing Process
- Transferring Notches From Pattern To Fabric
- Transferring Seamlines to Fabric
- Staystitching
- Backstitching: A Complete Guide
- Hand Basting: A Complete Guide
- Sewing Continuous Bias Binding
- Darts >
-
Sewing Seams
>
- The Basics Of Seams And Seam Allowance
- How To Sew A Straight Seam
- Sewing Curved Seams
- Sewing Corner Seams
- Trimming And Grading Seam Excess
- Notching/Clipping Seam Allowance for Tension Release
- Sewing Topstitched Seams
- Sewing Corded Seams
- Sewing A Slot Seam
- Sewing A Gathered Seam
- Sewing Bias Seams
- Sewing Seams With Ease
- Sewing Seams With Crossing Seamlines
- Sewing Unlike Fabric Seams
- How To Iron Seams: Ironing Tools And Conventions
- Sewing With Knit Fabrics
- Understanding Stitch Length And Tension
- Sewing Unique Fabric Seams
-
Seam Finishes
>
- Seam Finishing Techniques - Overview
- Applying A Pinked Seam Finish
- Applying A Bias Bound Seam Finish
- Serging And Zigzag Seam Finishes
- Sewing A Self-Bound Seam Finish
- Sewing A French Seam Finish
- Sewing A Hong Kong Seam Finish
- Sewing A Mock French Seam Finish
- Sewing A Turned-and-Stitched Seam Finish
- Sewing Overcast Hand-Applied Seam Finishes
- Sewing A Flat Felled Seam
- Sewing A Hairline Seam Finish
-
Hem Finishes
>
- Garment Hem Finishes: Overview
- Sewing A Double Fold Hem Finish
- Sewing A Single Fold Hem Finish
- Sewing Bound Hem Finishes
- Sewing An Exposed Double Layer Bound Hem
- Sewing A Folded-Up Bound Hem with Pre-folded Binding
- Sewing A Hong Kong Hem Finish
- Sewing A Band Hem Finish
- Sewing A Bias Faced Hem Finish
- Sewing A Twill Tape Hem Finish
- Sewing A Rolled Hem Finish
- Sewing A Shaped Hem Facing
- Using Fusible Hem Tape And Webbing
- Finishing A Lace Fabric Hem
- Finishing A Leather Hem
- Sewing Faced Hem Corners
- How To Finish Lining At The Hem
- Finishing Fabric Corners by Mitering >
- Interfacing A Hemline: Lined And Unlined Examples
-
Sewing Pockets
>
- Curved Patch Pocket With Flap
- Unlined Square Patch Pockets
- Lined Patch Pockets: Two Ways
- Extension On-Seam Pockets
- Separate On-Seam Pocket
- Front Hip Pockets
- Bound Double Welt Pocket
- Double Welt Pocket With Flap
- Self-Welt Pocket (Using Single Fabric Layer)
- Slanted Welt Pocket (Hand-Stitched)
- Faced Slash Pockets: Overview >
-
Sewing Zippers
>
- Sewing Zippers: General Information
- Sewing A Centered Zipper
- Sewing A Lapped Zipper
- Sewing An Invisible Zipper
- Sewing A Fly Front Zipper
- Sewing A Closed-End Exposed Zipper (No Seam)
- Sewing An Exposed Separating Zipper
- Sewing Hand Stitched Zipper Applications
- Sewing A Zipper Underlay
- Sewing A Placket-Enclosed Separating Zipper
- Sleeveless Finishes >
-
Neckline Finishes
>
- Sewing A Neck Shaped Facing
- Sewing An All-In-One Neck Facing
- Neck And Garment Opening Combination Facings >
- Sewing A Bias Faced Neckline Finish
- Sewing A Band Neckline Finish
- Bound Neckline Finishes: Overview >
- Sewing A Semi-Stretch Strip Band Neckline
- Ribbed Neck Band And Classic Turtleneck
- Decorative Neckline Finishes >
- Finishing Facing Edges >
-
Extras
>
- A Complete Guide on Interfacing
- Sewing Bound Spaghetti Straps
- Sewing Spaghetti Straps To A Faced Neckline
- Sewing Ruffles: Overview
- Patterning And Sewing A Circle Ruffle
- Sewing A Gathered Heading Ruffle
- Sewing Double Layer Gathered Ruffles
- Sewing A Gathered Ruffle Into A Seam
- Sewing A Gathered Ruffle To A Fabric Edge
- Sewing A Fabric Surface Slit
- Sewing A Slit Seam
- Hand-Applied Straight Stitches
- Hand-Applied Blind Stitches
- Hand-Applied Overedge Stitches
- Hand-Applied Tack Stitches
- Hand-Applied Decorative Stitches
-
Basics
>
- Custom Bridal
- Custom Apparel
- About
- Blog

 RSS Feed
Services |
Company |
|
