|
As one of my favorite looks of all time, this box pleat skirt is every bit the playful yet classic cut you want in a silhouette. From a technical stand point, drafting its sewing patterns form scratch is moderately simple yet a little more time consuming (proof in the duration of the sewalong video below). The steps below will walk you through the complete process of sewing a full, box pleat skirt with invisible side zipper and side seam pocket, from drafting all sewing patterns (from scratch) to cutting, marking and sewing the final skirt! Side note: This tutorial will emphasize the importance of using notches as they provide one of the most essential markers for matching pleats and pockets in the sewing process. Drafting The Box Pleat Skirt PatternsWhen I draft sewing patterns from scratch, I always work from a set of basic dress patterns (also called blocks) fitted perfectly to my size. If you choose to do the same, never work on your original basic patterns. Always trace a copy to a separate piece of paper that you can then completely alter into the new design. Doing so not only allows for re-usability but also takes the pressure off making mistakes! If you take a difficult-to-fix wrong turn, you can always retrace the basic dress patterns and start the process all over. My dress patterns are cut on fold style with single pointed bust darts on the front and double pointed (contour) waist darts at the front and back. This style is as simple as you can get in terms of a non-stretch, basic fitted dress. For this skirt tutorial, I separated the bottom portion of each front and back dress pattern and used it as a blue print for drafting my box pleat skirt. The Waistband Patterns Before you start altering the body of the skirt pattern, use the original waistline to draft the waistband patterns first. It is a lot more difficult to draft the waistband once the pleats have alreday been added to the skirt's waistline as you would have to keep the pleats folded as you draft. No need to complicate things! Get the waistband patterns out of the way first.
You can view the full tutorial of drafting this particular waistband pattern here: How To Draft A Sewing Pattern For A Non-Stretch Skirt Waistband (Faced Style) To give you a more succinct breakdown, here are some of the main steps in the process:
0 Comments
If you've ever sewn a garment from start to finish, you most likely know of that one or multiple elements in the process that once sewn, make everything instantly come together! For me, that special moment happens when either completing the zipper, attaching both sleeves or sewing in the waistband. When sewing bottoms, the waistband is often that single component that keeps everything together, binding the rest of the design elements into a finished product. In this tutorial, I will be using a simple yet classic technique to sew a waistband to the box pleat skirt I've been working on in this recent sewalong. Attaching this particular woven waistband is especially rewarding as it provides structure and support to the deep pleating along the skirt's waistline. Needless to say, a classic waistband (like the one in this tutorial) will keep all the folds aligned properly while also visually enhancing the skirt's fullness. When adding a waistband to an edge that houses pleats or gathers, it is always a good idea to first reinforce the folds or gathers with an additional stitch so that they don't stretch or come undone during the rest of the sewing process. Although waistband construction techniques vary based on style, fabric and design, reinforcing the garment's edge is one of those rules that needs to be followed regardless.
My skirt will have a basic two piece (faced) waistband that is non-stretch (woven). The design also calls for an invisible zipper sewn into the side seam which as you'll see below, will dictate the sequence of steps for sewing this particular band. That being said, if you follow the steps in order, you should not run into any major issues. If you're anything like me, you will find the process fairly enjoyable! I love on-seam pockets so much that I could sew one with my eyes closed. Simple, yet extremely functional, on-seam or in-seam pockets (whatever you want to call them) work with almost all garments without altering them aesthetically. As you'll see below, they are also very simple to sew and will elevate just about any design. I like to add my own spin on it by making the pocket bag a contrasting color or print. It's a great way to add character and a pop of color to the garment without overwhelming it! On-seam pockets are composed of two parts: the underlayer, which is sewn to the front piece of the garment, and an identical layer sewn to the back garment piece. When put together, the two layers form the pocket bag. Conventionally, these two pieces are identical in shape and are the mirror copies of each other. This facilitates the process of cutting and matching them to each seam edge. The easiest way to draft a sewing pattern for an on-seam pocket is to use your garment's front pattern piece as a guide. Using the seam that the pocket will be sewn into, sketch out the shape of the pocket bag. Mark all the appropriate notches for matching and sewing the pocket pieces later. For a full tutorial on drafting this skirt pocket pattern, check out this tutorial: How To Make A Sewing Pattern For A Skirt On-Seam Pocket. Seeing the pocket pattern being drafted should hopefully help you visualize how each piece fits into the finished clothing item.
For the past few weeks, you've seen glimpses of this lined crop top go through some of its development stages. From a simple sketch to the more complicated sewing process in between, this blouse's construction progressed with minimal hiccups along the way. When all is said and done, it is so rewarding to see everything come together into a garment that fits and functions exactly as I envisioned it. I can certainly attest to that as I got the chance to wear the blouse (paired with a matching skirt to come soon!) at this year's Heart To Heart Gala. As you go through the video sewalong and the steps below, you'll be able to access related tutorials that give you a detailed look at each process and sewing technique. Designing And Sketching The BlouseIt all started with a sketch. Or rather, two yards of fabric I came across at the fabric store while browsing for something completely unrelated. I didn't have the design in mind at the time but this blue-gold abstract print reminded me of my undying love for classically full, structured skirts of which you'll see more in the skirt sewing tutorials to come. The medium weight nature of this fabric provided the perfect canvas for finally taking on the project. 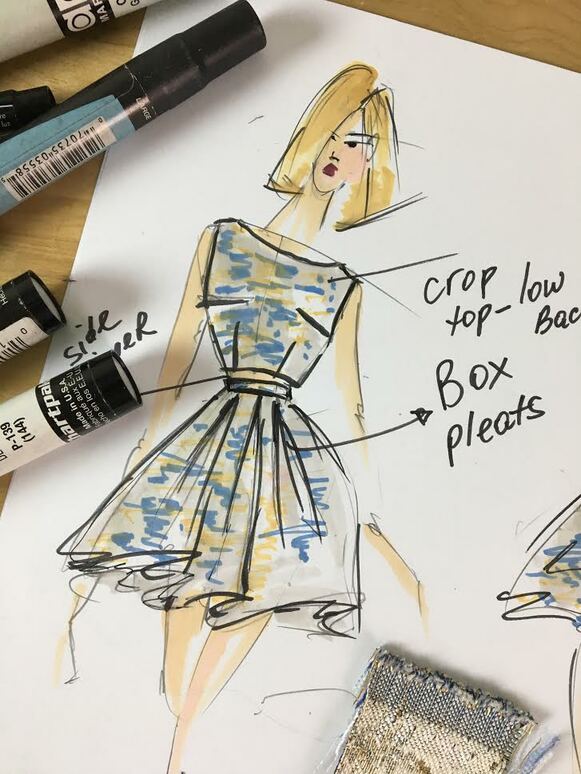 For the design development and sketching video, check out: The Start Of A Sewalong- Sketching And Conceptualizing A Two Piece Cocktail Dress.
When I first started sewing years ago, I was completely perplexed (and intimidated) by the idea of finishing and sealing lining edges. You know the lining style I'm talking about? The kind where the lining is sewn shut without a visible sign or obvious opening. It used to confuse me to no end! Fast forward 10 years later, and sewing lining has become one of my favorite finishes due to both its simplicity and clean quality. Although this tutorial deals specifically with enclosing and sealing lining edges into a zippered blouse, it is imperative to first learn how to attach the lining itself. If you are unfamiliar with the process, check out this tutorial- Video Tutorial: How To Sew Full Lining To A Fitted Blouse With Darts The blouse I'm working with is fully lined and has a hem facing. Before finishing the blouse hem itself, I attached the hem facing to the lining layer at the bottom. As an alternative, if you have a hem facing, you can sew it into the bottom of the blouse first after which you can connect it to the bottom edge of the lining. Some may argue this is a better technique, but I find that sealing the lining to the very bottom edge of the blouse hem is a bit more simple On that same note, if your garment has a zipper, whether along the sides seam (like in this case) or any other seam (center back, center front, etc.) make sure the zipper is fully stitched into the blouse layer first before finishing the lining to the zipper tape.
Every time I do a tutorial about invisible zippers, I spend the first paragraph talking about their convenience and how much I love using them. This time around, I'll (try to) spare you the long praise- well, aside from telling you that invisible zippers are probably one of the best inventions in dressmaking. In a previous sewing tutorial, I introduced you to the basics of sewing an invisible zipper using a regular zipper presser foot on your sewing machine (not invisible zipper foot). In this video tutorial, I'll walk you through an actual application of an invisible zipper into the side seam of a lined blouse. This application is widely used with form fitted woven dresses, especially those that are more formal and tailored. While my invisible zipper will be sewn into the side seam, you can use the same technique to apply it to any regular seam. It is called invisible for reason- When closed, invisible zippers blend into the seam, becoming essentially unnoticeable on the outside of the garment. This characteristic makes it ideal for a quick, clean garment closure that doesn't alter its design.
Its simplicity doesn't require any special seam manipulation aside from the necessity of a seam allowance that matches the invisible zipper tape. In most cases, the seam that will house the invisible zipper should have anywhere from 1/2" to 5/8" seam allowance, depending on the width of the zipper tape being used. The reason seam allowance is important with this type of zipper application is that for best (easiest) results, the zipper tape edges should be aligned with each corresponding seam allowance edges such that when closed, the zipper blends evenly into the seam without altering its fit or size. |
The Blog:A journey into our design process, sewing tutorials, fashion tips, and all the inspiring people and things we love. 
Doina AlexeiDesigner by trade and dressmaker at heart. I spend most of my days obsessing over new fabrics and daydreaming new ideas. 
Sadie
Executive Assistant & Client Relations Manager Archives
November 2019
Categories
All

|

-
Sewing Tutorials
-
Basics
>
- Aligning Pattern Grainlines To Fabric
- Preparing Fabrics For Sewing
- Pinning Sewing Patterns To Fabric
- Placing Sewing Patterns On Fabric For Cutting
- Rotary Cutters or Fabric Scissors?
- Cutting The Sewing Patterns
- What Are Notches And How To Use Them In The Sewing Process
- Transferring Notches From Pattern To Fabric
- Transferring Seamlines to Fabric
- Staystitching
- Backstitching: A Complete Guide
- Hand Basting: A Complete Guide
- Sewing Continuous Bias Binding
- Darts >
-
Sewing Seams
>
- The Basics Of Seams And Seam Allowance
- How To Sew A Straight Seam
- Sewing Curved Seams
- Sewing Corner Seams
- Trimming And Grading Seam Excess
- Notching/Clipping Seam Allowance for Tension Release
- Sewing Topstitched Seams
- Sewing Corded Seams
- Sewing A Slot Seam
- Sewing A Gathered Seam
- Sewing Bias Seams
- Sewing Seams With Ease
- Sewing Seams With Crossing Seamlines
- Sewing Unlike Fabric Seams
- How To Iron Seams: Ironing Tools And Conventions
- Sewing With Knit Fabrics
- Understanding Stitch Length And Tension
- Sewing Unique Fabric Seams
-
Seam Finishes
>
- Seam Finishing Techniques - Overview
- Applying A Pinked Seam Finish
- Applying A Bias Bound Seam Finish
- Serging And Zigzag Seam Finishes
- Sewing A Self-Bound Seam Finish
- Sewing A French Seam Finish
- Sewing A Hong Kong Seam Finish
- Sewing A Mock French Seam Finish
- Sewing A Turned-and-Stitched Seam Finish
- Sewing Overcast Hand-Applied Seam Finishes
- Sewing A Flat Felled Seam
- Sewing A Hairline Seam Finish
-
Hem Finishes
>
- Garment Hem Finishes: Overview
- Sewing A Double Fold Hem Finish
- Sewing A Single Fold Hem Finish
- Sewing Bound Hem Finishes
- Sewing An Exposed Double Layer Bound Hem
- Sewing A Folded-Up Bound Hem with Pre-folded Binding
- Sewing A Hong Kong Hem Finish
- Sewing A Band Hem Finish
- Sewing A Bias Faced Hem Finish
- Sewing A Twill Tape Hem Finish
- Sewing A Rolled Hem Finish
- Sewing A Shaped Hem Facing
- Using Fusible Hem Tape And Webbing
- Finishing A Lace Fabric Hem
- Finishing A Leather Hem
- Sewing Faced Hem Corners
- How To Finish Lining At The Hem
- Finishing Fabric Corners by Mitering >
- Interfacing A Hemline: Lined And Unlined Examples
-
Sewing Pockets
>
- Curved Patch Pocket With Flap
- Unlined Square Patch Pockets
- Lined Patch Pockets: Two Ways
- Extension On-Seam Pockets
- Separate On-Seam Pocket
- Front Hip Pockets
- Bound Double Welt Pocket
- Double Welt Pocket With Flap
- Self-Welt Pocket (Using Single Fabric Layer)
- Slanted Welt Pocket (Hand-Stitched)
- Faced Slash Pockets: Overview >
-
Sewing Zippers
>
- Sewing Zippers: General Information
- Sewing A Centered Zipper
- Sewing A Lapped Zipper
- Sewing An Invisible Zipper
- Sewing A Fly Front Zipper
- Sewing A Closed-End Exposed Zipper (No Seam)
- Sewing An Exposed Separating Zipper
- Sewing Hand Stitched Zipper Applications
- Sewing A Zipper Underlay
- Sewing A Placket-Enclosed Separating Zipper
- Sleeveless Finishes >
-
Neckline Finishes
>
- Sewing A Neck Shaped Facing
- Sewing An All-In-One Neck Facing
- Neck And Garment Opening Combination Facings >
- Sewing A Bias Faced Neckline Finish
- Sewing A Band Neckline Finish
- Bound Neckline Finishes: Overview >
- Sewing A Semi-Stretch Strip Band Neckline
- Ribbed Neck Band And Classic Turtleneck
- Decorative Neckline Finishes >
- Finishing Facing Edges >
-
Extras
>
- A Complete Guide on Interfacing
- Sewing Bound Spaghetti Straps
- Sewing Spaghetti Straps To A Faced Neckline
- Sewing Ruffles: Overview
- Patterning And Sewing A Circle Ruffle
- Sewing A Gathered Heading Ruffle
- Sewing Double Layer Gathered Ruffles
- Sewing A Gathered Ruffle Into A Seam
- Sewing A Gathered Ruffle To A Fabric Edge
- Sewing A Fabric Surface Slit
- Sewing A Slit Seam
- Hand-Applied Straight Stitches
- Hand-Applied Blind Stitches
- Hand-Applied Overedge Stitches
- Hand-Applied Tack Stitches
- Hand-Applied Decorative Stitches
-
Basics
>
- Custom Bridal
- Custom Apparel
- About
- Blog
 RSS Feed
Services |
Company |
|
