|
Every time I do a tutorial about invisible zippers, I spend the first paragraph talking about their convenience and how much I love using them. This time around, I'll (try to) spare you the long praise- well, aside from telling you that invisible zippers are probably one of the best inventions in dressmaking. In a previous sewing tutorial, I introduced you to the basics of sewing an invisible zipper using a regular zipper presser foot on your sewing machine (not invisible zipper foot). In this video tutorial, I'll walk you through an actual application of an invisible zipper into the side seam of a lined blouse. This application is widely used with form fitted woven dresses, especially those that are more formal and tailored. While my invisible zipper will be sewn into the side seam, you can use the same technique to apply it to any regular seam. It is called invisible for reason- When closed, invisible zippers blend into the seam, becoming essentially unnoticeable on the outside of the garment. This characteristic makes it ideal for a quick, clean garment closure that doesn't alter its design. Its simplicity doesn't require any special seam manipulation aside from the necessity of a seam allowance that matches the invisible zipper tape. In most cases, the seam that will house the invisible zipper should have anywhere from 1/2" to 5/8" seam allowance, depending on the width of the zipper tape being used. The reason seam allowance is important with this type of zipper application is that for best (easiest) results, the zipper tape edges should be aligned with each corresponding seam allowance edges such that when closed, the zipper blends evenly into the seam without altering its fit or size. To sew an invisible zipper into a seam with lining, make sure to leave the entire seam completely unstitched. The invisible zipper will be sewn first after which the seam will be finalized. The blouse in this tutorial is a cropped style part of this sewalong in the works. The side seam invisible zipper in this case will be opening from the bottom up, stopping right under the armhole. Due to the form fitted nature of this lined blouse, the zipper opening should extend past the bust darts (horizontal), opening almost the entire length of the seam without fully separating. What you'll need: - An invisible zipper of the appropriate size for your clothing item. Keep in mind that in order for a non-stretch, fitted garment to function properly, the zipper opening should extend past the tightest parts of the garment (waistline, waist darts, bust darts, etc). - Pins. - Hand sewing needle and contrast color thread (recommended). Highly recommended for hand basting the zipper in place before permanently stitching it. - A regular zipper foot (shown below). If your sewing machine comes with an invisible zipper foot, use that instead. - As always, a good pair of scissors. 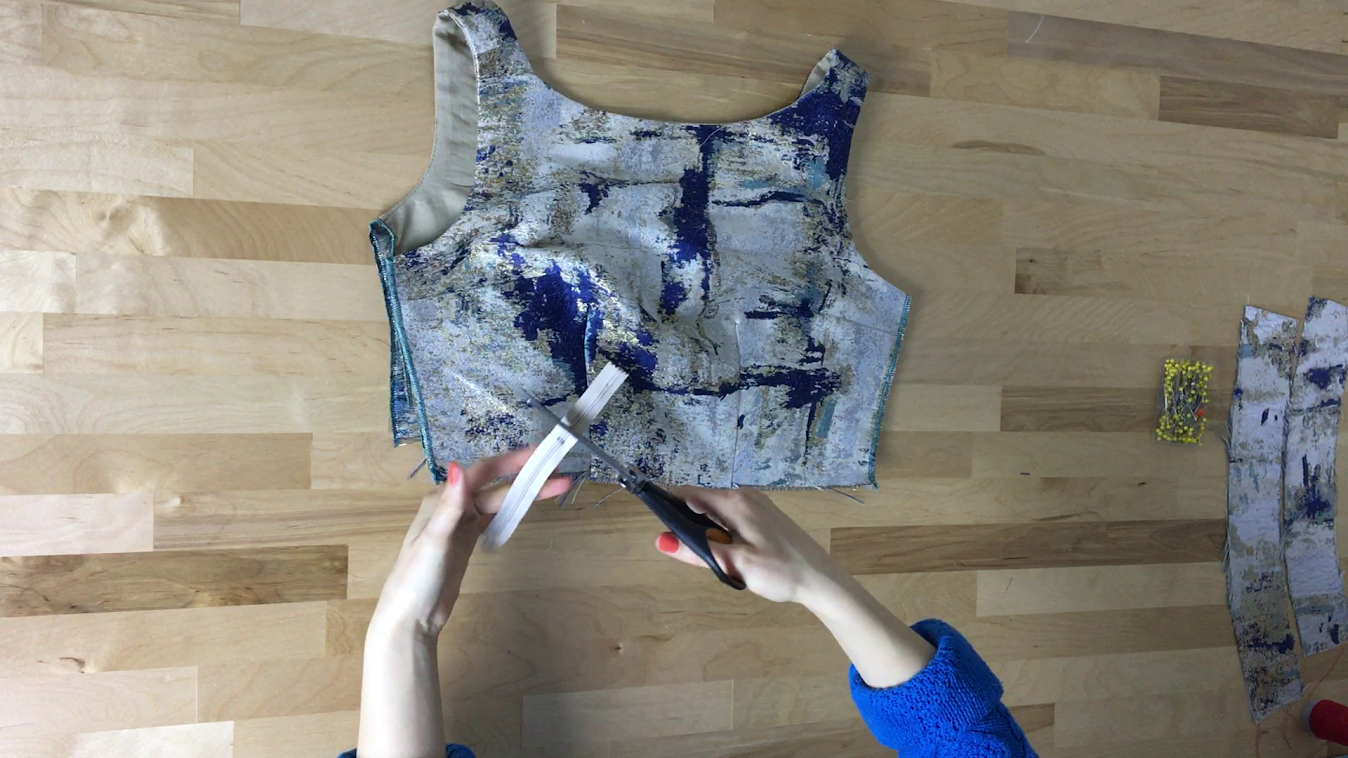 1. On your garment, mark the length of the seam where the invisible zipper will be inserted. To be safe, use a longer zipper for a slightly wider opening. However, the opposite is necessary in my example. Since I'm working with a crop top, I need a shorter zipper then the shortest option I could find in the fabric store. To achieve the perfect length, I shortened it by hand using the method described in this tutorial: 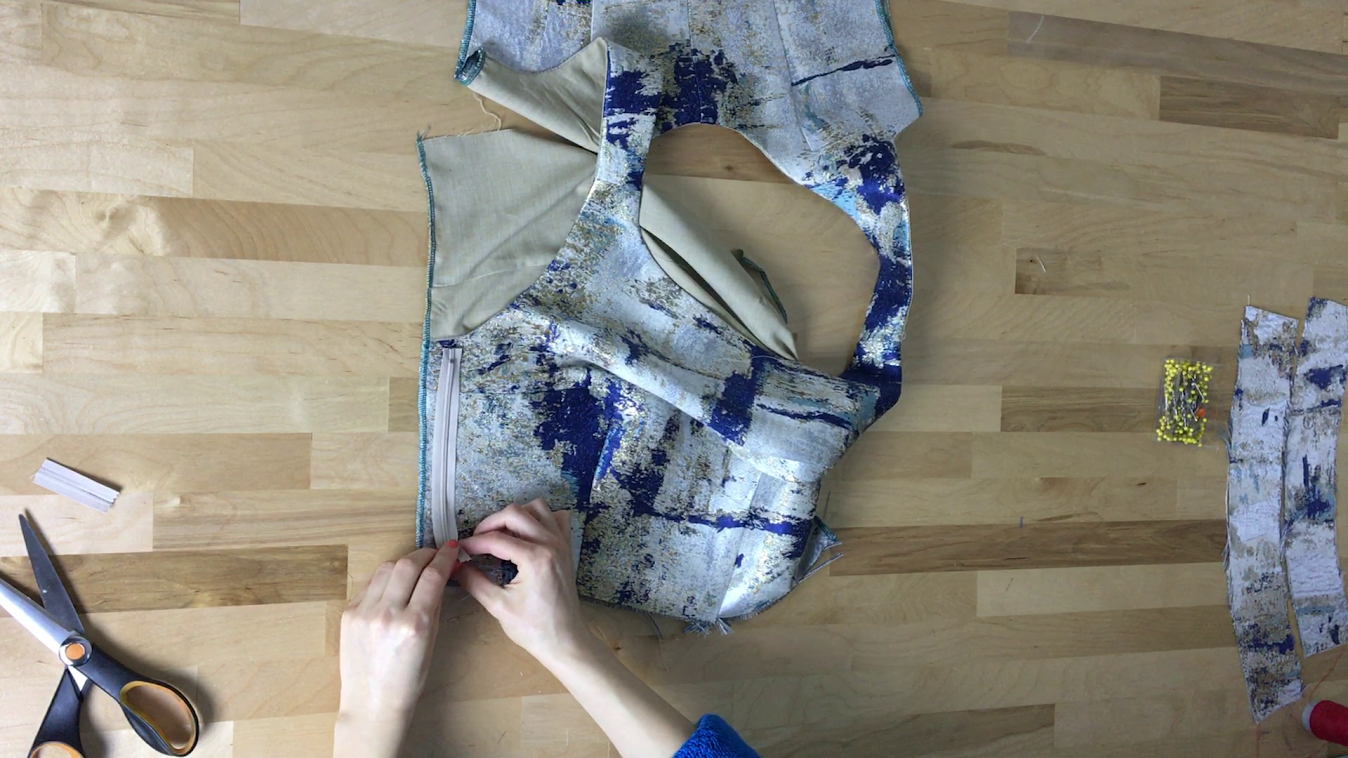 2. Open the lining and self as shown above. The zipper will be sewn to the self layer first. The lining on the other hand, will be clean finished (next week's tutorial) only after the zipper has been sewn to the self layers of the seam. Align the invisible zipper face down along one of the self edges as shown. As noted, my zipper will open from the bottom up (conventional for blouses). Conversely, if you are sewing a dress, the zipper should open from the top down. Keep this in mind as you are aligning the zipper to the garment's edge, making sure the zipper tab is aligned accordingly (top or bottom). Note: The term self refers to the blouse layer while lining refers to simply, the lining layer. 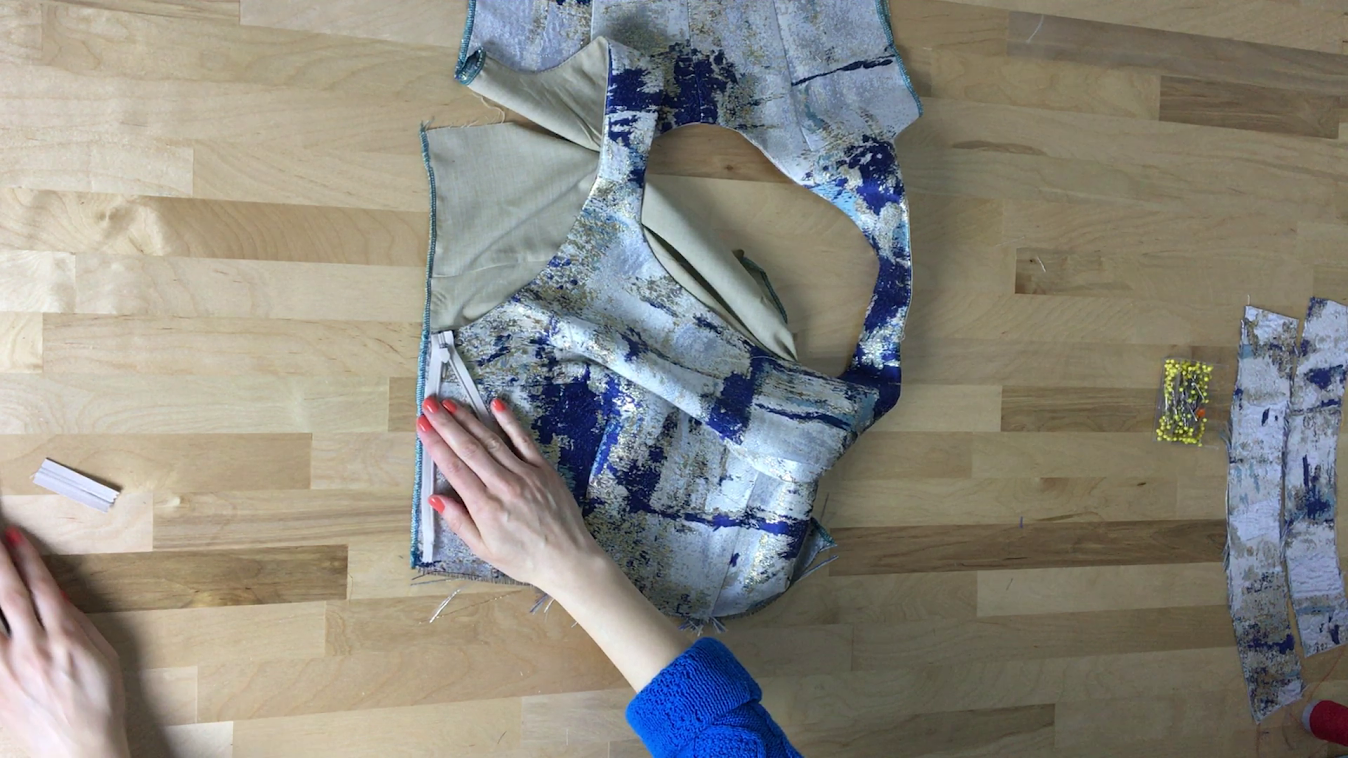 Keeping the zipper aligned face down, open it up all the way as shown above. Align the zipper tape edge to the blouse self edge as shown. The bottom of the tape aligns to the hem of the blouse. As you can see, the zipper opening extends the entire length of the seam. 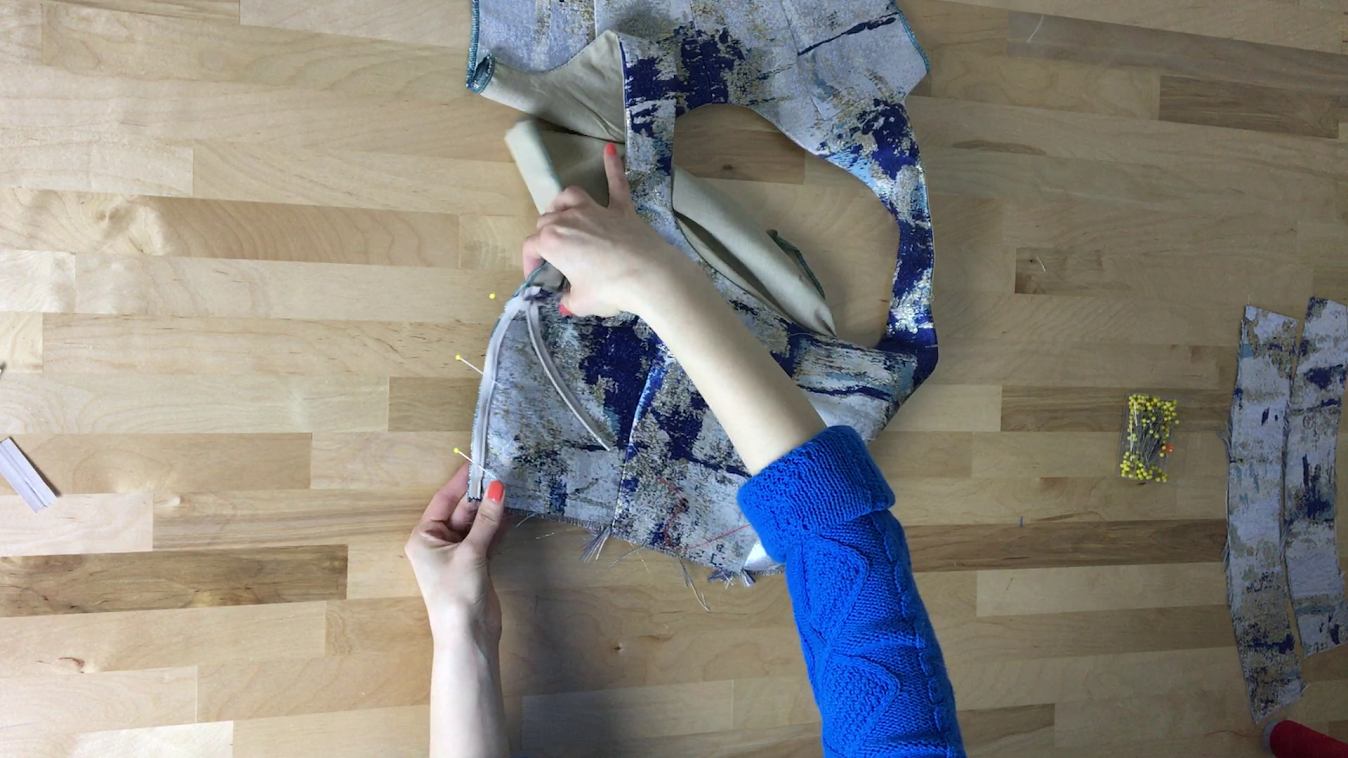 4. Insert pins to keep the tape and blouse edges together. For best results, insert the pins perpendicular to the edge as shown here. This alignment will ensure a secure connection while also making the pins easy and convenient to remove during machine stitching (that's if you choose to skip the hand basting step below). 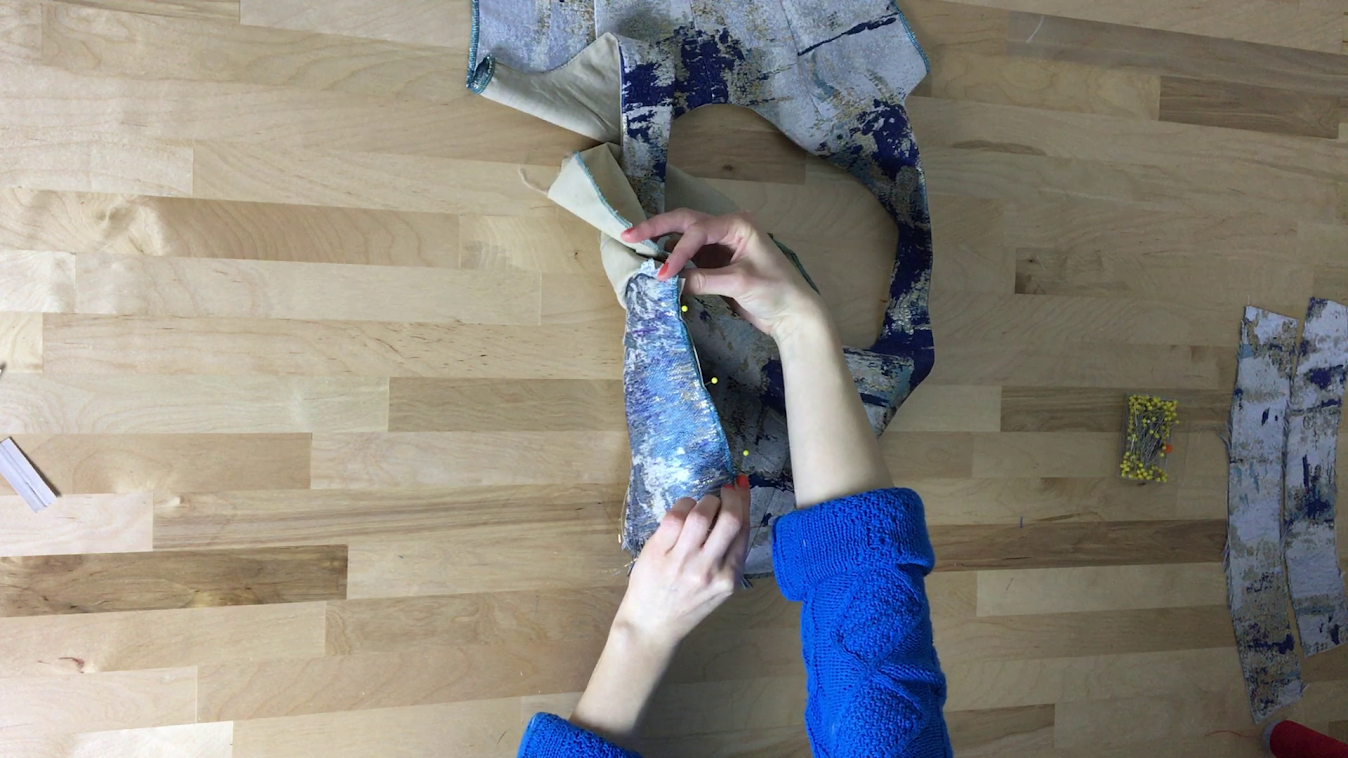 The edge of the blouse should align perfectly to the zipper tape edge. Keep in mind that the seam allowance of the seam should be the same length as the invisible zipper tape. For that reason, once the finished zipper is closed it becomes a continuation of the rest of the seam, hiding into a smooth seam line. Note: Always clean finish the seam edges using a zig zag stitch or overlock stitch (if you have a serging machine) first before applying the zipper. If your fabric doesn't fray much and you'll be clean finishing the garment with lining, you can skip this step. 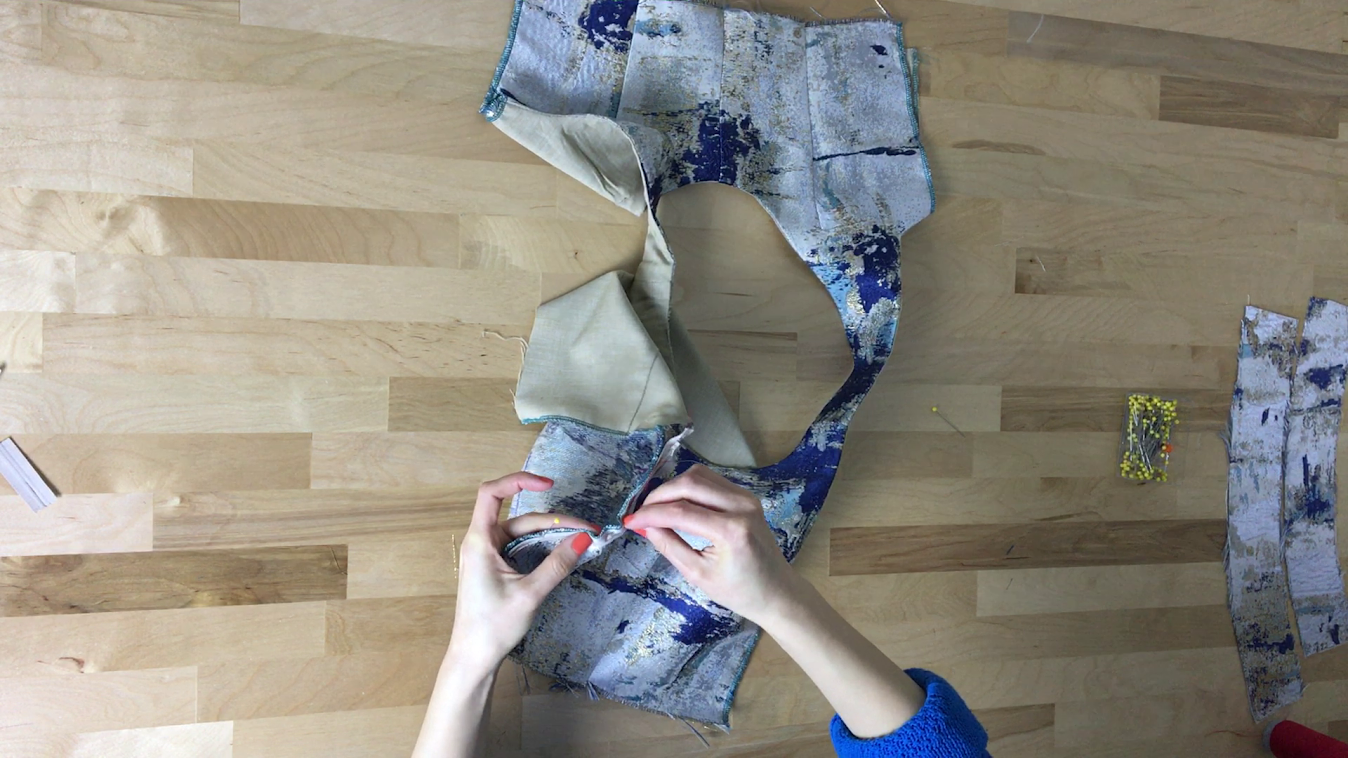 5. If you feel comfortable stitching the zipper while it is held in place with pins alone, you can skip this basting step. However, I highly recommend that if you don't have much experience sewing zippers, you hand baste it before applying the final machine stitch. It will keep the zipper tape from shifting and provide a more secure alignment. Use a hand sewing needle and contrast thread (I like to use red) to add a quick, uneven basting stitch connecting the zipper tape and seam edge as shown.  The basting stitch will hold the two layers of fabric together without the need for pins. Once basted, you can remove all the pins and use the basting alone as a temporary connector. 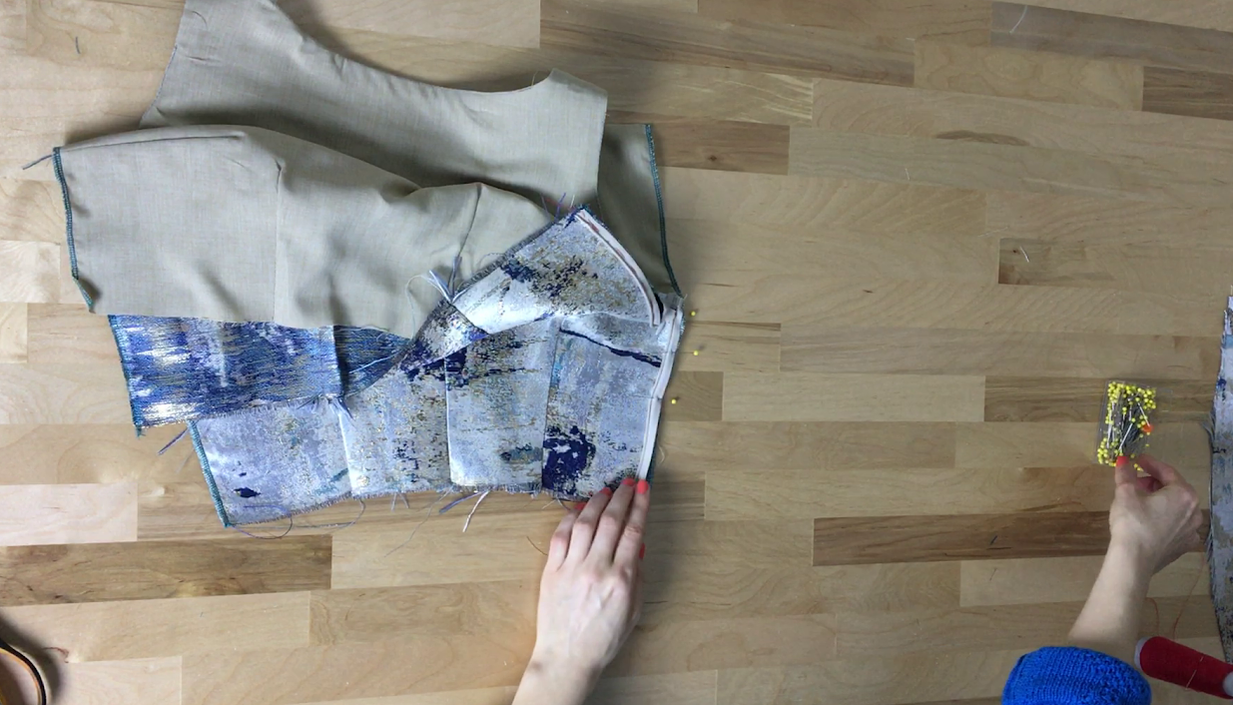 6. To connect the other side of the zipper, turn the blouse over so that the face of the other zipper portion corresponds to the face of the other seam edge. It may take a bit of fiddling until you get this alignment down, especially if you've never sewn an invisible zipper before. What I like to do is close the zipper and replicate what it will look like when the zipper is inserted into the seam. Once I figure out the correct alignment, I hold the zipper tape and garment edge in place, open the zipper, and secure with pins to finish aligning it permanently. As you did on the other side, pin the zipper tape and seam edge together as shown. At this point, you should try to close the zipper and confirm that it is aligned properly. If further adjustment is needed, just unpin and re-pin the edges correctly.  As you did on the other end, hand baste the tape and seam edge together making sure the outer edges of both are aligned perfectly. Once both zipper ends are aligned and basted, they are ready for the final machine stitch!  7. Using a zipper presser foot (I'm using a regular zipper foot in this tutorial), start stitching the zipper from one end, aligning the needle such that it corresponds to the fold underneath the zipper teeth. 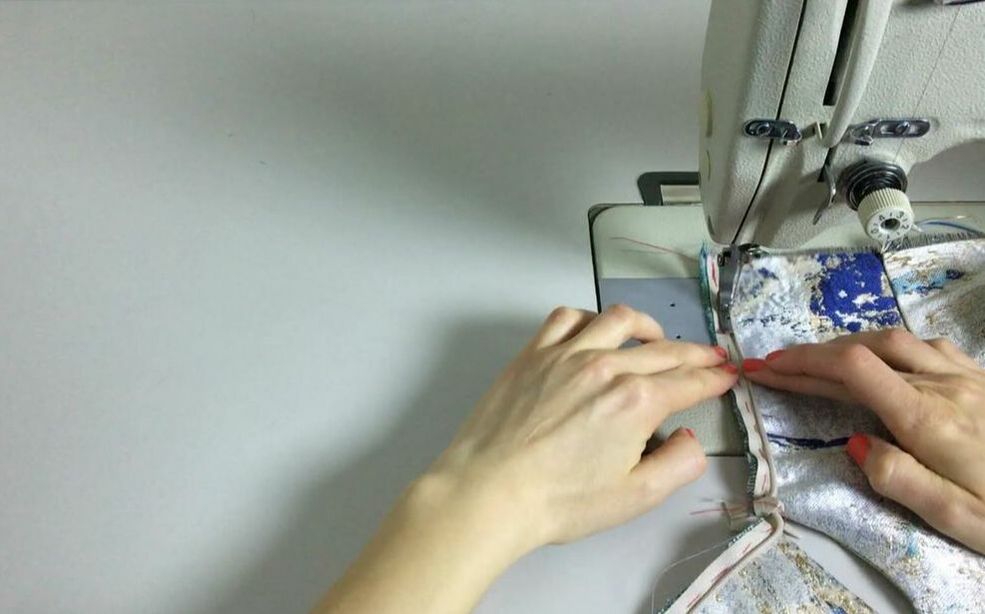 When using a regular zipper foot, you will most likely have to keep the zipper teeth open, such that the needle ends up right on the fold line (behind the zipper teeth). If you are using an invisible zipper presser foot provided in your sewing machine kit, it has the capability to keep the zipper teeth lifted such that the needle ends up right on the fold line, behind the zipper teeth, without the need to keep them manually separated during stitching. Don't get disappointed if the needle isn't landing perfectly behind the zipper teeth. It takes lots of practice and sometimes, a few broken needles, to get this down. Keep practicing and you'll get the hang of it! 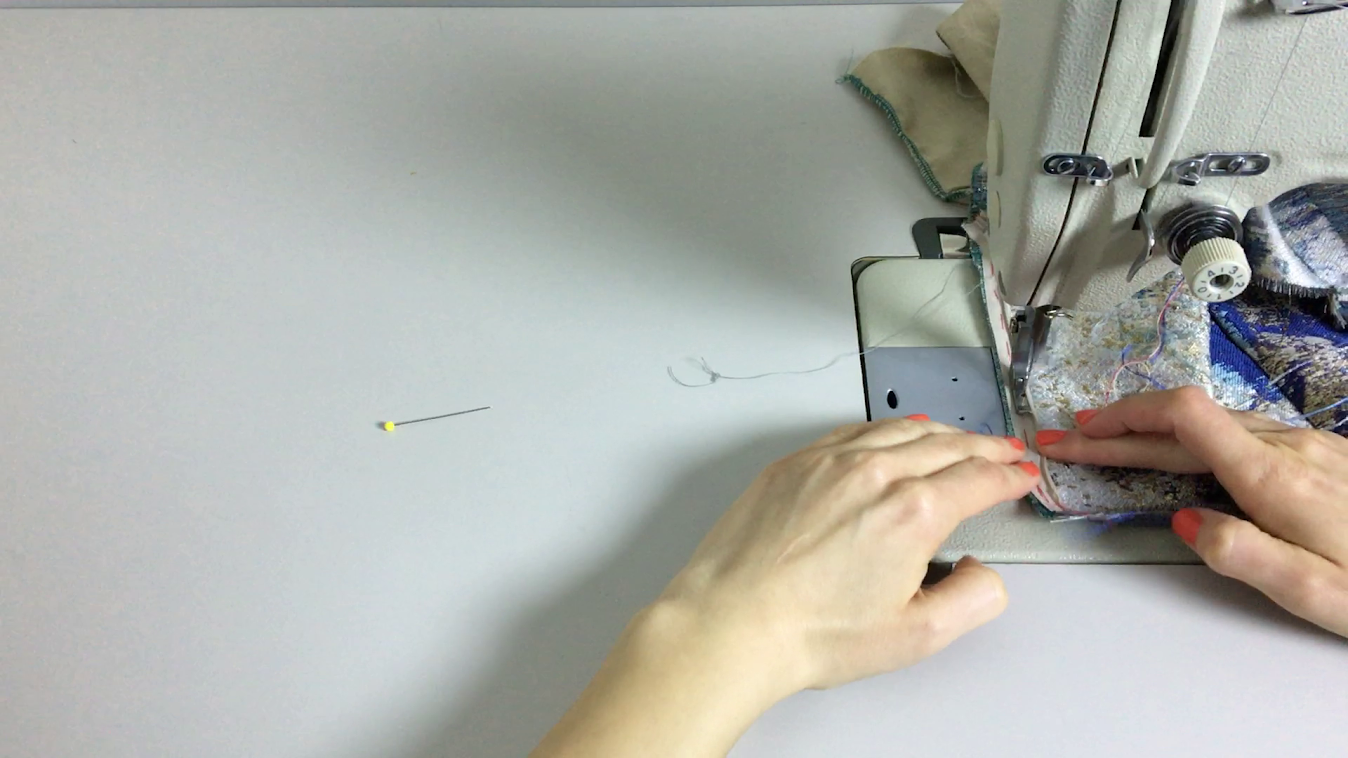 8. Repeat the stitching process with the other side of the zipper. You may need to start the stitch from the opposite end as shown. Use the needle placement in relation to the zipper teeth as a guide. 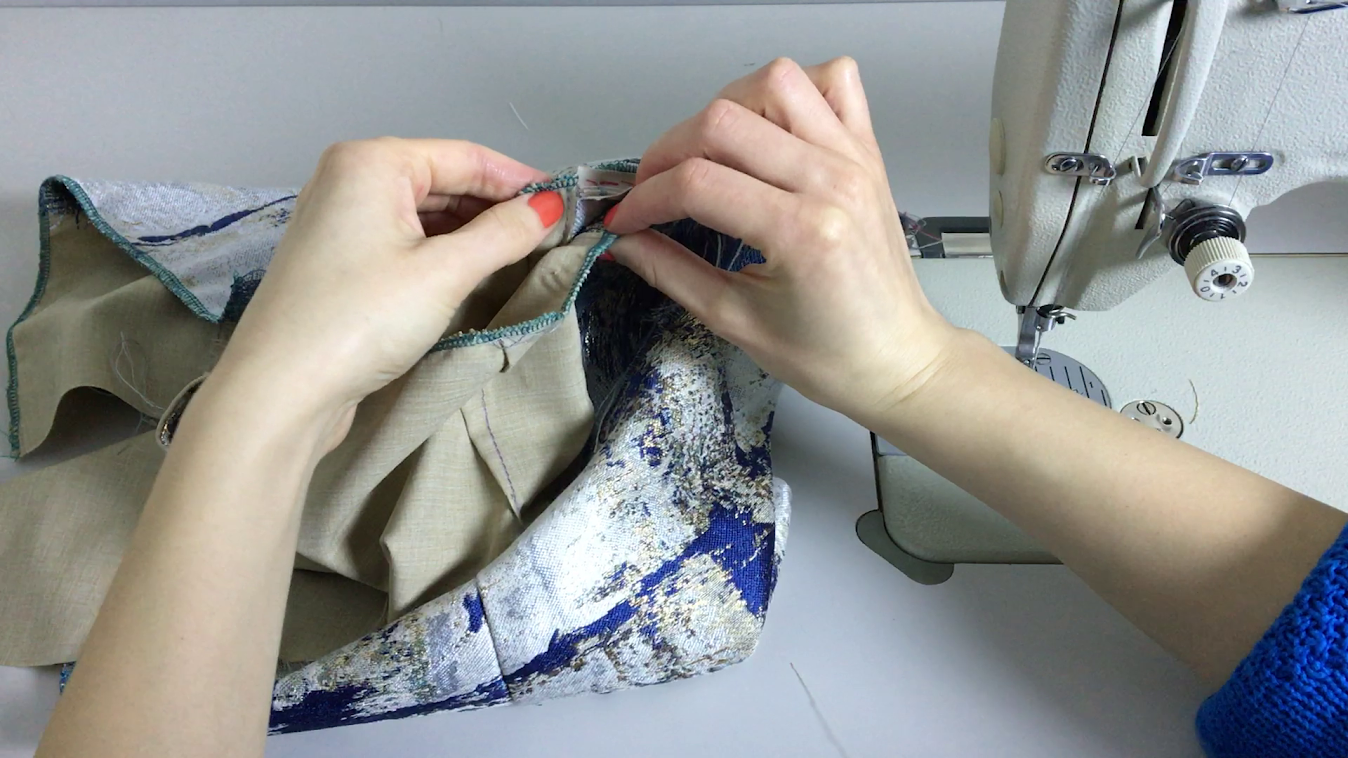 9. Once the zipper is stitched into the edges, the rest of the seam can be finalized. To do so, match the edges of the seam together at the end of the zipper area. Since the blouse in this tutorial has full lining, and the zipper ends at the top of the blouse, make sure to align the seamlines that connect lining and self to each other on both edges (shown above) 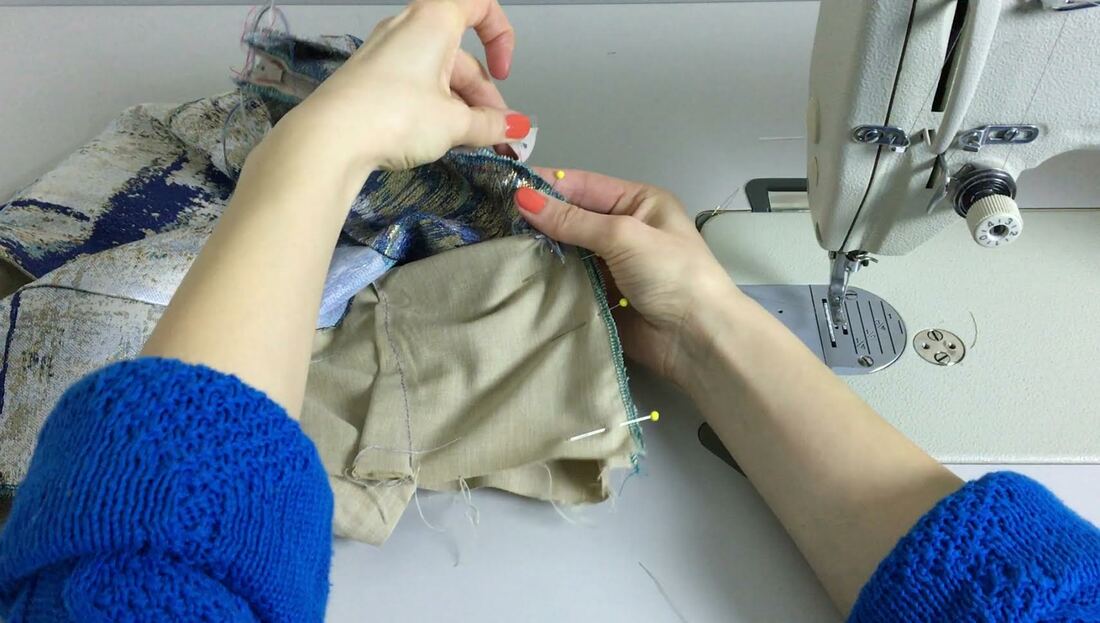 Insert pins perpendicular to the seam edges. I like to pin the lining all the way down as it keep everything aligned. Keep in mind that the lining will not actually be stitched all the way down. 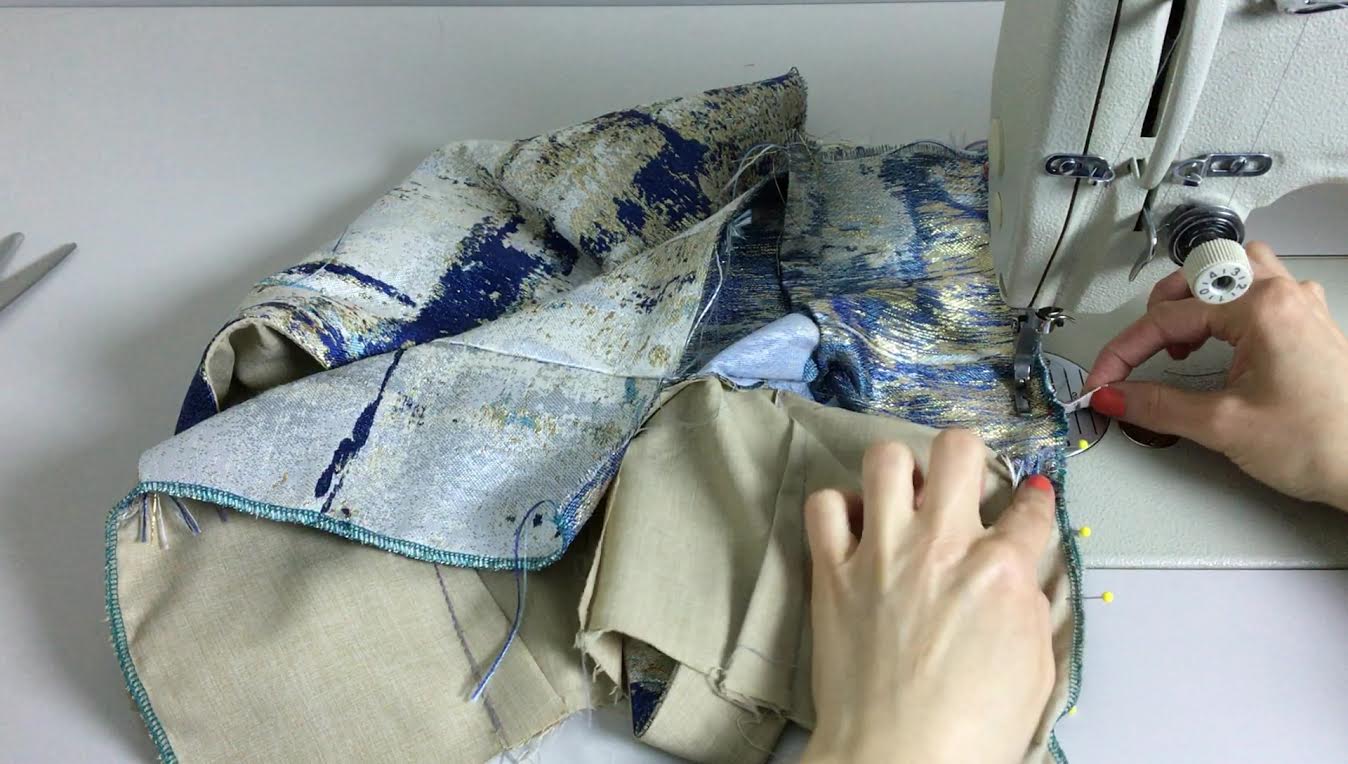 10. Using the zipper presser foot again, align the needle right next to the end of the zipper, at the end of the visible zipper stitch from the previous steps above. It helps to keep the zipper closed during this step. Keeping the zipper tape out of the way as shown, stitch following the appropriate seam allowance as shown (1/2" in this tutorial). 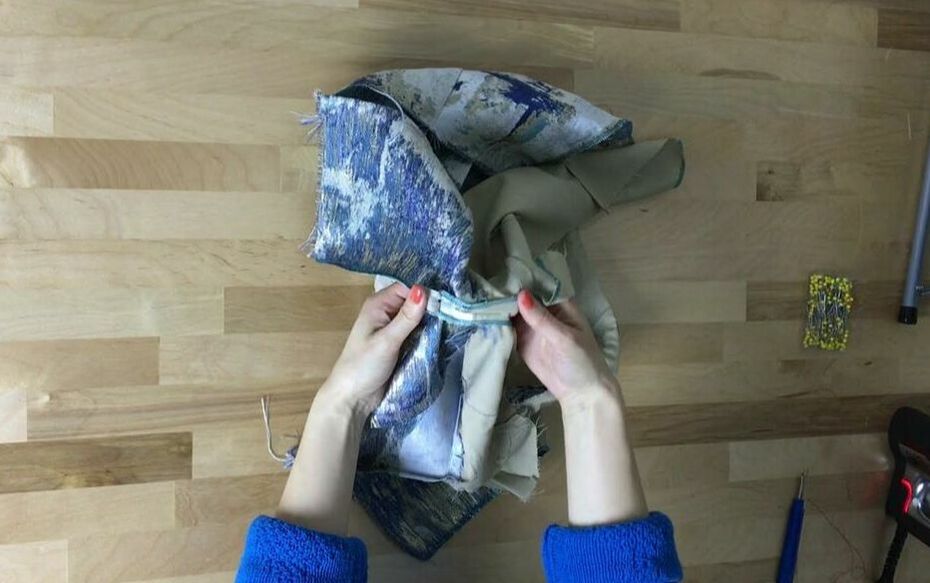 Stitch about 1" into the lining, leaving the rest of the lining edges open. They will be individually clean finished to the zipper tape edges later. You can iron the seam allowance open at the top, but do not iron the edges that house the invisible zipper or you'll have a plastic melting disaster on your hands. 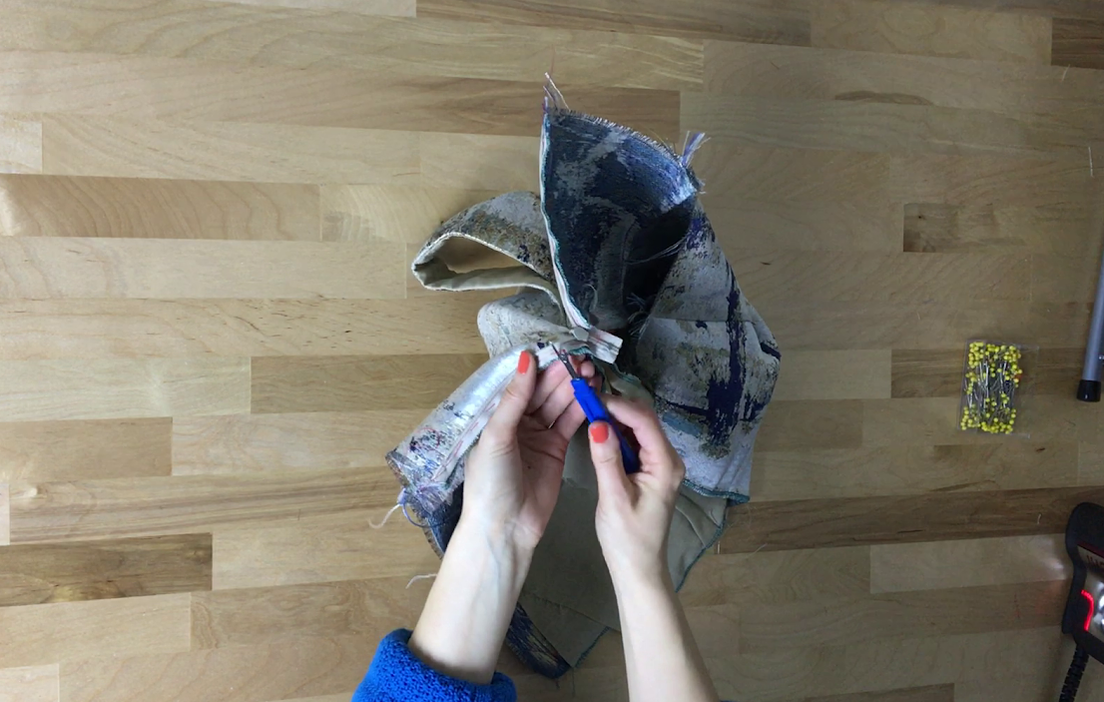 11. Using your seam ripper, or anything that has a pointy edge, remove all the hand basting threads (red). 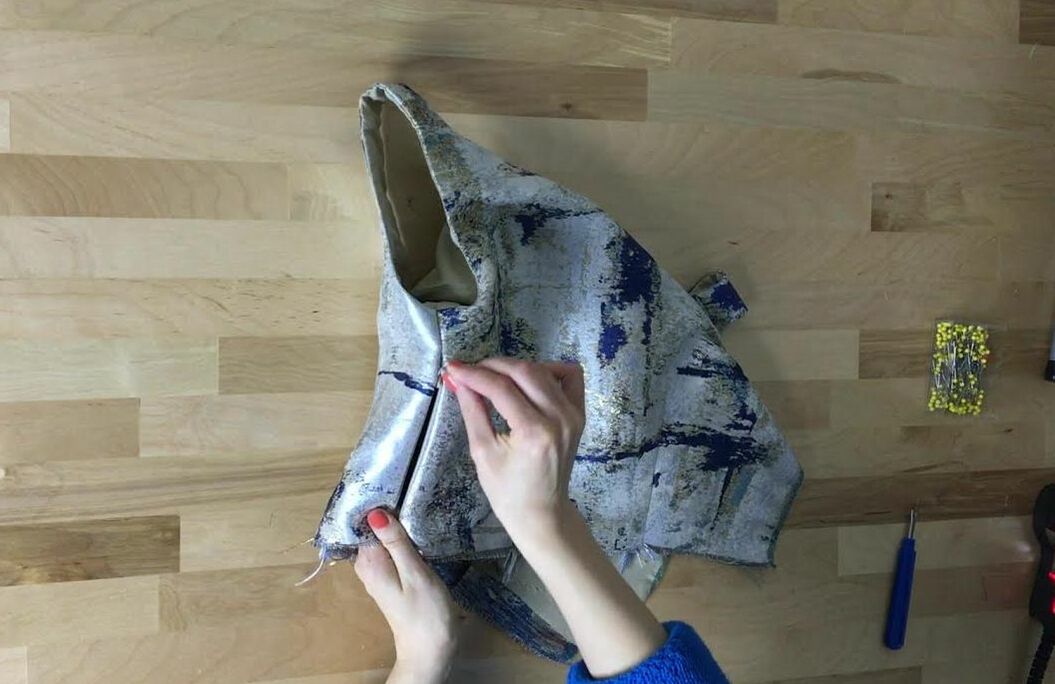 Fold the lining over towards the inside of the garment as shown. The zipper is now complete! Stay tuned for next week's tutorial on how to clean finish lining to the zipper opening and seal the lining edges to the blouse hem. Similar tutorials you may like: 5 Types Of Zipper Applications You Should Know As a Sewing Beginner The Easiest Way To Sew An Invisible Zipper Using A Zipper Presser Foot How To Sew Lining To The Zipper Area (Invisible Zipper Example) How To Alter A Zipper: Shortening And Preparing Zippers For Dress Placket Use How To Sew A Lapped Zipper- The Easy Way How To Sew A Separating Zipper: Topsticthing And Faced Methods What Is Basting? How And When To Use It In Garment Construction
0 Comments
Leave a Reply. |
The Blog:A journey into our design process, sewing tutorials, fashion tips, and all the inspiring people and things we love. 
Doina AlexeiDesigner by trade and dressmaker at heart. I spend most of my days obsessing over new fabrics and daydreaming new ideas. 
Sadie
Executive Assistant & Client Relations Manager Archives
November 2019
Categories
All

|

-
Sewing Tutorials
-
Basics
>
- Aligning Pattern Grainlines To Fabric
- Preparing Fabrics For Sewing
- Pinning Sewing Patterns To Fabric
- Placing Sewing Patterns On Fabric For Cutting
- Rotary Cutters or Fabric Scissors?
- Cutting The Sewing Patterns
- What Are Notches And How To Use Them In The Sewing Process
- Transferring Notches From Pattern To Fabric
- Transferring Seamlines to Fabric
- Staystitching
- Backstitching: A Complete Guide
- Hand Basting: A Complete Guide
- Sewing Continuous Bias Binding
- Darts >
-
Sewing Seams
>
- The Basics Of Seams And Seam Allowance
- How To Sew A Straight Seam
- Sewing Curved Seams
- Sewing Corner Seams
- Trimming And Grading Seam Excess
- Notching/Clipping Seam Allowance for Tension Release
- Sewing Topstitched Seams
- Sewing Corded Seams
- Sewing A Slot Seam
- Sewing A Gathered Seam
- Sewing Bias Seams
- Sewing Seams With Ease
- Sewing Seams With Crossing Seamlines
- Sewing Unlike Fabric Seams
- How To Iron Seams: Ironing Tools And Conventions
- Sewing With Knit Fabrics
- Understanding Stitch Length And Tension
- Sewing Unique Fabric Seams
-
Seam Finishes
>
- Seam Finishing Techniques - Overview
- Applying A Pinked Seam Finish
- Applying A Bias Bound Seam Finish
- Serging And Zigzag Seam Finishes
- Sewing A Self-Bound Seam Finish
- Sewing A French Seam Finish
- Sewing A Hong Kong Seam Finish
- Sewing A Mock French Seam Finish
- Sewing A Turned-and-Stitched Seam Finish
- Sewing Overcast Hand-Applied Seam Finishes
- Sewing A Flat Felled Seam
- Sewing A Hairline Seam Finish
-
Hem Finishes
>
- Garment Hem Finishes: Overview
- Sewing A Double Fold Hem Finish
- Sewing A Single Fold Hem Finish
- Sewing Bound Hem Finishes
- Sewing An Exposed Double Layer Bound Hem
- Sewing A Folded-Up Bound Hem with Pre-folded Binding
- Sewing A Hong Kong Hem Finish
- Sewing A Band Hem Finish
- Sewing A Bias Faced Hem Finish
- Sewing A Twill Tape Hem Finish
- Sewing A Rolled Hem Finish
- Sewing A Shaped Hem Facing
- Using Fusible Hem Tape And Webbing
- Finishing A Lace Fabric Hem
- Finishing A Leather Hem
- Sewing Faced Hem Corners
- How To Finish Lining At The Hem
- Finishing Fabric Corners by Mitering >
- Interfacing A Hemline: Lined And Unlined Examples
-
Sewing Pockets
>
- Curved Patch Pocket With Flap
- Unlined Square Patch Pockets
- Lined Patch Pockets: Two Ways
- Extension On-Seam Pockets
- Separate On-Seam Pocket
- Front Hip Pockets
- Bound Double Welt Pocket
- Double Welt Pocket With Flap
- Self-Welt Pocket (Using Single Fabric Layer)
- Slanted Welt Pocket (Hand-Stitched)
- Faced Slash Pockets: Overview >
-
Sewing Zippers
>
- Sewing Zippers: General Information
- Sewing A Centered Zipper
- Sewing A Lapped Zipper
- Sewing An Invisible Zipper
- Sewing A Fly Front Zipper
- Sewing A Closed-End Exposed Zipper (No Seam)
- Sewing An Exposed Separating Zipper
- Sewing Hand Stitched Zipper Applications
- Sewing A Zipper Underlay
- Sewing A Placket-Enclosed Separating Zipper
- Sleeveless Finishes >
-
Neckline Finishes
>
- Sewing A Neck Shaped Facing
- Sewing An All-In-One Neck Facing
- Neck And Garment Opening Combination Facings >
- Sewing A Bias Faced Neckline Finish
- Sewing A Band Neckline Finish
- Bound Neckline Finishes: Overview >
- Sewing A Semi-Stretch Strip Band Neckline
- Ribbed Neck Band And Classic Turtleneck
- Decorative Neckline Finishes >
- Finishing Facing Edges >
-
Extras
>
- A Complete Guide on Interfacing
- Sewing Bound Spaghetti Straps
- Sewing Spaghetti Straps To A Faced Neckline
- Sewing Ruffles: Overview
- Patterning And Sewing A Circle Ruffle
- Sewing A Gathered Heading Ruffle
- Sewing Double Layer Gathered Ruffles
- Sewing A Gathered Ruffle Into A Seam
- Sewing A Gathered Ruffle To A Fabric Edge
- Sewing A Fabric Surface Slit
- Sewing A Slit Seam
- Hand-Applied Straight Stitches
- Hand-Applied Blind Stitches
- Hand-Applied Overedge Stitches
- Hand-Applied Tack Stitches
- Hand-Applied Decorative Stitches
-
Basics
>
- Custom Bridal
- Custom Apparel
- About
- Blog
 RSS Feed
Services |
Company |
|
