|
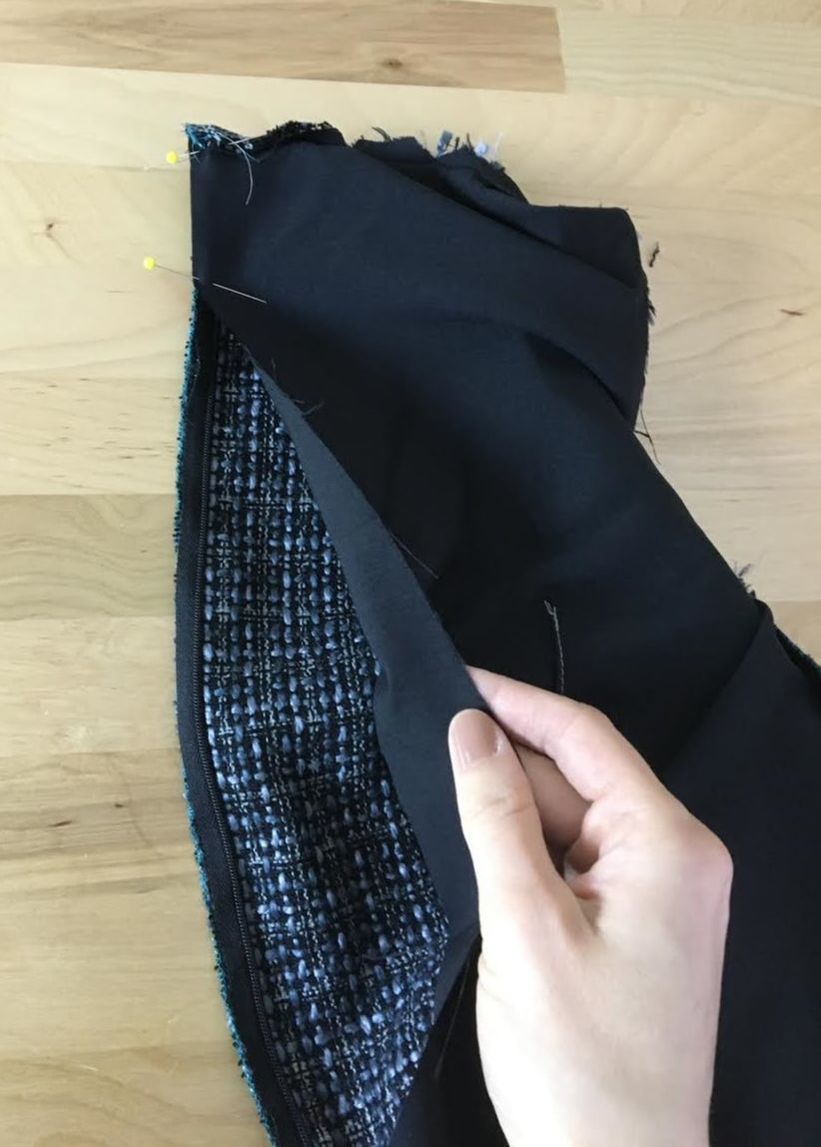
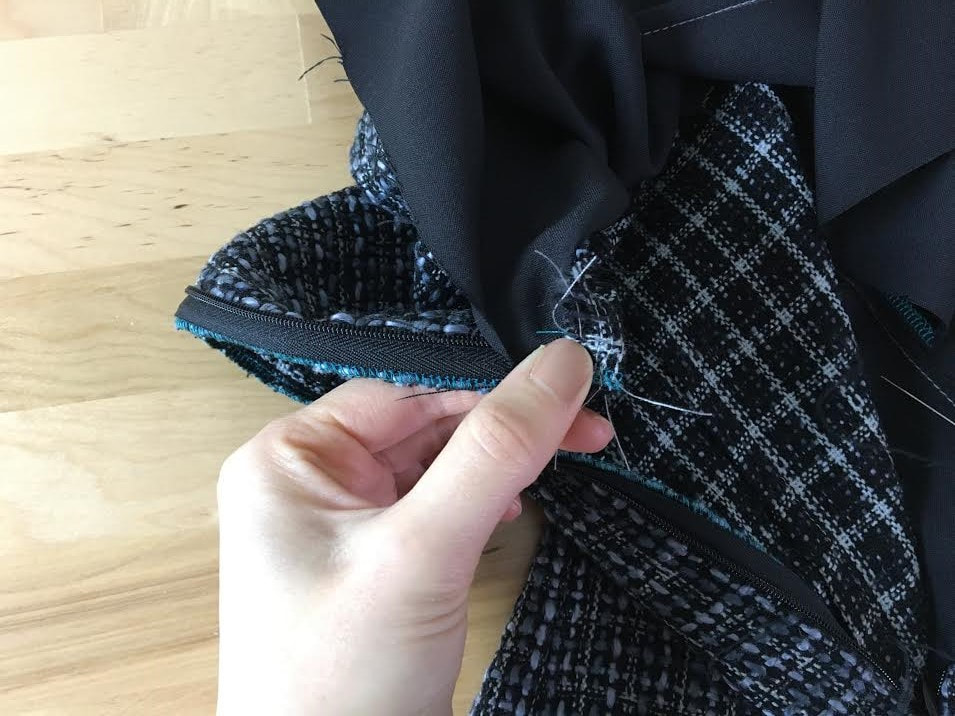
Do you remember the very first clothing item you made? I vividly remember mine: an A-line blouse with long sleeves that extended into an exaggerated bell silhouette (oh early 2000's fashion...). Here I am, years later, thinking about some of the sewing elements that still intimidate me to this day. Regardless of how much you love this craft, there are always things you love to sew more than others. That's just a very natural aspect of dressmaking, regardless of your skill level. One of the things I used to dread, but have actually come to enjoy, is sewing lining and facings to the zipper area. 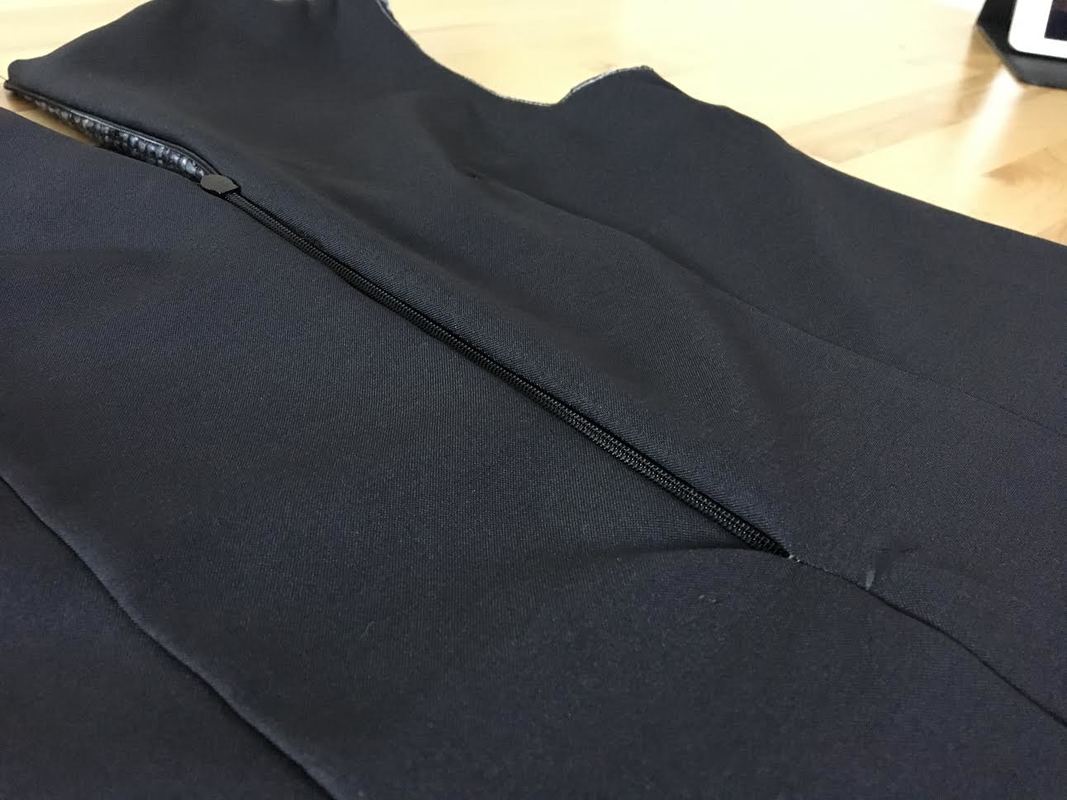 I used to be terrified of anything remotely related to zippers. From sewing them evenly to navigating around the zipper coils during machine stitching, needless to say, all were highly dreaded. Along the way, I've learned that the key to getting past the fear is not only to keep practicing, but also to embrace the possibility of making mistakes. In the process, it is also a good idea to adhere to some basic sewing rules. I know, nobody likes rules, and quite frankly, they can overwhelm a sewing beginner to the point of giving up way too early in the game. Nonetheless, they are designed to be helpful in the long run and save you time in the sewing process. This concept is especially applicable to sewing zippers and clean finishing lining. If you follow some basic techniques correctly, you'll minimize stress and make the process a lot more enjoyable. That being said, when it comes to finishing lining edges against that dreaded zipper, there are a few main sewing factors (or basic sewing rules) that come into play: 1. Fabric pieces should be sewn face to face, with their right sides touching (in most cases). 2. Sewing clean finished corners at the top of the zipper opening should be done correctly, at a 90 degree angle. 3. Learning how to use a regular zipper presser foot for different sewing applications (you'll fall in love with the convenience of this one!) The process of sewing the lining to the zipper area is usually done in consecutive steps. For example, you won't be able to use the technique described in the steps below if the top edges of the lining and self fabric layer (in this case, the neckline) have not yet been sewn together. Knowing when to perform each sewing step consecutively can be pretty challenging for beginners, and this is one of those cases where it can be downright confusing. If this happens to be something you find to be intimidating, use the images below for more clarity as to when each sewing technique/step should be performed. 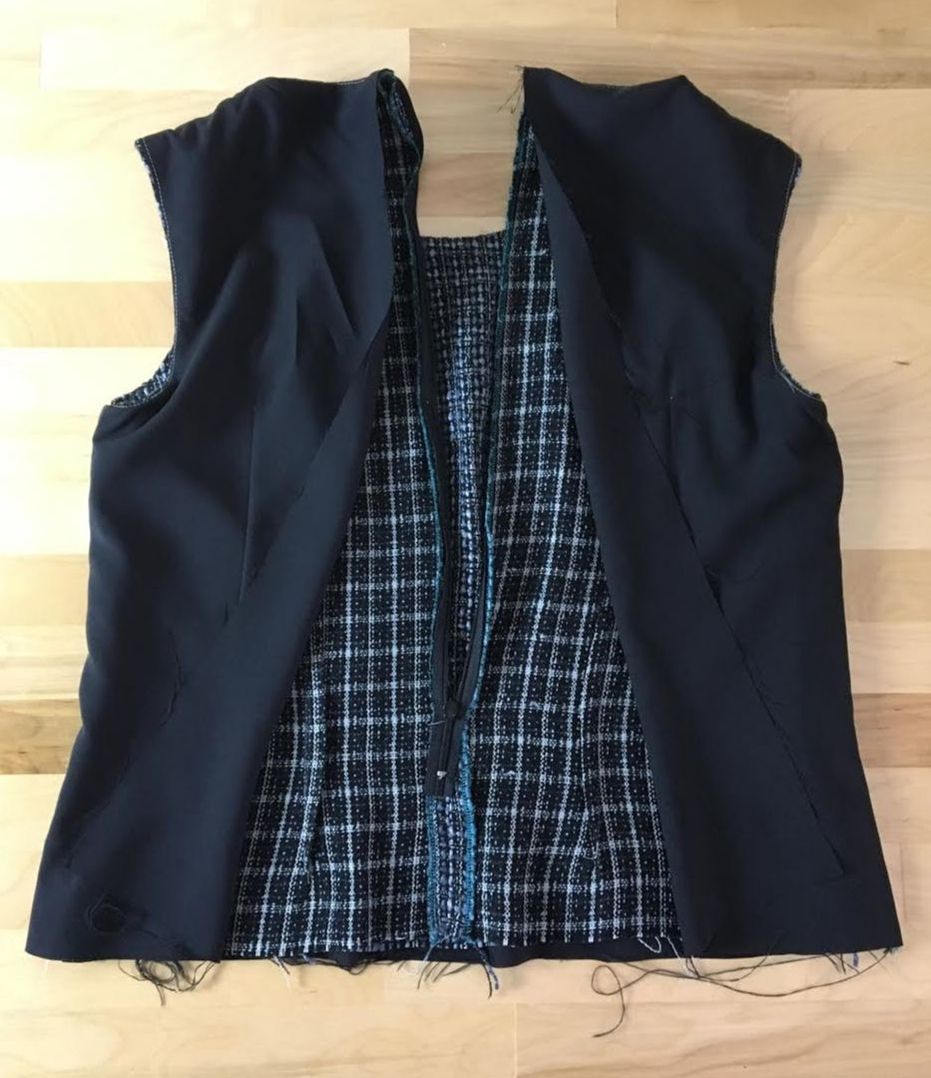 To start with, make sure the lining is already sewn to the top edge and understitched as necessary. In this tutorial, I'll be cleaning finishing a center back invisible zipper. The lining is already sewn to the neckline and armhole edges. The hem of both lining and self blouse will be clean finished last, after everything else is sewn. If you are unsure as to when in the process to sew the lining to the zipper area, the image above should hopefully serve as a guide. As long as the zipper is completely inserted into the blouse seam, and the top edge of the blouse and lining are sewn together, you should be able to use this easy technique without a problem. 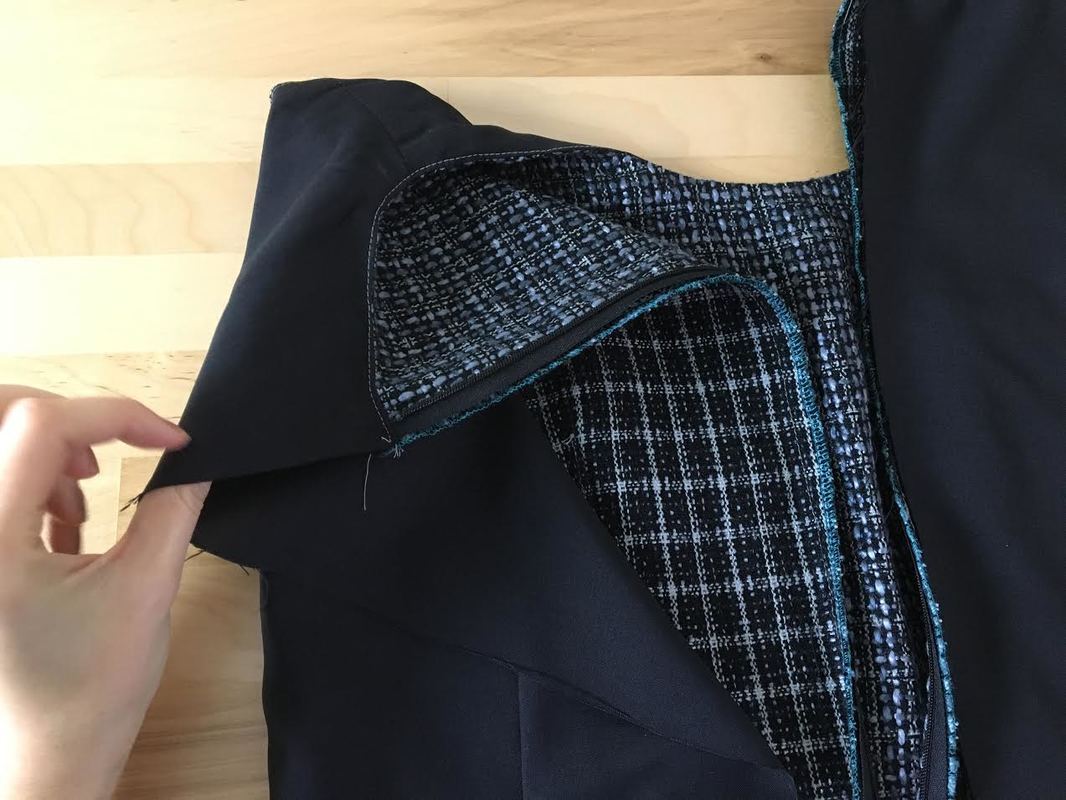 1. To start with, make sure the zipper is open all the way down, as far as you can go. Separate the lining from the self layer at the very top edge as shown above. 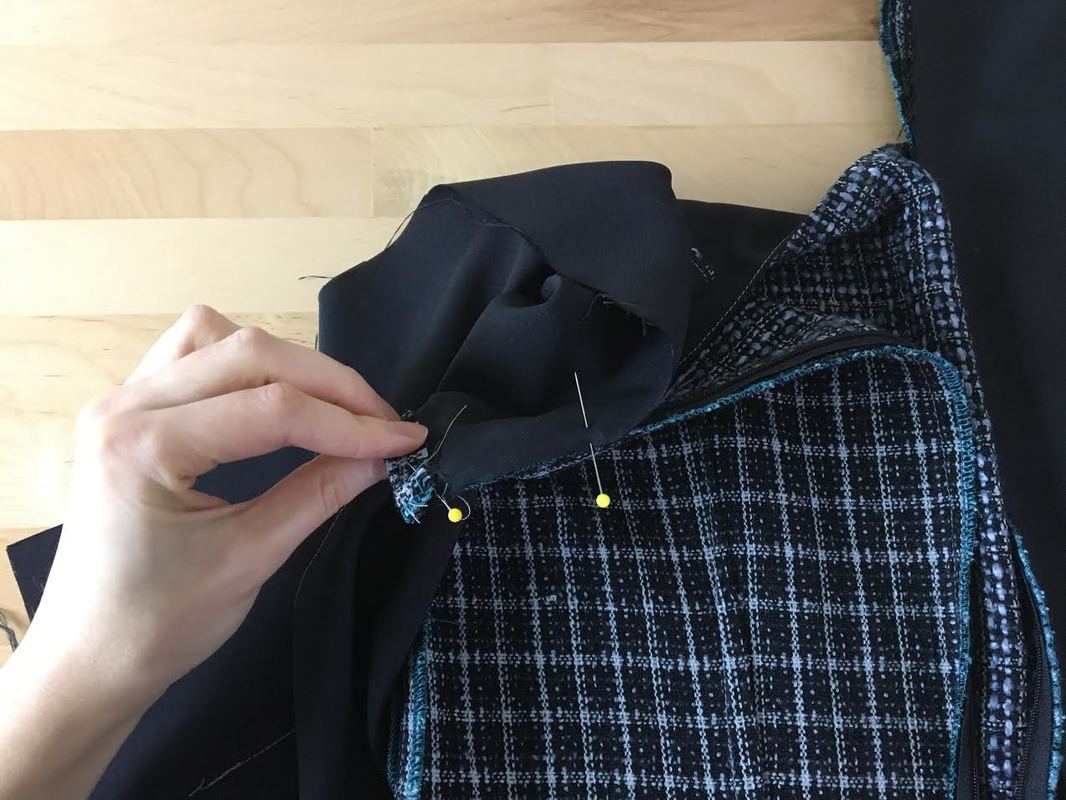 2. Flip the lining over the top edge such that its right side is touching the right side of the blouse self layer. The zipper tape should be sandwiched in between as shown above. Insert pins perpendicular to the edge to hold the two layers in place. The top edge seam allowance should be laying flat towards the lining side. 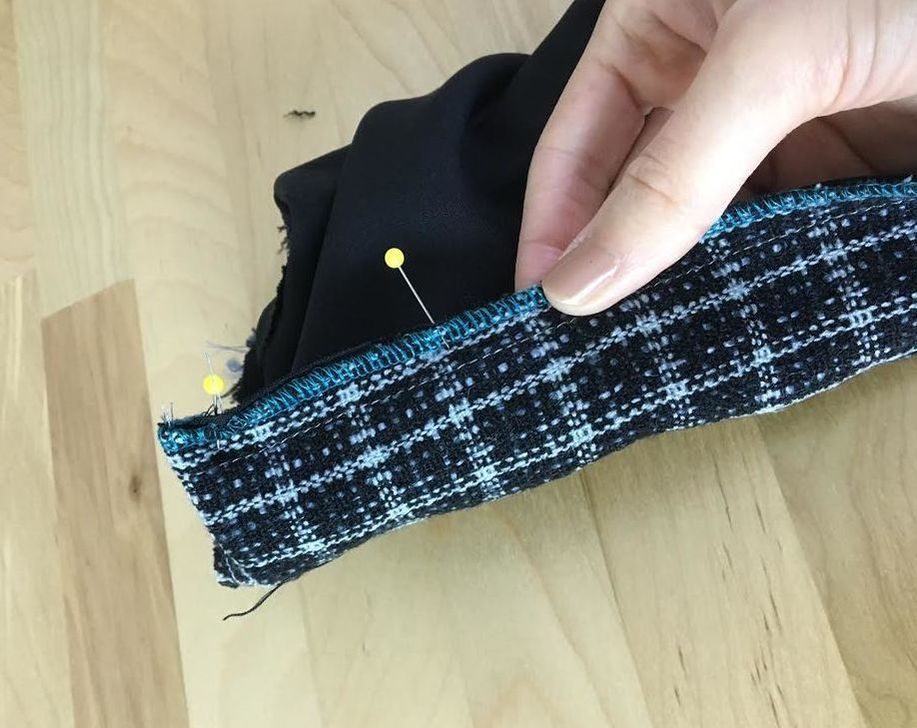 If you look on the other side of this alignment, you should see the wrong side of blouse fabric. The zipper tape sandwiched in between and not visible on either side.
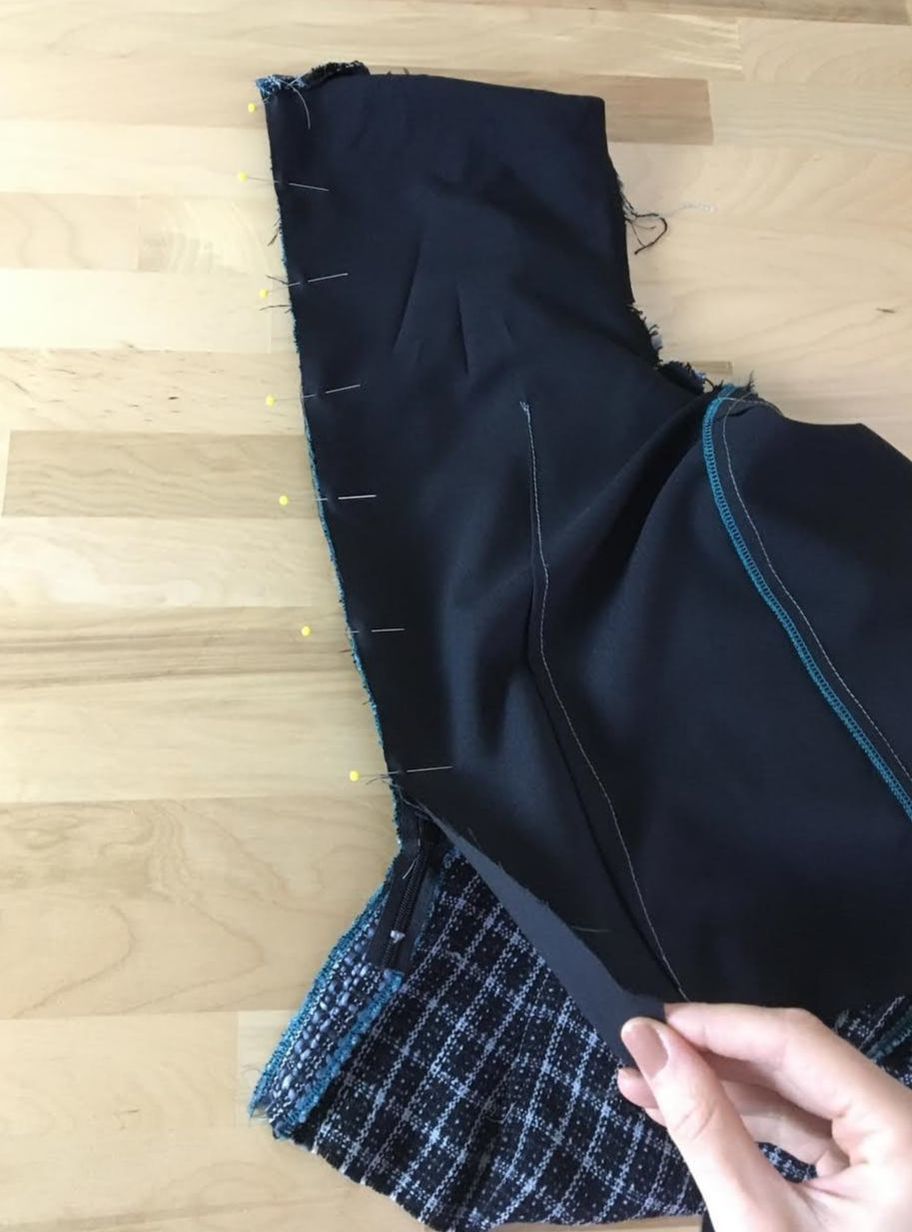
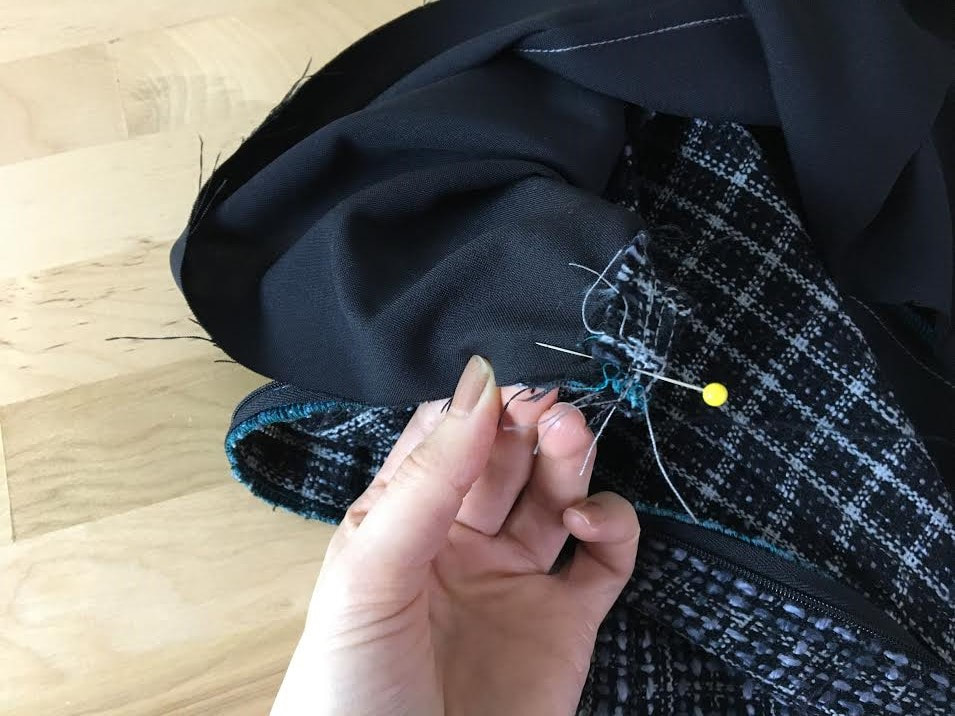
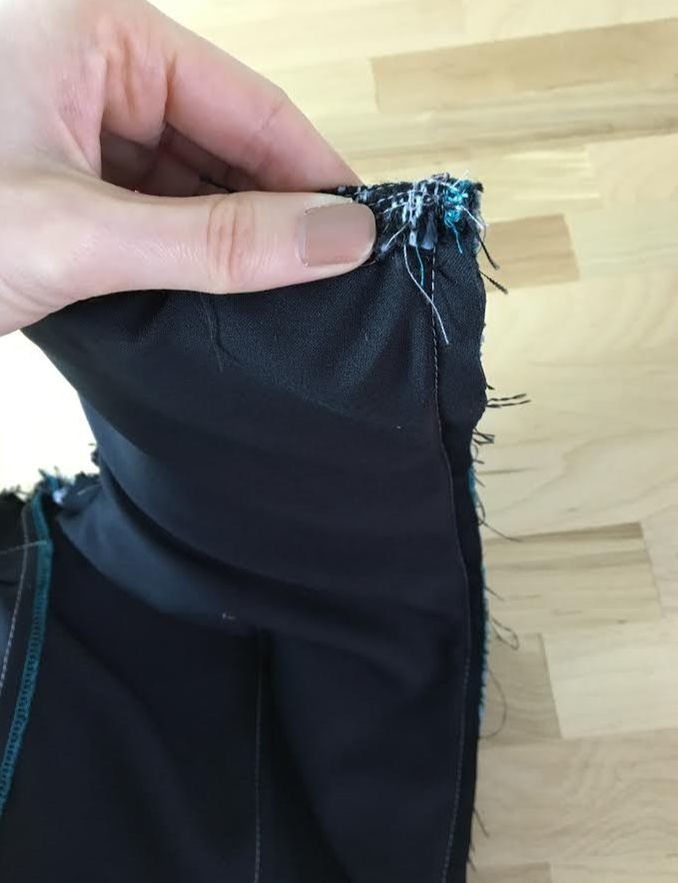
3. Continue pinning the lining edge to the blouse self edge, enclosing the zipper tape in between. Make sure both edges are aligned evenly throughout. Pin in perpendicular direction for easier removal during the stitching process. 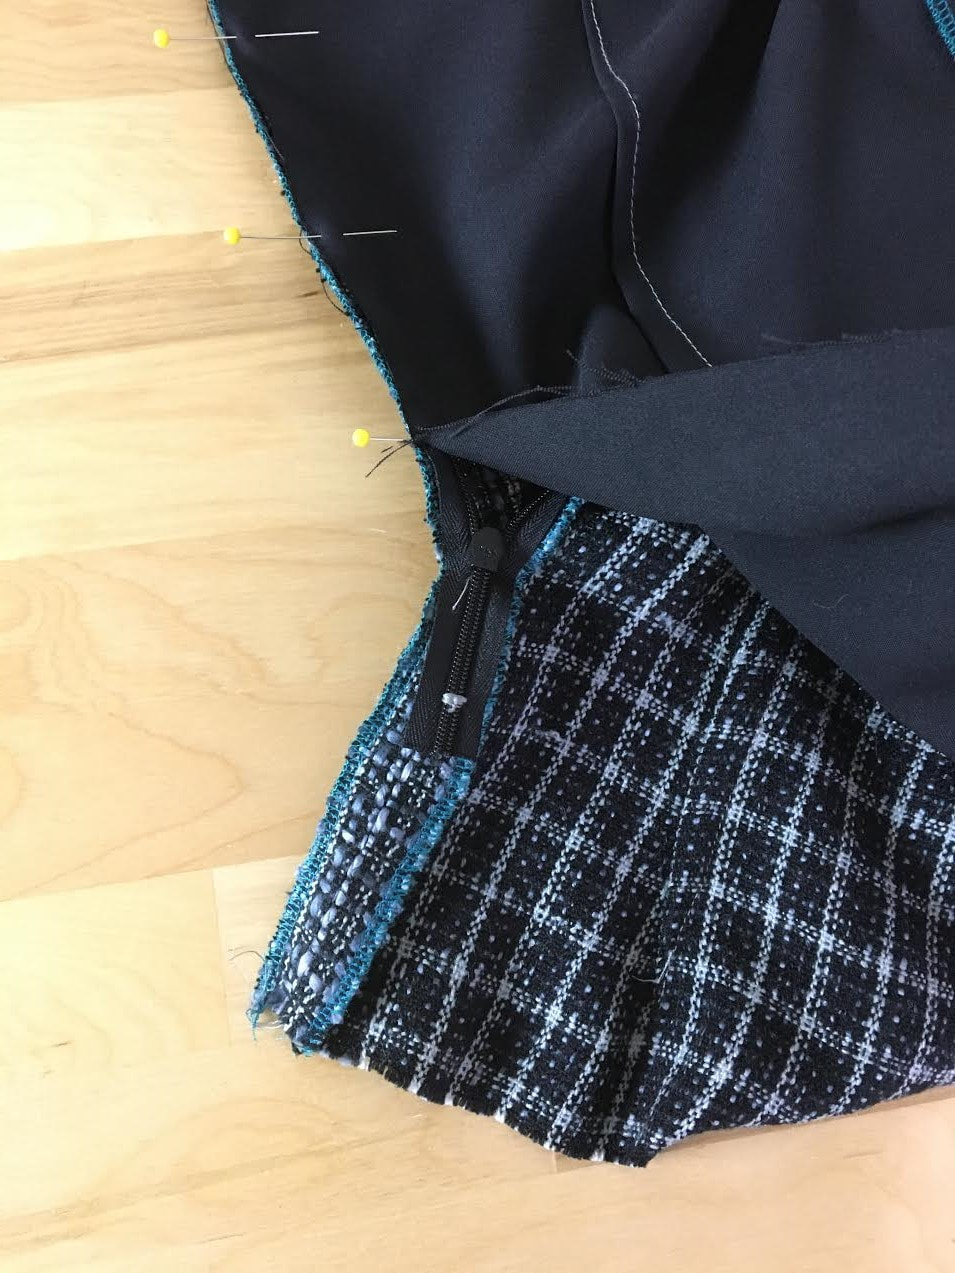 Pin until you get as close as possible to the zipper slider/end. 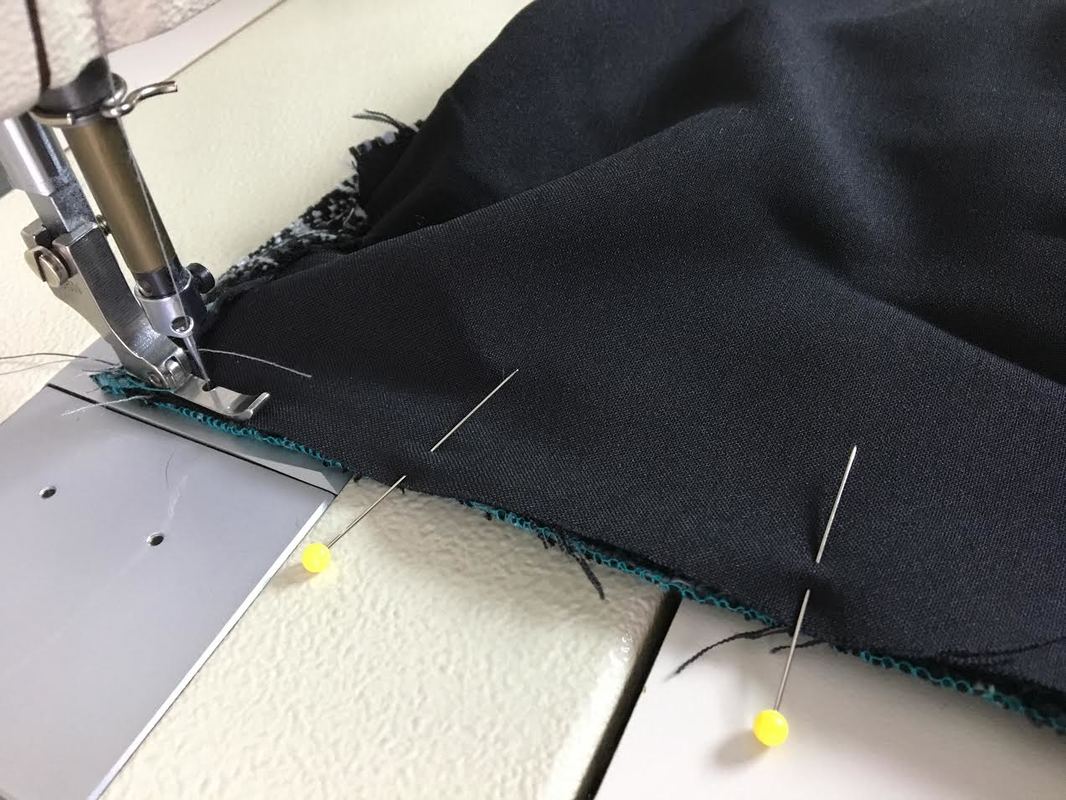 4. Starting at the very top, stitch the two layers together using a regular zipper foot. The needle should be aligned on the side of the zipper coils. Stitch as close as possible to the zipper teeth, through the two fabric layers and zipper tape in between, being careful not to stitch any of the coils in the process. Your sewing machine should include a conventional zipper foot like the one in the image above. Mine is one directional so I just turn the fabric around to sew the opposite edge (as you'll see below). Your zipper foot may shift to both directions. Perhaps your sewing machine has two separate zipper feet (one for each direction), in which case, you can align the seam as is most comfortable for you, as long as the machine needle is aligned on the side of the zipper teeth. The whole point of a zipper presser foot is to sew as close to the zipper coils as possible while still feeding the fabric layers during the stitching process underneath. If you've never worked with a zipper foot before, you'll love its convenience. It is also commonly used to sew corded, piped seams and heavily decorated fabrics. 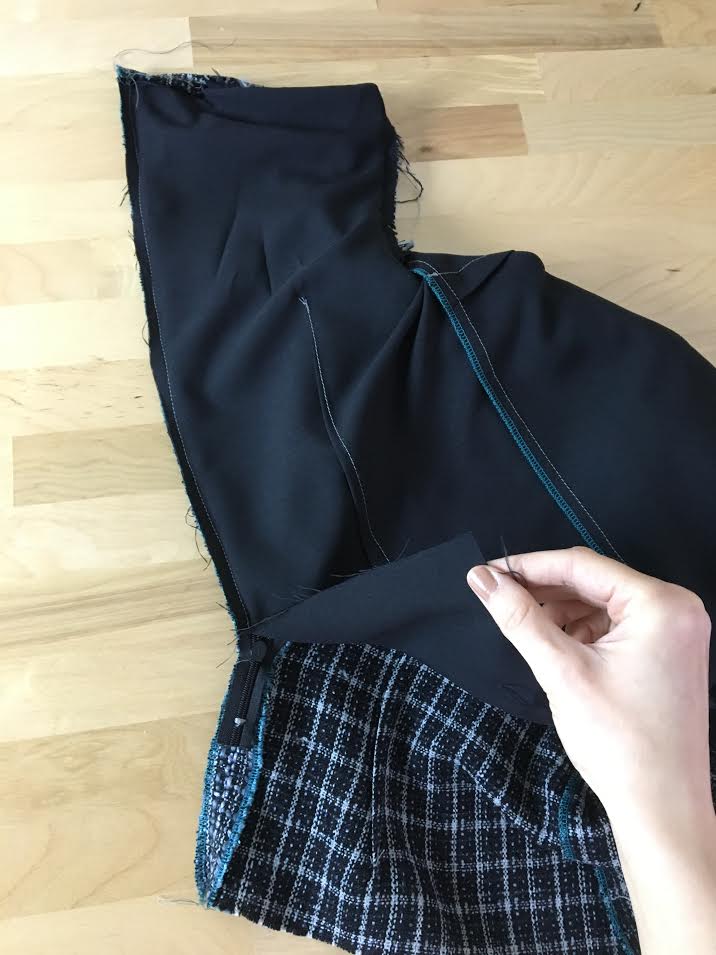 Stitch as close and as comfortably as possible to the zipper slider (shown above). The bottom edge of the lining should remain unstitched for now.  At the very top, the seam allowance should be folded and sewn down in the direction of the lining layer. This alignment will form a perfect 90 degree angle when this top corner is pulled right side out from underneath. 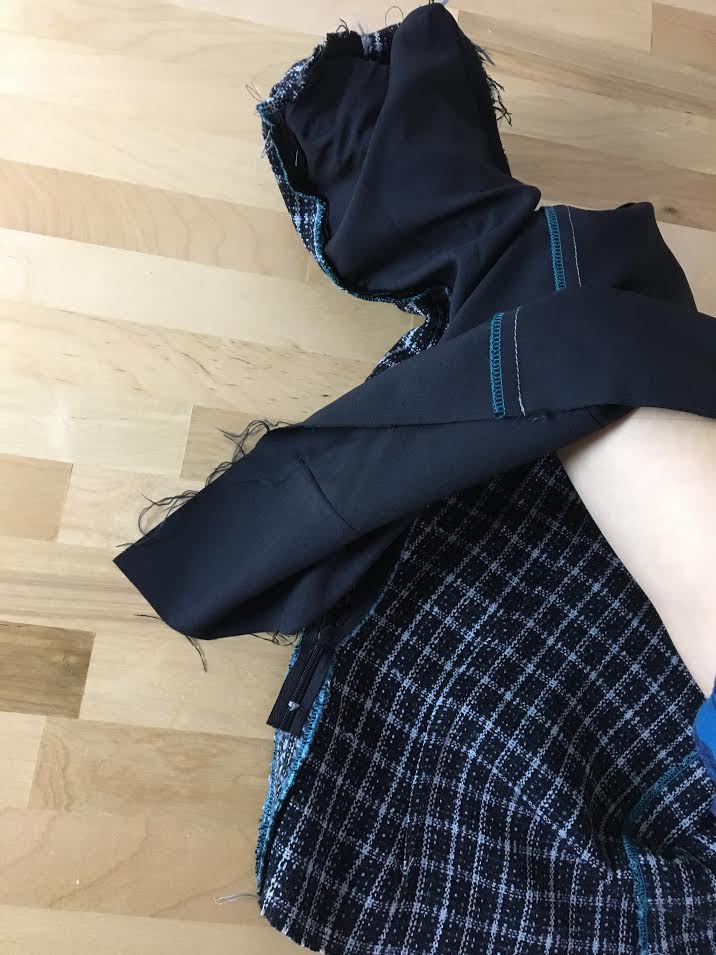 5. Go in between the lining and self layers and grab onto the zipper teeth at the very top, in the upper corner. 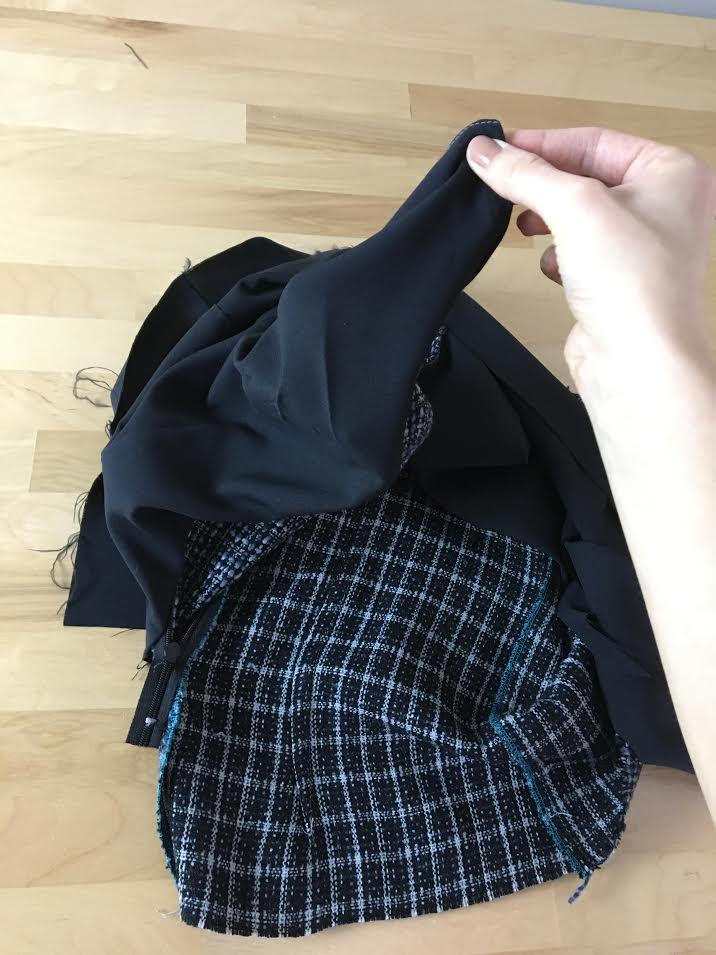 Pull the corner inside out to turn blouse on its face side as shown. 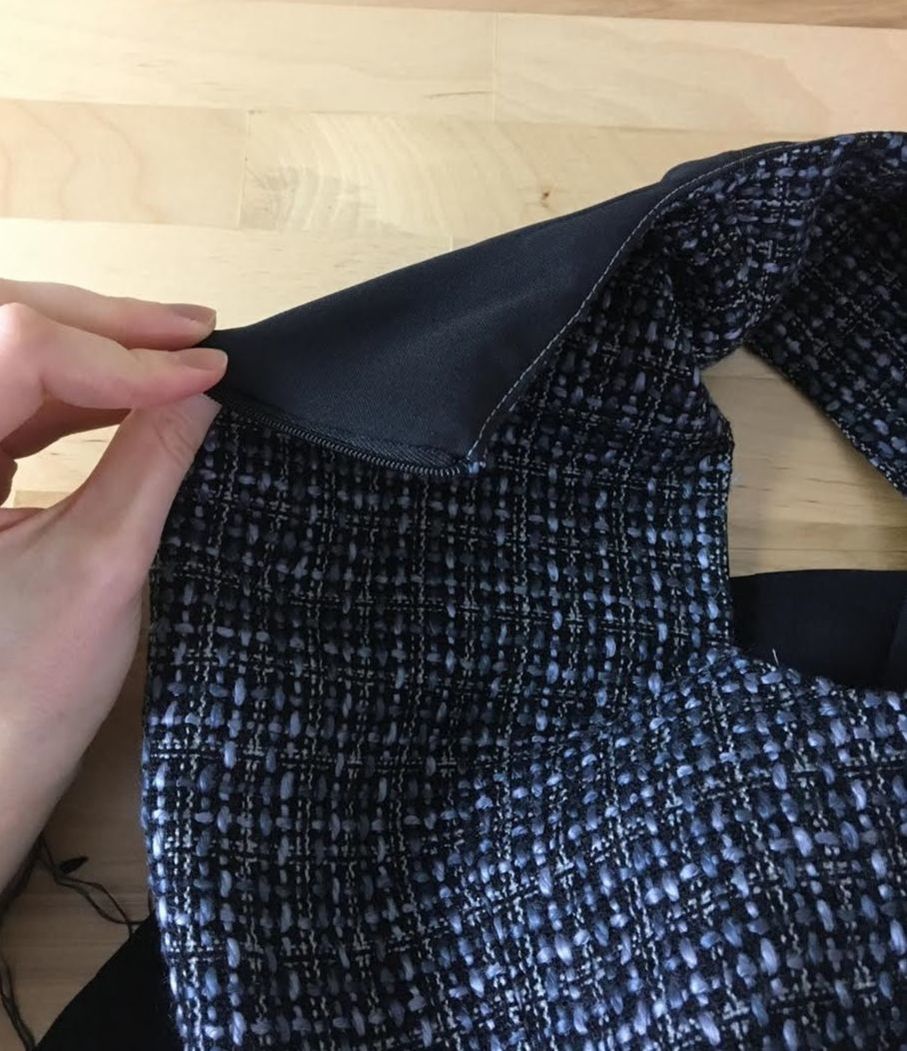 Turning the stitched layers right side out will reveal an evenly enclosed zipper with the coils corresponding to the lengthwise edge of the center back opening. 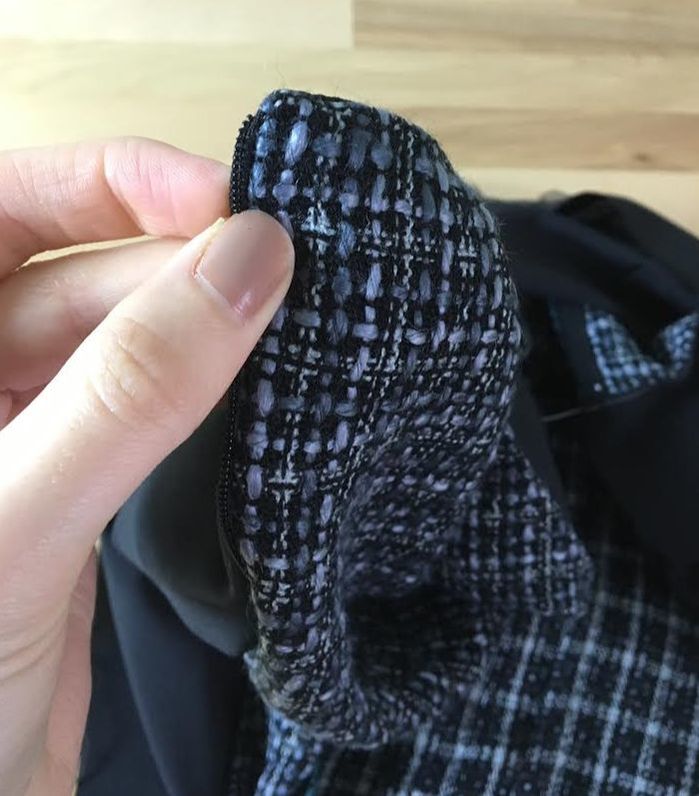 Pull the zipper teeth out at the very top corner to achieve a straight, 90 degree angle. If the top (neckline) seam allowance was aligned properly in the sewing process above, this should happen naturally, without the need for much adjustment. 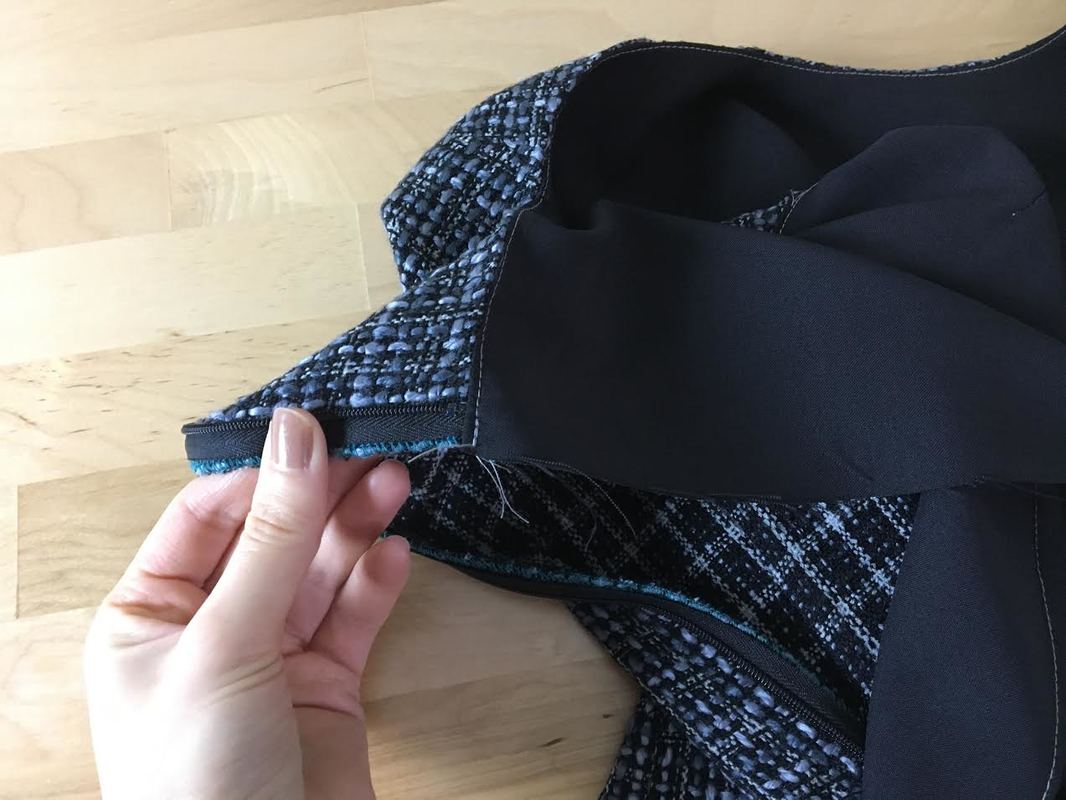 6. Repeat the process on the other side of the zipper opening. Make sure the zipper remains fully open in this process.
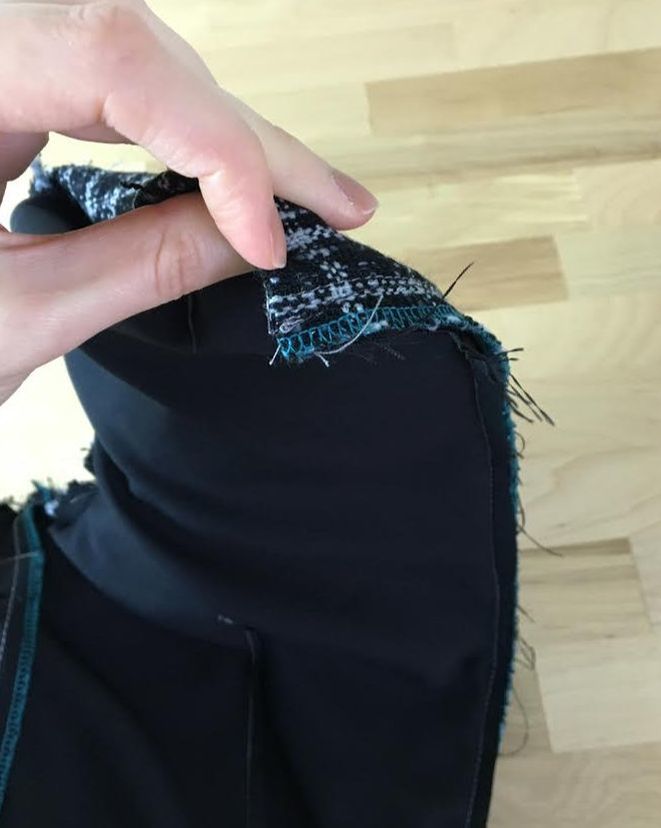
7. Again, flip the lining over the zipper tape such that both right sides are touching, and pin the top edge seam allowance down towards the lining side as shown above. If the facing was under-stitched, this alignment should happen fairly naturally. 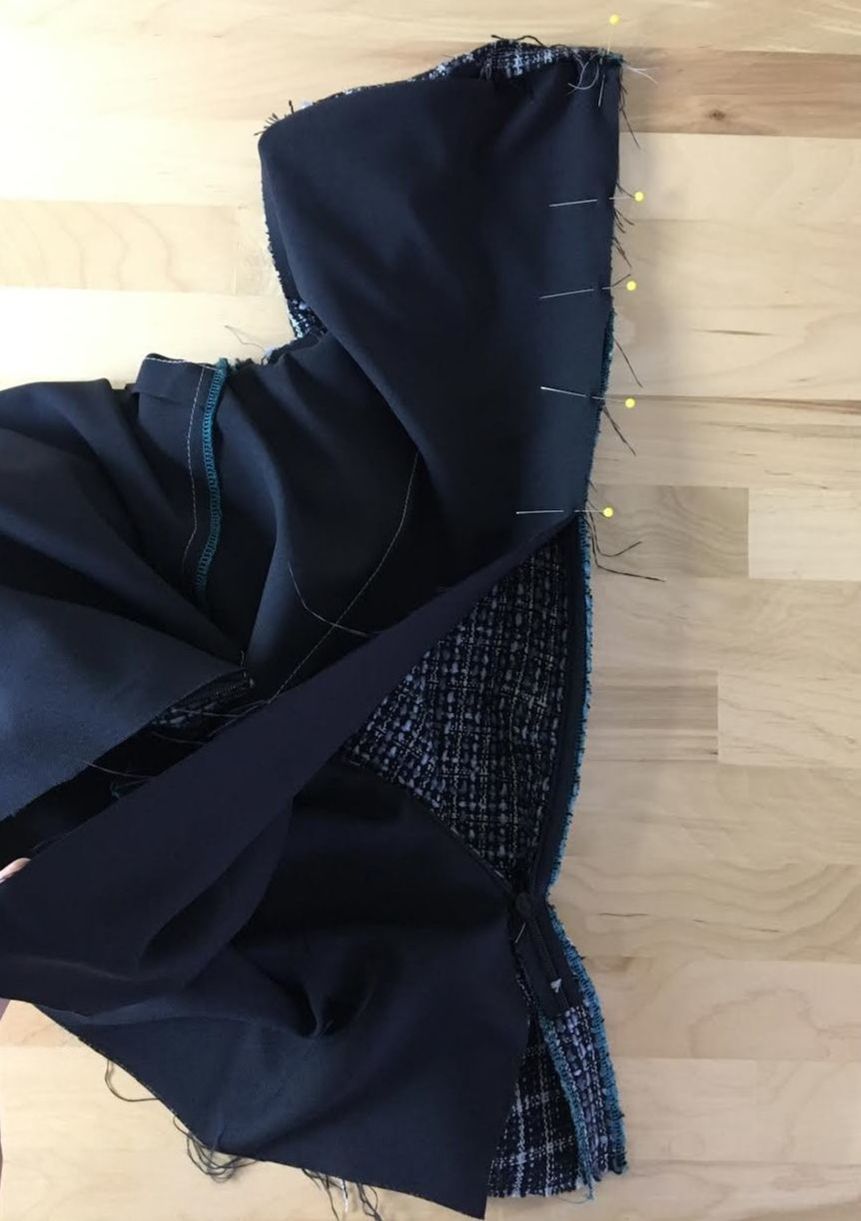 8. Just as you did on the other side, continue pinning the two layers all the way down to zipper slider, or as close as you can get to it. The zipper tape should be sandwiched in between the two fabric layers. Pin perpendicular to the edges for more comfort and easy pin removal during the machine stitching process. 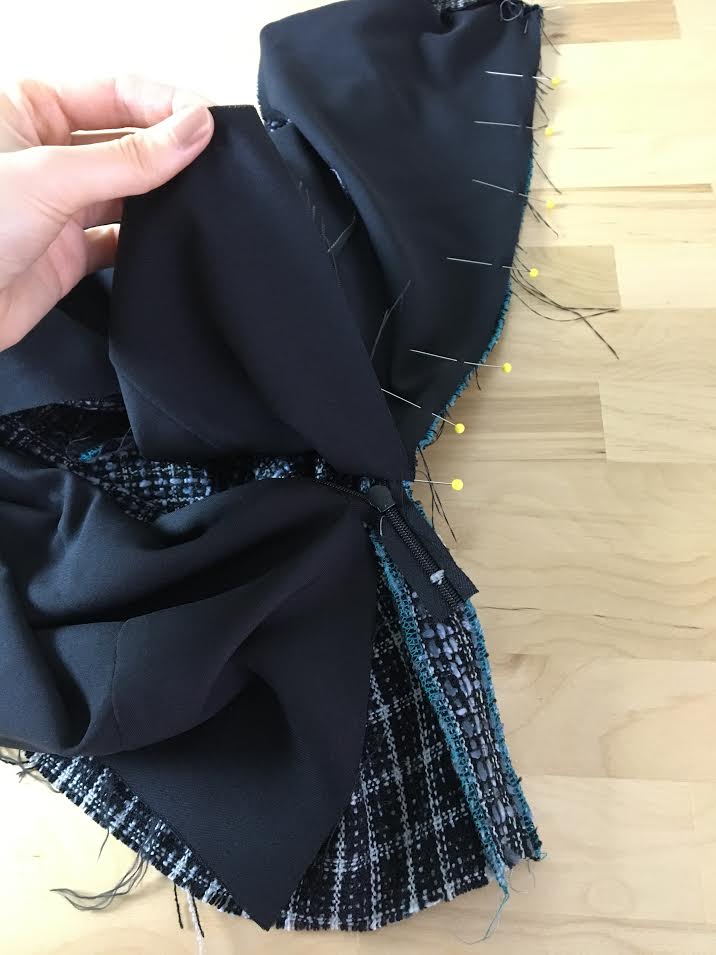 Leave the bottom edge of the lining hanging free. 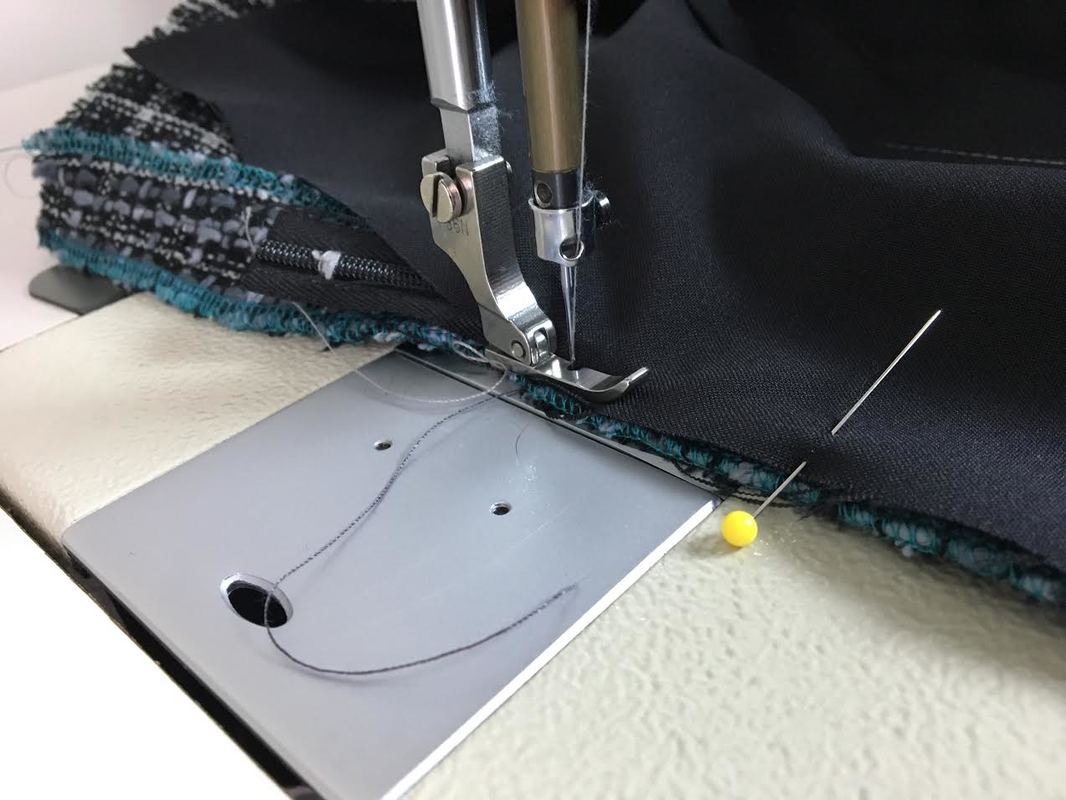 9. Using your zipper foot again, stitch the two layers together enclosing the zipper tape in between. As mentioned above, my zipper foot is one directional so this time, I'm starting at the bottom (next to the zipper tab) and stitching towards the very top. The reason for this directional switch is that the needle has to be aligned close to the zipper teeth and since I'm stitching on the opposite edge, that's just how the needle aligns in relation the zipper coils. It is a good idea to backstitch at the beginning and end of this stitch as this will maintain the zipper's durability during wear and care. 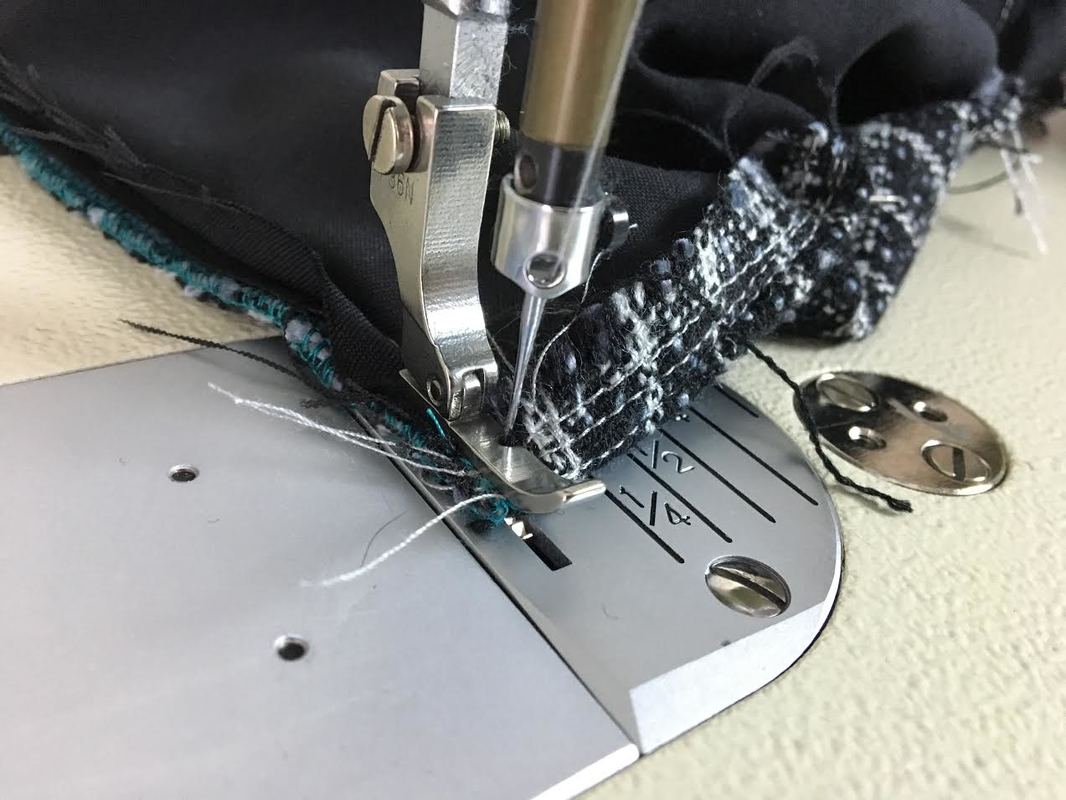 Stitch all the way to the top and make sure you keep the top seam allowance down, still pointing towards the lining layer as shown. Backstitch at the very top to lock the stitch in place. 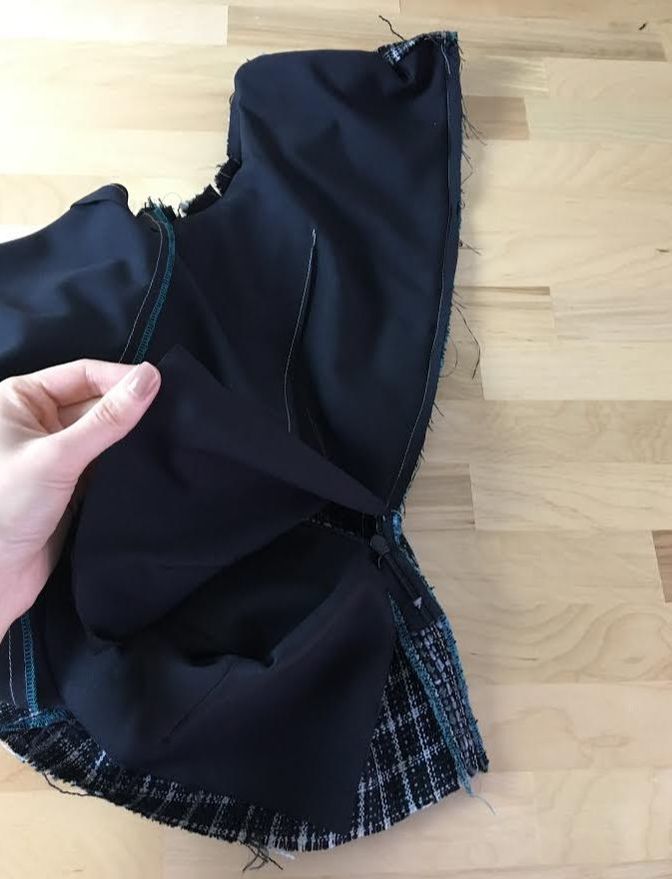 Just as you did on the other side, leave the bottom portion of the lining unstitched for now.
The very top corner should lay flat and keep the seam allowance down as shown above. 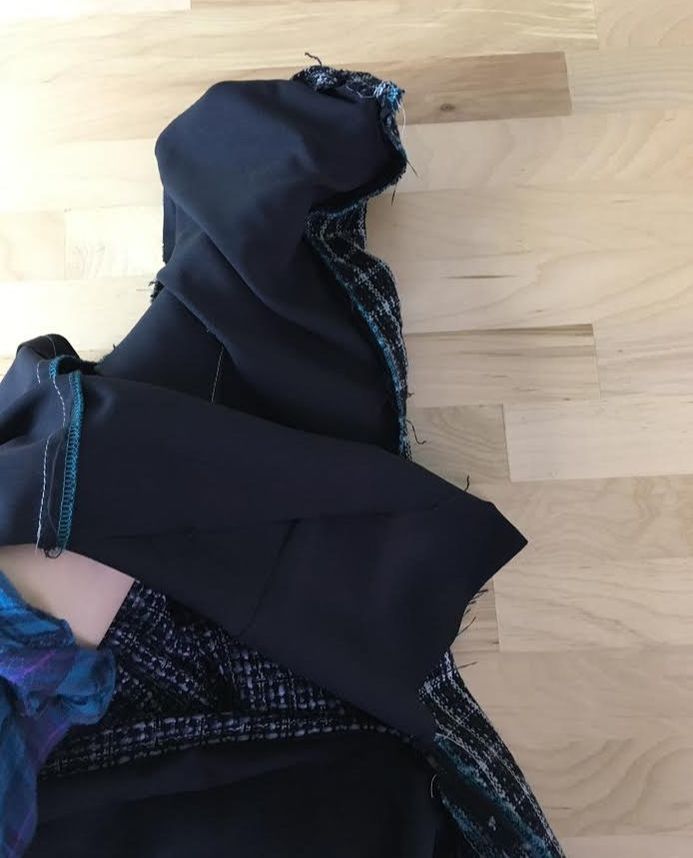 10. Go in between the two fabric layers and grab onto the very top of the zipper teeth (just as you did on the other side). 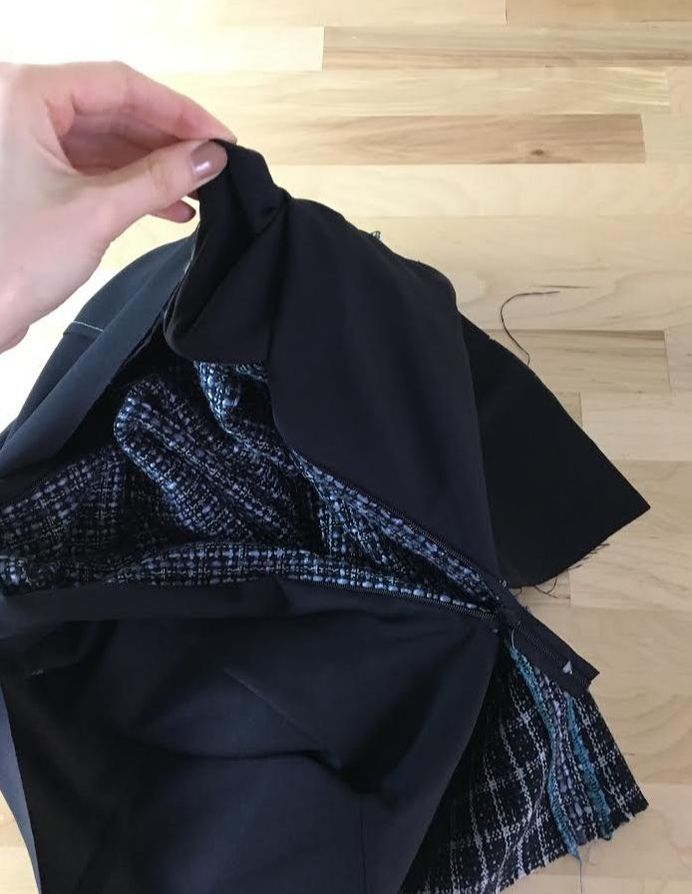 Pull the corner on its right side to expose the face of the lining and blouse as shown. 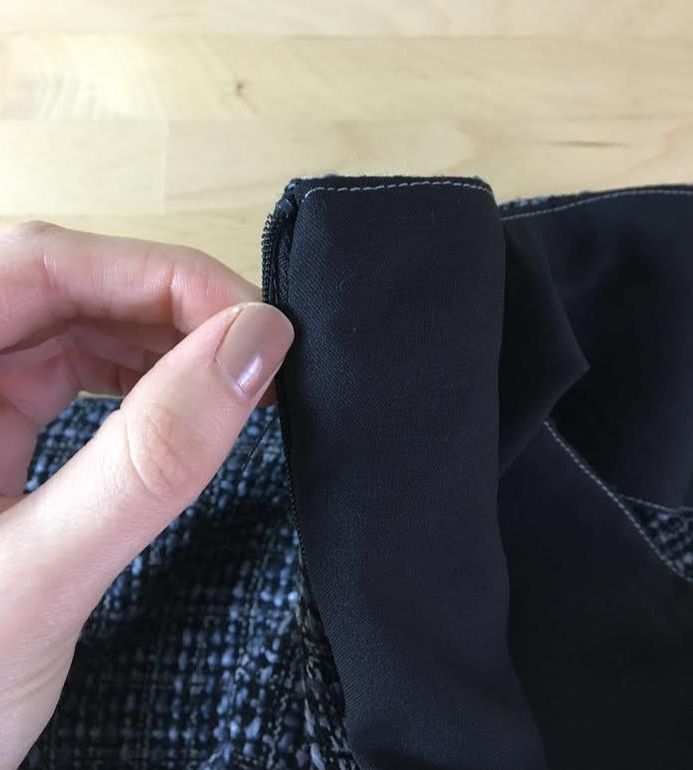 Pull by the zipper teeth to straighten the corner into a 90 degree angle. This should happen naturally due to how the top edge seam allowance was aligned and sewn underneath. 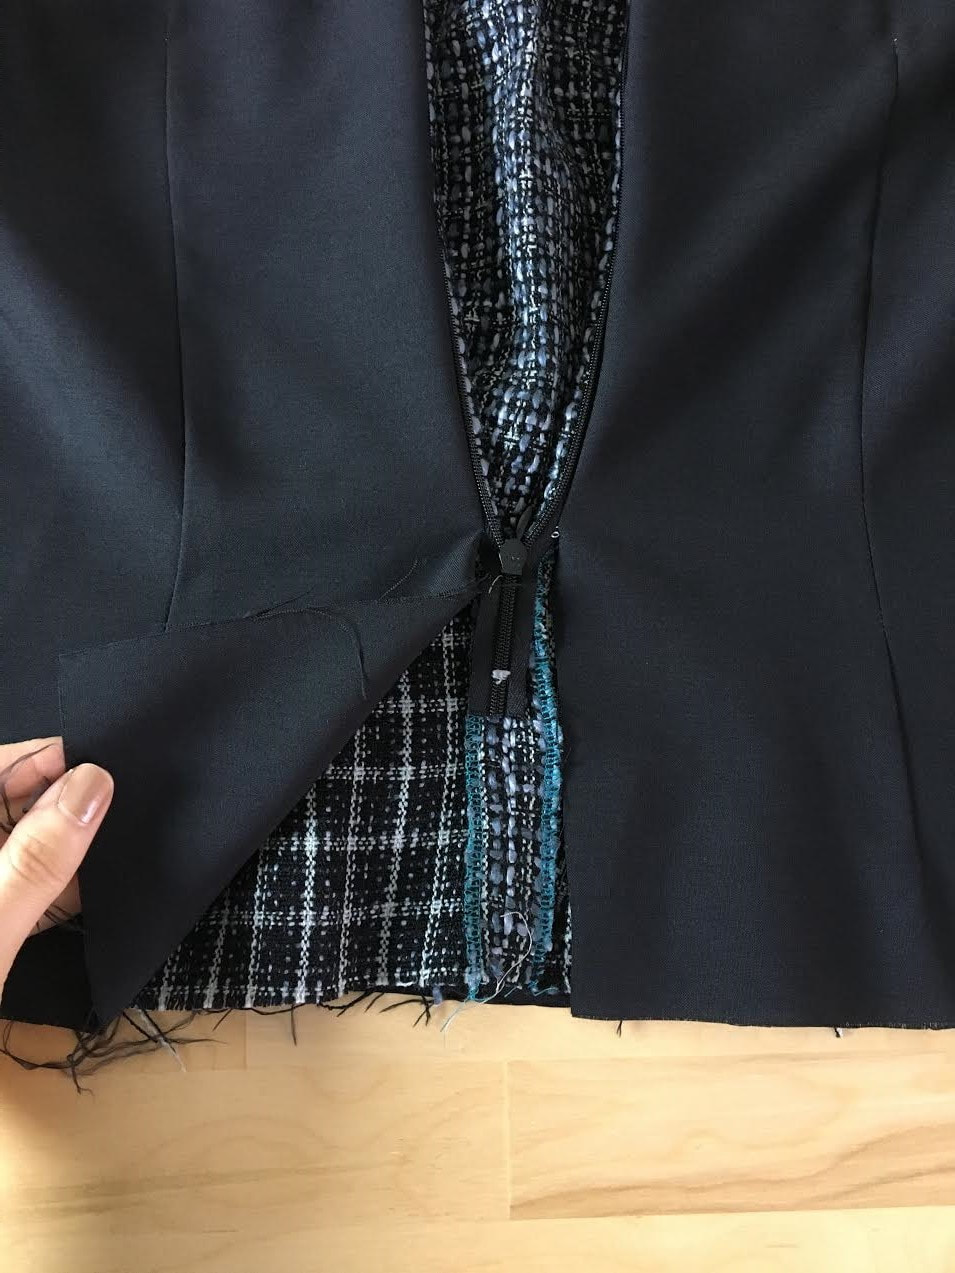 Now lets focus on the bottom lining edges. Remember, we left them unstitched and unfinished in the steps above. They will actually be sewn together as you would with any regular seam. 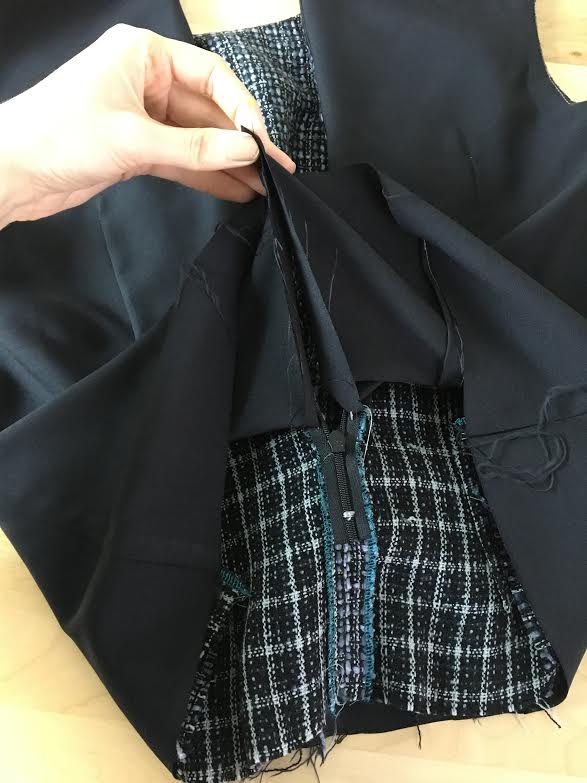 11. Align the lining edges lengthwise such that the right side of both lining pieces are touching. If you get a bit confused as to how this should be done, follow the image above for more clarity. It's also a good idea to close the zipper at the bottom for added comfort during the machine stitching process next. 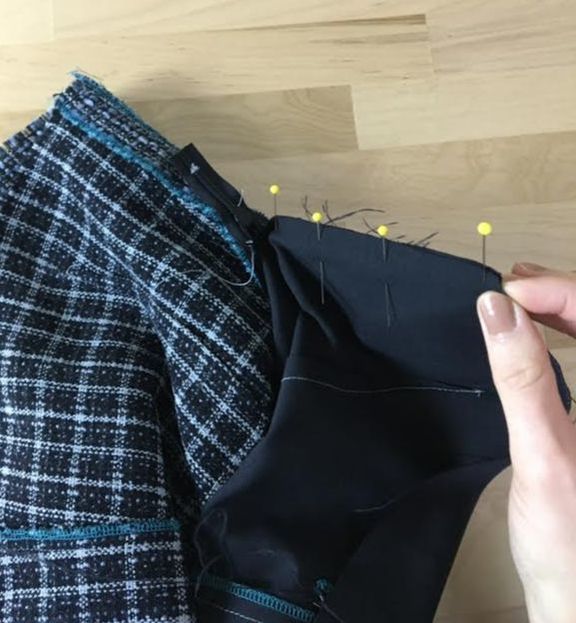 12. Pin the lining pieces together perpendicular to the edges just as you would with any regular seam. Try to get as close as possible to the zipper at the top. 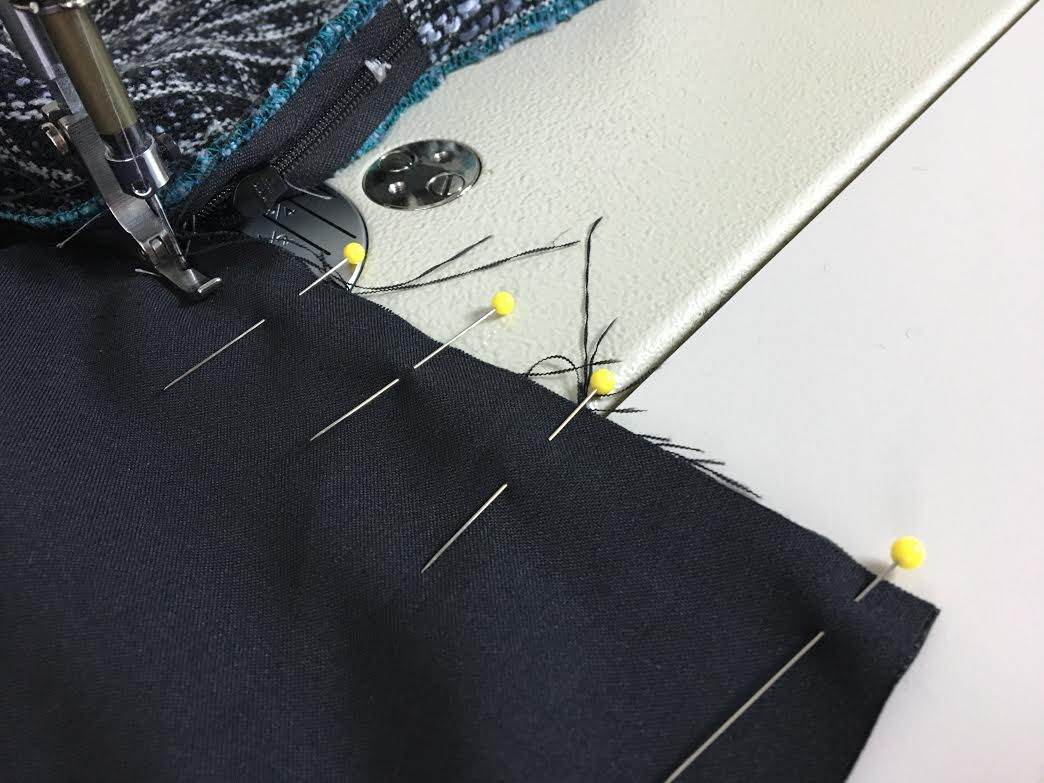 To stitch the seam, it's best to use your regular zipper foot again since it allows you to get closer to the zipper at the top. Your goal here is to sew as close to the zipper as possible while still maintaining the right seam allowance throughout. In my case, the seam allowance is 1/2". 13. Start next to the zipper at the top and stitch down to the lining hem, following your designated seam allowance. 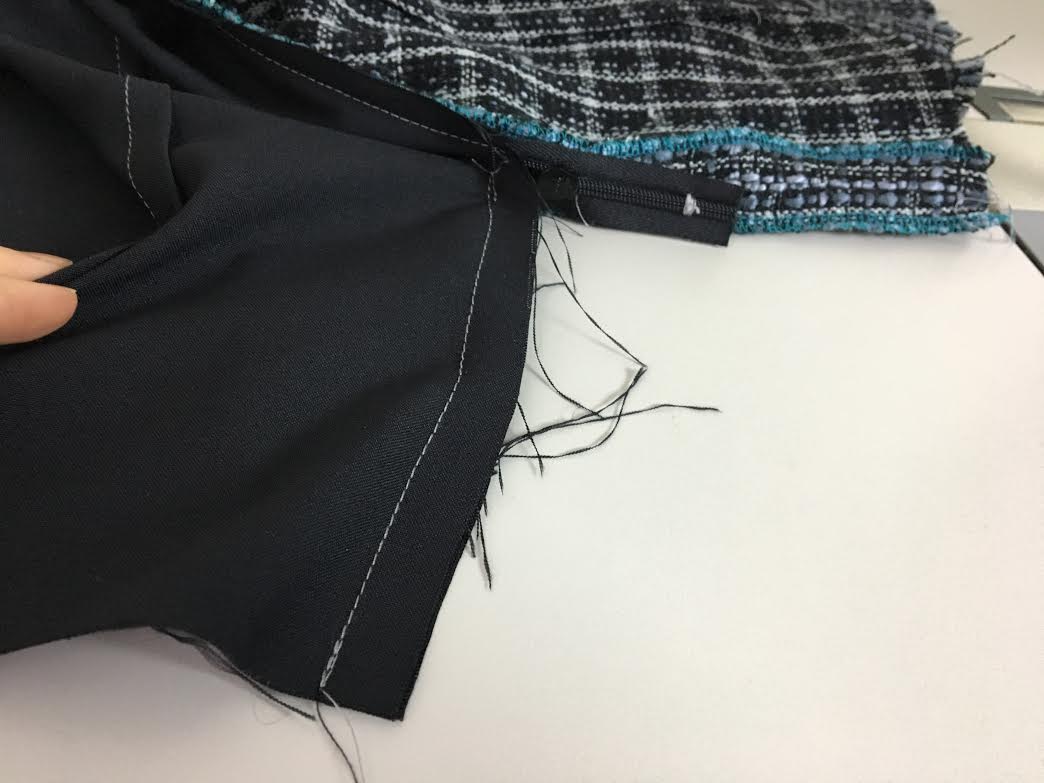 It may take some practice to keep the stitch straight right next to the zipper but once you get the hang of it, you'll do this pretty fast, maintaining good accuracy. You should also try to backstitch at the beginning if your stitch (closest to the zipper) if possible. As you open and close the zipper during wear, this extra measure will prevent the lining from weakening or coming undone at this area. 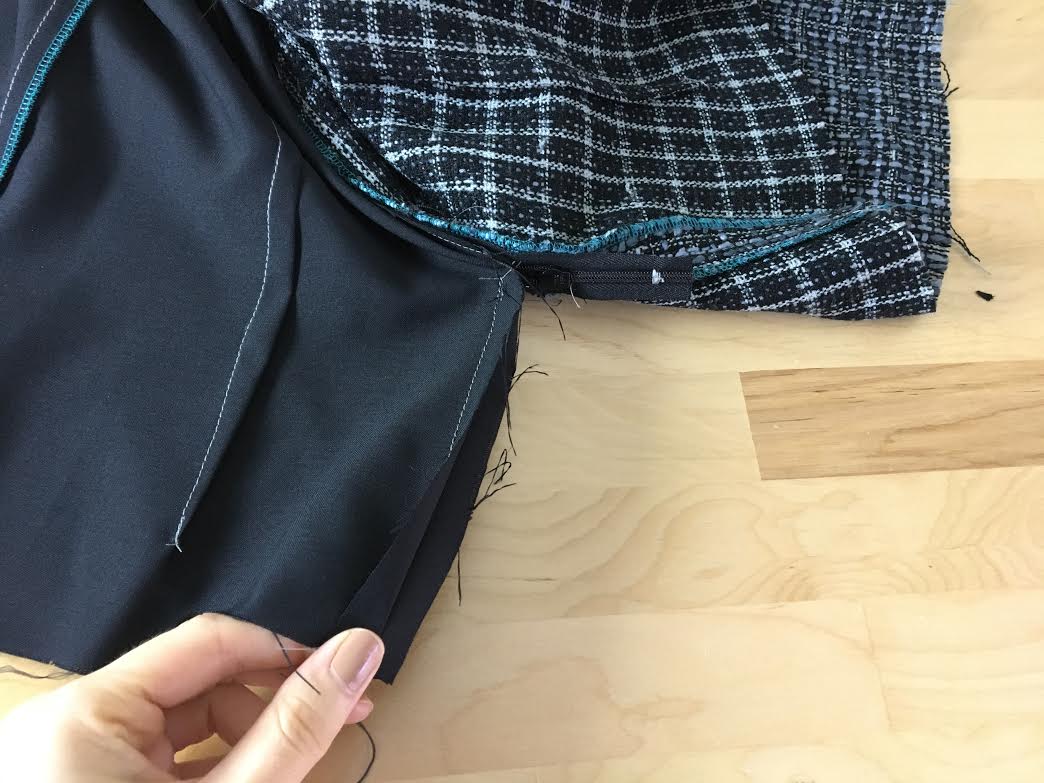 In order for the lining to lay flat at the bottom, the seam allowance layers (corresponding to each lining pieces) should be ironed open. If you are working with a fabric that frays easily, you should clean finish each edge individually using a zig zag stitch or serging stitch (if you own an overlock sewing machine). 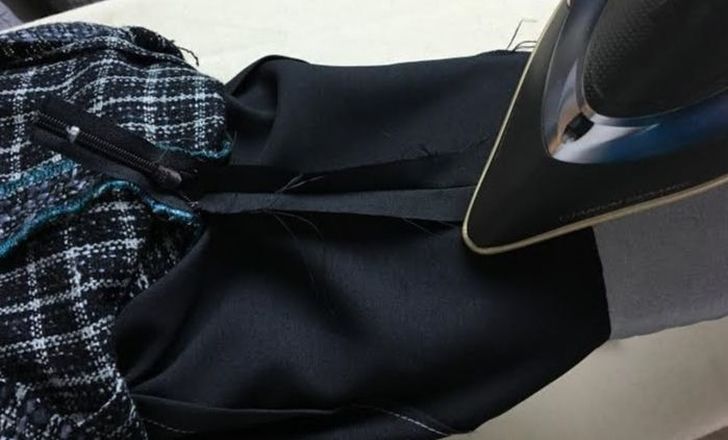 14. To get the bottom of the lining to lay flat, iron the seam allowance open as shown above. For best results, this should be done on the wrong side of the seam. 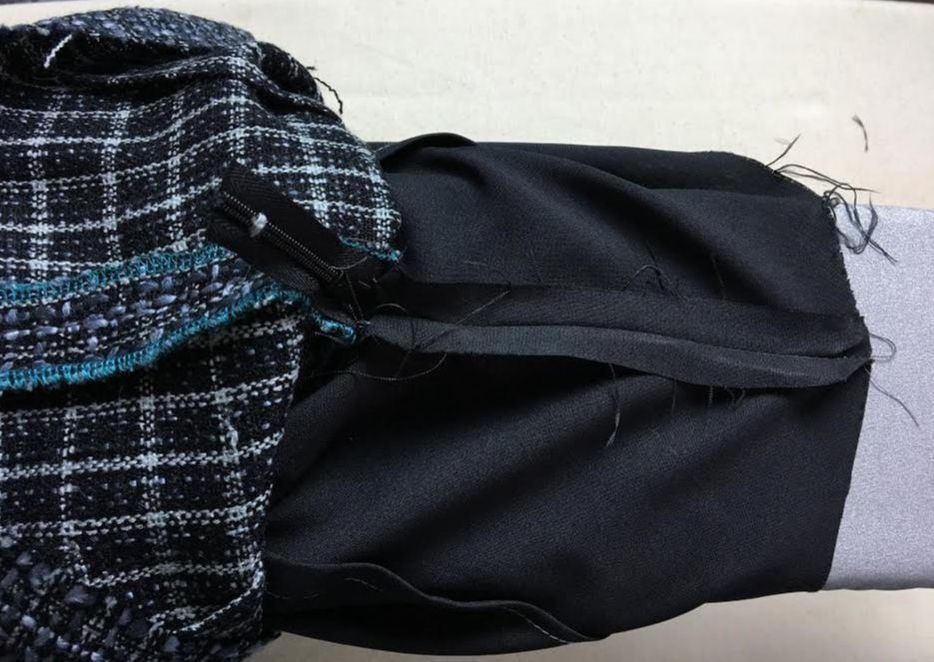 Iron all the way up to the zipper at the top but be careful not to apply too much heat directly on the zipper coils or you risk melting them in the process. Iron gently next to the zipper using the hot tip of the iron. 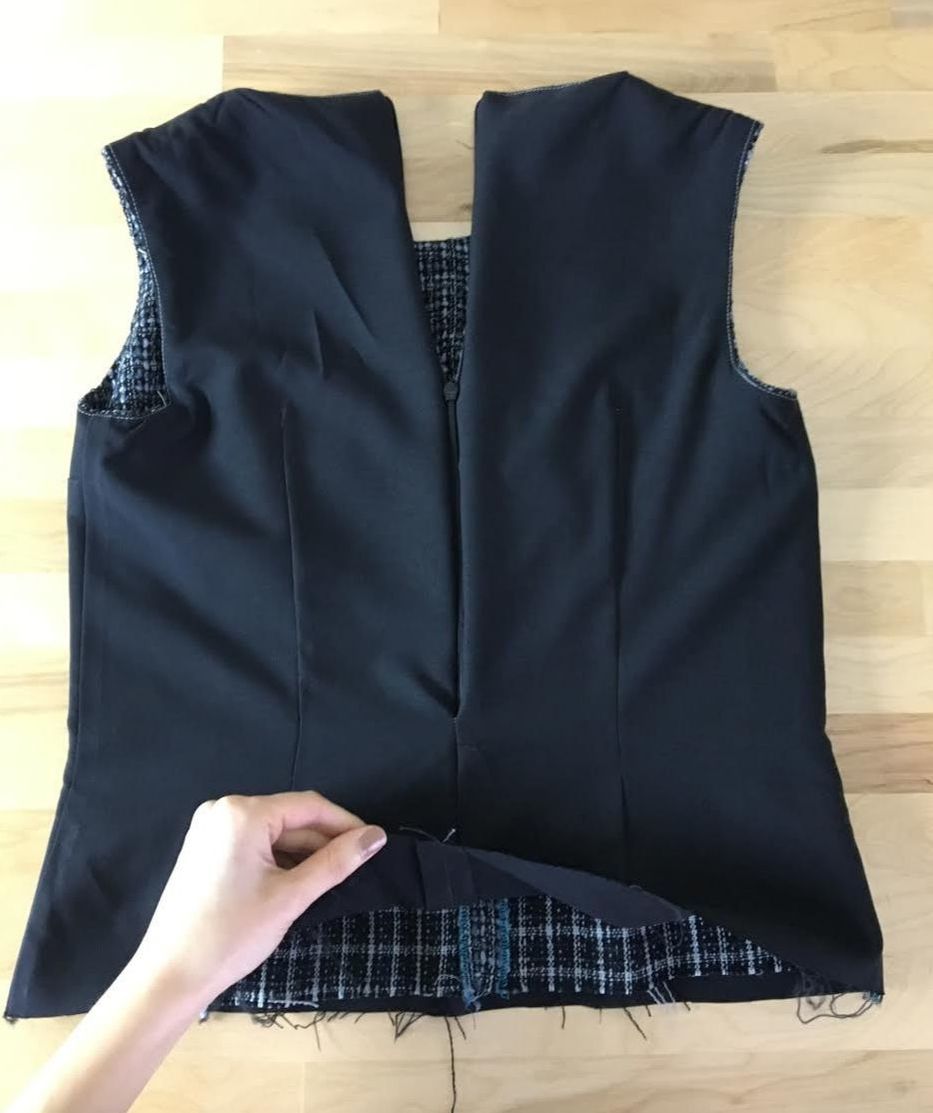 The lining is now complete! The lining seam at the bottom should overlap and match the blouse center back seam perfectly. The wrong sides of both seams should be touching as shown. You can use this simple method with almost all regular zipper applications including lapped and centered zippers. Similar tutorials you may also like: How To Sew An Invisible Zipper Using A Regular Zipper Foot 5 Types Of Zipper Applications You Should Know As A Sewing Beginner How To Sew A Lapped Zipper-The Easy Way. How To Sew A Separating Zipper: Topstitched and Faced Methods How To Sew Self Finished Inner And Outer Corners
0 Comments
Leave a Reply. |
The Blog:A journey into our design process, sewing tutorials, fashion tips, and all the inspiring people and things we love. 
Doina AlexeiDesigner by trade and dressmaker at heart. I spend most of my days obsessing over new fabrics and daydreaming new ideas. 
Sadie
Executive Assistant & Client Relations Manager Archives
November 2019
Categories
All

|

-
Sewing Tutorials
-
Basics
>
- Aligning Pattern Grainlines To Fabric
- Preparing Fabrics For Sewing
- Pinning Sewing Patterns To Fabric
- Placing Sewing Patterns On Fabric For Cutting
- Rotary Cutters or Fabric Scissors?
- Cutting The Sewing Patterns
- What Are Notches And How To Use Them In The Sewing Process
- Transferring Notches From Pattern To Fabric
- Transferring Seamlines to Fabric
- Staystitching
- Backstitching: A Complete Guide
- Hand Basting: A Complete Guide
- Sewing Continuous Bias Binding
- Darts >
-
Sewing Seams
>
- The Basics Of Seams And Seam Allowance
- How To Sew A Straight Seam
- Sewing Curved Seams
- Sewing Corner Seams
- Trimming And Grading Seam Excess
- Notching/Clipping Seam Allowance for Tension Release
- Sewing Topstitched Seams
- Sewing Corded Seams
- Sewing A Slot Seam
- Sewing A Gathered Seam
- Sewing Bias Seams
- Sewing Seams With Ease
- Sewing Seams With Crossing Seamlines
- Sewing Unlike Fabric Seams
- How To Iron Seams: Ironing Tools And Conventions
- Sewing With Knit Fabrics
- Understanding Stitch Length And Tension
- Sewing Unique Fabric Seams
-
Seam Finishes
>
- Seam Finishing Techniques - Overview
- Applying A Pinked Seam Finish
- Applying A Bias Bound Seam Finish
- Serging And Zigzag Seam Finishes
- Sewing A Self-Bound Seam Finish
- Sewing A French Seam Finish
- Sewing A Hong Kong Seam Finish
- Sewing A Mock French Seam Finish
- Sewing A Turned-and-Stitched Seam Finish
- Sewing Overcast Hand-Applied Seam Finishes
- Sewing A Flat Felled Seam
- Sewing A Hairline Seam Finish
-
Hem Finishes
>
- Garment Hem Finishes: Overview
- Sewing A Double Fold Hem Finish
- Sewing A Single Fold Hem Finish
- Sewing Bound Hem Finishes
- Sewing An Exposed Double Layer Bound Hem
- Sewing A Folded-Up Bound Hem with Pre-folded Binding
- Sewing A Hong Kong Hem Finish
- Sewing A Band Hem Finish
- Sewing A Bias Faced Hem Finish
- Sewing A Twill Tape Hem Finish
- Sewing A Rolled Hem Finish
- Sewing A Shaped Hem Facing
- Using Fusible Hem Tape And Webbing
- Finishing A Lace Fabric Hem
- Finishing A Leather Hem
- Sewing Faced Hem Corners
- How To Finish Lining At The Hem
- Finishing Fabric Corners by Mitering >
- Interfacing A Hemline: Lined And Unlined Examples
-
Sewing Pockets
>
- Curved Patch Pocket With Flap
- Unlined Square Patch Pockets
- Lined Patch Pockets: Two Ways
- Extension On-Seam Pockets
- Separate On-Seam Pocket
- Front Hip Pockets
- Bound Double Welt Pocket
- Double Welt Pocket With Flap
- Self-Welt Pocket (Using Single Fabric Layer)
- Slanted Welt Pocket (Hand-Stitched)
- Faced Slash Pockets: Overview >
-
Sewing Zippers
>
- Sewing Zippers: General Information
- Sewing A Centered Zipper
- Sewing A Lapped Zipper
- Sewing An Invisible Zipper
- Sewing A Fly Front Zipper
- Sewing A Closed-End Exposed Zipper (No Seam)
- Sewing An Exposed Separating Zipper
- Sewing Hand Stitched Zipper Applications
- Sewing A Zipper Underlay
- Sewing A Placket-Enclosed Separating Zipper
- Sleeveless Finishes >
-
Neckline Finishes
>
- Sewing A Neck Shaped Facing
- Sewing An All-In-One Neck Facing
- Neck And Garment Opening Combination Facings >
- Sewing A Bias Faced Neckline Finish
- Sewing A Band Neckline Finish
- Bound Neckline Finishes: Overview >
- Sewing A Semi-Stretch Strip Band Neckline
- Ribbed Neck Band And Classic Turtleneck
- Decorative Neckline Finishes >
- Finishing Facing Edges >
-
Extras
>
- A Complete Guide on Interfacing
- Sewing Bound Spaghetti Straps
- Sewing Spaghetti Straps To A Faced Neckline
- Sewing Ruffles: Overview
- Patterning And Sewing A Circle Ruffle
- Sewing A Gathered Heading Ruffle
- Sewing Double Layer Gathered Ruffles
- Sewing A Gathered Ruffle Into A Seam
- Sewing A Gathered Ruffle To A Fabric Edge
- Sewing A Fabric Surface Slit
- Sewing A Slit Seam
- Hand-Applied Straight Stitches
- Hand-Applied Blind Stitches
- Hand-Applied Overedge Stitches
- Hand-Applied Tack Stitches
- Hand-Applied Decorative Stitches
-
Basics
>
- Custom Bridal
- Custom Apparel
- About
- Blog
 RSS Feed
Services |
Company |
|
