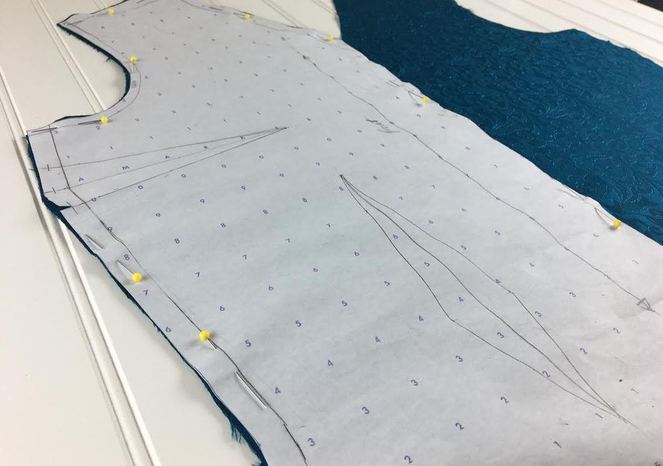
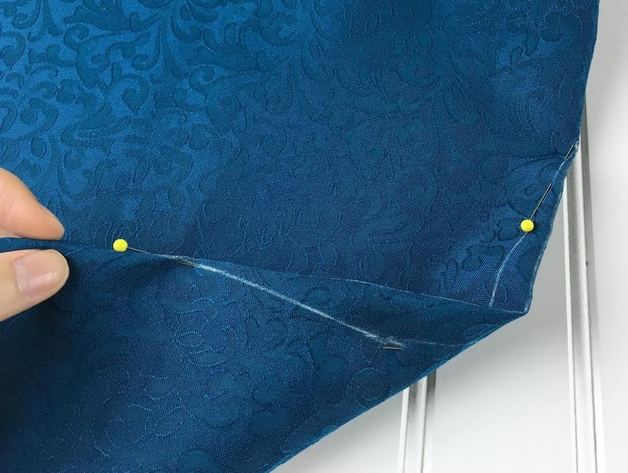
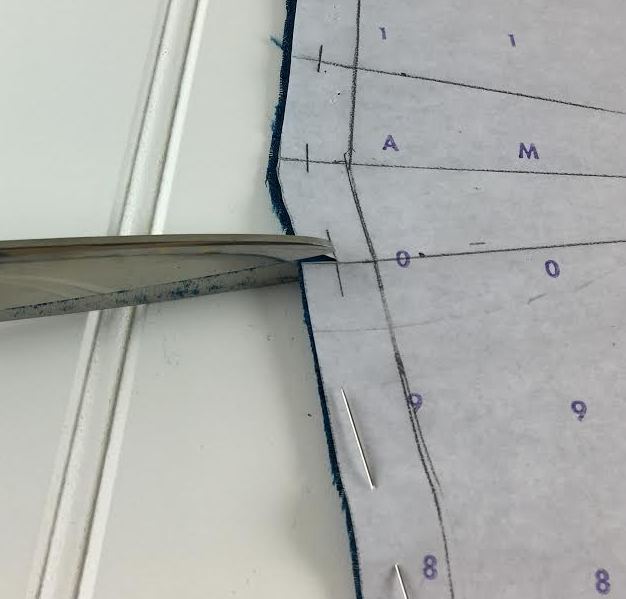
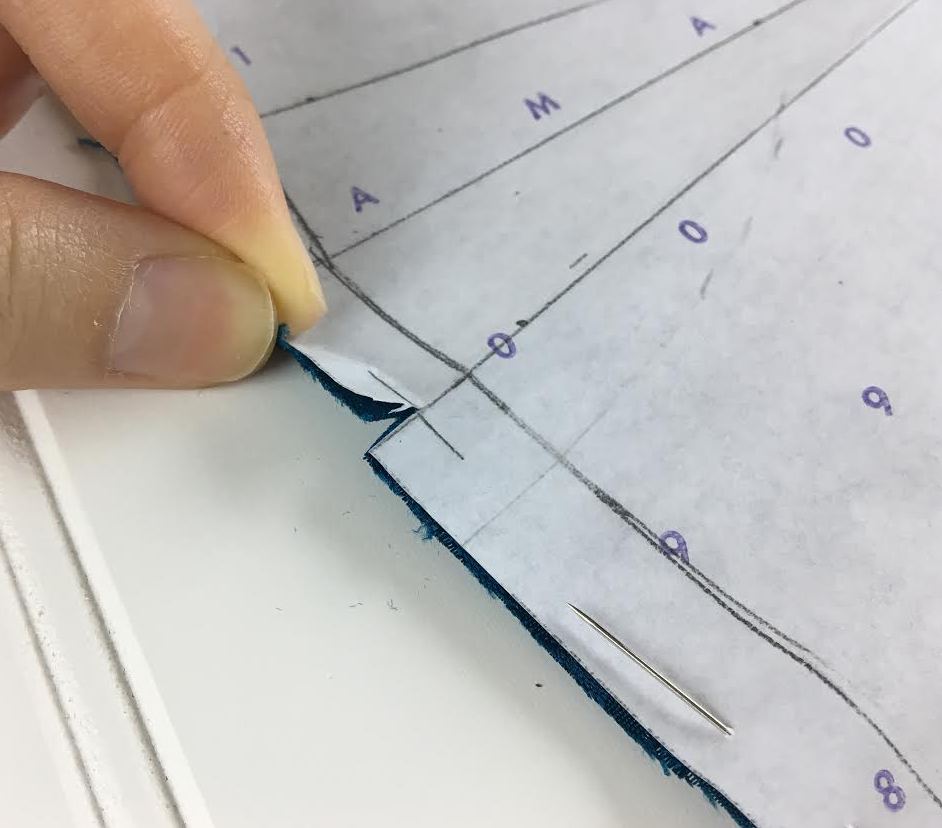
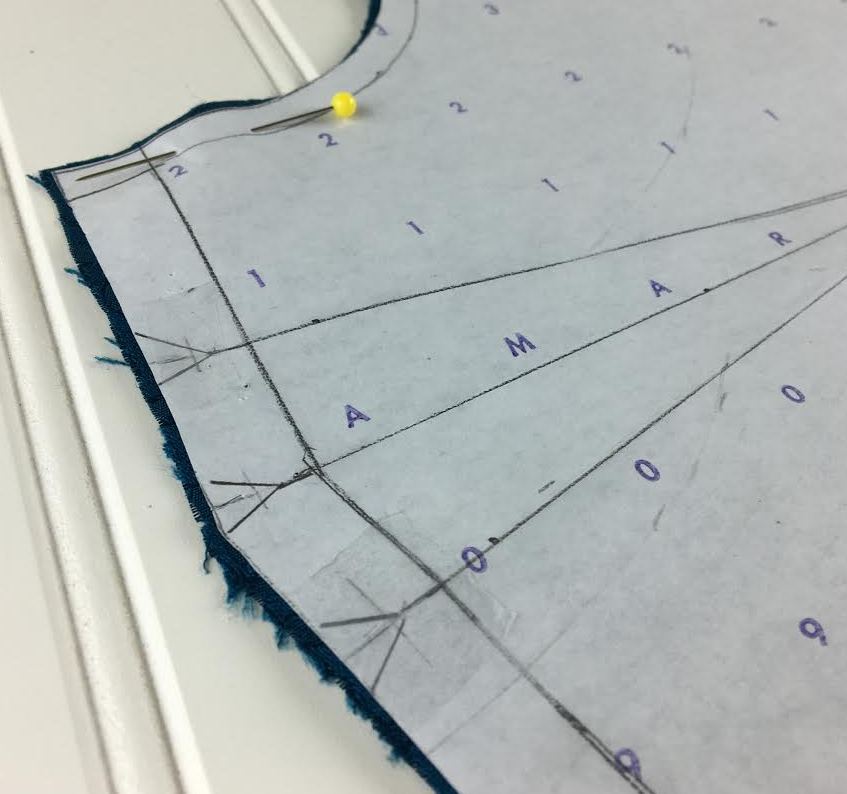
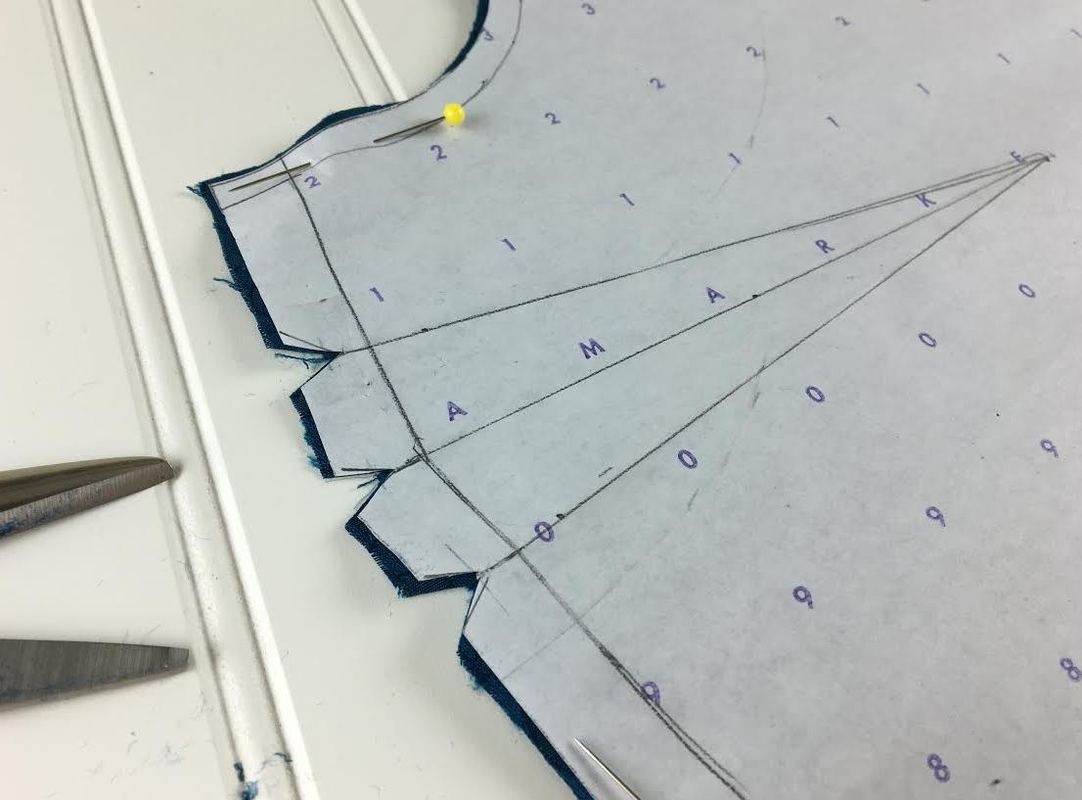
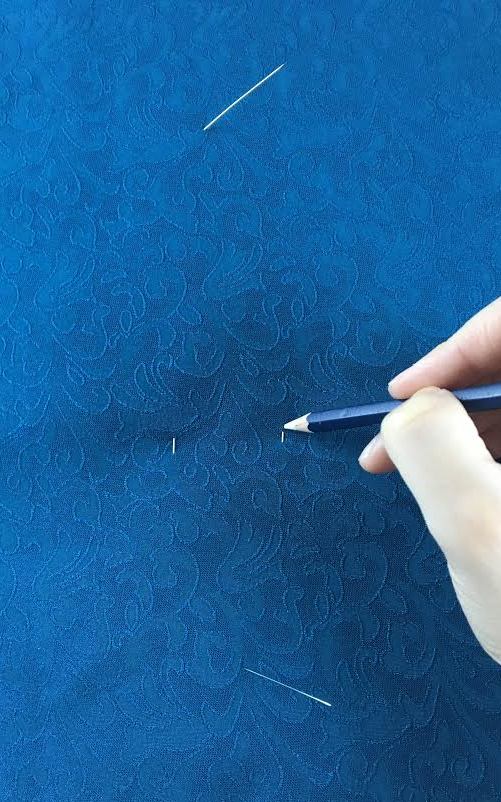
 What Are DartsWhen it comes to sewing apparel, the first thing to remember is that you are sewing for the human body which is an organic form. In order to construct a garment that is comfortable and wearable, a woven fabric's flat surface needs to be molded into a 3-dimensional shape. Darts allow you to turn an otherwise flat, non-stretch surface into a semi organic shape. They are subtle and easy to sew, and just a few simple darts can help the garment mold perfectly to the shape of the human form. Darts are triangular in-takes that when sewn, eliminate excess in the most curved areas of the body thus conforming to the organic shape of it. Darts have a vanishing point and two identical lines of the same length called dart legs. The dart is folded along a dart fold line so that the dart legs overlap. Once they are aligned to match up in length, they are sewn together up to the vanishing point. This takes in the excess necessary to achieve the desirable 3-dimensional shape. Although darts are mostly used in more fitted woven garments, some darts (like a bust dart) are inserted not only to achieve a form-fitting structure but also for comfort and fit purposes in less fitted styles. As you start to understand the necessity of darts and how to sew them, you will get a better grip on which types of darts to use for each specific clothing item. Types of DartsThere are two main categories of darts you should know as a sewing beginner: Double pointed darts and single pointed darts. These darts come in different lengths and widths and you can find them on a variety of different non-stretch (and some stretch) woven fabric items. 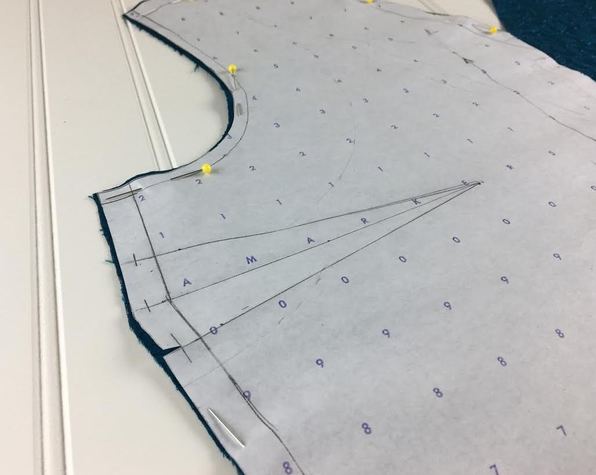 Single pointed darts have a single vanishing point and two dart legs. They look a lot like the shape of an angle. Remember drawing an angle in math class? Well, it looks exactly like that! A single pointed dart is the most commonly used dart in sewing. It is found on a number of clothing items from separates like tops and bottoms to dresses, suiting and outerwear. Some examples of single pointed darts are: bust darts, shoulder darts, waist darts, and elbow darts. 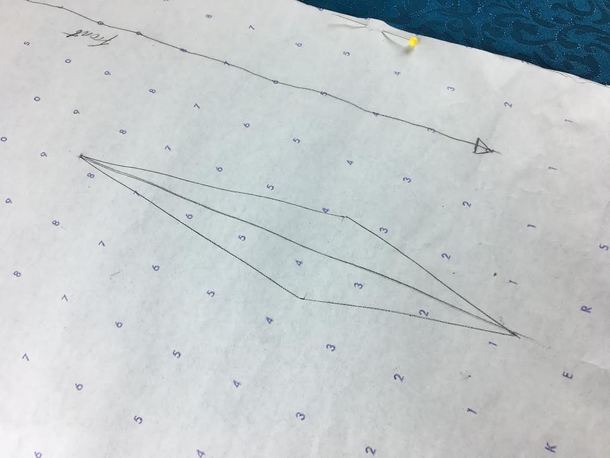 Double pointed darts have two vanishing points and two dart legs that are angular in shape. Think of it this way: If you take two single pointed darts and match their open ends together it will form the shape of a double pointed dart. Sewing a double pointed dart is like sewing two single pointed darts simultaneously. Double pointed darts are used most commonly around the waist and hip area on both front and back of a garment. They are able shape the curves of the waist and hips together in a smooth line. Double pointed darts are mostly found in form-fitting woven dresses, suits, blazers, and outerwear. Thinner double pointed darts are added to jackets and outerwear garments to achieve a more pronounced waist but that is not necessarily a completely form-fitting structure. How to Mark and Sew Single Pointed DartsTransferring a single pointed dart from sewing pattern onto fabric: As a first step, transfer the dart from your sewing pattern to the fabric. 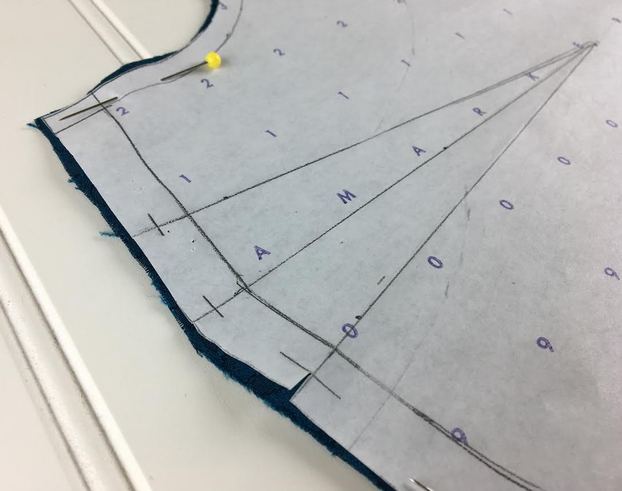 At the end of each dart leg and dart fold line you'll find a notch in the seam allowance. These notches will either be marked with a "T" shape or a triangle depending on the sewing patterns you are using. In order to make the dart sewing process easier, a dart fold line is added right in the middle of the dart between the two dart legs. When the dart fold line is folded lengthwise it allows the two dart legs to naturally overlap and align properly for sewing. 1. Snip the "T" shape up to the vertical line, or cut out the triangle notches in order to mark each dart leg's end and dart fold line in the middle. Follow the images bellow as a guide for both notch styles.
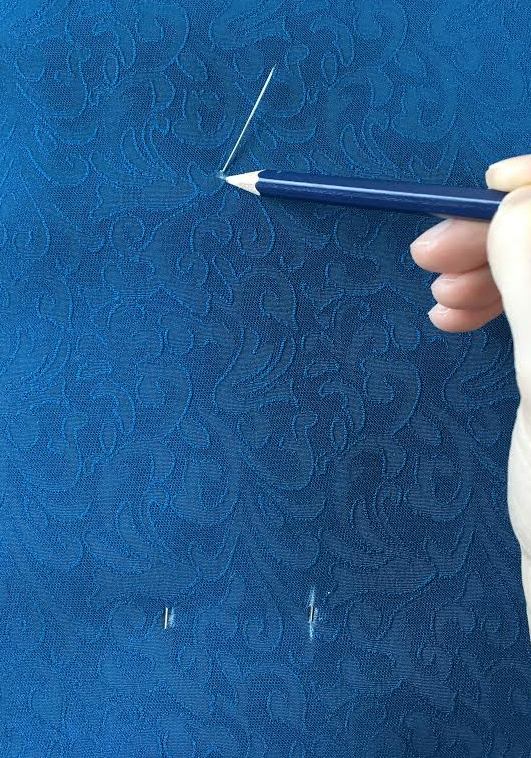
Once your notches are transferred, the next steps are to mark the vanishing point and transfer the actual lines of the dart legs and dart fold line onto the fabric. The easiest way to do this as a sewing beginner is by using a pin and a fabric marking pencil. 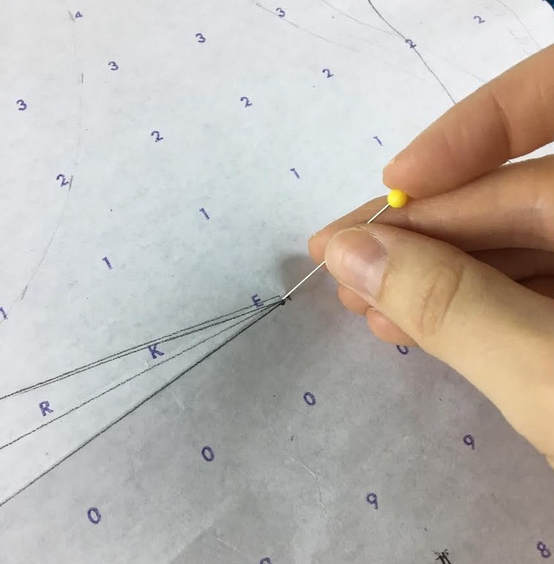 2. Put a pin through both layers of the fabric and pattern at the dart point (vanishing point of the dart). 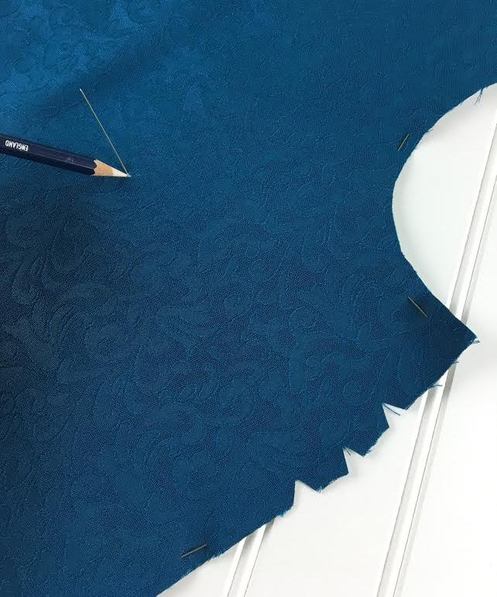 3. Turn your pattern over so that the fabric is facing you, and mark with a fabric pencil the point where the pin comes through on the fabric, thus transferring the dart vanishing point. Note: All your markings should be made on the wrong side of the fabric.
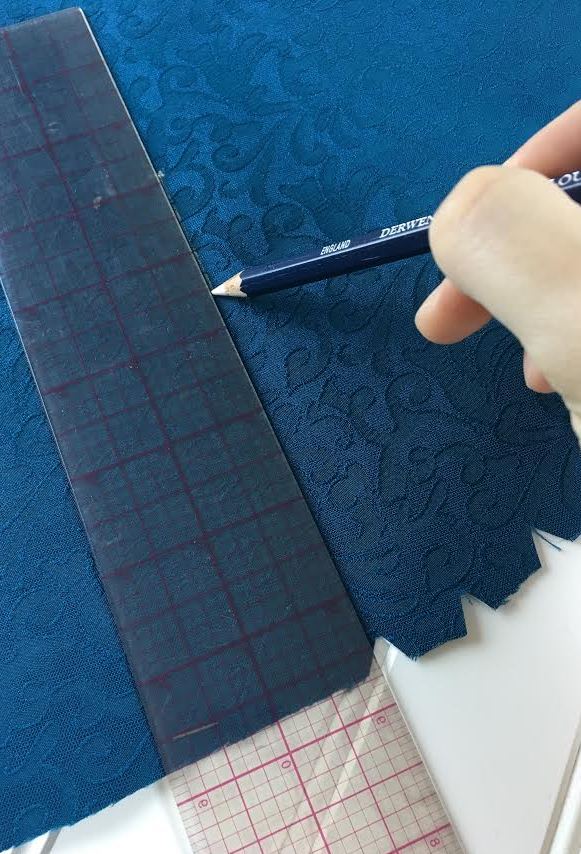
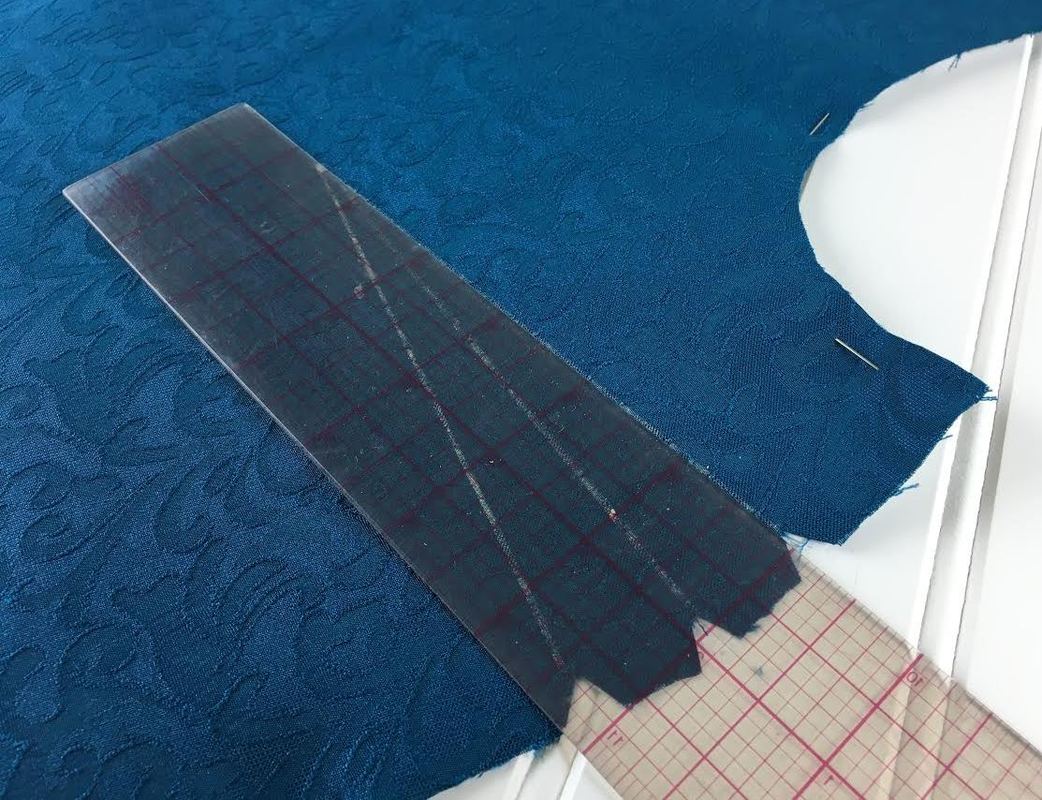
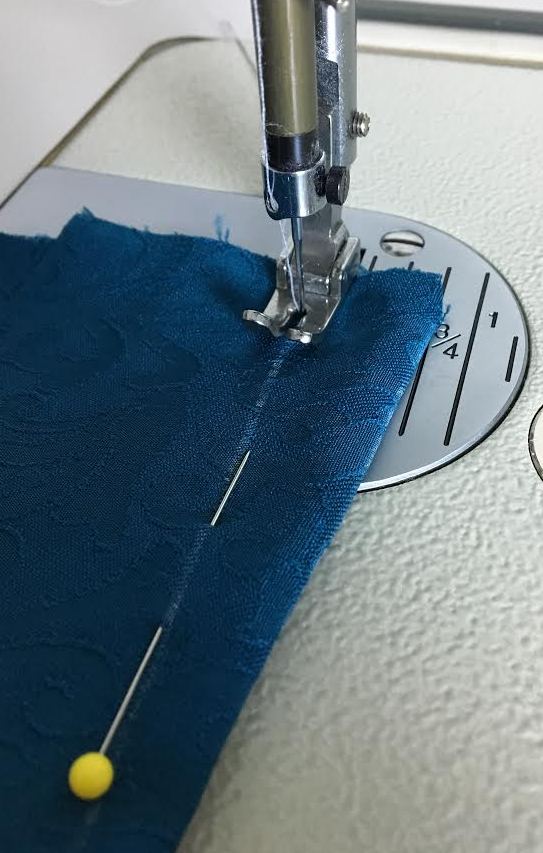
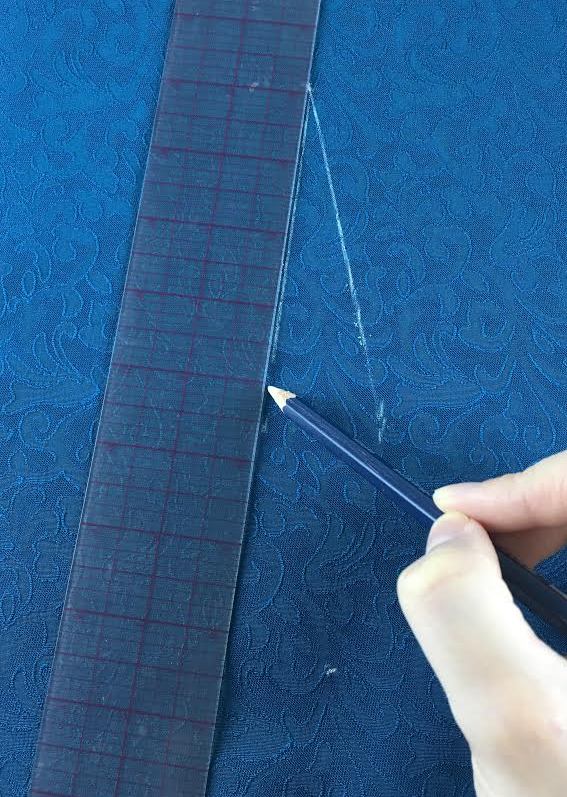
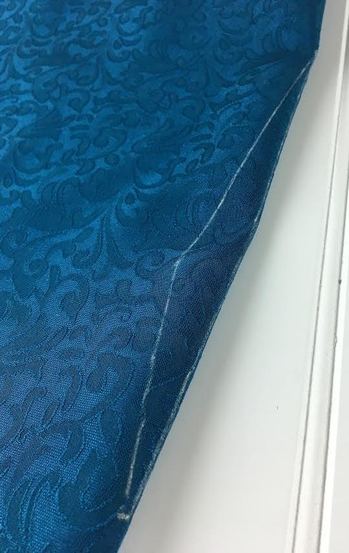
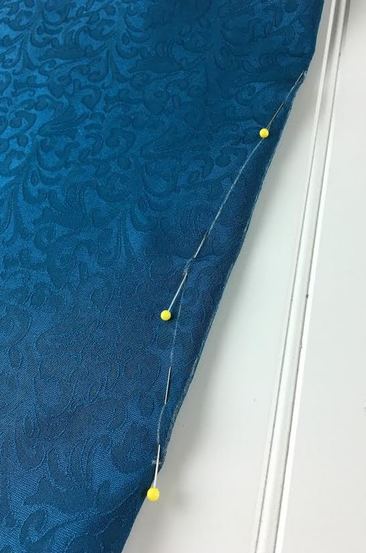
4. Remove all the pins and using a straight ruler and your fabric marking pencil, draw straight lines directly on the fabric from vanishing dart point to each one of the seam allowance notches. These three straight lines will form the dart legs and fold line and will later guide you in the sewing process. 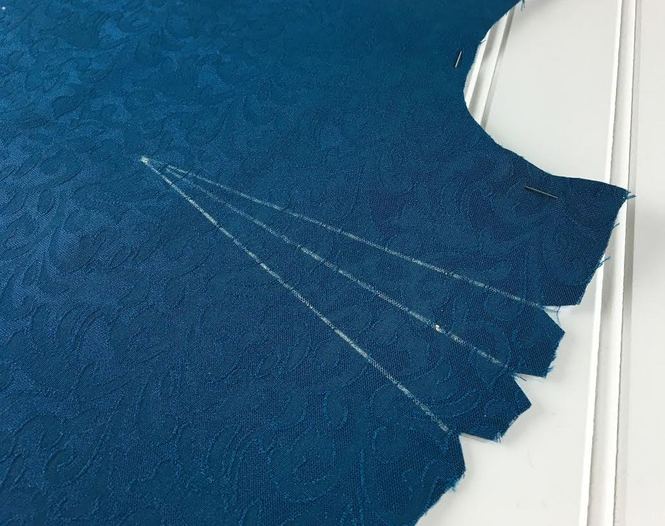 Keep in mind that darts should always be marked on the wrong side of the fabric as displayed below. This not only keeps the face of the fabric clean, but the darts will be easier to sew by following the pencil markings on the wrong side of the fabric. 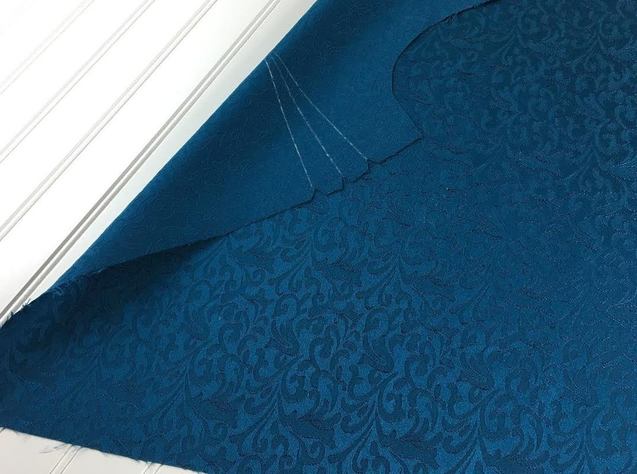 Sewing a single pointed dart: 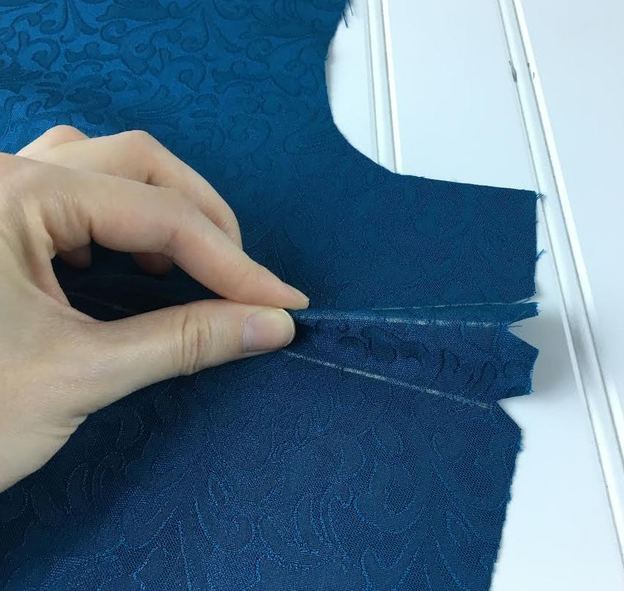 1. Working on the wrong side of the fabric, fold the dart along the dart fold line in the middle. 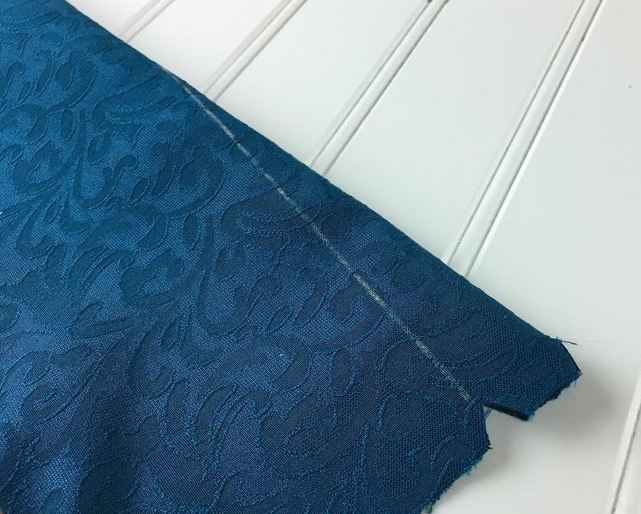 Folding the dart fold line will naturally overlap the dart legs properly and align the dart leg notches. It also helps to iron this fold in order to keep the dart stable for sewing. 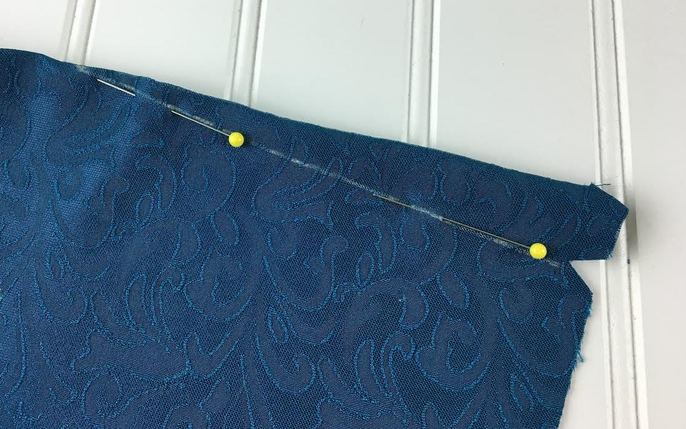 2. Place a few pins along the dart leg through both layers of fabric as shown. 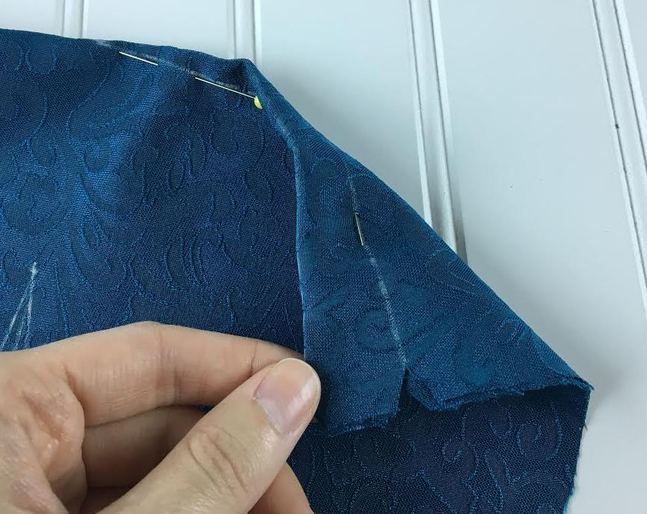 3. Check that both dart legs are matching and aligned right on top of each other. The pin should go through the dart leg lines on both sides as displayed above.
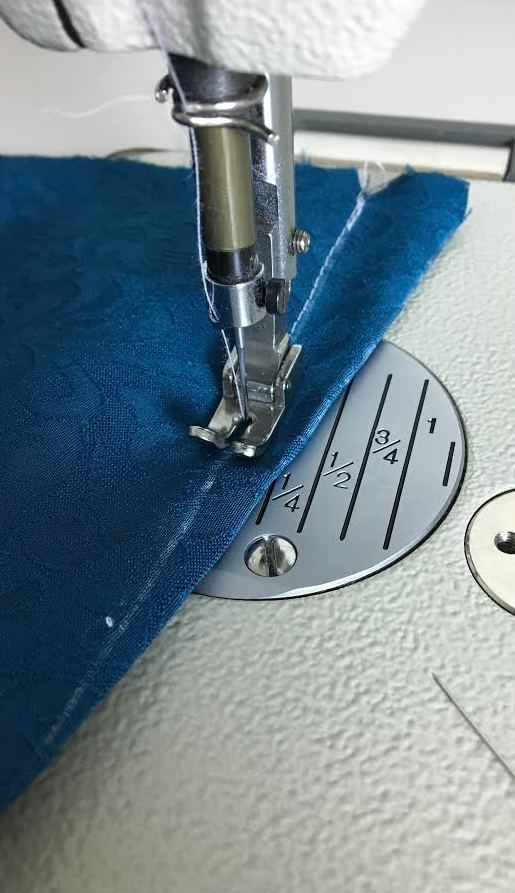
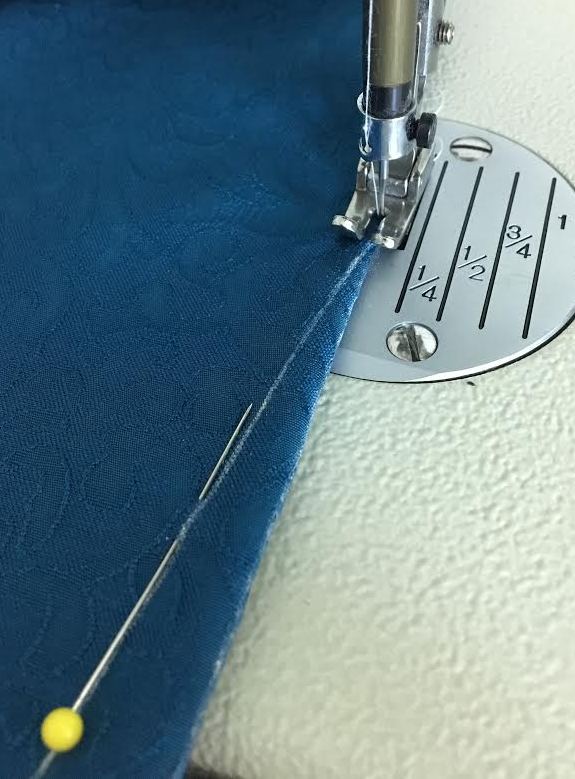
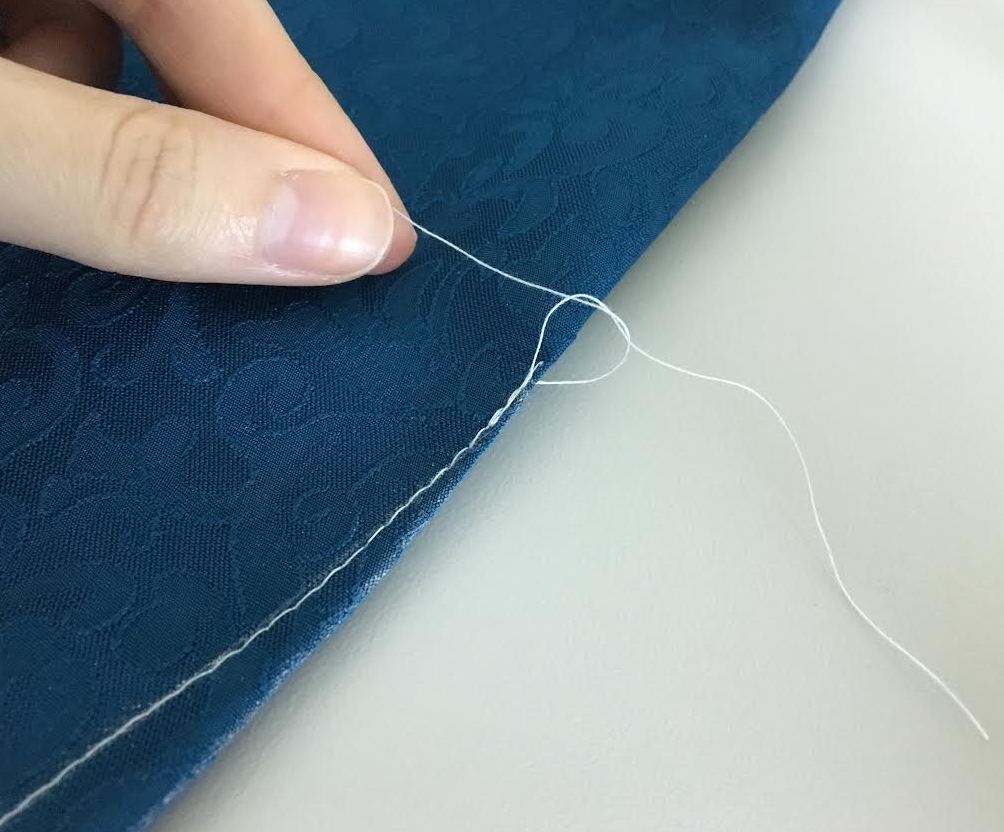
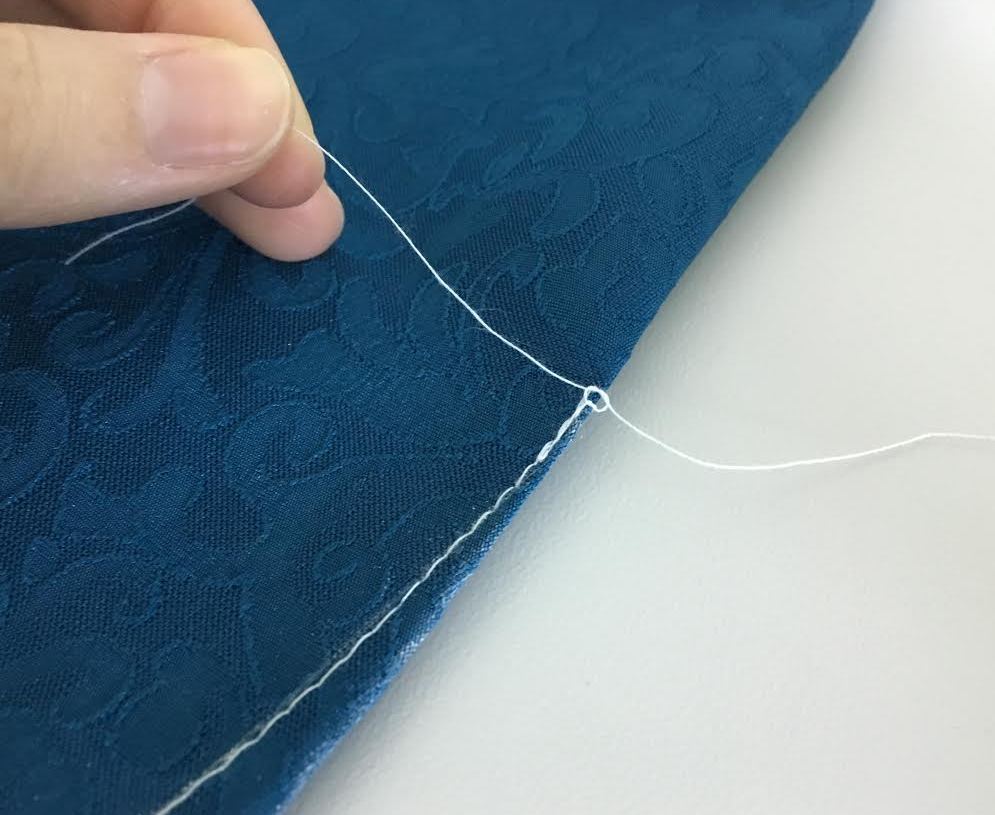
4. Starting from the notch area, begin sewing right on top of the dart leg moving towards the dart vanishing point. Make sure to keep the dart legs matching and overlapping properly while stitching. 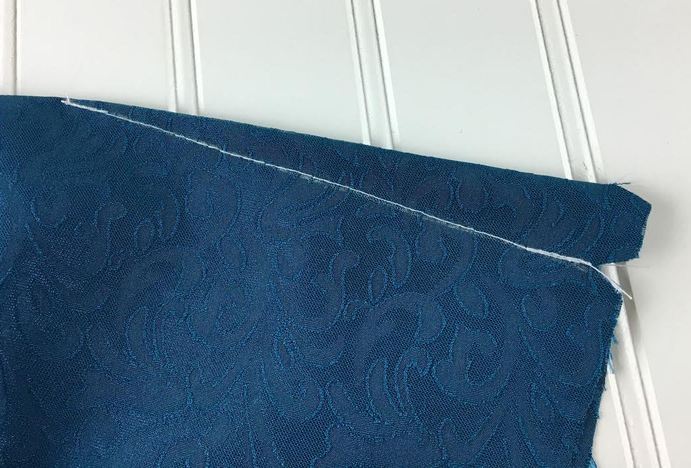 5. Get in the habit of backstitching at the beginning of the dart. However, be careful when backstitching at the vanishing point. When working with lightweight, fine fabrics stay away from backstitching at the dart vanishing point as this can damage the fabric and cause it to crease. For sturdy, thicker fabrics you may backstitch both at the dart notches and dart vanishing point. It will take some practice to know which fabrics can handle backstitching and which don't. For the fabrics that machine backstitching may prove to be too harsh, you should backstitch by hand or knot the loose threads to stabilize the machine stitch. 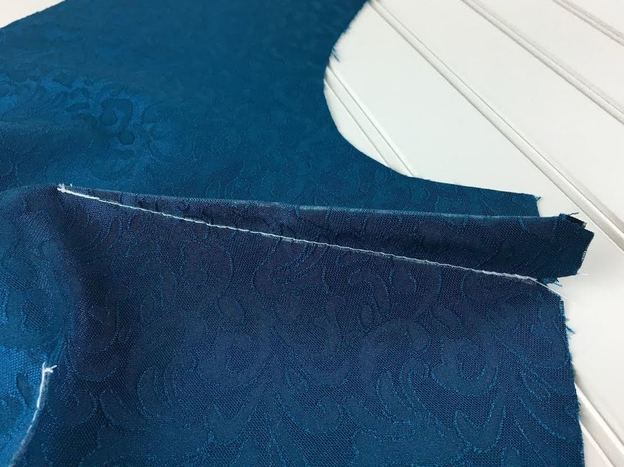  Iron the dart on the face side of the garment with the excess pointing down. How to Mark and Sew Double Pointed DartsTransferring a double pointed dart from sewing pattern onto fabric: 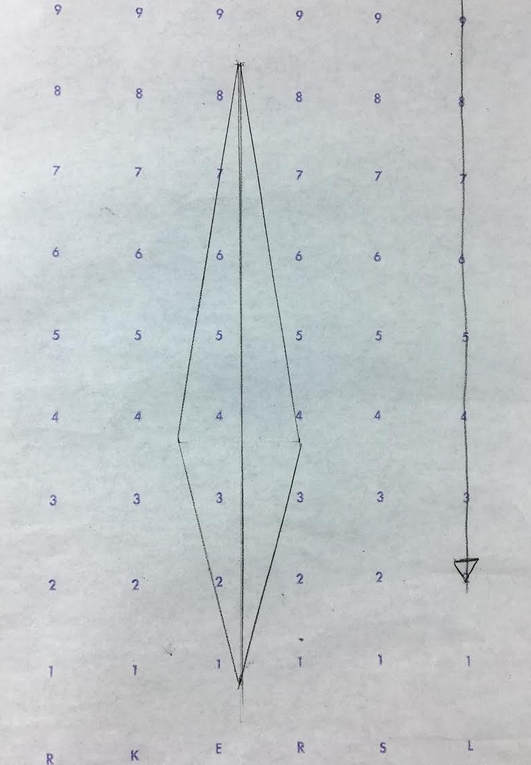 A double pointed dart has two dart vanishing points and two transitional points that will need to be transfered from pattern onto fabric. Below, we'll use the pin and fabric pencil marking technique as this is the easiest and requires the least tools.
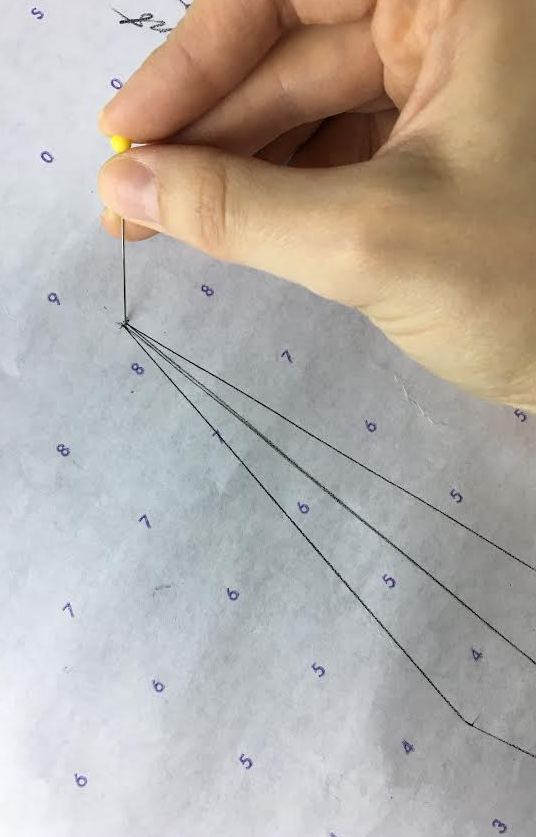
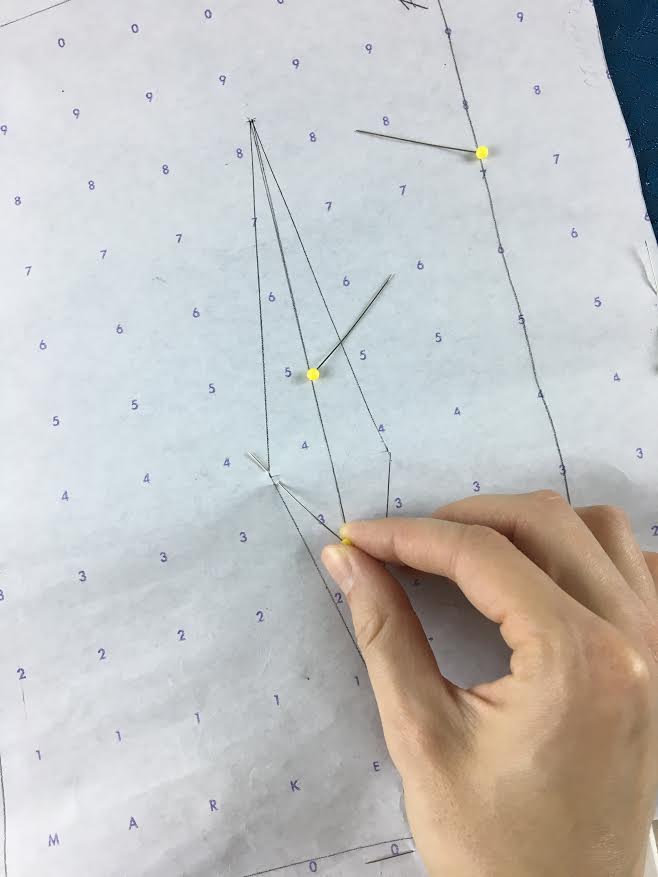
1. Place a pin through the sewing pattern and fabric at the top dart point as displayed above. 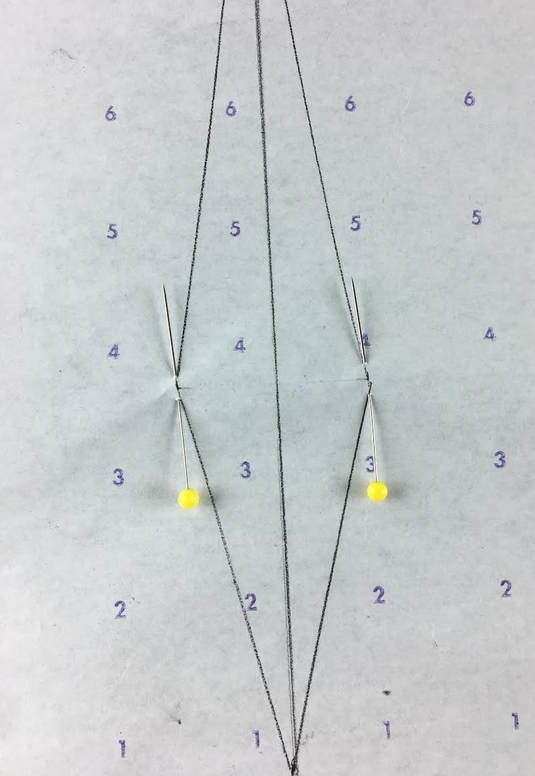 2. Insert a pin through both fabric and sewing patterns at the transitional areas of the dart. These are the two points where the dart changes direction. They are easy to recognize by the fact that they represent the outer most points of the double pointed dart on each side. 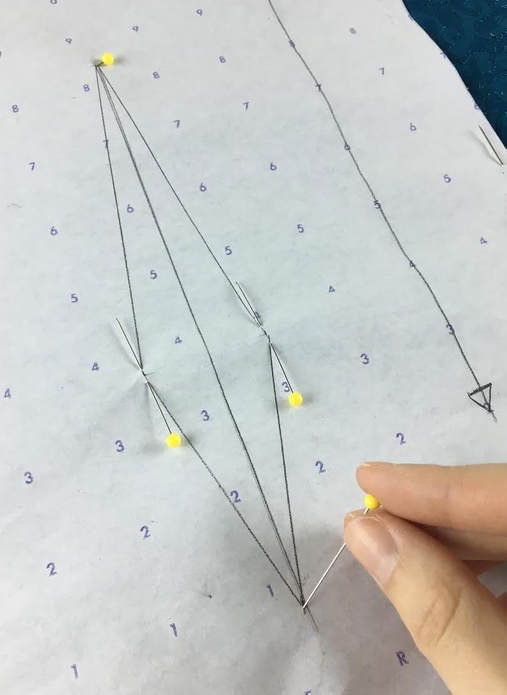 3. Finally, insert a pin through the sewing pattern and fabric at the bottom dart point.
4. Turn the sewing pattern over so that the wrong side of the fabric is facing you, and using a fabric marking pencil, transfer each pin marking on the fabric as shown above.
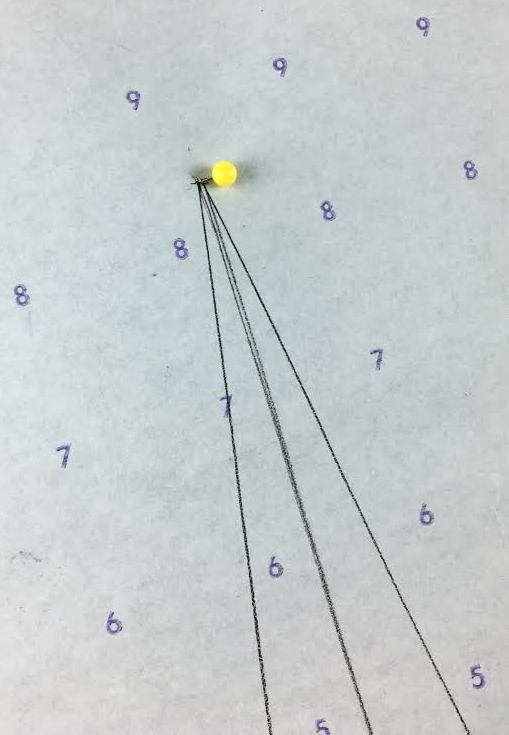
5. Remove the pins, and using a straight ruler and fabric pencil, connect all the markings with straight lines. 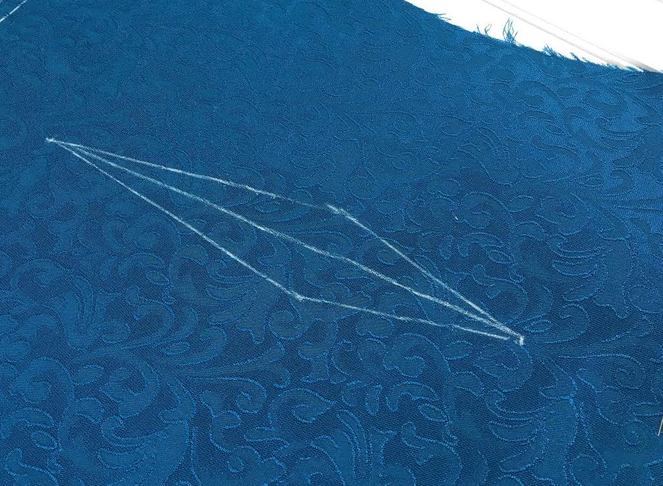 6. Add a straight line from top dart point to bottom dart point, splitting the double pointed dart in half. This will serve as the dart fold line and will help when finally folding and sewing the dart.  Make sure that all your pencil markings are on the wrong side of the fabric. Sewing a double pointed dart: 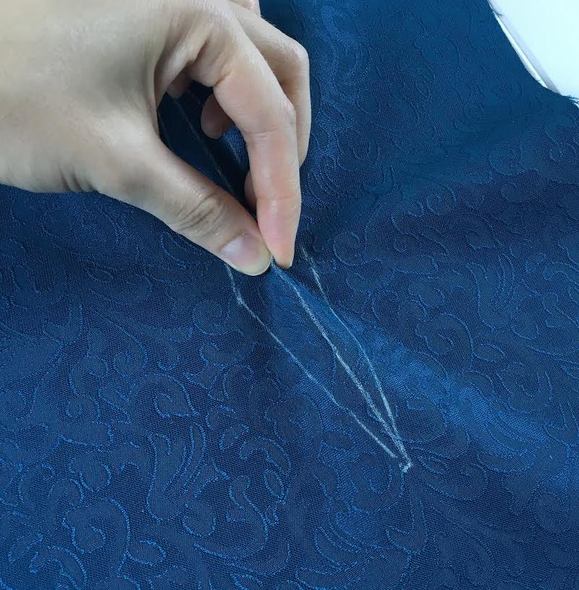 1. Fold along the dart fold line as displayed above.
 3. Make sure the dart legs are matched properly by inserting the pin through the pencil markings on each side simultaneously.
4. Start at one dart point and stitch down towards the second dart point at the bottom. It will take some practice to make a smooth transition at the outer most part of the dart. Keep practicing and you'll achieve a smooth stitch in no time!
In the case where backstitching may damage or crease the fabric at the vanishing point (fine, lightweight fabrics), knot the loose threads to lock the machine stitch in place at each dart vanishing point. 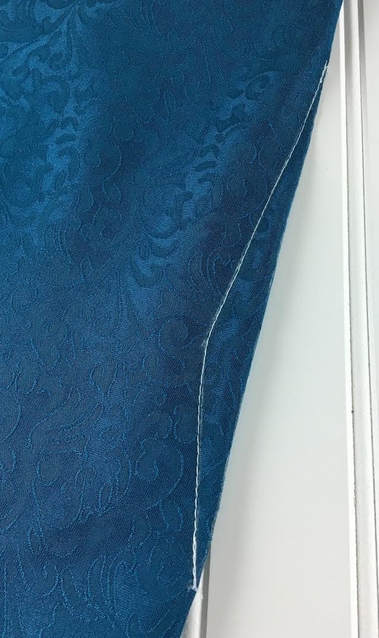 5. Once completed, iron the double pointed dart seam on the face of the garment with the excess pointing towards the center (center front or center back). It is not necessary that you trim the excess unless the dart excess is unusually wide and requires tension release. 
0 Comments
Leave a Reply. |
The Blog:A journey into our design process, sewing tutorials, fashion tips, and all the inspiring people and things we love. 
Doina AlexeiDesigner by trade and dressmaker at heart. I spend most of my days obsessing over new fabrics and daydreaming new ideas. 
Sadie
Executive Assistant & Client Relations Manager Archives
November 2019
Categories
All

|

-
Sewing Tutorials
-
Basics
>
- Aligning Pattern Grainlines To Fabric
- Preparing Fabrics For Sewing
- Pinning Sewing Patterns To Fabric
- Placing Sewing Patterns On Fabric For Cutting
- Rotary Cutters or Fabric Scissors?
- Cutting The Sewing Patterns
- What Are Notches And How To Use Them In The Sewing Process
- Transferring Notches From Pattern To Fabric
- Transferring Seamlines to Fabric
- Staystitching
- Backstitching: A Complete Guide
- Hand Basting: A Complete Guide
- Sewing Continuous Bias Binding
- Darts >
-
Sewing Seams
>
- The Basics Of Seams And Seam Allowance
- How To Sew A Straight Seam
- Sewing Curved Seams
- Sewing Corner Seams
- Trimming And Grading Seam Excess
- Notching/Clipping Seam Allowance for Tension Release
- Sewing Topstitched Seams
- Sewing Corded Seams
- Sewing A Slot Seam
- Sewing A Gathered Seam
- Sewing Bias Seams
- Sewing Seams With Ease
- Sewing Seams With Crossing Seamlines
- Sewing Unlike Fabric Seams
- How To Iron Seams: Ironing Tools And Conventions
- Sewing With Knit Fabrics
- Understanding Stitch Length And Tension
- Sewing Unique Fabric Seams
-
Seam Finishes
>
- Seam Finishing Techniques - Overview
- Applying A Pinked Seam Finish
- Applying A Bias Bound Seam Finish
- Serging And Zigzag Seam Finishes
- Sewing A Self-Bound Seam Finish
- Sewing A French Seam Finish
- Sewing A Hong Kong Seam Finish
- Sewing A Mock French Seam Finish
- Sewing A Turned-and-Stitched Seam Finish
- Sewing Overcast Hand-Applied Seam Finishes
- Sewing A Flat Felled Seam
- Sewing A Hairline Seam Finish
-
Hem Finishes
>
- Garment Hem Finishes: Overview
- Sewing A Double Fold Hem Finish
- Sewing A Single Fold Hem Finish
- Sewing Bound Hem Finishes
- Sewing An Exposed Double Layer Bound Hem
- Sewing A Folded-Up Bound Hem with Pre-folded Binding
- Sewing A Hong Kong Hem Finish
- Sewing A Band Hem Finish
- Sewing A Bias Faced Hem Finish
- Sewing A Twill Tape Hem Finish
- Sewing A Rolled Hem Finish
- Sewing A Shaped Hem Facing
- Using Fusible Hem Tape And Webbing
- Finishing A Lace Fabric Hem
- Finishing A Leather Hem
- Sewing Faced Hem Corners
- How To Finish Lining At The Hem
- Finishing Fabric Corners by Mitering >
- Interfacing A Hemline: Lined And Unlined Examples
-
Sewing Pockets
>
- Curved Patch Pocket With Flap
- Unlined Square Patch Pockets
- Lined Patch Pockets: Two Ways
- Extension On-Seam Pockets
- Separate On-Seam Pocket
- Front Hip Pockets
- Bound Double Welt Pocket
- Double Welt Pocket With Flap
- Self-Welt Pocket (Using Single Fabric Layer)
- Slanted Welt Pocket (Hand-Stitched)
- Faced Slash Pockets: Overview >
-
Sewing Zippers
>
- Sewing Zippers: General Information
- Sewing A Centered Zipper
- Sewing A Lapped Zipper
- Sewing An Invisible Zipper
- Sewing A Fly Front Zipper
- Sewing A Closed-End Exposed Zipper (No Seam)
- Sewing An Exposed Separating Zipper
- Sewing Hand Stitched Zipper Applications
- Sewing A Zipper Underlay
- Sewing A Placket-Enclosed Separating Zipper
- Sleeveless Finishes >
-
Neckline Finishes
>
- Sewing A Neck Shaped Facing
- Sewing An All-In-One Neck Facing
- Neck And Garment Opening Combination Facings >
- Sewing A Bias Faced Neckline Finish
- Sewing A Band Neckline Finish
- Bound Neckline Finishes: Overview >
- Sewing A Semi-Stretch Strip Band Neckline
- Ribbed Neck Band And Classic Turtleneck
- Decorative Neckline Finishes >
- Finishing Facing Edges >
-
Extras
>
- A Complete Guide on Interfacing
- Sewing Bound Spaghetti Straps
- Sewing Spaghetti Straps To A Faced Neckline
- Sewing Ruffles: Overview
- Patterning And Sewing A Circle Ruffle
- Sewing A Gathered Heading Ruffle
- Sewing Double Layer Gathered Ruffles
- Sewing A Gathered Ruffle Into A Seam
- Sewing A Gathered Ruffle To A Fabric Edge
- Sewing A Fabric Surface Slit
- Sewing A Slit Seam
- Hand-Applied Straight Stitches
- Hand-Applied Blind Stitches
- Hand-Applied Overedge Stitches
- Hand-Applied Tack Stitches
- Hand-Applied Decorative Stitches
-
Basics
>
- Custom Bridal
- Custom Apparel
- About
- Blog

 RSS Feed
Services |
Company |
|
