|
On-seam pockets are a staple of functionality. Whether used on casual garments or formal styles, they are undeniably a valuable asset to the garment's versatility. I find myself adding pockets to any design I sew from scratch, any chance I get. They are fairly easy to pattern and sew, elevating the garment with the addition of just a few simple steps. On-seam pockets have now become somewhat essential to me. I don't know about you, but I'm always instinctively searching for pockets to house my keys or phone when I'm out and about (doing a million things at once). The simplicity of sewing on-seam pockets is often contingent on your sewing pattern. If you start off with a good, clear pocket pattern, the rest is easy to complete. There are a variety of different pocket bag shapes and styles you could choose from, but in this tutorial, I'll work from a skirt pattern to draft a simple, round pocket bag. When drafting pocket patterns, it is easiest to use the main pattern of the clothing item (you are adding the pocket to) as a blueprint. You will be using the actual seam (on the pattern) to generate the pocket pattern. My skirt will have a pocket on one side seam, thus I'll draw the actual pocket bag pattern directly on the main skirt pattern using the skirt's side seam as a guide. This technique works for any clothing item whether a skirt, dress or pants as long as you work directly on the seamline of the main pattern, at the exact desired location of the pocket. To get more clarity, follow the steps in the video tutorial above and/or the step-by step breakdown below. By the way, stay tuned to learn how to then sew this pocket in a video tutorial to come! Deciding The Pocket Location And Marking Its OpeningFirst and foremost, let's decide on the pocket's location. Although you could technically place it just about anywhere along the seam, keep in mind the pocket's optimal functionality. You want to be able to comfortably insert your hand and easily retrieve (or place) items in without any discomfort. The best way to measure how far down to place an on-seam pocket is to measure its opening in relation to the waistline location on the pattern. This rule applies specifically to pockets sewn into the side seam, which technically is the most common application. As a general rule, the side seam pocket should open starting at about 3-5" down from the waistline. For optimal comfort, the pocket opening itself should be about 5-5 1/2" inches long, although that varies depending on your specifications (and type of pocket). To start the pocket pattern, measure down the seam about 3-5" (as desired) from the waistline down. If the waistline isn't clearly defined on your pattern, find the point along the seam that is closest to the waist area. The top edge of my skirt pattern in this tutorial corresponds to the waistline, so I just measured about 3.5" down the side seam from the very top edge (not counting seam allowance). This location will mark the beginning of the pocket opening. Moving down the seam again, measure the desired length of the pocket opening and mark with a short horizontal line. This line will eventually become a notch, essentially, marking the bottom location of the pocket opening. As mentioned above, an on-seam pocket opening usually measures about 5 and 1/2 inches. It is really up to you how wide you'd like the opening to be but if unsure, stick to this conventional measurement. That's what I did with my pocket. I measured 5" and 1/2" down from the top pocket opening in the step above. Moving down the seam again, the next measurement and final notch will mark the depth of the pocket bag (you'll see what I mean as we move to the next steps below). Usually 1" and 1/2" to 2" is enough to create good pocket depth. Following this logic, I measured 1" and 1/2" down from the horizontal line/notch (bottom of pocket opening) in the step above, and marked a horizontal line to mark another notch as shown. If you want a deeper pocket, measure a longer distance down. 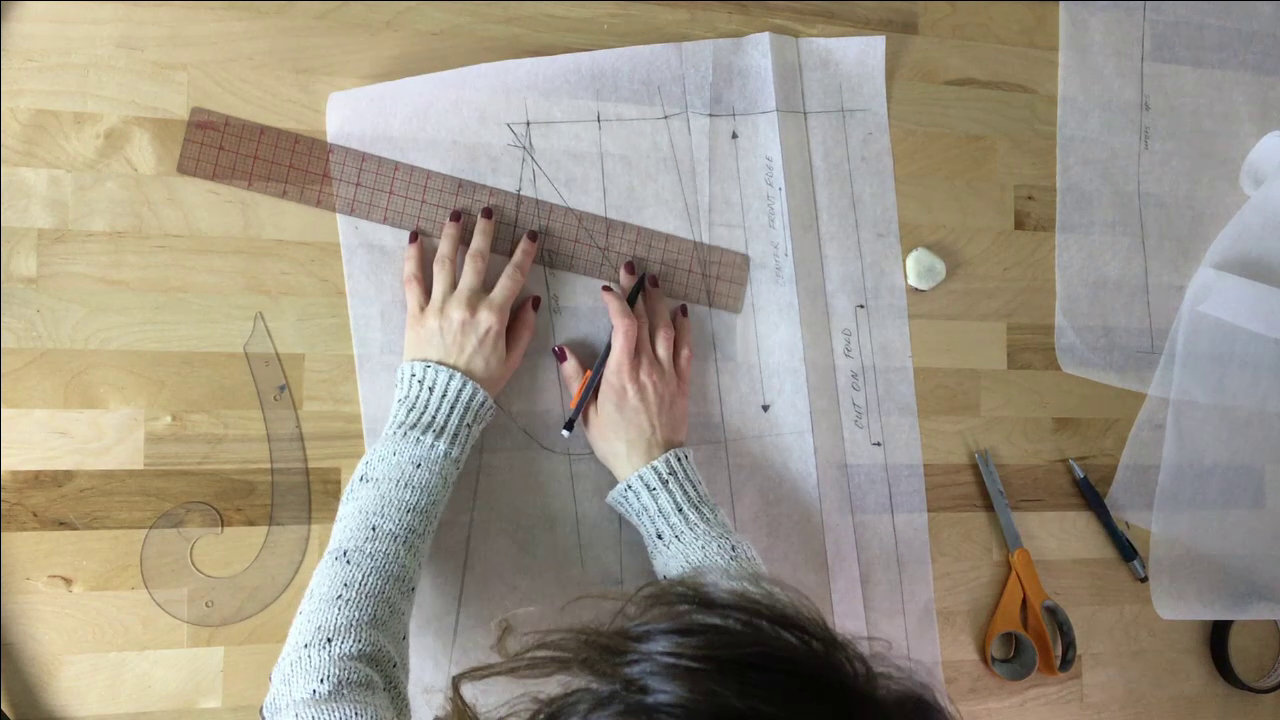 Now, let's add all additional notches. Fill in the notch for the top pocket bag opening by measuring up 5 1/2" from the bottom pocket opening notch. Add a horizontal line to define the top opening of the pocket bag. From this notch measure up at about 1 and 1/2" and add a second notch at the top as shown. This very top notch will mark the very top edge of the pocket bag. 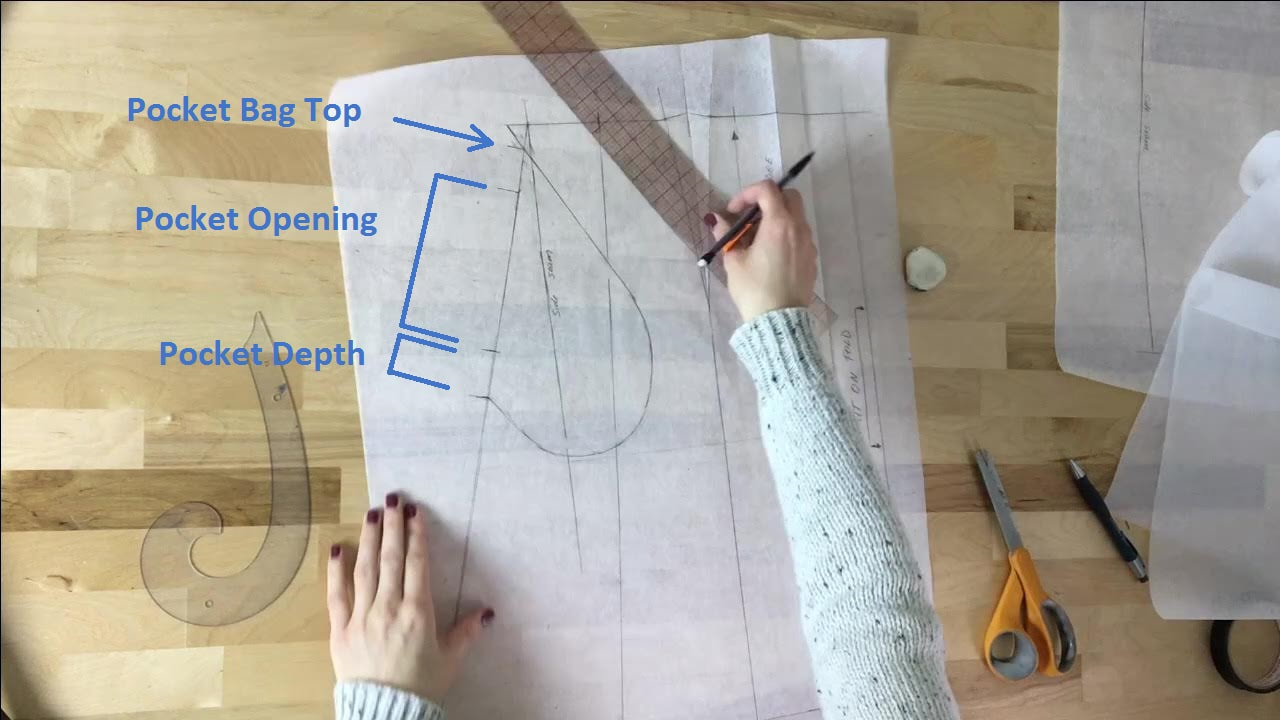 These 4 horizontal lines (which will later become notches) represent the pocket location, opening length and depth exactly as it will appear on the finished side seam. The best part is, once you have these 4 notches marked on the seam, you can use them as a guide to sketch the shape of the pocket bag as described below. As you can see, I've already sketched my pocket bag to give you a better visualization of the pocket bag location in relation to its seam opening. You'll find a breakdown of how to draw this curved pocket style below. Sketching The Pocket Bag OutlineDrafting the pocket bag shape is the more fun part of the process. First, decide what shape the pocket bag will have. I prefer the round bottom but you may like a square shape. Regardless, as long as the pocket is connecting to the side seam edges correctly, the shape of the pocket body is completely up to you! 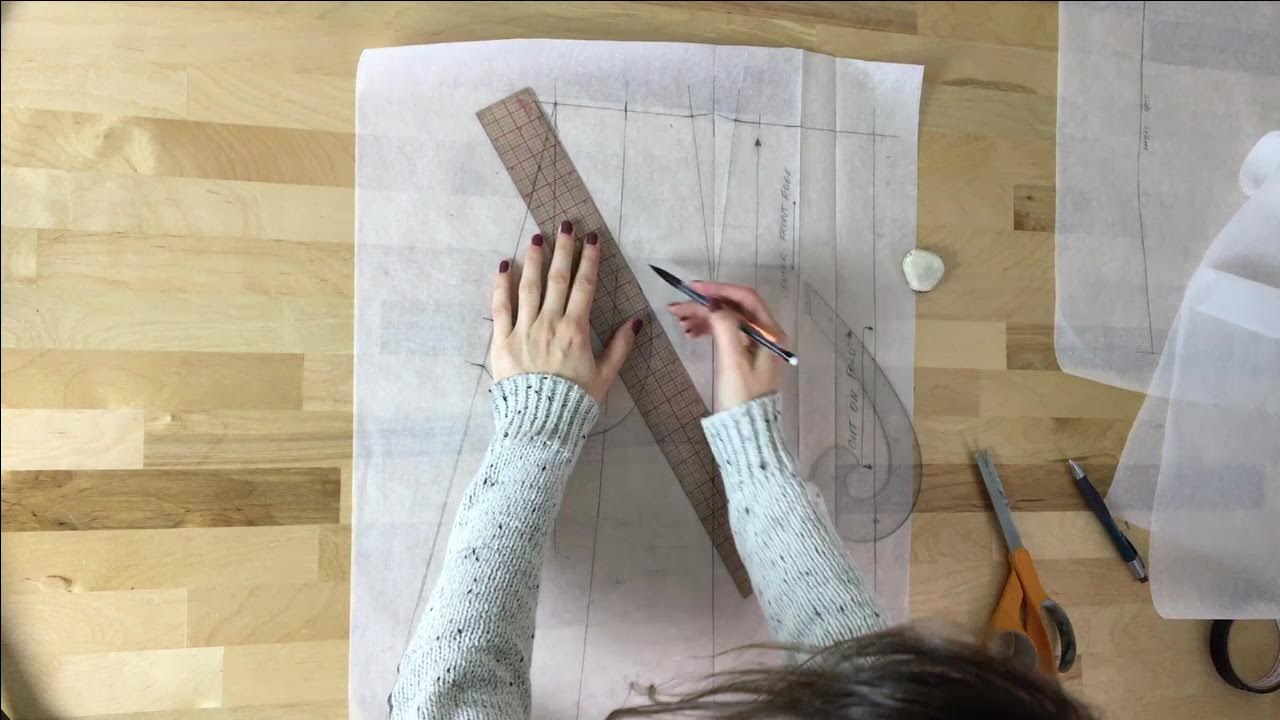 For a curved pocket bag as seen here: Starting at the very top notch (1st notch), sketch a straight line gradually moving away from the side seam as shown. How much you extend this line out depends on how wide you want the pocket bag to be. If unsure, use the video above as a guide. 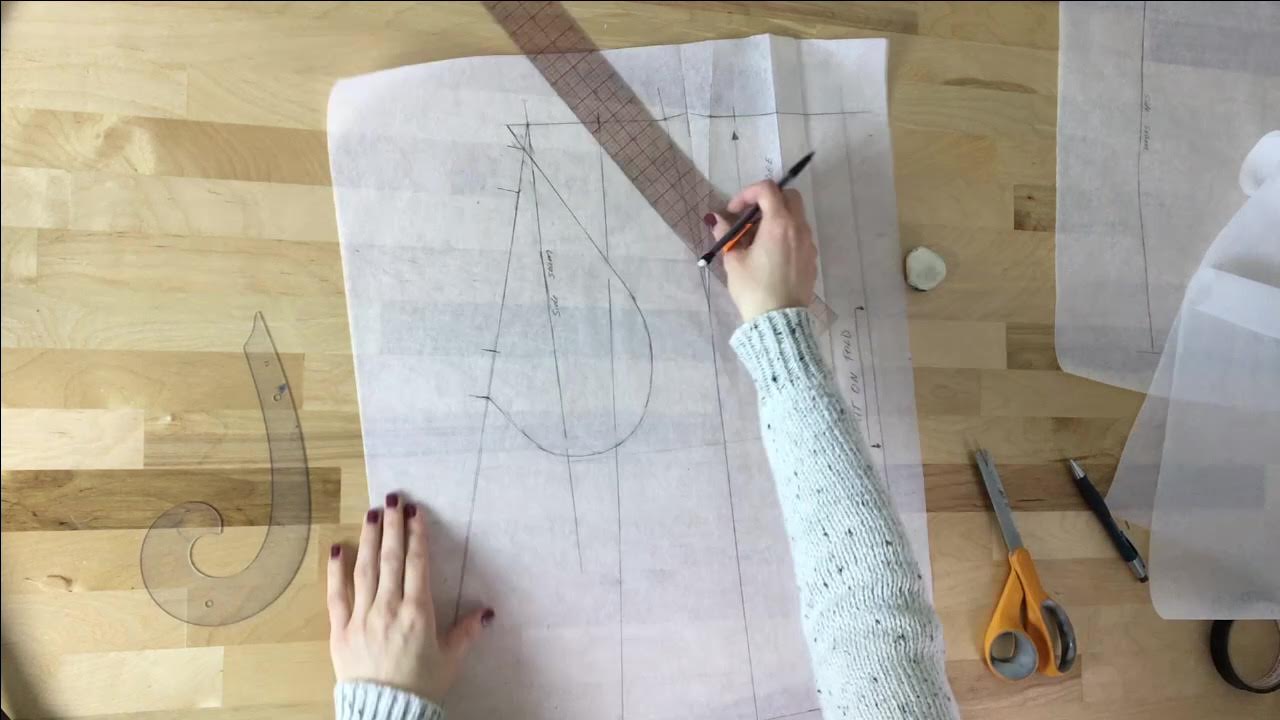 Starting at the very bottom notch (4th notch) sketch, or rather, freehand a curved line that goes slightly down then moves back up to blend into the diagonal straight line at the top. This curve will become the bottom edge of the pocket bag. The very top and very bottom notches (along side seam) connect to the pocket bag outer edges (before seam allowance is added). using this logic, feel free to manipulate the shape of your pocket bag whichever way you like. FYI- The middle notches (2nd and 3rd) mark the pocket opening and are essential to the pocket's sewing portion. All 4 notches will have to be transferred onto the final pocket pattern, and finally, the cut fabric pieces. The pocket bag draft is now complete! Keep in mind that this is just a draft/blueprint. You cannot cut the skirt sewing pattern to separate this pocket pattern. As a final step, you'll need to transfer it to a new piece of pattern paper, add seam allowance and cut it into a separate pocket pattern. Transferring And Finalizing The Pocket PatternUse a separate piece of pattern paper that is large enough for the pocket bag and the addition of seam allowance. I recommend using a transparent or semi-transparent paper like tracing paper as it makes it so much easier in the transfer process. 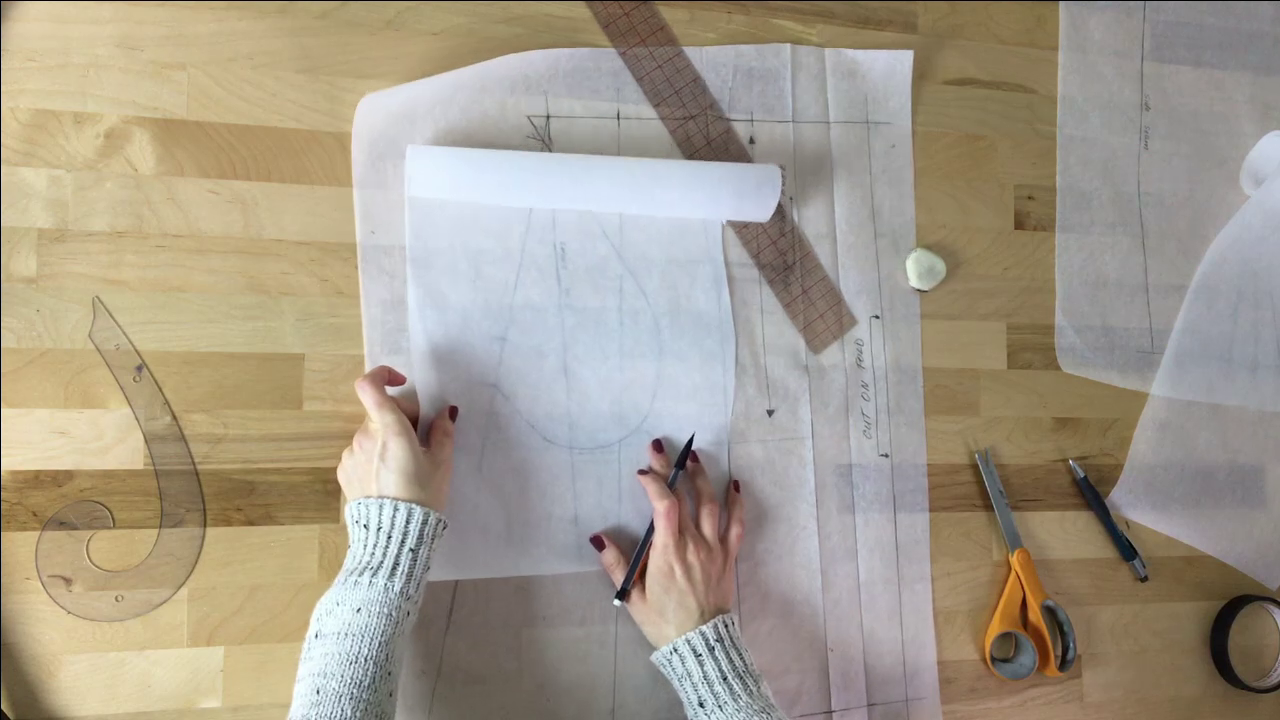 1. Place the separate piece of paper on top of the pocket bag sketch and secure it in place either with some tape, a random object off your work table as I did :), or simply holding it in place with your hand during the transfer process. 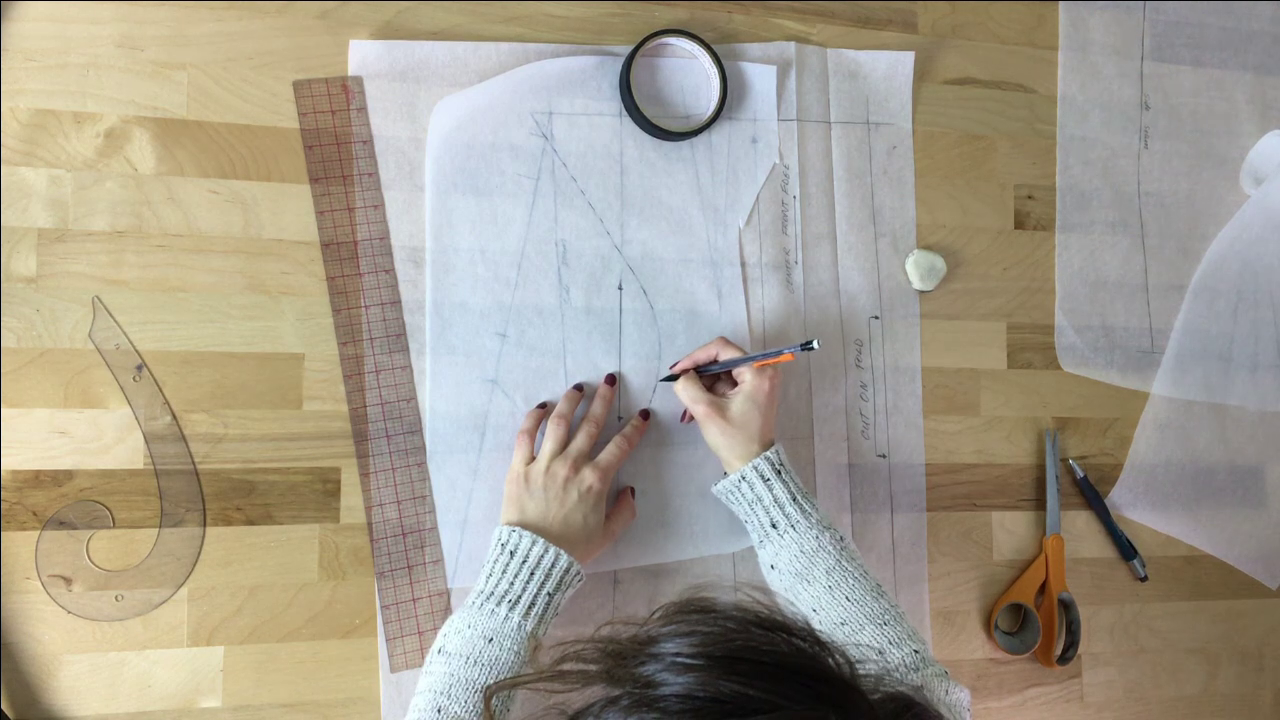 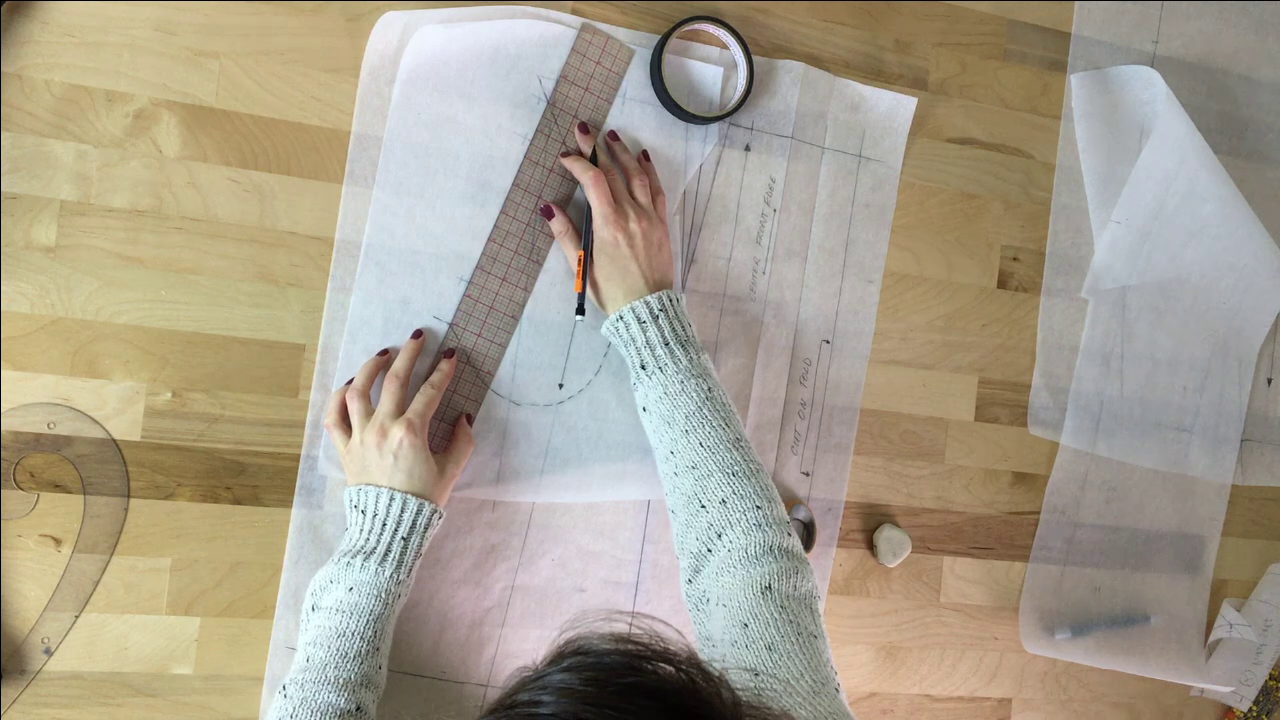 2. Transfer the pocket bag, the 4 notches, and the side seam portion connected to the pocket bag as shown in the two images above. I like to use a dash line when transferring pattern markings before solidifying the final lines with my ruler and french curve. 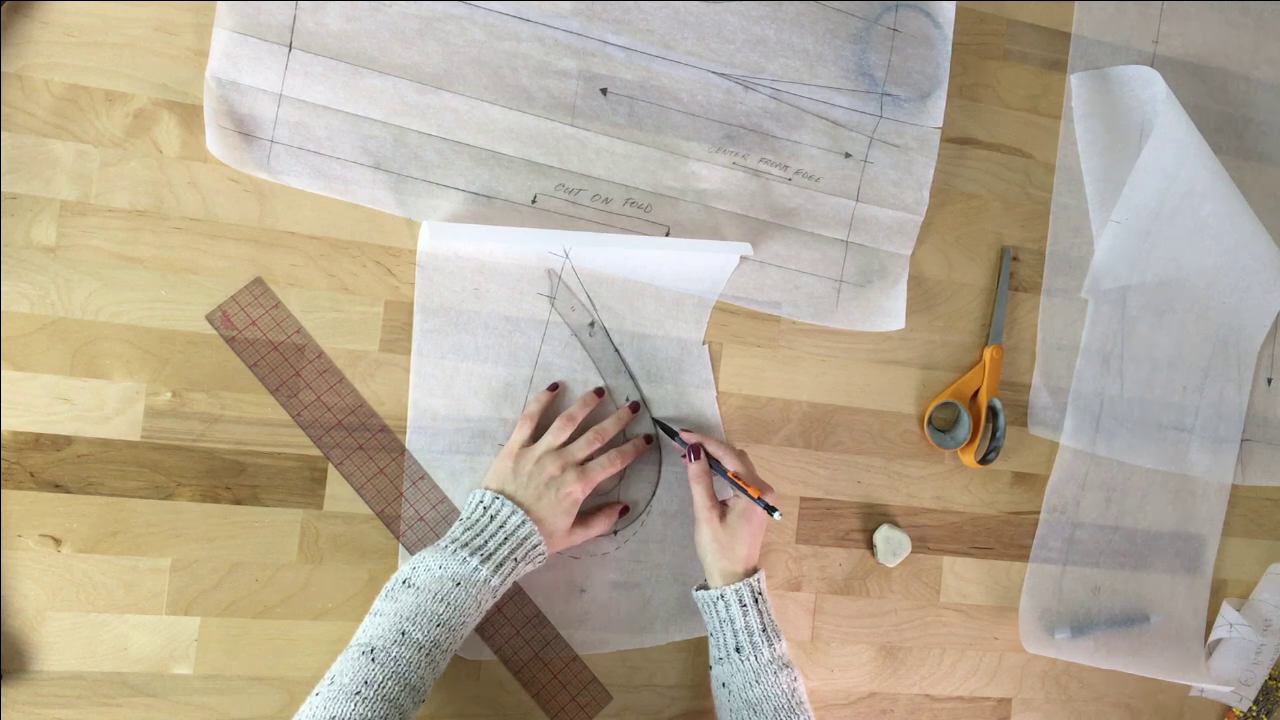 If you used a dashed line during the transfer process above, smooth out all the pocket pattern lines using a straight ruler and french curve a shown. 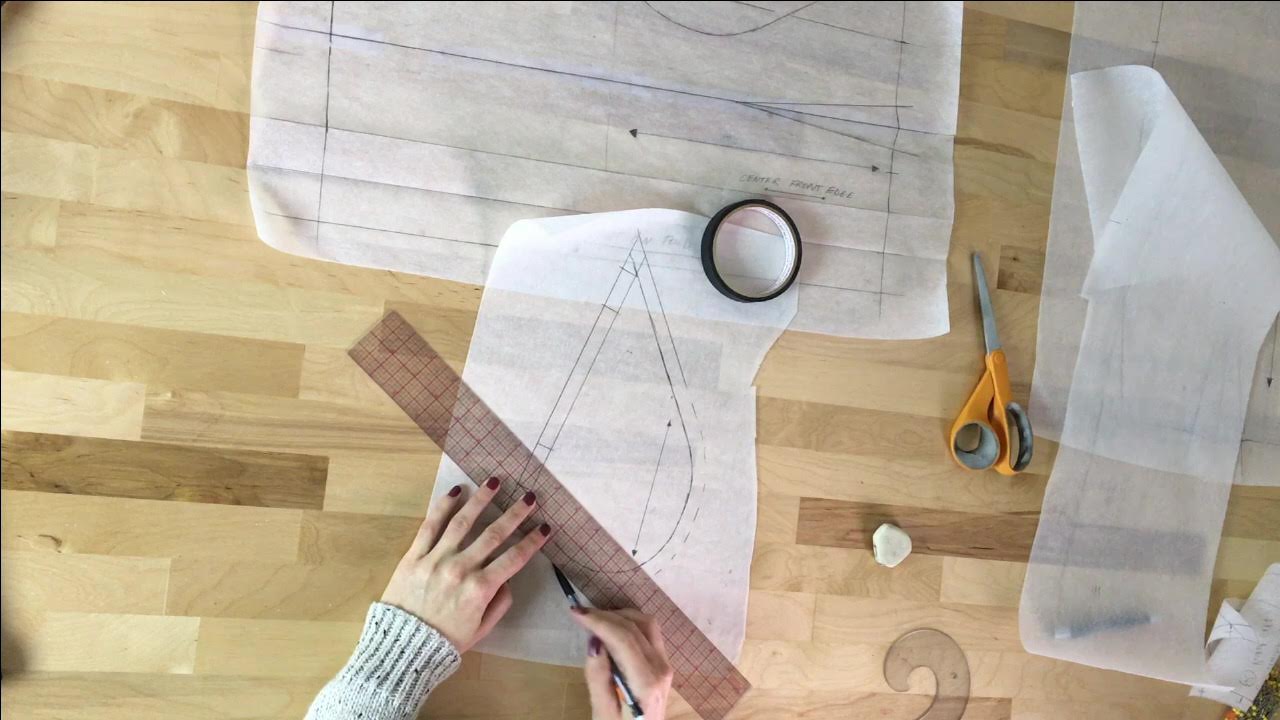 3. Add seam allowance along all the pocket bag edges. Keep in mind that the side seam portion of the pocket pattern (the one with all the notches) should have seam allowance that matches that of the garment's side seam. In this instance, my seam allowance is 1/2" along all edges including the side seam. Use a marked, clear plastic ruler to measure and add seam allowance evenly throughout. 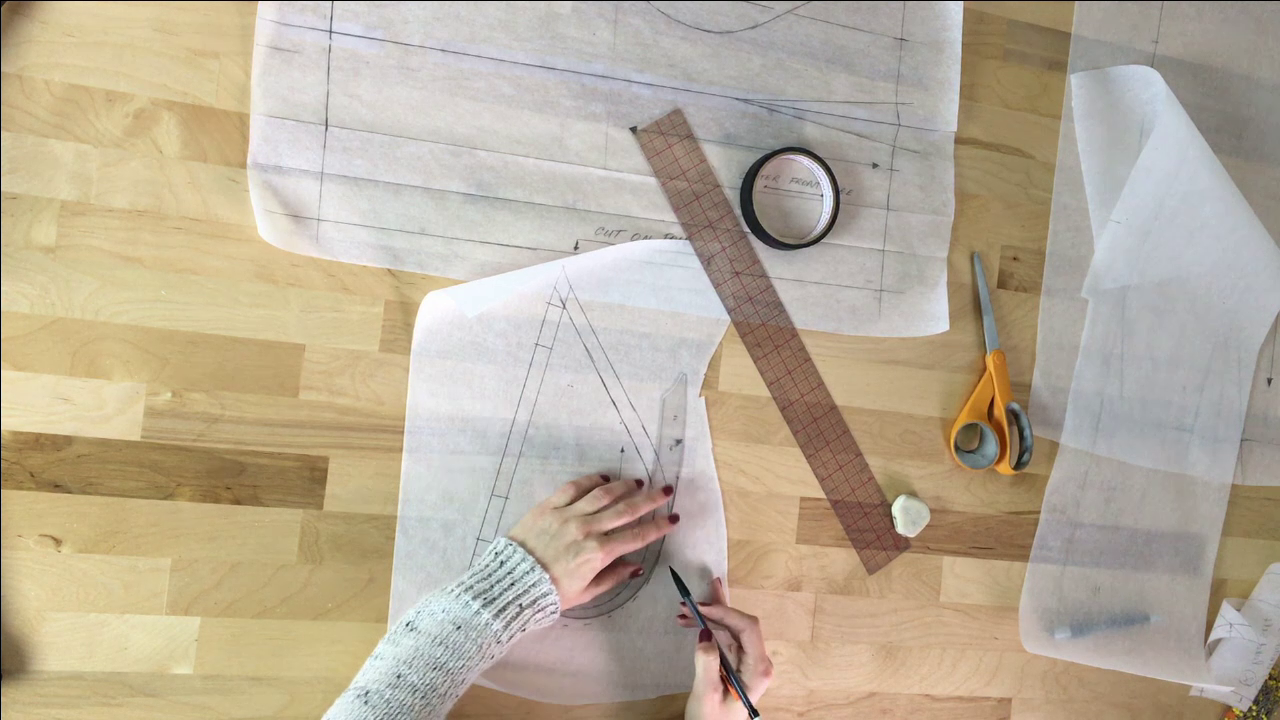 Smooth out the curved seam allowance edges using your french curve. 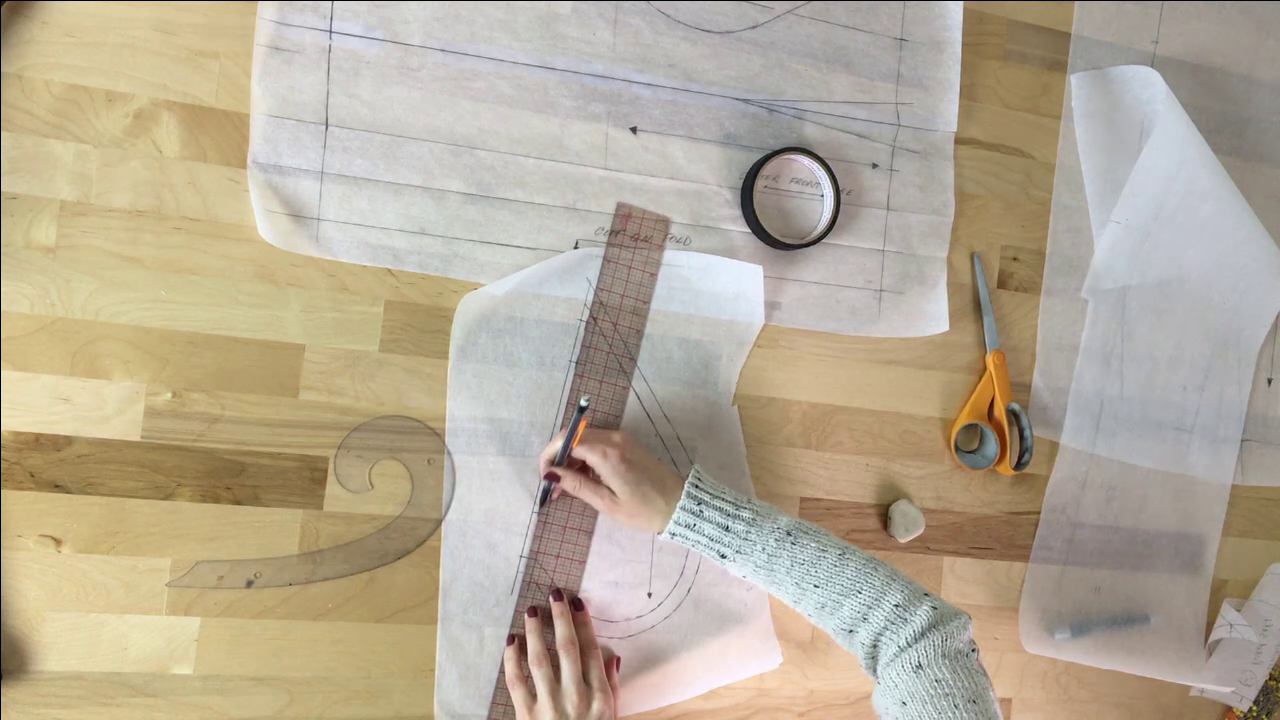 4. Add a little vertical dash to all the notches (horizontal lines) to form T-shaped notches as shown. If you feel more comfortable with V-shaped notches, you can draw a V at the location of each horizontal line within the seam allowance (4 total). 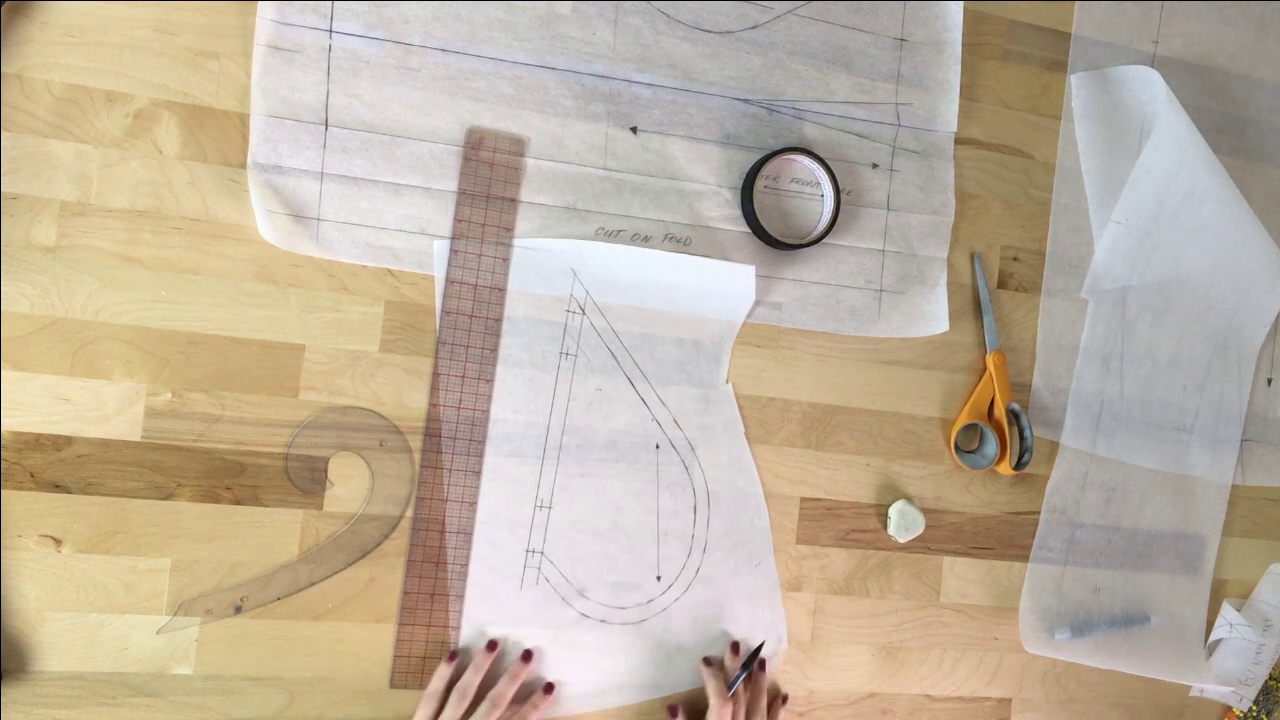 Once everything is transferred and marked, make sure you include an appropriate grain line on your pattern to be used in the cutting process. I added mine following the vertical grain line on the main pattern. 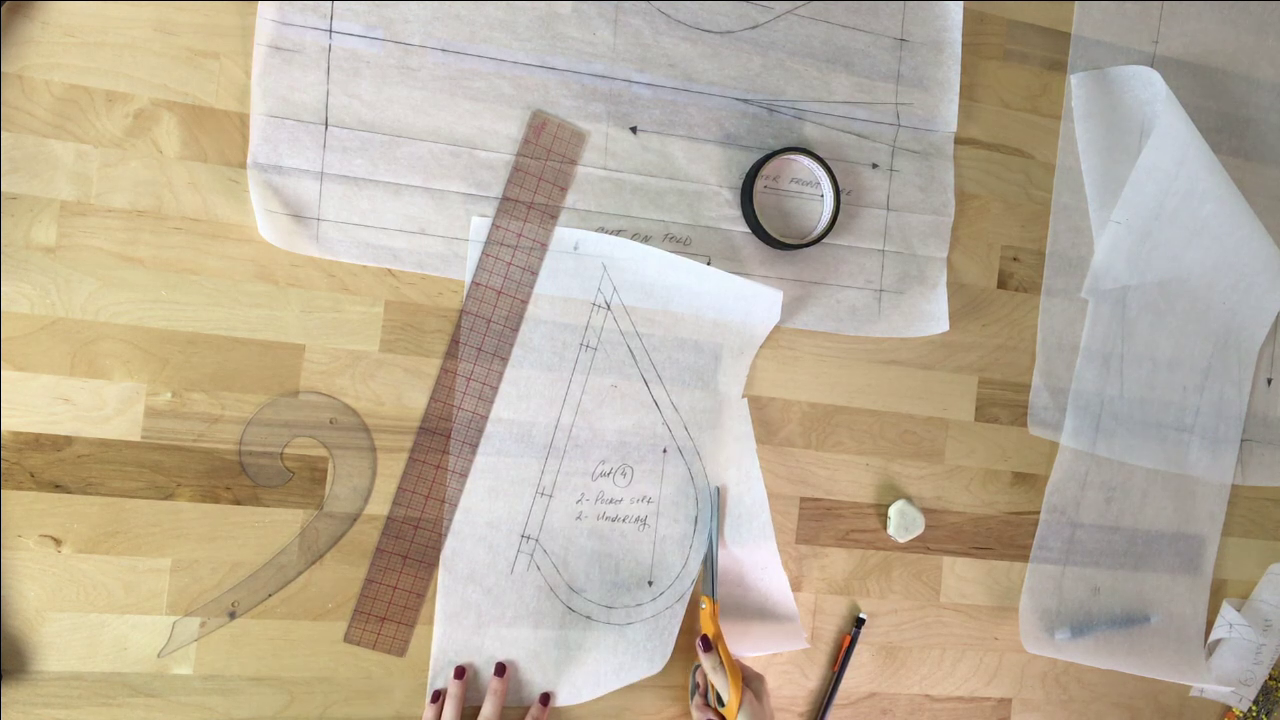 5. Cut the pattern carefully along the seam allowance outer edges as shown. When cutting out the fabric pieces later, you will need to cut 2 copies (mirror image) of this pocket pattern per pocket. Thus, if you are adding an on-seam pocket to each side seam, you will need 4 pocket pieces total. Stay tuned for the sewing portion of the pocket to come next week! Similar Tutorials You May Like: How To Add A Side Seam Pocket To A Dress How To Make A Sleeveless Blouse Sewing Pattern From Scratch Video Tutorial: How To Draft A Sewing Pattern For Non-Stretch Skirt Waistband 4 Ways To Lay Out A Sewing Pattern For Cutting: Understanding Fabric Grain And The Selvage Edge How To Make A Sewing Pattern For A Round Neckline Facing 3 Easy-to-Find Substitutes For Pattern Paper That Wont Break The Bank Want To Learn How To Sew And Make Your Own Patterns? These Are The Basic Supplies You Need To Have.
0 Comments
Leave a Reply. |
The Blog:A journey into our design process, sewing tutorials, fashion tips, and all the inspiring people and things we love. 
Doina AlexeiDesigner by trade and dressmaker at heart. I spend most of my days obsessing over new fabrics and daydreaming new ideas. 
Sadie
Executive Assistant & Client Relations Manager Archives
November 2019
Categories
All

|

-
Sewing Tutorials
-
Basics
>
- Aligning Pattern Grainlines To Fabric
- Preparing Fabrics For Sewing
- Pinning Sewing Patterns To Fabric
- Placing Sewing Patterns On Fabric For Cutting
- Rotary Cutters or Fabric Scissors?
- Cutting The Sewing Patterns
- What Are Notches And How To Use Them In The Sewing Process
- Transferring Notches From Pattern To Fabric
- Transferring Seamlines to Fabric
- Staystitching
- Backstitching: A Complete Guide
- Hand Basting: A Complete Guide
- Sewing Continuous Bias Binding
- Darts >
-
Sewing Seams
>
- The Basics Of Seams And Seam Allowance
- How To Sew A Straight Seam
- Sewing Curved Seams
- Sewing Corner Seams
- Trimming And Grading Seam Excess
- Notching/Clipping Seam Allowance for Tension Release
- Sewing Topstitched Seams
- Sewing Corded Seams
- Sewing A Slot Seam
- Sewing A Gathered Seam
- Sewing Bias Seams
- Sewing Seams With Ease
- Sewing Seams With Crossing Seamlines
- Sewing Unlike Fabric Seams
- How To Iron Seams: Ironing Tools And Conventions
- Sewing With Knit Fabrics
- Understanding Stitch Length And Tension
- Sewing Unique Fabric Seams
-
Seam Finishes
>
- Seam Finishing Techniques - Overview
- Applying A Pinked Seam Finish
- Applying A Bias Bound Seam Finish
- Serging And Zigzag Seam Finishes
- Sewing A Self-Bound Seam Finish
- Sewing A French Seam Finish
- Sewing A Hong Kong Seam Finish
- Sewing A Mock French Seam Finish
- Sewing A Turned-and-Stitched Seam Finish
- Sewing Overcast Hand-Applied Seam Finishes
- Sewing A Flat Felled Seam
- Sewing A Hairline Seam Finish
-
Hem Finishes
>
- Garment Hem Finishes: Overview
- Sewing A Double Fold Hem Finish
- Sewing A Single Fold Hem Finish
- Sewing Bound Hem Finishes
- Sewing An Exposed Double Layer Bound Hem
- Sewing A Folded-Up Bound Hem with Pre-folded Binding
- Sewing A Hong Kong Hem Finish
- Sewing A Band Hem Finish
- Sewing A Bias Faced Hem Finish
- Sewing A Twill Tape Hem Finish
- Sewing A Rolled Hem Finish
- Sewing A Shaped Hem Facing
- Using Fusible Hem Tape And Webbing
- Finishing A Lace Fabric Hem
- Finishing A Leather Hem
- Sewing Faced Hem Corners
- How To Finish Lining At The Hem
- Finishing Fabric Corners by Mitering >
- Interfacing A Hemline: Lined And Unlined Examples
-
Sewing Pockets
>
- Curved Patch Pocket With Flap
- Unlined Square Patch Pockets
- Lined Patch Pockets: Two Ways
- Extension On-Seam Pockets
- Separate On-Seam Pocket
- Front Hip Pockets
- Bound Double Welt Pocket
- Double Welt Pocket With Flap
- Self-Welt Pocket (Using Single Fabric Layer)
- Slanted Welt Pocket (Hand-Stitched)
- Faced Slash Pockets: Overview >
-
Sewing Zippers
>
- Sewing Zippers: General Information
- Sewing A Centered Zipper
- Sewing A Lapped Zipper
- Sewing An Invisible Zipper
- Sewing A Fly Front Zipper
- Sewing A Closed-End Exposed Zipper (No Seam)
- Sewing An Exposed Separating Zipper
- Sewing Hand Stitched Zipper Applications
- Sewing A Zipper Underlay
- Sewing A Placket-Enclosed Separating Zipper
- Sleeveless Finishes >
-
Neckline Finishes
>
- Sewing A Neck Shaped Facing
- Sewing An All-In-One Neck Facing
- Neck And Garment Opening Combination Facings >
- Sewing A Bias Faced Neckline Finish
- Sewing A Band Neckline Finish
- Bound Neckline Finishes: Overview >
- Sewing A Semi-Stretch Strip Band Neckline
- Ribbed Neck Band And Classic Turtleneck
- Decorative Neckline Finishes >
- Finishing Facing Edges >
-
Extras
>
- A Complete Guide on Interfacing
- Sewing Bound Spaghetti Straps
- Sewing Spaghetti Straps To A Faced Neckline
- Sewing Ruffles: Overview
- Patterning And Sewing A Circle Ruffle
- Sewing A Gathered Heading Ruffle
- Sewing Double Layer Gathered Ruffles
- Sewing A Gathered Ruffle Into A Seam
- Sewing A Gathered Ruffle To A Fabric Edge
- Sewing A Fabric Surface Slit
- Sewing A Slit Seam
- Hand-Applied Straight Stitches
- Hand-Applied Blind Stitches
- Hand-Applied Overedge Stitches
- Hand-Applied Tack Stitches
- Hand-Applied Decorative Stitches
-
Basics
>
- Custom Bridal
- Custom Apparel
- About
- Blog

 RSS Feed
Services |
Company |
|
