|
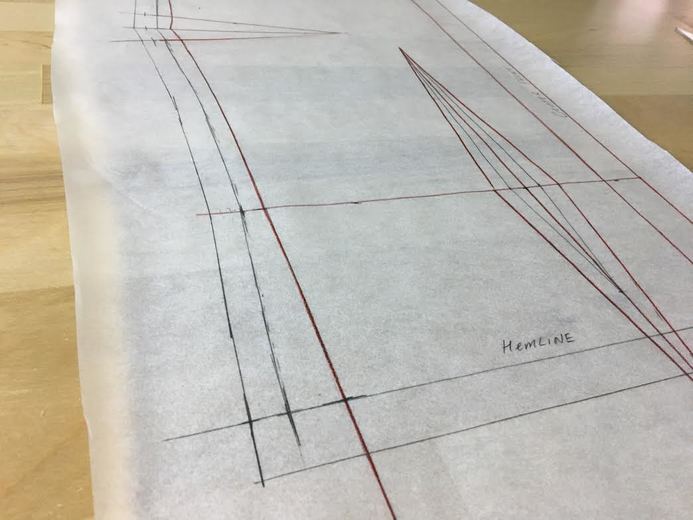
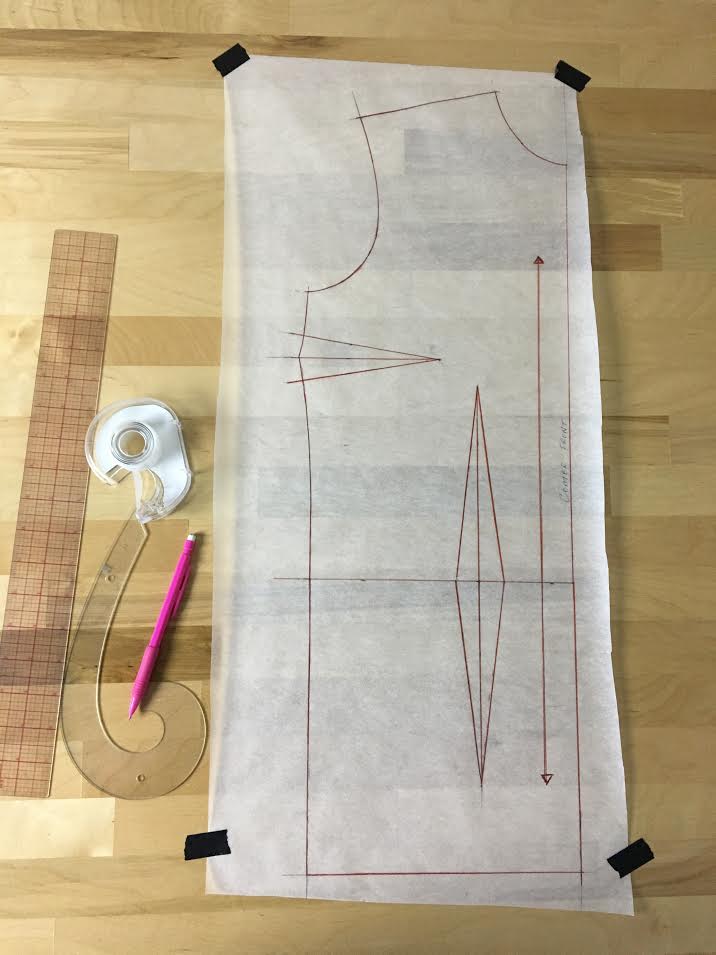
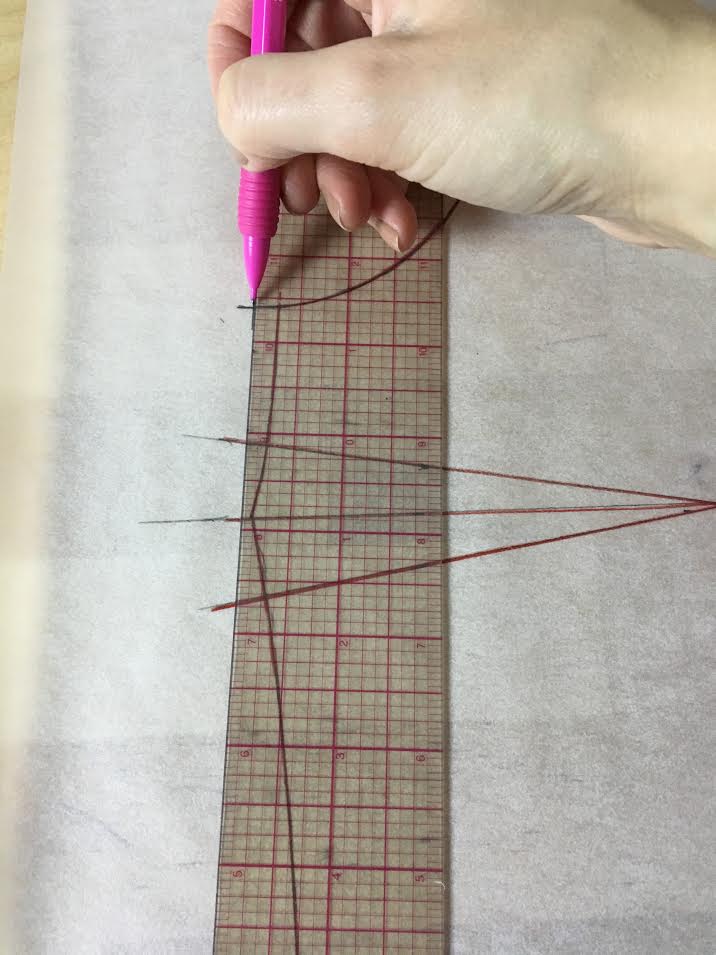
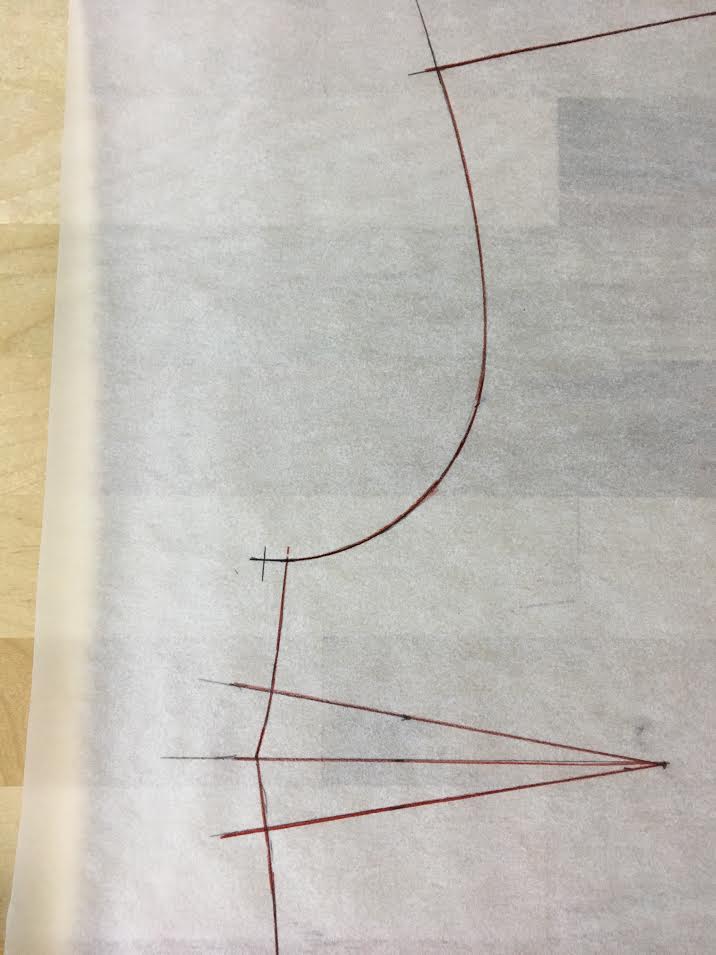
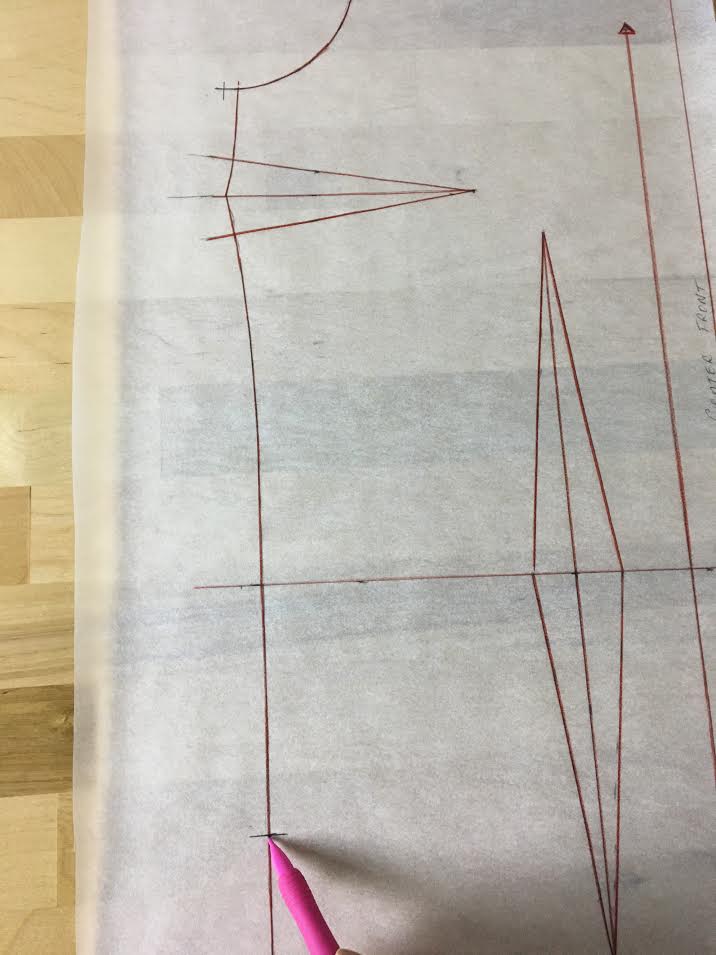
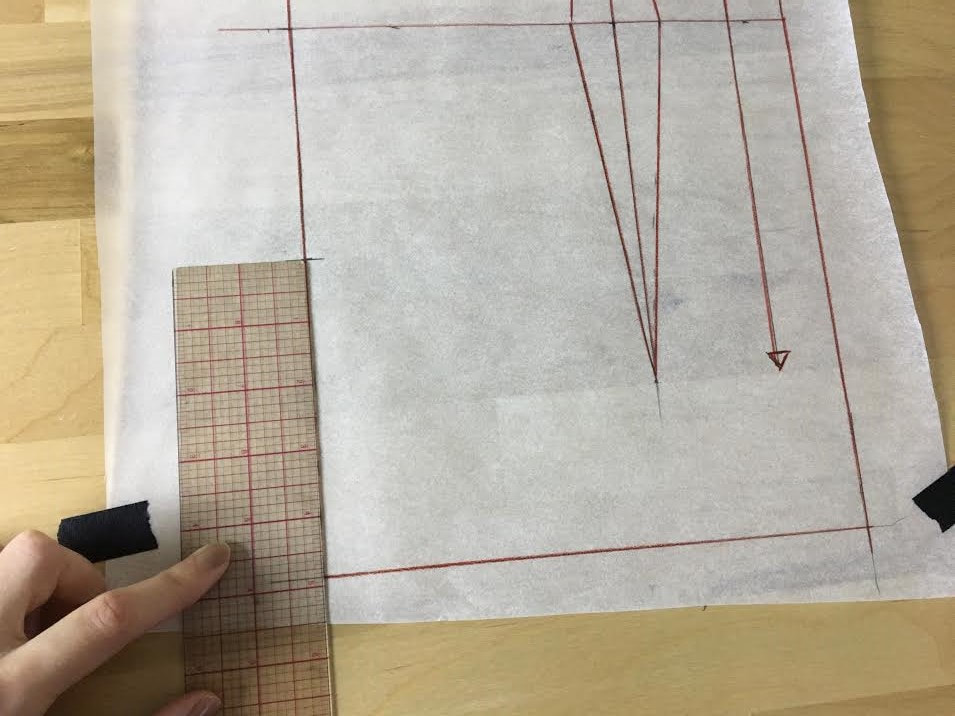
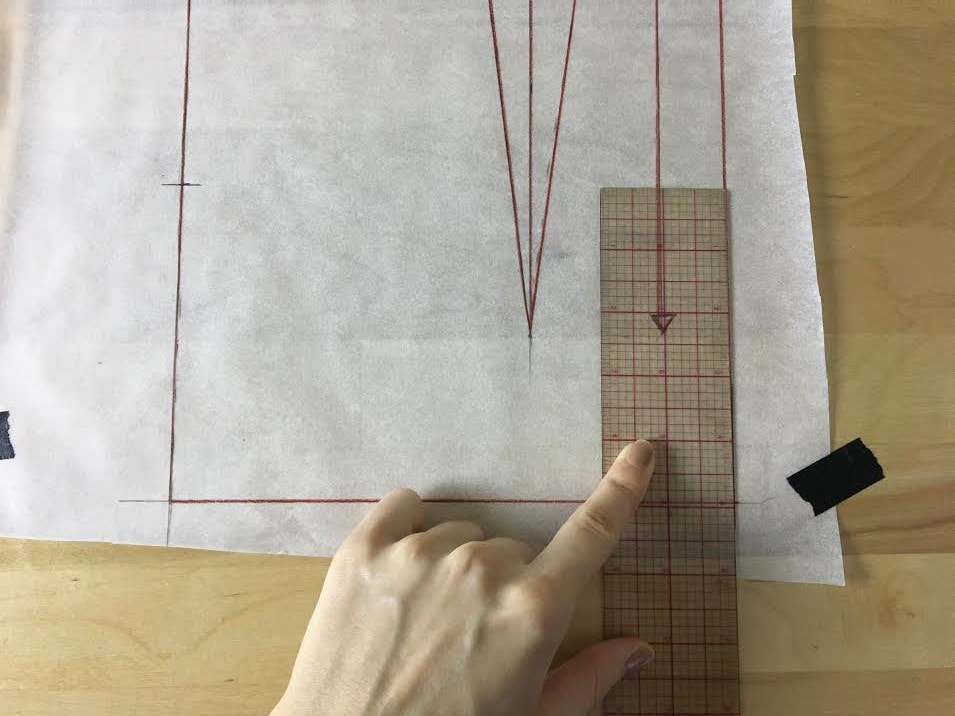
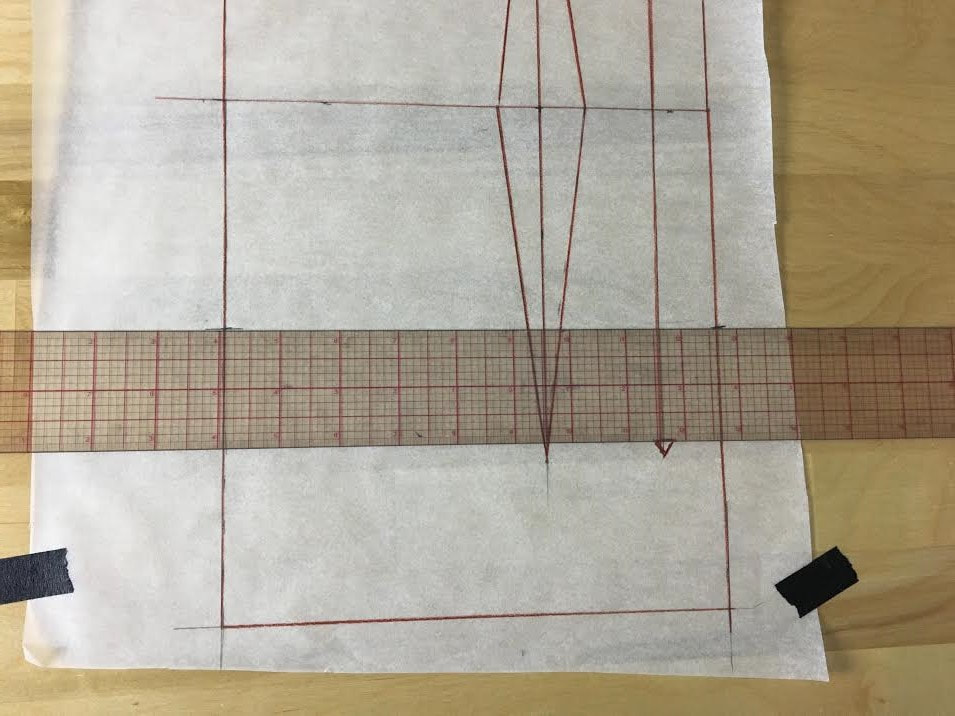
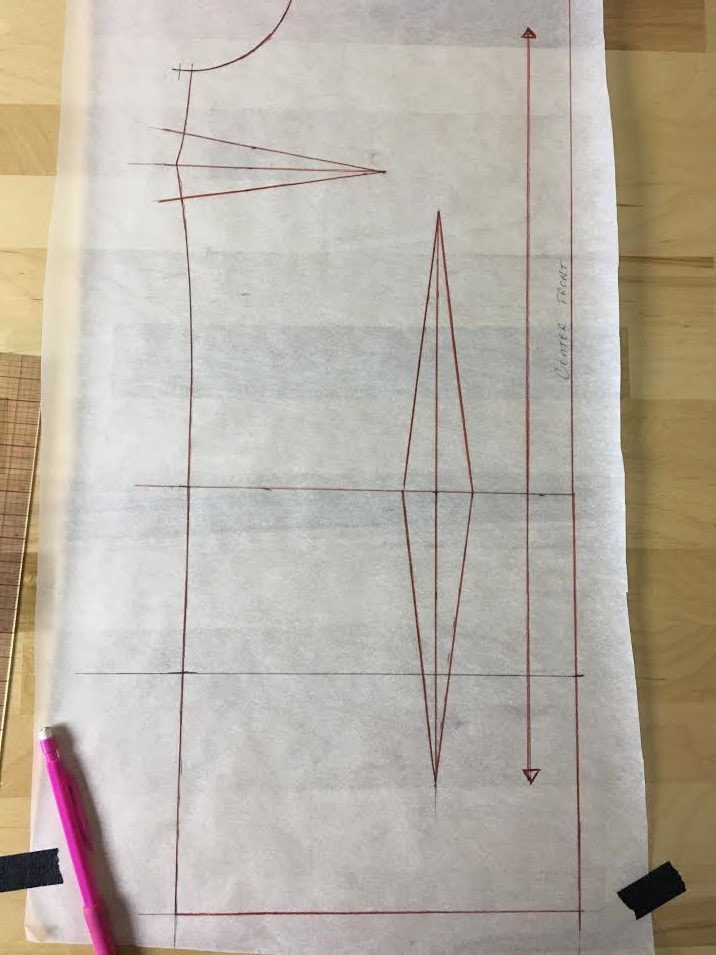
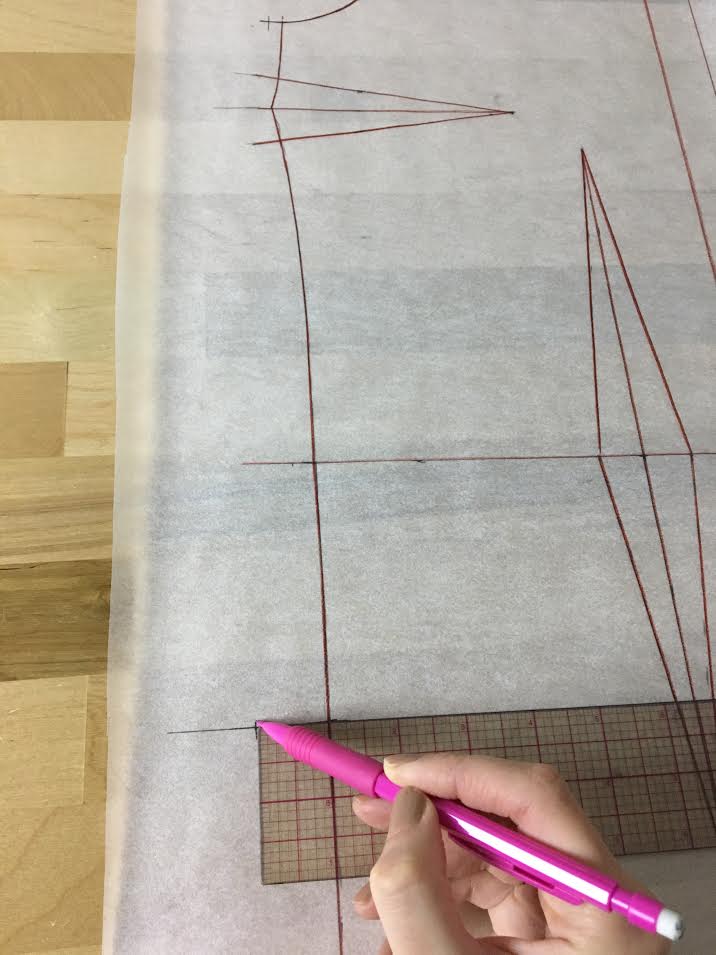
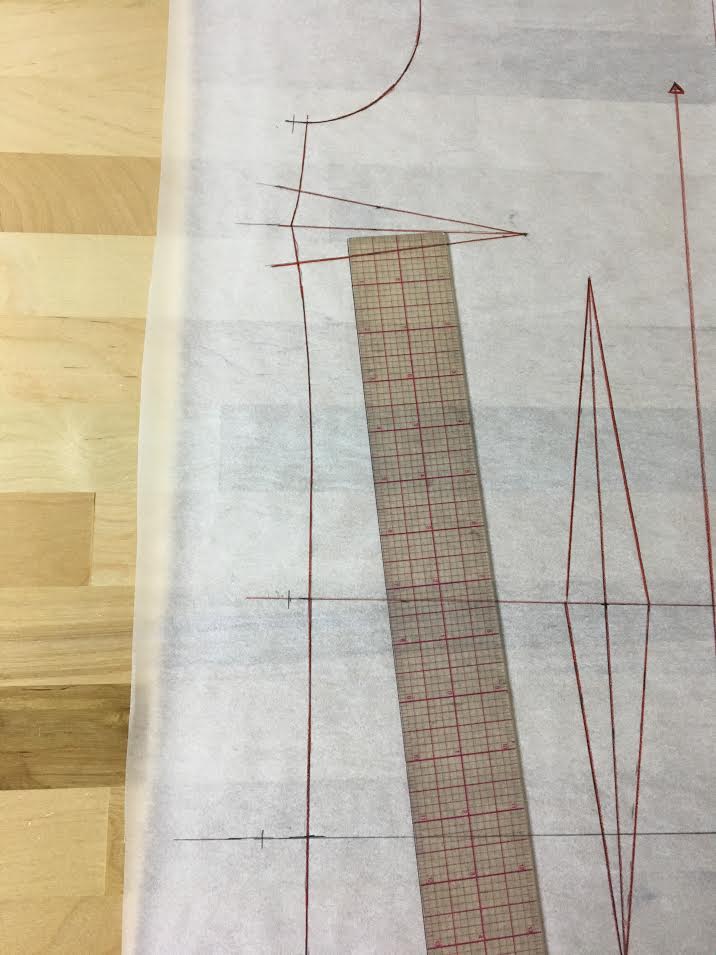
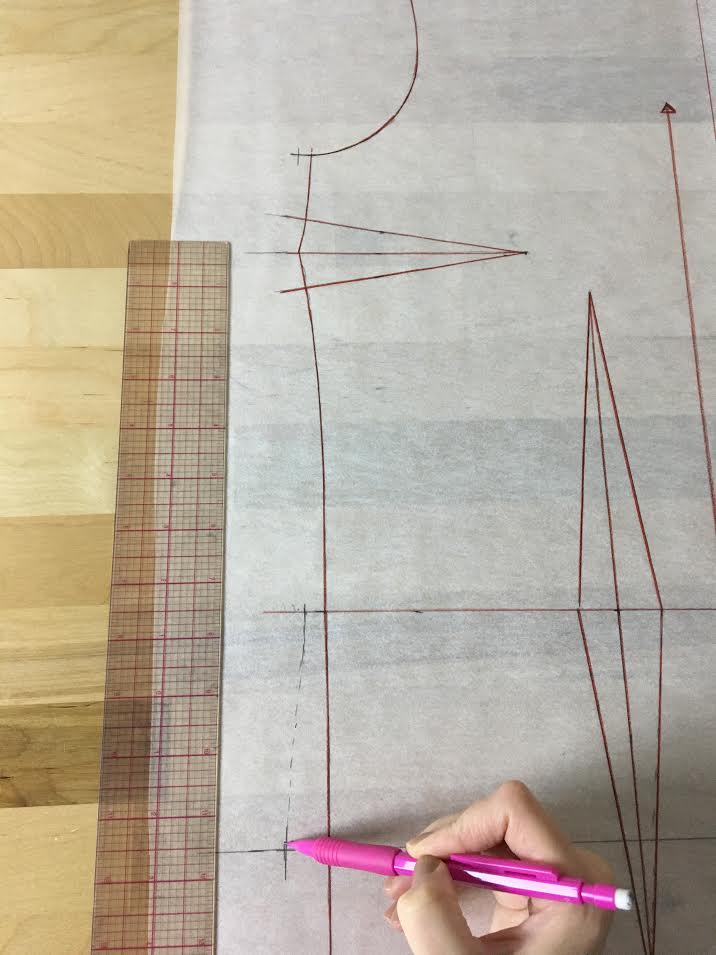
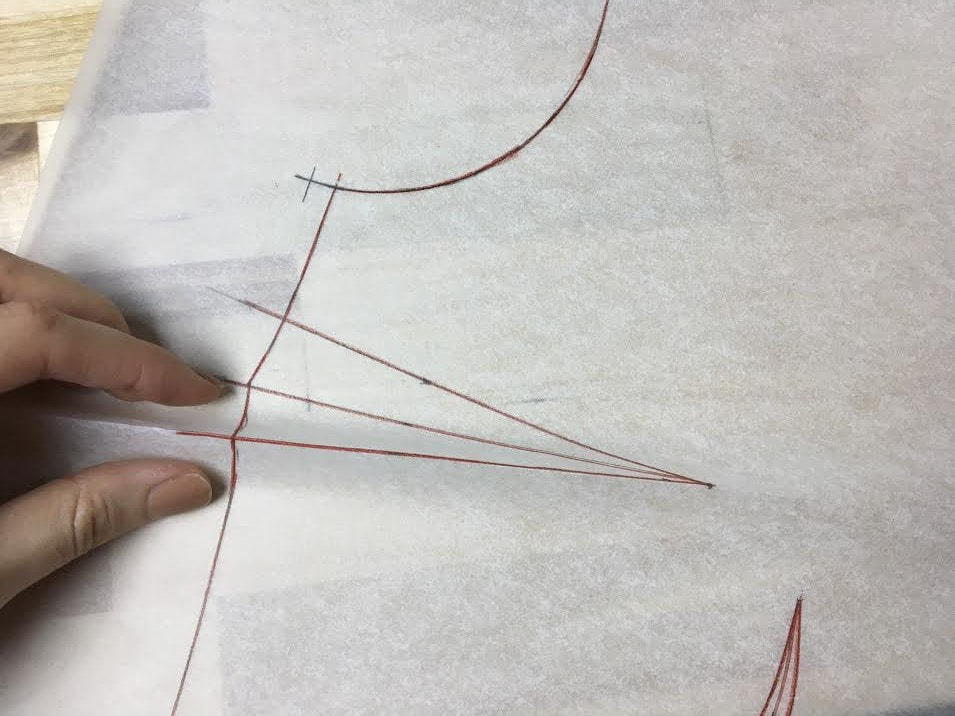
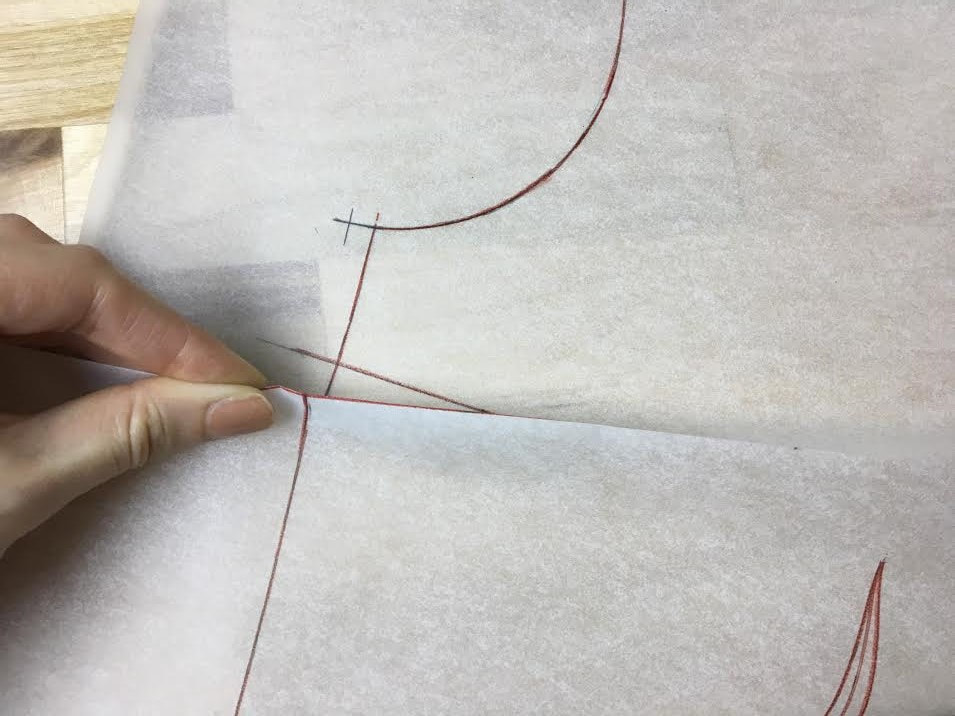
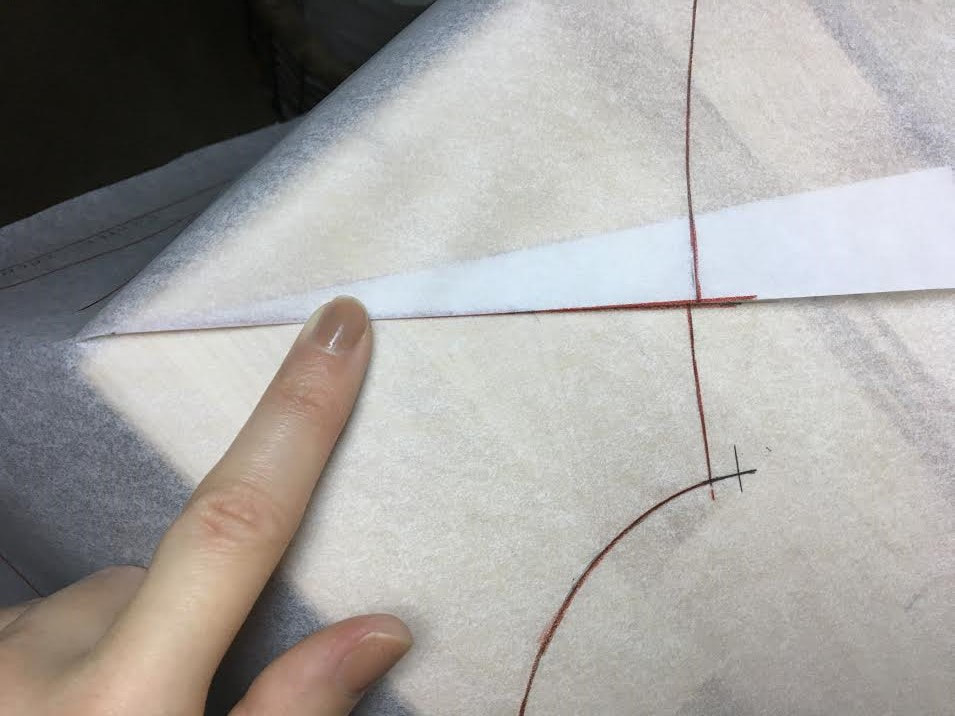
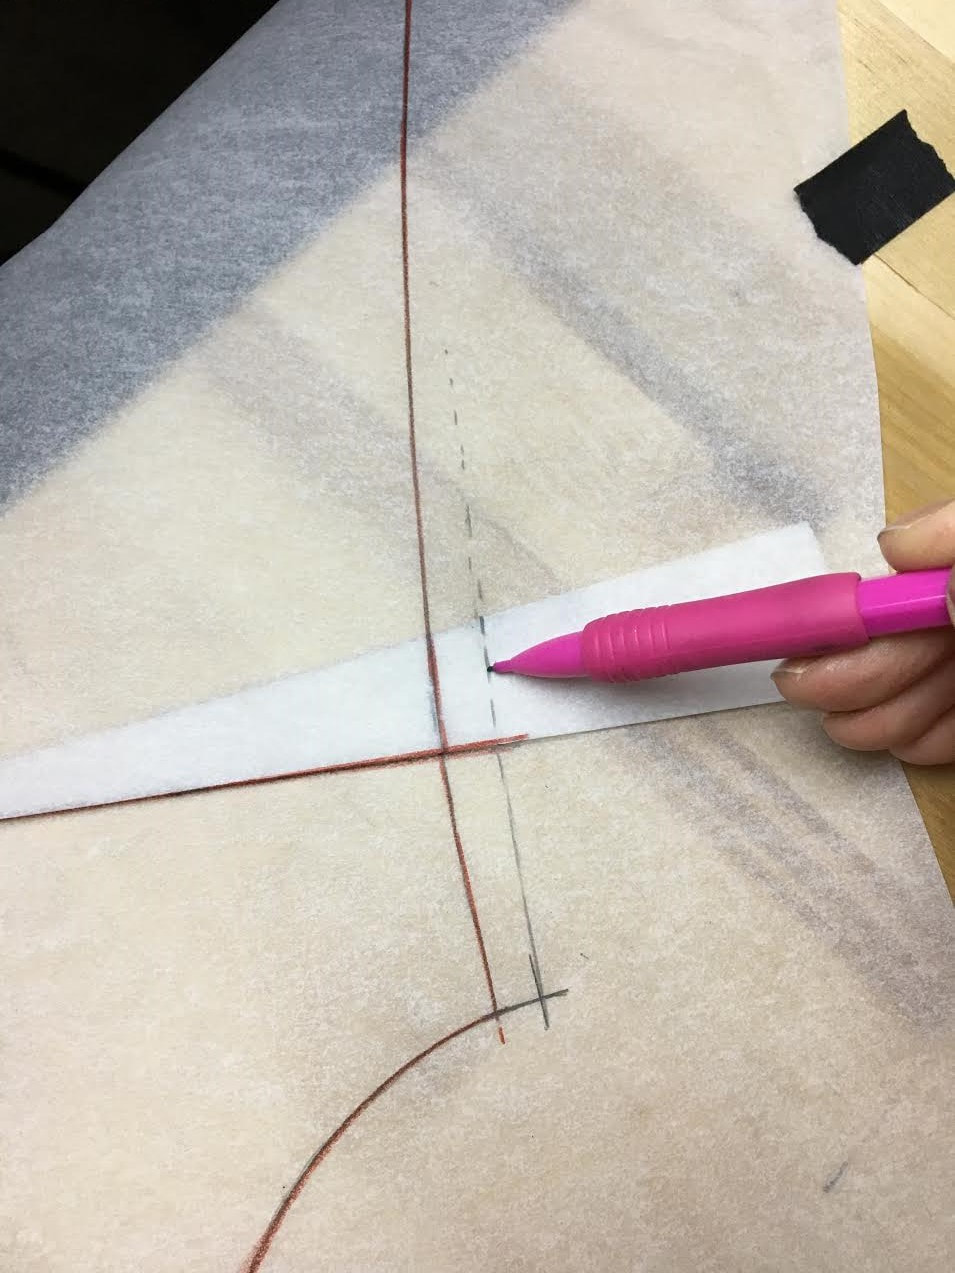
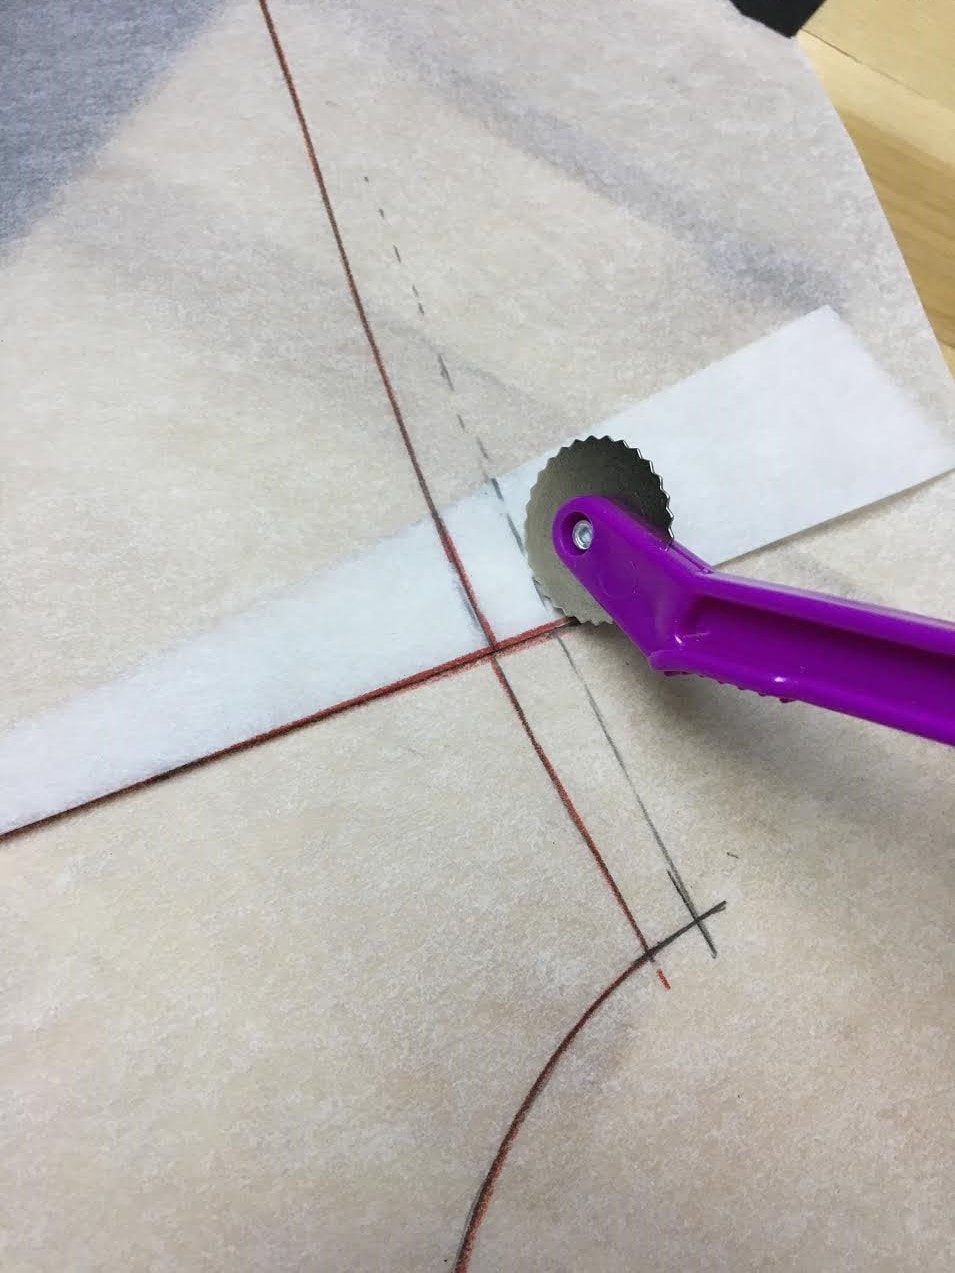
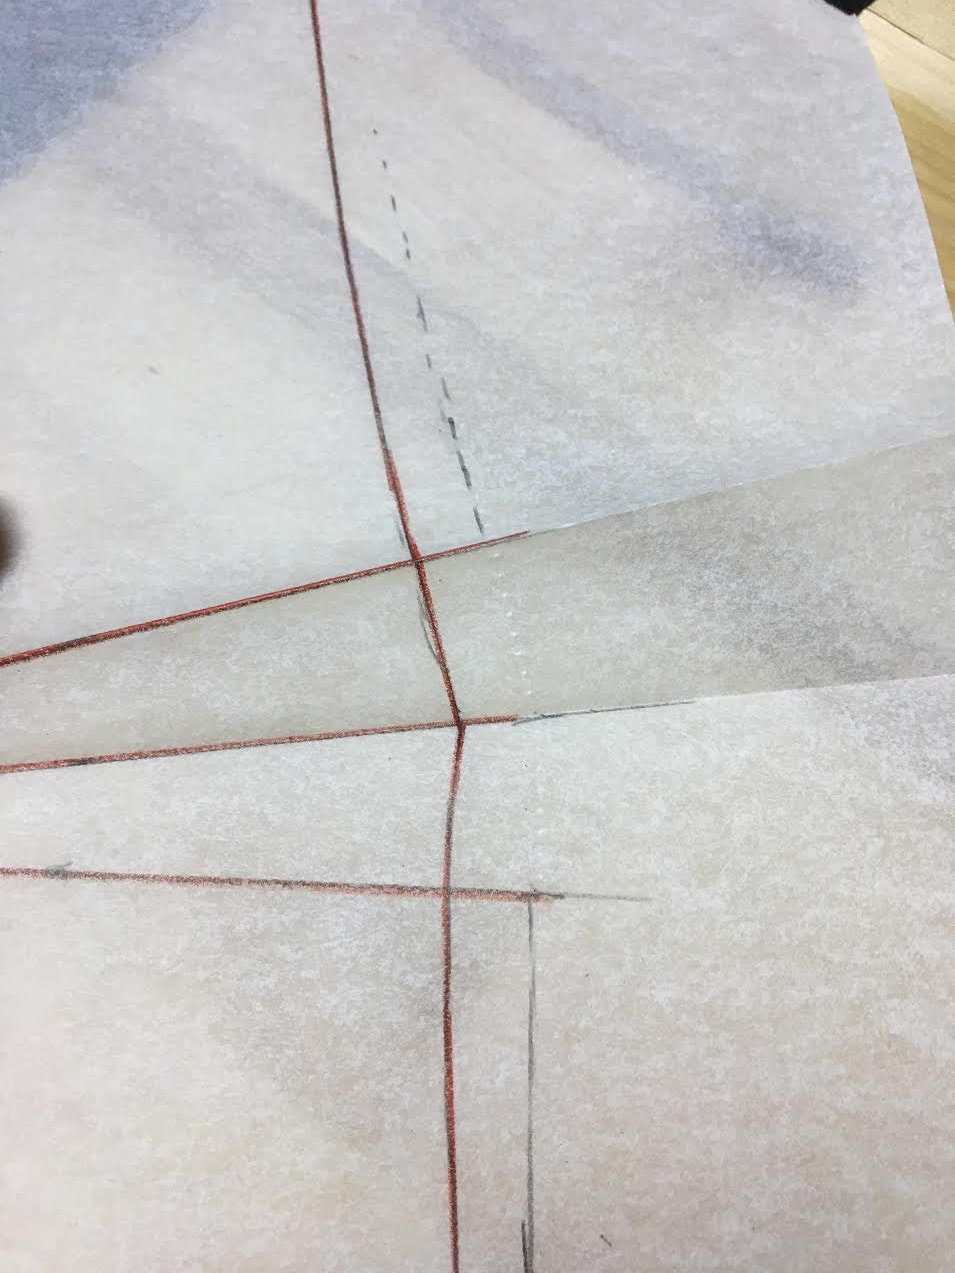
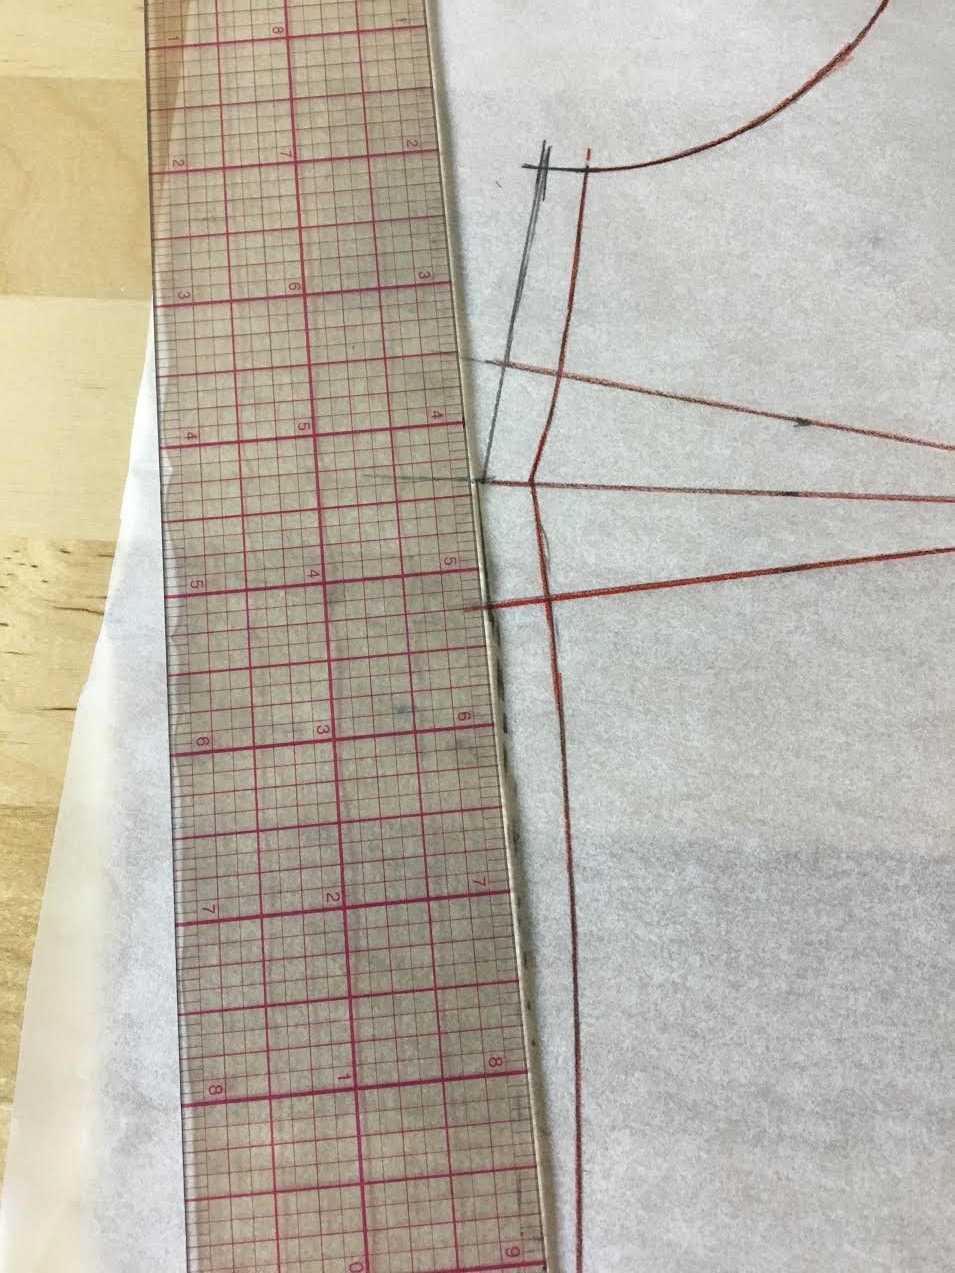
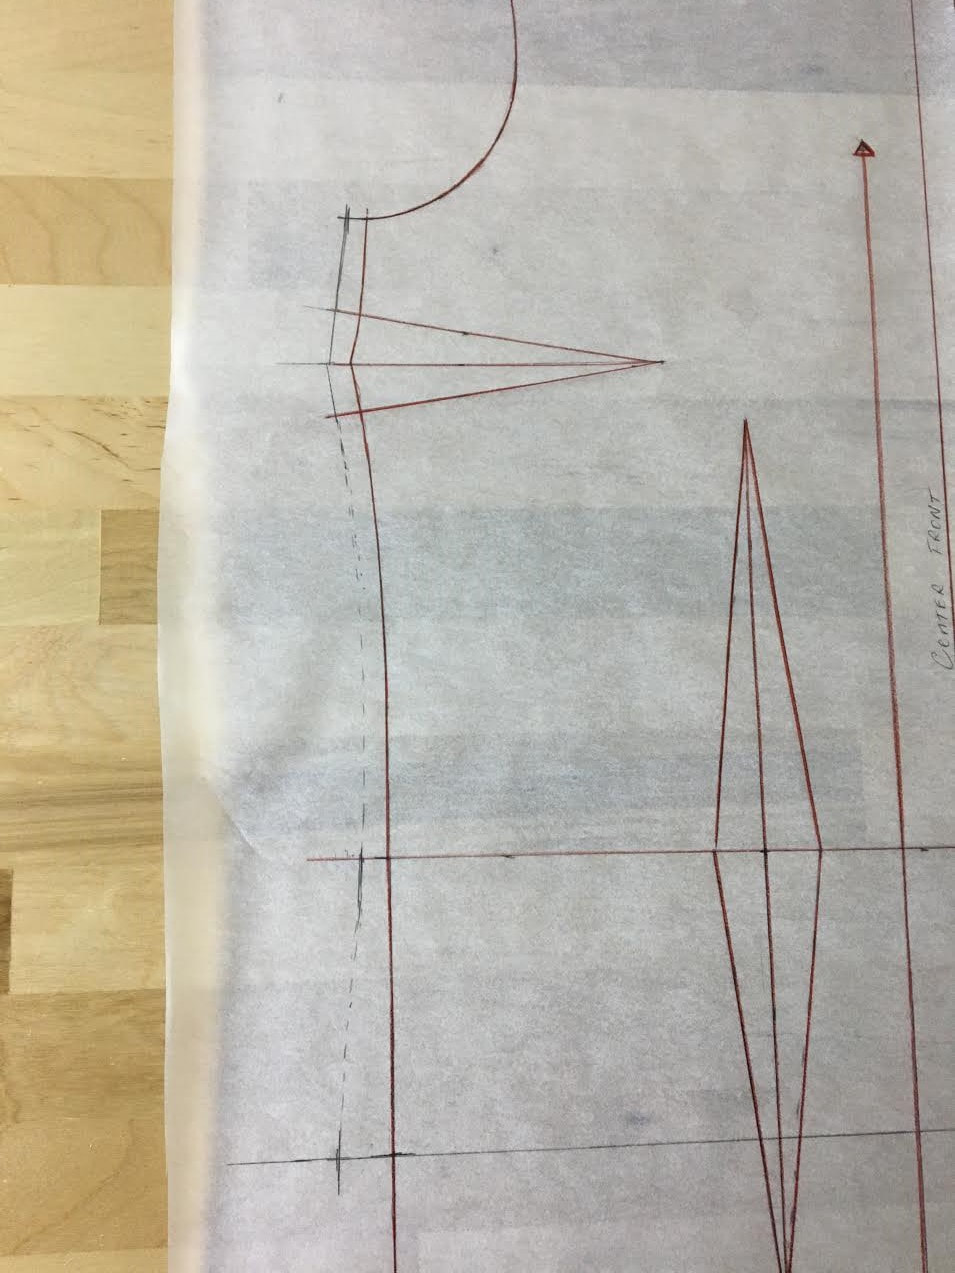
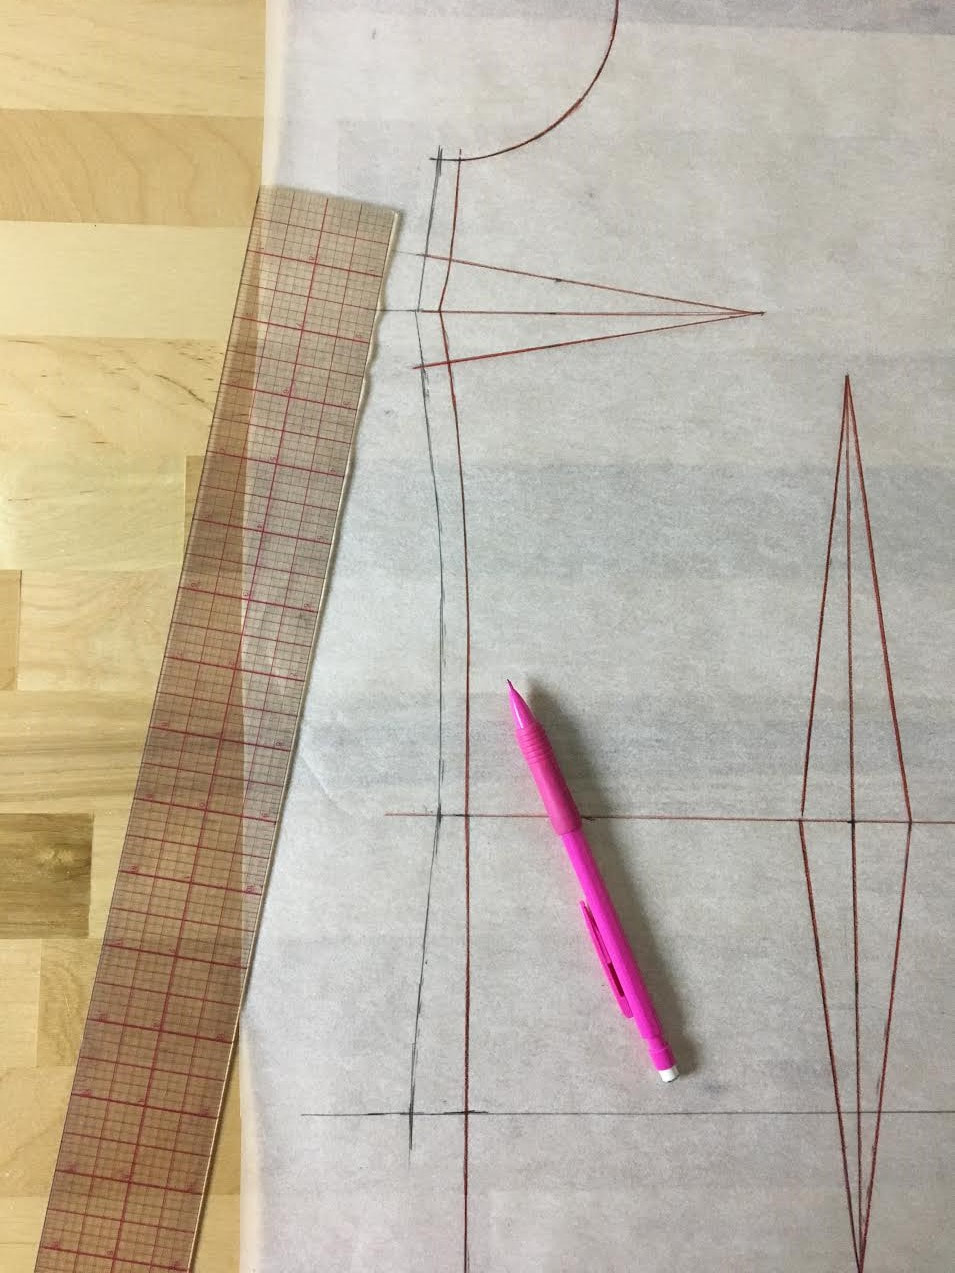
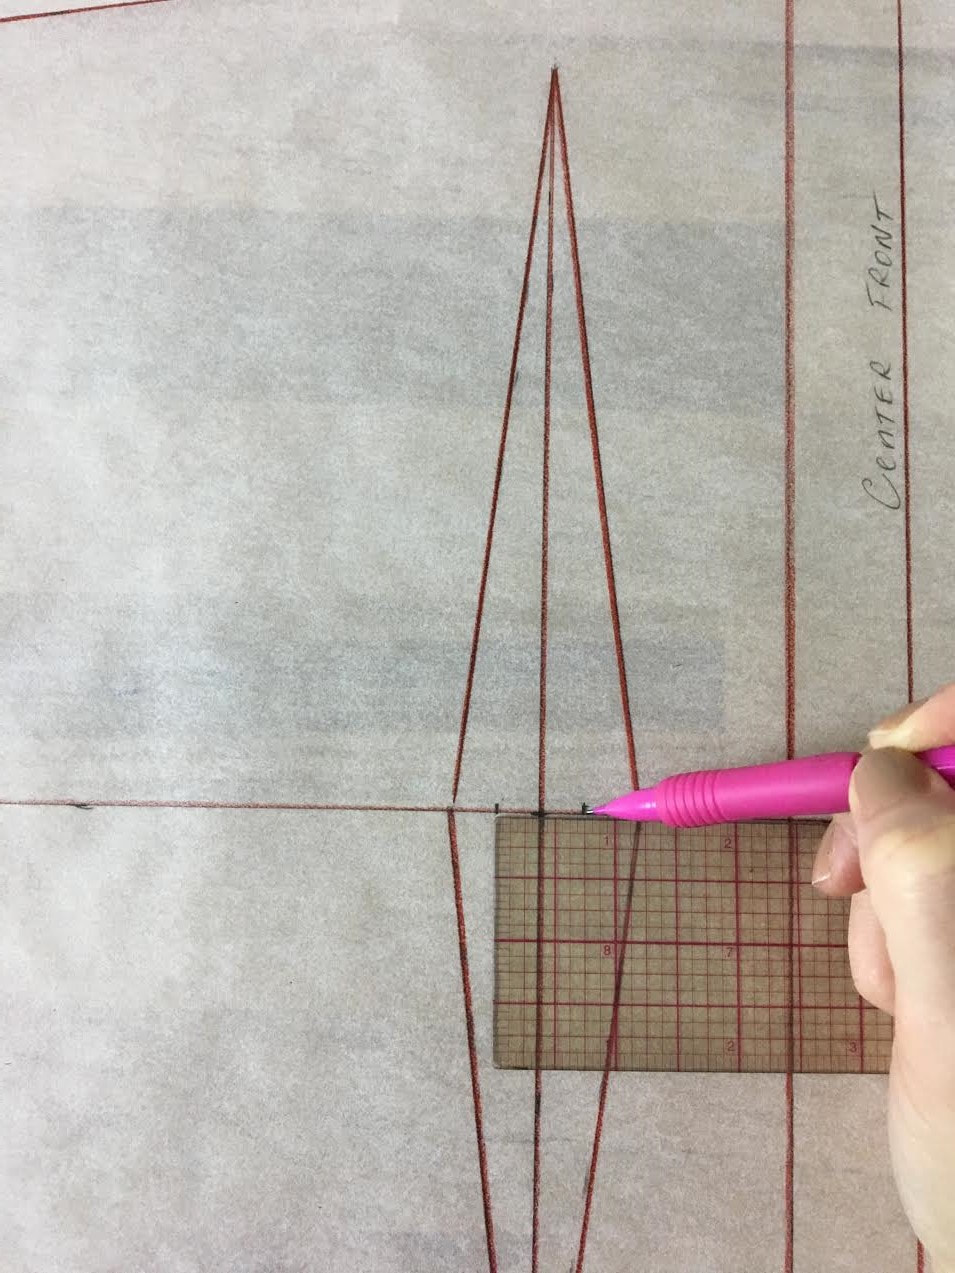
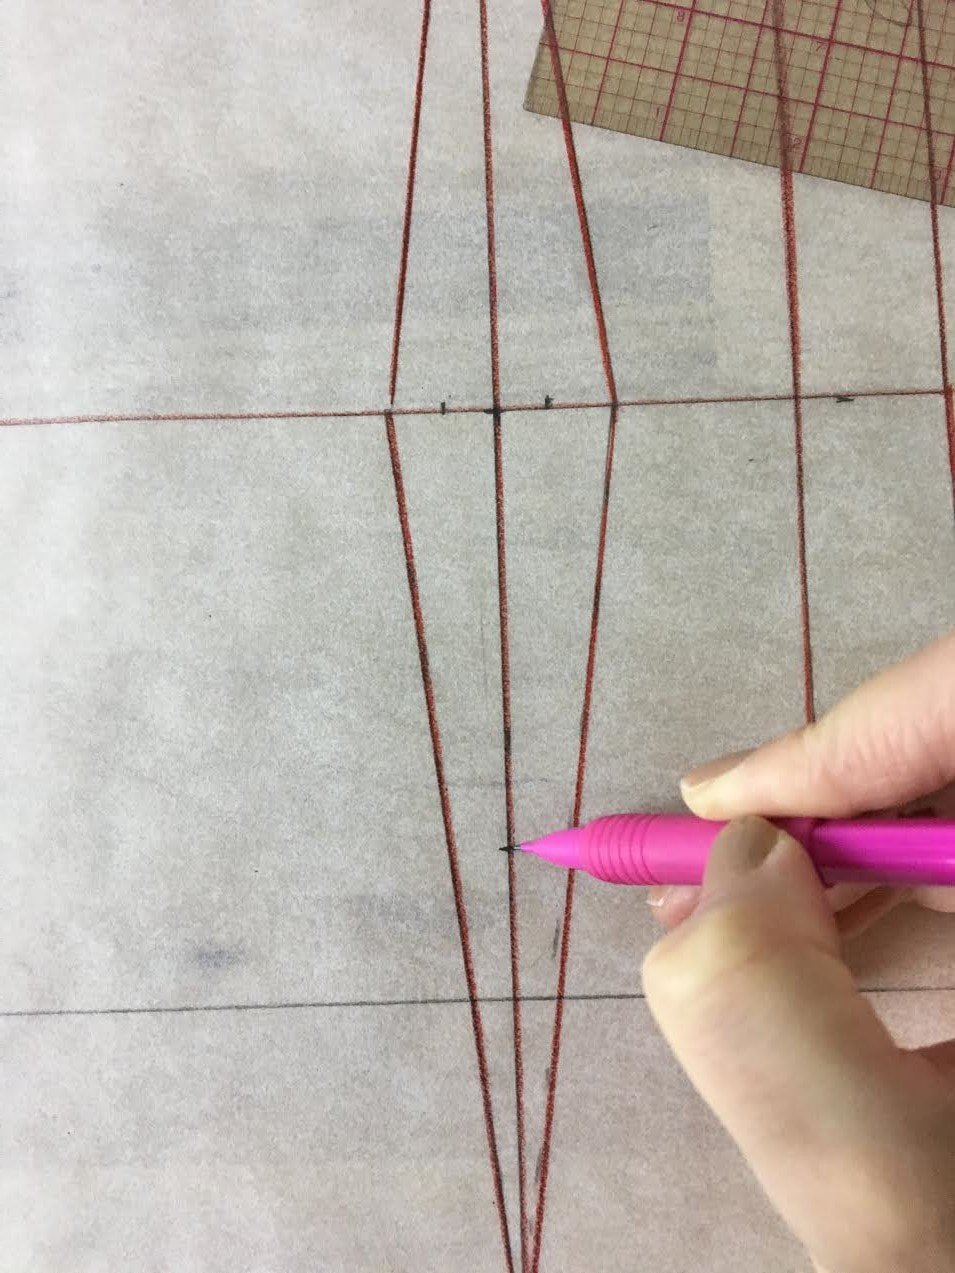
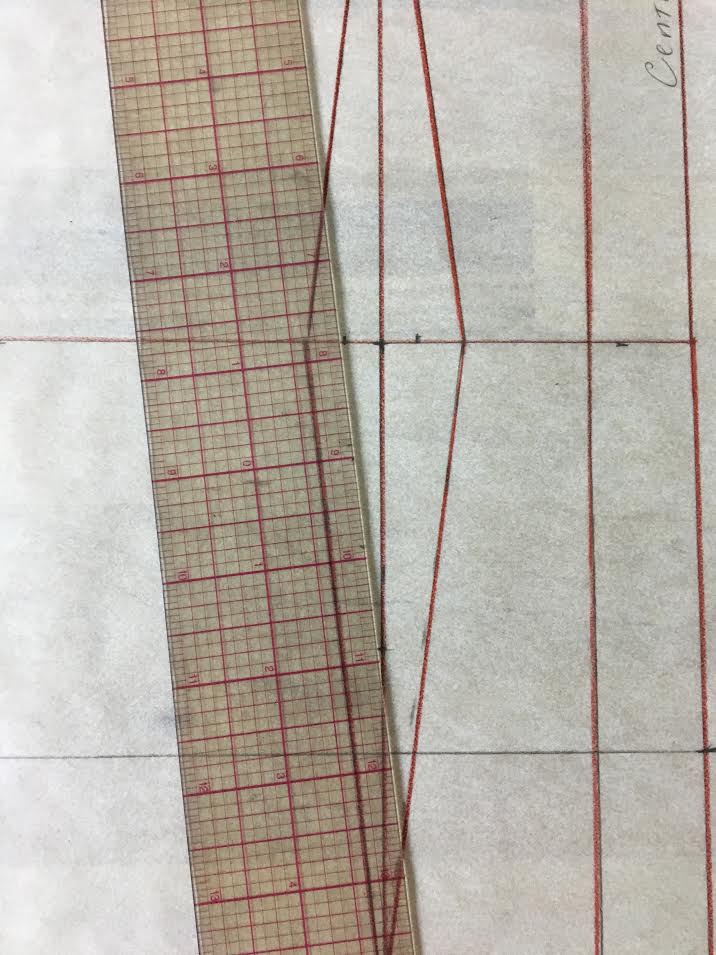
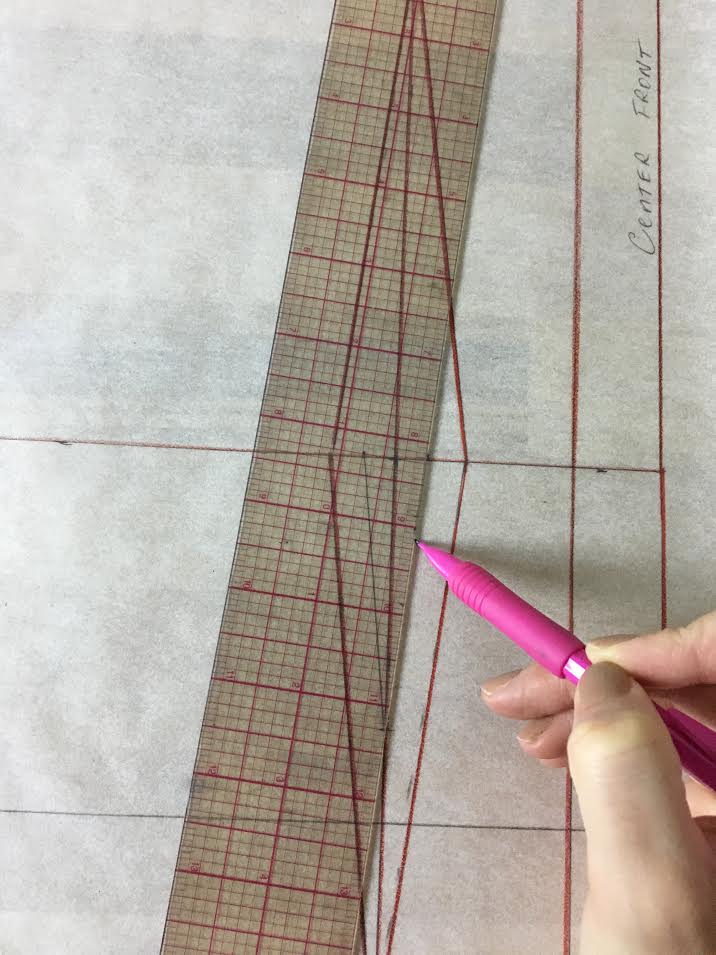
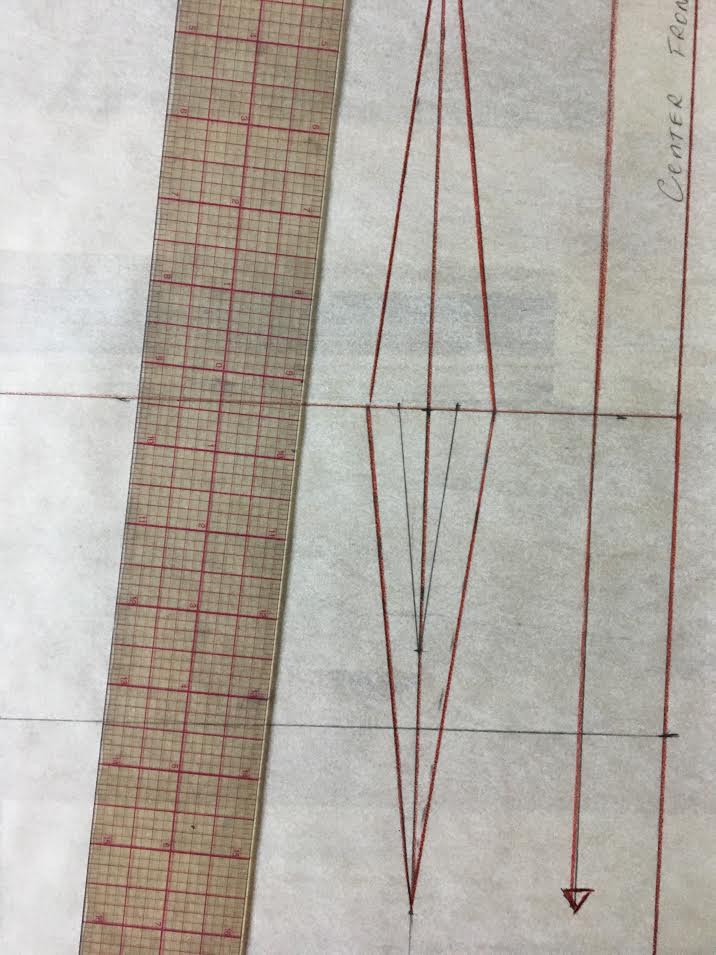
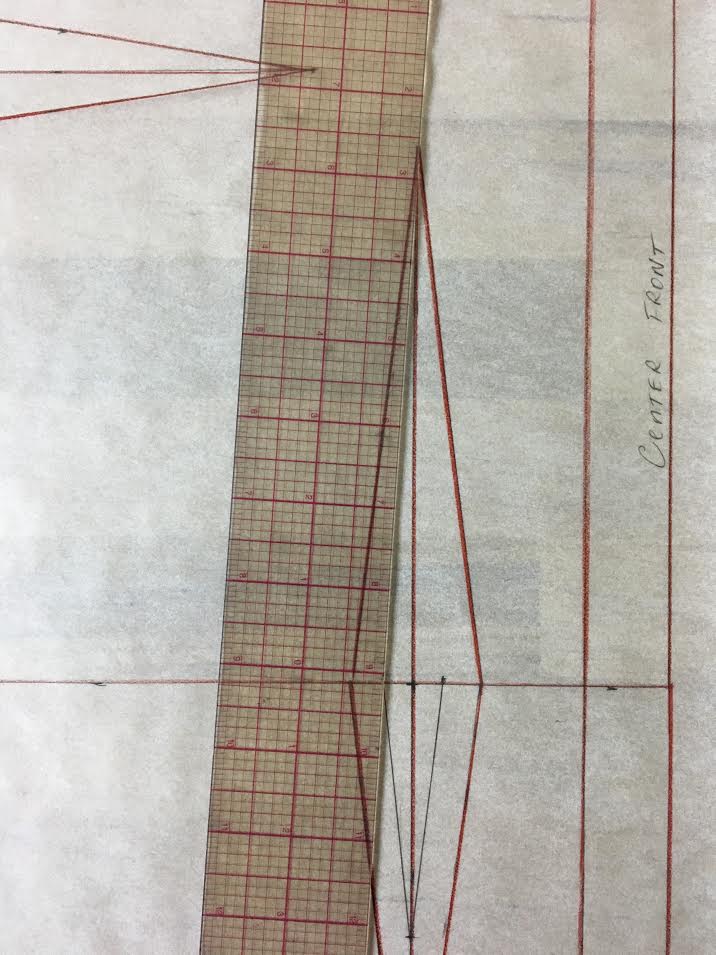
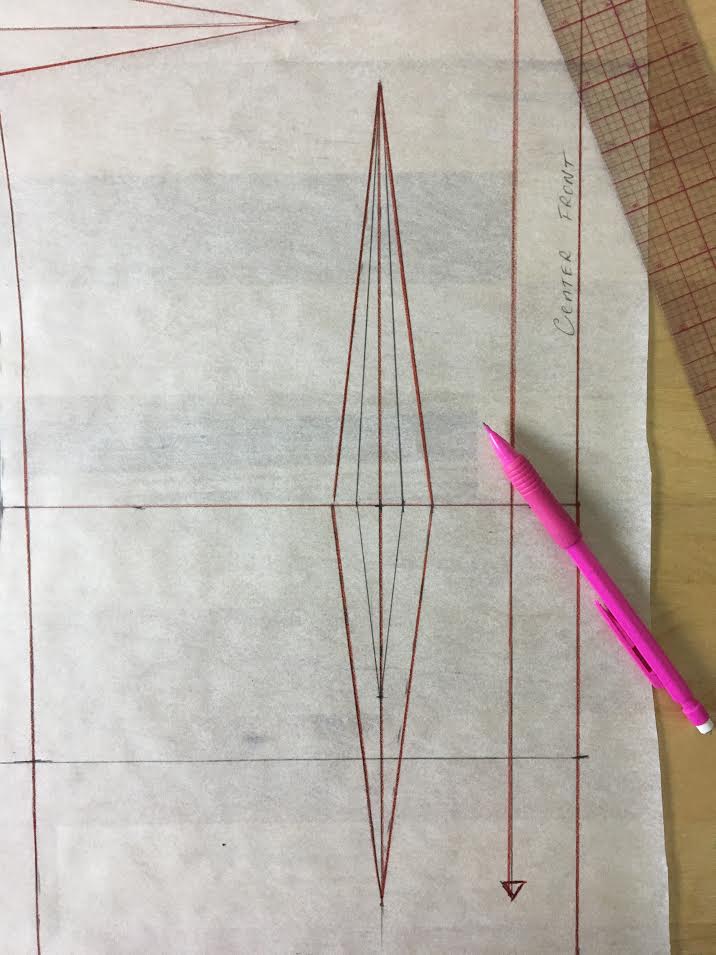
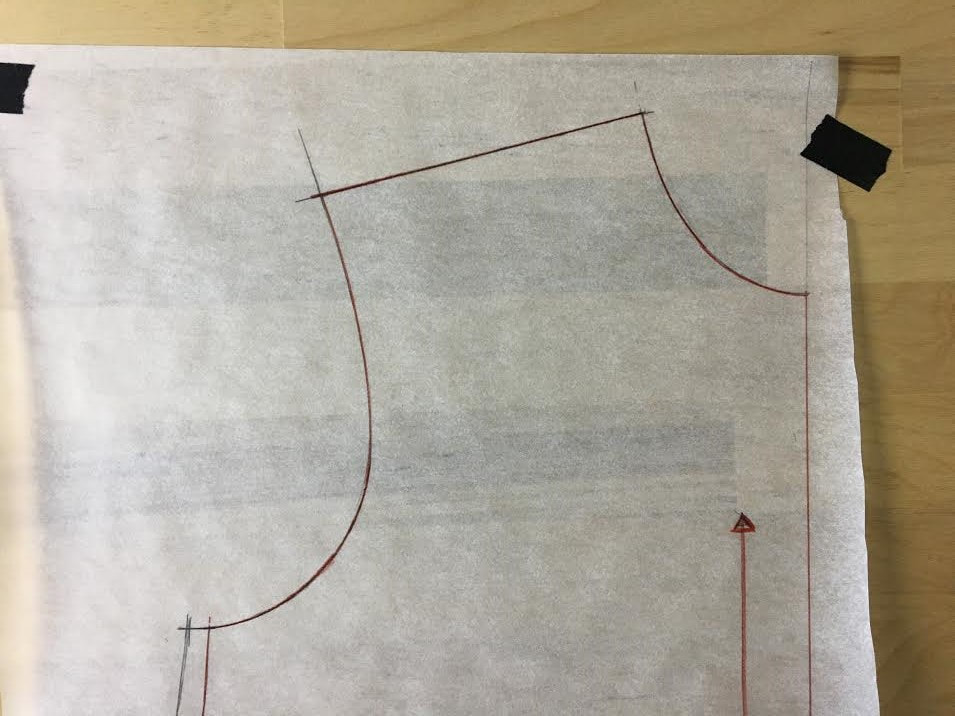
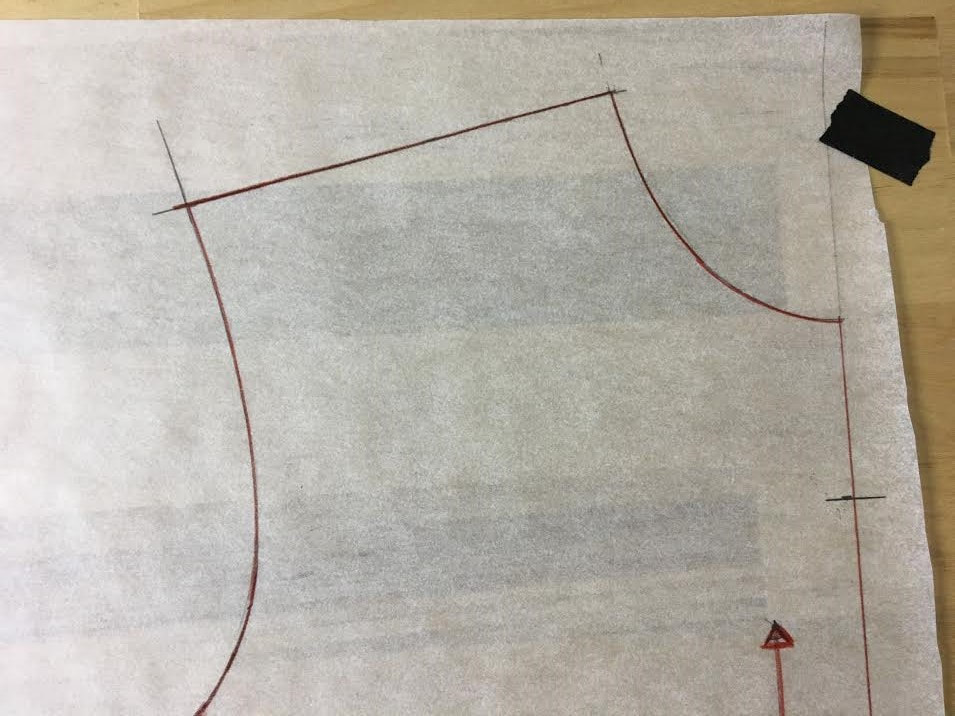
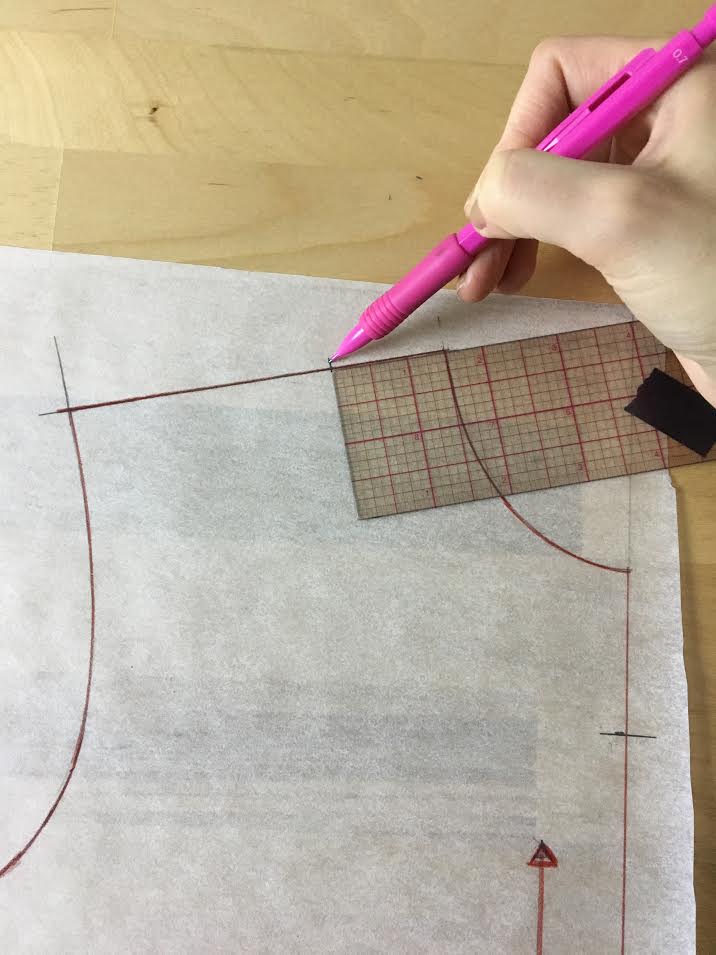
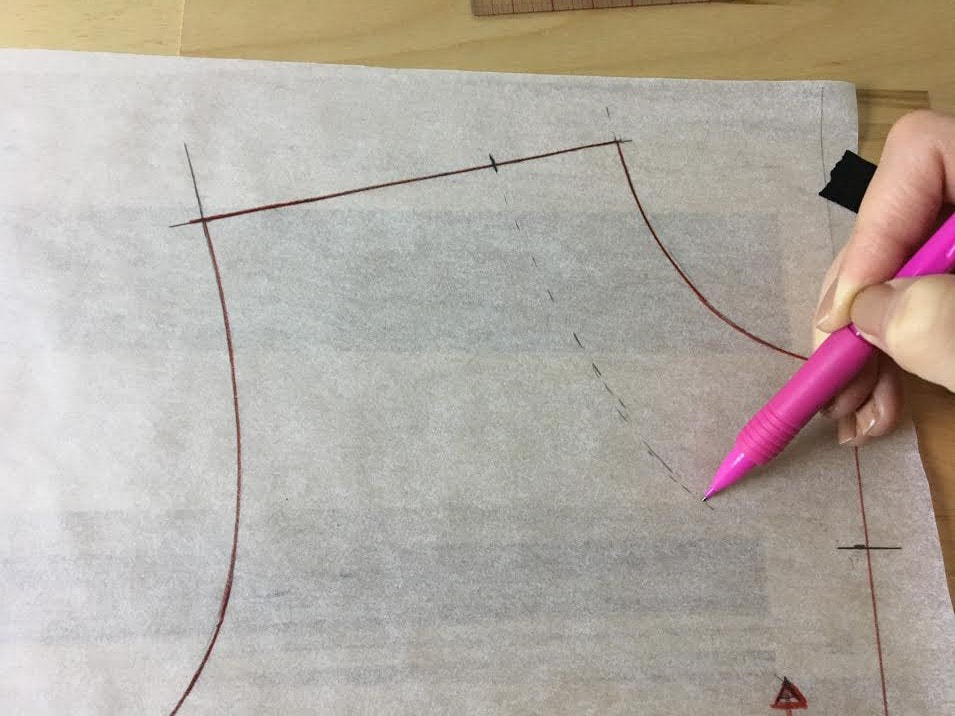
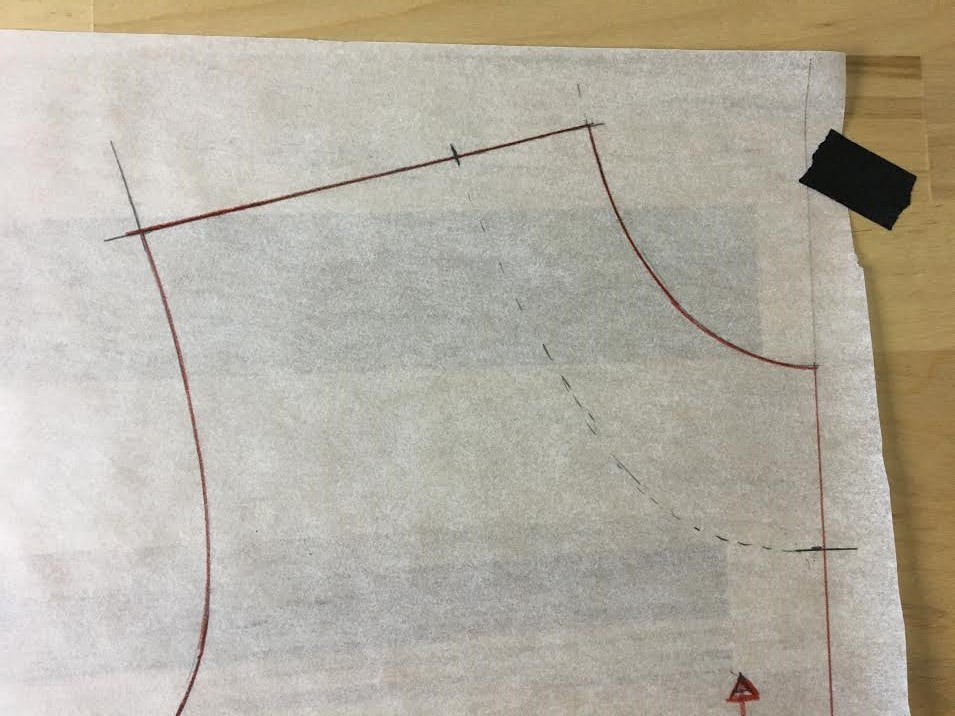
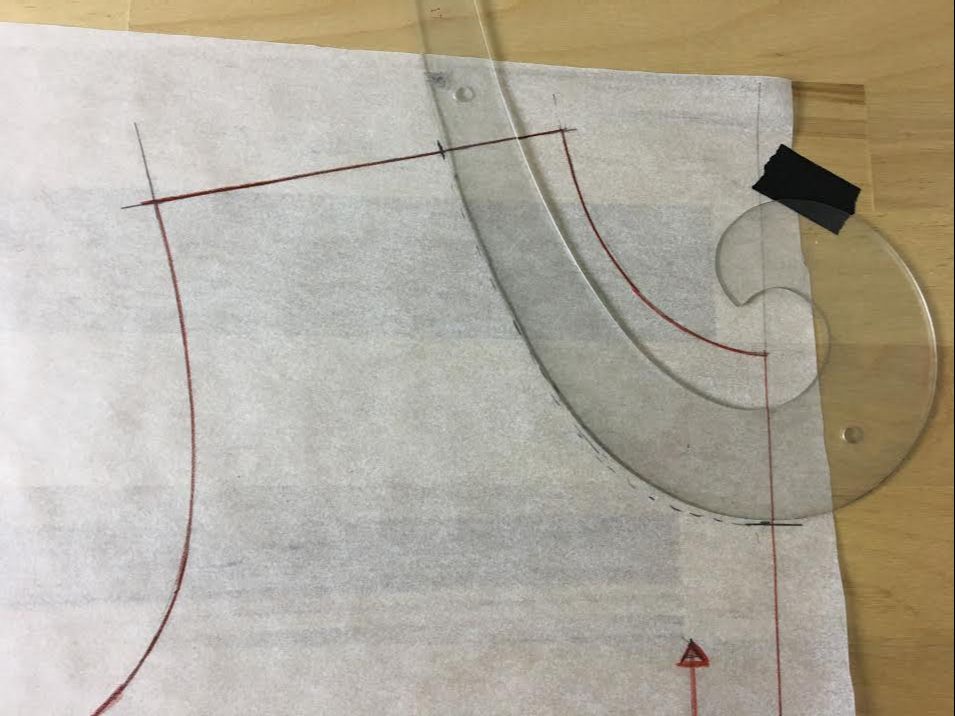
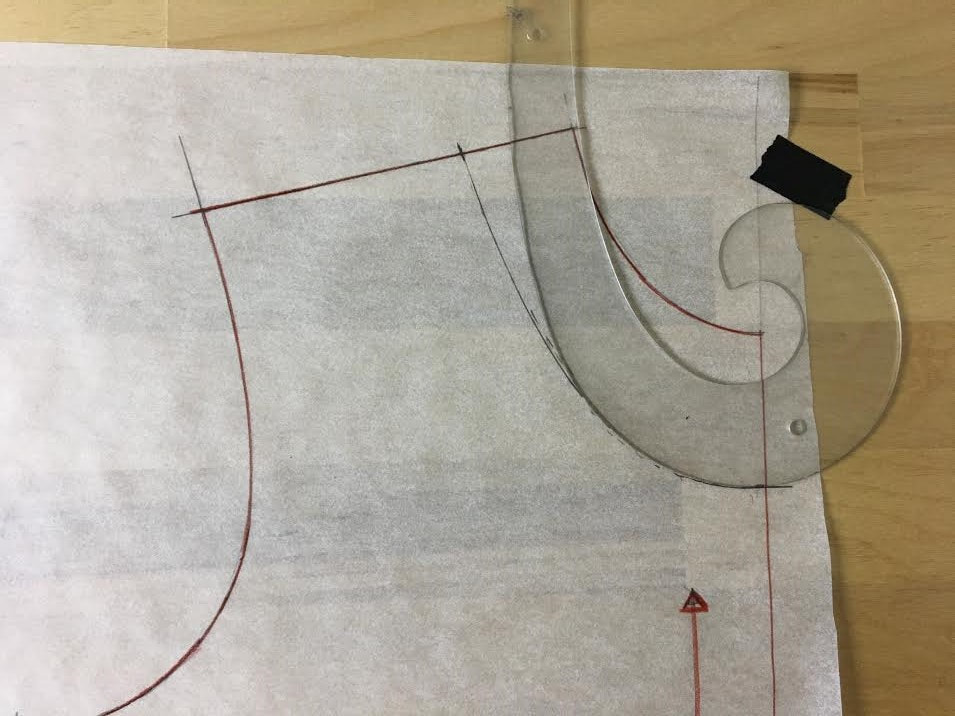
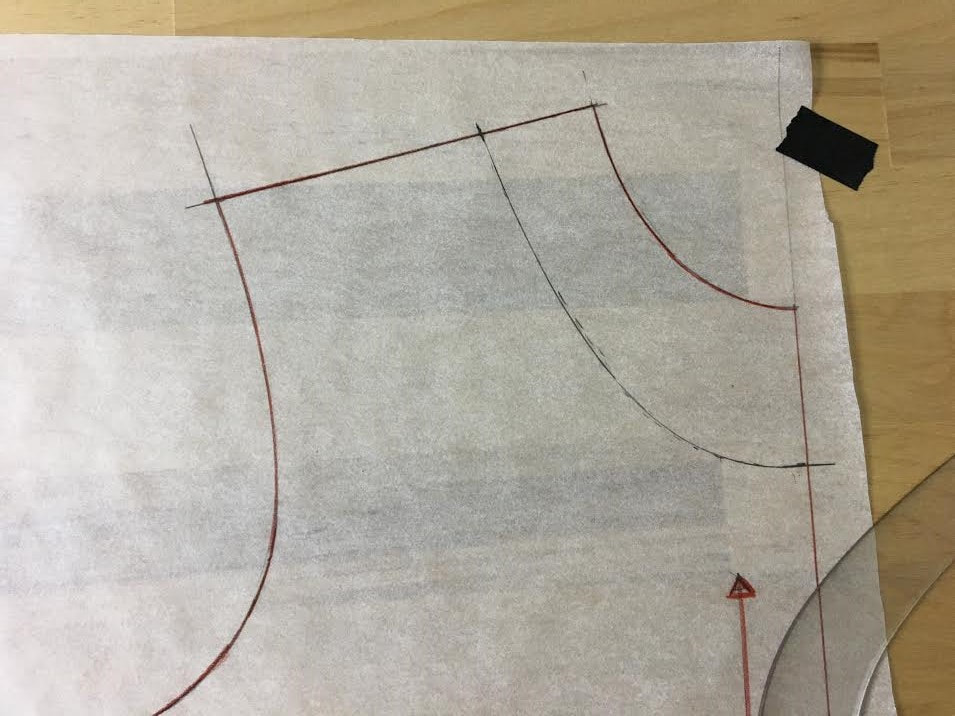
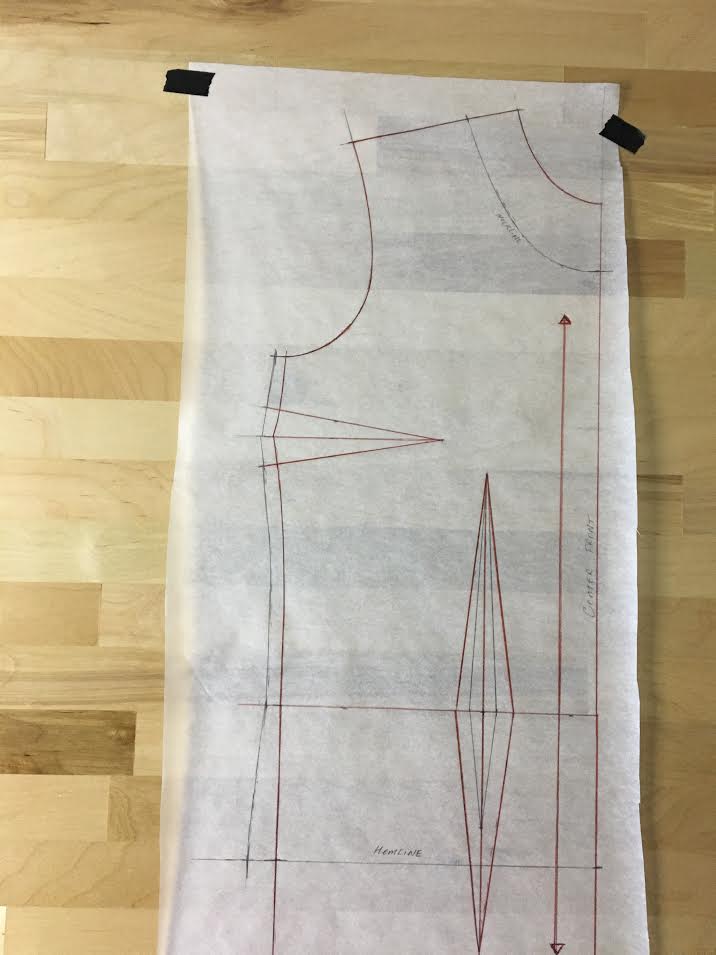
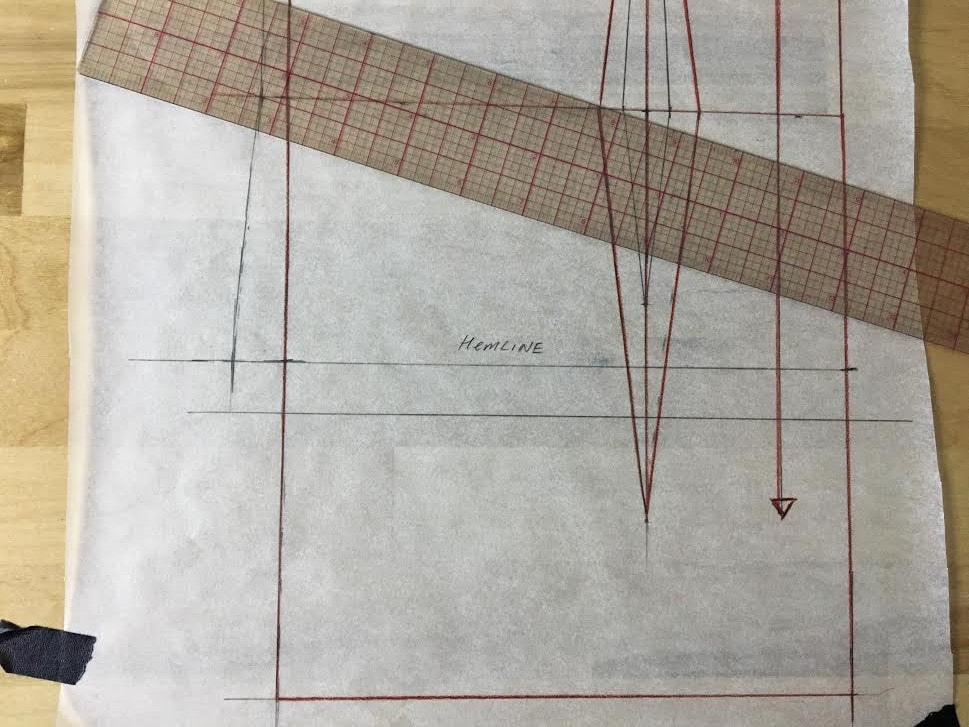
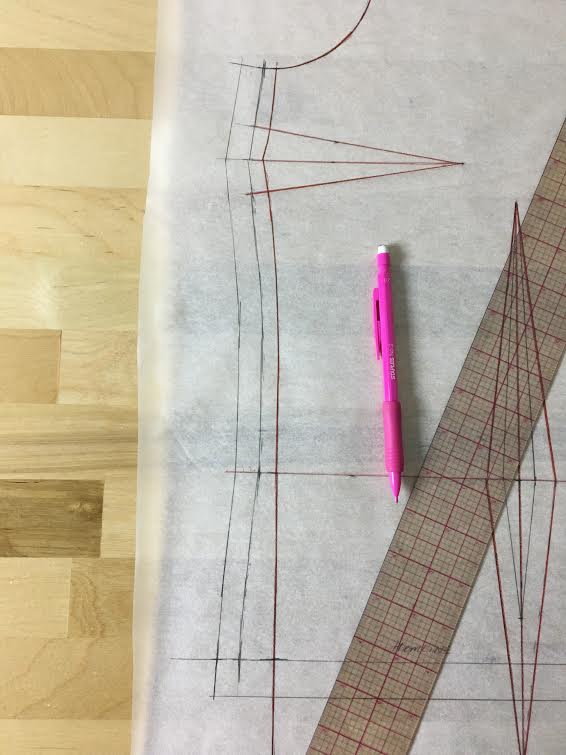
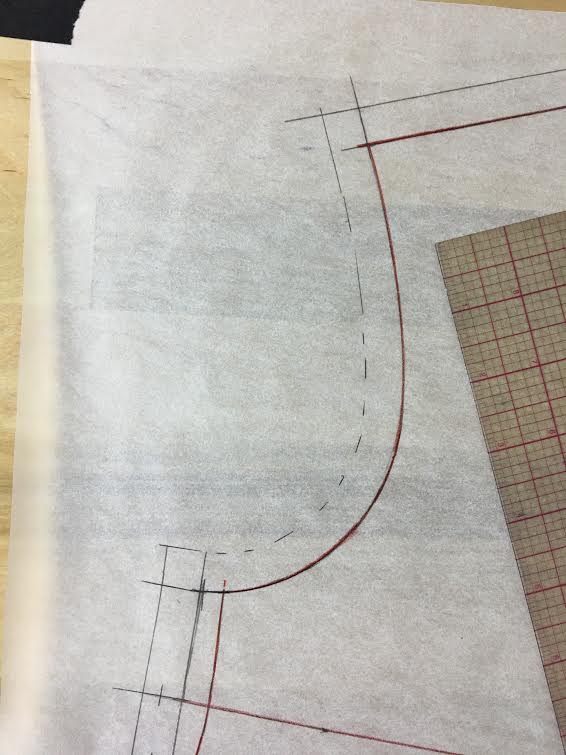
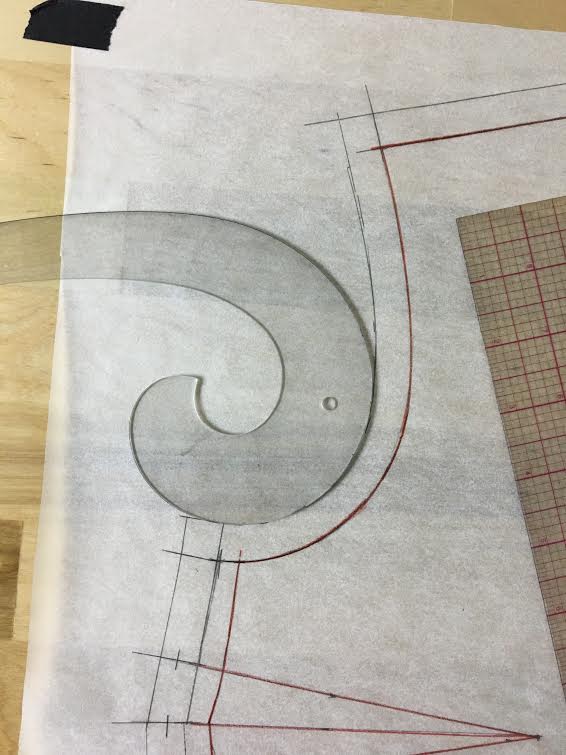
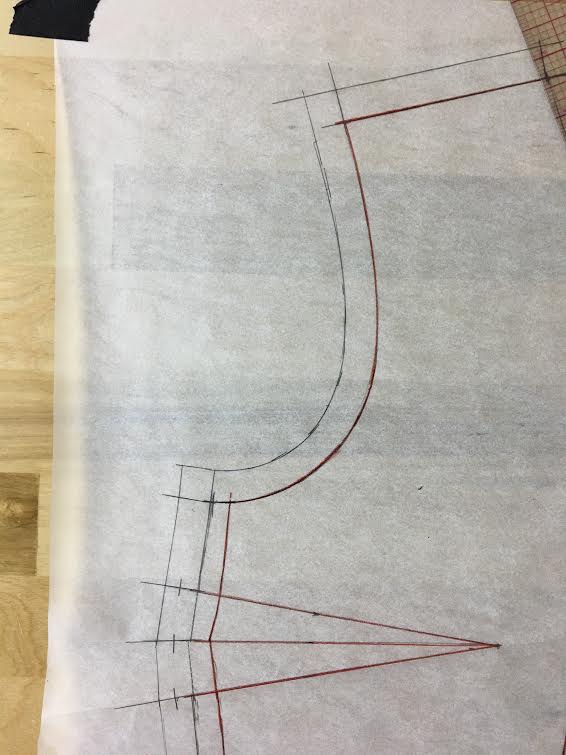
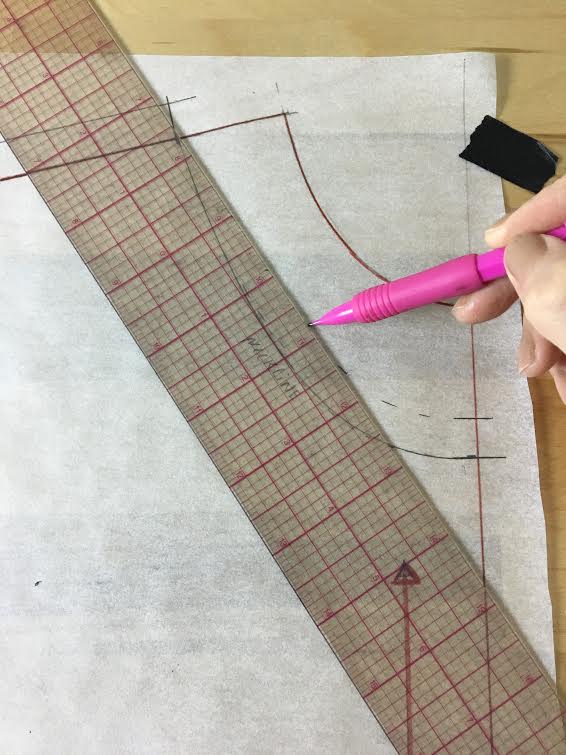
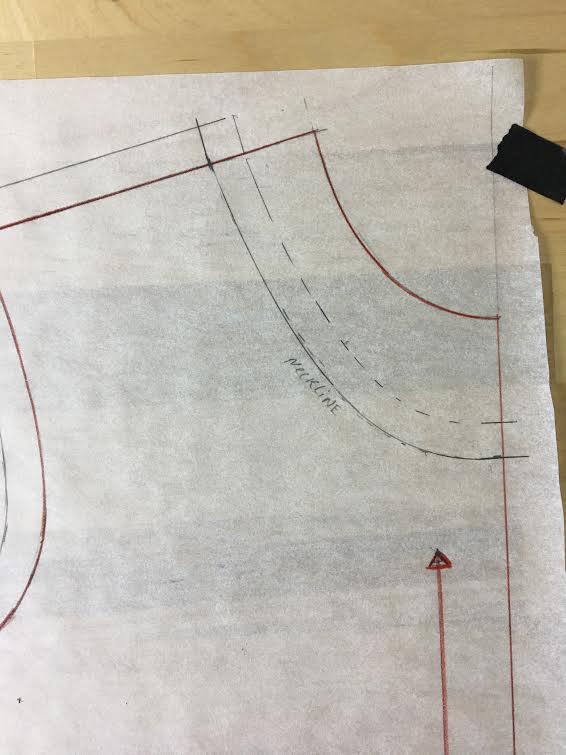
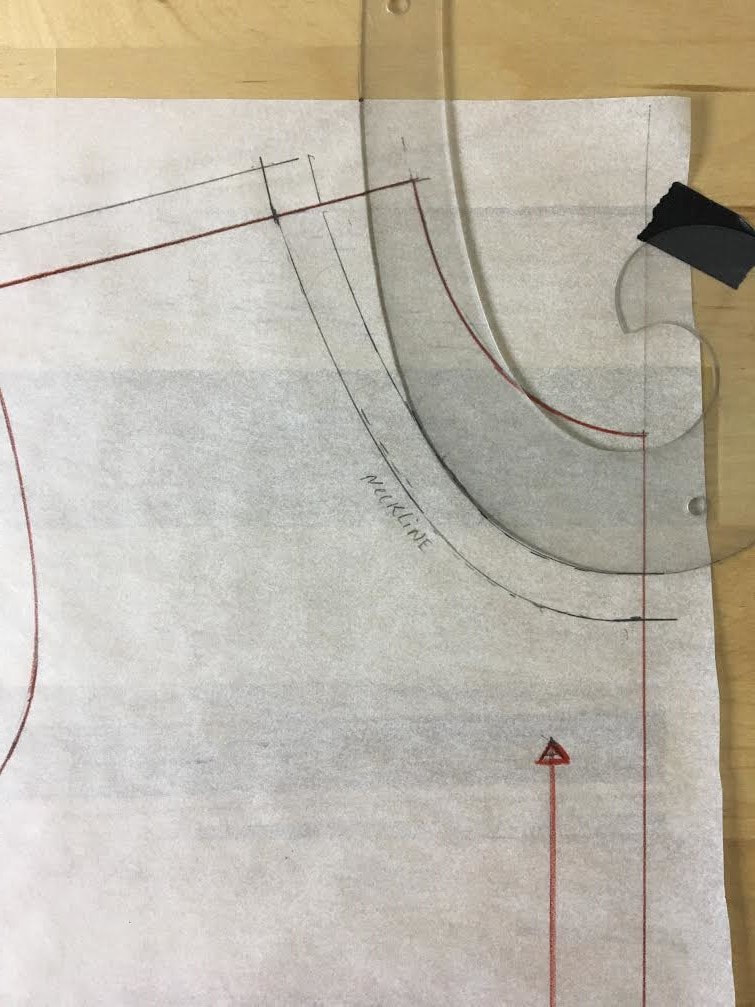
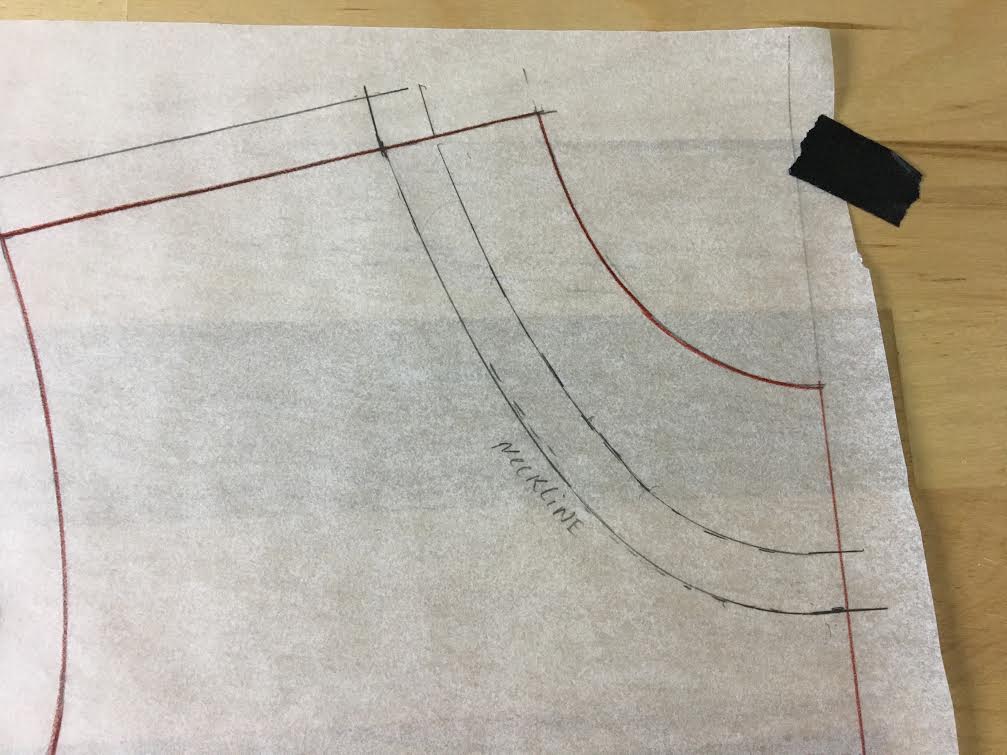
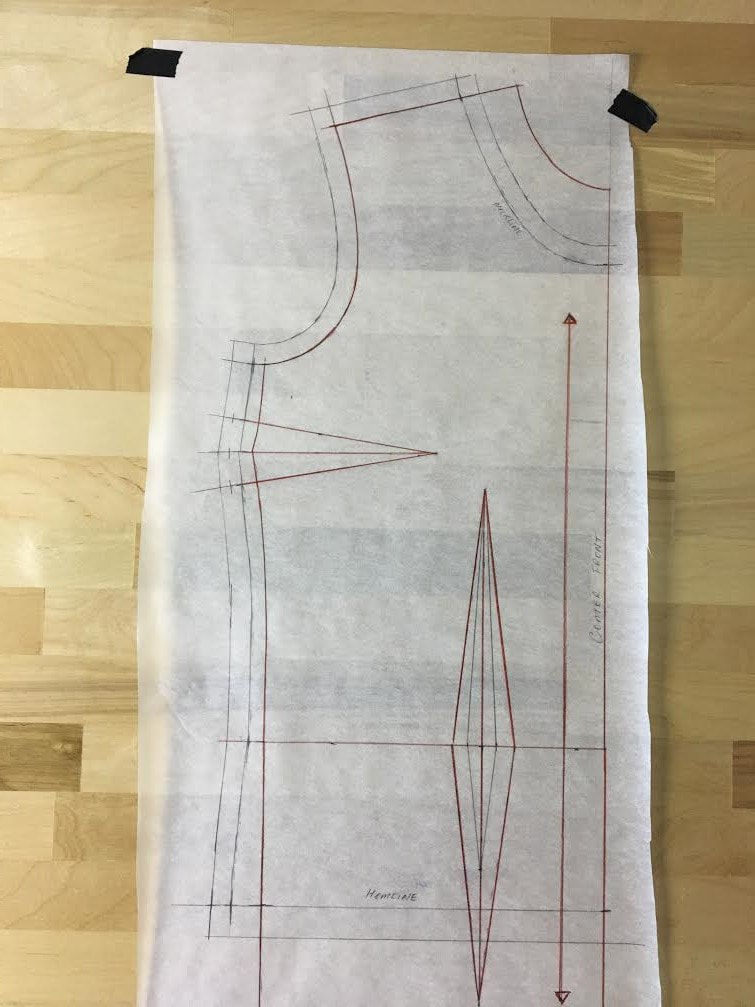
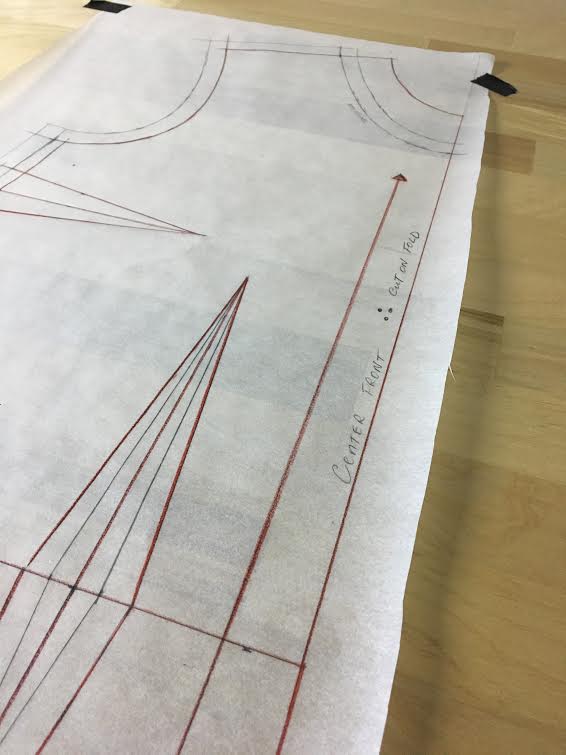
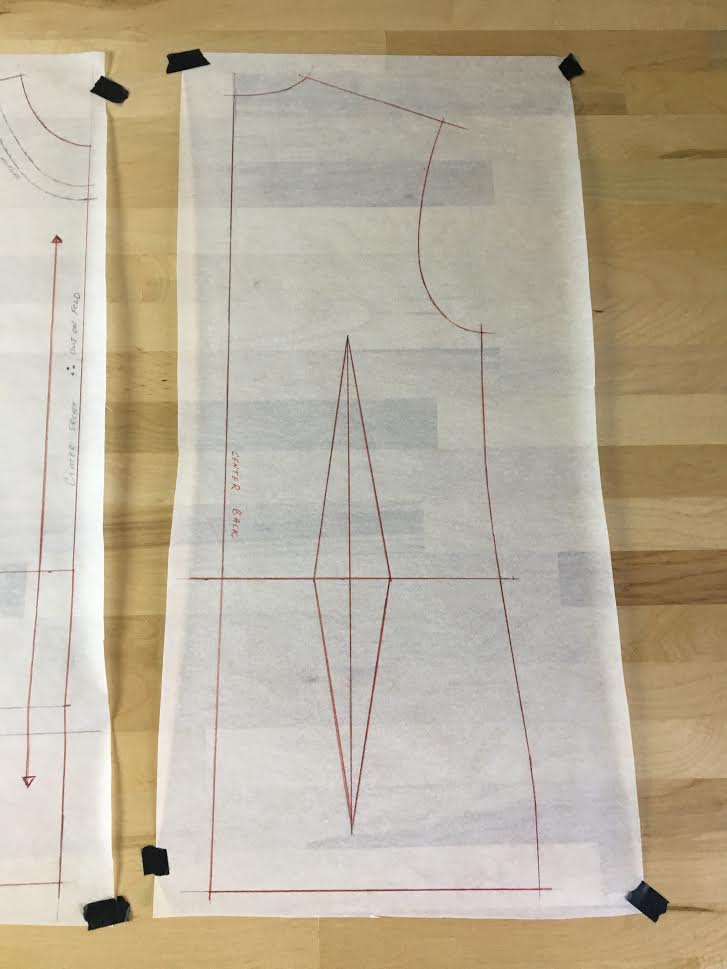
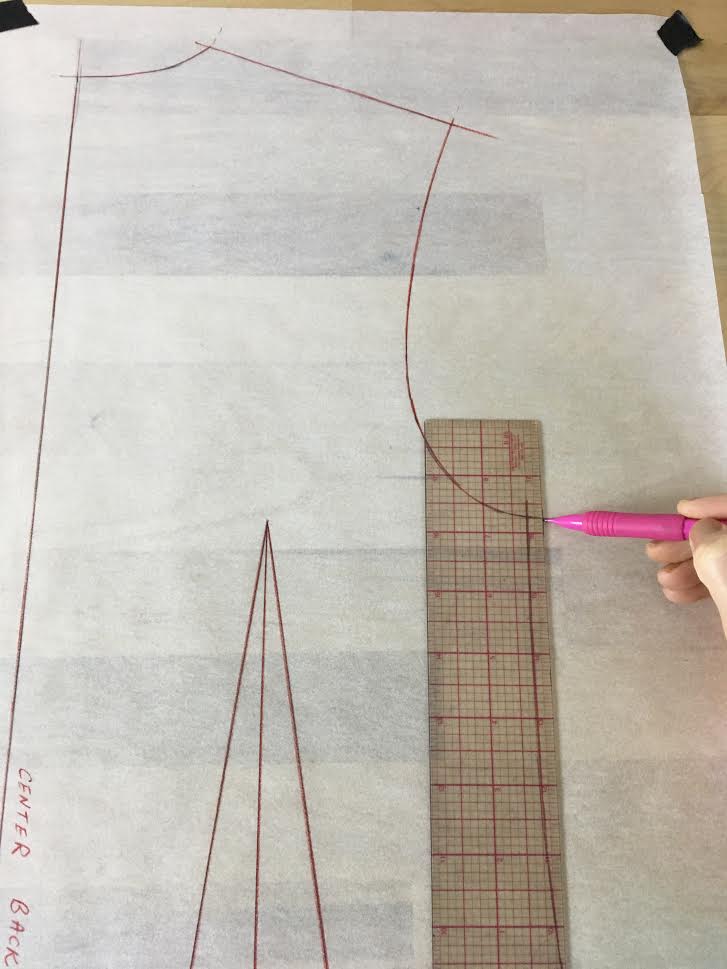
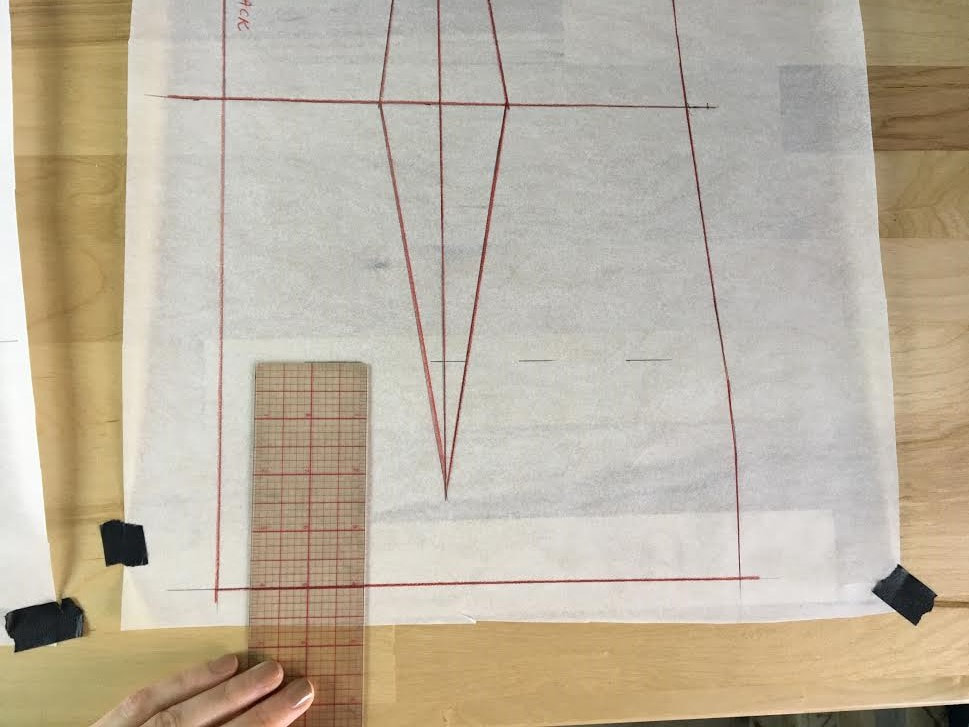
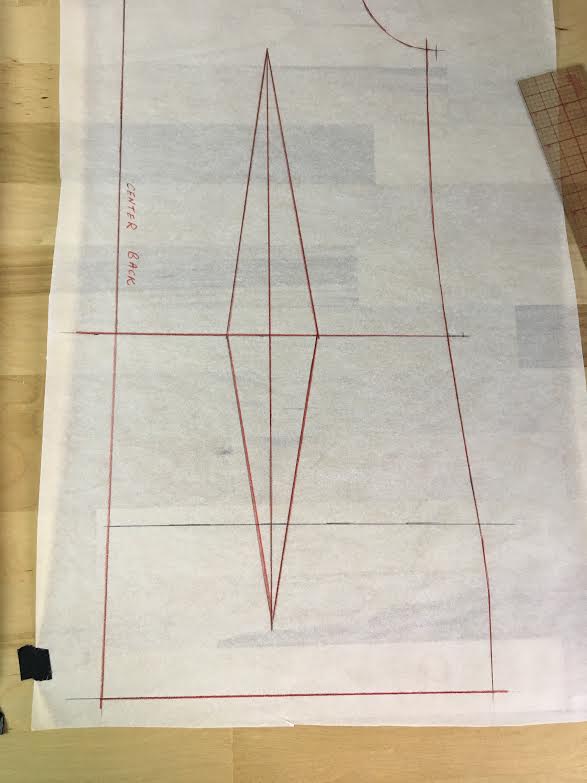
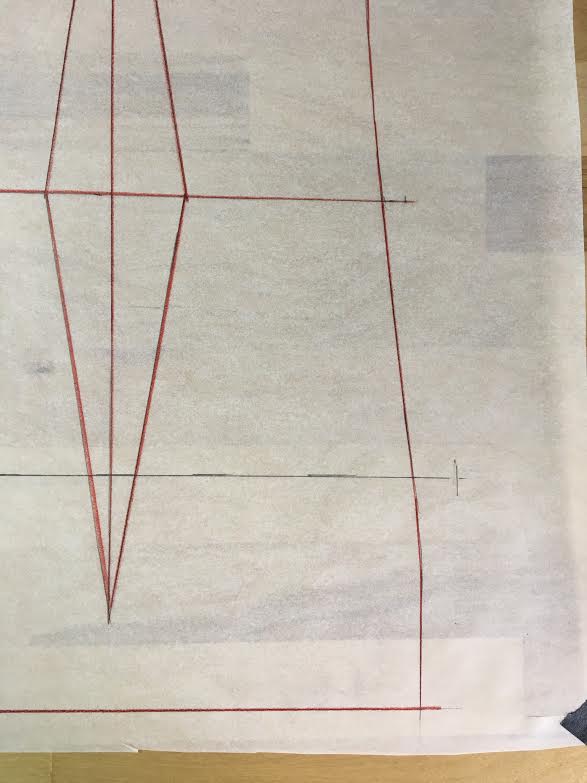
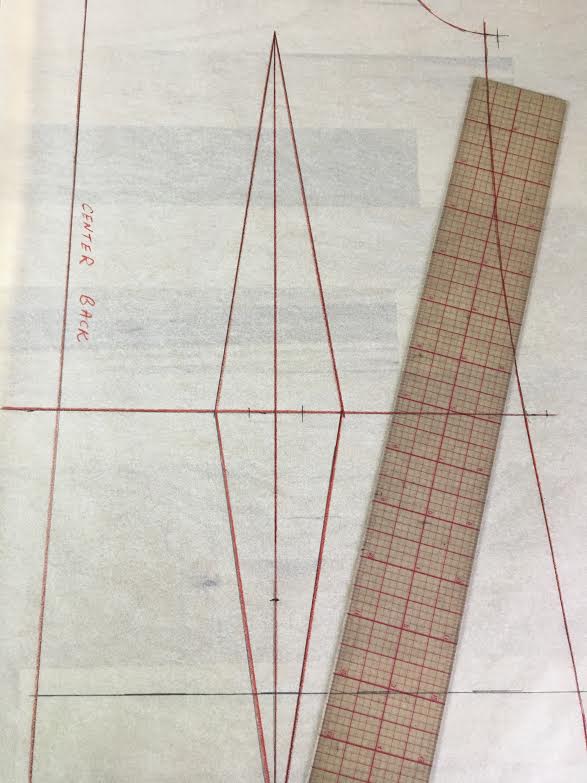
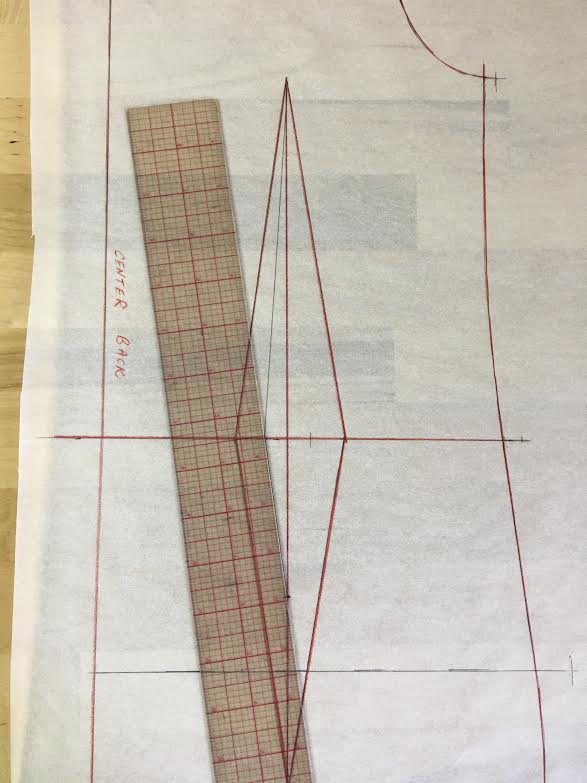
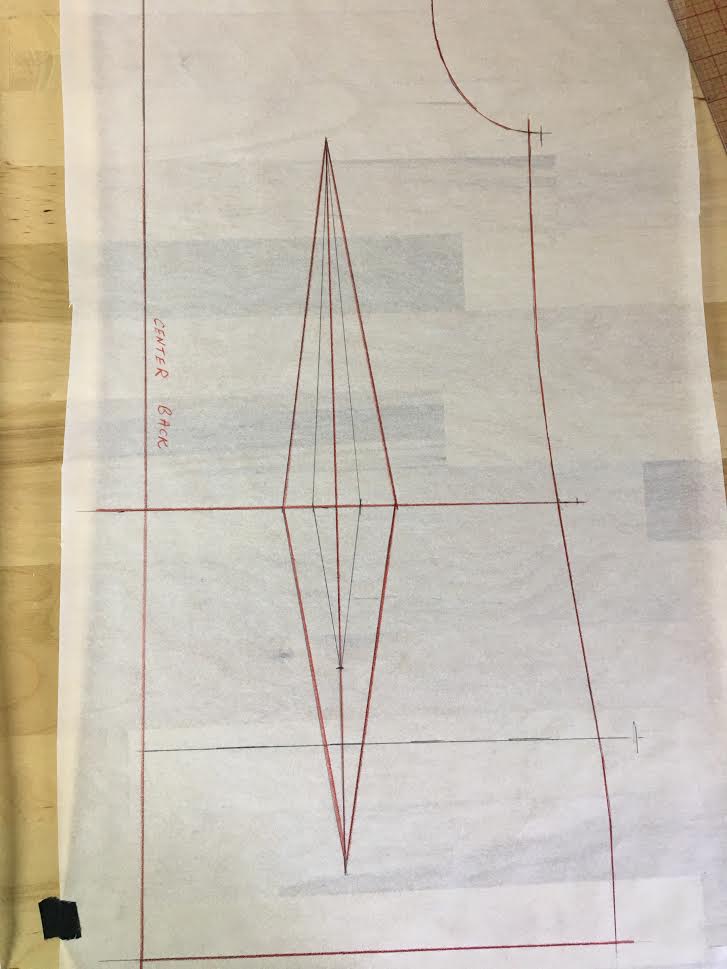
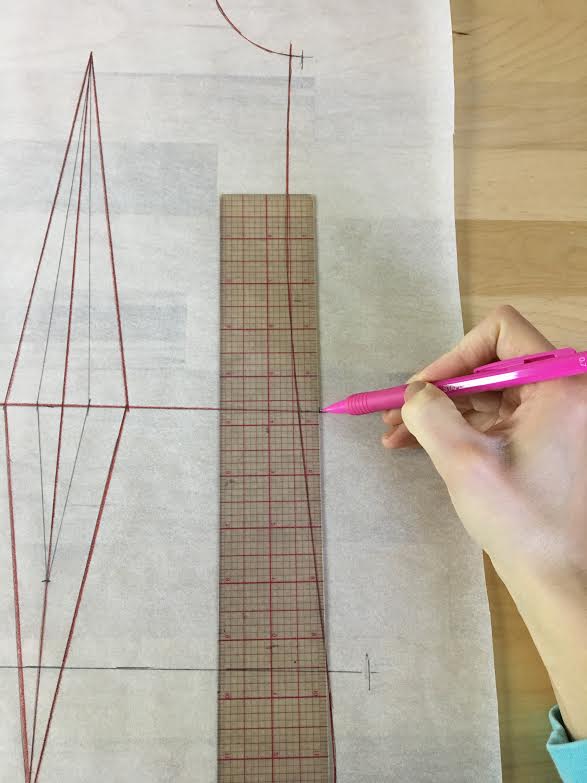
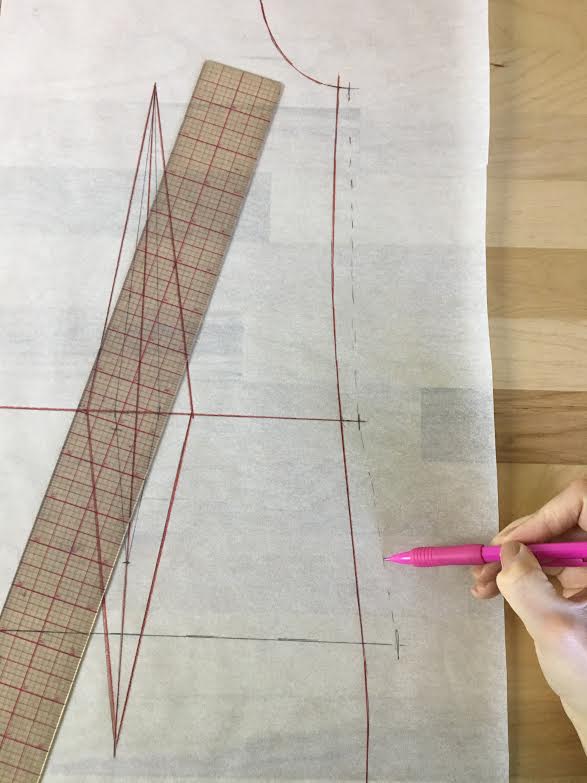
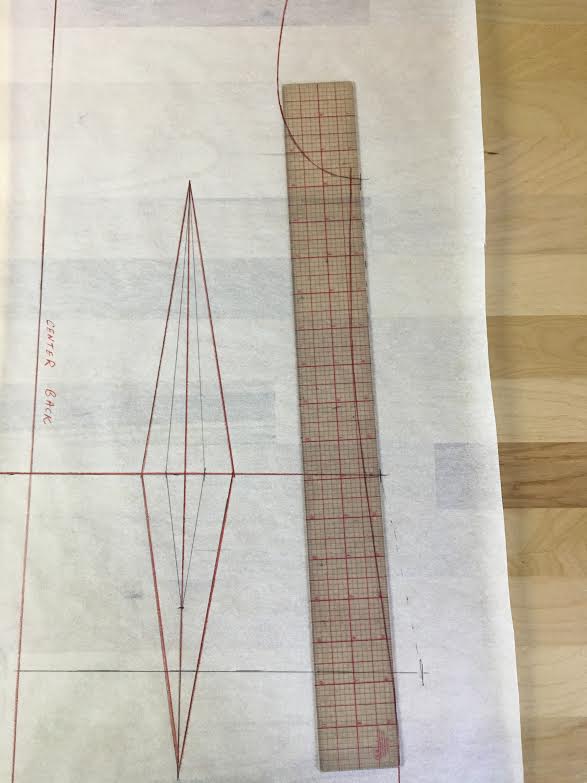
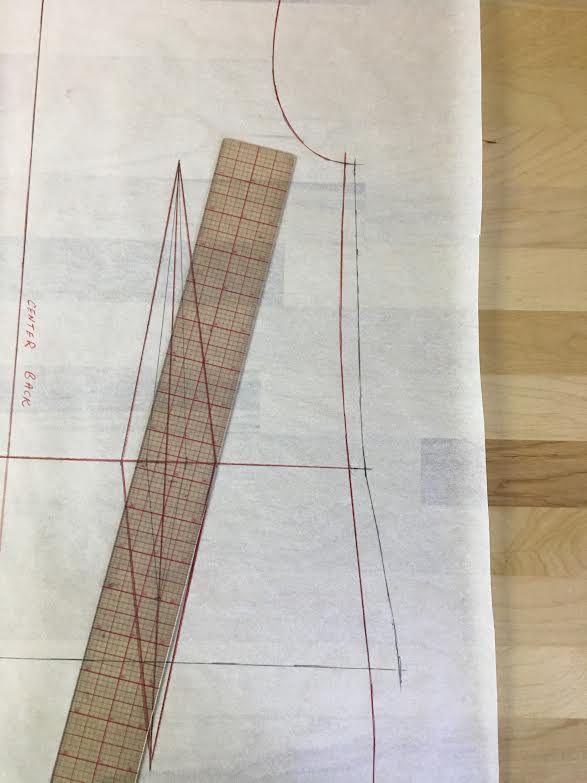
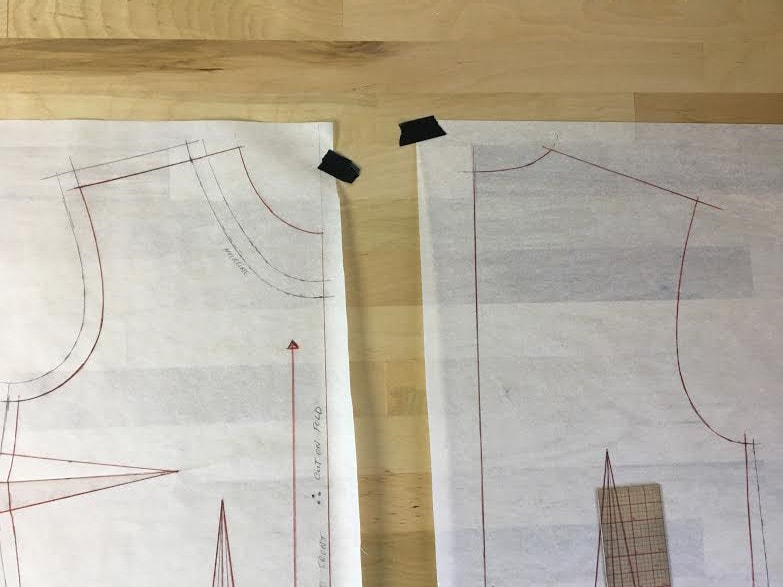
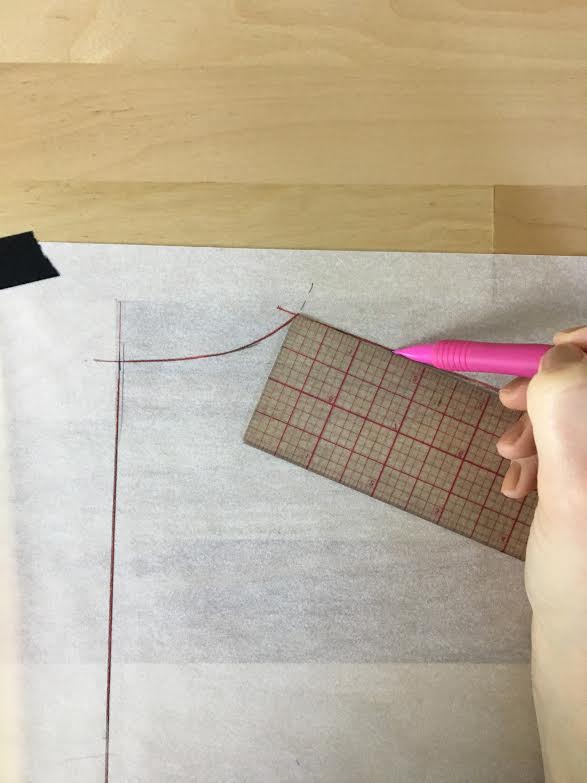
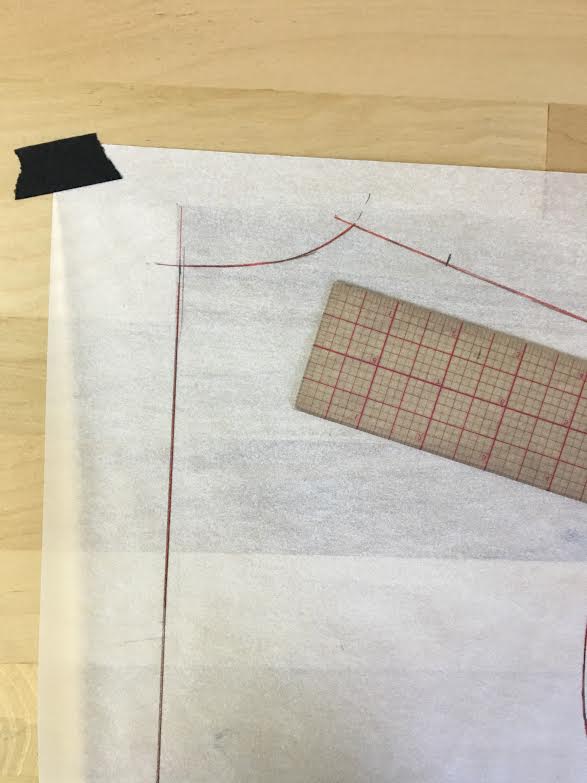
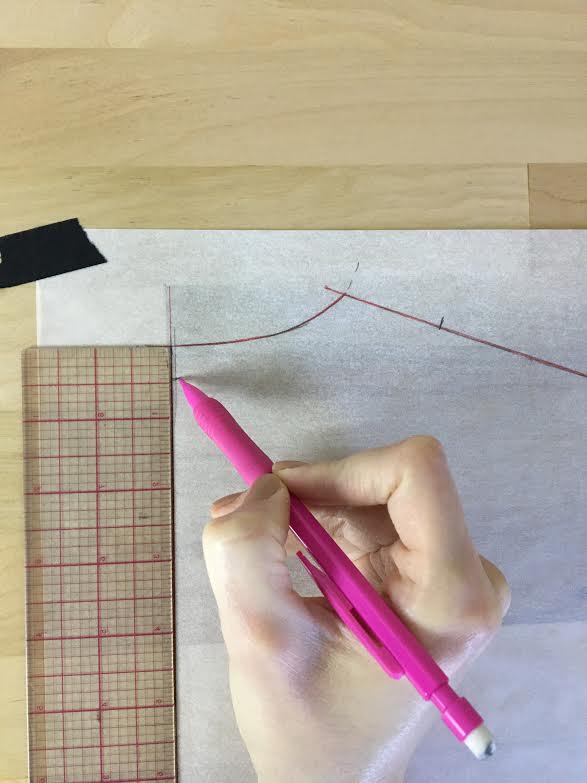
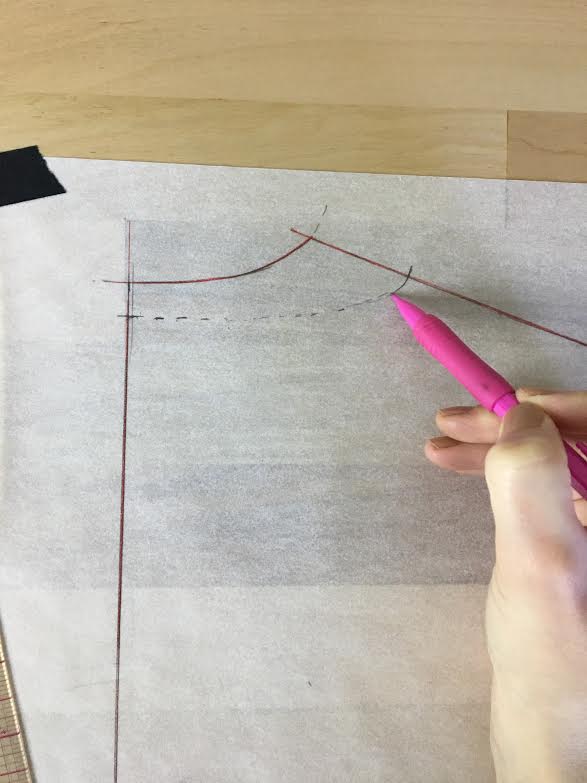
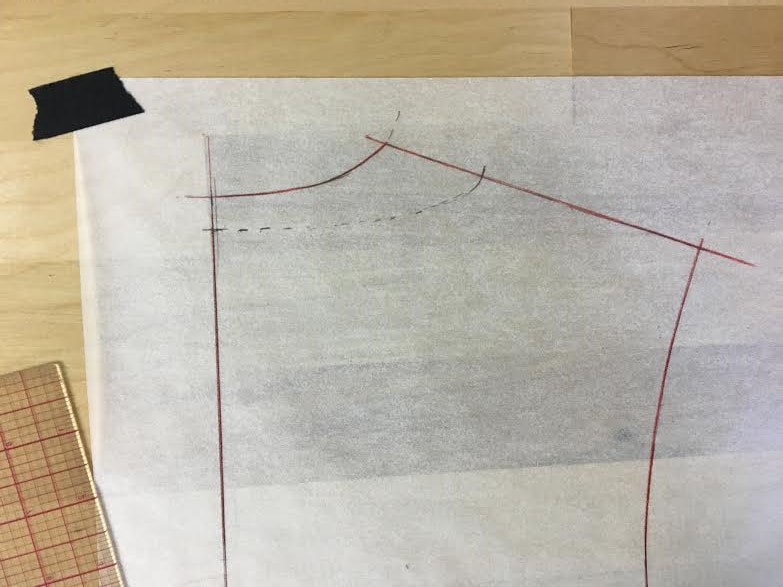
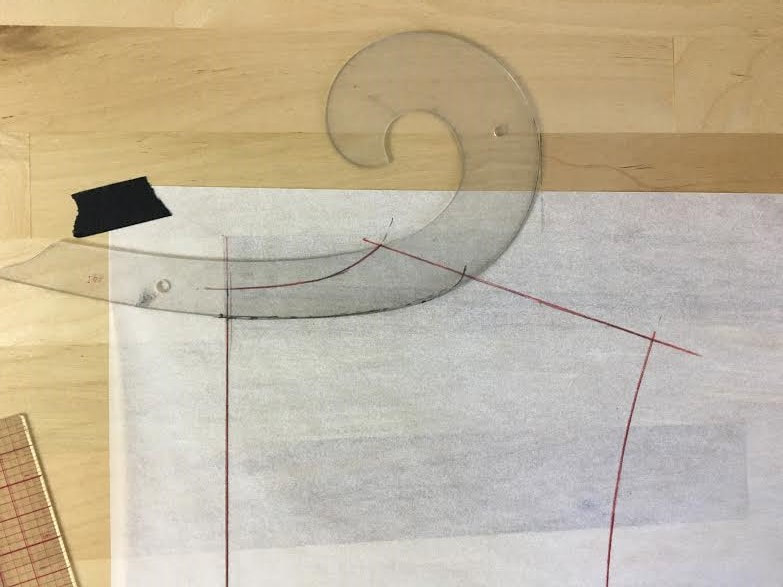
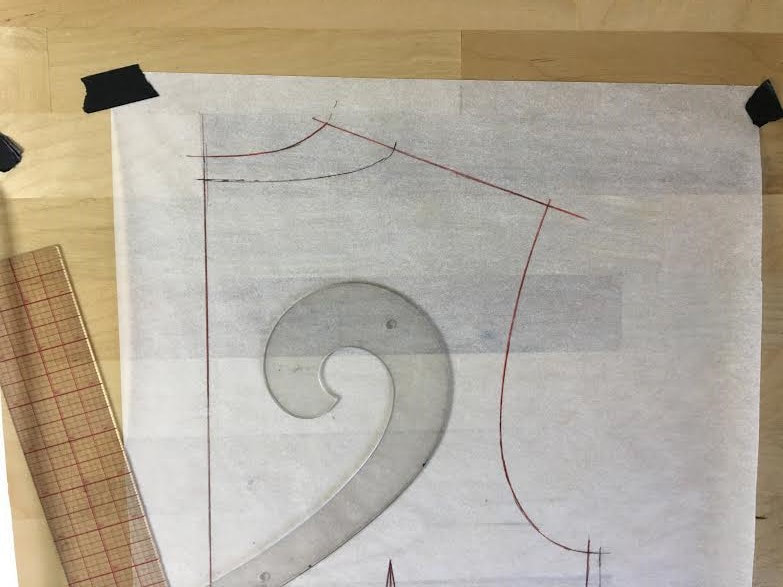
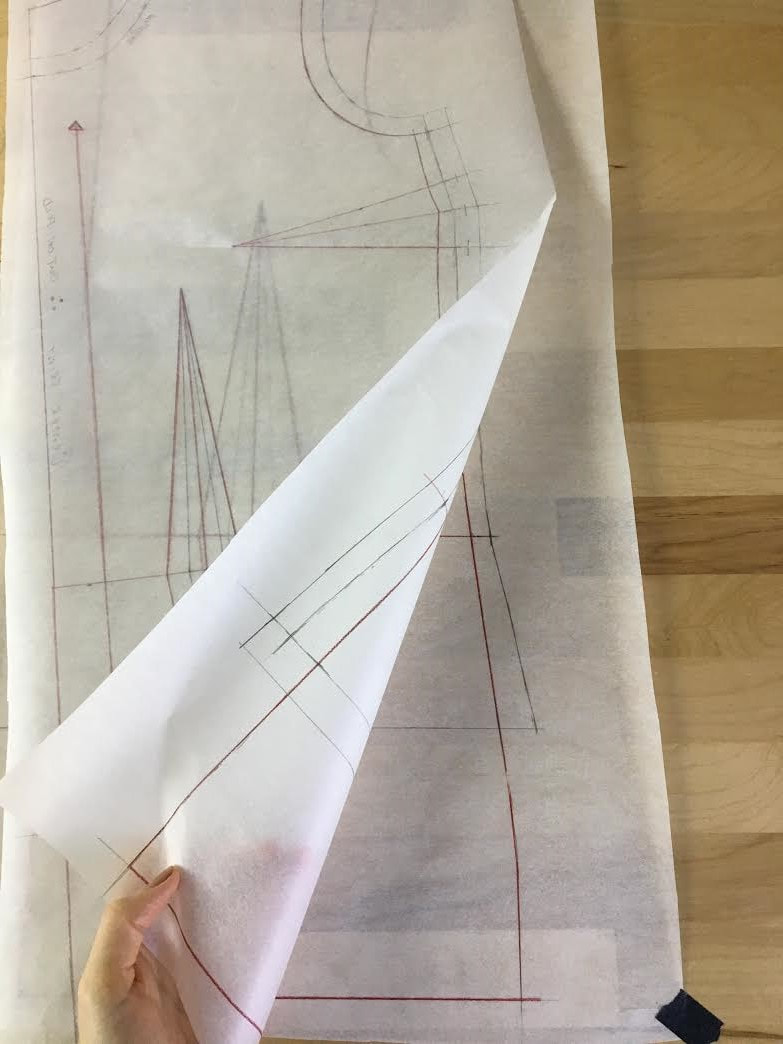
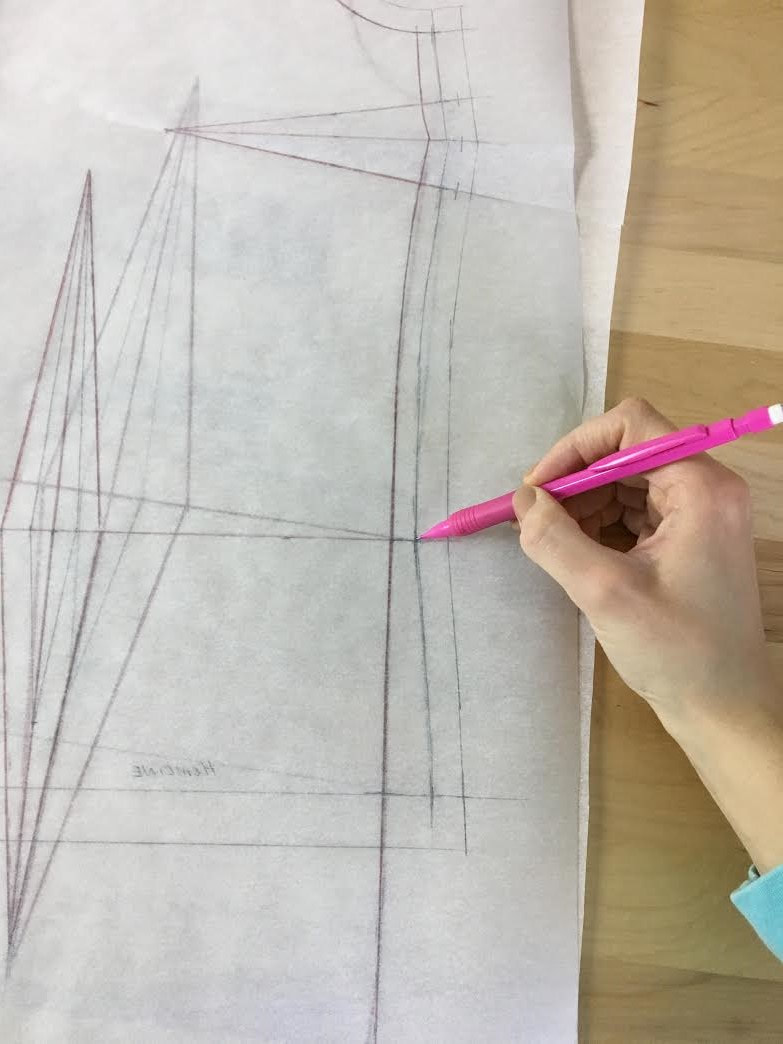
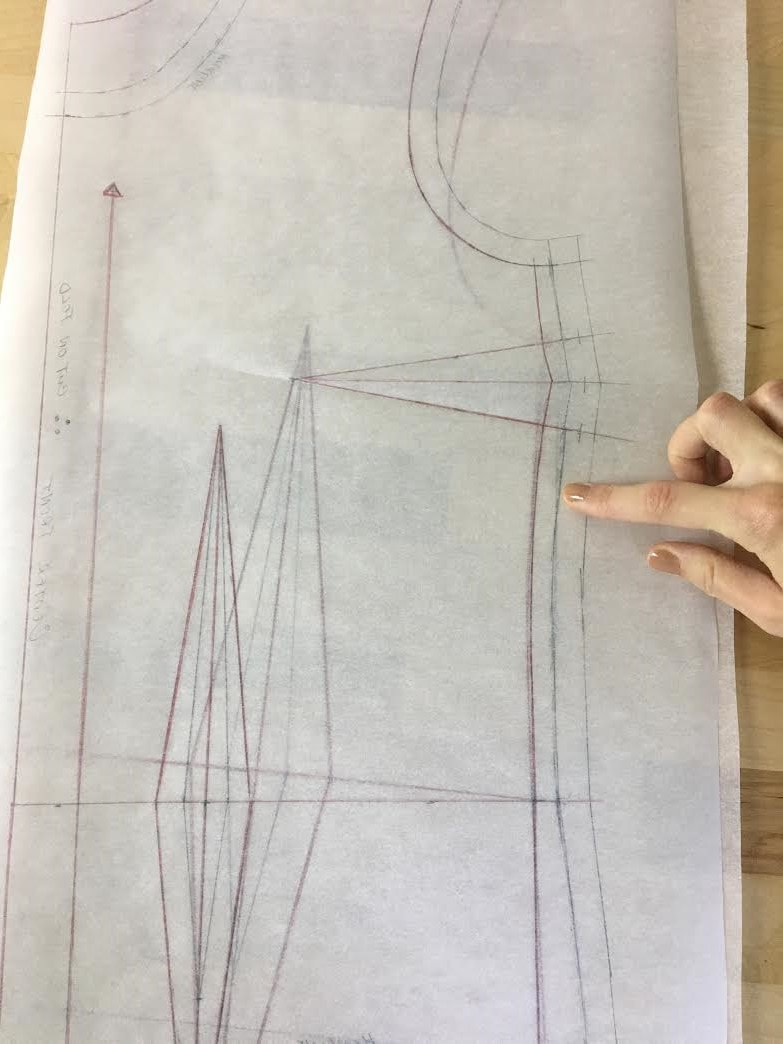
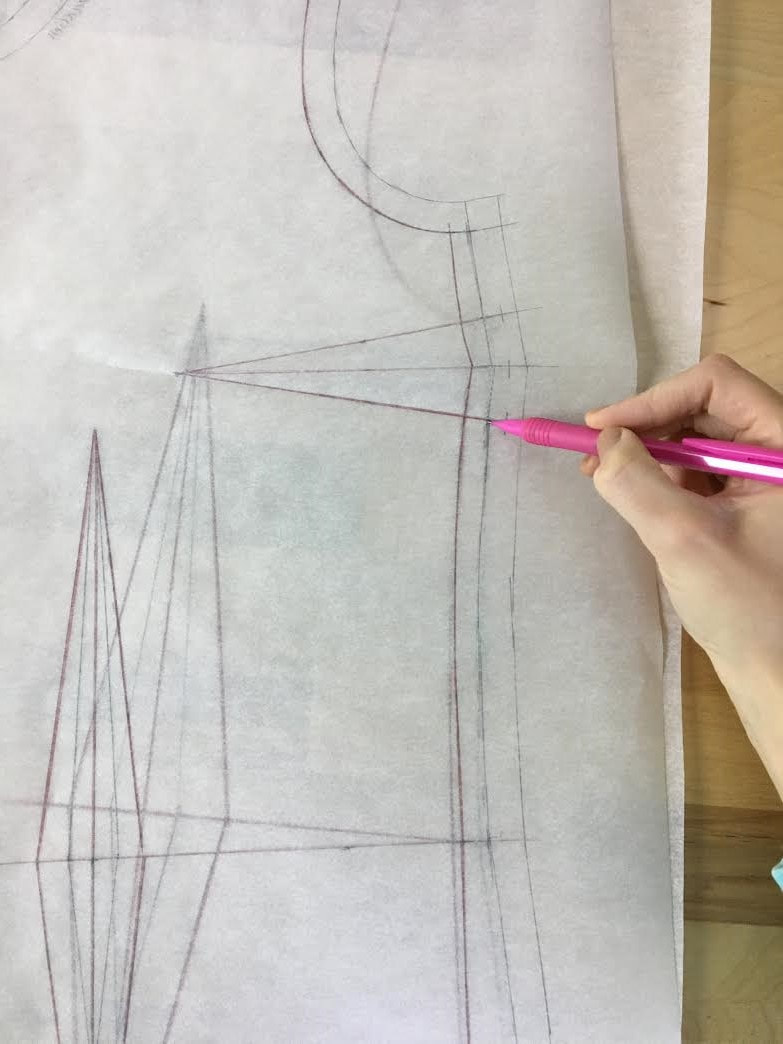
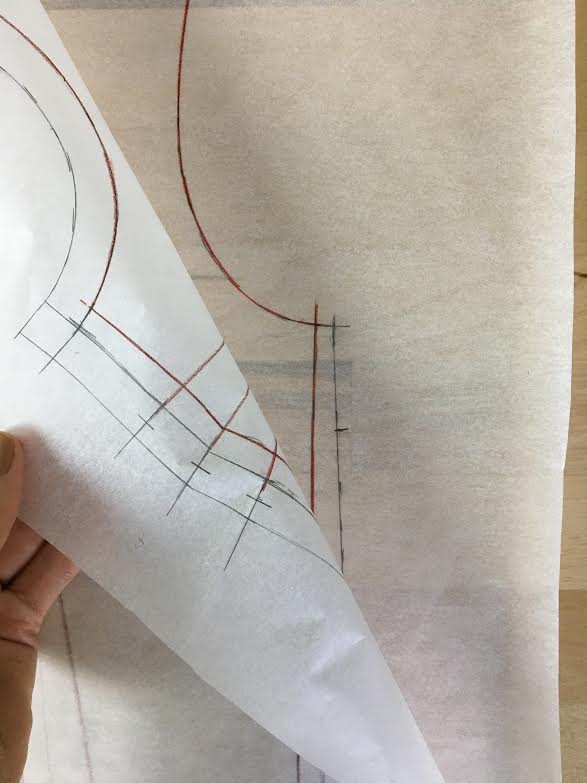
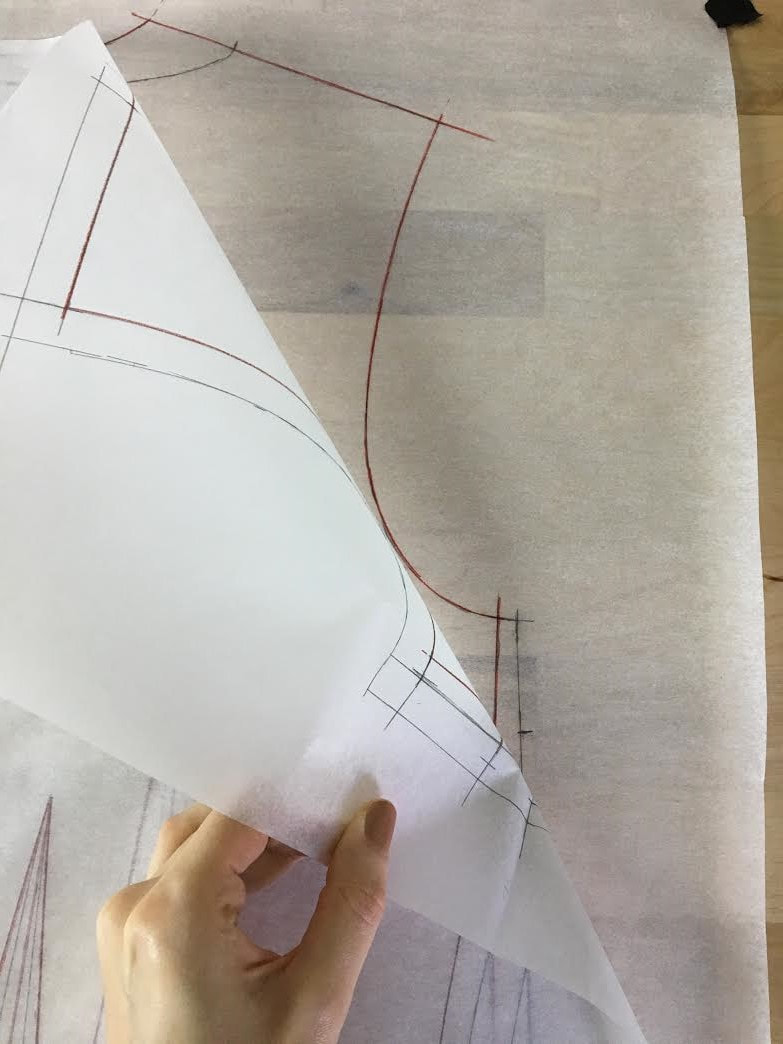
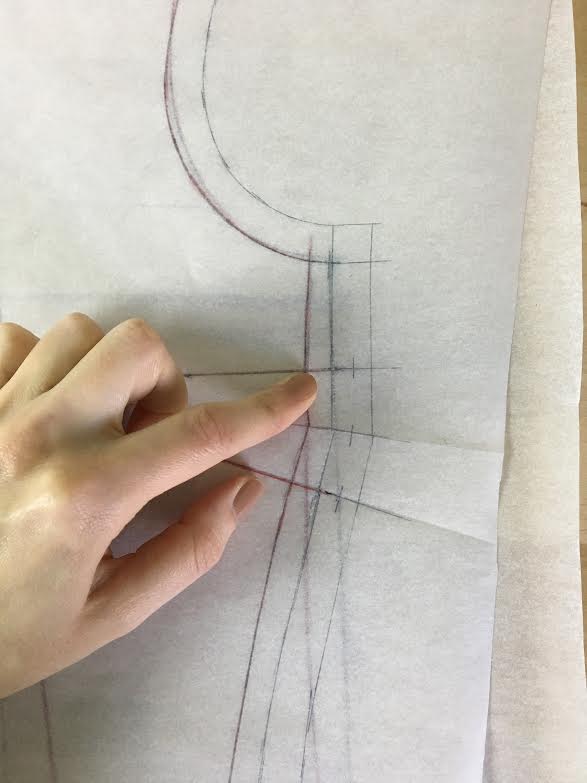
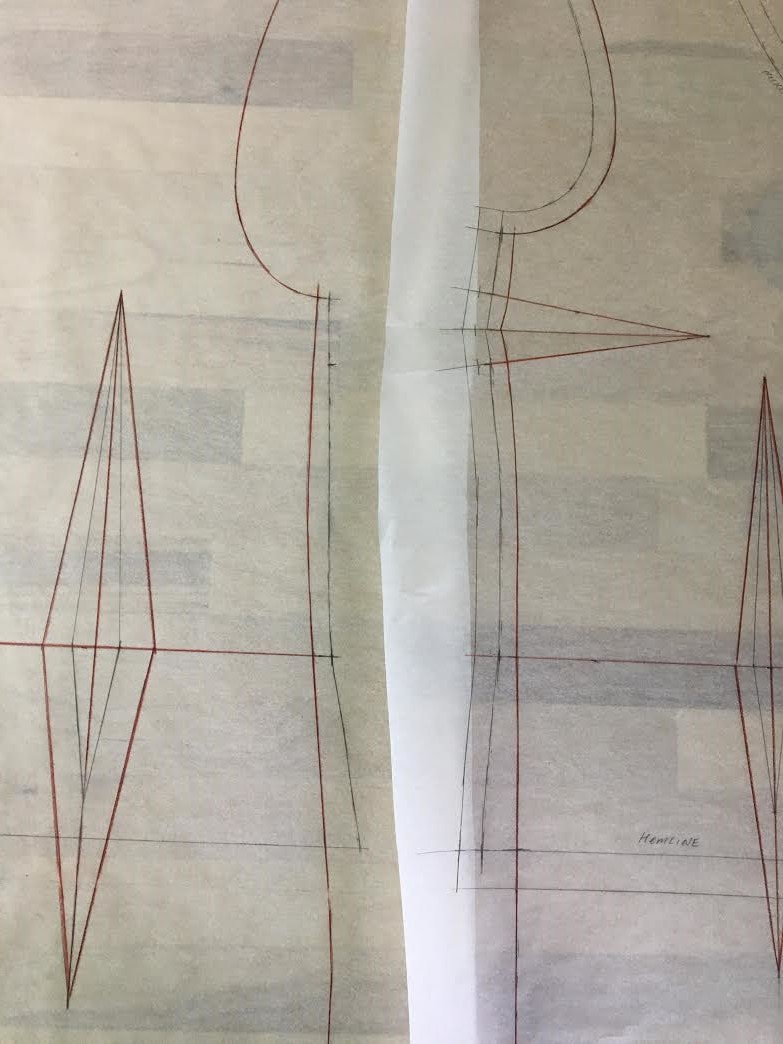
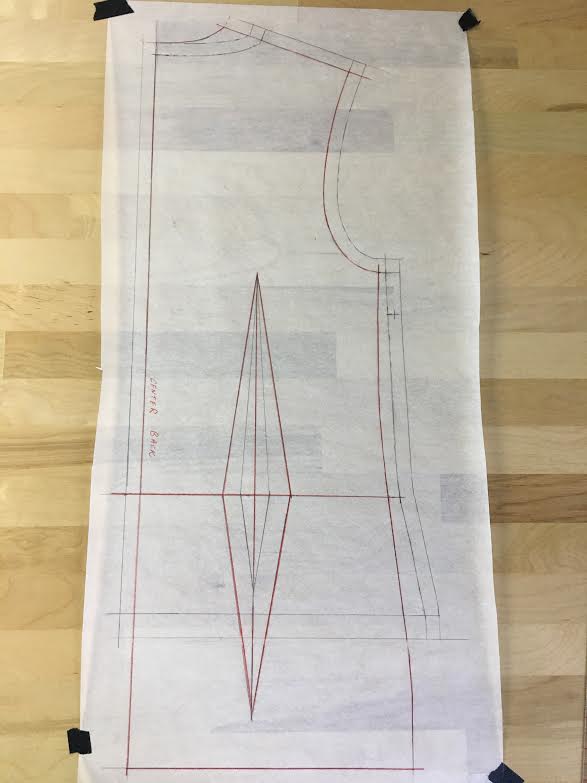
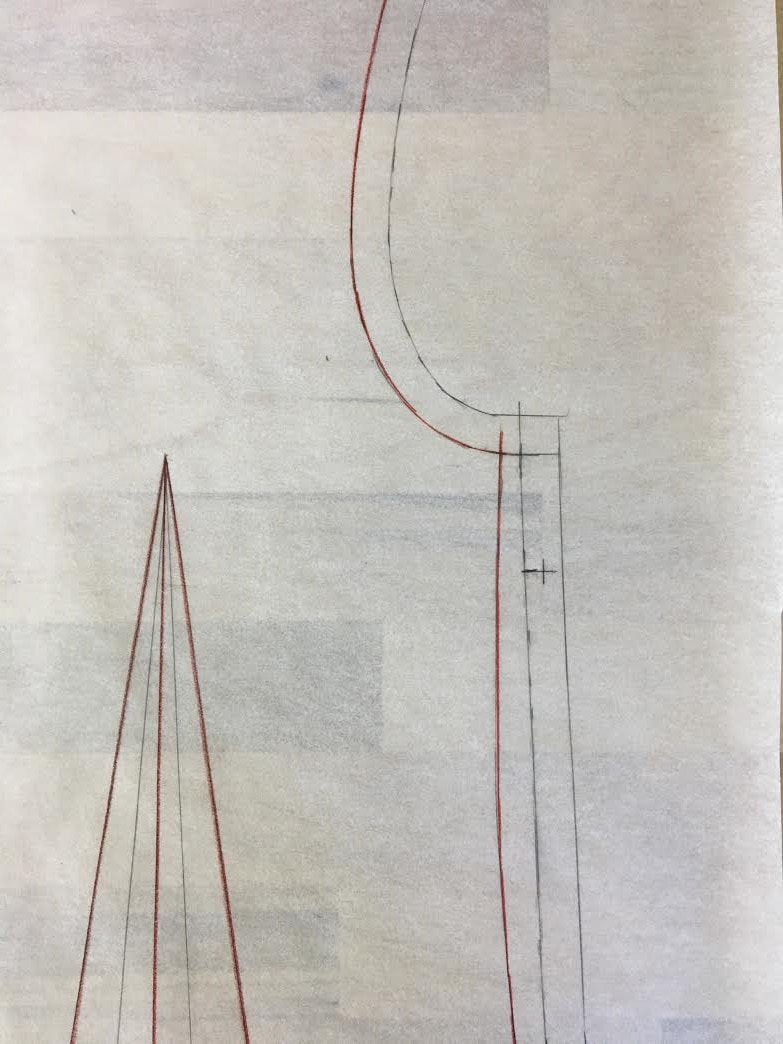
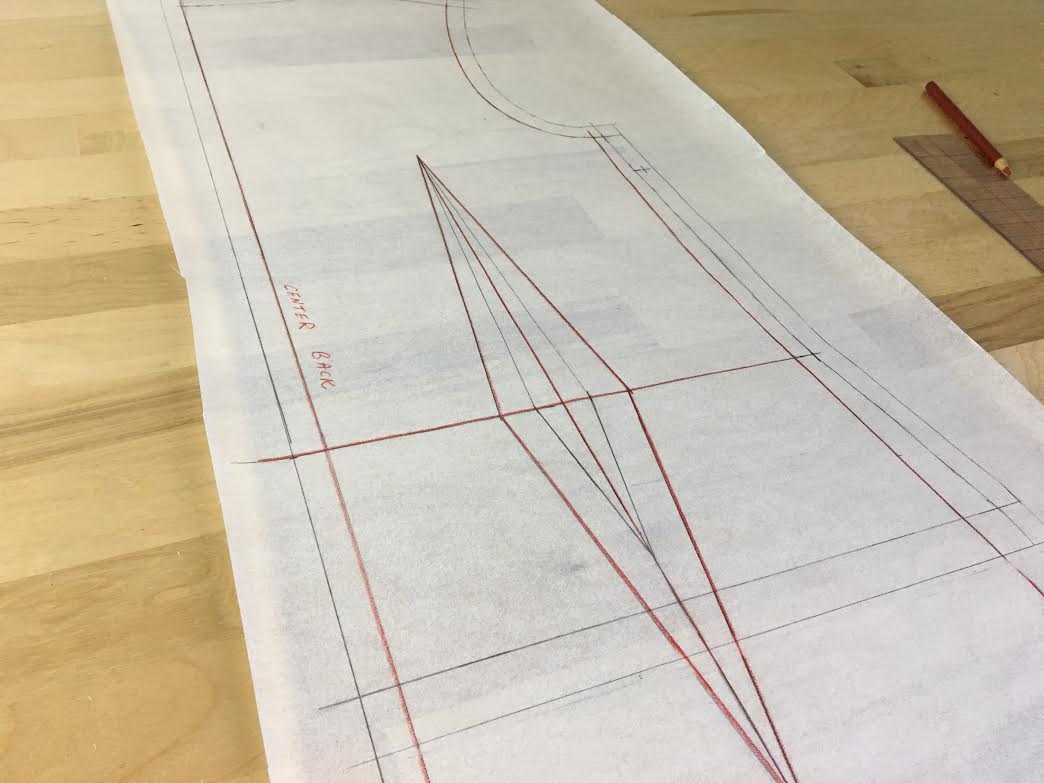
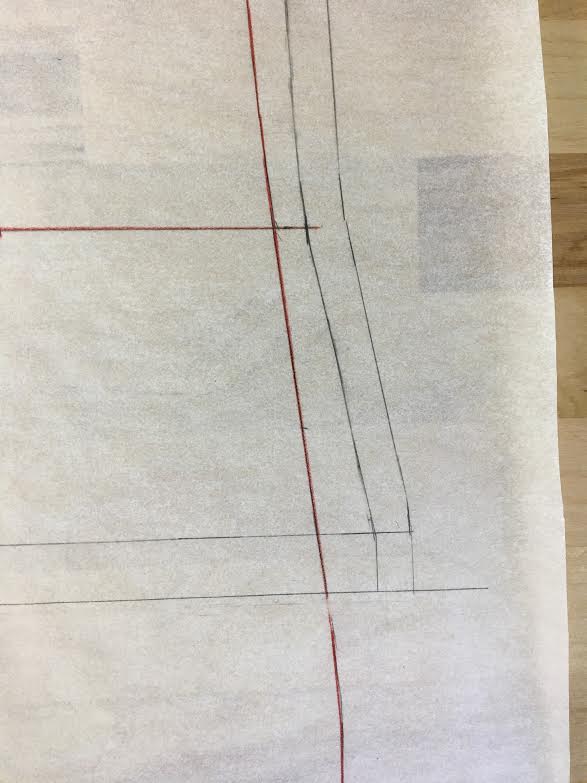
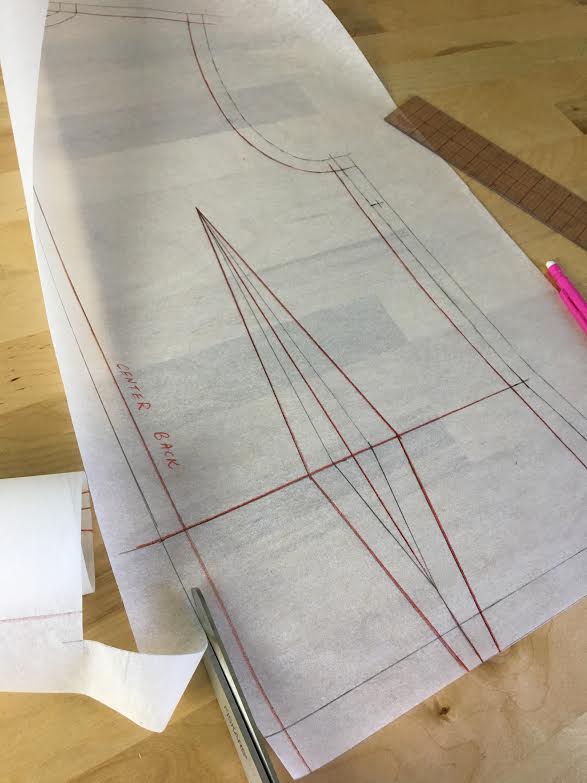
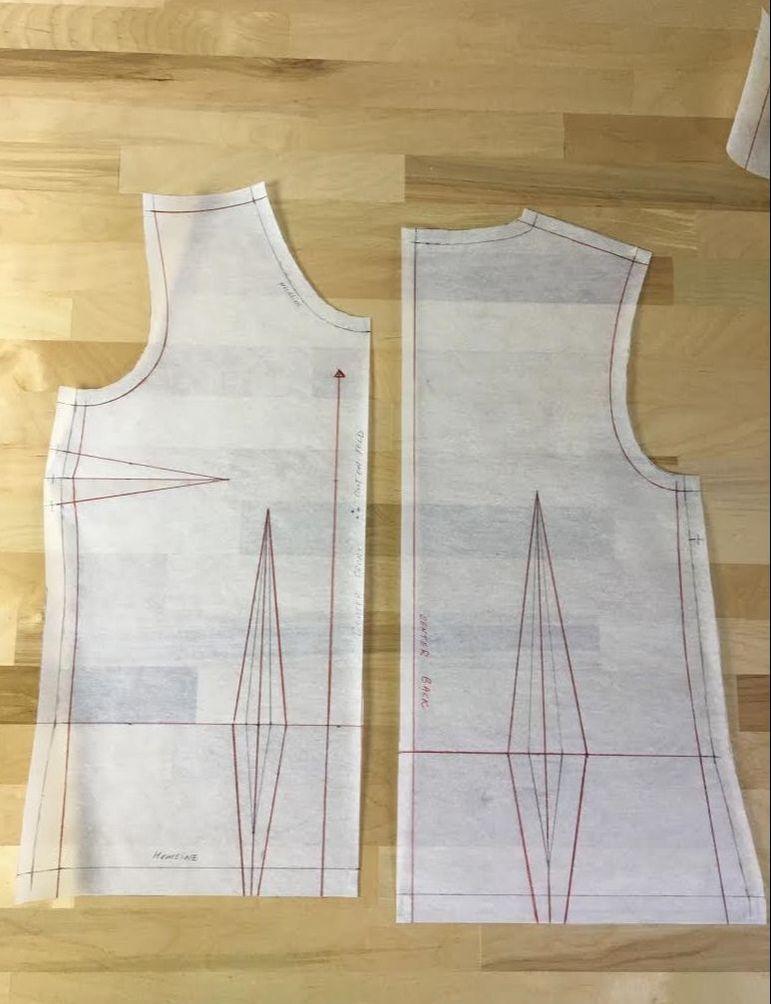
The idea of drafting your own patterns can feel pretty intimidating. After all, it takes some acquired technical skill and understanding. It is true that there is a greater learning curve associated with learning pattern making. However, if you start the right way, learning just a few important principles, you can actually start making your own sewing patterns in no time! The whole idea of patternmaking is based on altering basic patterns. Every dressmaker/patternmaker should have a basic set of patterns they work from. These basic sewing patterns are called slopers or blocks in the fashion industry. If your goal is to make patterns for yourself, then all you really need is a good basic dress pattern with a simple curved neckline. When it comes to a basic dress pattern, keep in mind that it should include all appropriate darts (bust and waist darts) and form a well fitted garment for your body type. I personally like to work from a good dress pattern (form fitted to my body type) because it allows me to see the transition from waist to hip, providing a way to make longer tops and outerwear without having to physically piece together a bodice pattern and skirt pattern. A basic dress pattern keeps things simple and can be separated to create both tops and bottoms. So where should you get your basic dress pattern? Well, you can start with a commercial, form fitted pattern (that is simple) from your local craft/fabric store. Make a sample of this dress from muslin (or other similar test fabric), try the dress on and based on the fit, make any adjustments you feel are necessary to capture your perfect fit. When I do this, I actually use a pen or a sharpie to write/mark on the muslin dress itself. When I take off the dress, I use these lines and notes to make all necessary changes to my paper patterns. It is, of course, always a good idea to cut another sample dress out of the newly adjusted dress patterns and ensure the dress fits exactly as desired. This will take some time investment on your part and yes, it does take a lot of patience! However, having a perfectly fitted basic pattern is the key to generating a multitude of other patterns with very few fit issues. Needles to say, once you have those perfectly fitted dress patterns, you'll avoid lots of headache and frustration when it comes to all your future sewing projects, so it's well worth the initial effort! With your personalized basic dress patterns in hand, you can now do some serious patternmaking! From a technical standpoint, there are a few important rules/standards to consider, some more complicated than others. I won't bore you with the more complex ones, but I will introduce you to a couple of basic concepts you should always keep in mind when drafting your own sewing patterns. You will see them being used throughout this tutorial. Some Basic Pattern-Making Rules:1. The top vanishing points of the darts located on the front bodice all radiate towards the apex points- the two highest points on the bust. This is important if/when you eventually start shifting darts around. 2. Any time you want to alter an edge that houses a dart, you should close the dart first (the same way you would if you were sewing it) before marking the new edge. This concept is also demonstrated in the tutorial below. 3. Don't add seam allowance to the edge that will be cut on fold. Cut on fold patterns are those that are symmetric on both sides of the cut-on-fold line. This line, usually center back or center front, is aligned to a fabric's fold, and the pattern is cut through two layers of fabric simultaneously. 4. The size adjustments made to a front pattern piece should be same as the back piece along all edges that will be stitched together. For example, if you are adding 1/4" at the sides of a front sewing pattern, approximately the same should be added to the back pattern's side seam in order to maintain a well balanced garment. Of course, more complicated designs may not follow this rule. 5. Once pattern changes and adjustments are made, check that all edges that will eventually be sewn together are matching in length. For this step, pretend you are sewing each corresponding edges together by overlapping the pattern pieces. If they are not equal in length due to some adjustment error, simply blend the lines on both patterns until they match up. Remember, all edges that are sewn together should match in length but not necessarily in shape. You'll get a little glimpse of how to do this in the pattern tutorial below. A few words of encouragement: Nobody gets it right the first time! Even professional pattern makers need a few tries to draft that perfect sewing pattern. It is totally OK (if not expected) to go back to your completed patterns and have to alter them again. Invisible scotch tape will be your best friend when patterning, so don't worry if your patterns have already been cut. You can tape on additional paper and extend any necessary line or seams. To make the woven blouse sewing pattern below, you will need the following tools: - Clear plastic ruler (18") marked down to 1/16". This ruler will be your go-to for all pattern-making needs and can be found at all art and craft stores. - Basic french curve. I don't over complicate my life by working with heavily marked and fancy french curves. Instead, I prefer a plain, unmarked french curve like the one on this sewing supply list. - A tracing wheel for transferring perforated pattern lines. -A mechanical pencil. Mechanical pencils create thinner, more precise lines without the need for constantly sharpening them. -The pattern paper of your choice. I have to say that after working with professional pattern paper (marked paper) for years, I recently fell in love with plain tracing paper. As you get into pattern drafting, you'll find that lots of transferring, overlapping lines, and checking pattern pieces against one another is required. The transparency and flexibility of basic tracing paper allows for a much easier way to accomplish all these necessary tasks. If you are looking for similar paper options, check out these pattern paper substitutes. Drafting The Front Blouse Pattern1. As a first step, transfer your basic dress patterns onto a new sheet of tracing paper. Seam allowance will be added after the new pattern is drafted, so don't worry about transferring it at this point. In the image above, I transferred my front dress pattern and traced all the lines in red. As I add the new pattern lines, you'll be able to compare the new blouse pattern to this initial dress pattern. Make sure to transfer the grainline, darts, dart fold lines (straight line in the middle of each dart), notches and all other important marks and notations. 2. Since my basic dress is form fitted and I want to give the blouse a little more movement at the sides, I start by adding about 1/4" excess away from the side seam at the armhole area as shown above. This vertical dash line marked at 1/4" away from the dress side will represent the top of the blouse side seam. 3. Move down to the bottom portion of the pattern and determine how long you'd like the blouse to be. I like to measure from the waistline (horizontal middle line marked on the pattern) down. A sort of informal way I determine how long the blouse should be is by finding a point on my actual waistline and measuring down with a ruler to the location were I envision the finished blouse hemline. I always add an excess of about 1/2" to this measurement just to give it some extra length. Mark this desired length with a horizontal dash on the existing (dress) side seam line as shown above. Measure from the hem of the dress to the dash line you just marked (desired blouse hem) in the step above and note this exact measurement. 4. Move over to the center front line and mark this measurement as another horizontal dash line intersecting this vertical line as shown. Connect the two horizontal dashes in a straight line using your ruler- this will create the final blouse hemline! 5. Mark the new blouse hemline with a straight line (shown above). Extend this hemline out at the side seam. Since my blouse will have a more relaxed fit (not as form fitted as the dress), I can safely ignore the double pointed dart for now. I would still like to keep the double pointed dart in my design since it adds femininity to the overall fit, but it will be shortened and much thinner compared to the original (red). As you'll see, doing so will give the blouse a relaxed fit but still maintain a semi-accentuated waist. 6. Add some extra width at the bottom side seam by marking a vertical dash line right on top of the extended blouse hemline. I added 1" extra but you can really add as little or as much as you wish based on desired fit.. 7. Add a little ease at the waistline as well. I measured a little ever 1/4" away from the side seam and marked it with a vertical dash line directly on the horizontal waistline extension as shown above. 8. Now for the fun part- connecting the dots! Starting at the waistline mark (vertical dash), use dashed lines to connect down to the hemline mark (bottom vertical dash) as shown. This dashed line should be somewhat semi curved and blend in smoothly at the blouse's hem (shown above). In order to connect the top armhole mark (from Step 2) to the waistline and complete the new side seam, you have to first close the dart as if you would if it was sewn. If you don't follow this step, you will not be able to achieve a straight, smooth side seam, not to mention it will be very complicated to pattern around the dart edge. 9. Fold the bust dart in such that the excess points to the bottom of the pattern as shown. This may feel a bit awkward since the pattern will no longer lay flat on the table. To make sure the folded dart and side seam lay flat, place the pattern at the corner of the table such that the vanishing point of the folded dart is matched to the table's corner as shown. In doing so you'll be able to see the side seam come together into a continuous line. 10. Starting at the top extension (initially added in Step 2), mark a dash line in the direction of the waistline, using the existing side seam as a guide. Make sure to keep the dart fully closed during this entire process. 11. Before unfolding the dart, use a tracing wheel to transfer the new seam line to the inside of the folded dart as shown. When you unfold the dart, you should clearly see the tracing wheel perforations along the dart's edge. 12. Connect the perforation dots into straight lines using your ruler and mechanical pencil. Continue sketching the blouse side seam, blending it in at the waist as shown above. I went for a more form fitted, contoured line but if you want a more relaxed fit, you can draw a straighter line. 13. Using your ruler again, connect the dashed lines into a continuous, solid line. This line will become your new side seam! 14. Next, lets work on the double pointed waist dart. To achieve a more contoured, feminine silhouette, I am keeping these darts in my blouse design. I will however make them thinner for a less fitted look. Keep in mind that the bust darts (horizontal side darts) should not be altered. Due to their location and horizontal placement, their excess is normally never altered (unless shifted to vertical position). This is a pattern making concept that is a bit more complex, so for now, just leave the bust darts intact and include them in the blouse. Starting at the waistline (middle of the drat), mark the new width of the dart. For this particular blouse, I want the new waist darts to be about 3/4" wide. Mark this new measurement equally on both sides of the fold line (straight middle line). If this sounds a bit confusing, follow the image above as a guide. 15. Since I'm making the drat narrower, I am also going to shorten it at the bottom. Measure about 1" to 1.5" up from the blouse hemline (horizontal line you drew in the step above) and mark on top of the middle fold line with a small dash line as shown. The top of the dart will not be altered. This is sort of another pattern-making rule. On a front pattern, the top of the double pointed waist darts blend into the apex (highest points on the bust) and are essential to the fit of a garment. If the top vanishing point is lowered, the garment will become bulkier at the top and potentially create some fit issues. If this top vanishing point is ever lowered, it should be done carefully, on a case-by-case basis where it wouldn't affect fit (when drafting a jacket pattern or adding more excess at the bust area, for example). 16. To complete the new double pointed dart, connect the dots. Draw straight lines from the newly marked bottom vanishing point to the narrower sides as shown above. Follow the same step (described above) to draw the top of the new double pointed dart. Draw straight lines form the new sides of the dart to the top vanishing point a shown above. The new double pointed dart is complete! In the image above, take a look at the size difference by comparing this new dart to the original dart outlined in red. The new dart is shorter at the bottom but also much narrower in width. As you'll see in the completed sewalong later, this thin dart will add a bit of contour to the waistline without being too form fitting. Drafting The Neckline Portion Of The Front Pattern:Before altering the dress neckline, decide on the desired shape and depth of the new neckline design. How much do you want to lower it, what will its shape be (curved, v-neck, etc.) and where will the neckline start at the shoulder seam in relation to the actual neck. The sewing techniques eventually used to clean finish it should also be taken in consideration. Will you use facing, lining, binding or another method? For this particular blouse design, I will keep the neckline curved but lower it about 2.5 inches from the top. The shoulder seam will start at about 1.5" away from the neck. Normally, if you lower the neckline, you want to also shorten the shoulder seam starting from the neck area in. Doing so allows for a more natural curve and well balanced neckline. 1. To start with, measure down the center front line from the existing neckline down 2.5" (or the length you want to lower the neckline by). Draw a short line perpendicular to the center front line as shown above. 2. Next, starting at the neckline and moving in, measure 1.5 " (or however much you are shorting the shoulder seam by) directly on the shoulder seam line as shown. Mark with a vertical dash. 3. Starting at the shoulder seam dash, and working down to the horizontal bottom neckline mark (perpendicular to center front line), free hand the curve of the neckline using a dotted or dashed lined. The point here is to blend in the two marks into the smoothest curve possible. When arriving at the lowest point of the neckline (at center front), make sure the curve blends into a straight horizontal line as shown above. This will ensure that when cut, the new neckline maintains a smooth, continuous curve at the center. 4. Use your french curve to blend in the dashed lines into a smooth line. Keep in mind that you will have to shift the french curve around a bit to appropriately match it to the dashed marks. You will most likely not achieve a smooth, continuous line with a single placement (it just doesn't always work that way). The neckline is now complete! That wasn't too bad, right? If you are unsure of whether this neckline will fit how you envision it, don't worry. You can always trim the fabric to lower it as long as you're being careful to maintain its symmetry. The Front blouse pattern is now complete! Notice the difference between the pencil lines (blouse pattern) and the red lines (original dress pattern). Let's recap: 1. We lowered the neckline and shortened the shoulder seam from the neck area in. 2. We added ease (or excess) at the side seams to give the blouse more movement. The excess amount increases as we move towards the hemline (hip area). 3. The bust dart (horizontal drat) has not been altered and will be included as an essential fit element in the blouse design. 4. The vertical double pointed waist dart has been shortened at the bottom (about 1.5" above blouse hemline) and narrowed in width. Note the difference between the dart pencil lines and original dress dart (red traced lines). All that's left to do now is add seam allowance! This front blouse pattern will be cut on fold which means the vertical center front line will not have any seam allowance added to it. Adding Seam Allowance To The Front Blouse Pattern:Deciding what seam allowance to add along each edge depends on what sort of seam and edge finishes will be applied to your garment. This particular blouse will be clean finished with a lining in its entirety so I'll work with 1/2" seam allowance along all edges except the hemline, which will have a longer hem allowance of 3/4". To add seam allowance, your clear plastic marked ruler will be a life saver! Starting at the hemline, I added 3/4" hem allowance as shown above. Next, add seam allowance along the new side seam edge. Place the ruler at 1/2" away from the seamline and mark the seam allowance evenly throughout as shown above. Add seam allowance along the curved edges of the neckline and armhole. The best way to do this is to measure the seam allowance length by shifting the ruler in the direction of the curve. Mark a dashed curved line evenly throughout at 1/2" (or whatever your armhole seam allowance is) away from the edge. Next, use your french curve to connect the dashed lines into a smooth continuous curve. This curved line should be exactly 1/2" away from the armhole edge throughout. Repeat the process with the neckline curve, using a dashed line to mark the seam allowance evenly along the neckline edge. Just as you did with the armhole, use your french curve to blend the dash lines into a smooth, continuous curve. The front blouse pattern is now ready to be cut! Don't forget to add notches to the side seam dart legs and dart fold line as shown above. To do this, simply extend the dart lines into the seam allowance and add vertical dashes to form "T" shaped notches. Keep in mind that because the front blouse pattern will be cut on fold, no seam allowance is added to the center front edge. Next, lets draft the matching back pattern for the blouse. You'll be using your front pattern as a guide, so the back pattern piece should be a bit easier to draft. Drafting The Back Blouse Pattern:If you look at the the basic back dress pattern above, you'll notice right away that it is missing bust darts (horizontal side seam darts) and the waist double pointed dart is much larger and deeper. This is due to the fact that our waist is a lot more defined at the back than it is at the front. You'll also notice that the armhole curve is much deeper and longer on the back pattern than the front. In addition, the center back vertical edge is longer, given that the back neckline is always positioned higher in relation to the front neckline. These are all things you will learn with time and practice, but it's a good idea to keep these basic characteristics in mind from the get go. To draft a matching back pattern for my blouse, I'll be repeating some of the same steps but adjust them in terms of the back shape and proportions accordingly. 1. Let's start with the side seam. The good news is, on a back pattern, you don't have to worry about working around a bust dart- the side seam is one continuous line. Add the same amount of excess at the armhole as you did for the front pattern. In this case, 1/4" away from the existing dress side seam. 2. Measure the same exact distance from the existing dress hemline up, just as you did for the front pattern in the steps above. Ignore the double pointed waist dart for now. Mark the new blouse hemline with horizontal dash lines as shown above. Connect the interrupted lines into a continuous straight line to mark the blouse hemline. Extend this horizontal line out at the side seam as shown above. 3. Just as you did on the front blouse pattern, add excess of about 3/4" at the side hemline, marking it with a vertical line as shown in the image above. 4. Just as I did for the front blouse pattern, I am going to leave the double pointed waist dart in but make it a bit narrower and shorter at the bottom. As mentioned, this dart is much larger and thicker at the back so the new width will not necessarily match that of the front waist dart. I estimated about 1/2" on each side of the middle fold line, and marked this distance with a vertical dashed line on each side of the fold line as shown above. I'm leaving the top vanishing point as is but will shorten the bottom of the drat. Following the same logic used on the front pattern, measure about 1.5" up from the blouse hemline and mark with a dot/dash line directly on the dart fold line (middle dart line) as shown above. Next connect, the dots into the new blouse dart. Connect the top existing vanishing point to each of the marks made at the middle of the dart. Then, connect the new dart sides to the new shortened vanishing point at the bottom. Use the images above as a guide. The blouse dart is now complete. Although nowhere near as thick as the original dart (red lines), this narrower dart will add just enough contour to the back waist, providing some subtle femininity. 5. Next, add the same amount of excess at the waistline as you did for the front pattern. Measure and mark this excess with a vertical dash line as shown above. For instance, the front pattern had about 1/4" excess at the waistline. Following good pattern-making standards, I've added about the same on the back pattern. It is OK if you want to add a bit more ease on the back pattern. However, make sure you stay within range or you risk the front and back side seams not matching in the sewing process, and the final garment fitting out of proportion. 6. Just as you did on the front blouse pattern, sketch out the new blouse side seam using dashed lines. Blend the line gently from the top armhole mark to the waistline mark and then again down to the bottom vertical mark as shown above. 7. Using your ruler, blend in the dashed line into a continuous solid line. The back blouse side seam is now complete! You still have to check that its length matches that of the front side seam but that comes a bit later. For now, let's focus on the neckline below. To draft the back neckline, you (again) have to use the front blouse neckline as a guide. Most importantly, keep in mind that the front and back shoulder seams will be sewn together so they have to match in length. Remember that we shortened the front shoulder seam but 1.5" starting at the neck area in. The same will have to be done on the back shoulder seam. 8. On the back pattern, measure 1.5" (or however much you shortened your shoulder seam by) from the back neckline in, and mark with a small vertical dash directly on top of the shoulder seam line as shown above. Unless you are after a low back design, the back neckline is often never lowered, or lowered by only about 1/2" depending on your original sewing pattern. I know that my basic dress pattern (red lines) has a higher-than-usual neckline all around. For that reason, I am lowering the back neckline at about 1/2" down. To do this, measure from the existing neckline edge at 1/2" down the center back line and mark this location with a horizontal line (perpendicular to center back). 9. As you did on the front neckline, sketch the desired neckline curve using dashed lines. The neckline should start out straight, perpendicular to the center back, and curve out more as it reaches the shoulder seam. 10. Use your french curve to connect the dash lines into a smooth, continuous curve as shown above. The back neckline is now complete! If you overlap the shoulder seam on your back pattern to that on the front pattern, their length should match perfectly. Before adding the seam allowance, it is important to check that both front and back seams are matching in length. This is necessary due to the fact that the side seams were sketched individually but will eventually be sewn together. Thus, they must match up in length. This is the part where working with tracing paper really pays off! 11. Place the front blouse pattern on top of the back pattern such that the side seams are overlapping as shown above. Basically, try to recreate how the side seams will be matched for sewing if the patterns were the actual fabric pieces. Starting at the hemline and moving up, overlap the front and back side seams and make sure the distance from the hemline to the waistline is exactly the same. Keeping the patterns perfectly aligned at the waistline point, shift the front pattern (top) such that its side seam line overlaps the bottom seam line (back pattern underneath) as shown above. Only overlap and match the front and back seam lines from waistline to the very bottom dart leg as shown above. Pay attention to matching the length and not the shape. The front and back lines are naturally shaped slightly different. Transfer the location of where this bottom dart leg hits on the bottom pattern (back pattern). This will mark a notch which will help you match up the front and back side seams in the sewing process later. Next, shift the top pattern (front) down such that the top dart leg is now matched up with the newly marked notch on the bottom back pattern. Keeping the notch and dart leg aligned, overlap the rest of the front and back seam lines and make sure they correspond in length. If there is a slight difference in length, blend both front and back seam lines such that their length matches up. 12. Now that the back pattern is tested against the front and no adjustments are necessary, I'm ready to add seam allowance to the back pattern piece. Again, think about what sort of finishes and closure the garment will need. For example, this particular blouse will have an invisible zipper down center back. For that reason, I'll be adding 1/2" seam allowance to the center back edge shown above. With that in mind, I will be cutting 2 separate pieces for the back blouse which will be connected with an invisible zipper down center back. These two pieces should be mirror images of each other. If you think back to the front pattern, keep in mind that no seam allowance was added to the center front edge since the front pattern piece will actually be cut on fold. On the back side seam, draw the "T" notch marked in the pattern matching/testing process above. Add the same seam allowance to the back pattern as you did for the corresponding front pattern. In this tutorial, the hem allowance is 3/4" while the rest of the edges have a seam allowance of 1/2". Note: When extending the side seam lines into the hem allowance, always straighten them as shown above. Due to the fact that this hem allowance will be folded up when eventually finished, the straightened sides will eliminate unnecessary excess in the hem allowance. Now that your blouse patterns are fully drafted, cut them along the seam allowance edges (outer edge) as shown. Stay tuned for the blouse cutting and sewing tutorials coming soon!
3 Comments
Jenan B
4/9/2023 12:46:36 am
Nice job, thank you, this is helpful pattern making!
Reply
Eloise
10/2/2023 04:46:57 am
Your attention to detail for each process is so awesome, I'm excited to embark on my own sleeveless blouse <a href="http://www.epsilonpatternsandgrading.com/">sewing patterns</a> . What's more is your willingness to demostrate the pattern drafting process, providing clear instructions and insights of how to draft a pattern that will suit our own style. With your blog it's not only the detailed pattern instructions, or the intricacies of creating sleeveless blouse that I learned, but also the felt a sense of kinship making it more enjoyable and interesting to read.
Reply
Leave a Reply. |
The Blog:A journey into our design process, sewing tutorials, fashion tips, and all the inspiring people and things we love. Doina AlexeiDesigner by trade and dressmaker at heart. I spend most of my days obsessing over new fabrics and daydreaming new ideas. Sadie
Executive Assistant & Client Relations Manager Archives
November 2019
Categories
All
|
-
Sewing Tutorials
-
Basics
>
- Aligning Pattern Grainlines To Fabric
- Preparing Fabrics For Sewing
- Pinning Sewing Patterns To Fabric
- Placing Sewing Patterns On Fabric For Cutting
- Rotary Cutters or Fabric Scissors?
- Cutting The Sewing Patterns
- What Are Notches And How To Use Them In The Sewing Process
- Transferring Notches From Pattern To Fabric
- Transferring Seamlines to Fabric
- Staystitching
- Backstitching: A Complete Guide
- Hand Basting: A Complete Guide
- Sewing Continuous Bias Binding
- Darts >
-
Sewing Seams
>
- The Basics Of Seams And Seam Allowance
- How To Sew A Straight Seam
- Sewing Curved Seams
- Sewing Corner Seams
- Trimming And Grading Seam Excess
- Notching/Clipping Seam Allowance for Tension Release
- Sewing Topstitched Seams
- Sewing Corded Seams
- Sewing A Slot Seam
- Sewing A Gathered Seam
- Sewing Bias Seams
- Sewing Seams With Ease
- Sewing Seams With Crossing Seamlines
- Sewing Unlike Fabric Seams
- How To Iron Seams: Ironing Tools And Conventions
- Sewing With Knit Fabrics
- Understanding Stitch Length And Tension
- Sewing Unique Fabric Seams
-
Seam Finishes
>
- Seam Finishing Techniques - Overview
- Applying A Pinked Seam Finish
- Applying A Bias Bound Seam Finish
- Serging And Zigzag Seam Finishes
- Sewing A Self-Bound Seam Finish
- Sewing A French Seam Finish
- Sewing A Hong Kong Seam Finish
- Sewing A Mock French Seam Finish
- Sewing A Turned-and-Stitched Seam Finish
- Sewing Overcast Hand-Applied Seam Finishes
- Sewing A Flat Felled Seam
- Sewing A Hairline Seam Finish
-
Hem Finishes
>
- Garment Hem Finishes: Overview
- Sewing A Double Fold Hem Finish
- Sewing A Single Fold Hem Finish
- Sewing Bound Hem Finishes
- Sewing An Exposed Double Layer Bound Hem
- Sewing A Folded-Up Bound Hem with Pre-folded Binding
- Sewing A Hong Kong Hem Finish
- Sewing A Band Hem Finish
- Sewing A Bias Faced Hem Finish
- Sewing A Twill Tape Hem Finish
- Sewing A Rolled Hem Finish
- Sewing A Shaped Hem Facing
- Using Fusible Hem Tape And Webbing
- Finishing A Lace Fabric Hem
- Finishing A Leather Hem
- Sewing Faced Hem Corners
- How To Finish Lining At The Hem
- Finishing Fabric Corners by Mitering >
- Interfacing A Hemline: Lined And Unlined Examples
-
Sewing Pockets
>
- Curved Patch Pocket With Flap
- Unlined Square Patch Pockets
- Lined Patch Pockets: Two Ways
- Extension On-Seam Pockets
- Separate On-Seam Pocket
- Front Hip Pockets
- Bound Double Welt Pocket
- Double Welt Pocket With Flap
- Self-Welt Pocket (Using Single Fabric Layer)
- Slanted Welt Pocket (Hand-Stitched)
- Faced Slash Pockets: Overview >
-
Sewing Zippers
>
- Sewing Zippers: General Information
- Sewing A Centered Zipper
- Sewing A Lapped Zipper
- Sewing An Invisible Zipper
- Sewing A Fly Front Zipper
- Sewing A Closed-End Exposed Zipper (No Seam)
- Sewing An Exposed Separating Zipper
- Sewing Hand Stitched Zipper Applications
- Sewing A Zipper Underlay
- Sewing A Placket-Enclosed Separating Zipper
- Sleeveless Finishes >
-
Neckline Finishes
>
- Sewing A Neck Shaped Facing
- Sewing An All-In-One Neck Facing
- Neck And Garment Opening Combination Facings >
- Sewing A Bias Faced Neckline Finish
- Sewing A Band Neckline Finish
- Bound Neckline Finishes: Overview >
- Sewing A Semi-Stretch Strip Band Neckline
- Ribbed Neck Band And Classic Turtleneck
- Decorative Neckline Finishes >
- Finishing Facing Edges >
-
Extras
>
- A Complete Guide on Interfacing
- Sewing Bound Spaghetti Straps
- Sewing Spaghetti Straps To A Faced Neckline
- Sewing Ruffles: Overview
- Patterning And Sewing A Circle Ruffle
- Sewing A Gathered Heading Ruffle
- Sewing Double Layer Gathered Ruffles
- Sewing A Gathered Ruffle Into A Seam
- Sewing A Gathered Ruffle To A Fabric Edge
- Sewing A Fabric Surface Slit
- Sewing A Slit Seam
- Hand-Applied Straight Stitches
- Hand-Applied Blind Stitches
- Hand-Applied Overedge Stitches
- Hand-Applied Tack Stitches
- Hand-Applied Decorative Stitches
-
Basics
>
- Custom Bridal
- Custom Apparel
- About
- Blog
Services |
Company |
|



 RSS Feed

