|
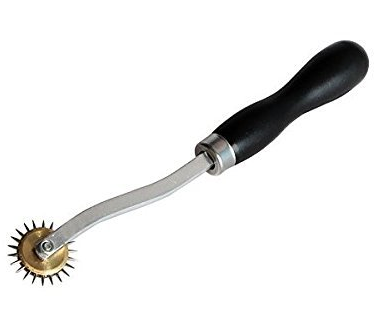
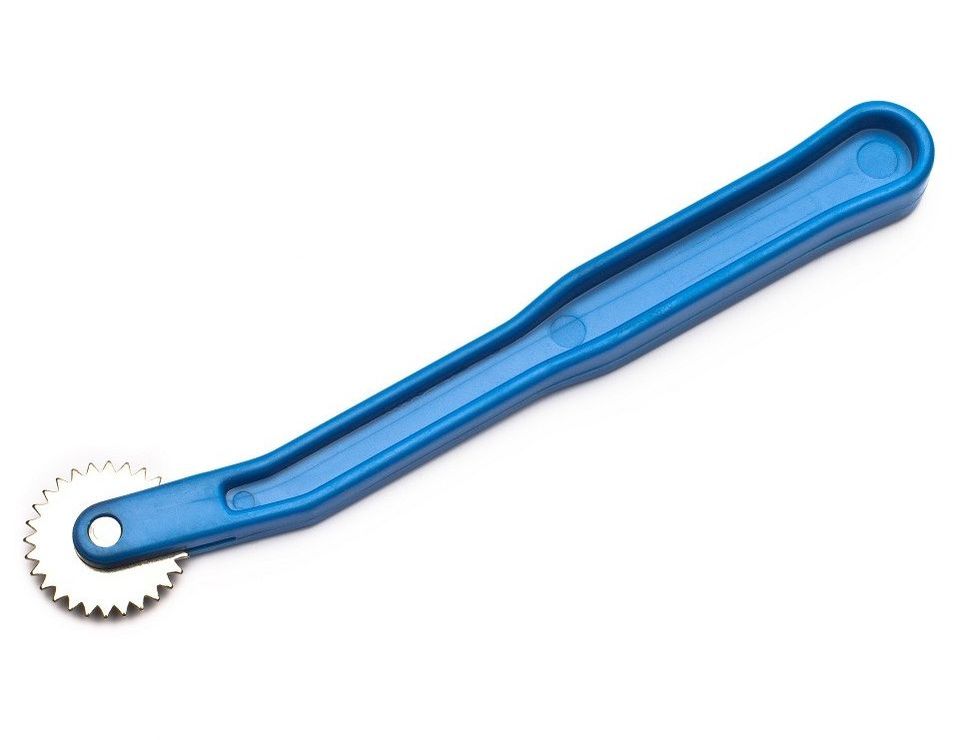
It may look a little intimidating, or even like a weapon, but fear not! The tracing wheel is a basic sewing tool that will become one of the most useful items in your sewing basket when it comes to pattern making. A tracing wheel is a pattern making tool with little spikes or teeth, that allows you to transfer information from one surface to the next by tracing and making perforations (I’ll explain more below!). The tracing wheel is a must have tool if you are learning how to pattern and make your own clothes. Types of Tracing Wheels: There are basically 2 types of tracing wheels out there: A needle point tracing wheel and a smooth serrated tracing wheel.
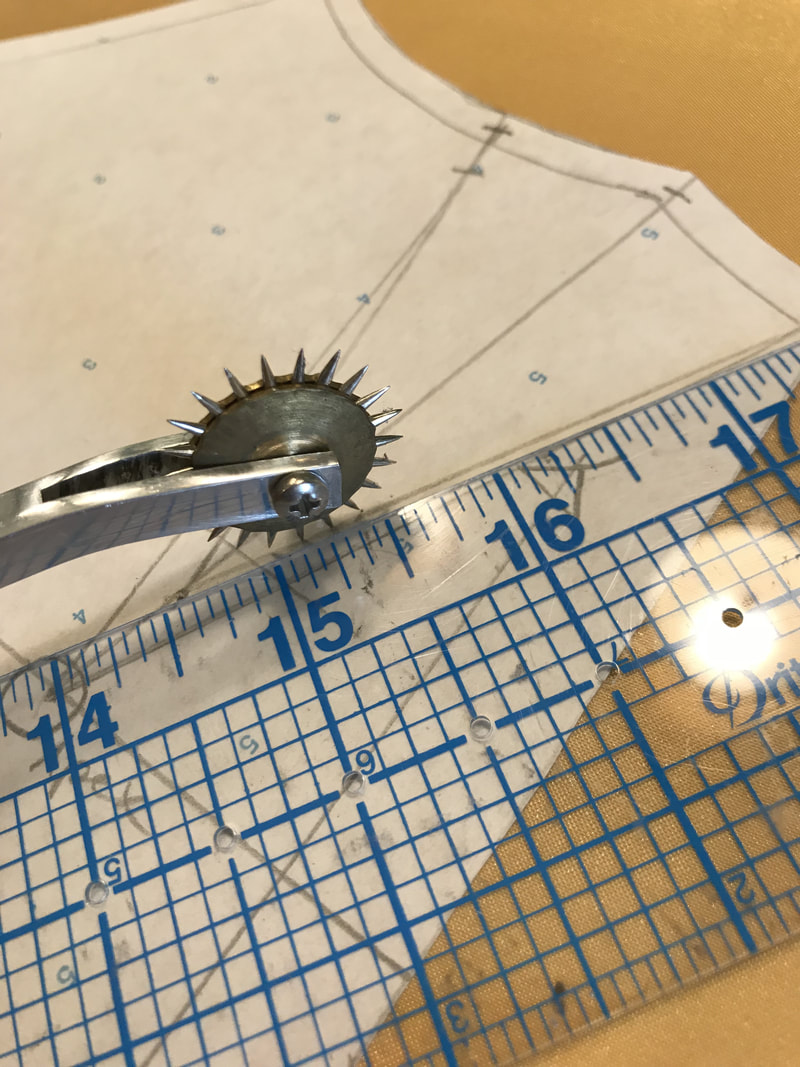
Personally, I prefer the needle point style because the markings are more dense and go through layers of fabric and paper with ease. It has a sturdy, wooden handle (conventionally) while the spikes on the wheels make deep indentations which really help when transferring information. The needle point version is built for durability. For me, it’s certainly well worth the investment, being only a few more dollars than the next option. More commonly found at fabric shops is the soft serrated tracing wheel. This usually has a plastic handle and is available in two blade options: smooth or soft serrated. If you aren’t ready to commit to the needle point tracing wheel, the soft serrated version is still a great option to get your feet wet. How And When To Use a Tracing Wheel: The most common ways to use a tracing wheel are:
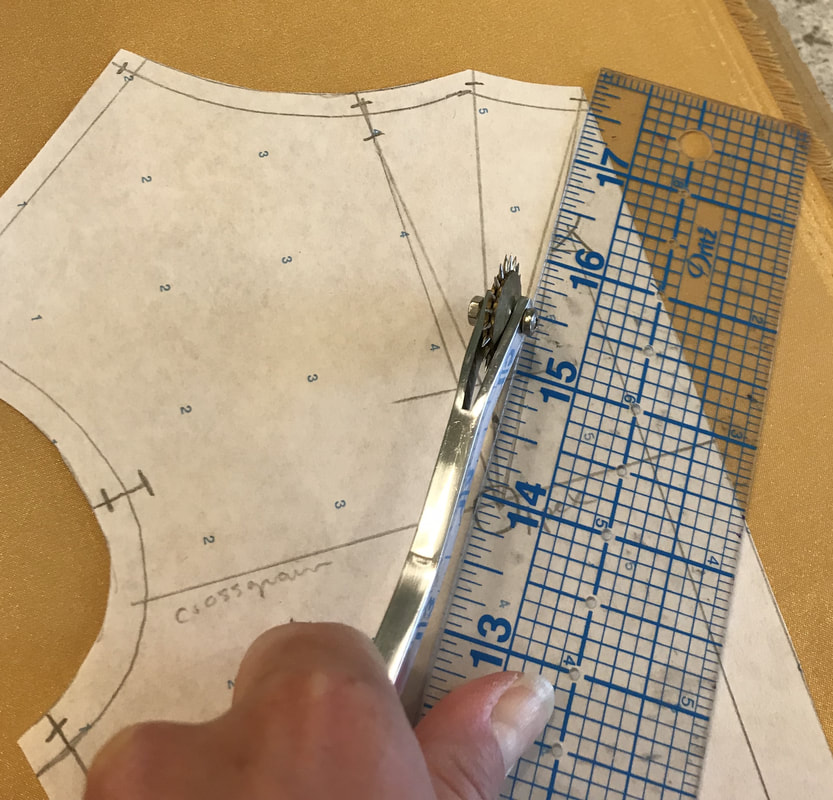
When I say “information” this includes: transferring darts, buttonholes, notches, alterations, pockets, etc… just to name a few. Using a Tracing Wheel To Transfer Markings From a Working Pattern To a Final Pattern: 1. Put a cutting mat down on your table. The cushion of the cutting mat really helps to get clean perforations as well as protects your work surface. 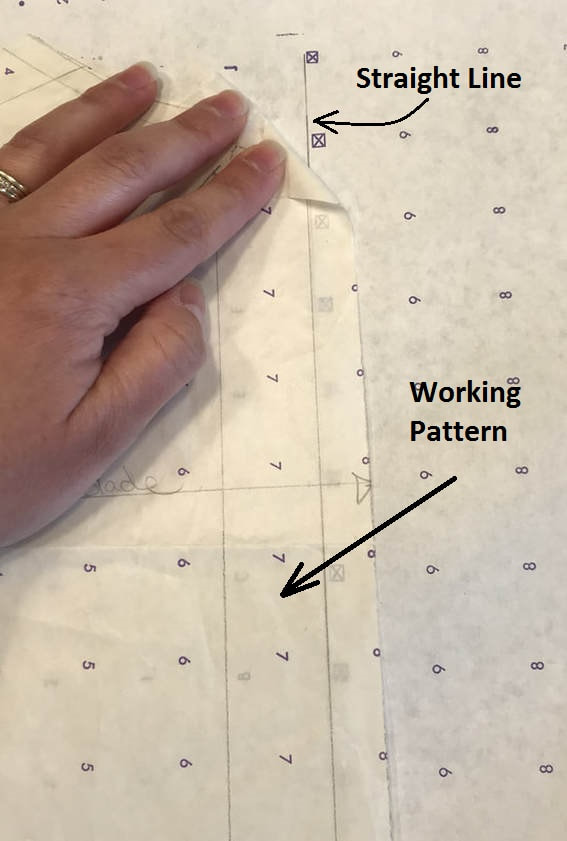 2. Place your blank pattern paper down and draw a vertical line. Next, place your work pattern (the pattern to be transferred) on top of the blank pattern paper. Use the initially drawn line to align your working pattern onto the blank pattern paper as shown above. Once you're lined up, secure your working pattern down with tape. If you do not have dotted/marked pattern paper, check out these equally-efficient substitutes: 3 Easy To Find Substitutes For Pattern Paper That Won't Break The Bank. 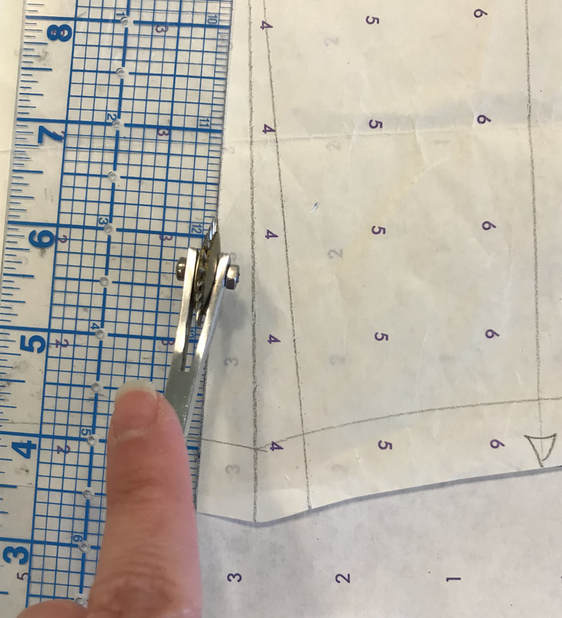 3. Now you’re ready to start tracing! In the beginning, you may feel more comfortable using your ruler as a guide. Line up your ruler (or French curve in the case of transferring curved lines) on the lines you want to transfer, and turn the wheel while pressing directly on top of the lines to start tracing. Trace all seam lines, darts, notches, etc. I like to draw my seam allowances on after, but everything else gets traced. Pro Tip: Give the tracing wheel a little strength when you trace. The more force you use, the darker and more pronounced the perforations will be on the underlayer of paper. 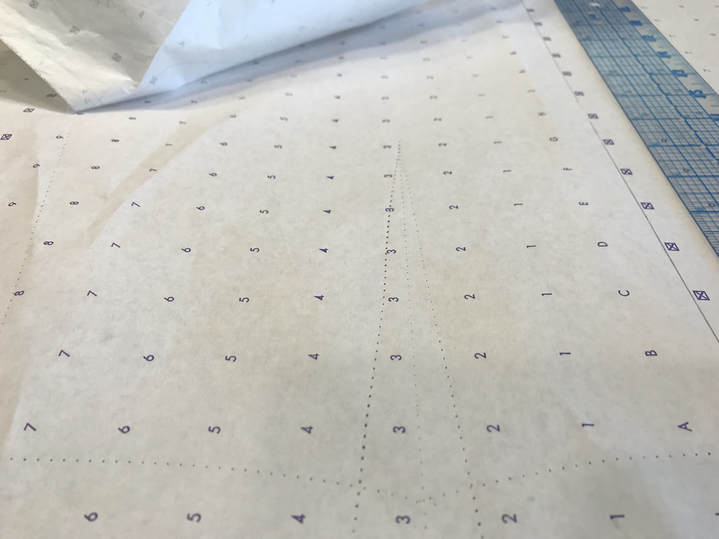 4. When you're done tracing all your information, lift your working pattern off the bottom layer of pattern paper. You should see your perforations clearly marked. If you don’t see the tracing wheel perforations as clearly as you want, re-align your sewing pattern and try again. 5. Now that you have clearly marked perforations, it's time to connect the dots! Using your pencil, ruler and French curve, redraw all of your pattern lines by marking over all of the perforations. It should look like this: 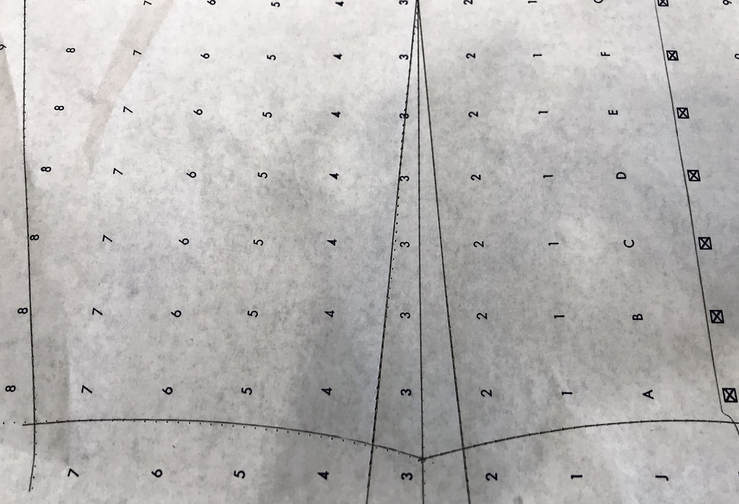 6. Once you’re done connecting the dots, add on your seam allowances and you’re done! By the way, the easiest way to add seam allowance is to use an 18" clear plastic ruler marked down to the 1/16th of an inch. This is a great patterning tool to have if you plan on getting into pattern-making later down the road.  Photo courtesy of Westcott Transferring Markings From Final Pattern To Fabric Using a Tracing Wheel: Whether you’ve created your own final pattern (from above) or you bought a commercial sewing pattern at your local fabric store, once you cut out the basic shape on your fabric, you may need to transfer some internal lines (ie. darts, notches, buttonholes, etc.). You can use a tracing wheel to easily transfer these important marks. These are the simple steps on how to transfer information from a sewing pattern to fabric using a needle pointed tracing wheel: 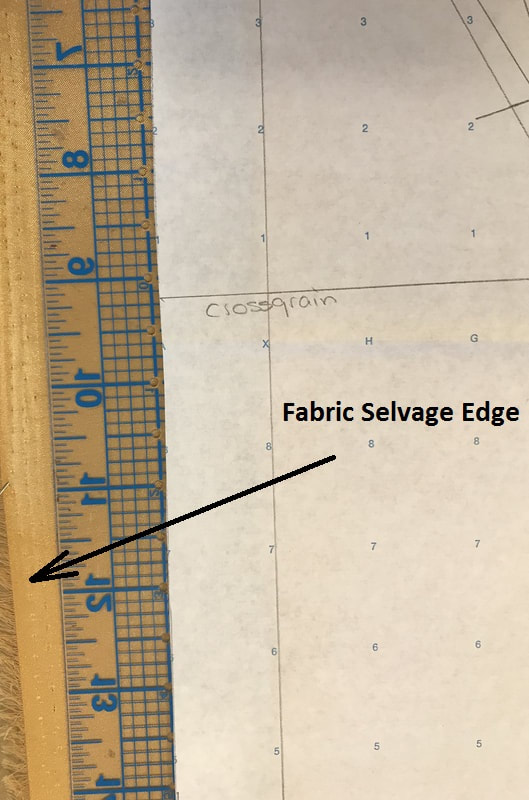 1. Again, lay your cutting mat down to cushion and protect your work area. Next, lay your fabric out flat on the cutting mat. Once laid out, find the grainline on your fabric. You can do this by using the fabric's selvage edge as a guide (shown in the image above). Use your ruler as a guide and place your pattern piece onto the fabric, lining the pattern grainline up with the ruler line as shown above. You can learn more about grainline and how to properly align and cut a sewing pattern in this tutorial: 4 Ways To Lay Out A Sewing Pattern For Cutting: Understanding Fabric Grain And The Selvage Edge. Once you're lined up, secure everything in place with weights or pins.
2. If you are a sewing beginner, feel free to use your ruler as a guide. Line up your ruler (or French curve) with the lines you want to transfer onto fabric and begin tracing. Since you’ll be cutting your pattern piece out, you will only need to trace the internal lines (ie. darts, notches buttonholes, etc..) Pro Tip: Give the tracing wheel a little strength when you trace. The more force you use, the darker and more severe the perforations will be on the underlayer of paper. While this tracing wheel technique works on most smooth surface fabrics, some bulky/textured fabrics will not take on the perforations made by the tracing wheel teeth, even when used with fabric tracing paper. In special cases as such, you may need to use the tailors tack method or the tailors chalk-and-pin technique to transfer your internal lines. 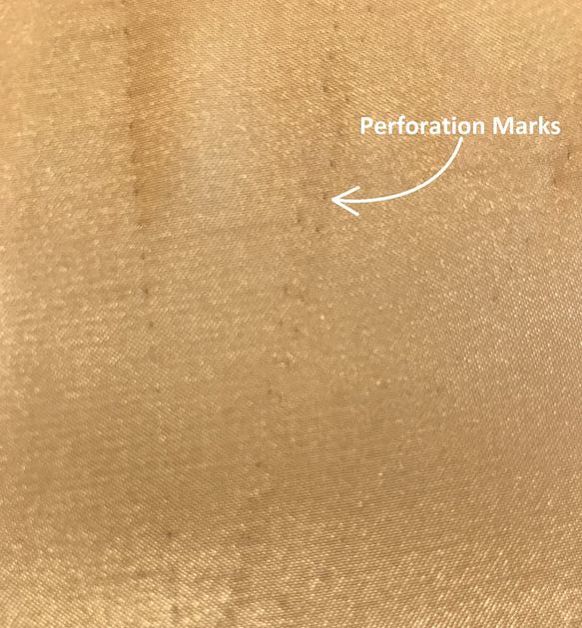 3. When you're done tracing all internal information, lift the pattern off your fabric. You should see perforations clearly marked on your fabric. If you don’t see perforations as clearly as you want, line your pattern back up and try again. 4. Now that you have the marked perforations, you can finally connect the dots! Get your pencil, ruler and French curve out and redraw all of your lines on the fabric layer. In this example, I traced a dart from my sewing pattern to the fabric and used a water-soluble pencil to draw the dart lines directly on the fabric. 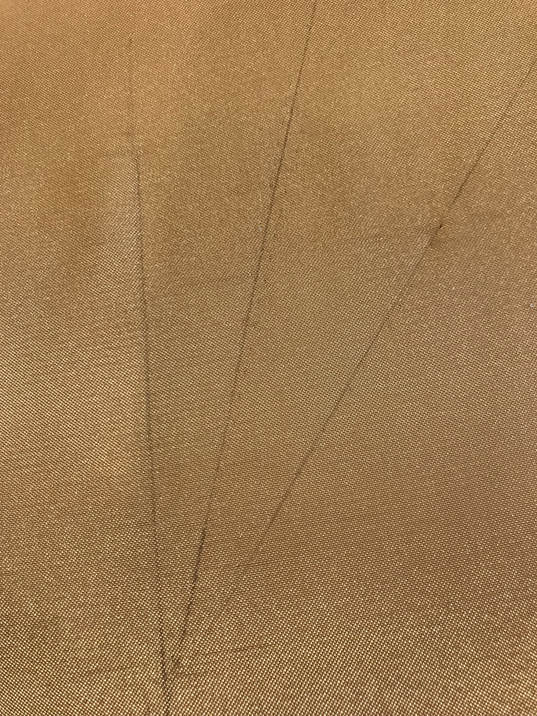 Very important: Use a washable marker or a pencil (available at your local fabric store) to draw all the lines on fabric. Do not use pen or a permanent marker as they will bleed through fabric. These internal line markings are not supposed to be dark or permanent. They are to help you in the sewing process but once the finished garment is washed, they should disappear. Transferring from fabric to a final pattern. If you’re looking to transfer fabric markings to a final pattern, follow the steps above under Transfer Markings From a Working Pattern To a Final Pattern. In this case, substitute the fabric where the directions say “working pattern”.
0 Comments
Leave a Reply. |
The Blog:A journey into our design process, sewing tutorials, fashion tips, and all the inspiring people and things we love. 
Doina AlexeiDesigner by trade and dressmaker at heart. I spend most of my days obsessing over new fabrics and daydreaming new ideas. 
Sadie
Executive Assistant & Client Relations Manager Archives
November 2019
Categories
All

|

-
Sewing Tutorials
-
Basics
>
- Aligning Pattern Grainlines To Fabric
- Preparing Fabrics For Sewing
- Pinning Sewing Patterns To Fabric
- Placing Sewing Patterns On Fabric For Cutting
- Rotary Cutters or Fabric Scissors?
- Cutting The Sewing Patterns
- What Are Notches And How To Use Them In The Sewing Process
- Transferring Notches From Pattern To Fabric
- Transferring Seamlines to Fabric
- Staystitching
- Backstitching: A Complete Guide
- Hand Basting: A Complete Guide
- Sewing Continuous Bias Binding
- Darts >
-
Sewing Seams
>
- The Basics Of Seams And Seam Allowance
- How To Sew A Straight Seam
- Sewing Curved Seams
- Sewing Corner Seams
- Trimming And Grading Seam Excess
- Notching/Clipping Seam Allowance for Tension Release
- Sewing Topstitched Seams
- Sewing Corded Seams
- Sewing A Slot Seam
- Sewing A Gathered Seam
- Sewing Bias Seams
- Sewing Seams With Ease
- Sewing Seams With Crossing Seamlines
- Sewing Unlike Fabric Seams
- How To Iron Seams: Ironing Tools And Conventions
- Sewing With Knit Fabrics
- Understanding Stitch Length And Tension
- Sewing Unique Fabric Seams
-
Seam Finishes
>
- Seam Finishing Techniques - Overview
- Applying A Pinked Seam Finish
- Applying A Bias Bound Seam Finish
- Serging And Zigzag Seam Finishes
- Sewing A Self-Bound Seam Finish
- Sewing A French Seam Finish
- Sewing A Hong Kong Seam Finish
- Sewing A Mock French Seam Finish
- Sewing A Turned-and-Stitched Seam Finish
- Sewing Overcast Hand-Applied Seam Finishes
- Sewing A Flat Felled Seam
- Sewing A Hairline Seam Finish
-
Hem Finishes
>
- Garment Hem Finishes: Overview
- Sewing A Double Fold Hem Finish
- Sewing A Single Fold Hem Finish
- Sewing Bound Hem Finishes
- Sewing An Exposed Double Layer Bound Hem
- Sewing A Folded-Up Bound Hem with Pre-folded Binding
- Sewing A Hong Kong Hem Finish
- Sewing A Band Hem Finish
- Sewing A Bias Faced Hem Finish
- Sewing A Twill Tape Hem Finish
- Sewing A Rolled Hem Finish
- Sewing A Shaped Hem Facing
- Using Fusible Hem Tape And Webbing
- Finishing A Lace Fabric Hem
- Finishing A Leather Hem
- Sewing Faced Hem Corners
- How To Finish Lining At The Hem
- Finishing Fabric Corners by Mitering >
- Interfacing A Hemline: Lined And Unlined Examples
-
Sewing Pockets
>
- Curved Patch Pocket With Flap
- Unlined Square Patch Pockets
- Lined Patch Pockets: Two Ways
- Extension On-Seam Pockets
- Separate On-Seam Pocket
- Front Hip Pockets
- Bound Double Welt Pocket
- Double Welt Pocket With Flap
- Self-Welt Pocket (Using Single Fabric Layer)
- Slanted Welt Pocket (Hand-Stitched)
- Faced Slash Pockets: Overview >
-
Sewing Zippers
>
- Sewing Zippers: General Information
- Sewing A Centered Zipper
- Sewing A Lapped Zipper
- Sewing An Invisible Zipper
- Sewing A Fly Front Zipper
- Sewing A Closed-End Exposed Zipper (No Seam)
- Sewing An Exposed Separating Zipper
- Sewing Hand Stitched Zipper Applications
- Sewing A Zipper Underlay
- Sewing A Placket-Enclosed Separating Zipper
- Sleeveless Finishes >
-
Neckline Finishes
>
- Sewing A Neck Shaped Facing
- Sewing An All-In-One Neck Facing
- Neck And Garment Opening Combination Facings >
- Sewing A Bias Faced Neckline Finish
- Sewing A Band Neckline Finish
- Bound Neckline Finishes: Overview >
- Sewing A Semi-Stretch Strip Band Neckline
- Ribbed Neck Band And Classic Turtleneck
- Decorative Neckline Finishes >
- Finishing Facing Edges >
-
Extras
>
- A Complete Guide on Interfacing
- Sewing Bound Spaghetti Straps
- Sewing Spaghetti Straps To A Faced Neckline
- Sewing Ruffles: Overview
- Patterning And Sewing A Circle Ruffle
- Sewing A Gathered Heading Ruffle
- Sewing Double Layer Gathered Ruffles
- Sewing A Gathered Ruffle Into A Seam
- Sewing A Gathered Ruffle To A Fabric Edge
- Sewing A Fabric Surface Slit
- Sewing A Slit Seam
- Hand-Applied Straight Stitches
- Hand-Applied Blind Stitches
- Hand-Applied Overedge Stitches
- Hand-Applied Tack Stitches
- Hand-Applied Decorative Stitches
-
Basics
>
- Custom Bridal
- Custom Apparel
- About
- Blog

 RSS Feed
Services |
Company |
|
