|
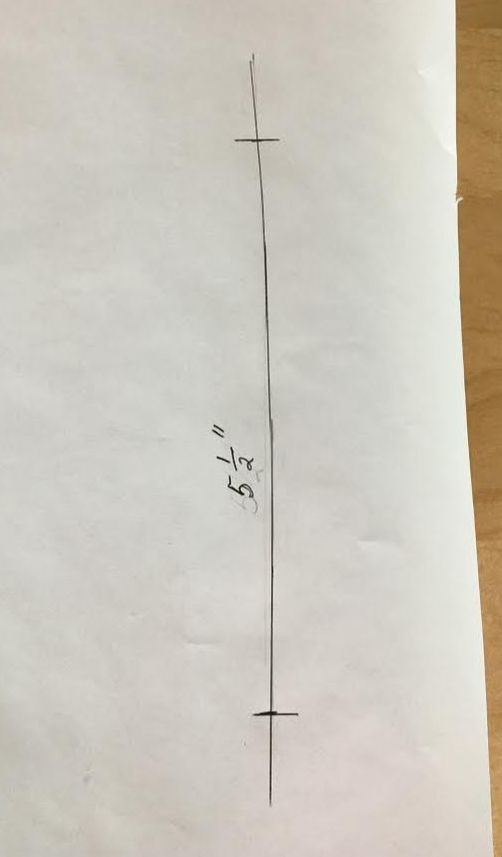
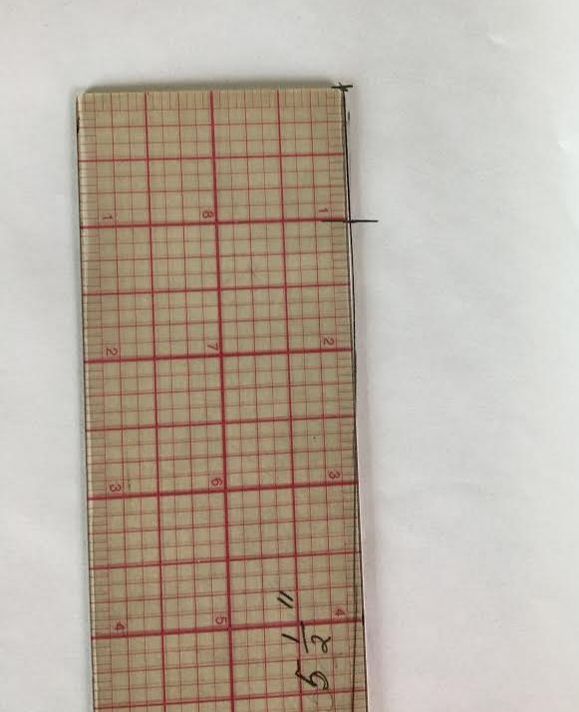
One of the best ways to make a dress more comfortable is by the addition of side seam pockets. Of course, fabric and style matter enormously when it comes to comfort, but there is nothing more appealing than comfort and functionality working together to create the perfect garment. 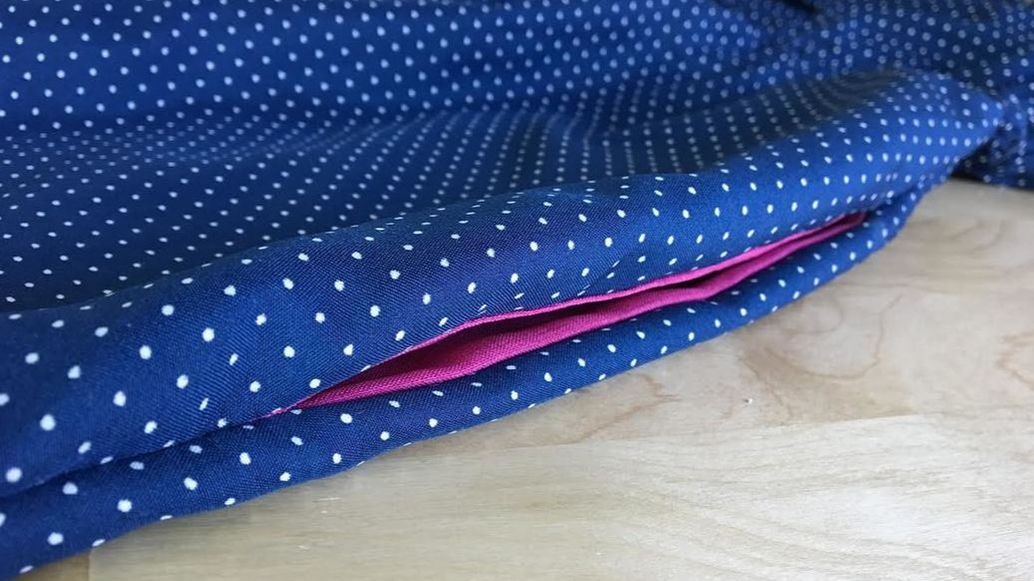 On-seam pocket sewn into the side seam of a dress. While all pockets are a desirable addition to any garment, there is something about the discreetness and convenience of on-seam pockets (or in-seam pockets) that truly elevate the quality of a clothing item. Due to their very functional nature, on-seam pockets, especially those that are sewn into the side seams, work well with almost all styles of dresses. Unfortunately, in a world where apparel manufacturing costs are very high, adding pockets to dresses means raising the prices on both wholesale and consequently, retail levels. If you love pockets, especially those comfy side seam ones, and have some favorite dresses that could benefit a great deal from their addition, there is no reason why you shouldn't be able to sew a pair of functional pockets to an already made dress yourself. It's actually quite simple to do and you get to choose the size, color and shape of the actual pocket- there is nothing more fun than playing fashion designer with the clothing items in your own closet. Learning how to make this useful alteration will become your go-to for adding function and comfort to all your favorite clothing items from dresses to bottoms that need a little upgrade. In the extensive tutorial to follow, we'll show you how to draft a classic on-seam pocket pattern from scratch, how to cut the pocket pieces out of fabric, and finally, how to sew a functional on-seam pocket into the side seam of an already-made dress. This is a dream alteration for women that love the convenience of pockets, and applicable to almost all garment types. 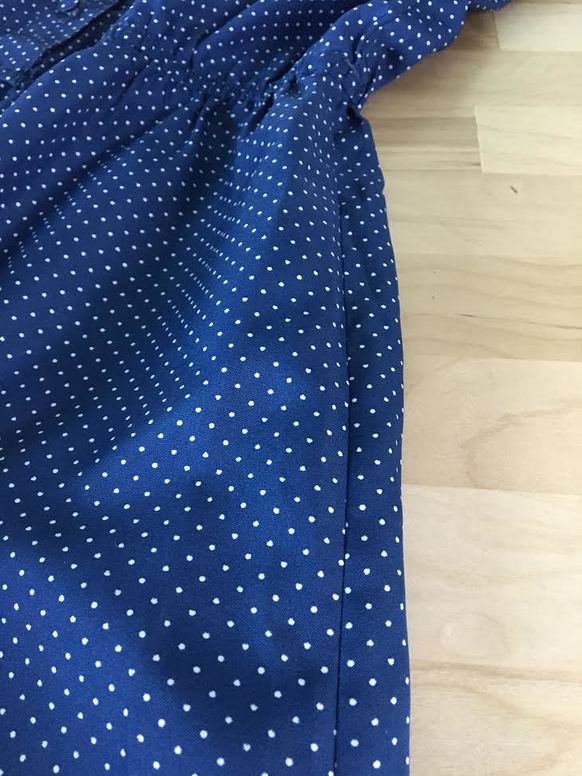 1. Choose the area on the side seam where you want the pockets to be located. The easiest way to do this is by trying the dress on and then placing your hand in the area where the pocket opening should be. This opening should not be too high or too uncomfortably low on the seam. The best pocket placement is at about 3-4 inches down from the waistline. In this case, our dress has an elastic waistband which provides a clear mark for where the waist is located on the dress. Measure from this elastic waistband (or the waistline on your dress) about 3-4 inches down along the side seam and follow the next step to mark the actual pocket opening starting at this point. 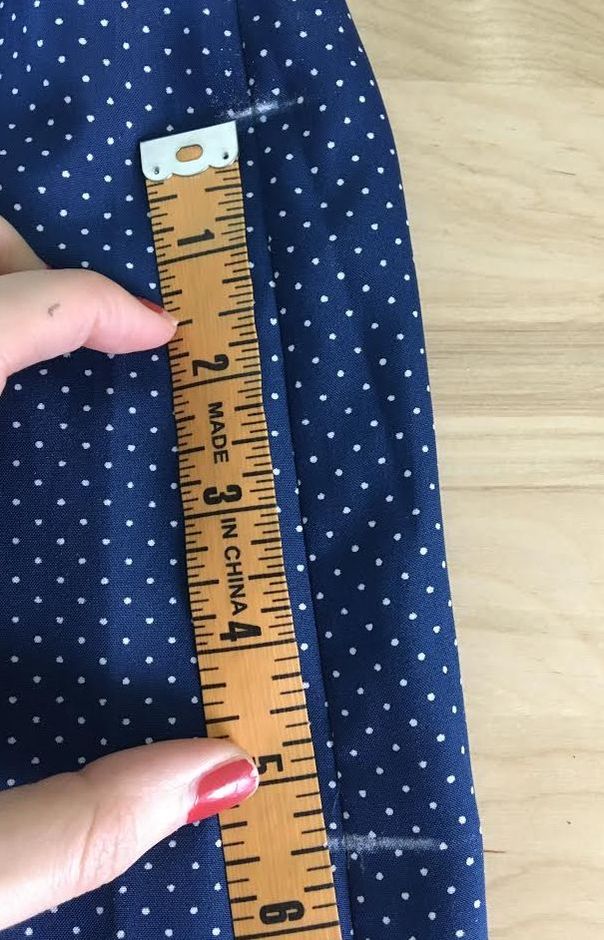 2. In the step above, you measured about 3-4 inches down from the waist. Next, mark horizontally using tailor's chalk or a fabric marking pencil (or a dry bar of soap!) at this location (top dash mark in the picture). Make sure this horizontal dash mark extends on both sides of the seam line as shown- this will be important in the sewing process. Now, measure from the top dash mark down the seam line and mark another horizontal dash at 5.5" (5 1/2") down- these two dash marks represent the opening of the pocket. 5.5-6" inches is a standard measurement for the opening of on-seam pockets. However, if you want your pocket to have a larger opening you can always extend this measurement by a couple of inches. Vise versa, this measurement can be less than 5.5" if you'd rather sew a smaller pocket opening. 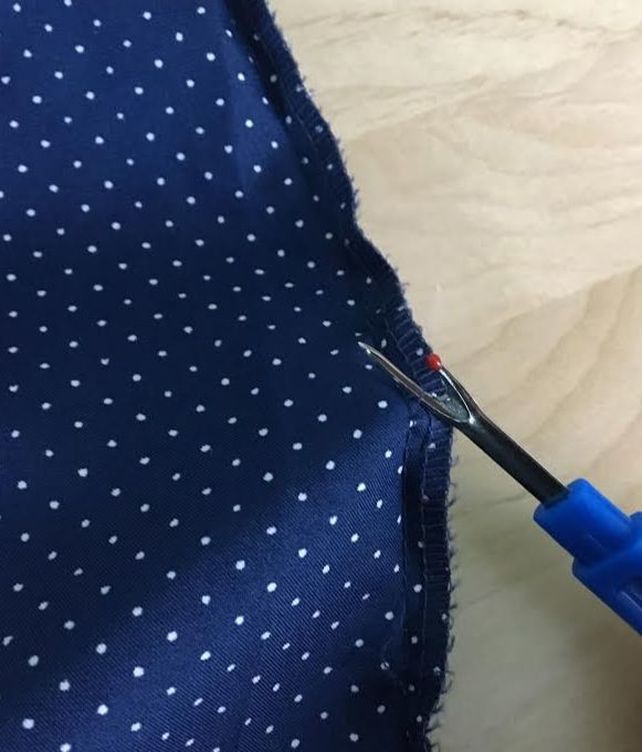 3. Turn the dress/garment inside out and using a seam ripper, take out the stitches at the pocket area. 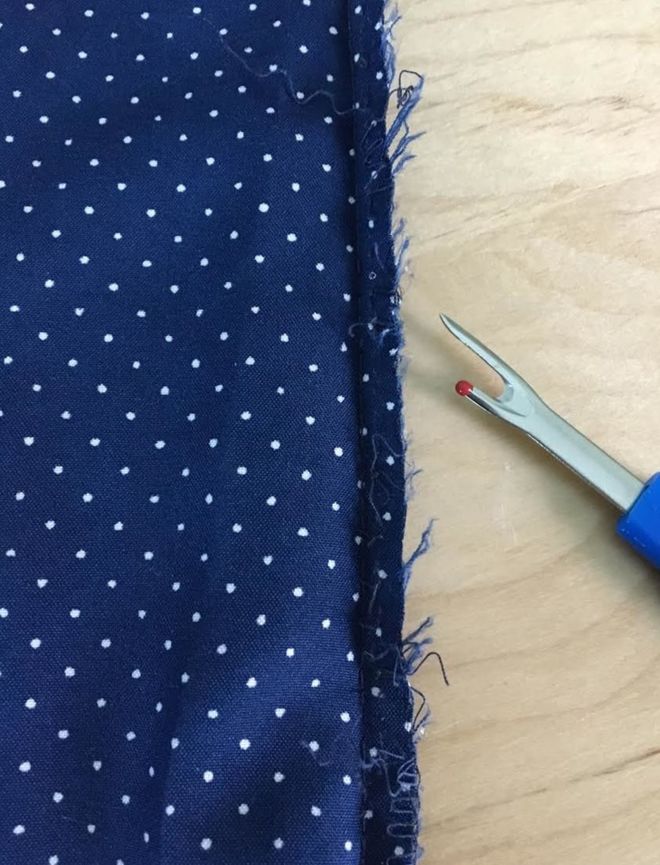 Since you are adding pockets to an already made garment, its seams are most likely clean finished. In most cases, this clean finishing method is achieved with a serging stitch which will also need to be removed in order to open up the seam entirely. To learn how to easily remove a serging stitch, follow the steps in this tutorial: How To Remove An Overlock/Serged Stitch. 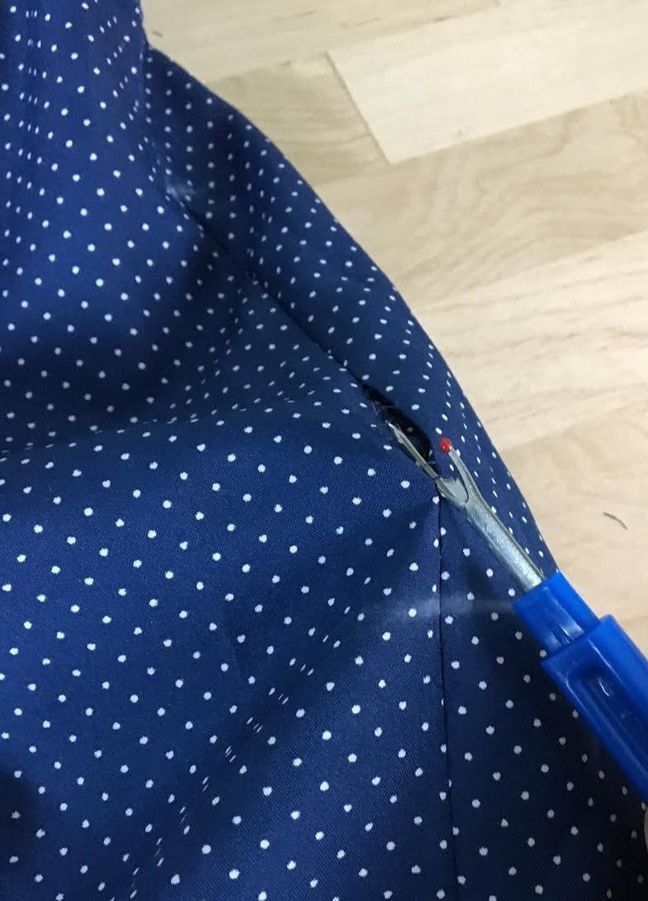 You may also find it easier to remove the stitches from the right side of the garment as shown above. Regardless of your preferred method, make sure that the fabric is not damaged in the process- you should always be very careful not to accidentally catch the fabric with your seam ripper. 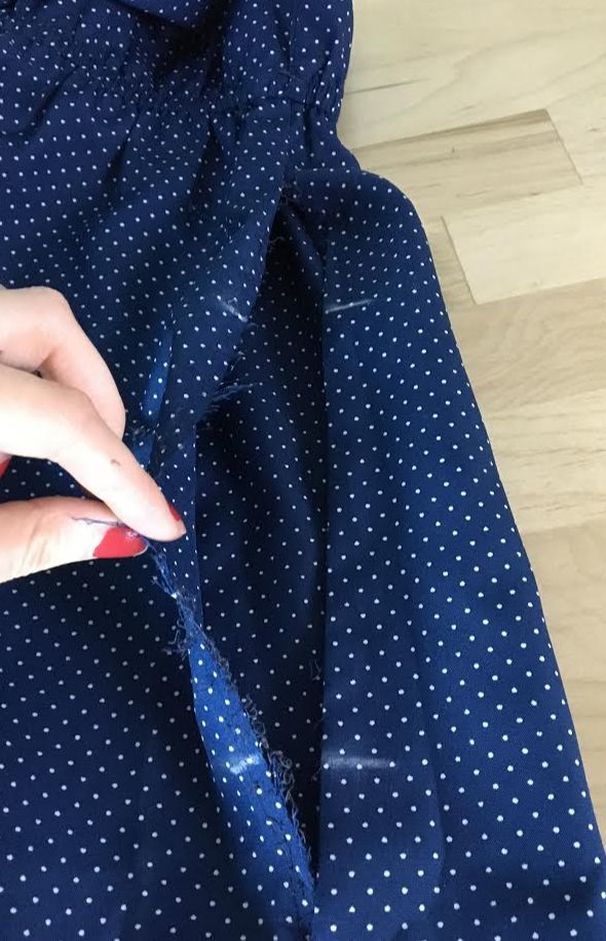 4. Remove the seam stitch at about 4" distance from each of the dash marks so that you have enough room to sew the pocket pieces later. Remove all the loose threads that may still be attached to each edge. You 'll find that one of the fabric edges (or both) may remain folded due to the fact that the seam was ironed when the dress was finished. You will need a flat surface on each seam edge during the sewing pocket application so make sure you iron each fabric edge flat at this opening to facilitate the sewing process later on. 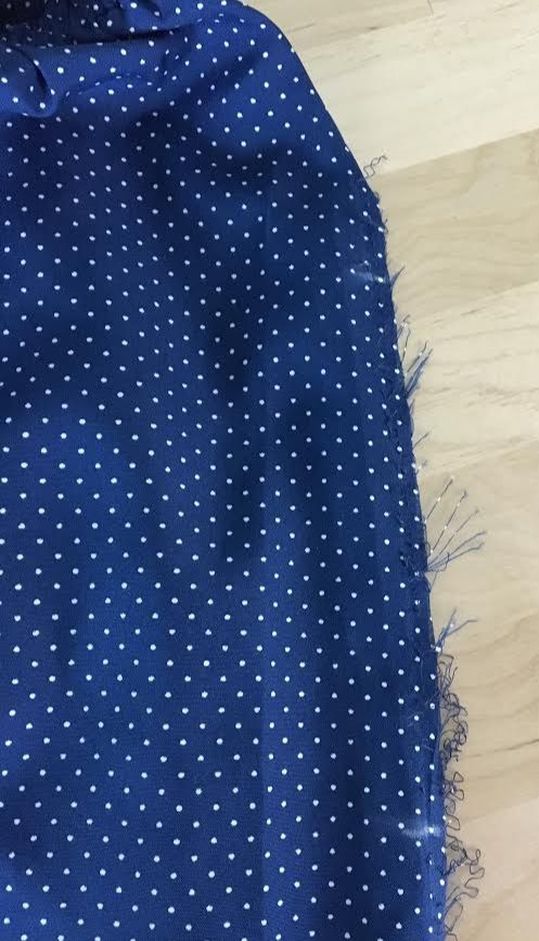 If you look at the fabric edges of this opening, you'll notice a very slight curve at the top as it moves towards the waistline. This subtle curve is added on the side of dresses and skirts to achieve better fit at the hip area. This is also an important line to note for the pattern-making portion coming up in this tutorial. How To Make a Sewing Pattern For On-Seam Pockets You might be tempted to skip the pattern-making step in this tutorial and attempt to free-hand a pocket shape on fabric. As easy as this may seem, it will be a lot more frustrating to handle and sew later on. Pockets require a bit of technique exactness as their pieces should always match once connected. If the pocket pieces lack precision, the garment seams may not lay flat, and the pocket will pull on the garment causing drape and fit issues. Drafting a quick pocket pattern will make your life so much easier in the sewing process resulting in a clean, effortless finish. You'll find that if you follow the steps below, making a sewing pattern for an on-seam pocket is actually quite simple to do. The best part? It is re-usable! Once you have this pattern, you can use it to add pockets to all your favorite dresses and bottoms.
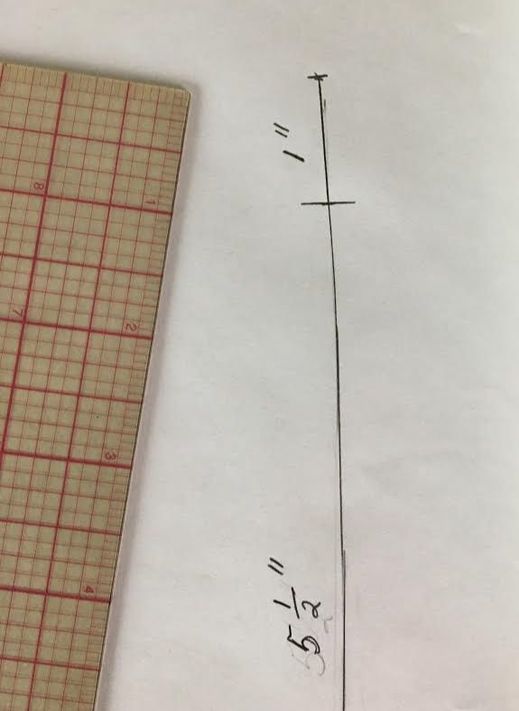
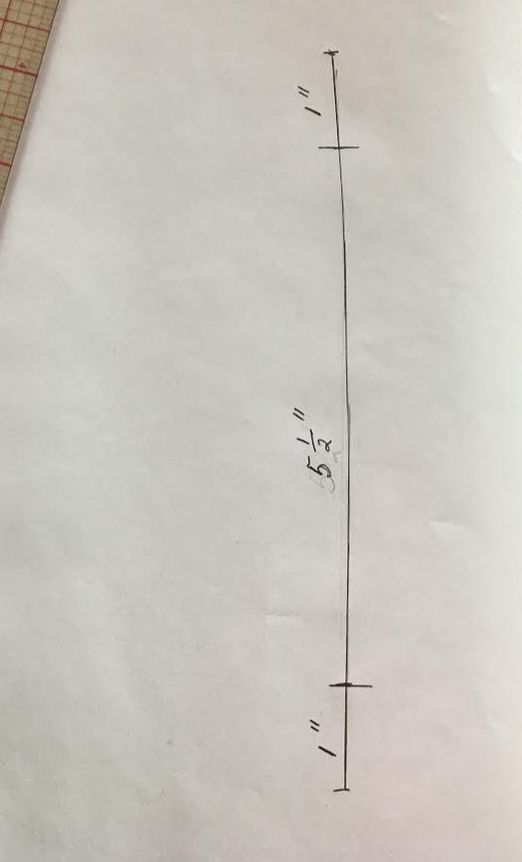
3. From the top dash, measure 1" up and mark with another little dash mark to record this distance as shown. 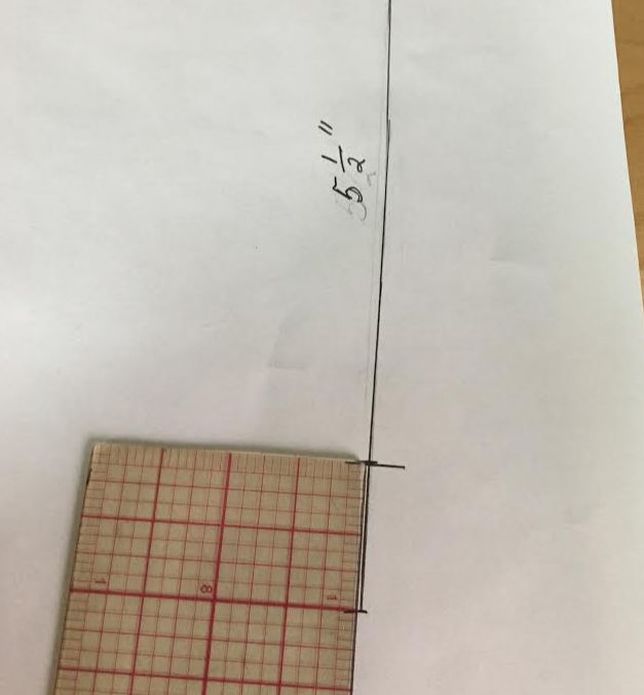 4. Repeat the process from the bottom dash down, measuring and marking at 1" distance. This bottom distance will determine the depth on the pocket bag. For this tutorial, we'll show you a simple 1" deep pocket. However, as you get more comfortable with sewing on-seam pockets, you'll be able to change this distance according to how deep you want your pocket to be. For example: Instead of 1", you could add a distance of 3" and the pocket will be much larger having greater depth. If this sounds a bit confusing, don't worry! It will become much clearer as you move through the sewing steps below.
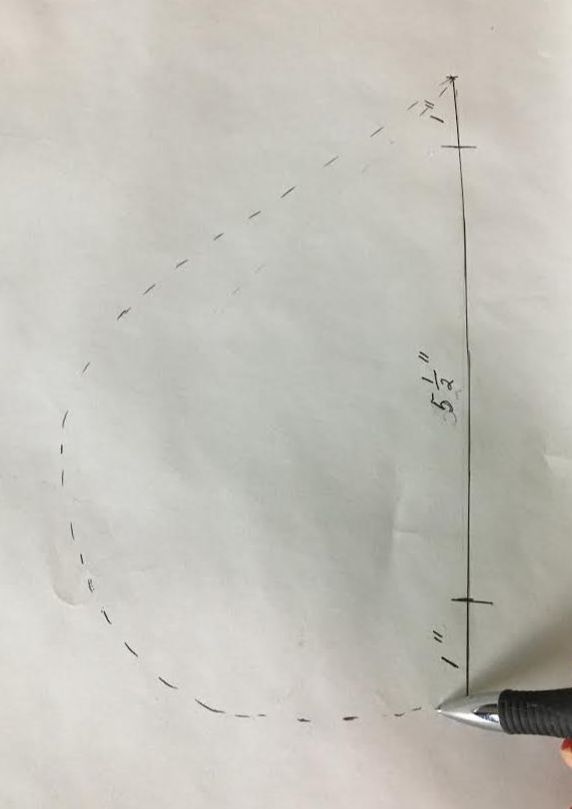
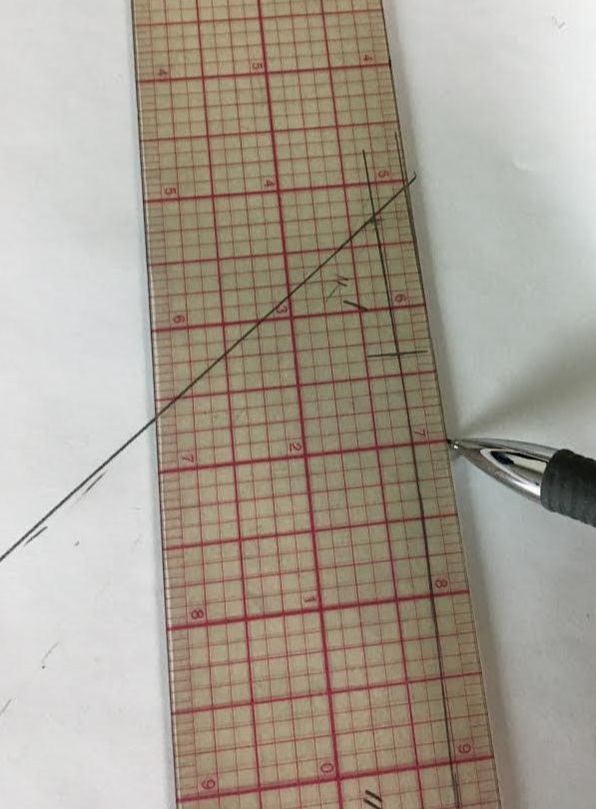
You can actually control the shape and size of the pocket bag as desired. Although this tutorial teaches you a circle-shaped pocket bag, an on-seam pocket can take on any shape you wish as long as the edges of the pocket bag extend into the side seam (vertical semi curved line) as shown. 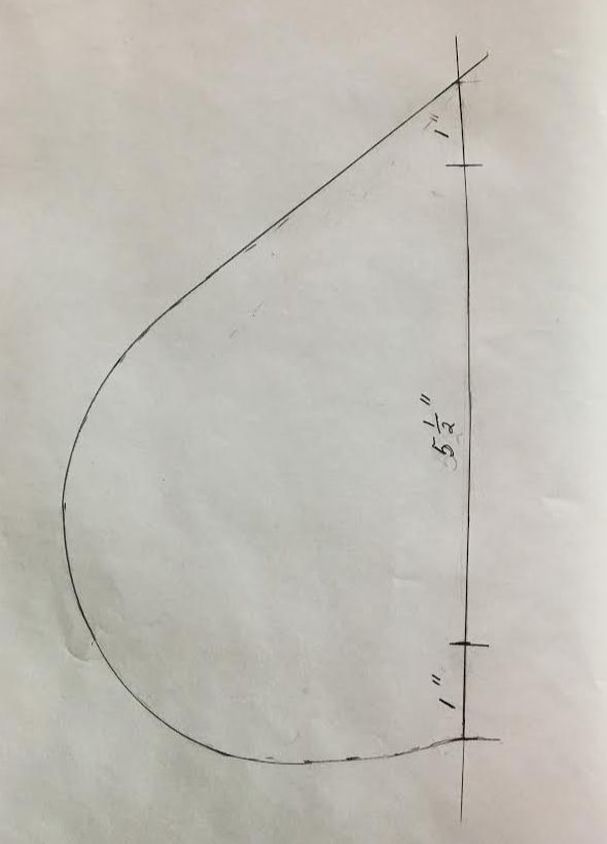 7. Use your ruler and a french curve to connect the circular edge of the pocket bag into a solid line. The pocket shape is now complete! All you have to do now is add the proper seam allowance to each edge. If you are unsure what a french curve looks like or just want to learn more about the basic pattern-making tools you need as a sewing beginner, check out this tutorial: Want To Learn How To Sew And Make Your Own Patterns? These Are The Supplies You Need To Have.
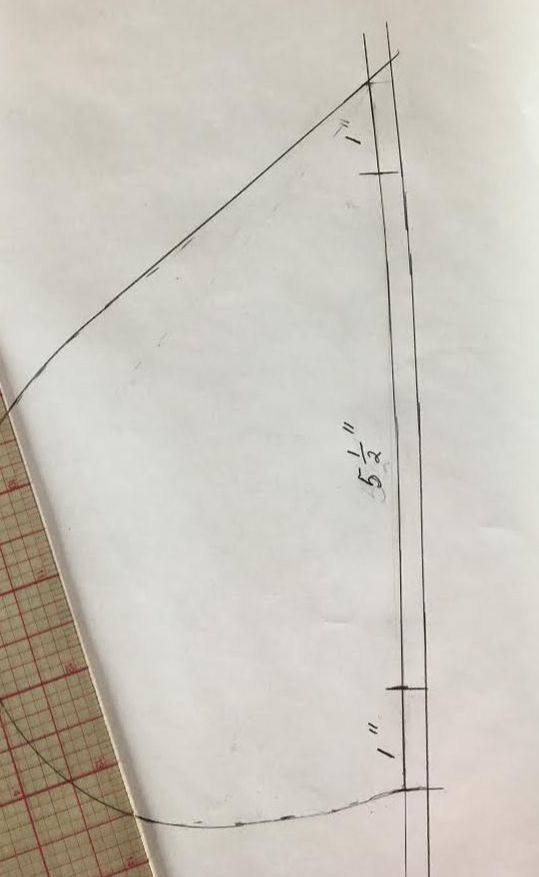
8. Add seam allowance along the side seam of the pocket bag first. The seam allowance for this edge should correspond to the seam allowance used on the side seam of the dress. If you are unsure what the seam allowance is on the dress, measure inward at the seam opening of the dress from the fabric edge to the seam stitch mark to find out the correct seam allowance measurement. In this case, our seam allowance is 1/4" (.25"). Use a marked clear plastic ruler (preferably) to add this seam allowance along the vertical edge of the pocket bag (pocket seam) evenly throughout as shown above. 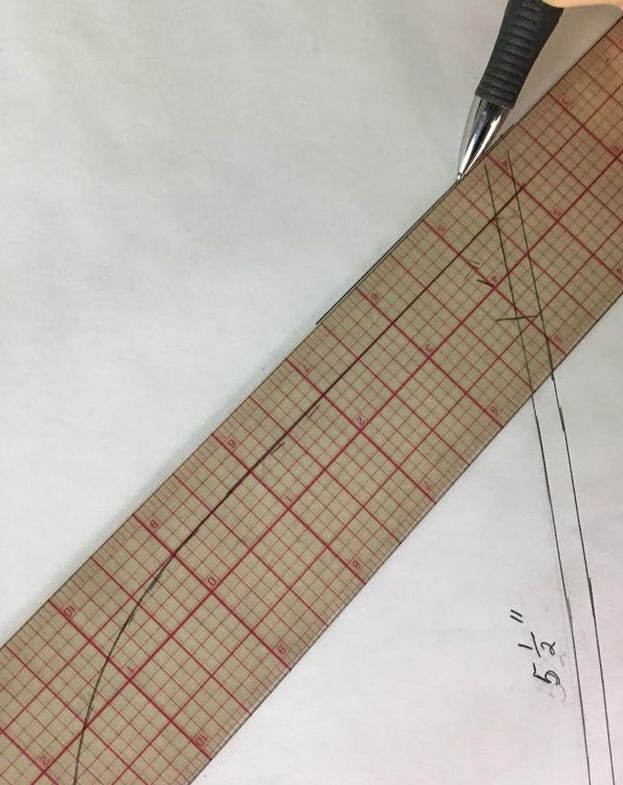 9. Next, add the pocket bag seam allowance. To make it easier on yourself, add a 1/2" seam allowance as this is easy to measure and allows for enough room for error if you need to make any changes in the finished pocket bag. 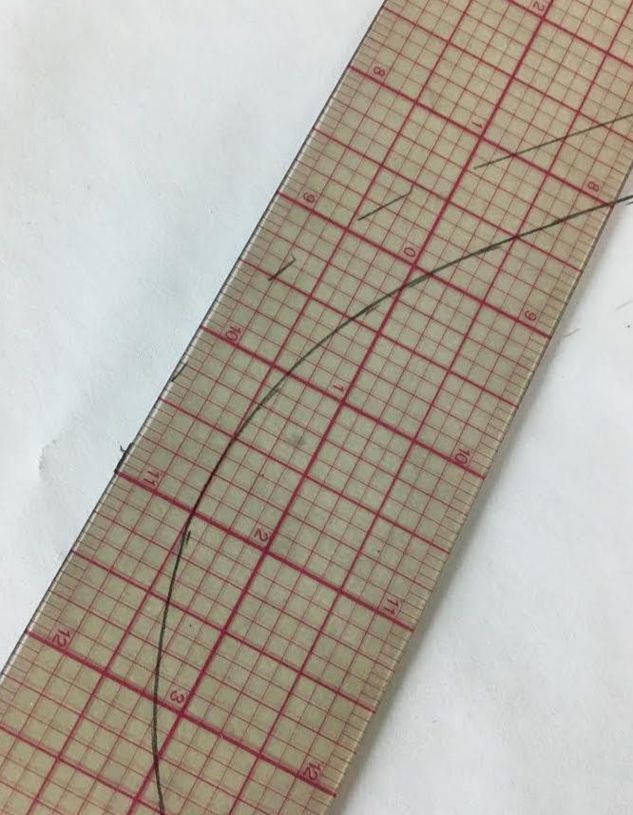 To add seam allowance along the most curved circular edge of the pocket bag, shift your ruler such that it corresponds to the 1/2" mark and add a dash line each time the ruler is shifted. This will result in a curved dash line located at 1/2" from the pocket bag edge evenly throughout.  Use a french curve and the straight ruler to connect the dash lines into a smooth solid line as shown.  10. Last but certainly not least- the notches! These are extremely important in the sewing process so don't forget to mark them. The notches on this pocket pattern correspond to the tailor's chalk dash marks on the dress located at 5 1/2" distance away from one another. Remember, these marks represent the top and bottom of the bag opening. The notches on the pattern will be matched to the chalk marks on the dress. To mark the notches, simply extend the inner marks, located at 5.5" (5 1/2") away from each other, into the seam allowance and add a vertical dash that intersects each line to form a "T" shape as shown above.  The pocket pattern is now complete! Add a lengthwise grain line for fabric cutting purposes and note how many pieces of the pattern should be cut for each full pocket. The pattern above is marked with "Cut 2"- this means that you will need to cut two identical fabric pieces that are the mirror image of each other for a single pocket. If you are adding two pockets (one for each side seam), make sure you follow the same concept and cutting process when cutting the pocket corresponding to the second seam.  11. Carefully cut along the outer edge of the pattern maintaining the cut as smooth and even as you can. 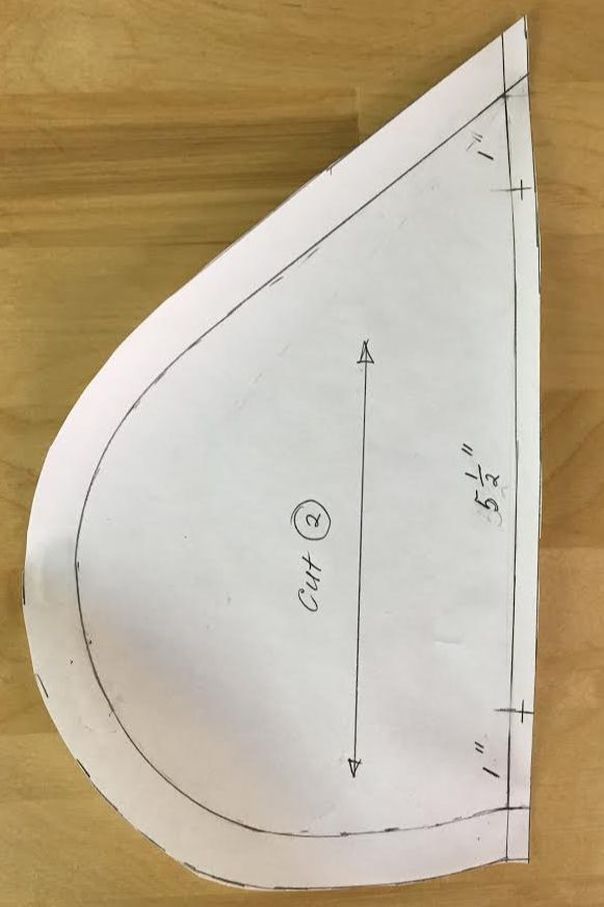 The fabric pocket pieces are now ready to be cut! Make sure you keep this pattern and use it anytime you want to add on-seam pockets to a garment as it is infinitely re-usable! How To Cut The On-Seam Pocket Pattern 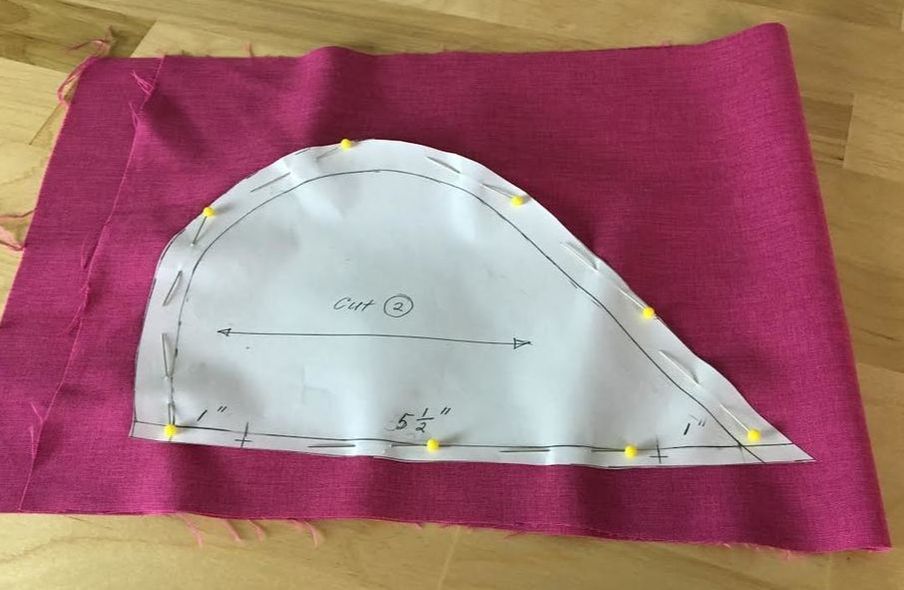 For a single pocket, we have to cut two identical pieces mirroring each other. To do this, fold the fabric such that the face of the fabric is on the inside of the fold and pin the pocket pattern through both layers of fabric according to the grain line. Pin along the seam allowance of the pattern in order to keep it as flat as possible during cutting, To learn more about pattern cutting according to grainline, check out this tutorial: 4 Ways To Lay Out a Pattern For Cutting: Understanding Grain And The Selvage Edge. 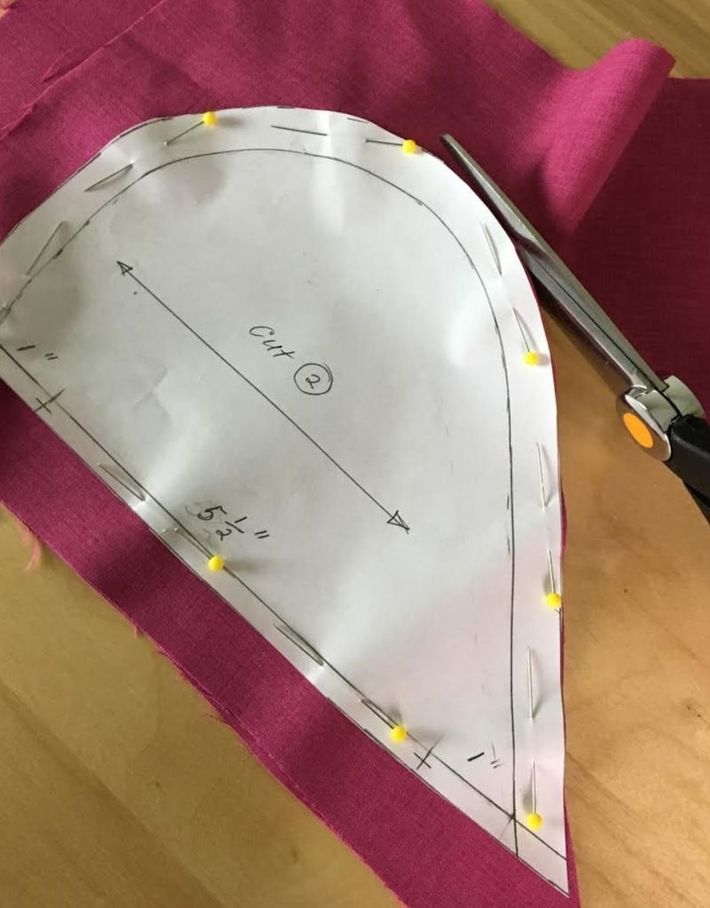 Cut the two layers of fabric carefully and smoothly along the edge of the pattern. 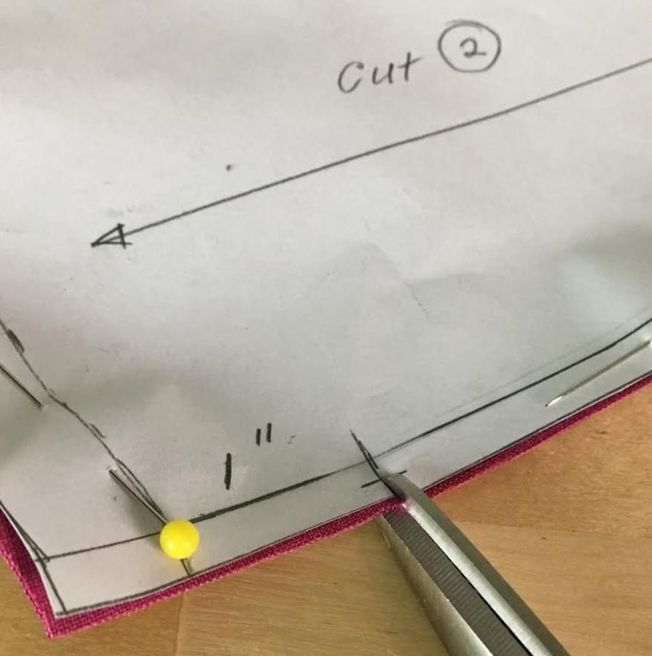 VERY IMPORTANT- don't forget to transfer the notches! To do so, clip through both layers of fabric up to the vertical line as shown. 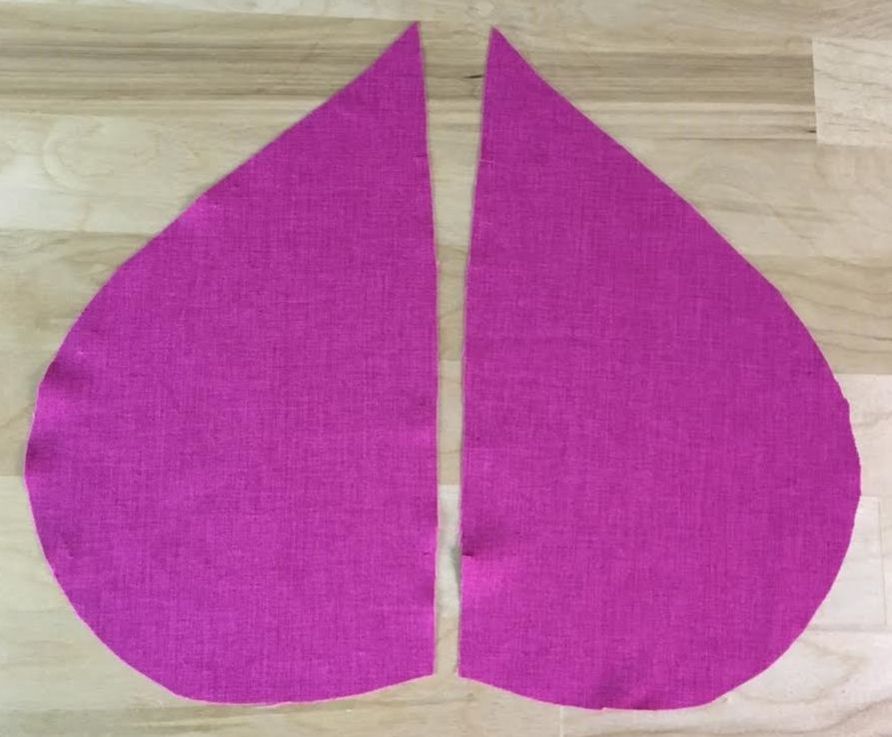 Once both notches are transferred, you can unpin and remove the sewing pattern. As a result, you should have two identical pieces that are the mirror image of each other (resembling and upside down heart :) ) Sewing The Pocket Into The Dress Seam 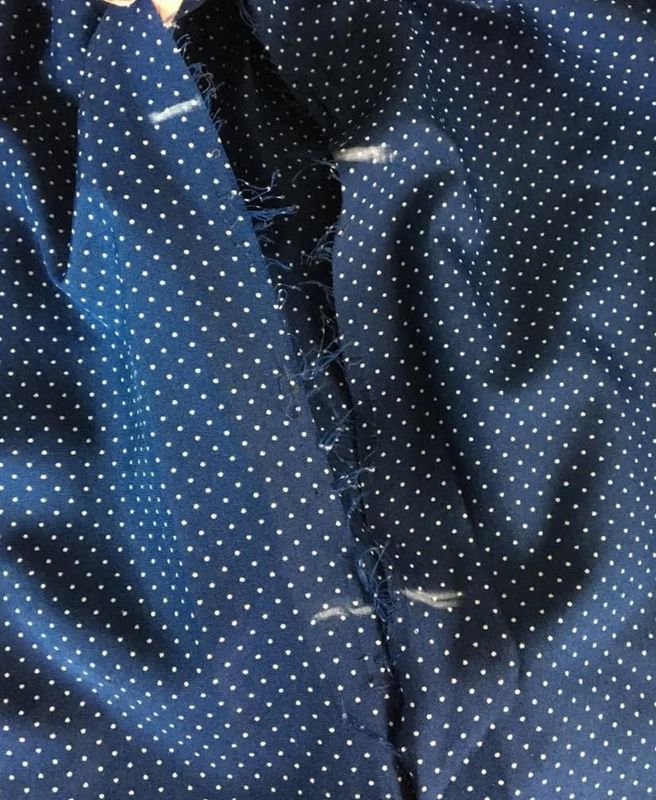 So lets go back to the open side seam on the dress. You should have enough open space on both top and bottom of the chalk dash marks to comfortably sew the pocket pieces in. 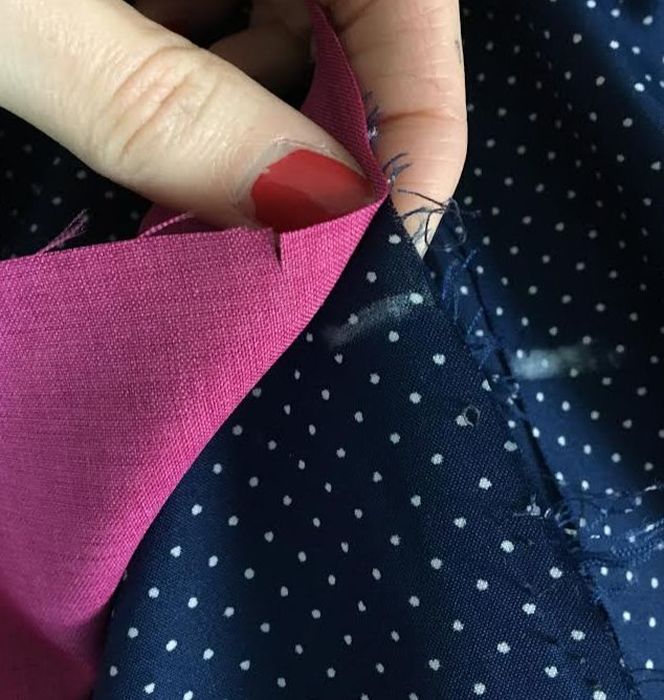 1. Starting on the front side of the dress, align one of the pocket pieces such that the right side of both pocket piece and dress are touching, and the vertical edge of the pocket piece aligns to the side seam edge of the dress. Each notch on the pocket edge should match to each white tailor's chalk mark on the dress as shown. 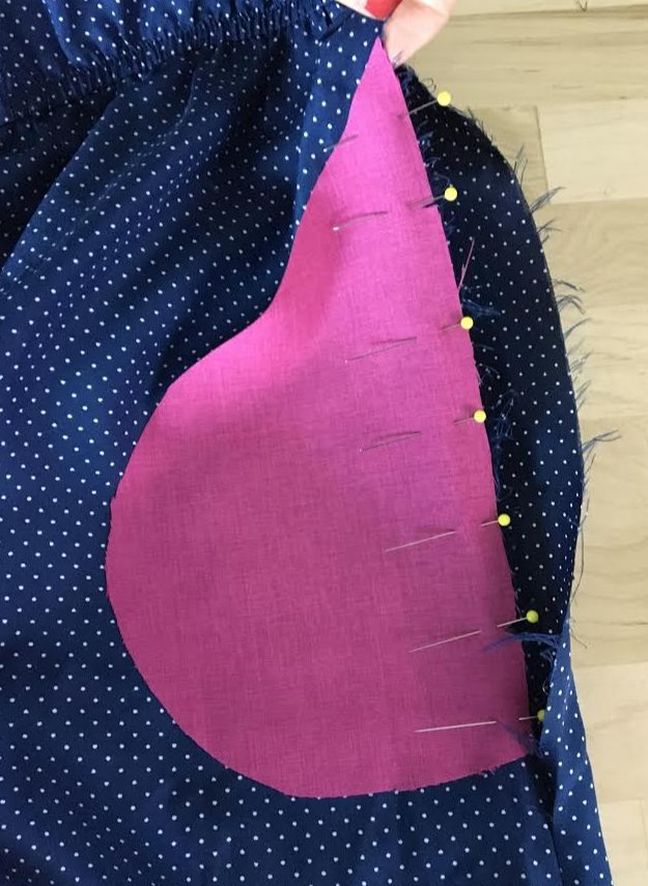 2. Pin horizontally through both the pocket piece and edge of the front dress as shown above. The narrower area of the pocket piece should be positioned at the top, while its fuller, circular portion should correspond to the bottom. 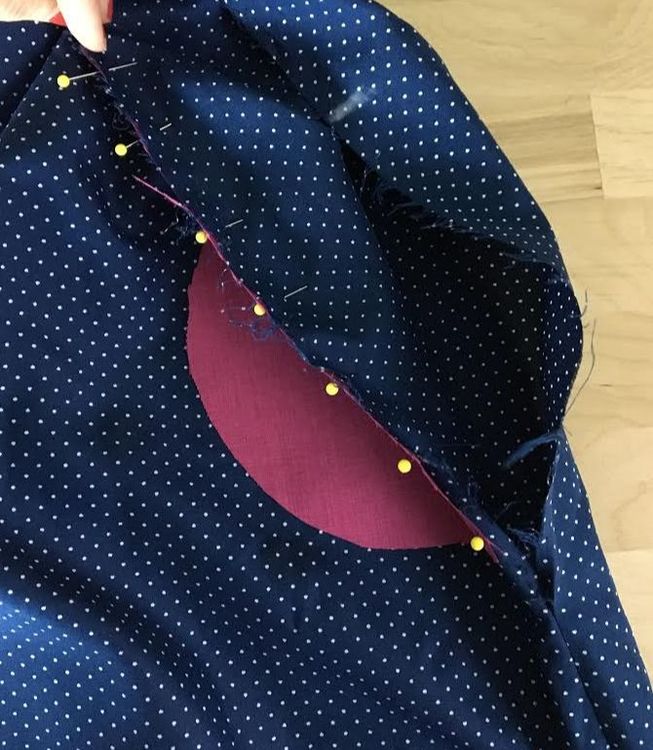 Make sure the edge of the pocket piece is aligned accurately to the edge of the dress, and that both notches are matching the white chalk marks along the edge of the dress. 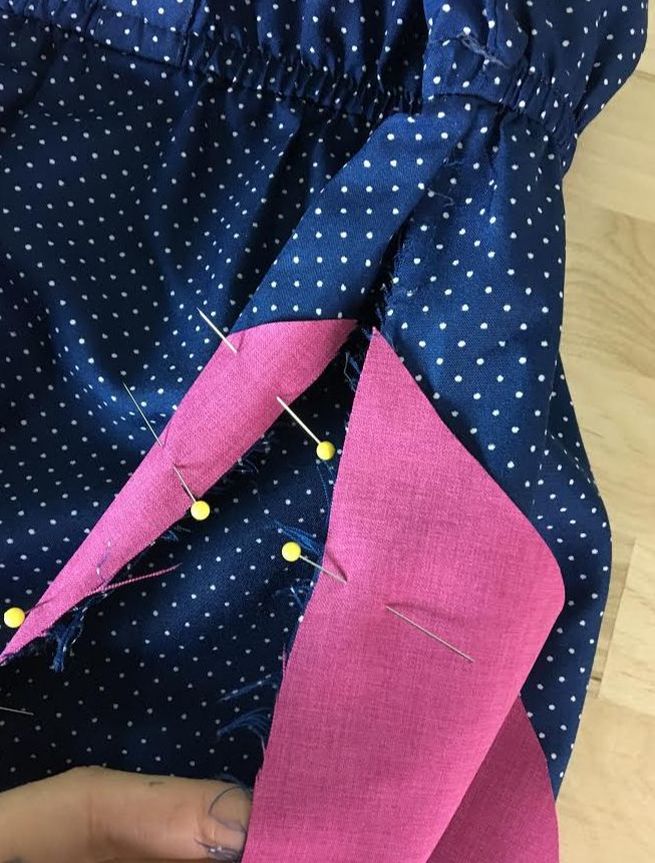 3. Repeat the pinning process described above with the other pocket piece- pin it to the edge corresponding to the back of the garment making sure both fabric edges are accurately matched. 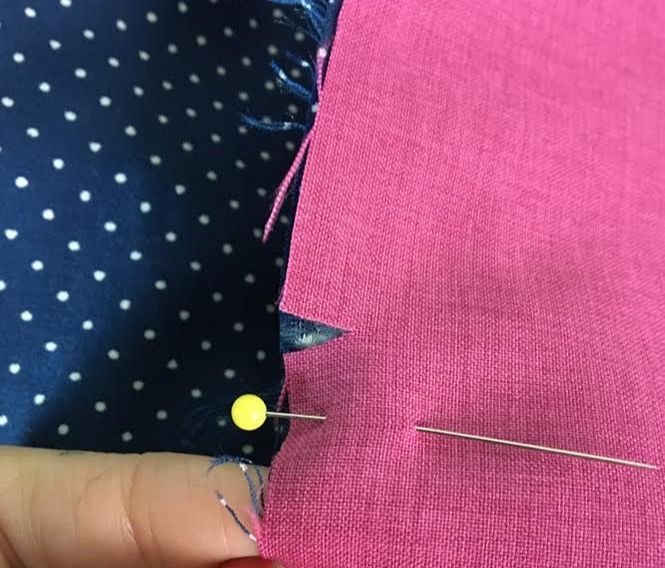 As you did for the front of the dress, match each notch on the pocket piece to each chalk mark on the dress' edge as shown above.  The two pocket pieces should be the mirror image of each other with the wider part (which will later become the pocket bag) positioned at the bottom. It is also important that both pocket side seams (pinned edges) are aligned to match perfectly. If you look at the top and bottom of each pocket piece, both should be aligned to start and end at exactly the same points. 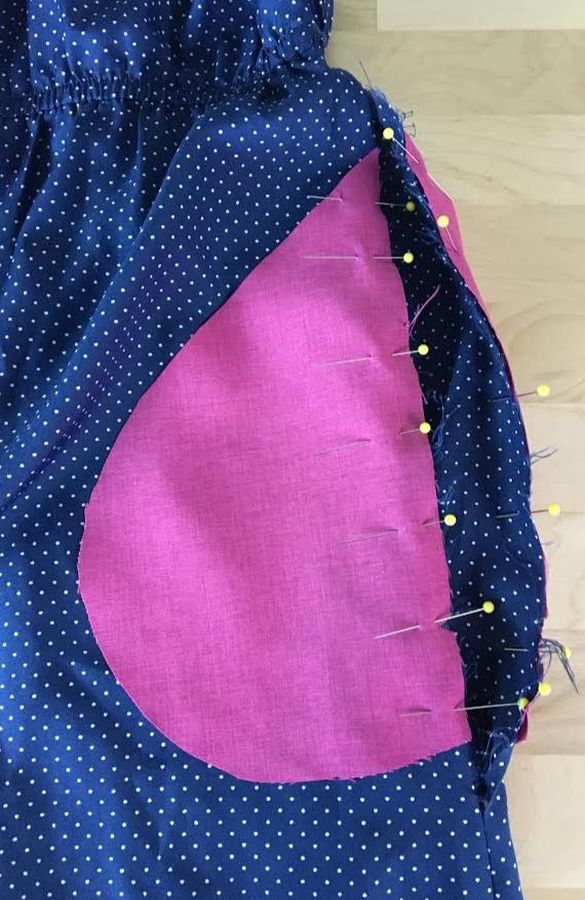 Above is a second view of the pocket pieces pinned to the edges of the dress side seams. Each pocket piece is connected to its corresponding front or back of the garment. If you are interested in learning some sewing terms, keep in mind that the pocket piece connected to the front portion of the dress is called the pocket underlay. As you'll see form the steps to follow, the pocket underlay will receive an understitch in order to keep the pocket flat and prevent it from rolling to the outside of the garment.
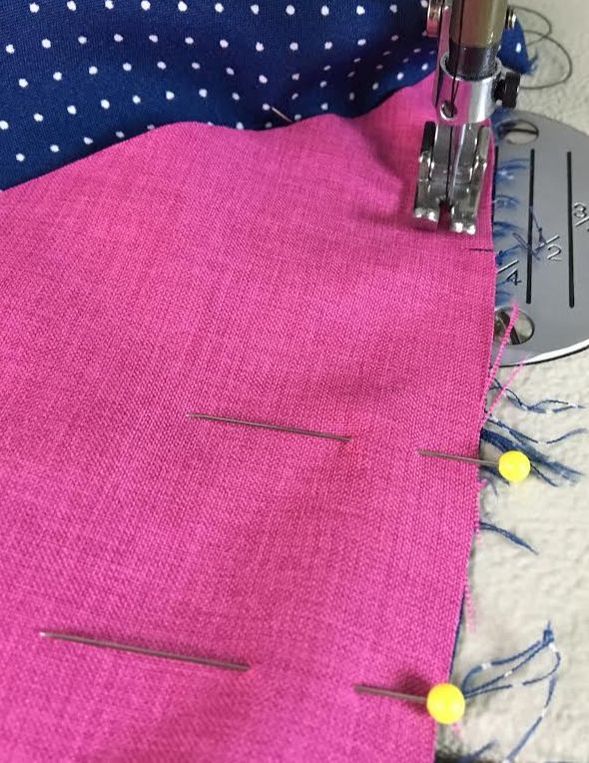
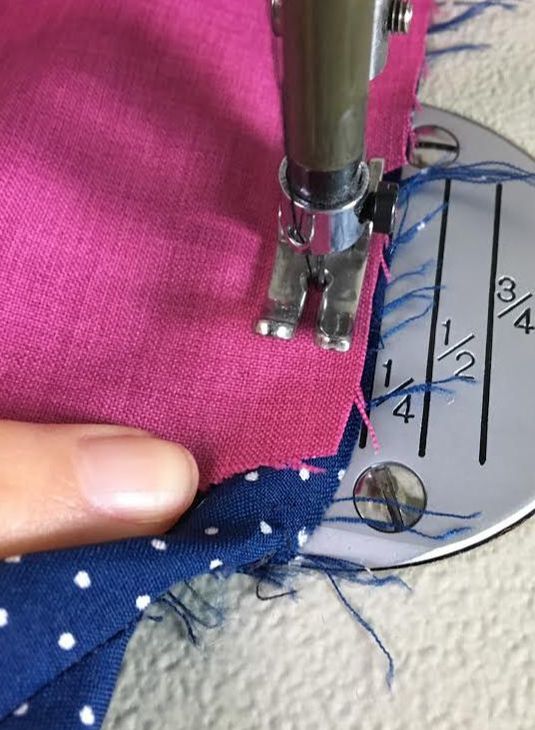
4. Once the pocket pieces are pinned and everything matches up, stitch them permanently to each side of the dress (front and back) on your sewing machine following the correct side seam allowance- 1/4" in this tutorial. 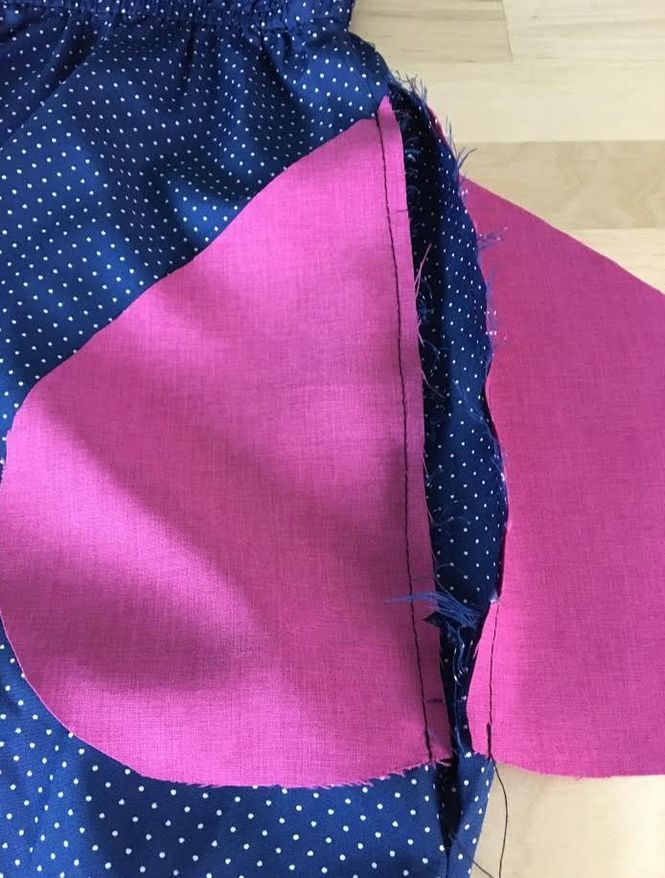 Follow the seam allowance evenly and don't forget to backstitch at the beginning and end of all your stitches for a more durable finish. 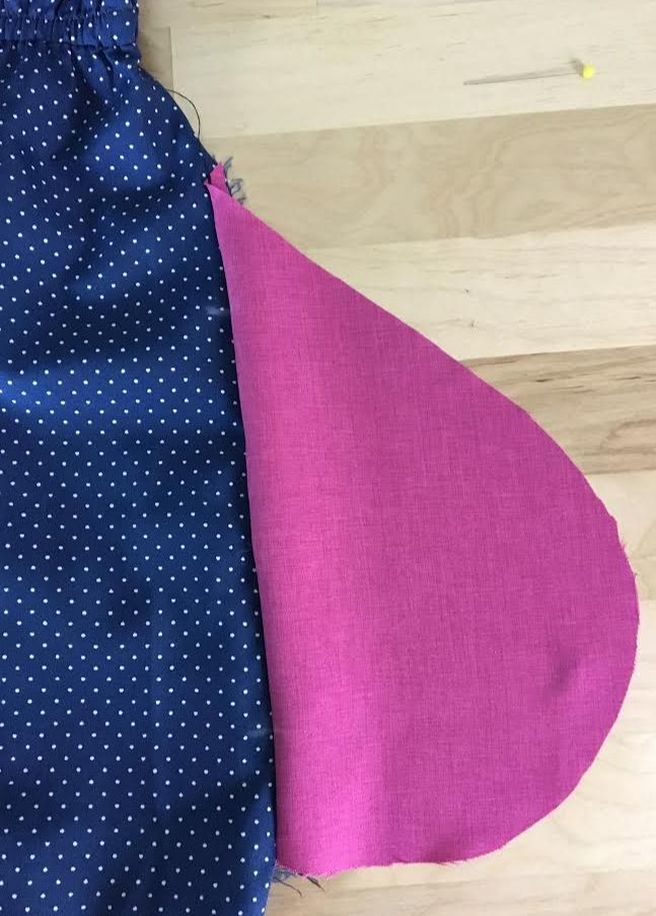 Align the pocket pieces so that the they are pointing away from the dress and the seam allowance is pointing towards the pocket bag. The seam allowance should be underneath the pocket piece. 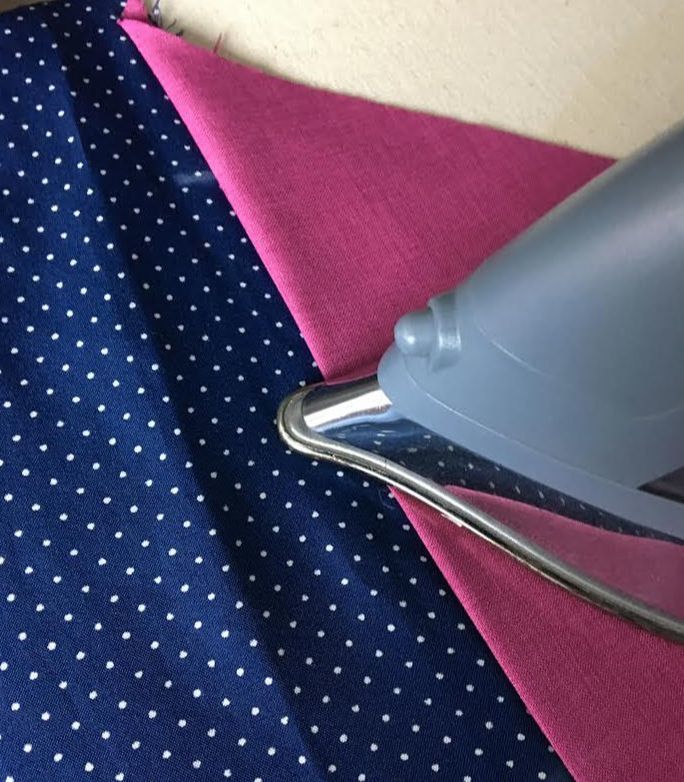 Iron on top of the seam to keep this fold/seam allowance alignment in place. 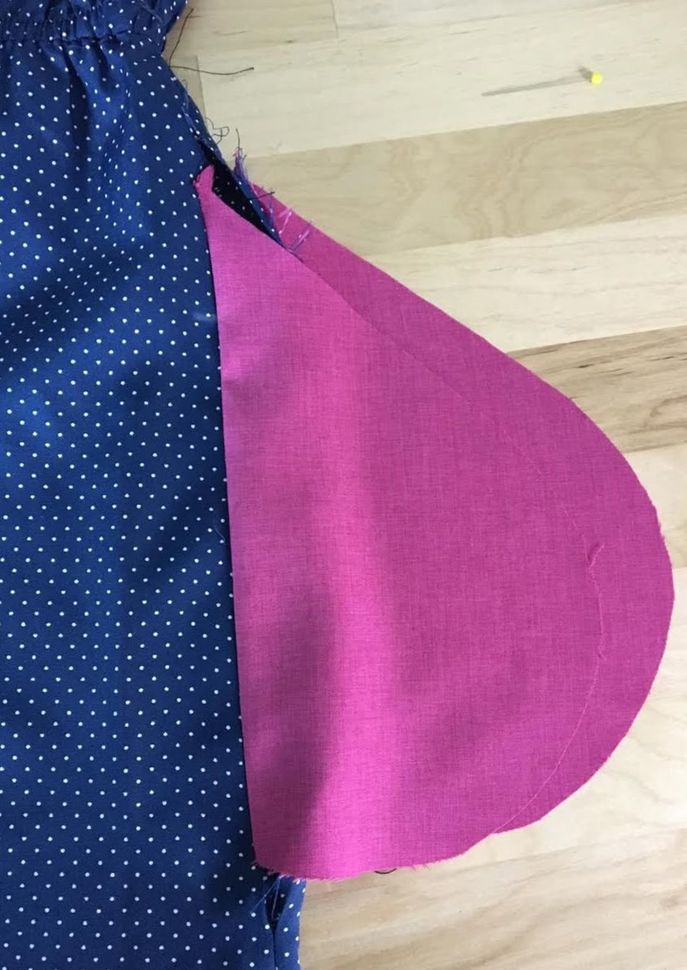 Repeat this ironing step for both pocket pieces at each seam- make sure the seam allowance is pointing away from the garment towards each front and back pocket piece- this is very important for the steps to follow.  Next, the pocket underlay, which is the pocket piece connected to the front of the dress, will receive an understitch. Keep in mind that only the front pocket piece will have this stitch- the back pocket piece does not need to be understitched. To facilitate the stitching process, place a couple of pins horizontally along the front pocket seam to keep the seam allowance and the fold stable during stitching. 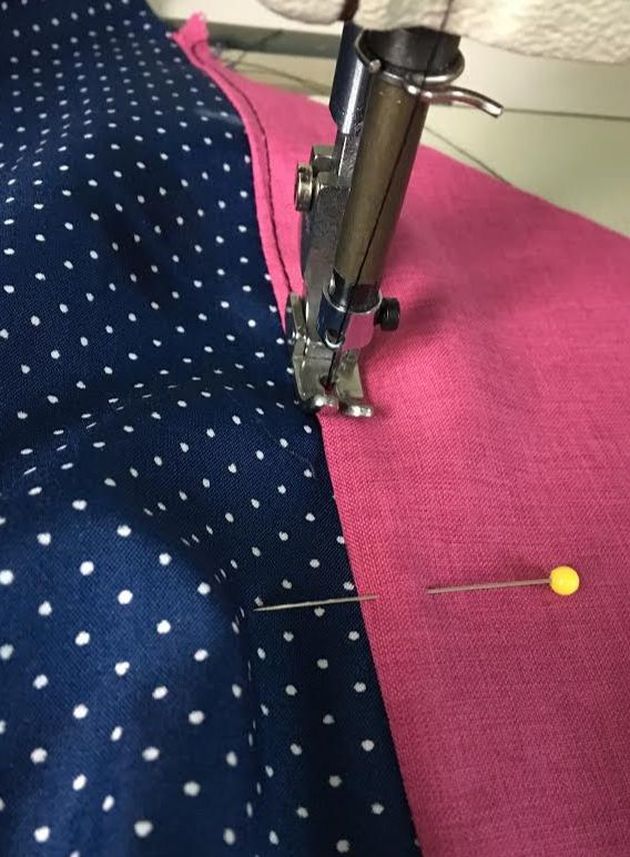 5. Starting from the top, stitch at about 1/8" away from the seamline directly on top of the front pocket piece (underlay) and through all layers of the seam allowance underneath- this is called understitching. 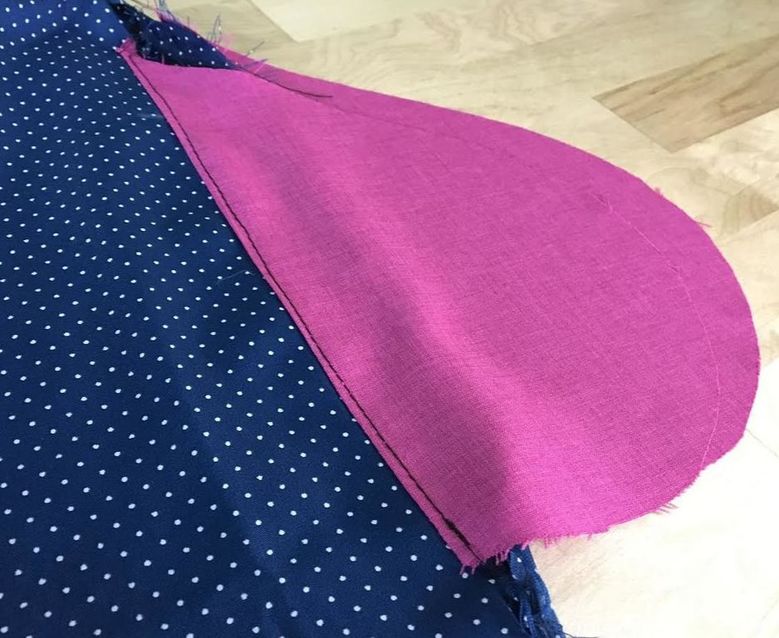 You need to add this stitch to the front pocket piece only. Ty to keep the stitch as straight and even as possible- this may take a few tries if you are a sewing beginner. It get easier with practice! 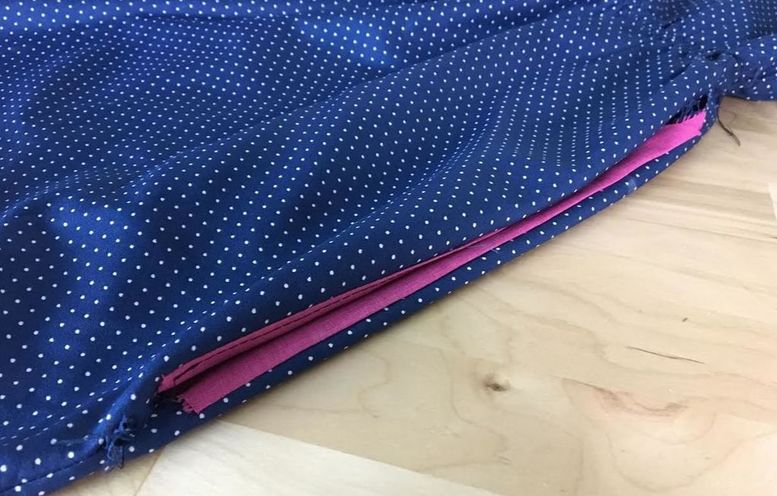 Next, flip both front and back pocket pieces to the inside of the dress. Turn the dress inside out- You will be working on the inside of the garment for the final steps. 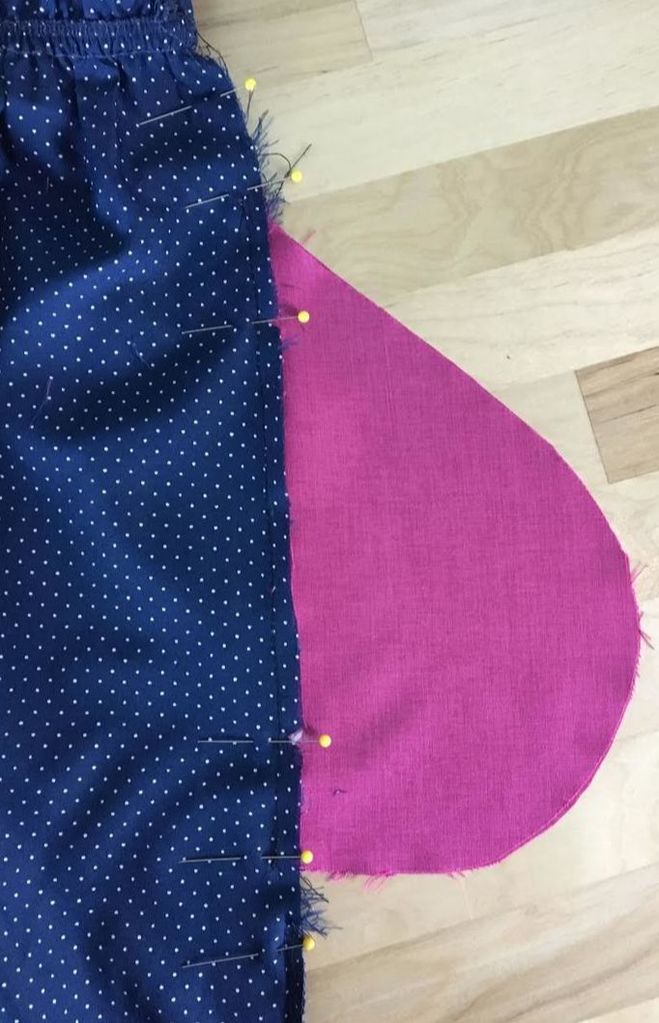 When you turn the pocket pieces to the inside of the dress, they should overlap perfectly right on top of each other. This is where you'll know if you made any errors when matching the notches. If the notches of the pocket pieces were matched accurately to the white tailor's chalk marks on the side edges of the dress, then the pocket portions should also match perfectly on top of each other creating the pocket bag. 6. Place pins horizontally along the dress side seam from the area where the seam opens to each notch at the top and bottom. You will not be sewing past these notches since they mark the pocket opening. If you sew past the notches, the pocket opening will become smaller depending on how much distance you sew past each notch.  The image above displays a close up of the seam pinning at the top of the pocket bag. As you can see, the pins are placed starting where the side seam opens at the top to the first notch at the top- Again, don't pin bellow this notch. 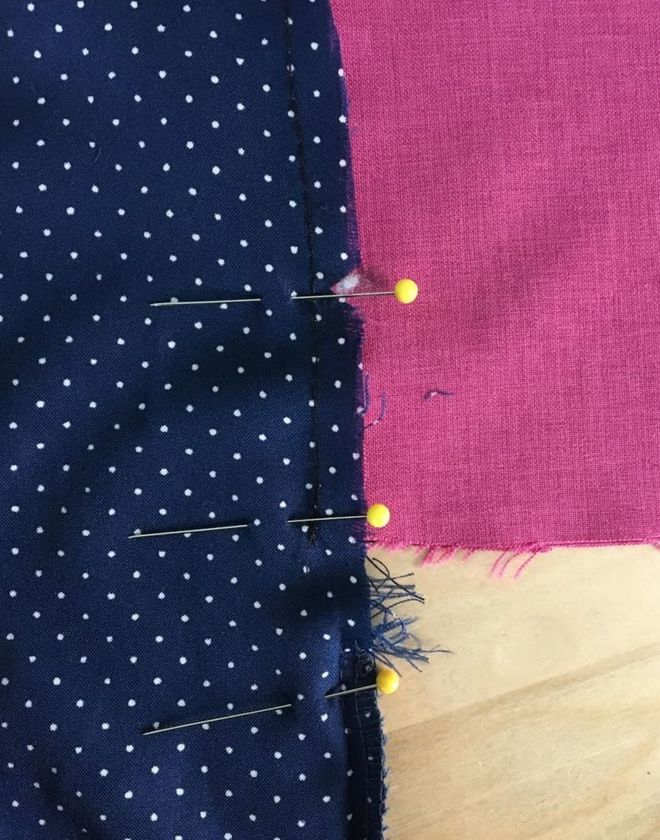 Follow the same logic when pinning the bottom of the pocket - pin from where the existing stitch line of the dress starts up to the bottom notch, making sure to not go past it. 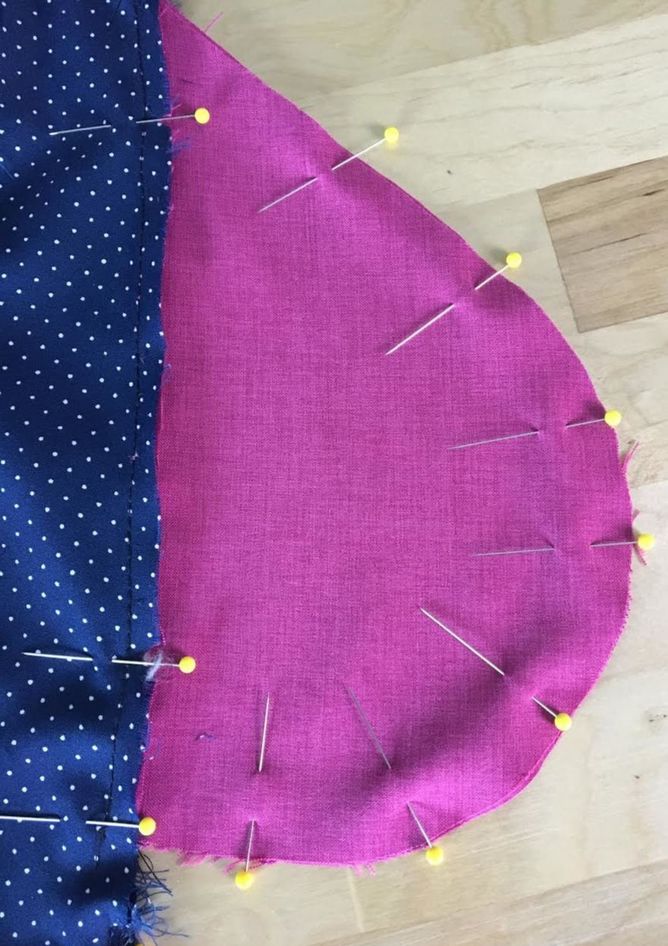 7. Next, pin the pocket bag horizontally along its edge as shown above. The circular edges of the front and back pocket pieces will be stitched to form the body of the functional on-seam pocket. 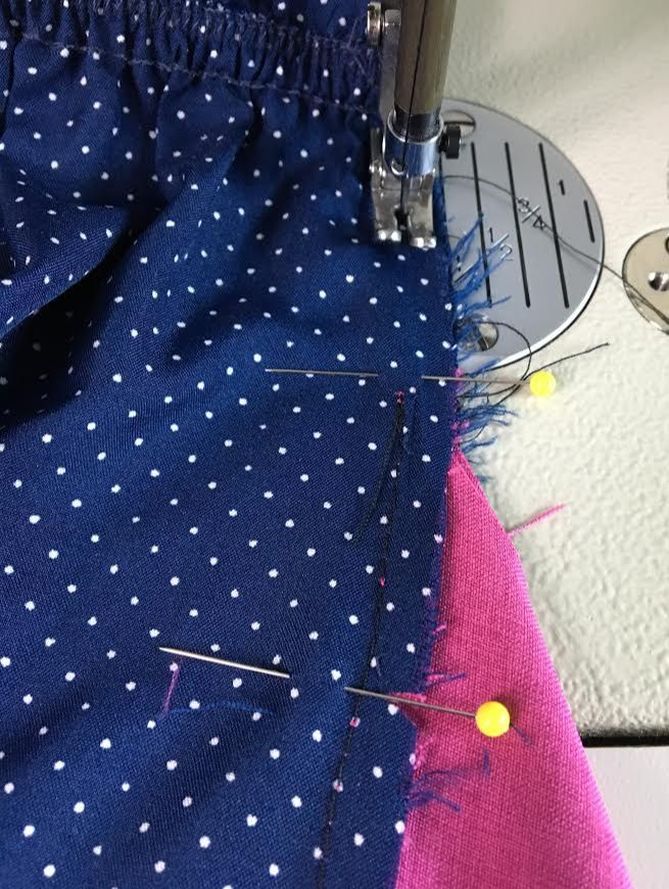 8. Starting at the top of the dress side seam as shown above, stitch down at the proper seam allowance (1/4" in this case) moving into the pocket seam. Make sure you stitch slightly to the left of the pocket seam stitch so that it remains hidden on the face of the garment when the pocket is complete. 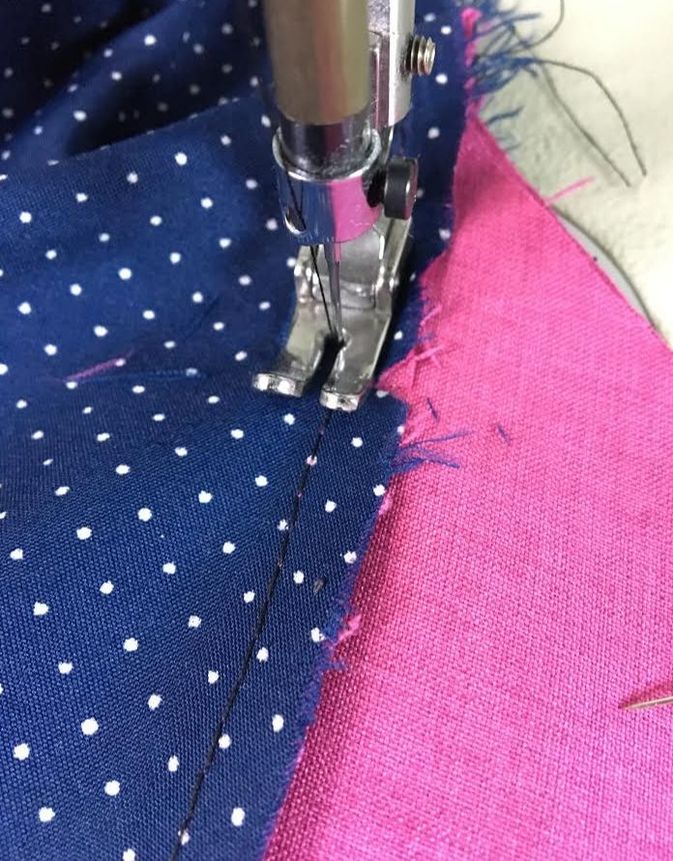 Stitch only up to the notch. When you get to the notch, reinforce the stitch either by backstitching or turning the dress in the opposite direction and stitching again on top of the existing stitch- a method which is displayed bellow. 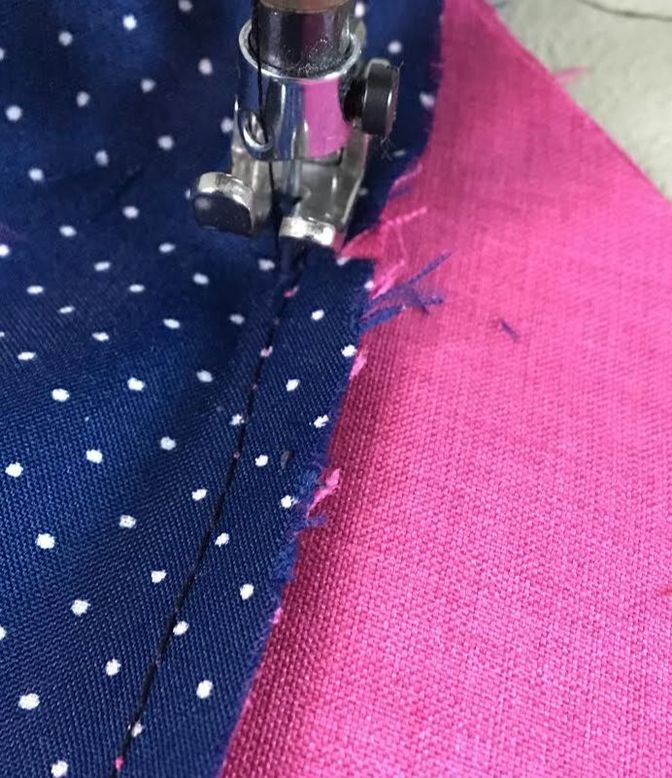 Lift the presser foot making sure the needle stays inserted into all layers of the fabric. 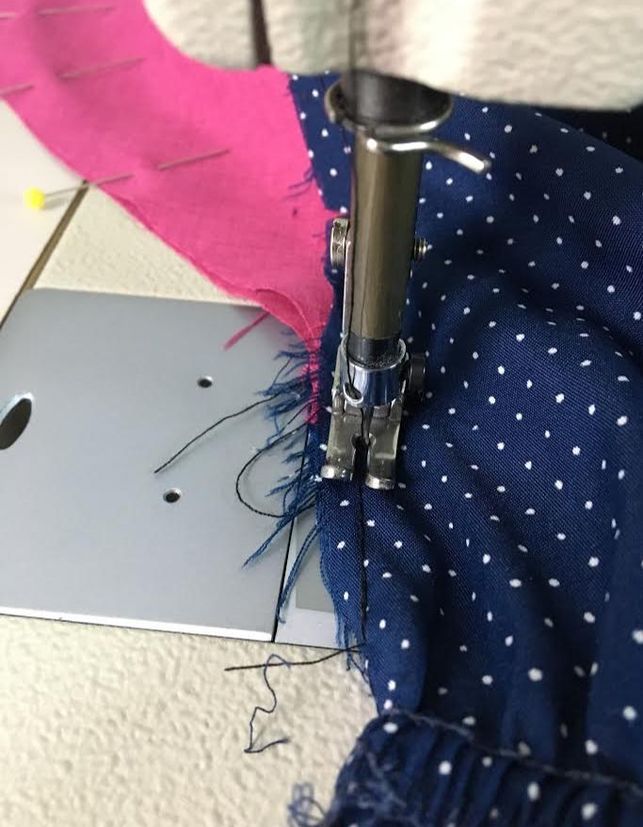 Turn the entire dress in the opposite direction (towards where you started the stitch) and stitch again directly on top of the existing stitch. This will lock the stitch thus reinforcing and strengthening the pocket opening. 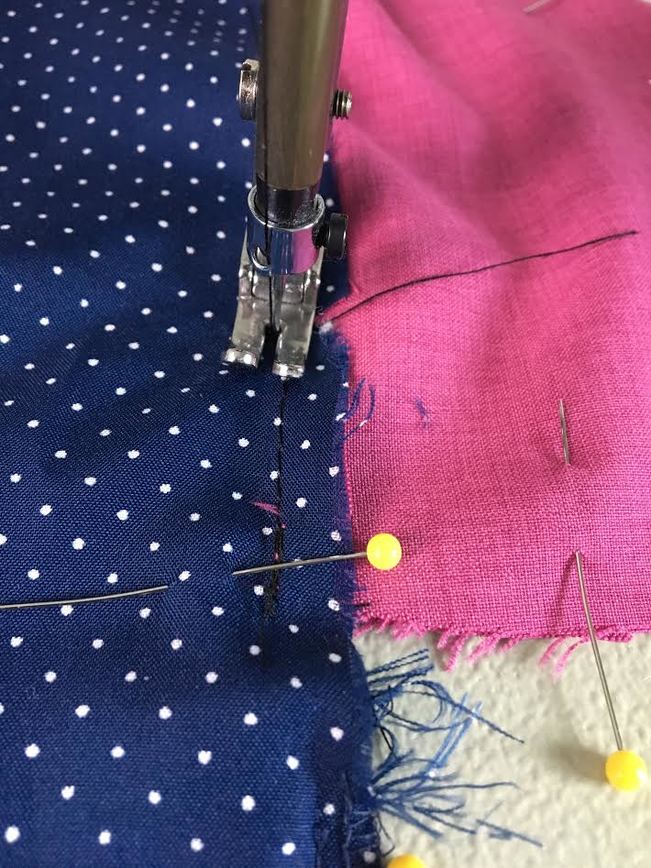 9. To sew the bottom of the pocket opening, stitch at the bottom of the pocket seam starting at the bottom notch and moving into the existing side seam stitch of the dress. Again, it is imperative that you lock the beginning of the stitch where the notch is located as this will create the bottom of the pocket opening- you can use the backstitch method for this portion. 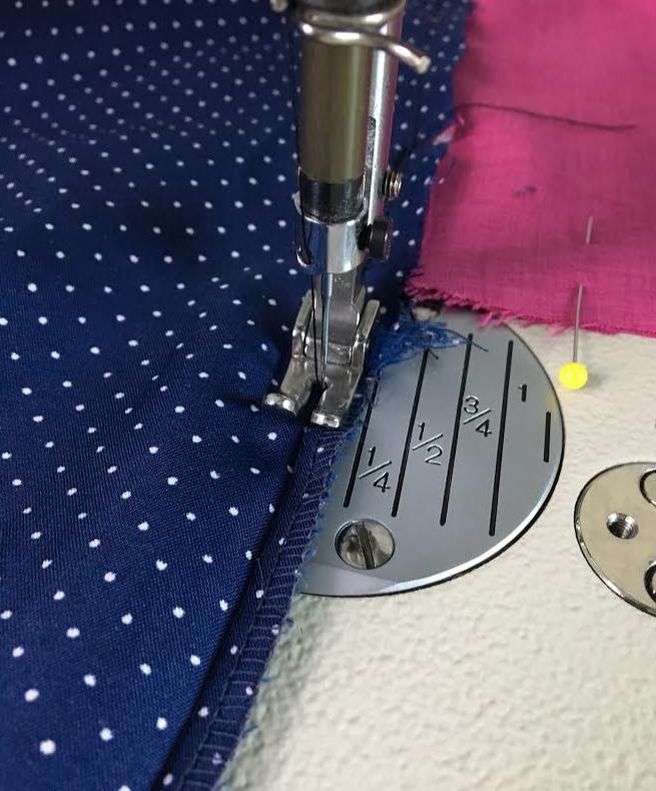 Connect smoothly into the existing dress side seam stitch for a smooth finish on the face of the garment. This will close the side seam of the dress permanently at the bottom of the pocket. 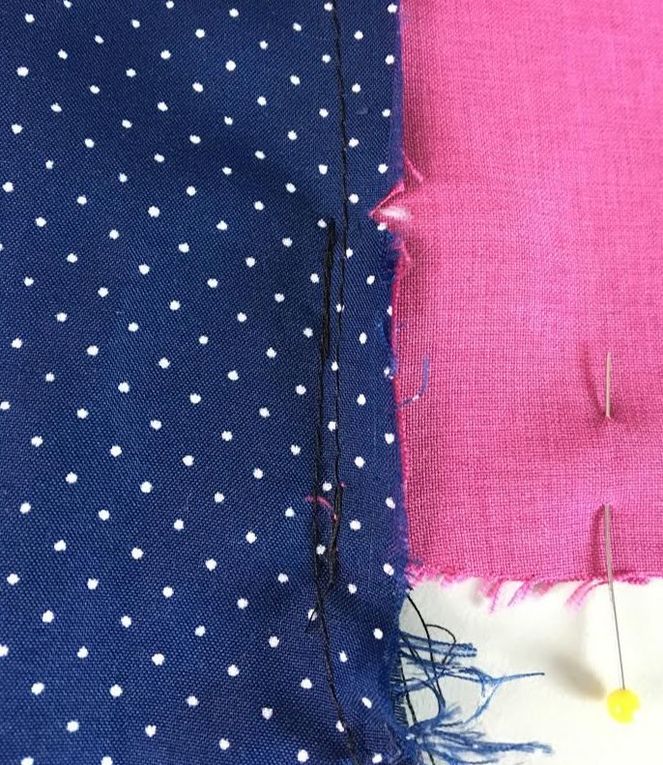 As mentioned above, always make sure that you stitch slightly to the left of the pocket seam stitch as shown above, this will create a smooth finish and ensure that the pocket edges aren't showing through the dress side seam. It is extremely important that you reinforce and lock the stitches both at the top and bottom of the pocket as they will coincide with the top and bottom opening of the pocket. This opening needs to be strong enough to withstand considerable and long-term use. 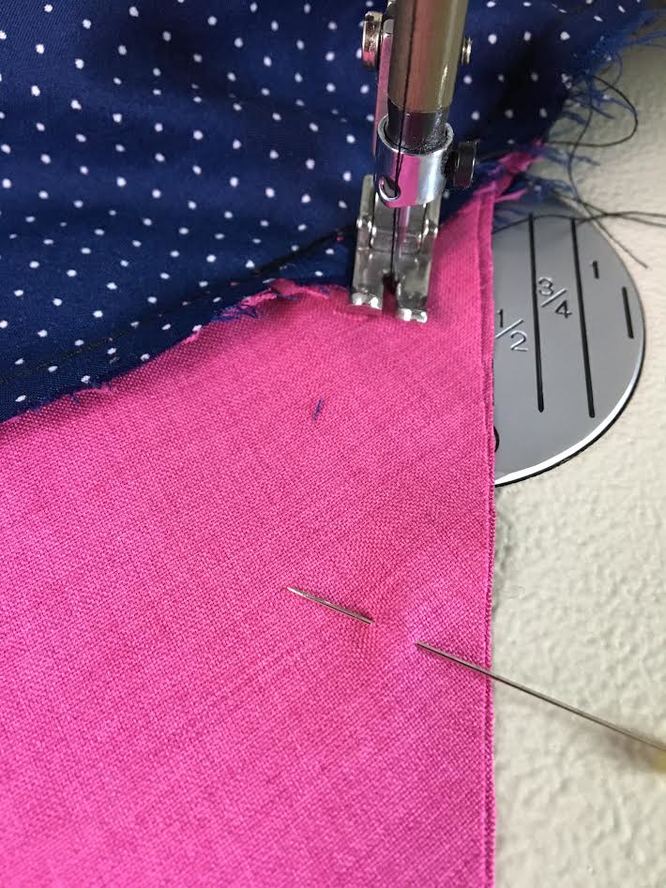 10. To close the pocket bag, stitch at 1/2" (or whatever seam allowance your pocket edges have) through both layers of the pocket bag. Start at the top of the pocket as shown above. 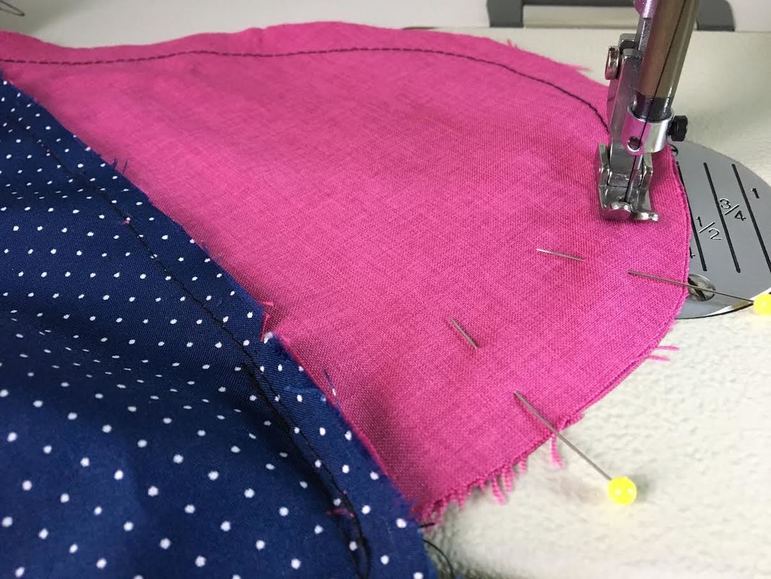 As you stitch along the very curved edges of the pocket bag, try to maintain a smooth curved stitchline at an even distance from the edge throughout. 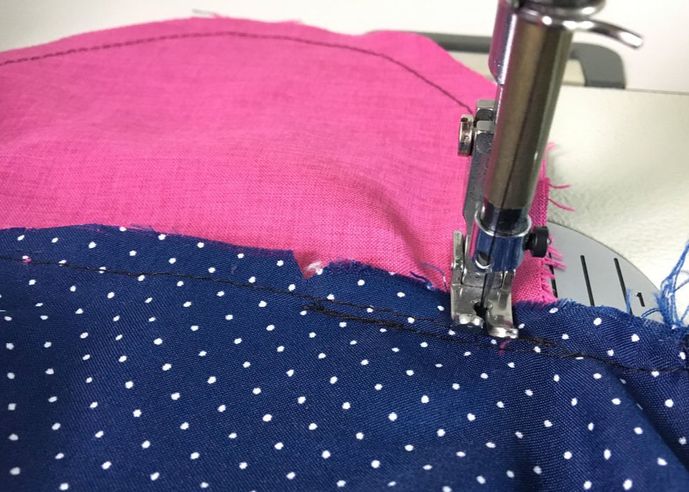 As you get to the bottom of the pocket bag, sew halfway on top of the seam allowance of the dress to fully close the pocket bottom. 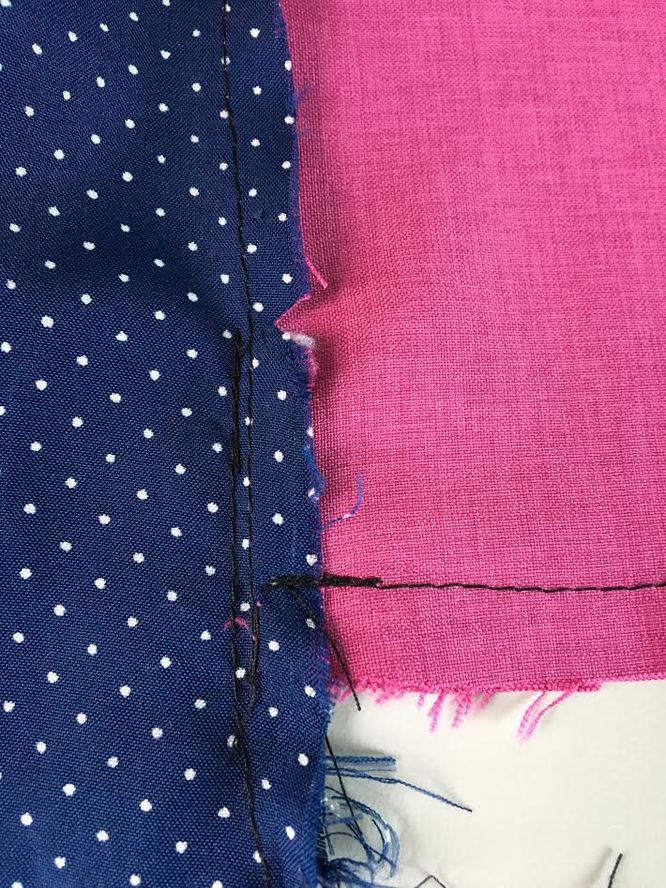 Make sure you backstitch at the end of the stitch for a durable finish. Be careful not to cross over the vertical side seam stitch of the dress- Stop at midway through the seam allowance (blue) as shown above. 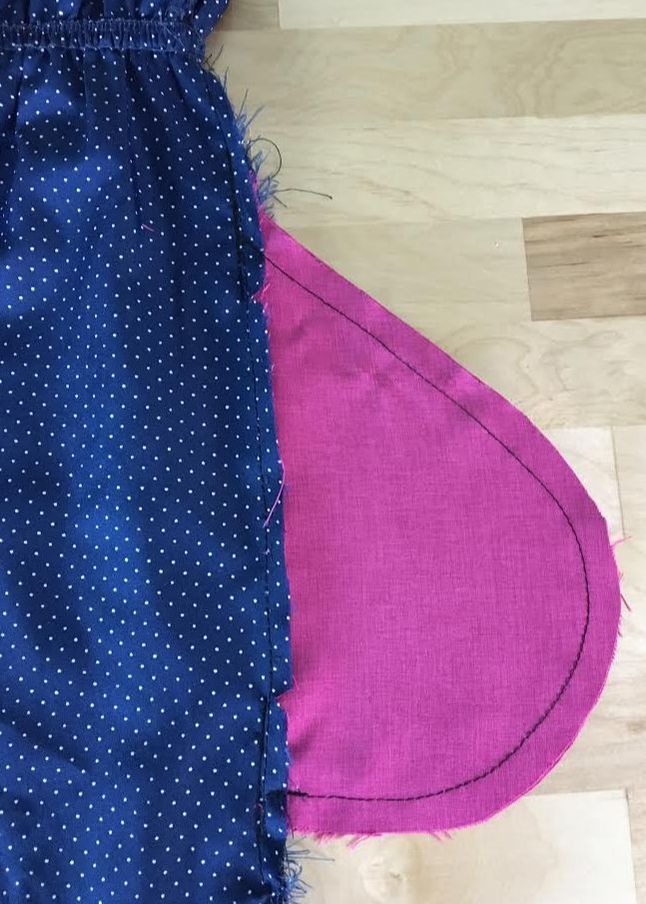 The on-seam pocket is now complete! All you have to do now is clean finish the raw edges of the side seam and pocket bag. 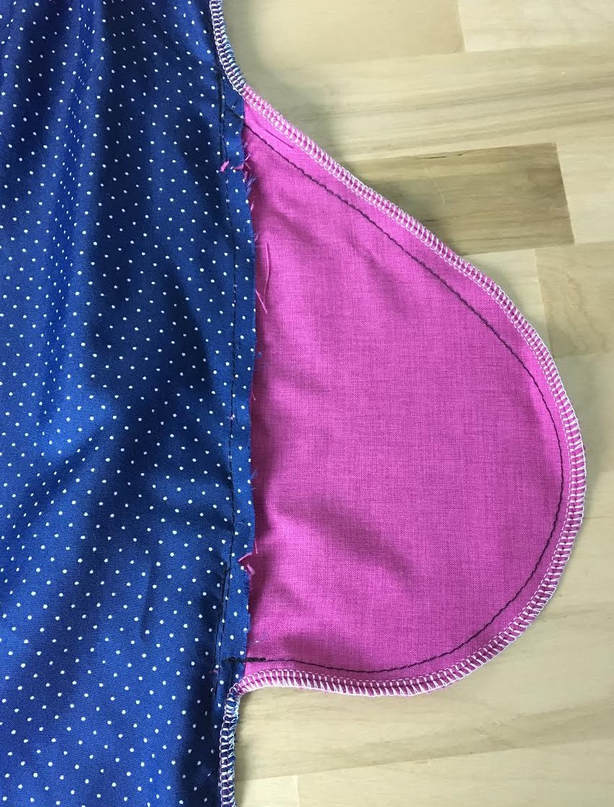 Apply a zig zag stitch on your home sewing machine along all raw edges of the seam and pocket bag. In this tutorial, we used a serging stitch following the same application steps as a regular zig zag stitch. You may need a bit of practice to apply the zig zag stitch along the most curved edge of the pocket bag- turn the pocket bag as you stitch to facilitate the process. 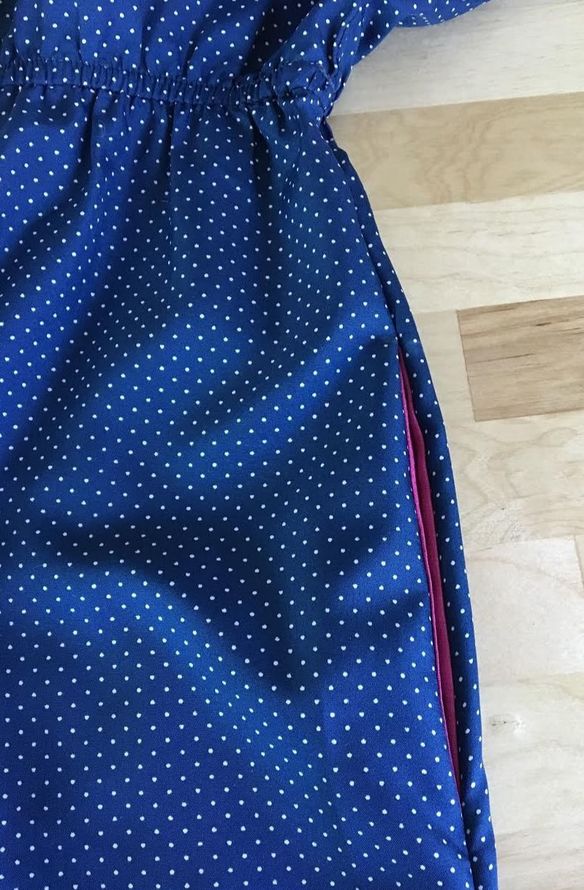 Once clean finished, turn the dress on its right side and iron the seam accordingly. You can also iron the pocket opening edges so that both the front and back pocket pieces are firmly pointing towards the inside of the dress. 
8 Comments
Maureen
2/27/2022 05:10:05 pm
Wow!
Moreen Mwaniki
7/31/2023 12:43:39 pm
This was of great help to me, I just loved how well this tutorial is illustrating.step by step and making it look like a piece of cake
Terri Sidell
3/7/2022 09:02:31 pm
Thanks so ever much for your tutorial on how to make an inseam pocket for a dress and how to sew it in!! I really appreciate the time you took to do this!!
Penny
8/30/2022 04:54:00 am
Thankyou so much for explaining clearly how to sew a pocket into a side seam. I have been trying to work out how to replace a pocket in my favourite robe. As a complete novice and yet to do more than just alter hems and sleeves this has given me the confidence to give this a go. I also have a pair of linen slacks that could benefit from having pockets. So glad I have found your site through Pinterest.
Petrina Lee
6/26/2023 03:37:13 am
I just purchased a tunic and thought how nice if it had pockets, and then I chanced upon your tutorial - I did it in about 2 hours (reading your tutorial and drafting the pattern), and I'm quite happy with the results though I feel it could be better but I know with more practice, I should be able to do it right. Thank you for an informative tutorial - I truly appreciate this!
Nehka
7/29/2023 04:04:16 am
This is by far the best explanation I've seen since my search for the best and simple way to sew inseam pockets. Thanks so much for this post.
Nina
8/13/2023 03:59:14 am
Thank you so much. This is the best tutorial I have ever read. Thank you for taking the time to lay it out so clearly. Leave a Reply. |
The Blog:A journey into our design process, sewing tutorials, fashion tips, and all the inspiring people and things we love. 
Doina AlexeiDesigner by trade and dressmaker at heart. I spend most of my days obsessing over new fabrics and daydreaming new ideas. 
Sadie
Executive Assistant & Client Relations Manager Archives
November 2019
Categories
All

|

-
Sewing Tutorials
-
Basics
>
- Aligning Pattern Grainlines To Fabric
- Preparing Fabrics For Sewing
- Pinning Sewing Patterns To Fabric
- Placing Sewing Patterns On Fabric For Cutting
- Rotary Cutters or Fabric Scissors?
- Cutting The Sewing Patterns
- What Are Notches And How To Use Them In The Sewing Process
- Transferring Notches From Pattern To Fabric
- Transferring Seamlines to Fabric
- Staystitching
- Backstitching: A Complete Guide
- Hand Basting: A Complete Guide
- Sewing Continuous Bias Binding
- Darts >
-
Sewing Seams
>
- The Basics Of Seams And Seam Allowance
- How To Sew A Straight Seam
- Sewing Curved Seams
- Sewing Corner Seams
- Trimming And Grading Seam Excess
- Notching/Clipping Seam Allowance for Tension Release
- Sewing Topstitched Seams
- Sewing Corded Seams
- Sewing A Slot Seam
- Sewing A Gathered Seam
- Sewing Bias Seams
- Sewing Seams With Ease
- Sewing Seams With Crossing Seamlines
- Sewing Unlike Fabric Seams
- How To Iron Seams: Ironing Tools And Conventions
- Sewing With Knit Fabrics
- Understanding Stitch Length And Tension
- Sewing Unique Fabric Seams
-
Seam Finishes
>
- Seam Finishing Techniques - Overview
- Applying A Pinked Seam Finish
- Applying A Bias Bound Seam Finish
- Serging And Zigzag Seam Finishes
- Sewing A Self-Bound Seam Finish
- Sewing A French Seam Finish
- Sewing A Hong Kong Seam Finish
- Sewing A Mock French Seam Finish
- Sewing A Turned-and-Stitched Seam Finish
- Sewing Overcast Hand-Applied Seam Finishes
- Sewing A Flat Felled Seam
- Sewing A Hairline Seam Finish
-
Hem Finishes
>
- Garment Hem Finishes: Overview
- Sewing A Double Fold Hem Finish
- Sewing A Single Fold Hem Finish
- Sewing Bound Hem Finishes
- Sewing An Exposed Double Layer Bound Hem
- Sewing A Folded-Up Bound Hem with Pre-folded Binding
- Sewing A Hong Kong Hem Finish
- Sewing A Band Hem Finish
- Sewing A Bias Faced Hem Finish
- Sewing A Twill Tape Hem Finish
- Sewing A Rolled Hem Finish
- Sewing A Shaped Hem Facing
- Using Fusible Hem Tape And Webbing
- Finishing A Lace Fabric Hem
- Finishing A Leather Hem
- Sewing Faced Hem Corners
- How To Finish Lining At The Hem
- Finishing Fabric Corners by Mitering >
- Interfacing A Hemline: Lined And Unlined Examples
-
Sewing Pockets
>
- Curved Patch Pocket With Flap
- Unlined Square Patch Pockets
- Lined Patch Pockets: Two Ways
- Extension On-Seam Pockets
- Separate On-Seam Pocket
- Front Hip Pockets
- Bound Double Welt Pocket
- Double Welt Pocket With Flap
- Self-Welt Pocket (Using Single Fabric Layer)
- Slanted Welt Pocket (Hand-Stitched)
- Faced Slash Pockets: Overview >
-
Sewing Zippers
>
- Sewing Zippers: General Information
- Sewing A Centered Zipper
- Sewing A Lapped Zipper
- Sewing An Invisible Zipper
- Sewing A Fly Front Zipper
- Sewing A Closed-End Exposed Zipper (No Seam)
- Sewing An Exposed Separating Zipper
- Sewing Hand Stitched Zipper Applications
- Sewing A Zipper Underlay
- Sewing A Placket-Enclosed Separating Zipper
- Sleeveless Finishes >
-
Neckline Finishes
>
- Sewing A Neck Shaped Facing
- Sewing An All-In-One Neck Facing
- Neck And Garment Opening Combination Facings >
- Sewing A Bias Faced Neckline Finish
- Sewing A Band Neckline Finish
- Bound Neckline Finishes: Overview >
- Sewing A Semi-Stretch Strip Band Neckline
- Ribbed Neck Band And Classic Turtleneck
- Decorative Neckline Finishes >
- Finishing Facing Edges >
-
Extras
>
- A Complete Guide on Interfacing
- Sewing Bound Spaghetti Straps
- Sewing Spaghetti Straps To A Faced Neckline
- Sewing Ruffles: Overview
- Patterning And Sewing A Circle Ruffle
- Sewing A Gathered Heading Ruffle
- Sewing Double Layer Gathered Ruffles
- Sewing A Gathered Ruffle Into A Seam
- Sewing A Gathered Ruffle To A Fabric Edge
- Sewing A Fabric Surface Slit
- Sewing A Slit Seam
- Hand-Applied Straight Stitches
- Hand-Applied Blind Stitches
- Hand-Applied Overedge Stitches
- Hand-Applied Tack Stitches
- Hand-Applied Decorative Stitches
-
Basics
>
- Custom Bridal
- Custom Apparel
- About
- Blog
 RSS Feed
Services |
Company |
|
