|
I've had a personal obsession with pockets for years. I love them all regardless of style and find them to be one of the primary functional elements in a garment. Today, I'll show you how to sew one of my all time favorites: the welt pocket. A classic, tailored pocket that is conventionally used with men's trousers, suit jackets, vests and other menswear and womenswear tailored items. Although they seem to be more prevalent in menswear, I love seeing a welt pocket as a design element in more casual women's wear. The clean, high quality finish of a welt pocket can elevate a garment's look and function regardless of whether this a business-appropriate style or a pair of casual shorts.  There are two main types of welt pockets: single and double welt, although these derive other styles. Naturally, the single welt pocket has a single welt (rectangular tab) while the double has two, usually equal width taps or welts. As you might have already guessed, the single welt is easier to sew simply for the fact that there is less stitching and measuring involved in comparison to a double style. I do have to admit that welt pockets can be a bit tricky for sewing beginners, but after you sew a few of them, they will definitely start looking more uniform and professional! So if you love welt pockets as much as I do, don't give up on the first try! I recommend that you don't move on to the double welt pocket until you feel comfortable with sewing a single welt. OK, before we move on to the sewing steps below, here are a few things to keep in mind with regards to the construction and styling of welt pockets:
Steps For Sewing A Single Welt Pocket1. To start with, measure and cut your welt pocket components. This should include the welt piece itself and two separate pocket bag pieces (for this particular method). If you are unsure about where to start, use the measurement ratios provided in the image below as a guide. All the pocket piece measurements are the same width but different lengths. If you've never attempted to sew a welt pocket before, I suggest just duplicating the measurements I'm using in this tutorial. This should help you follow the sewing steps easier and you can thankfully skip the math! 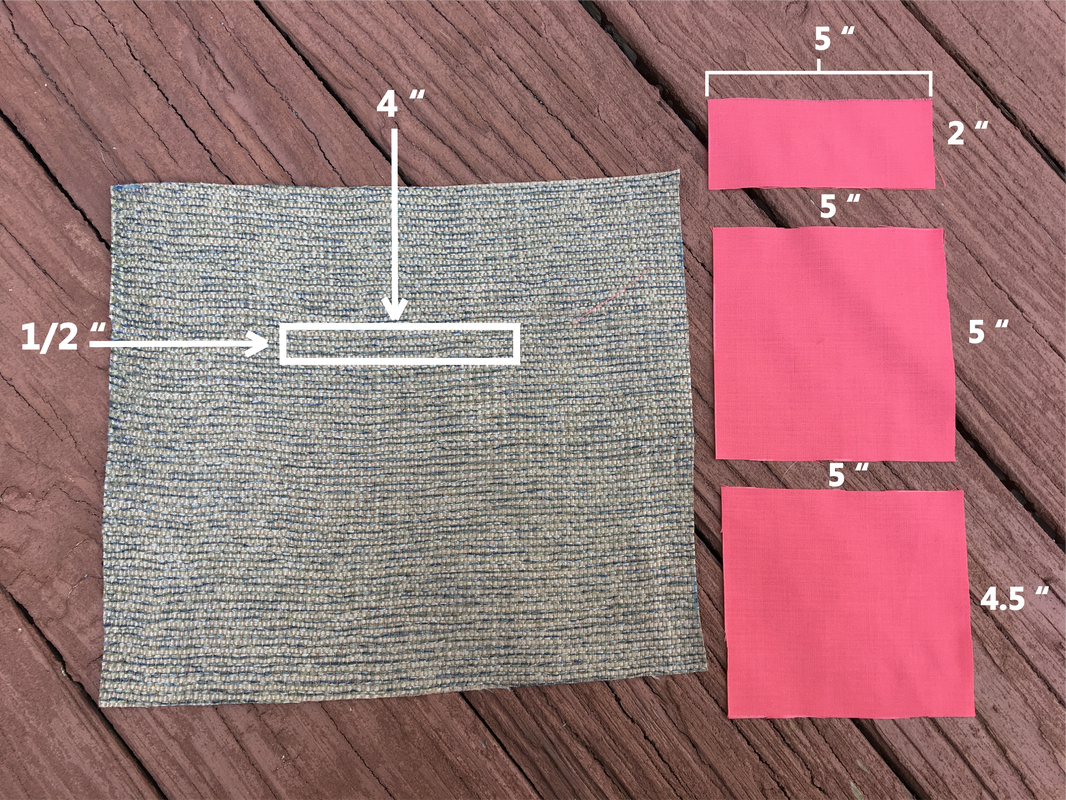 So for the single welt pocket, you need: The welt piece and two pocket bag pieces one being slightly shorter than the other- you'll see why as you go through the rest of the steps below. Use the image above as a reference for your measurements. Note: There is another welt pocket technique that uses a single piece of fabric for the pocket bag (instead of two). This technique is fairly conventional and used a lot in the manufacturing world. I personally learned to sew a welt using two separate pocket bag pieces so that's the method I'll show you here. The benefit of using two separate fabric layers is that you can use different fabrics for each layer as desired. 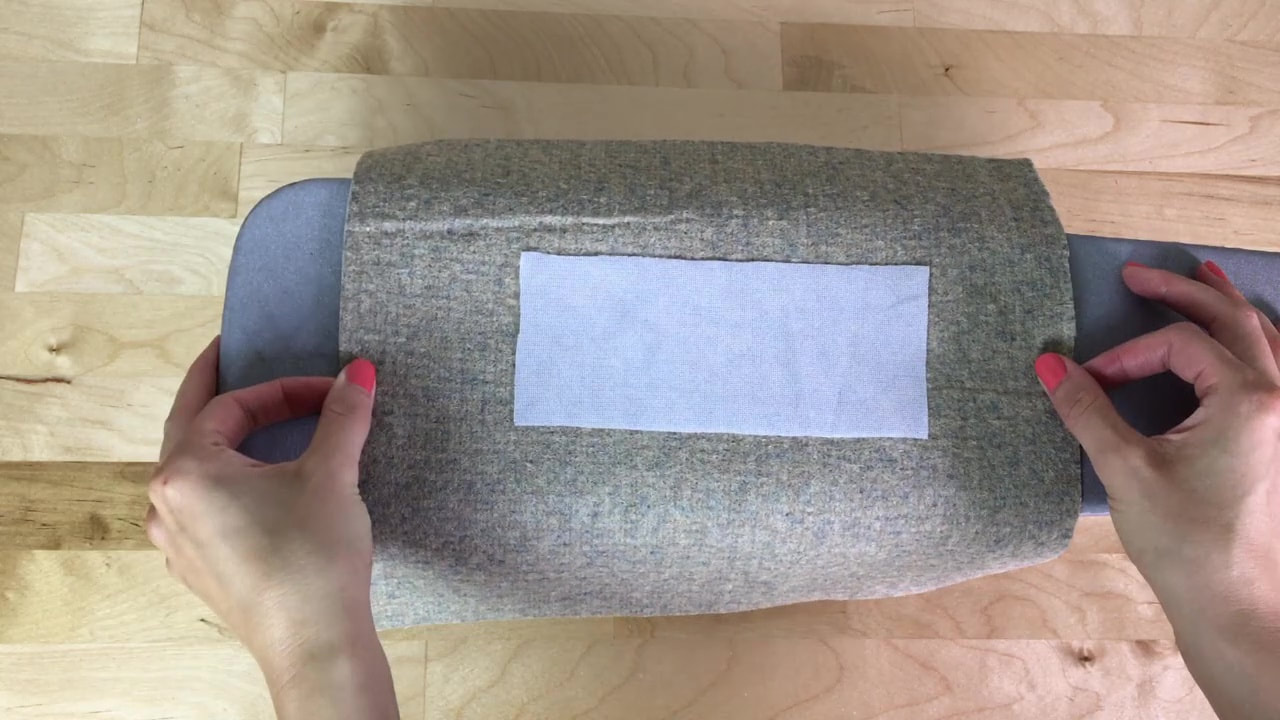 2. First, it is very important that you back the location of the welt pocket with fusible interfacing on the wrong side of the fabric. I like to work with knit fusible interfacing as it offers a bit more stretch and doesn't disintegrate in the wash. Covering the desired location of the welt pocket, fuse a rectangular cut of the interfacing on the back (wrong side) of the fabric about 1-2 inches larger than the welt length in all directions. Use a cotton cloth for both fabric and iron protection. 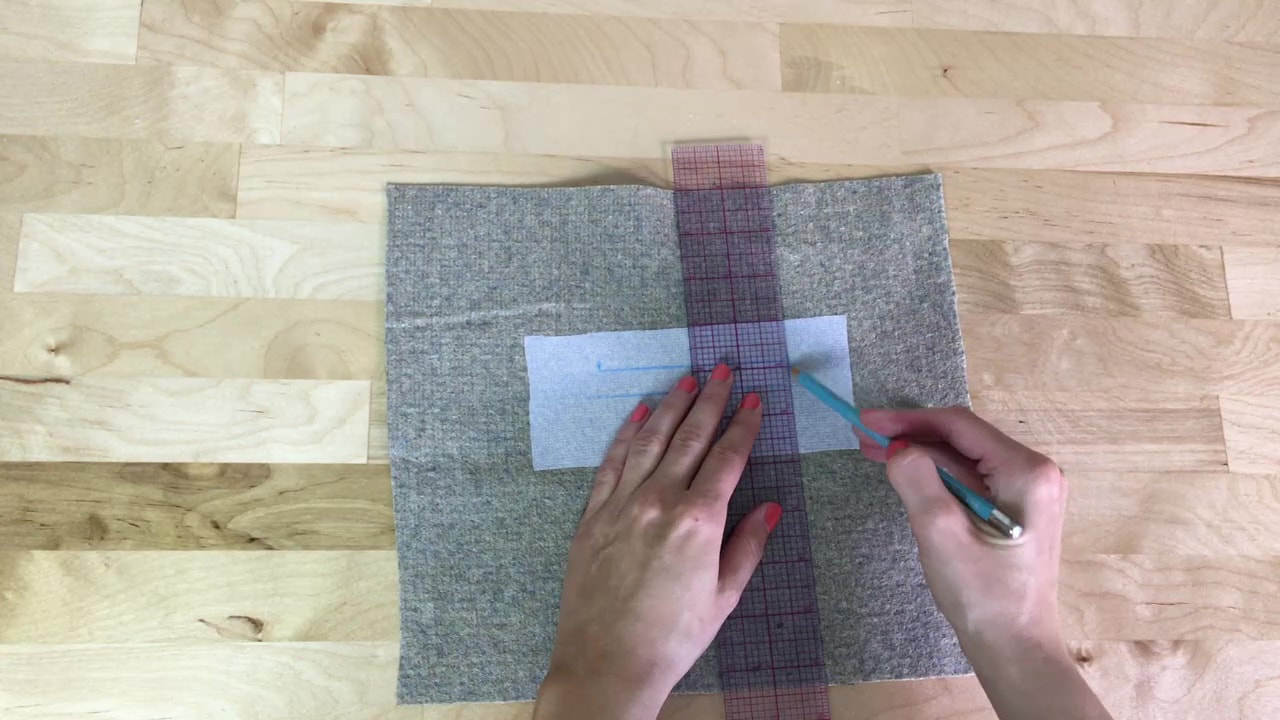 3. Once fused, use a fabric quilting pencil (recommended!) and a ruler to draw the exact length, width and shape of the welt directly on the fusible interfacing as shown. Mine is 4" long and 1/2" tall. 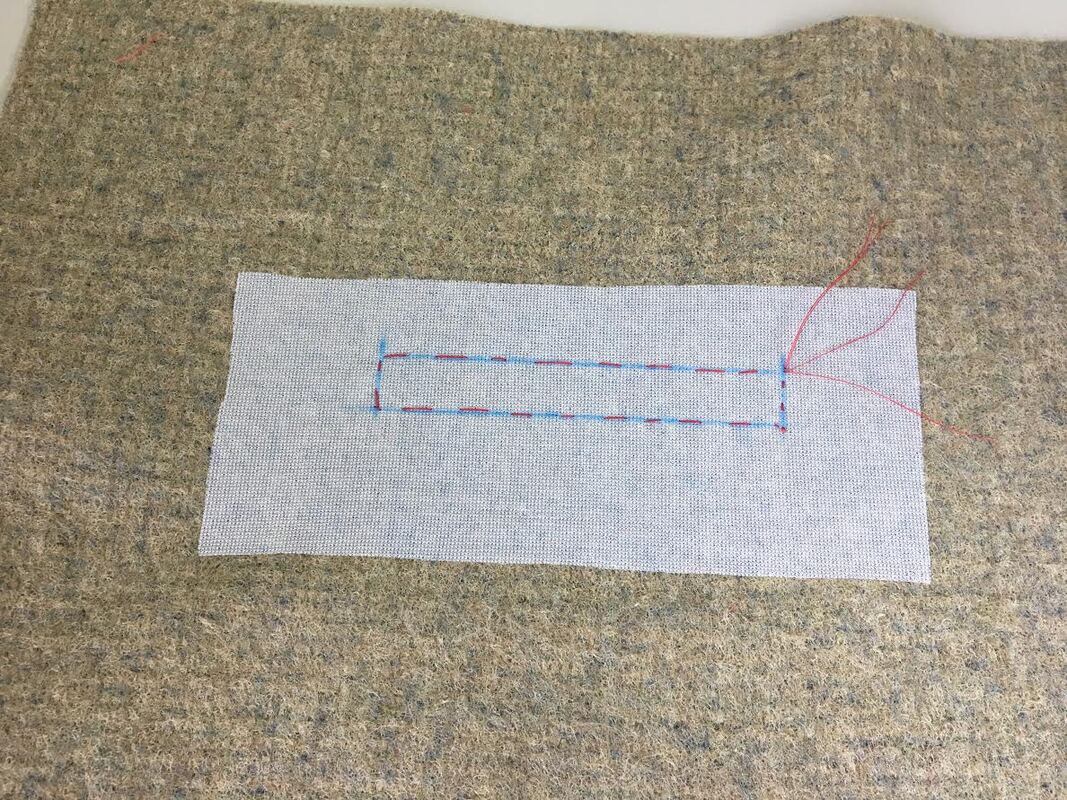 4. A welt pocket is actually mostly sewn from the right side of the fabric, so you will need to carefully transfer the welt pocket marks onto the other side. To be exact in the transfer process, use a hand basting stitch to mark the rectangle on the fabric's right side. 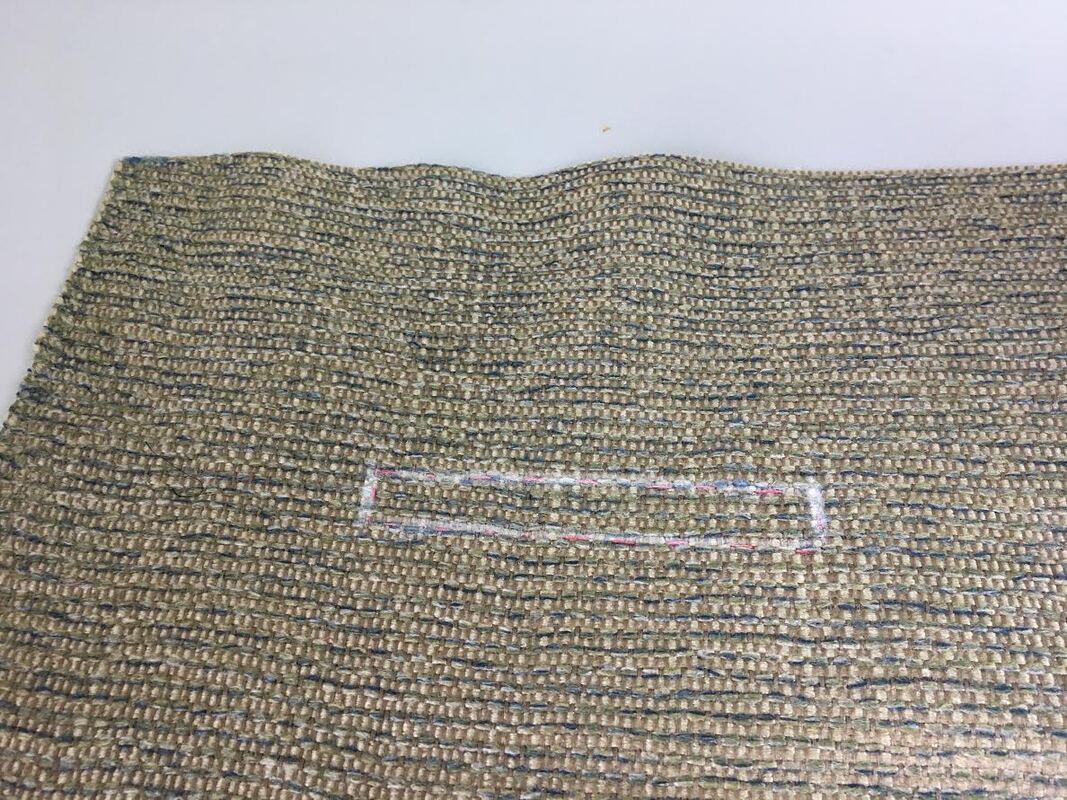 Normally, this basting stitch should be enough to provide all the marks you need in the sewing process. However, due to the fact that I'm working with a very textured fabric, I'm going to reinforce my welt pocket lines with a dry piece of soap. Yes, not tailor's chalk, a dry piece of soap. Call me crazy, but this is one of my favorite hacks passed down to me from generations. :) Dry soap shows really well on textured fabrics and provides a very easily removable option. Following my basting stitch lines, I re-drew the welt pocket on the right side of the fabric. The fabric surface is now prepped for the welt! 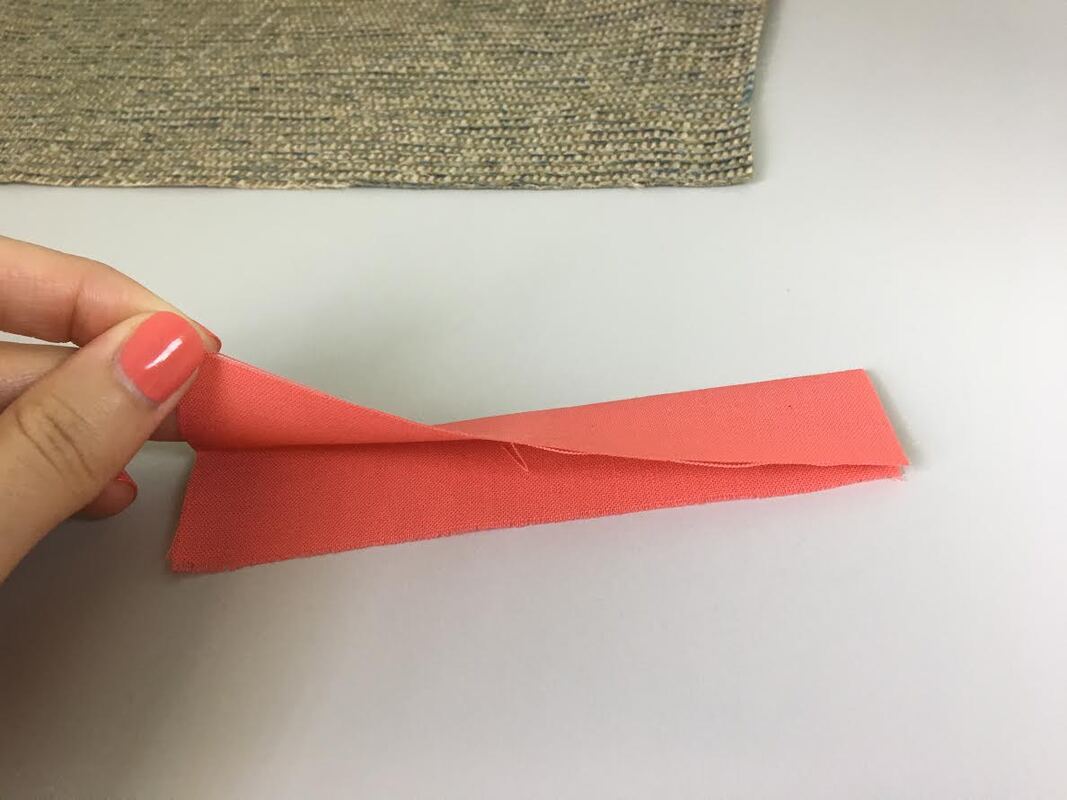 5. Fold the welt strip lengthwise down the middle and iron to reinforce. This piece will be stitched to top edge of the rectangle on your fabric. 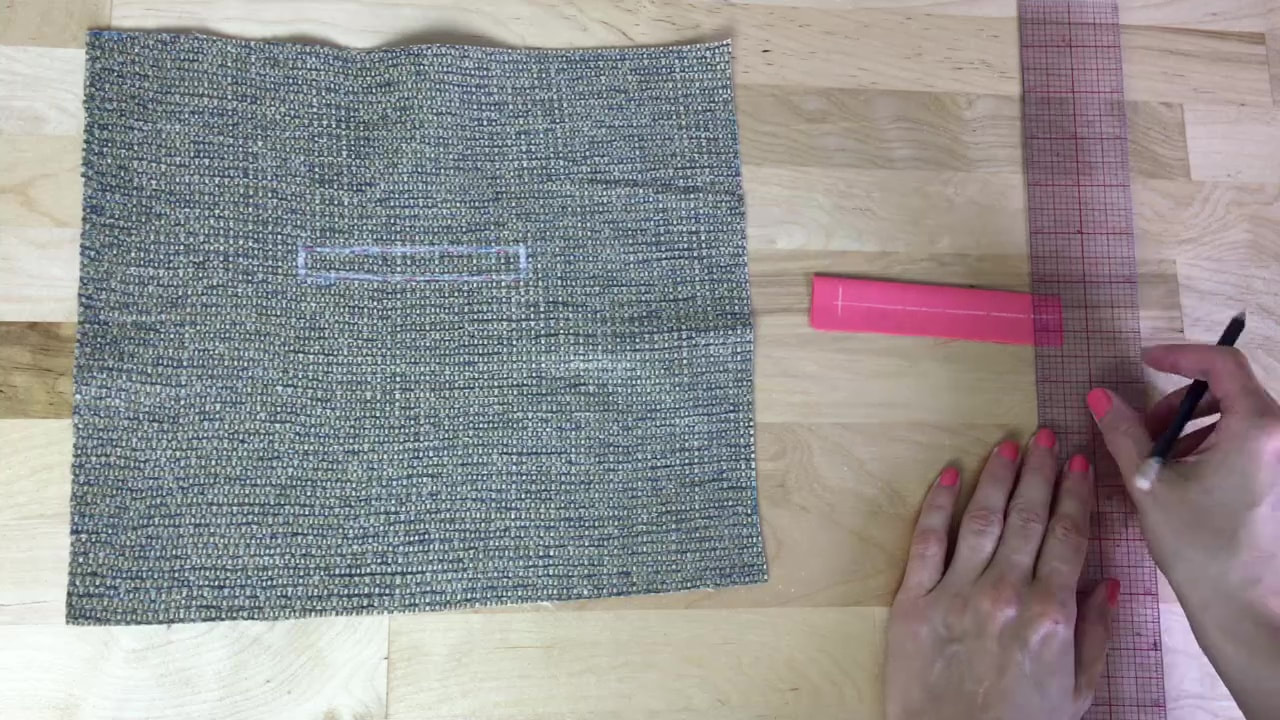 6. Using your fabric quilting pencil, draw the lines of the finished welt on this folded strip of fabric. In doing so, you are basically marking all your stitch lines which will then help you position the welt perfectly on your fabric. 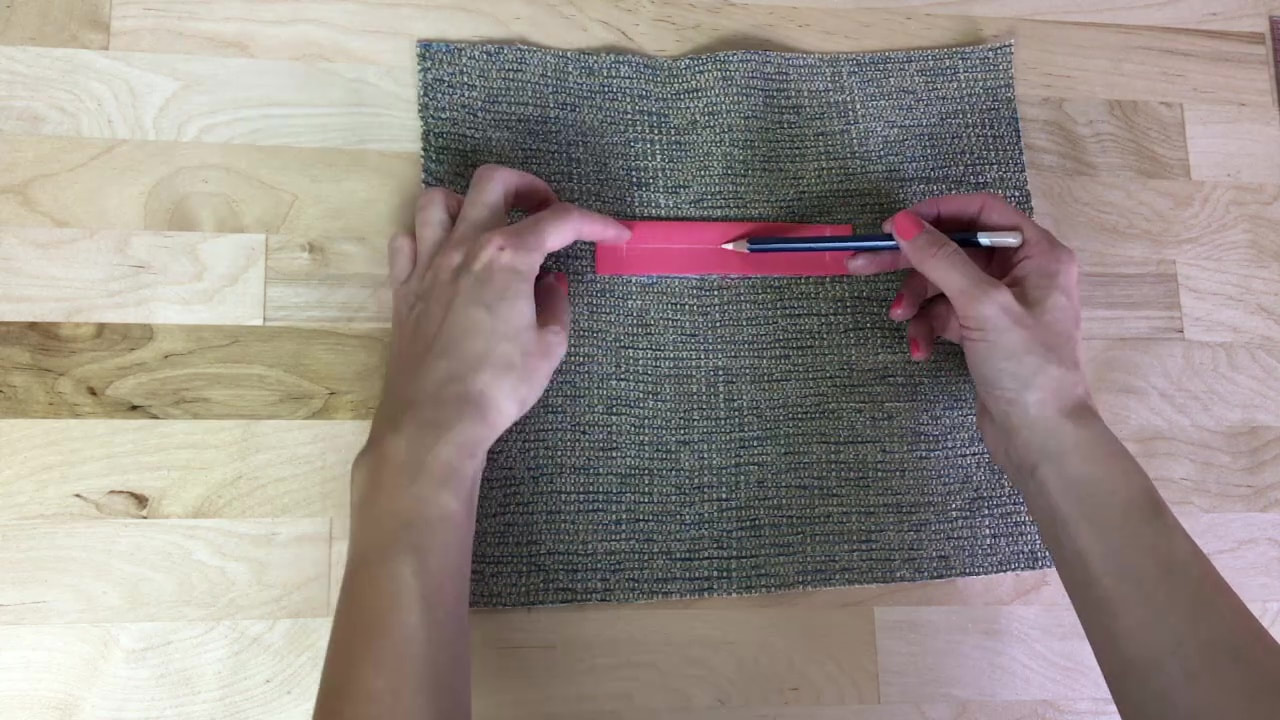 7. Align the raw edges of the welt with the bottom line of the welt rectangle on your fabric (shown above). The line you marked on the actual welt piece in the step above should align with the top line of the rectangle. 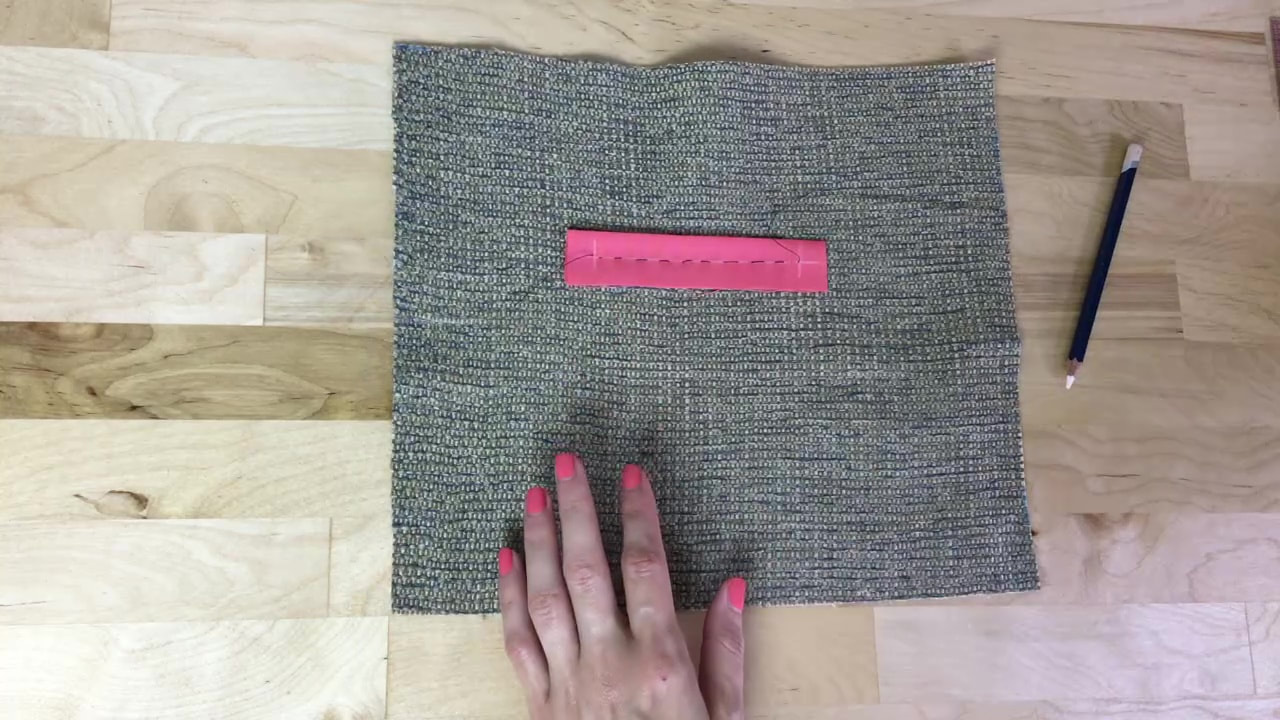 8. Hand baste the welt to the fabric layer directly on top of the marked line as shown. Leave the seam allowance portion unstitched on both sides as shown. When the hand basting is complete, pin the bottom raw edges of the welt up and out of the way so you can now work with the bottom edge of the rectangle marked on your fabric. 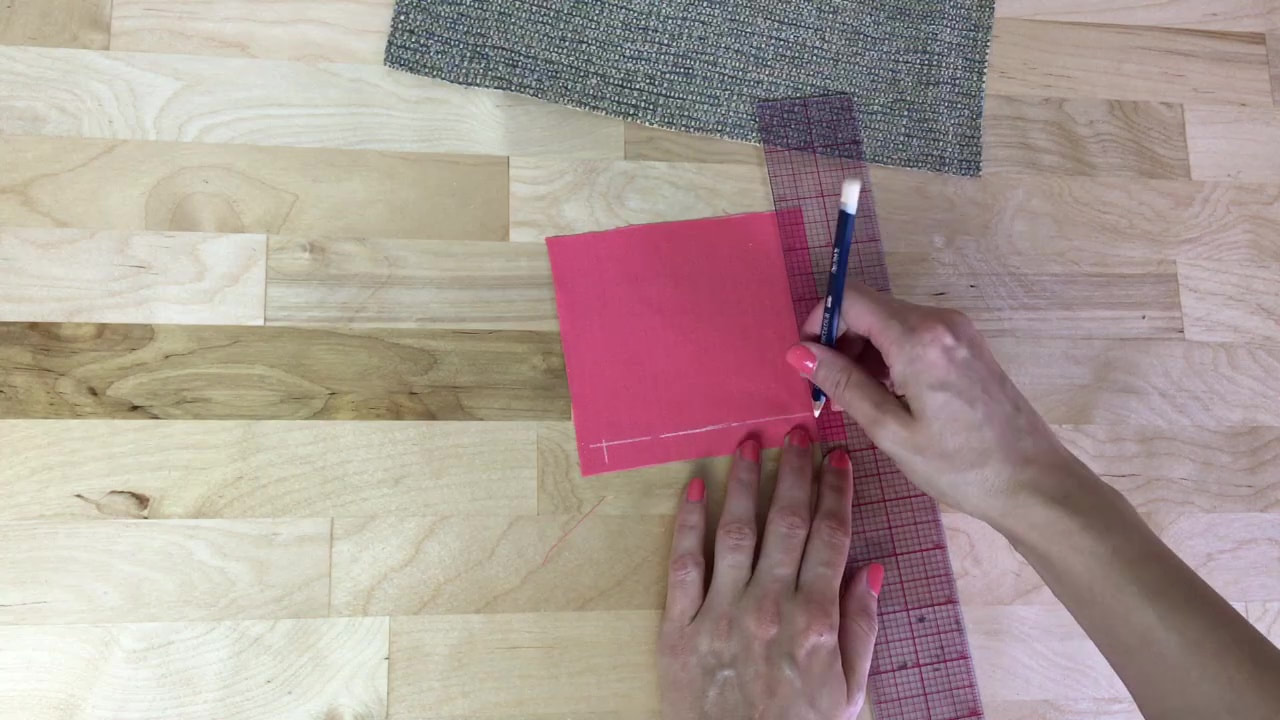 9. On the smaller pocket bag piece use your pencil and ruler again to mark a straight horizontal line 1/2" down from the fabric edge (or whatever your seam allowance is). As you did on the welt piece, mark the seam line with a vertical dash on each side of this pocket piece. The length of the straight line between these two vertical lines should be exactly the length of the final welt. If this process sounds a bit confusing, use the video and image above for more guidance. 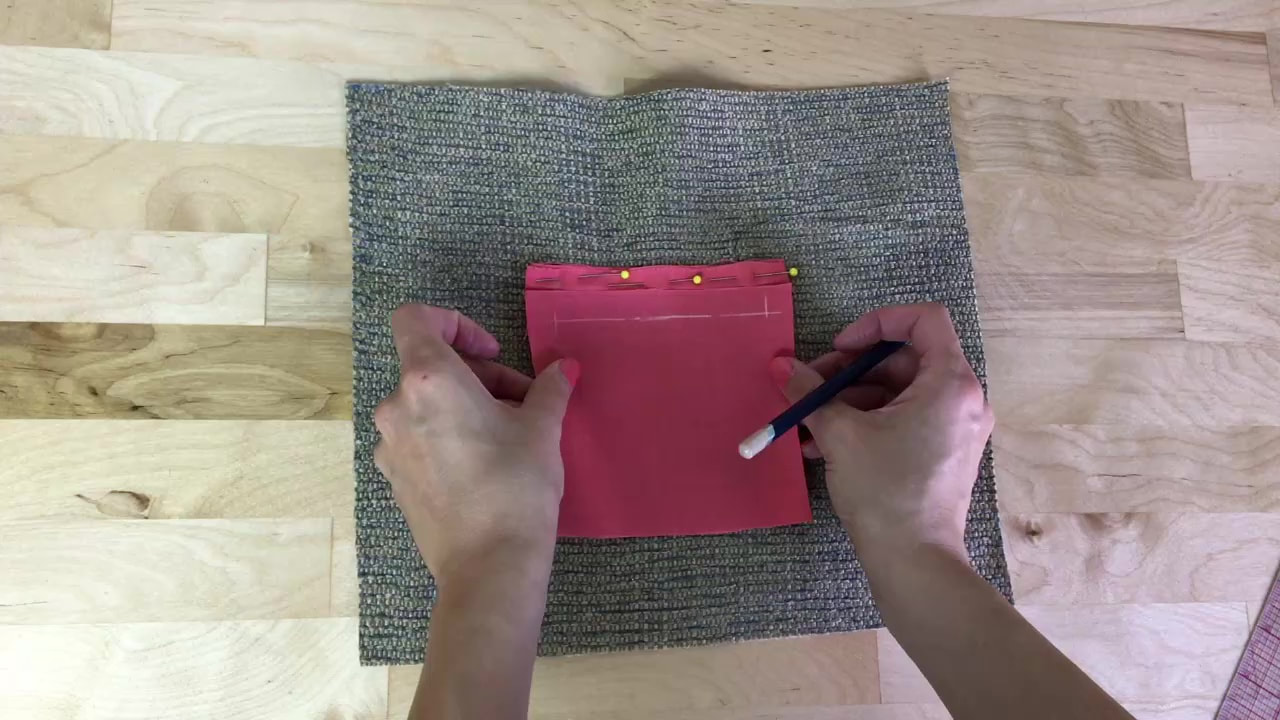 10. Next, align the pencil line on the pocket piece to the bottom edge of the rectangle marked on your fabric (the one opposite to the welt above). Make sure the marked vertical lines on each side correspond to the sides of the fabric rectangle as well as those on the welt piece itself. 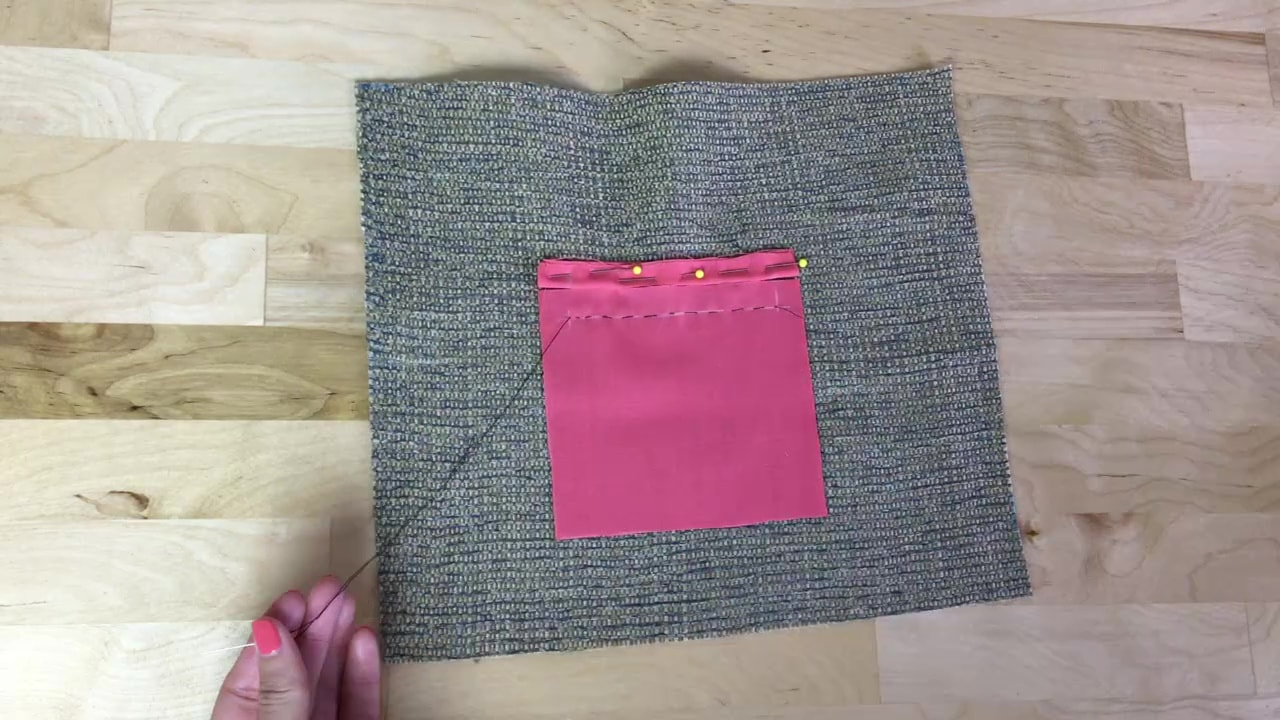 11. As you did for the welt, hand baste the pocket piece to the fabric through the marked horizontal line, starting at one vertical dash and ending at the other. 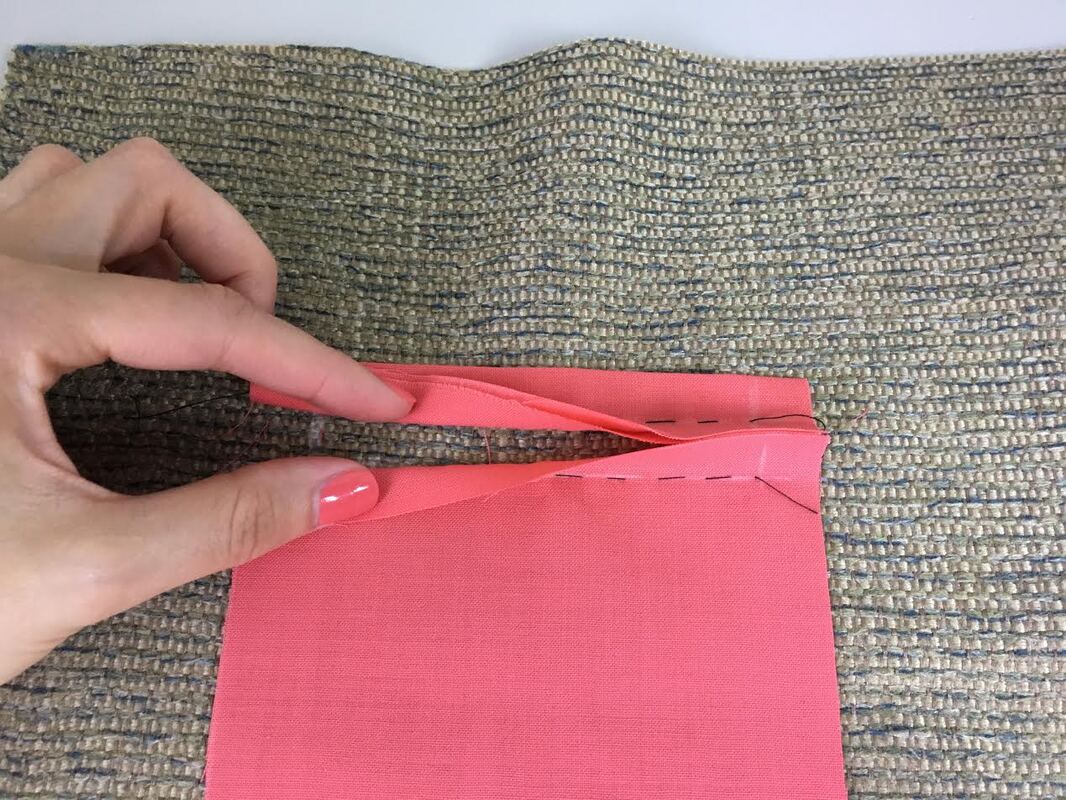 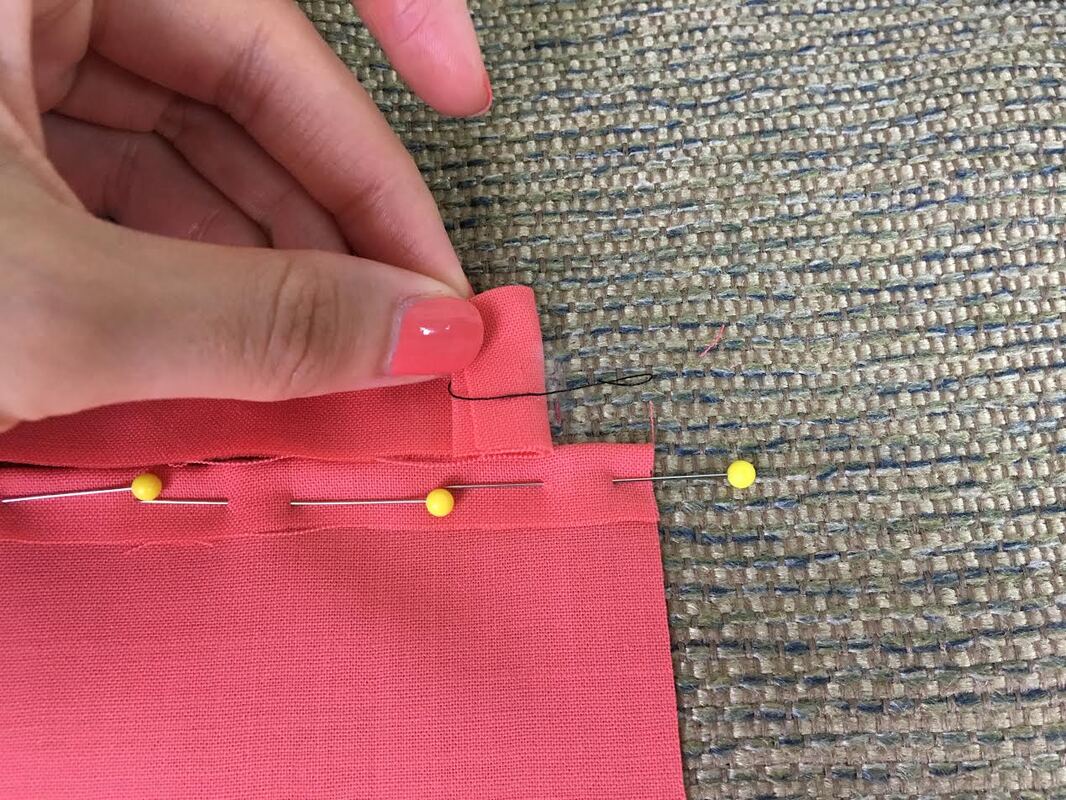 The basting stitches holding these two pieces together (pocket bag and welt) should start and end exactly at the same location as shown. This uniformity is what ensures that the final welt pocket's side edges remain straight, forming perfect 90 degree corners at the top and bottom 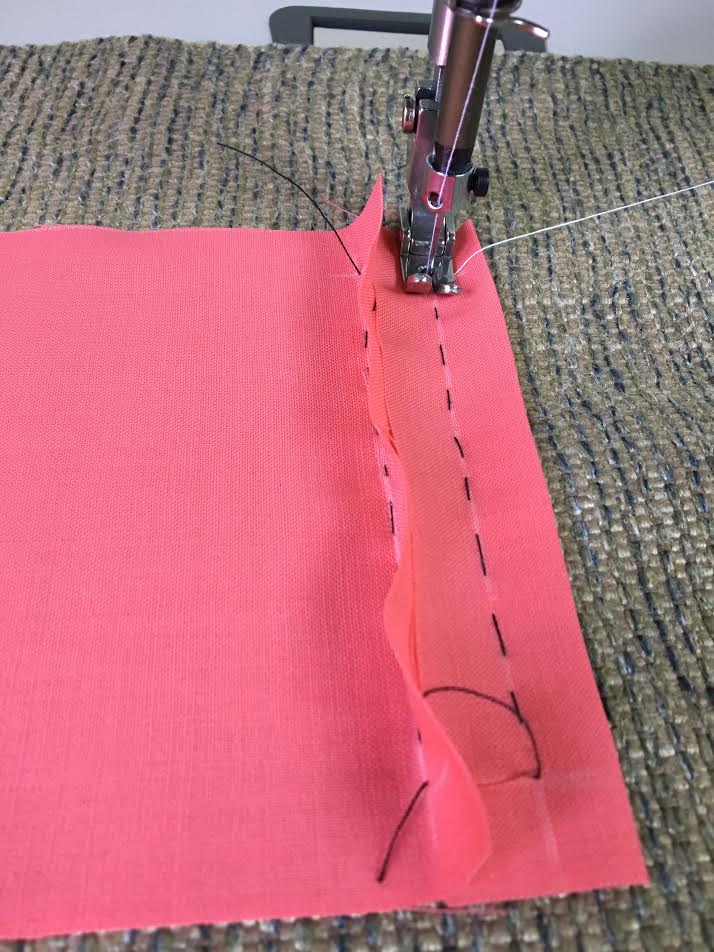 12. Following the pencil marks and hand basting carefully, machine stitch the welt piece to the fabric surface. Keep in mind that this stitch is applied only through the length of the desired welt pocket not including the seam allowance on both ends (as shown). I highly recommend backstitching both at the beginning and end of your stitch to prevent it from unraveling. If you don't feel comfortable backstitching yet, tie the loose threads together to lock the stitch. 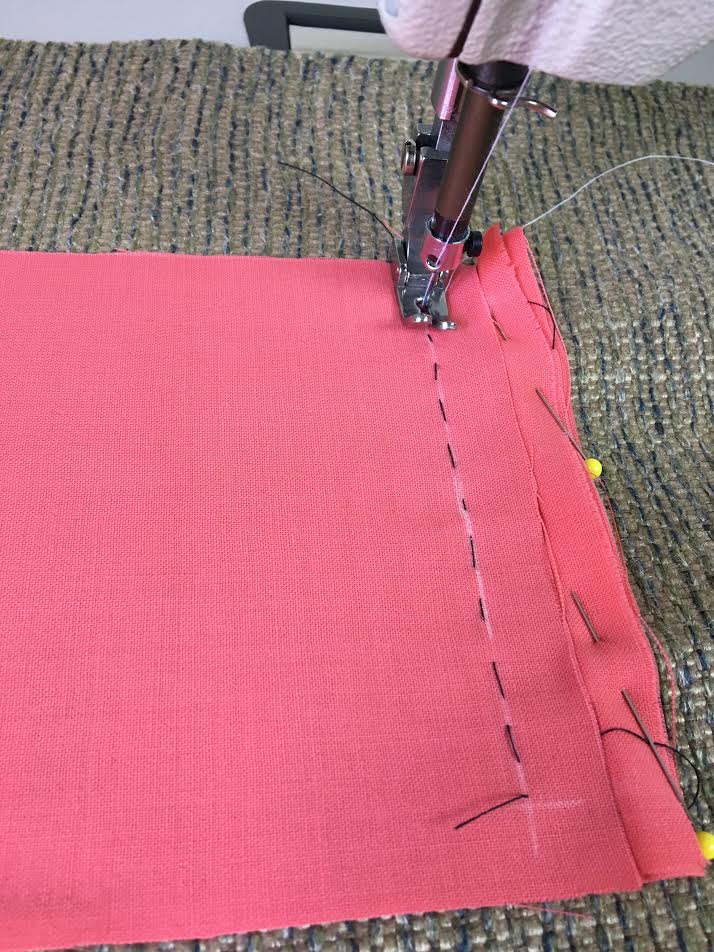 13. Repeat the same stitching process described in Step 12 for the pocket bag piece. Again, make sure that this stitch starts and ends at exactly the same distance as the welt piece above. Don’t forget to leave the seam allowance edges on both left and right sides unstitched. Backstitch on both ends to reinforce. 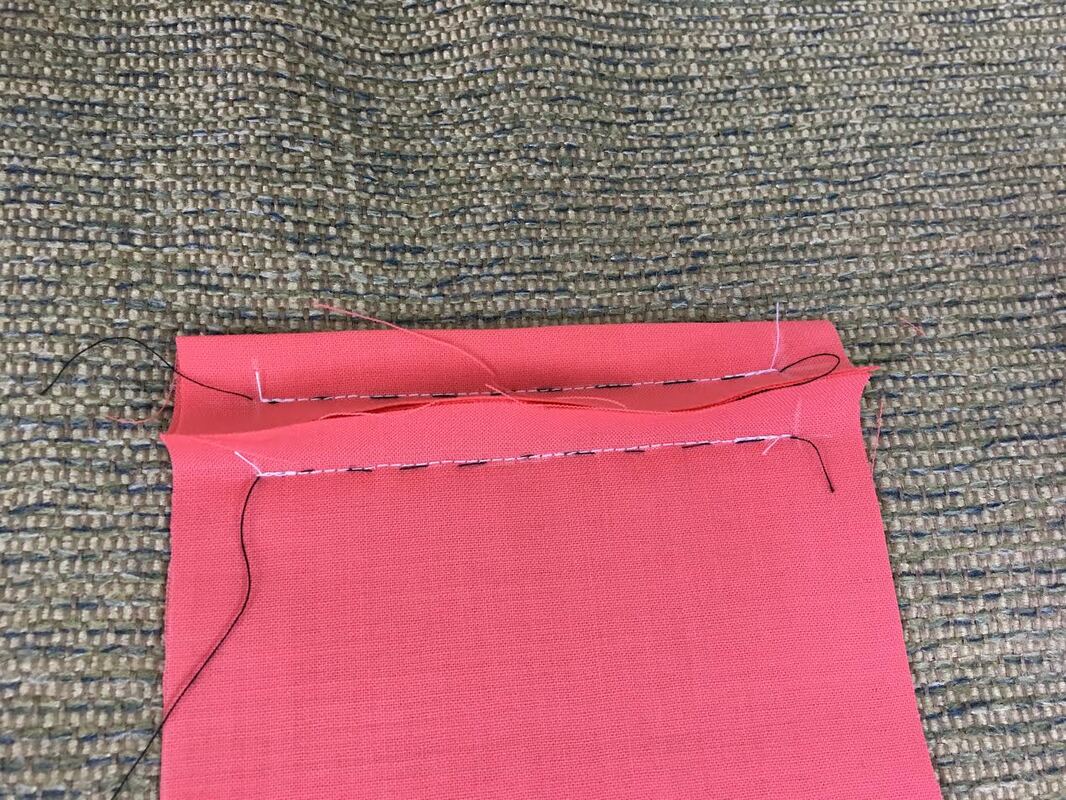 When looking at both stitch lines side by side, you should see two perfectly parallel lines that are exactly the same length. 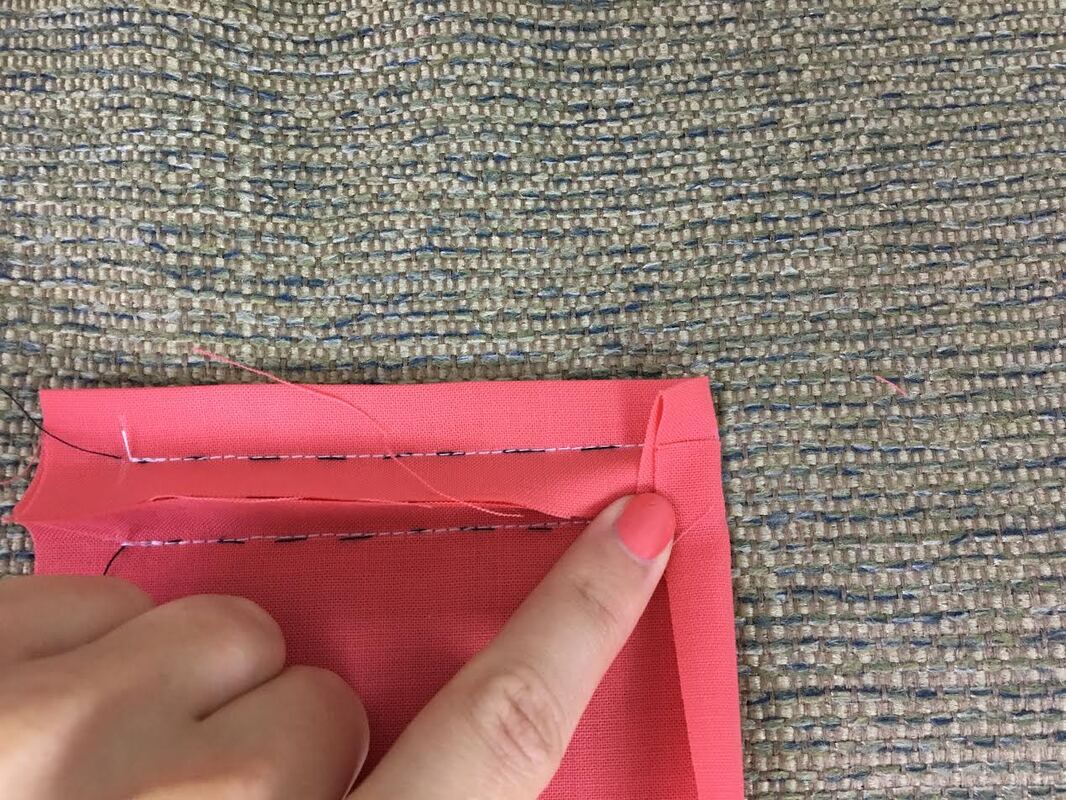 These stitch lines should start and end at the same distance/location. 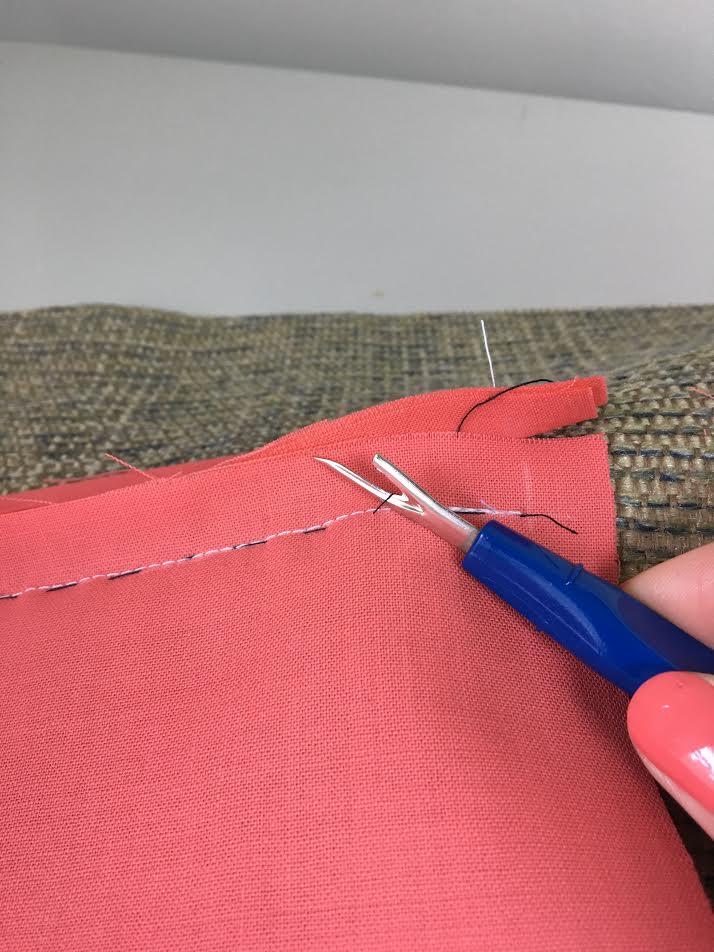 Remove all basting at this point. Now for the fun part! You may be wondering how in the world can this now become a welt pocket? We are actually going to cut a slit directly through the fabric- don't worry, it's perfectly legal! In fact, there is a standard cut used specifically for welt pockets which I will show you below: 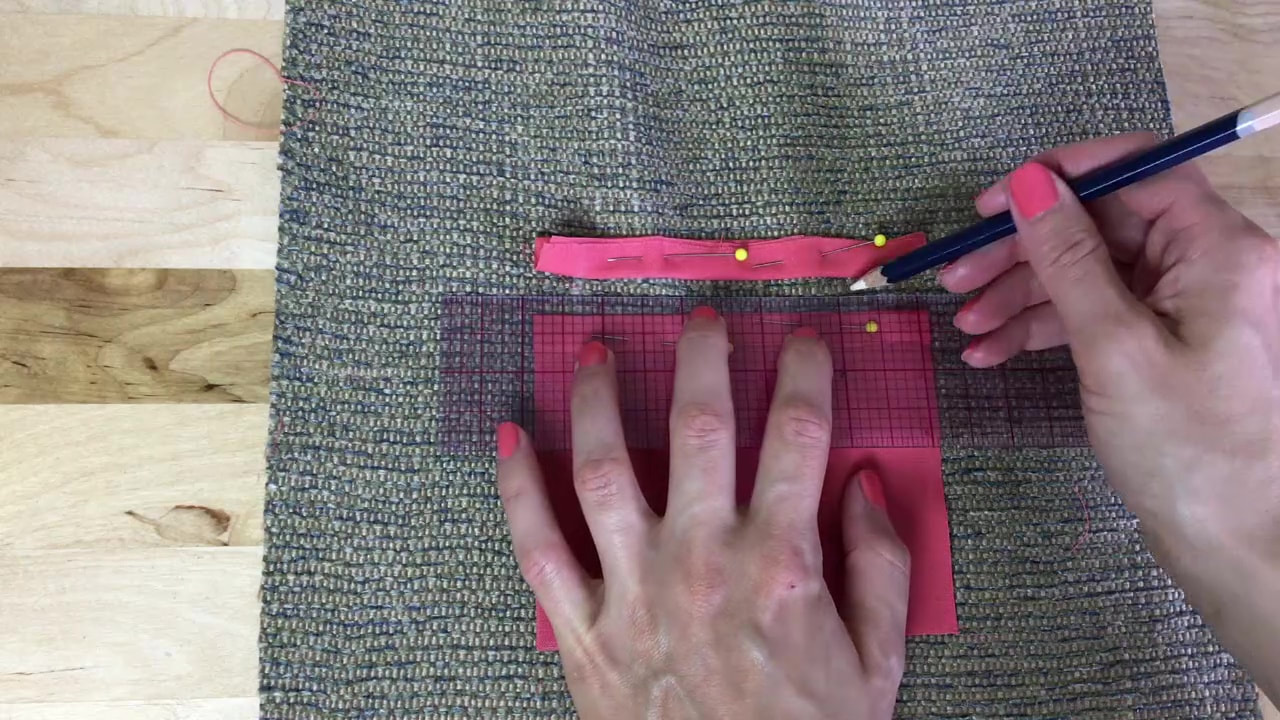 14. To mark the cut lines, measure and draw a horizontal line down the middle of the welt rectangle starting and ending at about 1/2" from each vertical side edge. 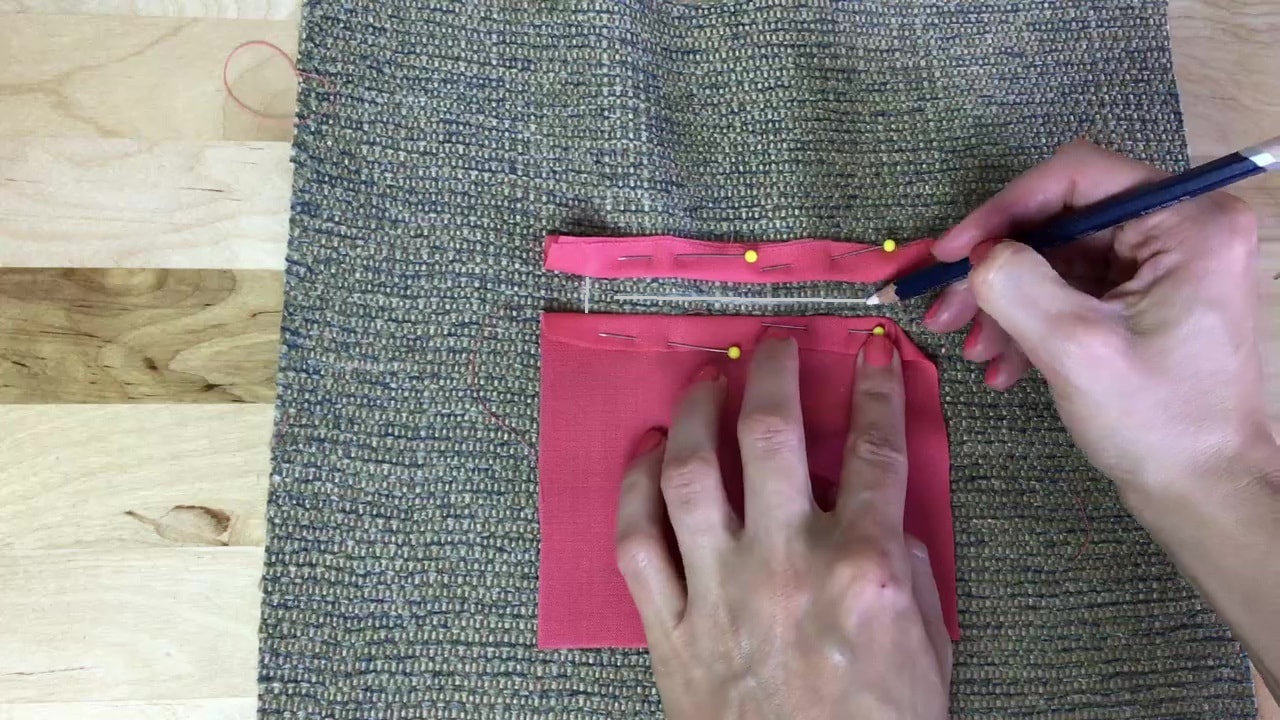 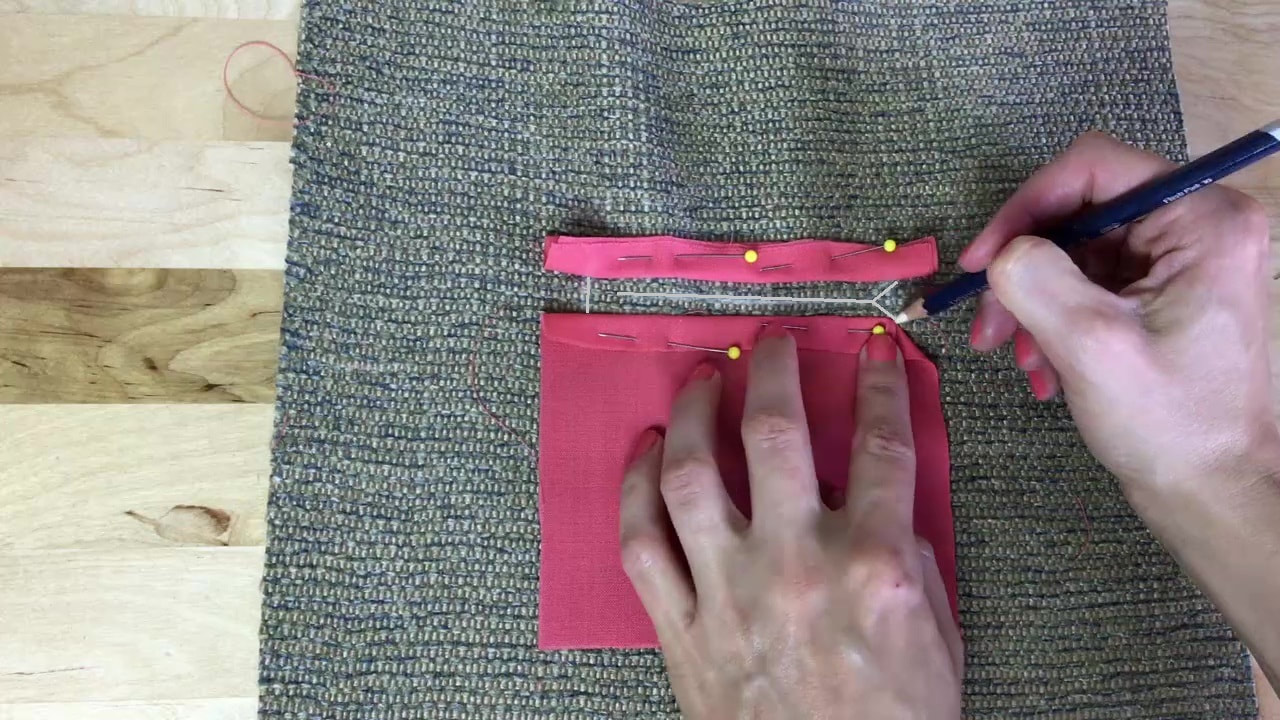 From each end, draw a line to connect to the very start of the welt stitch and another line to connect to the start of the pocket bag piece at the bottom. Repeat this step on each end. The sides will look like triangles angled inwards. 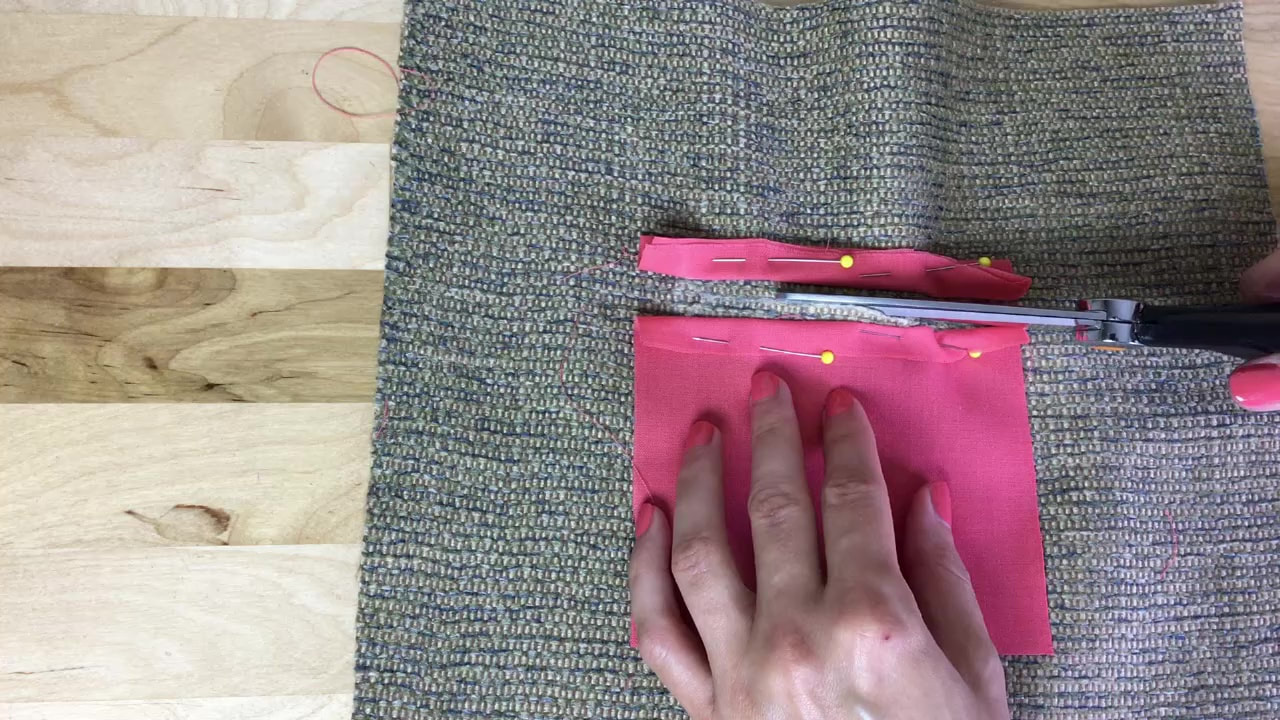 15. Slit an opening down the middle horizontal line using your fabric scissors and continue cutting down the line until you arrive at the corner of each triangle. 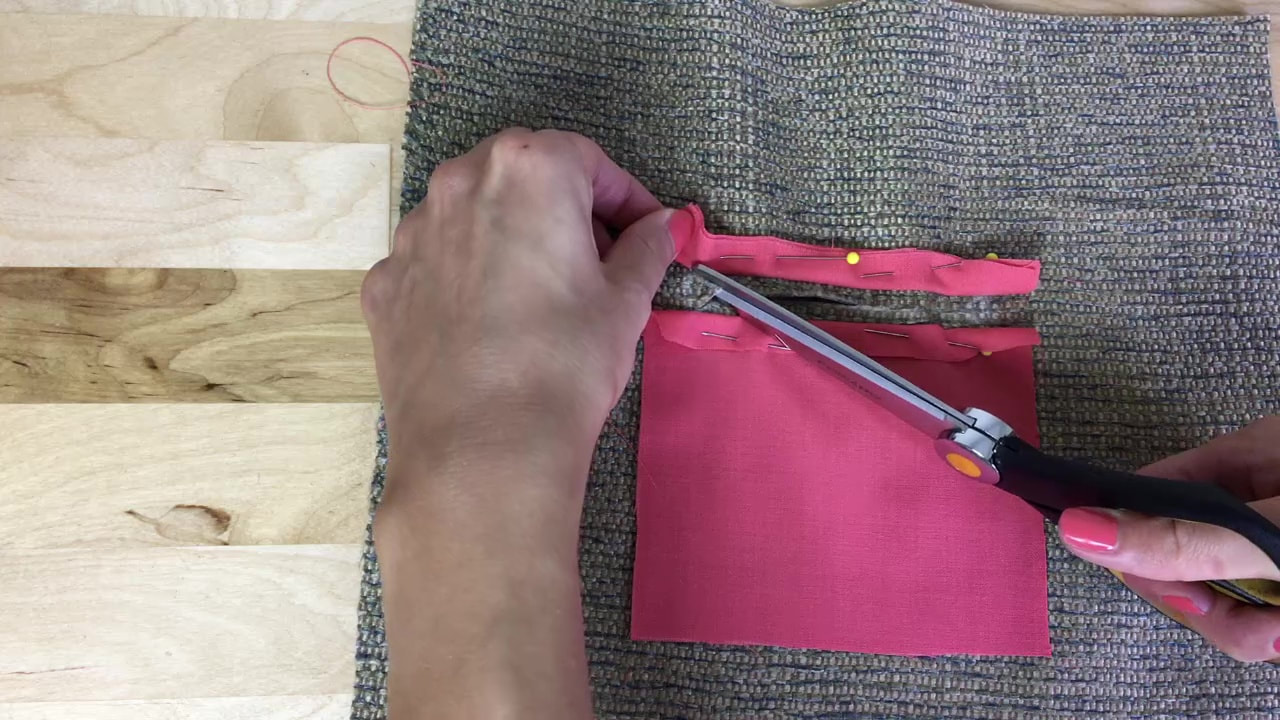 From each of these two points, cut down both triangle lines ending very close to (but not through!) the beginning of the stitching on each side.  If you've never attempted a welt pocket before, this part can feel a bit unsettling. Don't let fear intimidate you! Your first pocket may not be perfect but by with some additional practice attempts you'll be a pro in no time!  16. Are you ready to see your welt pocket come to life? Flip the welt and the pocket bag pieces through the slash to the wrong side of the fabric as shown. 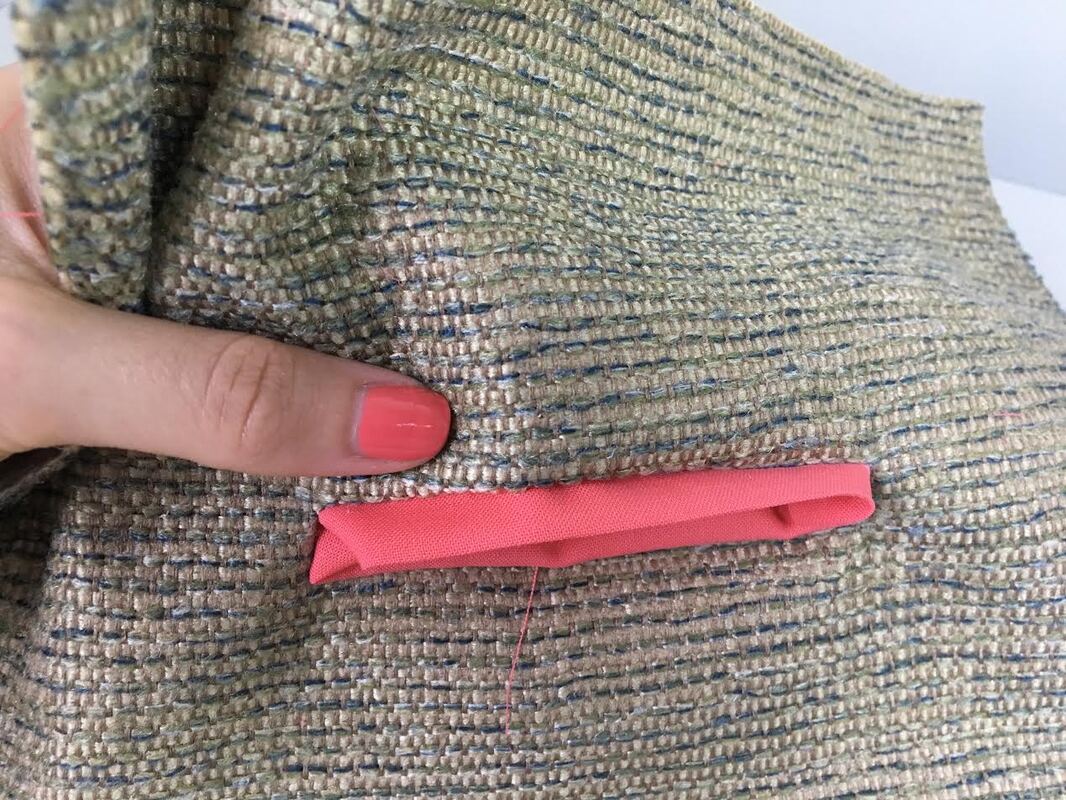 You may need to pull on the ends a bit to adjust the pocket's shape a bit. This next step is very important and one that took me some practice to master myself- stitching the welt pocket sides. 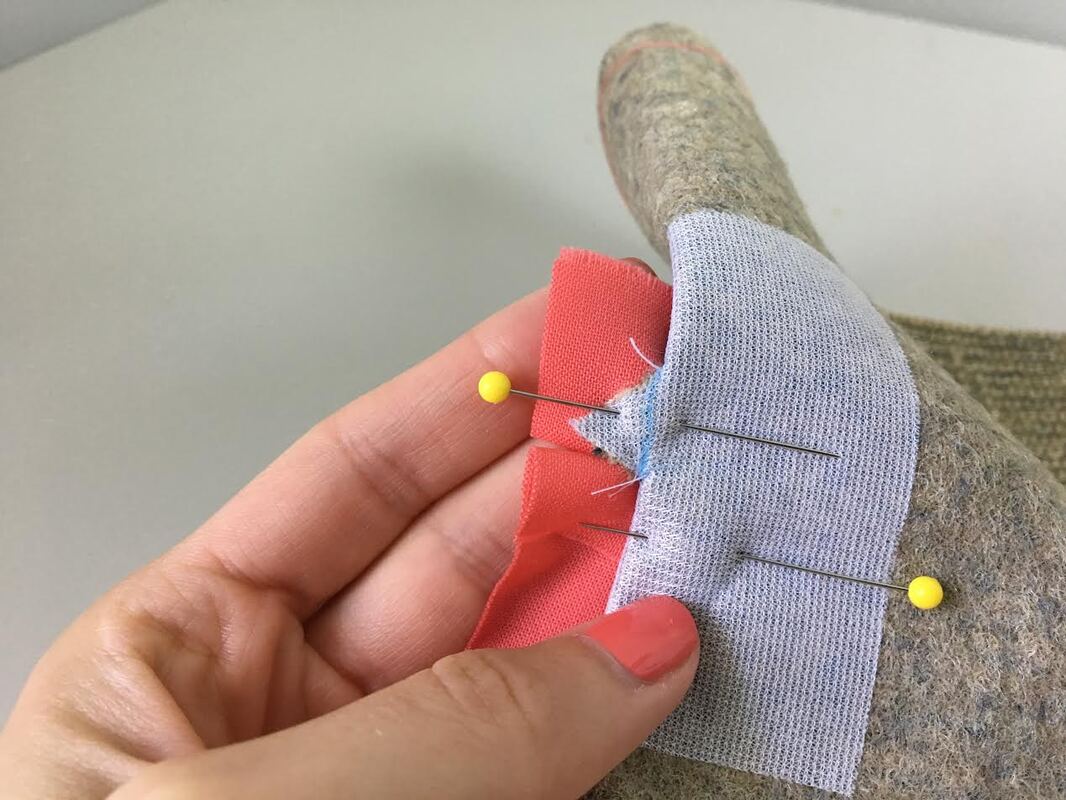 17. Turn your fabric such that the little triangle extension is on top of the welt and pocket bag piece underneath. Pull the triangle outwards, away from the pocket opening a bit to straighten it. Underneath, make sure the both fold lines (welt and pocket bag) are touching and aligning but not overlapping. Insert a few pins through the triangular piece and pocket layers underneath to keep this alignment in place. I suggest using a hand basting stitch (as I did the first few times I sewed a welt pocket) to prevent everything from shifting during the stitching process. 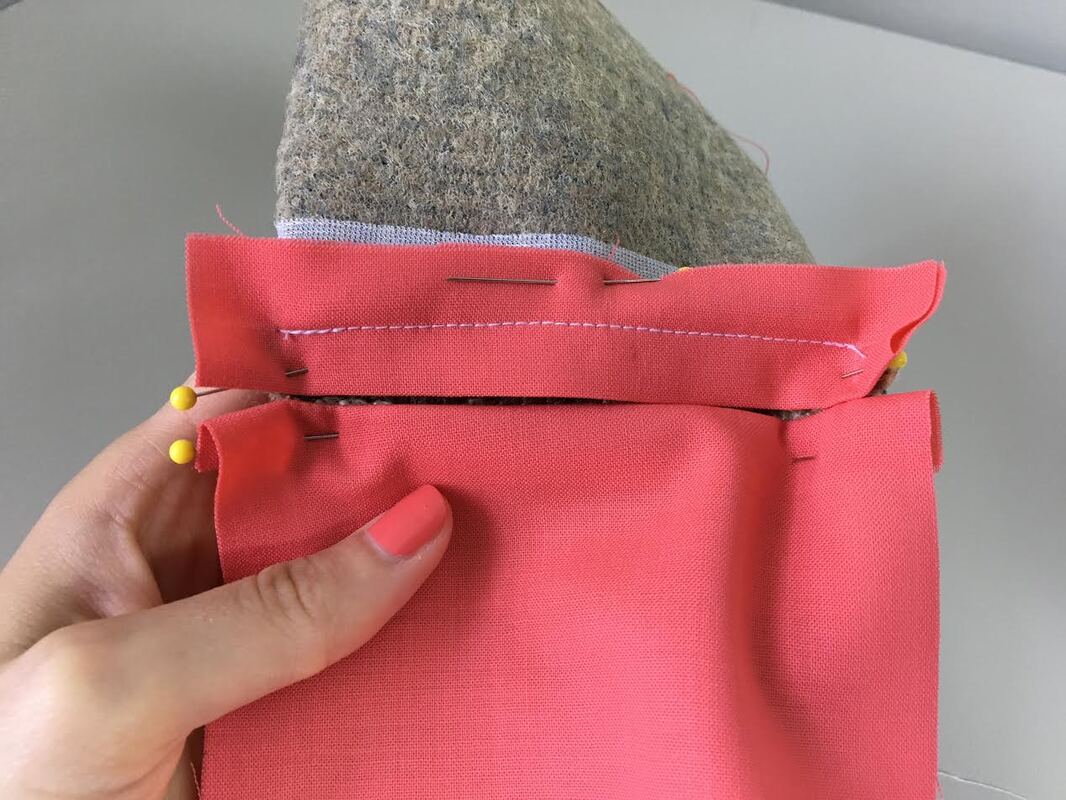 Repeat on the other side of the welt pocket. Above is a view of the pocket on the fabric's wrong side. 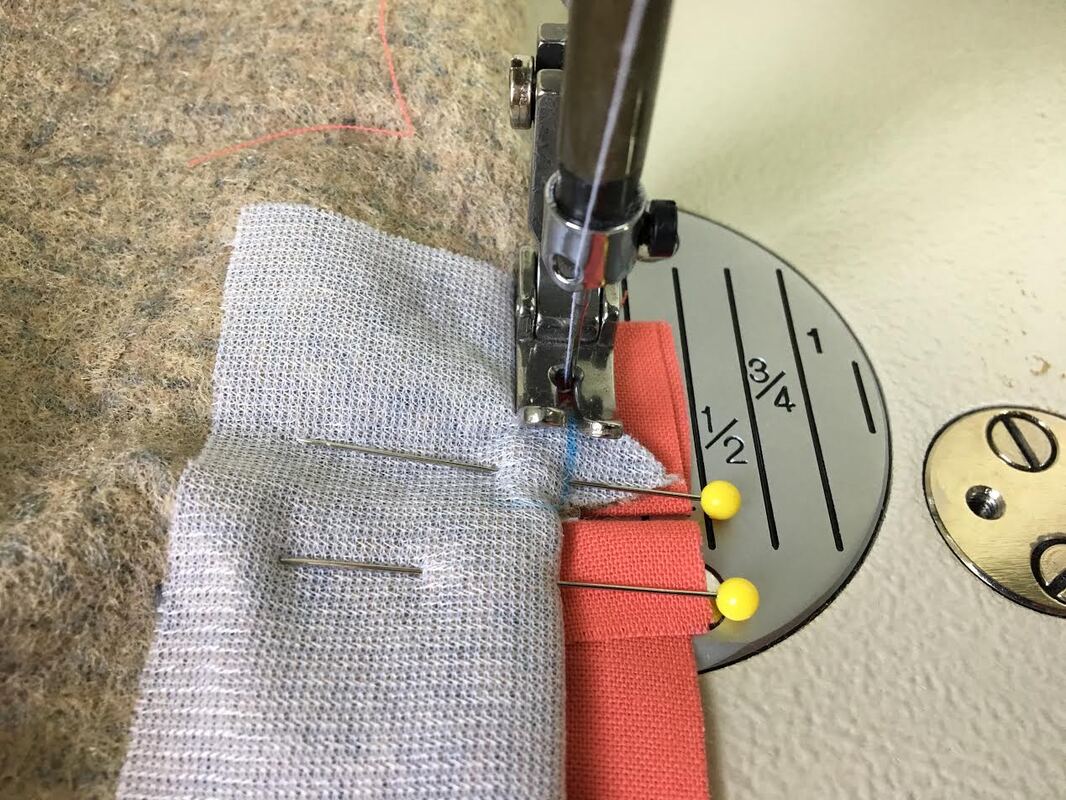 18. Stitch in a vertical straight line right at the base of the triangle applying a few back and forth stitches to reinforce. 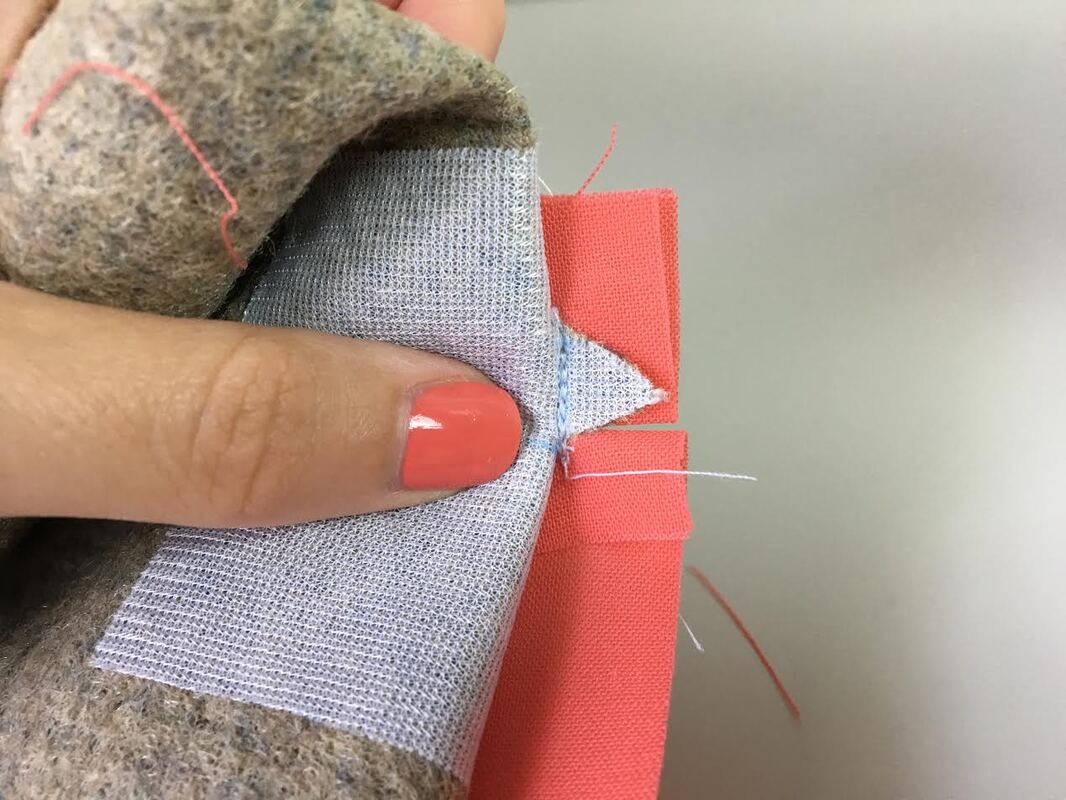 As you stitch, make sure the welt and pocket bag piece have not shifted in the process and the fold lines are still touching and aligned accordingly. 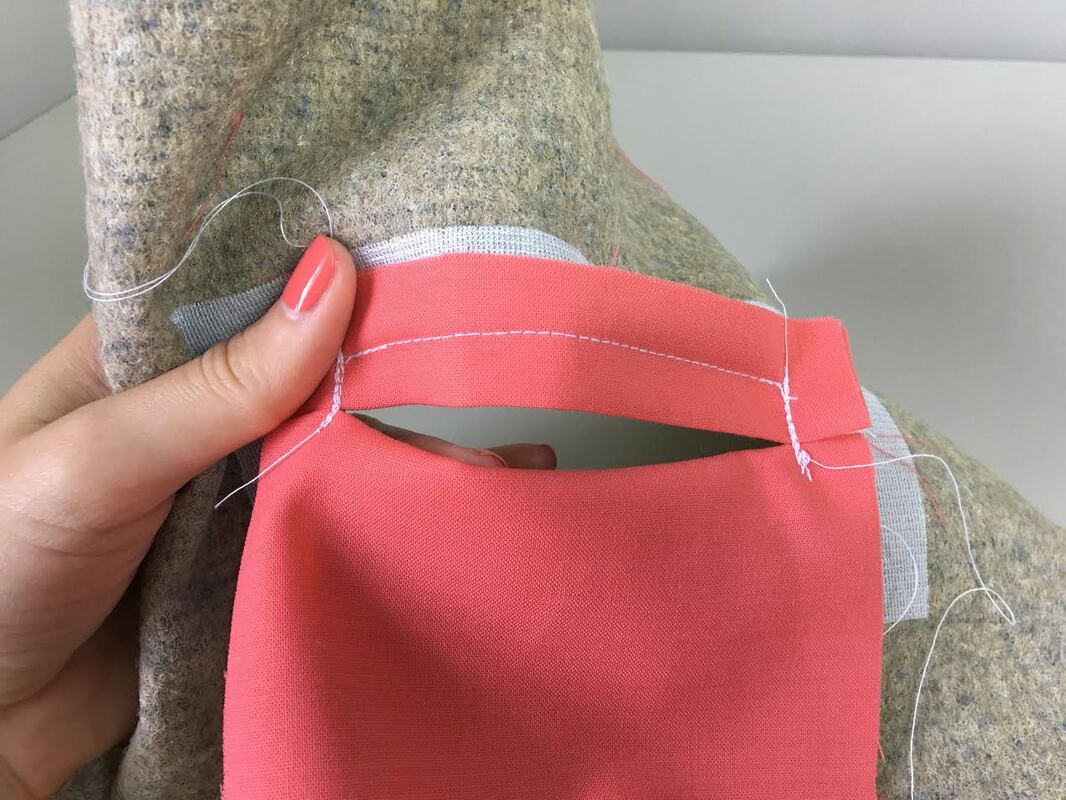 Whew! The most complicated steps are now behind us. At this point, if you look at the welt on the right side of your fabric, it should look finished! 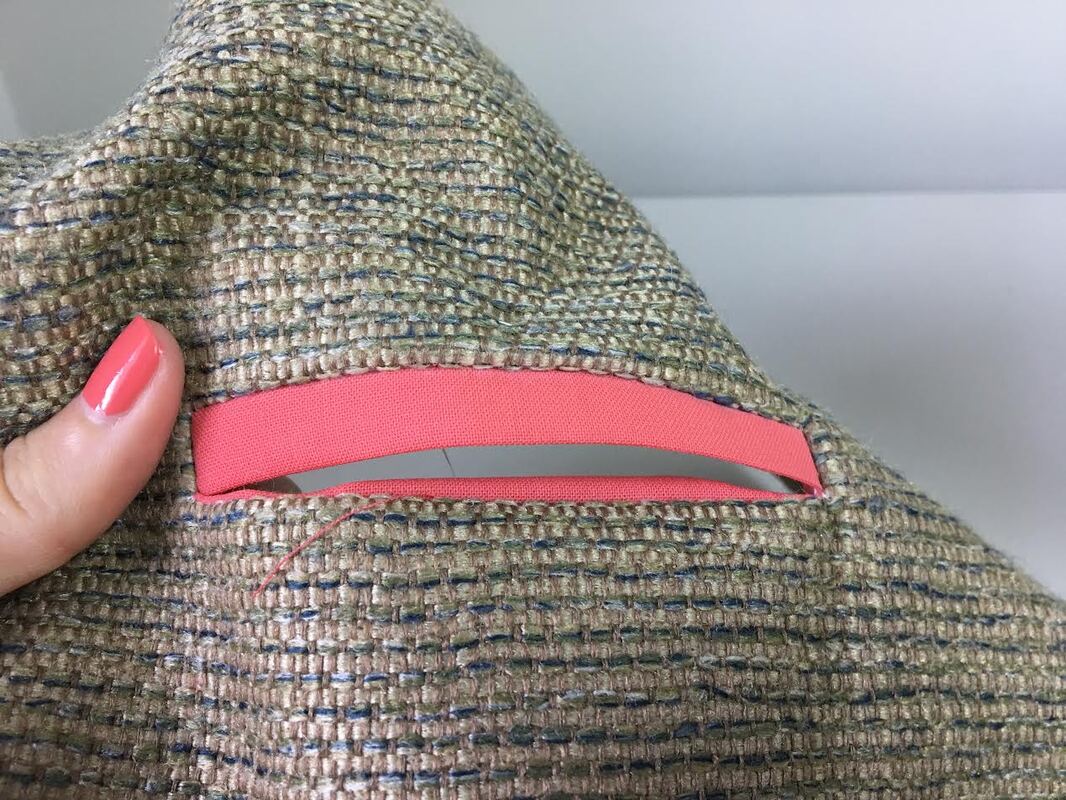 The single welt should be perfectly rectangular and the bottom pocket bag piece should be enclosed on the inside. However, were not quite done yet! We still have to stitch the larger pocket piece (remaining) in order to complete the fully functional pocket bag. 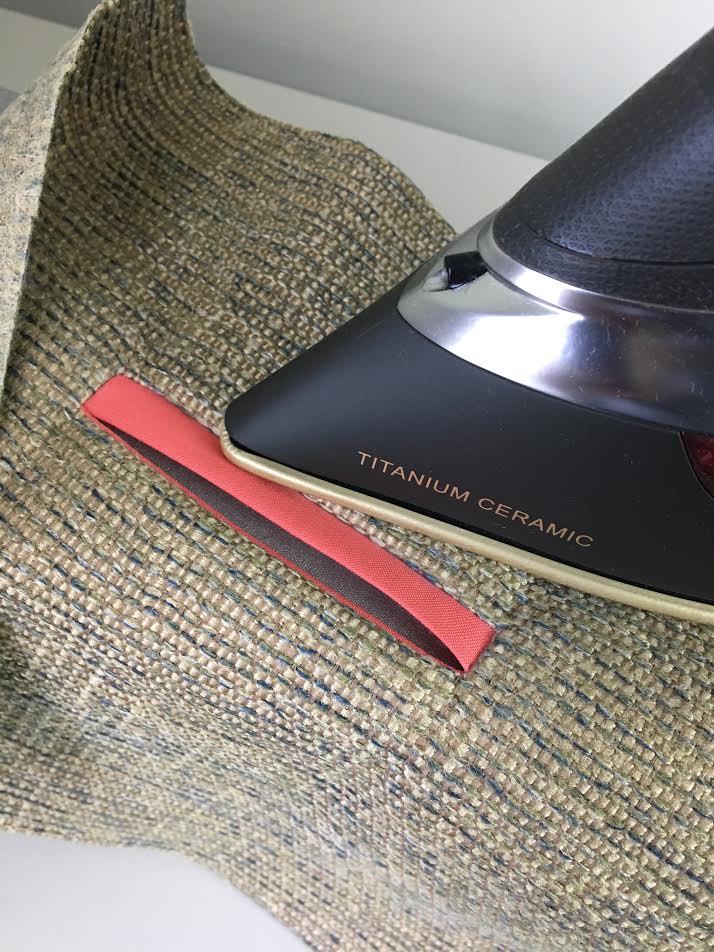 Before moving on, iron the top and bottom welt opening edges as shown. 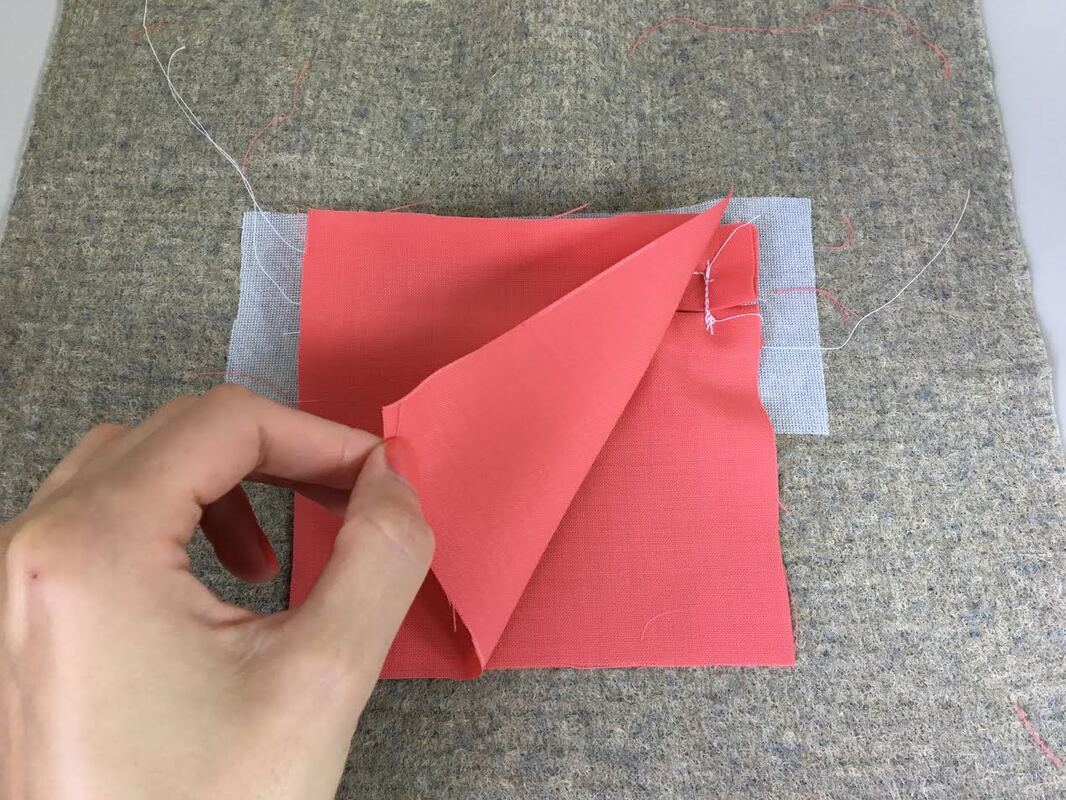 19. Turn your fabric/garment on its wrong side and align the remaining (larger) portion of the pocket bag to all the raw edge of the welt pocket. 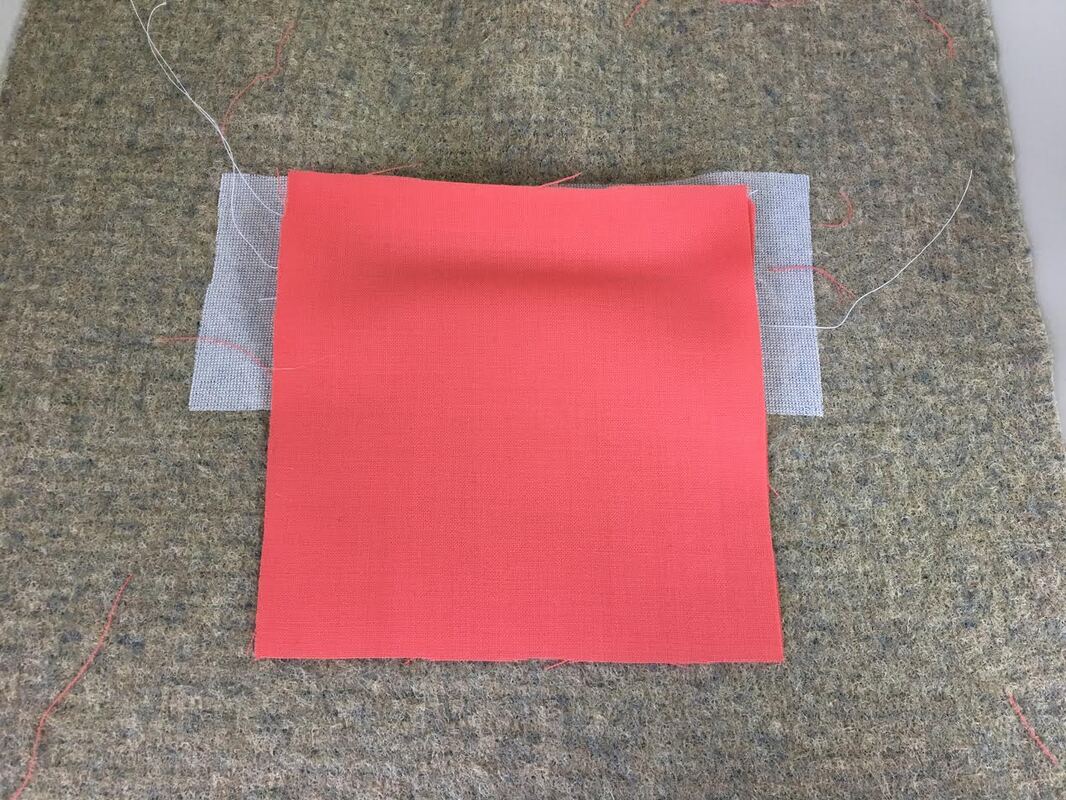 All the corners should align naturally when laid flat. 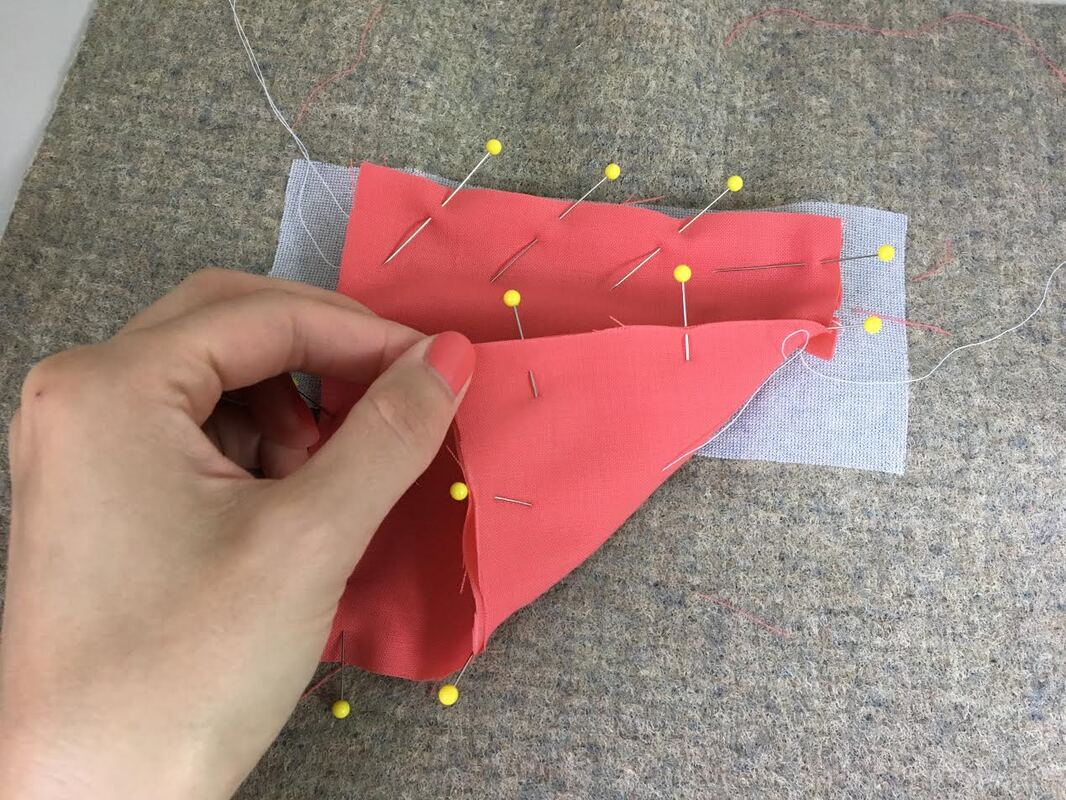 20. Pin this larger pocket bag piece to the other pocket layers along all edges. Don't pin onto the garment itself. 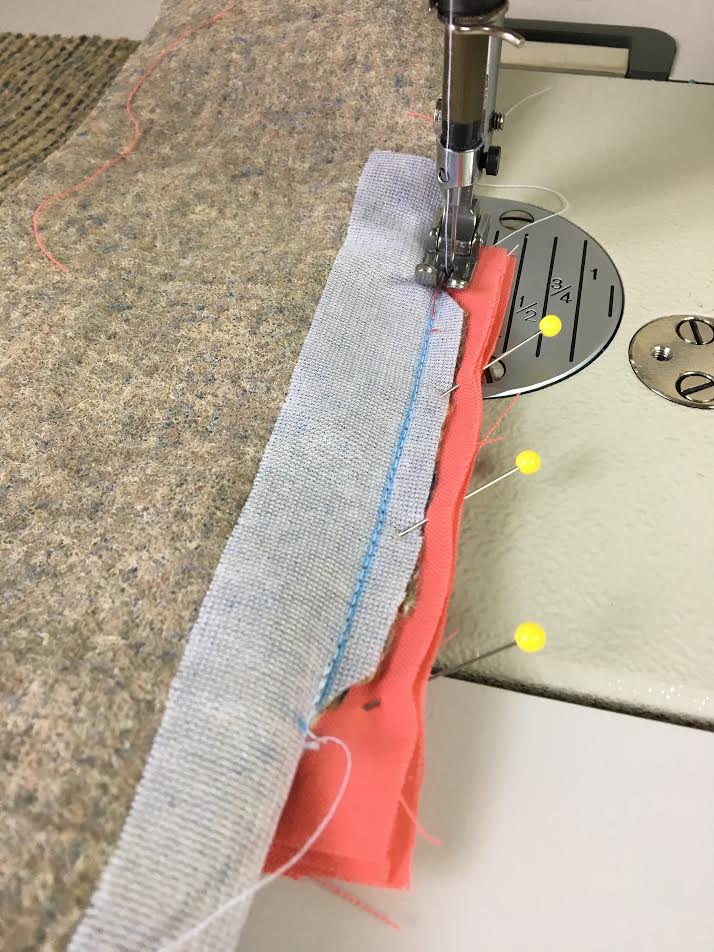 21. Stitch to connect all edges and permanently seal the pocket bag at the top, side edges and bottom as shown. 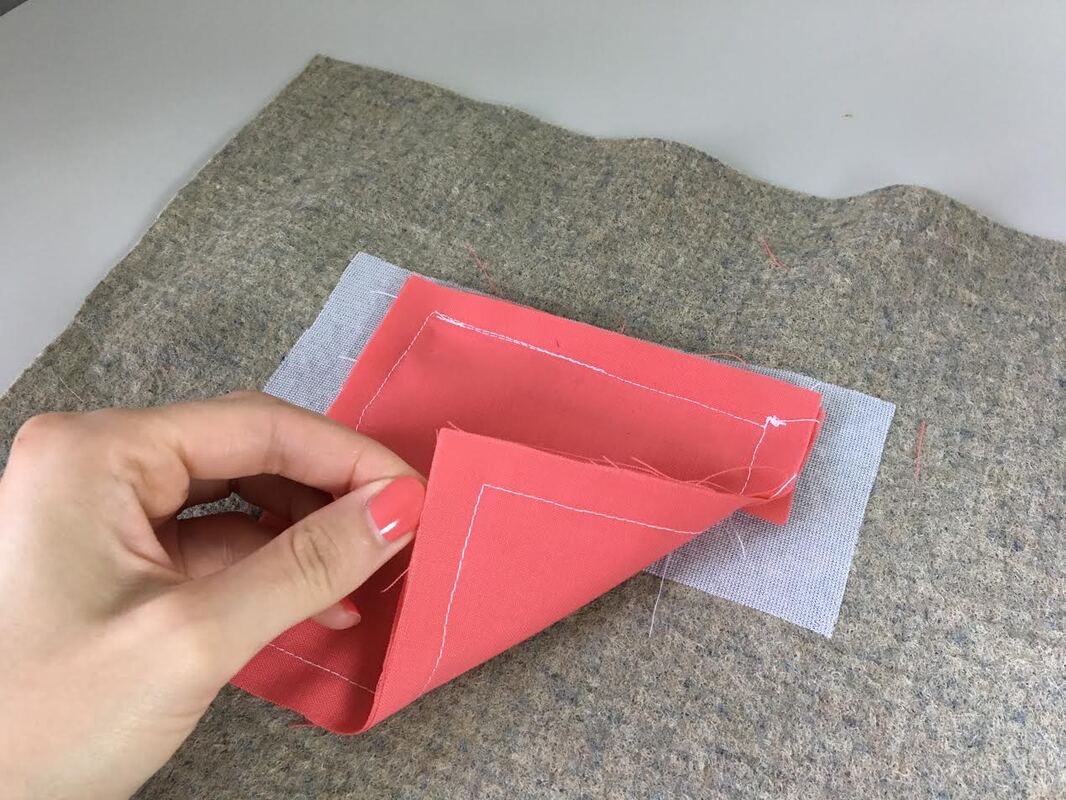 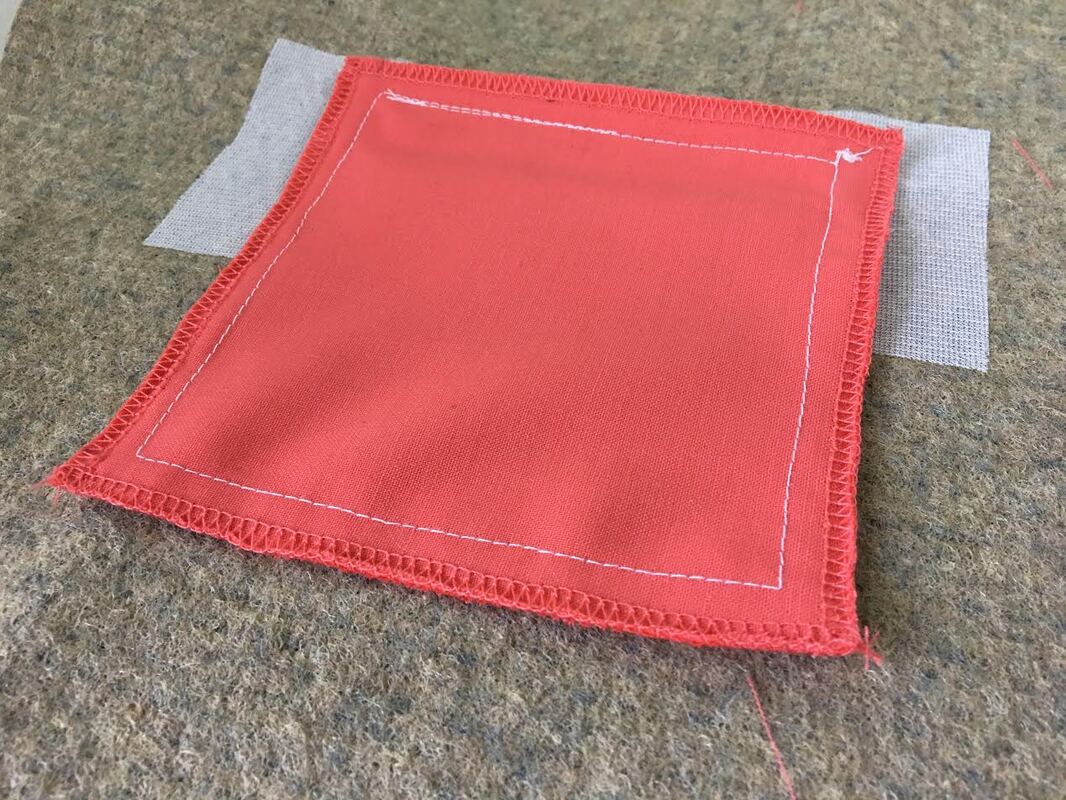 22. Apply your desired finishing technique to the pocket bag’s edges. I used a serging stitch but as an alternative, you can apply a zig zag stitch on your home sewing machine. You can find some more clean finishing options in this tutorial: How To Finish Seam Raw Edges- 4 Ways If you’re interested in a no-sew finish, take a look at these techniques: How To Stop Fabric Edges From Fraying Using No-Sew Techniques Similar Tutorials You May Like: How To Add A Side Seam Pocket To A Dress A Video Guide To Sewing On-Seam Pockets Video Sewalong: Box Pleat Full Skirt With Contrast On Seam Pocket How To Sew A Regular Set In Sleeve How To Sew An Armhole Facing How To Sew A Round Neckline Facing How To Sew A Lapped Zipper: The Easy Way
5 Comments
Beth Each
9/13/2020 08:08:16 am
Following your directions, I made an almost perfect single welt on my first attempt. This after four wonky practice pockets with directions from others. If only the welt was on the correct side of the pocket bag opening. The welt is perfect almost but the pocket needs help.( I am putting curved pockets on a Burda trousers and their instructions left me baffled Still do.). Thank you! I am on the right path now. 9/13/2020 08:11:37 am
Hi Beth! I am so glad this tutorial helped! Welt pockets are not easy to sew- just a little more practice and you’ll master it to perfection. Doina
Lee
4/3/2021 06:52:41 am
Hei, Thanks to your article, I did my welt pocket in a paper bag pants toile I am sewing..! It went perfect..!
Ingrid Prendergast
8/14/2022 01:25:46 pm
Hello Thank you for the tutorial. It seems like the welt is upside down being sewn on the top line of the rectangle. Is it just me or did I completely miss something?
Sian
3/26/2023 09:00:59 pm
Hi, Leave a Reply. |
The Blog:A journey into our design process, sewing tutorials, fashion tips, and all the inspiring people and things we love. 
Doina AlexeiDesigner by trade and dressmaker at heart. I spend most of my days obsessing over new fabrics and daydreaming new ideas. 
Sadie
Executive Assistant & Client Relations Manager Archives
November 2019
Categories
All

|

-
Sewing Tutorials
-
Basics
>
- Aligning Pattern Grainlines To Fabric
- Preparing Fabrics For Sewing
- Pinning Sewing Patterns To Fabric
- Placing Sewing Patterns On Fabric For Cutting
- Rotary Cutters or Fabric Scissors?
- Cutting The Sewing Patterns
- What Are Notches And How To Use Them In The Sewing Process
- Transferring Notches From Pattern To Fabric
- Transferring Seamlines to Fabric
- Staystitching
- Backstitching: A Complete Guide
- Hand Basting: A Complete Guide
- Sewing Continuous Bias Binding
- Darts >
-
Sewing Seams
>
- The Basics Of Seams And Seam Allowance
- How To Sew A Straight Seam
- Sewing Curved Seams
- Sewing Corner Seams
- Trimming And Grading Seam Excess
- Notching/Clipping Seam Allowance for Tension Release
- Sewing Topstitched Seams
- Sewing Corded Seams
- Sewing A Slot Seam
- Sewing A Gathered Seam
- Sewing Bias Seams
- Sewing Seams With Ease
- Sewing Seams With Crossing Seamlines
- Sewing Unlike Fabric Seams
- How To Iron Seams: Ironing Tools And Conventions
- Sewing With Knit Fabrics
- Understanding Stitch Length And Tension
- Sewing Unique Fabric Seams
-
Seam Finishes
>
- Seam Finishing Techniques - Overview
- Applying A Pinked Seam Finish
- Applying A Bias Bound Seam Finish
- Serging And Zigzag Seam Finishes
- Sewing A Self-Bound Seam Finish
- Sewing A French Seam Finish
- Sewing A Hong Kong Seam Finish
- Sewing A Mock French Seam Finish
- Sewing A Turned-and-Stitched Seam Finish
- Sewing Overcast Hand-Applied Seam Finishes
- Sewing A Flat Felled Seam
- Sewing A Hairline Seam Finish
-
Hem Finishes
>
- Garment Hem Finishes: Overview
- Sewing A Double Fold Hem Finish
- Sewing A Single Fold Hem Finish
- Sewing Bound Hem Finishes
- Sewing An Exposed Double Layer Bound Hem
- Sewing A Folded-Up Bound Hem with Pre-folded Binding
- Sewing A Hong Kong Hem Finish
- Sewing A Band Hem Finish
- Sewing A Bias Faced Hem Finish
- Sewing A Twill Tape Hem Finish
- Sewing A Rolled Hem Finish
- Sewing A Shaped Hem Facing
- Using Fusible Hem Tape And Webbing
- Finishing A Lace Fabric Hem
- Finishing A Leather Hem
- Sewing Faced Hem Corners
- How To Finish Lining At The Hem
- Finishing Fabric Corners by Mitering >
- Interfacing A Hemline: Lined And Unlined Examples
-
Sewing Pockets
>
- Curved Patch Pocket With Flap
- Unlined Square Patch Pockets
- Lined Patch Pockets: Two Ways
- Extension On-Seam Pockets
- Separate On-Seam Pocket
- Front Hip Pockets
- Bound Double Welt Pocket
- Double Welt Pocket With Flap
- Self-Welt Pocket (Using Single Fabric Layer)
- Slanted Welt Pocket (Hand-Stitched)
- Faced Slash Pockets: Overview >
-
Sewing Zippers
>
- Sewing Zippers: General Information
- Sewing A Centered Zipper
- Sewing A Lapped Zipper
- Sewing An Invisible Zipper
- Sewing A Fly Front Zipper
- Sewing A Closed-End Exposed Zipper (No Seam)
- Sewing An Exposed Separating Zipper
- Sewing Hand Stitched Zipper Applications
- Sewing A Zipper Underlay
- Sewing A Placket-Enclosed Separating Zipper
- Sleeveless Finishes >
-
Neckline Finishes
>
- Sewing A Neck Shaped Facing
- Sewing An All-In-One Neck Facing
- Neck And Garment Opening Combination Facings >
- Sewing A Bias Faced Neckline Finish
- Sewing A Band Neckline Finish
- Bound Neckline Finishes: Overview >
- Sewing A Semi-Stretch Strip Band Neckline
- Ribbed Neck Band And Classic Turtleneck
- Decorative Neckline Finishes >
- Finishing Facing Edges >
-
Extras
>
- A Complete Guide on Interfacing
- Sewing Bound Spaghetti Straps
- Sewing Spaghetti Straps To A Faced Neckline
- Sewing Ruffles: Overview
- Patterning And Sewing A Circle Ruffle
- Sewing A Gathered Heading Ruffle
- Sewing Double Layer Gathered Ruffles
- Sewing A Gathered Ruffle Into A Seam
- Sewing A Gathered Ruffle To A Fabric Edge
- Sewing A Fabric Surface Slit
- Sewing A Slit Seam
- Hand-Applied Straight Stitches
- Hand-Applied Blind Stitches
- Hand-Applied Overedge Stitches
- Hand-Applied Tack Stitches
- Hand-Applied Decorative Stitches
-
Basics
>
- Custom Bridal
- Custom Apparel
- About
- Blog

 RSS Feed
Services |
Company |
|
